Acme LED100B: инструкция
Раздел: Аксессуары для фото- и видеотехники
Тип:
Инструкция к Acme LED100B
Оглавление
Model: LED 100 S
LED 100 B
Universal
Wall Bracket
www.acme.eu
www.acme.eu


GB 4 Installation Instruction 88 Warranty card
LT 11 Montavimo instrukcija 89 Garantinis lapas
LV 18 Uzstādīšanas instrukcija 90 Garantijas lapa
EE 25 Paigaldusjuhend 91 Garantiileht
PL 32 Instrukcja instalacji 92 Karta gwarancyjna
DE 39 Installationsanleitung 93 Garantieblatt
FI 46 Asennusohjeet 94 Takuulomake
SE 53 Installation Instruktion 95 Garantisedel
RO 60 Instrucţiuni de montare 96 Fişa de garanţie
BG 67 Инструкции за монтаж 97 Гаранционен лист
RU 74 Инструкция по установке 98 Гарантийный талон
UA 81 Інструкція по установці 99 Гарантійний лист
3

GB
Unpacking instructions
• Carefully open the carton, remove contents and lay out on cardboard
or other protective surface to avoid damage.
• Check package contents against the Supplied Parts List in the next
page to assure that all components were received undamaged. Do
not use damaged or defective parts.
• Carefully read all instructions before attempting installation.
Important safety information
Install and operate this device with care. Please read this instruction
before beginning the installation, and carefully follow all instructions
contained herein. Use proper safety equipment during installation.
Please call a qualied installation contractor for help if you:
• If you don’t understand these directions or have any doubts about the
safety of the installation.
• If you are uncertain about the nature of your wall, consult a qualied
installation contractor.
Do not use this product for any purpose or in any conguration not
explicitly specied in this instruction. We hereby disclaim any and all
liability for injury or damage arising from incorrect assembly, incorrect
mounting, or incorrect use of this product.
4

GB
This TV mount must be securely attached to the vertical wall.
If the mount is not properly installed it may fall, resulting in
possible injury and/or damage.
WARNING
•3/8”(10mm)
•5/32"(4mm) Drill Bit
• Wrench or Socket Set
Tools Required
Masonry Bit
•Screwdriver
• Carpenter’s Level
•Stud Finder
Note: The mounting components and hardware supplied in this package
are not designed for installations to walls with steel studs or to cinder block
walls. If the hardware you need for your installation is not included, please
consult your local hardware store for proper mounting hardware for the
application.
5
GB
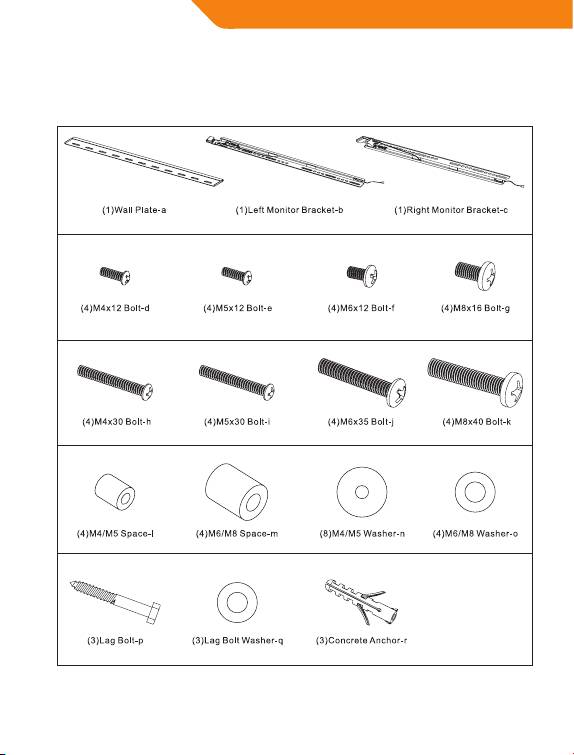
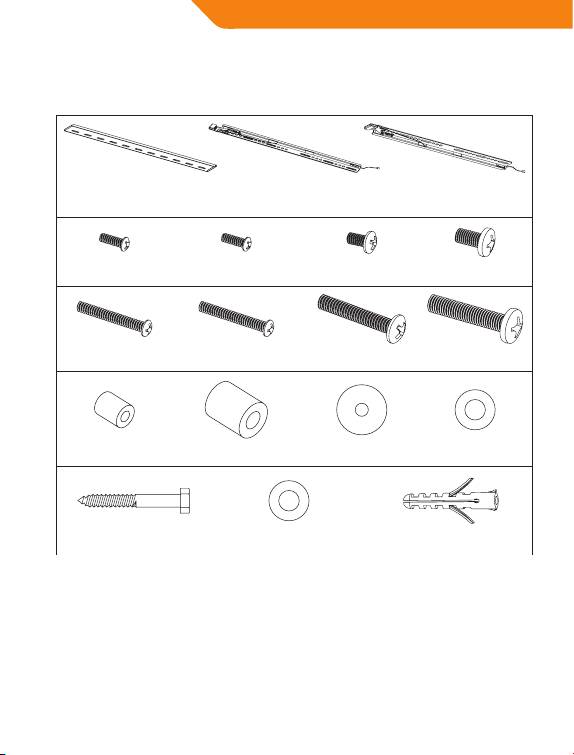
Supplied parts list
6

GB
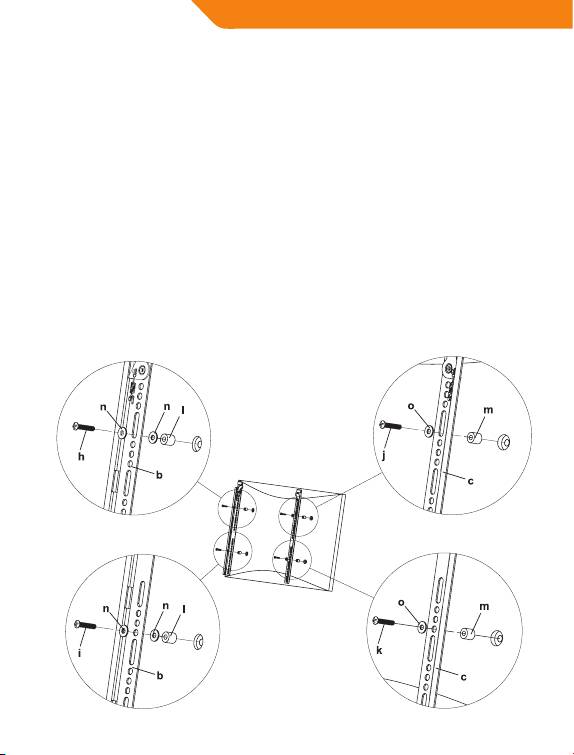
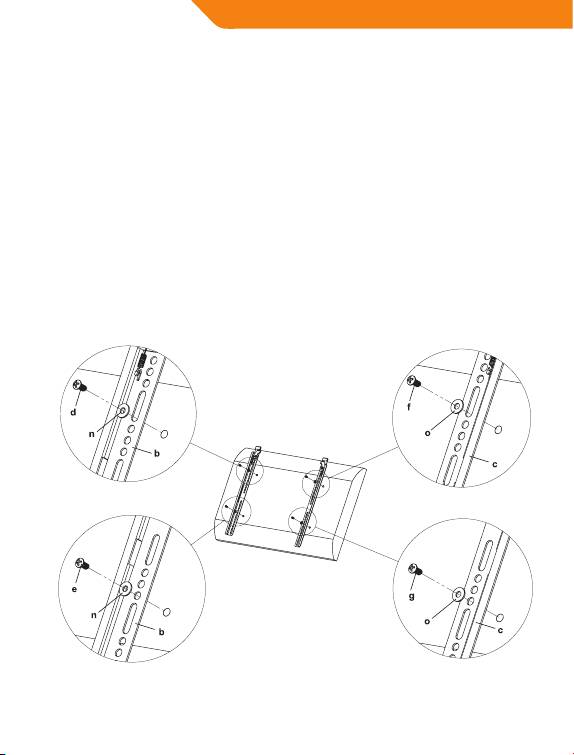
Mounting the monitor
brackets to a TV with flat back
First of all, make sure the diameter of the Bolt (d, e, f, g) your TV requires.
Once you have determined the correct diameter, please see the relative
diagram as below. You will thread the Bolt into the TV using the correct
Washer (n, o). Please make sure the Monitor Brackets (b, c) are vertically
centered and level with each other.
M4 Diameter Bolt
M6 Diameter Bolt
Diagram 1A
M5 Diameter Bolt M8 Diameter Bolt
7
GB
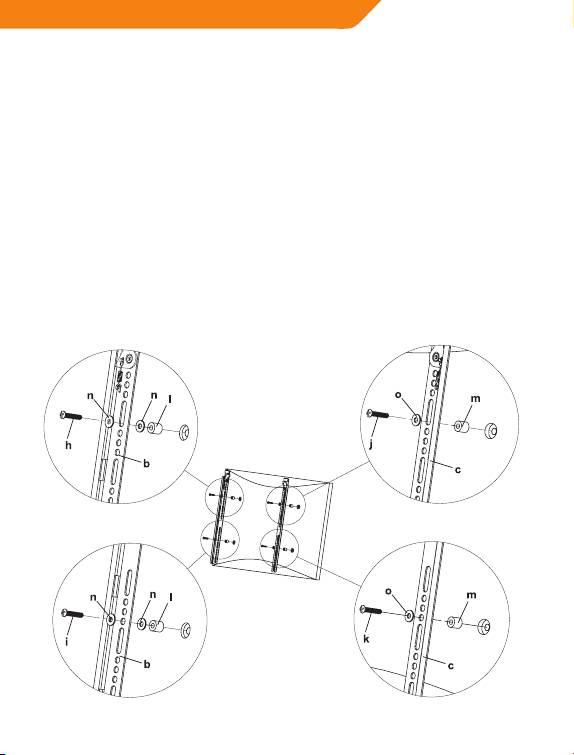
Mounting the monitor
brackets to a TV with curved
back
First of all, make sure the diameter of the Bolt(h,i,j,k) your TV requires.
Once you have determined the correct diameter, please see the relative
diagram as below. You will thread the Bolt into the TV using the correct
Washer(n,o) and spacer(l,m). For the M4 or M5 diameter bolt, you will
need another M4/M5 Washer between the Monitor Bracket and the
Spacer. Please make sure the Monitor Brackets are vertically centered
and level with each other.
M4 Diameter Bolt
M6 Diameter Bolt
Diagram 1B
M5 Diameter Bolt M8 Diameter Bolt
8
GB
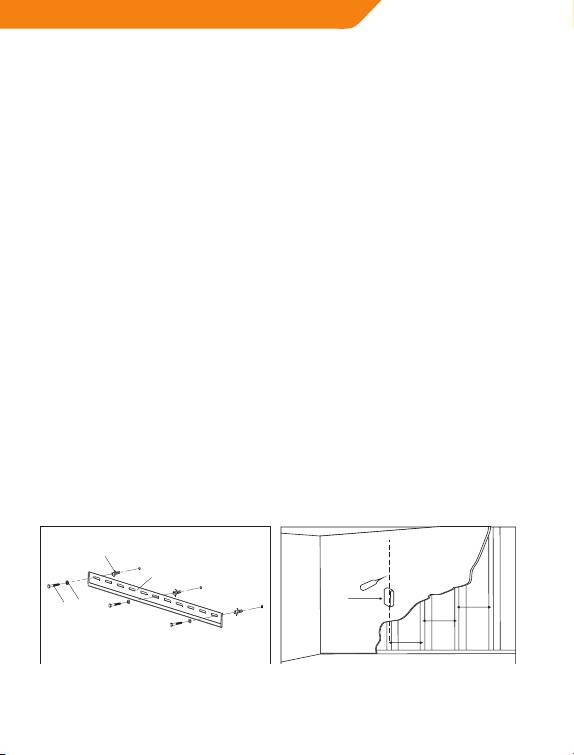
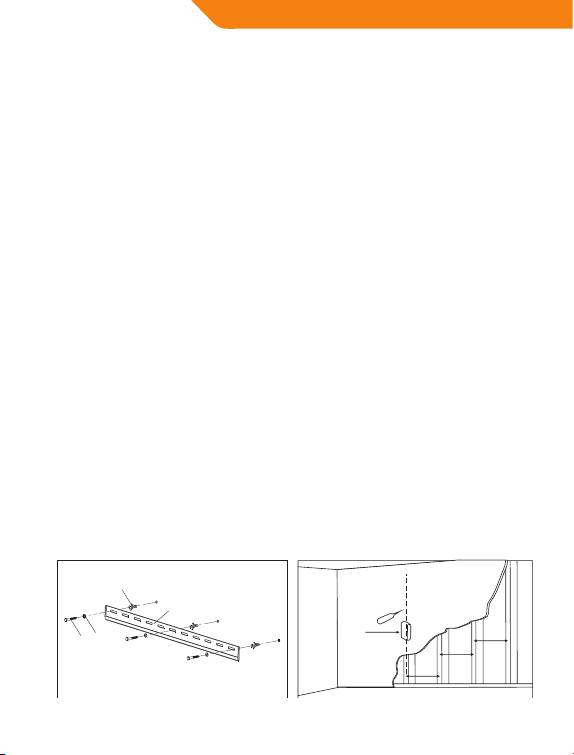
Mounting the wall plate
to the wall
Brick, Solid Concrete and Concrete Block mounting:
Use the Wall Plate(a) as a template to mark 3 hole locations on the wall.
Make sure these holes are level. Pre-Drill these holes with a 3/8”(10mm)
masonry bit to at least 2.4”(60mm) in depth. Insert a Concrete Anchor(r)
into each of these holes. Make sure the anchor is seated completely
ush with the concrete surface even if there is a layer of drywall or other
material in front. Attach the Wall Plate to the wall using 3pcs Lag Bolts(p)
and 3pcs Lag Bolt Washers(q), shown in Diagram 2A.
Wood Stud mounting:
The Wall Plate(a) must be mounted to two wood studs at least
16”(406mm) apart. Use a stud nder to locate two adjacent studs. It is a
good idea to verify where the studs are located with an awl or thin nail
shown in Diagram 2B. Pre-drill a 2.4”(60mm) deep hole at the desired
height in each stud using a 5/32”(4mm) drill bit. Make sure these holes
are in the center area of the studs and level with each other. Attach
the Wall Plate to the wall using the 2pcs Lag Bolts(p) and 2pcs Lag Bolt
Washers(q).
Diagram 2A Diagram 2B
r
a
16 inch
Stud Finder
q
p
16 inch
16 inch
9

GB
Attaching monitor
to wall plate
Warning: Some TVs may require two people to lift! We are not responsible
for personal injury or product damage.
First pull the rope on the each end of Bracket(b,c) to release the spring
locking system, as shown in Diagram 3A, then hook the Bracket on the
Wall Plate(a), last loose the rope to lock the Brackets on the position, as
shown in Diagram 3B.
Diagram 3BDiagram 3A
Thanks for choosing our products, enjoy the using.
10

LT
Išpakavimo nurodymai
• Atsargiai atidarykite kartoninę dėžę, išimkite jos turinį ir padėkite ant
kartono arba kito apsauginio paviršiaus, kad nepažeistumėte.
• Patikrinkite pakuotės turinį pagal pateiktų dalių sąrašą, esantį kitame
puslapyje, kad įsitikintumėte, jog yra visos sudedamosios dalys ir jos
nepažeistos. Nenaudokite pažeistų arba defektuotų dalių.
• Prieš bandydami montuoti, atidžiai perskaitykite visus nurodymus.
Svarbi saugos informacija
Montuokite ir naudokite šį įtaisą atsargiai. Prieš pradėdami montuoti
perskaitykite šią instrukciją ir kruopščiai laikykitės visų joje pateikiamų
nurodymų. Montavimo metu naudokite tinkamą saugos įrangą.
Kvieskite kvalikuotą montavimo rangovą, kad jums padėtų, jei:
• Nesuprantate šių nurodymų arba turite abejonių dėl montavimo
saugos;
• Nesate tikri, kokios rūšies jūsų siena (pasikonsultuokite su kvalikuotu
montavimo rangovu).
Nenaudokite šio gaminio jokiais kitais tikslais išskyrus tuos, kurie
nurodyti šioje instrukcijoje. Šiuo dokumentu pareiškiame, kad nesame
atsakingi už sužalojimus ar žalą, atsiradusius dėl netinkamo šio gaminio
surinkimo, montavimo ar naudojimo.
11
LT
Šis televizoriaus laikiklis turi būti saugiai pritvirtintas prie
vertikalios sienos. Jeigu laikiklis sumontuojamas netinkamai,
jis gali nukristi ir dėl to galima susižaloti ir (arba) patirti žalos.
ĮSPĖJIMAS
•Veržliaraktis arba
Reikalingi
•4 mm grąžtas
•10 mm mūro grąžtas
movų rinkinys
įrankiai
•Atsuktuvas
•Statramsčių ieškiklis
•Dailidės gulsčiukas
Pastaba! Šioje pakuotėje pateikiamos montavimo sudedamosios dalys
ir techninė įranga nėra pritaikytos sienoms su plieniniais statramsčiais ar
šlakbetonio blokų sienoms. Jei montavimui reikalinga techninė įranga
nepridėta, prašome dėl įtaisui tinkamos montavimo techninės įrangos
kreiptis į vietinę technine įranga prekiaujančią parduotuvę.
12

LT
Pateiktų dalių sąrašas
(1) Tvirtinimo
(1) Kairysis
(1) Dešinysis
prie sienos plokštė – a
monitoriaus laikiklis – b
monitoriaus laikiklis – c
(4) M 4 x 12 varžtas – d (4) M 4 x 12 varžtas – e (4) M 4 x 12 varžtas – f (4) M 6 x 12 varžtas – g
(4) M 4 x 30 varžtas – h (4) M 5 x 30 varžtas – i (4) M 6 x 35 varžtas – j (4) M 8 x 40 varžtas – k
(4) M 4 / M 5 tarpinė – i (4) M 6 / M 8 tarpinė – m (8) M 4 / M 5 poveržlė – n (4) M 6 / M 8 poveržlė – o
(3) sraigtas – p (3) sraigto poveržlė – q (3) betono kaištis – r
13
LT
Rėmo montavimas prie
televizoriaus su plokščia
nugarėle
Pirmiausia įsitikinkite, kad varžto (d, e, f, g) skersmuo tinka jūsų
televizoriui. Pasirinkę reikiamus varžtus, išnagrinėkite žemiau pateiktas
schemas. Jums reikės įsukti varžtą į savo televizoriaus nugarėlę,
naudokite tinkamas poveržles (n, o). Užtikrinkite, kad televizoriaus rėmai
(b, c) būtų sumontuoti statmenai ir viename lygyje.
M 4 skersmens varžtas
M6 skersmens varžtas
1A schema
M5 skersmens varžtas M8 skersmens varžtas
14
LT
Rėmo montavimas prie
televizoriaus su nelygia
nugarėle
Pirmiausia įsitikinkite, kad varžto (h, i, j, k) skersmuo tinka jūsų
televizoriui. Pasirinkę reikiamus varžtus, išnagrinėkite žemiau pateiktas
schemas. Jums reikės įsukti varžtą į savo televizoriaus nugarėlę,
naudokite tinkamas poveržles (n, o) ir tarpines (l, m). M4 arba M5
varžtams jums reikės papildomos M4/M5 poveržlės tarp televizoriaus
rėmelio ir tarpinės. Užtikrinkite, kad televizoriaus rėmai būtų sumontuoti
statmenai ir viename lygyje.
M 4 skersmens varžtas
M6 skersmens varžtas
1B schema
M8 skersmens varžtas
M5 skersmens varžtas
15
LT
Sienos plokštės montavimas
prie sienos
Tvirtinimas prie mūro, kieto betono ar betoninių blokų sienos:
naudokite sienos plokštelę (a) kaip šabloną ir pažymėkite 3 kiaurymių
padėtis sienoje. Šios žymos turi būti viename lygyje. 3/8“ (10 mm) mūro
grąžtu išgręžkite ne mažesnio kaip 2,4“ (60 mm) gylio skylę. Įstatykite
betonui skirtą kaištį (r) į kiekvieną kiaurymę. Kaištis turi tvirtai įsistatyti
į betoninę sieną, net jei paviršiuje yra tinko ar kitos medžiagos plokštė.
Sienos plokštelę prie sienos primontuokite 3 sraigtais (p) ir 3 sraigtų
tarpinėmis (q) (žr. 2A schemą).
Tvirtinimas prie medinės sienos konstrukcijos:
sienos plokštelė (a) turi būti montuojama prie ne mažiau kaip dviejų
medinių sijų, viena nuo kitos esančių ne mažesniu kaip 16“ (406 mm)
atstumu. Elektroniniu sienos konstrukcijų ieškikliu sienoje tiksliai
nustatykite medinių konstrukcijų vietas. Patartina yla arba plona vinimi
patikrinti medinių sijų vietas (žr. 2B schemą). Kiekvienoje sijoje 5/32“ (4
mm) grąžtu išgręžkite po 2,4” (60 mm) gylio kiaurymę. Užtikrinkite, kad
šios kiaurymės būtų sijų centruose ir viename lygyje. Sienos plokštelę
prie sienos sumontuokite 2 sraigtais (p) ir 2 sraigtų tarpinėmis (q).
2A schema 2B schema
r
a
40,6 cm
Statramsčių
q
p
40,6 cm
ieškiklis
40,6 cm
16

LT
Televizoriaus tvirtinimas
prie sienos plokštelės
Dėmesio! Sunkesnius televizorius privalo tvirtinti du asmenys! Mes
neprisiimame jokios atsakomybės už galimus sužeidimus ar žalą gaminiui.
Pirmiausia patraukite už troso kiekvieno rėmo (b, c) gale – atlaisvinsite
spyruoklinę ksavimo sistemą (žr. 3A schemą). Tada pakabinkite
televizorių su rėmu ant sienos plokštelės (a) ir, atlaisvindami trosus, rėmą
užksuokite pasirinktoje padėtyje (žr. 3B schemą).
3B schema3A schema
Dėkojame, kad renkatės mūsų gaminius.
Mėgaukitės juos naudodami.
17

LV
Instrukcijas izsaiņošanai no
iepakojuma
• Uzmanīgi atveriet kartona iepakojumu, izņemiet iepakojuma saturu
un novietojiet to uz kartona vai cita virsmu aizsargājoša materiāla, lai
izvairītos no bojājumiem.
• Pārbaudiet iepakojuma saturu, vai tas atbilst piegādāto detaļu
sarakstam, kas dots nākamajā lappusē, lai pārliecinātos, vai visi
komponenti piegādāti bez bojājumiem. Nelietojiet bojātas detaļas vai
detaļas ar defektiem.
• Pirms mēģināt veikt uzstādīšanu uzmanīgi izlasiet visas instrukcijas.
Svarīga informācija drošībai
Uzstādiet un izmantojiet šo ierīci uzmanīgi. Lūdzu, pirms uzstādīšanas
rūpīgi izlasiet šo instrukciju un uzmanīgi ievērojiet visas šeit minētās
instrukcijas. Uzstādīšanas laikā izmantojiet atbilstošu aprīkojumu.
Lūdzu, zvaniet kvalicētam uzstādīšanas darbuzņēmējam šādos
gadījumos:
• Ja nesaprotat šīs instrukcijas vai rodas šaubas par drošību, veicot
uzstādīšanu;
• Ja neesat drošs par to, kāds ir sienas materiāls, konsultējieties ar
kvalicētu uzstādīšanas darbuzņēmēju.
Neizmantojiet šo izstrādājumu citiem mērķiem un kongurācijā, kas
nav skaidri norādīta šajā instrukcijā. Ar šo mēs atsakāmies no jebkādas
atbildības par ievainojumiem vai bojājumiem, kas radušies nepareizas
montāžas, uzstādīšanas vai nepareizas lietošanas rezultātā.
18
LV
Šis TV stiprinājums ir jāpiestiprina pie vertikālas sienas. Ja
stiprinājums tiek uzstādīts nepareizi, tas var nokrist, rezultātā
izraisīt ievainojumus un vai bojājumus.
BRĪDINĀJUMS
•10 mm betona
• Atslēga vai atslēgu
Nepieciešamie
• 4 mm koka urbis
urbis
komplekts
instrumenti
• Skrūvgriezis
•Prolu meklētājs
• Līmeņrādis
Piezīme: Komplektācijā iekļautās detaļas un aprīkojums nav paredzēti
uzstādīšanai pie metāla karkasa vai izdedžu bloku sienām. Ja komplektācijā
nav iekļauts uzstādīšanai nepieciešamais aprīkojums, lūdzu, konsultējieties
vietējā celtniecības materiālu veikalā par atbilstoša montāžas aprīkojuma
izmantošanu.
19
LV
Komplektā iekļautās detaļas
(1) Sienas plāksne (a) (1) Kreisā ekrāna konsole (b) (1) Labā ekrāna konsole (c)
(4) M4x12 skrūve (d) 4) M5x12 skrūve (e) (4) M6x12 skrūve (f) (4) 8Mx16 skrūve (g)
(4) M4x30 skrūve (h) (4) M5x30 skrūve (i) (4) 6x35 skrūve (j) (4) 8x40 skrūve (k)
(4) M4/M5 distancers (l) (4) M6/M8 distancers (m) (8) M4/M5 starplika (n) (4) M6/M8 starplika (o)
(3) Skrūve (p) (3) Skrūves starplika (q) (3) Betona enkurs (r)
20
