Acme V-130: инструкция
Раздел: Бытовая, кухонная техника, электроника и оборудование
Тип: Плеер
Инструкция к Плееру Acme V-130
Оглавление
- Примечания: Особенности:
- 1 .Основные операции 2. Воспроизведение музыки 1). Воспроизведение
- 2). Кнопки 3). Регулировка громкости 4). Предыдущий/следующий файл; перемотка (FF/RW) 5). Пауза 6). Список воспроизведения 7). Повтор A-B
- 4. FM-тюнер: (зависит от модели)
- 5. Запись: 6. Проводник
- 7. Настройки 1) Войдите в меню Setting (Настройки) 2) Кнопки 3) Выбор шаблона эквалайзера, включая normal (стандартный), 4) Настройки воспроизведения 5) Настройки дисплея
- 6) Выключение 7) Настройка записи 8) Язык 9) Настройка радиоприемника 10). Системные настройки
- 8. Обновление системы
- 9. Выявление и устранение неисправностей
- 10. Технические характеристики

Model V-130
Mp3 player
Extreme series
User’s Manual
Vartotojo gidas
Посібник користувача
Lietotāja rokasgrāmata
Ръководство на потребителя
Kasutusjuhend
Podręcznik użytkownika
Инструкция пользователя
Benutzerhandbuch

EN
Note:
1. Do not use the unit in places that are extremely hot, cold, dusty,
or humid.
2. Avoid the unit being dropped.
3. The battery service life may dier under dierent usage conditions
and dierent models.
4. The unit is charged when connected to PC via USB cable no
matter the power is on or o.
5. Please charge the unit when any of the following cases occur:
A. The battery indicator informs low battery;
B. The player turns o automatically, and turns o again after
rebooting;
C. The keys become inactive;
D. The player des not turn on.
6. Do not disconnect the player while it is formatting or uploading/
downloading, otherwise the procedures may lead to errors.
7. While using as mobile storage disk, please store and derive
documents during proper document managing operation,
otherwise the documents might be lost.
8. Do not disassemble. If you have any doubts, please contact the
dealer.
9. Specications are subject to change and improvement without
notice.
10. While formatting the player, please select the le system FAT32.
Features:
MP3/WMA/WAV playback•
Stores 30 radio stations (optional)•
High quality voice recording; A-B repeat function•
No driver necessary under Windows 2K, XP, 2003, VISTA, 7•
Mobile storage function•
Supports MsPlayFx sound•
Several EQ modes •
ID3 TAG support (title, artist, and lyrics – edited in advance)•
Built-in rechargeable Lithium-ion battery •
USB 2.0•

EN
1. Basic operations
1) Power on/o
A) On: Press and hold “
” button to turn on the unit, LCD displays
the logo picture. Then the unit enters to the main interface.
B) O: Press and hold “ ” button, the player is turned o.
2) Charging
By connecting with PC: link the unit to the computer via USB cable,
the player enters U-disk mode automatically. Exit the U-disk mode,
the player enters charging mode.
Note: For safety, the charging time should not exceed 8 hours. And since the service time of the
battery depends on the charging time, please charge the battery after it is exhausted and until
it is full.
3) Buttons
Under the main interface, press “+” or “-” to select the required menu
and press “M” button to enter it. In the menus, press and hold “M”
button to return to the main interface.
4) FM tuner (Optional)
The earphones act as the antenna while listening to the FM stations.
Please plug the earphones rst if you want to listen to FM.
2. Music Playback
The player allows you to enjoy MP3/WMA/WAV codied music.
1) Playback
Select “Music” in the main menu, and press “M” button to enter. Take
a look at the dierent options available for you to easily select your
music:
2) Buttons
A) Press “+” or “-” to select audio les.
B) Press “
” button to start playback.
C) Press and hold “M” to return to the main interface.
3) Volume Adjustment
Under playback status, press “REC” little longer to enter the volume
adjusting menu (number showing power of volume, starts to blink),
and then press “+” or “-”to increase or decrease the volume.

EN
4) Previous le/Next le; FF/RW
Press “+” button to skip to the next le and press “-” button to skip to
the previous le.
Press and hold “+” or “-” to FF or RW .
5) Pause
Under playback mode, press “
” button to pause. Press “ ” button
again, the unit continues to play.
6) Play list
Press “M” button to enter the play list. Press “+” or “-” to select les and
press “M” button to enter and start playback.
7) A-B repeat
While playing music, press “REC” button to set the start point “A”, the
LCD displays “A“; press “REC” button again to set the end point “B”,
the LCD displays “A-B”, and the player starts to repeat the section.
Press the “REC” button the third time to exit.
“A-B” repeat function is not available under pause status.
Note: Under “A” or “A-B” status, press and hold “+” or “-” button to FF or RW, the A-B repeat will
be cancelled.
4. FM tuner: (Optional)
1) Enter FM tuner:
Press “M” button to enter the menu, and then press “+” or “-” button to
select “Radio” and press “M” button to conrm.
2) Buttons
A) Press “M” button to enter into menu.
B) Press “+” or “-” to select function.
C) Press and hold “M” button to return to the main menu.
3)Volume adjustment
Press “REC” to enter the volume adjusting mode, and then press “+” or
“-”to increase or decrease the volume.
4) Manual searching
Press “M” button to select “manual searching”, each time you press “+”
or “-” button the frequency will increase or decrease by 0.1 MHz.

EN
5) Auto-searching
Press “M” button to enter the auto searching mode, the unit begins
to search all stations and store them automatically. You can turn to
“preset” status to listen to the FM stations after searching is nished.
6) Storing
Press “M” button, then use “+” or “-” button to select “Mem”, and then
press “M” button to enter. Press “+” or “-” button to select the channel
for saving the station: CH1, CH2…, and press “
” button; use keys “+”
or “-” to select the choice “Yes” or “No”. Press “M” button to conrm.
7) Preset station
Press “M” button, then use “+” or “-” button to select “Preset” and press
“M” button to start to listen to the preset stations. Press “+” or “-”
button to select channels.
8) Delete Stations
Press “M” button, then use “+” or “-” button to select “Delete” and press
“M” button to enter. Press “+” or “-” button to select the station you
want to delete, press “
” button and use keys “+” or “-” to select the
choice “Yes” or “No”. Press “M” button to conrm your choice.
5. Recording:
1) Enter recording
Under the main interface, select “Record’ menu and press the “M”
button to enter.
2) Start recording
After entering the recording interface, press the “rec” button to start
recording.
3) Pause recording
Under “Recording” mode, press the “rec” button to pause, press it
again to continue.
4) Save and exit recording
Press and hold the “M” button to save the recorded le and exit
recording.

EN
5) Play recorded le
A) Enter the “Music” menu, press the “M” button to display the le
list.
B) Press the “+” or “-” button to select the “Voice” folder.
C) Press the “M” button to enter, and press “+” or “-” button to select
the le you want to play.
D) Press the “M” button to start playback.
6. Explorer
1) Enter the Explorer.
Select “Explorer” in the main menu, and press the “M” button to
enter.
2) File list
List of all the les of the player in the Explorer.
3) Select Files
A) Press “+” or “-” to select the folder or le.
B) Press the “M” button to enter after selection. The player enters
the corresponding function interface. If the le is not recognized,
there will be no response after pressing the “M” button.
C) Press the “M” button to return to Explorer.
D) Press “REC” to go back one step in Explorer.
E) Press and hold the “M” button to return to the main menu.
7. Settings
1) Enter Settings menu
Select “Settings” under the main menu, and press the “M” button to enter.
2) Buttons
A) Press “+” or “-” to select the items.
B) Press the “M” button to enter.
C) Press the “rec” button to return to the previous menu.
D) Press and hold the “M” button to return to the main interface.
3) EQ Selection: normal, MS PlayFx, rock, pop, Classic, Bass and Jazz.
4) Music playback settings
A) Repeat Mode Settings: once, repeat 1, Folder once, Folder
Repeat, All once, All Repeat and Intro.
B) Play Mode Settings: order and shue.

EN
5) Display settings
In this menu, there are three options: BLight time, Lum, and BLight
mode.
A) Backlight time (BLight time)
In this menu, there are 6 options to be selected: 5 seconds, 10
seconds, 15 seconds, 20seconds, 30 seconds, always on.
B) Lum
In this menu, there are ve options: 1, 2, 3, 4 and 5. The lower the
level is, the darker the display light will be.
C) Backlight mode (BLight mode)
In this menu, there are two options: Normal and Power save.
6) Power o
In this menu, there are six options to be selected as follows: OFF, 10
minutes, 15 minutes, 30 minutes, 60 minutes and 120 minutes.
7) Record setting
In this setting, there is one option: record quality.
A) Record quality
In this menu, there are two options: High quality, General quality.
8) Language
There are 5 languages for you to select.
9) Radio setting
In this menu there are two options: stereo switch, FM region.
A) Stereo switch
In this menu, there are two options: On and O.
B) Listening area
In this menu, there are four options: China, Europe, Japan, and
the U.S.A.
10) System
In this menu, there are three options to be selected: about, upgrade
and Default.
A) About
Press “M” key, the following information is displayed: Firmware
version, Firmware date, Free/Total memory.
Press “M” key to exit.
EN
B) Firmware upgrade
In this menu, in pop up dialog box, press “+” or “-” to select
“Yes” or “No”, and then press the “M” button, connect the player
with the PC via USB, the system enters the rmware upgrading
status.
C) Default set
Select this item, a dialog box pops up. Press “+” or “-” to select
“Yes” and press the “M” button to conrm. The player is resumed
to the defaulted value then.
8. System Upgrade
There are two ways to upgrade the rmware:
1) Select “Settings>System>Upgrade” in the main menu, and then
start to upgrade as per the prompt. For details please refer to
Section 10 “Firmware upgrade”.
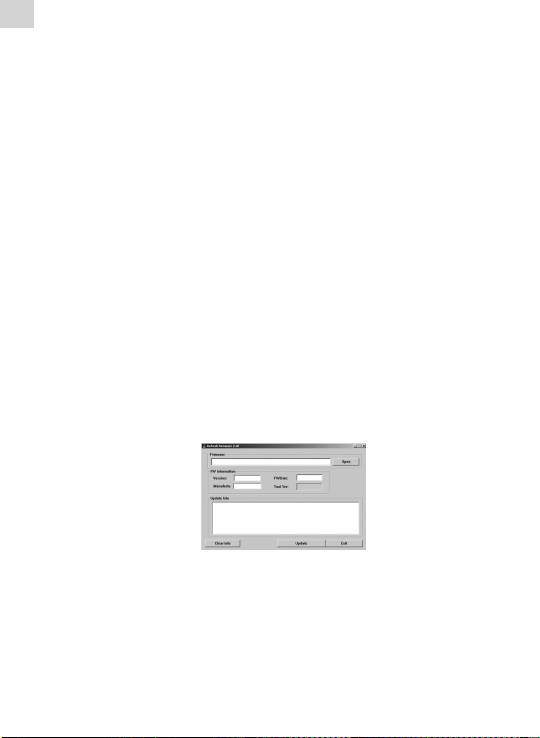
2) Use the “rmware upgrade tools” in the enclosed CD to upgrade
the rmware.
Operation steps:
A) Turn o the player, press and hold the “M” button, do not release
it, and connect the player with the PC via USB cable.
B) After the player is connected to the PC, the PC prompts “New
hardware found”. Install the driver as per the requirement. USB
device drivers are in CD. (If the driver has been installed, you can
jump over this step directly.)
C) After the driver is installed, run the “Firmware Upgrade” tool in
the enclosed CD.
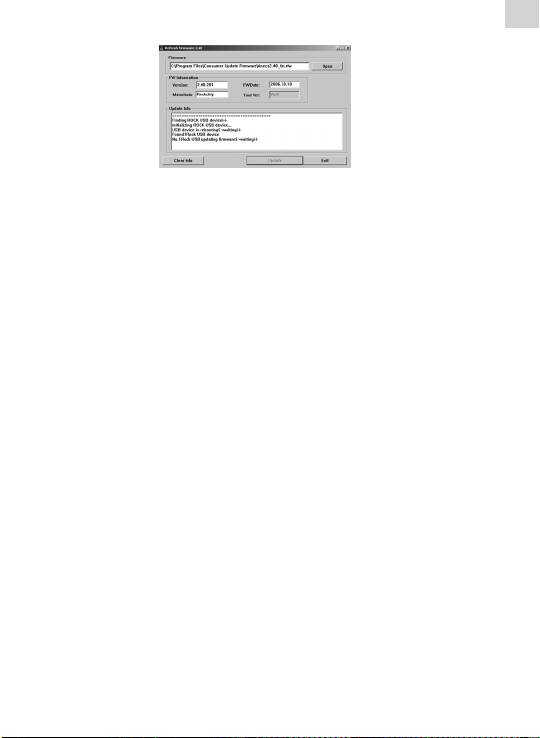
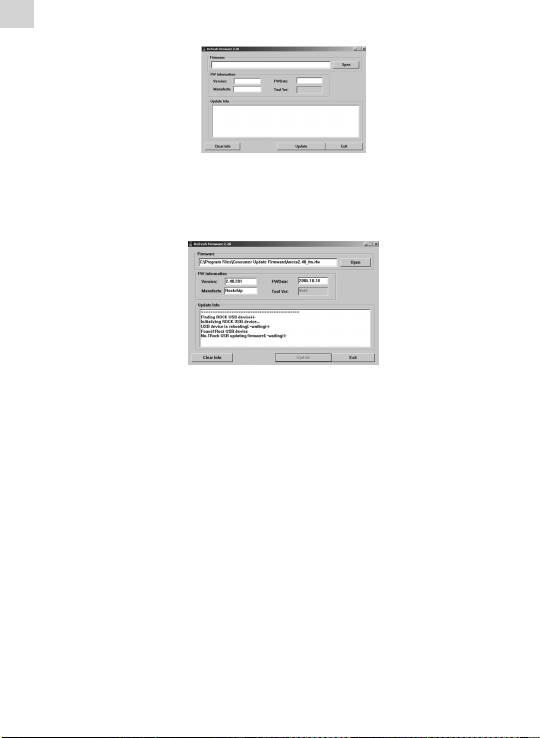
D) Press “Open rmware”, and then select a rmware le.
EN
E) Press “Upgrade”.
After the upgrading nishes, exit the program and disconnect
the connection between MP3 and PC.
9. Troubleshooting
1) Failure to start:
• Checkthepowerofbattery;
• Checkthepoweradapteragain;
• Ifitstillfailstostartaftercharge,pleasecontactourcustomer
service center.
2) No voice in the earphones:
• Pleasecheckifthevolumeis0ornot;
• Pleasechecktheconnectionoftheearphones.
3) Serious noise:
• Pleasecheckwhetherthepinoftheearphoneisdirtyornot,as
the dirt could cause noise.
• Pleasecheckwhetherthemusicleisbrokenornot.Youcould
try to play another music le. If the le is damaged, it could
cause serious noise or pause.
4) The eect of FM tuner is not good:
• Adjustthepositionoftheplayerandtheearphones;
• Turnothedevicesthatareclose;
• Theearphonesactasantenna.
5) Display on the screen is unclear:
• Pleasecheckwhetherthelanguageisproperlyselected.Enter
<Setting>\<system settings>\<language selection> to set the
language.
6) Download le failure:
• Ensure that the connection between computer and player is
properly arranged;
• Checkwhetherthememoryisfull;
• CheckwhethertheUSBcableisbroken.

EN
10. Specications
Connecting to PC USB2.0 (HIGH SPEED)
Built-in memory 128Mb• 8Gb
Power source Built-in Lithium battery
Recording Sampling rate 8 kHz / 16 kHz
Recording format WAV (32 kbps / 64 kbps)
Recording time 8 hours (128M Flash)
MP3, WMA
(L) 5 mW + (R)5
Earphone Max output
mW (32 ohms)
MP3 bit rate 8 kbps – 320 kbps
WMA bit rate 32 kbps – 384 kbps
Frequency response 20 Hz to 20 kHz
OS FM tuner (Optional)
SNR 85 dB
Distortion 0.06%
76MHz-90MHz /
Frequency range
87.5MHz• 108MHz
Music le format MP3, WMA, WAV
Operating temperature -5 – 40 °C
Language English, Lithuanian etc.
OS Windows 2K, XP, 2003, VISTA, 7

EN
Dėmesio!
1. Nenaudokite prietaiso ypač karštose, šaltose, dulkėtose ar
drėgnose vietose.
2. Saugokite, kad prietaisas nenukristų.
3. Priklausomai nuo skirtingų naudojimo sąlygų ir skirtingų modelių,
baterijos veikimo laikas gali skirtis.
4. Prietaisas įkraunamas, kai prijungiamas prie asmeninio
kompiuterio USB kabeliu, nepriklausomai nuo to, ar jis įjungtas, ar
išjungtas.
5. Prašome įkrauti prietaisą, kai:
a) akumuliatoriaus indikatorius rodo, kad jis baigia išsikrauti;
b) grotuvas automatiškai išsijungia, o jį iš naujo įjungus vėl
išsijungia;
c) neveikia mygtukai;
d) grotuvas neįsijungia.
6. Neatjunkite grotuvo, kai formatuojami arba iškeliami ar įrašomi
failai, kitaip procedūros bus klaidingai užbaigtos.
7. Naudodami kaip nešiojamą laikmeną, išsaugokite ir iškelkite
dokumentus tinkamos dokumentų tvarkymo procedūros metu,
kitaip prarasite dokumentus.
8. Neardykite prietaiso. Jeigu kyla klausimų, susisiekite su
pardavėju.
9. Specikacijos gali būti pakeistos be įspėjimo.
10. Formatuodami grotuvą, pasirinkite failų sistemą FAT32.
Savybės:
Groja MP3 ir WMA formato muzikos failus;•
Išsaugo 30 radijo stočių (pasirenkama);•
Aukštos kokybės balso įrašymas, A–B kartojimo funkcija;•
Naudojantis „Windows 2K, XP, 2003, VISTA, 7“ operacinėmis •
sistemomis, nereikia jokios tvarkyklės;
Nešiojamosios laikmenos funkcija;•
Palaiko „MsPlayFx“ garsą;•
Keletas glodintuvo režimų; •
Palaiko „ID3 TAG“ (pavadinimas, atlikėjas ir žodžiai redaguojami iš •
anksto);
Įtaisytas įkraunamas ličio jonų akumuliatorius; •
USB 2.0.•

LT
1. Pagrindiniai naudojimo principai
1) Įjungimas ir išjungimas
A. Norėdami įjungti, paspauskite ir palaikykite „
“ mygtuką, skystųjų
kristalų ekrane atsiras logotipas. Tada atsidaro pagrindinė
prietaiso sąsaja.
B. Norėdami išjungti, paspauskite ir palaikykite „ “ mygtuką,
grotuvas išsijungs.
2) Krovimas
Prijungiant prie asmeninio kompiuterio: sujunkite prietaisą su
kompiuteriu USB kabeliu. Grotuvas automatiškai įjungia „U“ disko
režimą. Išjungus „U“ disko režimą, grotuvas pradedamas krauti.
Pastaba! Dėl saugumo krovimo laikas neturėtų būti ilgesnis, nei 8 valandos. Be to, kadangi
baterijos naudojimo trukmė priklauso nuo krovimo laiko, prašome krauti bateriją tik tada, kai ji
išsenka iki tada, kai ji visiškai įkraunama.
3) Mygtukai
Pagrindinėje sąsajoje mygtukais „+“ ir „-“ pasirinkite reikiamą meniu
ir mygtuko „M“ paspaudimu atidarykite. Norėdami iš meniu grįžti į
pagrindinę sąsają, paspauskite ir palaikykite mygtuką „M“.
4) FM imtuvas (Jei yra numatytas)
Klausantis FM stočių, ausinės veikia kaip antena. Jeigu norite klausytis
FM, pirma prijunkite ausines.
2. Muzikos failų paleidimas
Grotuvu galima klausytis MP3, WMA, WAV formato muzikos failų.
1) Paleidimas
Pagrindiniame meniu pasirinkite „Muzika“ ir mygtuko „M“ paspaudimu
įeikite. Savo muziką lengvai galite pasirinkti keletu būdų.
2) Mygtukai
A) Spauskite „+“ arba „-“ garso failams pasirinkti.
B) Mygtuku „
“ paleiskite failą.
C) Norėdami grįžti į pagrindinę sąsają, paspauskite ir palaikykite
mygtuką „M“.
3) Garsumo reguliavimas
Norėdami atidaryti garsumo reguliavimo meniu, grojimo metu šiek tiek
ilgiau paspauskite „REC“ (pradeda mirksėti skaičius, rodantis garsumo
lygį), tada mygtukais „+“ ir „-“ didinkite arba mažinkite garsumo lygį.

LT
4) Peršokimas prie ankstesnio arba kito failo, sukimas pirmyn
arba atgal
Norėdami peršokti prie kito failo, paspauskite mygtuką „+“, o
norėdami peršokti prie ankstesnio failo — mygtuką „-“.
Norėdami sukti į priekį arba atgal, paspauskite ir laikykite „+“ arba „-“
mygtuką.
5) Pauzė
Norėdami padaryti pauzę, grojimo metu paspauskite mygtuką „
“.
Dar kartą paspaudus mygtuką „ “, kūrinio atkūrimas tęsiamas.
6) Grojaraštis
Norėdami atidaryti grojaraštį, paspauskite „M“ mygtuką. Mygtukais
„+“ ir „-“ pasirinkite failus ir mygtuko „M“ paspaudimu paleiskite.
7) A–B kartojimas
Grojant muzikai, paspauskite mygtuką „REC“ taškui A nustatyti. Tada
skystųjų kristalų ekrane rodoma „A“. Dar kartą paspaudus mygtuką
„REC“, nustatomas taškas B, skystųjų kristalų ekrane rodoma „A–B“
ir pradedama groti kartojama dalis. Norėdami išjungti, trečią kartą
paspauskite „REC“ mygtuką.
A–B kartojimo funkcija pauzės metu neveikia.
Pastaba! Įjungę A arba A–B režimą bei paspaudus ir ir palaikius „+“ arba „-“ mygtuką, norint
sukti į priekį arba atgal, A–B kartojimas bus išjungtas.
4. FM imtuvas (pasirenkama)
1) FM imtuvo įjungimas
Paspauskite „M“ mygtuką, kad atidarytumėte meniu, tada mygtukais
„+“ ir „-“ pasirinkite „Radijas“ ir „M“ mygtuku įjunkite.
2) Mygtukai
A) Spauskite „M“ mygtuką, kad atidarytumėte meniu.
B) Spauskite „+“ arba „-“ mygtuką funkcijai pasirinkti.
C) Norėdami grįžti į pagrindinį meniu, paspauskite ir palaikykite
„M“ mygtuką.
3) Garsumo reguliavimas
Paspauskite „REC“, norėdami įjungti garsumo reguliavimo režimą,
tada mygtukais „+“ ir „-“ didinkite ir mažinkite garsumo lygį.

LT
4) Rankinė paieška
Spausdami „M“ mygtuką pasirinkite „Rankinė paieška“; tada kas kartą
paspaudę „+“ arba „-“ mygtuką, padidinsite arba sumažinsite dažnį
0,1 MHz.
5) Automatinė paieška
Spauskite „M“ mygtuką, kad įjungtumėte automatinės paieškos
režimą, ir prietaisas pradės ieškoti visų stočių ir jas automatiškai
išsaugos. Galite įeiti į išankstinio nustatymo režimą ir klausyti FM
stočių, kai paieška baigiama.
6) Saugojimas
Paspauskite „M“ mygtuką, tada mygtukais „+“ ir „-“ pasirinkite
„Atmintis“ ir paspauskite „M“ mygtuką, kad atidarytumėte. Mygtukais
„+“ ir „-“ pasirinkite numerį, kuriuo išsaugosite stotį: „CH1“, „CH2“ ir t.
t., tada paspauskite „
“ mygtuką; mygtukais „+“ ir „-“ pasirinkite „Taip“
arba „Ne“. Spausdami mygtuką „M“ patvirtinkite.
7) Stoties išankstinis nustatymas
Paspauskite „M“ mygtuką, tada mygtukais „+“ ir „-“ pasirinkite
„Nustatymas“ ir paspauskite „M“ mygtuką, norėdami klausytis iš
anksto nustatytų stočių. Mygtukais „+“ ir „-“ pasirinkite numerius.
8) Stočių šalinimas
Paspauskite „M“ mygtuką, tada mygtukais „+“ ir „-“ pasirinkite
„Ištrinti“ ir paspauskite „M“ mygtuką, kad atidarytumėte. Mygtukais
„+“ ir „-“ pasirinkite stotį, kurią norite šalinti, spauskite „
“ mygtuką ir
mygtukais „+“ ir „-“ pasirinkite „Taip“ arba „Ne“. Spausdami mygtuką
„M“ patvirtinkite savo pasirinkimą.
5. Įrašymas
1) Įjungti įrašymo funkciją
Pagrindinėje sąsajoje pasirinkite įrašymo meniu ir paspauskite „M“
mygtuką, kad atidarytumėte.
2) Pradėti įrašyti
Atidarę įrašymo sąsają, spauskite „REC“ mygtuką, norėdami pradėti
įrašyti.
3) Sustabdyti įrašymą
Įrašymo režimo metu spauskite „REC“ mygtuką pauzei įjungti, dar
kartą paspauskite, norėdami tęsti įrašymą.

LT
4) Išsaugoti ir išjungti įrašymo funkciją
Norėdami išsaugoti įrašytą failą ir išjungti įrašymo funkciją,
paspauskite ir palaikykite „M“ mygtuką.
5) Paleisti įrašytą failą
A) Atidarykite muzikos meniu ir paspauskite „M“ mygtuką failų
sąrašui atidaryti.
B) Mygtukais „+“ ir „-“ pasirinkite katalogą „Voice“.
C) „M“ mygtuku atidarykite ir mygtukais „+“ ir „-“ pasirinkite failą,
kurį norite paleisti.
D) Mygtuku „M“ paleiskite failą.
6. Naršyklė
1) Atidaryti naršyklę
Pagrindiniame meniu pasirinkite „Naršyklė“ ir mygtuko „M“
paspaudimu atidarykite.
2) Failų sąrašas
Visų grotuve esančių failų sąrašas naršyklėje.
3) Pasirinkti failus
A) Spauskite „+“ arba „-“ katalogui arba failui pasirinkti.
B) Spauskite „M“ mygtuką pasirinktam katalogui arba failui atidaryti.
Atidaroma atitinkamos funkcijos sąsaja. Jei failas neatpažįstamas,
paspaudus mygtuką „M“, grotuvas nesureaguos.
C) Norėdami grįžti į naršyklę, spauskite „M“ mygtuką.
D) Naršyklėje norėdami grįžti vienu žingsniu atgal, spauskite „REC“
mygtuką.
E) Norėdami grįžti į pagrindinį meniu, paspauskite ir palaikykite
mygtuką „M“.
7. Nustatymai
1) Atidaryti nustatymų meniu
Pagrindiniame meniu pasirinkite „Nustatymai“ ir mygtuko „M“
paspaudimu atidarykite.
2) Mygtukai
A) Spauskite „+“ arba „-“ parinktims pasirinkti.
B) Spauskite „M“ mygtuką parinkčiai atidaryti.

LT
C) Norėdami grįžti į ankstesnį meniu, spauskite mygtuką „REC“.
D) Norėdami grįžti į pagrindinę sąsają, paspauskite ir palaikykite
mygtuką „M“.
3) Glodintuvo parinktys: įprastinis, „MS PlayFx“, roko, populiariosios
muzikos, klasikos, žemų dažnių ir džiazo
4) Muzikos grojimo nustatymai
A) Kartojimo režimo nustatymai: kartą, kartoti vieną, kartoti
katalogą kartą, kartoti katalogą, kartoti viską kartą, kartoti viską
ir introdukcija.
B) Grojimo režimo nustatymai: iš eilės ir atsitiktine tvarka.
5) Vaizdo nustatymai
Šiame meniu galima pasirinkti iš trijų parinkčių: apšvietimo trukmės,
šviesumo lygio ir apšvietimo režimo.
A) Apšvietimo trukmė
Šiame meniu galima pasirinkti iš šešių parinkčių: 5 sekundės, 10
sekundžių, 15 sekundžių, 20 sekundžių, 30 sekundžių ir visada
įjungtas.
B) Šviesumo lygis
Šiame meniu galima pasirinkti iš penkių parinkčių: 1, 2, 3, 4 ir 5.
Kuo žemesnis lygis, tuo blankesnis bus ekrano apšvietimas.
C) Apšvietimo režimas
Šiame meniu galima pasirinkti iš dviejų parinkčių: įprastinis ir
taupantis energiją.
6) Išjungimas
Šiame meniu galima pasirinkti iš šešių parinkčių: išjungti, 10 minučių,
15 minučių, 30 minučių, 60 minučių ir 120 minučių.
7) Įrašymo nustatymas
Šiame meniu yra viena parinktis: įrašymo kokybė.
A) Įrašymo kokybė
Šiame meniu galima pasirinkti iš dviejų parinkčių: aukšta kokybė
ir įprastinė kokybė.
8) Kalba
Galima pasirinkti iš 5 kalbų.
9) Radijo nustatymai
Šiame meniu galima pasirinkti iš dviejų parinkčių: stereo ir FM
regionas.

LT
A) Stereo
Šiame meniu galima pasirinkti iš dviejų parinkčių: įjungta ir
išjungta.
B) Klausymosi zona
Šiame meniu galima pasirinkti iš keturių parinkčių: Kinija,
Europa, Japonija ir JAV.
10) Sistema
Šiame meniu galima pasirinkti iš trijų parinkčių: apie, plėtojimas ir
numatytieji nustatymai.
A) Apie
Paspaudus mygtuką „M“, bus rodoma ši informacija: Mikroprogramos
versija, mikroprogramos data, laisva ir visa atmintis.
Paspaudę mygtuką „M“ išeisite.
B) Mikroprogramos plėtojimas
Šiame meniu iššokusiame dialogo lange mygtukais „+“ ir „-“
pasirinkite „Taip“ arba „Ne“ ir paspauskite „M“ mygtuką.
Prijunkite grotuvą prie asmeninio kompiuterio USB jungtimi, ir
įsijungs mikroprogramos plėtojimo režimas.
C) Numatytieji nustatymai
Pasirinkus šią parinktį, iššoks dialogo langas. Mygtukais „+“ ir
„-“ pasirinkite „Taip“ arba „Ne“ ir mygtuku „M“ patvirtinkite
pasirinkimą. Atstatomos numatytosios grotuvo vertės.
8. Sistemos plėtojimas
Mikroprogramą plėtoti galima dviem būdais.
1) Pagrindiniame meniu pasirinkite „Nustatymai“ > „Sistema“ >
„Plėtojimas“ ir, vadovaudamiesi kreipiniais, pradėkite naujinti.
Daugiau informacijos ieškokite 10 skyrelyje „Mikroprogramos
plėtojimas“.
2) Norėdami plėtoti mikroprogramą, naudokite mikroprogramos
plėtojimo įrankius, esančius pridėtame kompaktiniame diske.
Procedūra
A) Išjunkite grotuvą, paspauskite ir palaikykite „M“ mygtuką,
neatleiskite jo ir prijunkite grotuvą prie asmeninio kompiuterio
USB kabeliu.
B) Kai grotuvas prijungtas prie asmeninio kompiuterio, atsiranda
kreipinys „Rasta nauja techninė įranga“. Pagal reikalavimus
įdiekite tvarkyklę. USB įrenginio tvarkyklės yra kompaktiniame
diske. (Jeigu tvarkyklė yra įdiegta, galite pereiti tiesiai prie kito
žingsnio.)
LT
C) Kai tvarkyklė įdiegiama, pridėtame kompaktiniame diske
paleiskite mikroprogramos plėtojimo įrankį.
D) Paspauskite „Atidaryti mikroprogramą“ („Open rmware“) ir
pasirinkite mikroprogramos failą.
E) paspauskite „Plėtoti“ („Upgrade“).
Kai plėtojimas baigiamas, išjunkite programą ir atjunkite grotuvą nuo
asmeninio kompiuterio.
9. Trikčių šalinimas
1) Grotuvas neįsijungia:
• patikrinkite,arakumuliatoriusįkrautas;
• darkartąpatikrinkitemaitinimoadapterį;
• jei jis neįsijungia įkrovus, prašome susisiekti su mūsų klientų
aptarnavimo skyriumi.
2) Per ausines nieko nesigirdi:
• prašomepatikrinti,arnustatytasgarsolygisne„0“;
• prašomepatikrintiausiniųjungtį.
3) Didelis triukšmas:
• prašomeįsitikinti,arausiniųgalvutėsnepurvinos,nesdėltogali
atsirasti trikdžių;
• prašomeįsitikinti,armuzikosfailasnepažeistas.Galitepabandyti
paleisti kitą muzikos failą. Jei failas pažeistas, jis gali sukelti didelį
triukšmą arba nutrūkti.

LT
4) FM imtuvas blogai veikia:
• pakoreguokitegrotuvoirausiniųpadėtį;
• išjunkiteartiesančiusprietaisus;
• ausinėsveikiakaipantena.
5) Ekrane rodomas vaizdas nesuprantamas:
• prašomeįsitikinti,arpasirinktatinkamakalba.Norėdaminustatyti
kalbą, spauskite „Nustatymai“ > „Sistemos nustatymai“ > „Kalba“.
6) Nepavyko įsirašyti failo:
• įsitikinkite,kadgrotuvastinkamaiprijungtaspriekompiuterio;
• patikrinkite,aratmintisnepilna;
• patikrinkite,arnepažeistasUSBkabelis.
10. Specikacijos
Prijungimas prie
USB2.0 (DIDELĖ SPARTA)
asmeninio kompiuterio
Vidinė atmintis 128 Mb–8 Gb
Maitinimo šaltinis Įtaisytas ličio akumuliatorius
Įrašymas Pavyzdžio ėmimo dažnis – 8 kHz / 16 kHz
Įrašytų failų formatas WAV (32 kbps / 64 kbps)
Įrašymo trukmė 8 valandos (128 M „Flash“)
MP3, WMA
(L) 5 mW + (R) 5
Maksimali ausinių galia
mW (32 omai)
MP3 sparta (bitais) 8 kbps–320 kbps
WMA Sparta (bitais) 32 kbps–384 kbps
Dažnis 20 Hz–20 kHz
FM imtuvas
SNR 85 dB
(pasirenkama)
Iškraipymas 0,06 %
76 MHz–90 MHz /
Dažnių diapazonas
87,5 MHz–108 MHz
Muzikos failų formatai MP3, WMA, WAV
Eksploatacinė
-5–40 °C
temperatūra
Kalba Anglų, lietuvių ir t.t.
Operacinės sistemos „Windows 2K, XP, 2003, VISTA, 7“

LV
Piezīme:
1. Nelietojiet ierīci pārāk karstā, aukstā, putekļainā vai mitrā vidē.
2. Izvairieties no ierīces nokrišanas.
3. Akumulatora ekspluatācijas laiks ir atkarīgs no lietošanas
apstākļiem, kā arī tas var atšķirties dažādiem modeļiem.
4. Ierīce tiek uzlādēta, pieslēdzot to datoram ar USB kabeli, neatkarīgi
no tā vai ierīce ir ieslēgta vai izslēgta.
5. Lūdzu, uzlādējiet ierīci, ja novērojama, kāda no minētajām
pazīmēm:
A. akumulatora indikators norāda zemu uzlādes līmeni;
B. atskaņotājs automātiski izslēdzas, kā arī automātiski izslēdzas
pēc atsāknēšanas;
C. taustiņi kļūst neaktīvi;
D. nevar ieslēgt atskaņotāju.
6. Neatvienojiet atskaņotāju laikā, kad notiek formatēšana vai
augšupielāde/lejupielāde, vai arī šādas darbības var izraisīt
kļūdas.
7. Izmantojot ierīci kā mobilo datu glabāšanas diskiekārtu, lūdzu,
uzglabājiet un izgūstiet dokumentus, izmantojot atbilstošas
dokumentu pārvaldības darbības, vai arī dokumenti var pazust.
8. Neizjauciet ierīci. Neskaidrību gadījumā, lūdzu, sazinieties ar
izplatītāju.
9. Specikācijas var tikt mainītas un uzlabotas bez iepriekšēja
paziņojuma.
10. Formatējot atskaņotāju, lūdzu, izvēlieties FAT32 failu sistēmu.
Funkcijas:
MP3/WMA/WAV atskaņošana;•
30 radiostaciju saglabāšana (pēc izvēles);•
Augstas kvalitātes balss ierakstīšana, A-B atkārtošanas funkcija;•
Operētājsistēmām Windows 2K, XP, 2003, VISTA nav nepieciešamas •
draiveris;
Mobilās datu glabāšanas funkcija;•
Atbalsta MsPlayFx skaņu;•
Dažādi EQ (ekvalaizera) režīmi; •
ID3 ETIĶETES atbalsts (nosaukums, izpildītājs un dziesmas vārdi – •
Iepriekš rediģējami);
Iebūvēts uzlādējams litija-jonu akumulators; •
USB 2.0.•
