Acme DP01: инструкция
Раздел: Бытовая, кухонная техника, электроника и оборудование
Тип: Медиаплеер
Характеристики, спецификации
Инструкция к Медиаплееру Acme DP01
Оглавление
-
- :
-
- / ( ) Гнездо выхода Y/Pb/Pr
- HDMI ( )
- USB
- /
- Работа HD медиаплеера
-
-
-
- DEVICE () Обновление аппаратного обеспечения Приложения
-
Model: DP-01
www.acme.eu


GB 4 User’s manual 150 Warranty card
LT 16 Vartotojo gidas 151 Garantinis lapas
LV 28 Lietošanas instrukcija 152 Garantijas lapa
EE 41 Kasutusjuhend 153 Garantiileht
PL 53 Instrukcja obsługi 154 Karta gwarancyjna
DE 65 Bedienungsanleitung 155 Garantieblatt
FI 77 Kayttoohje 156 Takuulomake
SE 89 Bruksanvisning 157 Garantisedel
RO 101 Manual de utilizare 158 Fişa de garanţie
BG 113 159
RU 125 160
UA 138 161
3

GB
ACME Digital Home Multimedia Center
User’s Manual
TABLE OF CONTENTS
INTRODUCTION ...................................................................... 5
Preface ............................................................................................... 5
Packing List ..................................................................................... 5
Cautions............................................................................................ 5
Usage Cautions ................................................................. 5
Power ................................................................................... 5
Radio Interference ........................................................... 5
Repair ................................................................................... 6
Others .................................................................................. 6
Production Introduction .......................................................... 6
Front Panel ......................................................................... 6
Back Panel ........................................................................... 6
Connecting to a TV ...................................................................... 7
TV Connect ......................................................................... 7
Connecting a USB Device ............................................. 9
Connecting the Power Supply .................................... 9
Power on/o ................................................................................. 10
Power on ..........................................................................................10
Power o ...........................................................................10
Remote control............................................................................10
OPERATING THE HD MEDIA PLAYER .................... 11
Main Page ...................................................................................... 11
Setup Page .................................................................................... 11
Photo .............................................................................................. 12
Music .............................................................................................. 13
Playlist ................................................................................ 13
Movie .............................................................................................. 13
File .............................................................................................. 14
Device .............................................................................................. 14
FIRMWARE UPGRADE ...................................................... 15
APPENDIXES ............................................................................15
Product Specications .............................................................15
Copyrights and Trademarks..................................................15
4
GB
Introduction
Preface
Dear Customer,
Thank you very much for purchasing the ACME digital home multimedia center. In the digital era, this product is a great home
entertainment partner. With the outstanding design, you can enjoy movies and music, view photos of precious moments.
This player has the following functionality:
Movie Playback - Supports AVI, MP4, MOV, M2TS, MKV, TS, TRP, MPG, VOB;
Music Playback - Supports MP3, WMA
Photo Playback - Supports digital camera JPEG and BMP JPEG/PNG les.
USB HOST - Supports USB 2.0 host ports.
High-Denition Multimedia Interface transmits the highest quality digital video and audio via a
HDMI -
single cable, simplies cabling and provides high quality home theater experience.
Packing List
Part Quantity
Player 1
A/V cable 1
Y/Pb/Pr cable 0
USB cable 0
Remote Control 1
Remote Control Battery 2
AC/DC adaptor Power Cord 1
User Manual (printed) 1
Driver CD (with User Manual) 0
HDMI cable 0 (optional)
Note:
The actual contents in the package might be dierent from the packing list in this manual.
Cautions
This player’s design and manufacture has your safety in mind. In order to safely and eectively use this player, please read the
following before usage.
Usage Cautions
User should not modify this player. If commercial hard disk is being used, the environmental temperature should be
o
o
within +5
~ +35
.
Power
The player’s power voltage: DC 5V.
When using this player, please connect the supplied AC adapter or AC adapter cable to the player’s power jack. When placing
the adapter cable, make sure it can not get damaged or be subject to pressure. To reduce the risk of electric shock, unplug the
adapter rst before cleaning it. Never connect the adapter to the player in a humid or dusty area. Do not replace the adapter or
cable’s wire or connector.
Radio Interference
- If not properly shielded, almost all electronic devices will get radio interference. Under some conditions, your player might
get interference.
- The design of this player has followed the FCC/CE standard, and has followed the following rules:
(1) This player may not cause harmful interference;
(2) This player could accept some interference received including interference that may cause undesired operation.
5
GB
Repair
If the player has a problem, you should take it to an appointed repair center and let the specialists do the repair, never repair
the player yourself, you might damage the player or endanger yourself or your data.
Others
When using this player, please do not let the player come into contact with water or other liquid, if water is accidentally spilled
on the player, please use a dry cloth to absorb the spillage.
Electronic products are vulnerable, when using please avoid shaking or hitting the player, and do not press the buttons too
hard.
• Do not let the player come into contact with water or other liquid.
• Do not disassemble the player, repair the player or change the design of the player, any damage done will not be included
in the repair policy.
• Do not press the buttons of the player too hard.
• Avoid hitting the player with hard object, avoid shaking the player, and stay away from magnetic elds.
• During electrostatic discharge and the strong electromagnetic eld, the product will malfunction, then unplug the power
cable and the product will return to normal performance next time it is powered on.
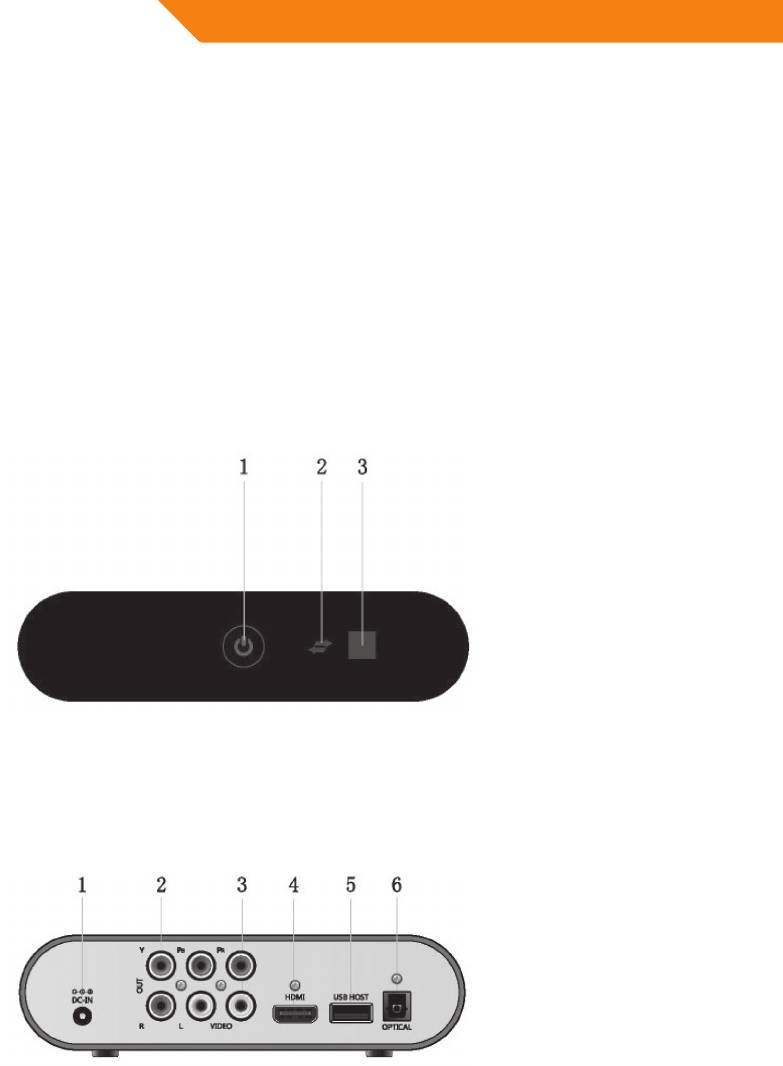
Production Introduction
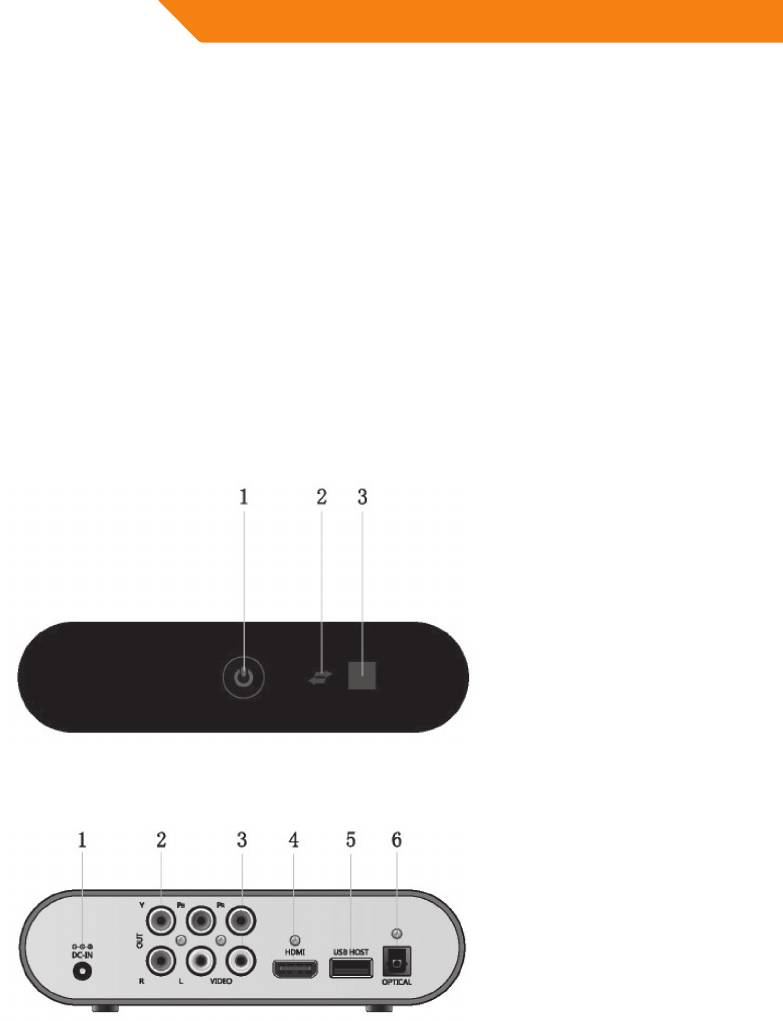
Front Panel
1. Power button
2. USB indicator
3. IR receiver
Back Panel
1. DC in jack
2. Y/Pb/Pr OUT jack
3.A/V OUT jack
4. HDMI jack
5. USB HOST port
6. S/PDIF OPTICAL jack
6
GB
Connecting to a TV
TV Connect
The below connection method can help you to enjoy the high quality movie, music and photo.
The standard connection uses the AV cable.
The best connection uses the HDMI cable.
Note: HDMI and Toslink (Optical) cables are sold separately.
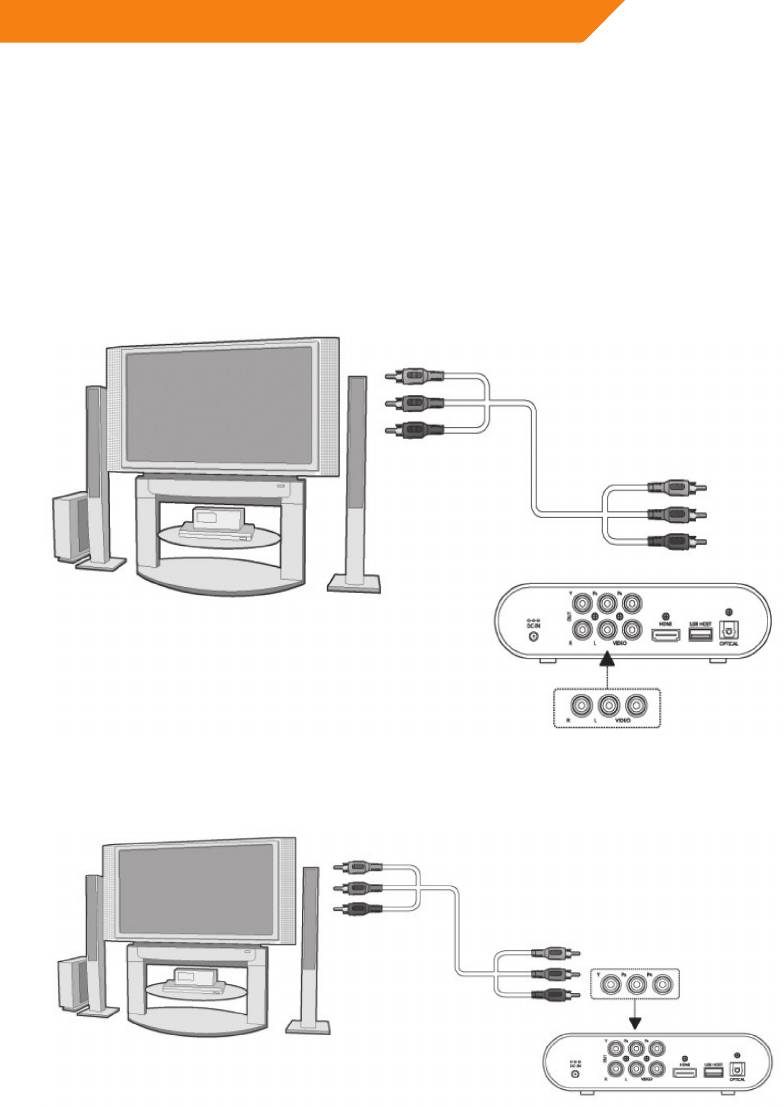
A/V OUT (Standard Denition)
(1) Follow the picture and plug in the 3 color connector to the player’s A/V OUT jack;
(2) Follow the picture and plug in the 3 color connector to the TV’s A/V IN jack.
(3) Select the appropriate TV input source.
Y/Pb/Pr Component OUT
(1) Follow the picture and plug in the 3 color connector to the player’s Y/Pb/Pr jack;
(2) Follow the picture and plug in the 3 color connector to the TV’s Y/Pb/Pr jack.
Y/Pb/Pr cable connection only output video, you will need AV cable or S/PDIF (coaxial or optical) cable for audio output.
7

GB
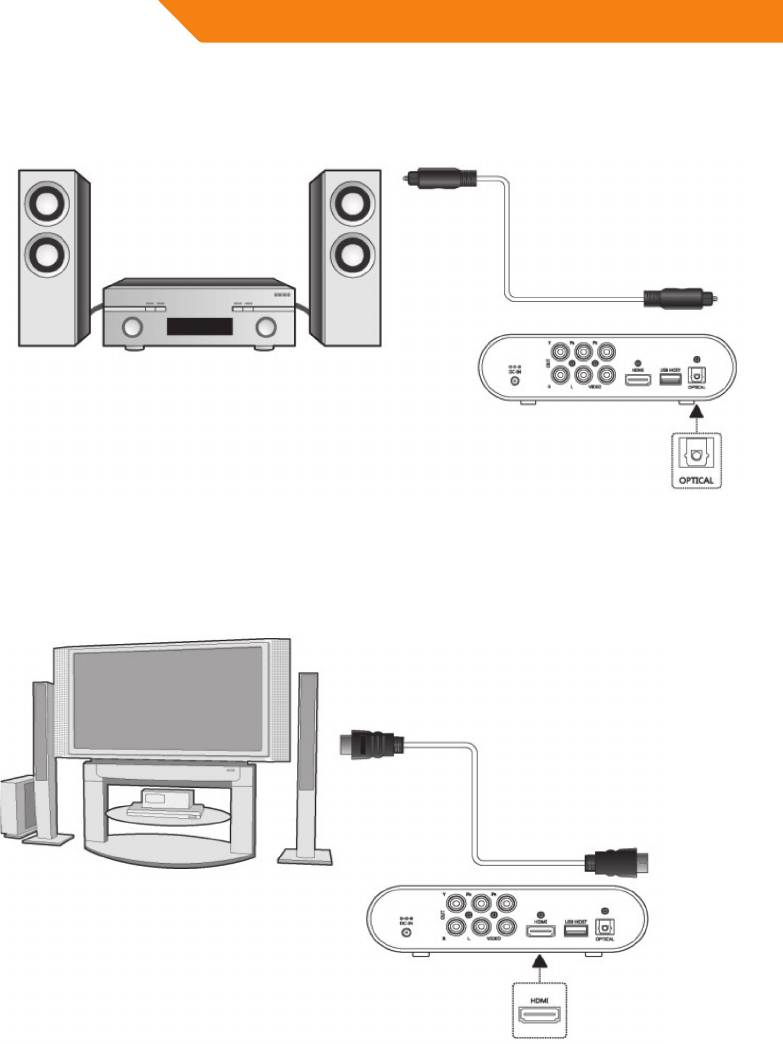
Follow the Audio Connection method as below:
First method: Use the audio output from the A/V OUT jack;
Second method: Use the audio output from the S/PDIF Optical jack.
In this way, you can also enjoy videos, music
and photos in the player on TV.
HDMI OUT (High Denition)
The HDMI connection can provide video quality resolution up to 1080p.
(1) Follow the picture and plug one connector on your HDMI cable to the player’s HDMI jack;
(2) Follow the picture and plug the other connector on your HDMI cable to the TV’s HDMI jack.
(3) Select the appropriate TV input source.
8
GB
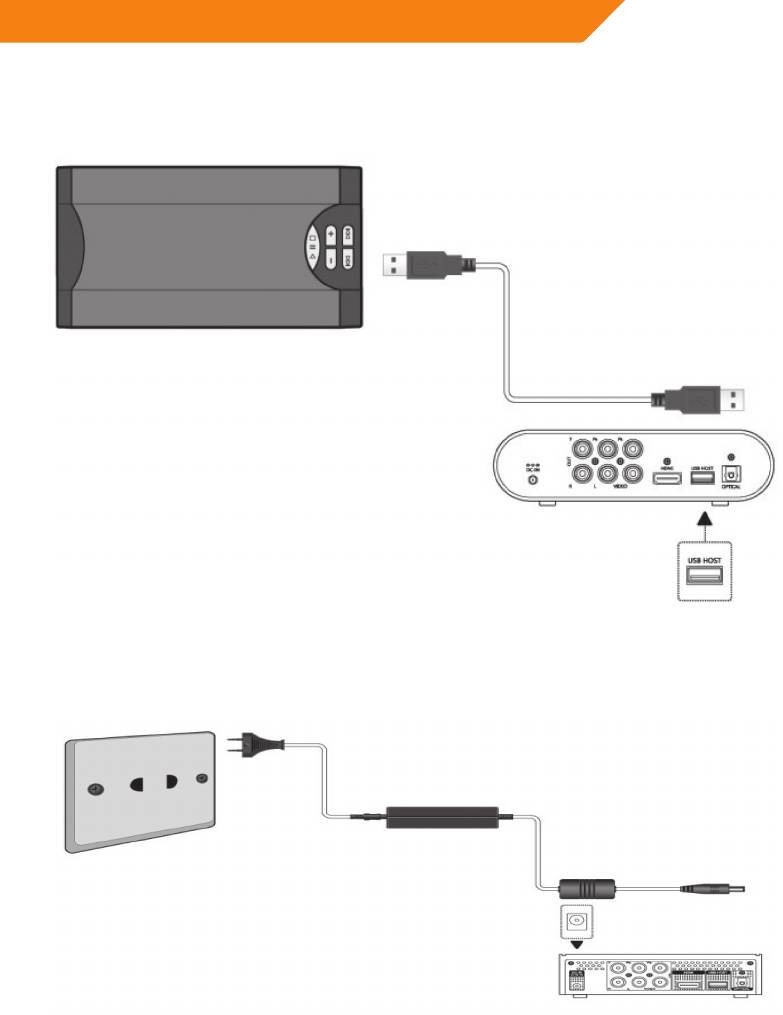
Connecting a USB Device
(1) Make sure the player is powered on;
(2) Plug in the USB stick or USB HDD etc. to the USB HOST port of this player.
In this way, you can browse contents on the USB device.
Connecting the Power Supply
The Movie cube installation procedure is outlined below:
(1) Follow the picture and connect the AC adaptor to the player’s DC IN jack;
(2) Follow the picture and plug in the AC adaptor to the power outlet.
In this way, you can browse contents on the memory card.
9
GB
Power on/o
Power on
After connecting the power supply cord and turning on the POWER switch, the player will soon enter the main page, and the
POWER indicator on the front panel will turn blue.
Power o
When the system is running, press the POWER button on the front panel or remote control, the player will be shut down.
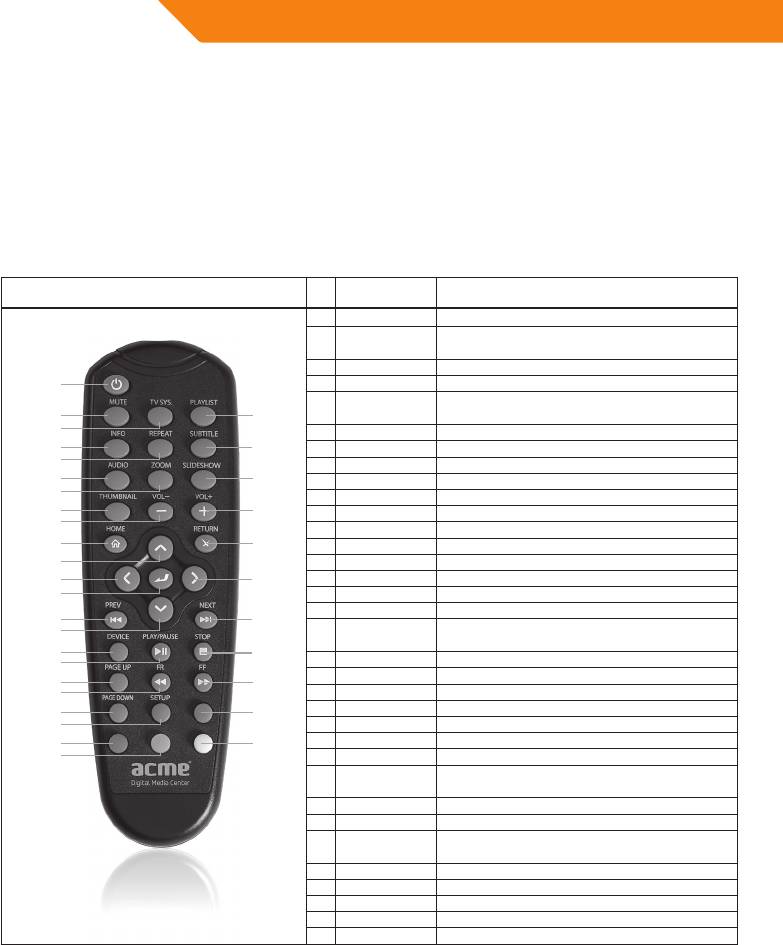
Remote control
Picture No. Button Function
1 POWER Press to turn o the power
Press to mute audio output, and press again to
2 MUTE
resume.
3 TV SYS Press to change aspect ratio
1
4 INFO Press to get the multimedia information
Press to switch the play mode among - one, all
5 REPEAT
2
34
and Shue.
3
6 AUDIO Press to select an audio track.
4
33
7 ZOOM Press to zoom in/out the image.
5
8 THUMBNAIL Press to play the pictures with 8 thumbnail
6
32
9 VOL- Press to decrease the volume.
7
10 HOME Press to view the main page.
8
31
11 UP Press the arrow buttons to select menu options.
9
12 LEFT Press the arrow buttons to select menu options.
10
30
13 ENTER Press to select options in menus.
11
14 PREV Press to go to the previous le
12
29
15 DOWN Press the arrow buttons to select menu options.
13
16 DEVICE Press to view the device page.
17 PLAY/PAUSE Press to play/pause the playback of a title.
14
28
15
Press to fast rewind the current playback.
18 FR
Press repeatedly to select speeds.
16
27
17
19 PAGE - UP Press to page up
18
20 PAGE - DOWN Press to page down
26
19
21 SETUP Press to view the setup page.
20
22 RED Special functions according to dierent app
25
21
23 GREEN Special functions according to dierent app
22
24
24 YELLOW Special functions according to dierent app
23
25 BLUE Special functions according to dierent app
Press to fast forward the current playback.
26 FF
Press repeatedly to select speeds.
27 STOP Press to stop playback.
28 NEXT Press to go to the next le
Press to move the highlight right while navigating
29 RIGHT
menus.
30 RETURN Press to return to previous page
31 VOL+ Press to increase the volume.
32 SLIDESHOW Press to auto play the pictures one by one
33 SUBTITLE Press to activate the subtitle list menu if available.
34 PLAYLIST Press to enter playlist app
10

GB
Operating the HD Media player
Main Page
There are six options, including MOVIE, MUSIC, PHOTO, FILE, SETUP
and DEVICE. Use the LEFT/RIGHT navigational buttons to select a
menu. Press ENTER to conrm. Press RETURN to cancel and display the
previous menu screen.
Use the LEFT/RIGHT navigational buttons to select an option, and then
press ENTER.
Setup Page
The Setup menu allows you to personalize and congure the preferences for your player.
Use the UP/DOWN navigaonal buons to select an opon, and LEFT/RIGHT to choose to change.
System Settings:
Use the UP/DOWN navigational buttons to select an option, and LEFT/RIGHT to switch options/changing relative functions.
English/Lithuanian/Latvian/Estonian/French/
OSD LANGUAGE
Russian/Germanian/Dutch/Spanish/Italian/
16:9 Wide Screen/ 4:3Pan&Scan /4:3 FULL/
Aspect Rate
4:3 LetterBox/AUTO
TV Format PAL / NTSC
HDMI 480p/720p/1080i/1080p/
SPDIF HDMI Raw Data/SPDIF Raw Data/pcm/o
Preview On/o
rmware version Display software version
Movie Settings:
Use the UP/DOWN navigational buttons to select an option, and
LEFT/RIGHT to switch options/changing relative functions.
Subtitle Specic Normal /BIG/ Small
Subtitle BG Transparent / Gray /Yellow Green /White
Subtitle FontColor Red/Bule/Green
Start Resume On/o
Photo Settings:
Use the UP/DOWN navigational buttons to select an option, and LEFT/
RIGHT to switch options/changing relative functions.
Slideshow Time 2S/3S/5S/7S
11
GB
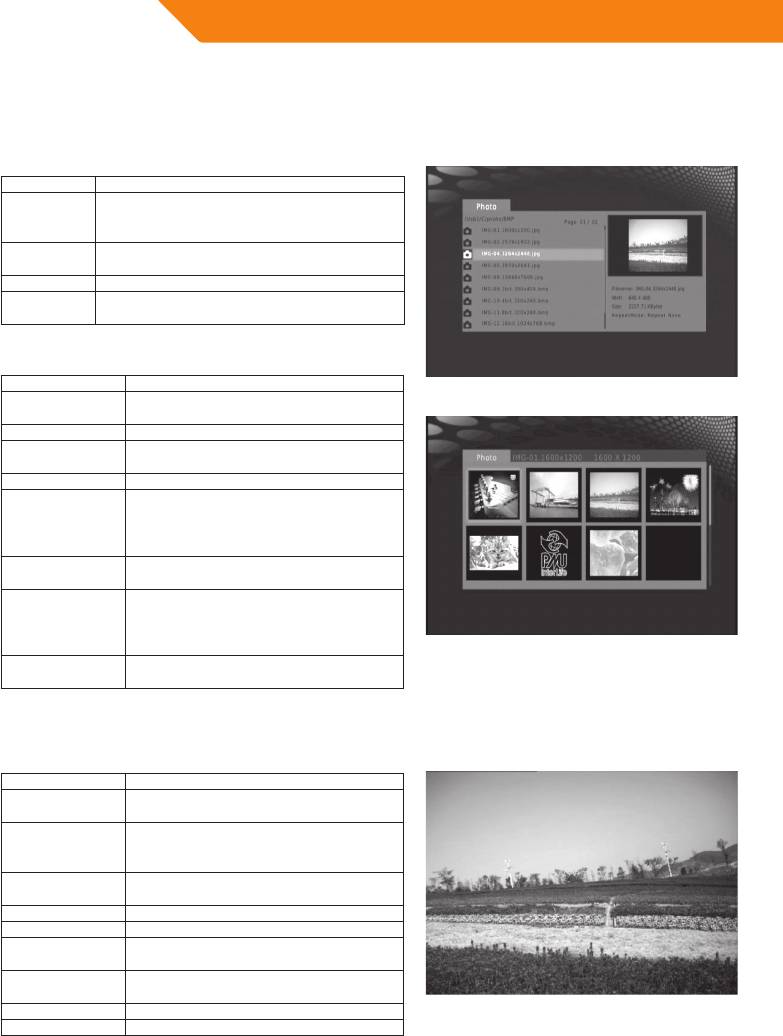
Photo
Only supported picture les can be showed on this page
Background Music:
Keys Functions
Press once to playback the background music,
PLAYLIST
and press again to stop it(only available when
there are les in the PLAYLIST)
Playback automatic the pictures one by one
SLIDESHOW
according to the SLIDE TIME
THUMBNAIL Press to enter the 8 pictures page
Switch signals’ resolution among 480P/576P,
TV SYS
720P, 1080I and 1080P
Thumbnail Mode:
Keys Functions
To ZOOM in/out the current playing pictures
ZOOM
at 2X,4X,8X,1X,1/8X,1/4X,1/2X,1X
PLAY/ENTER playback in 8 pictures preview page
In current playing pictures, UP: 90, 180, 270,
Up/Down
360, DOWN, Reversal
PAGE UP / DOWN Do paging in 8 pictures preview page
To stop the current playback le and
return to 8 pictures preview page; and in 8
RETURN
pictures preview page, press it to return to
upper directory.
Open/Close the le information of current
INFO
playback le.
Press once to playback the background
music, and press again to stop it(only
PLAYLIST
available when there are les in the
PLAYLIST)
In 8 pictures preview page, move to the
PREVIOUS/NEXT
previous/next 8 pictures
Slide Show
This function can be fully settled in SETUP menu.
Keys Functions
Press to set repeat option: One, All, Shue
REPEAT
and cancel repeat function.
Press once to initialize the background
PLAYLIST
music, and press again to stop it(only works
when there are les in the PLAYLIST)
Open/Close le basic information during
INFO
full screen playback mode.
RETURN Return to File page
PREVIOUS/NEXT Playback the previous/next picture
To ZOOM in/out the current playing
ZOOM
pictures at 2X,4X,8X,1X,1/8X,1/4X,1/2X,1X
In current playing pictures, UP: 90, 180, 270,
Up/Down
360, DOWN: Reversal
Play/Pause Play/Pause
Stop Stop playback and return to File page
12
GB
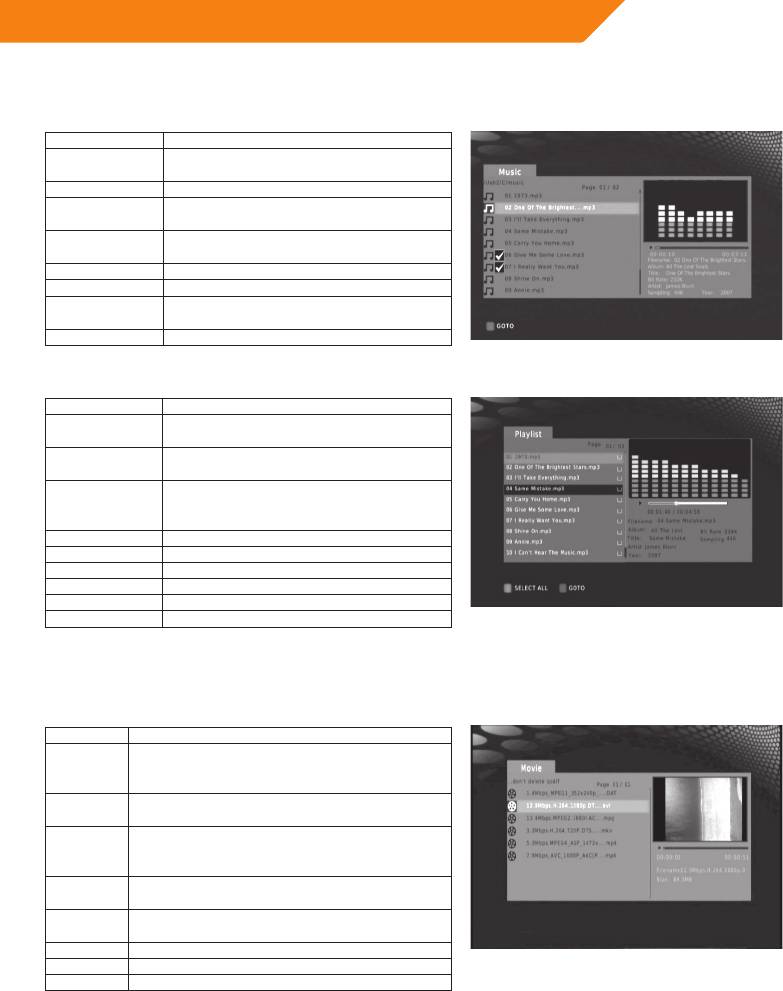
Music
Only supported picture music le can be showed on this page
Keys Functions
RIGHT Mark the supported audio le to be added
in playlist
ENTER Playback the highlight le
REPEAT Press to set repeat mode: One, All, Shue
and cancel repeat function
RETURN Return to the upper directory, and the
playback le will not be stopped
Play/Pause Play/Pause
Stop Stop playback
FF/FR Fast forward/fast reward at
2X\4X\8X\16X\32X
PREVIOUS/NEXT Play PREVIOUS/NEXT
Playlist
Keys Functions
Mark the media le in playlist to delete when
RIGHT
exit the playlist feature
Press to set repeat mode: One, All, Shue
REPEAT
and cancel repeat function
Return to the previous menu, and if any le
RETURN
in the playlist is marked, a dialogue would be
pop-up to ask whether to delete it or not.
Red Select all/Inverse/Clear
Blue Select to go to the selected time point
Play/Pause Play/Pause
Stop Stop playback
FF/FR Fast forward/fast reward at 2X\4X\8X\16X\32X
PREVIOUS/NEXT PREVIOUS/NEXT
Movie
File playback in preview window
Keys Functions
Press once to play in preview window, twice to play
Enter
in full screen(if preview is settled to OFF in setup,
then press to full screen mode directly)
Play/
Full screen playback/ pause
pause
Press once to mark the start point of the repeated
Green
clip, press again to mark the end point of the
repeated clip.
Red Press to switch between preview playback and full
screen playback
Tv sys Switch the signal resolution among: 480P/576P,
720P, 1080I, 1080P, etc.
Blue Press to go to the pointed time point
Stop Stop
FF/FR Fast forward/fast reward at 2X\4X\8X\16X\32X
Now you can play the movie from the settled Start Point to End Point repeatly
13
GB
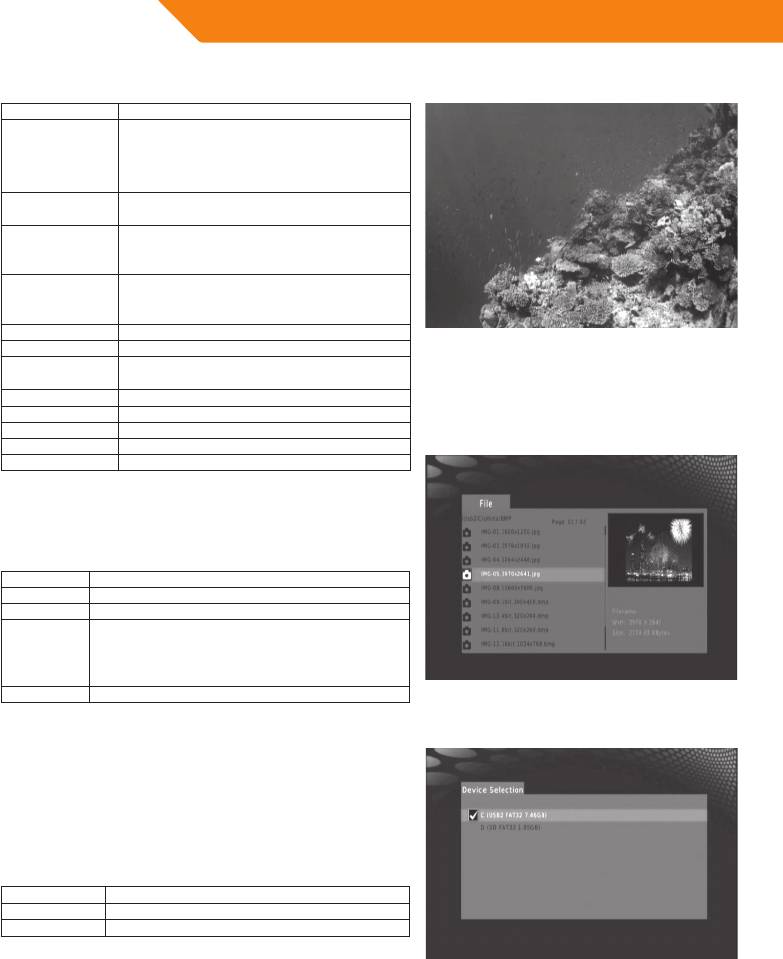
Full screen playback page:
Keys Functions
Press once to display the subtitle options,
twice to display subtitle individuation
Subtitle
selection bar, in which font(grounding,
boldface,etc), type size, location can be settled
Press to display/ close video information, as
INFO
movie resolution, bit stream, etc
Press once to play in preview window, twice to
REPEAT
play in full screen(if preview is settled to OFF in
setup, then press to full screen mode directly)
Press once to mark the start point of the
Green
repeated clip, press again to mark the end
point of the repeated clip.
RETURN Stop playback and return to le page
Stop Stop
Press to switch between preview playback and
Red
full screen playback
Zoom Press to ZOOM in/out 2X, 4X, 8X, 1/2X, 1X
PREVIOUS/NEXT PREVIOUS/NEXT
FF/FR Fast forward/fast reward at 2X\4X\8X\16X\32X
Blue Press to go to the pointed time point
Audio Changing the audio track
File
Keys Functions
Play/Pause Play/Pause playback
Stop Stop
Subtitle Press once to display the subtitle options, twice
to display subtitle individuation selection bar, in
which font(grounding,etc), type size, location can
be settled
Blue Press to go to the pointed time point
Device
You can decide which portable device be chosen as default device,
and the player also supports loading the content in one portable
multi-media storage simultaneously
You can quickly switch to this page by pressing the DEVICE button on
remote control
Keys Functions
up/down Move cursor in device list
enter Choose the device with cursor
14

GB
Firmware Upgrade
The rmware is the operation system (OS) installed on the device.
Firmware upgrade can bring new features, improvements and bug
xes.
To upgrade your rmware, please according to the follows:
• Prepare the USB Pen Drive directory of our USB Pen Drive.
• Connect the USB Pen Drive
• Plug the USB Pen Drive into one of the USB HOST ports of the
player.
• Select the rmware in FILE option, then press the ENTER button,
a blue upgrade page will appear on the TV screen.
Note: Do not turn o the power during upgrading. The USB Pen Drive is not allowed to be unplugged during upgrading.
Appendixes
Product Specications
I/O INTERFACES SUPORTED:
• USB 2.0 HOST port (compatible to USB 1.1)
• Composite (CVBS) A/V jack
• Component Y/Pb/Pr jack
• HDMI V1.2 interface
• S/PDIF optical jack
FILE SYSTEM SURPORTED:
• FAT32/NTFS
CONTENT FORMATS SUPPORTED:
• AVI/MKV/TS/MPG/MP4/MOV/VOB /DAT /M2TS/DIVX/TP/TRP, resolution up to 1080p
• MP3 /WMA
• HD JPEG/BMP/PNG, with unlimited resolution
VIDEO CODECS SURPORTED:
• H.264
• HD MPEG-1/2/4
• Divx
• Xvid
AUDIO CODECS SURPORTED:
• MP2/3, WMA
SUBTITLE FORMATS SURPORTED:
• SRT,SSA,SUB
Copyrights and Trademarks
Copyrights
All rights reserved. No part of this manual may be reproduced, or transmitted in any form or by any means, whether by
electronically or mechanically, without the express written permission from the copyright holder.
Copyrightedmaterials,suchassoftware,musicles,ormovies,areprotectedbylocallaw,andmaynotbeillegally
copied or used without permission from the copyright owner.
Trademarks
Microsoft and Windows are registered trademarks of Microsoft Corporation.
All other trademarks are property of their respective holders.
15

LT
ACME skaitmeninės namų kino teatro
sistemos naudojimo instrukcija
TURINYS
ĮŽANGA .......................................................................................................................17
Įvadas .............................................................................................................................17
Pakuotės sudėtis ......................................................................................................17
Įspėjimai ........................................................................................................................17
Atsargumo priemonės naudojant ..........................................................17
Maitinimas .......................................................................................................17
Radijo trikdžiai ...............................................................................................17
Taisymas ...........................................................................................................18
Kitos priemonės.............................................................................................18
Apie prietaisą ..............................................................................................................18
Priekinis skydelis ...........................................................................................18
Užpakalinis skydelis .....................................................................................18
Prijungimas prie televizoriaus ...........................................................................19
Prijungimas prie televizoriaus ..................................................................19
USB prietaiso prijungimas .........................................................................21
Maitinimo įjungimas ....................................................................................21
Įjungimas ir išjungimas ..........................................................................................22
Įjungimas .........................................................................................................22
Išjungimas .......................................................................................................22
Nuotolinio valdymo pultas ..................................................................................22
DIDELĖS GEBOS MEDIJOS LEISTUVO NAUDOJIMAS ............23
Pagrindinis puslapis ................................................................................................23
Sąrankos puslapis .....................................................................................................24
Nuotraukos ..................................................................................................................25
Muzika ............................................................................................................................25
Grojaraštis ........................................................................................................25
Filmai .............................................................................................................................25
FAILAI .............................................................................................................................26
PRIETAISAI ....................................................................................................................26
MIKROPROGRAMOS PLĖTOJIMAS .......................................................27
Priedai ............................................................................................................................27
Gaminio specikacijos ...........................................................................................27
Autoriaus teisės ir prekių ženklai......................................................................27
16

LT
Įžanga
Įvadas
Brangus vartotojau!
Dėkojame, kad įsigijote ACME skaitmeninę namų kino sistemą. Šiuo skaitmeniniu laikotarpiu šis gaminys yra puikus pagalbininkas
rengiant pramogas namuose. Naudodamiesi šiuo puikaus dizaino prietaisu galite žiūrėti lmus, klausytis muzikos ir žiūrėti
nuotraukas, kuriose užksuotos svarbios akimirkos.
Leistuvo funkcijos
Filmų peržiūra - Palaiko AVI, MP4, MOV, M2TS, MKV, TS, TRP, MPG, VOB formatus.
Muzikos
- Palaiko MP3, WMA formatus.
perklausa
Nuotraukų
- Palaiko skaitmeninių fotoaparatų JPEG, BMP, JPEG / PNG formato failus.
peržiūra
USB - Palaiko USB 2.0 prievadus.
Didelės gebos multimedijos sąsaja aukščiausios kokybės vaizdas ir garsas perduodamas tik vienu
HDMI -
kabeliu, taip užtikrinama paprasta kabelių sistema ir aukštos kokybės namų kino teatro funkcija.
Pakuotės sudėtis
• ACMEdidelėsgebosleistuvasDP-01
• A/Vkabelis
• Nuotoliniovaldymopultas
• 2nuotoliniovaldymopultobaterijos
• AC/DCadapteris
• Maitinimolaidas
• Naudojimoinstrukcija(spausdinta)
Pastaba!
Pakuotės turinys gali skirtis nuo šioje instrukcijoje pateikiamo pakuotės turinio sąrašo.
Įspėjimai
Leistuvas suprojektuotas ir pagamintas atsižvelgiant į jūsų saugą. Kad naudotumėtės grotuvu saugiai ir efektyviai, prieš
naudodamiesi perskaitykite toliau pateikiamą instrukciją.
Atsargumo priemonės naudojant
Nemodikuokite leistuvo. Jei naudojamas komercinis standusis diskas, aplinkos temperatūra turi būti nuo + 5 °C iki + 35 °C.
Maitinimas
Leistuvo maitinimo įtampa – DC 5 V.
Naudodami šį leistuvą į leistuvo maitinimo lizdą įjunkite pridėtą AC adapterį arba AC adapterio kabelį. Jungdami adapterio
kabelį įsitikinkite, kad jis nebus pažeistas arba slegiamas. Norėdami sumažinti elektros šoko riziką, prieš valydami pirma
atjunkite adapterį. Niekada nejunkite adapterio prie leistuvo drėgnoje arba dulkėtoje vietoje. Nekeiskite adapterio kabelio
laido arba kištuko.
Radijo trikdžiai
- Netinkamai apsaugoti beveik visi elektroniniai prietaisai gauna radijo trikdžių. Tam tikromis sąlygomis jūsų leistuvas taip pat
gali gauti trikdžių.
- Šio leistuvo dizainas atitinka FRK / CE standartą ir šias taisykles:
(1) šis leistuvas negali kelti žalingų trikdžių;
(2) šis prietaisas gali priimti bet kokius gaunamus trikdžius, įskaitant trikdžius, galinčius sukelti nepageidaujamas operacijas.
17
LT
Taisymas
Jei grotuvas sugenda, reikia jį nugabenti į paskirtą remonto centrą ir pavesti taisymo darbus specialistams. Niekada netaisykite
leistuvo patys, nes galite pažeisti leistuvą ir rizikuoti savo sveikata bei prietaise esančia informacija.
Kitos priemonės
Saugokite leistuvą nuo kontakto su vandeniu ar kitokiu skysčiu. Jei ant leistuvo netyčia išpilama vandens, sugerkite vandenį
sausa šluoste.
Elektroniniai gaminiai yra pažeidžiami, todėl naudodami nekratykite ir netrankykite leistuvo ir per stipriai nespauskite
mygtukų.
• Neleiskite, kad ant grotuvo patektų vandens ar kito skysčio.
• Neardykite, netaisykite ir nekeiskite leistuvo dizaino, nes bet kokia tokių veiksmų metu žala nebus įtraukta į taisymo politiką.
• Nespauskite leistuvo mygtukų per stipriai.
• Netrankykite leistuvo sunkiais objektais, nekratykite jo ir nelaikykite arti magnetinių laukų.
• Elektrostatinės iškrovos ir stiprių elektromagnetinių laukų atveju gaminys blogai veiks. Tokiu atveju atjunkite maitinimo
kabelį, ir prietaisas kitą kartą įjungtas veiks normaliai.
Apie prietaisą
Priekinis skydelis
1. Maitinimo mygtukas
2. USB indikatorius
3. Infraraudonųjų spindulių imtuvas
Užpakalinis skydelis
1. DC lizdas
2. Y /Pb / Pr išvesties lizdas
3. A / V išvesties lizdas
4. HDMI lizdas
5. USB prievadas
6. S / PDIF optinis lizdas
18

LT
Prijungimas prie televizoriaus
Prijungimas prie televizoriaus
Prijungę toliau pateikiamais jungimo būdais galėsite mėgautis aukštos kokybės lmais, muzika ir nuotraukomis.
Standartinei jungčiai naudojamas AV kabelis.
Aukščiausios kokybės jungčiai naudojamas HDMI kabelis.
Pastaba! HDMI ir „Toslink“ (optinis) kabeliai parduodami atskirai.
A / V išvestis (standartinis ryškumas)
(1) Pagal paveikslą prijunkite 3 spalvų jungtį prie leistuvo A / V išvesties lizdo.
(2) Pagal paveikslą prijunkite 3 spalvų jungtį prie televizoriaus A / V įvesties lizdo.
(3) Pasirinkite tinkamą televizoriaus įvesties šaltinį.
Y / Pb / Pr komponento išvestis
(1) Pagal paveikslą prijunkite 3 spalvų jungtį prie leistuvo Y / Pb / Pr lizdo.
(2) Pagal paveikslą prijunkite 3 spalvų jungtį prie televizoriaus Y / Pb / Pr lizdo.
Y / Pb / Pr kabeliu jungiama tik vaizdo išvestis, garso išvesčiai reikia AV kabelio arba S / PDIF (bendraašio arba optinio) kabelio.
19
LT
Garso jungties metodas
Pirmas metodas: naudokite garso išvestį iš A / V išvesties lizdo.
Antras metodas: naudokite garso išvestį iš S / PDIF optinio lizdo.
Tokiu būdu taip pat galite mėgautis lmais, muzika ir
nuotraukomis, esančiais leistuve, per televizorių.
HDMI išvestis (didelė geba)
HDMI jungtimi galima padidinti vaizdo kokybę iki 1080 p.
(1) Pagal paveikslą prijunkite vieną HDMI kabelio jungtį prie leistuvo HDMI lizdo.
(2) Pagal paveikslą prijunkite kitą HDMI kabelio jungtį prie televizoriaus HDMI lizdo.
(3) Pasirinkite tinkamą televizoriaus įvesties šaltinį.
20


