Acme PLB102B: инструкция
Раздел: Аксессуары для фото- и видеотехники
Тип:
Инструкция к Acme PLB102B
Оглавление
- Распаковывание Важная информация по технике безопасности
- ВНИМАНИЕ
- Список деталей поставки
- Крепление кронштейнов к телевизору с плоской задней стенкой
- Крепление кронштейнов монитора к телевизору с выпуклой задней стенкой
- Крепление стеновой пластины к стене
- Выберите положение установки на планшете или сделайте наклон на 5 градусов
- Крепление монитора к стенке крепления и установка запорной планки
Model: PLB-102B
Universal
Wall Bracket
www.acme.eu
www.acme.eu


GB 4 Installation Instruction 100 Warranty card
LT 12 Montavimo instrukcija 101 Garantinis lapas
LV 20 Uzstādīšanas instrukcija 102 Garantijas lapa
EE 28 Paigaldusjuhend 103 Garantiileht
PL 36 Instrukcja instalacji 104 Karta gwarancyjna
DE 44 Installationsanleitung 105 Garantieblatt
FI 52 Asennusohjeet 106 Takuulomake
SE 60 Installation Instruktion 107 Garantisedel
RO 68 Instrucţiuni de montare 108 Fişa de garanţie
BG 76 Инструкции за монтаж 109 Гаранционен лист
RU 84 Инструкция по установке 110 Гарантийный талон
UA 92 Інструкція по установці 111 Гарантійний лист
3

GB
Unpacking instructions
• Carefully open the carton, remove contents and lay out on cardboard
or other protective surface to avoid damage.
• Check package contents against the Supplied Parts List in the next
page to assure that all components were received undamaged. Do
not use damaged or defective parts.
• Carefully read all instructions before attempting installation.
Important safety information
Install and operate this device with care. Please read this instruction
before beginning the installation, and carefully follow all instructions
contained herein. Use proper safety equipment during installation.
Please call a qualied installation contractor for help if you:
• If you don’t understand these directions or have any doubts about the
safety of the installation.
• If you are uncertain about the nature of your wall, consult a qualied
installation contractor.
Do not use this product for any purpose or in any conguration not
explicitly specied in this instruction. We hereby disclaim any and all
liability for injury or damage arising from incorrect assembly, incorrect
mounting, or incorrect use of this product.
4

GB
This TV mount must be securely attached to the
vertical wall. If the mount is not properly installed it
may fall, resulting in possible injury and/or damage.
WARNING
•3/8”(10mm)
•5/32"(4mm) Drill Bit
• Wrench or Socket Set
Tools Required
Masonry Bit
•Screwdriver
• Carpenter’s Level
•Stud Finder
Note: The mounting components and hardware supplied in this package
are not designed for installations to walls with steel studs or to cinder block
walls. If the hardware you need for your installation is not included, please
consult your local hardware store for proper mounting hardware for the
application.
5
GB
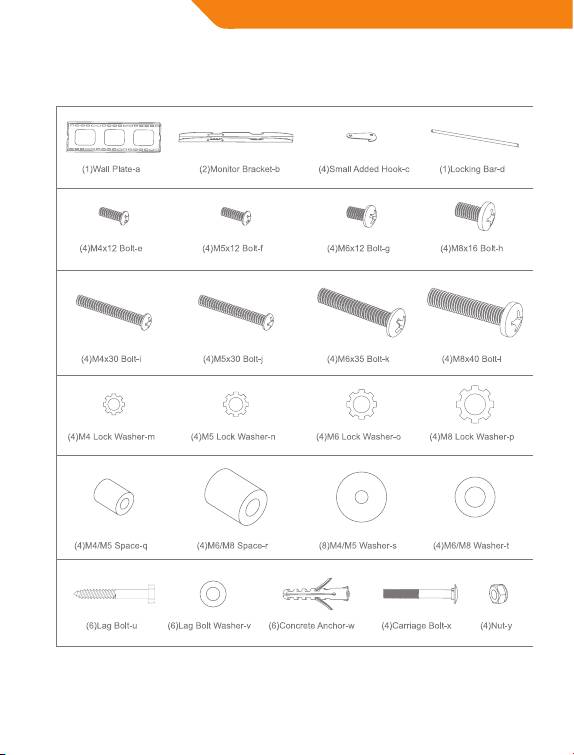
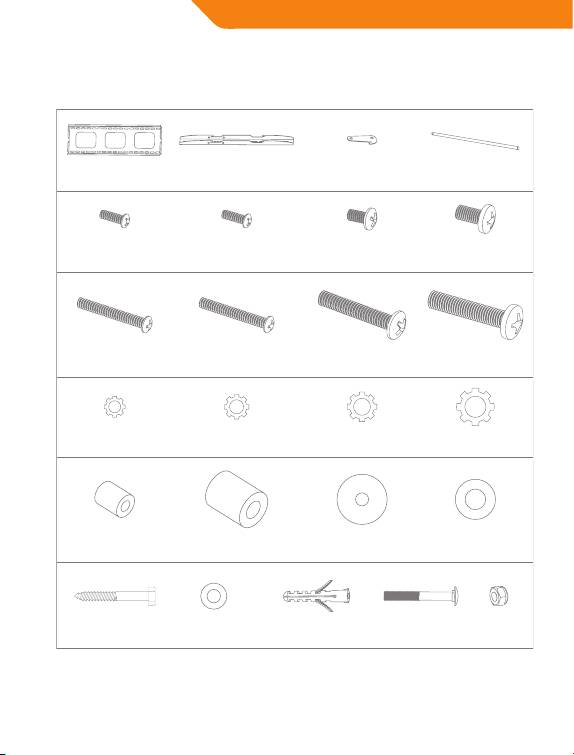
Supplied parts list
6
GB
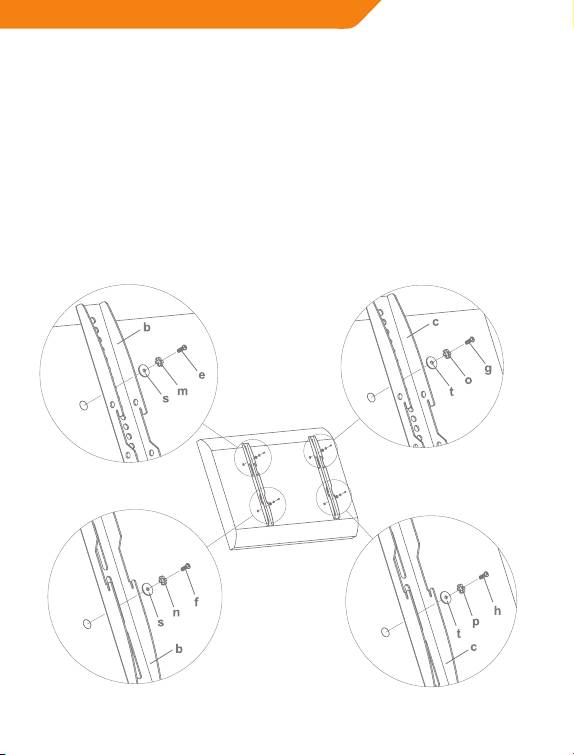
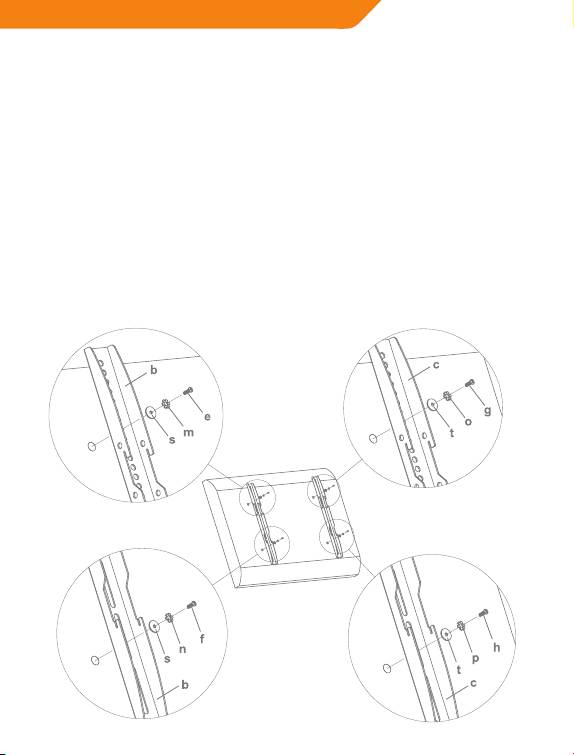
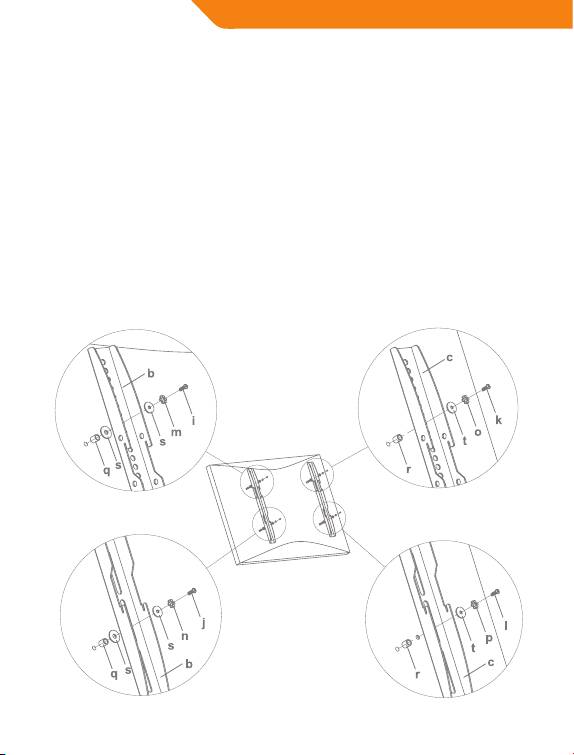
Mounting the monitor
brackets to a TV with flat back
First of all, make sure the diameter of the Bolt(e,f,g,h) your TV requires.
Once you have determined the correct diameter, please see the relative
diagram as below. You will thread the Bolt into the TV using the correct
Lock Washer(m,n,o,p) and Washer(s,t). Please make sure the Monitor
Brackets(b,c) are vertically centered and level with each other.
M4 Diameter Bolt
M6 Diameter Bolt
Diagram 1A
M5 Diameter Bolt M8 Diameter Bolt
7
GB
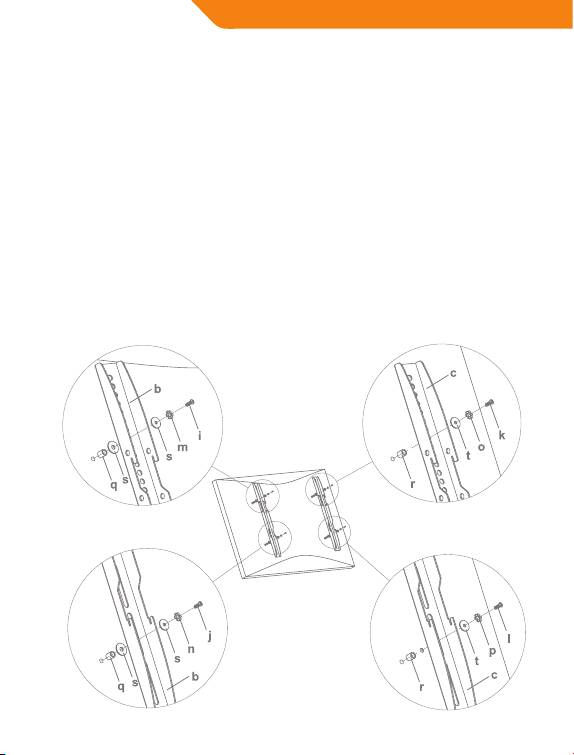
Mounting the monitor
brackets to a TV with curved
back
First of all, make sure the diameter of the Bolt(i,j,k,l) your TV requires.
Once you have determined the correct diameter, please see the relative
diagram as below. You will thread the Bolt into the TV using the correct
Lock Washer(m,n,o,p), Washer(s,t) and spacer(q,r). For the M4 or M5
diameter bolt, you will need another M4/M5 Washer between the
Monitor Bracket and the Spacer. Please make sure the Monitor Brackets
are vertically centered and level with each other.
M4 Diameter Bolt
M6 Diameter Bolt
Diagram 1B
M8 Diameter Bolt
M5 Diameter Bolt
8
GB
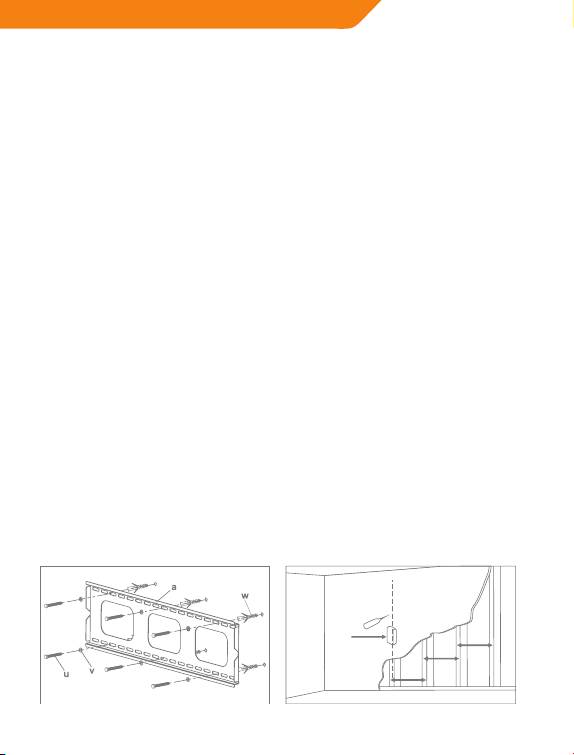
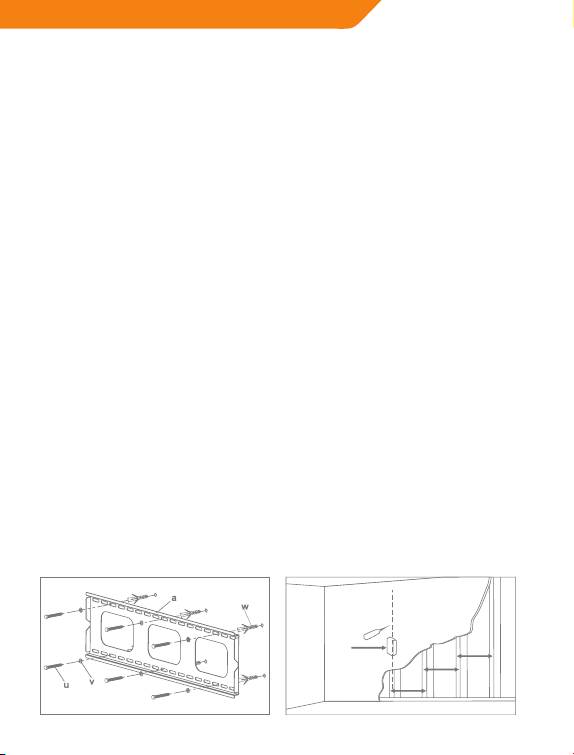
Mounting the wall plate
to the wall
Brick, Solid Concrete and Concrete Block mounting:
Use the Wall Plate(a) as a template to mark 6 hole locations on the wall.
Three in the top row of slots and three more in the bottom row. Make sure
these holes are level and there is at least 6”(150mm) distance between
any two holes. Pre-Drill these holes with a 3/8”(10mm) masonry bit to
at least 2.4”(60mm) in depth. Insert a Concrete Anchor(w) into each of
these holes. Make sure the anchor is seated completely ush with the
concrete surface even if there is a layer of drywall or other material in
front. Attach the Wall Plate to the wall using 6pcs Lag Bolts(u) and 6pcs
Lag Bolt Washers(v), shown in Diagram 2A.
Wood Stud mounting:
The Wall Plate(a) must be mounted to two wood studs at least
16”(406mm) apart. Use a stud nder to locate two adjacent studs. It is a
good idea to verify where the studs are located with an awl or thin nail
shown in Diagram 2B. Pre-drill a 2.4”(60mm) deep hole at the desired
height in each stud using a 5/32”(4mm) drill bit. Make sure these holes
are in the center area of the studs and level with each other. Use the Wall
Plate as a template to mark the location of the second hole in each stud.
Drill 2.4”(60mm) deep holes using the 5/32”(4mm) drill bit in the marked
locations. Attach the Wall Plate to the wall using the 4pcs Lag Bolts(u)
and 4pcs Lag Bolt Washers(v).
Diagram 2A Diagram 2B
16 inch
Stud Finder
16 inch
16 inch
9
GB
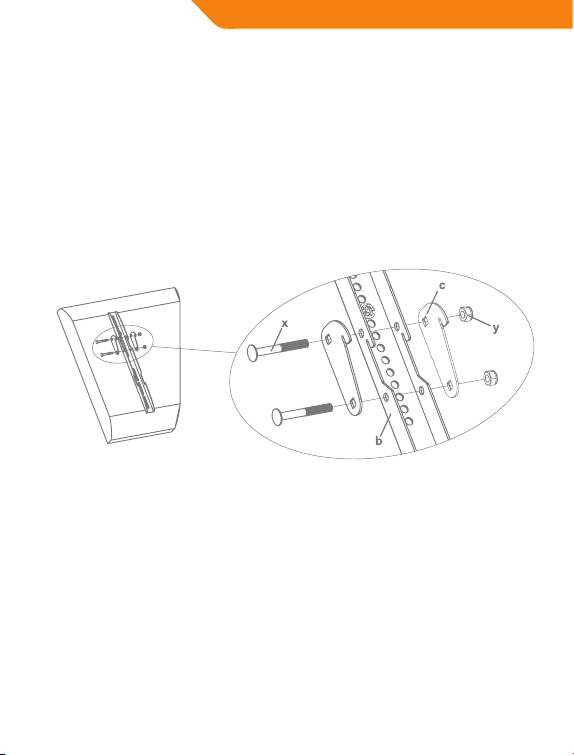
Choose Mounting Position
in plat or minus 5 degree
You can mount your television in either of two positions: at or at a
minus 5 degree downward tilt. To mount the television at to the wall
use only the Monitor Brackets(b). To mount the television in the minus 5
degree tilt position you must rst add two Small Added Hook(d) to each
Monitor Bracket with two Carriage Bolts(x) and two Nuts(y) as shown in
Diagram 3.
Diagram 3
10

GB
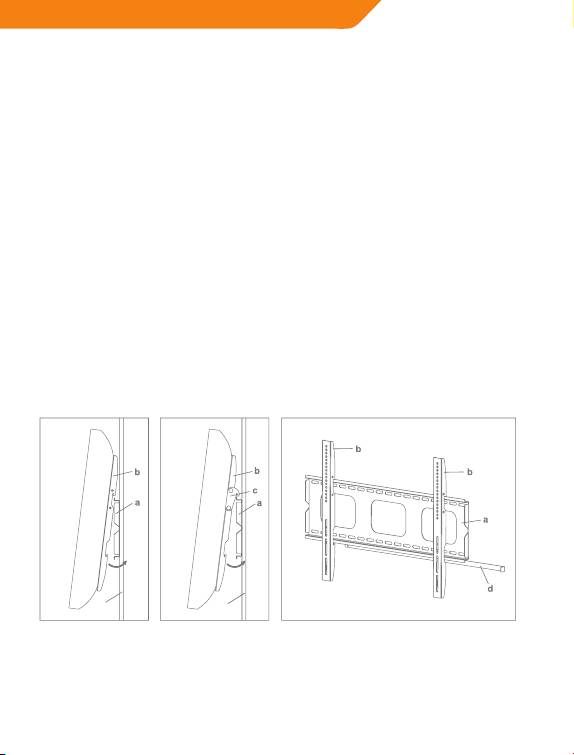
Attaching Monitor to Wall
Plate and Insert the Locking
Bar
Warning: Some TVs may require two people to lift! We are not responsible
for personal injury or product damage.
First hook the Monitor Brackets(b) over the top of the wall Plate(a),
then let the bottom of the Monitor Brackets rotate to the bottom of the
Wall Plate. This process is shown with the at mount option in Diagram
4A, and with the minus 5 degree tilt option in Diagram 4B. Insert the
Locking Bar(d) into the slots in the bottom of the Monitor Brackets so
that is sits behind the bottom tab on the Wall Plate. Once the Locking Bar
passes out from the other side of wall plate, a padlock can be added for
additional security. Details see Diagram 4C.
Diagram 4BDiagram 4A
Diagram 4C
wall wall
Thanks for choosing our products, enjoy the using.
11

LT
Išpakavimo nurodymai
• Atsargiai atidarykite kartoninę dėžę, išimkite jos turinį ir padėkite ant
kartono arba kito apsauginio paviršiaus, kad nepažeistumėte.
• Patikrinkite pakuotės turinį pagal pateiktų dalių sąrašą, esantį kitame
puslapyje, kad įsitikintumėte, jog yra visos sudedamosios dalys ir jos
nepažeistos. Nenaudokite pažeistų arba defektuotų dalių.
• Prieš bandydami montuoti, atidžiai perskaitykite visus nurodymus.
Svarbi saugos informacija
Montuokite ir naudokite šį įtaisą atsargiai. Prieš pradėdami montuoti
perskaitykite šią instrukciją ir kruopščiai laikykitės visų joje pateikiamų
nurodymų. Montavimo metu naudokite tinkamą saugos įrangą.
Kvieskite kvalikuotą montavimo rangovą, kad jums padėtų, jei:
• Nesuprantate šių nurodymų arba turite abejonių dėl montavimo
saugos;
• Nesate tikri, kokios rūšies jūsų siena (pasikonsultuokite su kvalikuotu
montavimo rangovu).
Nenaudokite šio gaminio jokiais kitais tikslais išskyrus tuos, kurie
nurodyti šioje instrukcijoje. Šiuo dokumentu pareiškiame, kad nesame
atsakingi už sužalojimus ar žalą, atsiradusius dėl netinkamo šio gaminio
surinkimo, montavimo ar naudojimo.
12

LT
Šis televizoriaus laikiklis turi būti saugiai pritvirtintas
prie vertikalios sienos. Jeigu laikiklis sumontuojamas
netinkamai, jis gali nukristi ir dėl to galima susižaloti
ĮSPĖJIMAS
ir (arba) patirti žalos.
•Veržliaraktis arba
Reikalingi
•4 mm grąžtas
•10 mm mūro grąžtas
movų rinkinys
įrankiai
•Atsuktuvas
•Statramsčių ieškiklis
•Dailidės gulsčiukas
Pastaba! Šioje pakuotėje pateikiamos montavimo sudedamosios dalys
ir techninė įranga nėra pritaikytos sienoms su plieniniais statramsčiais ar
šlakbetonio blokų sienoms. Jei montavimui reikalinga techninė įranga
nepridėta, prašome dėl įtaisui tinkamos montavimo techninės įrangos
kreiptis į vietinę technine įranga prekiaujančią parduotuvę.
13
LT
Pateiktų dalių sąrašas
(1) Tvirtinimo
(2) Monitoriaus
(4) Pridedamas
(1) Tvirtinamasis
prie sienos plokštė – a
laikiklis – b
kabliukas – c
strypas – d
(4) M4 x 12 varžtas – e (4) M5 x 12 varžtas – f (4) M6 x 12 varžtas – g (4) M8 x 16 varžtas – h
(4) M 4 x 30 varžtas – i (4) M 5 x 30 varžtas – j (4) M 6 x 35 varžtas – k (4) M 8 x 40 varžtas – l
(4) M 4
(4) M 5
(4) M 6
(4) M 8
kaištinė poveržlė – m
kaištinė poveržlė – n
kaištinė poveržlė – o
kaištinė poveržlė – p
(4) M 4 / M 5 tarpiklis – q (4) M 6 / M 8 tarpiklis – r (8) M 4 / M 5 poveržlė – s (4) M 6 / M 8 poveržlė – t
(3) Pritvirtinimo
(3) Pritvirtinimo
(3) Betono
(4) Laikomasis
(4) Veržlė – y
varžtas – u
varžto poveržlė – v
ankeris – w
varžtas – x
14
LT
Monitoriaus laikiklių
tvirtinimas prie televizoriaus
su plokščia užpakaline dalimi
Pirma pažiūrėkite, kokio skersmens varžto (e, f, g, h) reikia jūsų
televizoriui. Kai nustatysite tinkamą skersmenį, žr. į atitinkamą apačioje
pavaizduotą schemą. Varžtą į televizorių suksite per atitinkamą kaištinę
poveržlę (m, n, o, p) ir poveržlę (s, t). Įsitikinkite, kad monitoriaus laikikliai
(b, c) centruoti vertikaliai ir viename lygyje.
M 4 skersmens varžtas
M6 skersmens varžtas
1A schema
M5 skersmens varžtas M8 skersmens varžtas
15
LT
Monitoriaus laikiklių
tvirtinimas prie televizoriaus
su išgaubta užpakaline dalimi
Pirma pažiūrėkite, kokio skersmens varžto (i, j, k, l) reikia jūsų televizoriui.
Kai nustatysite tinkamą skersmenį, žr. į atitinkamą apačioje pavaizduotą
schemą. Varžtą į televizorių suksite per atitinkamą kaištinę poveržlę (m,
n, o, p) ir poveržlę (s, t) ir tarpiklį (q, r). M4 ir M5 skersmens varžtams reikia
kitos M4 / M5 poveržlės tarp monitoriaus laikiklio ir tarpiklio. Įsitikinkite,
kad monitoriaus laikikliai centruoti vertikaliai ir viename lygyje.
M 4 skersmens varžtas
M6 skersmens varžtas
1B schema
M5 skersmens varžtas
M8 skersmens varžtas
16
LT
Sienos plokštės montavimas
prie sienos
Montavimas prie plytinių sienų, betoninių sienų ir betoninių blokų
sienų
Naudokite plokštę pritvirtinimui prie sienos (a) kaip šabloną šešioms
skylėms ant sienos pažymėti. Trys turi būti viršutinėje skylių eilėje ir
trys – apatinėje. Įsitikinkite, kad šios skylės yra sulygiuotos ir kad tarp
bet kurių dviejų skylių yra bent 6” (150 mm). Pragręžkite šias skyles 3/8”
(10 mm) mūro grąžtu bent iki 2,4” (60 mm) gylio. Į kiekvieną iš šių skylių
įkiškite betono inkarą (w). Įsitikinkite, kad inkaras visiškai įkištas vienu
lygiu su betoniniu paviršiumi, net jei priekyje yra sausos sienos ar kitos
medžiagos sluoksnis. Pritvirtinkite sienos plokštę prie sienos naudodami
6 pritvirtinimo varžtus (u) ir 6 pritvirtinimo varžtų poveržles (v), parodytas
2A schemoje.
Montavimas prie sienos su mediniais statramsčiais
Sienos plokštė (a) turi būti pritvirtinama prie dviejų medinių statramsčių,
tarp kurių yra bent 16” (406 mm) atstumas. Dviem gretimiems
statramsčiams rasti naudokite statramsčių ieškiklį. Galima nustatyti
statramsčio vietą yla arba plona vinimi, kaip parodyta 2B schemoje. Prieš
naudodami 5/32”(4 mm) grąžtą, kiekviename statramstyje pragręžkite
2,4”(60 mm) gylio skylę norimame aukštyje. Įsitikinkite, kad šios skylės
yra statramsčių centrinėje dalyje ir viename lygyje. Naudokite plokštę
pritvirtinimui prie sienos kaip šabloną antrai skylei kiekviename rėme
pažymėti. Pažymėtose vietose 5/32” (4 mm) grąžtu pragręžkite 2,4” (60
mm) gylio skyles. Pritvirtinkite plokštę prie sienos naudodami keturis
pritvirtinimo varžtus (u) ir keturias pritvirtinimo varžtų poveržles (v).
2A schema 2B schema
40,6 cm
Statramsčių
40,6 cm
ieškiklis
40,6 cm
17

LT
Montavimo padėties
pasirinkimas: plokščiai arba
pakreipiant 5 laipsniais
Galite tvirtinti televizorių dviem padėtimis: plokščiai arba pakreipdami
5 laipsniais žemyn. Norėdami pritvirtinti televizorių plokščiai prie sienos,
naudokite tik monitoriaus laikiklius (b). Norėdami pritvirtinti televizorių
pakreipdami jį 5 laipsnių kampu, pirma turite pritvirtinti du pridedamus
kabliukus (d) prie kiekvieno monitoriaus laikiklio dviem laikomaisiais
varžtais (x) ir dviem veržlėmis (y), kaip parodyta 3 schemoje.
3 schema
18
LT
Monitoriaus tvirtinimas prie
sienos plokštės ir tvirtinamojo
strypo montavimas
Perspėjimas! Kai kuriems televizoriams pakelti reikia dviejų žmonių! Mes
nesame atsakingi už asmenų susižalojimus ar žalą, padarytą gaminiui.
Pirma užkabinkite monitoriaus laikiklius (b) ant sienos plokštės (a) viršaus,
tada leiskite monitoriaus laikiklių apatinėms dalims įsisukti į sienos
plokštės apatinę dalį. Šis procesas 4A schemoje parodytas tvirtinimo
plokščiai atveju, o 4b schemoje — tvirtinimo pakreipiant 5 laipsniais
atveju. Įkiškite tvirtinimo strypą (d) į monitoriaus laikiklių apačioje
esančias angas, kad ji laikytųsi už apatinio sienos plokštės stulpelio.
Kai strypas išlenda į kitą sienos plokštės pusę, galima dėl papildomo
saugumo pritvirtinti pakabinamą spyną. Detaliau žr. 4C schemoje.
4B schema4A schema
4C schema
sienasiena
Dėkojame, kad renkatės mūsų gaminius.
Mėgaukitės juos naudodami.
19

LV
Instrukcijas izsaiņošanai no
iepakojuma
• Uzmanīgi atveriet kartona iepakojumu, izņemiet iepakojuma saturu
un novietojiet to uz kartona vai cita virsmu aizsargājoša materiāla, lai
izvairītos no bojājumiem.
• Pārbaudiet iepakojuma saturu, vai tas atbilst piegādāto detaļu
sarakstam, kas dots nākamajā lappusē, lai pārliecinātos, vai visi
komponenti piegādāti bez bojājumiem. Nelietojiet bojātas detaļas vai
detaļas ar defektiem.
• Pirms mēģināt veikt uzstādīšanu uzmanīgi izlasiet visas instrukcijas.
Svarīga informācija drošībai
Uzstādiet un izmantojiet šo ierīci uzmanīgi. Lūdzu, pirms uzstādīšanas
rūpīgi izlasiet šo instrukciju un uzmanīgi ievērojiet visas šeit minētās
instrukcijas. Uzstādīšanas laikā izmantojiet atbilstošu aprīkojumu.
Lūdzu, zvaniet kvalicētam uzstādīšanas darbuzņēmējam šādos
gadījumos:
• Ja nesaprotat šīs instrukcijas vai rodas šaubas par drošību, veicot
uzstādīšanu;
• Ja neesat drošs par to, kāds ir sienas materiāls, konsultējieties ar
kvalicētu uzstādīšanas darbuzņēmēju.
Neizmantojiet šo izstrādājumu citiem mērķiem un kongurācijā, kas
nav skaidri norādīta šajā instrukcijā. Ar šo mēs atsakāmies no jebkādas
atbildības par ievainojumiem vai bojājumiem, kas radušies nepareizas
montāžas, uzstādīšanas vai nepareizas lietošanas rezultātā.
20
