Brother Innov-is 4750D: Creating Bobbin Work
Creating Bobbin Work: Brother Innov-is 4750D
8
Creating Bobbin Work
Positioning the Fabric and Sewing
a
Place a lightweight tear-away stabilizer on
top (wrong side) of the fabric.
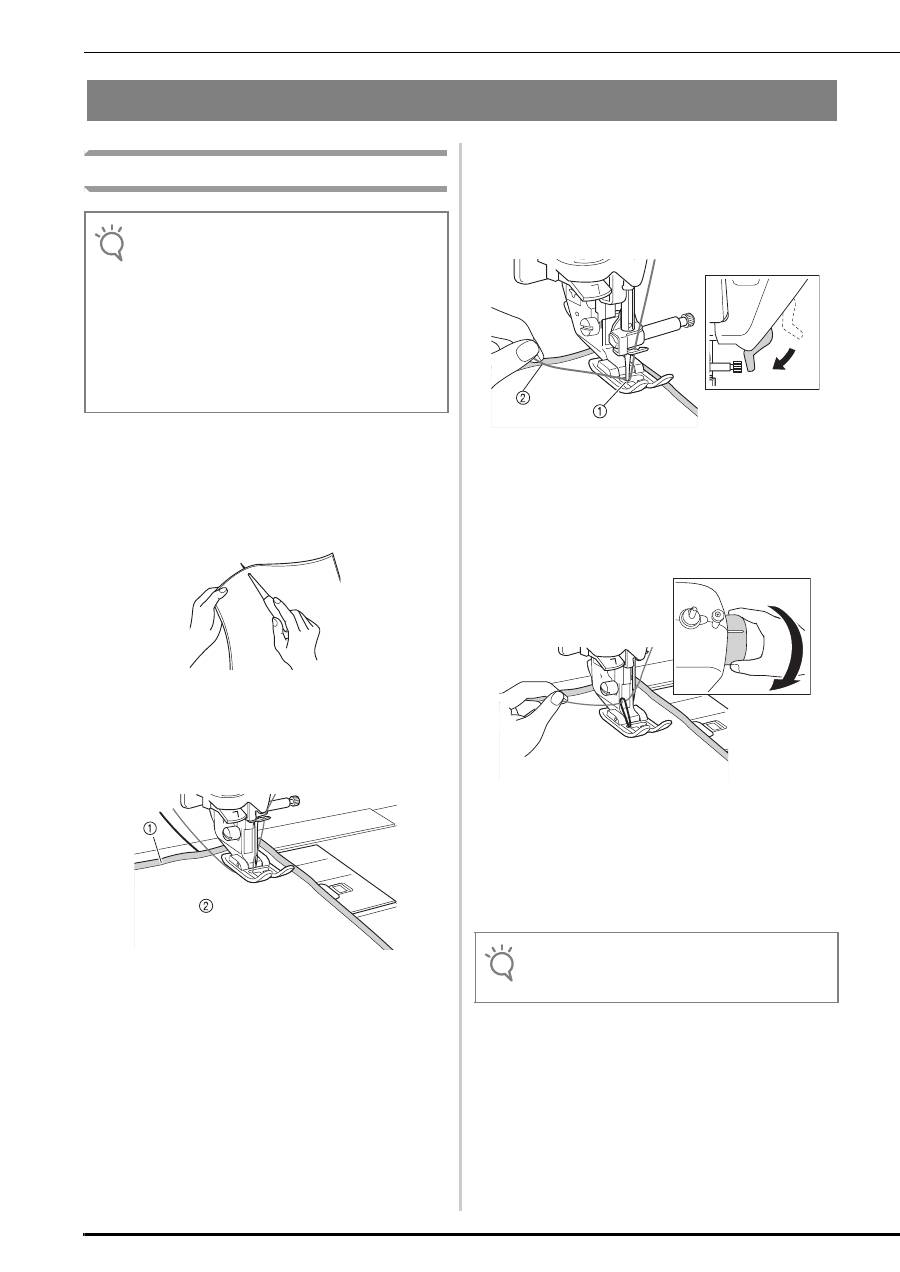
b
Using an awl, punch a hole in the fabric at the
beginning of stitching so the bobbin thread
can be fed through the fabric.
c
Use the presser foot lever to raise the presser
foot.
d
With the wrong side facing up, place the
fabric with stabilizer under the presser foot.
a
Wrong side of fabric
b
Stabilizer on wrong side of fabric
e
Turn the handwheel toward you
(counterclockwise) to feed the needle into the
punched hole. Position the upper thread over
the presser foot and lightly hold then, lower
the presser foot.
a
Punched hole
b
Upper thread over the presser foot
f
Pulling the upper thread gently, turn the
handwheel toward you (counterclockwise)
until the mark on the handwheel aligns with
the center top of machine.
A loop of the bobbin thread comes up through the
hole in the fabric.
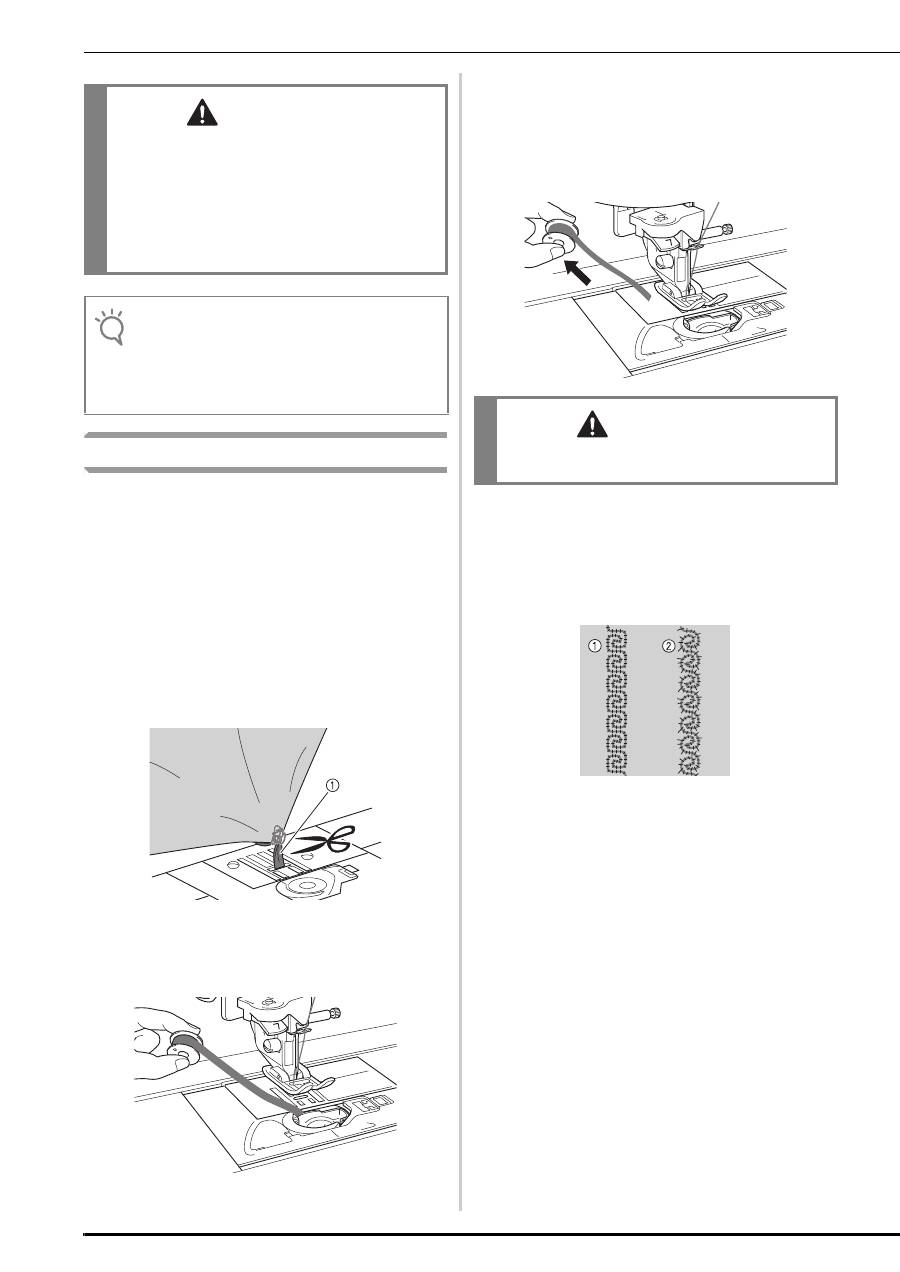
g
Raise the presser foot lever, and then use
tweezers to pull up the bobbin thread and
bring the end of the thread to the top of the
fabric.
Note
• Be sure to sew trial stitches using same fabric and
threads as your project in order to check the sewing
results.
• The bobbin thread may become tangled due to the
type of pattern and thread that are being used. Since
this may cause the needle to break, immediately
stop sewing if this occurs. Turn off the machine and
cut out the tangled thread with scissors. Then, clean
the race and bobbin case as described in see
“Preparing the Bobbin Thread” on page 4.
Note
• Pull the thread while holding down the fabric so it
does not move out of place.

9
EN
GL
IS
H
h
Align the upper thread and bobbin thread,
and then pass them under the presser foot
toward the rear of the machine.
i
Turn on the machine.
j
Select a stitch.
k
Adjust the upper thread tension.
For details on adjusting the upper thread tension,
refer to the machine’s Operation Manual.
l
If your machine is equipped with the
automatic thread cutting function and
automatic reinforcement/reverse stitching
function, make sure the automatic thread
cutting and automatic reinforcement/reverse
stitching have been turned off.
m
While gently holding threads at the rear of the
machine, turn the handwheel to feed the
needle into the punched hole again, and then
lower the presser foot lever.
n
Select a low speed, gently hold the threads
behind the presser foot and start sewing.
Threads can be released after several stitches
have been made.
o
When you have reached the end of the
stitching area, stop the machine.
p
Raise the needle and presser foot.
Memo
• For best results, select a longer stitch length and a
wider stitch width. Depending on the selected stitch,
it may not be possible to change the stitch length
and stitch width settings. For details on adjusting the
stitch length and stitch width, refer to the machine’s
Operation Manual.
• Depending on the fabric, bunched stitches may
result. We recommend selecting a simple stitch and
sewing trial stitches to check the sewing results.
Examples of simple stitches:
,
,
Memo
We recommend an upper thread tension that is higher
than the standard setting.
CAUTION
• Before sewing, make sure the automatic thread
cutting has been turned off. If sewing is started with
automatic thread cutting turned on, the thread may
become tangled or the machine may be damaged.
Note
• Before sewing, check that there is enough thread in
the bobbin.
Note
• Do not sew reinforcement/reverse stitches at the
end of the stitching, otherwise the threads may
become tangled or the needle may break. In
addition, it will be difficult to pull the bobbin thread
up to the wrong side of the fabric.

10
q
Leaving about 10 cm (approx. 4 inches) of
thread at the ends, use scissors to cut the
threads.
a
10 cm (approx. 4 inches)
Finishing the Thread Ends
a
At the end of the stitching, pull the end of the
bobbin thread up to the wrong side of the
fabric.
a
Wrong side of fabric
b
Bobbin thread
b
From the wrong side of the fabric, tie the
bobbin thread and the upper thread together
by hand, and then cut off excess threads with
scissors.
a
Wrong side of fabric
b
Surface of fabric
c
If the desired results could not be achieved,
adjust the tension of the bobbin thread and of
the upper thread, and then try sewing the
stitching again.
For more details, refer to see “Adjusting the
Thread Tension” on page 11.
Bobbin Work Free-Motion Sewing
If so desired, use a template or draw your design on the
stabilizer to allow for ease of stitching. Remember, your
stitches with your decorative thread will be on the
underneath side of your fabric and the stabilizer will be
on the top of the wrong side of your fabric.
a
Print the desired template.
Note
• Do not sew reinforcement/reverse stitches or use a
“Thread Cutter” button (if so equipped) at the end of
the stitching; otherwise it will be difficult to pull the
bobbin thread up to the wrong side of the fabric. In
addition the threads may become tangled or the
needle may break possibly causing machine
damage.
Note
• If it is difficult to pull up the bobbin thread, use a
ribbon embroidery needle to pull the thread up to the
wrong side of the fabric. Otherwise, use an awl to
pull up the bobbin thread.
Note
• To ensure threads do not come undone after being
tied place a drop of fabric glue on knots.
Note
• For bobbin work free motion sewing use the
instructions for “Creating Bobbin Work” beginning on
page 8.
• Use the quilting foot provided with your machine. If
you do not have a quilting foot, contact your nearest
authorized dealer to purchase. For details on using
the quilting foot, refer to the Operation Manual
provided with your machine or with the presser foot.
Note
• Print the template in its original dimensions. If an
enlarged template is used, the bobbin thread may
run out during sewing.

11
EN
GL
IS
H
b
Affix the stabilizer to the wrong side of the
fabric.
c
Place commercially available transfer paper
on the stabilizer, then the paper printed with
the template on top, and then trace the design
with a pencil.
a
Template
b
Transfer paper
c
Stabilizer on wrong side of fabric
d
Once the design is transferred to the stabilizer,
position the fabric under the free-motion
presser foot on the machine, and then use free-
motion sewing to sew the design.
Adjusting the Thread Tension
After sewing trial stitches and checking the sewing
results, adjust the thread tensions if necessary. After
adjusting the tensions, be sure to sew trial stitches again
in order to check the sewing results.
■
Adjusting the Upper Thread Tension
We recommend an upper thread tension that is higher
than the standard setting.
Refer to the machine’s Operation Manual for detailed
instruction.
■
Adjusting the Tension of the Bobbin Thread
If the desired stitching cannot be achieved after
adjusting the upper thread tension, adjust the tension of
the bobbin thread. The tension of the bobbin thread can
be adjusted by turning the slotted-head (–) screw on the
bobbin case (gray) for bobbin work.
a
Do not turn the phillips screw (+).
b
Adjust with the small screwdriver.
To increase the tension of the bobbin thread, turn the
slotted-head (–) screw 30° to 45° clockwise.
To decrease the tension of the bobbin thread, turn the
slotted-head (–) screw 30° to 45° counterclockwise.
Note
• Some templates have the arrows to show you the
sewing direction. Trace the arrows with design.
Note
• Turning the screw on the bobbin case (gray) may
push up the spring plate, as shown below.
If this occurs, gently press down the spring plate
with a screwdriver so it is lower than the top surface
of the bobbin case (gray), and then insert the bobbin
case into the machine.
a
Spring plate
12
Troubleshooting
Several solutions for minor problems are described
below. If the problem persists, contact your nearest
authorized dealer.
■
The Thread was Accidentally Cut
Automatically and the Bobbin Thread is
Caught inside the Machine (Only for
Machines Equipped with the Automatic
Thread Cutting Function)
a
Cut the thread near the fabric above the
needle plate, and then remove the fabric.
a
Thread
b
Remove the bobbin, and then hold it out
toward the left side of the machine.
c
Lower the presser foot.
d
Press the “Thread Cutter” button again, and
then pull the thread out to the left while the
thread cutter is operating.
■
The Pattern is Misaligned
Refer to “Adjusting the Thread Tension” and increase
the upper thread tension. If the pattern is still
misaligned, reduce the tension of the bobbin thread.
Example: Decorative Stitch
a
Correct tension
b
The upper thread tension is too loose, or the bobbin
thread tension is too tight.
■
The Bobbin Thread Catches on the Tension
Spring of the Bobbin Case
Sew with no tension applied to the bobbin thread.
(Refer to see “When Tension is Not Applied to the
Bobbin Thread” on page 6.)
CAUTION
• DO NOT adjust the position of the phillips (+)
screw on the bobbin case (gray) as this may result in
damage to the bobbin case, rendering it useless.
• If the slotted screw (-) is difficult to turn, do not use
force. Turning the screw too much or providing
force in either (rotational) direction may cause
damage to the bobbin case. Should damage occur,
the bobbin case may not maintain proper tension.
Note
• If the bobbin thread tension is tight, the thread
cannot be passed through the tension spring when
the bobbin is installed in the bobbin case. (Refer to
see “When Tension is Not Applied to the Bobbin
Thread” on page 6.)
CAUTION
• Do not pull on the thread with excessive force,
otherwise the machine may be damaged.
Оглавление
- CONTENTS
- About Bobbin Work
- Creating Bobbin Work
- INHALT
- Über Bobbin Work
- Kreieren von Bobbin Work
- TABLE DES MATIÈRES
- À propos du travail à la canette
- Création d’un travail à la canette
- INHOUDSOPGAVE
- Info over werken met de spoel
- Werken met de spoel
- SOMMARIO
- Informazioni sul ricamo con spolina
- Creazione del ricamo con spolina
- CONTENIDO
- Acerca de los efectos decorativos con bobinas
- Creación de efectos decorativos con bobinas
- СОДЕРЖАНИЕ
- Общие сведения об объемном вышивании
- Создание объемной вышивки
