Brother NX-2000: инструкция
Раздел: Швейное Оборудование
Тип: Швейная Машина

Характеристики, спецификации
Инструкция к Швейной Машиной Brother NX-2000
CircularAttachment_OM_brother
K
CIRCULAR ATTACHMENT
Instruction Manual
ANLEITUNG ZUM KREISNÄHEN
Gebrauchsanleitung
GUIDE POUR COUTURE CIRCULAIRE
Manuel d'instructions
CIRKELHULPSTUK
Handleiding
ATTACCO CIRCOLARE
Manuale d'istruzioni
UNIDAD PARA COSTURA CIRCULAR
Manual de instrucciones
Модуль для кругового вышивания
Руководство пользователя программы
XF0464-001
Printed in Taiwan

1
FRANÇAIS
DEUTSCH
ENGLISH
NEDERLANDS
ITALIANO
ESPAÑOL
CONTENTS
About the Circular Attachment ................................................................................................. 4
Included Accessories ................................................................................................................ 4
Attaching the Circular Attachment............................................................................................ 5
Sewing a Circle......................................................................................................................... 5
Using the Quarter Circle Template ........................................................................................... 7
Using the Included Presser Feet ................................................................................................ 7
INHALT
Über den Einsatz zum Kreisnähen .......................................................................................... 10
Mitgeliefertes Zubehör............................................................................................................ 10
Anbringen des Einsatzes zum Kreisnähen ............................................................................... 11
Nähen eines Kreises................................................................................................................ 11
Anwendung der Viertelkreis-Schablone .................................................................................. 13
Anwendung der mitgelieferten Nähfüße ................................................................................. 13
TABLE DES MATIÈRES
À propos du guide pour couture circulaire.............................................................................. 16
Accessoires inclus................................................................................................................... 16
Fixation du guide pour couture circulaire ............................................................................... 17
Couture d'un cercle................................................................................................................ 17
Utilisation du gabarit quart de cercle...................................................................................... 19
Utilisation du pied-de-biche fourni......................................................................................... 19
INHOUDSOPGAVE
Over het cirkelhulpstuk .......................................................................................................... 22
Bijgeleverde accessoires ......................................................................................................... 22
Het cirkelhulpstuk bevestigen................................................................................................. 23
Een cirkel naaien .................................................................................................................... 23
Werken met de kwartcirkelsjabloon........................................................................................ 25
Werken met de bijgeleverde persvoet..................................................................................... 25
SOMMARIO
Informazioni sull'attacco circolare.......................................................................................... 28
Accessori in dotazione............................................................................................................ 28
Montaggio dell'attacco circolare............................................................................................. 29
Cucitura di un cerchio............................................................................................................ 29
Utilizzo del modello del quarto di cerchio ............................................................................. 31
Utilizzo dei piedini premistoffa in dotazione .......................................................................... 31
CONTENIDO
Información sobre la unidad para costura circular .................................................................. 34
Accesorios incluidos............................................................................................................... 34
Colocación de la unidad para costura circular........................................................................ 35
Costura de un círculo ............................................................................................................. 35
Utilización de la plantilla de cuarto de círculo ....................................................................... 37
Uso de los pies prensatela incluidos ....................................................................................... 37

2

3
Русский
СОДЕРЖАНИЕ
О модуле для кругового вышивания.................................................................................................. 40
Принадлежности в комплекте поставки............................................................................................ 40
Крепление модуля для кругового вышивания .................................................................................. 41
Вышивание круга................................................................................................................................. 41
Использование шаблона на четверть круга....................................................................................... 43
Использование прижимной лапки из комплекта поставки ............................................................. 43
Contents
About the Circular Attachment
This device can sew circular patterns that graduate out at 5mm intervals, ranging from 30mm to 130mm in
radius* when the center needle position is selected. The device is set to the left of the needle on your sewing
machine. Utility and decorative stitches can both be sewn using this device.
*
Radius= Distance from center of circle to any point on the circle.
Included Accessories
4
Note
• You cannot use any decorative stitch with side feeding, or stitches over 7.0 mm in width. Use fabrics with a thickness of
less than 4mm (approx. 3/16”).
CAUTION
• Special care is required for the pivot pin; Neglectful treatment may cause injury. Young children should
be supervised to ensure that they do not play with the attachment. When attachment is not in use, always
keep the pivot pin in the indicator to avoid its loss.
1
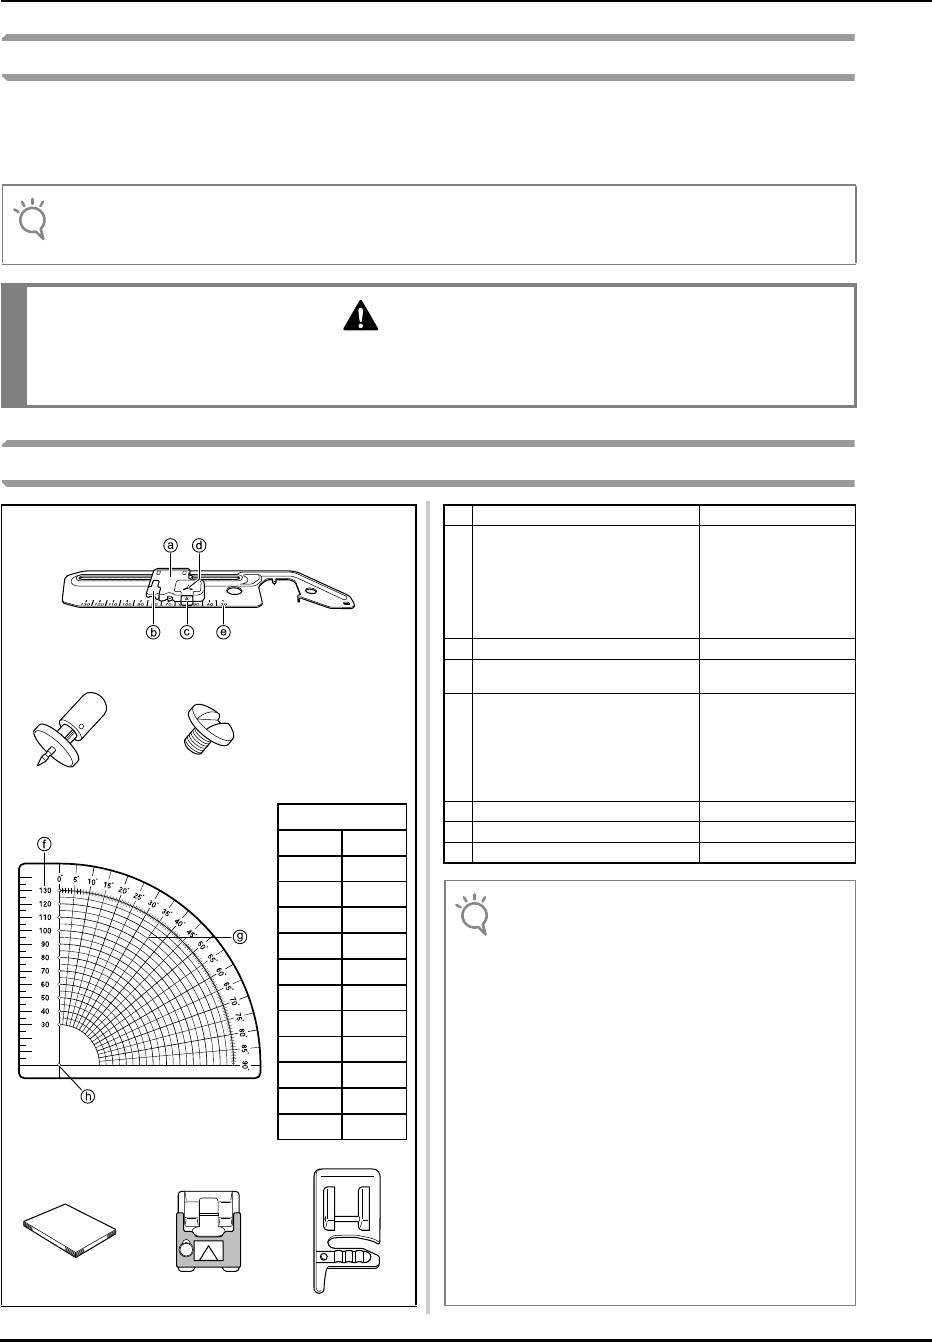
No. Part Name Part Code
1 Circular Attachment
-
a Indicator
b Handle/Flips Up
c Release button
d Setting position for pivot pin
e Scale
2 Pivot Pin XE6016-001
23
3 Attachment Screw
XE6022-001
(2pcs. one is extra)
4 Template
XE6024-001
f Radius of circle in mm
g Angular lines listed in degrees
starting at 0 with 5 degree
intervals
h Center
4
Conversion Chart
5 Instruction Manual This Manual
6 Braiding Foot SA141/F021N
mm (f)inch
7 Cording Foot SA110/F013N
130 5 3/16
120 4 3/4
110 4 3/8
100 4
90 3 1/2
80 3 3/16
70 2 3/4
60 2 3/8
50 2
40 3/2
30 13/16
567
Note
• We recommend that you use the extension table on
your sewing machine for smooth fabric control.
• Do not raise the extension table when the circular
devise is attached.
• The pivot pin may be released if you hold up the
fabric while attached to the circular attachment.
When holding up the fabric gently press down on the
top of the pivot pin.
• When sewing smaller circles or using fabric with a
grain or uneven textures, a perfect circle may not be
achieved.
• Some of presser feet such as the side cutter cannot
be used with this attachment, always test your
accessory feet with the attachment.
• When using this attachment test the sewing speed
of your machine for the best results.
• When sewing larger pieces of fabric or garments,
make sure that your fabric or garment does not get
caught on the machine creating drag or distortion of
your design.
5
ENGLISH
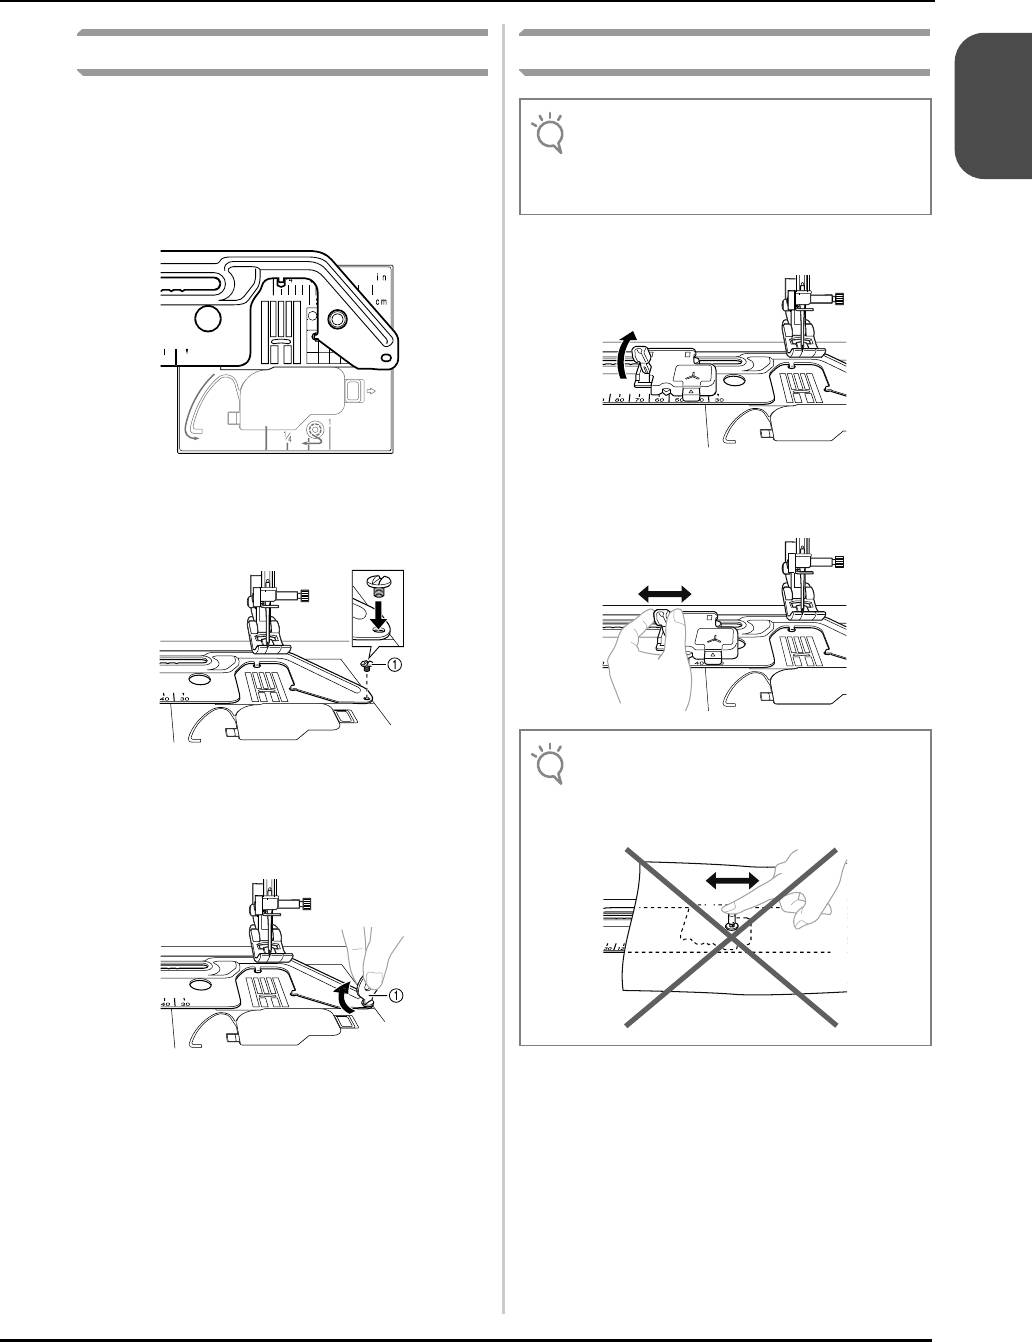
Attaching the Circular Attachment
Sewing a Circle
Place the circular attachment at left as shown
a
in the figure.
The two tabs on the underside of the attachment will
drop down into corresponding holes in the needle
plate, so that the attachment lays flat on the bed of
your machine.
Raise the handle.
a
Slide the indicator to match the desired size
Insert the screw on the circular attachment in
b
b
of your circle.
the screw hole at the right of the needle plate
(a).
a Attachment Screw
Securely tighten the screw with the disc-
c
shaped screwdriver included in your
machine.
a Disc-shaped screwdriver
30
40
Note
• Thread the machine needle before setting the pivot
pin into the circular attachment. Threading lever
may hit the pivot pin and damage the pin or the
machines threading mechanism.
Note
• Do not slide the indicator by holding onto the pivot
pin, doing so may cause the pivot pin to bend or
break.
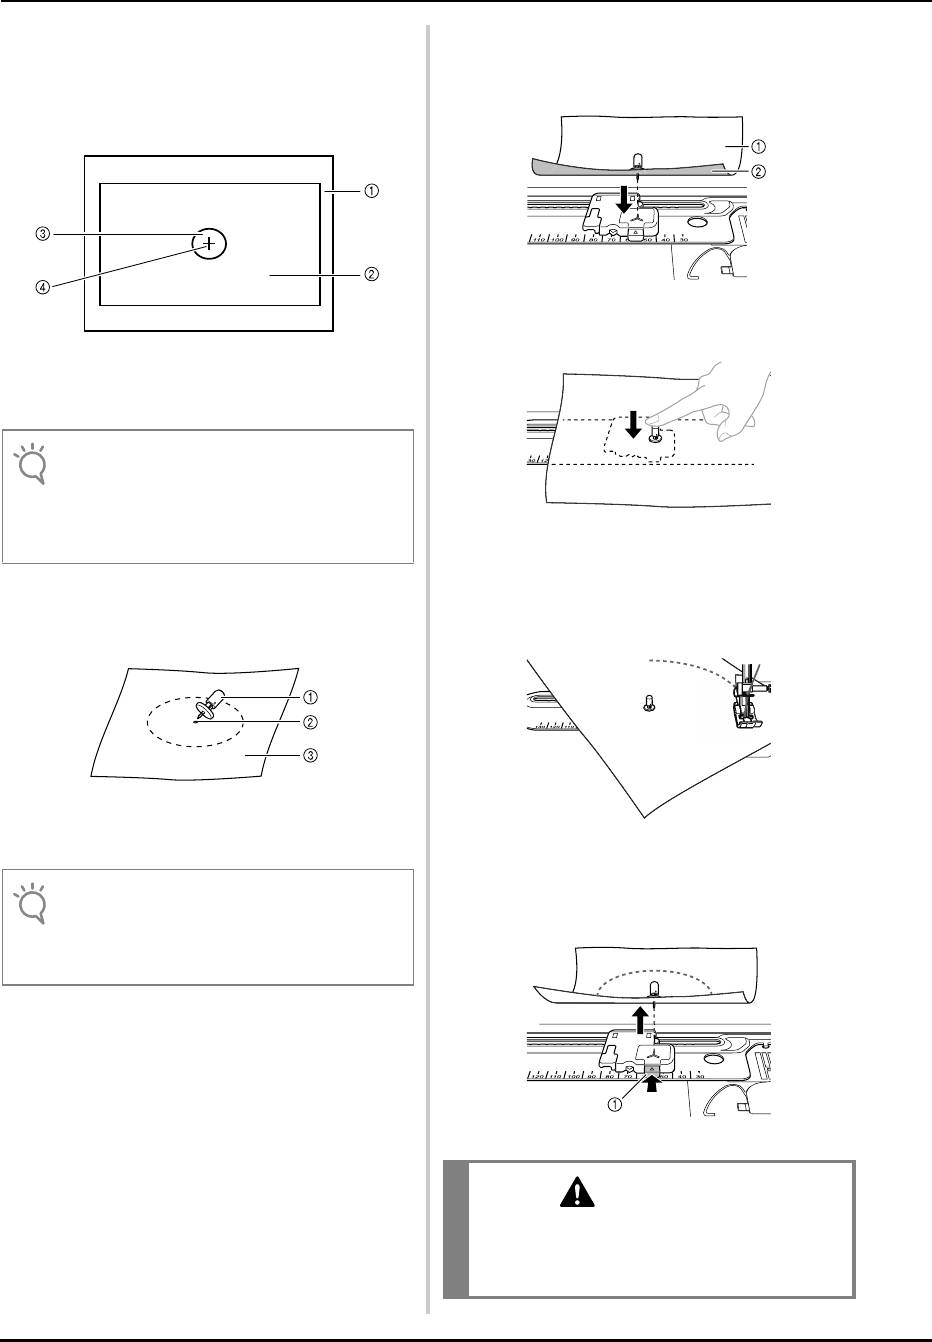
Use a piece of stabilizer that is larger than
Pressing the top of the pivot pin, insert the
c
e
your design area, reinforcing with a smaller
point of the pivot pin into the “Y” mark on
piece of the stabilizer at the center of the
the attachment.
circle when using fine fabric or the same
pivot pin area repeatedly.
a Right side of Fabric
b Wrong side of Fabric
a Wrong side of Fabric
b Stabilizer
c Reinforcement Stabilizer
d Pivot Pin area
Select the desired stitch and sew allowing the
f
fabric to feed smoothly, making sure that you
Insert the pivot pin at the center of circle
d
do not push or pull your fabric causing an
from the right side of fabric.
uneven circle.
a Pivot Pin
b Center of circle
c Right side of Fabric
After sewing, always press the release button
g
to remove the pin and fabric from the circular
attachment.
a Release button
6
Note
• A stabilizer is always required when sewing on any
fabric or garment to prevent stretching or puckering.
Depending on the type of fabric being sewn, will
determine wether you use permanent, iron on,
temporary or a sticky stabilizer.
Note
• When sewing a small diameter circle, we
recommend that you first pin the fabric to the
attachment and then set the indicator to your
desired size.
CAUTION
• Do not leave the pivot pin inserted in your fabric
and not attached to the circular attachment. To do
so may result in accidental injury or machine
damage.
7
ENGLISH
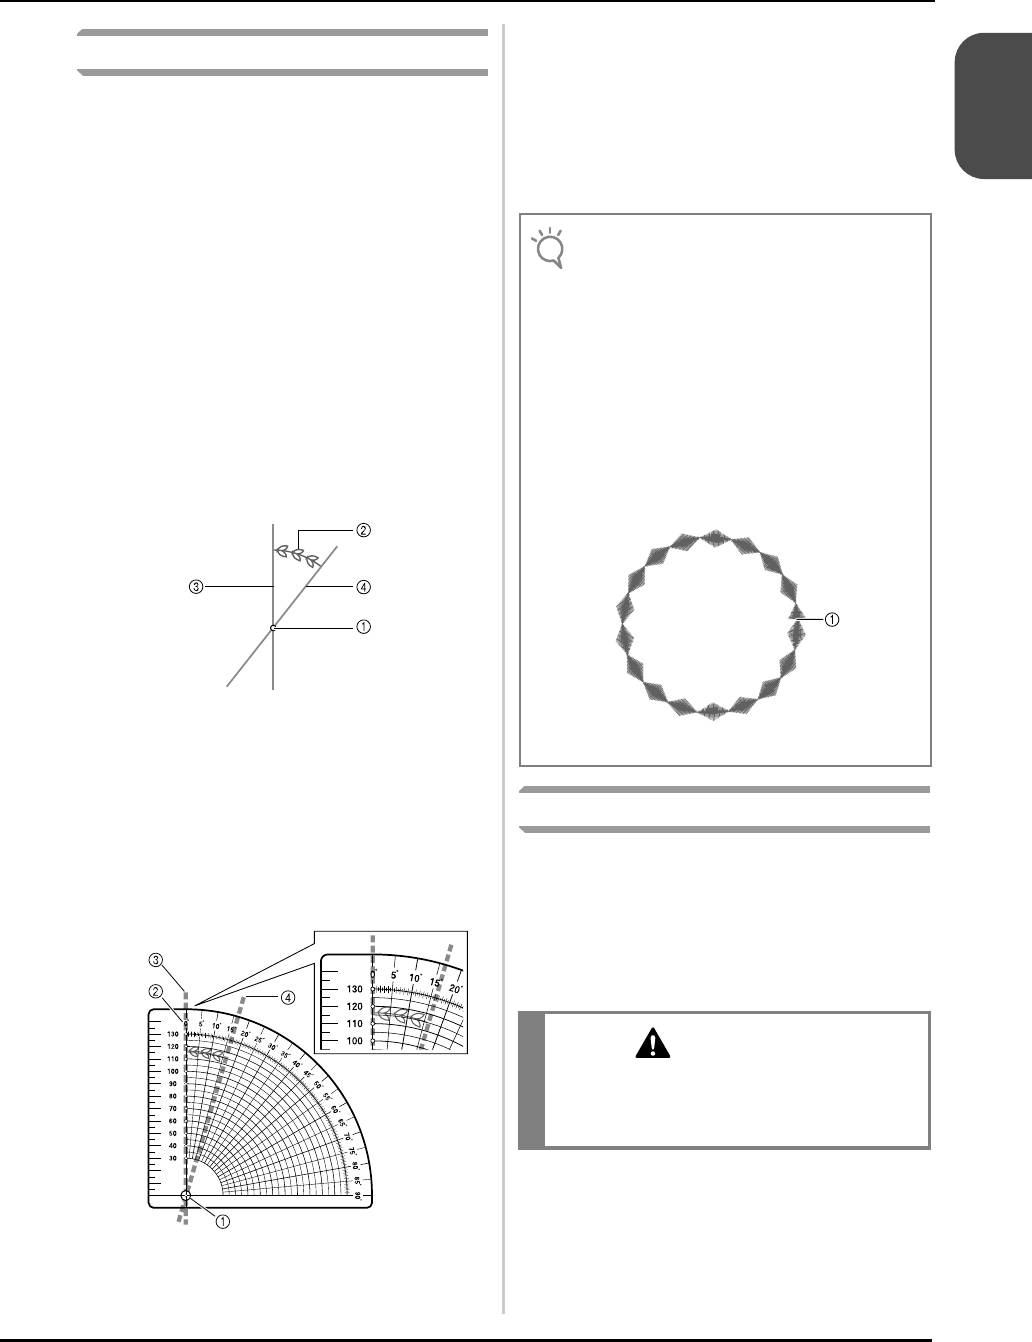
Check the line at the end of the stitch (d) and
g
Using the Quarter Circle Template
note the approximate degrees. With a circle
measuring 360 degrees divide the stitch
When combining utility or decorative stitches, or
length (your degree/stitch measurement) into
repeating an individual stitch, use the included
360 and that will give you an approximate
template as a guide.
count on the stitch repetitions. SAMPLE: Your
Mark the pivot point (center of your circle)
stitch is 16 degrees long so: 360 divided by 16
a
prior to sewing on the fabric (a).
equals 22.5 repetitions.
Select your desired stitch and the size of a
b
circle using the markings on the attachment,
then place the fabric on the attachment.
Sew a single stitch or one pattern
c
combination (b).
Remove fabric or garment from attachment.
d
With temporary pencil draw two lines from
e
the pivot point, one at the start of your stitch
pattern (c) and one at the end of the stitch
pattern (d).
a Pivot Point
b Single stitch/Pattern combination
c Start of the stitch
d End of the stitch
Place the template on top of your design,
f
Using the Included Presser Feet
lining up the center pivot point and the center
marking on the template (a). Then place the
Using the included presser feet, you can embellish
0 degree line on the right side of template (b)
your sewing projects, giving them a professional look
at the start of the stitch (c).
with your personal flair.
■ BRAIDING FOOT
You can use a wide variety of braiding up to 5mm in
width, using straight, zigzag and select decorative
stitches.
a Center on template
b 0 degree line
c Start of the stitch
d End of the stitch
Note
• This is not an exact count due to the number of
variables i.e. stitch length, fabric used, thread and
the stabilizer. You may be able to adjust the length
of the stitch, depending on the stitch used,
increasing or decreasing to get a closer match so
that your circle closes without overlapping or
shortage (a).
• Always stitch a trial version of the design checking
the stitch length, width and the direction of sewing,
making sure that it is suitable for your project.
• Additional calculations may be necessary if your
pattern overlaps.
Example: Shortage of the Pattern
a
End of the stitch
CAUTION
• Do not use this foot when sewing with densely
woven braiding that is difficult for the needle to
penetrate easily. Doing so could result in needle
breakage, damage and/or injury.
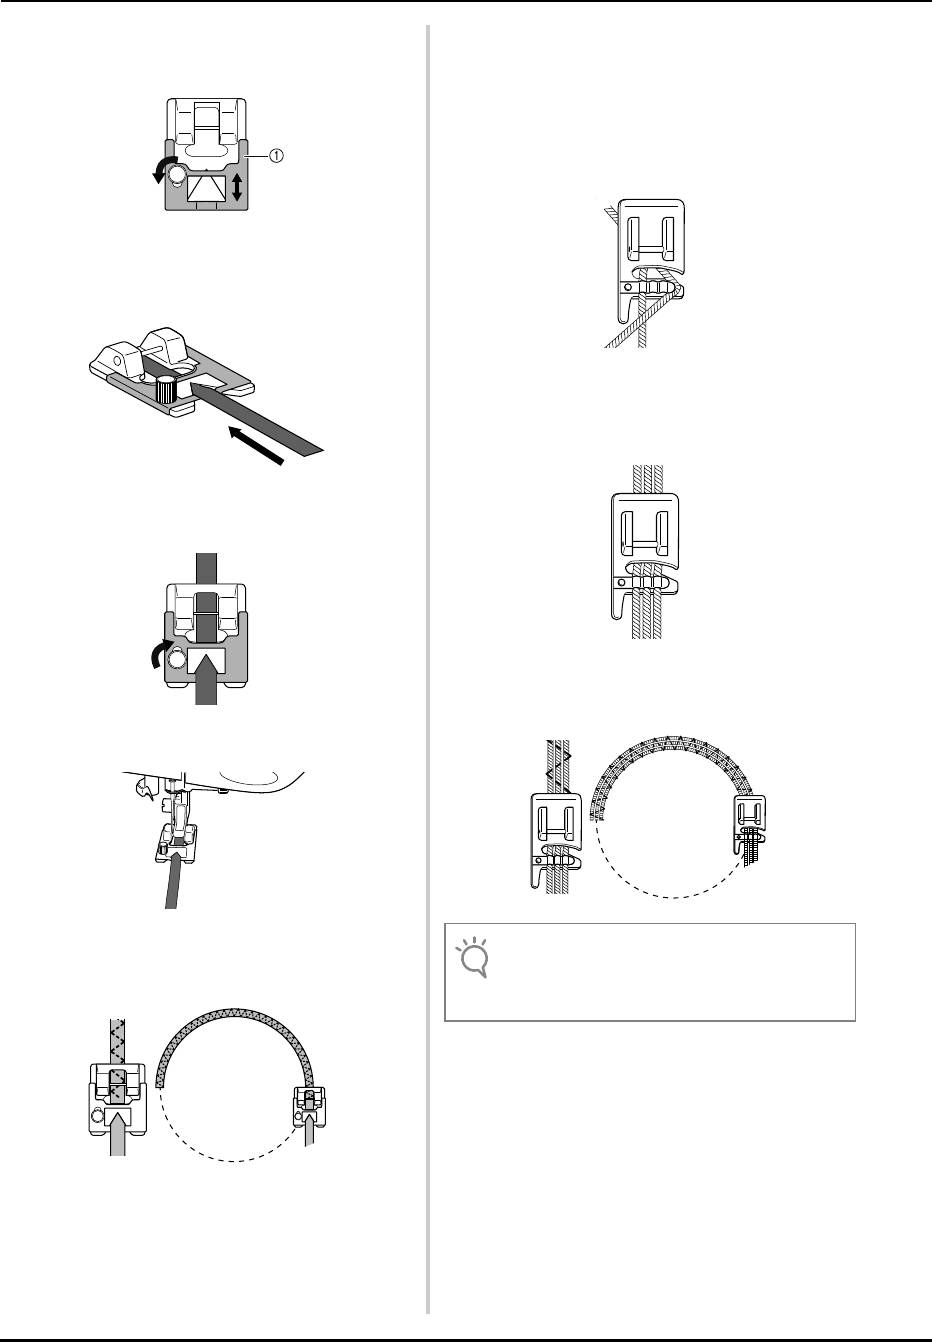
Loosen the screw on the guide plate sliding
a
■ CORDING FOOT
the plate to fit the width of the braid.
You can embellish using 1 to 3 cords of decorative
threads or yarn.
Slip a cord from the right of the presser foot,
a
into each guide (to use single cord, use the
center guide).
a Plate
Insert the braid through the guide before
b
attaching the foot onto the machine.
Place the cords under and to the back of the
b
cording foot.
Tighten the screw and pull the braid to the
c
back of the braiding foot.
Select a zigzag or decorative stitch and sew in
c
a circular manner gently guiding the cords.
Attach the foot onto the machine.
d
Select the desired stitch and sew in a circular
e
manner gently guiding the braid.
8
Note
• When sewing with zigzag or decorative stitches,
adjust the stitch width, so that it is slightly wider than
the width of the braid or cording.


