Brother PocketJet3Plus w BT (PJ-563): инструкция
Раздел: Бытовая, кухонная техника, электроника и оборудование
Тип: Принтер
Инструкция к Принтеру Brother PocketJet3Plus w BT (PJ-563)
User’s Guide
PJ-522 and PJ-523
Mobile Printer
l Before using this printer, be sure to read this User’s Guide.
l We suggest that you keep this manual in a handy place
for future reference.

Thank you for your purchasing a Brother PocketJet mobile printer. This manual covers the
following list of printers.
Printer name Shorter name Model Name Part Number
Brother PocketJet 3 Engine PJ3 PJ-522 PJ522
Brother PocketJet 3 BT Engine PJ3 w/BT PJ-522-BT PJ522-BT
Brother PocketJet 3 Kit PJ3 Kit PJ-522-K PJ522-K
Brother PocketJet 3 BT Kit PJ3 w/BT PJ-522-BTK PJ522-BTK
Brother PocketJet 3 Plus Engine PJ3 Plus PJ-523 PJ523
Brother PocketJet 3 Plus BT
Engine PJ3 Plus w/BT PJ-523-BT PJ523-BT
Brother PocketJet 3 Plus Kit PJ3 Plus Kit PJ-523-K PJ523-K
PJ3 Plus w/BT
Brother PocketJet 3 Plus BT Kit
Kit PJ-523-BTK PJ523-BTK
Brother PocketJet 3 In-Vehicle
Kit PJ3 IV Kit PJ-522-KV PJ522-KV
Brother PocketJet 3 In-Vehicle
BT Kit PJ3 IV BT Kit PJ-522-BTKV PJ522-BTKV
Brother PocketJet 3 Plus In-
Vehicle Kit PJ3 Plus IV Kit PJ-523-KV PJ523-KV
Brother PocketJet 3 Plus in-
PJ3 Plus IV BT
vehicle Bluetooth Kit
Kit PJ-523-BTKV PJ523-BTKV
Before using the printer, be sure to read this User’s Guide.
We suggest that you keep this manual in a handy place for future reference.
®
®
®
Microsoft
, Windows
, and Windows Vista
are registered trademarks of Microsoft
Corporation in the United States and other countries.
®
®
The Bluetooth
word mark and logos are owned by the Bluetooth
SIG, Inc. and any use of
such marks by Brother Industries, Ltd. under license.
Brother is a registered trademark of Brother Industries, Ltd.
All other software and product names mentioned are trademarks
or registered trademarks of their respective companies.
(c) 2009 Brother Mobile Solutions, Inc. All rights reserved. Specications subject to
change without notice.

Contents
Chapter 1 – Setting Up the Printer ............................................................................ 1
Unpacking the Printer ............................................................................................ 2
Connecting to an AC Outlet (Optional) ................................................................. 2
Connecting to a DC Supply (Optional) ................................................................. 3
Using the Operation Panel ..................................................................................... 4
Main Switch Functions .......................................................................................... 4
Indicator Lights ................................................................................................ 5
Chapter 2 – Using the Printer .................................................................................... 6
Printing Solutions .................................................................................................. 6
Driver Installation .................................................................................................. 7
CD Install ......................................................................................................... 7
Manual Install ................................................................................................... 8
Accessing Advanced Software Settings ................................................................ 8
Text Mode ........................................................................................................ 8
Density Modes .................................................................................................. 9
2-ply Mode ....................................................................................................... 9
Form Feed Modes ............................................................................................. 9
Selecting Media ................................................................................................... 10
Cut Sheet Paper .............................................................................................. 10
Non-Perforated Roll Paper ............................................................................. 10
Perforated Roll Paper ..................................................................................... 11
Windows Advanced Features Using PocketJet 3 Utility (Conguration Utility)
...... 11
Windows-Specic Operating System Features ................................................... 12
Connecting to Your Computer ............................................................................. 13
Via USB Cable ............................................................................................... 13
Via Infrared (IrDA) ........................................................................................ 14
Via Bluetooth (Bluetooth Models Only) ........................................................ 14
Printing ................................................................................................................ 15
Turning the Printer OFF ................................................................................. 16
Making Prints Lighter or Darker .................................................................... 16
PocketJet Utility (Conguration Utility) ............................................................. 17
Controllable Printer Features ......................................................................... 17
Installing the PocketJet 3 Utility .................................................................... 17
Using the PocketJet 3 Conguration Utility .................................................. 18
Menu Bar ........................................................................................................ 19
Conguration Options (Dropdown Menu Selections) ................................... 22
Printer Commands (Function Buttons) .......................................................... 33
Installing the Battery (Optional) .......................................................................... 36
Removing the Battery .......................................................................................... 38
Charging the Battery ............................................................................................ 39
Stopping the Charge Process .......................................................................... 39
Tips on Using the Battery .................................................................................... 40
Page iii

Chapter 3 – Tips on Using Paper ............................................................................. 41
Inserting Paper ..................................................................................................... 41
Use Brother Genuine Thermal paper ................................................................... 42
Usage and Handling Instructions ......................................................................... 42
Clearing a Paper Jam ........................................................................................... 43
Method 1 ........................................................................................................ 43
Method 2 ........................................................................................................ 43
Chapter 4 – Maintaining the Printer ........................................................................ 45
Cleaning the Print Head ....................................................................................... 45
Cleaning the Platen Roller ................................................................................... 47
Cleaning the Printer’s Exterior ............................................................................ 49
Chapter 5 – Reference ............................................................................................. 51
Indicator Lights .................................................................................................... 51
Indicator Light Table ...................................................................................... 51
Indicator Light Warnings ..................................................................................... 52
Self-Test Feature .................................................................................................. 54
Chapter 6 – Troubleshooting ................................................................................... 55
Overview ............................................................................................................. 55
Paper Problems .................................................................................................... 56
Printed Image Problems ....................................................................................... 56
Pages Don’t Print ................................................................................................. 59
Pages Are Partially Printed .................................................................................. 59
Chapter 7 – Technical Information .......................................................................... 60
Product Specications ......................................................................................... 60
Declarations of Conformity ................................................................................. 62
Radio & Television Interference .......................................................................... 66
United States FCC Regulations ...................................................................... 66
Canadian Regulations ..................................................................................... 67
Chapter 8 – Ordering Information ........................................................................... 68
Consumables ........................................................................................................ 68
Accessories .......................................................................................................... 68
Uploadable Fonts ................................................................................................. 69
Appendix I – Character Set Tables .......................................................................... 70
Page iv

Safety Information
Use Recommendations
- Because the printer uses a thermal printing method, it produces heat
during operation. Be sure to place it where it will receive adequate
ventilation.
- Don’t allow moisture to come in contact with the printer, the AC
adapter, or the AC Power Cord.
Outdoor Use Warning
To reduce the risk of electric shock, do not expose this printer, its AC
adapter, or the power cord to rain or moisture.
Caution: Using AC Power
To use AC power (with or without the battery installed), you must
use the AC adapter supplied with the printer.
The AC adapter allows you to connect to worldwide (100-240 volt)
power sources. The AC adapter automatically adjusts to the correct
voltage when connected.
Check the power plug congurations and voltages used in your coun-
try. If you need a different plug or power cord than supplied with
your printer, you can either purchase a plug adapter locally or contact
your local reseller or Brother for assistance in acquiring a proper
cord set.
Battery Recycling Information
This printer can run on an optional rechargeable Nickel-Metal
Hydride (NiMH) battery. The battery is recyclable. At the end of
its useful life, please consider recycling options for proper disposal
(contact your local solid waste ofcials). It may be illegal under
various state and local laws to dispose of the battery in your solid
waste collection.
Page v

C
Y
C
L
E
E
R
R B R C
1
Y
.
8
R
0
E
0
.
T
8
T
-
B
A
The RBRC seal on the NiMH Battery pack supplied for the
PocketJet 3/3 Plus printers indicates that Brother is voluntarily
participating in an industry program to collect and recycle these
battery packs at the end of their useful life, when taken out of
service within the United States. The RBRC program provides
a convenient alternative to putting spent NiMH battery packs into
the trash or municpal waste stream, which is illegal in some areas.
Brother payments to RBRC make it easy for you to drop the spent
battery pack at local retailers of replacement NiMH batteries or at
authorized Brother product service centers. You may also contact
your local recycling center for information on where to return the
spent battery packs. The involvement of Brother in this program
is part of its commitment to protecting our environment and con-
serving natural resources.
For users outside the United States, please contact your local
reseller or local solid waste ofcial for information on recycling
your used batteries.
Page vi

Page vii
Page viii
Page ix

Page x

Page xi
Chapter 1 - Setting Up the Printer
Unpacking the Printer
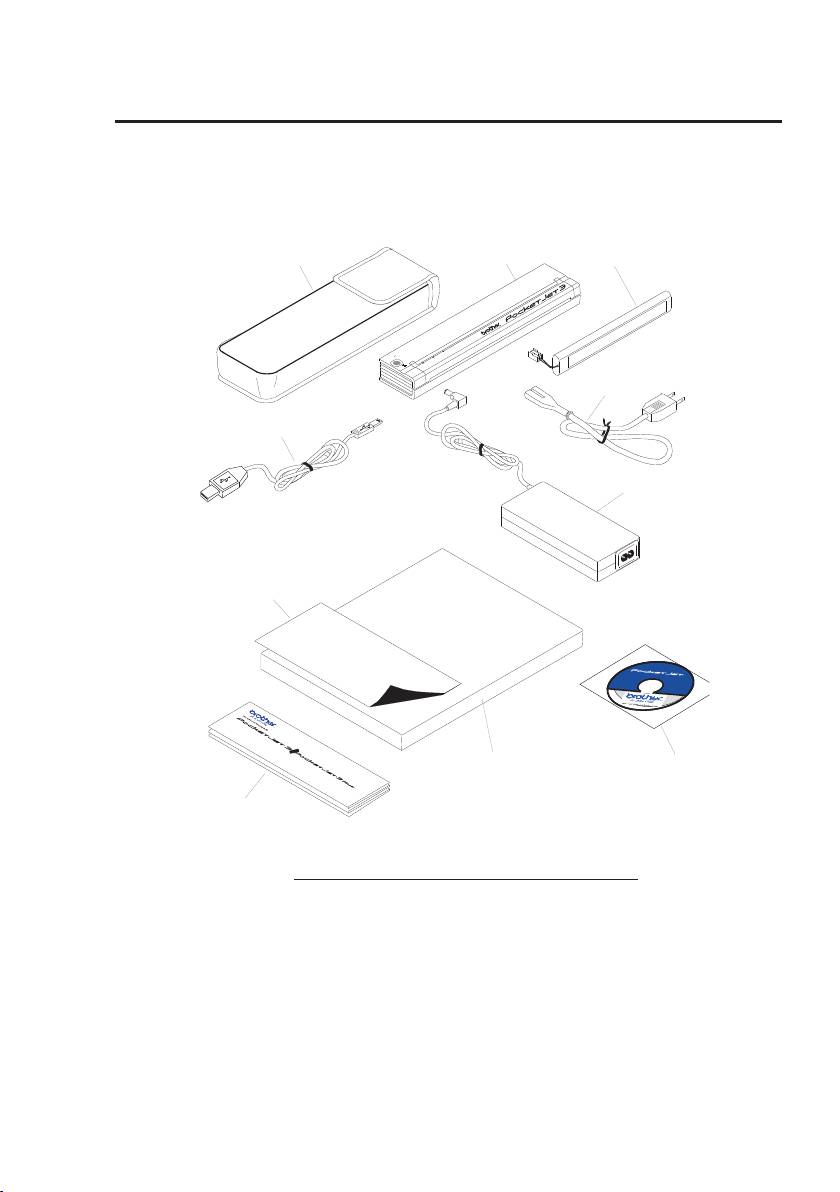
A typical printer kit may contain the items shown in Figure 1.
Page 1
Protective Case
Printer
Battery
BATTER Y
CHARGE
REFRESH
DATA
ON
OFF
POWER
AC Cable
USB Interface Cable
AC Adapter
Print Head
Cleaning
Cloth
Installation
Printer
CD v. 1.0
Configuration Utilities
User’s Manuals
Device Drivers
©2009 Brother Mobile Solutions, Inc. All Rights Reserved.
Portuguese
Spanish
English
French
M
a
d
e
i
n
U
S
A
Printer Quick Reference Card
®
Thermal Paper
CD
®
(100 Sheets)
Quick Reference
Card
Figure 1. The contents of a standard printer kit.
NOTE: Supplies, accessories, and replacement parts are listed in Chapter 8.
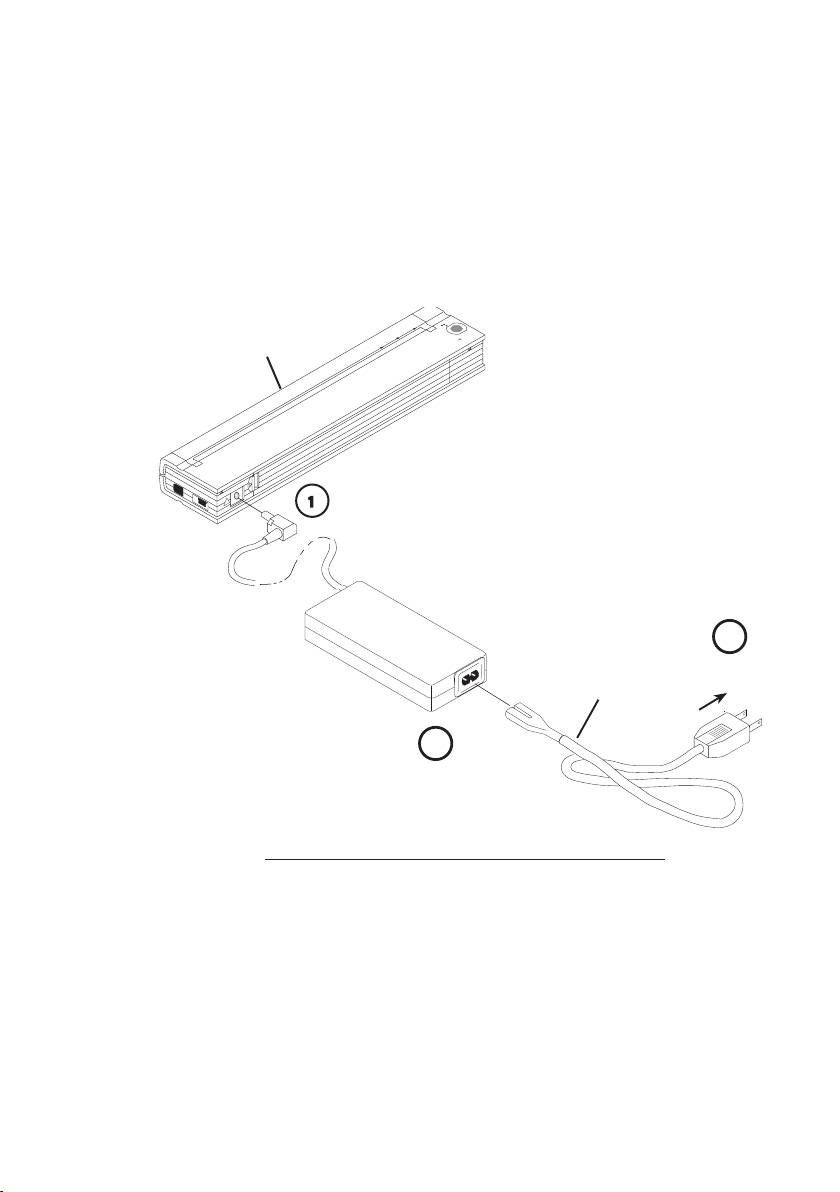
Connecting to an AC Outlet (Optional)
Connect the printer to a nearby AC power outlet to run it on AC power or to charge the
battery (See “Charging the Battery”, page 39).
1. Connect the AC adapter to the printer as shown in Figure 2.
2. Connect the AC power cord to the AC adapter.
3. Plug the AC power cord into a nearby AC power outlet (100~240 VAC, 50-60 Hz).
Figure 2. Connecting the printer to an AC power outlet
NOTE: AC power cord and AC Adapter are optional.
Please purchase appropriate adapter.
Page 2
POWER
F
F
N
O
O
DATA
S
E
F
E
R
H
G
R
A
R
H
C
E
BATTER Y
Printer
A
P
T
.
A
C
A
D
!
1
AC Adapter
3
To power
receptacle
AC Cable
2
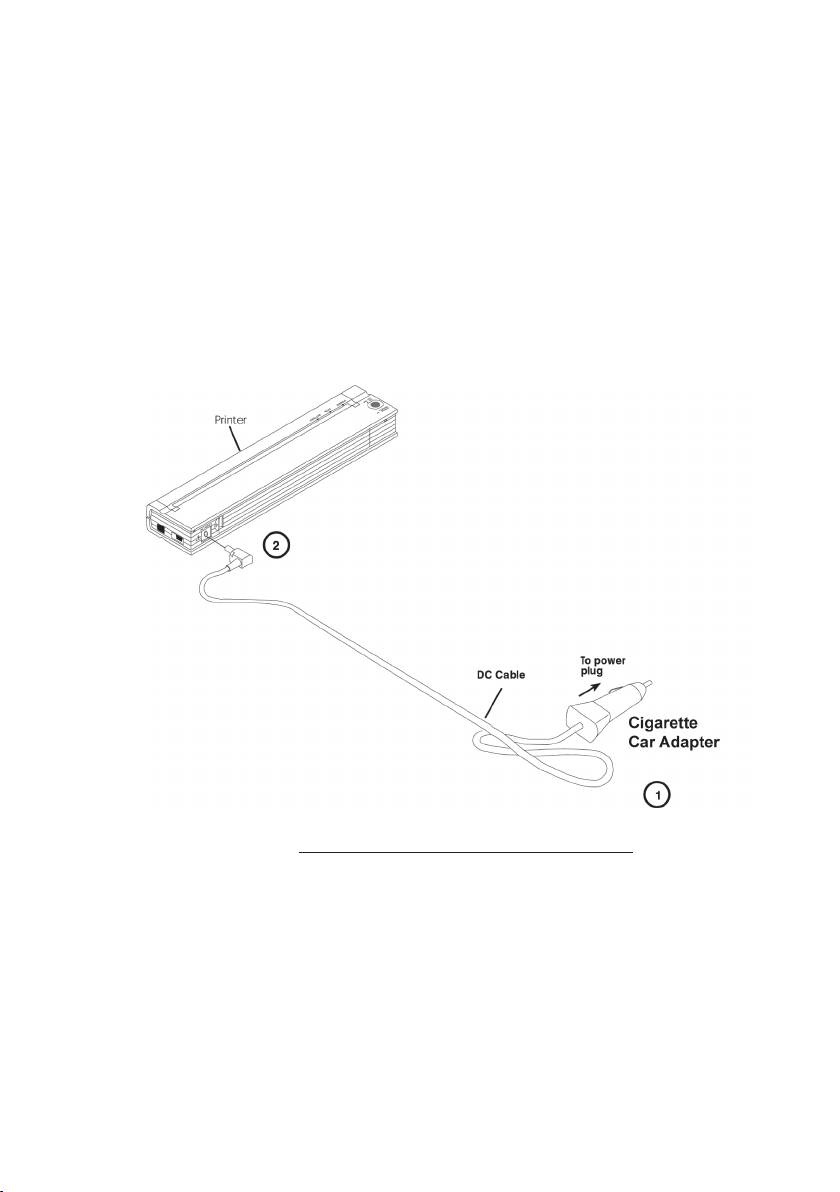
Connecting to a DC Supply (Optional)
The PocketJet can be powered from its internal NiMH battery or from a vehicle DC
supply. To install the battery, See page 36. To connect your PocketJet to a “12-volt”
vehicle DC supply to print or maintain the battery charge, follow the steps below.
1. Connect an appropriate power cord (either with a cigarette plug or direct wired)
to the vehicle 12VDC supply as shown in Figure 3. (These items are available as
options. See Chapter 8.)
2. Connect the power cord to the PocketJet.
3. Turn on the vehicle power, and then turn on the PocketJet.
Figure 3. Connecting the printer to DC power
Page 3
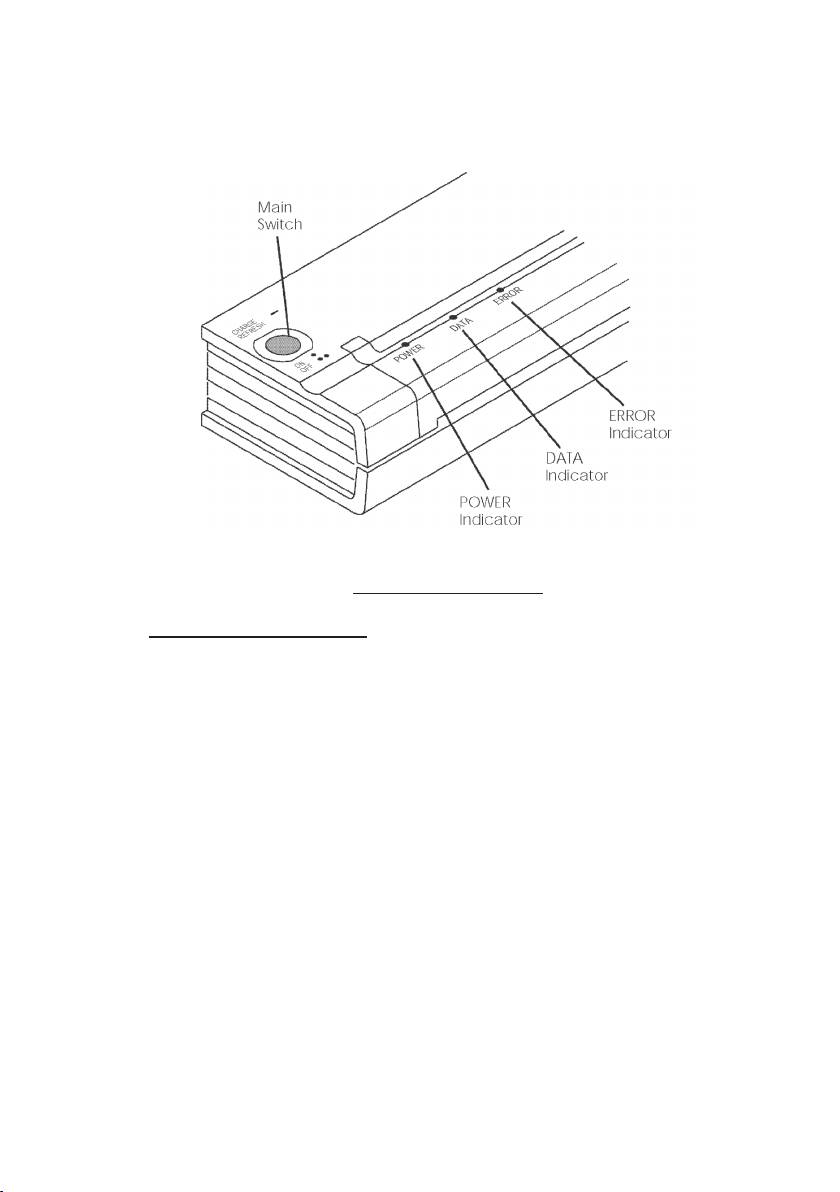
Using the Operation Panel
The operation panel consists of the main switch and three indicator lights.
See Figure 4.
Figure 4. Operation panel
Main Switch Functions
Power ON: Push once while the printer is OFF.
Power OFF: Push twice quickly.
Manual Form Feed: With power ON and paper inserted, press and hold the main
switch to feed (or eject) paper. Manual form feeds cannot be performed for ve
seconds after the printer has received any data in order to assure that printing is
complete before permitting a form feed. The button must then be held down for 1-1/2
seconds to start the form feed.
To Quickly Charge the Battery: With the printer off, push the main switch and
hold it down for two or more seconds until the POWER indicator begins to blink. The
POWER indicator light continues to blink until charging is complete.
To Power Off During Charge Mode: Push the main switch twice quickly (same as
when in normal operating mode).
Service Mode: After powering the unit on, press and hold for 2 seconds until the
DATA LED turns red. In this mode you may initiate self test printing (See Chapter 5)
or head cleaning (See Chapter 4).
Page 4

NOTE: Additional functions such as Auto On, Auto Off, and Pre-Feed are available
for your printer through the PocketJet 3 Utility or PocketJet 3Plus Utility.
See pages 17-35 for details.
Indicator Lights
The three indicator lights—POWER, DATA, and ERROR— show both normal
operation and error conditions. Each light may appear as green, red, or orange, and
may either stay lit continuously or blink. The meaning of the many possible indications
of these lights is explained in more detail in Chapter 5.
Some of the more common indications follow:
• POWER light is steady green: The printer is operating on external power.
• POWER light is red or orange: The printer is operating on battery power. Color and
blink/solid indicates approximate charge remaining.
• POWER light is alternately blinking green/yellow: Battery is being discharged prior
to charging.
• POWER light is blinking green: Battery is charging.
• DATA light is steady green: Unprinted data is in the printer buffer or a command has
been received from the computer.
• DATA light is blinking green: Printer is receiving data.
• ERROR light is steady or blinking in any color (except when sending new ash code
or fonts): An error has occurred.
Please refer to the table in Chapter 5 that contains all combinations of indicator lights
and their meanings.
Page 5
