Vitek VT-4060 SR: Storing Handing and Caring for Discs Step: FRONT PANEL REAR PANEL Remote control OPERATING THE REMOTE CONTROL Battery installation: Using the Remote Control
Storing Handing and Caring for Discs Step: FRONT PANEL REAR PANEL Remote control OPERATING THE REMOTE CONTROL Battery installation: Using the Remote Control: Vitek VT-4060 SR
Table of contents
- DVD 5.1 HOME THEATRE SYSTEM IMPORTANT NOTICES:
- ABOUT YOUR DVD PLAYER BEST LOCATION TO OBTAIN A CLEAR PICTURE PLAYABLE DISCS DIGITAL AUDIO OUTPUT ANALOG AUDIO OUTPUT LASERHEAD OVERCURRENT PROTECTION SYSTEM DISCS USE OF DISC Handling Cleaning
- Storing Handing and Caring for Discs Step: FRONT PANEL REAR PANEL Remote control OPERATING THE REMOTE CONTROL Battery installation: Using the Remote Control
- BATTERIES Connection Stereo Audio Coaxial Digital Audio Speaker Output
- SPEAKERS Composite Video SVideo ARRANGEMENT OF SPEAKERS Component Video (YUV) VGA SCART CONNECTING SPEAKERS
- ANGLE MARK: OSD LANG: CLOSED CAPTIONS: SCREEN SAVER: LAST MEMORY: CONNECTING ANTENNA AUDIO SETUP PAGE ANALOG AUDIO SETUP: DOWNMIX: LT/RT: MENU OPERATION: STEREO: 3D SURROUND: OFF: GENERAL SETUP PAGE FRONT, CENTER, REAR and SUBWOOFER SPEAKER: (No this DIALOG:
- DIGITAL AUDIO SETUP PAGE 3D PROCESSING: DIGITAL OUTPUT: SPDIF OFF: HDCD SETUP: ALL: KARAOKE PCM ONLY: LPCM OUT: DOLBY DIGITAL SETUP VIDEO SETUP PAGE DUAL MONO: DYNAMIC: COMPONENT V IDEO: CHANNEL DELAY PAGE: EQUALIZER: COLOR SETTING SETUP:
- PREFERENCES PLAYING THE RADIO AUDIO, SUBTITLE and DISC MENU LANGUAGE PAGE: PARENTAL: BASIC DVD OPERATION PASSWORD PAGE:
- PREV/NEXT playback MENU: MENU/PBC FUNCTIONS LOCATING A TITLE
- JPEG FILES
- Troubleshooting Symptom Cause Solution Specification DVD receiver
ENGLISH
Storing
Do not store discs in places subject to direct sunlight or near heat sources.
Do not store discs in places subject to moisture and dust.
Store discs vertically in a case. Stacking or placing objects on discs outside of their case may cause warping.
Handing and Caring for Discs Step:
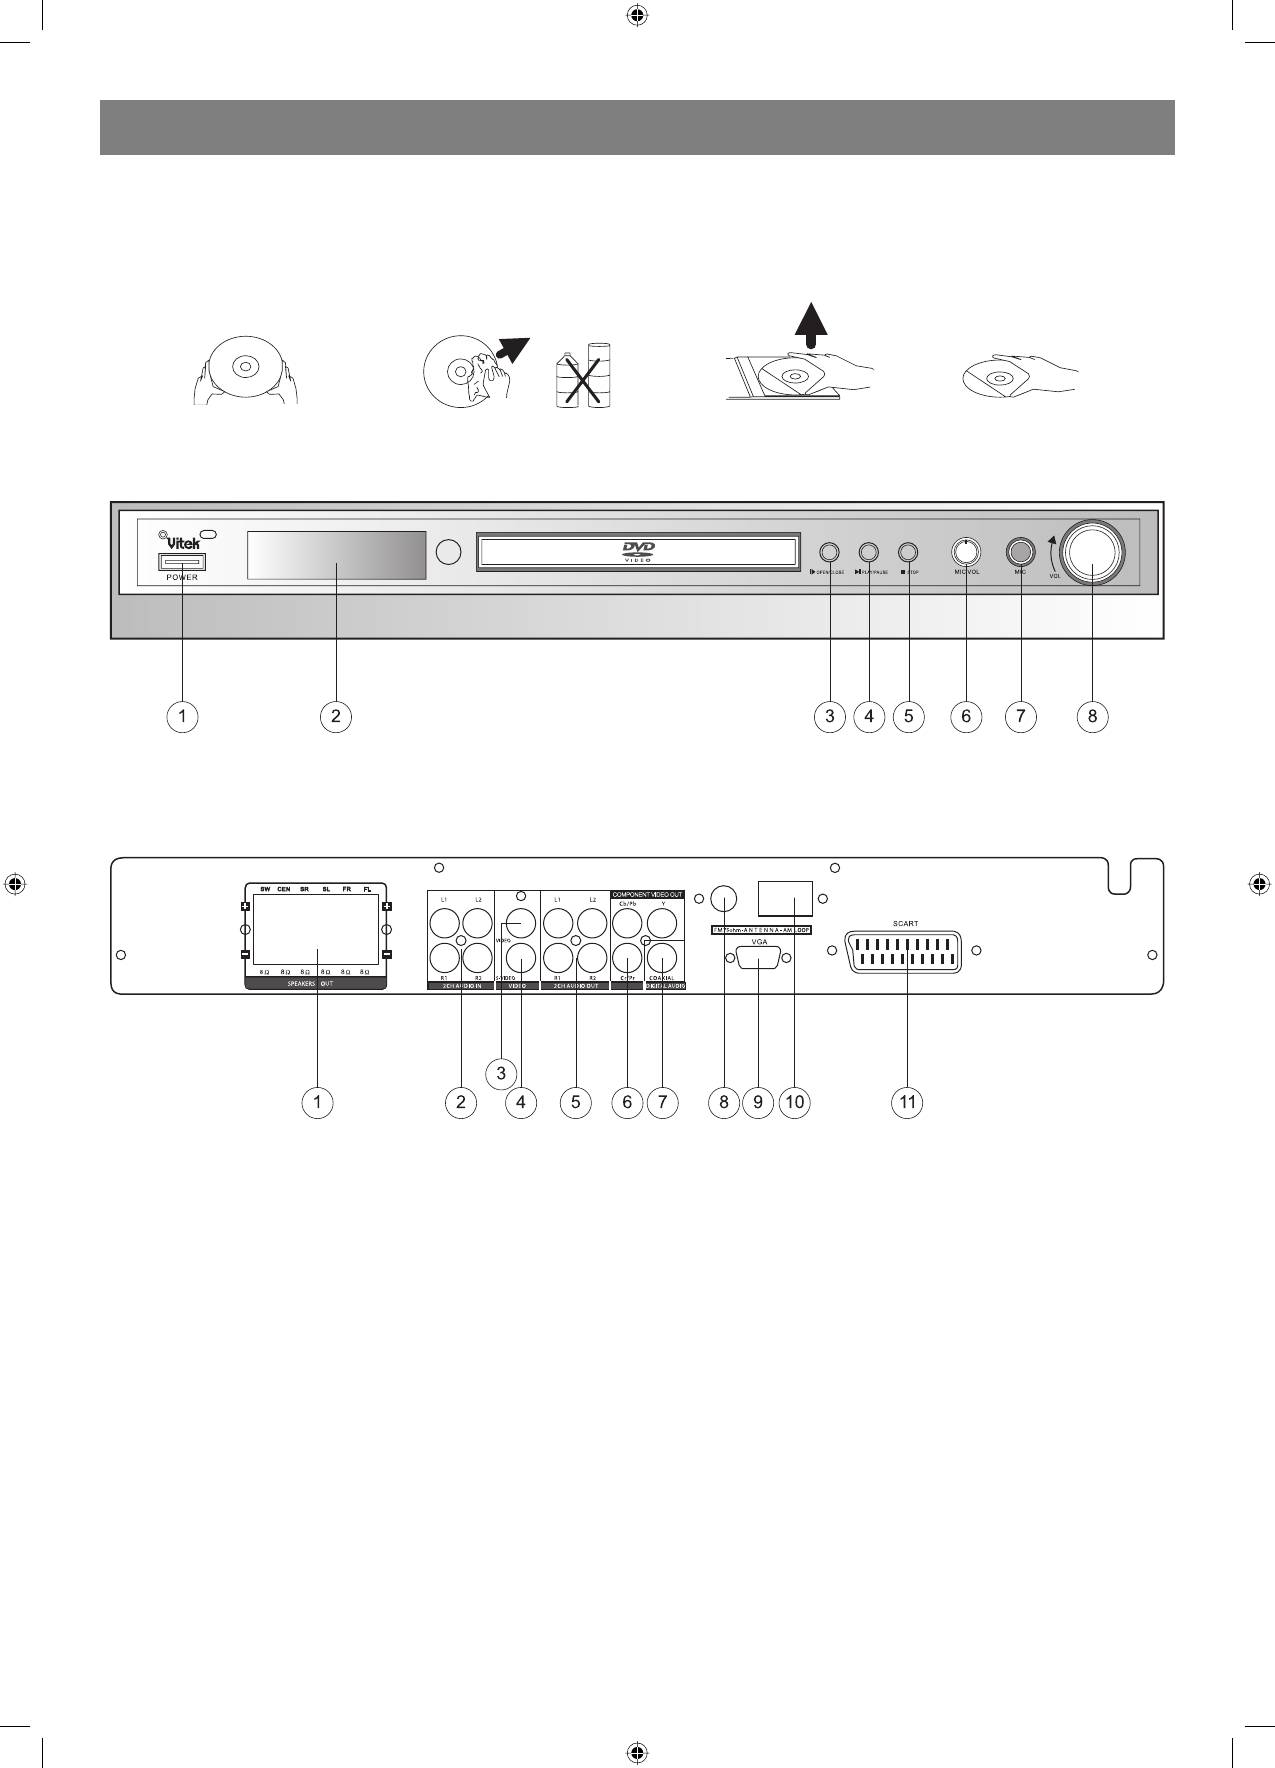
FRONT PANEL
1. Power
4. Play/Pause Button
7. Mic Jack
2. DVD Door
5. Stop Button
8. Volume Knob
3. Open/Close Button
6. Mic Volume
REAR PANEL
1. Speaker Output Terminals
5. 2CH Audio Output
9. VGA Jack
2 . 2CH Audio Input
6 . Component Y, Cb/Pb, Cr/Pr
10. AM Antenna Jack
3 . Video Output Jack
7. Coaxial Output Jack
11. Scart Jack
4 . SVideo Output Jack
8 . FM Antenna Jack
Remote control
OPERATING THE REMOTE CONTROL
Battery installation:
1. Push down and out on the battery Compartment cover to remove it.
2. Insert the two AAA batteries into the battery compartment of the remote control, and making sure the + and signs on the batteries and inside the
battery compartment match up.
3. Replace the battery compartment cover.
Notes:
1. Do not mix batteries from different manufacturers, nor old ones with new.
2. If the remote control will not be used for an extended period of time, remove the batteries to prevent damagecausing corrosion.
3. Remove dead batteries immediately to prevent damagecausing corrosion.
4. If battery leakage occurs, wipe the battery liquid from the battery compartment, then replace both batteries.
5. Always replace both batteries at the same time, using new, fully charged batteries.
6. Life expectancy of batteries may vary depending on amount of use.
Using the Remote Control
Point the remote control at the remote sensor on the DVD receiver. When the signal is received from the remote, the unit will function accordingly.
There mote will operate to approximately 16 from the remote sensor at an angle of around 30 degrees each direction.
Notes:
1. Do not direct the remote sensor toward any light source, such as direct sunlight or a strong fluorescent light, as it may cause the unit to not
operate correctly.
4
4060.indd 44060.indd 4 23.10.2006 9:25:1123.10.2006 9:25:11


