Vitek VT-1254: instruction
Class: Household, kitchen appliances, electronics and equipment
Type: Iron

Manual for Vitek VT-1254
Table of contents
1254.indd 11254.indd 1 29.01.2009 14:26:1829.01.2009 14:26:18
2
1254.indd 21254.indd 2 29.01.2009 14:26:2029.01.2009 14:26:20
3
1254.indd 31254.indd 3 29.01.2009 14:26:2029.01.2009 14:26:20

ENGLISH
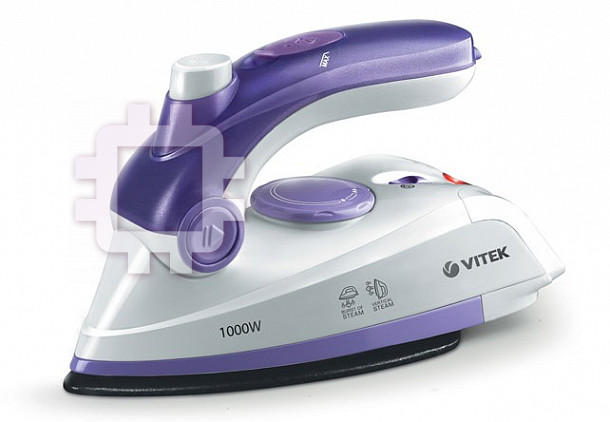
TRAVEL IRON
• Pour out water only after usage of the
unit.
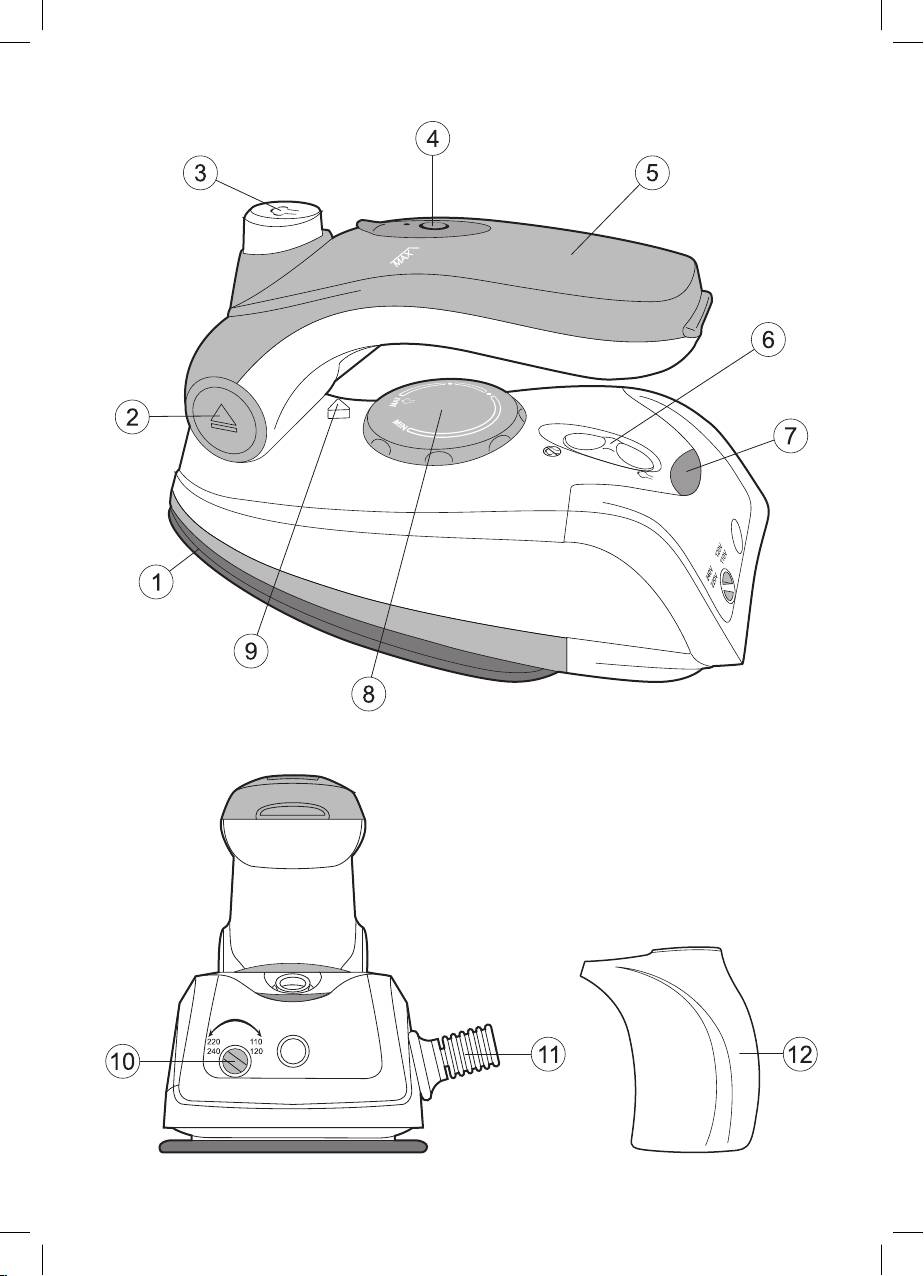
Description
• While operating the unit, provide that the
1. Iron sole
water tank lid is firmly closed.
2. Handle folding button
•
Close supervision is necessary when
3. Additional steam supply button
children or disabled persons are near the
4. Water tank lid
unit.
5. Handle
• Never leave the operating unit unattend-
6. Steam supply switch
ed.
7. Heating element switching on indica-
• Always unplug the unit if you do not use
tion
it.
8. Temperature control
• In order to avoid electric shock do not im-
9. Selected temperature indication
merse the unit into water or other liquids.
10. Power supply switch 110-120/220-240 V
• Do not fill the water tank with scented liq-
11. Power cord protection
uids, vinegar, starch solution, descaling
12. Water tank
reagents, chemical agents etc.
• Avoid contact with hot surfaces or outgo-
SAFETY MEASURES
ing steam of the iron in order to avoid get-
Before using the unit, please read the
ting of burns.
instructions carefully and pay attention
• Provide that the power cord does not
to the illustrations.
touch heated surfaces.
• Before plugging in, set the power switch
• To unplug the unit always take it by the
(10) according to the voltage of the mains.
plug, do not pull by the power cord.
After using of the unit at 110-120V always
• Before taking the unit away for keeping,
set the switch (10) to the 220-240V posi-
pour out the remaining water and let the
tion, it will prevent the iron from malfunc-
unit cool down.
tion in case of sudden plugging in of the
• Do not wind the cord over the unit until it
unit into the mains with insufficient volt-
cools down completely.
age.
• Pour out water only after you have un-
• Do not plug in the unit in the sockets,
plugged the unit.
intended for electric razors (in long-dis-
• Do not use the unit if the plug or the pow-
tance trains).
er cord is damaged or if there are other
• Before plugging in the unit, unwind the
damages in the unit.
power cord completely.
• In order to avoid electric shock do not
• Power cord is equipped with a euro plug;
repair the unit yourself. If there are some
insert it into the socket, with secure
damages in the unit apply to the author-
grounding.
ized service center.
• In order to avoid risk of fire do not use
• Travelling iron can help you quickly put
adapters while connecting the appliance
your things in order during journeys and
to the outlet.
business trips, but it cannot replace a
• In order to avoid overloading of the power
usual iron.
network do not switch on several appli-
ances with high power consumption si-
IRONING WITHOUT AN IRONING
multaneously.
BOARD
• Place the iron on a flat stable surface.
During journeys an ironing board is not al-
• Always unplug the unit while filling the wa-
ways handy; in such cases you can just put
ter tank with water.
a curled terry towel on a flat surface. Make
4
1254.indd 41254.indd 4 29.01.2009 14:26:2029.01.2009 14:26:20
ENGLISH
sure that the surface is heat resistant and
IRONING TEMPERATURE
waterproof. Do not use glass and plastic
Before operating test the heated iron on the
surface.
old cloth to be sure that the iron sole (1) and
the water tank are clean.
BEORE FIRST USAGE
• Always check the recommended iron
• Take out the iron from the package and
temperature indicated on the tag before
remove the protective cartoon covering
ironing.
from the iron sole (1).
• If the tag does not list the recommended
• Wipe the sole with a soft cloth.
ironing temperature, but you know the
• Before plugging in, set the power switch
type of fabric, then use the following table
(10) according to the voltage of the mains.
to determine the proper temperature.
After using of the unit at 110-120V always
set the switch (10) to the 220-240V posi-
Signs Fabric type/temperature
tion, it will prevent the iron from malfunc-
Synthetics, nylon, acryl, polyester
•
tion in case of sudden plugging in of the
(low temperature)
••
Silk/wool (medium temperature)
unit into the mains with insufficient volt-
•••
Cotton/flax (high temperature)
age.
• This table is only for smooth materials.
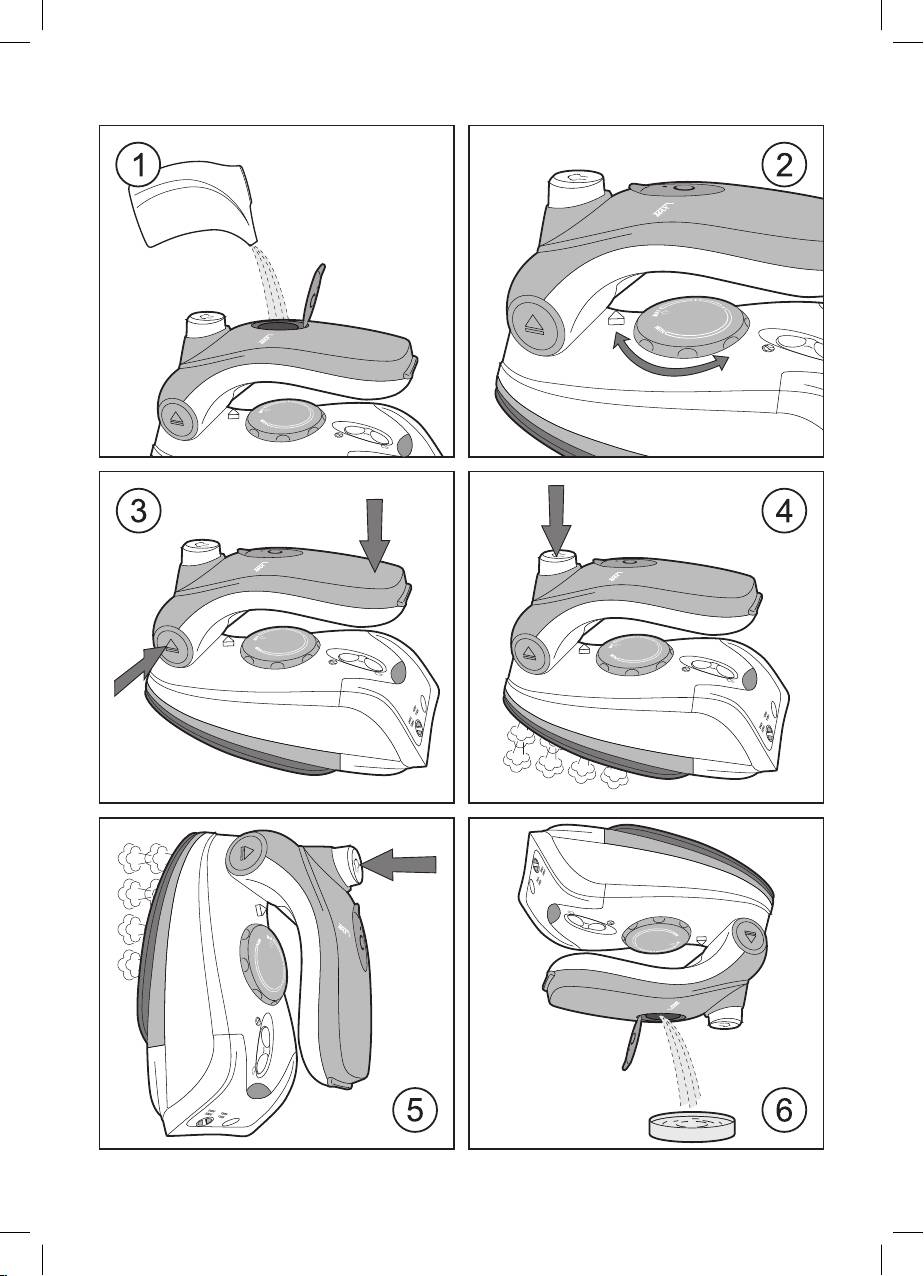
Filling with water (pic. 1)
Fabrics of other types (crimped, raised
- Before using the unit, fill the tank with tap-
etc.) are best ironed at low temperature.
ping water, if tapping water is too hard, it
• The iron heats up faster than is cools
is recommended using of distilled water.
down. For this reason it is recommended
- Before filling the unit with water, make
to begin ironing at low temperature (for in-
sure that it is unplugged.
stance synthetic fabrics). After that, move
• Set the steam supply regulator (6) to the
to higher temperature ironing. Cotton and
position of steam OFF
.
linens should be ironed last.
• Open the water tank lid (4).
• If an item is made from a mix of fabrics,
• Use the water tank (12), fill the tank with
then the iron should be set for the fab-
not more than 40 ml of water and close
ric with the lowest ironing (for instance if
the lid (4).
an item is made from 60% polyester and
40% cotton, it should be ironed at the
Note:
temperature used for ironing polyester
Steam will not be supplied if there is no
“•”).
water in the tank.
• If you cannot define the fabric the item is
• If you want to add water during iron-
made from, find a place on it that is hid-
ing, unplug the unit.
den while wearing and, on practice select
• Do not fill the water tank with scent-
the ironing temperature (always start at
ed liquids, vinegar, starch solution,
the lowest and gradually raise it until you
descaling reagents, chemical agents
get the desired result.)
etc.
• Corduroy and other fabrics that start
• After you finish ironing, switch off the
glossy quickly should be ironed strictly in
iron, let it cool down completely, then
one direction (along the lines) with slight
open the water tank lid (4), turn round
pressure.
the iron and drain the remaining water
• To avoid appearance of glossy spots on
(pic.6).
the synthetic and silk fabrics, iron them
back-side.
5
1254.indd 51254.indd 5 29.01.2009 14:26:2029.01.2009 14:26:20

ENGLISH
SETTING THE IRONING TEMPERATURE
STEAM IRONING
• If the handle (5) is at a low position, raise
For steam ironing set the temperature regu-
it, it will fix.
lator to «•••».
•
Unwind the power cord and insert the
• If the handle (5) is at a low position, raise
plug into the socket.
it, it will fix.
• Set the temperature regulator (8) to the
• Fill the tank with water as described
required ironing temperature: “•”, “••”,
above.
“•••” (depending on the type of fabric)
•
Unwind the power cord and insert the
(pic. 2), the indicator (7) will light up.
plug into the socket.
• Set the iron vertically.
• Set the switch (6) to the steam off posi-
• When the sole temperature (1) reaches
tion.
the desired temperature value, the indi-
• Set the temperature regulator (8) to the
cator (7) will go out, you can start iron-
required ironing temperature: “•••” (pic.
ing.
2), the indicator (7) will light up.
• Set the iron vertically.
IRONING
• When the sole temperature (1) reaches
• If the handle (5) is at a low position, raise
the desired temperature value, the indi-
it, it will fix.
cator (7) will go out, you can start iron-
• Unwind the power cord and insert the
ing.
plug into the socket.
• Switch on the steam supply, by setting of
• Set the temperature regulator (8) to the
the switch (6) to the steam supply On po-
required ironing temperature: “•”, “••”,
sition.
“•••” (depending on the type of fabric)
• After you finish ironing set the regulator
(pic. 2), the indicator (7) will light up.
(8) to the MIN position, and the switch (6)
• Set the iron vertically.
to the steam supply Off position.
• When the sole temperature (1) reaches
the desired temperature value, the indi-
Note: Always unplug the iron, if you are
cator (7) will go out, you can start iron-
not going using it even for a short period
ing.
of time.
• After you finish ironing set the regulator
(8) to the MIN position.
• Unplug the unit and let it cool down com-
pletely.
Note: Always unplug the iron, if you are
• Open the lid (4) and pour out water.
not going using it even for a short period
• Press the button (2) and lower the handle
of time.
(5) (pic. 3).
• Pull the plug out of the socket and let the
ATTENTION!
iron cool down completely.
If during the operation steam is not con-
• Press the button (2) and lower the handle
stantly supplied, check whether the tem-
(5) (pic. 3).
perature regulator (8) is set properly.
Note:
ADDITIONAL STEAM SUPPLY
While using the unit for the first time,
Additional steam supply function is useful
the heating element burns, that is why
when ironing folds and can only be used at
smoke or strange smell can appear – it
high ironing temperatures (when the iron
is normal.
temperature regulator (8) is set to “•••”.
When the additional steam supply button
6
1254.indd 61254.indd 6 29.01.2009 14:26:2029.01.2009 14:26:20

ENGLISH
(3) is pressed, steam will be vigorously re-
release regulator (6) to the left position -
leased from the openings in the iron sole
steam supply OFF position.
(pic.4).
• Remove the power plug from the outlet.
• Open the water tank lid (4), turn over the
Note: In order to avoid leakage of water
iron and drain any remaining water from
from steam openings, press the addi-
the water tank (pic. 6).
tional steam supply button (3) with 5-6
• Close the lid (2).
sec. interval.
• Set the iron vertically and allow it to cool
completely.
VERTICAL STEAMING
• Store the iron vertically.
Vertical steaming function can be used
only when the high temperature mode is
Delivery set
used (set the temperature regulator (8) to
1. Iron – 1 pc.
«•••»).
2. Water tank – 1pc.
• Hold the iron vertically at the distance10-
3. Travel pouch – 1pc.
20 cm from the clothes press the addi-
4. Instruction manual – 1 pc.
tional steam release button (3), steam will
be released from the sole (1) (pic. 5).
TECHNICAL CHARACTERISTICS
Power requirements:
Important information
110-120/220-240 V, ~ 50/60 Hz
• Vertical steaming is not recommended
Power consumption: 840-1000 W
for synthetic fabrics.
• To avoid melting the fabric, do not touch
Specifications subject to change without
the iron sole to the item while steaming.
prior notice.
• Never steam iron clothing on a person as
the steam temperature is very high and it
MINIMUM SERVICE LIFE - 3 YEARS
can cause burns. Use a coat-hanger or a
stand.
GUARANTEE
Details regarding guarantee conditions can
CARE AND CLEANING
be obtained from the dealer from whom the
• Before cleaning the iron, make sure that it
appliance was purchased. The bill of sale or
is turned off and has cooled completely.
receipt must be produced when making any
• Wipe the iron's outer surface with a damp
claim under the terms of this guarantee.
cloth and then wipe dry.
• Sediment on the iron sole can be removed
This product conforms to the
with a cloth soaked in vinegar-water solu-
EMC-Requirements as laid down
tion.
by the Council Directive 89/336/
• After removing sediment, polish the sole
EEC and to the Law Voltage
with a dry cloth.
Regulation (73/23 EEC)
• Do not use abrasive substances to clean
the sole and body of the iron.
• Avoid touching the iron sole with sharp
metal objects.
STORAGE
• Turn the temperature regulator (8) anti-
clockwise till MIN position, set the steam
7
1254.indd 71254.indd 7 29.01.2009 14:26:2029.01.2009 14:26:20

DEUTSCH
REISEBÜGELEISEN
• Es ist nicht gestattet, mehrere Geräte mit
hoher Verbrauchsleistung gleichzeitig
Beschreibung
einzuschalten, um die Überlastung des
1. Gleitsohle
Stromnetzes zu vermeiden.
2. Knopf fürs Zusammenklappen des
• Stellen Sie das Bügeleisen auf eine gera-
Handgriffs
de stabile Oberfl äche auf.
3. Taste der zusätzlichen Dampfzufuhr
• Beim Auffüllen des Wasserbehälters
4. Deckel der Wassereinfüllöffnung
schalten Sie das Bügeleisen vom
5. Handgriff
Stromnetz immer ab.
6. Regler der konstanten Dampfzufuhr
• Gießen Sie das Wasser nach der Nutzung
7. Indikator der Ein/Ausschaltung des
des Bügeleisens ab.
Heizkörpers
• Der Deckel der Einfüllöffnung soll beim
8. Temperaturregler
Bügeln dicht geschlossen sein.
9. Temperaturanzeige
• Besondere Vorsichtsmaßnahmen sind in
10. Spannungsschalter 110-120/220-240 V
den Fällen angesagt, wenn sich Kinder
11. Netzkabelschutz
oder behinderte Personen während der
12. Wassereinfüllbehälter
Nutzung des Geräts in der Nähe aufhal-
ten.
SICHERHEITSMAßNAHMEN
• Lassen Sie das eingeschaltete Gerät nie
Vor der Inbetriebnahme des Geräts
unbeaufsichtigt.
lesen Sie aufmerksam diese
• Schalten Sie das Gerät nach dem
Betriebsanleitung durch, achten Sie
Gebrauch vom Stromnetz immer ab.
auch auf die Abbildungen.
• Tauchen Sie das Gerät nie ins Wasser
• Vor der ersten Inbetriebnahme des
oder andere Flüssigkeiten, um
Bügeleisens vergewissern Sie sich,
Stromschlagrisiko zu vermeiden.
dass die Spannung des Geräts mit der
• Es ist nicht gestattet, Aromafl üssigkeiten,
Netzspannung (10) übereinstimmt. Nach
Essig, Stärkelösung, Reagenzien für die
der Nutzung des Geräts schalten Sie im-
Entfernung von Kalkstein, chemische
mer den Spannungsschalter (10) bei der
Lösungen usw. ins Wasserbehälter einzu-
Spannung 110-120 V in die Position 220-
gießen.
240 V, dadurch wird der Ausfall des Geräts
• Vermeiden Sie die Berührung der Haut
beim zufälligen Einschalten ins Netz mit
mit heißen Oberfl ächen des Bügeleisens
der nicht übereinstimmenden Spannung
oder austretendem Dampfes, um
vermieden.
Verbrennungen zu vermeiden.
• Es ist nicht gestattet, Steckdosen für
• Achten Sie darauf, dass das Netzkabel
den Betrieb des Geräts zu nutzen, die für
heisse Gegenstände nicht berührt.
Elektrorasierer (in Fernzügen) geeignet
• Es ist nicht gestattet, das Gerät beim
sind.
Abschalten vom Stromnetz am Netzkabel
• Wickeln Sie das Netzkabel vor dem
zu ziehen, halten und ziehen Sie es am
Einschalten des Bügeleisens komplett
Stecker.
ab.
• Vor der Wegpacken des Geräts schalten
• Das Netzkabel ist mit einem „Eurostecker“
Sie es vom Stromnetz ab, gießen Sie das
ausgestattet; schalten Sie diesen in die
Wasser ab und lassen Sie es abkühlen.
Steckdose mit sicherer Erdung.
• Es ist nicht gestattet, das Netzkabel um
• Verwenden Sie keine Übergangsstücke
das Gerät zu wickeln, wenn es nicht kom-
beim Anschließen des Geräts an das
plett abgekühlt ist.
Stromnetz, um Brandrisiko zu vermeiden.
• Gießen Sie das Wasser nur nach dem
8
1254.indd 81254.indd 8 29.01.2009 14:26:2029.01.2009 14:26:20

DEUTSCH
Abschalten des Bügeleisens vom
Auffüllen des Bügeleisens mit Wasser
Stromnetz ab.
(Abb. 1)
• Es ist nicht gestattet, das Gerät zu nut-
Vor der Nutzung des Bügeleisens fül-
zen, wenn das Netzkabel oder der
len Sie den Wasserbehälter mit ein-
Netzstecker beschädigt ist oder bei an-
fachem Leitungswasser auf, wenn
deren Störungen.
das Leitungswasser hart ist, wird es
• Es ist nicht gestattet, das Gerät selb-
empfohlen, destilliertes Wasser zu
ständig zu reparieren, um Stromschläge
nutzen.
zu vermeiden. Bei der Feststellung von
Vor dem Auffüllen des Bügeleisens mit
Beschädigungen wenden Sie sich an den
Wasser, vergewissern Sie sich, dass es
autorisierten Kundenservicedienst.
vom Stromnetz abgeschaltet ist.
• Das Reisebügeleisen hilft Ihnen Euro
• Stellen Sie den Regler der Dampfzufuhr
Sachen während der Urlaubs oder
(6) in die Position „Dampfzufuhr aus-
Dienstreise in Ordnung zu halten, kann
schalten“
.
jedoch das normale Bügeleisen nicht er-
• Öffnen Sie den Deckel der
setzen.
Wassereinfüllöffnung (4).
• Gießen Sie ca. 40 ml Wasser in die
BÜGELN OHNE BÜGELBRETT
Einfüllöffnung ein, nutzen Sie dabei das
Während der Reisen ist das Bügellbrett
Wasserbehälter (12), und schließen Sie
nicht immer bei der Hand, in solchen Fällen
den Deckel (4) zu.
genügt es, wenn Sie ein zweimal gefaltetes
Frottierhandtuch auf die gerade Oberfl äche
Anmerkung:
legen.
Die Dampzufuhr erfolgt nicht, wenn der
• Vergewissern Sie sich im voraus, dass
Wasserbehälter leer ist.
die Oberfl äche hitze und wasserbestän-
• Wenn sie während des Bügelns Wasser
dig ist. Es ist nicht gestattet, Glas und
nachgießen müssen, schalten Sie das
Platikoberfl ächen zum Bügeln zu nutzen.
Bügeleisen aus und ziehen Sie den
Netzstecker aus der Steckdose.
VOR DER ERSTNUTZUNG DES GERÄTS
• Es ist nicht gestattet, Aromafl üssigkeiten,
• Nehmen Sie das Bügeleisen aus der
Essig, Stärkelösung, Reagenzien für die
Verpackung heraus und entfernen Sie
Entfernung von Kalkstein, chemische
das Schutzmaterial von der Gleitsohle
Lösungen usw. ins Wasserbehälter ein-
(1).
zugießen.
• Wischen Sie die Gleitsohle des Geräts mit
• Nach dem Bügeln schalten Sie das Gerät
einem trockenen Tuch ab.
aus, lassen Sie es abkühlen, danach öff-
• Vor der ersten Inbetriebnahme des
nen Sie den Deckel der Einfüllöffnung
Bügeleisens vergewissern Sie sich,
(4), drehen Sie das Bügeleisen um und
dass die Spannung des Geräts mit der
gießen Sie Restwasser aus (Abb.6).
Netzspannung (10) übereinstimmt. Nach
der Nutzung des Geräts schalten Sie im-
TEMPERATUR BEIM BÜGELN
mer den Spannungsschalter (10) bei der
Vor der Inbetriebnahme prüfen Sie das auf-
Spannung 110-120 V in die Position 220-
geheizte Bügeleisen auf einem Tuch, ob die
240 V, dadurch wird der Ausfall des Geräts
Gleitsohle (1) und der Wasserbehälter sau-
beim zufälligen Einschalten ins Netz mit
ber sind.
der nicht übereinstimmenden Spannung
• Vor dem Bügeln sollen Sie die
vermieden.
Überschriften auf dem Etikett der
9
1254.indd 91254.indd 9 29.01.2009 14:26:2029.01.2009 14:26:20
DEUTSCH
Kleidung beachten, wo die empfohlene
leichtem Druck streng in einer Richtung
Temperatur angegeben ist.
gebügelt werden (in Richtung des
• Wenn das Etikett mit den Hinweisen fehlt,
Strichs).
Sie kennen aber den Stofftyp, so kön-
• Um die Entstehung von Glanzfl ecken auf
nen Sie die Temperaturangaben der fol-
den synthetischen und seidenen Stoffen
genden Tabelle entnehmen:
zu vermeiden, bügeln Sie diese von der
Innenseite aus.
Symbole Stofftyp (Temperatur)
Synthesefaser, Nylon, Acryl,
EINSTELLEN DER BÜGELTEMPERATUR
•
Polyester (niedrige Temperatur)
• Falls sich der Handgriff (5) in der unteren
Seide/Wolle/Viskose (mittlere
••
Position befi ndet, heben Sie ihn und fi xie-
Temperatur)
ren Sie ihn in der oberen Position.
Baumwolle/Leinen (hohe
•••
• Wickeln Sie das Netzkabel ab und stecken
Temperatur)
Sie den Netzstecker in die Steckdose.
• Die Tabelle ist nur für glatte Stoffe geeig-
• Stellen Sie mit dem Regler (8) die ge-
net. Wenn Sie das Material eines anderen
wünschte Bügeltemperatur ein: „•“,
Typs verwenden (gaufriert, geriffelt usw.),
„••“, „•••“ (abhängig vom Stofftyp)
dann soll es bei der niedrigen Temperatur
(Abb. 2), dabei wird der Indikator (7) auf-
gebügelt werden.
leuchten.
• Das Bügeleisen wird schneller aufgeheizt
• Bewahren Sie das Bügeleisen in der
als abgekühlt. Aus diesem Grund wird
senkrechten Lage auf.
es empfohlen, Sachen bei der niedrigen
• Wenn die Temperatur der Gleitsohle (1)
Temperatur zu bügeln (z.B. synthetische
auf die gewünschte Temperatur steigt
Stoffe). Danach können Sie auch zum
und der Indikator (7) erlöscht, können Sie
Bügel bei höheren Temperaturen über-
zum Bügeln übergehen.
gehen (Seide, Wolle). Erzeugnisse aus
Baumwolle und Leinen sollen zuletzt ge-
TROCKENES BÜGELN
bügelt werden.
• Falls sich der Handgriff (5) in der unteren
• Wenn das Kleidungsstück aus
Position befi ndet, heben Sie ihn und fi xie-
Mischfasern ist, soll die Temperatur auf
ren Sie ihn in der oberen Position.
die niedrigste Stufe eingestellt werden
• Wickeln Sie das Netzkabel ab und stecken
(z.B. wenn das Kleidungsstück zu 60%
Sie den Netzstecker in die Steckdose.
aus Polyester und zu 40% aus Baumwolle
• Stellen Sie mit dem Regler (8) die ge-
Besteht, so soll es bei der Temperatur
wünschte Bügeltemperatur ein: „•“,
gebügelt werden, die für das Bügeln von
„••“, „•••“ (abhängig vom Stofftyp)
Polyester geeignet ist "•“)
(Abb. 2), dabei wird der Indikator (7) auf-
• Wenn Sie den Stofftyp nicht feststellen
leuchten.
können, woraus das Kleidungsstück her-
• Stellen Sie das Bügeleisen in die senk-
gestellt ist, fi nden Sie darauf ein unbe-
rechte Lage auf.
merkbare Stelle beim Tragen, und wählen
• Wenn die Temperatur der Gleitsohle (1)
Sie durch das Prüfen die Temperatur des
auf die gewünschte Temperatur steigt
Bügelns aus (fangen Sie immer von der
und der Indikator (7) erlöscht, können Sie
niedrigsten Temperatur an und erhöhen
zum Bügeln übergehen.
Sie diese, bis das gewünschte Ergebnis
• Schalten Sie das Bügeleisen aus, in-
nicht erreicht wird).
dem Sie den Temperaturregler (8) in die
• Kordstoffe und andere Stoffe, die sehr
Position „MIN“ stellen.
schnell beginnen zu glänzen, sollen unter
10
1254.indd 101254.indd 10 29.01.2009 14:26:2029.01.2009 14:26:20

DEUTSCH
Anmerkung: Schalten Sie das Gerät immer
„MIN“ und den Regler der konstan-
vom Stromnetz ab, wenn Sie es auch für
ten Dampfzufuhr (6) in die Position
kürzere Zeit nicht nutzen.
„Dampfzufuhr ausschalten“ stellen.
• Schalten Sie das Gerät vom Stromnetz ab
Anmerkung: Schalten Sie das Gerät immer
und warten Sie ab, bis dieses abgekühlt
vom Stromnetz ab, wenn Sie es auch für
wird.
kürzere Zeit nicht nutzen.
• Drücken Sie die Taste (2) und senken Sie
den Handgriff des Bügeleisens (5) nach
• Schalten Sie das Gerät vom Stromnetz ab
unten (Abb. 3).
und warten Sie ab, bis dieses komplett
abgekühlt wird.
Anmerkung:
• Öffnen Sie den Deckel (4) aus und gießen
Beim ersten Einschalten des Bügeleisens
Sie das Wasser aus dem Wasserbehälter
verbrennt das Heizelement, es kann zur
ab.
Entstehung des Rauches oder eines frem-
• Drücken Sie die Taste (2) und senken Sie
den Geruchs führen – es ist normal.
den Handgriff des Bügeleisens (5) nach
unten (Abb. 3).
BÜGELN MIT DAMPF
Beim Bügeln mit Dampf soll die Temperatur
ACHTUNG!
in die Position „•••“ eingestellt werden.
Wenn konstante Dampfzufuhr während des
• Falls sich der Handgriff (5) in der unteren
Betriebs des Geräts nicht erfolgt, prüfen
Position befi ndet, heben Sie ihn und fi xie-
Sie die Richtigkeit der Positionierung des
ren Sie ihn in der oberen Position.
Temperaturreglers (8).
• Füllen Sie den Wasserbehälter mit Wasser
auf, wie es im entsprechenden Kapitel
ZUSÄTZLICHE DAMPFZUFUHR
beschrieben wird.
Die Funktion der zusätzlichen Dampfzufuhr
• Wickeln Sie das Netzkabel ab und stecken
ist fürs Glätten der Falten zweckmäßig und
Sie den Netzstecker in die Steckdose.
kann nur beim Hochtemperaturbetrieb
• Stellen Sie den Regler der Dampfzufuhr
des Bügelns verwendet werden
(6) in die Position „Dampfzufuhr aus-
(Temperaturregler (8) in der Position
schalten“.
"•••“).
• Stellen Sie mit dem Regler (8) die ge-
Bei Drücken der Taste der zusätzlichen
wünschte Bügeltemperatur ein: „•••“
Dampfzufuhr (3) tritt der Dampf intensiver
Abb. 2), dabei wird der Indikator (7) auf-
aus der Gleitsohle aus (Abb. 4).
leuchten.
• Stellen Sie das Bügeleisen in die senk-
Anmerkung: Um das Auslaufen des Wassers
rechte Lage auf.
aus den Dampföffnungen zu vermeiden,
• Wenn die Temperatur der Gleitsohle (1)
drücken Sie den Knopf der zusätzlichen
auf die gewünschte Temperatur steigt
Dampfzufuhr (3) mit dem Intervall von 56
und der Indikator (7) erlöscht, können Sie
Sekunden.
zum Bügeln übergehen.
• Stellen Sie den Regler der Dampfzufuhr
VERTIKALE ABDAMPFUNG
(6) in die Position „Dampfzufuhr einschal-
Die Funktion der vertikalen Abdampfung
ten“.
kann nur beim Hochtemperaturbetrieb
Nach der Nutzung des Bügeleisens
des Bügelns verwendet werden (der
schalten Sie es aus, indem Sie den
Temperaturregler (8) in der Position
Temperaturregler (8) in die Position
"•••“).
11
1254.indd 111254.indd 11 29.01.2009 14:26:2029.01.2009 14:26:20

DEUTSCH
• Halten Sie das Bügeleisen senkrecht
• Ziehen Sie den Netzstecker aus der
1020 cm von der Bekleidung entfernt
Steckdose.
und drücken Sie den Knopf der zusätz-
• Öffnen Sie den Deckel der
lichen Dampfzufuhr (3), der Dampf wird
Wassereinfüllöffnung (4) und gießen Sie
aus der Gleitsohle des Geräts (1) austre-
das Restwasser aus dem Wasserbehälter
ten (Abb. 5).
(Abb. 6). Schließen Sie den Deckel (2)
zu.
Wichtige Information
• Stellen Sie das Bügeleisen senkrecht auf
• Es wird nicht empfohlen, die vertikale
und lassen Sie es vollständig abkühlen.
Abdampfung von synthetischen Stoffen
• Bewahren Sie das Bügeleisen in der
durchzuführen.
senkrechten Lage auf.
• Es ist nicht gestattet, die Gleitsohle des
Bügeleisens mit dem Stoff zu berühren,
Lieferumfang
um seine Verschmelzung zu vermei-
1. Bügeleisen – 1 St.
den.
2. Behälter fürs Wassereinfüllen – 1 St.
• Es ist nicht gestattet, die Kleidung, die
3. Reisetasche – 1 St.
der Mensch trägt, abzudämpfen, weil die
4. Bedienungsanleitung – 1 St.
Temperatur des austretenden Dampfes
sehr hoch ist, benutzen Sie Kleiderbügel
TECHNISCHE EIGENSCHAFTEN
oder Aufhängebügel.
Stromversorgung:
110-120/220-240 V, ~ 50/60 Hz
REINIGUNG UND PFLEGE
Leistungsaufnahme: 840-1000 W
• Vor der Reinigung des Bügeleisens verge-
wissern Sie sich, dass es vom Stromnetz
Der Hersteller behält sich das Recht vor
abgeschaltet und abgekühlt ist.
die Charakteristiken des Gerätes ohne
• Wischen Sie das Gehäuse des
Vorbescheid zu ändern.
Bügeleisens mit einem feuchten Tuch,
danach trocknen Sie es.
Die Lebensdauer des Gerätes beträgt
• Ablagerungen an der Gleitsohle des
nicht weniger, als 3 Jahre
Bügeleisens können Sie mit einem Stoff
abwischen, der mit Essiglösung ange-
Gewährleistung
feuchtet ist.
Ausführliche Bedingungen der
• Nach der Entfernung des
Gewährleistung kann man beim Dealer,
Kalkablagerungen polieren Sie die
der diese Geräte verkauft hat, bekom-
Gleitsohle des Bügeleisens mit einem
men. Bei beliebiger Anspruchserhebung
trockenen Tuch.
soll man während der Laufzeit der vorlie-
• Es ist nicht gestattet, Abrasivmittel für
genden Gewährleistung den Check oder
die Reinigung der Gleitsohle und des
die Quittung über den Ankauf vorzulegen.
Gehäuses des Bügeleisens zu nutzen.
• Vermeiden Sie den Kontakt der Gleitsohle
Das vorliegende Produkt ent-
mit scharfen Metallgegenständen.
spricht den Forderungen
der elektromagnetischen
AUFBEWAHRUNG
Verträglichkeit, die in 89/336/
• Drehen Sie den Temperaturregler (8) ge-
EWG -Richtlinie des Rates und
gen Uhrzeigesinn in die Position „MIN“,
den Vorschriften 73/23/EWG
stellen Sie den Regler der Dampfzufuhr
über die Niederspannungsgeräte
(6) in die Position „Dampf ausschalten“.
vorgesehen sind.
12
1254.indd 121254.indd 12 29.01.2009 14:26:2029.01.2009 14:26:20

РУССКИЙ
ДОРОЖНЫЙ УТЮГ
• Во избежание перегрузки электричес-
кой сети не включайте одновременно
Описание утюга
несколько приборов с большой пот-
1. Подошва утюга
ребляемой мощностью.
2. Кнопка для складывания ручки
• Ставьте утюг на ровную устойчивую
3. Кнопка дополнительной подачи пара
поверхность.
4. Крышка заливного отверстия
• При наполнении резервуара водой
5. Ручка
всегда отключайте утюг от сети.
6. Выключатель постоянной подачи пара
• Сливайте воду после использования
7. Индикатор включения нагреватель-
утюга.
ного элемента
• При пользовании утюгом крышка за-
8. Регулятор температуры
ливочного отверстия должна быть
9. Указатель выбранной температуры
плотно закрыта.
10. Переключатель напряжения питания
• Будьте особенно внимательны при
110-120/220-240 В
использовании прибора в непосредс-
11. Защита сетевого шнура
твенной близости от детей и людей с
12. Емкость для заливки воды
ограниченными возможностями.
• Не оставляйте включенный утюг без
МЕРЫ БЕЗОПАСНОСТИ
присмотра.
Перед эксплуатацией внимательно
• Всегда отключайте утюг от сети, если
прочитайте инструкцию, а также об-
не пользуетесь им.
ратите внимание на иллюстрации.
• Чтобы избежать поражения электри-
• Перед включением утюга в электри-
ческим током, не погружайте утюг в
ческую сеть установите переключатель
воду или в любую другую жидкость.
напряжения питания (10) в соответс-
• Запрещается заливать в резервуар
твии с напряжением в электрической
для воды ароматизирующие жидкос-
сети. После использования утюга при
ти, уксус, раствор крахмала, реагенты
напряжении сети 110-120В всегда пе-
для удаления накипи, химические ве-
реводите переключатель напряжения
щества и т.д.
питания (10) в положение 220-240В,
• Избегайте контакта открытых участков
это предотвратит выход утюга из
кожи с горячими поверхностями утюга
строя при случайном включении утюга
или выходящим паром, чтобы избе-
в электрическую сеть с несоответс-
жать получения ожогов.
твующим напряжением.
• Следите, чтобы сетевой шнур не ка-
• Не подключайте утюг к розеткам,
сался горячих поверхностей.
предназначенным для электробритв
• При отключении утюга от электричес-
(в поездах дальнего следования).
кой сети всегда держитесь за сетевую
• Перед включением утюга в сеть пол-
вилку, никогда не тяните за сетевой
ностью размотайте сетевой шнур.
шнур.
• Сетевой шнур снабжен "евровилкой";
• Перед тем как убрать утюг, слейте ос-
включайте ее в розетку, имеющую на-
татки воды и дайте ему полностью ос-
дежный контакт заземления.
тыть.
• Во избежание риска возникновения
• Не оборачивайте сетевой шнур вокруг
пожара не используйте переходники
утюга до его полного охлаждения.
при подключении прибора к электри-
• Сливайте воду только после отключе-
ческой розетке.
ния утюга от сети.
13
13
1254.indd 131254.indd 13 29.01.2009 14:26:2029.01.2009 14:26:20

РУССКИЙ
• Не используйте утюг с поврежденной
Наполнение утюга водой (рис. 1)
сетевой вилкой, сетевым шнуром, а
- Перед использованием утюга напол-
также с любыми другими неисправ-
ните резервуар обычной водопровод-
ностями.
ной водой, если водопроводная вода
• Во избежание поражения электричес-
обладает повышенной жесткостью, то
ким током никогда не разбирайте утюг
рекомендуется использовать дистил-
самостоятельно, при обнаружении не-
лированную воду.
исправности обращайтесь в автори-
- Прежде чем залить воду в утюг, убеди-
зованный сервисный центр.
тесь, что он отключен от сети.
• Дорожный утюг поможет вам быстро
• Установите переключатель подачи
привести ваши вещи в порядок во вре-
пара (6) в положение «Подача пара
мя путешествий или деловых поездок,
выключена»
.
но он не является заменой обычному
• Откройте крышку заливного отверстия
бытовому утюгу.
(4).
• Используя емкость для заливки воды
ГЛАЖЕНИЕ БЕЗ ГЛАДИЛЬНОЙ ДО-
(12), залейте не более 40 мл воды в
СКИ
отверстие и закройте крышку (4).
Во время путешествий, гладильная до-
ска не всегда оказывается под рукой,
Примечание:
для таких случаев достаточно положить
Подача пара не будет осуществлять-
на ровную поверхность свёрнутое в два
ся, если в резервуаре нет воды.
раза махровое полотенце.
• Если во время глажения необходи-
Предварительно убедитесь, что повер-
мо долить воду, то отключите утюг
хность жаро- и влагоустойчива. Не ис-
и выньте сетевую вилку из розет-
пользуйте стеклянные и пластиковые
ки.
поверхности.
• Запрещается заливать в резервуар
для воды ароматизирующие жид-
ПЕРЕД ПЕРВЫМ ИСПОЛЬЗОВАНИЕМ
кости, уксус, раствор крахмала,
• Извлеките утюг из упаковки, при на-
реагенты для удаления накипи, хи-
личии защиты на подошве (1) удалите
мические вещества и т.д.
ее.
• После того как вы закончите гла-
• Протрите подошву утюга сухой тка-
дить, выключите утюг, дождитесь
нью.
его полного остывания после чего
• Перед включением утюга в электри-
откройте крышку заливочного от-
ческую сеть установите переключатель
верстия (4), переверните утюг и
напряжения питания (10) в соответс-
слейте остатки воды (рис 6.).
твии с напряжением в электрической
сети. После использования утюга при
ТЕМПЕРАТУРА ГЛАЖЕНИЯ
напряжении сети 110-120В всегда пе-
Перед началом эксплуатации протес-
реводите переключатель напряжения
тируйте нагретый утюг на кусочке тка-
питания (10) в положение 220-240В,
ни, чтобы убедиться в том, что подошва
это предотвратит выход утюга из
утюга (1) и резервуар для воды чистые.
строя при случайном включении утюга
• Всегда перед глажением вещей смот-
в электрическую сеть с несоответс-
рите на ярлык изделия, где указана
твующим напряжением.
рекомендуемая температура глаже-
ния.
14
1254.indd 141254.indd 14 29.01.2009 14:26:2029.01.2009 14:26:20
РУССКИЙ
• Если ярлык с указаниями по глажению
• Чтобы избежать появления лоснящих-
отсутствует, но вы знаете тип матери-
ся пятен на синтетических и шелковых
ала, то для выбора температуры гла-
тканях, гладьте их с изнаночной сторо-
жения смотрите таблицу.
ны.
Обозначения Тип ткани (температура)
УСТАНОВКА ТЕМПЕРАТУРЫ
синтетика, нейлон, акрил,
ГЛАЖЕНИЯ
•
полиэстер (низкая темпе-
• Если ручка утюга (5) находится в ниж-
ратура)
нем положении, поднимите ее, в верх-
шелк/шерсть/вискоза
••
нем положении ручка зафиксируется.
(средняя температура)
• Размотайте сетевой шнур и вставьте
Хлопок/лен (высокая темпе-
•••
ратура)
сетевую вилку в розетку.
• Поворотом регулятора (8) установи-
• Таблица применима только для глад-
те требуемую температуру глажения:
ких материалов. Если материал друго-
«•», «••», «•••» (в зависимости от
го типа (гофрированный, рельефный
типа ткани) (рис. 2), при этом загорит-
и т.д.), то лучше всего его гладить при
ся индикатор (7).
низкой температуре.
• Поставьте утюг в вертикальное поло-
• Утюг нагревается быстрее, чем осты-
жение.
вает. Поэтому сначала рекомендуется
• Когда температура подошвы утюга (1)
гладить вещи при низкой температу-
достигнет установленной темпера-
ре (например, синтетические ткани).
туры, индикатор (7) погаснет, можно
После чего переходите на глажение
приступать к глажению.
при более высоких температурах
(шелк, шерсть). Изделия из хлопка и
СУХОЕ ГЛАЖЕНИЕ
льна гладьте в последнюю очередь.
• Если ручка утюга (5) находится в ниж-
• Если в состав ткани входят смесовые
нем положении, поднимите ее, в верх-
волокна, то необходимо установить
нем положении ручка зафиксируется.
температуру глажения самую низкую
• Размотайте сетевой шнур и вставьте
(например, если изделие состоит на
сетевую вилку в розетку.
60% из полиэстера и на 40% из хлопка,
• Поворотом регулятора (8) установи-
то её следует гладить при температуре,
те требуемую температуру глажения:
подходящей для полиэстера «•»).
«•», «••», «•••» (в зависимости от
• Если вы не можете определить состав
типа ткани) (рис. 2), при этом загорит-
ткани, то найдите на изделии место,
ся индикатор (7).
которое не заметно при носке, и опыт-
• Поставьте утюг в вертикальное поло-
ным путём выберите температуру
жение.
глажения (всегда начинайте с самой
• Когда температура подошвы утюга (1)
низкой температуры и постепенно по-
достигнет установленной темпера-
вышайте её, пока не добьётесь желае-
туры, индикатор (7) погаснет, можно
мого результата).
приступать к глажению.
• Вельветовые и другие ткани, которые
• После использования утюга установи-
быстро начинают лосниться, следует
те регулятор температуры (8) в поло-
гладить строго в одном направлении
жение «MIN».
(в направлении ворса) с небольшим
нажимом.
Примечание: Всегда рекомендует-
15
1254.indd 151254.indd 15 29.01.2009 14:26:2029.01.2009 14:26:20

РУССКИЙ
ся выключать утюг, даже если вы не
Примечание: Всегда рекомендует-
используете его в течение короткого
ся выключать утюг, даже если вы не
времени.
используете его в течение короткого
времени.
• Выньте вилку сетевого шнура из ро-
зетки и дождитесь полного остывания
• Выньте вилку сетевого шнура из ро-
утюга.
зетки и дождитесь полного остывания
• Нажмите на кнопку (2) и опустите руч-
утюга.
ку утюга (5) вниз (рис. 3).
• Откройте крышку(4) и слейте воду из
резервуара.
Примечание:
• Нажмите на кнопку (2) и опустите руч-
При первом включении нагреватель-
ку утюга (5) вниз (рис. 3).
ный элемент утюга обгорает, поэто-
му возможно появление небольшого
ВНИМАНИЕ!
количества дыма или постороннего
Если во время работы не происходит
запаха - это нормальное явление.
постоянная подача пара, проверьте пра-
вильность положения регулятора тем-
ПАРОВОЕ ГЛАЖЕНИЕ
пературы (8).
При паровом глажении необходимо
устанавливать температуру глажения
ДОПОЛНИТЕЛЬНАЯ ПОДАЧА ПАРА
«•••».
Функция дополнительной подачи пара
• Если ручка утюга (5) находится в ниж-
полезна при разглаживании складок и
нем положении, поднимите ее, в верх-
может быть использована только при
нем положении ручка зафиксируется.
высокотемпературном режиме глаже-
• Заполните резервуар водой как опи-
ния (регулятор температуры (8) в поло-
сано в соответствующем разделе.
жении «•••»).
• Размотайте сетевой шнур и вставьте
При нажатии кнопки дополнительной
сетевую вилку в розетку.
подачи пара (3) пар из подошвы утюга
• Установите переключатель (6) в поло-
будет выходить более интенсивно (рис.
жение «Подача пара выключена».
4).
• Поворотом регулятора (8) установите
температуру глажения: «•••» (рис. 2),
Примечание: Во избежание выте-
при этом загорится индикатор (7).
кания воды из паровых отверстий
• Поставьте утюг в вертикальное поло-
нажимайте кнопку дополнительной
жение.
подачи пара (3) с интервалом в 5-6
• Когда температура подошвы утюга (1)
секунд.
достигнет установленной темпера-
туры, индикатор (7) погаснет, можно
ВЕРТИКАЛЬНОЕ ОТПАРИВАНИЕ
приступать к глажению.
Функция вертикального отпаривания
• Включите постоянную подачу пара,
может быть использована только при
установив переключатель (6) в поло-
высокотемпературном режиме глаже-
жение «Подача пара включена».
ния (регулятор температуры (8) в поло-
• После использования утюга устано-
жении «•••»).
вите регулятор температуры (8) в по-
• Держите утюг вертикально на рассто-
ложение «MIN», а переключатель (6) в
янии 10-20см от одежды и нажимайте
положение «Подача пара выключена».
кнопку дополнительной подачи пара
16
1254.indd 161254.indd 16 29.01.2009 14:26:2129.01.2009 14:26:21

РУССКИЙ
(3), пар будет выходить из подошвы
• Поставьте утюг вертикально и дайте
утюга (1) (рис. 5).
ему полностью остыть.
• Храните утюг в вертикальном положе-
Важная информация
нии.
• Не рекомендуется выполнять верти-
кальное отпаривание синтетических
Комплект поставки
тканей.
1. Утюг – 1 шт.
• При отпаривании не прикасайтесь по-
2. Емкость для заливки воды – 1 шт.
дошвой утюга к материалу, чтобы из-
3. Дорожная сумочка – 1 шт.
бежать его оплавления.
4. Инструкция по эксплуатации – 1 шт.
• Никогда не отпаривайте одежду, оде-
тую на человека, т.к. температура вы-
ТЕХНИЧЕСКИЕ ХАРАКТЕРИСТИКИ
ходящего пара очень высокая, поль-
Электропитание:
зуйтесь плечиками или вешалкой.
110-120/220-240 В, ~ 50/60 Гц
Потребляемая мощность: 840-1000 Вт
УХОД И ЧИСТКА
• Прежде чем чистить утюг, убедитесь,
Производитель сохраняет за собой
что он отключен от сети и уже остыл.
право изменять дизайн и техничес-
• Протирайте корпус утюга слегка влаж-
кие характеристики прибора без
ной тканью, после этого протрите его
предварительного уведомления.
насухо.
• Отложения на подошве утюга можно
Срок службы прибора не менее 3-х
удалить тканью, смоченной в уксусно-
лет
водном растворе.
• После удаления отложений протрите
Данное изделие соответствует
поверхность подошвы сухой тканью.
всем требуемым европейским
• Не используйте для чистки подошвы и
и российским стандартам безо-
корпуса утюга абразивные чистящие
пасности и гигиены.
средства.
• Избегайте контакта подошвы утюга с
Производитель: АН-ДЕР ПРОДАКТС
острыми металлическими предмета-
ГмбХ, Австрия
ми.
Нойбаугюртель 38/7А, 1070 Вена,
Австрия
ХРАНЕНИЕ
• Поверните регулятор температуры (8)
против часовой стрелки до положе-
ния «MIN», установите переключатель
постоянной подачи пара (6) в положе-
ние «Подача пара выключена».
• Выньте вилку сетевого шнура из ро-
зетки.
• Откройте крышку заливочного отвер-
стия (4), переверните утюг и слейте
оставшуюся воду из резервуара для
воды (рис. 6).
• Закройте крышку (2).
17
1254.indd 171254.indd 17 29.01.2009 14:26:2129.01.2009 14:26:21

ҚАЗАҚ
ТАСЫМАЛДАНАТЫН ҮТҮК
құралды желіге бірден қосудан сақ
болыңыз.
Үтүктің сипаттамасы
• Үтүкті тегіс, нық тұратын тегістікке
1. Үтүк табаншасы
орнатыңыз.
2. Тұтқаны жинастыру түймешесі
• Сыймаға су толтырар алдында үтүкті
3. Буды қосымша жіберу түймешесі
желіден үнемі ажыратып қойыңыз.
4. Су қую тесігінің қақпағы
• Үтүкті қолданып болғаннан кейін суын
5. Тұтқасы
төгіп тастаңыз.
6. Буды үнемі жіберуді тоқтату
• Үтүкті қолдану барысында су қую
түймешесі
тесігінің қақпағы жақсы жабылған болу
7. Қыздыру элементін қосу индикаторы
керек.
8. Температура реттеуіші
• Мүмкүндіктері шектелген адамдардың
9. Таңдалған температура көрсеткіші
немесе балалардың жанында үтүкті
10. Қуаттану кернеуінің ауыстырғышы
қолдану барысында аса сақ болыңыз.
110-120/220-240 В
• Қосылған үтүкті қараусыз
11. Желі шнурының қорғамасы
қалдырмаңыз.
12. Су қуюға арналған сыйма
• Егер үтүкті қолданбайтын болсаңыз,
оны желіден ажыратып қойыңыз.
ҚАУІПСІЗДІК ШАРАЛАРЫ
• Электр тоғымен зақымданудың алдын
Қолдану алдында нұқсауламаны
алу үшін, үтүкті суға немесе өзге
мұқият оқып шығыңыз, сонымен
суйықтыққа батырмаңыз.
қатар, суреттеріне назар аударыңыз.
• Су сыймасына хош иісті сұйықтықтар
• Электр желісіне үтүкті қосу алдында
мен сірке суын, крахмал ерітіндісін,
қуаттану кернеуінің ауыстырғышын
қақ түсіргіш реагенттерді, химиялық
(10) электр желісінің кернеуіне сəйкес
заттарды жəне т.б. қуюға тиым
орнатыңыз.
салынады.
Үтүкті желі кернеуі 110-120В кезінде
• Күйіп қалудың алдын алу үшін терінің
қолданғаннан кейін қуаттану
ашық жерлерін үтіктің ыстық тегістіктері
кернеуінің ауыстырғышын (10) 220-
мен шығып тұрған буына тигізуден сақ
240В жағдайына орнатыңыз, егер үтүк
болыңыз.
кернеуі сəйкес емес желіге қосылған
• Желі шнуры ыстық тегістіктерге тиіп
жағдайда бұл шара оның істен шығуын
кетпеуін қадағалаңыз.
алдын алады.
• Үтүкті желіден ажырату барысында
• Үтүкті электрұстараларына (алыс
ешқашанда желі шнурынан тарпаңыз,
жолға жүретін поездарда) арналған
үнемі желі ашасынан ұстаңыз.
розеткаларға қоспаңыз.
• Үтүкті жинастырудың алдында, оның
• Үтүкті желіге қосар алдында, оның желі
ішіндегі суды төгіп, толық суытыңыз.
шнурын толық тарқатыңыз.
• Үтүк толығымен суығанша оның шнурын
• Желі шнуры «евроашамен»
орамаңыз.
жабдықталған; оны сенімді жермелеуі
• Суды үтүк желіден ажырағаннан кейін
бар розеткаға қосыңыз.
ғана төгіңіз.
• Өрт қаупінің алдын алу үшін құрылғыны
• Желі ашасы, желі шнуры зақымданған
электр розеткасына қосу барысында
немесе өзге ақаулары бар үтүкті
өткізгіштерді қолданбаңыз.
қолданбаңыз.
• Шамадан тыс жүктелудің алдын алу
• Электр тоғымен зақымданудың
үшін тұтыну қуаты жоғары бірнеше
алдын алу үшін, өздігіңізбен үтікті
18
18
1254.indd 181254.indd 18 29.01.2009 14:26:2129.01.2009 14:26:21

ҚАЗАҚ
ешқашан ашпаңыз, ақау пайда болған
• Су құю сыймасын (12) қолданып, 40
жағдайда қызмет көрсету орталығына
мл –ден аспайтын суды тесікке құйып,
хабарласыңыз.
қақпағын жабыңыз(4).
• Тасымалданатын жол жүру үтүгі жол
үстінде немесе ресми сапарлар
Ескерту:
кезінде киімдеріңізді тез ретке келтіруге
Егер сыймада су жоқ болса, бу жіберу
көмектеседі, дегенмен, кəдімгі тұрмыс
қызметі іске қосылмайды.
үтүгін ауыстыра алмайды.
• Егер үтүктеу барысында қосымша
су құю қажет болса, үтүкті
ТАҚТАЙШАСЫЗ ҮТІКТЕУ
сөндіріп, желі ашасын розеткадан
Сапар шегу барысында үтүктеу
суырыңыз.
тақтайшасы үнемі қол астында бола
• Су сыймасына хош иісті
бермейді, мұндай жағдайда тегіс жерге екі
сұйықтықтар мен сірке суын,
рет қабатталған махер сүлгісін төсесеңіз
крахмал ерітіндісін, қақ түсіргіш
болады.
реагенттерді, химиялық заттарды
Алдын ала тегістік ылғалға жəне ыстыққа
жəне т.б. қуюға тиым салынады.
төзімді екенін тексеріңіз. Əйнек немесе
• Үтүктеп болғаннан кейін, үтүкті
пластик тегістіктерді қолданбаңыз.
сөндіріңіз, оның толық суығанын
күтіңіз, су құю тесігінің қақпағын
АЛҒАШҚЫ ҚОЛДАНУ АЛДЫНДА
ашып, үтікті төңкеріп, қалған суды
• Үтүкті қаптамадан шығарыңыз,
төгіп тастаңыз(сурет 6).
табаншасында қорғаушы жапсырма (1)
болса, оны алып тастаңыз.
ҮТҮКТЕУ ТЕМПЕРАТУРАСЫ
• Үтүктің табаншасын құрғақ матамен
Қолдану алдында қызып тұрған үтүкті,
сүртіп тастаңыз.
оның табаншасын (1) мен су сыймасы
• Үтүкті электр желісіне қосу алдында
таза екендігін матаның қиығында сынап
қуаттану кернеуінің ауыстырғышын
көріңіз.
(10) электр желісінің кернеуіне сəйкес
• Затты үтүктеу алдында бұйымның
орналастырыңыз. Үтүкті желі кернеуі
жапсырмасында көрсетілген үтүктеу
110-120В кезінде қолданғаннан кейін
температурасын қараңыз.
қуаттану кернеуінің ауыстырғышын
• Егер үтүктеу нұсқауламасы бар
(10) 220-240В жағдайына орнатыңыз,
жапсырма затта жоқ болып, бірақ сіз
егер үтүк кернеуі сəйкес емес желіге
матаның түрін білетін болсаңыз, үтүктеу
кездейсоқ қосылған жағдайда бұл шара
температурасын таңдау үшін кестені
оның істен шығуын алдын алады.
қараңыз.
Үтікке су толтыру (сурет 1)
Матаның түрі (температу-
- Үтүкті қолдану алдында сыйманы
Белгілемелер
расы)
кəдімгі құбырлы сумен толтырыңыз,
синтетика, нейлон, акрил, по-
егер құбырдың суы қатты қақталған
•
лиэстер (төмен температура)
болса, қайнаған суды қолданған дұрыс.
Жібек/жүн/тоқыма
••
- Үтүкке су қуюдың алдында, оның
(орташа температура)
желіден ажырап тұрғанын тексеріңіз.
Мақта/зығыр
•••
• Бу жіберу ауыстырғышын (6) бу жіберу
(жоғары температура)
сөндірулі
жағдайына орнатыңыз.
• Бұл кесте тек тегіс маталарға арналған.
• Су құю тесігінің қақпағын ашыңыз(4).
Егер матаның түрі өзгеше болса
19
1254.indd 191254.indd 19 29.01.2009 14:26:2129.01.2009 14:26:21

ҚАЗАҚ
(бүжірленген, жиырылған жəне т.б. ),
• Үтүктің табаншасы (1) қажетті деңгейде
оны төмен температурада үтүктеген
қызғаннан кейін (7) индикатор сөнеді,
дұрыс.
сол кезде үтүктеуге кіріссеңіз болады.
• Үтүк жылдам қызады, баяу
суйыды. Сондықтан, алдымен
ҚҰРҒАҚ ҮТҮКТЕУ
төмен температураны қажет ететін
• Егер үтүктің тұтқасы (5) төменгі
заттарды үтүктеп алған жөн (мысалы,
жағдайда тұрса, оны көтеріңіз, жоғарғы
синтетикалық маталар).
жағдайда тұтқа қыстырылады.
Одан кейін, қатты қызуды қажет етен
• Желі шнурын тарқатып, желі ашасын
маталарға көшсеңіз болады (жібек,
розеткаға салыңыз.
жүн). Ал мақта мен зығырдан жасалған
• Реттеушіні(8) бұрап, үтүктеудің қажетті
заттарды ең соңында үтүктегеніңіз
температурасын орнатыңыз: «•», «••»,
дұрыс.
«•••» (матаның түруне қарай) (сурет 2),
• Егер матаның құрамында қоспалы
сол кезде индикатор (7)жанады.
тоқыма қолданылған болса, үтүктеу
• Үтүкті тігінен қойыңыз.
температурасының ең төменгісін
• Үтүктің табаншасы (1) қажетті деңгейде
таңдаңыз (мысалы, матаның 60%
қызғаннан кейін (7) индикатор сөнеді,
полиэстер, ал 40% мақтадан тұратын
сол кезде үтүктеуге кіріссеңіз болады.
болса, оны «•» полиэстерге сəйкес
• Үтүкті қолданып болғаннан кейін
температурада қолданған дұрыс ).
температура реттеуішін (8) «MIN»
• Егер сіз матаның түрін анықтай
жағдайына орнатыңыз.
алмасаңыз, оның киген кезде
көрінбейтін жерінде əр температураны
Ескерту:
Егер сіз үтүкті кысқа уақыт
сынап, қажеттісін анықтаңыз (үнемі
қоллданбайтын болсаңыз да, оны
төменгі температурадан бастап, оны
үнемі сөндіріп жүрген дұрыс.
қажетті нəтиже болғанынша бірте –бірте
жоғарылата беріңіз).
• Желі шнурының ашасын розеткадан
• Вельвет жəне басқа тез тозғыш
суырып, үтүктің толық суығанын күтіңіз.
маталарды міндетті түрде бір
• Түймешені (2) басыңыз, үтүктің тұтқасын
бағытта,(түгі жатқан бағытта) ақырын
төмен түсіріңіз (5) (сурет 3).
басып үтіктеу керек.
• Синтетикалық жəне жібек маталарда
Ескерту:
жылтыр дақтар пайда болмас үшін
Алғаш рет қосылғанда үтүктің
оларды теріс бетінен үтіктеңіз.
қыздырғыш элементі күйеді,
сондықтан, аздап түтін немесе
ҮТҮКТЕУ ТЕМПЕРАТУРАСЫН ОРНАТУ
өзгеше иіс шығуы мүмкін - ол
• Егер үтүктің тұтқасы (5) төменгі
қалыпты құбылыс.
жағдайда тұрса, оны көтеріңіз, жоғарғы
жағдайда тұтқа қыстырылады.
БУМЕН ҮТҮКТЕУ
• Желі шнурын тарқатып, желі ашасын
Бумен үтүктеу кезінде «•••» үтүктеу
розеткаға салыңыз.
температурасын таңдау керек.
• Реттеушіні(8) бұрап, үтүктеудің қажетті
• Егер үтүктің тұтқасы (5) төменгі
температурасын орнатыңыз: «•», «••»,
жағдайда тұрса, оны көтеріңіз, жоғарғы
«•••» (матаның түруне қарай) (сурет 2),
жағдайда тұтқа қыстырылады.
сол кезде индикатор (7)жанады.
• Сəйкес бөлімде сипатталғандай
• Үтүкті тігінен қойыңыз.
сыймаға су толтырыңыз.
20
1254.indd 201254.indd 20 29.01.2009 14:26:2129.01.2009 14:26:21


