Vitek VT-1557: instruction
Class: Household, kitchen appliances, electronics and equipment
Type: Food Steamer


Manual for Vitek VT-1557
Table of contents
- DESCRIPTION SAFETY INSTRUCTIONS BEFORE THE FIRST USAGE OPERATING INSTRUCTIONS
- WARMING-UP PRODUCTS
- Automatic switch off No water indication Timer setting TIPS
- REFILL WATER DURING COOKING USEFUL HINTS AND RECOMMENDATIONS COOKING EGGS (Pic. 3) COOKING RICE (Pic. 4)
- CLEANING FOOD COOKING TIME AND RECIPES REMOVING SCALING VEGETABLES
- MEAT AND CHICKEN FISH AND SEAFOOD
- RICE SPECIFICATIONS GUARANTEE
VT-1557 SR
MANUAL INSTRUCTION
4
11
20
29
37
45
53
62
71
www.vitek-aus.com
1557.indd 11557.indd 1 14.02.2008 9:15:3214.02.2008 9:15:32
2
1557.indd 21557.indd 2 14.02.2008 9:15:3314.02.2008 9:15:33
3
1557.indd 31557.indd 3 14.02.2008 9:15:3314.02.2008 9:15:33

ENGLISH
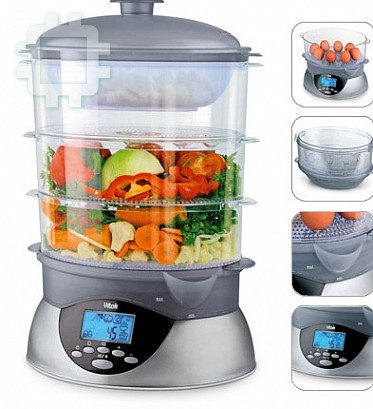
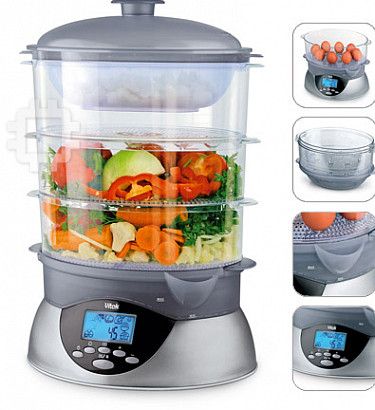
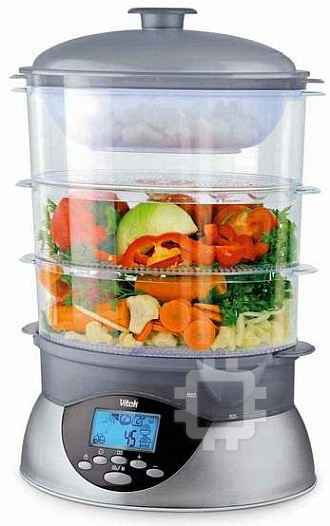
ELECTRICAL STEAM COOKER
• Be careful while operating the unit: any
Steamed products keep fragrance and nu-
liquid or steam condensate is very hot.
tritional value to a greater degree. Steam
• Avoid steam burns especially while re-
cooker Vitek allows you taking the first step
moving the Lid.
to the health food.
• Use pot holders when removing the Lid or
steam bowls.
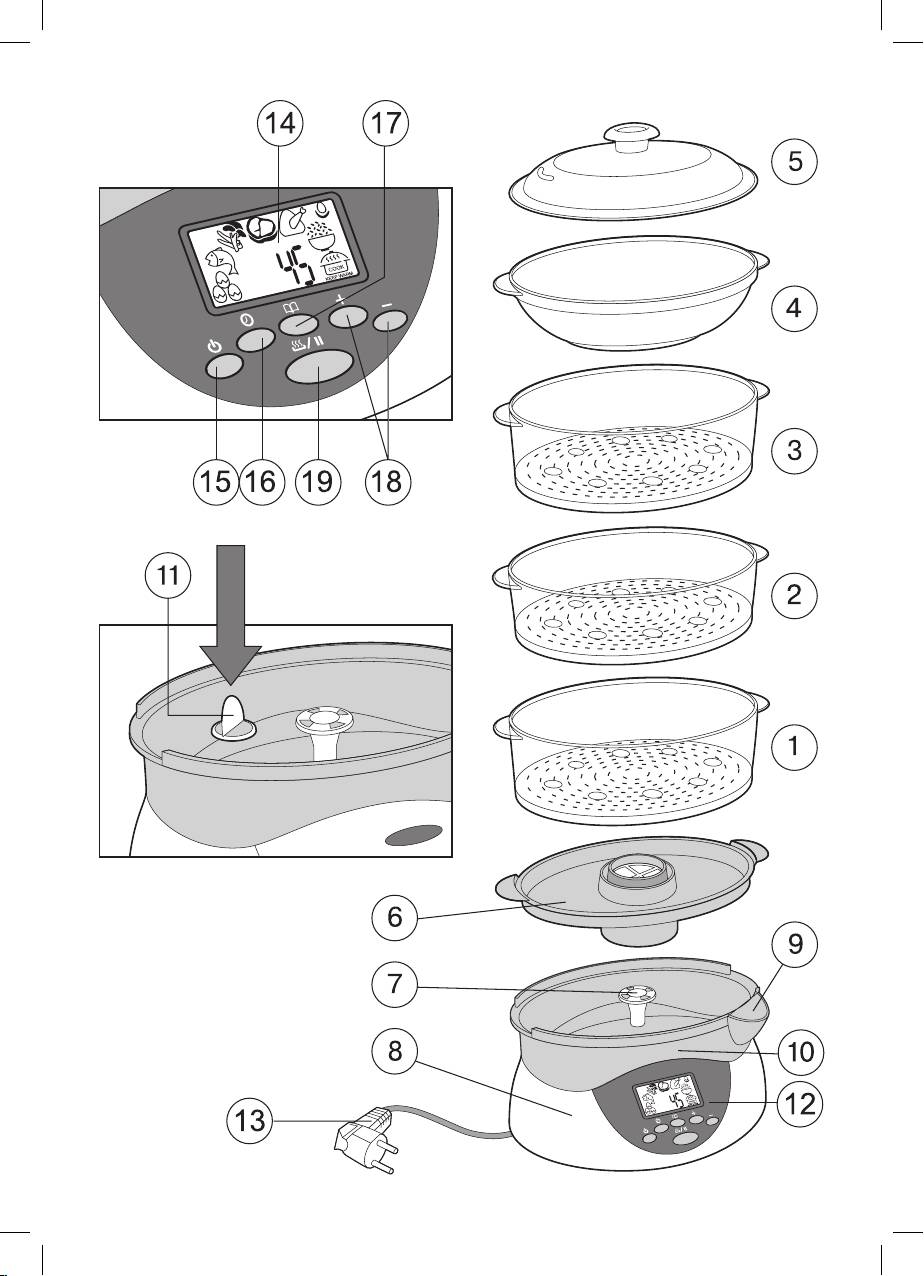
DESCRIPTION
• Do not move the unit with hot products in-
1. Lower steam bowl "1"
side.
2. Middle steam bowl "2"
• Do not leave the operating unit unattend-
3. Upper steam bowl "3"
ed. Close supervision is necessary when
4. Bowl for rice or soup cooking
there are children or disabled persons
5. Lid
near the operating unit.
6. Tray for condensate collection
• Do not use the unit in a microwave oven;
7. Steam sprayer
do not place it on or near a gas or electric
8. Body
burner.
9. Fill port
• Always disconnect the unit, if it is not be-
10. Water tank
ing used, while removing or setting the
11. Mesh filter
steam bowls and before cleaning.
12. Control panel
• Do not pull by the cord to disconnect the
13. Power cord
unit, take the power plug and pull it out of
14. LCD-display
the socket.
15. ON/OFF button
• Do not let the power cord hang down in
16. Timer button
places where children can get hold of it.
17. Auto cooking mode selection button
• Keep the unit out of reach of children.
18. Cooking time/heating and timer setting
• Never immerse the unit, the power cord or
button
the power plug into water – you can get
19. Cooking on/off button
electric shock.
• Do not operate the unit with damaged
SAFETY INSTRUCTIONS
power cord or plug. Apply to the author-
Read these instructions carefully before us-
ized service center for repair.
ing the Steam cooker for the first time.
• The unit is intended for household usage
• Before using the unit make sure that your
only.
line voltage and frequency corresponds
to the voltage and frequency specified on
KEEP THIS INSTRCUTION
the unit.
• Do not use the unit outdoors.
BEFORE THE FIRST USAGE
• Place the unit on a flat stable surface.
• Remove the unit and all the accessories
• Do not use the unit near walls or cup-
from the packaging.
boards as the outgoing hot steam can
• Wash the steam bowls (1, 2, 3), the rice/
damage them.
soup bowl (4), the Lid (5) and the tray (6),
• Use only the accessories supplied.
using soft detergents.
• Before using the unit for the first time,
• Rinse and dry thoroughly.
wash thoroughly all the details that will
• Wipe the inside surface of the water tank
contact products.
(10) with a damp cloth.
• Before switching on the steam cooker, fill
the water tank with water otherwise the
OPERATING INSTRUCTIONS
unit can be damaged.
• Place the unit on a stable level surface.
4
1557.indd 41557.indd 4 14.02.2008 9:15:3314.02.2008 9:15:33

ENGLISH
• Set the steam sprayer (7).
and one of the two programmed cooking
• Set the mesh filter (11) in the special re-
modes “Р1” and “Р2”. The corresponding
cess in the water tank (10).
indication of the product, cooking time
• Fill the water tank (10) with cold water up
and heating time will light up on the LCD-
to the МАХ mark.
display (17).
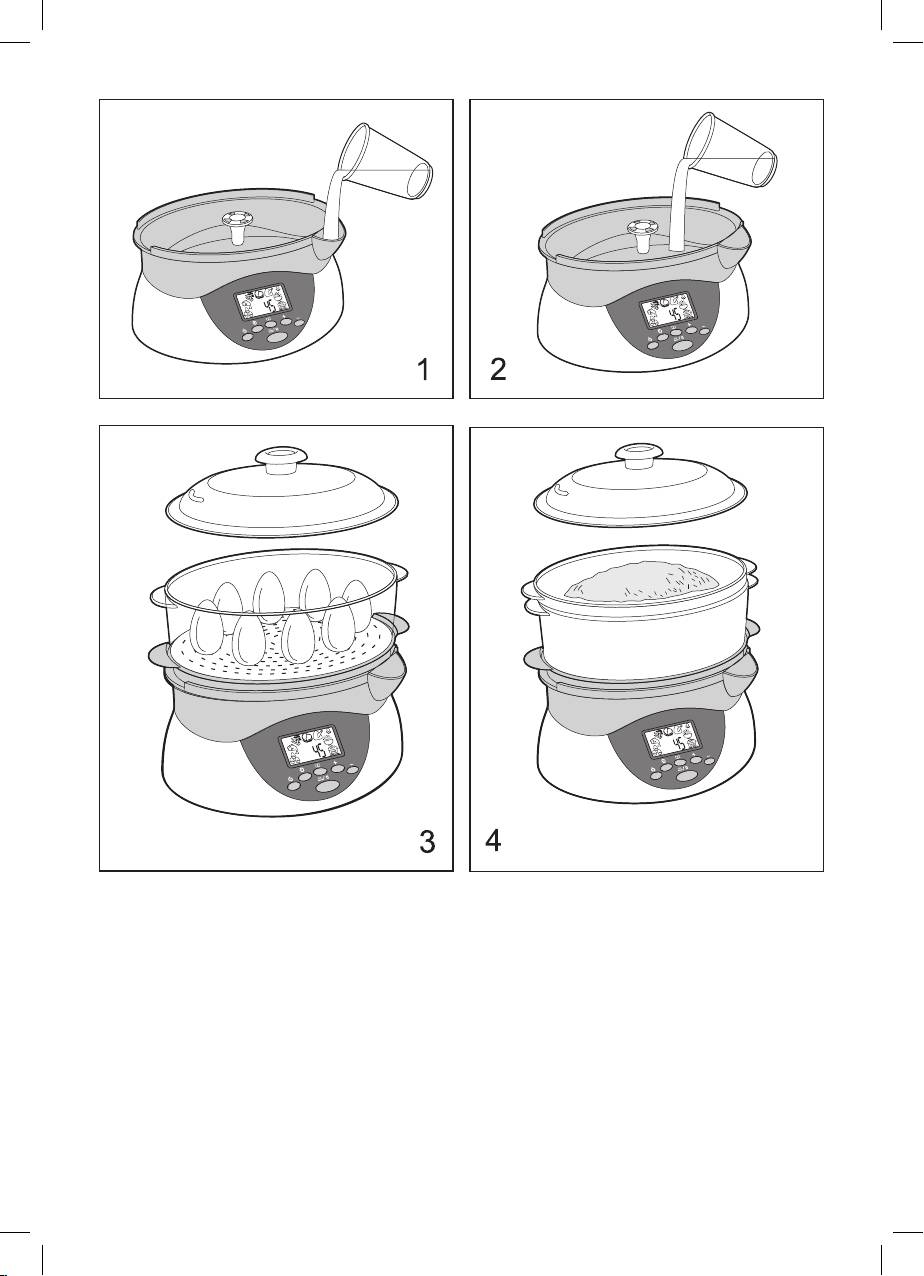
• You can fill the water tank with water in two
• After selecting one of the auto cooking
ways: - through the fill port (9) (Pic. 1) or
modes you can change the preset cook-
directly in the water tank (Pic. 2).
ing time, using the (18) buttons.
• If while cooking you will find that there
• Press the (19) button to start cooking/
is not enough water you can add water
through the fill port, (9), without removing
heating products, the (
) or (
the steam bowls (Pic. 1).
) symbol will be flashing on the LCD-dis-
play.
Use filtered water; it has lower hardness,
• After the cooking time is finished, two
and it will allow reducing scaling on the heat-
sound signals will be heard and the Steam
ing element. Do not exceed the MAX mark
cooker will switch to the heating mode,
while filling the water tank with water.
heating time is 20 minutes (the (
) symbol will be flashing on the LCD-dis-
Warning
play.
- Do not add any salt, pepper, seasonings,
• After heating is finished you will hear 5
herbs, wine, sauces or other liquids to the
sound signals, and the Steam cooker will
water tank. It may lead to damages of the
switch to the heating mode, in a minute
unit.
two sound signals will be heard and the
- Change water for every usage of the unit.
Steam cooker will switch off.
• Place the tray for the condensate collec-
tion (6) on the water tank (10) and make
Note:
sure that it is set properly.
in the heating mode you can change
• Set one or more steam bowls (1-2-3) on
heating time using the (18) buttons.
the tray.
• Close the steam bowl with the Lid (5).
• To stop cooking or heating, press the (19)
• Insert the plug into the socket, a sound
signal will be heard and the LCD-display
button, the (
) or ( ) symbols will
will light up; the Steam cooker is ready to
be on constantly.
operate within 45 minutes.
• Press the (15) button to switch off the unit,
or wait till it switches off automatically
Note:
if no actions are performed during 1
WARMING-UP PRODUCTS
minute two sound signals will be heard
• Use the (17) button to select the heating
and the Steam cooker will switch off.
mode, the (
) symbol, use the (18)
• Switch on the Steam cooker by pressing
buttons to set the necessary heating time
the (15) button, the LCD-display (14) will
from 1 to 99 minutes, press the (19) but-
light up and you will hear a sound signal.
ton to switch on the unit.
• Use the auto cooking mode selection
• After heating is finished you will hear 5
button (17) to select one of the operat-
sound signals, in a minute two sound sig-
ing modes: cooking eggs, fish, vegeta-
nals will be heard and the Steam cooker
bles, meat, chicken, rice, heating mode,
will switch off.
5
1557.indd 51557.indd 5 14.02.2008 9:15:3414.02.2008 9:15:34

ENGLISH
Programming of cooking modes
• In the standby mode, you can switch off
You can program cooking modes yourself.
the timer by pressing the (16) button.
• Insert the plug into the socket
• Switch on the Steam cooker, by pressing
Automatic switch off
the (15) button, the LCD-display (14) will
If you have not used the Steam cooker for a
light up and you will hear a sound signal.
minute it will switch off automatically. Before
• Press and hold the (17) button for 3 sec-
switching off you will hear two sound sig-
onds, the “Р1:00” symbols will start flashing
nals. You can stop cooking process during
on the LCD-display. Set the desired cooking
operation, by pressing the (19) button, and
time, using the (18) buttons and press the
pressing the (15) button will switch off the
(19) button to store the entered value.
Steam cooker.
• To set the cooking time for the second
mode press the (17) button till the “Р2:00”
No water indication
symbols appears on the LCD-display. Set
If water level in the water tank (10) is lower
the desired cooking time, using the (18)
than the MIN mark, you will hear a sound
buttons and press the (19) button to store
the entered value.
signal and the (
) symbol will be flash-
ing on the LCD-display.
Timer setting
Fill the water tank (10) with cold water to the
You can set delay time for the Steam cooker
МАХ mark.
to switch on.
You can fill the water tank with water in two
ways: - through the fill port (9) (Pic. 1) or di-
• Press the (16) button. The (
) and the
rectly in the water tank (Pic. 2).
“00:00” symbols will appear on the LCD-
display.
ATTENTION!
• Use the (18) buttons to set the delay
• During operation do not touch the Lid or
time for the Steam cooker to switch on.
the steam bowls – they are very hot.
Minimal delay time is 5 minutes, maxi-
• To avoid getting burns use pot holders
mal 23 hours 55 minutes, setting step is 5
when removing the Lid and the steam
minutes. Press the (19) button to confirm
bowls. Slowly raise the Lid up to release
the preset time.
steam, hold the Lid over the steam bowl to
• Use the (15) button to select the desired
drain water.
operating mode and then press the (19.)
• If you want to check on the cooking
button again.
progress, use a utensil with a long han-
• The timer symbol, operating mode sym-
dle.
bol and time symbol (time in which the
• Remember that water inside the water
cooking process will start) will appear on
tank can be hot when all the other compo-
the LCD-display.
nents are cooled down.
• After cooking is finished you will hear a
• Do not use the Steam cooker without the
sound signal and the Steam cooker will
tray, the steam bowls or the Lid.
switch to the 20 minute-heating mode
TIPS
automatically. (The (
) symbol will be
• Cook meat, fish and seafood till it is
flashing on the LCD-display).
cooked completely.
• After heating is finished you will hear 5
• Always use only defrost products, exclud-
sound signals, in a minute two sound sig-
ing vegetables, fish and seafood.
nals will be heard and the Steam cooker
• If you use several steam bowls at a time,
will switch off.
put meat, chicken or fish in the lower bowl
6
1557.indd 61557.indd 6 14.02.2008 9:15:3414.02.2008 9:15:34

ENGLISH
so that the liquid does not drain on the
• Press the (19) button to start cooking.
other products in the other steam bowls.
• Add fresh or dried herbs on the tray (6), to
REFILL WATER DURING COOKING
add more flavors to the products. Choose
For recipes with long cooking time:
herbs to your taste: thyme, cilantro, basil,
- Check water level while cooking.
dill, curry and tarragon, garlic, caraway,
- If necessary add water through the fill port
horseradish – are just a few known herbs.
(9), without removing the steam bowls.
You can combine herbs to add new flavor
to products. When using fresh herbs you
USEFUL HINTS AND
should cut them and increase the total
RECOMMENDATIONS
amount twice or thrice (compared with
• Food cooking time indicated in the tables
dries herbs).
is considered only for reference purpos-
es it may differ due to size of the pieces,
COOKING EGGS (Pic. 3)
amount of products and personal taste.
• Fill the water tank (10) with water.
As far as you manage the Steam cooker
• Place the tray (6).
you can select the desired products cook-
• Place the steam bowl (1, 2 or 3) on the
ing time.
tray (6).
• One layer of products is cooked quicker
• Place eggs in the recess on the bottom of
than several layers. That is why it is neces-
the steam bowl (1, 2 or 3) and Lid it (5).
sary to increase the cooking time accord-
• Insert the plug into the socket
ing to the amount of products.
• Switch on the Steam cooker by pressing
• In order to achieve the best result, make
the (15) button, the LCD-display (14) will
sure that the pieces of products are of
light up and sound signal will be heard.
equal size; place the thicker pieces closer
• Use the (17) button to select egg cooking
to the edges of steam bowl.
mode. Use the (18) buttons to set cooking
• Do not fill the steam bowl completely
time.
– keep space for steam.
• Press the (19) button to start cooking
• When cooking a large amount of products
it is necessary to stir them periodically. Be
COOKING RICE (Pic. 4)
especially careful and use the pot holders
• Fill the water tank (10) with water.
to protect hands from steam and kitchen
• Place the tray (6).
utensils with long handles.
• Place the steam bowl (1, 2 or 3) on the
• Do not add salt or spices directly to the
tray (6).
products when cooking.
• Place the Bowl for rice/soup cooking (4)
• Liquid accumulating in tray (6) is excellent-
on the steam bowl.
ly suitable for soup cooking or can be used
• Place one cup of rice and 1 1/2 cup of
as bouillon. But be careful – it is very hot.
water in the bowl (4). Maximum 250 g of
• Use only completely defrosted products.
rice.
• Close the bowl (4) with the Lid (5).
When using three steam bowls simulta-
• Insert the plug into the socket
neously:
• Switch on the Steam cooker by pressing
- Always put the largest pieces of products
the (15) button, the LCD-display (14) will
in the lower bowl.
light up and you will hear a sound signal.
- Condensate forming on the upper bowl
• Use the (17) button to select the desired
will drain to the lower bowl that’s why
cooking mode. Use the (18) buttons to set
make sure that the flavors of products to
cooking time.
be cooked are compatible.
7
1557.indd 71557.indd 7 14.02.2008 9:15:3414.02.2008 9:15:34

ENGLISH
- When cooking meat, chicken and vegeta-
• Set the tray (6), one steam bowl (1, 2 or
bles always put meat in the lower bowl to
3), close it with the Lid (5) and switch on
avoid the red meat juice getting into other
the Steam cooker for 20-25 minutes.
products.
- Cooking time of products in the upper
ATTENTION! If vinegar pours out over the
bowl is usually longer by 5 minutes.
edges of the tank then turn off the Steam
- When cooking products with different
cooker and with care pour some liquid out.
cooking time, put the products that are
• Upon completing the timer operation turn
cooked longer to the lower bowl. When
off the Steam cooker, wait until it cools
the products in upper bowl are cooked,
down completely before removing vin-
you can remove it and close the lower
egar.
bowl with Lid and continue cooking prod-
• Rinse the tank with cold water, fill it with
ucts in this bowl.
water again, set the tray (6), one steam
bowl (1, 2 or 3), close it with the Lid (5)
CLEANING
and switch on the Steam cooker for 5 min-
• Before cleaning turn off the Steam cook-
utes.
er, disconnect it from the mains and wait
• Turn off the Steam cooker, wait until it
until it cools down completely.
cools down completely, pour out water,
• It is prohibited to immerse power cord,
dry the tray, steam bowl, Lid and keep
power plug and Steam cooker into water.
stored until the next usage.
• Do not use abrasive cleaning agents when
cleaning steam bowls, tray, upper Lid and
FOOD COOKING TIME AND RECIPES
body of the Steam cooker.
• Time of cooking depends on the size of
• It is recommended to wash the steam
products, free space in the bowl, fresh-
bowls, bowl for rice cooking, drain tray
ness and personal taste.
and Lid in warm water with dishwashing
• Time of cooking is indicated with the view
agents. Dishwasher may be used if “soft”
to the lower bowl, products in the upper
mode for dishwashing is selected.
bowl are cooked longer approximately by
• Remove and wash the mesh filter (11).
5 minutes.
• Wipe the body with a damp cloth.
• Depending on small or large amount of
• Wash steam bowls regularly.
products, increase or decrease the time
of products cooking accordingly.
REMOVING SCALING
After 2-3 months of using the unit, scale may
VEGETABLES
be formed on the heating coil of the Steam
• Cut off the thick stalks of broccoli cab-
cooker. It is a natural process; it depends on
bage or thick stalks of cauliflower.
the hardness of water used. It is necessary
• Cook green leaf vegetables for the short-
to remove scale regularly for normal opera-
est time possible – they lose color quick-
tion of the Steam cooker.
ly.
• Fill the water tank with vinegar till the МАХ
• Add salt and spices after cooking.
mark. IMPORTANT: Do not use the scale
• Frozen vegetables are not required to de-
removers.
frost before cooking in the Steam cooker.
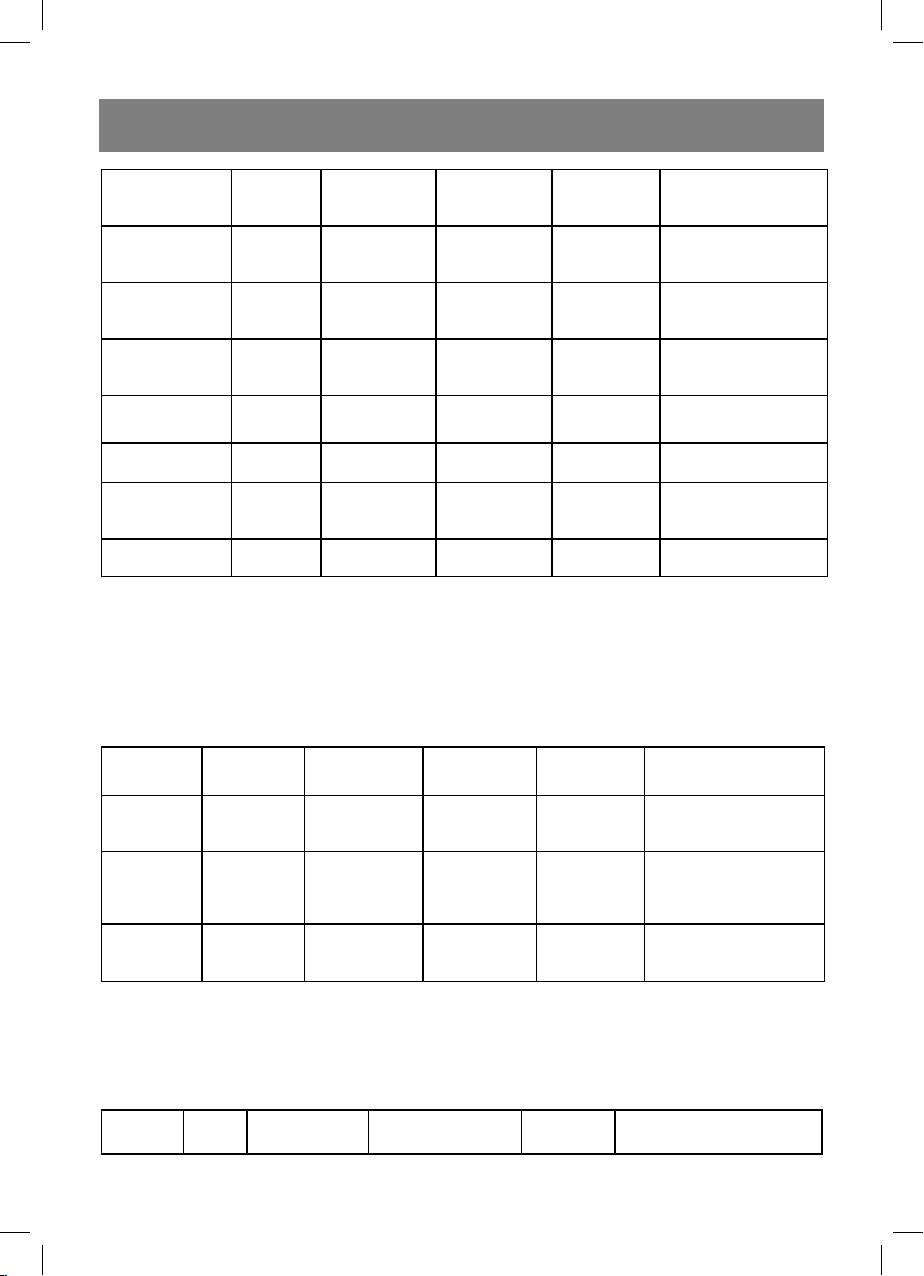
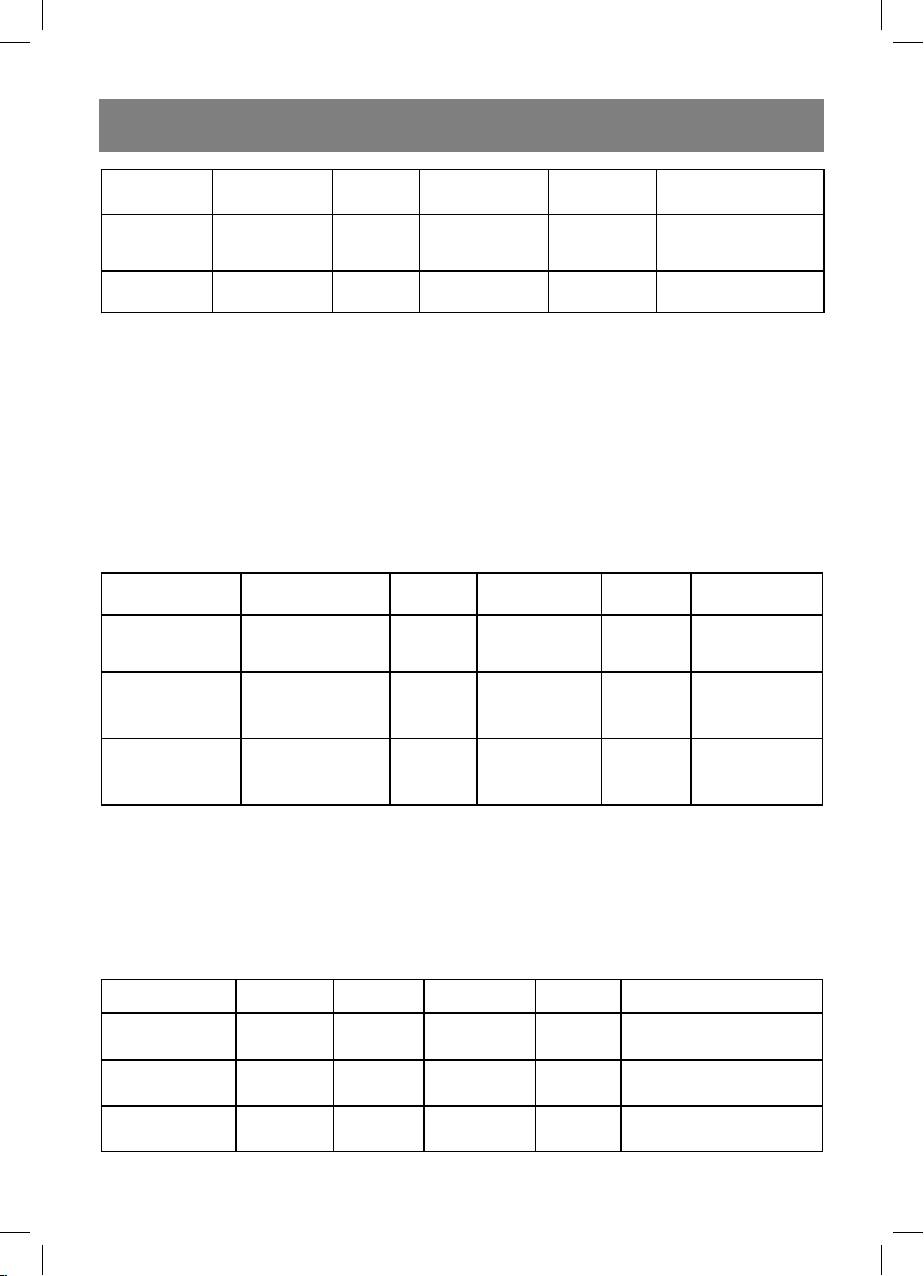
Weight/
Cooking time
Vegetables Type
Herbs
Recommendations
Volume, pcs.
(minutes)
garlic
Artichokes Fresh 3 medium
estragon
45-50 Cut stalks
dill
8
1557.indd 81557.indd 8 14.02.2008 9:15:3414.02.2008 9:15:34
ENGLISH
citriodora
Fresh
400 g
13 -15
Asparagus
bay leaf
Keep space for steam
Frozen
400 g
16-18
thyme
garlic
Fresh
400 g
16-18
Broccoli
paprika
Frozen
400 g
15-18
estragon
anise
Carrot (cut) Fresh 400 g
mint
20-22 Stir when cooking
dill
rosemary
Fresh
400 g
16-18
Cauliflower
sweet basil
Stir when cooking
Frozen
400 g
18-20
estragon
Fresh
250 g
thyme
8-10
Spinach
Stir when cooking
Frozen
250 g
garlic
18-20
caraway
Beans Fresh 400 g
18-20 Stir when cooking
dill
Fresh
400 g
Sweet basil
10-12
Peas
Frozen
Stir when cooking
400 g
marjoram mint
15-18
(podded)
Potatoes Fresh 400 g dill 20-22
MEAT AND CHICKEN
• Steam cooking of products has lots of advantages because when cooking fat is rendered
from products and drained to the tray. But before products cooking it is desirable to re-
move excess fat. Meat for grill is perfectly suitable for steam cooking.
• Marinade or fill meat or chicken with sauce before cooking.
• Check products for preparedness using a skewer.
• Use fresh or dry herbs when cooking products to season them.
Weight/
Cooking time
Products Type
Herbs
Recommendations
Volume, pcs.
(minutes)
carry
250g (4 pcs.)
12-15
Chicken fillet, legs
rosemary
Cut excess fat
450g
30-35
thyme
Rump steak,
400 g (4 pcs.,
fillet,
curry citriodora
Pork
thickness 2.5
5-10 Cut excess fat
stakes or
thyme
cm)
pieces of fillet
Pieces of
curry paprika
Beef
fillet, sirloin or
250 g
8-10 Cut excess fat
thyme
rump
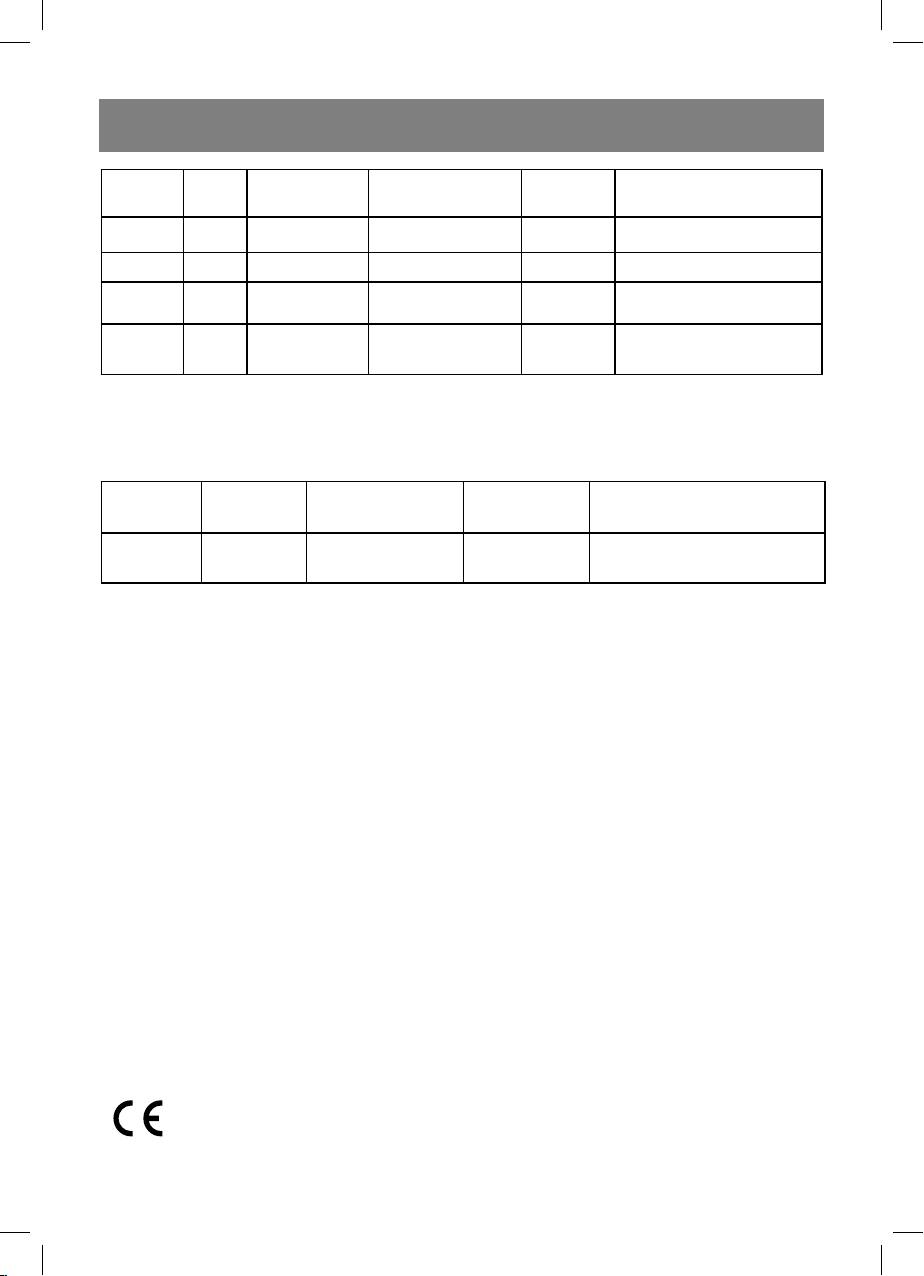
FISH AND SEAFOOD
• Fish is cooked when pieces can easily be removed from the bones.
• Frozen fish and seafood may be cooked without preliminary defrosting it is only necessary
to increase time of cooking.
• Use slice of lemon when cooking fish or seafood to season them.
Weight/
Cooking
Products Type
Herbs
Recommendations
Volume, pcs.
time (min)
9
1557.indd 91557.indd 9 14.02.2008 9:15:3414.02.2008 9:15:34
ENGLISH
sweet marjoram
Shellfish Fresh 250 g/400 g
8-10
citriodora
Shrimps Fresh 400 g citriodora garlic 6 Cook before reddening
Mussels Fresh 400 g citriodora garlic 8-10 Cook before shell opening
2 pcs. (400 g
Lobster Frozen
horseradish garlic 20-22 Cook before reddening
each)
Frozen
250 g
Mustard sweet mar-
10-12
Fish fillets
Cook before flaking
Fresh
250 g
joram
6-8
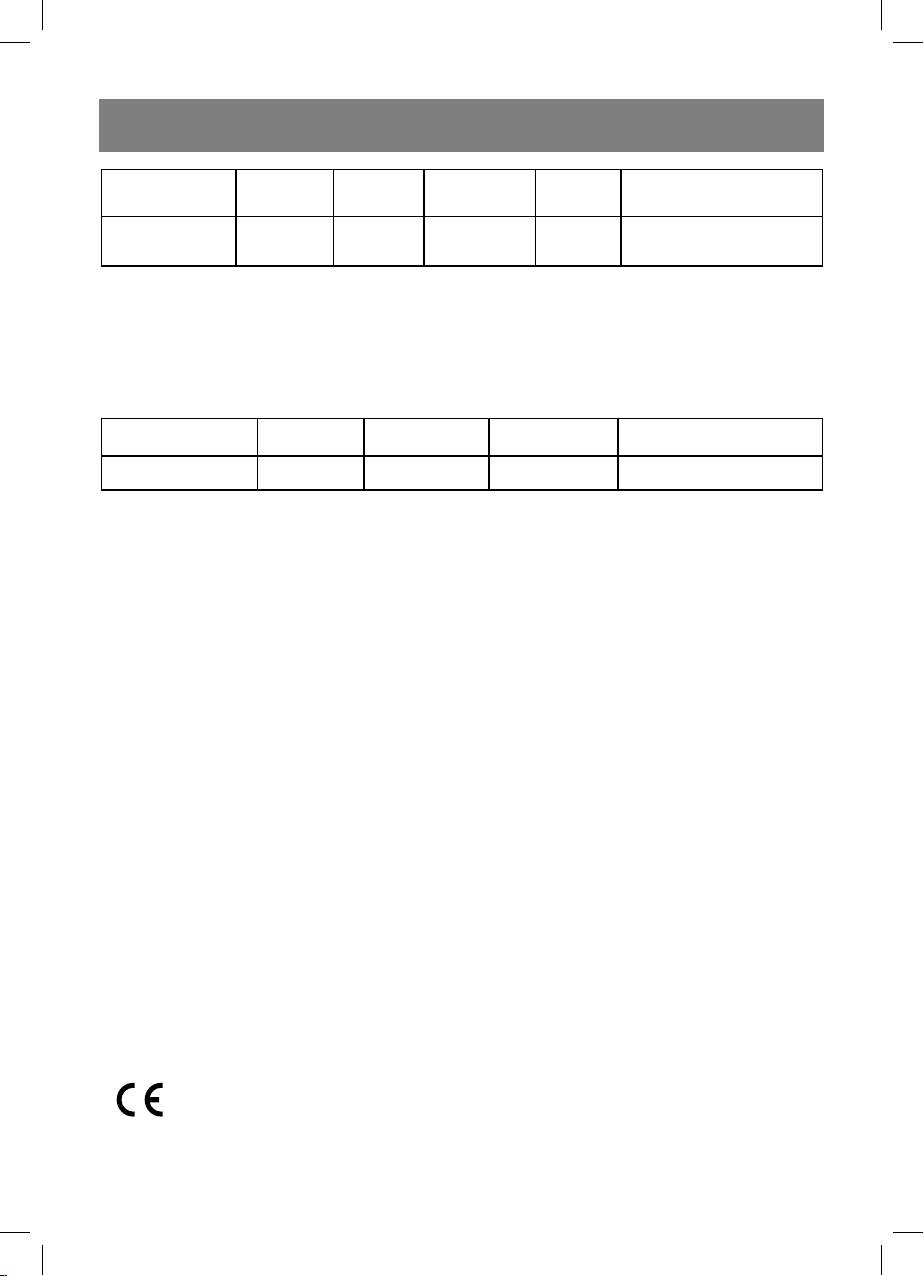
RICE
Using the bowl for rice cooking, fill the water tank with water; you can add some other liquid
to the rice bowl, for instance bouillon. You can add spices, minced onion, parsley, and al-
mond or chipped mushrooms.
Weight/ Volume,
Cooking time
Products Type
Recommendations
pcs.
(minutes)
Rice White 200 g/300 ml 35-40 Maximum volume of rice 250 g
Delivery set
1. Lid – 1 pc.
2. Steam bowls – 3 pcs.
3. Bowl for rice/soup cooking – 1 pc.
4. Tray for condensate collection – 1 pc.
5. Steam sprayer – 1 pc.
6. Mesh filter – 1pc.
7. Body (with water tank) – 1pc.
SPECIFICATIONS
Power supply: 220 V – 240 V ~ 50 Hz
Power intake: max. 755 – 900 W
Water tank capacity: 1,1 l
Bowl for rice/soup/other products cooking: 1,2 l
Specifications subject to change without prior notice.
MINIMUM SERVICE LIFE - 5 YEARS
GUARANTEE
Details regarding guarantee conditions can be obtained from the dealer from whom the
appliance was purchased. The bill of sale or receipt must be produced when making any
claim under the terms of this guarantee.
This product conforms to the EMC-Requirements as laid down by the Council
Directive 89/336/EEC and to the Law Voltage Regulation (73/23 EEC)
10
1557.indd 101557.indd 10 14.02.2008 9:15:3414.02.2008 9:15:34

DEUTSCH
ELEKTRISCHER DAMPFGARER
der Nähe einer Wand oder eines
Lebensmittel, die mit Dampf zuberei-
Anhängeschrankes zu benutzen, da der
tet sind, behalten mehr Aroma und
entstehende Dampf diese beschädigen
Nährwerteigenschaften. Der Dampfgarer
könnte.
Vitek macht es Ihnen möglich, einen Schritt
• Benutzen Sie nur Geräteteile, die zum
näher zur gesunden Ernährung zu ma-
Lieferungsumfang gehören.
chen.
• Waschen Sie vor der ersten
Inbetriebnahme alle Teile sorgfältig, die
BESCHREIBUNG
mit Nahrungsmitteln in Berührung kom-
1. Untere Schale "1“
men werden.
2. Mittlere Schale „2“
• Vor dem Einschalten des Dampfgarers
3. Obere Schale „3"
füllen Sie den Wasserbehälter mit Wasser
4. Reis/Suppenbehälter
auf, ansonsten kann das Gerät beschä-
5. Deckel
digt werden.
6. Tropfauffangschale
• Seien Sie bei der Nutzung des
7. Dampfzerstäuber
Geräts vorsichtig. Flüssigkeiten und
8. Gehäuse des Dampfgarers
Kondenswasser sind sehr heiß.
9. Nachfüllöffnung fürs Wasser
• Schützen Sie sich vor Bränden durch
10. Wasserbehälter
den austretenden Dampf, vor allem beim
11. Siebfi lter
Abnehmen des Deckels.
12. Steuerungsplatte
• Um den Deckel oder Dampfschalen abzu-
13. Netzkabel
nehmen, nutzen Sie einen Küchenlappen
14. LCDBildschirm
oder Handschuhe.
15. Ein/Ausschalttaste
• Es ist nicht gestattet, das Gerät umzustel-
16. Zeiteinstellungstaste
len, wenn es mit heißen Nahrungsmitteln
17. Taste zur Wahl der automatischen
gefüllt ist.
Betriebsstufe der Zubereitung
• Lassen Sie das Gerät nie unbeaufsich-
18. Tasten zur Einstellung der
tigt, besondere Vorsichtsmaßnahmen
Zubereitungs/Aufwärmungszeit und
sind in den Fällen angesagt, wenn sich
des Timers
Kinder oder behinderte Personen wäh-
19. Taste Start/Abbruch der Zubereitung
rend der Nutzung des Geräts in der Nähe
aufhalten.
SICHERHEITSMAßNAHMEN
• Es ist nicht gestattet, die Behälter des
Vor der ersten Inbetriebnahme des
Geräts in der Mikrowelle, und auch in
Geräts lesen Sie aufmerksam diese
den Elektroöfen und Gasherden zu be-
Betriebsanleitung durch.
nutzen.
• Schalten Sie das Gerät vom Stromnetz
• Vor der ersten Inbetriebnahme verge-
ab, wenn Sie es längere Zeit nicht nutzen
wissern Sie sich, dass die Spannung des
oder vor der Reinigung.
Geräts mit der Netzspannung überein-
• Es ist nicht gestattet, das Gerät zum
stimmt.
Abschalten am Netzkabel zu ziehen, hal-
• Es ist nicht gestattet, das Gerät außer-
ten Sie es am Netzstecker und ziehen Sie
halb der Räumlichkeiten zu benutzen.
diesen aus der Steckdose heraus.
• Stellen Sie den Dampfgarer auf eine ge-
• Achten Sie darauf, dass das Netzkabel
rade stabile Oberfl äche auf.
an den Stellen frei nicht hängt, an denen
• Es ist nicht gestattet, das Gerät in
Kinder daran festhalten können.
11
11
1557.indd 111557.indd 11 14.02.2008 9:15:3414.02.2008 9:15:34

DEUTSCH
• Bewahren Sie das Gerät in einem für
Wasserbehälter eingießen (Abb. 2).
Kinder unzugänglichem Ort auf.
• Wenn Sie während der Zubereitung fest-
• Es ist nicht gestattet, das Gerät, das
gestellt haben, dass der Wasserstand zu
Netzkabel oder den Netzstecker ins
niedrig ist, können Sie das Wasser durch
Wasser tauchen zu lassen, um das
die Nachfüllöffnung (9) nachfüllen, ohne
Stromschlagrisiko zu vermeiden.
den Dampfdeckel abzunehmen (Abb.
• Es ist nicht gestattet, das Gerät zu nut-
1).
zen, wenn das Netzkabel oder der
Nutzen Sie fi ltriertes Wasser, es hat
Netzstecker beschädigt ist. Um das
eine niedrigere Härte, dadurch wird die
Gerät zu reparieren, wenden Sie sich an
Bildung des Kalkes auf dem Heizelement
ein autorisiertes Kundenservicedienst.
heruntergesetzt. Es ist nicht gestattet,
• Das Gerät ist nur für den Gebrauch im
das Gerät mit Wasser über die Grenzlinie
Haushalt geeignet.
MAX zu füllen.
BEWAHREN SIE DIESE
WARNUNG
BEDIENUNGSANLEITUNG
Es ist nicht gestattet, Salz, Pfeffer,
SORGFÄLTIG AUF.
Gewürze, Kräuter, Wein, Saucen und an-
dere Flüssigkeiten ins Gerät zu geben. Es
VOR DER ERSTNUTZUNG DES GERÄTS
kann zur Beschädigung des Geräts füh-
• Vor der ersten Nutzung nehmen Sie das
ren.
Gerät aus der Verpackung heraus und
Wechseln Sie das Wasser vor jeder
entfernen Sie das Verpackungsmaterial.
Nutzung des Dampfgarers.
• Waschen Sie Dampfschalen (1, 2, 3), den
Reis/Suppenbehälter (4), den Deckel
• Stellen Sie die Saftauffangschale (6) auf
(5) und die Saftauffangschale (6) mit
den Wasserbehälter (10) auf, prüfen Sie,
einem weichen Waschmittel.
ob sie richtig aufgestellt wurde.
• Spülen Sie nach und trocknen Sie diese
• Setzen Sie eine oder mehre-
sorgfältig ab.
re Dampfschalen (123) auf die
• Wischen Sie die Innenseite des
Saftauffangschale (6) auf.
Wasserbehälters (10) mit einem feuch-
• Setzen Sie den Deckel auf die
ten Tuch ab.
Dampfschale (5) auf.
• Stecken Sie den Stecker des Netzkabels
BETRIEBSANLEITUNG
in die Steckdose, dabei ertönt ein
• Stellen Sie den Dampfgarer auf eine ge-
Tonsignal und der LCDBildschirm schal-
rade stabile Oberfl äche auf.
tet sich ein, der Dampfgarer ist betriebs-
• Stellen Sie den Dampfzerstäuber (7)
bereit (ca. 45 Minuten).
auf.
• Setzen Sie den Siebfi lter (11) auf den
Anmerkung:
Wasserbehälter (10) auf.
falls das Gerät im Laufe von 1 Minute nicht
• Füllen Sie den Wasserbehälter (10)
betätigt wird, ertönen zwei Tonsignale und
mit kaltem Wasser bis zum maximalen
der Dampfgarer schaltet sich aus.
Füllstand MAX auf.
• Es gibt zwei Möglichkeiten der Auffüllung
• Schalten Sie den Dampfgarer ein, drü-
des Wasserbehälters mit Wasser: über
cken Sie die Taste (15), dabei schaltet
die Nachfüllöffnung (9) (Abb. 1) oder
sich der LCDBildschirm (14) ein, ein
Sie können das Wasser direkt in den
Tonsignal ertönt.
12
1557.indd 121557.indd 12 14.02.2008 9:15:3414.02.2008 9:15:34

DEUTSCH
• Sie können mit der Taste der auto-
• Drücken Sie die Taste (15), um den
matischen Zubereitung (17) eine der
Dampfgarer auszuschalten, oder warten
Betriebsstufen aus: Kochen von Eiern,
Sie ab, bis er sich automatisch ausschal-
Zubereitung von Fisch, Gemüse, Fleisch,
tet.
Hähnchen, Reis, Aufwärmung, und auch
eine der zwei vorzeitig einprogrammier-
Aufwärmung von Lebensmitteln
ten Zubereitungsstufen "P1" und "P2".
• Wählen Sie mit der Taste (17) die
Dabei erscheint auf dem LCDBildschirm
Aufwärmungszeit von Lebensmitteln
(17) ein entsprechendes Symbol des
(
) aus, stellen Sie mit den Tasten
Produktes, die Zubereitungszeit und die
(18) die notwendige Aufwärmungszeit
Aufwärmungstemperatur.
von Lebensmitteln von 1 bis 99 Minuten
• Nach der Auswahl einer automatischen
ein, um der Dampfgarer einzuschalten,
Zubereitungsstufe, können Sie die ein-
drücken Sie die Taste (19).
gestellte Zubereitungszeit mit der Taste
• Nach der Beendigung der Aufwärmung
(18) ändern.
ertönen 5 Tonsignale, in einer Minute
• Drücken Sie die Taste (19), um mit
ertönen zwei Tonsignale und der
der Zubereitung/Aufwärmung von
Dampfgarer schaltet sich aus.
Lebensmitteln zu beginnen, dabei wird
auf dem LCDBildschirm das (
)
Programmierung von Betriebsstufen
der Zubereitung
oder (
) aufl euchten.
Sie können die Betriebsstufen der
• Nach der Beendigung der eingestell-
Zubereitung selbst einprogrammieren.
ten Zubereitungszeit ertönen zwei
• Stecken Sie den Netzstecker des
Tonsignale und der Dampfgarer schal-
Netzkabels in die Steckdose.
tet sich in den Warmhaltebetrieb um, die
• Schalten Sie den Dampfgarer ein, drü-
Aufwärmungszeit beträgt ca. 20 Minuten
cken Sie die Taste (15), dabei schaltet
(dabei wird auf dem LCDBildschirm das
sich der LCDBildschirm (14) ein, ertönt
ein Tonsignal.
Symbol (
) aufl euchten).
• Drücken Sie und halten Sie die Taste
• Nach der Beendigung der
(17) innerhalb von 3 Sekunden, auf dem
Aufwärmung ertönen 5 Tonsignale, der
LCDBildschirm werden Symbole «1:00»
Warmhaltebetrieb schaltet sich aus, in
aufl euchten. Stellen Sie die gewünschte
einer Minute ertönen zwei Tonsignale
Zubereitungszeit ein, drücken Sie da-
und der Dampfgarer schaltet sich aus.
bei die Tasten (18), und drücken Sie die
Taste (19), um die Einstellungen zu spei-
Anmerkung:
chern.
Im Warmhaltebetrieb können Sie die
• Um die Zubereitungszeit der zwei-
Aufwärmungszeit ändern, nutzen Sie dabei
ten Betriebsstufe einzustellen, drü-
die Tasten (18).
cken Sie die Taste (17), bis auf dem
LCDBildschirm blinkende Symbole
• Um die Zubereitung oder Aufwärmung
«2:00» erscheinen. Stellen Sie die ge-
zu unterbrechen, drücken Sie die Taste
wünschte Zubereitungszeit ein, drücken
Sie dabei die Tasten (18), und drücken
(19), dabei wird das Symbol (
) oder
Sie die Taste (19), um die Einstellungen
zu speichern.
(
) ständig leuchten.
13
1557.indd 131557.indd 13 14.02.2008 9:15:3414.02.2008 9:15:34

DEUTSCH
Einstellung des Timers für die
Um die Zubereitung fortzusetzen, drücken
Einschaltung des Dampfgarers
Sie die Taste (15).
Sie können die Einschaltversetzungszeit
einstellen.
Indikator des Wassermangels
• Drücken Sie die Taste (16). Auf
Wenn der Wasserstand im Wasserbehälter
dem LCDBildschirm erscheint das
(10) unter die Grenzlinie MIN sinkt, ertönt ein
Tonsignal und auf dem LCDBildschirm wird
Timersymbol (
) und das Symbol
«00:00».
das Symbol (
) aufl euchten. Füllen Sie
• Sie können mit den Tasten (18) die
den Wasserbehälter (10) mit kaltem Wasser
Einschaltversetzungszeit einstellen.
bis zum maximalen Grenzlinie MAX auf.
Minimale Einschaltversetzungszeit
Es gibt twei Möglichkeiten der Auffüllung
beträgt 5 Minuten, maximale
des Wasserbehälters mit Wasser: – über
Einschaltversetzungszeit 23 Stunden 55
die Nachfüllöffnung (9) (Abb. 1) oder direkt
Minuten, Zeitskalateilung 5 Minuten.
in den Wasserbehälter (Abb. 2).
Um die eingestellte Zeit zu bestätigen,
drücken Sie die Taste (19).
ACHTUNG!
• Wählen Sie die gewünschte Betriebsstufe
• Fassen Sie während des Betriebs des
mit der Taste (15), danach drücken Sie
Geräts den Deckel und die Dampfschalen
die Taste (19) wieder.
nicht an diese sind sehr heiß.
• Dabei erscheint auf dem LCDBildschirm
• Um Verbrennungen zu vermeiden,
das Symbol des Timers, der Betriebsstufe
nutzen Sie einen Küchenlappen oder
und die Zeit mit der Angabe der
Handschuhe für die Abnahme des
Zeitzubereitung.
Deckel oder der Dampfschalen. Nehmen
• Nach der Beendigung der Zubereitung
Sie den Deckel vorsichtig hoch, um den
ertönt ein Tonsignal und der Dampfgarer
Dampf herauszulassen, halten Sie den
schaltet sich in den Warmhaltebetrieb für
Deckel über der Dampfschale, damit das
20 Minuten automatisch um (dabei wird
Kondenswasser abläuft.
auf dem LCDBildschirm das Symbol
• Wenn Sie die Lebensmittel auf das
Gare überprüfen wollen, nutzen Sie
(
) aufl euchten).
Küchenzubehör mit langen Griffen.
• Nach der Beendigung der Aufwärmung
• Vergessen Sie nicht, dass das Wasser
ertönen 5 Tonsignale, in einer Minute
im Wasserbehälter sehr heiß sein kann,
ertönen zwei Tonsignale und der
obwohl andere Teile des Geräts schon
Dampfgarer schaltet sich aus.
abgekühlt sind.
Im Warmhaltebetrieb können Sie den
• Es ist nicht gestattet, den Dampfgarer
Timer ausschalten, nutzen Sie dabei die
zu nutzen, wenn die Saftauffangschale,
Taste (16).
Dampfschalen und der Deckel nicht auf-
gestellt sind.
Automatische Abschaltung
Wenn Sie den Dampfgarer innerhalb von 1
EMPFEHLUNGEN
Minute nicht betätigen, schaltet sich dieser
• Bereiten Sie Fleisch, Fisch und
automatisch aus.
Meeresprodukte bis zur vollständigen
Vor dem Einschalten des Dampfgarers
Gare zu.
ertönen 2 Tonsignale. Sie können die
• Nutzen Sie immer nur aufgetaute
Zubereitung unterbrechen, drücken Sie
Nahrungsmittel, ausgenommen von
dabei die Taste (19).
Gemüse, Fisch und Meeresprodukten.
14
1557.indd 141557.indd 14 14.02.2008 9:15:3414.02.2008 9:15:34

DEUTSCH
• Wenn Sie mehrere Dampfschalen gleich-
• Stellen Sie die Saftauffangschale (6)
zeitig nutzen, legen Sie Fleisch, Gefl ügel
auf.
und Fisch in die untere Schale, damit
• Setzen Sie eine Dampfschale (1, 2, 3) auf
die ausgeschiedene Flüssigkeit auf die
die Auffangschale (6) auf.
Lebensmittel in anderen Schalen nicht
• Stellen Sie auf die Reis/Suppenschale
herabfl ießt.
(4) auf.
• Legen Sie frische und trockene Kräuter in
• Geben Sie 1 Tasse Reis in den Behälter (4)
die Saftauffangschale (6), um ein zusätz-
und gießen Sie 1 1/2 Tassen Wasser ein.
liches Geschmack anderen Lebensmitteln
Die maximale Reismenge ist ca. 250 g.
zu verleihen. Wählen Sie Kräuter nach
• Setzen Sie auf die Dampfschale den
ihrem Geschmack aus: Thymian,
Deckel (5) auf.
Koriander, Basilikum, Dill, Curry, Dragon,
• Stecken Sie den Netzstecker des
Knoblauch, Kümmel, Meerrettich und an-
Netzkabels in die Steckdose.
dere Kräuter. Sie können Kräuter zwecks
• Schalten Sie den Dampfgarer ein, drü-
der Zugabe den Nahrungsmitteln eines
cken Sie die Taste (15), dabei schaltet
neuen Geschmacks kombinieren. Bei
sich der LCDBildschirm (14) ein, ertönt
der Nutzung von frischen Kräutern sollen
ein Tonsignal.
diese gehackt werden und ihre Menge
• Sie können mit den Tasten (17) die ge-
soll zweimal oder dreimal größer sein, als
wünschte Betriebsstufe der Zubereitung
die von den getrockneten Kräutern.
wählen. Sie können mit den Tasten (18)
die Zubereitungszeit selbst wählen.
ZUBEREITUNG VON EIERN (Abb. 3)
• Drücken Sie die Taste (19), um mit der
• Gießen Sie das Wasser in den
Zubereitung zu beginnen.
Wasserbehälter (10) ein.
• Stellen Sie die Saftauffangschale (6) auf.
NACHFÜLLEN VON WASSER WÄHREND
• Setzen Sie die Dampfschalen (1, 2, 3) auf
DER ZUBEREITNG
die Saftauffangschale auf.
Für Gerichte mit einer langen
• Legen Sie Eier in den Schalenboden der
Zubereitungszeit:
Dampfschale (1, 2, 3) ein und decken Sie
Kontrollieren Sie den Wasserstand wäh-
diese mit dem Deckel (5).
rend der Zubereitung.
• Stecken Sie den Netzstecker des
Falls notwendig ist, füllen Sie das Wasser
Netzkabels in die Steckdose.
über die Nachfüllöffnung (9) nach, ohne
• Schalten Sie den Dampfgarer ein, drü-
Dampfschalen abzunehmen.
cken Sie die Taste (15), dabei schaltet
sich der LCDBildschirm (14) ein, ertönt
NUTZHINWEISE UND EMPFEHLUNGEN
ein Tonsignal.
• Die in den Tabellen angegebene Zeiten
• Sie können mit den Tasten (17) die
für die Zubereitung von Lebensmitteln
Betriebsstufe der Zubereitung von Eiern
sollen als empfohlene angesehen wer-
wählen. Sie können mit den Tasten (18)
den, die Zeit kann sich wegen der
die Zubereitungszeit selbst wählen.
Stückgröße, dem Umfang oder persön-
• Drücken Sie die Taste (19), um mit der
lichem Geschmack unterscheiden. Mit
Zubereitung zu beginnen.
der Zeit können Sie die gewünschte Zeit
der Zubereitung selbst auswählen.
ZUBEREITUNG VON REIS (Abb. 4)
• Eine Produktschicht wird weniger zu-
• Gießen Sie das Wasser in den
bereitet als zwei Schichten, deswegen
Wasserbehälter (10) ein.
soll die Zubereitungszeit der größeren
15
1557.indd 151557.indd 15 14.02.2008 9:15:3414.02.2008 9:15:34

DEUTSCH
Menge von Lebensmitteln entsprechend
Wenn Sie Nahrungsmittel mit verschie-
erhöht werden.
dener Garzeit zubereiten, legen Sie in die
• Um ein besseres Ergebnis zu erzielen, le-
untere Schale die Nahrungsmittel, die län-
gen Sie dicke Stücke an die Ränder der
ger gegart werden. Wenn Nahrungsmittel
Dampfschale.
in der oberen Dampfschale gar werden,
• Füllen Sie die Dampfschale mit
können Sie diese Abnehmen, und die un-
Nahrungsmitteln nicht vollständig auf,
tere Dampfschale mit dem Deckel schlie-
lassen Sie Platz für den Dampfstrom.
ßen und die Zubereitung fortsetzen.
• Bei der Zubereitung einer größeren
Menge von Lebensmitteln sollen diese
REINIGUNG DES DAMPFGARERS
periodisch umgerührt werden. Seien
• Vor der Reinigung schalten Sie das Gerät
Sie dabei sehr vorsichtig, nutzen Sie ei-
vom Stromnetz ab, und lassen Sie es ab-
nen Küchenlappen oder Handschuhe
kühlen.
für den Schutz der Hände gegen heißen
• Es ist nicht gestattet, das Netzkabel, den
Dampf oder Küchenzubehör mit länge-
Netstecker und das Gehäuse des Geräts
ren Griffen.
ins Wasser zu tauchen.
• Es ist nicht gestattet, Salz und Gewürze
• Es ist nicht gestattet, Abrasivmittel bei
direkt auf Lebensmittel während ihrer
der Reinigung von Dampfschalen, dem
Zubereitung zu geben.
oberen Deckel und dem Gehäuse des
• Die Flüssigkeit, die sich in der
Dampfgarers zu nutzen.
Saftauffangschale (6) ansammelt, passt
• Es wird empfohlen, Dampfschalen,
sehr gut für die Zubereitung von Suppen
den Reis/Suppenbehälter, die
oder kann als Suppenbrühe benutzt wer-
Saftauffangschale und den Deckel
den. Seine Sie aber vorsichtig: sie ist
in warmem Wasser mit Spülmittel
sehr heiß.
zu waschen. Sie können auch eine
• Nutzen Sie nur vollständig aufgetaute
Spülmaschine benutzen, dabei stellen
Produkte.
Sie eine „leichte“ Betriebsstufe ein.
• Nehmen Sie den Siebfi lter (11) heraus
Bei der gleichzeitigen Nutzung von drei
und spülen Sie ihn ab.
Dampfschalen:
• Wischen Sie das Gehäuse des
Legen Sie immer nur die größten Stücke
Dampfgarers mit einem feuchten Tuch
in die untere Schale.
ab.
Das Kondenswasser, das sich in der
• Waschen Sie regelmäßig Dampfschalen.
oberen Dampfschale bildet, fl ießt in die
untere Dampfschale ab, deswegen ver-
ENTKALKUNG
gewissern Sie sich, ob die zubereiteten
Nach 23 Monaten der Benutzung des
Nahrungsmittel nach dem Geschmack
Geräts kann sich auf dem Heizelement
zueinander passen.
Kalk bilden. Das ist ein natürlicher Prozess,
Bei der Zubereitung von Fleisch,
der von der Wasserhärte abhängt. Es ist
Hähnchen und Gemüse legen Sie Fleisch
notwendig, das Gerät für den normalen
immer in die untere Dampfschale, damit
Betrieb regelmäßig zu entkalken.
der Saft von Rohfl eisch auf Gemüse nicht
• Füllen Sie den Wasserbehälter mit
abfl ießt.
Speiseessig bis zum maximalen Füllstand
Die Zubereitungszeit in der oberen
MAX auf. WICHTIG: Nutzen Sie keine
Dampfschale ist normalerweise ca. 5
chemischen Mittel für die Entkalkung.
Minuten länger.
• Stellen Sie die Saftauffangschale (6),
16
1557.indd 161557.indd 16 14.02.2008 9:15:3414.02.2008 9:15:34

DEUTSCH
eine Dampfschale (1, 2, 3) auf, setzen
ZUBEREITUNGSDAUER VON
Sie den Deckel (5) auf und schalten Sie
NAHRUNGSMITTELN UND
den Dampfgarer für 2025 Minuten ein.
EMPFEHLUNGEN
• Die Zubereitungsdauer hängt von der
ACHTUNG! Wenn der Essig aus dem
Menge der Nahrungsmittel, dem freien
Behälter heraustritt, schalten Sie den
Platz, der Frische von Nahrungsmitteln
Dampfgarer aus, gießen Sie vorsichtig ein
und ihrem Geschmack ab.
wenig Wasser ab.
• Für die Berechnung der
Zubereitungsdauer von Nahrungsmitteln
• Nach dem Ablauf der Timerzeit schalten
wurde die untere Dampfschale genom-
Sie den Dampfgarer vom Stromnetz ab,
men, in der oberen Dampfschale werden
lassen Sie ihn vollständig abkühlen, be-
Nahrungsmittel ca. 5 Minuten länger zu-
vor Sie den Essig ausleeren.
bereitet.
• Spülen Sie den Wasserbehälter mit kaltem
• Bei der größeren oder kleineren Menge
Wasser, setzen Sie die Saftauffangschale
von Nahrungsmitteln verlängern bzw.
(6), eine Dampfschale (1, 2, 3) auf, set-
verringern Sie die Zubereitungszeit.
zen Sie den Deckel (5) auf, schalten Sie
den Dampfgarer ein und stellen Sie den
GEMÜSE
Timer auf 5 Minuten ein.
• Schneiden Sie dicke Stengel von Brokkoli
• Schalten Sie den Dampfgarer vom
oder dicke Blütenstengel bei Blumenkohl ab.
Stromnetz ab, lassen Sie es vollstän-
• Bereiten Sie das grüne Blattgemüse ma-
dig abkühlen, gießen Sie das Wasser
ximal kurze Zeit zu, es verliert schnell sei-
ab, trocknen Sie die Saftauffangschale,
ne Farbe.
die Dampfschale und den Deckel und
• Geben Sie Salz und Gewürze nach der
packen Sie das Gerät bis zur nächsten
Zubereitung.
Nutzung weg.
• Tiefgefrorenes Gemüse sollte man vor
der Zubereitung im Dampfgarer nicht un-
bedingt auftauen.
Gewicht/
GARZEIT
GEMÜSE Art
Kräuter
Empfehlungen
Menge
(Minuten)
Knoblauch
Schneiden Sie Stängel
Artischocken frisch 3 mittlere
Dragon
4550
ab
Dill
Beerentraube
frisch tiefge-
400 g
1315
Lassen Sie Platz für den
Spargel
Lorbeer
froren
400 g
1618
Dampfdurchlauf
Thymian
Knoblauch
frisch tiefge-
400 g
1618
Brokkoli
Schotenpfeffer
froren
400 g
1518
Dragon
Karotten (ge-
Anis Pfefferminze
Bei der Zubereitung
frisch 400 g
2022
schnitten)
Dill
umrühren
frisch tiefge-
400 g
Rosmarin
1618
Bei der Zubereitung
Blumenkohl
froren
400 g
Basilikum Dragon
1820
umrühren
frisch tiefge-
250 g
Thymian
810
Bei der Zubereitung
Spinat
froren
250 g
Knoblauch
1820
umrühren
17
1557.indd 171557.indd 17 14.02.2008 9:15:3414.02.2008 9:15:34
DEUTSCH
Bei der Zubereitung
Bohnen frisch 400 g Kümmel Dill 1820
umrühren
frisch
Basilikum
400 g
1012
Bei der Zubereitung
Erbsen
tiefgefroren
Origano
400 g
1518
umrühren
(schotenartig)
Pfefferminze
Kartoffeln frisch 400 g Dill 2022
FLEISCH UND GEFLÜGEL
• Die Zubereitung mit Dampf hat Vorteile, das Fett wird während der Zubereitung aus den
Nahrungsmitteln ausgebraten und fl ießt in die Saftauffangschale herab. Jedoch ist es
wünschenswert, vor der Zubereitung das übrige Fett zu entfernen. Das Grillfl eisch passt
ideal zum Dampfkochen.
• Marinieren Sie und übergießen Sie Fleisch oder Gefl ügel vor der Zubereitung mit
Sauce.
• Prüfen Sie Nahrungsmittel auf die Gare mittels Einstechen.
• Nutzen Sie frische oder getrocknete Kräuter während der Zubereitung von
Nahrungsmitteln, um ihnen einen zusätzlichen Geschmack zu verleihen.
Gewicht/
GARZEIT
Nahrungsmittel Art
Kräuter
Empfehlungen
Menge
(Minuten)
Curry
250 g (4 St.)
1215
Das übrige Fett
Hähnchen Filet, Keule
Rosmarin
450 g
3035
entfernen
Thymian
Filetbraten, Filet,
400 g (4 St.)
Curry
Steaks oder
Das übrige Fett
Schweinefl eisch
Dicke
Beerentraube
510
Filetstücke
entfernen
2,5 cm)
Thymian
Filetbraten,
Curry
Filet
Das übrige Fett
Rinderfl eisch
250 g
Schotenpfeffer
810
Oder
entfernen
Thymian
Oberschalenstück
FISCH UND MEERESPRODUKTE
• Der Fisch ist gar, wenn sich Fischfi let von Knochen leicht trennt.
• Tiefgefrorener Fisch und Meeresprodukte können ohne vorläufi ges Auftauen zubereitet
werden, die Garzeit soll aber verlängert werden.
• Geben Sie Zitronenstücke während der Zubereitung von Fisch oder Meeresprodukten,
um ihnen einen besonderen Geschmack zu verleihen.
Gewicht/
GARZEIT
Nahrungsmittel Art
Kräuter
Empfehlungen
Menge
(Minuten)
250 /
Origano
Muscheln frisch
810
400 g
Beerentraube
Beerentraube
Die Garzeit ist beendet, wenn
Schrimps frisch 400 g
6
Knoblauch
die Kruste gerötet ist
Beerentraube
Die Garzeit ist beendet, wenn
Miesmuscheln frisch 400 g
810
Knoblauch
Miesmuscheln geöffnet sind
18
1557.indd 181557.indd 18 14.02.2008 9:15:3414.02.2008 9:15:34
DEUTSCH
2 St. (400 g
Meerrettich
Die Garzeit ist beendet, wenn
Hummer tiefgefroren
2022
je Hummer)
Knoblauch
die Kruste gerötet ist
tiefgefroren
250 g
Senf
1012
Die Garzeit ist beendet, wenn
Fischfi let
frisch
250 g
Origano
68
Fleisch in kleine Stücke zerfällt
REIS
Falls Sie den Reisbehälter nutzen, gießen Sie das Wasser in den Wasserbehälter ein, und
sie können andere Flüssigkeiten in den Reisbehälter eingießen, z.B. Brühe. Sie können in
den Reisbehälter auch Gewürze, gehackte Zwiebel, Petersilie, Mandeln oder geschnit-
tene Pilze geben.
Anzahl/
GARZEIT
Nahrungsmittel Art
Empfehlungen
Wassermenge
(Minuten)
Reis weiß 200 g/300 ml 3540 Max. Reismenge bis 250 g
Lieferumfang
1. Deckel – 1 St.
2. Dampfschalen – 3 St.
3. Reis/Suppenbehälter– 1 St.
4. Saftauffangschale – 1 St.
5. Dampfzerstäuber – 1 St.
6. Siebfi lter – 1 St.
7. Gehäuse des Dampfgarers (mit Wasserbehälter) 1 St.
TECHNISCHE EIGENSCHAFTEN
Stromversorgung: 220 240 V ~ 50 Hz
Maximale Leistung: 755 900 W
Fassungsvermögen der Wasserschale: 1,1 Liter
Fassungsvermögen der Schale für Reis/Suppen/andere Produkte: 1,2 Liter
Der Hersteller behält sich das Recht vor die Charakteristiken des Gerätes ohne
Vorbescheid zu ändern.
Die Lebensdauer des Gerätes beträgt nicht weniger, als 5 Jahre
Gewährleistung
Ausführliche Bedingungen der Gewährleistung kann man beim Dealer, der diese Geräte
verkauft hat, bekommen. Bei beliebiger Anspruchserhebung soll man während der
Laufzeit der vorliegenden Gewährleistung den Check oder die Quittung über den Ankauf
vorzulegen.
Das vorliegende Produkt entspricht den Forderungen der elektromagnetischen
Verträglichkeit, die in 89/336/EWG -Richtlinie des Rates und den Vorschriften
73/23/EWG über die Niederspannungsgeräte vorgesehen sind.
19
1557.indd 191557.indd 19 14.02.2008 9:15:3414.02.2008 9:15:34

РУССКИЙ
ЭЛЕКТРОПАРОВАРКА
выходящий горячий пар может их
Продукты, приготовленные на пару, в
повредить.
большей степени сохраняют свой аро-
• Используйте только те комплектую-
мат и питательную ценность, чем те,
щие, которые входят в комплект пос-
которые приготовлены иным способом.
тавки.
Пароварка Vitek позволит Вам сделать
• Перед первым применением уст-
шаг к здоровому питанию.
ройства тщательно промойте все де-
тали, которые будут контактировать с
ОПИСАНИЕ
пищевыми продуктами.
1. Нижняя паровая чаша «1»
• Перед тем как включить пароварку,
2. Средняя паровая чаша «2»
заполните резервуар водой, в про-
3. Верхняя паровая чаша «3»
тивном случае устройство может быть
4. Емкость для варки риса или супа
повреждено.
5. Крышка
• Будьте внимательны при работе с ус-
6. Поддон для сбора конденсата
тройством: любая жидкость или кон-
7. Распылитель пара
денсат очень горячие.
8. Корпус пароварки
• Остерегайтесь ожогов выходящим
9. Заливное отверстие
паром, особенно в момент снятия
10. Резервуар для воды
крышки.
11. Сетчатый фильтр
• Для снятия крышки или паровых чаш
12. Панель управления
используйте кухонные прихватки или
13. Сетевой шнур
рукавички.
14. ЖК-дисплей
• Не перемещайте устройство, когда в
15. Кнопка включения/выключения
нем находятся горячие продукты.
16. Кнопка включения таймера
• Не оставляйте работающий прибор
17. Кнопка выбора автоматических ре-
без присмотра, будьте особенно вни-
жимов приготовления
мательны, если рядом с работающим
18. Кнопки установки времени приготов-
прибором находятся дети или лица с
ления/подогрева и таймера
ограниченными возможностями.
19. Кнопка включения/остановки про-
• Запрещается использовать емкости
цесса приготовления
пароварки в микроволновых печах, а
также на электрических или газовых
ПРАВИЛА ТЕХНИКИ БЕЗОПАСНОСТИ
плитах.
Прежде чем начать пользоваться паро-
• Отключайте устройство от сети, если
варкой, внимательно прочитайте инс-
оно не используется, при снятии или
трукцию по эксплуатации.
установке паровых чаш, а также пе-
• Перед включением пароварки убеди-
ред чисткой.
тесь, что напряжение и частота вашей
• При отключении прибора не тяните за
электросети соответствуют марки-
шнур, возьмитесь за сетевую вилку и
ровке на устройстве.
извлеките ее из розетки.
• Не используйте пароварку вне поме-
• Следите за тем, чтобы сетевой шнур
щений.
не свисал в местах, где за него могут
• Устанавливайте устройство на ров-
взяться дети.
ную устойчивую поверхность.
• Храните устройство в недоступном
• Не пользуйтесь пароваркой вблизи
для детей месте.
стен или навесных шкафов, так как
• Никогда не погружайте устройство,
20
1557.indd 201557.indd 20 14.02.2008 9:15:3514.02.2008 9:15:35


