Vitek VT-1513: instruction
Class: Household, kitchen appliances, electronics and equipment
Type:
Manual for Vitek VT-1513
Table of contents
1513.indd 11513.indd 1 10.06.2010 15:21:4510.06.2010 15:21:45

2
1513.indd 21513.indd 2 10.06.2010 15:21:4810.06.2010 15:21:48
ENGLISH
COFFEE MAKER
to the off position and remove the plug out of the
socket. While unplugging the unit, take its plug,
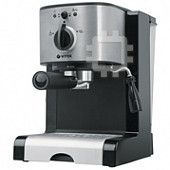
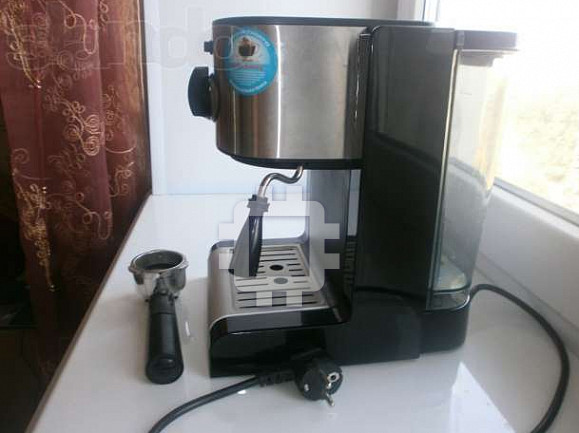
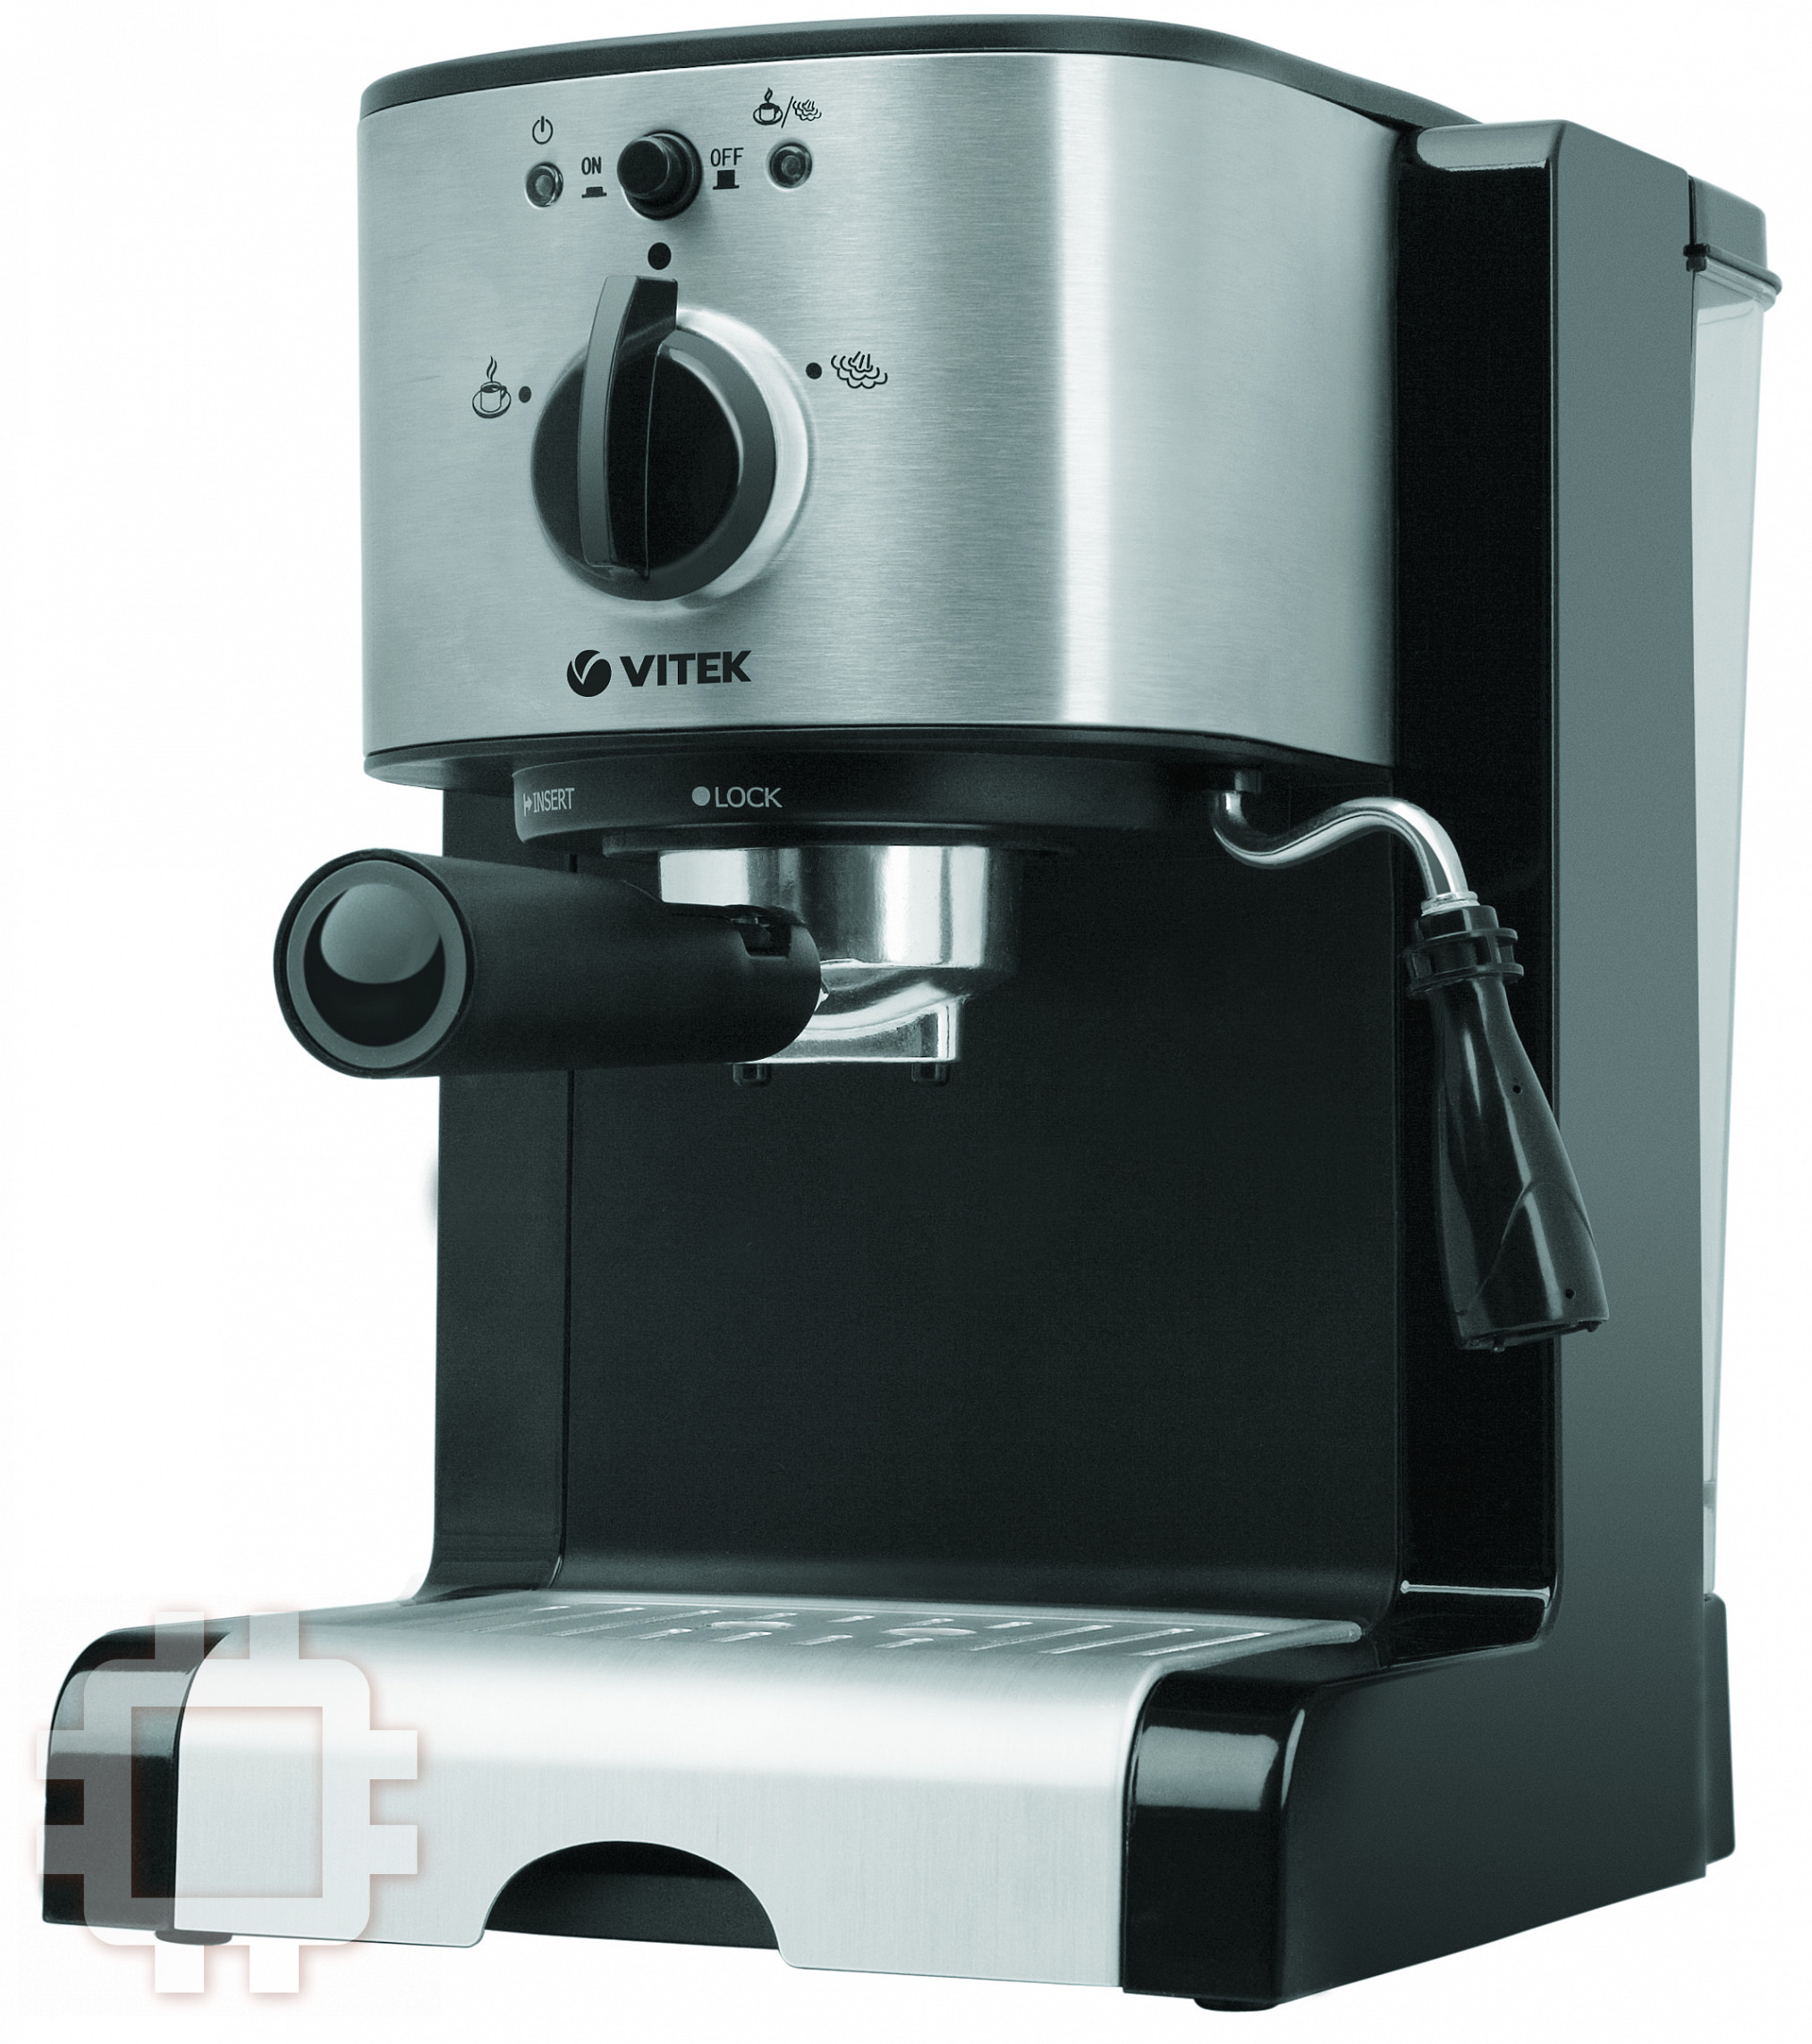
DESCRIPTION
do not pull its cord.
1 – Housing
• Make sure that the power cord does not hang
2 – Platform for warming the cups
over the table, and does not touch hot surfac-
3 – Water tank lid
es.
4 – Removable water tank
• Do not place the unit on heated surfaces.
5 – Ready indicator
• Do not use the coffee maker when the power
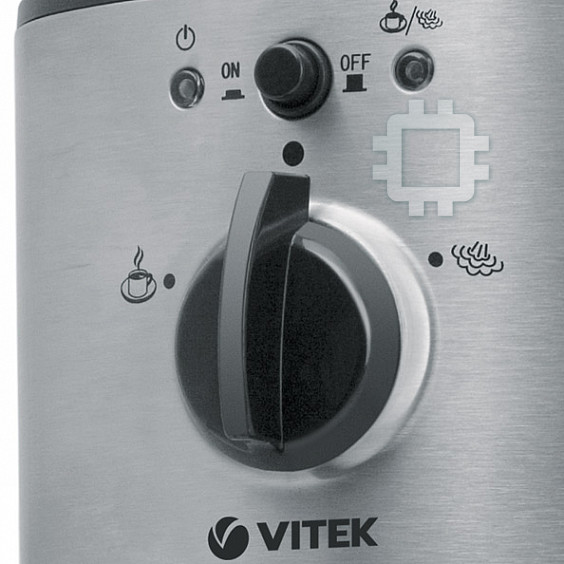
6 – Operating modes knob
cord or the plug are damaged, in case of mal-
7 – Cappuccinator pipe with a tip
function or after damages.
8 – Filter clamp
• Do not repair the unit yourself. Apply to the near-
9 – Drip tray
est authorized service center for repair.
10 – Tray grid
• Keep the unit out of reach of children.
11 – Filter holder handle
• Do not allow children to use the unit as a toy.
12 – Filter holder
• This unit is not intended for usage by children
13 – Coffee filter
or disabled persons unless they are given all the
14 – ON/OFF button
necessary instructions on safety measures and
15 – Power indicator
information about danger, which can be caused
16 – Measuring spoon with a ground coffee densi-
by improper usage of the unit.
fier
• Do not use the coffee maker outdoors.
• Never leave the coffee maker in places, where
IMPORTANT SAFEGUARDS
the temperature is below 0°C.
While using electrical appliances, basic safety
• The unit is intended for household usage only.
measures should always be followed including the
following:
KEEP THESE INSTRUCTIONS
• Read all the instructions carefully.
• Use the coffee maker only for its intended pur-
PREPARATION TO OPERATION
poses.
• Make sure that the button (14) is in the “OFF”
• Make sure that the mains voltage corresponds
position, and the knob (6) – is in the “
” posi-
to the voltage specified on the housing of the
tion.
unit.
• Before using the unit for the first time, wash all
• Use the plug with a secure grounding.
removable parts with warm water and wipe them
• In order to reduce risk of fire, do not use adapt-
with a dry cloth.
ers while connecting the unit to the wall outlet.
• Before switching on the unit, make sure that the
• Place the unit on the flat stable surface.
mains voltage corresponds to the voltage speci-
• Do not switch on the unit without water.
fied on the housing of the unit.
• Before switching on the unit, make sure that the
• Remove the tank (4), fill it with cold water till the
On/Off button is in the off position.
MAX mark and place on its place.
• Use only the accessories supplied.
• Insert the coffee filter (13) into the holder (12),
• Before using the coffee maker, make sure that
by matching the ledge on the filter (13) with the
all removable parts are set properly.
hole on the holder (12) and turn the filter (13)
• Do not touch hot surfaces of the unit.
clockwise/anticlockwise.
• Be careful while operating with outgoing steam.
• Place the filter holder into the coffee maker.
• Do not take off the filter holder during operation
Holder ledges (12) should match the groves on
of the unit.
the boiler, and then turn the filter holder handle
• In order to avoid fire, electric shock or physical
(11) to the right till the clamp.
damages, do not immerse the power plug, the
• Place the corresponding cup on the tray grid
power cord or the housing into water or other
(10).
liquids.
• Inset the plug into the socket.
• Always unplug the unit, when you do not use the
• Switch on the unit by pressing the ON/OFF (14),
unit or before cleaning.
button, the indicator (15) will light up.
• Let the unit cool down completely before clean-
• To fill the boiler with water set the knob (6) to the
ing and removing the attachments.
“
” position, in 15-20 seconds or when wa-
• To switch the unit off, set all the control buttons
ter starts appearing in the cup, switch off water
3
3
1513.indd 31513.indd 3 10.06.2010 15:21:4810.06.2010 15:21:48
ENGLISH
steam on the right side of the tray grid (10). Be
supply, by setting the knob (6) to the “ ” posi-
careful not to get burns by the outgoing steam.
tion.
- Watch the tray (9) filling, regularly pour out wa-
• Wait till the indicator (5) lights up, then set the
ter and wash the tray (9).
knob (6) to the “
” position, when the cup is
filled with water, switch off water supply by set-
• Switch off the coffee maker, by pressing the
ting the knob (6) to the “
” position, pour out
ON/OFF (14) button, the indicator (15) will go
water from the cup. Depending on the cup size,
out.
repeat this procedure several times, then the
• Let the unit cool down and remove the filter
boiler will be washed.
holder (12) turn the handle to the left. Remove
the remaining ground coffee and wash the filter
Attention!
(13).
- Do not remove the filter holder (12) during the
operation of the coffee maker.
Note:
- To remove the filter holder (12) turn the handle
- The cups should be preliminary heated up, put
to the left and remove the holder.
the cups on the platform (2), during warming
water into the boiler the platform heats up, heat-
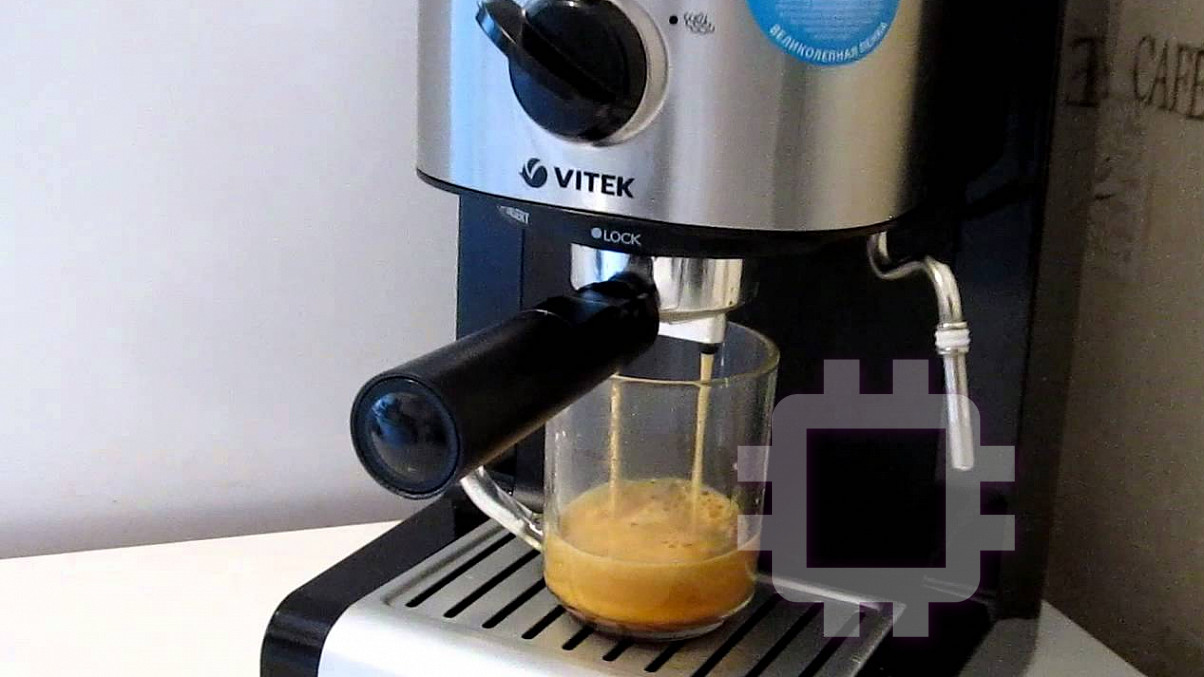
MAKING ESPRESSO
ing the cups.
• Make sure that the button (14) is in the “OFF”
position, and the knob (6) – is in the “
” posi-
MAKING CAPPUCCINO
tion.
Attention! Be careful not to get burns by the out-
• Remove the tank (4), fill it with cold water till the
going steam.
MAX mark and place on its place.
• Make coffee, as described in the “MAKING
• Fill the filter (13) with the ground coffee using
ESPRESSO” paragraph, in a cup, which size will
the measuring spoon (16) till the “МАХ” mark;
be enough to add whip foam, milk or cream.
slightly tamp the ground coffee by the back side
• Set the knob (6) to the “
” position, wait till the
of the measuring spoon (16).
indicator (5) lights up.
• Insert the coffee filter (13) into the holder (12),
• Put the cappuccinator pipe tip (7) into a glass
by matching the ledge on the filter (13) with the
filled with cold milk or cream. Set the knob (6)
hole on the holder (12) and turn the filter (13)
to the “
” position. The cappuccinator pipe
clockwise/anticlockwise.
tip (7) should not touch the bottom of the glass,
• Place the filter holder into the coffee maker.
otherwise steam release will be blocked, and
Holder ledges (12) should match the groves on
several seconds are enough to get dense foam.
the boiler, and then turn the filter holder handle
• Close steam supply by setting the knob (6) to
(11) to the right till the clamp.
the “
”position.
• Place the corresponding cup on the tray grid
• Switch off the coffee maker, by pressing the
(10).
ON/OFF (14) button, the indicator (15) will go
• Inset the plug into the socket.
out.
• Switch on the unit by pressing the ON/OFF (14),
button, the indicator (15) will light up.
Important:
• Wait till the indicator (5) lights up, the unit is
- It is necessary that milk for making foam is fresh
ready for making coffee.
and without additives, is not long storage milk.
• Switch on water supply, by setting the knob (6)
Take usual whole milk with fat status from 4 to
to the “
” position, watch the process of the
6%, cream fat status should be not less than
cup filling with coffee.
10%.
• To switch off water supply, set the knob (6) to
- Immediately after whisking milk or cream clean
the “
” position.
the cappuccinator pipe and the tip (7) – im-
merse the cappuccinator pipe with the tip (7)
Note:
into a glass with water, switch on steam supply,
- After setting the operating modes knob (6) to
by setting the knob (6) to the “
” position, af-
the “
” position, pressure will be released, the
ter it close steam supply and switch off the cof-
remaining hot water is supplied in the tray (9),
fee maker.
you will hear a sound signal and see outgoing
- Wait till the coffee maker cools down and remove
4
4
1513.indd 41513.indd 4 10.06.2010 15:21:4810.06.2010 15:21:48
ENGLISH
the tip (7) from the cappuccinator pipe, wipe the
5. Place the corresponding cup on the tray grid
outer surface of the cappuccinator pipe with a
(10).
damp soft cloth, wash the tip (7) under tapping
6. Insert the plug into the socket.
water.
7. Switch on the coffee maker, by pressing the
ON/OFF (14) button, the indicator (15) will light
Note:
up.
- Repeated making of coffee should be performed
8. Wait till the indicator (5) lights up.
with at least 5 min interval.
9. Set the knob (6) to the “
” position and fill
a cup of 100 ml with water (it is necessary to
WARMING UP BEVERAGES
remove water from the boiler and fill the boiler
You can warm up beverages, by putting the cap-
with citric acid solution), switch off water sup-
puccinator pipe without a plastic tip (7) into a cup.
ply by setting the knob (6) to the “
” position.
• Set the knob (6) to the “
” position, wait till the
10. Remove the tip (7) from the cappuccinator pipe
indicator (5) lights up.
and put a corresponding container under the
• Put the cappuccinator pipe without a plastic tip
pipe. Wait till the indicator (5) lights up, switch
(7) into a cup with a beverage, you want to warm
on steam supply for about 2 minutes, by setting
up. Set the knob (6) to the “
” position.
the knob (6) to the “
” position, then switch
• Close steam supply by setting the knob (6) to
off steam supply, by setting the knob (6) to the
the “
” position.
“
” position and switch off the coffee maker
• Switch off the coffee maker, by pressing the
by pressing the ON/OFF (14) button. Wait for
ON/OFF (14) button, the indicator (15) will go
10-15 minutes.
out.
11. Repeat the procedure, described in paragraphs
7-10, at least 3 times.
HOW TO GET GOOD ESPRESSO
12. Switch on the coffee maker, by pressing the
- Use the coffee powder intended specially for
ON/OFF (14) button, the indicator (15) will light
the “espresso” coffee makers.
up.
- Slightly ram the ground coffee in the filter (13),
13. Wait till the indicator (5) lights up.
you can do it using the back side of the measur-
14. With small intervals, repeat the boiler cleaning
ing spoon (16).
procedure (paragraph 9) till citric acid solution
- The strength of coffee depends on quality and
completely resolves in the tank.
the grade of coffee beans grinding. If coffee is
15. Fill the tank (4) with clear water till the maxi-
pouring out too long this means the coffee pow-
mal level and make paragraphs 7-10 at least 3
der is too fine or it is rammed too strongly.
times, without 10-15-minute interval.
16. Switch on the coffee maker, by pressing the
REMOVING THE SCALE
ON/OFF (14) button
For effective operation of the coffee maker we
recommend removing scale each 2-3 months and
Note:
when using “hard” water – more often.
- To remove scale you can use special substances
1. Make sure that the button (14) is in the “OFF”
for scale removal, strictly following the instruc-
position, and the knob (6) – is in the “
” posi-
tions on their usage.
tion.
2. Make citric acid solution: 2 teaspoons and 1 l of
CLEANING
water and pour this solution into the water tank
- Cleaning filter (13), if the openings are blocked
(4). Set the tank (4) on its place.
with the rest of ground coffee, you can clean
3. Insert the coffee filter (13) into the holder (12),
them with a small brush.
by matching the ledge on the filter (13) with the
- Wipe the housing of the coffee maker with a
hole on the holder (12) and turn the filter (13)
damp soft cloth. Do not use metal brushes and
clockwise/anticlockwise.
abrasives.
4. Place the filter holder into the coffee maker.
- Do not immerse the unit into water or other liq-
Holder ledges (12) should match the groves on
uids.
the boiler, and then turn the filter holder handle
- Wash removable parts with warm water and
(11) to the right till the clamp.
wipe them with a dry cloth.
5
1513.indd 51513.indd 5 10.06.2010 15:21:4810.06.2010 15:21:48
ENGLISH
Drip tray (9)
- Remove the grid (10) from the tray (9), remove the tray (9) and pour out water, put the tray on its place,
put the grid (10) on the tray.
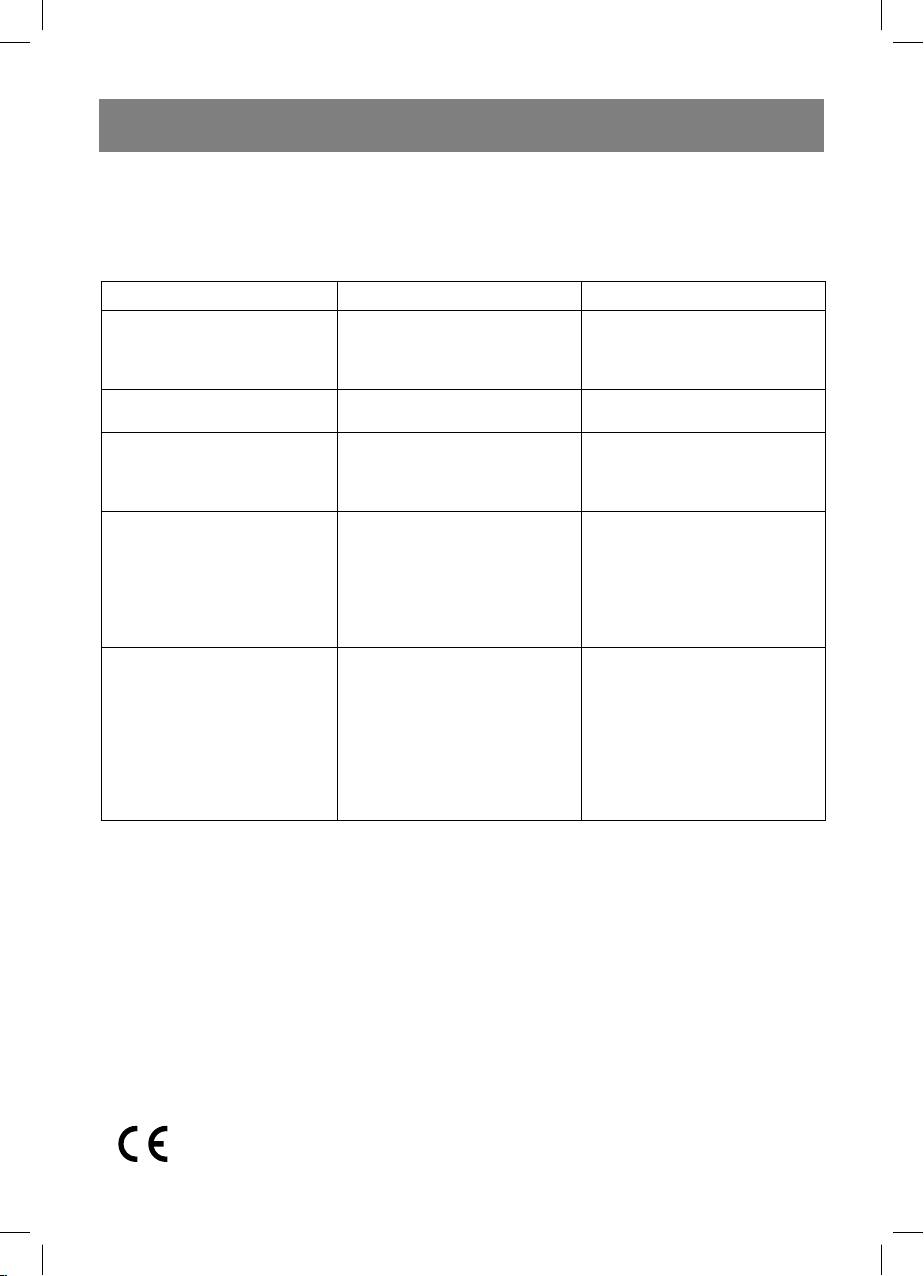
PROBLEMS, THEIR CAUSES AND SOLUTIONS
Problem Cause Solution
Make sure that the socket is in
No voltage in the socket.
The coffee maker does not
operating position.
Power plug is not completely
switch on
Check whether the plug is com-
inserted into the socket.
pletely inserted into the socket.
Water leaks away from the
The tray is full. Pour out water from the tray
lower part of the unit
Filter does not firmly join the
Coffee leakage from the filter
densifier in the boiler, ground
Clean the edges of the filter.
holder
coffee got on the edges of the
filter.
Refer to “Preparation to op-
eration”, “Scale removal” para-
Wrong process of scale removal
graphs and repeat them several
Coffee made has a strange
in the boiler
times.
odor
Improper storage of coffee
Use fresh ground coffee.
Keep coffee in a dry cool place
Whisk milk only after the indica-
Low temperature of the outgoing
tor (5) lights up.
steam
Use narrow high container to
Steam does not whisk milk
The tank is too large or its size is
whisk milk
improper
You used skimmed milk
Use only whole milk, with fat
status 4-6%.
FOR HOUSEHOLD USAGE ONLY
The unit does not have replaceable parts.
Specifications
Power supply: 230 V ~ 50 Hz
Power consumption: 1350 W
Specifications subject to change without prior notice.
Service life of appliance - 5 years
GUARANTEE
Details regarding guarantee conditions can be obtained from the dealer from whom the appliance was
purchased. The bill of sale or receipt must be produced when making any claim under the terms of this
guarantee.
This product conforms to the EMC-Requirements as laid down by the Council Directive
89/336/EEC and to the Law Voltage Regulation (73/23 EEC)
6
1513.indd 61513.indd 6 10.06.2010 15:21:4810.06.2010 15:21:48

DEUTSCH
KAFFEEMASCHINE
sichtig.
• Es ist nicht gestattet, die Filterhalterung wäh-
BESCHREIBUNG
rend des Betriebs des Geräts abzunehmen.
1 Gehäuse
• Tauchen Sie nie das Kabel in die
2 Aufheizboden für Tassen
Kaffeemaschine oder andere Flüssigkeiten,
3 – Deckel des Wasserbehälters
um Stromschlagrisiko oder Verletzungen zu
4 – Abnehmbarer Wasserbehälter
vermeiden.
5 Bereitschaftsanzeige
• Schalten Sie das Gerät vor der Reinigung oder
6 – Betriebsstufenschalter
der Aufbewahrung vom Stromnetz immer ab.
7 Rohr für Capuccinozubereitung mit
• Lassen Sie es vor der Reinigung oder der
Endstück
Abnahme der Geräteteile komplett abkühlen.
8 Filterfi xiervorrichtung
• Nach dem Abschalten der Kaffeemaschine
9 Tropfenauffangschale
schalten Sie diese mit der Ein/Ausschalttaste
10 –Gitter der Auffangschale
aus, und danach ziehen Sie den Netzstecker
11 – Griff des Filterhalters
aus der Steckdose. Es ist nicht gestattet,
12 Filterhalterung
das Gerät beim Abschalten vom Stromnetz
13 Kaffeefi lter
am Netzkabel zu ziehen, halten Sie es am
14 Ein/Ausschalttaste (ON/OFF)
Stecker.
15 Versorgungseinschaltungsanzeige
• Achten Sie darauf, dass das Netzkabel an
16 –Meßlöffel mit Kaffeepresse
den Stellen frei nicht hängt oder mit heißen
Gegenständen nicht in Berührung kommt.
WICHTIGE SICHERHEITSHINWEISE
• Es ist nicht gestattet, die Kaffeemaschine auf
Beim Gebrauch der elektrischen Geräte sind
heiße Oberfl ächen aufzustellen.
wichtige Sicherheitsmaßnahmen zu beachten,
• Es ist nicht gestattet, das Gerät zu nutzen,
unter anderem:
wenn das Netzkabel oder der Netzstecker des
• Vor der Inbetriebnahme des Geräts lesen Sie
Netzkabels beschädigt ist, sowie beim nicht
aufmerksam alle Betriebsanleitungen durch.
ordnungsgemäßen Betrieb oder beliebigen
• Nutzen Sie die Kaffeemaschine bestimmungs-
Störungen.
gemäß.
• Es ist nicht gestattet, das Gerät selbstän-
• Vergewissern Sie sich vor dem Einschalten
dig zu reparieren. Um das Gerät zu reparie-
des Geräts , ob die Netzspannung mit der
ren, wenden Sie sich an einen autorisierten
Spannung Ihres Geräts übereinstimmt, die am
Kundenservicedienst.
Gehäuse des Geräts angegeben ist.
• Bewahren Sie das Gerät in einem für Kinder
• Nutzen Sie für das Anschließen der
unzugänglichem Ort auf.
Kaffeemaschine den Netzstecker mit sicherer
• Es ist nicht gestattet, das Gerät den Kindern
Kontakterdung.
als Spielzeug zu geben.
• Verwenden Sie keine Verlängerungen beim
• Besondere Vorsichtsmaßnahmen sind in den
Anschließen des Geräts an das Stromnetz, um
Fällen angesagt, wenn sich Kinder oder be-
Brandrisiko zu vermeiden.
hinderte Personen während der Nutzung des
• Stellen Sie das Gerät auf eine gerade stabile
Geräts in der Nähe aufhalten. Dieses Gerät
Oberfl äche auf.
darf von Kindern und behinderten Personen
• Es ist nicht gestattet, die Kaffeemaschine ohne
nicht genutzt werden, es sei denn ihnen eine
Wasser einzuschalten.
angemessene und verständliche Anweisung
• Vergewissern Sie sich vor dem Einschalten
über die sichere Nutzung des Geräts und die
des Geräts, dass sich die Einschalttaste in der
Gefahren seiner falschen Nutzung durch die
Position „AUS“ befi ndet.
Person, die für ihre Sicherheit verantwortlich
• Benutzen Sie nur Geräteteile, die zum
ist.
Lieferungsumfang gehören.
• Es ist nicht gestattet, das Gerät außerhalb der
• Vergewissern Sie sich vor dem Einschalten
Räumlichkeiten zu benutzen.
des Geräts, dass alle abnehmbaren Ersatzteile
• Es ist nicht gestattet, das Gerät in den Räumen
richtig aufgestellt sind.
mit der Temperatur unter 0°C zu nutzen.
• Berühren Sie nie heiße Stellen des Geräts.
• Das Gerät ist nur für den Gebrauch im Haushalt
• Seien Sie mit dem austretenden Dampf vor-
geeignet.
7
7
1513.indd 71513.indd 7 10.06.2010 15:21:4810.06.2010 15:21:48

DEUTSCH
Achtung!
BEWAHREN SIE DIESE
Es ist nicht gestattet, die Filterhalterung (12)
BEDIENUNGSANLEITUNG SORGFÄLTIG AUF
während des Betriebs des Geräts abzuneh-
• Vergewissern Sie sich, dass sich die Taste (14)
men.
in der Position „OFF/AUS“ und der Schalter (6)
Um die Filterhalterung (12) abzunehmen, dre-
in der Position “” befi ndet.
hen Sie den Griff nach links und nehmen Sie
• Spülen Sie abnehmbare Teile des Geräts vor
die Filterhalterung ab.
der ersten Nutzung mit warmem Wasser und
trocknen Sie diese ab.
ZUBEREITUNG VON „ESPRESSO“
• Vergewissern Sie sich vor dem Einschalten
• Vergewissern Sie sich, dass sich die Taste (14)
des Geräts, ob die Netzspannung mit der
in der Position „OFF/AUS“ und der Schalter (6)
Spannung Ihres Geräts übereinstimmt, die am
in der Position “” befi ndet.
Gehäuse des Geräts angegeben ist.
• Nehmen Sie den Wasserbehälter (4) ab und
• Nehmen Sie den Wasserbehälter (4) ab und
füllen Sie ihn mit kaltem Wasser bis zum ma-
füllen Sie ihn mit kaltem Wasser bis zum ma-
ximalen Füllstand MAX und stellen Sie diesen
ximalen Füllstand MAX und stellen Sie diesen
zurück.
zurück.
• Geben Sie den gemahlenen Kaffee mit dem
• Setzen Sie den Kaffeefi lter (13) in die
Messlöffel (16) in den Kaffeefi lter (13) bis zur
Kaffeehalterung (12) zurück, so dass die
Grenzlinie „MAX“, pressen Sie den Kaffee mit
Vorsprünge des Kaffeefi lters (13) mit den
der anderen Seite des Messlöffels (16) leicht
Aussparrungen der Halterung (12) zusam-
zusammen.
menfallen und drehen Sie den Kaffeefi lter (13)
• Setzen Sie den Kaffeefi lter (13) in die
im/gegen Uhrzeigersinn.
Kaffeehalterung (12) zurück, so dass die
• Stellen Sie die Filterhalterung in die
Vorsprünge des Kaffeefi lters (13) mit den
Kaffeemaschine. Die Vorsprünge der
Aussparrungen der Halterung (12) zusam-
Filterhalterung (12) müssen mit den
menfallen und drehen Sie den Kaffeefi lter (13)
Aussparungen des Heißwassererzeugers zu-
im/gegen Uhrzeigersinn.
sammenfallen, danach drehen Sie den Hebel
• Stellen Sie die Filterhalterung in die
der Filterhalters (11) nach rechts bis zum
Kaffeemaschine. Die Vorsprünge der
Anschlag.
Filterhalterung (12) müssen mit den
• Stellen Sie die passende Tasse auf das Gitter
Aussparungen des Heißwassererzeugers zu-
der Auffangschale (10).
sammenfallen, danach drehen Sie den Hebel
• Stecken Sie den Netzstecker des Netzkabels
der Filterhalters (11) nach rechts bis zum
in die Steckdose.
Anschlag.
• Schalten Sie die Kaffeemaschine mit der Taste
• Stellen Sie die passende Tasse auf das Gitter
ON/OFF (14) ein, dabei wird die Anzeige (15)
der Auffangschale (10).
aufl euchten.
• Stecken Sie den Netzstecker des Netzkabels
• Stellen Sie den Schalter (6) zum Auffüllen
in die Steckdose.
des Heißwassererzeugers mit Wasser in die
• Schalten Sie die Kaffeemaschine mit der Taste
Position “”, schalten Sie die Wasserzufuhr
ON/OFF (14) ein, dabei wird die Anzeige (15)
in 1520 Sekunden oder beim Beginn des
aufl euchten.
Auffüllens der Tasse mit Wasser aus, stellen
• Warten Sie ab, bis die Anzeige (5) aufl euchtet,
Sie den Schalter (6) in die Position “”.
die Kaffeemaschine ist betriebsbereit.
• Warten Sie ab, bis die Anzeige (5) aufl euch-
• Schalten Sie die Wasserzufuhr ein, stellen Sie
tet, stellen Sie danach den Schalter (6) in die
den Schalter (6) in die Position ““, verfolgen
Position “”, schalten Sie die Wasserzufuhr
Sie den Prozess des Auffüllens der Tasse mit
nach dem Auffüllen der Tasse mit Wasser aus,
dem zubereiteten Kaffee.
stellen Sie den Schalter (6) in die Position
• Stellen Sie den Schalter (6) in die Position „“,
“”, gießen Sie Wasser aus der Tasse ab.
um die Wasserzufuhr auszuschalten.
Wiederholen Sie diese Handlung mehrmals
Anmerkung:
abhängig von der Größe der Tasse, damit der
Der Dampf wird nach der Einstellung des
Heißwassererzeuger durchgespült wird.
Betriebsstufenschalters (6) in die Position “”
herabgesetzt und der Rest des Wassers in die
8
1513.indd 81513.indd 8 10.06.2010 15:21:4810.06.2010 15:21:48

DEUTSCH
Auffangschale (9) abgeleitet, dabei hören Sie
einen typischen Ton und der Dampf tritt von der
Wichtig:
rechten Seite des Gitters der Auffangschale
Es ist wichtig, frische Milch und ohne
(10) aus. Seien Sie vor Verbrühungen mit
Konservierungsstoffe für die Zubereitung von
heißem Dampf vorsichtig.
Schaum zu benutzen, d.h. keine Dauermilch.
Achten Sie darauf, dass die Auffangschale (9)
Normale Vollmilch soll 46% Fett, Milchsahne
nicht überfüllt wird, gießen Sie Wasser perio-
mindestens 10% Fett enthalten.
disch ab und spülen Sie die Auffangschale (9)
Reinigen Sie das Rohr für die
mit Wasser.
Capuccinozubereitung (7) gleich nach dem
Schlagen von Milch oder Milchsahne. Tauchen
• Schalten Sie die Kaffeemaschine mit der Taste
Sie dafür das Rohr für die Capuccinozubereitung
ON/OFF (14) ab, dabei wird die Anzeige (15)
mit dem Endstück (7) ins Glas mit Wasser ein,
erlöschen.
schalten Sie die Dampfzufuhr mit dem Schalter
• Warten Sie ab, bis die Kaffeemaschine abge-
(6) in die Position „“ ein, unterbrechen Sie da-
kühlt wird, nehmen Sie die Filterhalterung (12)
nach die Dampfzufuhr und schalten Sie die
ab, drehen Sie den Hebel nach links. Entfernen
Kaffeemaschine aus.
Sie Reste des gemahlenen Kaffee und spülen
Warten Sie ab, bis die Kaffeemaschine abge-
Sie den Kaffeefi lter (13) ab.
kühlt wird und nehmen Sie das Endstück vom
Rohr für die Capuccinozubereitung (7) ab, wi-
Anmerkung:
schen Sie es von außen mit einem feuchten
Tassen sollen vorgeheizt werden, stellen
Tuch ab, spülen Sie das Endstück mit Wasser
Sie dafür die verwendenden Tassen auf den
ab.
Aufheizboden (2), der Aufheizboden wird
während der Aufwärmung des Wassers im
Anmerkung:
Heißwassererzeuger auch aufgewärmt, wobei
Es wird empfohlen, den Kaffee mit minimalen
die Tassen auch aufgewärmt werden.
Intervallen von 5 Minuten zuzubereiten.
ZUBEREITUNG VON CAPUCCINO
AUFWÄRMUNG VON GETRÄNKEN
Achtung!
Sie können Getränke aufwärmen, indem Sie das
Seien Sie vor Verbrühungen mit heißem Dampf
Rohr für die Capuccinozubereitung ohne das
vorsichtig.
Kunststoffendstück (7) in die Tasse tauchen.
• Bereiten Sie den Kaffee in der Tasse zu, de-
• Stellen Sie den Schalter (6) in die Position “”,
ren Umfang für die Zugabe von Milchschaum
warten Sie ab, bis entsprechende Anzeige (5)
und Milchsahne ausreichend ist, wie es im
aufl euchtet.
Abschnitt „ZUBEREITUNG VON ESPRESSO“
• Tauchen Sie das Rohr für die
beschrieben ist.
Capuccinozubereitung ohne das
• Stellen Sie den Schalter (6) in die Position “”,
Kunststoffendstück (7) in die Tasse mit dem
warten Sie ab, bis entsprechende Anzeige (5)
Getränk, das Sie aufwärmen möchten. Stellen
aufl euchtet.
Sie den Schalter (6) in die Position „“.
• Tauchen Sie das Endstück des Rohrs für die
• Stellen Sie den Schalter (6) in die Position “”,
Capuccinozubereitung (7) in kalte Milch oder
um die Wasserzufuhr auszuschalten.
Milchsahne. Stellen Sie den Schalter (6) in
• Schalten Sie die Kaffeemaschine mit der Taste
die Position „“. Das Endstück des Rohrs für
ON/OFF (14) ab, dabei wird die Anzeige (15)
die Capuccinozubereitung (7) darf den Boden
erlöschen.
des Glases nicht berühren, sonst wird der
Dampfaustritt verhindert sein, für den Gewinn
ZUBEREITUNG VOM RICHTIGEN ESPRESSO
des Schaums sind einige Sekunden ausrei-
Nutzen sie den frisch gemahlenen Kaffee, der
chend.
für die Zubereitung von „Espresso“ geeignet
• Stellen Sie den Schalter (6) in die Position “”,
ist.
um die Wasserzufuhr auszuschalten.
Pressen Sie den gemahlenen Kaffee im
• Schalten Sie die Kaffeemaschine mit der Taste
Kaffeefi lter (13) leicht zusammen, Sie können
ON/OFF (14) ab, dabei wird die Anzeige (15)
es mit der anderen Seite des Messlöffels (16)
erlöschen.
machen.
9
1513.indd 91513.indd 9 10.06.2010 15:21:4810.06.2010 15:21:48

DEUTSCH
Die Kaffeestärke hängt von der Qualität und
die Position “”, schalten Sie danach die
der Mahlfeinheitsgrades der Kaffeebohnen
Wasserzufuhr aus, indem Sie den Schalter
ab. Wird die Tasse mit Kaffe zu lange gefüllt,
(6) in die Position “” aufstellen und schalten
bedeutet das, dass Kaffee sehr grob gemah-
Sie die Kaffeemaschine mit der Taste ON/
len oder zusammengepresst ist.
OFF (14) aus. Warten Sie 1015 Minuten ab.
11. Wiederholen Sie die Punkte 710 mindestens
ENTKALKUNG
dreimal.
Führen Sie die Entkalkung der Kaffeemaschine
12. Schalten Sie die Kaffeemaschine mit der
für den effektiven Betrieb der Kaffeemaschine
Taste ON/OFF (14) ein, dabei wird die Anzeige
mindestens 23 mal pro Monat oder öfters aus,
(15) aufl euchten.
wenn Sie „hartes“ Wasser nutzen.
13. Warten Sie ab, bis die Anzeige (5) aufl euch-
1. Vergewissern Sie sich, dass sich die Taste
tet.
(14) in der Position „OFF/AUS“ und der
14. Wiederholen Sie den Prozess der Reinigung
Schalter (6) in der Position “” befi ndet.
des Heißwassererzeuger (Punkt 9) mit
2. Bereiten Sie Lösung mit Zitronensäure zu: 2
kurzen Pausen bis zur vollen Aufl ösung der
Teelöffel für 1 Liter Wasser und gießen Sie
Zitronensäure im Behälter.
die Lösung in den Wasserbehälter (4) ein.
15. Füllen Sie den Behälter (4) mit reinem
Stellen Sie den Wasserbehälter wieder auf.
Wassers bis zum maximalen Füllstand auf
3. Setzen Sie den Kaffeefi lter (13) in die
und wiederholen Sie mindestens dreimal
Kaffeehalterung (12) zurück, so dass die
die in den Punkten 710 beschriebenen
Vorsprünge des Kaffeefi lters (13) mit den
Handlungen, ohne 1015 Minutenpause zu
Aussparrungen der Halterung (12) zusam-
machen.
menfallen und drehen Sie den Kaffeefi lter
16. Schalten Sie die Kaffeemaschine mit der
(13) im/gegen Uhrzeigersinn.
Taste ON/OFF (14) ein.
4. Stellen Sie die Filterhalterung in die
Kaffeemaschine. Die Vorsprünge der
Anmerkung:
Filterhalterung (12) müssen mit den
Zur Entkalkung können unter Beachtung der
Aussparungen des Heißwassererzeugers zu-
Betriebsanleitung spezielle Mittel verwendet
sammenfallen, danach drehen Sie den Hebel
werden, die für die Entkalkung geeignet sind.
der Filterhalters (11) nach rechts bis zum
Anschlag.
REINIGUNG
5. Stellen Sie die passende Tasse auf das Gitter
Reinigung des Kaffeefi lters (13), falls
der Auffangschale (10).
Filteröffnungen mit den Kaffeeresten verstopft
6. Stecken Sie den Netzstecker des Netzkabels
sind, können Sie diese mit einer kleinen Bürste
in die Steckdose.
reinigen.
7. Schalten Sie die Kaffeemaschine mit der
Wischen Sie das Gehäuse der Kaffeemaschine
Taste ON/OFF (14) ein, dabei wird die Anzeige
mit einem feuchten Tuch ab. Es ist nicht ge-
(15) aufl euchten.
stattet, Metallbürsten und Abrasivmittel für die
8. Warten Sie ab, bis die Anzeige (5) aufl euch-
Reinigung des Geräts zu benutzen.
tet.
Es ist nicht gestattet, das Gehäuse des Geräts
9. Stellen Sie den Schalter (6) in die Position ““
ins Wasser oder andere Flüssigkeiten zu tau-
und füllen Sie die Tasse mit 100 ml Wasser
chen.
auf (es ist notwendig, um Wasser aus dem
Spülen Sie abnehmbare Teile der
Heißwassererzeuger zu entfernen und
Kaffeemaschine mit warmem Wasser mit
dieses mit Zitronensäure aufzufüllen), schal-
einem weichen Reinigungsmittel, wischen Sie
ten Sie die Wasserzufuhr aus, indem Sie den
und trocknen Sie diese ab.
Schalter (6) in die Position “” stellen.
10. Stellen Sie ein passendes Geschirr un-
Tropfenauffangschale (9)
ter das Endstück des Rohrs für die
Nehmen Sie das Gitter von der Auffangschale
Capuccinozubereitung (7). Warten Sie ab,
(9) ab, nehmen Sie die Auffangschale (9)
bis die Anzeige (5) aufl euchtet, schalten
ab und gießen Sie Wasser ab, stellen Sie die
Sie danach die Wasserzufuhr für 2 Minuten
Auffangschale zurück, stellen Sie das Gitter
ein, stellen Sie dabei den Schalter (6) in
(10) auf die Auffangschale.
10
1513.indd 101513.indd 10 10.06.2010 15:21:4810.06.2010 15:21:48

DEUTSCH
STÖRUNGEN, IHRE URSACHEN UND BESEITIGUNGSMETHODEN
Störung Ursache Störungsbeseitigungsmethode
Vergewissern Sie sich, dass der
Keine Netzspannung.
Die Kaffeemaschine schaltet
Netzstecker funktioniert.
Der Netzstecker des Netzkabels
sich nicht ein.
Der Netzstecker des Netzkabels sitzt
sitzt in der Steckdose undicht.
in der Steckdose undicht.
Wasser fl ießt aus
Die Wasserauffangsschale ist
Gießen Sie Wasser von der
dem unteren Teil der
überfüllt.
Wasserauffangschale ab.
Kaffeemaschine heraus.
Das Anliegen des Filters an die
Ausfl ießen von Kaffee aus
Dichtung im Heißwassererzeuger
Filterhalterung
Reinigen Sie Ränder des Filters.
ist undicht, der gemahlenen ist
auf Ränder des Filters geraten.
Siehe den Abschnitt „Vorbereitung zur
Die Entkalkung im
Inbetriebnahme“, „Entkalkung“ und
Heißwassererzeuger wurde nicht
führen Sie diese mehrmals aus.
Der zubereitete Kaffee hat
richtig durchgeführt.
einen fremden Geruch.
Nutzen Sie den frisch gemahlenen
Der Kaffee wird nicht richtig auf-
Kaffee. Bewahren Sie das Gerät an
bewahrt.
einem kühlen Ort auf.
Die Temperatur des austretenden
Schlagen Sie Milch nur, wenn die
Dampfes ist zu niedrig.
Anzeige (5) aufl euchtet.
Der Dampf schlägt Milch
Der Behälter ist zu groß oder
Um Milch zu schlagen, nutzen Sie
nicht auf.
passt nicht.
enges und hohes Geschirr.
Sie haben entrahmte Milch ge-
Nutzen Sie nur Vollmilch mit 4% Fett.
nutzt.
DAS GERÄT IST NUR FÜR DEN GEBRAUCH IM HAUSHALT GEEIGNET
Enthält keine ersetzbaren Teile.
Technische Eigenschaften
Stromversorgung: 230 V ~ 50 Hz
Leistungsaufnahme: 1350 W
Der Hersteller behält sich das Recht vor die Charakteristiken des Gerätes ohne Vorbescheid zu än-
dern.
Betriebslebensdauer des Geräts – 5 Jahre
Gewährleistung
Ausführliche Bedingungen der Gewährleistung kann man beim Dealer, der diese Geräte verkauft
hat, bekommen. Bei beliebiger Anspruchserhebung soll man während der Laufzeit der vorliegenden
Gewährleistung den Check oder die Quittung über den Ankauf vorzulegen.
Das vorliegende Produkt entspricht den Forderungen der elektromagnetischen
Verträglichkeit, die in 89/336/EWG -Richtlinie des Rates und den Vorschriften 73/23/EWG
über die Niederspannungsgeräte vorgesehen sind.
11
1513.indd 111513.indd 11 10.06.2010 15:21:4810.06.2010 15:21:48

РУССКИЙ
КОФЕВАРКА
• Не дотрагивайтесь до горячих частей и
поверхностей кофеварки.
ОПИСАНИЕ
• Соблюдайте осторожность во время ра-
1 – Корпус кофеварки
боты с выходящим паром.
2 – Площадка для подогрева чашек
• Запрещается снимать держатель филь-
3 – Крышка емкости для воды
тра во время работы кофеварки.
4 – Съемная емкость для воды
• Во избежание пожара, удара электричес-
5 – Индикатор готовности
ким током или физических повреждений
6 – Ручка режимов работы
не погружайте вилку сетевого шнура, се-
7 – Трубка-капучинатор с наконечником
тевой шнур или корпус кофеварки в воду
8 – Фиксатор фильтра
или другие жидкости.
9 – Поддон для капель
• Всегда отключайте кофеварку от элект-
10 – Решетка поддона
рической сети, когда она не использует-
11 – Ручка держателя фильтра
ся, или перед чисткой.
12 – Держатель фильтра
• Дайте устройству полностью остыть пе-
13 – Фильтр для кофе
ред чисткой и снятием принадлежностей.
14 – Кнопка включения/выключения (ON/
• Для отключения кофеварки от сети уста-
OFF)
новите все кнопки управления в выклю-
15 – Индикатор включения питания
ченное положение, а затем выньте се-
16 – Мерная ложка с уплотнителем молото-
тевую вилку из розетки. Вынимая вилку
го кофе
сетевого шнура из розетки, не тяните за
шнур, а держитесь за вилку.
ВАЖНЫЕ МЕРЫ ПРЕДОСТОРОЖНОСТИ
• Следите за тем, чтобы сетевой шнур не
При пользовании электрическими прибора-
свешивался над краем стола и не сопри-
ми необходимо всегда соблюдать основные
касался с горячими поверхностями.
меры
• Не ставьте кофеварку на горячие поверх-
предосторожности, в том числе:
ности.
• Внимательно прочитайте все инструкции.
• Не пользуйтесь кофеваркой с повреж-
• Используйте кофеварку только по ее пря-
денной вилкой сетевого шнура, повреж-
мому назначению.
денным сетевым шнуром, в случае ее
• Убедитесь, что напряжение электричес-
неправильной работы или после любых
кой сети соответствует напряжению, ука-
повреждений.
занному на корпусе устройства.
• Запрещается самостоятельно ремонти-
• Используйте сетевую розетку с надеж-
ровать кофеварку; по вопросам ремонта
ным контактом заземления.
обратитесь в ближайший авторизован-
• Во избежание риска возникновения по-
ный сервисный центр.
жара не используйте переходники при
• Храните прибор в местах, недоступных
подключении прибора к электрической
для детей.
розетке.
• Не разрешайте детям использовать уст-
• Устанавливайте устройство на ровную,
ройство в качестве игрушки.
устойчивую поверхность.
• Будьте особенно внимательными, если
• Не включайте кофеварку без воды.
прибор используется детьми или людь-
• Перед включением убедитесь, что кнопка
ми с ограниченными возможностями.
включения находится в выключенном по-
Данное устройство не предназначено для
ложении.
использования детьми и людьми с огра-
• Используйте только принадлежности,
ниченными возможностями, если только
входящие в комплект поставки.
лицом, отвечающим за их безопасность,
• Перед включением кофеварки убедитесь,
им не даны соответствующие и понятные
что все съемные детали установлены пра-
им инструкции о безопасном пользова-
вильно.
нии устройством и тех опасностях, кото-
12
1513.indd 121513.indd 12 10.06.2010 15:21:4910.06.2010 15:21:49
РУССКИЙ
рые могут возникать при его неправиль-
водой выключите подачу воды, установив
ном пользовании.
ручку (6) в положение “
”, слейте воду из
• Не используйте кофеварку вне помеще-
чашки. В зависимости от объема чашки
ний.
проведите эту процедуру несколько раз,
• Никогда не оставляйте кофеварку в поме-
после этого бойлер будет промыт.
щениях с температурой ниже 0°C.
• Только для домашнего использования.
Внимание!
- Запрещается снимать держатель филь-
СОХРАНИТЕ ЭТУ ИНСТРУКЦИЮ
тра (12) во время работы кофеварки.
- Для снятия держателя фильтра (12) по-
ПОДГОТОВКА К РАБОТЕ
верните ручку в левую сторону и снимите
• Убедитесь, что кнопка (14) находится в
держатель.
положении «OFF/выкл», а ручка (6) - в по-
ложении “
”.
ПРИГОТОВЛЕНИЕ КОФЕ ЭСПРЕССО
• Перед первым использованием кофевар-
• Убедитесь, что кнопка (14) находится в
ки промойте все ее съемные части теплой
положении «OFF/выкл», а ручка (6) - в по-
водой и просушите.
ложении “
”.
• Перед включением убедитесь, что напря-
• Снимите емкость (4), наполните ее хо-
жение электрической сети соответствует
лодной водой до отметки MAX и устано-
напряжению, указанному на корпусе уст-
вите на место.
ройства.
• Насыпьте молотый кофе в фильтр (13)
• Снимите емкость (4), наполните ее хо-
мерной ложкой (16) до отметки «МАХ»,
лодной водой до отметки MAX и устано-
слегка утрамбуйте кофе обратной сторо-
вите на место.
ной мерной ложки (16).
• Вставьте фильтр для кофе (13) в держа-
• Вставьте фильтр для кофе (13) в держа-
тель (12), совместив выступ на фильтре
тель (12), совместив выступ на фильтре
(13) с прорезью в держателе (12) и по-
(13) с прорезью в держателе (12) и по-
верните фильтр (13) по/против часовой
верните фильтр (13) по/против часовой
стрелке.
стрелке.
• Установите держатель фильтра в кофе-
• Установите держатель фильтра в кофе-
варку. Выступы держателя (12) должны
варку. Выступы держателя (12) должны
совпасть с пазами на бойлере, после чего
совпасть с пазами на бойлере, после чего
поверните ручку держателя фильтра (11) в
поверните ручку держателя фильтра (11) в
правую сторону до упора.
правую сторону до упора.
• Поставьте подходящую чашку на решетку
• Поставьте чашку на решетку поддона
поддона (10).
(10).
• Вставьте вилку сетевого шнура в розетку.
• Вставьте вилку сетевого шнура в розетку.
• Включите кофеварку нажатием кнопки
• Включите кофеварку нажатием кнопки
ON/OFF (14), при этом загорится индика-
ON/OFF (14), при этом загорится индика-
тор (15).
тор (15).
• Для заполнения водой бойлера установи-
• Дождитесь, когда загорится индикатор
(5), кофеварка готова для варки кофе.
те ручку (6) в положение “
”, через 15-
• Включите подачу воды, установив ручку
20 секунд, или при первых признаках по-
явления воды в чашке, выключите подачу
(6) в положение “
”, следите за про-
воды, установив ручку (6) в положение “
цессом наполнения чашки приготовлен-
”.
ным кофе.
• Дождитесь, когда загорится индикатор
• Для выключения подачи воды установите
(5), после этого установите ручку (6) в по-
ручку (6) в положение “
”.
ложение “
”, после заполнения чашки
13
1513.indd 131513.indd 13 10.06.2010 15:21:4910.06.2010 15:21:49
РУССКИЙ
Примечание:
Важно:
- После установки ручки режимов работы
- Необходимо, чтобы молоко, используе-
(6) в положение “
”, происходит сброс
мое для приготовления пенки, было све-
давления, остатки горячей воды подают-
жим и без консервантов, то есть не так на-
ся в поддон (9), при этом вы услышите ха-
зываемое молоко длительного хранения.
рактерный звук и увидите выходящий пар
Используйте обычное цельное молоко
с правой стороны решетки поддона (10),
жирностью от 4 до 6%, жирность сливок
опасайтесь ожогов от выходящего горя-
должна быть не менее 10%.
чего пара.
- Сразу после взбивания молока или сли-
- Следите за заполнением поддона (9), пе-
вок прочистите трубку-капучинатор и на-
риодически сливайте воду и промывайте
конечник (7) - для этого опустите трубку-
поддон (9).
капучинатор с наконечником (7) в стакан с
водой, включите подачу пара, установив
• Отключите кофеварку, нажав кнопку ON/
ручку (6) в положение «
», после этого
OFF (14), индикатор (15) погаснет.
закройте подачу пара и выключите кофе-
• Дождитесь остывания кофеварки и сни-
варку.
мите держатель фильтра (12), поверните
- Дождитесь остывания кофеварки и сни-
ручку в левую сторону. Удалите остатки
мите наконечник (7) с трубки-капучинато-
молотого кофе и промойте фильтр (13).
ра, протрите трубку-капучинатора снару-
жи влажной, мягкой тканью, сам наконеч-
Примечание:
ник (7) промойте под струей воды.
- Используемые чашки необходимо пред-
варительно нагреть, для этого установите
Примечание:
чашки на площадку (2), во время нагрева
- Повторное приготовление кофе рекомен-
воды в бойлере площадка тоже нагрева-
дуется производить с интервалами не
ется, подогревая при этом чашки.
менее 5 минут.
ПРИГОТОВЛЕНИЕ КАПУЧИНО
ПОДОГРЕВ НАПИТКОВ
Внимание! Опасайтесь ожогов от выходя-
Вы можете подогреть напитки, опустив
щего горячего пара.
трубку-капучинатора без пластикового на-
• Сварите кофе, как описано в разделе
конечника (7) в чашку.
«ПРИГОТОВЛЕНИЕ ЭСПРЕССО», в чаш-
• Установите ручку (6) в положение “
”,
ке, объема которой будет достаточно для
дождитесь, когда загорится индикатор
добавления взбитой пенки молока или
(5).
сливок.
• Опустите трубку-капучинатора без плас-
• Установите ручку (6) в положение “
”,
тикового наконечника (7) в чашку c на-
дождитесь, когда загорится индикатор
питком, который вы хотите подогреть.
(5).
Установите ручку (6) в положение «
».
• Опустите наконечник (7) в стакан с холод-
• Закройте подачу пара, установив ручку
ным молоком или сливками. Установите
(6) в положение “
”.
ручку (6) в положение «
». Наконечник
• Отключите кофеварку, нажав кнопку ON/
(7) не должен касаться дна стакана, иначе
OFF (14), индикатор (15) погаснет.
выход пара будет затруднен, при опреде-
ленном навыке для получения молочной
КАК ПОЛУЧИТЬ ХОРОШИЙ ЭСПРЕССО
пены достаточно несколько секунд.
- Используйте свежемолотый кофе, пред-
• Закройте подачу пара, установив ручку
назначенный для кофеварок «эспрессо».
(6) в положение “
”.
- Слегка утрамбовывайте молотый кофе в
• Отключите кофеварку, нажав кнопку ON/
фильтре (13), это можно сделать обрат-
OFF (14), индикатор (15) погаснет.
ным концом мерной ложки (16).
- Крепость получаемого кофе будет за-
14
1513.indd 141513.indd 14 10.06.2010 15:21:4910.06.2010 15:21:49
РУССКИЙ
висеть от качества и степени помола
нуты, установив ручку (6) в положение «
кофейных зерен. Если кофе наливается
», после чего выключите подачу пара,
слишком долго, это означает, что кофе
установив ручку (6) в положение “
” и
очень мелкого помола или слишком силь-
выключите кофеварку нажатием кнопки
но утрамбован.
ON/OFF (14). Подождите 10-15 минут.
11. Повторите процедуру, описанную в пунк-
УДАЛЕНИЕ НАКИПИ
тах 7-10, не менее 3 раз.
Для эффективной работы кофеварки ре-
12.Включите кофеварку нажатием кнопки
комендуется проводить удаление накипи
ON/OFF (14), при этом загорится инди-
каждые 2-3 месяца, а при использовании
катор (15).
«жесткой» воды, чаще.
13.Дождитесь, когда загорится индикатор
1. Убедитесь, что кнопка (14) находится в
(5).
положении «OFF/выкл», а ручка (6) - в по-
14.С небольшими перерывами, повторите
ложении “
”.
процедуру очистки бойлера (пункт 9) до
2. Приготовьте раствор лимонной кислоты:
полного окончания раствора лимонной
2 чайные ложки на 1 литр воды и залей-
кислоты в резервуаре.
те полученный раствор в резервуар для
15.Заполните емкость (4) чистой водой до
воды (4). Установите резервуар (4) на
максимального уровня и вновь выполни-
место.
те пункты 7-10 не менее 3 раз, не делая
3. Вставьте фильтр для кофе (13) в держа-
10-15 минутного перерыва.
тель (12), совместив выступ на фильтре
16.Включите кофеварку, нажав кнопку ON/
(13) с прорезью в держателе (12) и по-
OFF (14).
верните фильтр (13) по/против часовой
стрелке.
Примечание:
4. Установите держатель фильтра в кофе-
- Для удаления накипи можно использо-
варку. Выступы держателя (12) должны
вать специальные средства для удаления
совпасть с пазами на бойлере, после
накипи в кофеварках и кофе машинах,
чего поверните ручку держателя фильтра
строго соблюдая инструкции по их ис-
(11) в правую сторону до упора.
пользованию.
5. Поставьте подходящую чашку на решет-
ку поддона (10).
ЧИСТКА
6. Вставьте вилку сетевого шнура в розет-
- При чистке фильтра (13), если отверстия
ку.
засорены осадком молотого кофе, их
7. Включите кофеварку нажатием кнопки
можно почистить небольшой щеткой.
ON/OFF (14), при этом загорится индика-
- Протирайте корпус кофеварки мягкой,
тор (15).
влажной тканью. Не используйте метал-
8. Дождитесь, когда загорится индикатор
лические щетки и абразивные моющие
(5).
средства.
9. Установите ручку (6) в положение “
”
- Запрещается погружать корпус кофевар-
и наполните водой чашку объемов около
ки в воду или другие жидкости.
100 мл (это необходимо для того, чтобы
- Съемные детали кофеварки промывайте
удалить воду из бойлера и заполнить его
теплой водой с мягким моющим средс-
раствором лимонной кислоты), выклю-
твом, сполосните и высушите их.
чите подачу воды, установив ручку (6) в
Поддон для капель (9)
положение “
”.
- Снимите решетку (10) с поддона (9), сни-
10.Снимите наконечник (7) с трубки-капучи-
мите поддон (9) и слейте из него воду,
натора и подставьте под трубку подходя-
промойте поддон (9) и установите его на
щую посуду. Дождитесь, когда загорит-
место, установите решетку (10) на под-
ся индикатор (5), после этого включите
дон.
подачу пара, приблизительно на 2 ми-
15
1513.indd 151513.indd 15 10.06.2010 15:21:4910.06.2010 15:21:49
РУССКИЙ
НЕИСПРАВНОСТИ, ИХ ПРИЧИНЫ И МЕТОДЫ УСТРАНЕНИЯ
Неисправность Причина Метод устранения
В сетевой розетке отсутству-
Убедитесь, что сетевая розет-
ет напряжение.
ка работает.
Кофеварка не включается
Вилка сетевого шнура не до
Проверьте, до конца ли встав-
конца вставлена в розетку.
лена вилка в розетку.
Вода вытекает из нижней
Поддон для воды перепол-
Слейте воду из поддона.
части кофеварки
нен.
Неплотное прилегание филь-
Утечка кофе из
тра к уплотнителю в бойлере,
держателя фильтра
Очистите края фильтра.
молотый кофе попал на края
фильтра.
Обратитесь к разделам
Неправильный процесс уда-
«Подготовка к работе»,
ление накипи в бойлере ко-
«Удаление накипи», и выпол-
Приготовленный кофе имеет
феварки.
ните их несколько раз.
посторонний запах
Неправильное хранение
Используйте свежемолотый
кофе.
кофе. Храните кофе в сухом,
прохладном месте.
Взбивайте молоко только
Низкая температура выходя-
после того, как загорится ин-
щего пара.
дикатор (5).
Емкость слишком большая
Для взбивания молока, ис-
Пар не взбивает молоко
или не подходящего размера.
пользуйте узкую высокую
посуду.
Вы использовали обезжирен-
ное молоко.
Используйте только цельное
молоко, жирностью 4-6%.
ТОЛЬКО ДЛЯ ДОМАШНЕГО ИСПОЛЬЗОВАНИЯ
Не содержит заменяемых частей.
Технические данные:
Напряжение питания: 230 В ~ 50 Гц
Потребляемая мощность: 1350 Вт
Производитель сохраняет за собой право изменять дизайн и технические характеристики
прибора без предварительного уведомления.
Срок службы прибора - 5 лет
Данное изделие соответствует всем требуемым европейским и российским стан-
дартам безопасности и гигиены.
АН-ДЕР ПРОДАКТС ГмбХ, Австрия
Нойбаугюртель 38/7А, 1070 Вена, Австрия
16
1513.indd 161513.indd 16 10.06.2010 15:21:4910.06.2010 15:21:49

ҚАЗАҚ
КОФЕ БҰҚТЫРҒЫШ
• Шығатын бумен жұмыс істеген кезде абай
болыңыз.
СУРЕТТЕМЕ
• Сүзгіні ұстауышты кофебұқтырғыш жұмыс
1 – Кофебұқтырғыштың корпусы
істеп тұрған кезде шешіп алуға тыйым
2 – Кеселерді қыздыруға арналған алаң
салынады.
3 – Суға арналған ыдыстың қақпағы
• Өрттің шығуын, электр тоғының соғуын
4 – Суға арналған алынбалы ыдыс
немесе физикалық жарақат алып қалуды
5 – Дайындық көрсеткіші
болдырмау үшін желі шнуырының ашасын,
6 – Жұмыс күйлерінің тұтқасы
желі шнурын немесе кофебұқтырғыштың
7 – Ұшы бар тұтқа-капучинатор
корпусын суға немесе басқа да
8 – Сүзгі бекіткіші
сұйықтықтарға батырмаңыз.
9 - Тамшыларға арналған төсем
• Кофебұқтырғышты қолданбайтын жағдайда
10 – Төсемнің торы
немесе оны тазалау алдында үнемі электр
11 – Сүзгі ұстағышының тұтқасы
желісінен ажыратып отырыңыз.
12 – Сүзгі ұстағыш
• Құрылғыны тазалау жəне бөлшектерін
13 - Кофеге арналған сүзгі
шешіп алар алдында оны толық суытып
14 – Қосу/өшіру (ON/OFF) тетігі
алыңыз.
15 - Қуат қорегін қосу көрсеткіші
• Кофебұқтырғышты желіден ажырату үшін
16 - Ұсақталған кофенің тығыздауышы бар
барлық басқару тетіктерін сөндірілген
өлшеуіш қасық
күйге орнатыңыз да, содан кейін желі
ашасын розеткадан суырып алыңыз. Желі
МАҢЫЗДЫ САҚТАНУ ШАРАЛАРЫ
шнурының ашасын розеткадан суырған
Электр приборларын қолданған кезде үнемі
кезде, оны шнурынан тартпаңыз, ашадан
негізгі сақтану шараларын сақтап отыру
ұстаңыз.
қажет, соның ішінде:
• Желі шнурының үстелдің шетінен
• Барлық нұсқаулықты мұқият оқып
салбырамауыг жəне ыстық беттерге
шығыңыз.
тимеуін қадағалаңыз.
• Кофебұқтырғышты тек оның тікелей
• Кофебұқтырғышты ыстық беттерге
мақсаты бойынша ғана пайдаланыңыз.
қоймаңыз.
• Электр желісінің кернеуі құрылғының
• Желі шнурының ашасы, желі шнуры бүлінген
корпусында көрсетілген кернеуге сəйкес
кофебұқтырғышты, ол дұрыс жұмыс
келетіндігін тексеріп алыңыз.
істемей тұрған жағдайда немесе оның кез
• Жерге сенімді қосылған желілік розетканы
келген бүлінуінен кейін қолданбаңыз.
пайдаланыңыз.
• Кофебұқтырғышты өз бетіңізше жөндеуге
• Өрттің пайда болу тəуекелін болдырмас
тыйым салынады, жөндету үшін жақын
үшін құрылғыны электр розеткасына
арадағы рұқсаты бар сервис орталығына
қосқан кезде өткізушы тоқ құралдарын
жолығыңыз.
пайдаланбаңыз.
• Приборды балалардың қолдары жетпейтін
• Құрылғыны тегіс тұрақты бетке
жерде сақтаңыз.
орналастырыңыз.
• Құрылғыны балаларға ойыншық ретінде
• Кофебұқтырғышты сусыз пайдаланбаңыз.
пайдалануға рұқсат бермеңіз.
• Қосар алдында, қосу тетігі өшірулі күйде
• Приборды балалар немесе мүмкіншілігі
тұрғанын тексеріп алыңыз.
шектеулі жандар пайдаланған кезде өте
• Тек жеткізу жинағына кіретін
мұқият болыңыз. Бұл құрылғы балалар
айлабұйымдарды пайдаланыңыз.
мен мүмкіндіктері шектеулі адамдардың
• Кофебұқтырғышты қосар алдында,
пайдалануына арналмаған, ол тек, олардың
барлық алынбалы бөлшектерінің дұрыс
қауіпсіздігіне жауап беретін адаммен,
орнатылғанын тексеріп алыңыз.
оларға қауіпсіз пайдалану туралы тиісті
• Кофебұқтырғыштың ыстық бөліктері мен
жəне түсінікті нұсқаулықтар мен құрылғыны
беттеріне қол тигізбеңіз.
дұрыс пайдаланбаған жағдайда пайда
17
1513.indd 171513.indd 17 10.06.2010 15:21:4910.06.2010 15:21:49
ҚАЗАҚ
болуы мүмкін қауіптер туралы түсінік
тоқтатыңыз, тұтқаны (6) “
” күйіне орнатып,
берілген жағдайда ғана мүмкін.
суды кеседен төгіп тастаңыз. Кесенің
• Кофебұқтырғыштыбөлмеден тыс жерде
көлеміне байланысты осы процедураны
пайдаланбаңыз.
бірнеше рет жүргізіңіз, осыдан кейін бойлер
• Кофебұқтырғышты температурсы 0°C-ден
жуылады.
төмен бөлбеде қалдырмаңыз.
• Тек үйде пайдалануға арналған.
Назар аударыңыз!
- Сүзгінің ұстауышын (12) кофебұқтырғыш
ОСЫ НҰСҚАУЛЫҚТЫ САҚТАҢЫЗ
жұмыс істеп тұрған кезде шешіп алуға
ЖҰМЫСҚА ДАЙЫНДАУ
тыйым салынады. – Сүзгінің ұстауышын
• Тетіктің (14) «OFF/сөнд» күйінде, ал тұтқа
(12) шешіп алу үшін тұтқаны сол жаққа
(6) -
қарай бұраңыз да ұстауышты шешіп
“
” күйінде тұрғанын тексеріп алыңыз.
алыңыз.
• Кофебұқтырғышты алғаш пайдаланар
алдында оның барлық алынбалы
ЭСПРЕССО КОФЕСІН ƏЗІРЛЕУ
бөлшектерін жылы сумен жуып жіберіңіз
• Тетіктің (14) «OFF/сөнд» күйінде, ал тұтқа
де, оны кептіріңіз.
(6) -
• Қосар алдында, электр желісінің кернеуі
“
” күйінде тұрғанын тексеріп алыңыз.
құрылғының корпусында көрсетілген
• Ыдысты (4) шешіп алыңыз, оған суық суды
кернеуге сəйкес келетіндігін тексеріп
МАХ белгісіне дейін құйыңыз да, орнына
алыңыз.
орналастырыңыз.
• Ыдысты (4) шешіп алыңыз, оған суық суды
• Ұсқталған кофені сүзгіге (13) өлшеуіш
МАХ белгісіне дейін құйыңыз да, орнына
қасықпен (16) «МАХ» белгісіне дейін
орналастырыңыз.
себіңіз, өлшеуіш қасықтың (16) керісінше
• Кофеге арналған сүзгіні (13) ұстауышқа (12),
жағымен кофені сəл басқылаңыз.
сүзгідегі (13) шығыңқы жерін ұстауыштағы
• Кофеге арналған сүзгіні (13) ұстауышқа (12),
(12) ойыққа келтіре отырып орнатыңыз
сүзгідегі (13) шығыңқы жерін ұстауыштағы
жəне сүзгіні (13) сағат тілінің бағытымен/
(12) ойыққа келтіре отырып орнатыңыз
қарсы бағытта бұраңыз.
жəне сүзгіні (13) сағат тілінің бағытымен/
• Сүзгіні ұстауышты кофебұқтырғышқа
қарсы бағытта бұраңыз.
орнатыңыз. Ұстауыштың (12) шығыңқы жері
• Сүзгіні ұстауышты кофебұқтырғышқа
бойлердегі пазаларға сəйкес келуі керек,
орнатыңыз. Ұстауыштың (12) шығыңқы жері
одан кейін сүзгіні ұстауыштың тұтқасын
бойлердегі пазаларға сəйкес келуі керек,
(11) оң жаққа түбіне дейін бұраңыз.
одан кейін сүзгіні ұстауыштың тұтқасын
• Қолайлы кесені төсемнің торына (10)
(11) оң жаққа түбіне дейін бұраңыз.
орналастырыңыз.
• Кесені төсемнің торына (10)
• Желі шнурының ашасын розеткаға
орналастырыңыз.
сұғыңыз.
• Желі шнурының ашасын розеткаға
• Кофебұқтырғышты ON/OFF тетіктерін (14)
сұғыңыз.
басып қосыңыз, осы кезде көрсеткіш (15)
• Кофебұқтырғышты ON/OFF тетіктерін (14)
жанады.
басып қосыңыз, осы кезде көрсеткіш (15)
• Бойлерге су толытру үшін тұтқаны (6)
жанады.
“
” күйіне орнатыңыз, 15-20 секундтан
• Көрсеткіштің (5) жанғанын күтіңіз,
кейін немесе кеседе судың алғашқы пайда
кофебұқтырғыш кофені бұқтыруға дайын.
болуының белгілері білінген кезде, тұтқаны
• Тұтқаны (6) “
” күйіне орната отырып, су
(6) “
” күйіне орнатып су беруді сөндіріңіз.
беруді қосыңыз, кесеге əзірленген кофенің
• Көрсеткіштің (5) жанғанын күтіңіз, осыдан
толу процесін қадағалап отырыңыз.
кейін тұтқаны (6) “
” күйіне орнатыңыз,
• Су беруді өшіру үшін тұтқаны (6) “
” күйіне
кесеге су толғаннан кейін су беруді
орнатыңыз.
18
1513.indd 181513.indd 18 10.06.2010 15:21:4910.06.2010 15:21:49
ҚАЗАҚ
Ескертпе:
Маңызды:
- Жұмыс күйлерінің тұтқасын (6) “
” күйіне
- Көбікті əзірлеуге арналған сүт балғын жəне
орнатқаннан кейін, қысымды түсіру
консервантсыз болуы қажет, яғни, ұзақ
жүргізіледі, ыстық судың қалдықтары
сақталатын сүт болмауы керек. Кəдімгі
төсемге (9) ағады, осы кезде сіз тиісті
майлылығы 4-тен 6%-ға дейінгі сүтті
дыбысты естисіз жəне төсемнің торының
пайдаланыңыз, кілегейдің майлылығы
(10) оң жағынан будың шыққанын көресіз,
кемінде 10% болуы керек.
шығып жатқан ыстық буға күйіп қалмаңыз.
- Сүтті немесе кілегейді көпірткеннен кейін
- Төсемнің (9) толуын қадағалап отырыңыз,
бірден капучинатор түтігін жəне ұшты (7)
уақытылы суды төгіп отырыңыз жəне
тазалап жіберіңіз – бұл үшін капучинатор
төсемді (9) жуып отырыңыз.
түтігін ұшымен (7) бірге суы бар стақанға
салыңыз, тұтқаны (6) «
» күйіне
• Кофебұқтырғышты ON/OFF тетігін (14)
орнатып, бу беруді қосыңыз, осыдан кейін
баса отырып ажыратыңыз, көрсеткіш (15)
бу беруді жауып қойып, кофебұқтырғышты
сөнеді.
сөндіріңіз.
• Кофебұқтырғыштың суығанын күтіңіз де,
- Кофебұқтырғыштың суығанын күтіп, ұшты
сүзгіні ұстауышты (12) шешіп алыңыз,
(7) капучинатор түтіктен шешіп алыңыз,
тұтқаны сол жаққа бұраңыз. Ұнтақталған
капучинатор түтігін сыртына ылғал матамен
кофенің қалдығын кетіріңіз де сүзгіні (13)
сүртіңіз, ұштың (7) өзін ағын судың астында
жуып жіберіңіз.
жуып жіберіңіз.
Ескертпе:
Ескертпе:
- Пайдаланылатын кеселерді алдын ала
- Кофені қайта əзірлеуді арасына кемінде 5
қыздырып алу керек, бұл үшін кесені
минут салып барып жүргізу керек.
алаңға (2) қойыңыз, бойлерде судың ысып
жатқан кезінде аудан да кеселерді қыздыра
СУСЫНДАРДЫ ЖЫЛЫТУ
отырып қызады.
• Тұтқаны (6) “
” күйіне орнатыңыз,
көрсеткіштің (5) жанғанын күтіңіз.
КАПУЧИНОНЫ ƏЗІРЛЕУ Шығып жатқан буға
• Капучинатор түтігін пластикті ұшынсыз
күйіп қалмаңыз.
(7) жылытқыңыз келген сусыны бар
• Кофені, «ЭСПРЕССОНЫ ƏЗІРЛЕУ»
кесеге малыңыз. Тұтқаны (6) «
» күйіне
бөліміндегідей, сүттің көбігі мен кілегейді
орнатыңыз.
қосу үшін жеткілікті орны бар кеседе
• Тұтқаны (6) “
” күйіне орната отырып бу
бұқтырыңыз.
беруді өшіріңіз.
• Тұтқаны (6) “
” күйіне орнатыңыз,
• Кофебұқтырғышты ON/OFF тетігін (14)
көрсеткіштің (5) жанғанын күтіңіз.
баса отырып ажыратыңыз, көрсеткіш (15)
• Ұшын (7) суық сүті немесе кілегейі бар
сөнеді.
стақанға батырыңыз. Тұтқаны (6) «
» күйіне орнатыңыз. Ұшы (7) стақанның
ЖАҚСЫ ЭСПРЕССОҒА ҚАЛАЙ ҚОЛ
түбіне тимеуі керек, өйткені будың шығуы
ЖЕТКІЗУГЕ БОЛАДЫ
қиындайды, Белгілі бір тəжірибеңіз болған
– «Эспрессо» кофебұқтырғыштарына
жағдайда сүттің көбігін алу үшін бірнеше
арналған балғын ұнтақталған кофені
секунд жеткілікті болады.
пайдаланыңыз.
• Тұтқаны (6) “” күйіне орната отырып су
- Сүзгідегі (13) ұнтақталған кофені сəл
беруді өшіріңіз.
басқылаңыз, бұны өлшеуіш қасықтың (16)
• Кофебұқтырғышты ON/OFF тетігін (14)
екінші ұшымен істеуге болады.
баса отырып ажыратыңыз, көрсеткіш (15)
- Алынатын кофенің қоюлығы кофе
сөнеді.
дəндерінің сапасы мен ұнтақталу
деңгейіне байланысты болады. Егер кофе
өте ұзақ құйылатын болса, бұл кофе өте
19
1513.indd 191513.indd 19 10.06.2010 15:21:4910.06.2010 15:21:49
ҚАЗАҚ
ұнтақ немесе қатты басылған дегенді
беруді өшіріңіз де, ON/OFF тетігін (14).
білдіреді.
басып кофебұқтырғышты сөндіріңіз. 10-
15 минут күтіңіз.
ҚАҚТЫ КЕТІРУ
11. 7-10 пункттерде сипатталған процедураны
Кофебұқтырғыштың тиімді жұмыс істеуі үшін
кемінде 3 рет қайталаңыз.
қақты əрбір 2-3 ай сайын кетіріп отыру қажет
12. Кофебұқтырғышты ON/OFF тетіктерін
болады, ал «ащы» суды қолданған жағдайда
(14) басып қосыңыз, осы кезде көрсеткіш
жиірек жасау керек.
(15) жанады.
1. Тетіктің (14) «OFF/сөнд» күйінде, ал
13. Көрсеткіштің (5) жанғанын күтіңіз.
тұтқа (6) - “
” күйінде тұрғанын тексеріп
14. Аз ғана үзіліс жасап, бойлерді тазалау
алыңыз.
процедурасын (9 пункт) резервуардағы
2. Лимон қышқылының ерітіндісін
лимон қышқылының ерітіндісі толық
дайындаңыз: 2 екі шай қасық лимон
таусылғанша қайталаңыз.
қышқылын 1 литр суға қосып алынған
15. Ыдысқа (4) таза суды максималды
ерітіндіні суға арналған резервуарға
деңгейге дейін құйыңыз да, 7-10
(4) құйыңыз. Резервуарды (4) орнына
пункттерін қайтадан кемінде 3 рет, 10-15
орнатыңыз.
минуттық үзіліс жасамай-ақ орындаңыз.
3. Кофеге арналған сүзгіні (13) ұстауышқа
16. ON/OFF тетігін (14) басып
(12), сүзгідегі (13) шығыңқы жерін
кофебұқтырғышты қосыңыз.
ұстауыштағы (12) ойыққа келтіре отырып
орнатыңыз жəне сүзгіні (13) сағат тілінің
Ескертпе:
бағытымен/қарсы бағытта бұраңыз.
- Қақты кетіру үшін кофебұқтырғыштарда
4. Сүзгіні ұстауышты кофебұқтырғышқа
жəне кофемашинадағы қақты кетіруге
орнатыңыз. Ұстауыштың (12) шығыңқы
арналған арнайы құралдарды оларды
жері бойлердегі пазаларға сəйкес келуі
пайдалану нұсқаулығын қатаң сақтай
керек, одан кейін сүзгіні ұстауыштың
отырып қолдануға болады.
тұтқасын (11) оң жаққа түбіне дейін
бұраңыз.
ТАЗАЛАУ
5. Қолайлы кесені төсемнің торына (10)
– Сүзгіні (13) тазалау, саңылаулар
орналастырыңыз.
ұнтақталған кофенің шөгінділерімен бітеліп
6. Желі шнурының ашасын розеткаға
қалған жағдайда, сіз оларды кішкене
сұғыңыз.
щеткалармен тазалай аласыз.
7. Кофебұқтырғышты ON/OFF тетіктерін
- Кофебұқтырғыштың корпусын жұмсақ
(14) басып қосыңыз, осы кезде көрсеткіш
ылғал матамен сүртіңіз. Метал щеткаларды
(15) жанады.
жəне қажайтын жуғыш құралдарды
8. Көрсеткіштің (5) жанғанын күтіңіз.
қолданбаңыз.
- Кофебұқтырғыштың корпусын суға немесе
9. Тұтқаны (6) “
” күйіне орнатыңыз
басқа да сұйықтыққа батыруға тыйым
да, көлемі шамамен 100 мл болатын
салынады.
кесеге су толтырыңыз (бұл бойлерден
- Кофебұқтырғыштың алынбалы
суды ағызып, оған лимон қышқылының
бөлшектерін жұмсақ жуғыш заты бар жылы
ерітіндісін құю үшін қажет), тұтқаны (6) “
сумен жуып жіберіңіз, оларды шайыңыз да,
” күйіне орнатып су беруді өшіріңіз.
құрғатыңыз.
10. Капучинатор түтігінен ұшты (7) шешіп
алыңыз да түтіктің астына қолайлы
Тамшыларға арналған төсем (9)
ыдысты қойыңыз. Көрсеткіштің (5)
- Төсемнен (9) торды (10) шешіп алыңыз,
жанғанын күтіңіз, осыдан кейін тұтқаны
төсемді (9) шығарып алыңыз да, оның
(6) «
» күйіне орната отырып бу беруді
ішіндегі суды төгіп тастаңыз, төсемді (9)
шамамен 2 минутқа қосыңыз, содан кейін
жуып жіберіңіз де оны орнына орнатыңыз,
тұтқаны (6) “
” күйіне орната отырып бу
торды (10) төсемге орнатыңыз.
20
1513.indd 201513.indd 20 10.06.2010 15:21:4910.06.2010 15:21:49


