Vitek VT-1511: instruction
Class: Household, kitchen appliances, electronics and equipment
Type:

Manual for Vitek VT-1511
Table of contents
1511.indd 11511.indd 1 03.02.2010 15:36:1403.02.2010 15:36:14
2
1511.indd 21511.indd 2 03.02.2010 15:36:1603.02.2010 15:36:16

ENGLISH
ESPRESSO/ CAPPUCCINO COFFEE
• Do not take off the filter holder while op-
MAKER
erating with the unit.
• Release steam from the cappuccinator
DESCRIPTION
pipe before removing the filter holder.
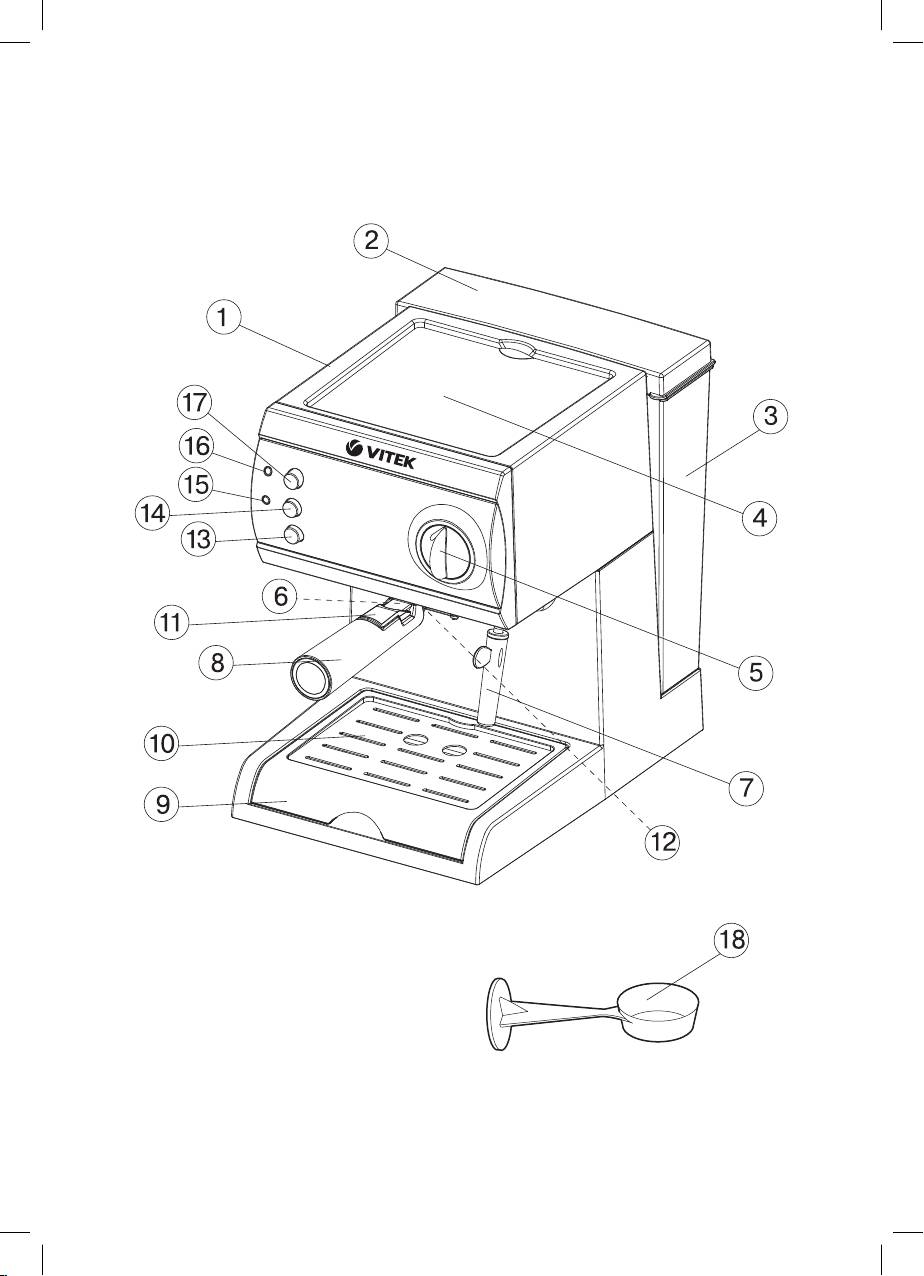
1 – Housing
• Place the unit on the flat stable surface.
2 – Water tank lid
• Never leave the unit unattended, be es-
3 – Removable water tank
pecially careful when children or disabled
4 – Platform for warming the cups
persons are near the appliance.
5 – Steam supply control handle
• In order to avoid fire, electric shock or
6 – Coffee filter
physical damages, do not immerse the
7 – Cappuccinator pipe with a tip
power plug, the power cord or the hous-
8 – Filter holder handle
ing into water or other liquids.
9 – Drops tray
• Always unplug the unit, when you do not
10 – Tray lid
use the unit or before cleaning.
11 – Filter clamp
• To switch the unit off, set all the control
12 – Filter holder
buttons to the off position and remove
13 – Water supply button
the plug out of the socket.
14 – Steam supply button
• Make sure that the power cord does not
15 – Readiness indicator
hang over the table, and does not touch
16 – Power supply connection indicator
hot surfaces.
17 –ON/OFF button
• Do not place the unit on heated surfac-
18 – Measuring spoon with ground coffee
es.
densifier
• Do not use the coffee maker when the
power cord, the plug are damaged, in
IMPORTANT SAFEGUARDS
case of malfunction or after damages.
While using electrical appliances the basic
• Do not repair the unit yourself. Apply to
safety guards should be followed including
the nearest authorized service center for
the next:
repair.
• Read all the instructions carefully.
• Do not use the unit outdoors.
• Use the coffee maker for intended pur-
• Do not leave the unit at the temperature
poses.
below 0°C.
• Make sure that the mains voltage cor-
• The unit is intended for domestic pur-
responds to the voltage specified on the
poses only.
housing of the unit.
• This appliance is not intended for use by
• Use the plug with a secure grounding.
persons (including children) with reduced
• In order to reduce risk of fire, do not use
physical, sensory or mental capabilities,
adapters while connecting the unit to the
or lack of experience and knowledge,
wall outlet.
unless they have been given supervision
• Do not switch on the unit without water.
or instruction concerning use of the ap-
• Use only the accessories supplied.
pliance by a person responsible for their
• Before using the coffee maker, make sure
safety
that all removable parts are set properly.
• Children should be supervised to ensure
• Do not touch hot surfaces of the unit.
that they do not play with the appliance.
• Be careful while operating with outgoing
steam.
KEEP THESE INSTRUCTIONS
3
3
1511.indd 31511.indd 3 03.02.2010 15:36:1603.02.2010 15:36:16

ENGLISH
PREPARATIONS BEFORE OPERATION
- Do not remove the filter holder (12) im-
• Make sure that all functional buttons (13,
mediately after preparing coffee as
14, 17) are in the off position.
there is redundant water vapor pressure
• To make sure that the steam supply is
inside, let the coffee maker cool down
blocked, turn the handle (5) clockwise till
completely.
the clamp.
- To remove the filter holder (12) turn the
• Before using the unit for the first time,
handle to the left and remove the holder.
wash all removable parts with warm wa-
ter and wipe them with a dry cloth.
MAKING ESPRESSO
• Before switching on the unit, make sure
• Make sure that all functional buttons (13,
that voltage of your home electric main
14, 17) are in the off position.
corresponds to the voltage specified on
• To make sure that the steam supply is
the unit.
blocked, turn the handle (5) clockwise till
• Remove the tank (3), fill it with cold water
the clamp.
till the MAX mark and place on its place.
• Remove the tank (3), fill it with cold water
• Insert the filter (6) into the holder (12), by
till the MAX mark and place on its place.
matching the ledge on the filter (6) with
• Insert the filter (6 or 19) into the holder
the hole on the holder (12) and turn the
(12), by matching the ledge on the filter
filter (6) clockwise/anticlockwise.
(6) with the grove on the holder (12) and
• Place the filter holder into the coffee
turn the filter (6) clockwise/anticlock-
maker. Holder ledges (12) should match
wise.
the groves on the boiler, and then turn
• Fill the filter (6) with the ground coffee:
the filter holder handle (8) to the right till
2 full measuring spoons – to make two
the clamp.
coffee cups and 1 full spoon - to make
• Place the corresponding cup on the cov-
one coffee cup, slightly tamp the ground
er of the tray (10).
coffee by the back side of the measuring
• Inset the plug into the socket.
spoon (18).
• Switch on the unit by pressing the ON/
• Place the filter holder into the coffee
OFF (17) button, the indicator (16) will
maker. Holder ledges (12) should match
light up.
the groves on the boiler, and then turn
• To fill the boiler with water press the (13)
the filter holder handle (8) to the right till
button in 15-20 seconds or when water
the clamp.
starts appearing in the cup, switch off
• Put one or two cups on the tray lid (10).
water supply, by pressing the (13) button
• Inset the plug into the socket.
once again.
• Switch on the unit by pressing the ON/
• Wait till the indicator (15) lights up, then
OFF (17) button, the indicator (16) will
switch on water supply, by pressing the
light up.
(13) button, when the cup is filled with
• Wait till the indicator (15) lights up, the
water, press the (13) button once again
unit is ready for making coffee.
to switch off water supply, pour out water
• Switch on water supply, by pressing the
from the cup. Depending on the cup size,
(13) button; watch the process of the cup
repeat this procedure several times, then
filling with coffee, press the (13) button
the boiler will be washed.
once again to switch off water supply.
Attention!
• Switch off the coffee maker by pressing
- Do not remove the filter holder (12) if the
the (17) ON/OFF button, the indicator
(13), (14) buttons are pressed
(16) will go out.
4
4
1511.indd 41511.indd 4 03.02.2010 15:36:1603.02.2010 15:36:16

ENGLISH
• Wait till the coffee maker cools down and
(5) for a quarter or more anticlockwise.
remove the filter holder (12) by turning
Cappuccinator pipe should not touch the
the handle to the left. Remove the rest
bottom of the glass, otherwise the steam
of the ground coffee and wash the filter
release will be blocked, several seconds
(6).
are enough to get dense foam.
• Close steam supply by turning the han-
Note:
dle (5) clockwise till the clamp.
- The cups should be preliminary heated
• Switch off steam supply, by pressing the
up, when water heats up in the boiler, put
steam release button (14) once again.
the cups on the platform (4).
• Switch off the coffee maker, by pressing
- When there is an extra need to remove
the (17) ON/OFF button, the indicator
the filter holder, reduce pressure in the
(16) will go out.
boiler, switch off the coffeemaker by
pressing the (17) ON/OFF button, put
Important:
the corresponding cup under the cap-
- It is important that milk for making foam
puccinator pipe and slightly open steam
is fresh and without additives, and not a
supply, by turning the control (5) anti-
long storage milk. Take usual whole milk
clockwise, when pressure in the boiler is
with fat status from 4 to 6%, cream fat
reduced, remove the filter holder (12).
status should be not less than 10%.
- Immediately after whisking milk or cream
MAKING CAPPUCCINO
clean the cappuccinator pipe (7) – im-
Attention! Be careful not to get burns by
merse the cappuccinator pipe (7) into a
the outgoing steam.
glass with water, switch on steam supply,
• Make sure that steam supply control (5)
by pressing the button (14) and turn the
is in the off position.
steam supply handle (5) anticlockwise,
• Make coffee, as described in the
to release small amount of steam, after
“MAKING ESPRESSO” paragraph, in
it close steam supply and switch off the
a cup, which size will be enough to add
coffee maker.
whipped foam of milk or cream.
- Wait till the coffee maker cools down
• Press the steam supply button (14); wait
and remove the tip from the cappucci-
till the indicator (15) lights up. Put a cor-
nator pipe (7), wipe the outer surface of
responding cup under the cappuccinator
the cappuccinator pipe with a damp soft
pipe (7). Carefully turn the steam sup-
cloth, wash the tip under tapping water
ply control handle (5) for a quarter anti-
- At strong blockage of the nozzle of the
clockwise to remove condensation left in
cappuccinator pipe (7), remove the tip
the steam pipe. After removal of conden-
from the pipe, take a measuring spoon
sation close the steam supply, by turning
(18) (there is a hexagon opening on the
the handle (5) clockwise till the clamp.
spoon which is the key to unscrew the
nozzle of the cappuccinator pipe), un-
Note: small amount of water or steam
screw the nozzle clockwise, wash the
can be released from the filter holder
nozzle and place it on its place, slightly
(12) or steam nozzle – it is normal.
tighten it using the measuring spoon
(18).
• Put the cappuccinator pipe (7) into a
glass filled with cold milk or cream; care-
Note: Repeated making of coffee should
fully turn the steam supply control handle
be performed with at least 5 min interval.
5
1511.indd 51511.indd 5 03.02.2010 15:36:1603.02.2010 15:36:16

ENGLISH
WARMING UP BEVERAGES
into the water tank (3). Set the tank (3)
You can warm up beverages, by putting the
on its place.
cappuccinator pipe (7) without a plastic tip
4. Insert the filter (6) into the holder (12), by
into a cup.
matching the ledge on the filter (6) with
• Press the steam supply button (14), wait
the grove on the holder (12) and turn the
till the indicator (15) lights up.
filter (6) clockwise/anticlockwise.
• Immerse the cappuccinator pipe (7) with-
5. Place the filter holder into the coffee
out a plastic tip into a cup with beverage,
maker. Holder ledges (12) should match
which you want to warm up, carefully turn
the groves on the boiler, and then turn
the steam supply control handle (5) anti-
the filter holder handle (8) to the right till
clockwise.
the clamp.
• Close steam supply by turning the handle
6. Put a corresponding cup on the lid of
(5) clockwise till the clamp.
the tray (10).
• Switch off steam supply, by pressing the
7. Inset the plug into the socket.
steam supply button (14) once again.
8. Switch on the unit by pressing the ON/
• Switch off the coffee maker, by press-
OFF (17) button, the indicator (16) will
ing the (17) ON/OFF button, the indicator
light up.
(16) will go out.
9. Press the (13) button and fill a cup of 100
ml with water (it is necessary to remove
Note: small amount of water or steam
water from the boiler and fill the boiler
can be released from the filter holder
with citric acid solution), switch off wa-
(12) or steam nozzle – it is normal.
ter supply, by pressing the (13) button
once again.
HOW TO GET GOOD ESPRESSO
10. Wait till the indicator (15) lights up, and
- Use the coffee powder intended specially
switch on water supply, by pressing the
for the espresso coffee machines.
(13) button and fill a cup of 100 ml with
- Slightly ram the ground coffee in the filter
water, press the (13) button once again
(6), you can do it using the back side of
to switch off water supply, pour out wa-
the measuring spoon (18).
ter from the cup.
- The strength of coffee depends on qual-
11. In some time repeat the procedure, de-
ity and the grade of coffee beans grind-
scribed in paragraph 10, and fill a cup of
ing. If coffee is pouring out too long this
100 ml with water once again.
means the coffee powder is too fine or it
12. Press the steam supply button (14),
is rammed too strongly.
wait till the indicator (15) lights up. Put
a corresponding cup under the cappuc-
REMOVING THE SCALE
cinator pipe (7) and open steam supply,
For effective operation of the coffee mak-
by turning the handle of the control (5)
er we recommend to remove scale each
anticlockwise. Carefully turn the control
2-3 months, in case of using “hard” water
handle (5) to the maximal steam sup-
– more often.
ply position, release steam for about
1. Make sure that all functional buttons
1 minute, close steam, by turning the
(13, 14, 17) are in the off position.
handle (5) clockwise till the clamp,
2. To make sure that the steam supply is
switch off steam supply, by pressing the
blocked, turn the handle (5) clockwise
(14) button.
till the clamp.
13. Switch off the coffee maker, by press-
3. Make citric acid solution: 2 teaspoons
ing the (17) button. Wait for 10 - 15 min-
and 1 l of water and pour this solution
utes.
6
1511.indd 61511.indd 6 03.02.2010 15:36:1603.02.2010 15:36:16
ENGLISH
14. Make procedures in paragraphs 10 and
CLEANING
11at least 3 times.
- Filter cleaning (6): you can wash filter
15. Repeat cleaning of steam output chan-
in a dishwashing machine. If the open-
nels, described in paragraph 12.
ings are blocked with the rest of ground
16. With small intervals, repeat the boiler
coffee, you can clean them with a small
cleaning procedure (paragraph 10) till
brush.
citric acid solution completely resolves
- Wipe the housing of the coffee maker
in the tank.
with a damp soft cloth. Do not use metal
17. Switch on the coffee maker, by press-
brushes and abrasives.
ing the (17) ON/OFF button.
- Do not immerse the unit into water or
18. Fill the tank (3) with clear water till the
other liquids.
maximal level and repeat paragraphs
- Wash removable parts with warm water
10, 12 at least 3 times, without 10-15-
and wipe them with a dry cloth.
minute interval.
19. Switch off the coffee maker, by press-
Drops tray (9)
ing the (17) ON/OFF button.
- Remove the grid (10) from the tray (9),
remove the tray (9) and pour out water,
Note:
put the tray on its place, put the grid on
- To remove scale you can use special
the tray. If necessary wash the tray (9)
substances for scale removal, strictly fol-
and the grid (10) in water with soft deter-
lowing the instructions on their usage.
gent, rinse and dry.
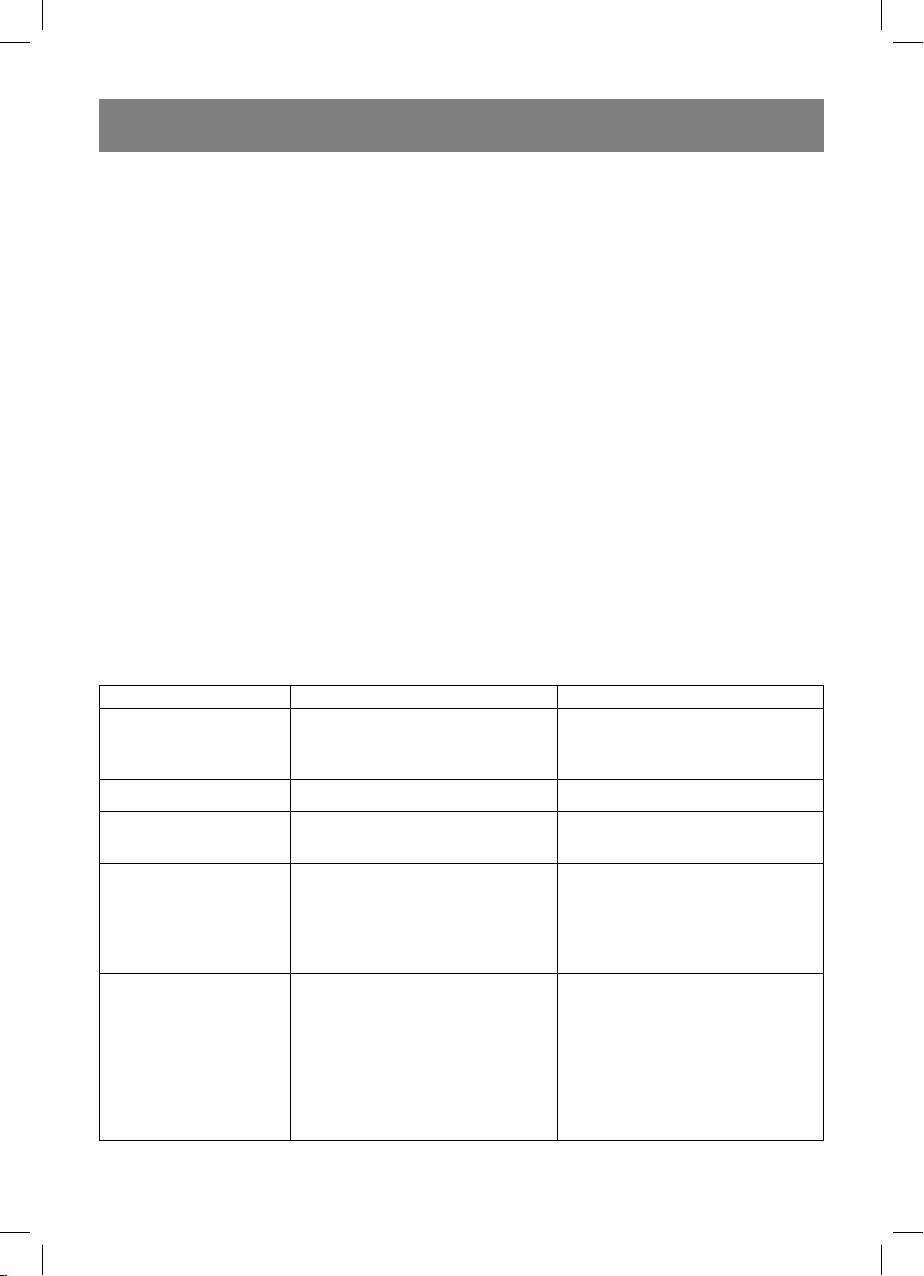
Problems, their causes and solutions
Problem Cause Solution
Make sure that the socket is in op-
No voltage in the socket.
The coffee maker does
erating position.
Power plug is not completely in-
not switch on
Check whether the plug is com-
serted into the socket.
pletely inserted into the socket.
Water leaks away from
The tray is full. Pour out water from the tray
the lower part of the unit
Filter does not join firmly the densi-
Coffee leakage from the
fier in the boiler, ground coffee got
Clean the edges of the filter.
filter holder
on the edges of the filter.
Refer to “Preparation to operation”,
Wrong process of scale removal in
“Scale removal” paragraph and
Coffee made has a
the boiler
repeat them several times.
strange odor
Improper storage of coffee
Use fresh ground coffee.
Keep coffee in a dry cool place
Whisk milk only after the indicator
Low temperature of the outgoing
(15) lights up.
steam
Use narrow high container to whisk
Steam does not whisk
The tank is too large or its size is
milk
milk
improper
You have used skimmed milk
Use whole milk only, with fat status
4-6%.
7
1511.indd 71511.indd 7 03.02.2010 15:36:1603.02.2010 15:36:16
ENGLISH
FOR DOMESTIC USE ONLY
GUARANTEE
The unit does not have replaceable parts.
Details regarding guarantee conditions can
be obtained from the dealer from whom
Specifications
the appliance was purchased. The bill of
Power supply: 230 V ~ 50 Hz
sale or receipt must be produced when
Power consumption: 1050 W
making any claim under the terms of this
guarantee.
Specifications subject to change without
prior notice.
This product conforms to the
EMC-Requirements as laid
Service life of appliance - 5 years
down by the Council Directive
89/336/EEC and to the Law
Voltage Regulation (73/23 EEC)
8
1511.indd 81511.indd 8 03.02.2010 15:36:1703.02.2010 15:36:17

DEUTSCH
KAFFEEMASCHINE FÜR ESPRESSO/
• Benutzen Sie nur Geräteteile, die zum
CAPPUCINO
Lieferungsumfang gehören.
• Vor dem Einschalten des Geräts verge-
BESCHREIBUNG
wissern Sie sich, dass alle abnehmbaren
1 Gehäuse
Ersatzteile richtig aufgestellt sind.
2 Deckel des Wasserbehälters
• Berühren Sie nie heiße Stellen des
3 Abnehmbarer Wasserbehälter
Geräts.
4 Aufheizboden für Tassen
• Seien Sie mit dem austretenden Dampf
5 Regler der Dampfzufuhr
vorsichtig.
6 Kaffeefi lter
• Es ist nicht gestattet, die Filterhalterung
7 Rohr für Capuccinozubereitung mit
während des Betriebs des Geräts abzu-
Endstück
nehmen.
8 – Hebel der Filterhalterung
• Lassen Sie den Dampf aus dem Rohr
9 Tropfenauffangschale
der Capuccinozubereitung vor dem
10 - Deckel der Auffangschale
Abnehmen des Kaffeefi lters ab.
11 Filterfi xiervorrichtung
• Stellen Sie das Gerät auf eine gerade sta-
12 Filterhalterung
bile Oberfl äche auf.
13 - Taste der Wasserzufuhr
• Lassen Sie das Gerät nie unbeaufsichtigt,
14 - Taste der Dampfzufuhr
besondere Vorsichtsmaßnahmen sind in
15 Bereitschaftsanzeige
den Fällen angesagt, wenn sich Kinder
16 Versorgungseinschaltungsanzeige
oder behinderte Personen während der
17 Ein/Ausschalttaste (ON/OFF)
Nutzung des Geräts in der Nähe aufhal-
18 - Meßlöffel mit Kaffeepresse
ten.
• Tauchen Sie nie das Kabel in die
WICHTIGE SICHERHEITSHINWEISE
Kaffeemaschine oder andere
Beim Gebrauch der elektrischen Geräte
Flüssigkeiten, um Stromschlagrisiko oder
sind wichtige Sicherheitsmaßnahmen zu
Verletzungen zu vermeiden.
beachten, unter anderem:
• Schalten Sie das Gerät vor der Reinigung
• Vor der Inbetriebnahme des Geräts lesen
oder der Aufbewahrung vom Stromnetz
Sie aufmerksam alle Betriebsanleitungen
immer ab.
durch.
• Nach dem Abschalten der Kaffeemaschine
• Nutzen Sie die Kaffeemaschine bestim-
schalten Sie diese mit der Ein/
mungsgemäß.
Ausschalttaste aus, und danach ziehen
• Vor dem Einschalten des Geräts verge-
Sie den Netzstecker aus der Steckdose.
wissern Sie sich, ob die Netzspannung
• Achten Sie darauf, dass das Netzkabel
mit der Spannung Ihres Geräts über-
an den Stellen frei nicht hängt oder mit
einstimmt, die am Gehäuse des Geräts
heißen Gegenständen nicht in Berührung
steht.
kommt.
• Nutzen Sie für das Anschließen der
• Es ist nicht gestattet, die Kaffeemaschine
Kaffeemaschine den Netzstecker mit si-
auf heiße Oberfl ächen aufzustellen.
cherer Kontakterdung.
• Es ist nicht gestattet, das Gerät zu
• Verwenden Sie keine Verlängerungen
nutzen, wenn das Netzkabel oder der
beim Anschließen des Geräts an das
Netzstecker des Netzkabels beschä-
Stromnetz, um Brandrisiko zu vermei-
digt ist, sowie beim nicht ordnungs-
den.
gemäßen Betrieb oder beliebigen
• Es ist nicht gestattet, die Kaffeemaschine
Störungen.
ohne Wasser einzuschalten.
• Um das Gerät zu reparieren, wen-
9
9
1511.indd 91511.indd 9 03.02.2010 15:36:1703.02.2010 15:36:17

DEUTSCH
den Sie sich an ein autorisiertes
Kaffeehalterung (12) zurück, so dass
Kundenservicedienst.
die Vorsprünge des Kaffeefi lters (6) mit
• Es ist nicht gestattet, das Gerät außerhalb
den Aussparrungen der Halterung (12)
der Räumlichkeiten zu benutzen.
zusammenfallen und drehen Sie den
• Es ist nicht gestattet, das Gerät in den
Kaffeefi lter (6) im/gegen Uhrzeigersinn.
Orten mit erhöhter Temperatur unter 0°C
• Stellen Sie die Filterhalterung in die
zu nutzen.
Kaffeemaschine. Die Vorsprünge der
• Das Gerät ist nur für den Gebrauch im
Filterhalterung (12) müssen mit den
Haushalt geeignet.
Aussparungen des Heißwassererzeugers
• Personen (einschließlich Kinder), die auf-
zusammenfallen, danach drehen Sie den
grund ihrer physischen, sensorischen
Hebel der Filterhalterung (8) nach rechts
oder geistigen Fähigkeiten oder ihrer
bis zum Anschlag.
Unerfahrenheit oder Unkenntnis nicht in
• Stellen Sie die geeignete Tasse auf den
der Lage sind, das Gerät sicher zu be-
Deckel der Auffangschale (10).
nutzen, sollten dieses Gerät nicht ohne
• Stecken Sie den Netzstecker des
Aufsicht oder Anweisung durch eine ver-
Netzkabels in die Steckdose.
antwortliche Person benutzen.
• Schalten Sie die Kaffeemaschine mit der
• Kinder sollten beaufsichtigt werden, um
Taste ON/OFF (17) ein, dabei wird die
sicherzustellen, dass sie nicht mit dem
Anzeige (16) aufl euchten.
Gerät spielen.
• Für das Auffüllen des
Heißwassererzeugers drücken Sie die
BEWAHREN SIE DIESE
Tate (13) in 1520 Sekunden oder beim
BEDIENUNGSANLEITUNG SORGFÄLTIG
Beginn des Auffüllens der Tasse mit
AUF.
Wasser, schalten Sie die Wasserzufuhr
durch das erneute Drücken der Taste (13)
VORBEREITUNG ZUR
aus.
INBETRIEBNAHME
Warten Sie ab, bis die Anzeige (15)
• Vergewissern Sie sich, dass sich alle
aufl euchtet, schalten Sie danach die
Steuerungstasten (13, 14, 17) in der aus-
Wasserzufuhr mit der Taste (13) aus,
geschalteten Position befi nden.
und drücken Sie nach dem Auffüllen
• Vergewissern Sie sich, dass die
der Tasse erneut die Taste (13), um die
Dampfzufuhr geschlossen ist, drehen Sie
Wasserzufuhr auszuschalten, gießen
dafür den Regler (5) im Uhrzeigersinn bis
Sie Wasser aus der Tasse ab. Abhängig
zum Anschlag.
von der Größe der Tasse wiederholen Sie
• Vor der ersten Nutzung des Geräts spü-
diese Handlung mehrmals, damit das
len Sie abnehmbare Teile mit warmem
Heißwassererzeuger gereinigt wird.
Wasser ab und trocknen Sie diese ab.
• Vor dem Einschalten des Geräts verge-
Achtung!
wissern Sie sich, ob die Netzspannung
Es ist nicht gestattet, die Filterhalterung
mit der Spannung Ihres Geräts über-
(12) bei den gedrückten Tasten (13), (14)
einstimmt, die am Gehäuse des Geräts
abzunehmen.
steht.
Es ist nicht gestattet, die Filterhalterung
• Nehmen Sie den Wasserbehälter (3) ab
(12) gleich nach der Kaffeezubereitung
und füllen Sie ihn mit kaltem Wasser bis
abzunehmen, weil Wasser und
zum maximalen Füllstand MAX und stel-
Dampfüberdruck innerhalb des Filters
len Sie diesen zurück.
sammeln kann, warten Sie ab, bis die
• Setzen Sie den Kaffeefi lter (6) in die
Kaffeemaschine abgekühlt wird.
10
1511.indd 101511.indd 10 03.02.2010 15:36:1703.02.2010 15:36:17

DEUTSCH
Um die Filterhalterung (12) abzunehmen,
Schalten Sie die Wasserzufuhr mit der
drehen Sie den Hebel nach links und neh-
Taste (13) ein, verfolgen Sie den Prozess
men Sie die Filterhalterung ab.
des Auffüllens der Tasse mit dem zube-
reiteten Kaffee, drücken Sie nochmals
ZUBEREITUNG VON KAFFEE
die Tasse (13), um die Wasserzufuhr aus-
„ESPRESSO“
zuschalten.
Vergewissern Sie sich, dass sich alle
• Schalten Sie die Kaffeemaschine mit der
Steuerungstasten (13, 14, 17) in der ausge-
Taste ON/OFF (17) ab, dabei wird die
schalteten Position befi nden.
Anzeige (16) erlöschen.
• Vergewissern Sie sich, dass die
• Warten Sie ab, bis die Kaffeemaschine
Dampfzufuhr geschlossen ist, drehen Sie
abgekühlt wird, nehmen Sie die
dafür den Regler (5) im Uhrzeigersinn bis
Filterhalterung (12) ab, drehen Sie den
zum Anschlag.
Hebel nach links. Entfernen Sie Reste
• Nehmen Sie den Wasserbehälter (3) ab
des gemahlenen Kaffee und spülen Sie
und füllen Sie ihn mit kaltem Wasser bis
den Kaffeefi lter (6) ab.
zum maximalen Füllstand MAX und stel-
len Sie diesen zurück.
Anmerkung:
• Setzen Sie den Kaffeefi lter (6 oder 19) in
Tassen sollen während der Aufwärmung
die Kaffeehalterung (12) zurück, so dass
des Wassers im Heißwassererzeuger vor-
die Vorsprünge des Kaffeefi lters (6) mit
geheizt werden, stellen Sie die Tassen auf
den Aussparrungen der Halterung (12)
den Aufheizboden (4).
zusammenfallen und drehen Sie den
Falls es notwendig ist, die Filterhalterung
Kaffeefi lter (6) im/gegen Uhrzeigersinn.
abzunehmen, soll der Druck im
• Geben Sie den gemahlenen Kaffee in den
Heißwassererzeuger herabgesetzt wer-
Kaffeefi lter (6) zu: 2 volle Messlöffel – für
den, schalten Sie die Kaffeemaschine
die Zubereitung von zwei Tassen Kaffee
mit der Taste (17) aus, stellen Sie eine
und einen vollen Löffel Kaffee – für die
passende Tasse unter das Rohr für
Zubereitung einer Tasse Kaffee, pressen
die Capuccinozubereitung und öff-
Sie den gemahlenen Kaffee mit der an-
nen Sie leicht die Dampfzufuhr mit dem
deren Seite des Messlöffels (18).
Regler (5) gegen den Uhrzeigersinn,
• Stellen Sie die Filterhalterung in die
nach der Herabsetzung des Drucks im
Kaffeemaschine. Die Vorsprünge der
Heißwassererzeuger nehmen Sie die
Filterhalterung (12) müssen mit den
Filterhalterung (12) ab.
Aussparungen des Heißwassererzeugers
zusammenfallen, danach drehen Sie den
ZUBEREITUNG VON CAPUCCINO
Hebel der Filterhalterung (8) nach rechts
Achtung!
bis zum Anschlag.
Seien Sie vor Verbrühungen mit heißem
• Stellen Sie eine oder zwei Tassen auf den
Dampf vorsichtig.
Deckel des Auffangschale (10).
• Vergewissern Sie sich, dass sich der
• Stecken Sie den Netzstecker des
Regler der Dampfzufuhr (5) in der Position
Netzkabels in die Steckdose.
„Dampfzufuhr ausgeschaltet“ befi ndet.
• Schalten Sie die Kaffeemaschine mit der
• Bereiten Sie den Kaffee in der Tasse
Taste ON/OFF (17) ein, dabei wird die
zu, deren Umfang für die Zugabe von
Anzeige (16) aufl euchten.
Milchschaum und Milchsahne aus-
• Warten Sie ab, bis die Anzeige (15) auf-
reichend ist, wie es im Abschnitt
leuchtet, die Kaffeemaschine ist be-
„ZUBEREITUNG VON ESPRESSO“ be-
triebsbereit.
schrieben ist.
11
1511.indd 111511.indd 11 03.02.2010 15:36:1703.02.2010 15:36:17

DEUTSCH
• Drücken Sie die Taste der Dampfzufuhr
Reinigen Sie das Rohr für die
(14), warten Sie ab, bis die Anzeige (15)
Capuccinozubereitung (7) gleich nach
aufl euchtet. Stellen Sie unter das Rohr
dem Schlagen von Milch oder Milchsahne
für die Capuccinozubereitung (7) ein
–tauchen Sie dafür das Rohr (7) ins
passendes Geschirr fürs Sammeln des
Glas mit Wasser ein, schalten Sie die
Wassers. Drehen Sie vorsichtig den Regler
Dampfzufuhr mit der Taste (14) ein und
der Dampfzufuhr um eine Vierteldrehung
drehen Sie den Regler der Dampfzufuhr
gegen Uhrzeigersinn, um Kondenswasser
(5) gegen Uhrzeigersinn, um eine kleine
abzuleiten, das im Dampfrohr geblieben
Dampfmenge abzuleiten, unterbrechen
ist. Unterbrechen Sie die Dampfzufuhr
Sie danach die Dampfzufuhr und schal-
nach der Ableitung des Kondenswassers,
ten Sie die Kaffeemaschine aus.
indem Sie den Regler (5) im Uhrzeigersinn
Warten Sie ab, bis die Kaffeemaschine
bis zum Anschlag drehen.
abgekühlt wird, nehmen Sie das Endstück
Anmerkung: Es kann aus der
vom Rohr (7) ab, wischen Sie es von au-
Filterhalterung (12) oder der Dampfdüse
ßen mit einem feuchten Tuch ab, spülen
eine kleine Menge Wasser oder Dampf
Sie das Endstück mit Wasser ab.
austreten – es ist normal.
Bei starker Verunreinigung der Düse des
• Tauchen Sie das Rohr für die
Rohres für die Capuccinozubereitung (7),
Capuccinozubereitung (7) in kalte Milch
nehmen Sie das Endstück vom Rohr ab,
oder Milchsahne, drehen Sie vorsich-
nehmen Sie den Messlöffel (Messlöffel
tig den Regler der Dampfzufuhr (5)
hat Sechskantenaufnahme, die zur
um eine Vierteldrehung oder mehr ge-
Abdrehung der Düse des Rohres dient),
gen Uhrzeigersinn. Das Rohr für die
drehen Sie die Düse im Uhrzeigersinn,
Capuccinozubereitung darf den Boden
spülen Sie die Düse ab und stellen Sie die
des Glases nicht berühren, sonst wir
Düse zurück, indem Sie diese mit dem
der Dampfaustritt verhindert sein, für
Messlöffel leicht festschrauben.
den Gewinn des Schaums sind einige
Sekunden ausreichend.
Anmerkung:
• Unterbrechen Sie die Dampfzufuhr, dre-
Es wird empfohlen, den Kaffee mit mini-
hen Sie den Regler (5) im Uhrzeigersinn
malen Intervallen von 5 Minuten zuzube-
bis zum Anschlag.
reiten.
• Unterbrechen Sie die Dampfzufuhr, idem
Sie erneut die Taste der Dampfzufuhr (14)
AUFWÄRMUNG VON GETRÄNKEN
drücken.
Sie können Getränke aufwärmen, indem Sie
• Schalten Sie die Kaffeemaschine mit der
das Rohr für die Capuccinozubereitung (7)
Taste ON/OFF (17) ab, dabei wird die
ohne das Kunststoffendstück in die Tasse
Anzeige (16) erlöschen.
tauchen.
• Drücken Sie die Taste der Dampfzufuhr
Wichtig:
(14), warten Sie ab, bis die Anzeige (15)
Es ist wichtig, frische Milch und ohne
aufl euchtet.
Konservierungsstoffe, d.h. keine
• Tauchen Sie das Rohr für die
Dauermilch, zur Zubereitung von Schaum
Capuccinozubereitung (7) ohne das
zu benutzen, d.h. keine Dauermilch.
Kunststoffendstück in die Tasse mit dem
Normale Vollmilch soll 46% Fett,
Getränk, das sie aufwärmen möchten,
Milchsahne mindestens 10% Fett enthal-
drehen Sie vorsichtig den Regler der
ten.
Dampfzufuhr (5) gegen Uhrzeigersinn.
• Unterbrechen Sie die Dampfzufuhr, dre-
12
1511.indd 121511.indd 12 03.02.2010 15:36:1703.02.2010 15:36:17

DEUTSCH
hen Sie den Regler (5) im Uhrzeigersinn
4. Setzen Sie den Kaffeefi lter (6) in die
bis zum Anschlag.
Kaffeehalterung (12) zurück, so dass
• Unterbrechen Sie die Dampfzufuhr, indem
die Vorsprünge des Kaffeefi lters (6) mit
Sie erneut die Taste der Dampfzufuhr (14)
den Aussparrungen der Halterung (12)
drücken.
zusammenfallen und drehen Sie den
• Schalten Sie die Kaffeemaschine mit der
Kaffeefi lter (6) im/gegen Uhrzeigersinn.
Taste ON/OFF (17) ab, dabei wird die
5. Stellen Sie die Filterhalterung in die
Anzeige (16) erlöschen.
Kaffeemaschine. Die Vorsprünge
der Filterhalterung (12) müs-
Anmerkung: Es kann aus der Filterhalterung
sen mit den Aussparungen des
(12) oder der Dampfdüse eine kleine
Heißwassererzeugers zusammenfal-
Menge Wasser oder Dampf austreten – es
len, danach drehen Sie den Hebel der
ist normal.
Filterhalters (8) nach rechts bis zum
Anschlag.
ZUBEREITUNG VON ESPRESSO
6. Stellen Sie die passende Tasse auf den
Nutzen sie den frisch gemahlenen Kaffee,
Deckel der Auffangschale (10).
der für die Zubereitung von Espresso ge-
7. Stecken Sie den Netzstecker des
eignet ist.
Netzkabels in die Steckdose.
Pressen Sie den gemahlenen Kaffee
8. Schalten Sie die Kaffeemaschine mit
im Kaffeefi lter (6) leicht zusammen, Sie
der Taste ON/OFF (17) ein, dabei wird
können es mit dem anderen Ende des
die Anzeige (16) aufl euchten.
Messlöffels (18) machen.
9. Drücken Sie die Tate (13) und füllen
Die Kaffeestärke hängt von der Qualität
Sie die Tasse mit 100 ml Wasser auf
und der Mahlfeinheitsgrades der
(es ist notwendig, um Wasser aus dem
Kaffeebohnen ab. Wird die Tasse mit
Heißwassererzeuger zu entfernen und
Kaffe zu lange gefüllt, bedeutet das, dass
dieses mit Zitronensäure aufzufüllen),
Kaffee sehr grob gemahlen oder zusam-
schalten Sie die Wasserzufuhr durch das
mengepresst ist.
erneute Drücken der Taste (13) aus.
10. Warten Sie ab, bis die Anzeige (15)
ENTKALKUNG
aufl euchtet, schalten Sie danach die
Führen Sie die Entkalkung der
Wasserzufuhr mit der Taste (13) ein und
Kaffeemaschine für den effektiven Betrieb
füllen Sie die Tasse mit 100 ml Wasser
der Kaffeemaschine mindestens 23 mal
auf, drücken Sie danach erneut die
pro Monat oder öfters aus, wenn Sie hartes
Taste (13), um die Wasserzufuhr aus-
Wasser nutzen.
zuschalten, gießen Sie Wasser aus der
1. Vergewissern Sie sich, dass sich alle
Tasse ab.
Steuerungstasten (13, 14, 17) in der
11. Wiederholen Sie nach einiger Zeit den
ausgeschalteten Position befi nden.
Prozess, der im Punkt 10 beschrieben
2. Vergewissern Sie sich, dass die
ist, und füllen Sie die Tasse mit 100 ml
Dampfzufuhr geschlossen ist, drehen
Wasser nochmals auf.
Sie dafür den Regler (5) im Uhrzeigersinn
12. Drücken Sie die Taste der Dampfzufuhr
bis zum Anschlag.
(14), warten Sie ab, bis die Anzeige
3. Bereiten Sie Lösung mit Zitronensäure
(15) aufl euchtet. Stellen Sie ein pas-
zu: 2 Teelöffel für 1 Liter Wasser und
sendes Geschirr unter das Rohr für
gießen Sie die Lösung in den Behälter
die Capuccinozubereitung (7) und dre-
(3) ein. Stellen Sie den Behälter wieder
hen Sie den Regler der Dampfzufuhr
auf.
(5) gegen Uhrzeigersinn, um die den
13
1511.indd 131511.indd 13 03.02.2010 15:36:1703.02.2010 15:36:17

DEUTSCH
Dampf abzuleiten. Drehen Sie den
wendet werden, die für die Entkalkung ge-
Regler (5) in die Position des maximalen
eignet sind,
Dampfaustritts, leiten Sie den Dampf
ca. 1 Minuten ab, unterbrechen Sie die
REINIGUNG
Dampfzufuhr, indem Sie den Regler (5)
Reinigung des Filters (6). Der Filter kann
im Uhrzeigersinn bis zum Anschlag dre-
in der Geschirrspülmaschine gewaschen
hen, schalten Sie die Dampfzufuhr mit
werden. Falls Filteröffnungen mit den
der Taste (14) aus.
Kaffeeresten verstopft sind, können Sie di-
13. Schalten Sie die Kaffeemaschine mit
ese mit einer kleinen Bürste reinigen.
der Taste (17) aus. Warten Sie 1015
Wischen Sie das Gehäuse der
Minuten ab.
Kaffeemaschine mit einem feuchten Tuch
14. Wiederholen Sie die in den Punkten 10
ab. Es ist nicht gestattet, Metallbürsten
und 11 beschriebenen Handlungen min-
und Abrasivmittel für die Reinigung des
destens dreimal.
Geräts zu benutzen.
15. Wiederholen Sie die Reinigung der
Es ist nicht gestattet, das Gerät ins Wasser
Kanäle des Dampfaustritts, die im Punkt
oder andere Flüssigkeiten zu tauchen.
12 beschrieben ist.
Spülen Sie abnehmbare Teile der
16. Wiederholen Sie den Prozess der
Kaffeemaschine mit warmem Wasser
Reinigung des Heißwassererzeuger
mit einem weichen Reinigungsmittel, wi-
(Punkt 10) mit kurzen Pausen bis zur
schen Sie und trocknen Sie diese ab.
vollen Aufl ösung der Zitronensäure im
Behälter.
Tropfenauffangschale (9)
17. Schalten Sie die Kaffeemaschine mit
Nehmen Sie den Deckel (10) von der
der Taste (17) ON/OFF ein.
Auffangschale (9) ab und gießen Sie
18. Füllen Sie den Behälter (3) mit reinem
Wasser ab, stellen Sie die Auffangschale
Wassers bis zum maximalen Füllstand
zurück, stellen Sie den Sieb auf die
auf und wiederholen Sie mindestens
Auffangschale auf. Bei der Notwendigkeit
dreimal die in den Punkten 10 und 11 be-
spülen Sie die Auffangschale (9) und den
schriebenen Handlungen, ohne 1015
Deckel (10) mit Wasser mit einem wei-
Minutenpause zu machen.
chen Reinigungsmittel, spülen Sie und
19. Schalten Sie die Kaffeemaschine mit
trocknen Sie diese ab.
der Taste (17) ON/OFF ein.
Anmerkung:
Zur Entkalkung können unter Beachtung
der Betriebsanleitung spezielle Mittel ver-
Störungen, ihre Ursachen und Beseitigungsmethoden
Störung Ursache Störungsbeseitigungsmethode
Vergewissern Sie sich, dass der
Keine Netzspannung.
Die Kaffeemaschine
Netzstecker funktioniert.
Der Netzstecker des Netzkabels
schaltet sich nicht ein.
Der Netzstecker des Netzkabels
sitzt in der Steckdose undicht.
sitzt in der Steckdose undicht.
Wasser fl ießt aus
Die Wasserauffangschale ist
Gießen Sie Wasser der
dem unteren Teil der
überfüllt.
Wasserauffangschale ab.
Kaffeemaschine heraus.
14
1511.indd 141511.indd 14 03.02.2010 15:36:1703.02.2010 15:36:17
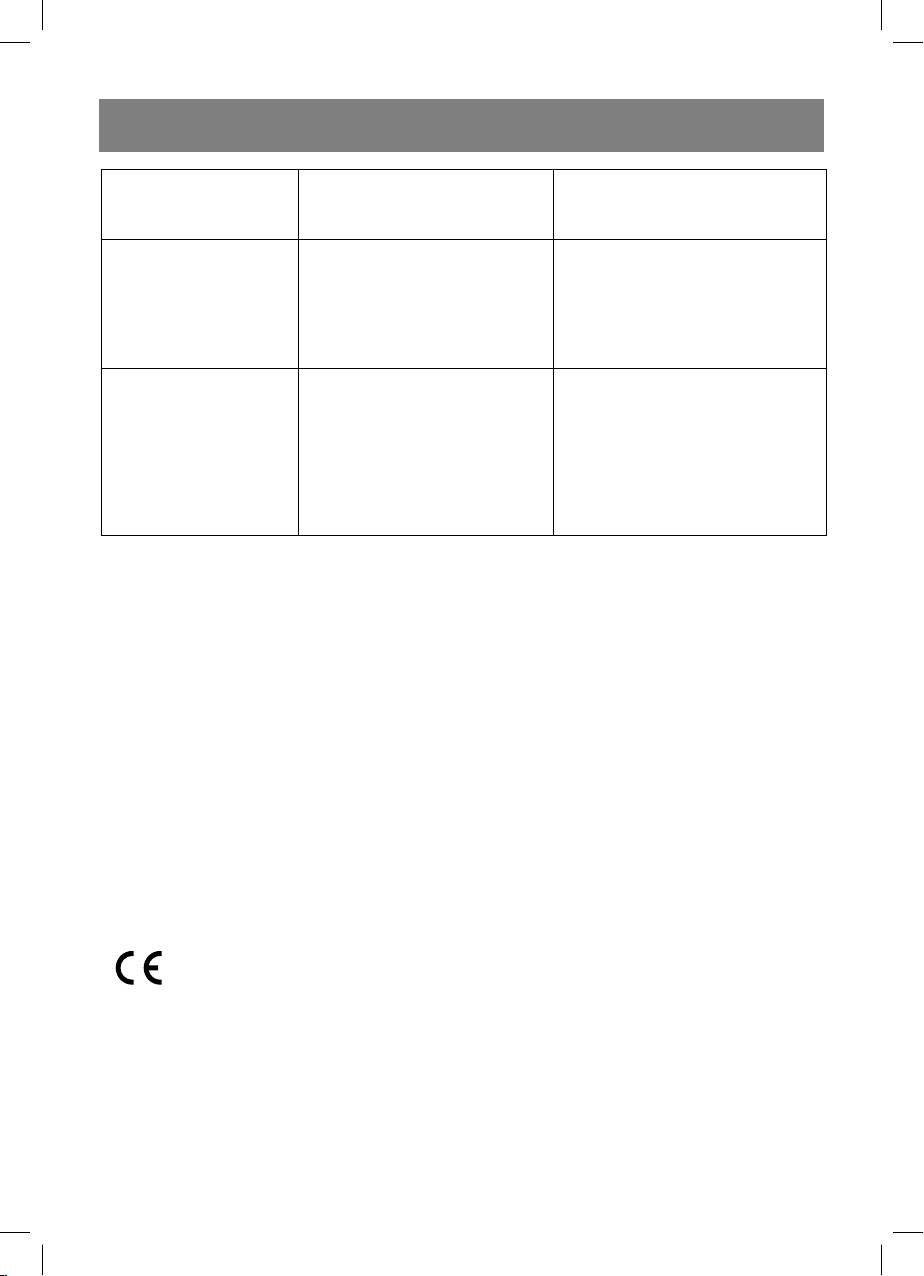
DEUTSCH
Das Anliegen des Filters an die
Ausfl ießen von Kaffee aus
Dichtung im Heißwassererzeuger
dem Filter
Reinigen Sie Ränder des Filters.
ist undicht, der gemahlenen ist
auf Ränder des Filters geraten.
Siehe den Abschnitt „Vorbereitung
Die Entkalkung im
zur Inbetriebnahme“, „Entkalkung“
Heißwassererzeuger wurde nicht
Der zubereitete Kaffee
und führen Sie diese mehrmals aus.
richtig durchgeführt.
hat einen fremden
Geruch.
Nutzen Sie den frisch gemahlenen
Der Kaffee wird nicht richtig
Kaffee. Bewahren Sie das Gerät an
aufbewahrt.
einem kühlen Ort auf.
Schlagen Sie Milch nur dann auf,
Die Temperatur des austretenden
wenn die Anzeige (15) aufl euchtet.
Dampfes ist zu niedrig.
Um Milch zu schlagen, nutzen Sie
Der Dampf schlägt Milch
Der Behälter ist zu groß oder
enges und hohes Geschirr.
nicht auf.
passt nicht.
Sie haben entrahmte Milch
Nutzen Sie nur Vollmilch mit 4%
genutzt.
Fett.
DAS GERÄT IST NUR FÜR DEN GEBRAUCH IM HAUSHALT GEEIGNET
Enthält keine ersetzbaren Teile.
Technische Eigenschaften
Stromversorgung: 230 V ~ 50 Hz
Leistungsaufnahme: 1050 W
Der Hersteller behält sich das Recht vor die Charakteristiken des Gerätes ohne Vorbescheid
zu ändern.
Betriebslebensdauer des Geräts – 5 Jahre
Gewährleistung
Ausführliche Bedingungen der Gewährleistung kann man beim Dealer, der diese Geräte
verkauft hat, bekommen. Bei beliebiger Anspruchserhebung soll man während der
Laufzeit der vorliegenden Gewährleistung den Check oder die Quittung über den Ankauf
vorzulegen.
Das vorliegende Produkt entspricht den Forderungen der elektromagnetischen
Verträglichkeit, die in 89/336/EWG -Richtlinie des Rates und den Vorschriften
73/23/EWG über die Niederspannungsgeräte vorgesehen sind.
15
1511.indd 151511.indd 15 03.02.2010 15:36:1703.02.2010 15:36:17

РУССКИЙ
КОФЕВАРКА ЭСПРЕССО/КАПУЧИНО
тесь, что все съемные детали установ-
лены правильно.
ОПИСАНИЕ
• Не дотрагивайтесь до горячих частей и
1 – Корпус кофеварки
поверхностей кофеварки.
2 – Крышка емкости для воды
• Соблюдайте осторожность во время
3 – Съемная емкость для воды
работы с выходящим паром.
4 – Площадка для подогрева чашек
• Запрещается снимать держатель
5 – Ручка регулятора подачи пара
фильтра во время работы кофеварки.
6 – Фильтр для кофе
• Выпустите пар из трубки-капучинатора
7 – Трубка-капучинатор с наконечником
перед снятием держателя фильтра.
8 – Ручка держателя фильтра
• Устанавливайте устройство на ровную
9 – Поддон для капель
устойчивую поверхность.
10 – Крышка поддона
• Не оставляйте работающий прибор без
11 – Фиксатор фильтра
присмотра, будьте особенно внима-
12 – Держатель фильтра
тельны, если поблизости от работаю-
13 – Кнопка подачи воды
щего прибора находятся дети или лица
14 – Кнопка подачи пара
с ограниченными возможностями.
15 – Индикатор готовности
• Во избежание пожара, удара электри-
16 – Индикатор включения питания
ческим током или физических повреж-
17 – Кнопка включения/выключения
дений не погружайте вилку сетевого
(ON/OFF)
шнура, сетевой шнур или корпус кофе-
18 – Мерная ложка с уплотнителем мо-
варки в воду или другие жидкости.
лотого кофе
• Всегда отключайте кофеварку от элек-
трической сети, когда она не использу-
ВАЖНЫЕ МЕРЫ
ется, или перед чисткой.
ПРЕДОСТОРОЖНОСТИ
• Для отключения кофеварки от сети ус-
При пользовании электрическими при-
тановите все кнопки управления в вы-
борами необходимо всегда соблюдать
ключенное положение, а затем выньте
основные меры предосторожности, в
сетевую вилку из розетки.
том числе:
• Следите за тем, чтобы сетевой шнур
• Внимательно прочитайте все инструк-
не свешивался над краем стола и не
ции.
соприкасался с горячими поверхнос-
• Используйте кофеварку только по ее
тями.
прямому назначению.
• Не ставьте кофеварку на горячие по-
• Убедитесь, что напряжение электричес-
верхности.
кой сети соответствует напряжению,
• Не пользуйтесь кофеваркой с повреж-
указанному на корпусе устройства.
денной вилкой сетевого шнура, пов-
• Используйте сетевую розетку с надеж-
режденным сетевым шнуром, в случае
ным контактом заземления.
ее неправильной работы или после
• Во избежание риска возникновения
любых повреждений.
пожара не используйте переходники
• Запрещается самостоятельно ремон-
при подключении прибора к электри-
тировать кофеварку. Для ремонта об-
ческой розетке.
ратитесь в ближайший авторизован-
• Не включайте кофеварку без воды.
ный сервисный центр.
• Используйте только принадлежности,
• Не используйте кофеварку вне поме-
входящие в комплект поставки.
щений.
• Перед включением кофеварки убеди-
16
1511.indd 161511.indd 16 03.02.2010 15:36:1703.02.2010 15:36:17

РУССКИЙ
• Никогда не оставляйте кофеварку в
• Вставьте вилку сетевого шнура в ро-
местах с температурой ниже 0°C.
зетку.
• Только для домашнего использова-
• Включите кофеварку нажатием кнопки
ния.
ON/OFF (17), при этом загорится инди-
• Данное устройство не предназначено
катор (16).
для использования детьми и людьми с
• Для заполнения водой бойлера на-
ограниченными возможностями, если
жмите кнопку (13) через 15-20 секунд
только им не даны соответствующие и
или при первых признаках появления
понятные им инструкции о безопасном
воды в чашке, выключите подачу воды,
пользовании устройством и тех опас-
еще раз нажав на кнопку (13).
ностях, которые могут возникать при
• Дождитесь, когда загорится индика-
его неправильном пользовании лицом,
тор (15), после этого включите подачу
отвечающим за их безопасность.
воды, нажав кнопку (13), после запол-
• Не разрешайте детям использовать
нения чашки водой, еще раз нажмите
устройство в качестве игрушки.
кнопку (13) для выключения подачи
воды, слейте воду из чашки.
СОХРАНИТЕ ЭТУ ИНСТРУКЦИЮ
В зависимости от объема чашки
проведите эту процедура несколько
ПОДГОТОВКА К РАБОТЕ
раз, после этого бойлер будет про-
• Убедитесь, что все кнопки управления
мыт.
(13, 14, 17) находятся в выключенном
положении.
Внимание!
• Убедитесь, что подача пара закрыта,
- Запрещается снимать держатель
для этого поверните ручку (5) по часо-
фильтра (12) при нажатых кнопках (13),
вой стрелке до упора.
(14)
• Перед первым использованием кофе-
- Не снимайте держатель фильтра (12)
варки промойте все ее съемные части
сразу же после приготовления кофе,
теплой водой и просушите.
так как внутри фильтра может быть из-
• Перед включением убедитесь, что на-
быточное давление воды и пара, дож-
пряжение электрической сети соот-
дитесь остывания кофеварки.
ветствует напряжению, указанному на
- Для снятия держателя фильтра (12) по-
корпусе устройства.
верните ручку в левую сторону и сни-
• Снимите емкость (3), наполните ее хо-
мите держатель.
лодной водой до отметки MAX и уста-
новите на место.
ПРИГОТОВЛЕНИЕ КОФЕ ЭСПРЕССО
• Вставьте фильтр для кофе (6) в держа-
• Убедитесь, что все кнопки управления
тель (12), совместив выступ на филь-
(13, 14, 17) находятся в выключенном
тре (6) с прорезью в держателе (12) и
положении.
поверните фильтр (6) по/против часо-
• Убедитесь, что подача пара закрыта,
вой стрелке.
для этого поверните ручку (5) по часо-
• Установите держатель фильтра в кофе-
вой стрелке до упора.
варку. Выступы держателя (12) должны
• Снимите емкость (3), наполните ее хо-
совпасть с пазами на бойлере, после
лодной водой до отметки MAX и уста-
чего поверните ручку держателя филь-
новите на место.
тра (8) в правую сторону до упора.
• Вставьте фильтр для кофе (6 или 19) в
• Поставьте подходящую чашку на крыш-
держатель (12), совместив выступ на
ку поддона (10).
фильтре (6) с прорезью в держателе
17
1511.indd 171511.indd 17 03.02.2010 15:36:1703.02.2010 15:36:17

РУССКИЙ
(12) и поверните фильтр (6) по/против
подходящую чашку и слегка приотк-
часовой стрелке.
рыть подачу пара, повернув регуля-
• Насыпьте молотый кофе в фильтр (6):
тор (5) против часовой стрелки, после
2 полные мерные ложки - для приго-
сброса давления в бойлере, снять де-
товления двух чашек кофе и 1 полную
ржатель фильтра (12).
ложку - для приготовления одной чаш-
ки кофе, слегка утрамбуйте молотый
ПРИГОТОВЛЕНИЕ КАПУЧИНО
кофе обратной стороной мерной лож-
Внимание! Опасайтесь ожогов выходя-
ки (18).
щим горячим паром.
• Установите держатель фильтра в кофе-
• Убедитесь, что ручка регулятора пара
варку. Выступы держателя (12) должны
(5) находится в положении «подача
совпасть с пазами на бойлере, после
пара выключена».
чего поверните ручку держателя филь-
• Сварите кофе, как описано в разделе
тра (8) в правую сторону до упора.
«ПРИГОТОВЛЕНИЕ ЭСПРЕССО», в
• Поставьте одну или две чашки на крыш-
чашке, объема которой будет доста-
ку поддона (10).
точно для добавления взбитой пенки
• Вставьте вилку сетевого шнура в ро-
молока или сливок.
зетку.
• Нажмите кнопку подачи пара (14), дож-
• Включите кофеварку нажатием кнопки
дитесь, когда индикатор (15) загорит-
(17) ON/OFF, при этом загорится инди-
ся. Подставьте под трубку-капучина-
катор (16).
тор (7) любую подходящую емкость
• Дождитесь, когда загорится индика-
для сбора воды. Осторожно поверните
тор (15), кофеварка готова для варки
против часовой стрелки ручку подачи
кофе.
пара (5) на четверть оборота для уда-
• Включите подачу воды, нажав кнопку
ления конденсата, оставшегося в па-
(13), следите за процессом наполне-
ровой трубке. После удаления конден-
ния чашки приготовленным кофе, еще
сата закройте подачу пара, повернув
раз нажмите кнопку (13) для выключе-
ручку (5) по часовой стрелке до упора.
ния подачи воды.
• Отключите кофеварку, нажав кнопку
Примечание: из держателя фильтра
(17) ON/OFF, индикатор (16) погаснет.
(12) или из парового сопла может
• Дождитесь остывания кофеварки и
выйти небольшое количество воды
снимите держатель фильтра (12), по-
или пара, это нормальное явление.
вернув ручку в левую сторону. Удалите
остатки молотого кофе и промойте
• Опустите трубку-капучинатор (7) в ста-
фильтр (6).
кан с холодным молоком или сливка-
ми, осторожно поверните ручку регу-
Примечание:
лятора подачи пара (5) против часовой
- Используемые чашки необходимо
стрелки на четверть оборота или боль-
предварительно нагреть, во время на-
ше. Трубка-капучинатор не должна ка-
грева воды в бойлере, установите чаш-
саться дна стакана, иначе выход пара
ки на площадку (4).
будет затруднен, для получения густой
- При экстренной необходимости снятия
пены достаточно несколько секунд.
держателя фильтра, необходимо сни-
• Закройте подачу пара, повернув ручку
зить давление в бойлере, выключить
(5) по часовой стрелке до упора.
кофеварку, нажав кнопку (17) ON/OFF,
• Отключите подачу пара, повторно на-
подставить под трубку-капуччинатор
жав кнопку подачи пара (14).
18
1511.indd 181511.indd 18 03.02.2010 15:36:1703.02.2010 15:36:17

РУССКИЙ
• Отключите кофеварку, нажав кнопку
• Нажмите кнопку подачи пара (14), дож-
(17) ON/OFF, индикатор (16) погаснет.
дитесь, когда индикатор (15) загорит-
ся.
Важно:
• Опустите трубку-капучинатор (7) без
- Важно, чтобы молоко, используемое
пластикового наконечника в чашку c
для приготовления пенки, было све-
напитком, который вы хотите подог-
жим и без консервантов, то есть не так
реть, осторожно поверните ручку регу-
называемое молоко длительного хра-
лятора подачи пара (5) против часовой
нения. Используется обычное цельное
стрелки.
молоко жирностью от 4 до 6%, жир-
• Закройте подачу пара, повернув ручку
ность сливок должна быть не менее
(5) по часовой стрелке до упора.
10%.
• Отключите подачу пара, повторно на-
- Сразу после взбивания молока или
жав кнопку подачи пара (14).
сливок прочистите трубку-капучинатор
• Отключите кофеварку, нажав кнопку
(7) - для этого опустите трубку-капучи-
(17) ON/OFF, индикатор (16) погаснет.
натор (7) в стакан с водой, включите
подачу пара, нажав кнопку (14) и по-
Примечание: из держателя фильтра
верните ручку подачи пара (5) против
(12) или из парового сопла может
часовой стрелки, чтобы выпустить не-
выйти небольшое количество воды
большое количество пара, после этого
или пара, это нормальное явление.
закройте подачу пара и выключите ко-
феварку.
КАК ПОЛУЧИТЬ ХОРОШЕЕ
- Дождитесь остывания кофеварки и
ЭСПРЕССО
снимите наконечник с трубки-капучи-
- Используйте свежемолотый кофе,
натора (7), протрите трубку-капучина-
предназначенный для кофеварок «эс-
тор снаружи влажной мягкой тканью,
прессо».
сам наконечник промойте под струей
- Слегка утрамбовывайте молотый кофе
воды.
в фильтре (6), это можно сделать об-
- При сильном засорении сопла трубки-
ратным концом мерной ложки (18).
капучинатора (7) снимите с трубки кол-
- Крепость получаемого кофе будет за-
пачок, возьмите мерную ложку (18) (на
висеть от качества и степени помола
ложке имеется шестигранное отвер-
кофейных зерен. Если кофе налива-
стие, служащие ключом для отвора-
ется слишком долго, это означает, что
чивания сопла трубки-капучинатора),
кофе очень мелкого помола или слиш-
отверните сопло по часовой стрелке,
ком сильно утрамбован.
промойте сопло и установите его на
место, слегка затянув при помощи
УДАЛЕНИЕ НАКИПИ
мерной ложки (18).
Для эффективной работы кофеварки ре-
Примечание:
комендуется проводить удаление наки-
- Повторное приготовление кофе реко-
пи каждые 2-3 месяца, а при использо-
мендуется производить с интервала-
вании «жесткой» воды, чаще.
ми не менее 5 минут.
1. Убедитесь, что все кнопки управле-
ния (13, 14, 17) находятся в выключен-
ПОДОГРЕВ НАПИТКОВ
ном положении.
Вы можете подогреть напитки, опустив
2. Убедитесь, что подача пара закрыта,
трубку-капучинатор (7) без пластикового
для этого поверните ручку (5) по ча-
наконечника в чашку.
совой стрелке до упора.
19
1511.indd 191511.indd 19 03.02.2010 15:36:1703.02.2010 15:36:17

РУССКИЙ
3. Приготовьте раствор лимонной кис-
стрелки. Соблюдая осторожность,
лоты: 2 чайные ложки на 1 литр воды
поверните ручку регулятора (5) в
и залейте полученный раствор в ре-
положение максимального выхода
зервуар для воды (3). Установите ре-
пара, выпускайте пар приблизитель-
зервуар (3) на место.
но 1 минуту, закройте пар, повер-
4.
Вставьте фильтр для кофе (6) в де-
нув ручку регулятора (5) по часовой
ржатель (12), совместив выступ на
стрелке до упора, выключите подачу
фильтре (6) с прорезью в держателе
пара, нажав кнопку (14).
(12) и поверните фильтр (6) по/про-
13. Выключите кофеварку, нажав кнопку
тив часовой стрелке.
(17). Подождите 10 - 15 минут.
5. Установите держатель фильтра в ко-
14. Выполните пункты 10 и 11 не менее 3
феварку. Выступы держателя (12)
раз.
должны совпасть с пазами на бойле-
15. Повторите очистку каналов выхода
ре, после чего поверните ручку де-
пара, описанную в пункте 12.
ржателя фильтра (8) в правую сторо-
16. С небольшими перерывами, повтори-
ну до упора.
те процедуру очистки бойлера (пункт
6. Поставьте подходящую чашку на
10) до полного окончания раствора
крышку поддона (10).
лимонной кислоты в резервуаре.
7. Вставьте вилку сетевого шнура в ро-
17. Включите кофеварку, нажав кнопку
зетку.
(17) ON/OFF.
8. Включите кофеварку нажатием кноп-
18. Заполните емкость (3) чистой водой
ки ON/OFF (17), при этом загорится
до максимального уровня и вновь вы-
индикатор (16).
полните пункты 10, 12 не менее 3 раз,
9. Нажмите кнопку (13) и наполните во-
не делая 10-15 минутного перерыва.
дой чашку объемом около 100 мл (это
19. Включите кофеварку, нажав кнопку
необходимо для того, чтобы удалить
(17) ON/OFF.
воду из бойлера и заполнить его рас-
твором лимонной кислоты), выклю-
Примечание:
чите подачу воды, еще раз нажав на
- Для удаления накипи можно использо-
кнопку (13).
вать специальные средства для удале-
10. Дождитесь, когда загорится индика-
ния накипи, строго соблюдая инструк-
тор (15), после этого включите подачу
ции по их использованию.
воды, нажав кнопку (13) и наполните
чашку объемом около 100 мл, еще
ЧИСТКА
раз нажмите кнопку (13) для выклю-
- Чистка фильтра (6): фильтр можно по-
чения подачи воды, слейте воду из
мыть в посудомоечной машине. Если
чашки.
отверстия засорены осадком молотого
11 . Через некоторое время повторите
кофе, вы можете почистить их неболь-
процедуру, описанную в пункте 10, и
шой щеткой.
наполните еще раз чашку объемом
- Протирайте корпус кофеварки мягкой
около 100 мл.
влажной тканью. Не используйте ме-
12. Нажмите кнопку подачи пара (14),
таллические щетки и абразивные мо-
дождитесь, когда индикатор (15) за-
ющие средства.
горится. Подставьте под трубку-ка-
- Запрещается погружать корпус кофе-
пучинатор (7) подходящую посуду и
варки в воду или другие жидкости.
приоткройте подачу пара, повернув
- Съемные детали кофеварки промы-
ручку регулятора (5) против часовой
вайте теплой водой с мягким моющим
20
1511.indd 201511.indd 20 03.02.2010 15:36:1703.02.2010 15:36:17


