Vitek VT-5009 SR: instruction
Class: Household, kitchen appliances, electronics and equipment
Type:

Manual for Vitek VT-5009 SR
Table of contents
- WARNINGS
- IMPORTANT SAFETY INSTRUCTIONS
- OPERATION BUTTONS AND PARTS 1. Main Unit (see page 2) 2. Remote Control (see page 3) POWER SUPPLY BASIC OPERA TION
- (C) TV Menu Function Operation BRIGHTNESS Setting: COLOUR Setting: CONTRAST Setting: SHARPNESS Setting: TINT Setting: LANGUAGE Setting: CALENDAR Setting: GAME Playing: Screen Mirror Function:
- Screen Up and Down Function: VIEW MODE Function: SCREEN BLUE BACK Setting SWAP Program Channel function: COPY Function: WEAK SIGNAL Function:
- (5) PRESET TV Program function: AUTO SEARCH Function: SEARCH Function (Manual Search): FINE TUNE Function: BAND Function: PROGRAM Function: SKIP Function: (6) CLOCK Set function SLEEP Function: TIME Function: OFF TIME Function:
- ON TIME Function: ALARM Function: B. TIME (BOOKING TIME) Function: B. PR. (BOOKING PROGRAM) Function: (D) FM Function Operation (1) PRESET FM Program of Radio Function: AUTO SEARCH Function: SEARCH Function: FINE TUNE Function:
- PROGRAM Function: STEREO Function: (2) SYSEM of FM Radio Mode Operation: (3) FUNCTION of FM Radio Mode Operation: (4) Clock Function Operation: (E) AV Mode Operation (F) Remote Control (G) Listen Audio with The Headphone (H) Charge Battery and Battery Operation Function:
- (I) Using Outdoor Antenna
- TROUBLE SHOOTING
- SPECIFICATIONS
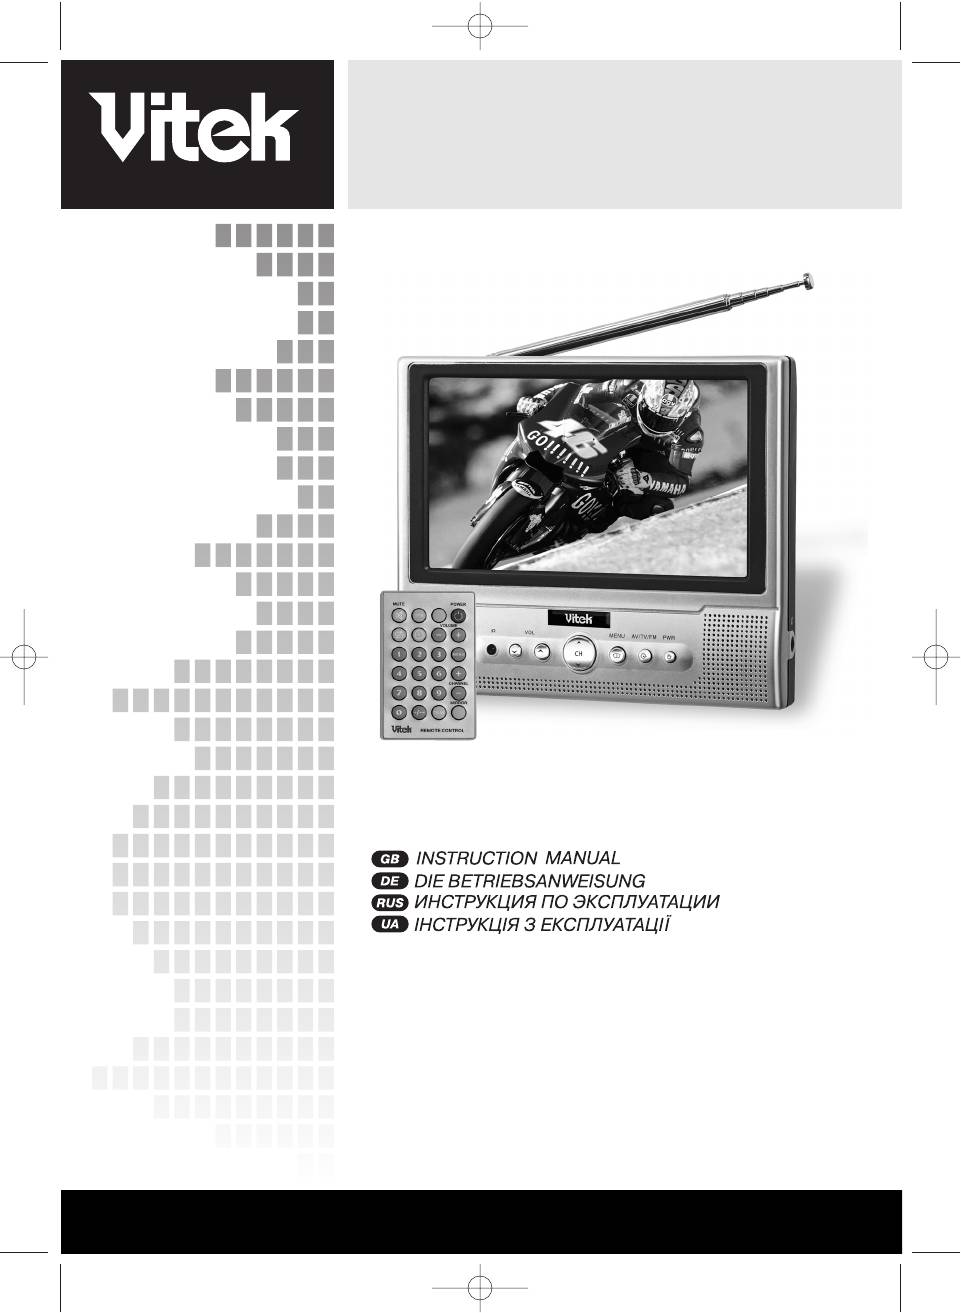
LCD TFT TV 7" with FM radio
MODEL VT5009 SR
INSTRUCTION MANUAL
4
15
26
37
www.vitekaus.com
5009.qxd 29.06.05 14:56 Page 1
2
5009.qxd 29.06.05 14:56 Page 2
3
5009.qxd 29.06.05 14:56 Page 3
ENGLISH
Dear consumer. Thank you for purchasing this TFTLCD colour television. To enjoy the feature of this unit to ensure
safety and years of troublefree operation, please read this manual and follow the instructions contained herein.
Keep it also handy for further future reference.
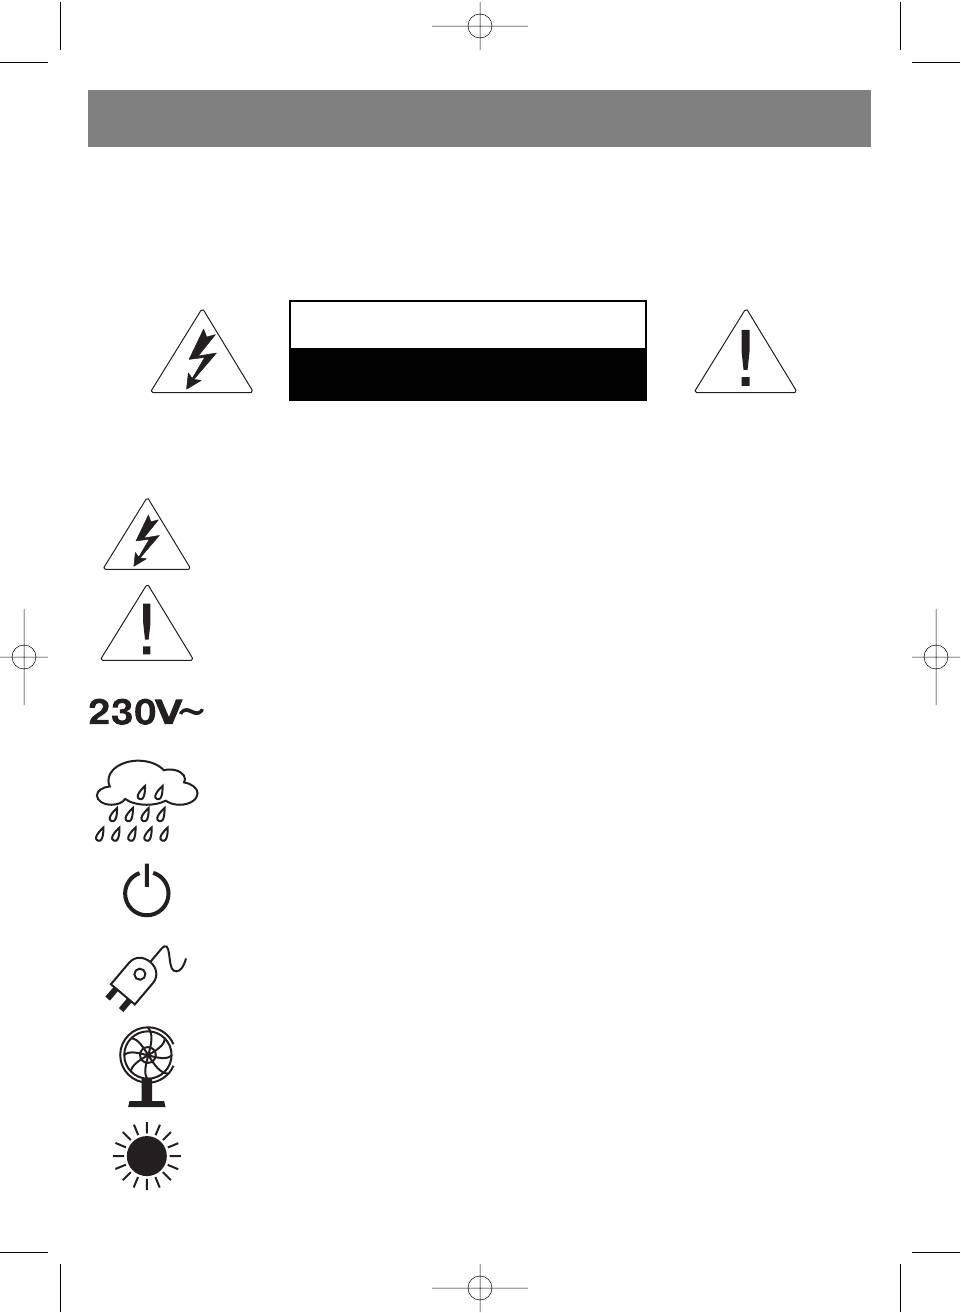
WARNINGS
TO REDUCE THE RISK OF FIRE OR ELECTRIC SHOCK, DO NOT EXPOSE THIS APPLIANCE TO RAIN OR MOISTURE.
CAUTION
RISK OF ELECTRIC SHOCK
DO NOT OPEN
CAUTION: TO REDUCE THE RISK OF ELECTRIC SHOCK, DO NOT REMOVE COVER (OR BACK). NO USERSERVICING TO
QUALIFIED SERVICE PERSONNEL.
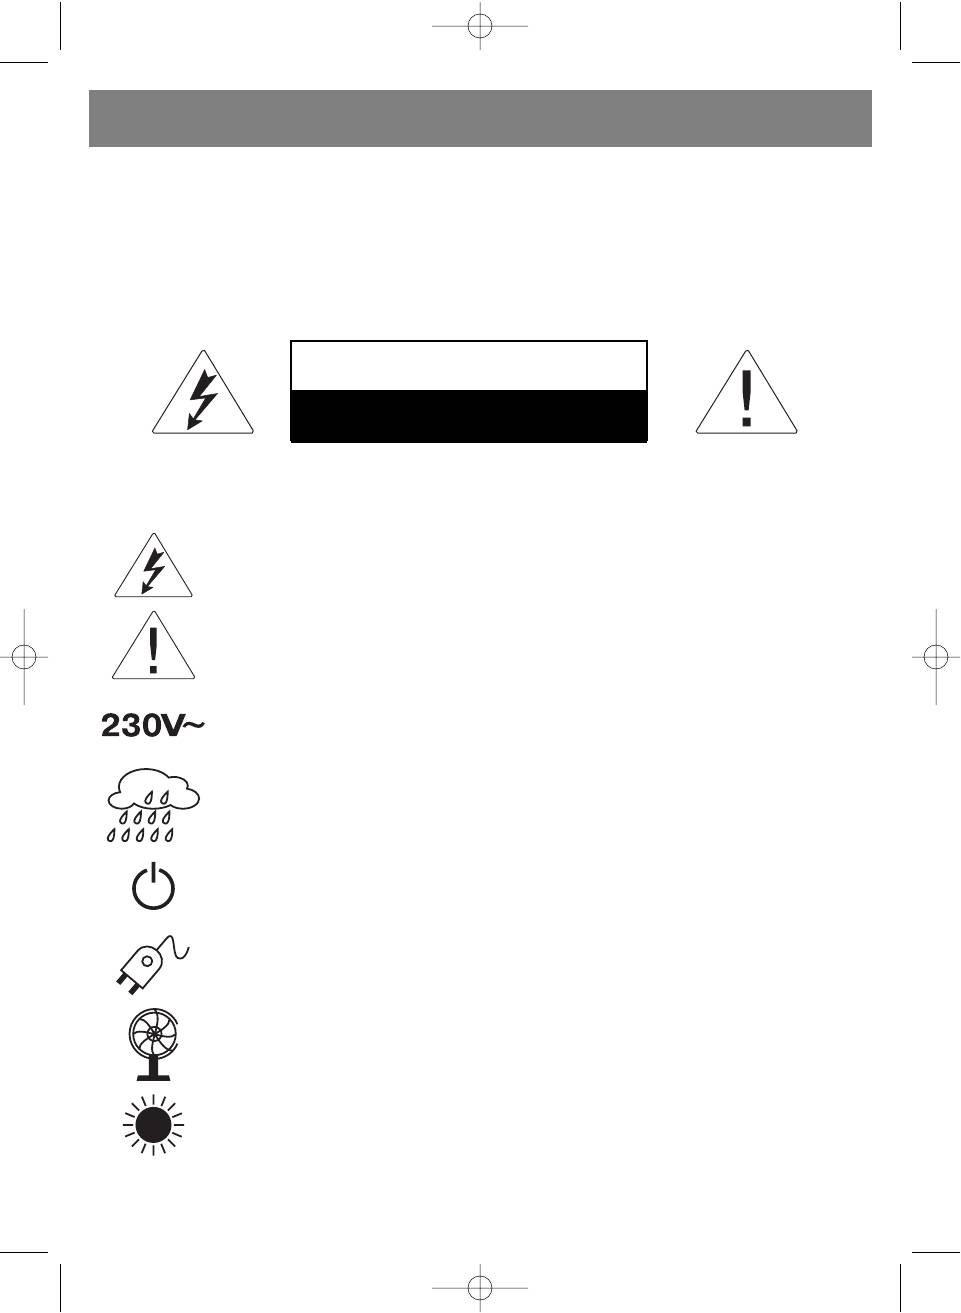
The lightning flash with arrowhead symbol, within an equilateral triangle, is intended to alert the user to
the presence of uninsulated "dangerous voltage" within the product's enclosure that may be of suffi
cient magnitude to constitute a risk of electric shock to persons.
The exclamation point within an equilateral triangle is intended to alert the user to the presence of impor
tant operating and maintenance (servicing) instructions in the literature accompanying the appliance.
This unit operates on 12VDC/230V ~ 50Hz. If the unit is not used for a long period of time, remove the
plug from the AC mains.
This unit must not be exposed to moisture or rain. During heavy rains with lightings unplug TV from
mains.
The power switch in this unit is mounted on the secondary circuit and does not disconnect the whole unit
from the mains in OFF position.
Ensure all connections are properly made before operating the unit.
This unit should be positioned so that it is properly ventilated.
Avoid placing it, for example, close to curtains, on the carpet or in
a builtin installation such as a bookcase.
Do not expose this unit to direct sunlight or heat radiating sources.
4
5009.qxd 29.06.05 14:56 Page 4
ENGLISH
IMPORTANT SAFETY INSTRUCTIONS
READ ALL INSTRUCTIONS BEFORE USING
1. READ INSTRUCTIONS
All the safety and operating instructions should be read before the appliance is operated.
2. RETAIN INSTRUCTIONS
The safety and operating instructions should be retained for future reference.
3. HEED WARNINGS
All warnings on the appliance and in the operating instructions should be adhered to.
4. FOLLOW INSTRUCTIONS
All operating and use instructions should be followed.
5. CARTS AND STANDS
The appliance should be used only with a cart or stand that is recommended by the manufacturer.
6. VENTILATION
The appliance should be situated so that its location or position does not interfere with its proper ventilation. For example,
the appliance should not be situated on a bed, sofa, rug or similar surface that may block the ventilation openings: or
placed in a builtin installation, such as a bookcase or cabinet that may impede the flow of air through the ventilation
openings.
7. POWER SOURCE
The appliance should be connected to a power supply only of the type described in the operating instructions or as
marked on the appliance.
8. MAINTENANCE
Do not open the cabinet and attempt to service the unit by yourself, please contact your agent for maintenance.
9. CLEAN
Do not use thinners or other chemical reagent. Wipe the TV off with a soft cloth if it gets dirty.
10. STORAGE & OPEARATION TEMPERATURE.
Do not storage and operation the unit in high or cold temperature places.
Permissible storage temperatures are within the range of 20°C to +60°C.
Permissible operation temperatures are within the range of 0°C to +40°C.
For safety, the driver should not watch TV or operate the controls during driving. Watching and operating the TV
while driving are prohibited by local law.
Due to TFTLCD Technology some light or dark dots may appear on the LCD. This does not mean the unit is dam
aged.
5
5009.qxd 29.06.05 14:56 Page 5
ENGLISH
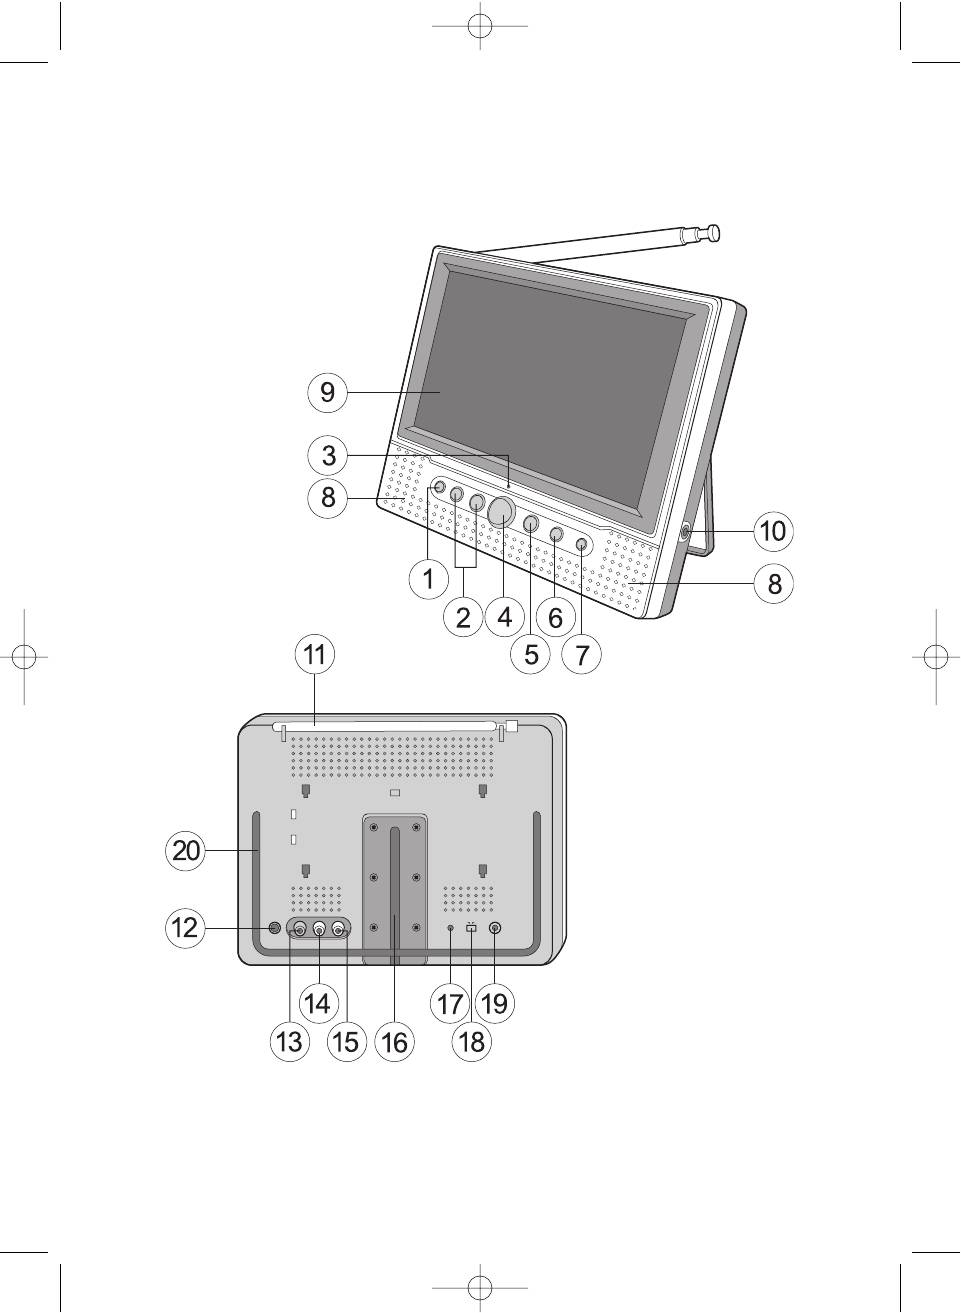
OPERATION BUTTONS AND PARTS
1. Main Unit (see page 2)
2. Remote Control (see page 3)
(1) Remote Sensor
(1) TV Sound System Control button
(2) Volume Up/Down Control buttons
(2) Mute Control button
(3) Power/FM (power save mode) Indicator
(3) Previous Program Control button
(4) Program Up/Down Control buttons
(4) Sleep Timer Control button
(5) Menu Control button
(5) Program Channel Control buttons
(6) TV/AV/FM Control button
(6) Program Digit Control button
(7) Power Control button
(7) View Mode Control button
(8) Right / Left Speaker
(8) Power ON/OFF control button
(9) TFT LCD Screen
(9) Volume Up Control button
(10) Earphone Jack
(10) Volume Down Control button
(11) Rod Antenna
(11) Menu Control button
(12) DC Power Supply Socket
(12) Program Up Control button
(13) Audio Right Channel Socket of AV IN
(13) Program Down Control button
(14) Audio Left Channel Socket of AV IN
(14) Picture Mirror Control button
(15) Video socket of AV IN
(15) TV/AV/FM Mode Control button
(16) Wall Mounting Bracket house
(17) Charge Battery Indicator
(18) Charge Battery Mode switch
(19) External Antenna Socket
(20) Unit Stand
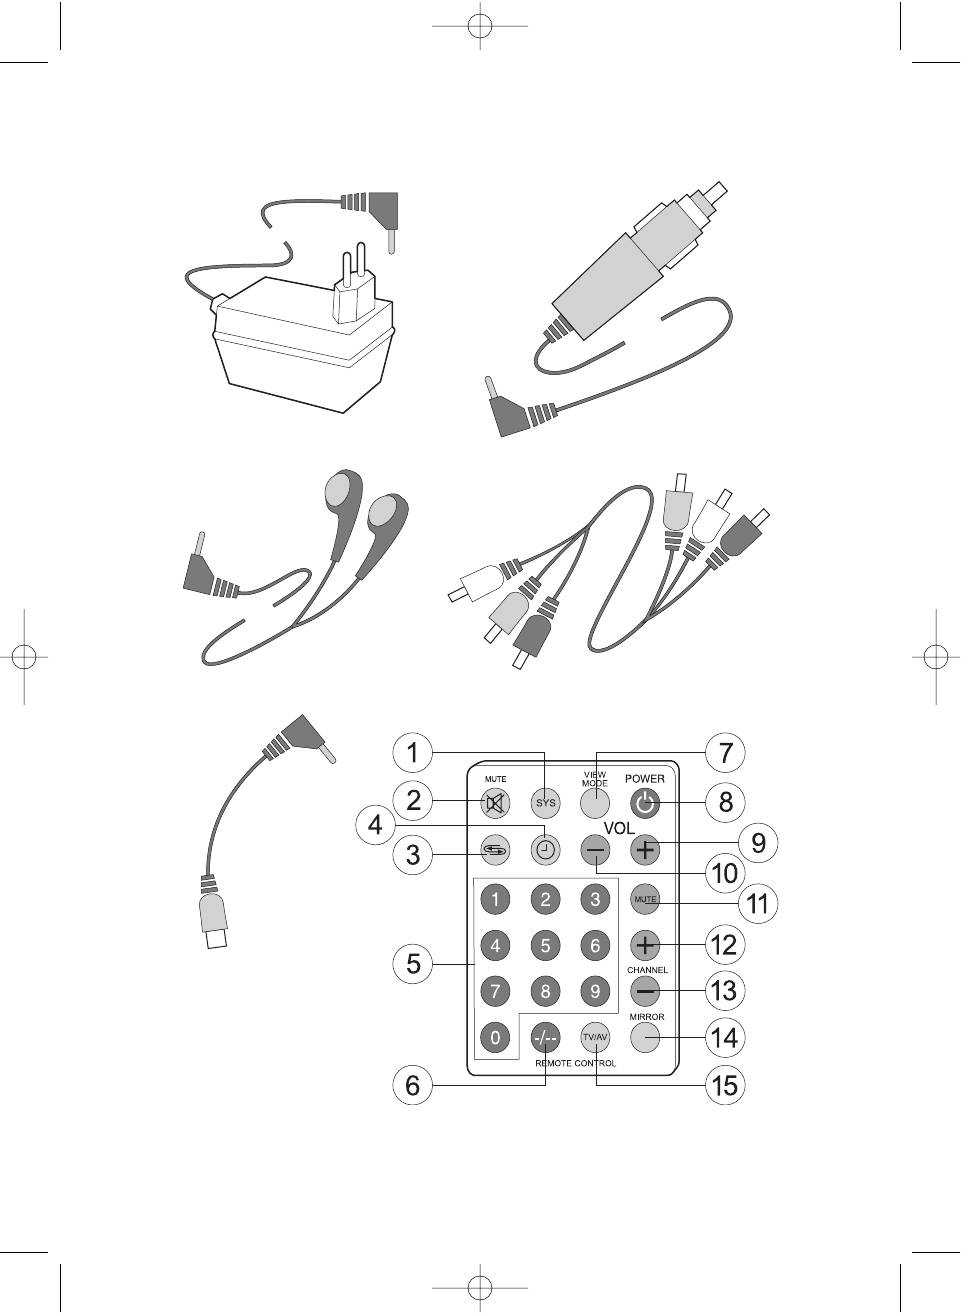
POWER SUPPLY
(1) AC Power:
The optional AC/DC adaptor allows the TV to be operated by household current, (Note: Please look over the symbol of the
AC/DC for correct voltage).
(2) Car Power (DC 12V):
The optional car adaptor (apply to the car with " " polarity connected to the ground) allows the TV to be powered by the car
battery through the vehicle 's cigarette lighter power.
(3) Battery operation:
The unit can be operated by 10 normal or rechargeable batteries (UM3, LR6 Size="AA").
The battery pack allows the rechargeable batteries to be charged for DC operation. Please check correct polarity before
using.
BASIC OPERA
TION
(A) Turning ON/OFF TV
• Press the [POWER ON/OFF] button to turn on the TV.
• Under the condition of being TV off mode, press [CH+] or [CH] button to turn on the TV automatically.
(B) Selecting the TV, AV or FM Mode
• Press [TV/AV/FM] button each to change the mode function from TV to AV and FM. During the mode transfer the audio
signal will be muting.
• For TV use the antenna input and connect to the household TV socket for best reception.
• When using the unit for the first time the TV/Radio stations should be set either by autosearch or manual search (For
details please function setting (3).
6
5009.qxd 29.06.05 14:56 Page 6
ENGLISH
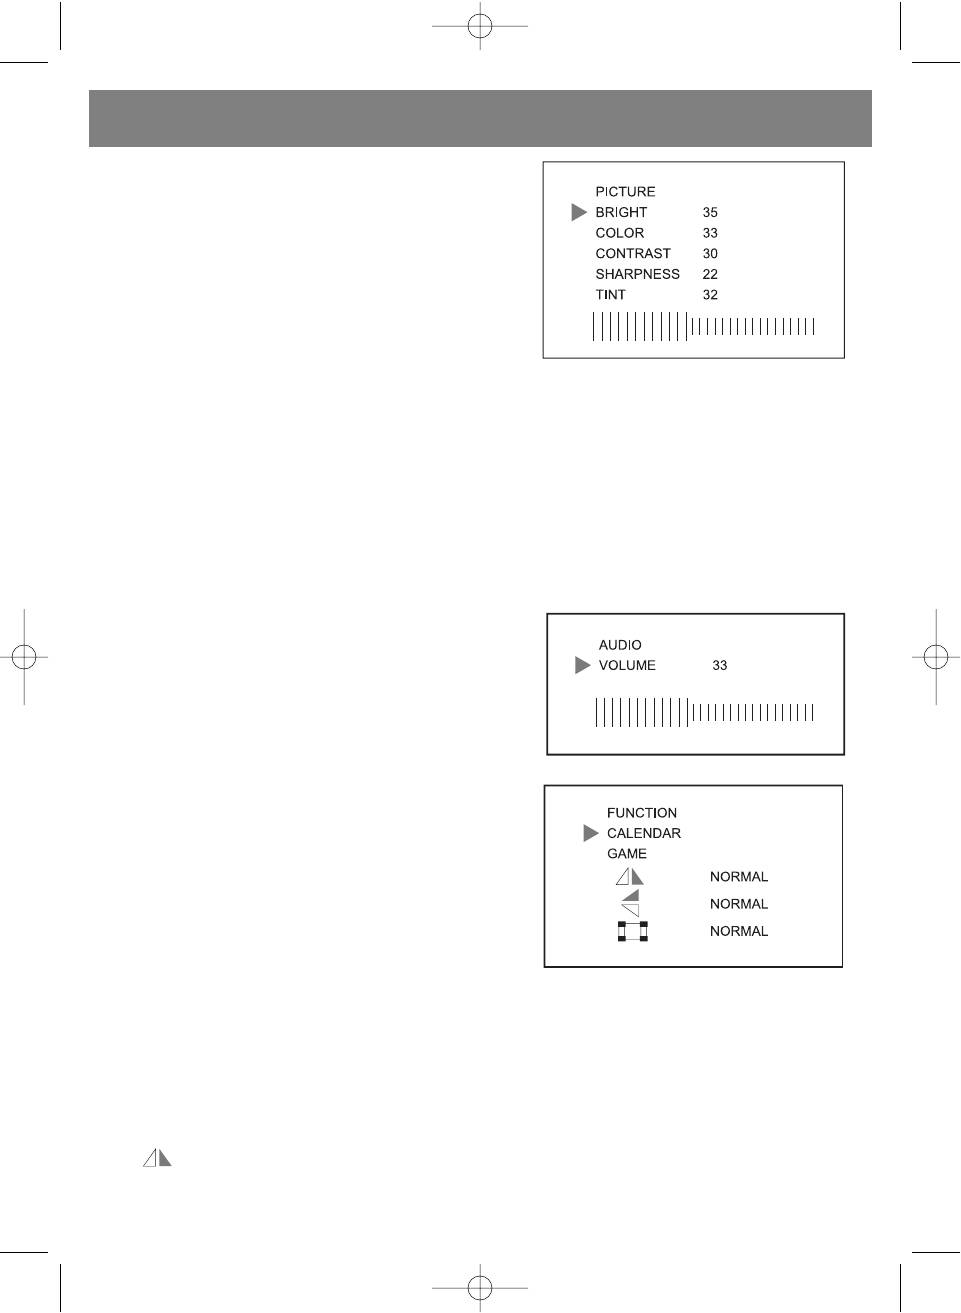
(C) TV Menu Function Operation
(1) Picture setting:
• Press the [MENU] button Picture setting menu will appear.
• Press the [CH+] or [CH] button to select setting.
• Press the [V+] or [V] button to adjust your desired setting level.
BRIGHTNESS Setting:
Press the [V+] or [V] button to adjust your desired brightness level
setting.
COLOUR Setting:
Press the [V+] or [V] button to adjust your desired colour level setting.
CONTRAST Setting:
Press the [V+] or [V] button to adjust your desired contrast level setting.
SHARPNESS Setting:
Press the [V+] or [V] button to adjust your desired sharpness level setting.
TINT Setting:
Press the [V+] or [V] button to adjust your desired tint level setting. (The TINT function is used in NTSC system only)
(2) Audio Level Setting
• Press the [MENU] second times then Audio setting menu will be
shown on the screen. Press or on hold the [V+] or [V] button to
set your desired volume level.
• The volume can also be set with the remote control by pressing
[V+] or [V] button on the remote.
(3) Function Setting
• Press the [MENU] button three times then the Function setting
menu will be shown on the screen.
• Press the [CH+] or [CH] button to select your desired function
setting position.
• Press the [V+] or [V] button to change your desired setting
function shown on the screen:
LANGUAGE Setting:
Press the [V+] or [V] button to your desired language setting.
CALENDAR Setting:
Press the [V+] or [V] button to display your desired year, month and date of calendar.
GAME Playing:
• The Russia Square game is installed in the unit.
• To play game, press the [V+] button to move box right side, press the [V] button to move box left side, press the [CH+] to
change box direction up and down, press the [CH] button to accelerate box movement.
Screen Mirror Function:
• The position is selected on screen, press the [V+] or [V] button to change picture display left to right side and
pressed the button back to normal mode.
7
5009.qxd 29.06.05 14:56 Page 7
ENGLISH
• Further, press MIRROR button of the remote to change the picture mirror mode directly.
Screen Up and Down Function:
• The position is selected on screen, press the [V+] or [V] button to change picture display up to down side and
pressed the button back to normal mode.
VIEW MODE Function:
• The position is selected on screen, press the [V+] or [V] button to change the screen view mode: Normal, 16:9,
Zoom or 4:3 of display format.
• Further, press VIEW MODE button of the remote handset to change the view mode of screen directly.
(4) Video and Audio System Setting:
• Press the [MENU] button four times continuously, then the
screen will show the System menu.
• Press the [CH+] or [CH] button to select your desired setting
item position.
• Press the [V+] or [V] button to change the setting functions and
shown on the screen:
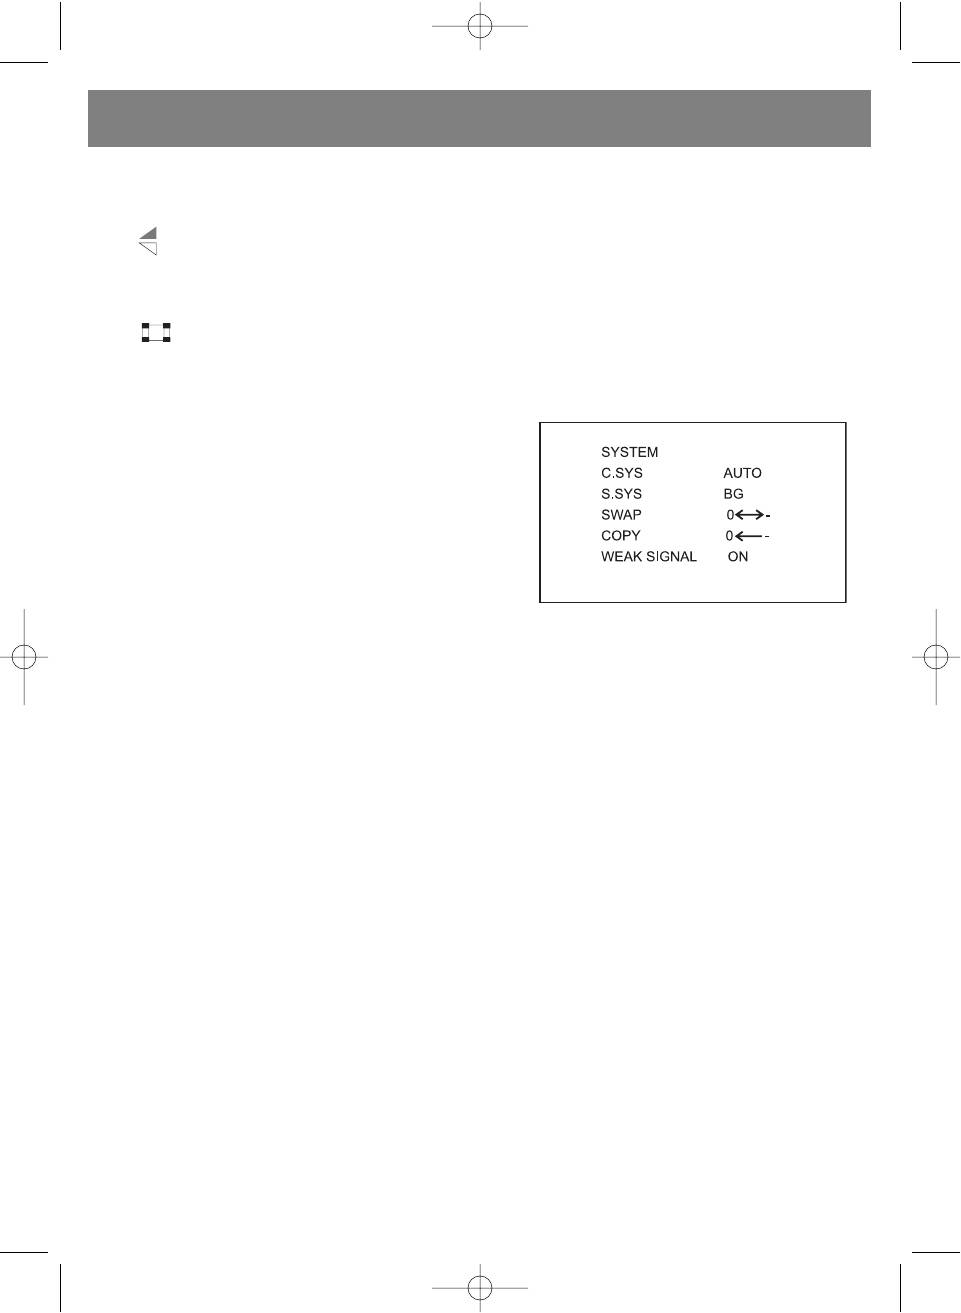
C. SYS. Setting ( Colour System Setting):
The C. SYS setting position is selected on screen, press the [V+] or
[V] button to select your local colour system. The colour system
would be set as following: AUTO, PAL (P4.43), P3.58, N3.58, N4.43,
SECAM. The unit original colour system is set to AUTO system.
S. SYS. Setting (Sound System Setting):
• The S. SYS setting position is selected on screen, press the [V+] or [V] to select the TV sound system position. The TV
sound system can be set to M, B/G, I, D/K of TV audio system.
• Further, by pressing SYS button of the remote handset to change sound system directly.
SCREEN BLUE BACK Setting
The BLUE BACK position is selected on screen, press the [V+] or [V] button to select the BLUE BACK to ON/OFF. If "ON" is
set and the screen will change to blue colour background automatically.
SWAP Program Channel function:
• The SWAP setting position is selected on screen which allows the current program channel to swap to your desired other
program channel.
• Press the [V+] or [V] button to store your desired target program channel (it means the target channel has been selected
with the channel number will be changed to red colour automatically.). Then press the [CH] button to confirm the swap
ping program channel and press the [V+] or [V] to swap the program function.
COPY Function:
• The COPY setting position of screen function allows you to copy current channel number to your desired program channel
memory.
• Press the [V+] or [V] to select up or down the program memory. Then press [CH] to confirm channel number and press
[V+] or [V] to copy the program function.
WEAK SIGNAL Function:
• Normally, the weak signal function has been set to ON. Even the weak signal function would be receiving in best sensitivity.
• In the case of high strength TV signal area, the weak signal should be set to OFF to improve the picture of screen.
In the WEAK SIGNAL setting position of screen, press the [V+] or [V] to set function ON or OFF.
8
5009.qxd 29.06.05 14:56 Page 8
ENGLISH
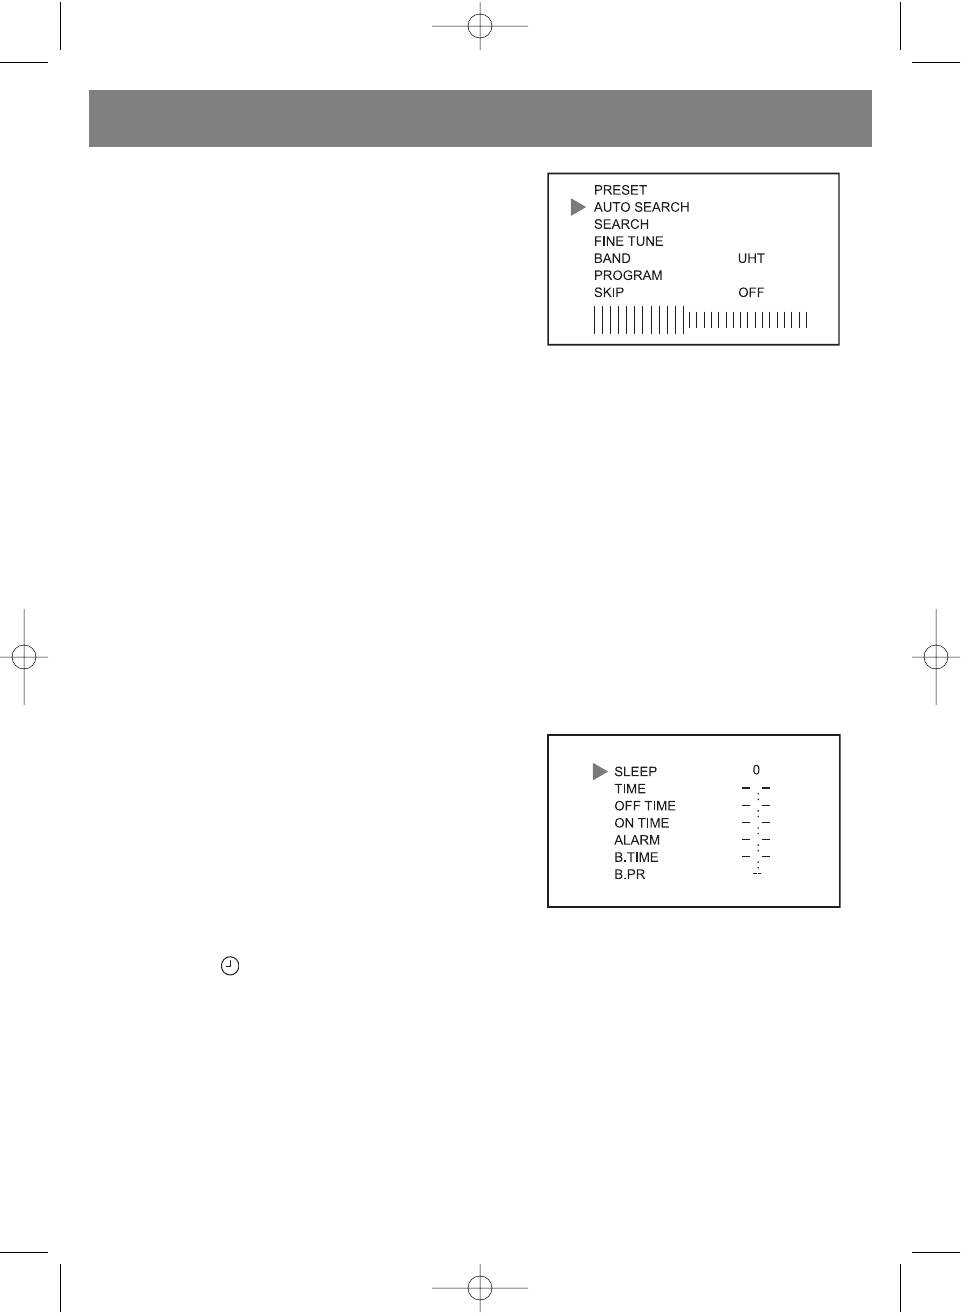
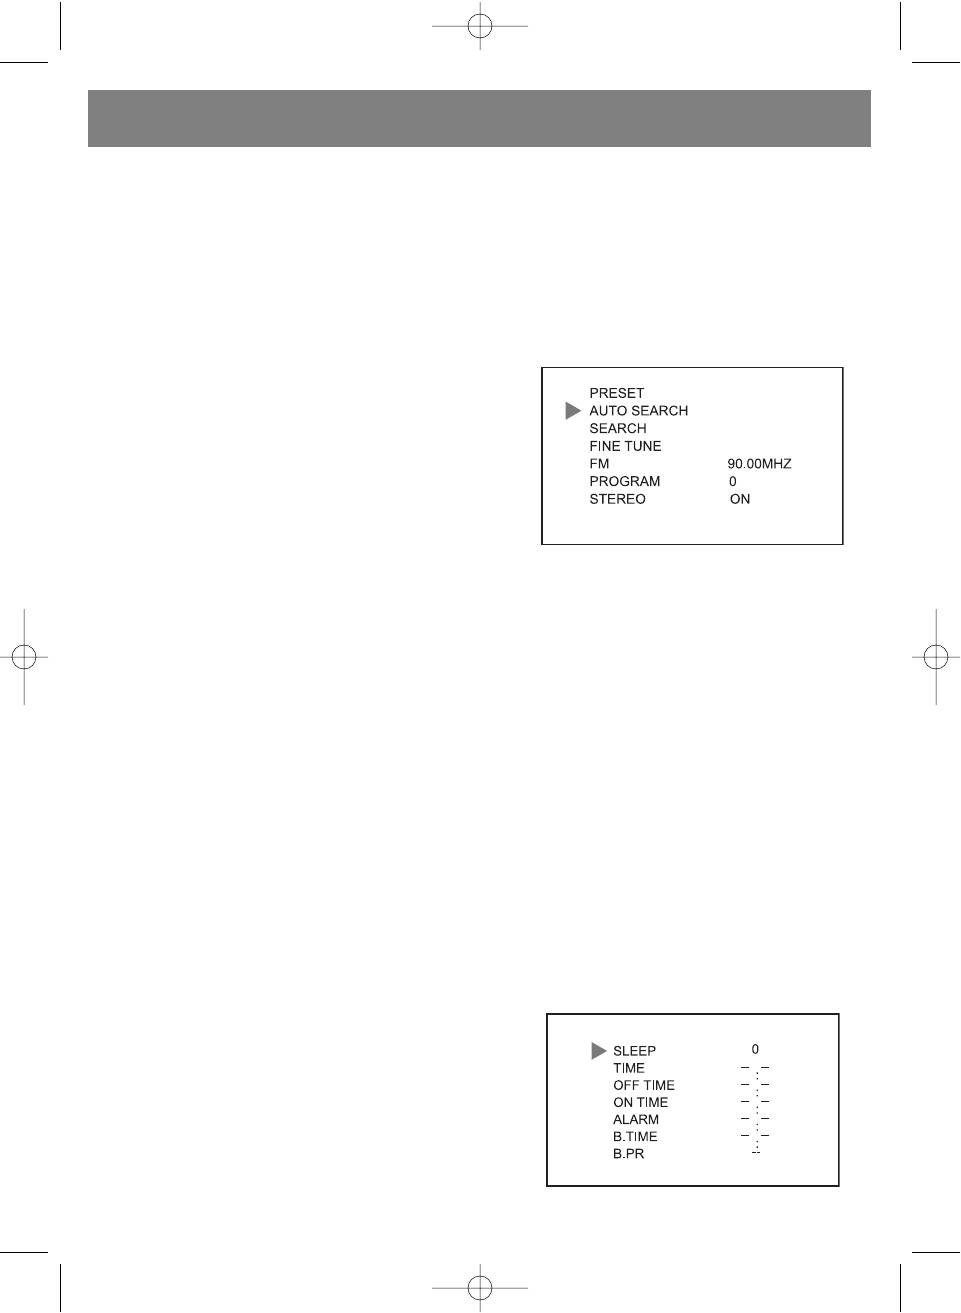
(5) PRESET TV Program function:
• Press the [MENU] button five times continuously then the preset
program setting menu will be shown on the screen.
• Press the [CH+] or [CH] to select your desired function. Then
pressed the [V+] or [V] button to set the item function as fol
lowing:
AUTO SEARCH Function:
AUTO SEARCH position is selected on screen, press [V+] or [V] to
search program with auto search processing. It will search all cur
rent TV program and store them automatically.
SEARCH Function (Manual Search):
SEARCH position is selected on screen, press the [V+] or [V] to search program and store it.
FINE TUNE Function:
The FINE TUNE position is selected on screen, press the [V+] or [V] button to adjust best receiving the program.
BAND Function:
The BAND position is selected on screen, press the [V+] or [V] button to your desired setting band for VHFL, VHFH or UHF
band.
PROGRAM Function:
The PROGRAM position is selected on screen, press the [V+] or [V] button to set up or down the program channel and select
your desired program memory from 0 to 255.
SKIP Function:
The SKIP position is selected on screen, press the [V+] or [V] button to set "ON" and the current program channel memory
will be deleted automatically.
(6) CLOCK Set function
Press the [MENU] button six times continuously then the Clock setting
menu will be shown on the screen.
Press the [CH+] or [CH] button to select your desired function.
Then press the [V+] or [V] button to set the item function.
NOTE: The all time setting will be canceled if the unit lose power supply.
SLEEP Function:
SLEEP position is selected on screen, press the [V+] or [V] button
once the sleep time will be counting up or down 10 minutes and the maximum sleep setting timer for 240 minutes.
Further, by pressing button of the remote handset to count up the sleep timer directly.
NOTE: When power off sleep timer setting would be reset.
TIME Function:
• TIME position is selected on screen, press the [V+] button to tune up the minute and pressed the [V] button to tune up
the hour to set real clock.
• In normal mode. When pressed the [V+] or [V] button clock will be display on the screen for 10 seconds automatically.
OFF TIME Function:
• OFF TIME position is selected on screen, press the [V+] button to tune up the minute and press the [V] button to tune up
the hour to set the off time.
• Then the unit will be counting down until the setting count to zero and the unit will be turned off automatically.
9
5009.qxd 29.06.05 14:56 Page 9
ENGLISH
NOTE: If the clock is not set before, the time off function will not set. When power off all clock and timer setting would be
reset.
ON TIME Function:
• ON TIME position is selected on screen, press the [V+] button to tune up the minute and press the [V] button to tune up
the hour to set the on time.
• Then the unit will be counting up until the setting time to count real clock and the unit will be tune on automatically.
NOTE: If the clock is not set, then the on time function will not set.
ALARM Function:
• ALARM position is selected on screen, press the [V+] button to tune up the minute and press the [V] button to tune up
hour the alarm time will set.
• The unit will be counting up the setting until the setting time to count real clock and will display the "ALARM" symbol on
screen automatically. If no any key is pressed within10 minutes, it will jump out of this function and the symbol will disap
pear automatically.
NOTE: If the clock is not set, then the alarm timer function will not set. When power off the alarm timer setting would be
reset.
B. TIME (BOOKING TIME) Function:
• B. TIME position is selected on screen, press the [V+] button to tune up the minute and press the [V] button to tune up
the hour setting the booking time.
• Then unit will be counting up until the setting count real clock and the unit will jump to your booking program automatically
during tune on the TV.
B. PR. (BOOKING PROGRAM) Function:
B. PR position is selected on screen, press [V+] or [V] button to set your desired booking program setting.
NOTE: If the clock or booking time is not set, then the booking time and booking program function will not set.
(D) FM Function Operation
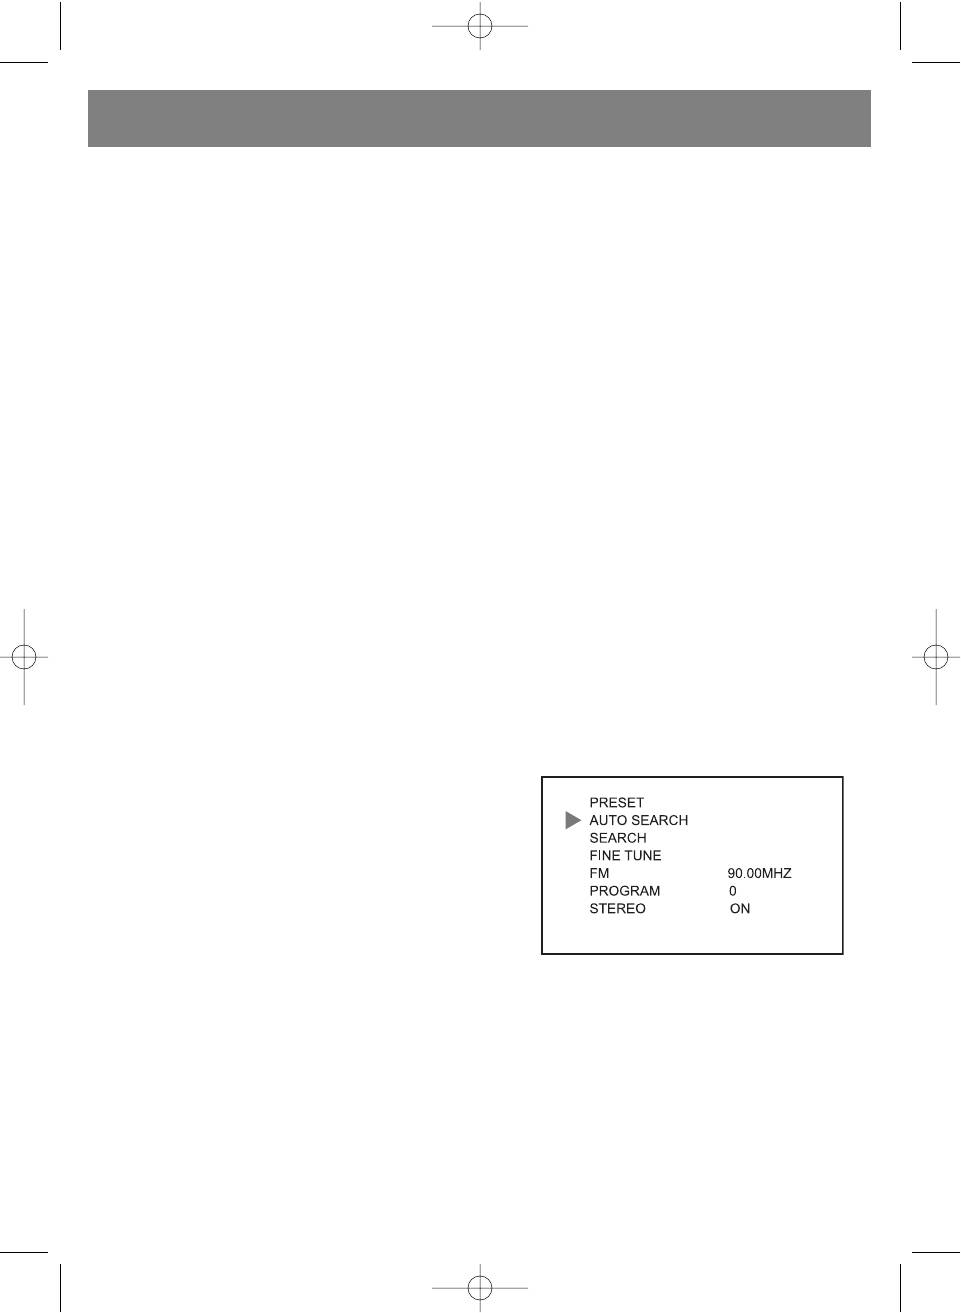
(1) PRESET FM Program of Radio Function:
• Press the [TV/AV/FM] button to show the FM logo on screen,
then press [MENU] button once and the FM Preset program set
ting menu will be shown on the screen.
• Press [CH+] or [CH] to select your desired recommend func
tion. Then press [V+] or [V] button to set the item function:
AUTO SEARCH Function:
AUTO SEARCH position is selected on screen, press the [V+] or [V]
button to search program with automatic search processing. It would search all the currently FM program and store them
automatically.
SEARCH Function:
SEARCH position is selected on screen, press the [V+] or [V] to search near program and store it automatically.
FINE TUNE Function:
FINE TUNE position is selected on screen, press the [CH+] or [CH] button, then press [V+] or [V] button to adjust and
improve the program reception.
10
5009.qxd 29.06.05 14:56 Page 10
ENGLISH
PROGRAM Function:
PROGRAM position is selected on screen, press the [V+] or [V] button to set up or down the program channel and select
your desired program from 0 to 99.
STEREO Function:
STEREO position is selected on screen, press [V+] or [V] button to set stereo ON or OFF mode. Normally the stereo function
is set to "ON" state.
(2) SYSEM of FM Radio Mode Operation:
Refer to section (4) TV SYSTEM operation and detail about SWAP and COPY function. C. SYS., S. SYS., WEAK SIGNAL func
tions will disappear on the menu of screen.
(3) FUNCTION of FM Radio Mode Operation:
Refer to section (3) TV FUNCTION system operation about the detail.
(4) Clock Function Operation:
Refer to section (6) CLOCK system operation about the detail.
(E) AV Mode Operation
• When you want to watch other source device with AVIN and connect the source signal to the unit and yellow colour jack
connect to video signal, Red colour jack connect to Audio Right channel, White colour jack connect to audio left channel.
• Press the [TV/AV/FM] button to select AV channel on screen. Then you can watch the video picture
NOTE: In AV mode. The PRESERT, S. SYS., SWAP, COPY, WEAK SIGNAL setting menu will disappear on the screen.
(F) Remote Control
• In the remote handset, press the MUTE button to temporary silences audio output, and press button again back to normal
state.
• Press the button to alternate between previous and current program.
• Press the / button to set direct key digit number 1, 2 or 3.
• Press the digit button 0 9 it will tune your desired program directly.
(G) Listen Audio with The Headphone
Plug the earphone into the earphone socket and it will cut off speaker signal automatically.
(H) Charge Battery and Battery Operation Function:
• Insert the rechargeable batteries into battery case (UM3, LR6, size= "AA" x 10 pcs) and install the case to main unit, Then
plug AC/DC adaptor power or Car power source into the main unit.
• Switch the battery mode to "Charge" position then it will charge up battery automatically and charge indicator light will be
on.
• If used the battery power set the battery mode switch at "Power" position and release the plug of AC/DC adaptor or Car
power.
Warning: Do not use NONRECHARGEABLE Batteries to charge. The batteries will explode and damage the unit.
Caution: DO NOT charge continuously for over 24 hours, as it will deteriorate the performance of the rechargeable
batteries.
NOTE: If rechargeable batteries are being charged for the first time, it will take approximately 15 hours to be full charged.
If the operating time is reduced drastically even when the rechargeable batteries are properly recharged replace a
new set of rechargeable batteries.
11
5009.qxd 29.06.05 14:56 Page 11
ENGLISH
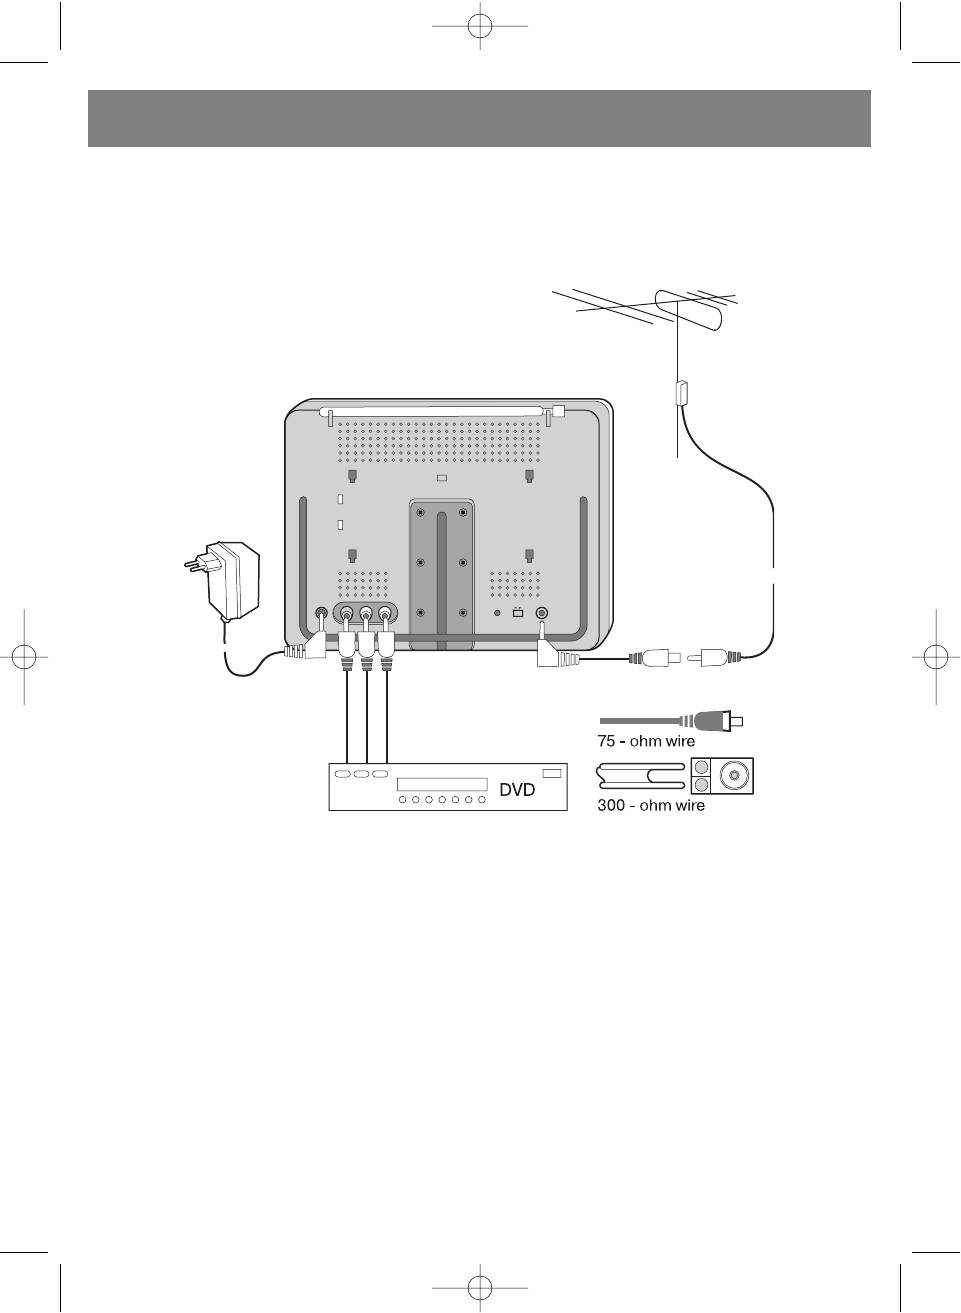
(I) Using Outdoor Antenna
In the case when TV signal are too weak with the rod antenna, connect to outdoor antenna with 3.5mm jack to 75 OHM anten
na jack adaptor as figure shown:
12
5009.qxd 29.06.05 14:56 Page 12
ENGLISH
TROUBLE SHOOTING
The following conditions do not necessary mean that the TV is broken. Please check the causes as indicated below request
ing that the TV be serviced.
Condition Cause
Dead batteries pack or is not properly connected.
AC adaptor is not properly connected.
No sound and picture
Unauthorized power supply being used.
The TV/AV is not selected properly.
The program is not tuned properly.
Resetting the broadcast program.
No picture
The S. SYS is not selected or matched video system
properly.
The volume level is set to minimum.
The earphone is plugged in to the unit.
No sound
Poor signal reception due to sound is muting automatically.
The S. SYS. is not selected and audio system properly.
The audio signal is muting.
The antenna is not adjusted to best direction or not connect
ed to out door antenna properly.
Poor reception
The program channel is not tuned up properly.
The S. SYS. is not selected or matched to system properly.
Poor brightness of screen The brightness and contrast is not set to the best level.
The broadcast signal may be too weak.
The screen not good or clear reception
The antenna is not adjusted to best direction properly.
The weak signal is set off.
You may be receiving electronic interference from car train
Snow on the screen
engines, and High voltage wires or neon signs cross it.
The colour system is not set to match video system.
Poor color
The signal is too weak and color system is not working.
The batteries lose power.
Remote controller doesn't work
The sharp rays interference the remote reception.
13
5009.qxd 29.06.05 14:56 Page 13
ENGLISH
SPECIFICATIONS
Type: TFT LCD Color Television
Reception Frequencies: TV: 45.25MHz 863.25MHz
FM:87.5MHz 108MHz
Clock Accuracy: +/6 Seconds/Day
Video and Audio System: Please refer to the rating label
Display Element: Colour TFT LCD 1440 X 234 elements of pixel
Screen Size: 7 inches
Audio Output: 250mW(Max) X2 (16 OHM)
Speaker size: 20mm x 40mm square speaker
LCD Back Light: high luminance fluorescent light tube
Connection Terminals:
External antenna 3.5mm socket
Stereo earphone 3.5mm socket
External power socket (DC 12V)
AV (Audio/Video) input socket (RCA)
Power Supply: 3 ways power supply system
AC/DC Adaptor
Car batteries car adaptor
Batteries batteries pack
Power consumption: Approx. 10W
Main Unit Dimension: 190mm (W) x 160mm(H) x 48mm (D)
Main Unit Weight: Approx. 680g
ACCESSORY WITH TV
AC/DC Adaptor, D3.5mm to 75 OHM Antenna Adaptor cable,
Remote Control unit, Battery Case, Car Adaptor, Stereo Earphone,
AV set cable (RCA to RCA cable), Wall mounting Stand, Leather Case.
The manufacture reserves the right to change the product specifications without prior notice of the users.
Service life of the unit is not less then 5 years
Guarantee
Details regarding guarantee conditions can be obtained from the dealer from whom the appliance was pur
chased. The bill of sale or receipt must be produced when making any claim under the terms of this guaran
tee.
This product conforms to the EMCRequirements as laid down by the Council Directive
89/336/EEC and to the Low Voltage Regulation (23/73 EEC)
14
5009.qxd 29.06.05 14:56 Page 14
DEUTSCH
7” (17.8cm) TFT LCDFARBFERNSEHER/ MONITOR / FM RADIO FUNKTION/
Sehr geehrter Käufer! Wir bedanken uns herzlich für Ihre Wahl. Wir garantieren Ihnen Sicherheit und Qualität der
Produktion unter Folgen den Anforderungen der Bedienungsanleitung. Um richtigen Betrieb des Geräts zu gewähren,
lesen Sie bitte die Bedienungsanleitung gewissenhaft durch und bewahren Sie sie für weiteren Gebrauch auf.
WARNUNG
Um den Brand oder den Stromschlag zu vermeiden, lassen Sie bitte den Fernseher nie beim Regen oder bei erhöhter
Feuchtigkeit stehen.
CAUTION
RISK OF ELECTRIC SHOCK
DO NOT OPEN
Warnung: Um das Risiko des Stromschlags zu reduzieren, nehmen Sie den Deckel oder die Rückwand nie ab. Die Wartung
muss ausschliesslich vom geschulten Personal durchgeführt werden.
Das Symbol des Dreiecks mit Blitz warnt vor nicht isolierter „gefährlicher Spannung“. Es besteht das
Risiko des Stromschlags.
Das Ausrufzeichen im Dreieck bedeutet, dass es um wichtige Hinweise hinsichtlich der Bedienung in der
vorliegenden Bedienungsanleitung geht.
Für die Spannung des Fernsehers wird der Gleichstrom 12V DC oder der Wechselstrom 230V, 50 Hz ver
wendet. Sollte das Gerät eine längere Zeit nicht gebraucht werden, so schalten Sie den Fernseher vom
Netz ab, indem Sie den Stecker aus der Steckdose herausnehmen.
Es ist verboten, den Fernseher bei erhöhter Feuchtigkeit oder beim Regen zu betreiben. Beim Gewitter
schalten Sie den Fernseher vom Wechselstromnetz ab, indem Sie den Stecker aus der Steckdose her
ausnehmen.
Bei der Position des Netzschalters OFF wird der Fernseher nicht abgeschaltet und verbraucht die
Energie weiter!
Vor dem Einschalten des Ferhsehers vergewissern Sie sich, dass das Gerät korrekt ins Netz eingeschal
tet wurde.
Stellen Sie den Fernseher auf einem durchgelufteten Platz auf, verdichten Sie nicht die
Isolationsöffnungen am Gehäuse. Stellen Sie den Fernseher nicht in der Nähe der Vorhänge, auf dem
Teppich oder in der Blockmöbel auf.
Bewahren Sie den Fernseher vor direkten Sonnenstrahlen und schalten Sie ihn nicht bei erhöhter
Lufttemperatur ein.
15
5009.qxd 29.06.05 14:56 Page 15
DEUTSCH
WICHTIGE SICHERHEITSMASSNAHMEN
LESEN SIE DIESE BEDIENUNGSANLEITUNG VOR DEM GEBRAUCH DES GERÄTS GEWISSENHAFT DURCH.
1. Um richtigen Betrieb des Geräts zu gewähren, lesen Sie bitte die Bedienungsanleitung gewissenhaft durch.
2. Bewahren Sie diese Bedienungsanleitung für weiteren Gebrauch auf.
3. Folgen sie allen Warnungen, die auf dem Gerät oder in der Bedienungsanleitung angegeben sind.
4. Folgen Sie allen Anforderungen der vorliegenden Bedienungsanleitung.
5. Diese Gerät darf nur mit dem Befestigungszubehör gebraucht werden, welches vom Hersteller empfohlen ist.
6. Stellen Sie den Fernseher auf einem durchgelufteten Platz auf, verdichten Sie nicht die Isolationsöffnungen am Gehäuse.
Stellen Sie den Fernseher nicht in der Nähe der Vorhänge, auf dem Teppich, auf dem Bett oder in der Blockmöbe auf. Bei
der Aufstellung des Fernseher in der Blockmöbel muss ein Abstand gewährt werden, nicht weniger als 15 cm von der
oberen, hinteren und den seitlichen Oberflächen des Gehäuses des Fernsehers.
7. Dieses Gerät funktioniert nur von der Speisungsquelle, die auf dem Gerät oder in der Bedienungsanleitung angegeben
ist.
8. Versuchen Sie nicht, den Fernseher bei dessen Störung selbstständig zu reparieren. Sollte beim Betrieb des Fernsehers
seltsame Sachen vorkommen, schalten Sie den Fernseher vom Netz ab und wenden Sie sich an qualifizierten Fachmann
des ServiceCenters.
9. Verwenden Sie keine flüssigen Mittel, Sprays und abrasiven Reinigungsmittel. Für das Reinigen des Fernsehers
gebrauchen Sie etwas feuchten weichen Stoff ohne Strich.
10. Es ist verboten, das Gerät bei zu hoher und zu niedriger Temperatur zu betreiben. Der Temperaturbereich für die
Aufbewahrung des Fernsehers ist von 20°C bis +60°C. Der Temperaturbereich des Betriebs des Fernsehers ist von 0°C
bis +40°C.
Zwecks seiner eigenen Sicherheit ist es dem Fahrer verboten, den Fernseher zu schauen oder seine
Funktionen zu steuern. In mehreren Ländern ist der Betrieb des Fernsehers beim Fahren verboten.
Die Technologie LCDTFT lässt das Erscheinen von einigen hellen oder dunklen Punkten auf dem Bildschirm
des Fernsehers zu. Solche Fernseher sind nicht defekt.
16
5009.qxd 29.06.05 14:56 Page 16
DEUTSCH
STEUERUNGSEINHEITEN
1. Beschreibung des Fernsehers (seite 2)
2. Fernbedienung (seite 3)
1. Indikator der Fernbedienung
1. Taste der Wahl des Tonsystems des Fernsehers.
2. Tasten der Regulierung der Tonstärke
2. Taste der Ausschaltung des Tons.
(reduzieren/erhöhen)
3. Taste der Rückkehr zu vorangehendem Programm.
3. Indikator der Speisung /FM (im Energiesparregime)
4. Taste der Einstellung des Timers „Schlaf“.
4. Tasten der Steuerung von Kanälen (die Kanalnummer
5. Tasten der Wahl der Programmnummer.
vergrössern/die Kanalnummer reduzieren).
6. Taste der direkten Wahl der ein, zwei oder dreistelligen
5. MenüTaste
Programm nummer.
6. Steuerungstaste TV / AV / FM.
7. Taste der Wahl des Bildregimes.
7. Steuerungstaste der Speisung.
8. Taste der Ein und Ausschaltung der Speisung.
8. Lautsprecher des Fernsehers (linker und rechter).
9. Taste des Reduzierens des Tons.
9. TFT LCD Bildschirm.
10. Taste des Erhöhens des Tons.
10. Konnektor der Kopfhörer.
11. MenüTaste
11. Antenne.
12. Taste der Umschaltung der Kanäle zunehmend.
12. Konnektor für den Anschluss der Speisung des
13. Taste der Umschaltung der Kanäle abnehmend.
Gleichstroms
14. Taste der Spiegelumwandlung des Bilds.
13. Rechter Audioeingang AV IN.
15. Taste der Steuerung der TV / AV / FM Regime.
14. Linker Audioeingang AV IN.
15. Videoeingang AV IN.
16. Zubehör für die Befestigung des Fernsehers an die
Wand.
17. Indikator der Ladung der Batterien.
18. Einschalten der Ladung der Batterien
19. Konnektor für den Anschluss der äusseren Antenne.
20. Gestell für den Fernseher.
SPEISUNG
1. Speisung vom Wechselstromnetz:
Der im Lieferumfang vorhandene AC/DC Adapter ermöglicht, den Fernseher ans Hausnetz der Speisung anzuschliessen.
(Bemerkung: vor dem Einschalten vergewissern Sie sich, dass die Spannung der Speisung im Netz korrekt ist).
2. Speisung des Autos (12 V):
Zusätzlicher Wagenadapter (angeschlossen über das Kabel „“ an die Masse des Wagens) ermöglicht, die Speisung an den
Fernseher über den Wagenanraucher anzuschliessen.
3. Speisung mit der Hilfe der Batterien:
Für die Speisung des Fernsehers kann man 10 übliche oder wiederladende Batterien verwenden. (UM3, LR6 “AA”).
Für das Laden der wiederladenden Batterien wird ein spezielles Gerät verwendet. Vor dessen Betrieb überprüfen Sie bitte die
korrekte Polarisierung der Batterien.
HAUPT
OPERATIONEN
1. Einschalten / Ausschalten des Fernsehers
• Für das Einschalten des Fernsehers drücken Sie die Taste der Ein und Ausschaltung.
• Wenn der Fernseher im Warteregime ist, drücken sie die Taste POWER (Speisung) auf der Fernbedienung, die Taste #/ $,
TV / AV oder eine der Zifferntasten, um den Fernseher aus dem Warteregime ins Betriebsregime zu überführen.
2. Wahl des Regimes TV / AV oder FM
• Drücken Sie die Taste (TV / AV / FM) jedes Mal, wenn Sie die Funktion wechseln möchten: TV, AV und FM. Beim Drücken
der Taste wird der Tonsignal abgeschaltet.
17
5009.qxd 29.06.05 14:56 Page 17
DEUTSCH
• Im Regime TV gebrauchen Sie den Eingang der Antenne. Schliessen Sie die äussere Antenne an den Konnektor des
Fernsehers an, um die Qualität des Empfangs besser zu machen.
• Beim Einschalten des Fernsehers zum ersten Mal müssen die TV/Radiosender auf die Autosuche oder manuelle Suche
umgeschaltet werden.
3. Steuerung der Funktionen des Menüs
Einstellung des Bilds
• Drücken Sie die Taste MENU, auf dem Bildschirm erscheint das
Menü der Einstellung des Bilds.
• Drücken Sie die Taste (CH+) oder (CH), um den ensprechen
den Punkt der Einstellung zu wählen.
• Drücken Sie die Taste (V+) oder (V), um die Einstellung des
gewählten Parameters des Menüs durchzuführen.
Regulierung der HELLIGKEIT
Drücken Sie die Taste (V+) oder (V), um alle Einstellungen der Helligkeit bis zu gewünschter Wert zu ändern.
Regulierung der FARBE
Drücken Sie die Taste (V+) oder (V), um alle Einstellungen der Farbe bis zu gewünschter Wert zu ändern.
Regulierung der SCHÄRFE
Drücken Sie die Taste (V+) oder (V), um alle Einstellungen der Schärfe bis zu gewünschter Wert zu ändern.
Regulierung der FARBSÄTTIGUNG
Drücken Sie die Taste (V+) oder (V), um alle Einstellungen der Farbsättigung bis zu gewünschter Wert zu ändern. (Diese
Funktion wird im System NTSC gebraucht).
Regulierung der Tonstärke
• Drücken Sie die Taste MENU (Menü) zweimal, um ins Menü der
Regulierung der Tonstärke einzugehen. Drücken Sie die Taste
V+ oder V, um die Tonstärke zu reduzieren oder höher zu
machen. Auf dem Bildschirm erscheint die Skala:
• Weiter können Sie die Tonstärke einfach durch das Drücken der
Tasten V+ oder V auf der Fernbedienung regulieren.
Menü FUNCTION (Funktionen)
• Drücken Sie die Taste MENU dreimal, um ins Menü Function
einzugehen.
• Das Umschalten zwischen den Menüpunkten erfolgt mit der
Hilfe der Tasten CH+ und CH.
• Mit der Hilfe der Tasten C V+ oder V erfolgt die Einstellung des
gewählten Parameters des Menüs.
Language (Sprache)
Um gewünschte Sprache zu wählen, drücken Sie die Taste V+ oder
V. Danach wird die ganze Information auf dem Bildschirm nur in
der von Ihnen gewählten Sprache abgebildet werden.
CALENDAR (Kalender)
Mit den Tasten CH+ und CH wählen Sie den Menüpunkt CALENDAR. Mit der Hilfe der Tasten V+ und V wählen Sie gewün
schten Monat und gewünschtes Jahr.
18
5009.qxd 29.06.05 14:56 Page 18
DEUTSCH
GAME (Spiel)
• Mit den Tasten CH+ und CH wählen Sie den Menüpunkt GAME. Um das Spiel SQUARE anzufordern, drücken Sie die
Taste V+ oder V.
• Spielregeln. Die Taste V+ dient für die Bewegung nach rechts, die Taste V für die Bewegung nach links. Mit der Hilfe der
Taste CH+ erfolgt das Biegen der Figur, die Taste CH ist für die schnellere Bewegung der Figur nach unten zuständig.
Screen Mirror (Spiegelumwandlung)
Wählen sie mit den Tasten CH+ und CH den Menüpunkt . Mit der Hilfe der Tasten V+ oder V drehen Sie das Bild
spiegelhaft um: der linke Teil wird zum rechten Teil und umgekehrt.
Diese Funktion kann auch mit der Hilfe der Taste der Spiegelumwandlung erfüllt werden.
Screen Up and Down (Umwandlung des Bildes von oben nach unten)
Wählen sie mit den Tasten CH+ und CH den Menüpunkt . Mit der Hilfe der Tasten V+ oder V drehen Sie das Bild um: der
obere Teil wird zum unteren Teil und umgekehrt.
View Mode (Bildformat)
Wählen sie mit den Tasten CH+ und CH den Menüpunkt . Mit der Hilfe der Tasten V+ oder V wählen Sie ein gewünscht
es Bildformat:, 16:9, Zoom oder 4:3. Weiter kann die Einstellung dieser Funktion mit der Taste VIEW MODE auf der
Fernbedienung erfüllt werden.
Menü der Einstellungen Audio und Video System
(Einstellungen)
Drücken Sie MENU viermal, um ins Menü System einzugehen. Auf
dem Bildschirm erscheint folgendes Bild:
BILD
Das Umschalten zwischen den Menüpunkten erfolgt mit der Hilfe
der Tasten CH+ und CH. Mit der Hilfe der Tasten V+ oder V wird
die Wahl des gewählten Parameters des Menüs gemacht.
C.SYS (Wahl des Farbsystems)
Mit den Tasten V+ oder V wählen Sie das Farbsystem aus der folgenden Liste: AUTO, PAL (P4.43), P3.58, N3.58, N4.43,
SECAM. Vorerst ist im Fernsehr das System AUTO eingestellt.
S.SYS (Wahl des Tonsystems)
Mit den Tasten V+ oder V wählen Sie das Tonsystem aus der folgenden Liste: DK, I, M, BG. Weitere Einstellung dieser
Funktion ist mit der Hilfe der Taste SYS auf der Fernbedienung möglich.
BLUE BACK (blauer Farbhintergrund)
Mit den TAsten CH+ und CH wählen Sie den Menüpunkt BLUE BACK. Mit den Tasten V+ oder V wählen Sie den Stand ON
oder OFF. Wenn es auf “ON” steht, wird auf dem Bildschirm automatisch blauer Hintergrund erscheinen.
SWAP (Sortierung der Kanäle)
Mit den Tasten CH+ und CH wählen Sie den Menüpunkt SWAP. Die Funktion SWAP (Sortierung der Kanäle) ermöglicht die
gefundenen Kanäle unter für den Gebraucher bequemen Nummern zu speichern. Gehen Sie in dieses Menü mit der Hilfe der
Tasten CH+ und CH ein, wählen Sie einen Kanal, den Sie unter Ihrer eingenen Nummer speichern möchten (nach der Wahl
des Kanals wechselt die Farbe ihre Nummer auf Rot). Dann geben Sie mit den Tasten V+ oder V die zukünftige Nummer des
Kanals ein. Danach wählen Sie mit den Tasten CH+ und CH den Kanal, der unter dieser Nummer gespeichert ist. Das
Drücken der Taste V+ und V bestätigt die Änderung.
COPY (Kopieren der Signale)
Mit den Tasten CH+ und CH wählen Sie den Menüpunkt COPY. Die Funktion COPY (Kopieren der Signale) ermöglicht, den
19
5009.qxd 29.06.05 14:56 Page 19
DEUTSCH
laufenden Kanal in nötigen Platz zu kopieren. Gehen Sie in dieses Menü mit der Hilfe der Tasten CH+ und CH ein, wählen Sie
einen Kanal, in welchen kopiert wird (nach der Wahl des Kanals wechselt die Farbe ihre Nummer auf Rot) . Weiter geben Sie
mit den Tasten V+ oder V die Nummer des Kanals, den Sie kopieren, ein. Danach wählen Sie mit den Tasten CH+ und CH
den Kanal, der unter dieser Nummer gespeichert ist. Das Drücken der Taste V+ und V bestätigt das Kopieren.
WEAK SIGNAL (System der Geräuschunterdrückung)
Wenn der Signal zu schwach ist, schalten Sie diese Funktion ein, um die Bildqualität besser zu machen. Wenn der Signal stark
ist, schalten Sie diese Funktion aus (Stand OFF). Im Regime AV schalten Sie diese Funktion ab, sonst wird das Bild schwarz
weiss sein.
Menü Preset (Einstellung)
Drücken Sie die Taste MENU fünfmal, um ins Menü Preset einzuge
hen. Auf dem Bildschirm erscheint folgendes Bild:
Das Umschalten zwischen den Menüpunkten wird mit der Hilfe der
Tasten CH+ und CH gemacht. Mit den Tasten V+ und V wird die
Einstellung des gewählten Parameters des Menüs gemacht.
AUTOSEARCH (Autosuche)
Drücken Sie für diese Funktion die Taste V+ und V. Der Fernseher
geht ins Regime der automatischen Suche und der Speicherung
gefundener Kanäle. Bei der automatischen Suche werden alle
gefangenen Sender nach deren Frequenz der Reihe nach gespeichert.
SEARCH (manuelle Suche)
Mit den Tasten CH+ und CH wählen sie den Menüpunkt SEARCH. Mit den Tasten V+ und V beginnen Sie die manuelle
Suche der Kanäle in nötiger Reihenfolge ab laufendem Kanal und dem Frequenzbereich. Die Eingabe aller Sender erfolgt
konsequent, ein Kanal nach dem anderen.
FINE TUNE (Präzise Einstellung)
Mit den Tasten CH+ und CH wählen sie den Menüpunkt FINE TUNE. Mit den Tasten V+ und V erreichen Sie den besten
Stand der Bild und Tonqualität.
BAND (Bereich)
Mit den Tasten CH+ und CH wählen sie den Menüpunkt BAND. Mit den Tasten V+ und V wählen Sie gewünschten
Suchbereich – VHFL / VHFH / UHF.
PROGRAM (Programm)
Mit den Tasten CH+ und CH wählen sie den Menüpunkt PROGRAM. Mit den Tasten V+ und V wählen Sie gewünschte
Nummer des Programms. Die Nummern der Kanäle können im Bereich 0255 geändert werden.
SKIP (Überspringen)
Mit den Tasten CH+ und CH wählen sie den Menüpunkt SKIP. Mit den Tasten V+ und V aktivieren Sie diese Funktion. Mit der
Hilfe dieser Funktion kann man jeden eingegebenen Kanal aus der Reihenfolge der durchzublätternden Kanäle weglassen.
Clockset (Uhr)
• Drücken Sie den Punkt MENU sechsmal, um ins Menü Clockset
einzugehen.
• Auf dem Bildschirm erscheint folgendes Bild:
• Das Umschalten zwischen den Menüpunkten wird mit der Hilfe der
Tasten CH+ und CH gemacht. Mit den Tasten V+ und V wird die
Einstellung des gewählten Parameters des Menüs gemacht.
ANMERKUNG: die Daten der eingestellten Uhr werden beim Auschalten
der Speisung des Fernsehers gelöscht.
20
5009.qxd 29.06.05 14:56 Page 20


