Vitek VT-4073 SR: instruction
Class: Household, kitchen appliances, electronics and equipment
Type: DVD Player
Manual for Vitek VT-4073 SR
Table of contents
- Operating manual MAINTENANCE RULES IMPORTANT SAFETY NOTICES USAGE NOTICES ON THE DVD PLAYER USAGE NOTICES ON POWER SUPPLY MAIN FEATURES OF THE DEVICE
- 24bit/96Khz Digital/Analog (D/A) converter. Component video output. Laser head overcurrent protecting system 1. Brief instruction of controls Front panel function: Back panel function:
- Remote control 2. PREPARATIONS 2.1 PACKAGE SET 1. DVD player 2.2 Battery installation into the remote control 2.3 SYSTEM CONNECTION
- Channal amplifier Digital audio amplifier 2.4. PLAY MODE SETTING 3. BASIC OPERATION
- 3.1. Disc playing 4. FUNCTIONALITY DESCRIPTION
- 4.2 N/P function 4.3 Subtitles 4.4 OPEN/ 4.5 PBC (PLAYBACK) 4.6 MIC ON/OFF 4.7 ANGLE 4.8 LANGUAGE» 4.9 TITLE 4.10 MENU 4.11. DIRECTION KEYS 4.12 3D FUNCTION 4.13 NUMBER KEYS 4.14 TIME 4.15 REPEAT FROM A TO B
- 4.16 REPEAT FUNCTION 4.17. ZOOM 4.18. PROGRAM 4.19. R/L FUNCTION (SOUND BALANCING) 4.20 VOLUME AND MUTE 4.21. THE “SLOW“ FUNCTION 4.22 VIDEO FUNCTION 5. SETTING UP THE SYSTEM
- 1.1. ANGLE MARK 1.1.3 SCREEN LANGUAGE 1.1.4 HIDE SUBTITLES 1.1.5 SCREEN PROTECTION 1.1.7 MEMORY PLAY SETTINGS
- 1. AUDIO SETUP 1..1 SPEAKER SETUP 1..1.1. DOWNMI� MODE When the center, rear and the subwoofer speaker are in the “Off” 1..1.3 CENTRAL SPEAKER
- 1..1.4 REAR SPEAKER 1..1.5 WOOFER SPEAKER 1.. DIGITAL AUTO SETUP 1...1 DIGITAL AUDIO OUTPUT 1... LPCM OUTPUT
- 1..3. DOLBYDIGITALSETUP 1..3.1 L+R SETUP 1..3. DYNAMIC RANGE COMPRESSION 1..4 EQUALIZER SETUP 1..4.1 EQUALIZER MODE 1..4. BASS ENHANCING 1..4.3 SUB WOOFER
- 1..4.4. TREBLE BOOST 1..5 3D PROCESSING SETUP 1..5.1 PRO LOGIC II SETUP 1..5.1.1 PRO LOGIC II SETUP 1..5.1.. PRO LOGIC II SETUP
- 1..5.1.3. PRO LOGIC II SETUP 1..5.1.4 PRO LOGIC II SETUP 1..5.1.5 PRO LOGIC II SETUP 1..5.1.5. MI�TURE MODE 1..6 MICROPHONE SETUP 1..6.1 MICROPHONE SETUP
- 1..6.1.1 MICROPHONE SETUP 1.3 VIDEO SETUP 1.3.1 COMPONENT 1.3. TV MODE 1.3.3 QUALITY 1.3.3.1 SHARPNESS 1.3.3. BRIGHTNESS 1.3.3.3 CONTRAST 1.4. PREFERENCE SETUP
- 1.4.1 TV TYPE SETUP AUDIO SETUP SUBTITLE SETUP DISC MENU LANGUAGE SETUP PARENTAL CONTROL
- 1.4.6. DEFAULT SETTINGS 1.5. PASSWORD SETUP 1.5.1. PASSWORD SETUP. 1.5.. PASSWORD 6. OPERATING THE МР3 FUNCTION 7. JPEG SETTINGS 8. TROUBLESHOOTING GUIDE 9. DISC PROTECTION
- 10. MPEG 4 OPERATION 11.Technical Specifications
www.vitek-aus.com
INSTRUCTION MANUAL
DVD PLAYER
MODEL VT-4073 SR
2
19
37
55
73
4073IM.indd 1
09.10.2007 12:28:29
ENGLISH
VT- 4073SR
Operating manual
Please, read and understand this manual carefully before the startup,
use and setup of the player. Keep the manual for future references.
CAUTION! IN ORDER TO AVOID ELECTRICAL SHOCK, FIRST
CONNECT THE CORD TO THE PLAYER, AND THEN INSERT PLUG
INTO THE ELECTRICAL OUTLET.
CAUTION!
This device contains a DVD player that uses a laser system.
Do not open the case in order to avoid exposure to laser radiation.
Invisible laser radiation is present when the case is open. DO NOT LOOK
AT THE LASER RAYS. Furthermore, use of the control system or making
adjustments or completing operations, other than those described in
these instructions, can lead to dangerous exposure to radiation.
We urge you to carefully study these operating instructions and save
them for future use. Contact a service center (if necessary) for service
and repairs.
CAUTION! DO NOT OPEN THE UPPER HOUSING OF THE DEVICE DUE
TO RISK OF ELECTRIC SHOCK. THERE ARE NO USER-SERVICEABLE
PARTS INSIDE. EMPLOY THE SERVICES OF QUALIFIED PERSONNEL.
ATTENTION
IN ORDER TO AVOID ELECTRICAL SHOCK, THE WIDE PRONG OF THE
PLUG SHOULD BE FIRMLY AND COMPLETELY INSERTED INTO THE
OUTLET. WATER MUST NOT SPILL INTO THE DEVICE. DO NOT PLACE
CONTAINERS OF LIQUIDS, LIKE VASES, ONTO THE DEVICE.
MAINTENANCE RULES
=
In the event of damaging the plug or the power cable of the DVD
player, please, unplug the player and send it for fixing to a qualified
technician
=
Don’t plug too many electric appliances into one electric socket and
don’t prolong the cable as it can result in a fire or an electric shock
=
Don’t put anything on the power cable and don’t connect the power
cable randomly as it may result in a fire or an electric shock
=
In the event of dropping the DVD player or damaging its panel,
please, plug the unit off from the power socket and send it for
repairing to a qualified technician.
=
Don’t insert anything in the DVD player housing. Never touch high
voltage parts – this may cause fire or electric shock.
=
To reduce the hazard of fire and electric shock don’t remove the
cover (or back panel) of the unit. Refer servicing only to qualified
service personnel.
=
Don’t place the DVD player on unstable surfaces, brackets or desks.
In the event of dropping this may cause injuries to people and
damages to the player itself.
=
In case the air humidity is too high don’t put the unit in dusty places.
The dust collected may cause failure of the DVD player’s base.
=
Don’t use the DVD player in the places next to running water, in
particular near bath tubs, dishwashers or basements.
=
Don’t cover the radiation hole with cloth or other materials.
=
Don’t place the DVD payer in beds, on sofas, trugs and other similar
places where it’s easy to block ventilation.
=
Don’t put the DVD player on radiators, next to heat sources or places
nearby.
=
Don’t put the DVD player in places with limited ventilation.
=
Avoid pouring any liquids on the DVD player and don’t place any
reservoirs with liquids (for instance, jardinières) on the unit.
=
Prevent the Display of the DVD player from direct sun beam
exposure.
=
In the event the DVD player still cannot work after the set up in
accordance with the TROUBLESHOOTING instructions, don’t open
the unit by yourself. Please, address repairing to professional
technicians.
=
Please, operate the DVD player according to the User Manual.
Should the DVD player be damaged due to your incorrect operation,
please, refer its repair to professional technicians.
=
Please, take out the plug, antenna and cable system for protecting
the DVD player if you don’t intend to use it soon.
=
Please, switch the unit off, remove the plug from the socket and refer
to a professional technician if the DVD player produces abnormal
sounds or smelling.
=
Due to the hazard of fire don’t put the sources of naked fire on or
next to the DVD player.
=
Prevent the DVD player housing (and especially its display) from hits.
=
If you don’t intend to use the DVD player for a long time, please,
switch off the unit and unplug the cable.
IMPORTANT SAFETY NOTICES
FORBIDDEN!
=
In order to prevent unit sections from damages provide good
ventilation.
=
Protect the DVDplayer from damages caused by moisture or
electric shock. Keep the device safe from exposure to rain or
moisture. Don’t put flowerpots or other objects with water onto the
unit.
=
To reduce the risk of fire or electric shock don’t remove the cover
(ort he back panel) of the DVD player. Refer servicing only to quali-
fied service professionals.
=
Don’t allow heat source impacting on the device.
CAUTION!
=
Clean the DVD player only with dry cloth.
=
Don’t touch the unit cover if there is a threat of electric shock.
=
Stop using the device at once after finding abnormal phenomena,
such as smoke, unusual sounds or smelling. In this event, please,
unplug the unit immediately.
=
Unplug the device when unused for long periods of time.
Special caution:
This product uses Class 1 lasers. If laser beams are directed to your
skin it will trigger radiation damage. Please, refer to the user guide when
using this appliance!
Please, read the manual carefully before operation. Keep it in a safe
place for future reference.
USAGE NOTICES ON THE DVD PLAYER
Please, don’t put the player in following positions:
• Sun shining or heat radiation places, such as heaters, stoves or
other appliances that produce heat.
• Tops of other heat radiation devices.
• Places with bad ventilation or dusty, high moisture, unsteady or
vibration places or those exposing the unit to rain or water.
• Next to high power speakers or on the same stand with the
speakers.to protect its normal work.
• To prevent the unit from damage don’t play scratched, bent or
creaked discs.
USAGE NOTICES ON POWER SUPPLY
• The power supply required is AC 9050V 50/60Hz.
• If you don’t intend to use the DVD player for a long period of time,
please, disconnect the AC power plug from the outlet.
• To extend the service life of the device, the period between
switching the DVD player on and off should last at least ten seconds.
MAIN FEATURES OF THE DEVICE
1. Fully compatible with DVD, SVCD,DVCD, VCD, Mp3, PHOTO CD,
DVDR, DVDRW, CDR and CDRW formats
. Read picture CD to realize digital picture displaying.
3. 10bit digital video converter with the resolution of more than 500
lines.
4. 4bit/96KHz digital audio converter, high quility of sound effect,
professional HiFi level.
5. Video component signal Svideo output, composite video output,
optical and coaxial output for selection.
The lightning bolt in a triangle symbol indicates to the
user that there are dangerous voltages inside the device
that can result in electrical shock.
The exclamation point in a triangle symbol indicates to
the user important operating instructions and technical
service information in the accompanying literature.
Indicates a device using a laser. This symbol
must be located on the rear panel of a
device, indicating that the device contains a
Class 1 laser and that laser rays are in use.
The possibility of laser exposure does not
exist without opening the device.
CLASS 1
LASER PRODUCT
CAUTION
Risk of electric shock
DO NOT OPEN
WARNING: In order to reduce the risk of fire or electrical shock,
do not remove the device panels. Contact qualified personnel for
service and repairs.
4073IM.indd 2
09.10.2007 12:28:30
ENGLISH
3
6. Professional digital Karaoke function.
7. Various screen options of TV display; also you may select preferred story section to view.
8. Full function intelligent upgrade.
9. Progressive scan function.
10. Highly integrated servo system, decoding on singlechip technology, high reliability and stability, super error correction.
11. AM/FM stereo radio tuner.
24bit/96Khz Digital/Analog (D/A) converter.
This latest conversion technology matches the software of 96 KHz sampling frequency (twice as high as a CD) and 4bit data, thus providing you
with perfect sound quality without distortion.
Component video output.
The component video output (Y, Cr, Cb) enables you to enjoy true DVD effect. It renders pure colour signals as they are and without any video noise.
Laser head overcurrent protecting system
Laser head ist he most important and critical part of the whole machine. Its performance is directly linked to the service life and error correcting
function of the whole device. When a common player reads a scratched disc or a nonstandard disc, the laser intensity will be 4 times or even 0
times higher than the normal level, thus greatly reducing its service life. This appliance is equipped with the unique laser head overcurrent protecting
system, which can ensure constant laser current and thus greatly extend the service life of the laser head.
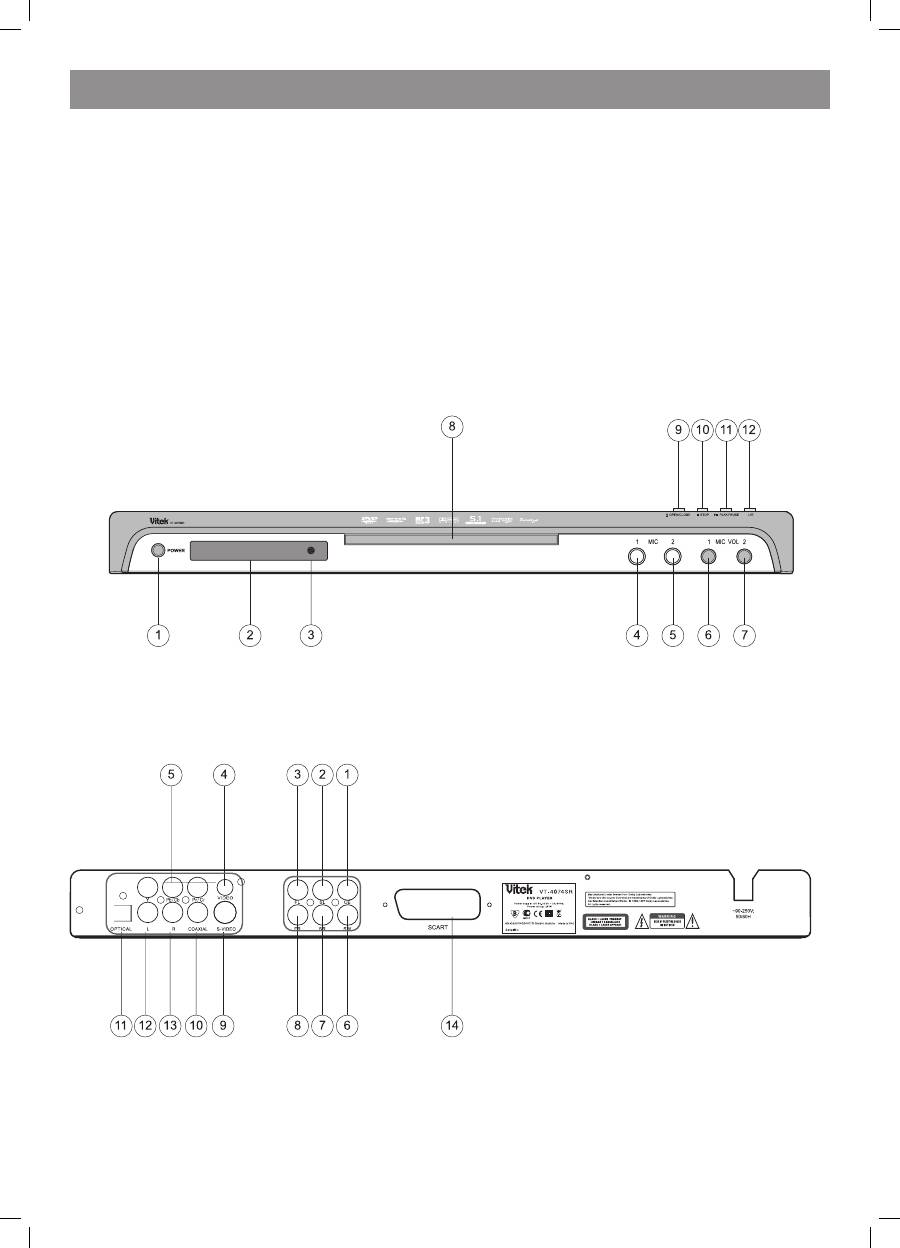
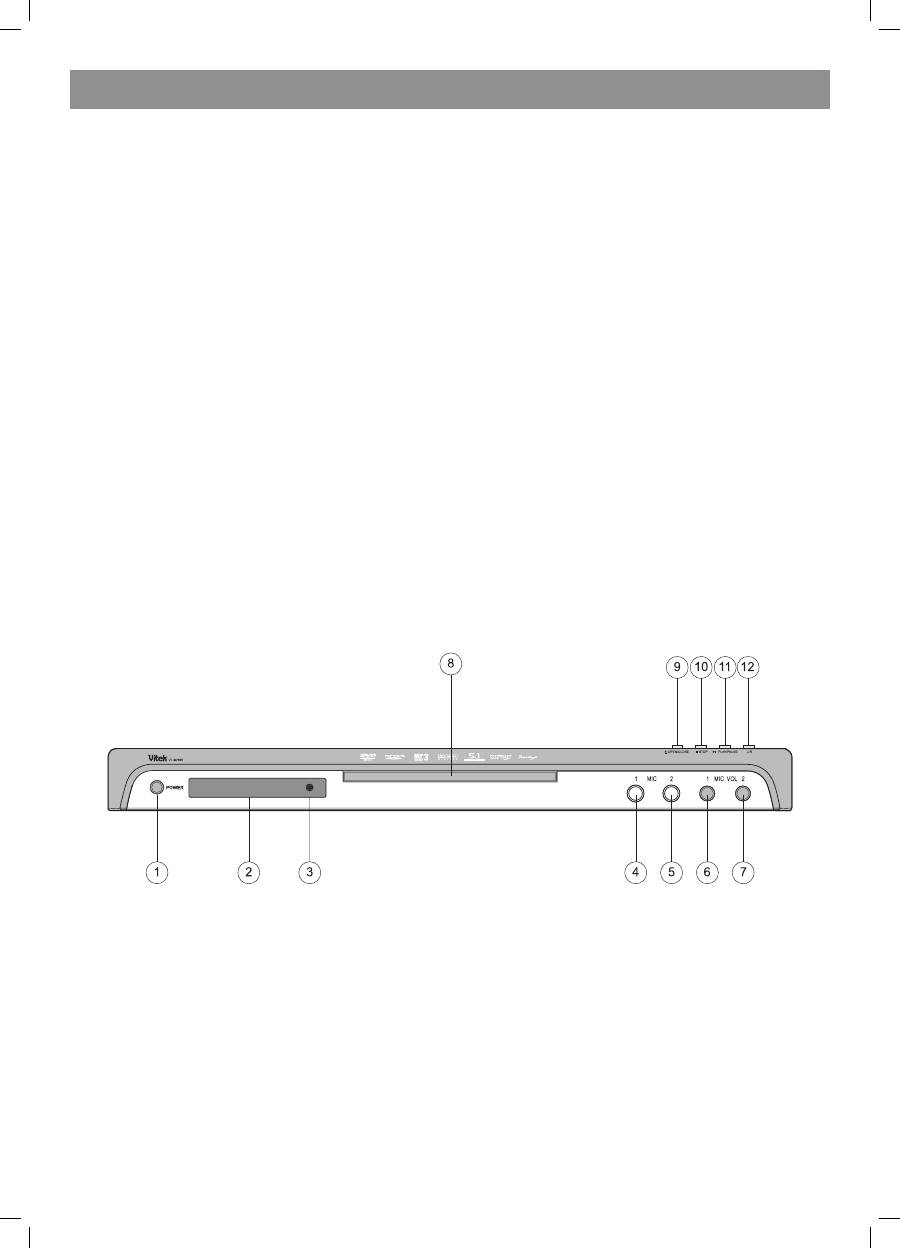
1. Brief instruction of controls
Front panel function:
1. POWER
. SENSOR
3. SCREEN
4. MIC 1
5. MIC
6. MIC VOL 1
7. MIC VOL
8. DISC TRAY
9. OPEN/CLOSE
10. STOP
11. PLAY/PAUSE
1. L/R
Back panel function:
1. 5.1 CH CEN output jack
. 5.1 CH SL output jack
3. 5.1 CH FL output jack
4. Video output jack
5. Component output jack
6. 5,1 CH SW output jack
7. 5,1 CH SR output jack
8. 5,1 CH FR output jack
9. SVideo output jack
10. Digital signal coaxial output jack
11. Digital signal optical output jack
1. L output jack
13. R output jack
14. SCART output jack
4073IM.indd 3
09.10.2007 12:28:30
ENGLISH
4
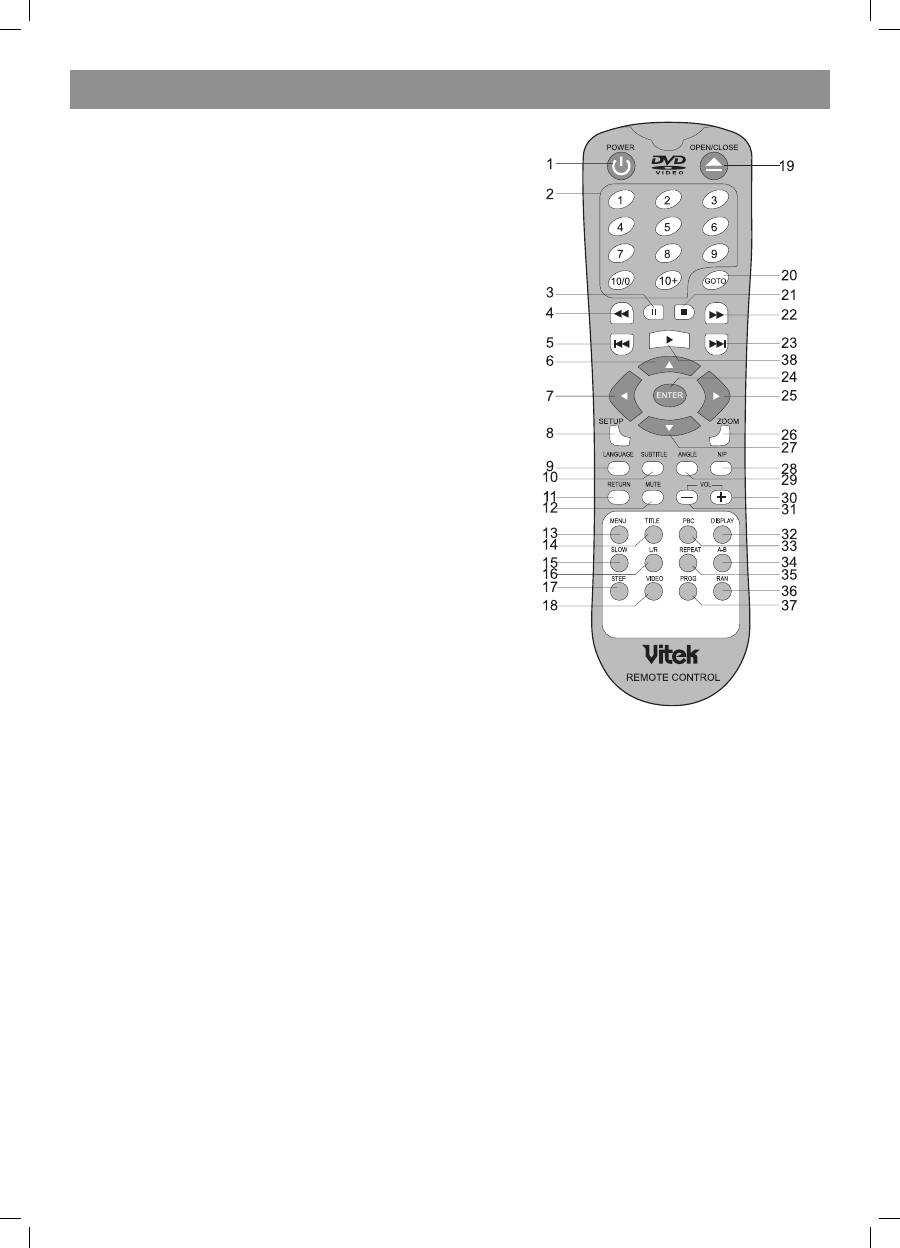
Remote control
• Point the remote control directly at the player’s remote sensor.
• Don’t leave the remote control in an extremely hot or humid place.
• Don’t insert the batteries in the wrong direction.
• If the remote control does not function correctly or the operating range becomes
reduced, replace all batteries with new ones.
1. POWER
. 09, 10+ NUMBER KEYS
3. PAUSE
4. PREV
5. REV
6.UP
7. LEFT
8. SETUP
9. LANGUAGE
10. SUBTITLE
SUBTITLE
11. RETURN
1. MUTE
13. MENU
14. TITLE
TITLE
15. SLOW
16. L/R
17. STEP
18. VIDEO
19. OPEN/CLOSE
/CLOSE
CLOSE
0. GOTO
1. STOP
. NE�T
NE�T
3. FWD
FWD
4. ENTER
5. RIGHT
RIGHT
6. ZOOM
7. DOWN
8. N/P
/P
P
9. ANGLE
ANGLE
30. VOL+
VOL+
+
31. VOL
VOL
3. DISPLAY
33. PBC
34. AB
35. REPEAT
REPEAT
36. RAN
37. PROG
38. PLAY
2. PREPARATIONS
2.1 PACKAGE SET
1. DVD player
. Remote control panel.
3. Audio/video cable.
4. User’s manual.
5. Batteries.
6. Warranty card.
7. Packaging (box).
2.2 Battery installation into the remote control
Place two AAAformat batteries in the battery compartment. Be sure the polarities are correct. There should be no large obstacles between the
remote controller and the main unit.
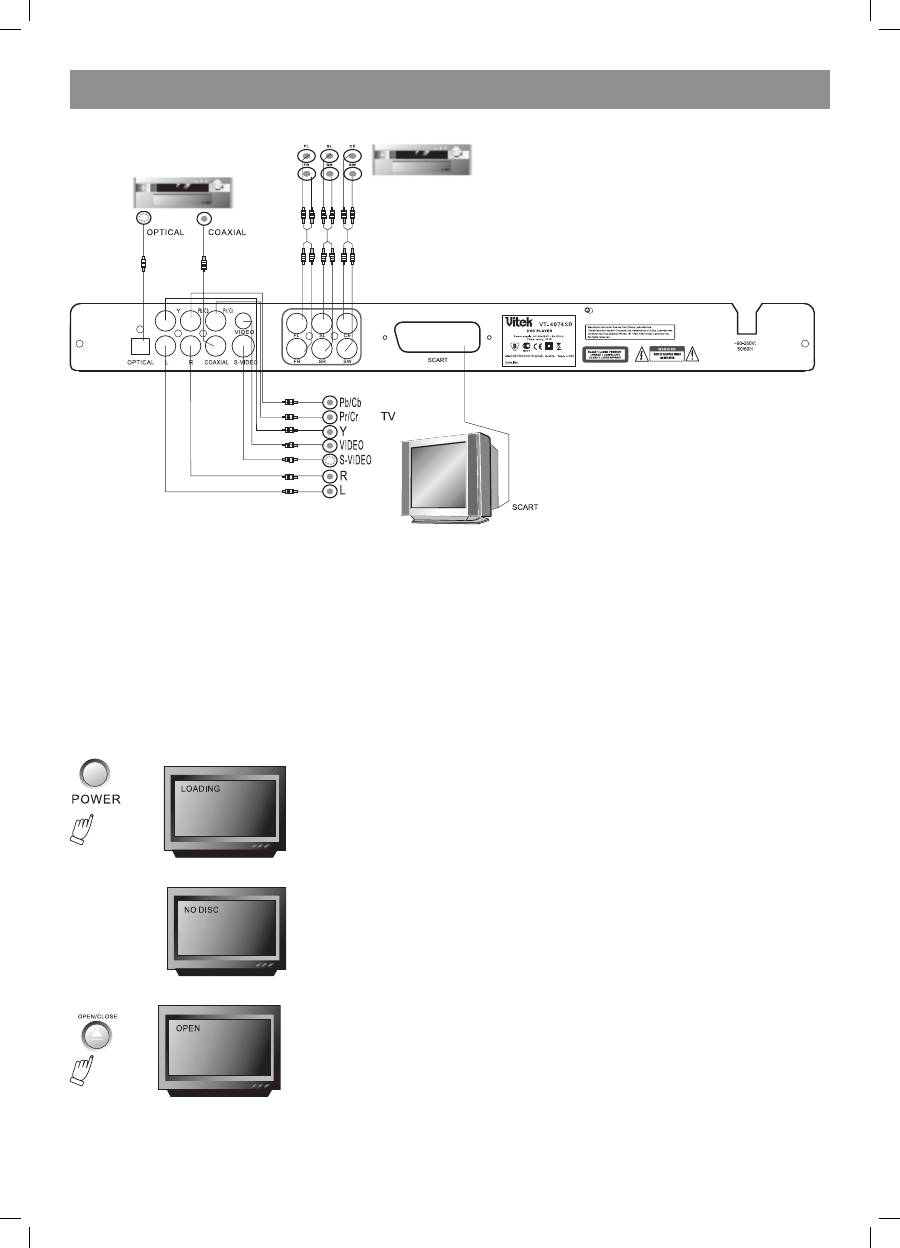
2.3 SYSTEM CONNECTION
1. When making connection between this unit and other components ensure that all connections are switched off.
. Audio/video cables are connected according to the different colour identification and should be inserted firmly.
a. Yellow cable should be connected to video jack.
b. White cable should be connected to audio jack.
c. Red cable should be connected to audio jack too.
3. Scheme of connection.
4073IM.indd 4
09.10.2007 12:28:30
ENGLISH
5
Channal amplifier
Digital audio amplifier
2.4. PLAY MODE SETTING
If you find that the picture couldn’t spread all over the screen or there is no colour, please, select PAL, NTSC or Multi mode by pressing the N/P key.
DVD disc may support pictures with different proportions. When using the TV mode you can also match the screen proportion to the proportions
of your discs. Select Normal/Full, Normal/mailbox, wide screen under the System setup. Operate in the following way: Press <SETUP> key to get
General setup, press <PLAY> key, use direction keys up and down to select the TV mode, then press left/right keys to to select Normal/Full, Normal/
mailbox, or wide screen options according to your need. Finally, press <PLAY>.
3. BASIC OPERATION
Upon the completion of all the system connection works the device is ready for service. Before playing ensure the completion of all the following
preparatory operations:
1. Switch on the TV and select AV mode. If the connection format is Svideo, select the Svideo mode.
. If an amplifier is used, switch it on and select AC3 or DVD mode.
3. Plug the DVD player cable in the electricity network.
Step 1: Press POWER key. After pressing DISC LOADING will display on the screen:
If the disc tray is empty, the NO DISC notice will appear on the screen.
Step : Press the OPEN/CLOSE key, the disc tray will come out automatically.
Step 3: Put he disc on the tray, press the OPEN/CLOSE key to close the tray, the disc type will be shown in the upperleft corner of the screen, as well
as on the VFD screen.
Note: Press the STANDBY key on the remote controller – the unit will switch to standby status. The power consumption in the standby mode is
approx. 10W.
4073IM.indd 5
09.10.2007 12:28:31
ENGLISH
6
3.1. Disc playing
Once the disc has been read, the machine will start playing
automatically.
• If the disc is in DVD format, the moacjine will show the DVD menu or
title menu.
• If the disc is in VCD.0 mode, the machine will activate PBC
playback control status.
• If the disc is in CD format, the machine will start playing the
sequence.
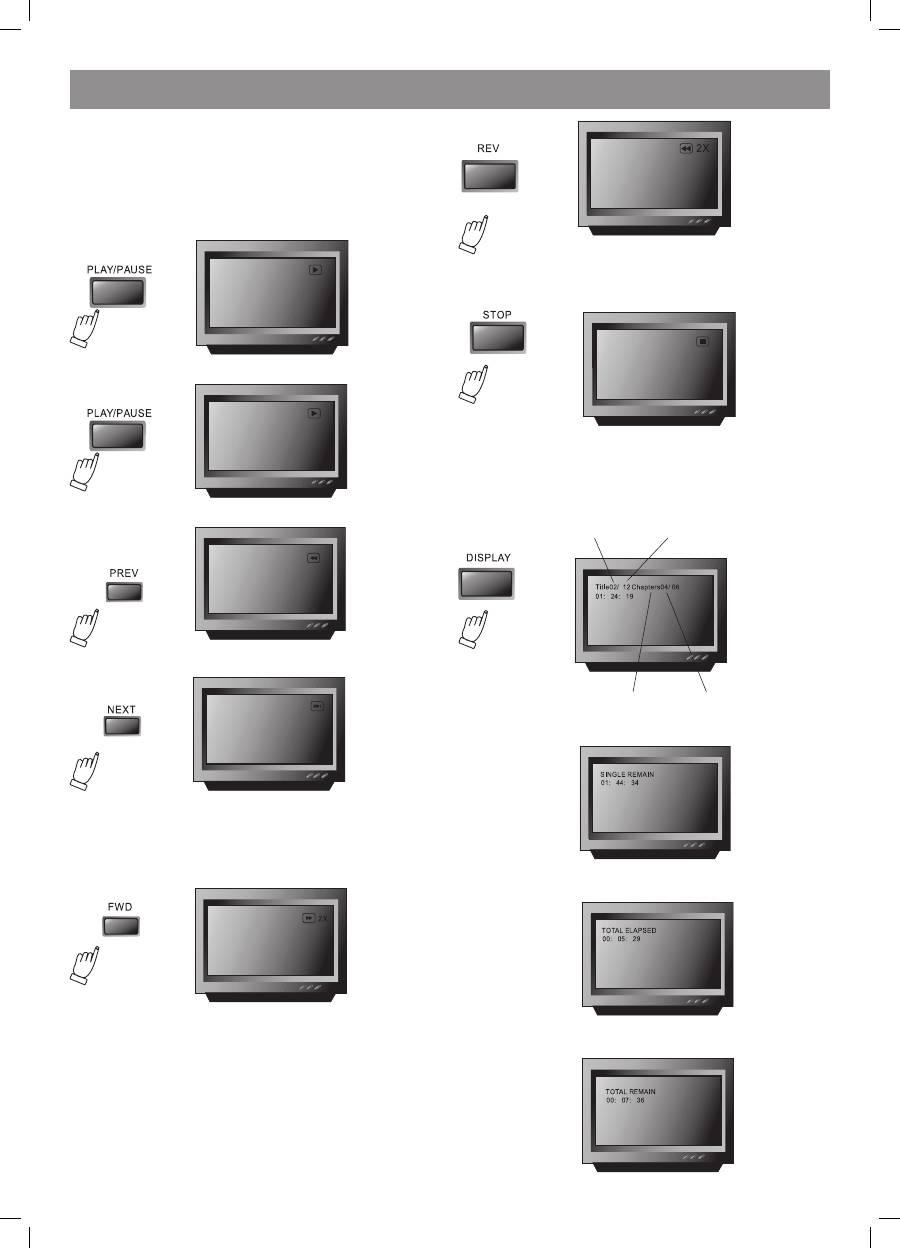
Press the PAUSE key
Press the PREV key:
Press the NE�T key:
Press the FWD key to get �, 4�, 8�, 16�, 3� normal play circular fast
forward function of DVD disc playing.
Press FWD key to get �, 4�, 8�, 16�, 3� normal play circular fast
forward function of other type of disc playing.
Press REV key to get �, 4�, 8�, 16�, 3� normal play circular fast
circular fast reverse function of DVD disc playing.
Press REV key to get �, 4�, 8�, 16�, 3� normal play circular fast
reverse function of other disc playing.
Press STOP key to get memory stop of the disc playing and press PLAY
key to get memory playing. To stop playing press the STOP key again.
4. FUNCTIONALITY DESCRIPTION
4.1 Screen DISPLAY
In the condition of DVD disc playing, press the DISPLAY key on the
remote controller to get following displays.
After pressing the DISPLAY key for the first time:
Chapter on Display
Title on Display
Title
Chapters
After pressing the
DISPLAY key for the second time:
After pressing the
DISPLAY key for
the third time:
After pressing the DISPLAY key for the fourth time:
4073IM.indd 6
09.10.2007 12:28:31
ENGLISH
7
After pressing the DISPLAY key fort he fifth time the message will
disappear from the screen.
4.2 N/P function
Press the N/P key repeatedly to get NTSC, Multi or PAL notices on the
screen (please, stop the disc playing before choosing this function).
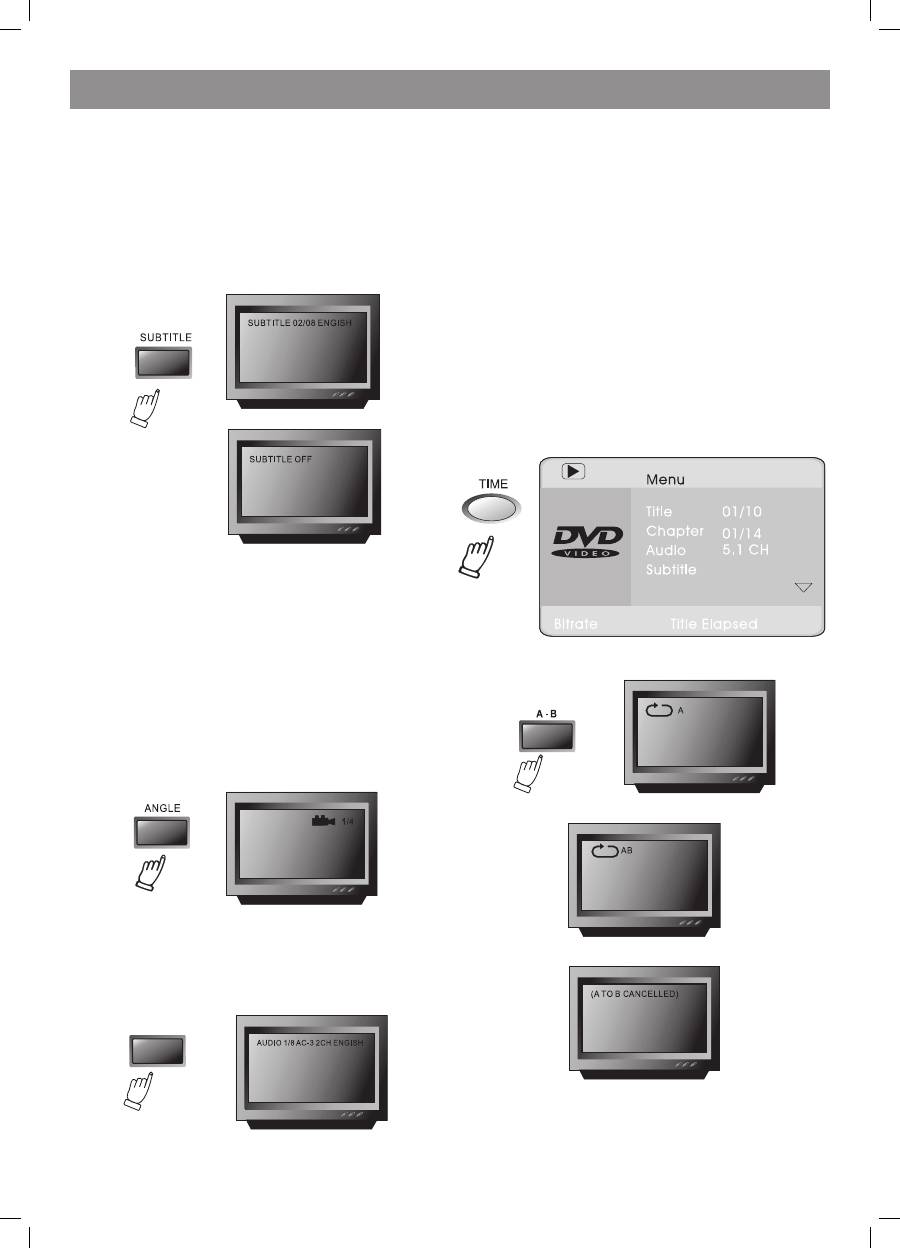
4.3 Subtitles
This function enables you to select multi subtitle languages (3
languages, only for discs with multi subtitles encoded). Press the
SUBTITLE key to get the desired text on the screen.
For instance, to select language 1 (English) from 8 options do the
following steps:
4.4 OPEN/
CLOSE
Eject or load the disc tray in Disc mode.
4.5 PBC (PLAYBACK)
When playing SVCD, VCD.0 discs press PBC – the disc menu will show.
You can select a program from the menu. After loading the disc, the unit
will enter PBC ON play automatically. After pressing the PBC button the
PBC OFF notice will appear on the screen. In this mode the menu won’t
appear – press digit key to select the track directly. PBC menu won’t
appear for VCD1.1, CDDA and Mp3 formats.
4.6 MIC ON/OFF
Use the Karaoke switch.
4.7 ANGLE
During athletic matches, concerts or theatrical programs you can select
various angles to view the same image by pressing the ANGLE key
continually (this function will work only for multi angle encoded discs).
4.8 LANGUAGE»
There are 8 languages to select (4 languages for CD format).
Press LANGUAGE key to select languages (this operation works only for
multi language encoded discs).
For example, when selecting language 1 from language options with
sound field effect AC3, channels, English the following notice will
appear on the screen:
4.9 TITLE
Press TITLE key to get the title menue (this operation works only with
multi title encoded discs).
4.10 MENU
Press MENU key to return to the main menu for DVD playing (this
function works only with multi subtitle encoded discs).
4.11. DIRECTION KEYS
When playing discs, the four direction keys allow you selecting your
option in the title, menu or setup.
If there is no menu or it’s not in the setup status, pressing the “left“
button of the remote controller switches off the VFD display, and
pressing the “right” direction key turns the VFD display on.
4.12 3D FUNCTION
Press 3D button to select the surround sound mode.
4.13 NUMBER KEYS
Press relevant number keys for playing favourite pictures according to
their series numbers in the menu.
4.14 TIME
This DVD player can display various data related to the disc played.
Pressing the TIME button allows selecting the title and the chapter,
Audio, Subtitle languages, Angle, Title time, Chapter time, repeat mode,
or display time.
4.15 REPEAT FROM A TO B
First set the initial point (A) by pressing the AB key:
Then set the end point (B) by pressing the AB key once again:
After this setting the program will repeat playing from A to B.
Third
pressing the AB key will cancel repeating.
4073IM.indd 7
09.10.2007 12:28:31
ENGLISH
8
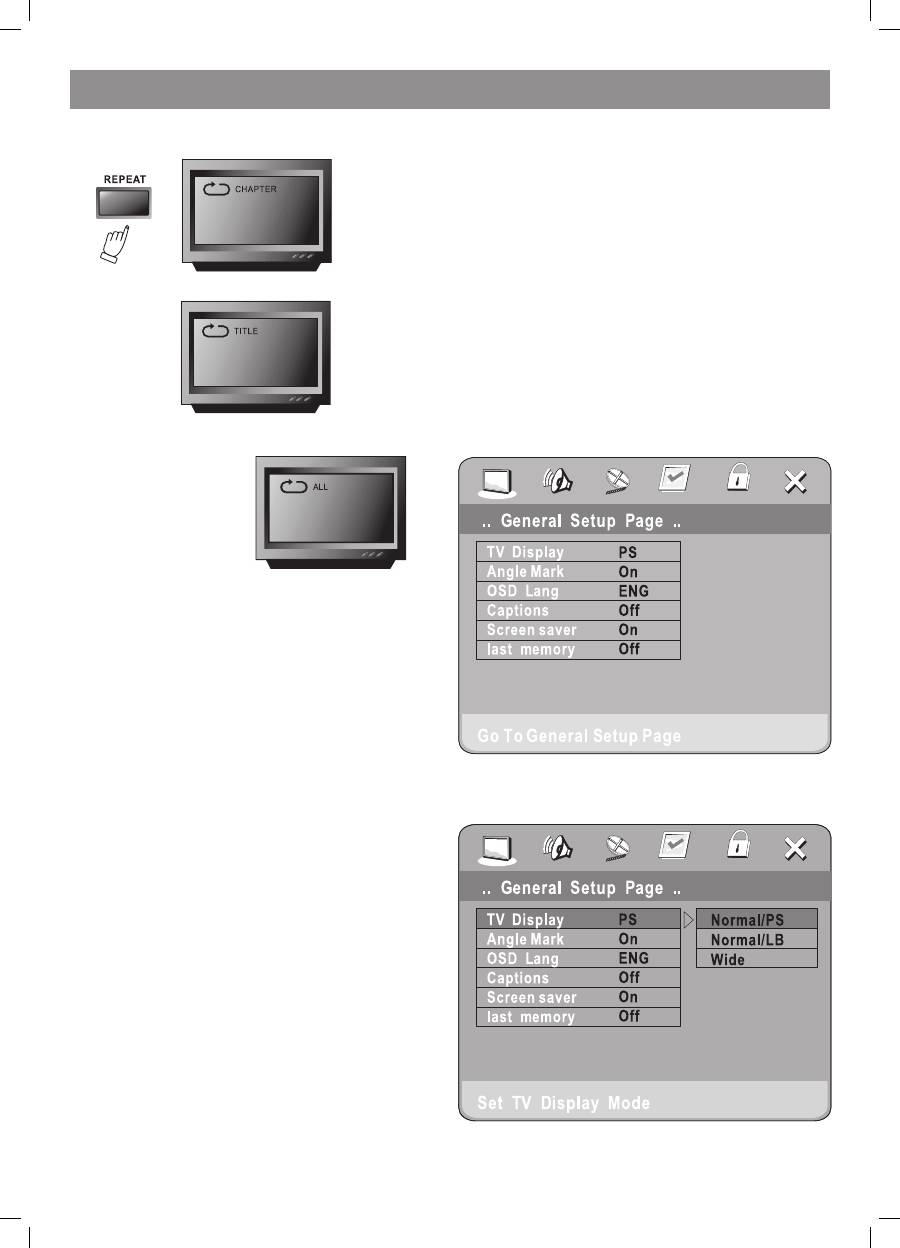
4.16 REPEAT FUNCTION
After pressing the REPEAT key in the DVD mode the following notice will
appear on the TV screen:
When repeating the chapter:
When repeating the title:
Repeating mode off
4.17. ZOOM
The picture may be enlarged up to 4 times to facilitate enjoying a
particular action or still picture. When repeatedly pressing this button
up to 6 times, the zoom scales will be x, 3x, 4x, 1/, 1/3, and 1/4
respectively. Pressing this button one more time will return the screen to
normal play status.
4.18. PROGRAM
If the disc has or more tracks, chapters or files, you may set up the
playing order up to your wish. In order to enter the program menu press
the PROGRAM button.
By pressing digit keys you can input track, title and chapter numbers.
If there are more than ten programmed tracks, press NE�T to go on
programming (with a maximum of 0 programmable items) use the up/
down/left/right keys to move the cursor to the START title. Press ENTER
for starting PROGRAM playing.
The PROGRAM function is unavailable when playing Mp3 discs! By
pressing the PROGRAM button once to enter the DIRECTORYPLAY
mode, you can select the program to play in the current directory;
pressing PROGRAM once again will allow you entering the FILELIST
mode, where you can select the program to play in the file list of the
whole disc.
4.19. R/L FUNCTION (SOUND BALANCING)
when playing discs in DVD or SVCD formats the screen shows Aud 1,
Aud , and “no lead sing” notices. When playing VCD discs it shows “left
lead sing”, “right lead sing” and “no lead sing”.
4.20 VOLUME AND MUTE
Press the <VOL+> volume key to increase volume and the <VOL> key to
reduce volume down to no volume output.
Press the MUTE key to switch the sound off, press it once again for
switching the sound on once again.
4.21. THE “SLOW“ FUNCTION
When playing a DVD disc pressing the SLOW button repeatedly will
enable you to slow the motion by x, 4x, 8x and 16x as the normal
forward speed or x, 4x and 8x as slow, as the normal backward speed.
For an SVCD or VCD disc, the track will be played at a x, 4x, 8x and 16x
slower than the normal playing speed.
4.22 VIDEO FUNCTION
By pressing the <VIDEO>key you may opt between SVIDEO, YUB and
RGB output modes.
5. SETTING UP THE SYSTEM
1. DVD MENU SETTING
After pressing the SETUP button on the remote controller the SETUP
MENU will be displayed. The disc will ask you to enter the PIN.
Simply enter “8888”, which is the manufacturer’s preset value.
1. After accessing the SETUP Menu, press the direction buttons for
moving up and down to select the item desired, then press the PLAY
button to confirm your entry and move to the submenu. Use the left
and right direction buttons to move the pointer, and the up and down
direction buttons to select the option desired. After that press the
PLAY button to confirm your selection. Now the setup of this current
function is completed.
. To end the setup, press the SETUP button again. In the SETUP
MENU you may choose any of the following options up to your wish.
1.1 GENERAL SETUP
This option is used for setting up the TV screen format., video functions,
and DVD functions, with such options, as “TV DISPLAY”, “ANGLE
MARK”, “OSD LANGUAGE”, “CAPTION”, “SCREEN SAVER“ and “LAST
MEMORY”.
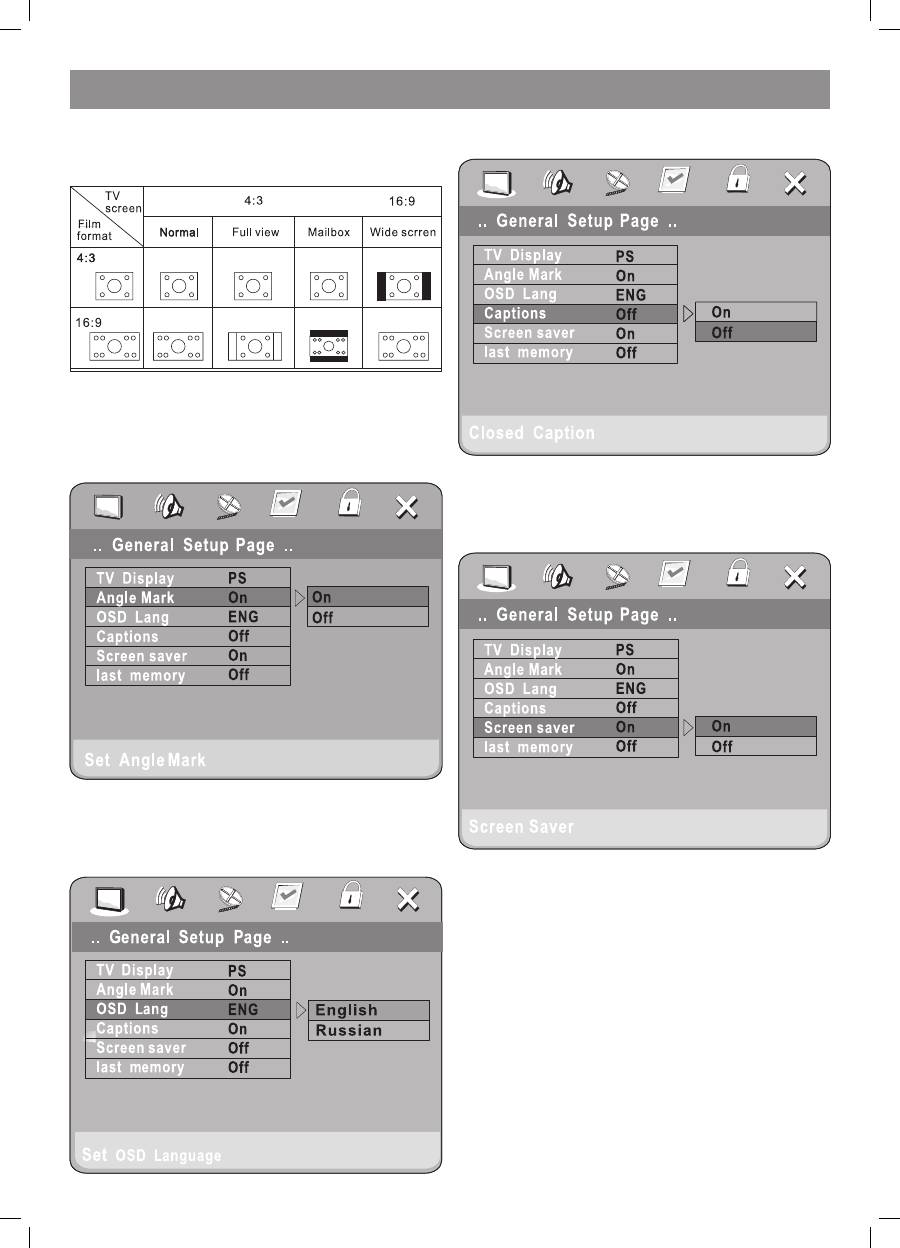
1.1.1 TV SCREEN
Follow the operating instructions stated in “DVD MENU SETUP” in
combination with the desired option as shown in the following figure.
Note:
1). Irrespective of what screen format you have selected, if your screen
4073IM.indd 8
09.10.2007 12:28:32
ENGLISH
9
displays in the 4:3 format, the picture will be shown in that format
anyway.
). For DVD discs the screen format is convertible.
3). If your screen displays in 4:3 format, when a DVD with 16:9 display
format is used, the picture will be flattened.
1.1. ANGLE MARK
When a DVD supporting multiple angles is used, the user may select a
particular shooting angle.
Follow the operating instructions stated in “DVD MENU SETUP” in
combination with the desired option as shown in the following figure.
1.1.3 SCREEN LANGUAGE
The user can use this item to switch the language of the setup menu into
Russian and back.
Follow the operating instructions stated in “DVD MENU SETUP” in
combination with the desired option as shown in the following figure.
1.1.4 HIDE SUBTITLES
Follow the operating instructions stated in “DVD MENU SETUP” in
combination with the desired option as shown in the following figure.
Note:
This function doesn’t work if the DVD doesn’t show it.
1.1.5 SCREEN PROTECTION
Select in the “General setup“ menu to get Screen protection Setting
according to the following figure.
1.1.7 MEMORY PLAY SETTINGS
Select memory play settings according to the following figure:
4073IM.indd 9
09.10.2007 12:28:33
ENGLISH
10
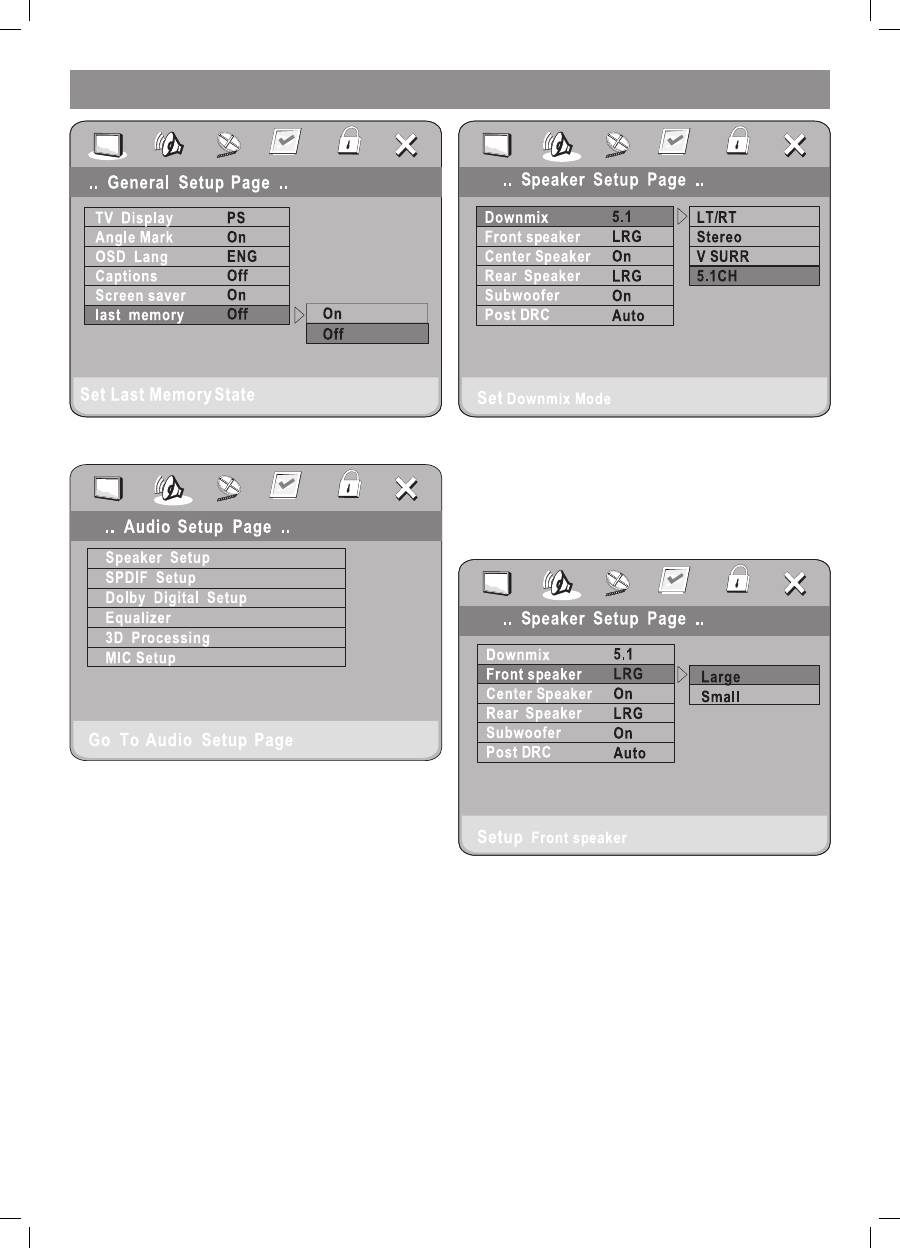
1. AUDIO SETUP
The function includes speaker setup, SPDIF setup, Dolby digital setup,
equalizer setup and 3D processing.
1..1 SPEAKER SETUP
The submenu options include DOWNMI� MODE, CENTER, REAR,
SUBWOOFER, POST DRC and AUDIO SETUP.
1..1.1. DOWNMI� MODE
Follow the operating instructions stated in “DVD MENU SETUP” in
combination with the desired option as shown in the following figure.
This setting is suitable for films. If you needonly two channels to enjoy
music, it’s recommended to select the option . Where the 5.1 theater
sound is available, the option 4 is recommended.
1..1. FRONT SPEAKER
When the center, rear and the subwoofer speaker are in the “Off”
position, and the front speaker is in the “Large” one, the front audio
signal can be mixed with the center, rear and subwoofer speaker. Usually
it is set to “Large”.
The front speaker can be set in Large or Small position.
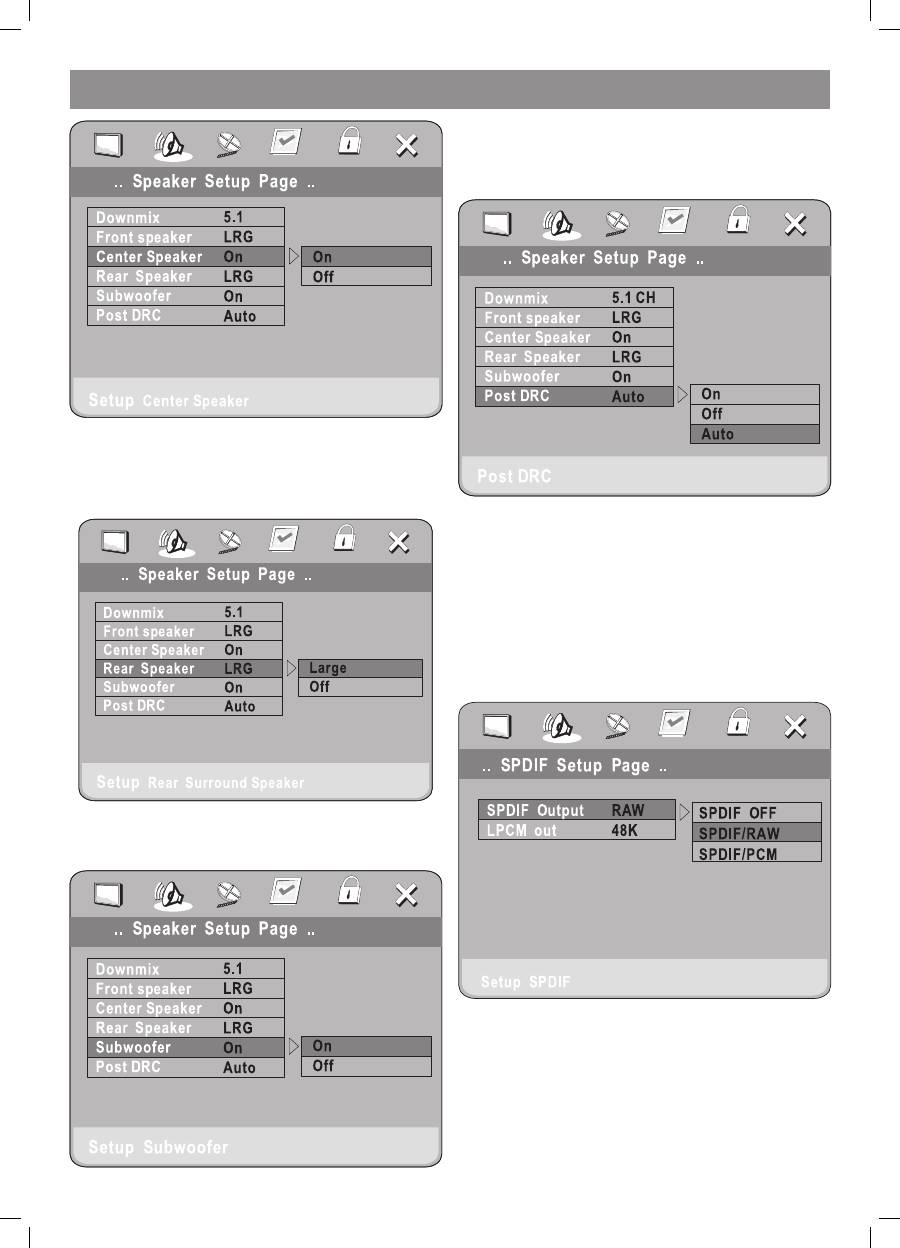
1..1.3 CENTRAL SPEAKER
Follow the operating instructions stated in “DVD MENU SETUP” in
combination with the desired option as shown in the following figure.
4073IM.indd 10
09.10.2007 12:28:34
ENGLISH
11
The central speaker can be set in ON or OFF position.
1..1.4 REAR SPEAKER
The rear speaker can be set in LARGE or OFF positions.
Follow the operating instructions stated in “DVD MENU SETUP” in
combination with the desired option as shown in the following figure.
1..1.5 WOOFER SPEAKER
The woofer speaker can be set in ON of OFF positions.
Follow the operating instructions stated in “DVD MENU SETUP” in
combination with the desired option as shown in the following figure
1..1.6 OUTPUT DYNAMIC COMPRESS
This function can compress audio signals with wide dynamic ranges
proportionally to reduce the intensive impact on the speakers.
Follow the operating instructions stated in “DVD MENU SETUP” in
combination with the desired option as shown in the following figure.
Set up output dynamic compression.
Output dynamic compression can be set in “ON“, “OFF” or “AUTO”
position.
1.. DIGITAL AUTO SETUP
The function includes SPDIF output and LPCM output.
1...1 DIGITAL AUDIO OUTPUT
Dolby digital or DTS signals can be output through OPTICAL or COA�IAL
sockets on the rear panel. Follow the operating instructions stated in
“DVD MENU SETUP” in combination with the desired option as shown in
the following figure.
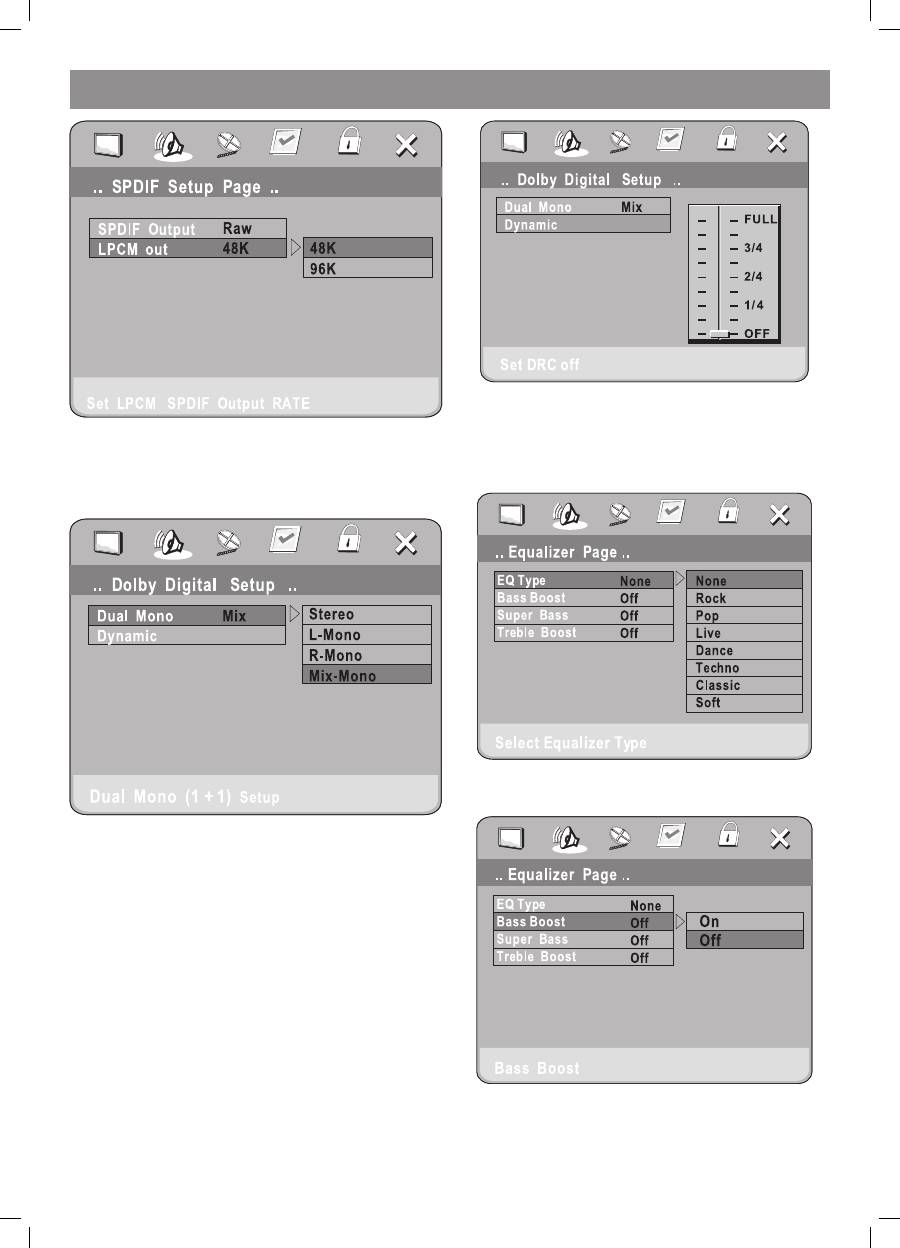
1... LPCM OUTPUT
To avoid disturbing neighbours at night, use this function to decrease
the volume without changing the original tone.
4073IM.indd 11
09.10.2007 12:28:35
ENGLISH
1
1..3. DOLBYDIGITALSETUP
Dolby digital setup includes L+R and dynamic range compressing.
1..3.1 L+R SETUP
Follow the operating instructions stated in “DVD MENU SETUP” in
combination with the desired option as shown in the following figure.
If you have Dolby digital output in your amplifier/decoder, you may
select stereo, left, right and mixed sound according toyour wishes.
1..3. DYNAMIC RANGE COMPRESSION
Follow the operating instructions stated in “DVD MENU SETUP” in
combination with the desired option as shown in the following figure.
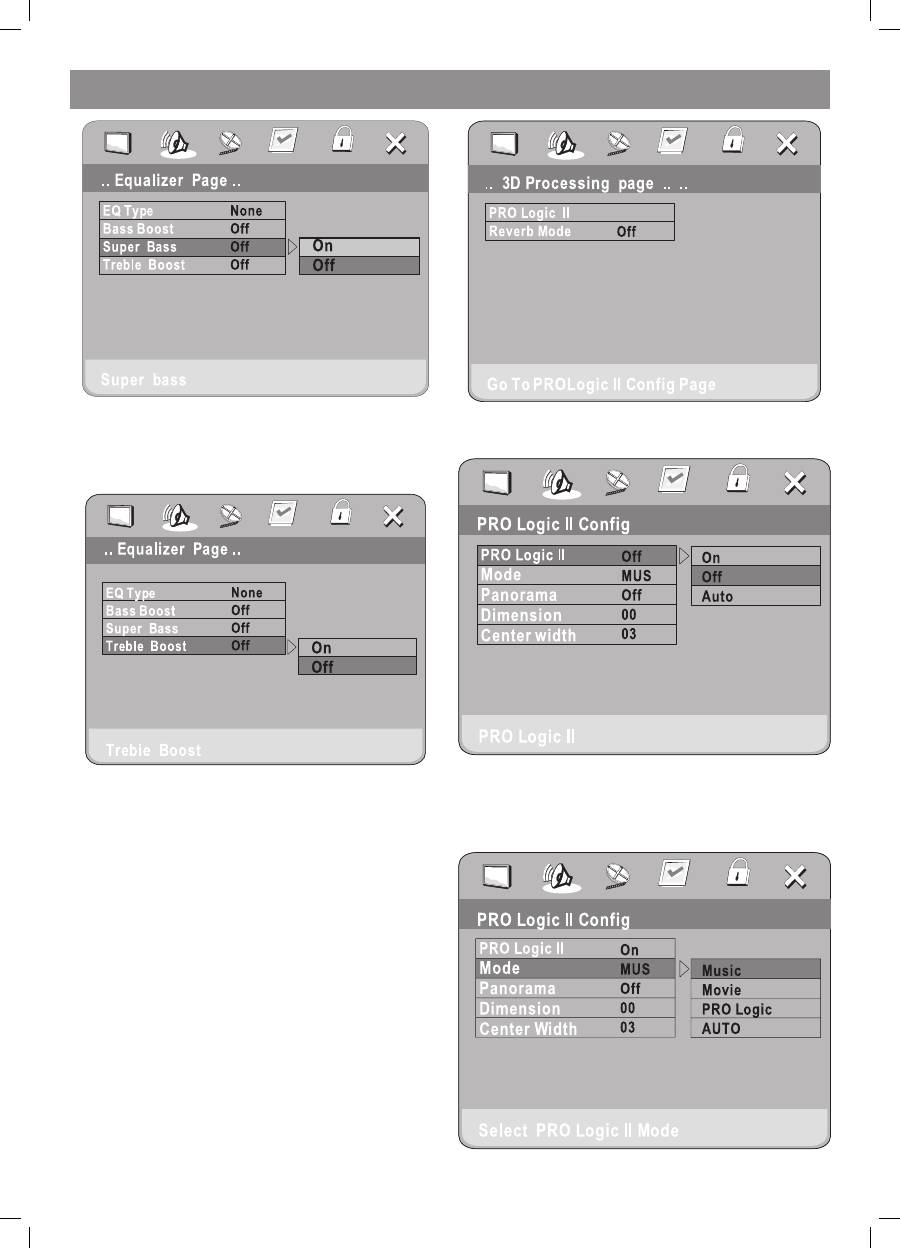
1..4 EQUALIZER SETUP
The function includes setting up the equalizer type, bass boost, super
bass and treble boost modes.
1..4.1 EQUALIZER MODE
Follow the operating instructions stated in “DVD MENU SETUP” in
combination with the desired option as shown in the following figure.
1..4. BASS ENHANCING
Follow the operating instructions stated in “DVD MENU SETUP” in
combination with the desired option as shown in the following figure.
The Bass Boost function can be set in the ON or OFF positions.
1..4.3 SUB WOOFER
Follow the operating instructions stated in “DVD MENU SETUP” in
combination with the desired option as shown in the following figure.
4073IM.indd 12
09.10.2007 12:28:36
ENGLISH
13
The Super Bass function can be set in the ON or OFF positions.
1..4.4. TREBLE BOOST
Follow the operating instructions stated in “DVD MENU SETUP” in
combination with the desired option as shown in the following figure.
The Treble Boost function can be set in the ON or OFF positions.
1..5 3D PROCESSING SETUP
3D processing setup includes PRO LOGIC and REVERB MODE
functions.
1..5.1 PRO LOGIC II SETUP
Follow the operating instructions stated in “DVD MENU SETUP” in
combination with the desired option as shown in the following figure.
Now go to the PRO Logic II setup page.
1..5.1.1 PRO LOGIC II SETUP
This function works when the speaker is set up in the “DOWNMI�” mode.
1..5.1.. PRO LOGIC II SETUP
4073IM.indd 13
09.10.2007 12:28:36
ENGLISH
14
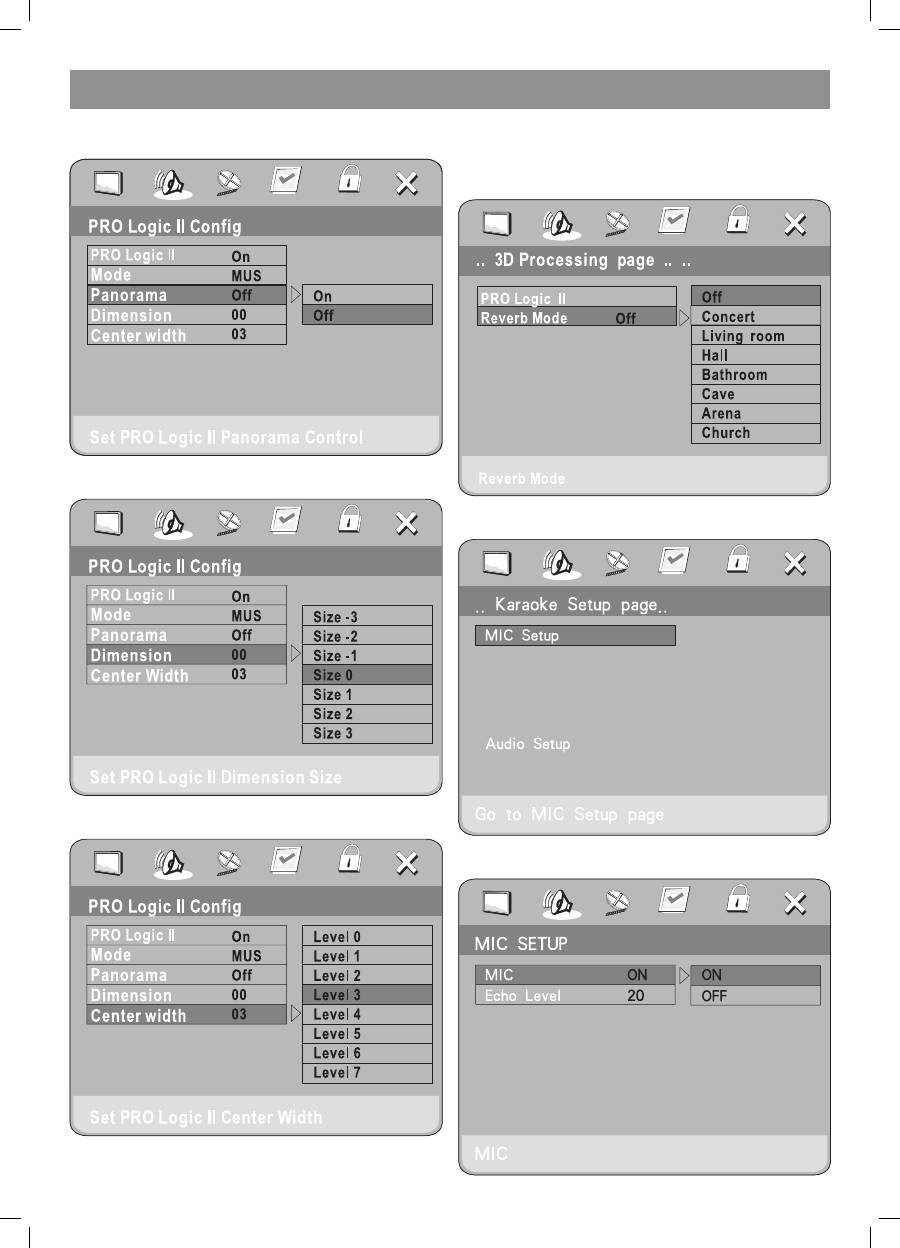
The Panorama function, dimensions and center width can be adjusted
only in the nonautomatic mode.
1..5.1.3. PRO LOGIC II SETUP
1..5.1.4 PRO LOGIC II SETUP
1..5.1.5 PRO LOGIC II SETUP
1..5.1.5. MI�TURE MODE
Follow the operating instructions stated in “DVD MENU SETUP” in
combination with the desired option as shown in the following figure.
1..6 MICROPHONE SETUP
1..6.1 MICROPHONE SETUP
4073IM.indd 14
09.10.2007 12:28:38
ENGLISH
15
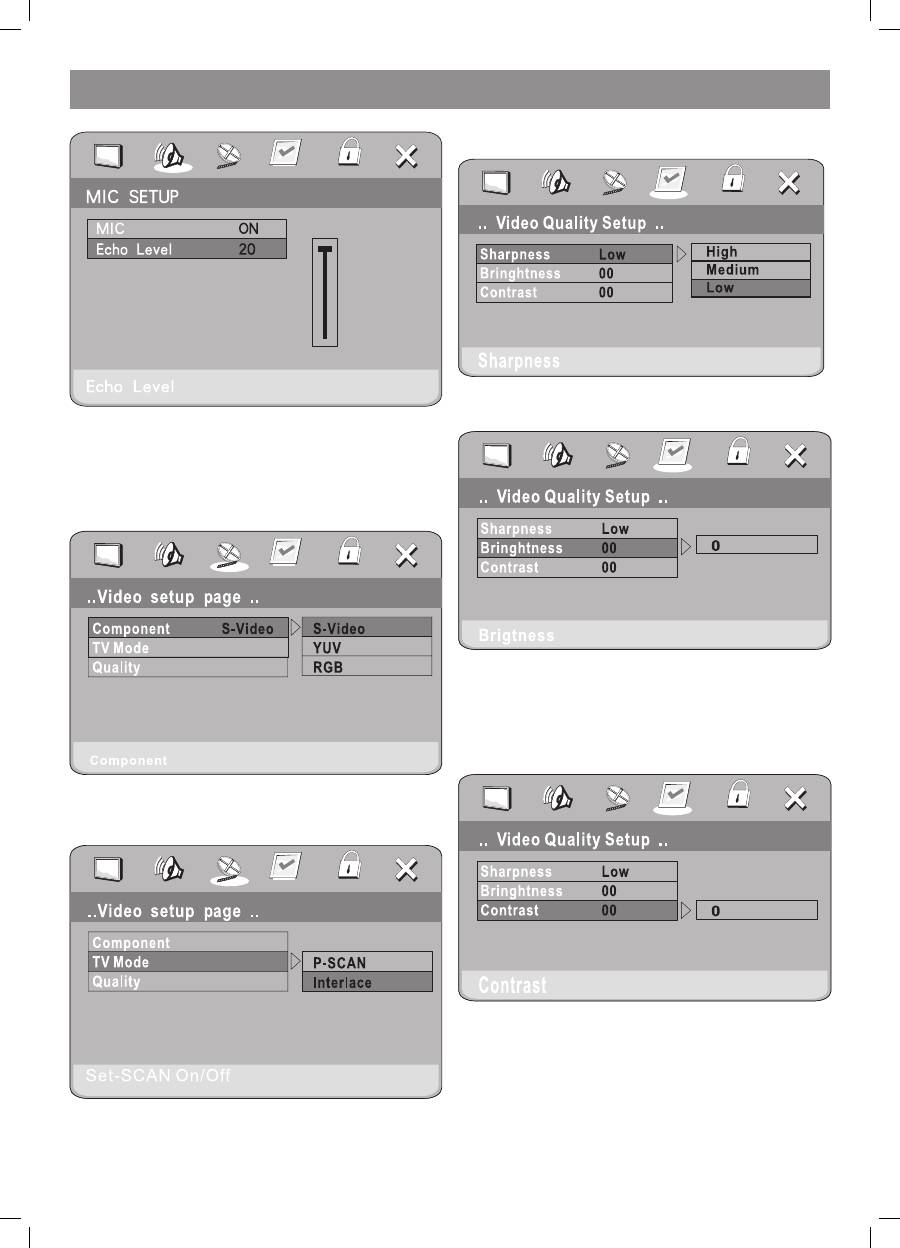
1..6.1.1 MICROPHONE SETUP
1.3 VIDEO SETUP
This function includes setting up the Component, TVmode and Quality
modes.
1.3.1 COMPONENT
Follow the operating instructions stated in “DVD MENU SETUP” in
combination with the desired option as shown in the following figure.
1.3. TV MODE
Follow the operating instructions stated in “DVD MENU SETUP” in
combination with the desired option as shown in the following figure.
1.3.3 QUALITY
The Quality function includes setting up the Sharpness, Brightness and
Contrast modes.
1.3.3.1 SHARPNESS
Follow the operating instructions stated in “DVD MENU SETUP” in
combination with the desired option as shown in the following figure.
1.3.3. BRIGHTNESS
Follow the operating instructions stated in “DVD MENU SETUP” in
combination with the desired option as shown in the following figure.
Press the right arrow button to enter the adjustment mode. After that
press up and down buttons to adjust the settings.
Press the left arrow button to return to the setup menu.
1.3.3.3 CONTRAST
Follow the operating instructions stated in “DVD MENU SETUP” in
combination with the desired option as shown in the following figure.
Press the right arrow button to enter the adjustment mode. After that
press the up and down buttons to adjust the settings.
Press the left arrow button to return to the setup menu.
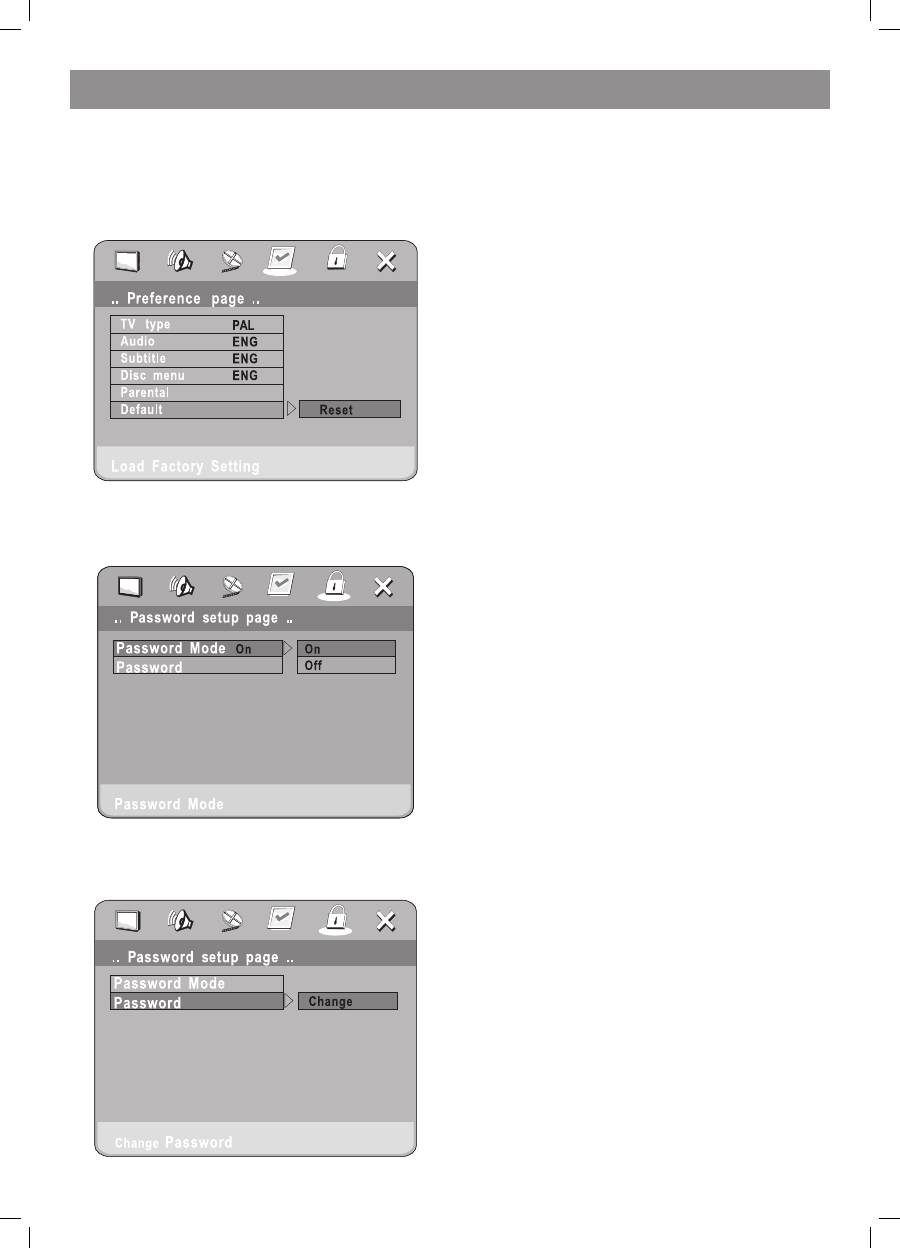
1.4. PREFERENCE SETUP
When in the stop mode press the SETUP button to access the Initial
Setup menum which includes such items as TV TYPE, PBC, AUDIO,
SUBTITLE, DISC MENU, COUNTRY REGION, PARENTAL and DEFAULTS.
The preset values are essential to a DVD player. The user may change
these items as desired.
4073IM.indd 15
09.10.2007 12:28:39

ENGLISH
16
1.4.1 TV TYPE SETUP
Follow the operating instructions stated in “DVD MENU SETUP” in
combination with the desired option as shown in the following figure.
This device supports outputs of various systems, including NTSC, Multi
and PAL.
1)
If your TV set works only in NTSC or PAL systems, in the event
of selecting a wrong system the TV screen will start blinking and become
colourless. In this case press the N/P button on the remote controller to
return to the normal screen. Don’t forget selecting the correct system.
)
To obtain more information on output formats refer to your TV
set instructions.
...
AUDIO SETUP
Follow the operating instructions stated in “DVD MENU SETUP” in
combination with the desired option as shown in the following figure.
The device provides the builtin disc dubbing language options in such
languages as English, French, Spanish, Chinese, Japanese, Korean,
Russian and Thai.
..3.
SUBTITLE SETUP
The device provides such builtin subtitle languages, as English, French,
Spanish, Chinese and Japanese. When playing a DVD disc, the user may
hide the subtitle or choose any of them as the preset subtitle language.
Follow the operating instructions stated in “DVD MENU SETUP” in
combination with the desired option as shown in the following figure.
..4.
DISC MENU LANGUAGE SETUP
This device provides such such film menu language options, as English,
French, Spanish, Chinese, Japanese, Korean, Russian and Thai.
Follow the operating instructions stated in “DVD MENU SETUP” in
combination with the desired option as shown in the following figure.
1.1.
PARENTAL CONTROL
Follow the operating instructions stated in “DVD MENU SETUP” in
combination with the desired option as shown in the following figure.
4073IM.indd 16
09.10.2007 12:28:40
ENGLISH
17
To prevent children watching restricted films the film class may be set
according to the label mark on the disc.
This function won’t work if the “Password Setup“ mode is on.
1.4.6. DEFAULT SETTINGS
This function allows using the original settings of the device.
Follow the operating instructions stated in “DVD MENU SETUP” in
combination with the desired option as shown in the following figure.
1.5. PASSWORD SETUP
Follow the operating instructions stated in “DVD MENU SETUP” in
combination with the desired option as shown in the following figure.
1.5.1. PASSWORD SETUP.
1.5.. PASSWORD
The default password is “8888“. The user may change it using this
option.
Follow the operating instructions stated in “DVD MENU SETUP” in
combination with the desired option as shown in the following figure.
6. OPERATING THE МР3 FUNCTION
MP3 is an audio compression mode using Level 3 of the international
MPEG standard. Under this standard the sound is compressed in the
proportion of 1:1. An MP3 disc may contain music enough for playing
longer than 600 minutes or record more than 170 songs providing the
same sound quality as the CD format.
To play an MP3 disc
Files menu of MP3 play
When playing an MP3 disc file menus can be selected by pressing on
the PROG key: File list and Folder.
1. FILE LIST
This function allows selecting the files to be played by pressing
the UP DOWN arrow keys in combination with the ENTER key, or
using the number keys together with the ENTER key for direct
selection. Should the input number be out of the music numbers, the
“CURRENT TRACK NUMBER” schould display in the screen.
. FOLDER.
Entert he screen menu first, after that press the UP DOWN or LEFT
RIGHT arrow keys and then the ENTER key to select the subdirectory
and music.
7. JPEG SETTINGS
JPEG format is the most efficient compression format that is widely used
as picture storage type flattened and stored format.
Even if pictures are compressed 150 types they still have good
performance. Supported by most picture processing software types and
fit for picture storage it requires small disc space and is easy for use. The
device can play picture CD discs in JPEG format.
Press relevant number keys to select picture display.
1. Put the disc on the disc tray correctly; the machine begins searching
the disc information.
. Press number keys to select the picture.
3. The present picture will be shown only after pressing the number
key.
Select playing by choosing the relevant menu item.
1. Put in the disc$ machine will start searching for the disc information
and the main menu will display on the screen. Press number keys
starting from 1 to select pictures, then press the play key to play.
. Press dirction keys to select pictures, then press the play key.
3. In the position of stop press direction keys to select other pictures.
4. In the stop position select the first line item on the right, then press
the play key to return to the upper menu.
8. TROUBLESHOOTING GUIDE
For your convenience we have enlisted some points to help solving
problems you might encounter while using the DVD player.
No sound
• Ensure firm connection between the player and other appliances,
such as power amplifier or TV set.
• Ensure correct operation of the TV and the power amplifier.
No picture
• Ensure firm connection between the player and other appliances,
such as power amplifier or TV set.
• Reassure that the disc is clear.
Remote controller doesn’t work
• Reassure there are no obstacles between the player and the remote
controller.
• Point with the remote controller at the remote control sensor.
• Check the battery
Picture dividing
• Make sure the disc is clean and unscratched.
• As the player is controlled with microcomputer, when encountering a
problem switch off the power first and then switch it on again in a few
seconds. By then, if no mistake icon is shown, the player shall work
well.
9. DISC PROTECTION
Protection
a. When loading or removing the disc, always hold it for the cental hole
and the edge.
b. Don’t stick or write anything on the surface. Protect discs from any
fingerprints.
4073IM.indd 17
09.10.2007 12:28:41

ENGLISH
18
Cleaning the disc surface
Use only a soft cloth for disc cleaning. Always wipe discs from the center towards the edge.
Disc storage
а. Never warp the discs. Diring nonuse periods, store discs in their cases, which should be kept vertically. Don’t expose discs to high tempera-
tures, humidity or extremely low temperatures, or other conditions that may damage discs.
b. Don’t expose discs to direct sunlight.
10. MPEG 4 OPERATION
Basic playback
Play MPEG 4 disc.
After the unit has read the MPEG4 disc, the TV screen will display the following figure:
Number of the
playing file
Total number of the
files in the disc
Name of the playing file
Folder
File
After entering the MPEG4 disc menu press the “up“ or “down” direction
key to select the desired folder, then press the “enter” key or the “right” direction key to enter the submenu of the folder. Press the “up” or ”down”
direction keys to select the desired chapter, and then press the “enter” key to play. Also you can press number keys for selecting chapters to play
directly.
Playback tips:
1. when playing the disc menu, pressing the “prog“ key once will make the unit put all the files to a general folder. Then press direction keys or
number keys to select the chapter desired.
. when playing the disc menu, press the direction button “right” to enter the next level submenu; or press the direction key “left” to enter the last
level menu.
3. when playing the disc menu, press the “mark“ key for programming to program the chapter to play. The procedure is as follows: press direction
keys to select the desired chapter, then press the “mark” key to program the chapter in the playback list; after finishing programming press the
“prog” key to enter the playback list for playing.
4. press the “repeat” key repeatedly to select an option from “play disorderly” > “random play” > “one chapter play” > “one chapter repeat”
> “catalogue repeat” > “catalogue play” digital selection of the chapter: when playing the menu or one chapter press number keys for direct
chapter selection, for example: to select chapter 8 press the numbers “” and ”8”, then press the “enter key”.
11.Technical Specifications
Type
DVD PLAYER
Model
VT4073 SR
VT4073 SR
Play mode
NTSC/PAL/AUTO
NTSC/PAL/AUTO
/PAL/AUTO
PAL/AUTO
/AUTO
AUTO
Disc mode
DVD, SVCD, DVCD, VCD, MP3, PHOTO CD, CDR, CDRW, DVD+R, DVDR, DVDRW, DVD+RW
Resolution
≥
500 lines
Video S/N ratio
≥
56 dB
Frequency response
fs 96 KHz: 4Hy44KHz: +/1 dB
Audio S/N ratio
≥
90 dB
Dynamic range
≥
90 dB
Distortion
< 0.01%
D/A converter
19KHz/4bit
Video Output
1Vpp(75 Ohm)
1Vpp(75 Ohm)
Svideo output
Y: 1Vpp(75 Ohm) C:0.3Vpp(75 Ohm)
Y: 1Vpp(75 Ohm) C:0.3Vpp(75 Ohm)
Audio output
.0V�0.0V, 1.0V
V�0.0V, 1.0V
AC3
5,1channel output
3
5,1channel output
Power voltage
10040V, AC 50/60 Hz
Power consumption
< 5 W
< 5 W
5 W
Dimensions
550x114x31 мм
Weight
,8 KG
Weight and size data are approximated.
The manufacturer reserves the right to make changes to the characteristics of the device without prior notice.
The service life of the device is no less than five years.
Guarantee
Details regarding guarantee conditions can be obtained from the dealer from whom the appliance was purchased. The bill of sale or receipt must be
produced when making any claim under the terms of this guarantee.
This product conforms to the EMC-Requirements as laid down by the Council Directive
89/336/EEC and to the Low Voltage Regulation (3/73 EEC)
4073IM.indd 18
09.10.2007 12:28:41
DEUTSCH
19
Bedienungsanleitung
VT-4073SR
Lesen Sie aufmerksam die in dieser Bedienungsanleitung enthaltene
Hinweise, bevor Sie den Spieler anschalten, benutzen oder justieren.
Bewahren Sie diese Bedienungsanleitung im Laufe der Benutzung des
Geräts auf.
SCHÜTZEN SIE SICH!
Notieren Sie sich das Modell und die Seriennummer des Gerätes,
solange sie noch gut sichtbar sind. Diese Nummern befinden sich
auf der Hinterwand des Gehäuses vom Gerät. Bewahren Sie diese
Informationen für die nachfolgenden Nutzung auf.
ACHTUNG��
DER VIDEOPLAYER DER DVD-PLATTEN IST EIN LASERGERÄT
DER A-KLASSE. DIE BENUTZUNG DER STEUERORGANE ODER
EINSTELLUNGEN, DIE IN VORLIEGENDER BEDIENUNGSANLEITUNG
NICHT ANGEGEBEN SIND, DIE DURCHFÜHRUNG DER ABLÄUFE, DIE
HIER NICHT BESCHRIEBEN SIND, KANN ZUR VERLETZUNG DURCH
DIE LASERSTRAHLUNG FÜHREN. DA DER LASERSTRAHL, DER IN
DIESEM GERÄT VERWENDET WIRD, FÜR DIE AUGEN GEFÄHRLICH
IST, VERSUCHEN SIE NICHT, DAS GEHÄUSE AUFZUMACHEN.
DIE BEDIENUNG DES GERÄTS SOLL AUSSCHLIESSLICH
VON QUALIFIZIERTEN FACHLEUTEN DES SERVICE CENTERS
VORGENOMMEN WERDEN.
TECHNISCHE BEDIENUNG
=
Bei der Beschädigung des Steckers oder des Netzkabels ziehen Sie
den Stecker aus der Steckdose und wenden Sie sich an den Kun-
denservice.
=
Schalten Sie nicht zu viele Elektrogeräte an eine Steckdose an und
verkürzen oder verlängern Sie das Netzkabel nicht. Das kann Brand
und/oder Stromschlag verursachen.
=
Um Brand und/oder Stromschlag zu vermeiden, stellen Sie auf das
Netzkabel des Geräts keine fremden Gegenstände. Befestigen Sie
das Kabel immer sicher.
=
Wenn das Gerät herunter fällt und seine Vorderplatte beschädigt
wird, ziehen Sie den Stecker des Spielers aus der Steckdose und
wenden Sie sich an den Kundenservice.
=
Um den Brand und/oder Stromschlag zu vermeiden, wird untersagt,
fremde Gegenstände ins Gerätgehäuse einzustecken und Hoch-
spannungselemente zu berühren.
=
Um Brand und/oder Stromschlagrisiko zu vermeiden, öffnen Sie
nie den Deckel oder die Hinterplatte des Geräts. Mit allen Fragen
bezüglich der technischen Bedienung wenden Sie sich nur an den
entsprechend qualifizierten Fachmann.
=
Stellen Sie das Gerät nie auf unstabile Oberfläche. Wenn das Gerät
herunterfällt, entsteht die Gefahr der Verletzung der Menschen und
der Beschädigung des Gerätes selbst.
=
Stellen Sie das Gerät nicht an den Stellen mit hoher Staubkonzentra-
tion oder erhöhter Luftfeuchtigkeit auf. Staub kann zu Beschädigun-
gen des Spielers führen.
=
Benutzen Sie das Gerät nicht in der Wassernähe, zum Beispiel ne-
ben der Wanne, des Geschirrspülers oder in den Kellerräumen.
=
Decken Sie die ausstrahlende Öffnung des Geräts mit dem Stoff
oder anderen Gegenständen nicht zu.
=
Stellen Sie das Gerät nicht auf dem Bett, auf dem Sofa, im Korb oder
an anderen Stellen auf, wo die Möglichkeit besteht, seinen Ventilator
zu verschließen.
=
Stellen Sie das Gerät nicht in der Nähe der Heizkörper und anderen
Wärmequellen auf.
=
Stellen Sie das Gerät nicht an den Stellen mit der beschränkten
Lüftung (zum Beispiel in den Schränken, verschlossenen Fernseh-
schränken usw.) auf.
=
Vermeiden Sie den Kontakt des Geräts mit flüssigen Substanzen.
Stellen Sie darauf keine Behälter mit Flüssigkeiten auf (unter ande-
rem auch keine Blumentöpfe o.ä.)
=
Schützen Sie den Bildschirm vor Wirkung der geraden Sonnenstrah-
len.
=
Öffnen Sie das Gerät nie selbständig. Im Fall, dass Sie die Arbeit des
Geräts entsprechend der „Anleitung zur Fehlersuche und –Beseiti-
gung“ nicht verbessern können, wenden Sie sich an den Kundenser-
vice oder Werkstatt.
=
Während des Betriebs, benutzen Sie bitte diese Bedienungsanlei-
tung. Wenn die Beschädigung des Gerätes wegen Ihrer Schuld, in-
folge Ihrer falschen Handlungen entsteht, wenden Sie sich an einen
qualifizierten Fachmann.
=
Wenn das Gerät im Laufe von längerer Zeit nicht benutzt wird, schal-
ten Sie es vom Elektronetz ab und ziehen Sie die Antenne heraus.
=
Falls das Gerät ungewöhnliche Geräusche oder Gerüche ausschei-
det, schalten Sie es ab, trennen Sie es vom Elektronetz und wenden
Sie sich an einen qualifizierten Fachmann.
=
Stellen Sie das Gerät nie in der Nähe des offenen Feuers auf.
=
Schützen Sie das Gerätgehäuse (besonders den Bildschirm) von
Schlägen.
=
Falls Sie keine Absicht haben, das Gerät in der nächsten Zeit
nicht zu benutzen, setzen Sie den Schalter in die „OFF“Position
(«AUSGESCHALTET») ein und trennen Sie es vom Netz.
WICHTIGE SICHERHEITSHINWEISE BEI DER GERÄTBEDIENUNG
VERBOTEN!
=
Um die Beschädigung des Geräts zu vermeiden, wird verboten die
Arbeit seines Ventilators zu verhindert.
=
Um die Beschädigungen zu vermeiden, wird verboten, das Gerät
der Wirkung von Feuchtigkeit und instabiler Spannung auszusetzen.
Kontakt mit Regentropfen, Feuchtigkeit und Benutzung des Geräts
als Untersetzer für Blumentöpfe und Wassergefäße ist unzulässig.
=
Um Brand und/oder Stromschlag zu vermeiden, wird verboten,
den Deckel und die hintere Platte des Geräts zu öffnen. Technische
Bedienung muss nur von qualifizierten Fachleuten durchgeführt
werden.
=
Es ist verboten, das Gerät in der Nähe der Wärmequellen
aufzustellen.
VORSICHT!
=
Reinigen Sie das Gerät nur mit Hilfe eines trockenen Stofftuchs.
=
Es ist verboten, den Deckel des Geräts während des Betriebs zu
berühren.
=
Bei Entstehung von fremden Erscheinungen, insbesondere von
Qualm, ungewöhnlichen Geräuschen und Gerüchen, schalten Sie
das Gerät sofort aus.
=
Wenn Sie nicht beabsichtigen, das Gerät in der nächsten Zeit zu
benutzen, trennen Sie es vom Elektronetz.
Besondere Warnung:
In diesem Gerät werden die erstklassigen Laser benutzt. Direkte
Auswirkung der Laserstrahlen auf die Haut kann Brandwunden ver-
ursachen. Befolgen Sie diese Bedienungsanleitung während des
Betriebs.
ANFORDERUNGEN ZUR BEDIENUNG DES GERÄTS
Es wird verboten, dieses Gerät an folgenden Stellen aufzustellen�
• An den Stellen der direkten Sonnenstrahlung, in der Nähe
zu Wärmequellen, insbesondere neben der Heizkörpern,
Küchenherden und anderen ähnlichen Vorrichtungen.
• Auf den Oberflächen von Heizkörpern.
• An den zu staubigen Stellen, mit dem ungenügenden Luftaustausch,
mit erhöhter Luftfeuchtigkeit, auf den nicht befestigten oder
vibrierenden Oberflächen. Es wird verboten, das Gerät der
Auswirkung von Regentropfen und Wasser auszusetzen.
• In der Nähe von starken Lautsprechern – um Beschädigungen zu
vermeiden, die Arbeitshindernisse verursachen.
• Um die Beschädigungsmöglichkeit des Geräts zu vermeiden,
wird verboten, zerkratzte, verbogene und zersplitterte Disken zu
verwenden.
Das Blitzzeichen im gleichschenkligen Dreieck weit den Benutzer
auf eine gefährliche Spannung im Inneren des Gerätes hin, die
Stromschlag zeugen kann.
Das Ausrufezeichen in gleichschenkligen Dreieck weist den Benutzer
auf wichtige Anweisungen hinsichtlich Betrieb und Wartung in der
Gebrauchsanweisung hin.
Markierung eines Lasergerätes. Die Markierung muss sich
auf der Hintertafel des Gerätes befinden und bedeutet,
dass das Gerät zur Klasse 1 gehört und Laserstrahlen
verwendet. Es ist keine Laserbestrahlungsgefahr
vorhanden, solange das Gerät nicht auseinander
genommen wird.
CLASS 1
LASER PRODUCT
CAUTION
Risk of electric shock
DO NOT OPEN
WARNUNG� Um das Risiko von Feuerentfachung oder Stromschlag zu
vermeiden, sollten Sie die Tafeln des Gerätes nicht abnehmen. Wenden Sie sich
zur Wartung ausschließlich an qualifiziertes Fachpersonal
4073IM.indd 19
09.10.2007 12:28:41
DEUTSCH
0
ANFORDERUNGEN ZUR STROMVERSORGUNG
• Erforderliche Stromversorgung� Wechselstrom mit Spannung 90250 V, Schwingungsfrequenz 50/60 Hz.
• Wenn Sie nicht beabsichtigen, das Gerät in nächster Zeit zu benutzen, ziehen Sie den Stecker des Spielers aus der Steckdose.
• Zeitabstand zwischen dem An und Ausschalten des Geräts muss nicht weniger als 10 Sekunden betragen. Das verlängert die Dienstfrist des
Geräts.
TECHNISCHE BESONDERHEITEN
1. Volle Kompatibilität mit folgenden Formaten� DVD, SVCD, DVCD, VCD, Mp3, PHOTO CD, DVDR und CDRW
2. Für die Wiedergabe von digitalen Bildern benutzen Sie die entsprechende CompactDisk.
3. 10bitDigitalwandler des Videosignals mit der Auflösung mehr als 500 Zeilen..
4. 24bitDigitalwandler des Audiosignals mit der Frequenz 96 kHz. Hohe Qualität des akustischen Effekts, professionelles HiFiNiveau.
5. Ausgang des Videosignals im Standard SVideo, kombinierter AusgangsVideosignal, optischer und koaxialer Ausgang zur Wahl.
6. Professionelle Funktion� DigitalKaraoke.
7. Große Moduswahl für die Arbeit des FernseherBildschirms. Wahlmöglichkeit für Bildschirmfragment mit dem gewünschten Film.
8. Möglichkeit für voll programmierte Erneuerung.
9. Zeilenweise AbtastungsFunktion.
10. Hochintegriertes System; Decodierung aufgrund der EinKristallTechnologie; hohe Zuverlässigkeit und Stabilität; hochqualifizierte
Fehlerkorrektur.
11. RadioEinstellung im StereoModus für AM/FMBereich.
24bitDigitalAnalogWandler (D/A) mit Frequenz 96 kHz.
Das Gerät ist auf einer der letzten Wandlungstechnologien basiert; es ist mit der ProgrammUnterstützung mit Messungsfrequenz 96 kHz (zweimal
höher, als bei einer normalen CompactDisk) und 24bitAngaben kompatibel. Das garantiert Ihnen auf solche Weise die beste Lautqualität ohne
Verzerrungsanzeichen.
Komplexer Ausgangsvideosignal.
Der komplexe Ausgangsvideosignal (Y, Cr, Cb) gibt Ihnen die Möglichkeit, den echten DVDEffekt zu erleben. Er gibt reine farbige Bildsignale ohne
jegliche Videostörungen wieder.
Lasersystem mit dem Schutz gegen Stromüberlastung
Laserkopf ist das wichtigste und kritischste Element im ganzen Gerät. Seine Arbeitsqualität hat direkte Auswirkung auf die Dienstfrist des Geräts
und die FehlerbehebungsFunktion. Beim Ablesen von einer zerkratzten oder nicht standardisierten Disk überschreitet die Laserspannung in einem
gewöhnlichen Spieler das normale Niveau in 24 Mal (manchmal auch in 20 Mal) und dadurch wird die Dienstfrist des Gerätes verringert. Dieser
Spieler ist mit einem einzigartigen Lasersystem mit dem Schutz gegen Stromüberlastung versehen, was einen ständigen Laserstrom versichert und
dadurch die Dienstfrist des Laserkopfes verlängert.
1. Kurze Übersicht über die Bedienelemente des Spielers.
Bedienelemente auf der Vorderplatte:
1. ANSCHALTEN
2. BILDSCHIRM
3. SENSOR FÜR FERNBEDIENUNGS
4. STECKBUCHSE FÜRS MIKROPHON 1
5. STECKBUCHSE FÜRS MIKROPHON 2
6. MIKROPHON 1TONREGLER
7. MIKROPHON 2TONREGLER
8. DISKLADESCHALE
9. DISKLADESCHALE ÖFFNEN/SCHLIEßEN
10. STOP
11. START/PAUSE
12. TONBALANCE
4073IM.indd 20
09.10.2007 12:28:41
