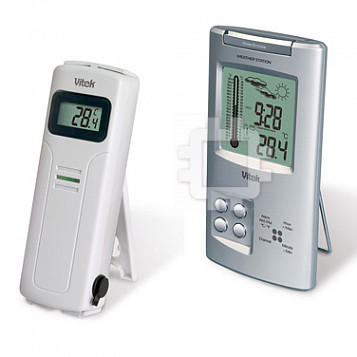
Vitek VT-3539: instruction
Class: Household, kitchen appliances, electronics and equipment
Type:


Manual for Vitek VT-3539
Table of contents
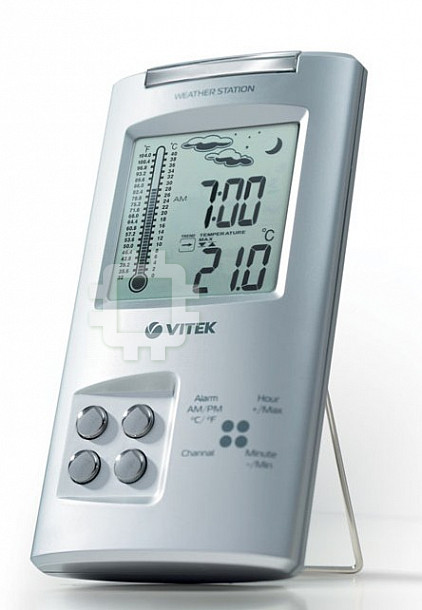
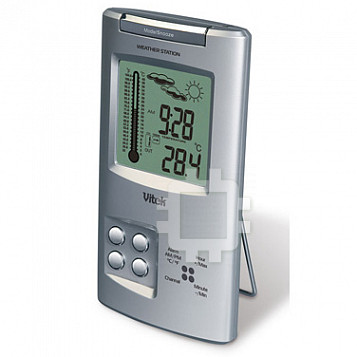
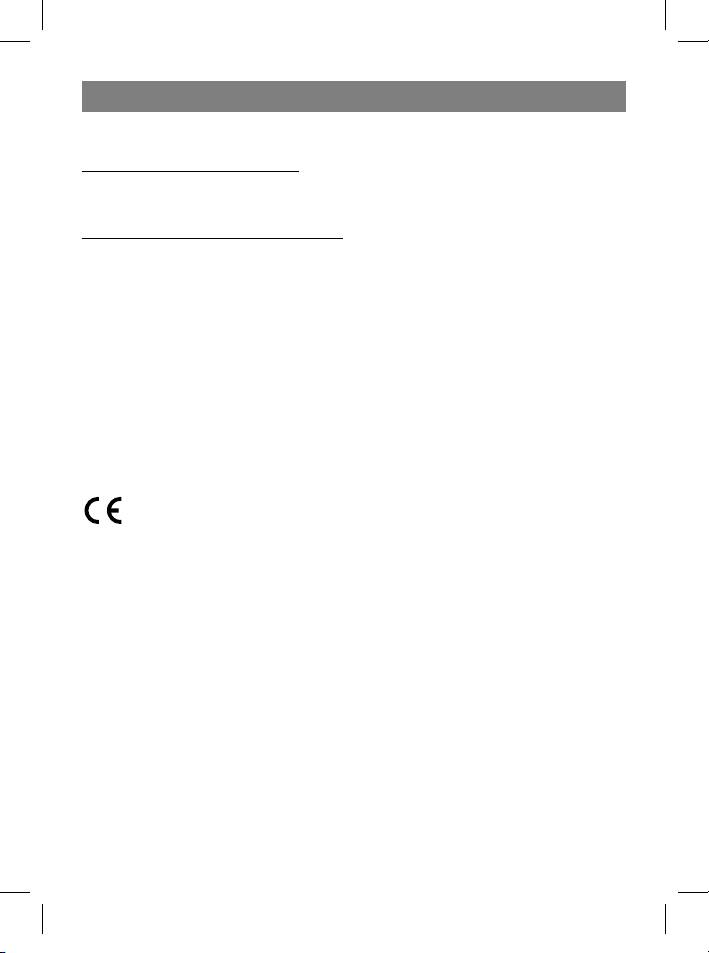
- WEATHER STATION USER INSTRUCTIONS Features: Block with main display:
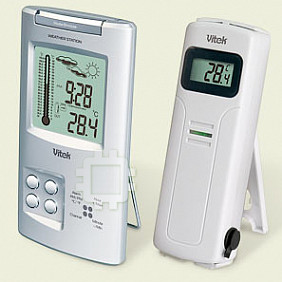
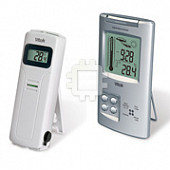
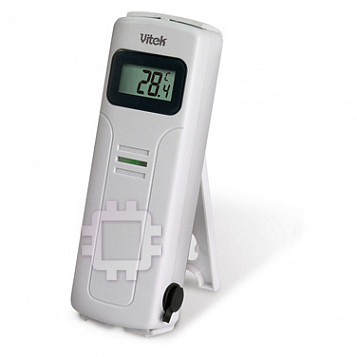
- Remote sensors: OPERATING CONTROLS
- READ BEFORE USING For best results: GETTING STARTED Step 1: Setting up the remote sensor:
- Step 2: Receiver settings SYNCHRONIZING THE OUTDOOR TEMPERATURE READING Auto-detect function: Manual learning function (Search for remote sensor signals):
- SETTING THE TIME AND ALARM Setting the time:
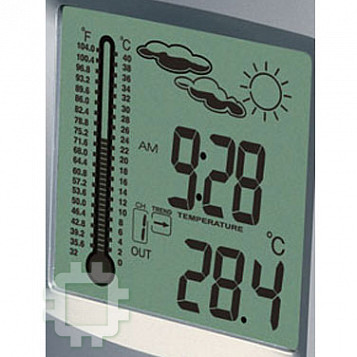
- WEATHER CONDITIONS DISPLAY
- Hi and Lo symbols on the display Temperature trend indicator The temperature trend indicator shows the temperature trend registered by a separate sensor over the past half-hour. TEMPERATURE CONDITIONS REPORT Temperature conditions reporting symbols Black ice warning
- TEMPERATURE ALARM SETTINGS High temperature alarm Low temperature alarm When the alarm will be heard
- BACKLIGHT USING AN EXTERNAL WIRED SENSOR LOW BATTERY INDICATOR Receiver:
- Remote sensor:
- RESOLVING MALFUNCTIONS Problem Resolution
- TECHNICAL CHARACTERISTICS Meteorological station receiver Meteorological station remote sensor MINIMUM SERVICE LIFE - 3 YEARS
WEATHER STATION
MODEL VT-3539
INSTRUCTION MANUAL
2
14
26
38
50
www.vitek-aus.com
35391.indd 135391.indd 1 23.05.2006 17:08:5123.05.2006 17:08:51
ENGLISH
WEATHER STATION
Thank you for purchasing this meteorology station – model VT-3539 with wireless
sensor. Take the time to carefully read these operating instructions.
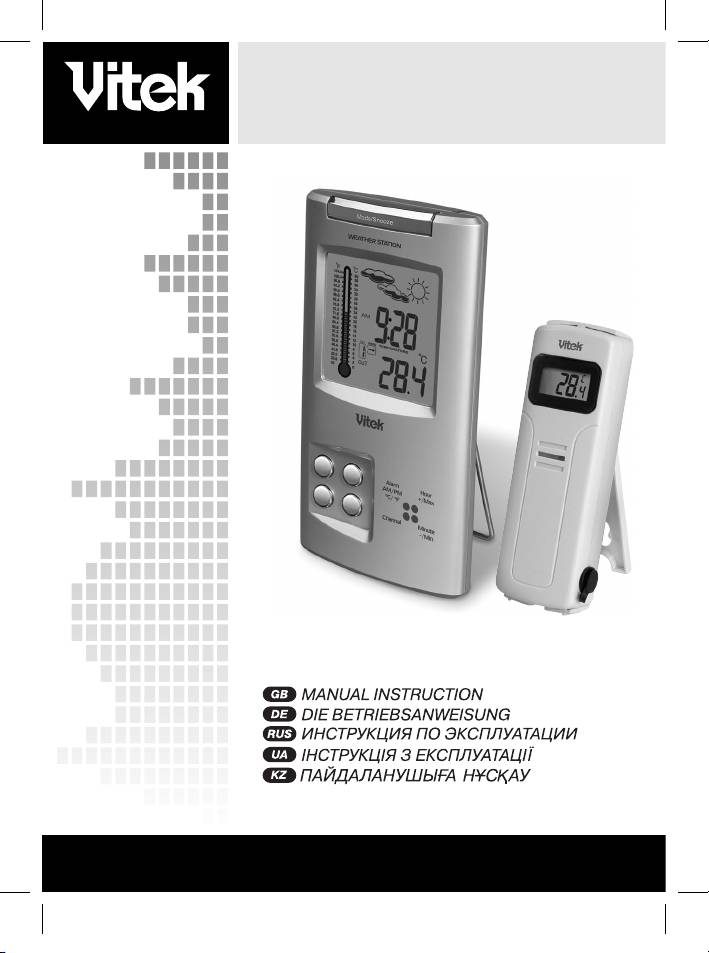
USER INSTRUCTIONS
Graphical Indoor
thermometer
Weather report sym-
bols
Clock; Clock Alarm
Inside temperature;
Outside temperature/
humidity display; Min/
Channel number/
Max record; Tempera-
Outside tempera-
ture Alarm
ture/Humidity
Temperature trend
indicator
Outside channel
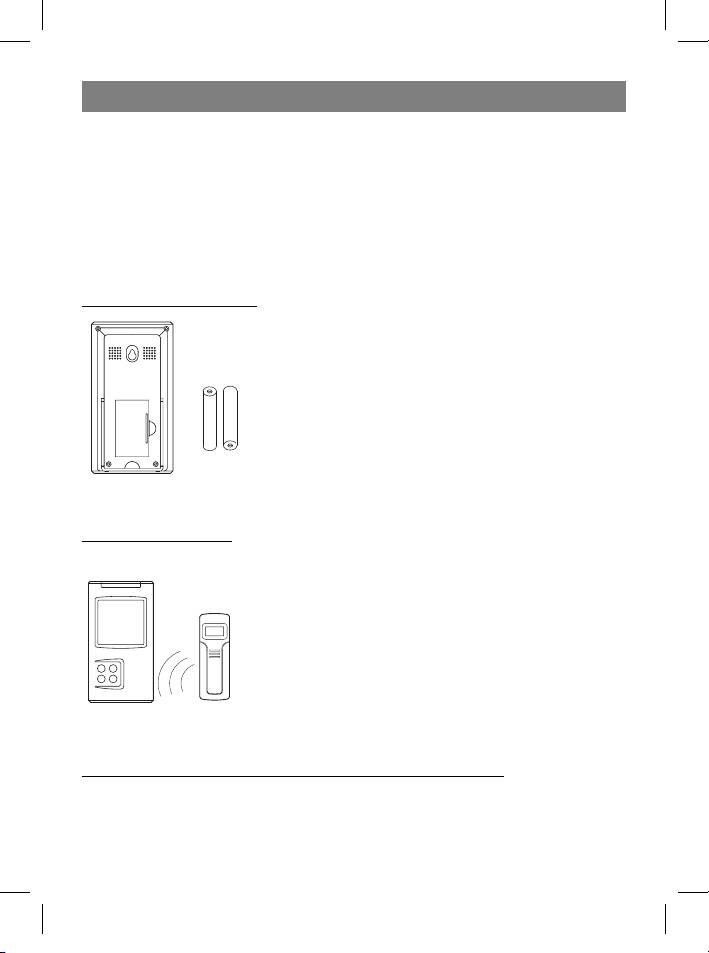
Features:
Block with main display:
• Clock with choice of time display format (12 or 24 hour)
• Indoor and outdoor temperature display
• Graphical display for indoor temperature
• Reception and display of temperature and humidity readings from remote sensors
(serves up to 4 sensors) by radio at 433 MHz.
• Records maximum and minimal temperatures
• Audible alarms for low and high temperatures.
• Temperature trend indicator.
• Temperature reporting symbols.
• Backlight
2
35391.indd 235391.indd 2 23.05.2006 17:08:5123.05.2006 17:08:51
ENGLISH
• Indications in Celsius or Fahrenheit
• Battery type: 2 x AA
Remote sensors:
• Weather-proof construction with liquid crystal display
• Jack for connecting external sensor
• External wired sensor
• Display of temperature readings in Celsius or Fahrenheit,
• Humidity display
• Transmission distance: up to 40 m in an open area
• Battery type: 2 x AA
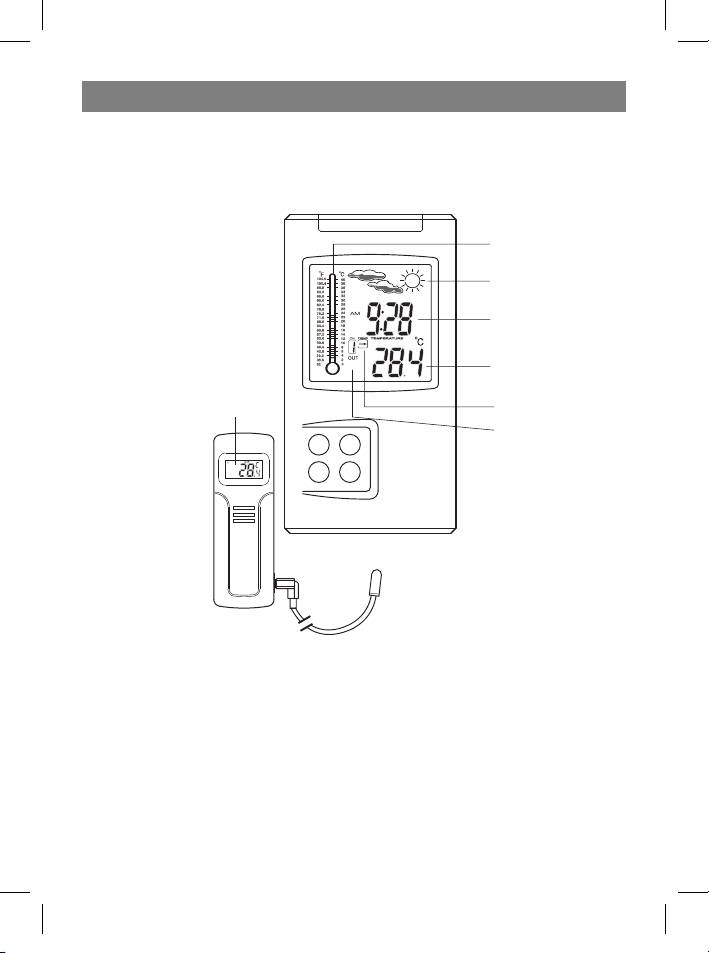
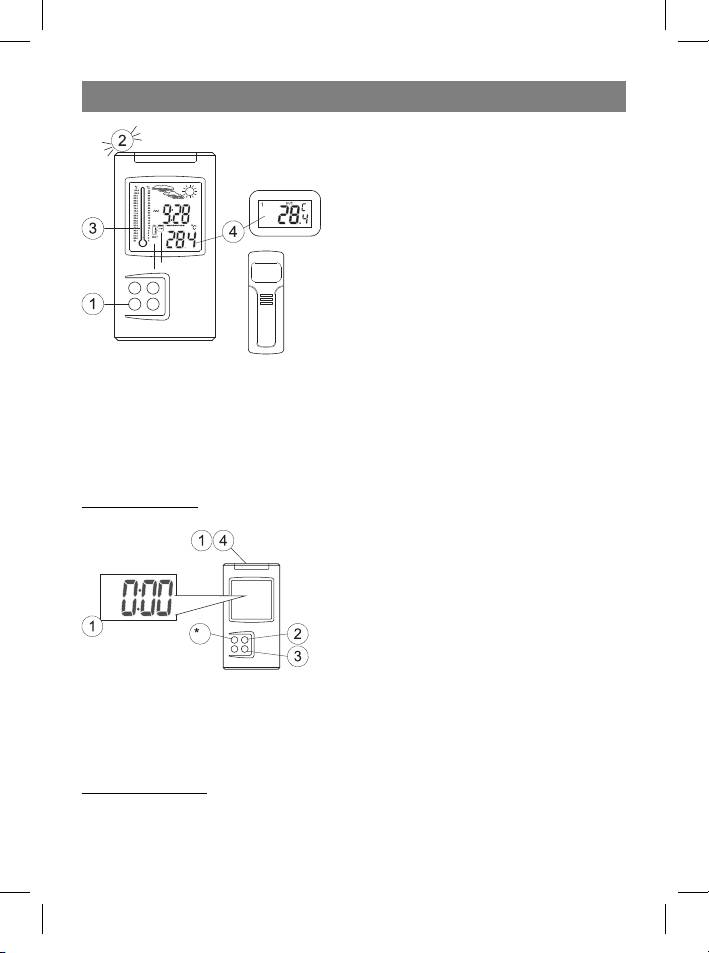
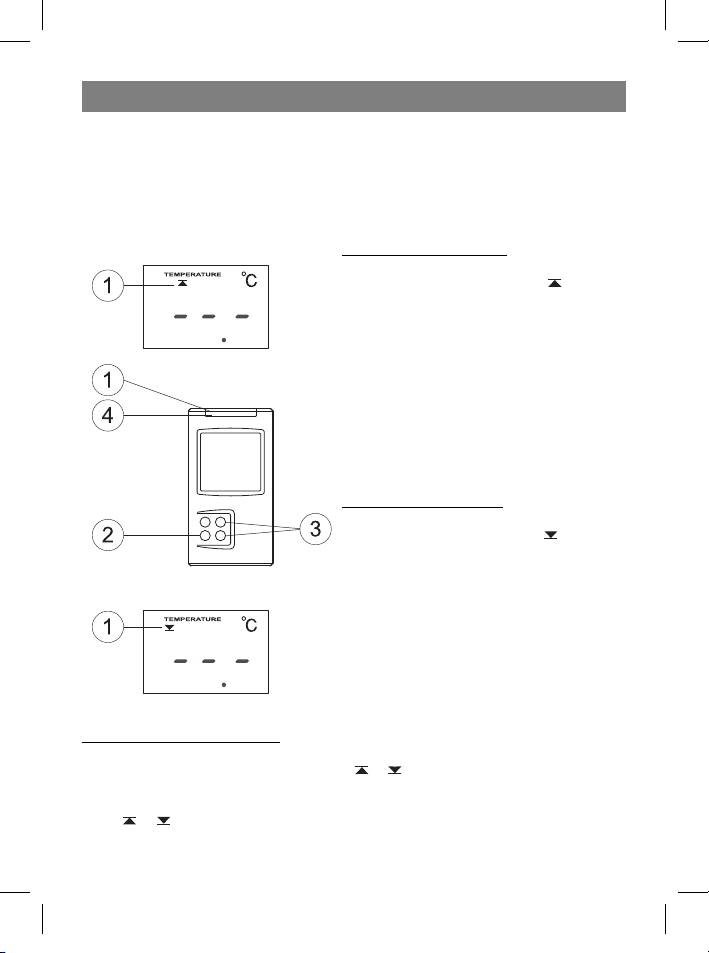
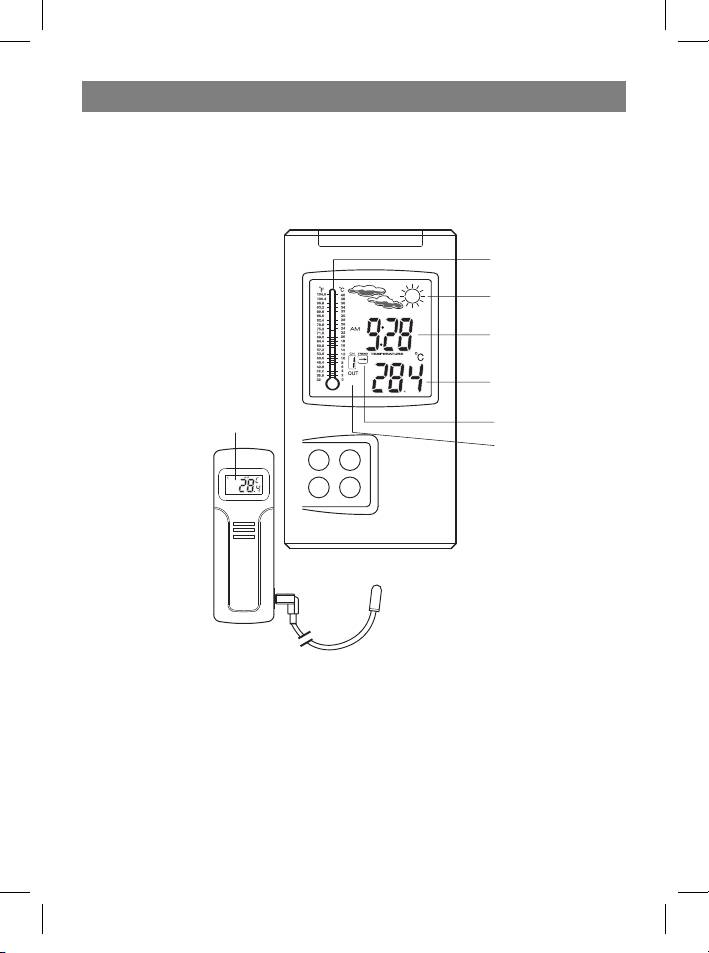
OPERATING CONTROLS
1. Mode/Snooze – switching display modes
between time, alarm, high and low tempera-
ture alarms in temperature control points;
temporary alarm deactivation.
2. Hour/+/Max – hour advance; maximum
temperature display.
3. Minute/-/Min – minutes advance; mini-
mum temperature display.
4. Alarm/°C/°F – switching between Celsius
and Fahrenheit, between 12-hour and 24-
hour time format, turning the alarm on and
off, erasing previous temperature alarm set-
tings.
5. Channel – switching between remote
control channels (from 1 to 4)
6. Wall mount and tabletop stand
7. SET: entering the home code and activat-
ing the channel settings mode
8. C/F: switching from °C to °F, changing the
channel or home code
9. Battery compartment
10. External sensor jack
11 . Liquid crystal display
12 . External wired sensor
3
35391.indd 335391.indd 3 23.05.2006 17:08:5123.05.2006 17:08:51
ENGLISH
READ BEFORE USING
For best results:
1. First install the battery in the remote sensor(s), and then in the receiver block.
2. Place the receiver and remote sensor(s) next to each other. This will synchronize the
receiver block with the remote sensor(s).
3. Place the remote sensor(s) at a proper operating distance.
• Although the remote sensor is designed to be weather-proof, it is recommended
that you install it in a location where it will not be exposed to direct sunlight, rain or
snow.
• Walls and the location of the remote sensor affect the effective operating range. Try
various installation locations and then choose the optimal one.
GETTING STARTED
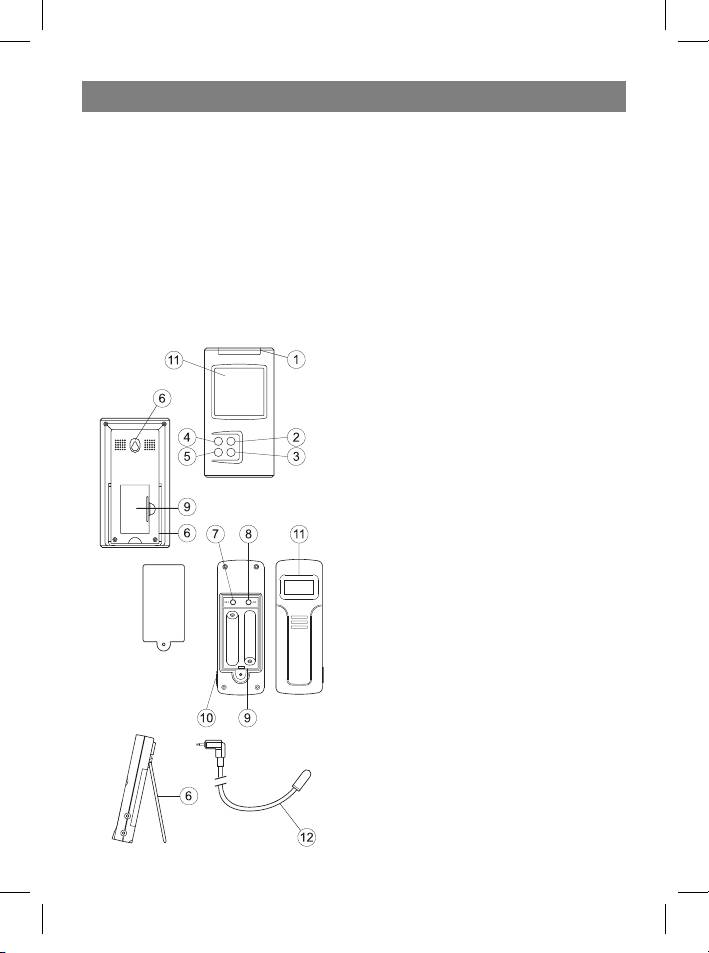
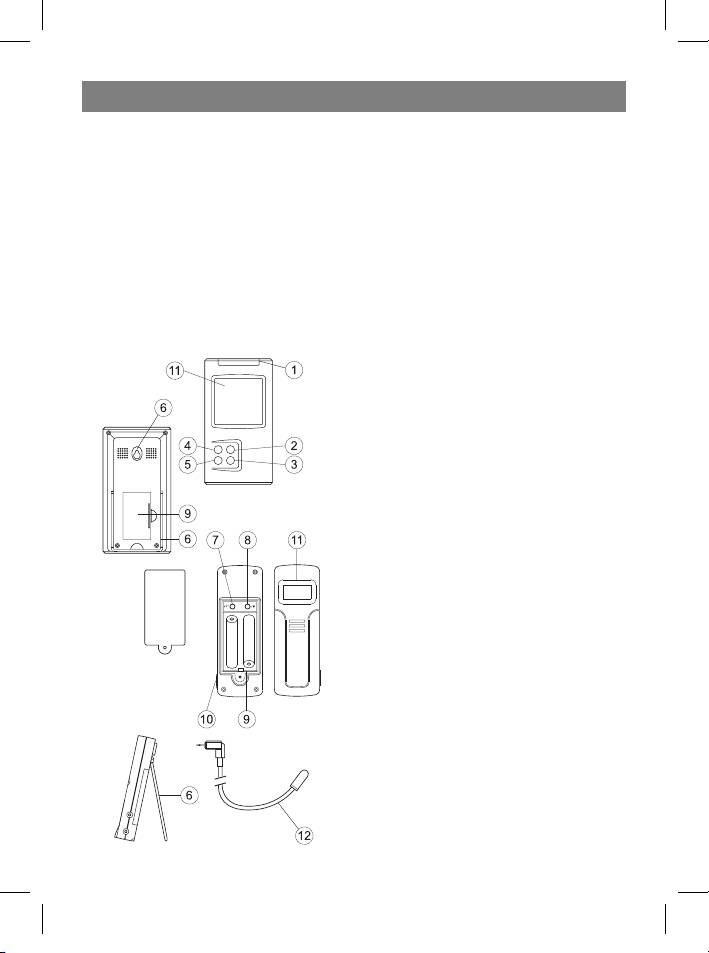
Step 1: Setting up the remote sensor:
1. Remove the lid from the battery compart-
ment and, according to the proper polarity,
insert two AA batteries. Close the battery
compartment lid.
2. The indication HOUSE CODE will blink on
the display for 8 seconds.
3. Choose a HOUSE CODE (from 01 to 15) by
pressing the C/F button. Make sure that all
the sensors in your home are set to the same
HOUSE CODE.
4. Press SET to save the HOUSE CODE. The
channel indicator will blink on the display for
8 seconds.
5. Choose the CHANNEL (from 1 to 4) by
pressing the C/F button. This number can
be confirmed by either pressing SET or, au-
tomatically, by waiting 10 seconds without
pressing any buttons. If you are only using
one sensor, we recommend that you use
CHANNEL number 01.
4
35391.indd 435391.indd 4 23.05.2006 17:08:5123.05.2006 17:08:51
ENGLISH
6. The temperature and humidity readings will appear on the display.
7. Switch from °F to °C by pressing the C/F button.
After these remote sensor settings have been completed, it will begin to transmit
weather data once per minute.
• If your meteorological station registers signals from neighboring sources, choose a
different house code.
• Factory default settings: house code = 01, channel = 01
Step 2: Receiver settings
8. Remove the lid from the battery compartment and, ac-
cording to correct polarity, install two AA batteries. Close
the battery compartment lid.
SYNCHRONIZING THE OUTDOOR TEMPERATURE READING
Auto-detect function:
1. After installing batteries in the receiver, activate the auto-
detect function, which should take about 3 minutes.
2. During these 3 minutes, the receiver will emit an audible
signals and display it once received the data from sensors.
• If no signal is received during the 3 minutes, the outdoor
temperature will be displayed as “- - -”. If this happens,
try installing all of the units closer together, or in different
places; run the auto-detect function again – remove the
batteries from the receiver and then insert them again.
Manual learning function (Search for remote sensor signals):
If a new sensor is added or if the signal is lost from an existing sensor (the outdoor tem-
perature on the display will blink), the detection function must be completed again.
5
35391.indd 535391.indd 5 23.05.2006 17:08:5123.05.2006 17:08:51
ENGLISH
1. While in current time display mode, press
and hold the Channel button for 3 seconds.
2. An audible alert will be heard. This means
the detection function has been activated.
3. Each time a remote sensor is located, an
audible alert will be emitted and the “CH”
symbol will blink on the display.
4. Temperature data from the remote sensor
will be displayed on the LCD.
• The auto-detect function is runs automatically for about 3 minutes.
• If the detection function finished unsuccessfully, make sure that the remote sensors
are located within the operating range of the receiver or try moving them to a new
location.
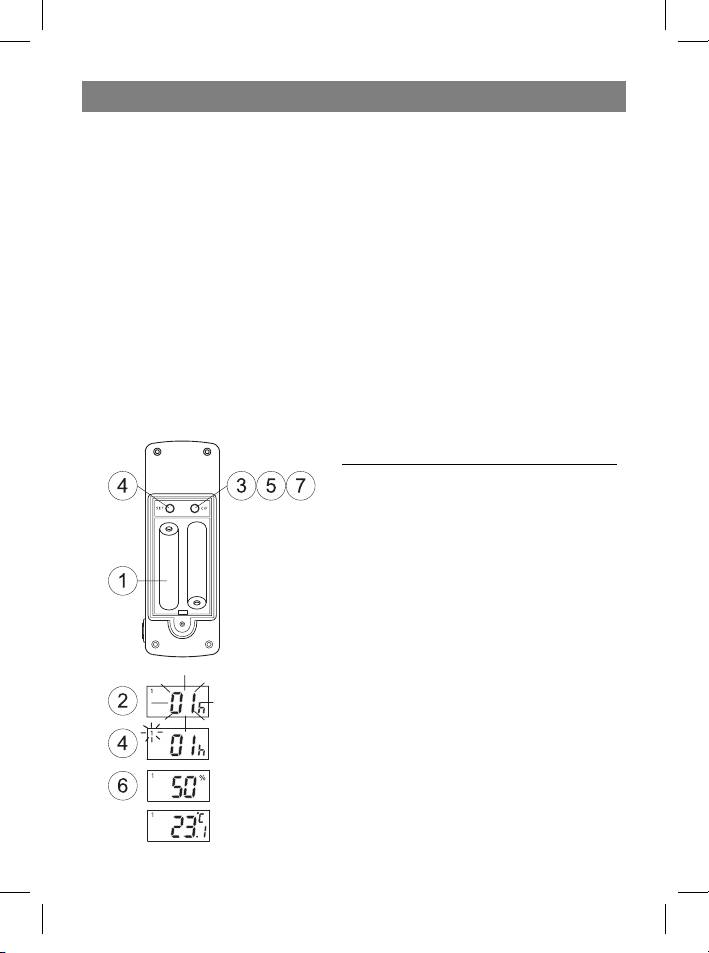
SETTING THE TIME AND ALARM
Setting the time:
1 Press and hold the Mode/Snooze but-
ton for 3 seconds to enter the time settings
mode.
2 Set the desired hours by pressing the
Hour/+/Max button.
3 Set the desired minutes by pressing the
Minute/-/Min button.
4 Press the Mode/Snooze button to save the settings.
• Press the Alarm/°C/°F button to switch between 12-hour and 24-hour time for-
mats.
Setting the alarm:
5 Press the Mode/Snooze button to choose the Clock Alarm mode; the “AL” symbol
will appear on the display.
6
35391.indd 635391.indd 6 23.05.2006 17:08:5123.05.2006 17:08:51
ENGLISH
6 Use the Hour/+/Max button to choose the
hour.
7 Use the Minute/-/Min button to choose
the minute.
8 While in alarm mode, press the Alarm/°C/
°F button to turn the alarm on or off. If the
alarm is ON, the
symbol will appear on the
display.
When the alarm is activated:
9 When the alarm is activated, the alarm sym-
bol will blink on the LCD.
10 Press the Mode/Snooze button to temporarily turn off the alarm for five minutes.
After this time has passed, the alarm will ring again.
11 Press ANY OTHER button on the device to turn off the alarm completely.
If the alarm is not turned off, it will automatically turn itself off after one minute.
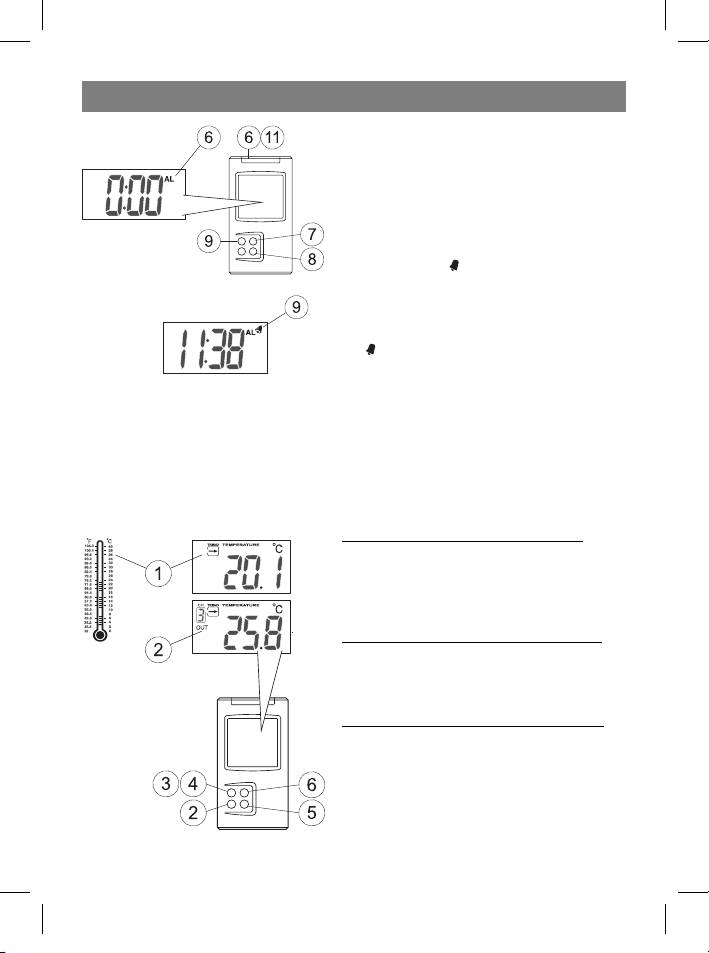
WEATHER CONDITIONS DISPLAY
Controlling the indoor temperature
After installing the batteries, the LCD will
show the indoor temperature. It also shows
a graphical thermometer of the indoor tem-
perature.
Displaying the temperature in °C or °F
To switch from °C to °F (or the opposite) press
the Alarm/°C/°F button while in time display
mode.
Minimum and maximum temperatures
To display the minimum temperature on the
LCD, pres the Minute/-/Min button while in
time display mode.
To display the maximum temperature on the
LCD, press the Hour/+/Max button while in
time display mode.
7
35391.indd 735391.indd 7 23.05.2006 17:08:5123.05.2006 17:08:51
ENGLISH
Note: The minimum and maximum temperature data is erased daily (at midnight).
Hi and Lo symbols on the display
The Hi and Lo symbols appear on the display if the temperature or humidity level is
without the measurement boundaries of the device.
Indoor/ Outdoor Temperature Humidity Reading on LCD
Indoor > + 55°C - Hi
Indoor < - 20°C - Lo
Outdoor > + 70°C > 95% Hi
Outdoor < - 30°C < 15% Lo
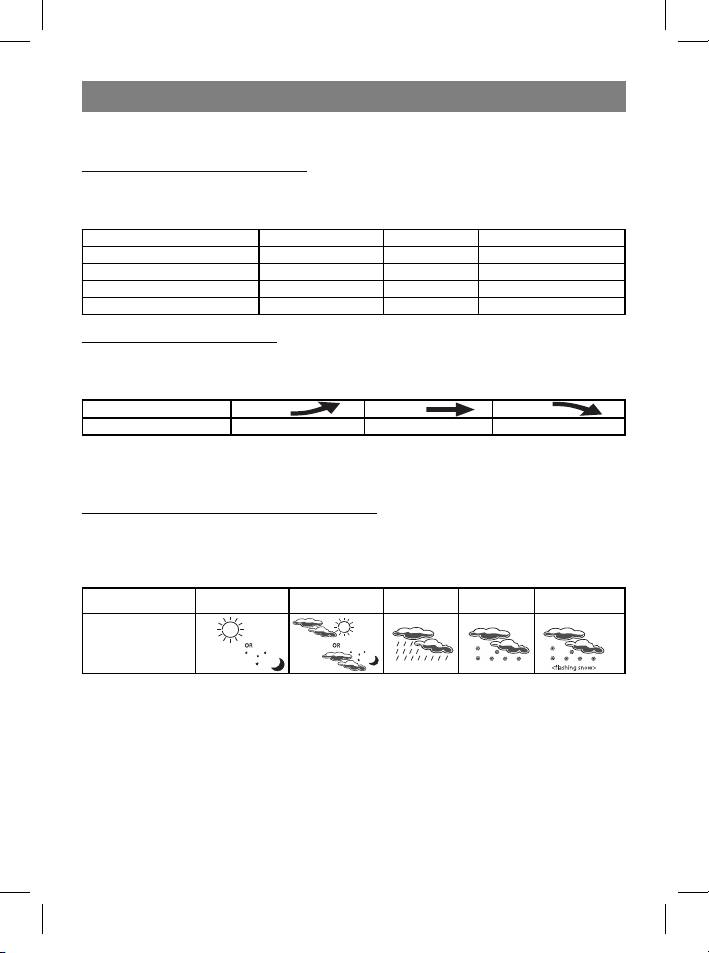
Temperature trend indicator
The temperature trend indicator shows the temperature trend registered by a separate
sensor over the past half-hour.
Pointer
Trend Rising Stable Falling
TEMPERATURE CONDITIONS REPORT
Temperature conditions reporting symbols
The receiver’s display will show the following symbols, representing the weather condi-
tions (they are chosen based on the temperature and humidity data received from the
remote sensor (channel 1)):
Sunny Cloudy Rain Snow Black Ice
Weather
conditions
indicator
Black ice warning
• Displayed as a blinking snow symbol.
• Is displayed when the temperature on channel one is between -1.9°C and +2.9°C.
• Snow hardens and changes into ice when the temperature on channel 1 becomes
less that -1.9 °C. This is the freezing temperature.
• Cloudy weather will be indicated when the device is first connected..
• The sensor on channel 1 is used for weather information.
• If there is no sensor connected to channel 1, cloudy weather will always be indi-
cated
8
35391.indd 835391.indd 8 23.05.2006 17:08:5223.05.2006 17:08:52
ENGLISH
• If there is not humidity data available for channel 1, cloudy weather will always be
indicated, although snow and black ice warnings will continue to be displayed.
TEMPERATURE ALARM SETTINGS
The temperature alarm function allows you to program the audible alarms if the tem-
perature becomes higher or lower than a preset setting.
High temperature alarm
1 Use the Mode/Snooze button to choose
the High temperature mode, the
symbol
will appear on the display.
2 Use the Channel button to choose the
channel (indoor, channel 1, channel 2, chan-
nel 3 or channel 4)
3 Press the Hour/+/Max or Minute/-/Min
buttons to set the desired temperature.
4 Press the Mode/Snooze button to save
the settings.
Low temperature alarm
1 Use the Mode/Snooze button to choose
the Low temperature mode, the symbol
will appear on the display.
2 Use the Channel button to choose the
channel (indoor, channel 1, channel 2, chan-
nel 3 or channel 4)
3 Press the Hour/+/Max or Minute/-/Min
buttons to set the desired temperature.
4 Press the Mode/Snooze button to save
the settings.
When the alarm will be heard
• When a low temperature or high temperature signal is detected on the pre-deter-
mined channel, the display will show the or symbol.
• When the alarm is activated, the display will show the channel giving the alarm and
the or symbol will blink (depending upon the type of alarm – low or high tem-
perature). Press ANY button to deactivate the alarm.
9
35391.indd 935391.indd 9 23.05.2006 17:08:5223.05.2006 17:08:52
ENGLISH
BACKLIGHT
This meteorological station has a backlight. Pressing ANY button will activate the back-
light. To save energy, you can turn the backlight on or off. To do this:
1 Press and hold the Mode/Snooze button to activate
the time settings menu.
2 Press the Channel button to activate or deactivate
the backlight.
• Press the Mode/Snooze button to exit the settings
menu.
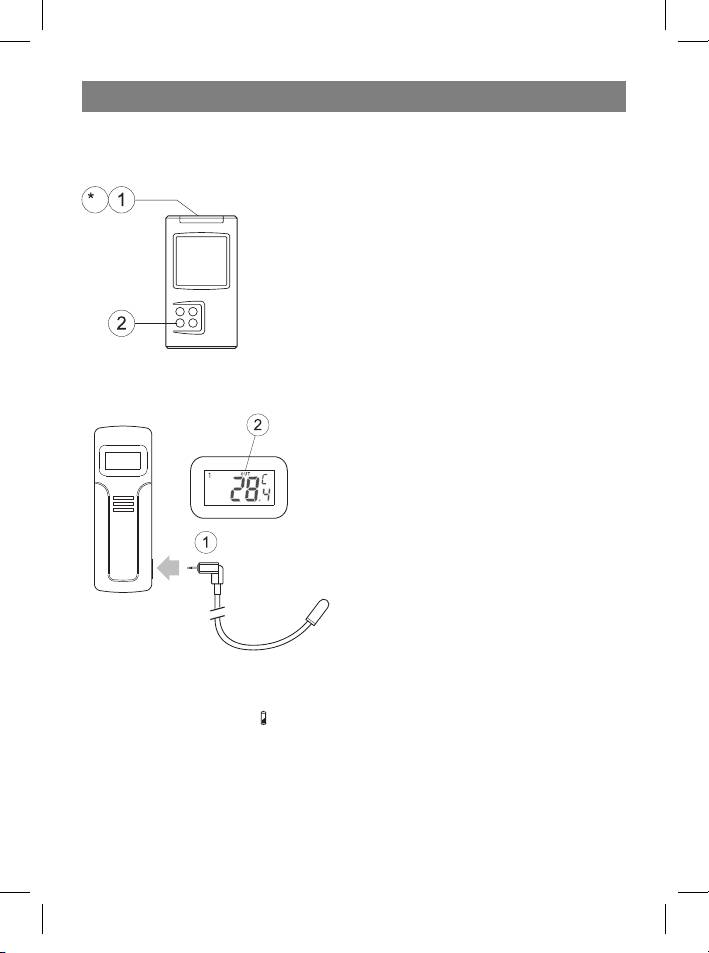
USING AN EXTERNAL WIRED SENSOR
The remote sensor has a jack for connecting an external wired sensor.
1 Connect the plug of the external sensor to
the jack on the remote sensor.
2 After connecting the external wired sensor,
the display will show the following:
- temperature reading from the external
sensor,
- the “OUT” symbol.
LOW BATTERY INDICATOR
Receiver:
1 If the low-battery symbol
appears on the receiver display under the weather trend
data, that means the receiver’s battery will soon die. The receiver will begin to oper-
ate poorly.
For example:
- the LCD will become dim
- the operating range of the remote sensors will decrease, data from remote sensors
may be lost.
10
35391.indd 1035391.indd 10 23.05.2006 17:08:5223.05.2006 17:08:52
ENGLISH
2 The receiver requires two AA batteries.
• All settings will be lost when changing the batteries.
Remote sensor:
1 If the low-battery symbol appears on the display, this means that the remote sen-
sor’s battery will soon die.
2 The low-battery symbol
will also be shown on the section of the display below the
weather trend data, relating to external weather conditions.
3 The remote sensor requires two AA batteries.
• All required settings will have to be re-entered after changing the batteries.
• If the remote sensor is exposed to very low temperatures for a long period of time,
the batteries may lose there charge and the operating range of the sensor may be
reduced. High temperature conditions can also affect battery life.
11
35391.indd 1135391.indd 11 23.05.2006 17:08:5223.05.2006 17:08:52
ENGLISH
RESOLVING MALFUNCTIONS
Problem Resolution
Wait for 1-2 minutes so that the remote sensor
and the receiver can become synchronized. Sec-
Measurements on the
ond option: re-synchronize the remote sensor
1
remote sensor and the
and receiver by pressing and holding the Chan-
receiver do not match
nel button for 3 seconds, until an audible signal
is heard.
Temperature from the
Make sure that the sensor is not exposed to direct
2
external temperature
sunlight; the sensor should not be near any heat
sensor seems elevated
sources.
- Repeat the detection function.
The receiver has
- Maybe the temperature is less than -30°C
stopped receiving data
- The batteries need to be changed in the re-
3
from remote sensors
mote sensor
and displaying this data
- Move the remote sensor closer to the receiver
on the LCD
- Make sure the remote sensor is not located
near sources of radio interference.
The device is not work-
The device must be reinstalled. Reinstall the de-
ing properly or is not
4
vice by changing the batteries in the receiver and
completing certain
the remote sensor
functions
12
35391.indd 1235391.indd 12 23.05.2006 17:08:5223.05.2006 17:08:52
ENGLISH
TECHNICAL CHARACTERISTICS
Meteorological station receiver
Battery type 2 x 1.5 V, type AA
Temperature range from -9.9°C to +55°C
Meteorological station remote sensor
Battery type 2 x 1.5 V, type AA
Temperature range from -30°C to +70°C
Humidity range from 15 to 95 %
Transmission frequency 433.92 MHz
Transmission range up to 40 m in an open area
Specifications subject to change without prior notice.
MINIMUM SERVICE LIFE - 3 YEARS
GUARANTEE
Details regarding guarantee conditions can be obtained from the dealer from whom
the appliance was purchased. The bill of sale or receipt must be produced when mak-
ing any claim under the terms of this guarantee.
This product conforms to the EMC-Requirements as laid down by the Council
Directive 89/336/EEC and to the Law Voltage Regulation (73/23 EEC)
13
35391.indd 1335391.indd 13 23.05.2006 17:08:5223.05.2006 17:08:52
DEUTSCH
MULTIFUNKTIONALE UHR/KABELLOSE WETTERSTATION
Wir danken Ihnen für den Erwerb der Wetterstation – Modell VT-3539 mit kabellosem
Sensor. Nehmen Sie sich die Zeit und lesen Sie aufmerksam die vorliegende Bedie-
nungsanleitung zum Gerät durch.
BENUTZERANLEITUNG
Grafischer Innenraum-
temperaturindikator
Bildsymbole der Wet-
terbedingungen
Uhr; Wecker
Innenraumtemperatur; Indi-
kationsdisplay der Außentem-
peratur und der Feuchtigkeit;
Speicherung der Höchst- und
Kanalnummer/Außen-
der Mindesttemperatur; Signal
temperatur/Feuchtig-
bei Temperaturänderung.
keit
Indikator des Tempera-
turtrends
Fernsenderkanal
Besonderheiten:
Block mit Hauptdisplay:
• Uhr mit umschaltbaren Zeitformat (12 oder 24 Stunden)
• Außen- und Innentemperaturanzeige
• Grafikdisplay für Innenraumtemperatur
• Empfang und Anzeige der Temperatur- und Feuchtigkeitswerte von den Fernsendern
(Bedienung von bis zu 4 Sendern) über einen Radiokanal auf der Frequenz 433 MHz.
• Speicherung der Mindesttemperatur
• Signalfunktion bei niedriger oder hoher Temperatur.
• Indikator des Temperaturtrends.
• Temperaturberichtsymbole.
14
35391.indd 1435391.indd 14 23.05.2006 17:08:5223.05.2006 17:08:52
DEUTSCH
• Beleuchtung
• Angaben in Grad Celsius oder Fahrenheit
• Batterietyp: 2 x AA
Fernsender:
• Spritzergeschützte Konstruktion mit Flüssigkristalldisplay
• Anschlussbüchse für Außensensor
• Außensensor mit Kabelanschluss
• Temperaturanzeige in Grad Celsius oder Fahrenheit,
• Feuchtigkeitsdisplay
• Sendereichweite: bis zu 40 m auf freiem Gelände
• Batterietyp: 2 x AA
BEDIENUNGSORGANE DES GERÄTS
1. Mode/Snooze – Umschaltung der Betriebe
der Zeitansicht, der Signalgabe, der Signalgabe
über niedrige oder hohe Temperatur in Tempe-
raturkontrollpunkten; vorläufiges Abschalten
des Signals
2. Hour/+/Max – Übergang im Stundenwert;
Anzeige der Höchsttemperatur.
3. Minute/-/Min – Übergang im Minutenwert;
Anzeige der Mindesttemperatur.
4. Alarm/°C/°F – Umschalten von Grad Celsius
auf Grad Fahrenheit und umgekehrt, vom 12-
Stunden auf den 24-Stunden-Format, Einschal-
ten und Ausschalten des Signals; Löschung der
voreingestellten Temperatursignaleinstellungen.
5. Channel – Umschalten zwischen den Fern-
kontrollekanälen (von 1 bis 4)
6. Wandhalter Tischhalter
7. SET: Eingabe des Hauscodes und Einschal-
ten des Kanalabstimmungsbetriebs
8. C/F: Umschalten von °C auf °F, Kanal- oder
Hauscodewechsel
9. Batteriefach
10. Anschlussbüchse für Fernsender
11 . Flüssigkristalldisplay
12 . Außensensor mit Kabelanschluss
15
35391.indd 1535391.indd 15 23.05.2006 17:08:5223.05.2006 17:08:52
DEUTSCH
VOR DER ANWENDUNG DURCHLESEN:
Zur Gewährung der optimalen Nutzungsbedingungen:
1. Setzen Sie zuerst die Batterien in den Fernsender (Sender), und erst danach – in den
Empfänger.
2. Platzieren Sie den Empfänger und die Sender (den Sender) nebeneinander. Das wird
eine Synchronisierung des Empfängers mit den Fernsendern (den Sender) gewäh-
ren.
3. Platzieren Sie die Fernsender (den Sender) im Bereich der Senderreichweite.
• Obwohl die Konstruktion des Senders so ist, dass es vor der Einwirkung von Wetterbe-
dingungen geschützt ist, wird es empfohlen ihn an Orten zu platzieren, an denen er vor
direktem Sonnenlicht, Regen oder Schnee geschützt ist.
• Auf die effektive Sendereichweite der Sender wirkt sich das Wandmaterial des Gebäu-
des und der Orte der Platzierung der Sender und des Empfängers aus. Versuchen Sie
verschiedene Varianten und wählen Sie die optimale aus.
BEGINN DER BENUTZUNG
Etappe 1: Abstimmung des Fernsenders:
1 Nehmen Sie den Deckel des Batteriefachs
ab und legen Sie zwei Batterien Größe AA ein,
beachten Sie dabei die Polarität. Schließen Sie
den Deckel des Batteriefachs.
2 Auf dem Display wird 8 Sekunden lang die
Aufschrift HOUSE CODE (Hauscode) blinken
3 Wählen Sie HOUSE CODE (von 01 bis 15),
pressen Sie die Taste C/F. Überzeugen Sie
sich davon, dass alle Sender in Ihrem System
auf ein und dieselbe Hauscode eingestellt
sind.
4 Pressen Sie SET, um die Abstimmung des
HOUSE CODE zu beenden. Auf dem Display
wird 8 Sekunden lang der Kanal blinken.
5 Wählen Sie den Kanal CHANNEL (von 1 bis
4), indem Sie die Taste C/F pressen. Diese
Nummer kann bestätigt werden, indem die
Taste SET gepresst wird, oder sie wird auto-
matisch bestätigt, wenn innerhalb von 10 Se-
16
35391.indd 1635391.indd 16 23.05.2006 17:08:5223.05.2006 17:08:52
DEUTSCH
kunden keine der Tasten gepresst wird. Wenn nur ein Sender benutzt wird, wird es
empfohlen für CHANNEL den Wert 01 eingestellt zu lassen.
6 Auf dem Display erscheinen die Temperatur- und Feuchtigkeitsangaben
7 Schalten Sie von °F auf °C um, pressen Sie dazu die taste C/F.
Nachdem die Abstimmung des Fernsenders beendet wurde, wird er einmal pro Minute
die Angaben übersenden.
• Wenn Ihre Wetterstation Signale von benachbarten Quellen registriert, benutzen Sie
einen anderen Hauscode.
• Fabrikeinstellungen: Hauscode = 01, Kanal = 01
Etappe 2: Einstellung des Empfängers
8 Nehmen Sie den Deckel des Batteriefachs ab und legen
Sie 2 Batterien Größe AA ein, beachten Sie dabei die Polari-
tät. Schließen Sie das Batteriefach.
SYNCHRONISIERUNG DER ANGABEN DER AUSSENTEMPERATUR
Funktion der automatischen Schulung:
1 Nach der Eingabe der Batterien in den Empfänger schaltet
sich die automatische Schulungsfunktion ein, deren Arbeit
etwa 3 Minuten dauert.
2 Innerhalb von diesen 3 Minuten wird der Empfänger Tonsi-
gnale von sich geben, Temperatur- und Feuchtigkeitsanga-
ben von den Sendern empfangen und diese anzeigen.
• Wenn innerhalb von 3 Minuten keine Signale empfangen
wurden, wird auf dem Display anstatt der Außentemperatu-
rangaben “- - -“ angezeigt. Wenn das geschehen ist, stellen
Sie alle Blocks näher zueinander oder an anderen Orten auf;
aktivieren Sie wieder die Funktion der automatischen Schu-
lung – entfernen Sie dazu die Batterien aus dem Empfänger
und legen Sie sie danach wieder ein.
17
35391.indd 1735391.indd 17 23.05.2006 17:08:5323.05.2006 17:08:53
DEUTSCH
Funktion der manuellen Schulung (Signalsuche der Fernsender):
Wenn ein neuer Sender hinzugefügt wurde, oder wenn das Signal verloren wurde (dabei
blinken auf dem Display die Außentemperaturangaben), muss die Schulungsfunktion er-
neut durchgeführt werden.
1 Pressen und halten Sie im Anzeigebetrieb
der aktuellen Uhrzeit 3 Sekunden lang die Ta-
ste Channel.
2 Ein Tonsignal erklingt. Das bedeutet, dass
sich die Schulungsfunktion eingeschaltet hat.
3 Bei Auffinden von jedem Fernsender wird auf
dem Display das Symbol “CH” blinken und ein
Tonsignal erklingen.
4 Die Temperaturangaben, die vom Fernsen-
der übertragen wurden, werden auf dem Dis-
play des Empfängers angezeigt.
• Die Schulungsfunktion wird automatisch ausgeführt, innerhalb von etwa 3 Minuten.
• Wenn der Versuch fehlschlug, überzeugen Sie sich davon, dass sich die Sender in-
nerhalb der Senderreichweite befinden oder versuchen Sie die Aufstellungsorte der
Geräte zu ändern.
EINSTELLUNG DER UHR UND DER ALARMZEIT
Einstellung der Uhr:
1 Pressen und halten Sie 3 Sekunden lang die
Taste Mode/Snooze, um den Betrieb der Uh-
reneinstellung einzuschalten.
2 Stelen Sie den erforderlichen Stundenwert
ein, indem Sie die Taste Hour/+/Max pres-
sen
3 Stellen Sie den erforderlichen Minutenwert
ein, indem Sie die Taste Minute/-/Min pres-
sen
4 Zum Beenden der Abstimmung pressen Sie die Taste Mode/Snooze
• Pressen Sie die Taste Alarm/°C/°F, um das 12-Stunden oder das 24-Stunden-Zeitfor-
mat einzuschalten.
18
35391.indd 1835391.indd 18 23.05.2006 17:08:5323.05.2006 17:08:53
DEUTSCH
Einstellung der Alarmzeit:
5 Wählen Sie mit der Taste Mode/Snooze
den Betrieb Clock Alarm, auf dem Display er-
scheint das Symbol “AL”.
6 Wählen Sie mit der Taste Hour/+/Max die
Stunde.
7 Wählen Sie mit der Taste Minute/-/Min den
Minutenwert.
8 Pressen Sie im Signalbetrieb die Taste
Alarm/°C/°F, um das Signal ein- oder auszu-
schalten. Wenn das Signal eingeschaltet ist
(ON), erscheint auf dem Display das Symbol
.
Wenn das Signal erklingt:
9 Wenn das Signal erklingt, blinkt das Alarm-
symbol auf dem Display
10 Zum vorläufigen Abschalten des Signals auf 5 Minuten pressen Sie die Taste Mode/
Snooze. Nach Ablauf dieser Zeit wird das Alarmsignal erneut erklingen.
11 Pressen Sie zum vollständigen Abschalten des Signals eine BELIEBIGE andere Taste.
Wenn das Signal nicht ausschaltet wird, schaltet es sich automatisch nach einer Minu-
te aus.
DISPLAY DER WETTERBEDINGUNGEN
Kontrolle der Innenraumtemperatur
Nach dem Einlegen der Batterien erscheinen
auf dem Flüssigkristalldisplay die Angaben der
Innenraumtemperatur. Es gibt auch ein grafi-
sches Thermometer, welches die Raumtem-
peratur anzeigt.
Temperaturanzeige in °C oder °F
Zum Umschalten von °C auf °F (oder umge-
kehrt) pressen Sie im Indikationsbetrieb der
aktuellen Uhrzeit die Taste Alarm/°C/°F .
Mindest- und Höchsttemperatur
Um auf dem Display die Angaben der Min-
desttemperatur anzuführen pressen Sie im
Uhrzeitbetrieb die Taste Minute/-/Min
19
35391.indd 1935391.indd 19 23.05.2006 17:08:5323.05.2006 17:08:53
DEUTSCH
Um auf dem Display die Angaben der Höchsttemperatur anzuführen pressen Sie im Uhr-
zeitbetrieb die Taste Hour/+/Max
Anmerkung: Die Mindest- und die Höchsttemperaturwerte werden täglich (um Mitter-
nacht) gelöscht.
Angaben Hi und Lo auf dem Display
Die Angaben Hi und Lo erscheinen auf dem Display in dem Fall, wenn die Temperatur oder
die Feuchtigkeit sich außerhalb der Messbereiche befinden.
Innen/ Außen Temperatur Feuchtigkeit Angaben auf dem Display
Innen > + 55°C - Hi
Innen < - 20°C - Lo
Außen > + 70°C > 95% Hi
Außen < - 30°C < 15% Lo
Indikator des Temperaturtrends
Der Indikator des Temperaturtrends zeigt den Temperaturtrend an, der von einem sepa-
raten Sensor für die letzte halbe Stunde registriert wird.
Pfeilanzeiger
Trend Steigt Konstant Sinkt
BERICHT ÜBER DIE WETTERBEDINGUNGEN
Berichtsymbole über die Wetterbedingungen
Auf dem Display des Empfängers werden die folgenden Symbole angezeigt, die die Wet-
terbedingungen anzeigen (sie werden aufgrund der Temperatur- und Feuchtigkeitsanga-
ben gewählt, die von dem Fernsender erhalte werden (Kanal 1)):
Sonnig Bewölkt Regen Schnee Glatteis
Indikator der
Wetterbedin-
gungen
Glatteiswarnung
• Das Schneesymbol wird blinkend angezeigt.
• Wird angezeigt, wenn sich die Temperatur am Kanal 1 im Bereich von -1,9°C bis +2,9°C
befindet.
• Der Schnee wird fest und verwandelt sich in Eis, wenn die Temperatur am Kanal 1 unter
-1,9 °C befindet. Das ist die Gefriertemperatur
20
35391.indd 2035391.indd 20 23.05.2006 17:08:5323.05.2006 17:08:53


