Vitek VT-3539: READ BEFORE USING For best results: GETTING STARTED Step 1: Setting up the remote sensor:
READ BEFORE USING For best results: GETTING STARTED Step 1: Setting up the remote sensor:: Vitek VT-3539
Table of contents
- WEATHER STATION USER INSTRUCTIONS Features: Block with main display:
- Remote sensors: OPERATING CONTROLS
- READ BEFORE USING For best results: GETTING STARTED Step 1: Setting up the remote sensor:
- Step 2: Receiver settings SYNCHRONIZING THE OUTDOOR TEMPERATURE READING Auto-detect function: Manual learning function (Search for remote sensor signals):
- SETTING THE TIME AND ALARM Setting the time:
- WEATHER CONDITIONS DISPLAY
- Hi and Lo symbols on the display Temperature trend indicator The temperature trend indicator shows the temperature trend registered by a separate sensor over the past half-hour. TEMPERATURE CONDITIONS REPORT Temperature conditions reporting symbols Black ice warning
- TEMPERATURE ALARM SETTINGS High temperature alarm Low temperature alarm When the alarm will be heard
- BACKLIGHT USING AN EXTERNAL WIRED SENSOR LOW BATTERY INDICATOR Receiver:
- Remote sensor:
- RESOLVING MALFUNCTIONS Problem Resolution
- TECHNICAL CHARACTERISTICS Meteorological station receiver Meteorological station remote sensor MINIMUM SERVICE LIFE - 3 YEARS
ENGLISH
READ BEFORE USING
For best results:
1. First install the battery in the remote sensor(s), and then in the receiver block.
2. Place the receiver and remote sensor(s) next to each other. This will synchronize the
receiver block with the remote sensor(s).
3. Place the remote sensor(s) at a proper operating distance.
• Although the remote sensor is designed to be weather-proof, it is recommended
that you install it in a location where it will not be exposed to direct sunlight, rain or
snow.
• Walls and the location of the remote sensor affect the effective operating range. Try
various installation locations and then choose the optimal one.
GETTING STARTED
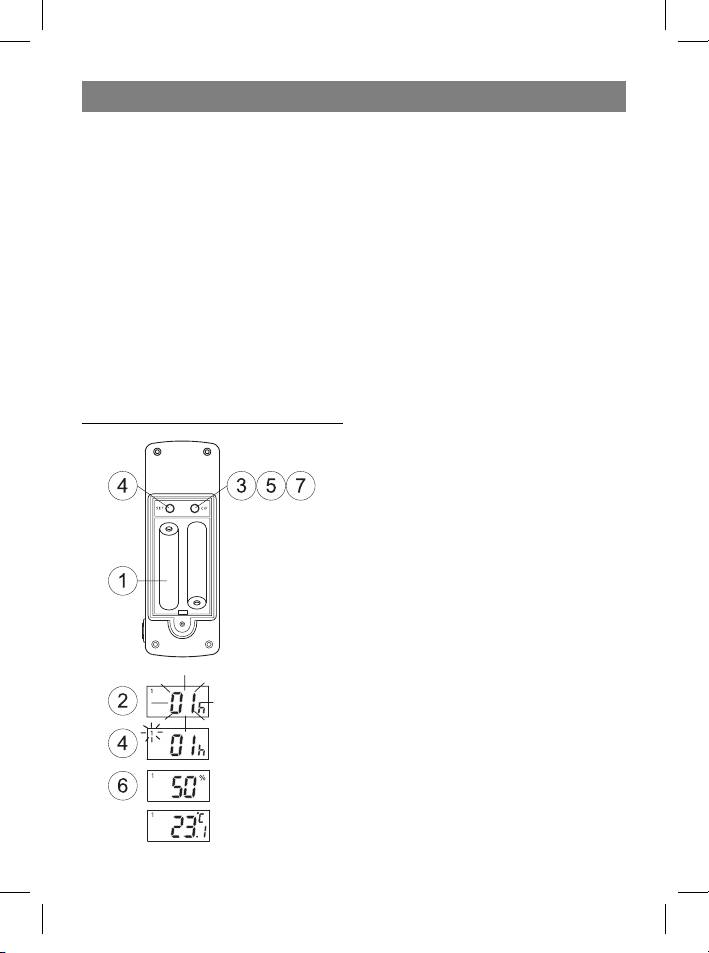
Step 1: Setting up the remote sensor:
1. Remove the lid from the battery compart-
ment and, according to the proper polarity,
insert two AA batteries. Close the battery
compartment lid.
2. The indication HOUSE CODE will blink on
the display for 8 seconds.
3. Choose a HOUSE CODE (from 01 to 15) by
pressing the C/F button. Make sure that all
the sensors in your home are set to the same
HOUSE CODE.
4. Press SET to save the HOUSE CODE. The
channel indicator will blink on the display for
8 seconds.
5. Choose the CHANNEL (from 1 to 4) by
pressing the C/F button. This number can
be confirmed by either pressing SET or, au-
tomatically, by waiting 10 seconds without
pressing any buttons. If you are only using
one sensor, we recommend that you use
CHANNEL number 01.
4
35391.indd 435391.indd 4 23.05.2006 17:08:5123.05.2006 17:08:51


