Vitek VT-3521: instruction
Class: Household, kitchen appliances, electronics and equipment
Type: Clock
Manual for Vitek VT-3521
Table of contents
- LOCATION OF CONTROL ELEMENTS AC POWER SUPPLY CAREFUL CLOCK SETTING THE ALARM TIME WAKING UP TO THE RADIO WAKING UP TO BUZZER ALARM WAKING UP TO A CD TURNING OFF THE ALARM
- SNOOZE FUNCTION SLEEP TIMER Set the selector (10) to CD. DISPLAY BRIGHTNESS RADIO LISTENING TO COMPACT DISCS TRACK SEARCH REPEAT PLAYBACK PROGRAMMING TRACK PLAYBACK ORDER BASS BOOST FUNCTION
- HEADPHONES JACK TECHNICAL CHARACTERISTICS GUARANTEE
CLOCK RADIO WITH ALARM
AND CD PLAYER
MODEL VT-3521
3
6
9
12
15
18
21
24
27
30
33
36
39
42
www.vitek-aus.com
MANUAL INSTRUCTION
3521.qxd 16.03.05 15:27 Page 1
3521.qxd 16.03.05 15:27 Page 2

CLOCK RADIO WITH ALARM AND CD PLAYER
MODEL VT-3521
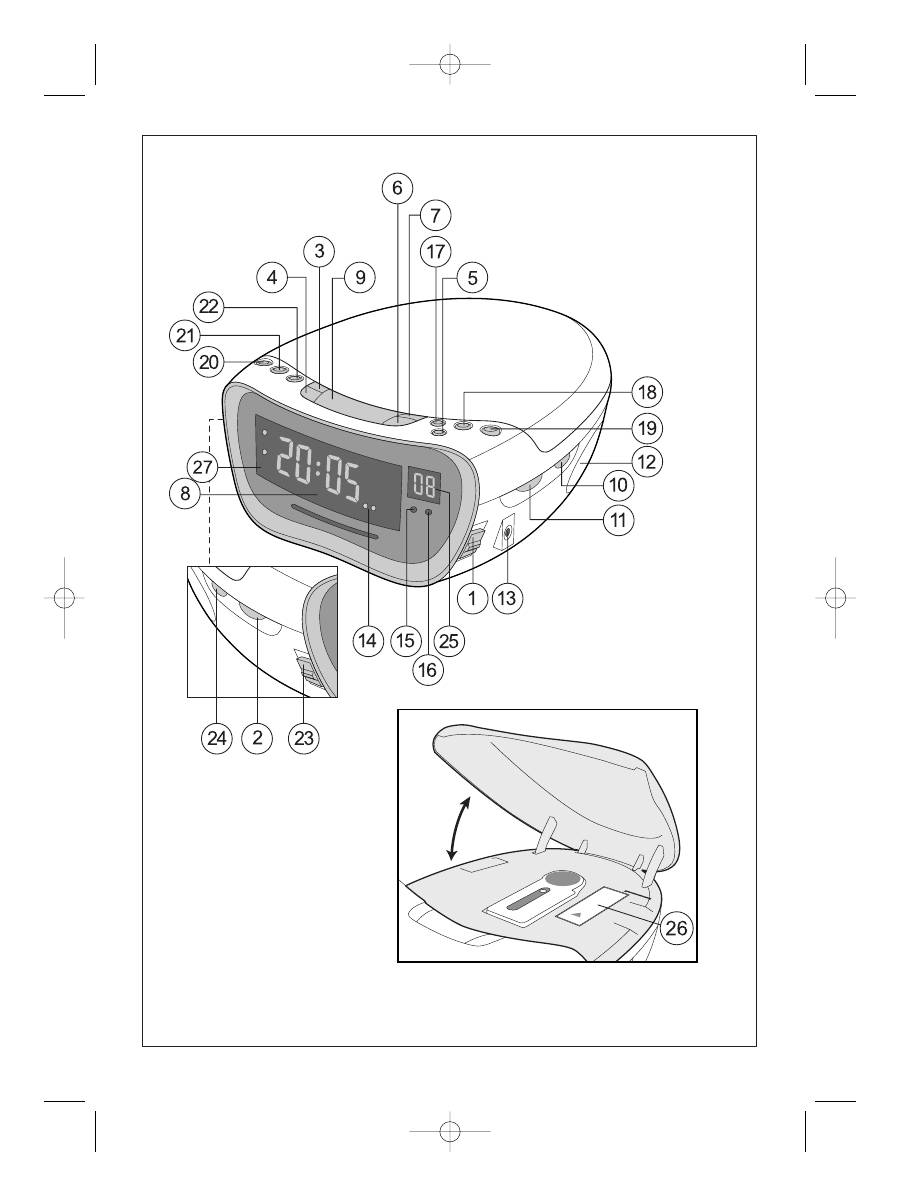
LOCATION OF CONTROL ELEMENTS
1. AUTO/OFF/ON SELECTOR
2. VOLUME/BUZZ DIAL
3. TIME SET BUTTON
4. ALARM SET BUTTON
5. SLEEP TIMER BUTTON
6. HOUR SET BUTTON
7. MINUTE SET BUTTON
8. LED DISPLAY
9. SNOOZE BUTTON/TIMER OFF
10.BAND SELECTOR (AM/FM)/CD)
11.TUNING KNOB
12.SPEAKER
13.HEADPHONES JACK
14.STEREO SIGNAL INDICATOR
15.REPEAT TRACK INDICATOR
16.PROGRAM INDICATOR
17.SKIP/SEARCH BACK BUTTON
18.SKIP/SEARCH FORWARD BUTTON
19.STOP BUTTON
20.PLAY/PAUSE BUTTON
21.REPEAT BUTTON
22.PLAYBACK PROGRAMMING BUTTON
23.DISPLAY BRIGHTNESS CONTROL
(DIMMER/BRIGHT)
24.BASS BOOST OFF/ON
25.TRACK NUMBER DISPLAY
26.EMERGENCY POWER BATTERY COMPART-
MENT
27.ALARM INDICATOR
AC POWER SUPPLY
Before connecting, make sure that the electrical
supply voltage is compatible with the devices
voltage requirements.
CAREFUL
Remove the AC plug from the outlet if the device
will not be used for a long period of time.
Do not attempt to repair this device yourself;
there are no user-serviceable parts inside.
Do not allow water to splash or spill onto the
device in order to avoid fire and electric shock.
Do not obstruct the natural ventilation of the
device; do not place it in closed bookshelves or
on shelves were there is not good ventilation.
Do not place sources of open flames, like can-
dles, on the device.
In case of malfunction, contact an authorized
service center.
CLOCK
Open the CD compartment lid, open the battery
compartment (26) and install one 6F-22 type 9V
battery (not included). The battery is used to
save information regarding the current time and
alarm settings in case of AC power interruption.
Set the Auto/Off/On (1) selector to the Off posi-
tion and plug the power plug into the outlet; the
display will start to blink.
To set the current time, press and hold the TIME
(3) button, then use the HOUR (6) and MIN (7)
buttons to set the current time.
SETTING THE ALARM TIME
Press and hold the ALARM (4) button; use the
HOUR (6) and MIN (7) buttons to set the desired
alarm time.
WAKING UP TO THE RADIO
Set the alarm time as instructed above.
Set the Auto/Off/On (1) selector to the On posi-
tion.
Set the band selector (10) to the desired band -
AM/FM, use the TUNING (11) dial to tune to the
desired radio station and make sure that the vol-
ume is set properly.
Set the Auto/Off/On (1) selector to Auto; the
ALM (27) indicator will light. At the set alarm
time the radio will automatically activate.
Note: reception of radio stations in the 88 108
MHz band is in stereo; if the radio station is
tuned accurately, the ST (stereo) indicator (14)
will also light.
WAKING UP TO BUZZER ALARM
Set the alarm time as indicated above.
Rotate the VOLUME/BUZZ (2) dial counter-
clockwise until it clicks in order to activate the
BUZZ alarm mode.
Set the Auto/Off/On (1) selector to Auto; the
ALM (27) indicator will light. The buzzer alarm
will activate at the set alarm time.
WAKING UP TO A CD
Set the alarm time as indicated above.
Set the selector (10) to CD.
Set the Auto/Off/On (1) selector to Auto.
Open the CD compartment and insert a com-
pact disc; close the CD compartment lid; set the
desired volume using the knob (2).
At the set alarm time, the CD will begin playing.
TURNING OFF THE ALARM
To turn off the alarm, press the ALARM (4) but-
ton once; the alarm will turn off and the set
alarm time is saved for the next day; the ALM
(27) indicator will stay lit.
To turn the alarm off completely, set the
Auto/Off/On (1) selector to the Off position; the
ALM (27) indicator will disappear.
ENGLISH
3
3521.qxd 16.03.05 15:27 Page 3

SNOOZE FUNCTION
You can temporarily silence the alarm (buzzer,
radio or CD) by pressing the Snooze (9) button;
the alarm will automatically activate again in 9
minutes.
SLEEP TIMER
Set the Auto/Off/On (1) selector to the Auto
position.
Press the SLEEP (5) button; the radio will acti-
vate and the timer will begin counting down from
59 minutes until radio shut-off.
To change the shut-off time, press and hold the
SLEEP (5) button, press the (6) HOUR button
and the shut-off time will change to 1h 59min, or
the MIN (7) button to change the alarm time
from 59 to 1 min.
Press the Snooze (9) button to deactivate this
function.
SLEEP TIMER USE WHILE LISTENING TO A CD
Set the selector (10) to CD.
Set the Auto/Off/On (1) selector to the Auto
position.
Insert a compact disc and press PLAY/PAUSE
(20); playback of the compact disc will begin.
Press the SLEEP (5) button; the timer will begin
to countdown from 59 minutes until shut-off.
To change the shut-off time, press and hold the
SLEEP (5) button, press the (6) HOUR button
and the shut-off time will change to 1h 59min, or
the MIN (7) button to change the alarm time
from 59 to 1 min.
Press the Snooze (9) button to deactivate this
function.
DISPLAY BRIGHTNESS
Display brightness is controlled with the DIM-
MER/BRIGHT (23) switch.
RADIO
AM band reception uses an internal antenna;
when tuning a radio station, turn the radio itself
in order to achieve optimal reception.
Set the Auto/Off/On (1) selector to the On posi-
tion.
Set the band selector (10) to the desired band
(FM/AM).
Rotate the TUNING (11) dial to tune to the
desired radio station.
Reception in the 88 108 MHz bandwidth is
possible in stereo; when tuned accurately, the
ST stereo reception indicator (14) will light.
Set the desired volume using the VOLUME (2)
dial.
Set the Auto/Off/On (1) to the Off position to
turn the radio off. If the radio does not turn off,
then its possible the Snooze mode is activate;
in this case, press the Snooze (9) button.
LISTENING TO COMPACT DISCS
Set the selector (10) to CD.
Set the Auto/Off/On (1) selector to On.
Open the CD compartment and insert a com-
pact disc; make sure the disc in installed prop-
erly; the disk should be inserted label-up. Close
the CD compartment lid.
The display (25) will show the total number of
tracks on the disc.
Press the PLAY/PAUSE (20) button to begin
playback; press the PLAY/PAUSE (20) button
again to PAUSE playback; to continue playback
of the compact disc, press the PLAY/PAUSE (20)
button again.
TRACK SEARCH
During playback of a compact disc, press the
SKIP/SEARCH FORWARD (18) and
SKIP/SEARCH BACK (17) buttons to search for
the desired track; the track number will be indi-
cated on the display (25).
REPEAT PLAYBACK
Press the REPEAT (23) button to repeat a track;
the indicator (15) will blink.
To repeat the entire disc, press the REPEAT (23)
button again; the indicator (15) will stop blink-
ing.
To cancel repeat playback mode, press the
REPEAT (23) button three times; the indicator
(15) will disappear.
PROGRAMMING TRACK PLAYBACK ORDER
Press the PROGRAM (22) button; the indicator
(16) will start to blink and the display (25) will
show the blinking program number; use the
SKIP/SEARCH FORWARD (18) or SKIP/SEARCH
BACK (17) button to choose the desired track.
Press the PLAY/PAUSE (20) button to begin
playback of tracks in the assigned order.
Press the STOP (19) button to end playback; to
cancel programmed playback of tracks, press
the STOP (19) button again; all previously pro-
grammed information will be erased from mem-
ory.
Note: the maximum amount of tracks that can
be programmed for playback is 20.
BASS BOOST FUNCTION
While listening to the radio or a compact disc,
you can activate the bass boost function by set-
ting the BASS BOOST OFF/ON (24) selector to
the ON position.
ENGLISH
4
3521.qxd 16.03.05 15:27 Page 4

HEADPHONES JACK
To listen to the radio or a compact disc individu-
ally, you can use headphones; insert the plug
into the headphones jack (13).
The headphones volume can be set using the
VOLUME (2) dial.
TECHNICAL CHARACTERISTICS
Frequency band
AM 540 1600 kHz
FM 88 108 MHz
Backup power
9 V 6F-22 battery
(not included)
Power requirements
AC 230 V ~ 50 Hz
The manufacturer reserves the right to make
changes to the technical characteristics of this
device without prior notice.
SERVICE LIFE NO LESS THAN FIVE YEARS.
GUARANTEE
Details regarding guarantee conditions can be
obtained from the dealer from whom the appliance
was purchased. The bill of sale or receipt must be
produced when making any claim under the terms of
this guarantee.
ENGLISH
5
This product conforms to the EMC-
Requirements as laid down by the
Council Directive 89/336/EEC and to the
Low Voltage Regulation (23/73 EEC)
3521.qxd 16.03.05 15:27 Page 5

UHRENWECKER MIT CD-SPIELER UND RADIO
MODELL VT-3521
ANORDNUNG DER STEUERELEMENTE
1. SCHALTER AUTOMAT. AUS/AN (Auto/Off/On)
2. LAUTSTÄRKENREGELUNG/EINSCHALTEN DES
SUMMERS (VOLUME/BUZZ)
3. EINSTELLEN DER UHRZEIT (TIME)
4. EINSTELLEN DES WECKERS (ALARM)
5. ABSTELLTIMER (SLEEP)
6. STUNDENEINSTELLUNG (HOUR)
7. MINUTENEINSTELLUNG (MIN)
8. LED-ANZEIGEN
9. EINSCHALTEN DER
SCHLUMERFUNKTION/ABSTELLEN DES
TIMERS (Snooze)
10.FREQUENZUMSCHALTER (AM/FM)/ EIN-
SCHALTEN DES CD-SPIELERS(CD)
11.ABSTIMMUNG DES RADIOS (TUNING)
12.LAUTSPRECHER
13.KOPBHÖRERBÜCHSE (Phone)
14.STEREOSIGNALINDIKATOR (ST)
15.WIEDERHOLUNGDSINDIKATOR DER TITEL-
WIEDERGABE (REPEAT)
16.PROGRAMMIERINDIKATOR (PROG)
17.TITELSUCHE IN RÜCKWÄRTSRICHTUNG
(TRACK)
18.TITELSUCHE INDIREKTER RICHTUNG
(SEARCH)
19.STOPP-TASTE (STOP)
20.TASTE WIEDERGABE/PAUSE (PLAY/PAUSE)
21.WIEDERHOLUNGSTASTE (REPEAT)
22.PROGRAMMIERTASTEDER TITELWIEDERGABE
(PROGRAM)
23.HELLIGKEITSREGLER DES DISPLAYS (DIM-
MER/BRIGHT)
24.AN/AUS TIEFFREQUENZVERSTÄRKUNG (BASS
BOOST OFF/ON)
25.TITLELNUMMERANZEIGEN
26.FACH FÜR NOTSPEISUNGSBATTERIE
27.ALARMINDIKATOR DES WECKERS (ALM)
WECHSELSTROMNETZSPEISUNG
Überzeugen Sie sich vor dem Einschalten
davon, dass die Netzstromspannung der
Betriebsspannung des Gerätes entspricht.
VORSICHT
Nehmen Sie die Steckgabel aus der Steckdose,
wenn Sie das Gerät für längere Zeit nicht
benutzen.
Nehmen Sie das Gerät nicht selbstständig
auseinander, im Inneren befinden sich keine
Teile, die vom Benutzer bedient werden
müssten.
Um Feuerentfachung und Stromschlaggefahr
vorzubeugen, lassen Sie kein Wasser in das
Innere des Gehäuses gelangen.
Es ist verboten die natürlichen
Lüftungsbedingungen des Gerätes zu beein-
trächtigen, stellen Sie es nicht in geschlossenen
Bücherschränken oder auf Regalen auf, wo die
Lüftung unzureichend ist.
Es ist verboten das Gerät auf offene
Flammenquellen, z.B. auf brennende Kerzen zu
stellen.
Beim Auffinden von Fehlern wenden Sie sich an
ein autorisiertes Service-Center.
UHR
Öffnen Sie des Deckel des CD-Faches, öffnen
Sie den Batteriefachdeckel (26) und legen Sie
eine Batterie Typ 6F-22 mit Spannung 9V (nicht
im Lieferumfang enthalten). Die Batterie wird für
die Speicherung von Informationen in der
Echtzeit und der eingestellten Alarmzeit des
Weckers verwendet, wenn die Netzstromzufuhr
unterbrochen wird.
Stellen Sie den Schalter Auto/Off/On (1) in die
Position Off und stecken Sie die Steckgabel in
die Steckdose, dabei werden die Angaben auf
dem Display blinken.
Um die aktuelle Uhrzeit einzustellen, pressen
und halten Sie die Taste TIME (3), stellen Sie
mit den Tasten HOUR (6) und MIN (7) die
aktuelle Uhrzeit ein.
EINSTELLEN DER ALARMZEIT DES WECKERS
Pressen und halten Sie die Taste ALARM (4),
stellen Sie mit den Tasten HOUR (6) und MIN (7)
die gewünschte Alarmzeit des Weckers ein.
EINSTELLEN DER ALARMZEIT ZUM ERWACHEN
BEI RADIOMUSIK
Stellen Sie die Alarmzeit des Weckers ein, wie es
oben beschrieben wurde.
Stellen Sie den Schalter Auto/Off/On (1) in die
Position On.
Stellen Sie den Schalter (10) auf den gewün-
schten Bandbereich AM/FM ein, stellen Sie mit
dem Reglergriff des Radios TUNING (11) den
gewünschten Radiosender ein und überzeugen
Sie sich davon, dass die richtige Lautstärke
eingestellt ist.
Stellen Sie den Schalter Auto/Off/On (1) in die
Position Auto, dabei schaltet sich der Indikator
ALM (27) ein. Wenn die laufende Uhrzeit mit der
voreingestellten Uhrzeit zusammenfällt, wird
sich das Gerätautomatisch im Radiobetrieb ein-
schalten.
Anmerkung: der Empfang von Radiosendungen
im Bereich 88 108 MHz erfolgt in Stereo , bei
genauer Abstimmung auf den Radiosender
leuchtet der Stereoempfangsindikator ST (14)
auf.
DEUTSCH
6
3521.qxd 16.03.05 15:27 Page 6

EINSTELLEN DES WECKERS ZUM ERWACHEN
BEI ALARMSIGNAL
Stellen Sie die Alarmzeit des Weckers ein, wie es
oben beschrieben wurde.
Drehen Sie den Lautstärkenregler
VOLUME/BUZZ (2) gegen den Uhrzeigersinn bis
zum Klickgeräusch, um das Summersignal
BUZZ einzustellen.
Stellen Sie den Schalter Auto/Off/On (1) in die
Position Auto, dabei schaltet sich der Indikator
ALM (27) ein. Wenn die laufende Uhrzeit mit der
voreingestellten Alarmzeit des Weckers zusam-
menfällt, wird sich ein sich unterbrechendes
Klangsignal einschalten.
EINSTELLEN DES WECKERS ZUM ERWACHEN
BEI CD-MUSIK
Stellen Sie die Alarmzeit des Weckers ein, wie es
oben beschrieben wurde.
Stellen Sie den Schalter (10) in die Position CD.
Stellen Sie den Schalter Auto/Off/On (1) in die
Position Auto.
Öffnen Sie den Deckel des CD-Faches CD und
legen Sie eine CD ein, schließen Sie den Deckel
des CD-Faches, die gewünschte Lautstärke wird
mit dem Regler (2) eingestellt.
Wenn die laufende Uhrzeit mit der voreingestell-
ten Alarmzeit zusammenfällt, schaltet der CD-
Spieler die Wiedergabe ein.
ABSTELLEN DES WECKERS
Zum Abstellen des Weckers pressen Sie einmal
die Taste ALARM (4), der Wecker schaltet sich
ab und die eingestellte Alarmzeit wird für den
nächsten Tag gespeichert, der Indikator ALM
(27) wird eingeschaltet sein.
Wenn der Wecker vollständig abgestellt werden
soll, stellen Sie den Schalter Auto/Off/On (1) in
die Position Off, der Indikator ALM (27) erlischt.
SCHLUMMERFUNKTION
Das Alarmsignal des Weckers kann vorläufig
durch das Pressen der Taste Snooze (9)
abgestellt werden; das Signal schaltet sich
automatisch nach 9 Minuten wieder ein.
Beim Erwachen bei Radiomusik kann durch das
Pressen der Taste Snooze (9 der Klang
abgestellt werden; die Musik schaltet sich nach
9 Minuten automatisch wieder ein.
Beim Erwachen im Wiedergabebetrieb des CD-
Spielers kann der Klang vorläufig abgestellt wer-
den, indem Sie die Taste Snooze (9) pressen,
die Musik schaltet sich nach 9 Minuten automa-
tisch wieder ein.
ABSTELLTIMER IM RADIOBETRIEB
Stellen Sie den Schalter Auto/Off/On (1) in die
Position Auto.
Pressen Sie die Taste SLEEP (5), das Radio wird
eingeschaltet und der Timer beginnt die
Rückzählung der Zeit bis zum Ausschalten, die
Zeitspanne kann bis zu 59 Minuten betragen.
Um die Abstellzeit zu ändern, pressen und hal-
ten Sie die Taste SLEEP (5), beim Pressen der
Taste (6) HOUR wird die Zeit bis zum Abschalten
1h 59 min betragen, und mit der Taste MIN (7)
kann die Abstellzeit in einer Zeitspanne von 59
bis 1 Minuten betragen.
Um den Timerbetrieb abzustellen, pressen Sie
die Taste Snooze (9).
ABSTELLTIMER IM CD-SPIELER-BETRIEB
Stellen Sie den Schalter (10) in die Position CD.
Stellen Sie den Schalter Auto/Off/On (1) in die
Position Auto.
Legen Sie eine CD ein, pressen Sie die Taste
PLAY/PAUSE (20), die Wiedergabe der CD
beginnt.
Pressen Sie die Taste SLEEP (5), der Timer
beginnt die Zeitrückzählung bis zum Anschalten,
die Zeitspanne beträgt 59 Minuten.
Um die Anstellzeit zu ändern, pressen und hal-
ten Sie die Taste SLEEP (5), beim Pressen der
Taste (6) HOUR wird die Anstellzeit 1h 59min
betragen, , und mit der Taste MIN (7) kann die
Abstellzeit in einer Zeitspanne von 59 bis 1
Minuten betragen.
Um den Timerbetrieb abzustellen, pressen Sie
die Taste Snooze (9).
HELLIGKEIT DES DISPLAYS
Die Helligkeit des Displays wird mit dem
Schalter DIMMER/BRIGHT (23) geregelt.
RADIO
Für den Empfang im Am-Bereich wird die innere
Antenne verwendet, stellen Sie den optimalen
Empfang ein, indem Sie während der
Abstimmung das Gehäuse des Gerätes drehen.
Stellen Sieden Schalter Auto/Off/On (1) in die
Position On.
Stellen Sie den Frequenzumschalter FM/AM
(10) auf den gewünschten Bereich ein.
Stellen Sie mit dem Abstimmungsregler TUNING
(11) den gewünschten Radiosender ein.
Der Empfang von Radiosendungen im Bereich
88 108 MHz erfolgt in Stereo, bei genauer
Abstimmung auf den Radiosender leuchtet der
Stereoempfangsindikator ST (14) auf.
Stellen Sie die gewünschte Lautstärke mit dem
Lautstärkenregler VOLUME (2) ein.
Zum Abstellendes Radios stellen Sie den
Schalter Auto/Off/On (1) in die Position Off.
Wenn sich das Radio nicht ausschaltet, kann es
sein, das der Abstelltimer eingestellt ist, in
diesem Fall pressen Sie einfach die Taste
Snooze (9).
DEUTSCH
7
3521.qxd 16.03.05 15:27 Page 7

ANHÖREN VON CDs
Stellen Sie den Schalter (10) in die Position CD.
Stellen Sieden Schalter Auto/Off/On (1) in die
Position On.
Öffnen Sie den Deckel des CD-Faches und
legen Sie eine CD ein, achten Sie dabei darauf,
dass die CD korrekt, mit dem Etikett nach oben
eingelegt ist. Schließen Sie den Deckel des CD-
Getriebes.
Auf dem Display (25) erscheint die
Gesamtanzahl der Titel auf der CD.
Pressen Sie die Taste PLAY/PAUSE (20), um die
Wiedergabe zu beginnen, beim wiederholten
Pressen der Taste PLAY/PAUSE (20) schaltet
sich der PAUSE-Betrieb ein, um die Wiedergabe
fortzusetzen, pressen Sie die Taste PLAY/PAUSE
(20) noch einmal.
TITELSUCHE
Während der Wiedergabe der CD kann mit den
Tasten SEARCH (18) und TRACK (17) die Suche
der gewünschten Titel in direkter Richtung
SEARCH (18) und in rückwärtiger Richtung
TRACK (17) durchgeführt werden, die
Titelnummer wird auf dem Display (25)
angezeigt.
WIEDERHOLTE WIEDERGABE
Zum Wiederholen des Titels pressen Sie einmal
die Taste REPEAT (23), der Indikator (15) fängt
zu blinken an.
Um die ganze CD zu wiederholen, pressen Sie
zweimal die Taste REPEAT (23), der Indikator
(15) wird konstant leuchten.
Um den Betrieb der wiederholten Wiedergabe
abzustellen, pressen Sie die Taste REPEAT (23)
dreimal, der Indikator (15) erlischt.
VORPROGRAMMIEREN DER WIEDER-
GABEORDNUNG DER TITEL
Pressen Sie die Taste PROGRAM (22), der
Indikator (16) blinkt, auf dem Display (25)
erscheint die blinkende Nummer des
Programms, wählen Sie mit den Tasten SEARCH
(18) oder TRACK (17) die Nummer des gewün-
schten Titels aus.
Pressen Sie die Taste PLAY/PAUSE (20), um die
Wiedergabe der Titel in dieser Reihenfolge zu
beginnen.
Um die Wiedergabe abzubrechen, pressen Sie
die Taste STOP (19), um die Wiedergabe der
vorprogrammierten Titel anzuschalten, pressen
Sie die Taste STOP (19) noch einmal, dabei wer-
den die Eingaben aus dem Speicher gelöscht.
Anmerkung: die maximale Titelzahl für die
Wiedergabe in vorprogrammierter Reihenfolge
beträgt bis zu 20 Titel.
TIEFFREQUENZVERSTÄRKUNG
Während des Anhörens vom Radio oder einer
CD können Sie die Funktion der
Tieffrequenzverstärkung einschalten, indem Sie
den Schalter BASS BOOST OFF/ON (24) in die
Position ON stellen.
KOPFHÖRERANSCHLUSS
Zum individuellen Anhören des Radios oder der
CDs können Sie Kopfhörer verwenden, indem
Sie den Stecker der Kopfhörerschnur in die
Büchse Phone (13) stecken.
Die Lautstärke in den Kopfhörern wird mit dem
Regler VOLUME (2) eingestellt.
TECHNISCHE KENNDATEN
Frequenzbereich
AM 540 1600 kHz
FM 88 108 MHz
Reservespeisung:
9 V Batterie 6F-22
(nicht im Lieferumfang enthalten)
Speisespannung:
AC 230 V ~ 50 Hz
Der Hersteller behält sich das Recht vor die
Charakteristiken des Gerätes ohne
Vorbescheid zu ändern.
DIE LEBENSDAUER DES GERÄTES BETRÄGT
NICHT WENIGER ALS 5 JAHRE
Gewährleistung
Ausführliche Bedingungen der Gewährleistung kann
man beim Dealer, der diese Geräte verkauft hat,
bekommen. Bei beliebiger Anspruchserhebung soll
man während der Laufzeit der vorliegenden
Gewährleistung den Check oder die Quittung über
den Ankauf vorzulegen.
DEUTSCH
8
Das vorliegende Produkt entspricht
den Forderungen der elektromagnetis-
chen Verträglichkeit, die in
89/336/EWG -Richtlinie des Rates und
den Vorschriften 23/73/EWG über die
Niederspannungsgeräte vorgesehen
sind.
3521.qxd 16.03.05 15:27 Page 8

×ÀÑÛ-ÁÓÄÈËÜÍÈÊ Ñ CD-ÏËÅÅÐÎÌ È ÐÀÄÈÎ
ÌÎÄÅËÜ VT-3521
ÐÀÑÏÎËÎÆÅÍÈÅ ÝËÅÌÅÍÒÎÂ ÓÏÐÀÂËÅÍÈß
1. ÏÅÐÅÊËÞ×ÀÒÅËÜ ÀÂÒÎÌÀÒ. ÂÛÊË./ÂÊË.
(Auto/Off/On)
2. ÐÅÃÓËÈÐÎÂÊÀ ÓÐÎÂÍß ÃÐÎÌÊÎÑÒÈ/ÂÊË.
ÇÓÌÌÅÐÀ (VOLUME/BUZZ)
3. ÓÑÒÀÍÎÂÊÀ ÂÐÅÌÅÍÈ (TIME)
4. ÓÑÒÀÍÎÂÊÀ ÁÓÄÈËÜÍÈÊÀ (ALARM)
5. ÒÀÉÌÅÐ ÎÒÊËÞ×ÅÍÈß (SLEEP)
6. ÓÑÒÀÍÎÂÊÀ ×ÀÑΠ(HOUR)
7. ÓÑÒÀÍÎÂÊÀ ÌÈÍÓÒ (MIN)
8. ÑÂÅÒÎÄÈÎÄÍÛÉ ÄÈÑÏËÅÉ
9. ÂÊËÞ×ÅÍÈÅ ÐÅÆÈÌÀ ÊÎÐÎÒÊÎÃÎ
ÑÍÀ/ÎÒÊËÞ×ÅÍÈÅ ÒÀÉÌÅÐÀ (Snooze)
10.ÏÅÐÅÊËÞ×ÀÒÅËÜ ÄÈÀÏÀÇÎÍΠ(AM/FM)/
ÂÊËÞ×ÅÍÈÅ ÏÐÎÈÃÐÛÂÀÒÅËß (CD)
11.ÍÀÑÒÐÎÉÊÀ ÐÀÄÈÎ (TUNING)
12.ÄÈÍÀÌÈÊ
13.ÃÍÅÇÄÎ ÄËß ÏÎÄÊËÞ×ÅÍÈß ÍÀÓØÍÈÊÎÂ
(Phone)
14.ÈÍÄÈÊÀÒÎÐ ÑÒÅÐÅÎÑÈÃÍÀËÀ (ST)
15.ÈÍÄÈÊÀÒÎÐ ÏÎÂÒÎÐÀ ÂÎÑÏÐÎÈÇÂÅÄÅÍÈß
ÒÐÅÊÎÂ (REPEAT)
16.ÈÍÄÈÊÀÒÎÐ ÏÐÎÃÐÀÌÌÈÐÎÂÀÍÈß (PROG)
17.ÏÎÈÑÊ ÒÐÅÊÎÂ Â ÎÁÐÀÒÍÎÌ
ÍÀÏÐÀÂËÅÍÈÈ (TRACK)
18.ÏÎÈÑÊ ÒÐÅÊΠ ÏÐßÌÎÌ ÍÀÏÐÀÂËÅÍÈÈ
(SEARCH)
19.ÊÍÎÏÊÀ ÑÒÎÏ (STOP)
20.ÊÍÎÏÊÀ ÂÎÑÏÐÎÈÇÂÅÍÅÍÈÅ/ÏÀÓÇÀ
(PLAY/PAUSE)
21.ÊÍÎÏÊÀ ÏÎÂÒÎÐ (REPEAT)
22.ÊÍÎÏÊÀ ÏÐÎÃÐÀÌÌÈÐÎÂÀß
ÂÎÑÏÐÎÈÇÂÅÄÅÍÈß ÒÐÅÊÎÂ (PROGRAM)
23.ÐÅÃÓËßÒÎÐ ßÐÊÎÑÒÈ ÄÈÑÏËÅß
(DIMMER/BRIGHT)
24.ÂÊË./ÂÛÊË. ÓÑÈËÅÍÈß ÍÈÇÊÈÕ ×ÀÑÒÎÒ
(BASS BOOST OFF/ON)
25.ÄÈÑÏËÅÉ ÍÎÌÅÐÀ ÒÐÅÊÀ
26.ÎÒÑÅÊ ÁÀÒÀÐÅÈ ÀÂÀÐÈÉÍÎÃÎ ÏÈÒÀÍÈß
27.ÈÍÄÈÊÀÒÎÐ ÂÊËÞ×ÅÍÈß ÁÓÄÈËÜÍÈÊÀ
(ALM)
ÏÈÒÀÍÈÅ ÎÒ ÑÅÒÈ ÏÅÐÅÌÅÍÍÎÃÎ ÒÎÊÀ
Ïåðåä âêëþ÷åíèåì óáåäèòåñü, ÷òî
íàïðÿæåíèå ýëåêòðè÷åñêîé ñåòè,
ñîîòâåòñòâóåò ðàáî÷åìó íàïðÿæåíèþ
óñòðîéñòâà.
ÎÑÒÎÐÎÆÍÎ
Âûíèìàéòå ñåòåâóþ âèëêó èç ðîçåòêè, åñëè
íå ïîëüçóåòåñü óñòðîéñòâîì äëèòåëüíîå
âðåìÿ.
Íå ðàçáèðàéòå óñòðîéñòâî ñàìîñòîÿòåëüíî,
âíóòðè íåò äåòàëåé, êîòîðûå îáñëóæèâàþòñÿ
ïîëüçîâàòåëåì.
Äëÿ ïðåäîòâðàùåíèÿ ïîæàðà è îïàñíîñòè
ïîðàæåíèÿ òîêîì íå äîïóñêàéòå ïîïàäàíèÿ
âîäû â êîðïóñ óñòðîéñòâà.
Çàïðåùàåòñÿ íàðóøàòü óñëîâèÿ
åñòåñòâåííîé âåíòèëÿöèè óñòðîéñòâà, íå
ñòàâüòå óñòðîéñòâî â çàêðûòûå êíèæíûå
øêàôû èëè íà ïîëêè, ãäå íåò äîñòàòî÷íîé
âåíòèëÿöèè.
Çàïðåùàåòñÿ ñòàâèòü íà óñòðîéñòâî
èñòî÷íèêè îòêðûòîãî ïëàìåíè, òàêèå êàê
ãîðÿùèå ñâå÷è.
Ïðè îáíàðóæåíèè íåèñïðàâíîñòè
îáðàùàéòåñü â àâòîðèçîâàííûé ñåðâèñíûé
öåíòð.
×ÀÑÛ
Îòêðîéòå êðûøêó îòñåêà CD, îòêðîéòå
êðûøêó áàòàðåéíîãî îòñåêà (26) è óñòàíîâèòå
áàòàðåéêó òèïà 6F-22 íàïðÿæåíèåì 9Â (â
êîìïëåêò ïîñòàâêè íå âõîäèò). Áàòàðåéêà
èñïîëüçóåòñÿ äëÿ ñîõðàíåíèÿ èíôîðìàöèè î
òåêóùåì âðåìåíè è âðåìåíè óñòàíîâêè
áóäèëüíèêà, ïðè ïðîïàäàíèè ñåòåâîãî
íàïðÿæåíèÿ.
Óñòàíîâèòå ïåðåêëþ÷àòåëü Auto/Off/On (1) â
ïîëîæåíèå Off è âñòàâüòå ñåòåâóþ âèëêó â
ðîçåòêó, ïðè ýòîì ïîêàçàíèÿ íà äèñïëåå
áóäóò ìèãàòü.
Äëÿ óñòàíîâêè òåêóùåãî âðåìåíè íàæìèòå è
óäåðæèâàéòå êíîïêó TIME (3), êíîïêàìè
HOUR (6) è MIN (7) óñòàíîâèòå òåêóùåå
âðåìÿ.
ÓÑÒÀÍÎÂÊÀ ÂÐÅÌÅÍÈ ÂÊËÞ×ÅÍÈß
ÁÓÄÈËÜÍÈÊÀ
Íàæìèòå è óäåðæèâàéòå êíîïêó ALARM (4),
êíîïêàìè HOUR (6) è MIN (7) óñòàíîâèòå
íåîáõîäèìîå âðåìÿ âêëþ÷åíèÿ áóäèëüíèêà.
ÓÑÒÀÍÎÂÊÀ ÁÓÄÈËÜÍÈÊÀ ÍÀ
ÏÐÎÁÓÆÄÅÍÈÅ ÏÎÄ ÐÀÄÈÎ
Óñòàíîâèòå âðåìÿ âêëþ÷åíèÿ áóäèëüíèêà êàê
ñêàçàíî âûøå.
Óñòàíîâèòå ïåðåêëþ÷àòåëü Auto/Off/On (1) â
ïîëîæåíèå On.
Óñòàíîâèòå ïåðåêëþ÷àòåëü (10) íà
íåîáõîäèìûé äèàïàçîí AM/FM, ðó÷êîé
íàñòðîéêè ðàäèî TUNING (11) íàñòðîéòåñü íà
æåëàåìóþ ðàäèîñòàíöèþ è óáåäèòåñü, ÷òî
óñòàíîâëåíà íåîáõîäèìàÿ ãðîìêîñòü.
Óñòàíîâèòå ïåðåêëþ÷àòåëü Auto/Off/On (1) â
ïîëîæåíèå Auto, ïðè ýòîì âêëþ÷èòüñÿ
èíäèêàòîð ALM (27). Êîãäà òåêóùåå âðåìÿ
ñîâïàäåò ñ ïðåäóñòàíîâëåííûì âðåìåíåì
âêëþ÷åíèÿ áóäèëüíèêà, òî óñòðîéñòâî
àâòîìàòè÷åñêè âêëþ÷èòñÿ â ðåæèìå ðàäèî.
Ïðèìå÷àíèå: ïðèåì ðàäèîñòàíöèé â
äèàïàçîíå 88 108 ÌÃö îñóùåñòâëÿåòñÿ â
ñòåðåîðåæèìå, ïðè òî÷íîé íàñòðîéêå íà
ïåðåäàþùóþ ðàäèîñòàíöèþ, çàãîðèòñÿ
ÐÓÑÑÊÈÉ
9
3521.qxd 16.03.05 15:27 Page 9

èíäèêàòîð ñòåðåîïðèåìà ST (14).
ÓÑÒÀÍÎÂÊÀ ÏÐÎÁÓÆÄÅÍÈß ÏÎÄ ÑÈÃÍÀË
ÁÓÄÈËÜÍÈÊÀ
Óñòàíîâèòå âðåìÿ âêëþ÷åíèÿ áóäèëüíèêà êàê
îïèñàíî âûøå.
Ïîâåðíèòå ðåãóëÿòîð ãðîìêîñòè
VOLUME/BUZZ (2) ïðîòèâ ÷àñîâîé ñòðåëêè äî
ùåë÷êà äëÿ âêëþ÷åíèÿ ñèãíàëà çóììåðà
BUZZ.
Óñòàíîâèòå ïåðåêëþ÷àòåëü Auto/Off/On (1) â
ïîëîæåíèå Auto, ïðè ýòîì âêëþ÷èòüñÿ
èíäèêàòîð ALM (27). Êîãäà òåêóùåå âðåìÿ
ñîâïàäåò ñ âûáðàííûì ïðåäóñòàíîâëåííûì
âðåìåíåì âêëþ÷åíèÿ áóäèëüíèêà,
âêëþ÷èòüñÿ ïðåðûâèñòûé çâóêîâîé ñèãíàë.
ÓÑÒÀÍÎÂÊÀ ÏÐÎÁÓÆÄÅÍÈÅ ÏÎÄ ÌÓÇÛÊÓ
ÏÐÎÈÃÐÛÂÀÒÅËß ÊÎÌÏÀÊÒ ÄÈÑÊÎÂ
Óñòàíîâèòå âðåìÿ âêëþ÷åíèÿ áóäèëüíèêà êàê
îïèñàíî âûøå.
Óñòàíîâèòå ïåðåêëþ÷àòåëü (10) â ïîëîæåíèå
CD.
Óñòàíîâèòå ïåðåêëþ÷àòåëü Auto/Off/On (1) â
ïîëîæåíèå Auto.
Îòêðîéòå êðûøêó îòñåêà CD è óñòàíîâèòå
êîìïàêò-äèñê, çàêðîéòå êðûøêó îòñåêà CD,
íóæíûé óðîâåíü ãðîìêîñòè çâóêà
óñòàíàâëèâàåòñÿ ðåãóëÿòîðîì (2).
Êîãäà òåêóùåå âðåìÿ ñîâïàäåò ñ âûáðàííûì
ïðåäóñòàíîâëåííûì âðåìåíåì âêëþ÷åíèÿ
áóäèëüíèêà, ïðîèãðûâàòåëü êîìïàêò äèñêîâ
âêëþ÷èòüñÿ íà âîñïðîèçâåäåíèå.
ÎÒÊËÞ×ÅÍÈß ÁÓÄÈËÜÍÈÊÀ
Äëÿ îòêëþ÷åíèÿ áóäèëüíèêà, îäèí ðàç
íàæìèòå êíîïêó ALARM (4), áóäèëüíèê
îòêëþ÷èòüñÿ, à óñòàíîâëåííîå âðåìÿ
âêëþ÷åíèÿ áóäèëüíèêà ñîõðàíèòüñÿ äëÿ
ñëåäóþùåãî äíÿ, èíäèêàòîð ALM (27) áóäåò
âêëþ÷åí.
Åñëè íåîáõîäèìî âûêëþ÷èòü áóäèëüíèê, òî
óñòàíîâèòå ïåðåêëþ÷àòåëü Auto/Off/On (1) â
ïîëîæåíèå Off, èíäèêàòîð ALM (27) ïîãàñíåò.
ÔÓÍÊÖÈß ÊÎÐÎÒÊÎÃÎ ÑÍÀ
Ñèãíàë áóäèëüíèêà ìîæíî âðåìåííî
îòêëþ÷èòü íàæàòèåì íà êíîïêó Snooze (9);
ñèãíàë àâòîìàòè÷åñêè âêëþ÷èòñÿ ÷åðåç 9
ìèíóò.
Ïðè ïðîáóæäåíèè ïîä ðàäèî, çâóê ìîæíî
âðåìåííî îòêëþ÷èòü íàæàòèåì íà êíîïêó
Snooze (9); çâóê àâòîìàòè÷åñêè âêëþ÷èòñÿ
÷åðåç 9 ìèíóò.
Ïðè ïðîáóæäåíèè â ðåæèìå ïðîèãðûâàòåëÿ
êîìïàêò äèñêîâ, çâóê ìîæíî âðåìåííî
îòêëþ÷èòü íàæàòèåì íà êíîïêó Snooze (9),
çâóê àâòîìàòè÷åñêè âêëþ÷èòñÿ ÷åðåç 9 ìèíóò.
ÒÀÉÌÅÐ ÎÒÊËÞ×ÅÍÈß ÏÐÈ
ÏÐÎÑËÓØÈÂÀÍÈÈ ÐÀÄÈÎ
Óñòàíîâèòå ïåðåêëþ÷àòåëü Auto/Off/On (1) â
ïîëîæåíèå Auto.
Íàæìèòå êíîïêó SLEEP (5), âêëþ÷èòüñÿ ðàäèî
è òàéìåð íà÷íåò îòñ÷åò âðåìåíè äî
îòêëþ÷åíèÿ, âðåìÿ îòêëþ÷åíèÿ 59 ìèíóò.
Äëÿ èçìåíåíèÿ âðåìåíè îòêëþ÷åíèÿ íàæìèòå
è óäåðæèâàéòå êíîïêó SLEEP (5), ïðè íàæàòèè
êíîïêè (6) HOUR, âðåìÿ îòêëþ÷åíèÿ ñîñòàâèò
1÷ 59 ìèí, à êíîïêîé MIN (7) ìîæíî
óñòàíîâèòü âðåìÿ îòêëþ÷åíèÿ â èíòåðâàëå îò
59 äî 1 ìèí.
Äëÿ âûêëþ÷åíèÿ ðåæèìà òàéìåðà íàæìèòå
êíîïêó Snooze (9).
ÒÀÉÌÅÐ ÎÒÊËÞ×ÅÍÈß ÏÐÈ
ÏÐÎÑËÓØÈÂÀÍÈÈ ÊÎÌÏÀÊÒ ÄÈÑÊÎÂ
Óñòàíîâèòå ïåðåêëþ÷àòåëü (10) â ïîëîæåíèå
CD.
Óñòàíîâèòå ïåðåêëþ÷àòåëü Auto/Off/On (1) â
ïîëîæåíèå Auto.
Óñòàíîâèòå êîìïàêò äèñê, íàæìèòå êíîïó
PLAY/PAUSE (20), âêëþ÷èòñÿ
âîñïðîèçâåäåíèå êîìïàêò-äèñêà.
Íàæìèòå êíîïêó SLEEP (5), òàéìåð íà÷íåò
îòñ÷åò âðåìåíè äî îòêëþ÷åíèÿ, âðåìÿ
îòêëþ÷åíèÿ 59 ìèíóò.
Äëÿ èçìåíåíèÿ âðåìåíè îòêëþ÷åíèÿ íàæìèòå
è óäåðæèâàéòå êíîïêó SLEEP (5), ïðè íàæàòèè
êíîïêè (6) HOUR, âðåìÿ îòêëþ÷åíèÿ ñîñòàâèò
1÷ 59ìèí, à êíîïêîé MIN (7) ìîæíî
óñòàíîâèòü âðåìÿ îòêëþ÷åíèÿ â èíòåðâàëå îò
59 äî 1 ìèí.
Äëÿ âûêëþ÷åíèÿ ðåæèìà òàéìåðà íàæìèòå
êíîïêó Snooze (9).
ßÐÊÎÑÒÜ ÄÈÑÏËÅß
Ðåãóëèðîâêà ÿðêîñòè äèñïëåÿ
îñóùåñòâëÿåòñÿ ïåðåêëþ÷àòåëåì
DIMMER/BRIGHT (23).
ÐÀÄÈÎ
Äëÿ ïðèåìà â äèàïàçîíå AM èñïîëüçóåòñÿ
âíóòðåííÿÿ íàïðàâëåííàÿ àíòåííà, âî âðåìÿ
íàñòðîéêè íà ðàäèîñòàíöèþ, ïîâîðîòîì
êîðïóñà óñòðîéñòâà, äîáåéòåñü íàèëó÷øåãî
ïðèåìà.
Óñòàíîâèòå ïåðåêëþ÷àòåëü Auto/Off/On (1) â
ïîëîæåíèå On.
Óñòàíîâèòå ïåðåêëþ÷àòåëü äèàïàçîíîâ
FM/AM (10) íà íóæíûé äèàïàçîí.
Ïîâîðîòîì ðó÷êè íàñòðîéêè TUNING (11)
íàñòðîéòåñü íà ïåðåäàþùóþ ðàäèîñòàíöèþ.
Ïðèåì ðàäèîñòàíöèé â äèàïàçîíå 88 108
ÌÃö îñóùåñòâëÿåòñÿ â ñòåðåîðåæèìå, ïðè
òî÷íîé íàñòðîéêå íà ïåðåäàþùóþ
ðàäèîñòàíöèþ, çàãîðàåòñÿ èíäèêàòîð
ñòåðåîïðèåìà ST (14).
ÐÓÑÑÊÈÉ
10
3521.qxd 16.03.05 15:27 Page 10

Óñòàíîâèòå íåîáõîäèìûé óðîâåíü ãðîìêîñòè
ðåãóëÿòîðîì VOLUME (2).
Äëÿ âûêëþ÷åíèÿ ðàäèî óñòàíîâèòå
ïåðåêëþ÷àòåëü Auto/Off/On (1) â ïîëîæåíèå
Off. Åñëè ðàäèî íå îòêëþ÷àåòñÿ, òî âîçìîæíî
âêëþ÷åí òàéìåð îòêëþ÷åíèÿ, â ýòîì ñëó÷àå
íàæìèòå êíîïêó Snooze (9).
ÏÐÎÑËÓØÈÂÀÍÈÅ ÊÎÌÏÀÊÒ-ÄÈÑÊÎÂ
Óñòàíîâèòå ïåðåêëþ÷àòåëü (10) â ïîëîæåíèå
CD.
Óñòàíîâèòå ïåðåêëþ÷àòåëü Auto/Off/On (1) â
ïîëîæåíèå On.
Îòêðîéòå êðûøêó îòñåêà CD è óñòàíîâèòå
êîìïàêò-äèñê, ñëåäèòå çà ïðàâèëüíîñòüþ
óñòàíîâêè äèñêà, äèñê äîëæåí áûòü
óñòàíîâëåí ýòèêåòêîé ââåðõ. Çàêðîéòå
êðûøêó ïðèâîäà CD.
Íà äèñïëåå (25) îòîáðàçèòñÿ îáùåå
êîëè÷åñòâî òðåêîâ íà êîìïàêò äèñêå.
Íàæìèòå êíîïêó PLAY/PAUSE (20) äëÿ íà÷àëà
âîñïðîèçâåäåíèÿ, ïðè ïîâòîðíîì íàæàòèè
êíîïêè PLAY/PAUSE (20) âêëþ÷èòñÿ ðåæèì
ÏÀÓÇÀ, äëÿ ïðîäîëæåíèÿ âîñïðîèçâåäåíèÿ
íàæìèòå êíîïêó PLAY/PAUSE (20) åùå ðàç.
ÏÎÈÑÊ ÒÐÅÊÎÂ
Âî âðåìÿ âîñïðîèçâåäåíèÿ êîìïàêò-äèñêà
êíîïêàìè SEARCH (18) è TRACK (17) ìîæíî
ïðîèçâîäèòü ïîèñê æåëàåìûõ òðåêîâ â
ïðÿìîì SEARCH (18) è TRACK (17) îáðàòíîì
íàïðàâëåíèè, íîìåð òðåêà áóäåò
îòîáðàæàòüñÿ íà äèñïëåå (25).
ÏÎÂÒÎÐÍÎÅ ÂÎÑÏÐÎÈÇÂÅÄÅÍÈÅ
Äëÿ ïîâòîðà òðåêà íàæìèòå îäèí ðàç êíîïêó
REPEAT (23), èíäèêàòîð (15) áóäåò ìèãàòü.
Äëÿ ïîâòîðíîãî ïðîñëóøèâàíèÿ âñåãî
êîìïàêò-äèñêà íàæìèòå äâà ðàçà êíîïêó
REPEAT (23), èíäèêàòîð (15) áóäåò ñâåòèòüñÿ
ïîñòîÿííî.
Äëÿ îòìåíû ðåæèìà ïîâòîðíîãî
âîñïðîèçâåäåíèÿ íàæìèòå íà êíîïêó REPEAT
(23) òðè ðàçà, èíäèêàòîð (15) ïîãàñíåò.
ÏÐÎÃÐÀÌÌÈÐÎÂÀÍÈÅ ÏÎÐßÄÊÀ
ÂÎÑÏÐÎÈÇÂÅÄÅÍÈß ÒÐÅÊÎÂ
Íàæìèòå êíîïêó PROGRAM (22), èíäèêàòîð
(16) áóäåò ìèãàòü, íà äèñïëåå (25)
îòîáðàçèòñÿ ìèãàþùèé íîìåð ïðîãðàììû,
êíîïêàìè SEARCH (18) èëè TRACK (17)
âûáåðèòå íîìåð æåëàåìîãî òðåêà.
Íàæìèòå êíîïêó PLAY/PAUSE (20) äëÿ íà÷àëà
âîñïðîèçâåäåíèÿ òðåêîâ â çàäàííîé
ïîñëåäîâàòåëüíîñòè.
Äëÿ îñòàíîâêè âîñïðîèçâåäåíèÿ íàæìèòå
êíîïêó STOP (19), äëÿ îòìåíû
âîñïðîèçâåäåíèÿ çàïðîãðàììèðîâàííûõ
òðåêîâ íàæìèòå êíîïêó STOP (19) åùå ðàç,
ïðè ýòîì âñå ðàíåå ïðîèçâåäåííûå
óñòàíîâêè áóäóò ñòåðòû èç ïàìÿòè.
Ïðèìå÷àíèå: ìàêñèìàëüíîå ÷èñëî òðåêîâ äëÿ
âîñïðîèçâåäåíèÿ â çàäàííîé
ïîñëåäîâàòåëüíîñòè íå áîëåå 20.
ÓÑÈËÅÍÈß ÍÈÇÊÈÕ ×ÀÑÒÎÒ
Âî âðåìÿ ïðîñëóøèâàíèÿ ðàäèî èëè êîìïàêò-
äèñêà Âû ìîæåòå âêëþ÷èòü ôóíêöèþ
óñèëåíèÿ íèçêèõ ÷àñòîò, óñòàíîâèâ
ïåðåêëþ÷àòåëü BASS BOOST OFF/ON (24) â
ïîëîæåíèå ON.
ÃÍÅÇÄÎ ÄËß ÏÎÄÊËÞ×ÅÍÈß ÍÀÓØÍÈÊÎÂ
Äëÿ èíäèâèäóàëüíîãî ïðîñëóøèâàíèÿ ðàäèî
èëè êîìïàêò äèñêîâ Âû ìîæåòå
âîñïîëüçîâàòüñÿ íàóøíèêàìè, âñòàâüòå
øòåêåð ïðîâîäà íàóøíèêîâ â ãíåçäî Phone
(13).
Óðîâåíü ãðîìêîñòè â íàóøíèêàõ
óñòàíàâëèâàåòñÿ ðåãóëÿòîðîì VOLUME (2).
ÒÅÕÍÈ×ÅÑÊÈÅ ÕÀÐÀÊÒÅÐÈÑÒÈÊÈ
×àñòîòíûé äèàïàçîí
AM 540 1600 êÃö
FM 88 108 ÌÃö
Ðåçåðâíîå ïèòàíèå
9 Â áàòàðåéêà 6F-22
(â êîìïëåêò ïîñòàâêè íå
âõîäèò)
Íàïðÿæåíèå ïèòàíèÿ
AC 230Â ~ 50 Ãö
Ïðîèçâîäèòåëü îñòàâëÿåò çà ñîáîé ïðàâî
èçìåíÿòü õàðàêòåðèñòèêè ïðèáîðà áåç
ïðåäâàðèòåëüíîãî óâåäîìëåíèÿ.
ÑÐÎÊ ÑËÓÆÁÛ ÏÐÈÁÎÐÀ ÍÅ ÌÅÍÅÅ 5-ÒÈ
ËÅÒ
Äàííîå èçäåëèå ñîîòâåòñòâóåò âñåì
òðåáóåìûì åâðîïåéñêèì è
ðîññèéñêèì ñòàíäàðòàì áåçîïàñíîñòè
è ãèãèåíû.
Ïðîèçâîäèòåëü: ÀÍ-ÄÅÐ ÏÐÎÄÀÊÒÑ ÃìáÕ, Àâñòðèÿ
Éåíåâàéíãàññå, 10/10, 1210, Âåíà, Àâñòðèÿ
ÐÓÑÑÊÈÉ
11
3521.qxd 16.03.05 15:27 Page 11

HORLOGE-REVEIL AVEC UN LECTEUR CD ET
LA RADIO
MODELE VT-3521
SITUATION DES ELEMENTS DE COMMANDE
1. SELECTEUR MARCHE/ARRET/REGIME
AUTOMATIQUE (Auto/Off/On)
2. REGLAGE DU VOLUME /BRANCHEMENT DU
RONFLEUR (VOLUME/BUZZ)
3. REGLAGE DU TEMPS (TIME)
4. REGLAGE DU REVIL (ALARM)
5. MINUTERIE DE DEBRANCHEMENT (SLEEP)
6. REGLAGE DES HEURES (HOUR)
7. REGLAGE DES MINUTES (MIN)
8. AFFICHEUR EN DIODES LUMINESCENTES
9. ACTIVATION DU COURT SOMMEIL
/DEBRANCHEMENT DE LA MINUTERIE
(Snooze)
10.SELECTEUR DES BANDES DE FREQUENCES
(AM/FM)/ BRANCHEMENT DU LECTEUR (CD)
11.SYNTONISATION (TUNING)
12.HAUT-PARLEUR
13.PRISE DE CONNEXION DES ECOUTEURS
(Phone)
14.INDICATEUR DU SIGNAL STEREOPHONIQUE
(ST)
15.INDICATEUR DU REGIME DE REPETITION DE
LECTURE DES PLAGES (REPEAT)
16.INDICATEUR DE PROGRAMMATION (PROG)
17.RECHERCHE DES PLAGES EN ARRIERE
(TRACK)
18.RECHERCHE DES PLAGES EN AVANT
(SEARCH)
19.TOUCHE STOP (STOP)
20.TOUCHE LECTURE /PAUSE (PLAY/PAUSE)
21.TOUCHE REPETITION (REPEAT)
22.TOUCHE DE PROGRAMMATION DE LA LEC-
TURE DES PLAGES (PROGRAM)
23.REGULATEUR DE LUMINANCE DAFFICHEUR
(DIMMER/BRIGHT)
24.MARCHE/ARRET DE LAMPLIFICATEUR DES
BASSES (BASS BOOST OFF/ON)
25.AFFICHEUR DU NUMERO DE LA PLAGE
26.COMPARTIMENT A PILE DALIMENTATION DE
RESERVE
27.TEMOIN DACTIVATION DU REVEIL (ALM)
ALIMENTATION PAR LE SECTEUR DU COURANT
ALTERNATIF
Avant de brancher lappareil assurez-vous que la
tension du secteur correspond à la tension de
fonctionnement de lappareil.
ATTENTION
Sortez la fiche dalimentation de la prise de
courant si vous nutilisez pas lappareil pendant
une longue période.
Ne démontez pas lappareil, lappareil ne con-
tient pas de détails nécessitant lentretien de la
part dutilisateur.
Au risque dincendie et délectrocution évitez
que leau pénètre à lintérieur du corps de lap-
pareil.
Il est interdit de violer la ventilation naturelle de
lappareil, ne placez pas lappareil dans des
armoires fermées ou à dautres endroits nayant
pas de ventilation nécessaire.
Il est interdit de placer sur lappareil des sources
de flamme et notamment des chandelles
allumées.
En cas de découverte des défaillances
adressez-vous au centre de service agréé.
HORLOGE
Ouvrez le couvercle du compartiment à CD,
ouvrez le couvercle du compartiment à pile (26)
et installez-y une pile de type 6F-22 de tension
9V (nest pas livrée avec lappareil). La pile est
destinée à sauvegarder linformation sur le
temps courant et le temps de réveil en cas de
manque délectricité au secteur.
Mettez linterrupteur Auto/Off/On (1) à la posi-
tion Off et insérez la fiche dalimentation dans la
prise de courant secteur, les indications de laf-
ficheur commenceront à clignoter.
Pour régler le temps courant appuyez et main-
tenez enfoncée la touche TIME (3), avec les
touches HOUR (6) et MIN (7) réglez le temps
courant.
REGLAGE DU TEMPS DE REVEIL
Appuyez et maintenez enfoncée la touche
ALARM (4), avec les touches HOUR (6) et MIN
(7) réglez le temps désiré de branchement du
réveil.
REGLAGE DU REVEIL POUR ETRE REVEILLE
PAR LA RADIO
Réglez le temps de branchement du réveil en
suivant les indications présentées ci-dessus.
Mettez le linterrupteur On/Off/Auto (1) à la
position On.
Mettez le sélecteur (10) à la position de la
bande de fréquence désirée AM/FM, avec la
manche de syntonisation TUNING (11) réglez la
radio sur la station désirée et assurez-vous que
le niveau du volume est réglé convenablement.
Mettez linterrupteur Auto/Off/On (1) à la posi-
tion Auto, lindicateur ALM (27) sallumera à laf-
ficheur. Quand le temps courant coïncidera avec
le temps programmé du réveil, la radio sera
automatiquement allumée.
Note: la réception des stations radio dans la
bande 88 108 MHz est effectuée au régime
stéréophonique, si lappareil est bien réglé sur
une station radio de cette gamme lindicateur du
régime stéréophonique ST (14) sallumera.
FRANÇAIS
12
3521.qxd 16.03.05 15:27 Page 12

REGLAGE DU REVEIL POUR ETRE REVEILLE
PAR LE RONFLEUR
Réglez le temps de branchement du réveil en
suivant les indications présentées ci-dessus.
Tournez le régulateur de puissance
VOLUME/BUZZ (2) dans le sens contraire dune
aiguille dune montre jusquun clic pour activer
le ronfleur BUZZ.
Mettez linterrupteur On/Off/Auto (1) à la posi-
tion Auto lindicateur ALM (27) sallumera à laf-
ficheur. Quand le temps courant coïncidera avec
le temps programmé du réveil, le signal du ron-
fleur retentira automatiquement.
REGLAGE DU REVEIL POUR ETRE REVEILLE
PAR LE LECTEUR CD
Réglez le temps de branchement du réveil en
suivant les indications présentées ci-dessus.
Mettez le sélecteur (10) à la position CD.
Mettez linterrupteur Auto/Off/On (1) à la posi-
tion Auto.
Ouvrez le couvercle du compartiment à CD,
placez-y un CD et fermez le couvercle. Réglez le
niveau du volume en tournant le régulateur (2).
Quand le temps courant coïncidera avec le
temps programmé du réveil, le lecteur des dis-
ques CD commencera la lecture.
DEBRANCHEMENT DU REVEIL
Pour débrancher le réveil appuyez une fois sur
la touche ALARM (4), le réveil sera débranché,
et le temps programmé sera reporté au lende-
main, lindicateur ALM (27) restera allumé.
Sil vous faut désactiver le réveil, mettez linter-
rupteur Auto/Off/On (1) à la position Off, lindi-
cateur ALM (27) séteindra.
FONCTION DU COURT SOMMEIL
Vous pouvez désactiver le signal du réveil pour
un certain temps en appuyant sur la touche
Snooze (9); le signal sera éteint mais il retentira
automatiquement 9 minutes après.
Si vous avez été réveillé par la radio, vous pou-
vez éteindre le son en appuyant sur la touche
Snooze (9); le son éteint mais il sera branché 9
minutes après.
Si vous avez été réveillé par le lecteur CD, vous
pouvez éteindre le son en appuyant sur la
touche Snooze (9); le son éteint mais il sera
branché 9 minutes après.
MINUTERIE DE DEBRANCHEMENT DE LA
RADIO
Mettez linterrupteur Auto/Off/On (1) à la posi-
tion Auto.
appuyez sur la touche SLEEP (5), la radio sera
allumée et la minuterie commencera le compte
à rebours du temps de débranchement qui est
égal à 59 minutes.
Pour changer le temps de débranchement de la
radio appuyez et maintenez enfoncée la touche
SLEEP (5), en appuyant sur la touche (6) HOUR,
vous augmentez le temps de la minuterie à 1
heure, et en appuyant sur la touche MIN (7)
vous pouvez régler le temps dans lintervalle de
59 à 1 min.
Pour désactiver le régime de la minuterie
appuyez sur la touche Snooze (9).
LA MINUTERIE DE DEBRANCHEMENT PEN-
DANT LA LECTURE DES DISQUES CD
Mettez le sélecteur (10) à la position CD.
Mettez linterrupteur Auto/Off/On (1) à la posi-
tion Auto.
Installez le disque CD, appuyez sur la touche
PLAY/PAUSE (20), la lecture du CD sera lancée.
Appuyez sur la touche SLEEP (5), la minuterie
commencera le compte à rebours du temps de
débranchement qui est égal à 59 minutes.
Pour changer le temps de débranchement de la
radio appuyez et maintenez enfoncée la touche
SLEEP (5), en appuyant sur la touche (6) HOUR,
vous augmentez le temps de la minuterie à 1
heure, et en appuyant sur la touche MIN (7)
vous pouvez régler le temps dans lintervalle de
59 à 1 min.
Pour désactiver le régime de la minuterie
appuyez sur la touche Snooze (9).
LUMINANCE DE LAFFICHEUR
Le réglage de lafficheur est effectué avec le
sélecteur DIMMER/BRIGHT (23).
LA RADIO
Pour la réception dans la bande AM est utilisée
lantenne directionnelle incorporée, pendant le
réglage sur une station radio tournez le corps de
lappareil pour avoir la meilleure réception.
Mettez linterrupteur Auto/Off/On (1) à la posi-
tion On.
Mettez le sélecteur de la bande de fréquence
FM/AM (10) à la position correspondant à la
bande requise.
En tournant la manche de syntonisation TUNING
(11) réglez lappareil sur une station radio.
La réception des stations de la bande 88 108
MHz est effectuée au régime stéréophonique, si
la station est bien réglée lindicateur de la
réception stéréophonique ST (14) sallumera.
Réglez le niveau du volume avec le régulateur
VOLUME (2).
Pour éteindre la radio mettez linterrupteur
Auto/Off/On (1) à la position Off. Si la radio ne
séteint pas ça peut signifier que la minuterie de
débranchement est activée. Dans ce cas pour
éteindre la radio appuyez sur la touche Snooze
(9).
FRANÇAIS
13
3521.qxd 16.03.05 15:27 Page 13
LECTURE DES DISQUES CD
Mettez le sélecteur (10) à la position CD.
Mettez linterrupteur (1) à la position On.
Ouvrer le couvercle du compartiment CD et
mettez-y un disque CD, assurez-vous que le
disque est installé correctement (étiquette en
haut). Fermez le couvercle du compartiment
CD.
Lafficheur (25) indiquera le nombre total des
plages sur le CD.
Appuyez sur la touche PLAY/PAUSE (20) pour
lancer la lecture, si vous appuyez sur la touche
PLAY/PAUSE (20) encore une fois, vous
activerez le régime de PAUSE, pour relancer la
lecture appuyez sur la touche PLAY/PAUSE (20)
encore une fois.
RECHERCHE DES PLAGES
Pendant la lecture des disques CD vous pouvez
rechercher les plages désirées avec les touches
SEARCH (18) et TRACK (17). Pour la recherche
en avant appuyez sur SEARCH (18) et pour la
recherche en arrière appuyez sur TRACK (17) le
numéro de la plage en cours sera affiché à
lécran (25).
LECTURE REPETEE
Pour activer la lecture répétée appuyez sur la
touche REPEAT (23)une fois, lindicateur (15)
commencera à clignoter.
Pour la lecture répétée du disque entier
appuyez sur la touche REPEAT (23) deux fois,
lindicateur (15) sera allumé de permanence.
Pour désactivée le régime de lecture répétée
appuyez sur la touche REPEAT (23) trois fois,
lindicateur (15) sera éteint.
PROGRAMMATION DE LORDRE DE LECTURE
Appuyez sur la touche PROGRAM (22), lindica-
teur (16) sera clignotant, lafficheur (25) indi-
quera le numéro clignotant du programme,
sélectionnez le numéro de la plage désirée avec
les touches SEARCH (18) ou TRACK (17).
Appuyez sur la touche PLAY/PAUSE (20) pour
lancer la lecture des plages à lordre program-
mé.
Pour arrêter la lecture appuyez sur la touche
STOP (19), pour désactiver la lecture des plages
programmées appuyez encore une fois sur la
touche STOP (19) les réglages du programme
de lecture seront remis à zéro.
Note: vous pouvez programmer la lecture des
20 plages au maximum.
AMPLIFICATEUR DES BASSES
En écoutant la radio ou le disque CD vous pou-
vez activer la fonction damplification des bass-
es, en mettant le sélecteur BASS BOOST
OFF/ON (24) à la position ON.
PRISE DE CONNEXION DES ECOUTEURS
Pour écouter la radio ou le disque CD seul, vous
pouvez utiliser un casque écouteur, pour cela
insérez le jack de connexion du casque dans la
prise Phone (13) de lappareil.
Réglez le niveau du volume avec le régulateur
VOLUME (2).
CARACTERISTIQUES TECHNIQUES
Bandes de fréquence
AM 540 1600 kHz
FM 88 108 MHz
Alimentation de réserve
9 V pile du type 6F-22
(nest pas livrée avec
lappareil)
Tension dalimentation
AC 230V ~ 50 Hz
Le fabricant se réserve le droit de modifier les
caractéristiques de lappareil sans préavis.
LE DELAI DE SERVICE DE LAPPAREIL EST PAS
MOINS DE 5 ANS
Garantie
Pour des conditions de garantie plus détaillées
adressez-vous au distributeur qui vous a vendu
lappareil. En cas de toute sorte de prétention pen-
dant la période de la présente garantie il faudra
présenter le ticket quittance de lachat.
FRANÇAIS
14
Le présent appareil satisfait aux exi-
gences de compatibilité électromagné-
tique en vertu de la directive 89/336/EEC
du conseil de lEurope et la préscription
23/73 EEC pour lappareillage de bas
voltage.
3521.qxd 16.03.05 15:27 Page 14

LOROLOGIO-SVEGLIA CON IL LETTORE CD E
LA RADIO
MODELLO VT-3521
DISPOSIZIONE DEGLI ELEMENTI DEL COMAN-
DO
1. INTERRUTORE AUTO/ON/ OFF/
2. REGOLAZIONE DEL LIVELLO DEL
VOLUME/ACCENSIONE DEL BUZZER (VOL-
UME/BUZZ)
3. IMPOSTAZIONE DEL TEMPO (TIME)
4. IMPOSTAZIONE DELLA SVEGLIA (ALARM)
5. TEMPORIZZATORE DELLO SPEGNIMENTO
(SLEEP)
6. IMPOSTAZIONE DELLE ORE (HOUR)
7. IMPOSTAZIONE DEI MINUTI (MIN)
8. VISUALIZZATORE A DIODI LUMINOSI
9. ACCENSIONE DEL SONNO CORTO/SPEGNI-
MENTO DEL TEMPORIZZATORE (SNOOZE)
10.SELETTORE DELLE BANDE (AM/FM)/ ACCEN-
SIONE DEL LETTORE (CD)
11.SINTONIZZAZIONE DELLA RADIO (TUNING)
12.ALTOPARLANTE
13.PRESA INSERIMENTO DELLE CUFFIE (Phone)
14.INDICATORE DEL SEGNALE STEREO (ST)
15.INDICATORE DELLA RIPETIZIONE DELLA
RIPRODUZIONE DEI BRANI (REPEAT)
16.INDICATORE DELLA PROGRAMMAZIONE
(PROG)
17.RICERCA DEI BRANI IN ORDINE INVERSO
(TRACK)
18.RICERCA DEI BRANI IN ORDINE DIRETTO
(SEARCH)
19.TASTO STOP
20.TASTO DELLA RIPRODUZIONE/DELLA PAUSA
(PLAY/PAUSE)
21.TASTO DELLA RIPETIZIONE (REPEAT)
22.TASTO DELLA PROGRAMMAZIONE DELLA
RIPRODUZIONE DEI BRANI (PROGRAM)
23.REGOLATORE DELLA LUMINANZA DEL VISUAL-
IZZATORE (DIMMER/BRIGHT)
24.ACCENSIONE/SPEGNIMENTO DELLAMPLIFI-
CAZIONE DELLE FREQUENZE BASSE (BASS
BOOST OFF/ON)
25.VISUALIZZATORE DEL NUMERO DEL BRANO
26.SCOMPARTIMENTO PILA DELLALIMENTAZIONE
DI EMERGENZA
27.INDICATORE DELLACCENSIONE DELLA SVEG-
LIA (ALM)
ALIMENTAZIONE DALLA RETE DELLA COR-
RENTE ALTERNATA
Prima dellaccensione assicuratevi che la ten-
sione della rete elettrica corrisponde alla ten-
sione del dispositivo.
ATTENZIONE
Staccate la spina dalla presa se il dispositivo
non viene usato per molto tempo.
Non cercate di smontare il dispositivo, dentro
non ci sono dei dettagli che vengono serviti dal-
lutente.
Per la prevenzione dellincendio e del pericolo
della scossa elettrica non lasciate lacqua pene-
trare nel corpo del dispositivo.
E vietato violare le condizioni della ventilazione
naturale del dispositivo, non posizionate il dis-
positivo nelle librerie chiuse o sui ripiani dove
manca la ventilazione.
E vietato mettere sul dispositivo le fonti della
fiamma aperta, come le candele accese.
Se scoprite i guasti, rivolgetevi al centro
riparazione autorizzato.
OROLOGIO
Aprite il coperchio dello scompartimento CD,
aprite il coperchio dello scompartimento pila
(26) e inserite una pila del tipo 6F-22 con la ten-
sione di 9 V (non entra nel completo di fornitu-
ra). Si usa la pila per la memorizzazione dellin-
formazione del tempo corrente e del tempo del-
limpostazione della sveglia in caso della
sparizione della tensione di rete.
Mettete linterrutore AUTO/ON/OFF (1) in
posizione OFF e inserite la spina nella presa, le
indicazioni sul visualizzatore cominciano a
tremolare.
Per impostare il tempo corrente premete e trat-
tenete premuto il pulsante TIME (3), tramite i
pulsanti HOUR (6) e MIN (7) impostate il tempo
corrente.
IMPOSTAZIONE DEL TEMPO DELLACCEN-
SIONE DELLA SVEGLIA
Premete e trattenete premuto il pulsante ALARM
(4), tramite i pulsanti HOUR (6) e MIN (7)
impostate il tempo desiderato dellaccensione
della sveglia.
IMPOSTAZIONE DELLA SVEGLIA PER IL
RISVEGLIO CON LA RADIO
Impostate il tempo dellaccensione della sveglia,
come sopra.
Mettete linterrutore AUTO/ ON/OFF (1) in
posizione ON.
Mettete il selettore (10) sulla banda desiderata
AM/FM, sintonizzate la radiostazione desiderata
tramite la manopola della sintonizzazione della
radio TUNING (11) e assicuratevi che il volume
necessario e messo.
Mettete linterrutore AUTO/ ON/OFF (1) in
posizione AUTO, si accende lindicatore ALM
(27). Quando il tempo corrente coincide al
tempo prestabilito dellaccensione della sveglia,
il dispositivo si accende automaticamente nel
regime della radio.
Nota: la ricezione delle radiostazioni nella banda
ITALIANO
15
3521.qxd 16.03.05 15:27 Page 15

88 108 MHz viene effettuata con la ricezione
stereo, se la sintonizzazione della radiostazione
e precisa, si accende lindicatore della
ricezione stereo ST (14).
IMPOSTAZIONE DEL RISVEGLIO CON IL SEG-
NALE DELLA SVEGLIA
Impostate il tempo dellaccensione della sveglia,
come sopra.
Girate il regolatore del volume VOLUME/BUZZ
(2) in direzione antioraria fino allo scatto per
laccensione del segnale del buzzer BUZZ.
Mettete linterrutore AUTO/ ON/OFF (1) in
posizione AUTO, si accende lindicatore ALM
(27). Quando il tempo corrente coincide al
tempo prestabilito dellaccensione della sveglia,
si accende il segnale acustico discontinuo.
IMPOSTAZIONE DEL RISVEGLIO CON LA MUSI-
CA DEL LETTORE DEI COMPACT DISC
Impostate il tempo dellaccensione della sveglia,
come sopra.
Mettete il selettore (10) in posizione CD.
Mettete linterrutore AUTO/ON/OFF (1) in
posizione AUTO.
Aprite il coperchio dello scompartimento CD,
inserite un compact disc, chiudete il coperchio
dello scompartimento CD, il livello del volume
desiderato si mette tramite il regolatore (2).
Quando il tempo corrente coincide al tempo
prestabilito dellaccensione della sveglia, si
accende la riproduzione del lettore dei compact
disc.
SPEGNIMENTO DELLA SVEGLIA
Per spegnere la sveglia, premete per una volta il
pulsante ALARM (4), la sveglia si spegne, il
tempo impostato dellaccensione della sveglia
viene memorizzato fino al prossimo giorno,
lindicatore ALM (27) sara acceso.
Se e necessario spegnere la sveglia, mettete
linterrutore AUTO/ON/OFF (1) in posizione OFF,
lindicatore ALM (27) si spegne.
FUNZIONE DEL SONNO CORTO
Si puo spegnere il segnale della sveglia tempo-
raneamente tramite la pressione del pulsante
SNOOZE (9); fra 9 minuti il segnale si accende
automaticamente.
Nel caso del risveglio con la radio, si puo speg-
nere il suono temporaneamente tramite la pres-
sione del pulsante SNOOZE (9); fra 9 minuti il
suono si accende automaticamente.
Nel caso del risveglio con il regime del lettore
dei compact disc, si puo spegnere il suono
temporaneamente tramite la pressione del pul-
sante SNOOZE (9); fra 9 minuti il suono si
accende automaticamente.
TEMPORIZZATORE DELLO SPEGNIMENTO
DURANTE LASCOLTO DELLA RADIO
Mettete linterrutore AUTO/ON/OFF (1) in
posizione AUTO.
Premete il pulsante SLEEP (5), la radio si
accende e il temporizzatore comincia il conteg-
gio del tempo fino allo spegnimento, il tempo
dello spegnimento e 59 minuti.
Per effettuare il cambio del tempo dello spegni-
mento, premete e trattenete premuto il pulsante
SLEEP (5), con la pressione del pulsante HOUR
(6) il tempo dello spegnimento e 1 ora 59 minu-
ti, e tramite il pulsante MIN (7) si puo inserire il
tempo dello spegnimento desiderato da 59
minuti fino a 1 minuto.
Effettuate lo spegnimento del regime del tem-
porizzatore tramite il pulsante SNOOZE (9).
TEMPORIZZATORE DELLO SPEGNIMENTO
DURANTE LASCOLTO DEI CD
Mettete il selettore (10) in posizione CD.
Mettete linterrutore AUTO/ON/OFF (1) in
posizione AUTO.
Inserite un compact disc, premete il tasto
PLAY/PAUSE (20), inizia la riproduzione del com-
pact disc.
Premete il pulsante SLEEP (5), il temporizzatore
comincia il conteggio del tempo fino allo spegni-
mento, il tempo dello spegnimento e 59 minuti.
Per effettuare il cambio del tempo dello spegni-
mento, premete e trattenete premuto il pulsante
SLEEP (5), con la pressione del pulsante HOUR
(6) il tempo dello spegnimento e 1 ora 59 minu-
ti, e tramite il pulsante MIN (7) si puo inserire il
tempo dello spegnimento desiderato da 59
minuti fino a 1 minuto.
Effettuate lo spegnimento del regime del tem-
porizzatore tramite il pulsante SNOOZE (9).
LUMINANZA DEL VISUALIZZATORE
La regolazione della luminanza del visualizzatore
viene effettuata tramite il selettore
DIMMER/BRIGHT (23).
RADIO
Per la ricezione nella banda AM si usa lantenna
direttiva interna, durante la sintonizzazione della
radiostazione ottenete la ricezione migliore
tramite il giro del corpo del dispositivo.
Mettete linterrutore AUTO/ON/OFF (1) in
posizione ON.
Mettete il selettore delle bande FM/AM (10)
sulla banda desiderata.
Tramite il giro della manopola della sintoniz-
zazione TUNING (11) sintonizzate la
radiostazione desiderata.
La ricezione delle radiostazioni nella banda 88-
108 MHz viene effettuata nel regime stereo, con
ITALIANO
16
3521.qxd 16.03.05 15:27 Page 16

la sintonizzazione precisa della radiostazione si
accende lindicatore della ricezione stereo ST
(14).
Mettete il livello del volume desiderato tramite il
regolatore del volume VOLUME (2).
Per spegnere la radio, mettete linterrutore
AUTO/ON/OFF/ (1) in posizione OFF. Se la radio
non si spegne, e possibile che e acceso il tem-
porizzatore dello spegnimento, in questo caso
premete il pulsante SNOOZE (9).
ASCOLTO DEI COMPACT DISC
Mettete il selettore (10) in posizione CD.
Mettete linterrutore AUTO/ON/OFF (1) in
posizione ON.
Aprite il coperchio dello scompartimento CD e
inserite un compact disc, badate alla correttezza
dellinserimento del compact disc, esso deve
essere inserito con letichetta rivolta verso lalto.
Chiudete il coperchio dellazionamento CD.
Sul visualizzatore (25) appare la quantita totale
dei brani del compact disc.
Premete il tasto PLAY/PAUSE (20) per iniziare la
riproduzione, dopo la seconda pressione del
tasto PLAY/PAUSE (20) si accende il regime
della PAUSA, per continuare la riproduzione
premete il tasto PLAY/PAUSE (20) ancora una
volta.
RICERCA DEI BRANI
Durante la riproduzione del compact disc si puo
effettuare la ricerca dei brani desiderati tramite i
tasti SEARCH (18) e TRACK (17) in ordine diret-
to SEARCH (18) e in ordine inverso TRACK (17),
il numero del brano viene mostrato sul visualiz-
zatore (25).
RIPRODUZIONE RIPETUTA
Per ripetere il brano, premete il tasto REPEAT
(23) per una volta, lindicatore (15) tremolera.
Per effettuare lascolto ripetuto di tutto il com-
pact disc, premete il tasto REPEAT (23) per due
volte, lindicatore (15) sara illuminato costante-
mente.
Per cancellare il regime della riproduzione
ripetuta, premete il tasto REPEAT (23) per tre
volte, lindicatore (15) si spegne.
PROGRAMMAZIONE DELLORDINE DELLA
RIPRODUZIONE DEI BRANI
Premete il tasto PROGRAM (22), lindicatore
(16) comincia a tremolare, sul visualizzatore (25)
appare il numero lampeggiante del programma,
tramite i tasti SEARCH (18) o TRACK (17) scegli-
ete il numero del brano desiderato.
Premete il tasto PLAY/PAUSE (20) per iniziare la
riproduzione dei brani in ordine prestabilito.
Per fermare la riproduzione premete il tasto
STOP (19), per cancellare la riproduzione dei
brani programmati premete il tasto STOP (19)
ancora una volta, tutte le impostazioni effettuate
prima vengono cancellate.
Nota: la quantita massima dei brani per la ripro-
duzione in ordine prestabilito non deve superare
20.
AMPLIFICAZIONE DELLE FREQUENZE BASSE
Durante lascolto della radio o del compact disc
Voi potete accendere la funzione dellamplifi-
cazione delle frequenze basse, se mettete il
selettore BASS BOOST OFF/ON (24) in
posizione ON.
PRESA INSERIMENTO DELLE CUFFIE
Per lascolto individuale della radio o dei com-
pact disc potete usare le cuffie, inserite la spina
del cavo delle cuffie nella presa Phone (13).
Il livello del volume nelle cuffie viene impostato
tramite il regolatore VOLUME (2).
CARATTERISTICHE TECNICHE
Banda di frequenze:
AM 540 1600 kHz
FM 88 108 MHz
Alimentazione di riserva:
9 V una pila 6F-22
(non entra nel completo di fornitura)
Tensione dellalimentazione: AC 230 V ~ 50 Hz
Il produttore si lascia il diritto di modificare le
caratteristiche dellapparecchio senza preavvi-
so.
LA DURATA DELLAPPARECCHIO NON E MENO
DI 5 ANNI.
Garanzia
Le condizioni dettagliate della garanzia si possono
richiedere al rivenditore dellapparecchio. Qualsiasi
reclamo deve essere richiesto prima della scaden-
za della garanzia e deve essere accompagnato
dallo scontrino fiscale oppure da un altro documen-
to che attesti lacquisto.
ITALIANO
17
Questo prodotto corrisponde ai requisiti
di compatibilità elettromagnetica stabiliti
dalla direttiva 89/336/EEC del Consiglio
Europeo e dalla Direttiva 23/73 CEE
sugli apparecchi di bassa tensione.
3521.qxd 16.03.05 15:27 Page 17

REPRODUCTOR DE CD RADIO RELOJ/DESPER-
TADOR
MODELO VT-3521
DISPOSICION DE CONTROLES
1. SELECTOR AUTO/ENCENDIDO/APAG.
(Auto/Off/On)
2. CONTROL DEL NIVEL DE VOLUMEN /ENCENDI-
DO DE ALARMA (VOLUME/BUZZ)
3. AJUSTE DEL RELOJ (TIME)
4. AJUSTE DEL DESPERTADOR (ALARM)
5. TEMPORIZADOR DE APAGADO (SLEEP)
6. AJUSTE DE HORAS (HOUR)
7. AJUSTE DE MINUTOS (MIN)
8. DISPLAY DE DIODO LUMINOSO
9. ENCENDIDO DE LA FUNCION /APAGADO DEL
TEMPORIZADOR (Snooze)
10.SELECTOR DE BANDAS (AM/FM)/ ENCENDIDO
DEL REPRODUCTOR DE CD
11.SINTONIZADOR DE RADIO (TUNING)
12.ALTAVOZ
13.ENTRADA PARA AURICULARES (Phone)
14.INDICADOR DE LA SEÑAL ESTEREO (ST)
15.INDICADOR DE REPETICION DE PISTAS
(REPEAT)
16.INDICADOR DE PROGRAMACION (PROG)
17.RETROCESO DE PISTAS (TRACK)
18.AVANCE DE PISTAS (SEARCH)
19.BOTON DE PARADA (STOP)
20.BOTON REPRODUCCION/PAUSA (PLAY/PAUSE)
21.BOTON DE REPETICION (REPEAT)
22.BOTON DE PROGRAMACION DE (PROGRAM)
23.AJUSTE DE BRILLO DEL DISPLAY
(DIMMER/BRIGHT)
24.ENCENDIDO/APAGADO DE REALCE DE BAJOS
(BASS BOOST OFF/ON)
25.DISPLAY DEL NUMERO DE PISTA
26.COMPARTIMIENTO PARA BATERÍA DE ALI-
MENTACION DE RESERVA
27.INDICADOR DE ACTIVACION DE ALARMA DEL
DESPERTADOR (ALM)
ALIMENTACION DE LA RED DE CORRIENTE
ALTERNA
Antes de encender el aparato, cerciórese que la
tensión de su red eléctrica coincida con la del
aparato.
ATENCION
Desenchufe el aparato de la red si no lo usa
durante largo tiempo.
No desmonte el aparato Usted mismo, pues en
su interior no hay piezas que requieran manten-
imiento por parte del usuario.
Para evitar un incendio o una descarga eléctrica
trate que el agua no penetre en el cuerpo del
aparato.
Se prohíbe obstruir la ventilación natural del
aparato, no coloque el aparato en bibliotecas
cerradas o estantes que no dispongan de sufi-
ciente ventilación.
Se prohíbe colocar sobre el aparato objetos de
llama abierta, tales como velas.
Si el aparato tiene fallas recurra a un centro de
servicio técnico autorizado.
RELOJ
Abra la tapa del compartimiento de CD, abra la
tapa del compartimiento para batería (26) y
coloque una batería tipo 6F-22 de 9V (no inclui-
da). La batería se usa para conservar la informa-
ción de la hora actual y la activación del des-
pertador, en caso de corte de luz.
Posicione el selector Auto/Off/On (1) en Off y
enchufe el aparato en el tomacorriente, y en el
display comenzarán a centellear los símbolos.
Para ajustar la hora actual presione y mantenga
presionado el botón TIME (3), y con los botones
HOUR (6) y MIN (7) ajuste la hora actual.
AJUSTE DE LA HORA DE ACTIVACION DE LA
ALARMA DEL DESPERTADOR
Presione y mantenga presionado el botón
ALARM (4), y con los botones HOUR (6) y MIN
(7) ajuste la hora de activación de la alarma del
despertador.
DESPERTAR CON RADIO
Ajuste la hora de activación del despertador
como se indica anteriormente.
Posicione el selector Auto/Off/On (1) en On.
Posicione el selector (10) en la banda deseada
AM/FM; con el sintonizador TUNING (11) sin-
tonice la emisora deseada y cerciórese que el
volumen esté en el nivel deseado.
Posicione el selector Auto/Off/On (1) en Auto, y
se encenderá el indicador ALM (27). Cuando
llegue la hora de activación del despertador,
automáticamente se encenderá la radio.
Observación: la recepción de una radio en los
rangos de frecuencia 88 108 MHz se realiza
en la función estéreo, y con la sintonización
exacta de una emisora se enciende el indicador
de la recepción estéreo ST (14).
AJUSTE DE HORA PARA DESPERTARSE CON
LA ALARMA DEL DESPERTADOR
Ajuste la hora de activación de la alarma del
despertador como se indica anteriormente.
Para activar la alarma BUZZ gire el control de
volumen VOLUME/BUZZ (2) en sentido contrario
a las agujas del reloj, hasta oír un clic.
Posicione el selector Auto/Off/On (1) en Auto, y
se encenderá el indicador ALM (27). A la hora
ajustada se activará la alarma intermitente del
despertador.
ESPAÑOL
18
3521.qxd 16.03.05 15:27 Page 18

DESPERTAR CON MUSICA DE CD
Ajuste la hora de activación del despertador
como se indica anteriormente.
Posicione el selector (10) en CD.
Posicione el selector Auto/Off/On (1) en Auto.
Abra la tapa del compartimiento de CD,
coloque el CD, cierre la tapa del compartimiento
de CD, y nivele el volumen deseado con el con-
trol (2).
Cuando llegue la hora de activación del desper-
tador, el reproductor de CD se encenderá para
reproducir la música.
APAGADO DEL DESPERTADOR
Para apagar el despertador presione una vez el
botón ALARM (4) y el despertador se apagará;
pero al día siguiente el despertador se activará
nuevamente y el indicador ALM (27) también se
encenderá.
Si desea apagar el despertador, ajuste la hora
de apagado del despertador entre 59 y 1 min.
Para desactivar la función del temporizador pre-
sione el botón Snooze (9).
TEMPORIZADOR DE APAGADO DURANTE LA
REPRODUCCIÓN DE CD
Posicione el selector (10) en CD.
Posicione el selector Auto/Off/On (1) en Auto.
Coloque el CD, presione el botón PLAY/PAUSE
(20), y comenzará la reproducción de CD.
Presione el botón SLEEP (5), y el temporizador
comenzará a marcar el tiempo que resta hasta
59 minutos de apagado.
Para modificar el tiempo de apagado presione y
mantenga presionado el botón SLEEP (5), al
presionar el botón (6) HOUR, el tiempo de apa-
gado será 1h 59min., mientras que con el botón
MIN (7) se puede ajustar el tiempo de apagado
entre 59 y 1 min.
Para desactivar la función del temporizador pre-
sione el botón Snooze (9).
BRILLO DEL DISPLAY
El ajuste del brillo del display se realiza con el
selector DIMMER/BRIGHT (23).
RADIO
Para la recepción de AM use la antena incorpo-
rada, y girando el cuerpo del aparato obtenga la
recepción óptima.
Posicione el selector Auto/Off/On (1) en On.
Posicione el selector de bandas FM/AM (10) en
la banda deseada.
Girando el sintonizador TUNING (11) sintonice la
emisora deseada.
La recepción de emisoras en losl rangos de fre-
cuencia de 88 108 MHz se realiza en la fun-
ción estéreo, y con la sintonización exacta de
una emisora se enciende el indicador de estéreo
ST (14).
Ajuste el volumen al nivel deseado con el control
VOLUME (2).
Para apagar la radio posicione el selector
Auto/Off/On (1) en Off. Si la radio no se apaga,
es posible que esté activado el temporizador de
apagado, en este caso presione el botón
Snooze (9).
REPRODUCCION DE CD
Posicione el selector (10) en CD.
Posicione el selector Auto/Off/On (1) en On.
Abra el compartimiento de CD y coloque el CD,
observando que el disco esté bien colocado, es
decir, con la etiqueta hacia arriba. Cierre la tapa
del compartimiento de CD.
En el display (25) aparecerá el total de las pistas
del CD.
Presione el botón PLAY/PAUSE (20) para
comenzar la reproducción, y si presiona nueva-
mente el botón PLAY/PAUSE (20) se activará la
función PAUSA; para continuar la reproducción
presione el botón PLAY/PAUSE (20) nueva-
mente.
BUSQUEDA DE PISTAS
Durante la reproducción de CD con los botones
SEARCH (18) y TRACK (17) se puede buscar la
pista deseada avanzando las mismas SEARCH
(18) o TRACK (17) retrocediéndolas; el número
de pistas se reflejarán en la pantalla (25).
REPETICION
Para repetir una pista presione una vez el botón
REPEAT (23), y centelleará el indicador (15).
Para repetir íntegramente el disco presione dos
veces el botón REPEAT (23) y el indicador (15)
permanecerá iluminado.
Para cancelar la repetición presione el botón
REPEAT (23) tres veces y el indicador (15) se
apagará.
PROGRAMACION DEL ORDEN DE REPRODUC-
CION DE PISTAS
Presione el botón PROGRAM (22), comenzará a
centellear el indicador (16) y en la pantalla (25)
aparecerá el número del programa; con los
botones SEARCH (18) o TRACK (17) seleccione
el número de la pista deseada.
Presione el botón PLAY/PAUSE (20) para
comenzar la reproducción de las pistas en el
orden programado.
Para parar la reproducción presione el botón
STOP (19); para cancelar la reproducción de las
pistas programadas presione el botón STOP
(19) nuevamente y todo lo programada anterior-
mente se borrará de la memoria.
Observación: la cantidad máxima de reproduc-
ción de pistas en secuencia programada no
supera las 20.
ESPAÑOL
19
3521.qxd 16.03.05 15:27 Page 19

REALCE DE BAJOS
Cuando escucha la radio o un CD puede activar
la función de realce de bajos, posicionando el
selector BASS BOOST OFF/ON (24) en ON.
ENTRADA PARA AURICULARES
Si desea escuchar la radio o CD en forma indi-
vidual puede usar los auriculares. Para ello
conecte la clavija de los auriculares en la entra-
da Phone (13).
El nivel de volumen de los auriculares se ajusta
con el control de volumen VOLUME (2).
CARACTERISTICAS TECNICAS
Rangos de frecuencia
AM 540 1600 kHz
FM 88 108 MHz
Alimentación de reserva
batería 6F-22 de 9 V
(no incluida)
Voltaje y frecuencia
AC 230V ~ 50 Hz
El fabricante se reserva el derecho de modi-
ficar las características técnicas del aparato,
sin aviso previo.
LA VIDA UTIL DEL APARATO ES NO MENOR DE
5 AÑOS.
Garantía
La garantía detallada es entregada por el vendedor
de este aparato. Para efectuar cualquier reclamo,
dentro del plazo de vigencia de la presente garan-
tía, se debe presentar el ticket o factura de com-
pra de este aparato.
ESPAÑOL
20
Este producto cumple con las normas
de compatibilidad electromagnética,
de la directiva 89/336/EEC del Consejo
de las Comunidades Europeas, y las
reglamentaciones 23/73 CEE, para los
aparatos de bajo voltaje.
3521.qxd 16.03.05 15:27 Page 20


