Vitek VT-1653: instruction
Class: Household, kitchen appliances, electronics and equipment
Type: Microwave oven

Manual for Vitek VT-1653
CCrryyssttaall
VT-1653
MANUAL INSTRUCTION
3
8
13
18
23
28
33
38
42
47
52
57
62
67
www.vitek-aus.com
Vt-1653.qxp 04.02.2005 10:10 Page 1
Vt-1653.qxp 04.02.2005 10:10 Page 2
MICROWAVE OVEN
7. Current time/ setting the auto-start time
- To set the current time, press the ”Clock/Pre-
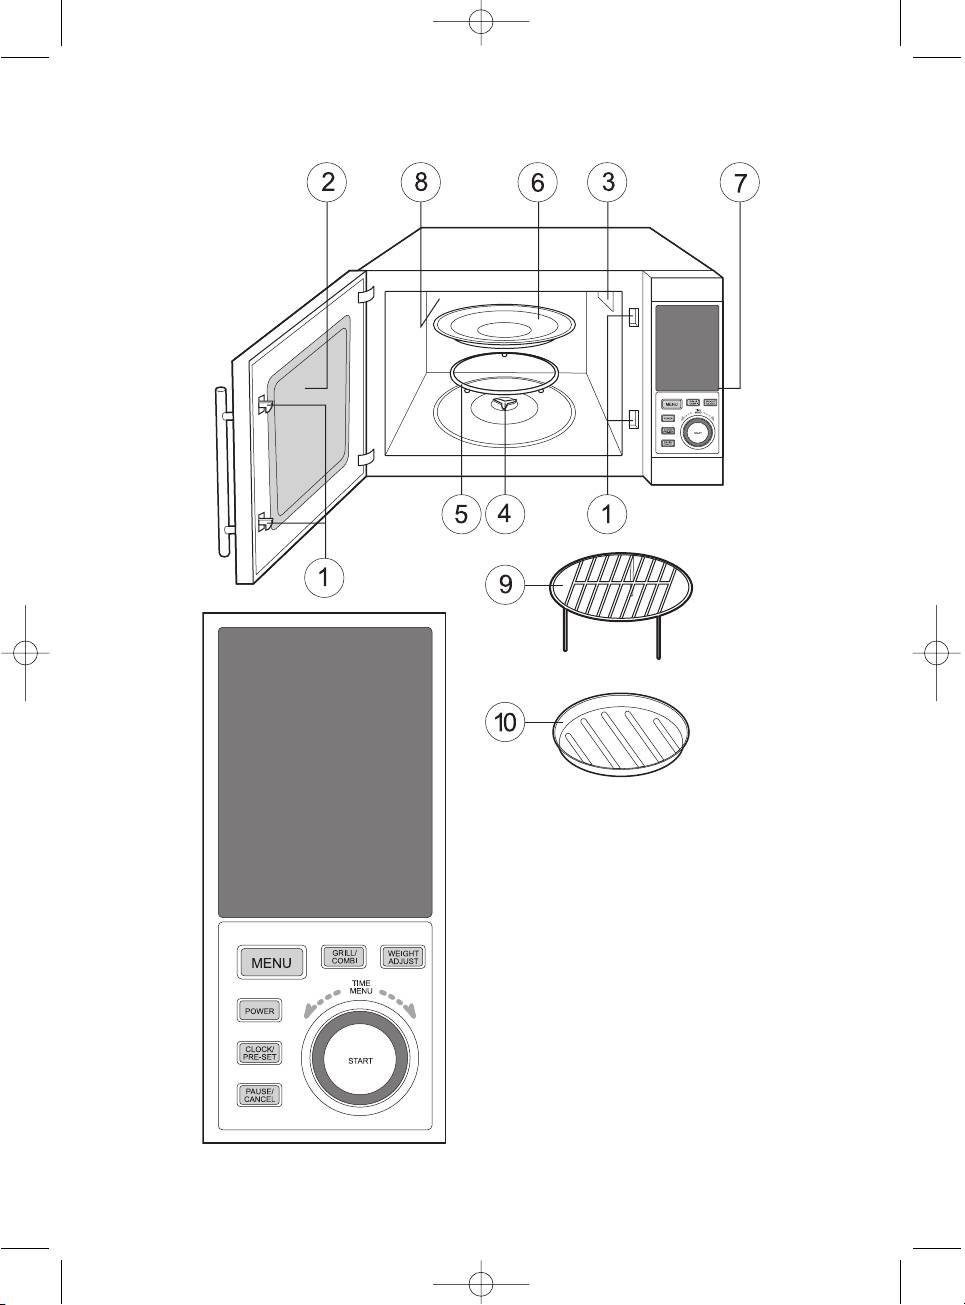
Parts List
set” button and turn the “Menu/Time” dial.
1. Protective locks
- Press the ”Clock/Pre-set” button to set the
2. Window
auto-start time.
3. Ventilation openings
4. Axis
8. Start
5. Roller ring
Press the ”Start” button to activate the auto-start
6. Rotating tray
cook mode.
7. Control panel
8. Heating element
9. Stop/cancel
9. Grill cover
a) Press the ”Pause/CLear” button before
10. Container for food preparation
programming the oven in order to cancel
any previous settings.
Control panel
b) Press the ”Pause/CLear” button once to
1. Display
temporarily deactivate the program and
The display shows the cooking time, power
twice to stop cooking.
level, operational indicators, as well as the
c) This button is also used to activate the child-
current time.
lock feature.
2. Power
PRECAUTIONS, WHICH MUST BE
Select one of the power levels by pressing the
FOLLOWED IN ORDER TO AVOID
“Power” button the required number of times.
EXPOSURE TO MICROWAVE ENERGY
1. Do not attempt to use the microwave oven
3. Automatic menu
when the door is open as you risk exposure
Press to enter the automatic menu mode,
to harmful microwave energy. It is very
including defrost.
important not to damage or ruin the internal
protective locks.
4. Grill/Combination mode
2. It is especially important that the door be
You can select the “Grill” mode or combination
closed firmly. Do not place foreign objects
modes 1 or 2 by pressing the ”Grill/Combi”
between the door and the microwave body
button the required number of times depending
and make sure that dirt and/or cleaning
on the desired cooking program.
liquids do not drip into the insulative layer.
3. Do not use the microwave oven if it is
5. Time/Menu
damaged; especially make sure that:
Rotate this dial in either direction:
a. the door is not bent;
- to set the current time;
b. the hooks and locks are not broken or
- to choose the required entry for the automatic
weakened;
menu, including defrost;
c. the door’s insulative layer has not been
- to set the cook time.
damaged.
4. Only a qualified specialist should maintain
6. Weight regulator
or service the microwave oven.
After choosing a function in the auto menu,
select the approximate weight of the food. To
BEFORE CONTACTING A SERVICE
do this, press the “Weight Adj” button and then
CENTER
the “Menu/Time” button repeatedly. The oven
1. Make sure that the oven is correctly
will automatically determine the optimum cook
connected to AC power. If there is a
time and power level for preparing each
problem with this, unplug the cord from the
particular type of food.
power source, wait 10 seconds, then
reconnect the oven to power.
2. Check if power is being supplied.
ENGLISH
3
Vt-1653.qxp 04.02.2005 10:10 Page 3

4
3. Make sure the control panel is programmed
b) adjust the antenna on the radio or television;
correctly and that the timer is not activated.
c) relocated the oven farther from the device;
4. Make sure the door is closed and latched
d) connect the microwave oven to a different
while the oven is operating.
outlet in order to avoid interference of the
devices.
INSTALLATION
1. Make sure to remove the packing material
SAFETY RULES FOR
from the microwave oven.
PREPARING FOOD IN YOUR
2. Systematically check the oven for any
MICROWAVE OVEN
damage. Do not use the oven if the locks or
Always follow these rules when using electrical
door are broken, or if there is damage to the
appliances:
internal parts of the oven. Contact a service
PRECAUTION: In order to reduce the risk of
center if you find these types of damage.
burns, electric shocks, fires and other effects of
3. The oven should be installed on a flat, stable
microwave energy:
surface.
1. Read these instructions carefully before
4. Do not install the oven near sources of high
operating the device.
temperatures or humidity.
2. Only use the microwave oven strictly for its
5. Provide for proper ventilation of the oven,
intended purpose. Do not put chemical
by leaving the following free space around
substances into the microwave oven. The
the oven: above - 20 cm, behind - 10 cm, on
oven is designed for heating and preparing
the sides - 5 cm each.
food. The oven is not designed for industrial
6. Do not use the oven without the glass tray.
or laboratory use.
Install the tray and other accessories
3. Do not turn the oven on when empty. This
correctly.
can lead to damage of the device.
7. Place the rotating tray into the oven; match
4. Do not use the device if the plug or cord is
the grooves on the axis with the lip of the
damaged.
tray. Make sure that it is properly installed
5. Be especially attentive when using the oven
on the roller ring and that the ring is inside
around children.
the central circle on the bottom of the oven.
6. In order to reduce the risk of burning inside
the microwave oven, adhere to the following
GROUNDING INSTRUCTIONS
rules:
This device should be grounded. In case of
a) Do not overcook food. Carefully monitor
short-circuit, the ground reduces the risk of
the device when using paper, plastic or other
electric shock because the power surge can
materials.
leave through the grounding wire. A grounded
b) Remove any wires from paper and plastic
cord and plug has been supplied with this
containers before placing them in the oven.
microwave oven. The plug is then connected to
c) In case materials burn in the oven, do not
an outlet that has been grounded properly.
open the door – turn off the oven and
WARNING: The use of a grounded outlet, as a
disconnect it from power.
rule, does not lead to the risk of electric shock.
d) Do not store food inside the microwave
oven.
Consult with qualified service specialists if the
7. Liquids and other foods prepared for
grounding instructions are not clear or if you
reheating must be in open containers.
are unsure as to whether or not your oven is
8. Kitchen dishes may get very hot in the
properly grounded.
microwave oven. Use an oven mitt to
remove dishes from the oven. When heating
Radio static
beverages in the microwave oven, the
1. Use of the microwave oven can create static
surface of the cup heats up. Carefully
for radios, television, and other devices
remove, avoiding burns.
operating nearby.
10. Do not fry food in the microwave oven.
2. To avoid static:
11. Do not cook eggs in the shell. Other types
a) firmly close the microwave oven door;
of food with skins, for example: hotdogs,
ENGLISH
Vt-1653.qxp 04.02.2005 10:10 Page 4

chicken livers, tomatoes and potatoes,
For example: you need to set the current time of
should be poked with a fork before cooking.
8:30. To do this:
12. Only use specially designed
1. Press the ”Clock/Pre-set” button.
microwavable dishes.
2. Press the ”Pause/CLear” button.
3. Rotate the “Menu/Time” dial until the
Test: place an empty dish into the microwave
display shows the number ”8”.
oven, set the highest power level and heat for
4. Press the "Clock/Pre-set" button again.
60 seconds. If the dish gets very got, then its use
5. Rotate the “Menu/Time” dial until the
is not recommended.
display shows the number ”30”.
6. Press the ”Clock/Pre-set” button to finish
Microwave-safe dishes
setting the clock.
Any glass, ceramic, porcelain and clay dishes
that do not have metal parts are suitable for use
If you want to view the current time while the
in a microwave oven.
microwave is operating, press the ”Clock/Pre-
Microwaves reflect off metal dishes and
set” button and the current time will be
therefore do not reach the food.
displayed for 5 seconds.
Glass, porcelain, cardboard and ceramics
provide for fast penetration of electromagnetic
Microwave cooking
waves.
For microwave cooking, press the ”Power”
When using plastic dishes, it is important to
button the required number of times needed to
remember that some plastic items are not heat
select a power level. Rotate the “Menu/Time”
resistant and may become deformed in the
dial to select the cook time. This microwave is
microwave oven.
equipped with a 90-minute timer with automatic
shutoff and an audible signal.
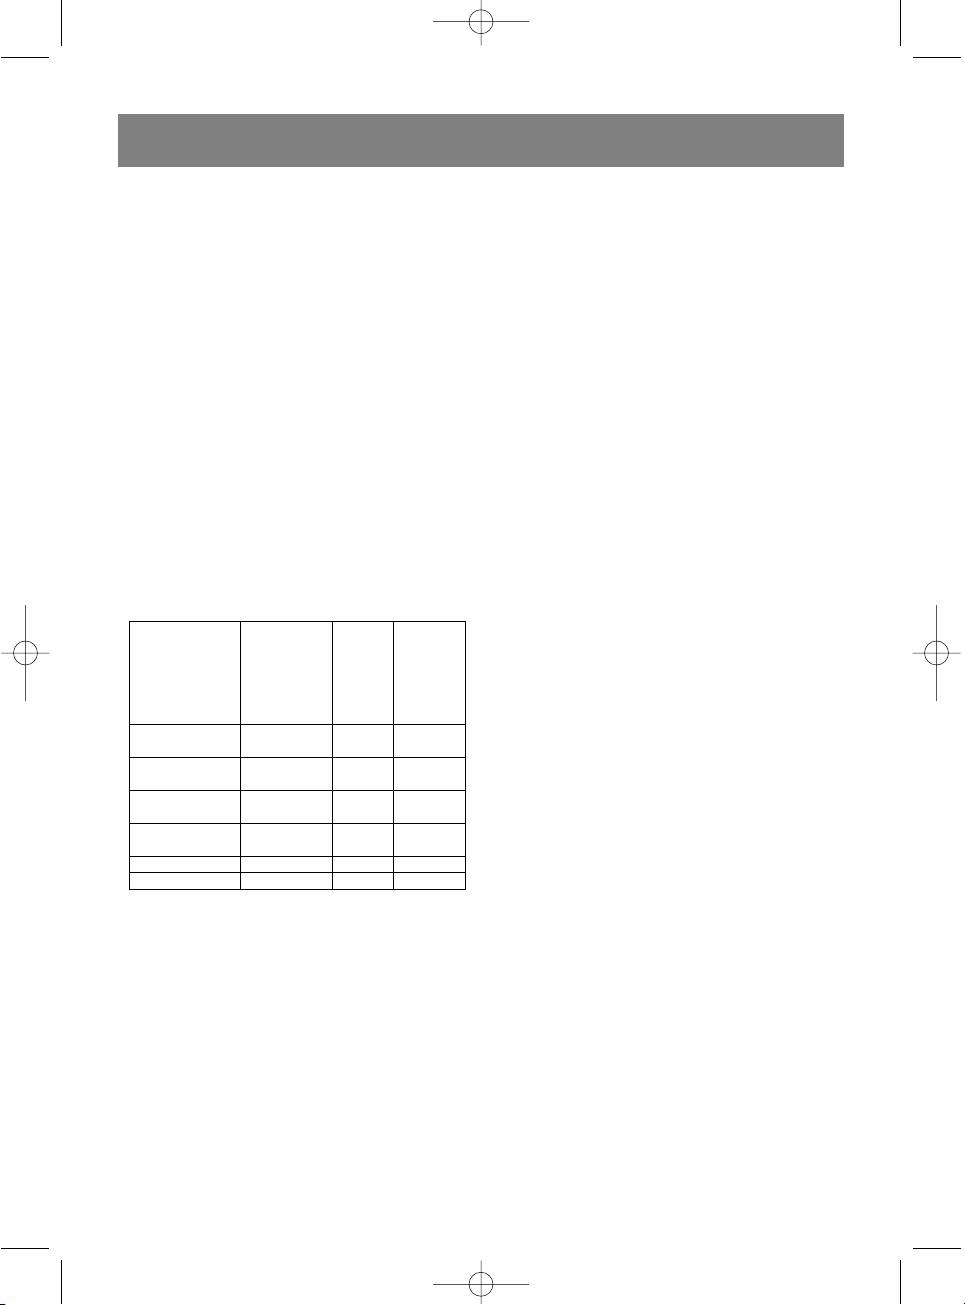
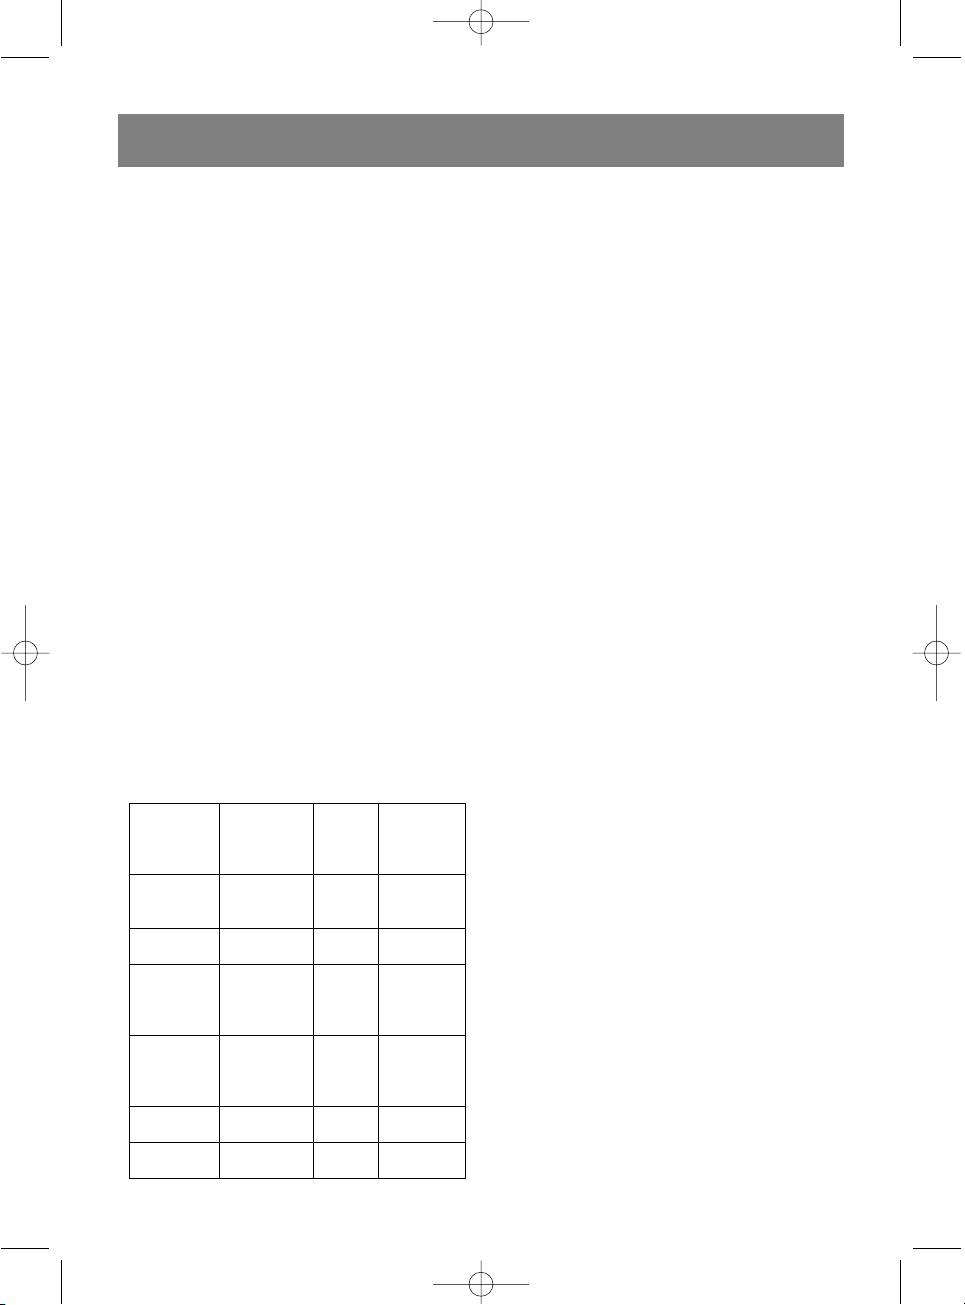
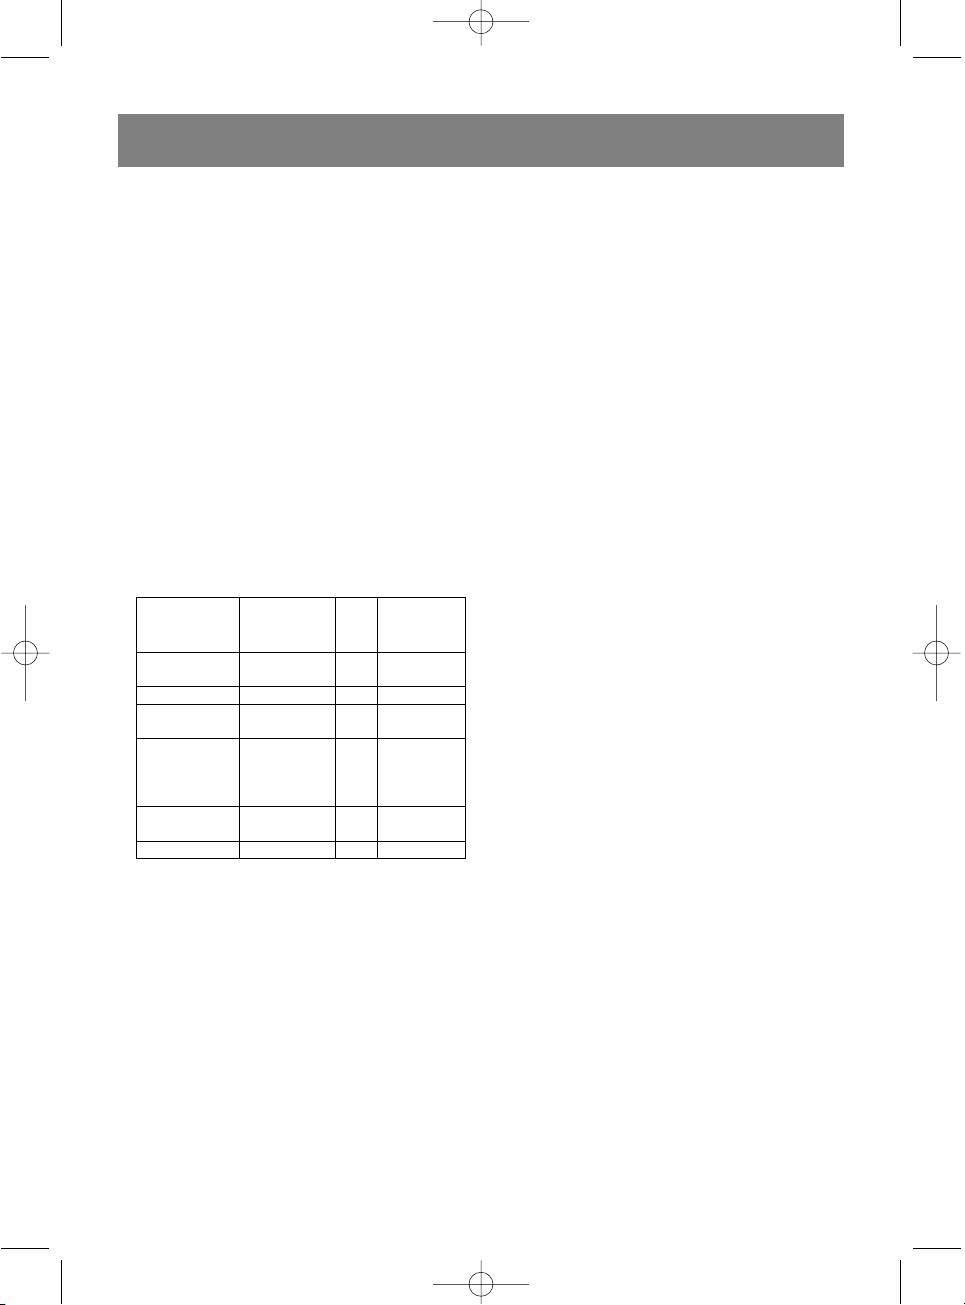
The following table will help you choose the
For example: you want to reheat a meal for 1
proper type of dishes:
minute at 80% power.
1. Press the ”Power” button twice.
Normal
Combo
2. Rotate the “Menu/Time” dial to set the
Type of
microwave
Grill
cook
cook time of ”1:00”.
dishes
mode
mode
3. Press the ”Start” button.
Heat
resistant
Yes Yes Yes
Grill
glass
Used for preparing will cooked, crunchy pieces
Regular
of meat, fish, poultry, potatoes, hotdogs, and
No No No
Glass
also for preparing hot sandwiches. The grill’s
Head
maximum operating time is 90 minutes.
resistant
Yes Yes Yes
Let’s say you want to grill something for 12
ceramics
minutes. To do so:
Microwav
1. Press the ”Grill/Combi” button once.
able
Yes No No
2. Rotate the “Menu/Time” dial to set the grill
plastic
time of “12:00”.
Paper
3. Press the ”Start” button.
Yes No No
towels
Combination cooking
Metallic No Yes No
Combines microwave cooking with a grill. The
function is recommended for preparing foods
Using the oven
such as lasagna, quick vareniky and baked
Each time you press a button on the control
vegetables
panel, you will hear an audible signal.
There are to combination cooking modes:
- combination C-1 (30% microwave cooking
Setting the current time
+ 70% grill) – recommended for preparing
When you first plug in the device, the display
fish, potatoes.
will show “12:00”.
ENGLISH
5
Vt-1653.qxp 04.02.2005 10:10 Page 5

6
Let’s say you want to cook in combination
3. Cook the food using the grill.
mode 1 for 25 minutes:
1. Press the ”Grill/Combi” button twice.
To do this:
2. Rotate the “Menu/Time” dial to set the cook
I. 1. Press the “Menu” button.
time of “25:00”.
2. Rotate the “Menu/Time” dial until the
3. Press the ”Start” button.
display shows the needed function (defrost).
- combination C-2 (55% microwave cooking
3. Press the “Weight Adj” button.
+ 45% grill) – recommended for preparing
4. Rotate the “Menu/Time” dial to select the
puddings, omelets, baked potatoes and
food’s weight.
homemade pizza.
II. 1. Press the ”Power” button to choose the
Let’s say you want to cook in combination
desired power level
mode 2 for 12 minutes:
2. Rotate the “Menu/Time” dial to set the
1. Press the ”Grill/Combi” button three times.
cook time.
2. Rotate the “Menu/Time” dial to set the cook
III. 1. Press the ”Grill/Combi” button
time of “12:00”.
2. Set the desired cooking parameters for
3. Press the ”Start” button.
food preparation in “Grill” mode.
IV. Press the ”Start” button.
Automatic menu
Note: During the program cooking process, the
This function allows you to choose a
display will show the indication “1S,” “2S” or
preprogrammed cooking mode. You need only
“3S,” depending on which part of the cooking
select the food code and weight, then press the
process is currently running. When the cooking
”Start” button.
program has finished, 6 signals audible signals
Example: Rice, 100 g.
will sound.
1. Press the “Menu” button.
2. Rotate the “Menu/Time” dial until the word
Setting the auto-start time
“Rice” appears on the screen.
Let’s say you want the cooking process to start
3. Press the “Weight Adj” button.
at 11:30 at 50% power level:
4. Rotate the “Menu/Time” dial to select the
1. Press the ”Clock/Pre-set” button.
food weight - “0.100”.
2. Rotate the “Menu/Time” dial until the
5. Press the ”Start” button.
display shows the number ”11”.
3. Rotate the “Menu/Time” dial until the
Automatic defrost
display shows the number ”30”.
You need only enter the weight of the food,
5. Press the ”Power” button 3 times to set the
from 100 to 4000 g., that you want to defrost
power level to 50%.
(meat, poultry, seafood), the oven will
6. Rotate the “Menu/Time” dial to select the
determine the needed program and
cooking time.
automatically defrost the food.
Note: make sure that the correct current time
Example: let’s say you want to defrost 600 g. of
was set previously.
shrimp. To do this:
When the settings are complete, the “PRE-
1. Press the “Menu” button.
SET” indicator will blink while waiting for the
2. Rotate the “Menu/Time” dial until the word
programmed time. At 11:30, the cooking
“Fish” is displayed on the screen.
process will begin according to the set
3. Press the “Weight Adj” button.
program.
4. Rotate the “Menu/Time” dial to set the food
weight - “0.600”.
Quick cook
5. Press the ”Start” button.
Fast heating of prepared meals at 100% power
level (from 5 to 90 sec.). To use this function
Setting the cooking program
simply set the desired cooking time by rotating
You can program every aspect of the cooking
the “Menu/Time” dial and pressing ”Start”.
process. For example, if you want to:
For example: you want to heat a meal for 2
1. Defrost some food.
minutes. To do this:
2. Set a particular power level.
ENGLISH
Vt-1653.qxp 04.02.2005 10:10 Page 6

1. Rotate the “Menu/Time” dial to set the cook
b) steam emerges from the oven;
time of ”2:00”.
2. Press the ”Start” button.
Cleaning
• Unplug the oven from power.
Setting the timer
• Wipe the inner part of the oven with a light
Let’s say you want to set the timer for 3
cleaning liquid, rinse and dry with a soft
minutes:
cloth.
1. Press the ”Pause/Clear” button.
• Wash the rotating tray and roller ring in
2. Press the ”Power” button six times.
soapy water, then rinse and dry.
3. Rotate the “Menu/Time” dial until the
• Carefully wipe the door and latches with a
desired time appears - ”3:00”.
damp cloth.
4. Press the ”Start” button.
Specifications
Container for preparing food
Power supply: 220-230 V~ 50 Hz
The oven includes a container with an anti-burn
Power requirements: 1400 Wt
coating (10) for cooking and reheating food.
Grill Power: 1000 Wt
Use this container to cook and reheat food in
Microwave Oven Power: 900 Wt
grill mode, by setting the cooking time.
Frequency: 2450 MHz
Volume: 23 liters
Child-lock feature
Diameter of rotating
In order to prevent children from using the
glass tray 314 mm
microwave oven, you can activate the child-
Oven weight: 16.5 kg.
lock feature. To activate this feature, press and
hold the ”Pause/Clear” button for 3 seconds,
The manufacturer reserves its right to modify
until the child-lock indicator appears on the
the device's technical characteristics without
display and you hear an audible confirmation
prior notice.
signal.
To cancel the child-lock feature, press and hold
Service life of the microwave oven not less
the ”Pause/Clear” button for about 3 seconds,
than 5 years
until the child-lock indicator disappears from
the display and you hear an audible
Guarantee
confirmation signal.
Details regarding guarantee conditions can be
obtained from the dealer from whom the
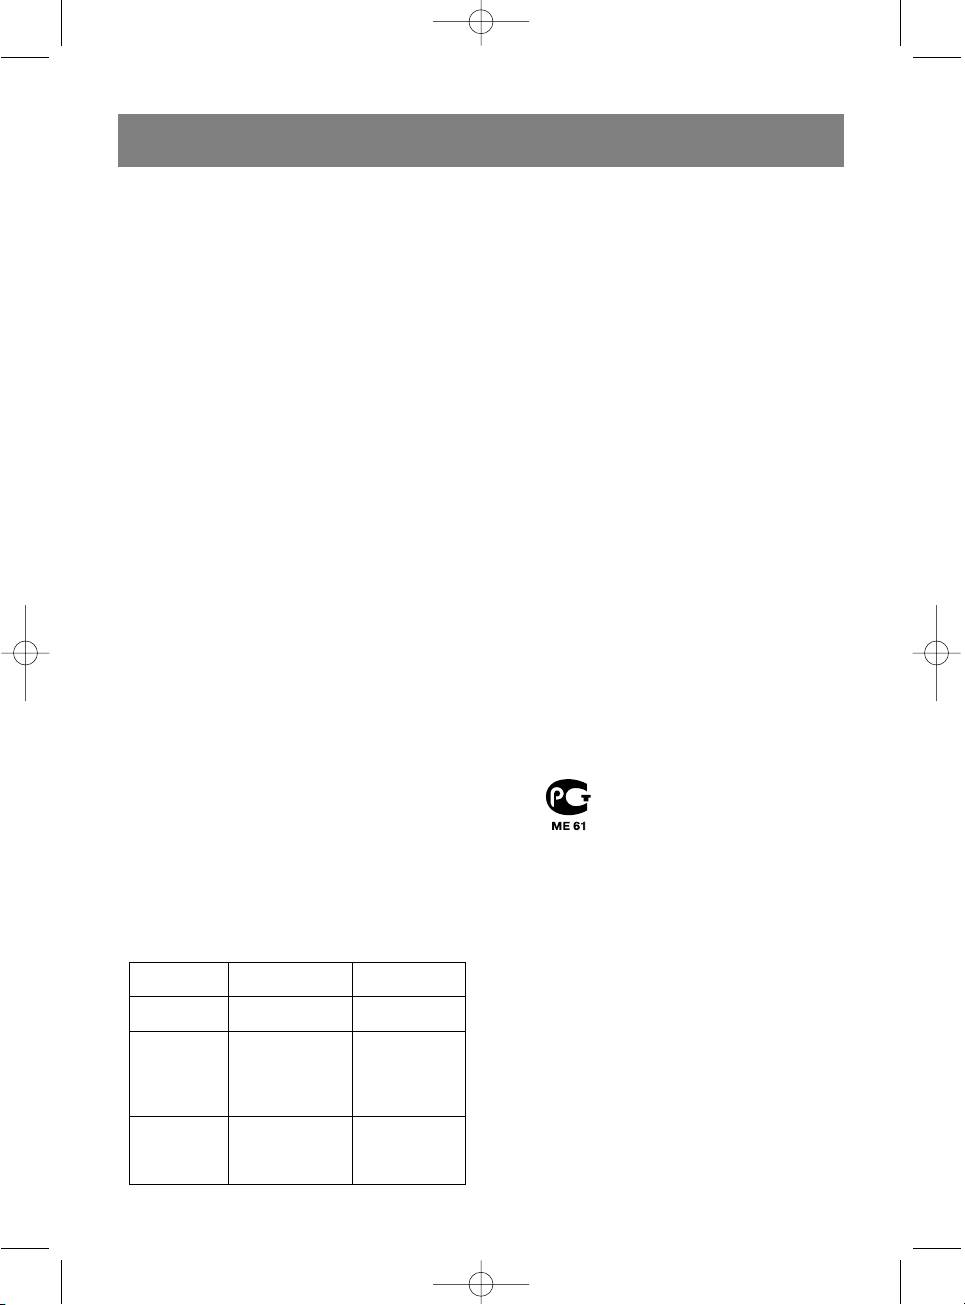
Malfunctions and their solutions
appliance was purchased. The bill of sale or
receipt must be produced when making any
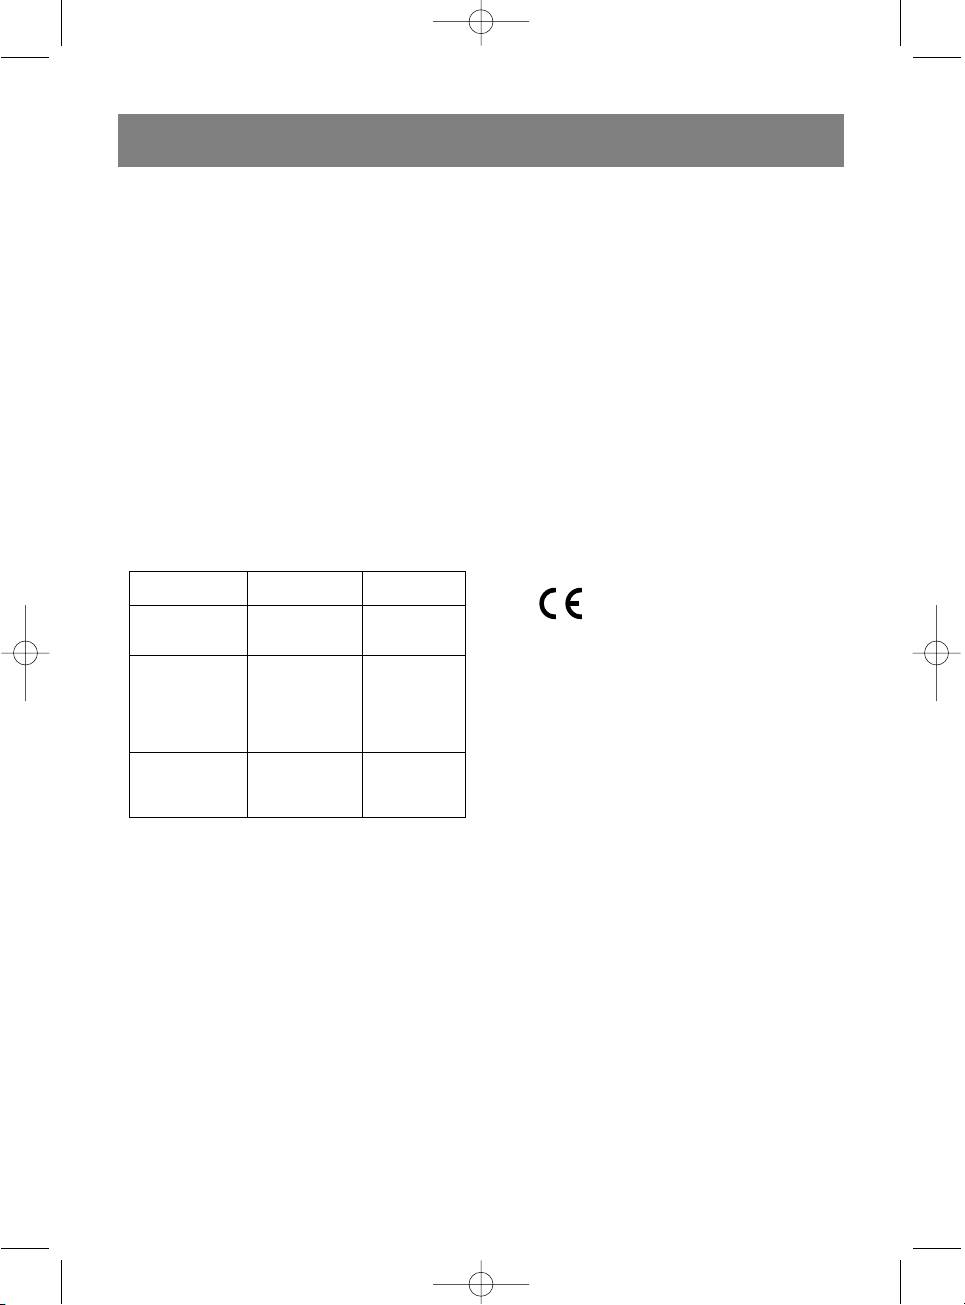
Problem Possible reason Solution
claim under the terms of this guarantee.
The oven
The device is
Plug it in
won’t turn
This product conforms to the
not plugged in
again
on
EMC-Requirements as laid
Short in power
down by the Council Directive
Call an
supply
89/336/EEC and to the Low
The oven
electrician
The oven door
Voltage Regulation (73/23 EEC)
doesn’t heat
Close the door
is not fully
firmly
closed
The rotating
The roller ring
glass tray is
Clean these
and oven floor
making
parts
is dirty
noises
Do not be alarmed by the following
situations:
a) the oven light is dull;
ENGLISH
7
Vt-1653.qxp 04.02.2005 10:10 Page 7
DEUTSCH
8
Vt-1653.qxp 04.02.2005 10:10 Page 8
MIKROWELLENOFEN
Drücken Sie auf den Knopf " Clock/Preset " für
die Eingabe der Zeit, wonach die Zubereitung
Benennung der Elemente
der Nahrung nach dem eingestellten Programm
1. Schutzschlösser
anfangen wird.
2. Sehfensterchen
3. Ventilationsöffnungen
8. Start
4. Achse
Drücken Sie auf den Knopf " Start " für die
5. Rollenring
Einschaltung der vorprogrammierten Betriebsart.
6. Drehglasteller
7. Paneel der Steuerung
9. Stop/ Aufhebung
8. Grill
a) Drücken Sie auf den Knopf " Pause/CLear " vor
9. Gitter für den Grill
dem Programmieren des Ofens für die
10. Behälter für die Zubereitung von Lebensmitteln
Rückstellung der Voreinstellungen.
b) Drücken Sie auf den Knopf " Pause/CLear "
Paneel der Steuerung
einmal für zeitweilige Ausschaltung des
1. Display
Programms und zwei Male für den Abschluss der
Auf dem Display wird die Zeit der Zubereitung,
Zubereitung der Gerichtes.
Niveau der Leistung und Indikation der Arbeit des
c) Der gegebene Knopf wird auch für die
Ofens, sowie aktuelle Zeit wiedergegeben.
Einstellung des Schlosses gegen Kinder
verwendet.
2. Leistung
Stellen Sie eines der Niveaus der Leistung, auf den
SICHERHEITSMASSNAHMEN, DIE MAN
Knopf " Power " die notwendige Anzahl der
BEACHTEN MUSS, UM DEM RISIKO DER
Bestätigungen drückend.
EINWIRKUNG DER MIKROWELLENENERGIE
ENTZOGEN ZU SEIN
3. Automatisches Menü
1. Versuchen Sie nicht, den Mikrowellenofen beim
Drücken Sie für den Eintritt in die Betriebsart des
geöffneten Türchen zu benutzen, da für Sie hier
automatischen Menüs, einschließlich des Auftauens.
das Risiko der schädlichen Einwirkung der
Mikrowellenenergie entsteht. Es ist sehr wichtig,
4. Grill / kombinierte Betriebsart
die inneren Schutzschlösser nicht zu
Sie können die Betriebsart "Grill ", kombinierte
beschädigen oder kaputt zu machen.
Betriebsart 1 oder 2, mit dem Drück auf den Knopf "
2. Es ist besonders wichtig, dass das Türchen dicht
Grill/Combi " die notwendige Anzahl der
geschlossen ist. Unterbringen Sie fremde
Bestätigungen je nach dem von Ihnen gewählten
Gegenstände zwischen dem Türchen und dem
Programm der Zubereitung des Gerichtes
Gehäuse des Mikrowellenofens nicht und lassen
einstellen.
Sie Schmutz oder Reste der Reinigungsmittel
auf den isolierenden Schichten nicht
5. Zeit / Menü
ansammeln.
Drehen Sie den Regler im oder gegen den
3. Benutzen Sie den Mikrowellenofen bei seiner
Uhrzeigersinn:
Beschädigung nicht, besonders beachten Sie,
für die Einstellung der aktuellen Zeit;
dass:
für die Auswahl des notwendigen Punktes des
a. Türchen nicht angebogen ist;
automatischen Menüs, einschließlich des
b. Haken und Klinken zerbrochen oder geschwächt
Auftauens;
sind;
für die Einstellung der Zeit der Zubereitung.
c. Isolierende Türschicht nicht verletzt ist.
4. Den Ofen einstellen und reparieren soll ein
6. Regler des Gewichts
qualifizierter Spezialist.
Nach der Auswahl des Punktes des Automenüs,
stellen Sie das ungefähre Gewicht des
BEVOR SIE SICH AN DEN SERVICEDIENST
Nahrungsmittels ein. Dafür drücken Sie auf den
WENDEN
Knopf “ Weight Adj ” und mit der Drehung des
1. Überzeugen Sie sich darin, dass der Ofen zum
Reglers «Menu/Time» stellen Sie das ungefähre
Netzwerk richtig angeschlossen ist. Wenn das
Gewicht des Nahrungsmittels ein. Der Ofen wird die
Problem darin liegt, schalten Sie die Schnur von
optimale Zeit und die Leistung für die Zubereitung
der Stromquelle ab, warten Sie 10 Sekunden ab
des konkreten Nahrungsmittels selbst wählen.
und schließen Sie den Ofen ans Netzwerk an.
2. Prüfen Sie ob Stromversorgung eingespeist
7. Aktuelle Zeit / Einstellung der Zeit, wonach
wird.
die Zubereitung der Nahrung anfangen wird
3. Überzeugen Sie sich, dass das Kontrollpaneel
Für die Einstellung der aktuellen Zeit drücken
richtig einprogrammiert und die Schaltuhr
Sie auf den Knopf " Clock/Preset " und mit dem
eingestellt ist.
Regler «Menu/Time» stellen Sie die Zeit ein.

DEUTSCH
9
Vt-1653.qxp 04.02.2005 10:10 Page 9
4. Prüfen Sie, ob das Türchen des Ofens auf die
c) Ändern Sie die Lage des Ofens in bezug auf
Klinke während des Betriebes geschlossen ist.
diese Geräte;
d) Schalten Sie den Mikrowellenofen in andere
INSTALLATION
Steckdose auf solche Weise ein, dass die Geräte
1. Überzeugen Sie sich, dass das ganze
beim Betrieb einander nicht stören.
Packmaterial aus dem Mikrowellenofen entfernt
ist.
REGELN DER SICHERHEIT BEI DER
2. Systematisch prüfen Sie den Ofen zwecks der
ZUBEREITUNG DER NAHRUNG IN
Störung. Benutzen Sie den Ofen nicht, wenn das
MIKROWELLENOFEN
Schloss oder das Türchen kaputt ist, oder
Bei der Nutzung der Elektrohaushaltsgeräte
Defekte innerhalb des Ofens vorhanden sind. Im
beachten Sie aufmerksam folgende Anweisungen:
Falle solcher Störungen oder Defekte wenden
WARNUNG: Um das Risiko der Brandwunde, des
Sie sich in das Servicezentrum.
elektrischen Schlages, des Brandes oder der
3. Der Ofen soll auf einer ebenen und standfesten
Einwirkung der Mikrowellenenergie herabzusetzen,
Oberfläche aufgestellt werden.
muss man:
4. Stellen Sie den Ofen unweit der Quellen der
1. die Betriebsanweisung vor der Nutzung
hohen Temperatur und an den Stellen der
aufmerksam lesen.
erhöhten Feuchtigkeit nicht auf.
2. Verwenden Sie den Mikrowellenofen streng
5. Sichern Sie Ventilation des Ofens, dabei lassen
bestimmungsgemäß. Unterbringen Sie
Sie bei der Installation des Ofens freien Raum:
chemische Stoffe ins Innere des Ofens nicht. Der
oben 20 cm, von der hinteren Wand 10 cm, an
Ofen ist für Aufwärmung und Zubereitung der
beiden Seitenwänden je 5 cm.
Nahrung bestimmt. Der Ofen ist für die
6. Verwenden Sie den Ofen ohne Glasdrehteller
industrielle oder Labornutzung nicht bestimmt.
nicht. Montieren Sie den Drehglasteller und
3. Es wird Einschaltung des Ofens leer nicht
anderes Zubehör richtig.
zugelassen. Das kann zur Beschädigung des
7. Unterbringen Sie den Drehglasteller in den Ofen,
Gerätes führen.
vereinen Sie die Falze der Achse mit den
4. Verwenden Sie das Gerät nicht, wenn der
Vorsprüngen auf dem Glasteller, überzeugen Sie
Stecker oder die Schnur beschädigt sind.
sich darin, dass er auf den Rollenring normal
5. Seien Sie bei Nutzung des Ofens seitens der
hinaufgestellt ist und dass sich der Ring
Kinder besonders aufmerksam.
innerhalb des zentralen Kreises auf dem Boden
6. Um das Risiko des Entzündens innerhalb des
des Ofens befindet.
Ofens herabzusetzen, beachten Sie folgende
Regeln:
ANWEISUNG ÜBER DIE ERDUNG
a) Braten Sie die Nahrung zu stark nicht.
Dieses Gerät soll geerdet werden. Im Falle
Aufmerksam passen Sie auf das Gerät bei
irgendeines Kurzschlusses, setzt die Erdung das
Nutzung von Papier, Plast oder anderen
Risiko des Erhaltens des Elektroschocks herab, da
Materialien auf.
der Strom durch den Ersatzleiter abfließen kann. Zu
b) Nehmen Sie den festigenden Draht von Papier
diesem Gerät wird eine Schnur mit der geerdeten
und Plastpaketen ab, bevor Sie sie in den Ofen
Leitung und geerdetem Stecker beigelegt. Der
unterbringen.
Stecker wird in die Steckdose eingeschaltet, die
c) Im Falle des Entzündens der Materialien im Ofen
entsprechend installiert und geerdet werden soll.
öffnen Sie das Türchen nicht, sondern schalten
WARNUNG: Nutzung des geerdeten Steckers nicht
Sie das Gerät aus, schalten Sie es von der
gemäß den Regeln kann zum Risiko des Erhaltens
Steckdose aus.
des Elektroschocks führen.
d) Bewahren Sie Nahrungsmittel innerhalb des
Mikrowellenofens nicht auf.
Konsultieren Sie einen qualifizierten Fachmann,
7. Flüssigkeiten und andere Nahrung, die fürs
wenn Ihnen die Anweisungen über die Erdung nicht
Aufwärmen bestimmt sind, sollen in dicht
klar sind oder Zweifel in der sicheren Erdung des
geschlossenes Geschirr unterbracht werden.
Mikrowellenofens da sind.
8. Das Küchengeschirr kann im Mikrowellenofen
stark erwärmt werden. Verwenden Sie
Küchenhandschuhe, um das Geschirr aus dem
Rundfunkstörungen
Gerät herauszunehmen.
1. Der Betrieb des Mikrowellenofens kann
9. Beim Aufwärmen der Getränke im
Störungen bei der Arbeit des Radiogerätes,
Mikrowellenofen wird die Oberfläche des
Fernsehers und anderen Geräte bedingen.
Geschirres erwärmt. Akkurat nehmen Sie das
2. Behebung der Störungen:
Geschirr heraus, Brandwunde meidend.
a) Dicht schließen Sie die Tür des
10. Braten Sie Nahrung im Mikrowellenofen nicht.
Mikrowellenofens;
11. Eier in Schale sollen nicht zubereitet werden.
b) Richten Sie die Empfangsantenne des
Andere Arten der Nahrung mit Häutchen, zum
Radioapparats oder des Fernsehers noch einmal
Beispiel, Würstchen, Eigelb, Hühnerleber,
ein;
DEUTSCH
10
Vt-1653.qxp 04.02.2005 10:10 Page 10
Tomaten und Kartoffeln muss man mit Gabel
6. Drücken Sie auf den Knopf " Clock/Preset " für
durchstechen.
die endgültige Einstellung der Uhr.
12. Verwenden Sie nur speziell für den
Wenn Sie aktuelle Zeit während der Arbeit des
Mikrowellenofen bestimmtes Küchengeschirr.
Ofens erfahren möchten, drücken Sie auf den
Knopf " Clock/Preset " und im Laufe von 5
Test: unterbringen Sie das leere Geschirr in den
Sekunden wird die Zeit gezeigt.
Mikrowellenofen, dabei stellen Sie die größte Stufe
der Erwärmung für 60 Sekunden ein. Wenn das
Mikrowellenzubereitung
Geschirr stark erwärmt wird, so ist dessen Nutzung
Für die Mikrowellenzubereitung der Nahrung
nicht empfehlenswert.
drücken Sie auf den Knopf " Power " die
notwendige Anzahl der Bestätigungen für die
Geschirr für Mikrowellenofen
Auswahl des Niveaus der Leistung. Mit der Drehung
Für Nutzung im Mikrowellenofen passt praktisch
des Reglers «Menu/Time» stellen Sie die Zeit der
beliebiges Geschirr aus Glas, Glaskeramik, Porzellan
Zubereitung ein. Im gegebenen Mikrowellenofen ist
und Ton, das keine Metalleinschlüsse enthält.
eine 90Minutenschaltuhr mit der automatischen
Die Mikrowellen werden vom Metallgeschirr
Ausschaltung und Tonsignal vorgesehen.
abgespiegelt und deshalb erreichen sie die Nahrung
Die Tabelle wird Ihnen bei der Auswahl des Niveaus
nicht.
der Leistung helfen:
Glas, Porzellan, Pappe und Keramik gewährleisten
Zum Beispiel, Sie möchten ein Gericht in 1 Minute
schnelle Durchdringung der elektromagnetischen
bei 80 % Niveau der Leistung aufwärmen.
Wellen.
1. Drücken Sie auf den Knopf " Power " zwei Male.
Bei Nutzung des Plastgeschirres muss man daran zu
2. Mit der Drehung des Reglers «Menu/Time»
denken, dass einige Plaststofferzeugnisse in
stellen Sie die Zeit ”1:00” ein.
Mikrowellenöfen verformt werden können.
3. Drücken Sie auf den Knopf " Start ".
Die unten aufgeführte Tabelle wird Ihnen bei der
Auswahl des Geschirres helfen:
Grill
Grill wird für die Zubereitung von gut gebratenen,
knirschenden Stückchen Fleisch, Fisch, Huhn,
GEWÖHNLI
Kartoffeln, Würstchen, und auch für die Zubereitung
CHE
KOMBIN
der heißen belegten Brote verwendet. Maximale Zeit
KÜCHENGES
BETRIEBSA
IERTE
GRILL
der Zubereitung in der Betriebsart " Grill " beträgt
CHIRR
RT DES
ZUBERE
90 Minuten.
MIKROWEL
ITUNG
Nehmen wir an, Sie wollen den Grill auf 12 Minuten
LENOFENS
einstellen. Dafür:
Feuerfestes
Ja Ja Ja
1. Drücken Sie auf den Knopf " Grill/Combi " ein
Glassgeschirr
Mal.
Gewöhnliches
Nein Nein Nein
2. Mit der Drehung des Reglers «Menu/Time»
Glassgeschirr
stellen Sie die Zeit “12:00” ein.
Feuerfestes
Ja Ja Ja
3. Drücken Sie auf den Knopf " Start ".
keramisches
Mikrowellenkun
Ja Nein Nein
Kombinierte Zubereitung
ststoffgeschirr
Kombiniert die Mikrowellenzubereitung und Grill.
Küchenpapier Ja Nein Nein
Diese Betriebsart ist empfehlenswert, für die
Metallgeschirr Nein Ja Nein
Zubereitung solcher Gerichte wie Lazanija, leniwije
Wareniki und eingebratenes Gemüse auszunutzen.
Betrieb des Ofens
Es sind 2 Kombinationen möglich:
Der Druck auf beliebigen Knopf des funktionalen
Kombination C1 (30 % Mikrowellenbearbeitung
Paneels wird vom Tonsignal begleitet.
+ 70 % Grill ) wird empfohlen, bei der
Zubereitung von Fisch, Kartoffeln zu verwenden.
Einstellung der aktuellen Zeit
Nehmen wir an, Sie wollen kombinierte
Bei Einschaltung des Gerätes ins Netzwerk
Betriebsart 1 für 25 Minuten einstellen:
erscheint auf dem Display “ 12:00”.
1. Drücken Sie auf den Knopf " Grill/Combi " zwei
Zum Beispiel, Sie müssen die aktuelle Zeit 8:30
Male.
einstellen. Dafür:
2. Mit der Drehung des Reglers «Menu/Time»
1. Drücken Sie auf den Knopf " Clock/Preset ".
stellen Sie die Zeit “25:00” ein.
2. Drücken Sie auf den Knopf " Pause/CLear ".
3. Drücken Sie auf den Knopf " Start ".
3. Drehen Sie den Regler «Menu/Time» solange,
Kombination C2 (55 % Mikrowellenbearbeitung
bis auf dem Display die Ziffer ”8” erscheint.
+ 45 % Grill ) – wird empfohlen bei Zubereitung
4. Drücken Sie auf den Knopf " Clock/Preset "
von Puddings, Omeletten, Bratkartoffeln und
noch einmal.
Hausgeflügel zu nutzen.
5. Drehen Sie den Regler «Menu/Time» solange,
bis auf dem Display die Zahl ”30” erscheint.

DEUTSCH
11
Vt-1653.qxp 04.02.2005 10:10 Page 11
Nehmen wir an, Sie möchten die kombinierte
2. Stellen Sie die notwendigen Parameter der
Betriebsart 2 auf 12 Minuten einstellen:
Zubereitung der Nahrung in der Betriebsart
1. Drücken Sie auf den Knopf " Grill/Combi " drei
"Grill " ein.
Male.
IV. Drücken Sie auf den Knopf " Start ".
2. Mit der Drehung des Reglers «Menu/Time»
stellen Sie die Zeit “12:00” ein.
Anmerkung: Im Laufe der Zubereitung der Nahrung
3. Drücken Sie auf den Knopf " Start ".
nach dem eingegebenen Programm erscheinen auf
dem Display die Indikatoren ”1S”, "2S" oder "3S" je
Automatisches Menü
nach dem Stadium, auf dem sich der Prozess der
Die gegebene Funktion erlaubt die
Zubereitung befindet. Nach der Vollendung des
vorprogrammierte Betriebsart der Zubereitung des
Programms der Zubereitung der Nahrung erklingt
Gerichtes zu wählen. Sie müssen nur den Kode des
ein sechsmaliges Tonsignal.
Gerichtes einstellen, das Gewicht wählen und auf
den Knopf " Start " drücken.
Einstellung der Zeit, wonach die Zubereitung
Beispiel: Reis, 100 Gr.
der Nahrung nach dem eingegebenen
1. Drücken Sie auf den Knopf " Menu ".
Programm beginnt.
2. Drehen Sie den Regler «Menu/Time» solange,
Nehmen wir an, Sie wollen den Prozess der
bis auf dem Display der Menüpunkt "Reis" blinkt.
Zubereitung der Nahrung um 11:30 mit 50% Niveau
3. Drücken Sie auf den Knopf “ Weight Adj ”.
der Leistung beginnen:
4. Drehen Sie den Regler «Menu/Time» für die
1. Drücken Sie auf den Knopf " Clock/Preset ".
Einstellung des Gewichts des Nahrungsmittels
2. Drehen Sie den Regler «Menu/Time» solange,
“0,100”.
bis auf dem Display die Zahl ”11” erscheint.
5. Drücken Sie auf den Knopf " Start ".
3. Drücken Sie auf den Knopf " Clock/Preset ".
4. Drehen Sie den Regler «Menu/Time» solange,
Automatisches Auftauen
bis auf dem Display die Zahl ”30” erscheint.
Sie haben nur das Gewicht der Nahrungsmittel von
5. Drücken Sie auf den Knopf " Power " 3 Male für
100 bis 4000 Gr. zu wählen, die Sie auftauen wollen
die Auswahl des 50% Niveaus der Leistung.
(Fleisch, Geflügel, Meeresprodukte), und der Ofen
6. Drehen Sie den Regler «Menu/Time» für die
wird das gehörige Programm selbst wählen und
Einstellung der Zeit der Zubereitung der
automatisch die Nahrungsmittel auftauen.
Nahrung.
Beispiel: Nehmen wir an, Sie wollen 600 Krevette
auftauen. Dafür:
Anmerkung: überzeugen Sie sich, dass die aktuelle
1. Drücken Sie auf den Knopf " Menu ".
Zeit früher eingestellt worden ist.
2. Drehen Sie den Regler «Menu/Time» solange,
Nach der Vollendung der notwendigen Einstellungen
bis auf dem Display Menüpunkt "Fisch" blinkt.
wird auf dem Display der Indikator der erwarteten
3. Drücken Sie auf den Knopf “ Weight Adj ”.
Zeit erscheinen. Um 11:30 wird der Prozess der
4. Drehen Sie den Regler «Menu/Time» für die
Zubereitung der Nahrung nach dem eingegebenen
Einstellung des Gewichts des Nahrungsmittels
Programm beginnen.
“0,600”.
5. Drücken Sie auf den Knopf " Start ".
Schnelle Zubereitung
Einstellung des Programms der Zubereitung
Schnelles Aufwärmen des fertigen Gerichtes mit
100% Leistung (von 5 bis 90 sec.) Dafür stellen Sie
der Nahrung
einfach die erwünschte Zeit des Aufwärmens des
Sie können beliebige Reihenfolge des Prozesses der
Gerichtes mit Drehung des Reglers «Menu/Time»
Zubereitung der Nahrung eingeben. Nehmen wir an,
ein und drücken Sie auf den Knopf " Start ".
Sie möchten:
Zum Beispiel, Sie möchten ein Gericht in 2 Minuten
1. Nahrungsmittel auftauen.
aufwärmen, dafür:
2. Ein bestimmtes Niveau der Leistung einstellen.
1. Mit der Drehung des Reglers «Menu/Time»
3. Die Nahrung unter Verwendung von Grill
stellen Sie die Zeit "2:00" ein.
zubereiten.
2. Drücken Sie auf den Knopf " Start ".
Dafür:
I. 1. Drücken Sie auf den Knopf " Menu ".
Einstellung der Schaltuhr
2. Drehen Sie den Regler «Menu/Time» solange,
Nehmen wir an, Sie möchten die Schaltuhr auf 3
bis auf dem Display der gewünschte Menüpunkt
Minuten einstellen. Dafür:
blinkt.
1. Drücken Sie auf den Knopf " Pause/CLear ".
3. Drücken Sie auf den Knopf “ Weight Adj ”.
2. Drücken Sie auf den Knopf " Power " sechs
4. Drehen Sie den Regler «Menu/Time» für die
Male.
Einstellung des Gewichts des aufzutauenden
3. Drehen Sie den Regler «Menu/Time» solange,
Nahrungsmittels.
bis auf dem Display ”3:00” erscheint.
II. 1. Drücken Sie auf den Knopf " Power " für die
4. Drücken Sie auf den Knopf " Start ".
Auswahl des erwünschten Niveaus der Leistung.
III. 1. Drücken Sie auf den Knopf " Grill/Combi "
DEUTSCH
12
Vt-1653.qxp 04.02.2005 10:10 Page 12
Behälter für die Zubereitung von Lebensmitteln
Frequenz 2450 Mhz
Im Lieferumfang des Ofens ist ein Behälter mit
Rauminhalt 23 Liter
AntihaftBeschichtung (10) für die Zubereitung oder
Drehglasteller Durchmesser 314 mm
das Aufwärmen von Lebensmitteln enthalten.
Gewicht des Ofens 16,5kg.
Benutzen Sie für die Zubereitung oder für das
Aufwärmen von Lebensmitteln den GrillBetrieb,
Der Produzent behält sich das Recht vor, die
stellen Sie dabei die gewünschte Zeit ein.
Charakteristiken der Geräte ohne Vorankündigung
zu ändern.
Schloss gegen Kinder (Kindersicherung)
Um die Nutzung des Ofens seitens der Kinder zu
Benutzungsdauer des Bügeleisens nicht
verhindern, können Sie die Betriebsart der
weniger als 5 Jahre
Blockierung einstellen. Dafür drücken Sie auch
halten Sie nieder den Knopf " Pause/CLear "
Gewährleistung
ungefähr 3 Sekunden lang, dabei wird auf dem
Ausführliche Bedingungen der Gewährleistung kann
Display der Indikator der Blockierung des Ofens
man beim Dealer, der diese Geräte verkauft hat,
erscheinen und es wird das Tonsignal ertönen.
bekommen.
Um die Blockierung aufzuheben, drücken Sie wieder
Bei beliebiger Anspruchserhebung soll man
und halten Sie nieder den Knopf " Pause/CLear "
während der Laufzeit der vorliegenden
ungefähr 3 Sekunden lang, bis auf dem Display der
Gewährleistung den Check oder die Quittung über
Indikator der Blockierung des Ofens erlöschen und
den Ankauf vorzulegen.
das Tonsignal ertönen wird.
Das vorliegende Produkt
Störungen und ihre Beseitigung
entspricht den Forderungen
der elektromagnetischen
Mögliche
Verträglichkeit, die in
Problem
Behebung
Ursache
89/336/EWG Richtlinie des
Der Ofen
Das Gerät ist ins
Rates und den Vorschriften
Schalten Sie
schaltet sich
Netzwerk nicht
noch einmal
73/23/EWG über die
nicht ein
eingeschaltet
Niederspannungsgeräte
Wenden sich
Störungen im
vorgesehen sind.
an einen
Der Ofen
Netzwerk
Elektriker
erwärmt sich
Tür des Ofens
Schließen Sie
nicht
ist schlecht
die Tür des
geschlossen
Ofens dicht
Schmutziger
Glasdrehteller
Rollenring und
Waschen Sie
bildet
der Boden des
diese Teile
Geräusche
Ofens
Folgende Erscheinungen sollen Sie nicht
beunruhigen:
a) trübes Licht des Backofens;
b) Dampfansammeln;
Reinigen
• Schalten Sie den Ofen vom Netzwerk ab.
• Wischen Sie die inneren Oberflächen mit
weichem reinigendem Mittel ab, waschen Sie mit
Wasser und wischen Sie trocken mit weichem
Stoff ab.
• Waschen Sie den Drehteller und Rollenring im
Seifenwasser, spülen und trocknen Sie.
• Wischen Sie das Türchen und die Schlösser mit
feuchtem Stoff akkurat ab.
Spezifikation
Stromversorgung 220230 V ~ 50 Hz
Mikrowellen 1400 Watt
Grillleistung 1000 Watt
Endleistung 900 Watt
ÐÓÑÑÊÈÉ
13
Vt-1653.qxp 04.02.2005 10:10 Page 13
МИКРОВОЛНОВАЯ ПЕЧЬ
- Для установки текущего времени нажмите
кнопку ”Clock/Pre-set”и регулятором
Наименование элементов
“Menu/Time” установите время.
1. Защитные замки
- Нажмите кнопку ”Clock/Pre-set” для задания
2. Окно
времени, по достижении которого начнется
3. Вентиляционные отверстия
приготовление пищи по установленной
4. Ось
программе.
5. Роликовое кольцо
6. Вращающийся стеклянный поднос
8. Старт
7. Панель управления
Нажмите кнопку ”Start” для включения
8. Гриль
предварительно запрограммированного режима.
9. Решетка для гриля
10. Емкость для приготовления продуктов
9. Стоп/отмена
а) Нажмите кнопку ”Pause/CLear”перед
Панель управления
программированием печи для сброса
1. Дисплей
предыдущих настроек.
На дисплее отражается время приготовления
б) Нажмите кнопку ”Pause/CLear”один раз для
пищи, уровень мощности, индикаторы работы, а
временного отключения программы и два
также текущее время.
раза - для окончания приготовления блюда.
в) Данная кнопка используется также для
2. Мощность
установки замка от детей.
Установите один из уровней мощности, нажав
на кнопку ”Power” необходимое количество раз.
ПРЕДОСТОРОЖНОСТИ, КОТОРЫЕ
НЕОБХОДИМО СОБЛЮДАТЬ, ЧТОБЫ НЕ
3. Автоматическое меню
ПОДВЕРГАТЬСЯ РИСКУ ВОЗДЕЙСТВИЯ
Нажмите для входа в режим автоматического
МИКРОВОЛНОВОЙ ЭНЕРГИИ
меню, включая разморозку.
1. Не пытайтесь пользоваться микроволновой
печью при открытой двери, т.к. при этом Вы
4. Гриль/комбинированный режим
рискуете подвернуться вредному
Вы можете установить режим “Гриль”,
воздействию микроволновой энергии. Очень
комбинированный режим 1 или 2, нажав на
важно не повредить и не испортить
кнопку ”Grill/Combi” необходимое количество
внутренние защитные замки.
раз в зависимости от выбранной Вами
2. Особенно важно, чтобы дверца была плотно
программы приготовления блюда.
закрыта. Не помещайте посторонние
предметы между дверцей и корпусом печи и
5. Время/меню
следите за тем, чтобы грязь или остатки
Вращайте регулятор по или против часовой
чистящих средств не скапливались на
стрелки:
изолирующих слоях.
- для установки текущего времени;
3. Не пользуйтесь микроволновой печью, если
- для выбора необходимого пункта
она повреждена, особенно следите за тем,
автоматического меню, включая разморозку;
чтобы:
- для установки времени приготовления.
a. дверца не была погнута;
b. крючки и защелки – сломаны или
6. Регулятор веса
ослаблены;
После выбора пункта автоменю, установите
c. дверной изолирующий слой не был нарушен.
приблизительный вес продукта. Для этого
4. Настраивать и чинить печь должен
нажмите на кнопку “Weight Adj” и поворотом
квалифицированный специалист.
регулятора “Menu/Time” установите
приблизительный вес продукта. Печь сама
ПЕРЕД ТЕМ КАК ОБРАТИТЬСЯ В
выберет оптимальное время и мощность для
СЕРВИСНУЮ СЛУЖБУ
приготовления конкретного продукта.
1. Убедитесь в том, что печь подключена к сети
правильно. Если проблема в этом,
7. Текущее время/ установка времени,
отсоедините шнур от источника питания,
по достижении которого начнется
подождите 10 секунд и подключите печь к
приготовление пищи
сети.
2. Проверьте, подается ли питание.

ÐÓÑÑÊÈÉ
14
Vt-1653.qxp 04.02.2005 10:10 Page 14
3. Убедитесь, что контрольная панель
а) плотно закройте дверцу микроволновой
запрограммирована правильно и таймер не
печи;
установлен.
б) переустановите принимающую антенну
4. Проверьте, закрыта ли дверца печи на
радиоприемника или телевизора;
защелку во время эксплуатации.
в) измените расположение печи по отношению
к этим приборам;
УСТАНОВКА
г) включите микроволновую печь в другую
1. Убедитесь, что весь упаковочный материал
розетку, чтобы исключить взаимное влияние
удалён из микроволновой печи.
приборов друг на друга.
2. Систематически проверяйте печь на предмет
поломки. Не пользуйтесь печью, если
ПРАВИЛА БЕЗОПАСНОСТИ ПРИ
сломан замок, дверца или есть дефекты
ПРИГОТОВЛЕНИИ ПИЩИ В
внутри печи. В случае таких поломок или
МИКРОВОЛНОВОЙ ПЕЧИ
дефектов обращайтесь в сервисный центр.
При использовании электробытовых приборов
3. Печь должна быть установлена на ровной и
внимательно следуйте следующим
устойчивой поверхности.
инструкциям.
4. Не устанавливайте печь вблизи источников
ПРЕДОСТЕРЕЖЕНИЕ: Чтобы снизить риск
высокой температуры и в местах
ожога, электрического удара, пожара или
повышенной влажности.
воздействия микроволной энергии необходимо:
5. Обеспечьте вентиляцию печи, оставив при
1. Прочитать внимательно инструкцию перед
установке прибора свободное пространство:
использованием прибора.
сверху - 20 см, с задней стороны - 10 см, по
2. Используйте микроволновую печь строго по
бокам - по 5 см.
назначению. Не помещайте химические
6. Не используйте печь без стеклянного
вещества внутрь печи. Печь предназначена
подноса. Устанавливайте поднос и другие
для подогрева и приготовления пищи. Печь
принадлежности правильно.
не предназначена для промышленного или
7. Поместите вращающийся поднос в печь,
лабораторного использования.
совместите пазы оси с выступами на
3. Не допускается включение печи вхолостую.
подносе, убедитесь в том, что он нормально
Это может привести к повреждению
установлен на роликовом кольце и что
прибора.
кольцо находится внутри центрального круга
4. Не используйте прибор, если повреждены
на дне печи.
вилка или шнур.
5. Будьте особенно внимательны при
ИНСТРУКЦИИ ПО ЗАЗЕМЛЕНИЮ
эксплуатации печи детьми.
Этот прибор должен быть заземлен. В случае
6. Для того чтобы снизить риск возгорания
какого-либо замыкания заземление снижает
внутри печи, придерживайтесь следующих
риск получения электрошока, т.к. ток может
правил:
уйти по заземляющему проводу. К этому
а) Не пережаривайте пищу. Внимательно
прибору прилагается заземляющий провод и
следите за прибором при использовании
заземленная вилка. Вилка подсоединяется к
бумажных, пластиковых или других
розетке, которая должна быть установлена и
материалов.
заземлена соответствующим образом.
б) Снимите закрепляющую проволоку с
ПРЕДУПРЕЖДЕНИЕ: Использование
бумажных и пластиковых пакетов перед тем,
заземленной вилки не по правилам может
как поместить их внутрь.
привести к риску получения электрошока.
в) В случае возгорания материалов в печи не
открывайте дверцу, а выключите прибор,
Проконсультируйтесь с квалифицированным
отсоедините его от сети.
специалистом, если Вам не ясны инструкции по
г) Не храните продукты внутри микроволновой
заземлению или есть сомнения, заземлен ли
печи.
прибор соответствующим образом.
7. Жидкости и другая пища, предназначенные
для подогревания, должны быть в открытой
Радиопомехи
посуде.
1. Эксплуатация микроволновой печи может
8. Кухонная посуда может сильно нагреваться
создать помехи при работе радио, телевизора
в микроволновой печи. Используйте
и др. приборов.
кухонные прихватки, чтобы извлечь посуду
2. Устранение помех:
из прибора. При нагревании напитков в
ÐÓÑÑÊÈÉ
15
Vt-1653.qxp 04.02.2005 10:10 Page 15
микроволновой печи поверхность посуды
Эксплуатация печи
нагревается. Аккуратно вынимайте посуду,
Нажатие на любую кнопку функциональной
избегая ожога.
панели сопровождается звуковым сигналом.
9. Не жарьте пищу в микроволновой печи.
10. Не готовьте яйца в скорлупе. Другие виды
Установка текущего времени
пищи с кожицей, например, сосиски,
При включении прибора в сеть на дисплее
куриную печень, помидоры и картофель
появится “12:00”.
нужно протыкать вилкой.
Например, Вам надо установить текущее время
11. Используйте только специально
8:30. Для этого:
предназначенную для микроволновой печи
1. Нажмите кнопку ”Clock/Pre-set”.
кухонную посуду.
2. Нажмите кнопку ”Pause/CLear”.
3. Вращайте регулятор “Menu/Time” до тех
Тест: поместите пустую посуду в
пор, пока на дисплее не появится цифра ”8”.
микроволновую печь, установив самую большую
4. Нажмите кнопку ”Clock/Pre-set”еще раз.
мощность СВЧ нагрева, на 60 сек. Если посуда
5. Вращайте регулятор “Menu/Time” до тех
сильно нагреется, то ее не рекомендуется
пор, пока на дисплее не появится цифра
использовать.
”30”.
6. Нажмите кнопку ”Clock/Pre-set”для
Посуда для микроволновой печи
окончательной установки часов.
Для использования в микроволновой печи
Если Вы хотите узнать текущее время во время
годится практически любая посуда из стекла,
работы печи, нажмите кнопку ”Clock/Pre-set”, и
стеклокерамики, фарфора и глины, не имеющих
в течение 5 секунд будет показано время.
металлических включений. Микроволны
отражаются от металлической посуды и поэтому
Микроволновое приготовление
не достигают пищи. Стекло, фарфор, картон и
Для микроволнового приготовления пищи
керамика обеспечивают быстрое проникновение
нажмите кнопку ”Power” необходимое
электромагнитных волн. При использовании
количество раз для выбора уровня мощности.
пластмассовой посуды следует помнить о том,
Поворотом регулятора “Menu/Time” установите
что некоторые изделия из пластиков
время приготовления. В данной микроволновой
нетермостойкие и могут деформироваться в
печи предусмотрен 90-минутный таймер с
СВЧ-печи.
автоматическим отключением и звуковым
сигналом.
Представленная ниже таблица поможет Вам
Например, Вы хотите подогреть блюдо за 1
при выборе посуды:
минуту при 80% уровне мощности.
1. Нажмите кнопку ”Power” два раза.
Обычный
Комбинир
2. Поворотом регулятора “Menu/Time”
Кухонная
режим
ованное
установите время ”1:00”.
Гриль
посуда
микроволн
приготовл
3. Нажмите кнопку ”Start”.
овой печи
ение
Огнеупор-
Гриль
ная
Да Да Да
Используется для приготовления хорошо
стеклянная
поджаренных хрустящих кусочков мяса, рыбы,
Обычная
курицы, картофеля, сосисок, а также для
Нет Нет Нет
стеклянная
приготовления горячих бутербродов.
Огнеупор-
Максимальное время работы гриля - 90 минут.
ная
Предположим, Вы хотите установить гриль на
Да Да Да
керамичес-
12 минут. Для этого:
кая
1. Нажмите кнопку ”Grill/Combi” один раз.
Микровол-
2. Поворотом регулятора “Menu/Time”
новая
установите время “12:00”.
Да Нет Нет
пластико-
3. Нажмите кнопку ”Start”.
вая
Кухонная
Комбинированное приготовление
Да Нет Нет
бумага
Сочетает микроволновое приготовление и
гриль. Этот режим рекомендуется использовать
Метали-
Нет Да нет
ческая
ÐÓÑÑÊÈÉ
16
Vt-1653.qxp 04.02.2005 10:10 Page 16
для приготовления таких блюд как лазанья,
Установка программы приготовления пищи
ленивые вареники и запеченные овощи.
Вы можете задать любую последовательность
Возможны 2 комбинации:
процесса приготовления пищи. Допустим, Вы
- комбинация С-1 (30% микроволн. пригот. +
хотите:
70% гриль) - рекомендуется использовать
1. Разморозить продукт.
при приготовлении рыбы, картофеля.
2. Установить определенный уровень
Допустим, Вы хотите установить
мощности.
комбинированный режим 1 на 25 минут:
3. Приготовить пищу в режиме гриля.
1. Нажмите кнопку ”Grill/Combi” два раза.
Для этого:
2. Поворотом регулятора “Menu/Time”
I. 1. Нажмите кнопку “Menu”.
установите время “25:00”.
2. Вращайте регулятор “Menu/Time” до тех
3. Нажмите кнопку ”Start”.
пор, пока на дисплее не замигает нужный
- комбинация С-2 (55% микроволн. пригот. +
пункт меню (разморозка).
45% гриль) - рекомендуется использовать
3. Нажмите кнопку “Weight Adj”.
при приготовлении пудингов, омлетов,
4. Вращайте регулятор “Menu/Time” для
печеного картофеля и домашней птицы.
установки веса размораживаемого продукта.
Допустим, Вы хотите установить
II. 1. Нажмите кнопку ”Power” для выбора
комбинированный режим 2 на 12 минут:
желаемого уровня мощности.
1. Нажмите кнопку ”Grill/Combi” три раза.
2. Вращайте регулятор “Menu/Time” для
2. Поворотом регулятора “Menu/Time”
установки времени приготовления.
установите время “12:00”.
III. 1. Нажмите кнопку ”Grill/Combi”
3. Нажмите кнопку ”Start”.
2. Установите необходимые параметры
приготовления пищи в режиме ”Гриль ”.
Автоматическое меню
IV. Нажмите кнопку ”Start”.
Данная функция позволяет выбрать
Примечание: Во время процесса приготовления
запрограммированный режим приготовления
пищи по заданной программе на дисплее
блюда. Вам нужно только установить код
появляются индикаторы ”1S”, ”2S ” или ”3S ” в
блюда, выбрать вес и нажать кнопку ”Start”.
зависимости от стадии, на которой находится
Пример: Рис, 100 г.
процесс приготовления. По завершении
1. Нажмите кнопку “Menu”.
программы приготовления пищи раздастся 6
2. Вращайте регулятор “Menu/Time” до тех
звуковых сигналов.
пор, пока на дисплее не замигает пункт меню
“Рис”.
Установка времени, по достижении которого
3. Нажмите кнопку “Weight Adj”.
начнется приготовление пищи по заданной
4. Вращайте регулятор “Menu/Time” для
программе
установки веса продукта “0,100”.
Допустим, Вы хотите начать процесс
5. Нажмите кнопку ”Start”.
приготовления пищи в 11:30 c 50% уровнем
мощности:
Автоматическое размораживание
1. Нажмите кнопку ”Clock/Pre-set”.
Вам нужно только выбрать вес продуктов от 100
2. Вращайте регулятор “Menu/Time” до тех
до 4000 г., которые Вы хотите разморозить
пор, пока на дисплее не появится цифра
(мясо, птицу, морепродукты), а печь сама
”11”.
выберет надлежащую программу и
3. Вращайте регулятор “Menu/Time” до тех
автоматически разморозит продукты.
пор, пока на дисплее не появится цифра
Пример: допустим, Вы хотите разморозить
”30”.
600 г. креветок. Для этого:
5. Нажмите кнопку ”Power” 3 раза для выбора
1. Нажмите кнопку “Menu”.
50% уровня мощности.
2. Вращайте регулятор “Menu/Time” до тех
6. Вращайте регулятор “Menu/Time” для
пор, пока на дисплее не замигает пункт меню
установки времени приготовления пищи.
“Рыба”.
Примечание: удостоверьтесь, что текущее
3. Нажмите кнопку “Weight Adj”.
время было установлено ранее.
4. Вращайте регулятор “Menu/Time” для
После завершения необходимых установок на
установки веса продукта “0,600”.
дисплее появится индикатор ожидаемого
5. Нажмите кнопку ”Start”.
времени. По достижении 11:30 начнется
процесс приготовления пищи по заданной
программе.
ÐÓÑÑÊÈÉ
17
Vt-1653.qxp 04.02.2005 10:10 Page 17
Быстрое приготовление
Следующие явления не должны Вас
Быстрый разогрев готового блюда со 100%
настораживать:
уровнем мощности (от 5 до 90 c). Для этого
а) тусклый свет духовки;
просто установите желаемое время разогрева
б) скопление пара;
блюда поворотом регулятора “Menu/Time” и
нажмите кнопку ”Start”.
Чистка
Например, Вы хотите подогреть блюдо за 2
• Отключите печь от сети.
минуты, для этого:
• Протрите внутренние поверхности мягким
1. Поворотом регулятора “Menu/Time”
очищающим средством, сполосните и
установите время ”2:00 ”.
вытрите досуха мягкой тканью.
2. Нажмите кнопку ”Start”.
• Вымойте вращающийся стеклянный поднос
и роликовое кольцо в мыльной воде, затем
Установка таймера
сполосните и высушите.
Допустим, Вы хотите установить таймер на 3
• Аккуратно протрите дверцу и замки влажной
минуты. Для этого:
тканью.
1. Нажмите кнопку ”Pause/Clear”.
2. Нажмите кнопку ”Power” шесть раз.
Спецификация
3. Вращайте регулятор “Menu/Time” до тех
Напряжение питания: 220-230 В~ 50 Гц,
пор, пока на дисплее не появится ”3:00”.
Потребляемая мощность: 1400 Вт
4. Нажмите кнопку ”Start”.
Мощность гриля: 1000 Вт
Мощность СВЧ: 900 Вт
Емкость для приготовления пищи
Частота: 2450 МГц
В комплект печи входит емкость с
Объем: 23 литра
антипригарным покрытием (10) для
Стеклянный поворотный стол: диаметр 314 мм
приготовления или разогрева пищи.
Вес печи: 16,5 кг.
Используйте для приготовления или разогрева
пищи режим гриля, установив необходимое
Производитель оставляет за собой право
время.
изменять характеристики приборов без
предварительного уведомления.
Замок от детей
Чтобы предотвратить использование печи
Срок службы прибора не менее 5-ти лет
детьми, Вы можете установить режим
блокировки. Для этого нажмите и удерживайте
Данное изделие
кнопку ”Pause/Clear” приблизительно 3 секунды,
соответствует всем
пока на дисплее не появится индикатор
требуемым европейским
блокировки печи и прозвучит сигнал.
и российским
Чтобы отменить блокировку, снова нажмите и
стандартам
удерживайте кнопку ”Pause/Clear”
безопасности и гигиены.
приблизительно 3 секунды, пока на дисплее не
погаснет индикатор блокировки печи и
прозвучит сигнал.
Производитель: АН-ДЕР ПРОДАКТС ГмбХ,
Австрия
Неисправности и их устранение
Йеневайнгассе, 10/10, 1210, Вена, Австрия
Возможная
Проблема
Устранение
причина
Печь не
Прибор не
Включите еще
включается
включен в сеть
раз
Обратитесь к
Перебои в сети
электрику
Печь не
Плохо закрыта
Плотно
нагревается
дверь печи
закройте дверь
печи
Грязные
Стеклянный
роликовое
Вымойте эти
поднос
кольцо и дно
части
создает шум
печи

FRANÇAIS
18
Vt-1653.qxp 04.02.2005 10:10 Page 18
FOUR À MICROONDES
Pressez la touche ”Clock/Preset” pour régler
le temps du début de cuisson selon le
Désignation des éléments
programme choisi.
1. Verrous de sécurité
2. Hublot d’observation
8. Start
3. Orifices de ventilation
Pressez la touche ”Start” pour activer le régime
4. Axe
préprogrammé.
5. Anneau à rouleaux
6. Plateau tournant en verre
9. Pause/Cancel
7. Panneau de commande
a) Pressez la touche ”Pause/CLear”avant de
8. Gril
commencer la programmation pour annuler
9. Grille pour le gril
les réglages précédentes.
10. Bol pour la cuisson des aliments
b) Pressez la touche ”Pause/CLear”une fois pour
arrêter temporairement le programme et deux
Panneau de commande
fois pour terminer le cuisson.
1. Écran de visualisation
c) La même touche est utilisée pour activer le
L’écran indique la durée de cuisson, le niveau de
verrouillage.
puissance, les témoins de fonctionnement et le
temps actuel.
PRÉCAUTIONS À SUIVRE POUR ÉVITER
L’EXPOSITION AU RAYONNEMENT MICRO
2. Puissance
ONDES
Sélectionnez le niveau de puissance désiré, en
1. N’essayez pas d’utiliser le four à microondes
pressant la touche “Micro Power” le nombre
avec la porte ouverte, puisque vous risquez de
nécessaire de fois.
s’exposer à l’influence nocive du rayonnement
microondes. Il est très important de garder
3. Menu automatique
en bon état le verrous de sécurités de la porte.
Pressez cette touche pour activer le régime du
2. Il est extrêmement important que la porte soit
menu automatique.
solidement fermée. Ne placez pas d’objets
étrangers entre la porte et le corps de
4. Gril/régime combiné
l’appareil et veillez à ce que la boue ou les
Vous pouvez activer le régime “Gril”, régime
restes des détergents ne s’accumulent pas
combiné 1 ou 2, en pressant la touche
sur les assises isolantes.
”Grill/Comb.” le nombre nécessaire de fois selon
3. N’utilisez pas le four endommagé, veillez
le programme de cuisson choisi.
surtout à ce que:
a. la porte ne doit pas être courbée;
5. Temps/menu
b. les crochets et le linguet ne soient pas
Tournez le régulateur:
endommagés ou desserrés ;
pour régler le temps réel;
c. le revêtement isolateur de la porte ne soit pas
pour choisir le point du menu automatique y
endommagé.
compris la décongélation;
4. Les travaux de réparation et de réglage du
pour régler la durée de cuisson.
four doivent être effectués par un spécialiste
qualifié.
6. Régulateur du poids
Après la sélection du régime du menu
AVANT DE S’ADRESSER AU CENTRE DE
automatique, introduisez le poids approximatif du
SERVICE
produit. Pour cela pressez la touche “Weight Adj”
1. Vérifiez que le four est correctement connecté
et en tournant le régulateur “Menu/Time”
au secteur. Si le problème est là, déconnectez
introduisez le poids approximatif du produit. Le
l’appareil du secteur, patientez 10 secondes
four choisira la durée et la puissance optimales
et reconnectez le four au secteur.
pour la cuisson du produit concret.
2. Vérifiez si l’alimentation est fournie à
l’appareil.
7. Temps actuel /réglage du temps du début
3. Assurezvous que le panneau de commande
de cuisson
est bien programmé et que la minuterie est
Pour régler le temps réel Pressez la touche
programmée, elle aussi.
”Clock/Preset”Î et introduisez le temps à
4. Vérifiez si la porte du four est bien fermée.
l’aide du régulateur “Menu/Time”.

FRANÇAIS
19
Vt-1653.qxp 04.02.2005 10:10 Page 19
INSTALLATION
d) branchez le four à microondes dans une
1. Assurezvous que tout le matériel d’emballage
autre prise de courant pour exclure la
est sorti du four à microondes.
possibilité d’interférence des appareils.
2. Contrôlez régulièrement l’état du four.
N’utilisez pas le four en cas
CONSIGNES DE SECURITÉ POUR LA CUISSON
d’endommagement du verrou, de la porte ou
DE LA NOURITURE DANS LE FOUR À MICRO
des endommagements à l’intérieur du four. Si
ONDES
vous avez découvert de pareils défauts,
En utilisant des appareils électroménagers suivez
adressezvous au centre de service agréé.
strictement de suivantes consignes.
3. Installez le four sur une surface plane et
AVERTISSEMENT: Pour diminuer le risque du
stable.
choc électrique, incendie, brûlure, ou exposition
4. N’installez pas le four à proximité des sources
au rayonnement microondes:
de la haute température ni dans les endroits
1. Veillez lire attentivement le mode d’emploi
de l’humidité élevée.
avant l’utilisation de l’appareil.
5. Assurer la ventilation du four en installant
2. N’utilisez le four à microondes qu’à sa
l’appareil de la manière à laisser de l’espace
destination. Ne placez pas d’agents chimiques
libre de: 20 cm audessus, 10 cm en arrière et
à l’intérieur du four. Le four à microondes est
5 cm aux côtés.
destiné uniquement à la cuisson et
6. N’utilisez pas le four sans le plateau en verre.
préparation de la nourriture et non pas à
Faites attention à installer correctement le
l’utilisation industrielle ou laboratoire.
plateau et autres accessoires.
3. Ne branchez pas le four vide. Ça peut
7. Placez le plateau tournant dans le four en
endommager l’appareil.
faisant coïncider les rainures de l’axe avec les
4. N’utilisez pas l’appareil avec le cordon ou la
saillies du plateau. Assurezvous que le
fiche d’alimentation endommagé.
plateau est bien installé sur l’anneau à
5. Soyez particulièrement attentif si l’appareil est
rouleaux et que l’anneau se trouve à l’intérieur
utilisé par les enfants.
de cercle central du fond de four.
6. Pour diminuer le risque d’inflammation à
l’intérieur du four suivez les suivantes
CONSIGNES SUR LA MISE À LA TERRE
consignes :
Cet appareil doit être mis à la terre. En cas du
a) Ne grillez pas trop la nourriture. Surveillez
courtcircuit la mise à la terre diminue le risque du
attentivement le fonctionnement de l’appareil
choc électrique, puisque le courant sera canalisé
en cas d’utilisation de la vaisselle en papier.
par le fil de la mise à la terre. L’appareil est doté
b) Enlevez le fil utilisé pour la fermeture des sacs
du cordon d’alimentation et la fiche d’alimentation
en papier ou en plastique avant de les placer
avec la mise à la terre incorporée. La prise de
dans le four.
courant à laquelle vous connectez l’appareil doit
c) En cas d’inflammation des aliments dans le
aussi être dotée de la mise à la terre incorporée.
four n’ouvrez pas la porte. Débranchez le four
AVERTISSEMENT: L’utilisation incorrecte de la
et déconnectezle du secteur.
fiche d’alimentation avec la mise à la terre
d) Ne gardez pas des aliments à l’intérieur du
incorporée augmente le risque du choc
four à microondes.
électrique.
7. Les liquides et autre nourriture à chauffer
doivent être dans des récipients bien fermés.
Si vous n’avez pas bien compris les consignes sur
8. Les ustensiles de cuisine peuvent se chauffer
la mise à la terre ou si vous n’êtes pas sur que
fortement à l’intérieur du four à microondes.
votre prise de courant soit équipée de la mise à la
Utilisez les gants de cuisine pour sortir les
terre, adressezvous à un spécialiste qualifié.
récipients de l’appareil. Pendant le chauffage
des boissons la surface du récipient se
Perturbations radioélectriques
chauffe. Sortez les récipients avec
1. L’exploitation du four à microondes peut
précautions pour éviter des brûlures.
brouiller le fonctionnement des postes radio,
9. Ne grillez pas des aliments dans le four à
de télévision et d’autres appareils.
microondes.
2. Neutralisation du brouillage:
10. Ne préparez pas des oeufs dans la coquille. Si
a) fermez solidement la porte du four à micro
vous préparer d’autres aliments avec des
ondes;
pellicules, par exemple saucisses, jaunes
b) changez l’emplacement de l’antenne
d’œuf, foi de poulet, tomates et pommes de
réceptrice du poste radio ou TV;
terre, percezles avec une fourchette.
c) changez la position du four par rapport de ces
11. Utilisez des ustensiles conçus pour l’utilisation
appareils;
dans le four à microondes.
FRANÇAIS
20
Vt-1653.qxp 04.02.2005 10:10 Page 20
Teste: pour tester si l’ustensile est utilisable dans
Si vous voulez consulter le temps actuel pendant
le four placezle dans le four, sélectionnez la plus
le fonctionnement du four, pressez la touche
haute puissance de chauffage et ajustez la
”Clock/Preset”, et pendant 5 secondes le temps
minuterie à 60 secondes. Si au bout de 60
actuel s’affiche à l’écran.
secondes l’ustensile est fortement chauffé ne
l’utilisez pas.
Cuisson à microondes
Pour la cuisson à microondes pressez la touche
Ustensile pour le four à microondes
”Power” le nombre nécessaire de fois pour choisir
Vous pouvez utiliser dans le four à microondes
le niveau de puissance. En tournant le régulateur
toute sorte d’ustensile en verre, vitrocéramique,
“Menu/Time” programmez la durée de cuisson.
porcelaine et argile sans inclusions métalliques.
Ce modèle de four est doté d’une minuterie de
Les microondes sont reflétées par les surfaces
90minutes avec le déclenchement automatique
métalliques et n’atteignent pas les aliments.
et un avertisseur sonore.
Verre, porcelaine, carton et céramique assurent la
Le tableau vous aidera à choisir le niveau de
pénétration rapide des ondes
puissance:
électromagnétiques.
Par exemple vous voulez cuisiner un plat pendant
En utilisant des ustensiles en plastique n’oubliez
une minute avec 80% de puissance.
pas que certains plastiques ne sont pas
1. Pressez la touche ”Power” deux fois.
thermorésistants et peuvent se déformer dans le
2. En tournant le régulateur “Menu/Time”
four.
programmez le temps ”1:00”.
3. Pressez la touche ”Start”.
Le tableau cidessous vous aidera à choisir des
Gril
ustensiles:
Gril est utilisé pour bien griller jusqu’à l’état
croustillant et doré des morceaux de viande,
Régime
Ustensile de
Cuisson
poisson, poulet, pommes de terre, saucisses et
ordinaire
Gril
cuisine
combiné
des sandwichs chauds. Durée maximale de
du four
cuisson au régime “Gril” 90 min.
en verre
oui oui oui
Par exemple vous voulez programmer le gril pour
ignifuge
12 minutes. Pour cela:
en verre non non non
1. Pressez la touche ”Grill/Combi” une fois.
en céramique
oui oui oui
2. En tournant le régulateur “Menu/Time”
ignifuge
programmez le temps “12:00”.
en plastique
3. Pressez la touche ”Start”.
pour les fours
oui non non
à micro
Cuisson combinée
ondes
Réunit la cuisson à microondes et le gril pour
papier de
oui non non
recevoir le meilleur résultat. Ce régime est utilisé
cuisine
pour la cuisson des plats comme lasagne,
métallique oui oui non
vareniks, légumes cuits.
2 combinaisons sont possibles:
Exploitation du four
combinaison C1 (30% microondes. + 70%
La pression des touches sur le panneau de
gril) il est recommandé d’utiliser ce régime
commande est suivie d’un signal sonore.
pour préparer le poisson et les pommes de
terre.
Réglage du temps actuel
Par exemple pour activer le régime combiné 1
Après le branchement de l’appareil au secteur
pour 25 minutes
l’écran affichera “12:00”.
1. Pressez la touche ”Grill/Combi” deux fois.
Par exemple il est 8:30. Pour programmer:
2. En tournant le régulateur “Menu/Time”
1. Pressez la touche ”Clock/Preset”.
programmez le temps “25:00”.
2. Pressez la touche ”Pause/Clear”.
3. Pressez la touche ”Start”.
3. Tournez le régulateur“Menu/Time” jusqu’à
combinaison C2 (55% microondes. + 45%
l’apparition du chiffre ”8”.
gril) ce régime est conseillé pour la cuisson
4. Pressez la touche ”Clock/Preset”encore une
des puddings, omelettes, pommes de terre
fois.
cuits et de volaille.
5. Tournez le régulateur“Menu/Time” jusqu’à
Par exemple pour activer le régime combiné 2
l’apparition du chiffre ”30”.
pour 12 minutes :
6. Pressez la touche ”Clock/Preset”pour
1. Pressez la touche ”Grill/Combi” trois fois.
terminer la réglage du temps.


