Vitek VT-4060 SR: BATTERIES Connection Stereo Audio Coaxial Digital Audio Speaker Output
BATTERIES Connection Stereo Audio Coaxial Digital Audio Speaker Output: Vitek VT-4060 SR
Table of contents
- DVD 5.1 HOME THEATRE SYSTEM IMPORTANT NOTICES:
- ABOUT YOUR DVD PLAYER BEST LOCATION TO OBTAIN A CLEAR PICTURE PLAYABLE DISCS DIGITAL AUDIO OUTPUT ANALOG AUDIO OUTPUT LASERHEAD OVERCURRENT PROTECTION SYSTEM DISCS USE OF DISC Handling Cleaning
- Storing Handing and Caring for Discs Step: FRONT PANEL REAR PANEL Remote control OPERATING THE REMOTE CONTROL Battery installation: Using the Remote Control
- BATTERIES Connection Stereo Audio Coaxial Digital Audio Speaker Output
- SPEAKERS Composite Video SVideo ARRANGEMENT OF SPEAKERS Component Video (YUV) VGA SCART CONNECTING SPEAKERS
- ANGLE MARK: OSD LANG: CLOSED CAPTIONS: SCREEN SAVER: LAST MEMORY: CONNECTING ANTENNA AUDIO SETUP PAGE ANALOG AUDIO SETUP: DOWNMIX: LT/RT: MENU OPERATION: STEREO: 3D SURROUND: OFF: GENERAL SETUP PAGE FRONT, CENTER, REAR and SUBWOOFER SPEAKER: (No this DIALOG:
- DIGITAL AUDIO SETUP PAGE 3D PROCESSING: DIGITAL OUTPUT: SPDIF OFF: HDCD SETUP: ALL: KARAOKE PCM ONLY: LPCM OUT: DOLBY DIGITAL SETUP VIDEO SETUP PAGE DUAL MONO: DYNAMIC: COMPONENT V IDEO: CHANNEL DELAY PAGE: EQUALIZER: COLOR SETTING SETUP:
- PREFERENCES PLAYING THE RADIO AUDIO, SUBTITLE and DISC MENU LANGUAGE PAGE: PARENTAL: BASIC DVD OPERATION PASSWORD PAGE:
- PREV/NEXT playback MENU: MENU/PBC FUNCTIONS LOCATING A TITLE
- JPEG FILES
- Troubleshooting Symptom Cause Solution Specification DVD receiver
ENGLISH
2. When other remote controls are used nearby or when the remote is
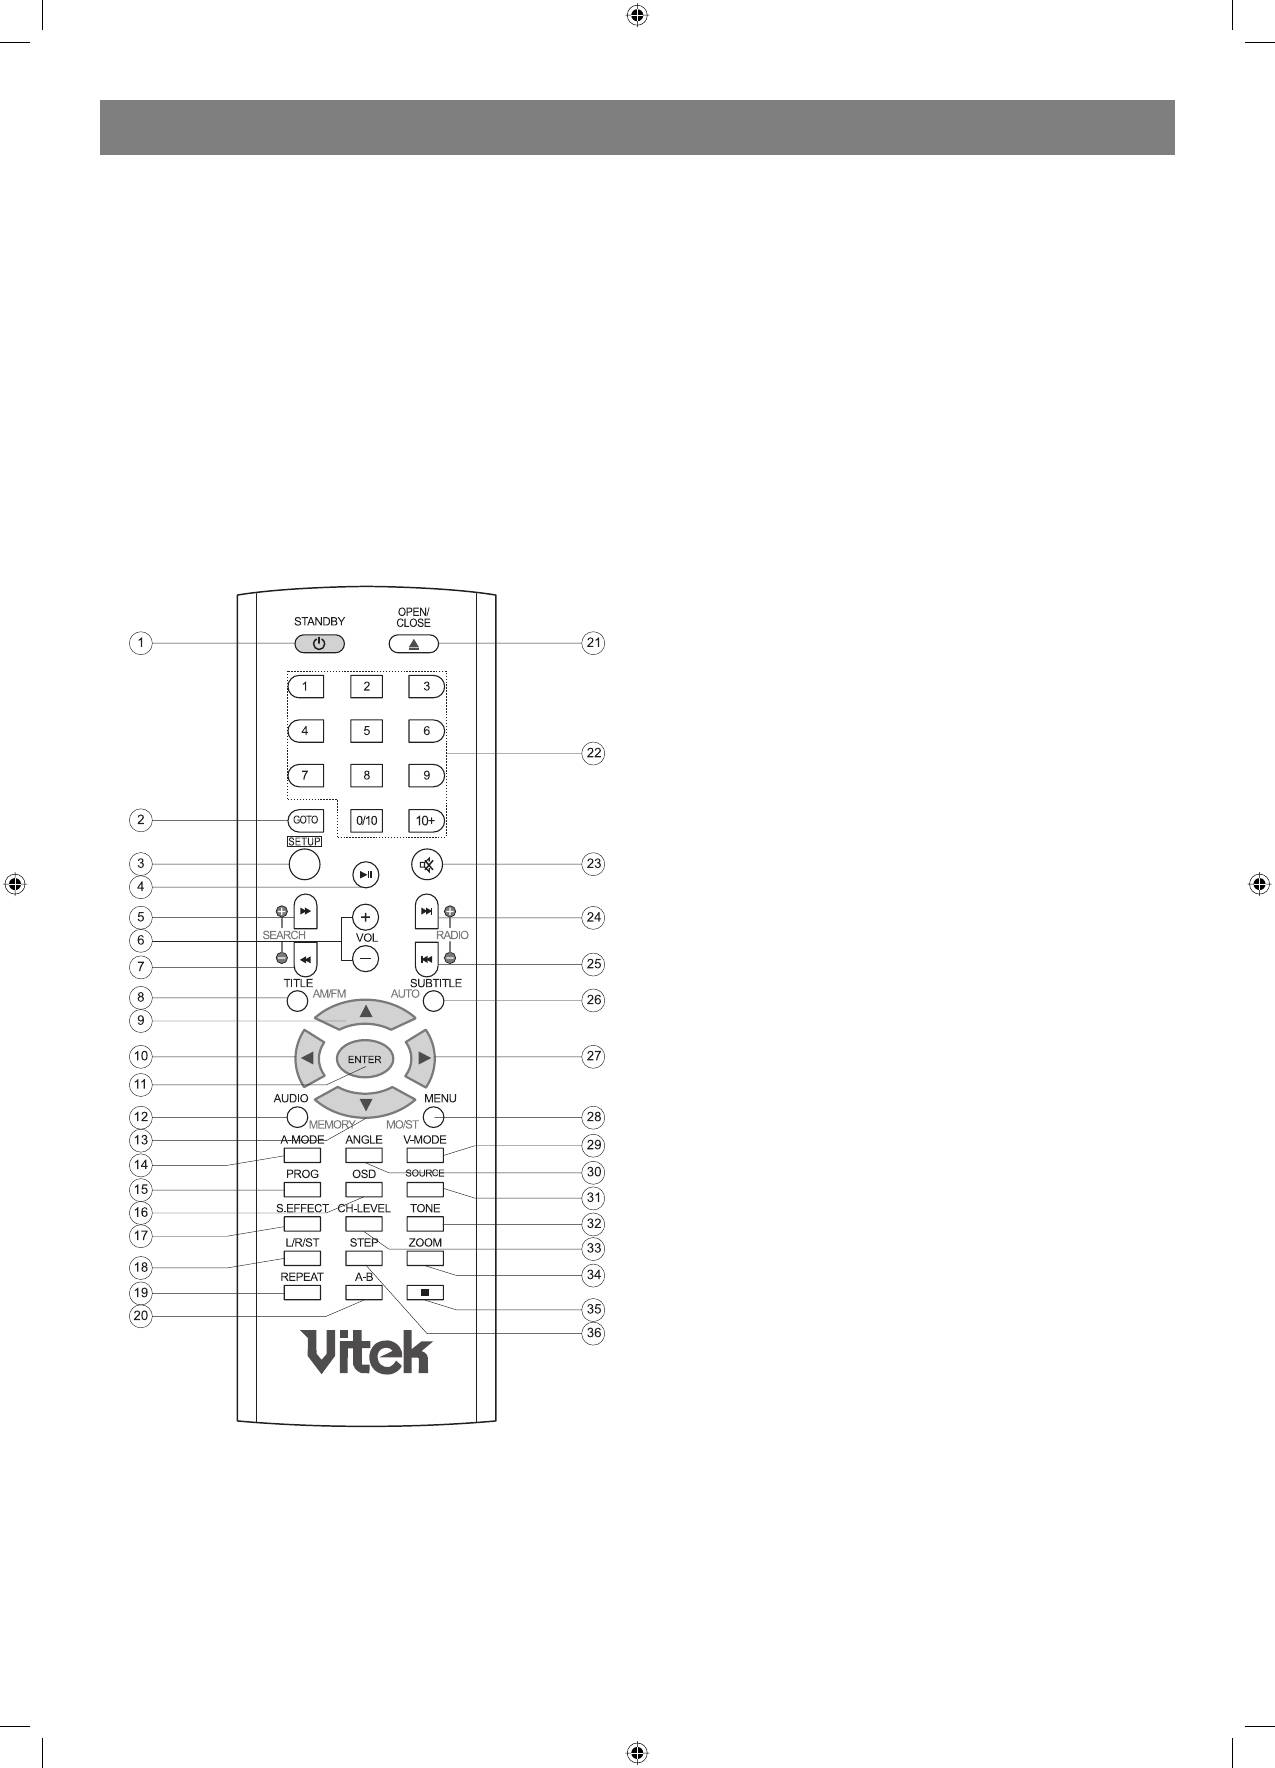
1. STANDBY
used near equipment using infrared rays, interference may occur.
2. GOTO
3. Placing an object on the remote control may cause it to inadvertently
3. SETUP
depress a button, changing a function and shortening battery life.
4. PLAY/PAUSE
4. Make sure there is no barrier between the remote control and
5. FAST FORWARD
remote sensor, as it could prevent the unit from receiving the signal.
6. VOLUME +/
5. Do not spill water or put wet items on the remote control.
7. FAST BACKWARD
6. Never disassemble remote control.
8. TITLE
9. UP
BATTERIES
10. LEFT
INCORRECT USE OF BATTERIES MAY CAUSE THEM TO LEAK,
11. ENTER
CORRODE OR EXPLODE.
12. AUDIO
13. DOWN
14. AMODE
15. PROG
16. OSD
17. S.EFFECT
18. L/R/ST
19. REPEAT
20. AB REPEAT
21. OPEN/CLOSE
22. NUMBER KEY
23. MUTE
24. NEXT
25. PREVIOUS
26. SUBTITLE
27. RIGHT
28. MENU
29. VMODE
30. ANGLE
31. SOURCE
32. TONE
33. CHLEVEL
34. ZOOM
35. STOP
36. STEP
Connection
Connection terminals for this DVD receiver are found on the rear panel.
Read carefully and follow the manufacture instructions of any video and
audio device being connected to this unit.
• Not connect the power until all connections have been properly
completed.
• Red terminal (marked R) is for connecting the right channel. The
white terminal (marked L) is for connecting the left channel. The
yellow terminal is for video connection. Make sure all connections
are securely made. Improper connections may cause noise, poor
performance, or cause damage to the equipment. An not tie the AV
cord with any other cords, such as the power cord or speaker wires,
as it may result in poor picture and/or sound quality.
Stereo Audio
• Use a pair of cable (red for right /white for left) to connect the stereo
audio output terminal of this unit to the other stereo audio input
terminal.
Coaxial Digital Audio
• Use the coaxial cable to connect the coaxial output terminal of this
unit to the coaxial input terminal of power amplifier.
Speaker Output
• Use the speaker cable to connect the speaker output of this unit to
the speakers' corresponding terminals.
Note: The physical connection should come with audio output setup of
this unit. Please refer to Audio Setup in System Setup.
5
4060.indd 54060.indd 5 23.10.2006 9:25:1223.10.2006 9:25:12


