Zelmer BM1000: ●
●: Zelmer BM1000

138
EN
Dear Customers
●
Do not unplug by pulling on cord.
●
The cord cannot hang over the edge of the table or
Congratulations on your choice of our appliance, and
counter and cannot touch hot surfaces.
welcome among the users of Zelmer products.
●
Do not operate the appliance if it has a damaged cord or
In order to achieve best possible results we recommend
if the housing is visibly damaged.
using exclusively original Zelmer accessories. They have
If the non-detachable part of the cord is damaged,
been specially designed for this product.
it should be replaced by the producer or at a proper
Please read these instructions carefully. Pay special attention
service point or by a qualied person in order to avoid
to important safety instructions to avoid accidents and/or
any hazards.
damage to the appliance. Keep this User’s Guide for future
The appliance can only be repaired by qualied service
reference.
personnel. Improper servicing may cause a serious
hazard to the user. In case of defects please contact
Important safety instructions
a qualied service center.
●
Do not touch hot surfaces of the appliance. Use pot
●
Read the entire instruction manual before operating the
holders. The appliance is very hot after the end of the
appliance.
baking process.
●
The appliance is intended for household use only. The
●
Allow the appliance to cool before dismantling and
warranty conditions change if the appliance is used in
cleaning. The appliance has a heat-insulated cool touch
gastronomic business.
housing. The metal parts become hot during use.
●
Plug the appliance only to a grounded electrical outlet
●
Do not wash under running water. Do not immerse the
with the voltage corresponding to the voltage indicated
appliance and the cord into water.
on the rating plate.
Do not use abrasive detergents such as emulsions,
●
Always place the appliance on a at, even surface so it
●
cream cleaners, polishes, etc. to clean the housing. They
does not fall during the kneading process of thick dough.
may remove the graphic information symbols such as:
It is especially important while using the programmed
scales, marks, warning signs etc.
functions and when the appliance is left unattended. In
case of extremely smooth surfaces, place the appliance
●
Do not wash metal parts in the dishwasher. Aggressive
on a thin rubber pad.
detergents used in the dishwasher cause these parts
to darken. Wash them manually using traditional
●
The appliance must be placed at a distance of at least 10
dishwashing liquids.
cm from other objects during operation.
●
The use of accessories not recommended by the
●
Never place the appliance near a gas or electric cooker
manufacturer may cause damage to the appliance.
or hot oven.
●
This appliance can be used by children aged from
●
Pay special attention while handling the appliance,
8 years and above and persons with reduced physical,
especially if it is full of hot substances.
sensory or mental capabilities or lack of experience
●
Never remove the baking tin while the appliance is
and knowledge if they have been given supervision or
working.
instruction concerning use of the appliance in a safe way
●
Do not ll the baking tin with an amount of ingredients
and understand the hazards involved. Children shall not
greater than the required by the recipe! Otherwise the
play with the appliance. Cleaning and user maintenance
bread will not bake evenly or the dough will overow.
shall not be made by children unless they are aged from
Follow the instructions carefully.
8 years and above and supervised.
●
Metal foils or other materials must not be put inside the
●
The appliance is not intended to be operated by means
appliance as these may cause a re or a short circuit!
of an external timer or separate remote-control system.
●
Never cover the appliance with towels or other materials
Make sure that the above instructions have been
during use. The heat and steam must be free to escape.
understood.
Danger of re arises if the appliance is covered with
ammable materials or comes in contact with curtains,
etc.
Technical parameters
●
Before trying to bake a given type of bread overnight, rst
try the recipe while keeping an eye on the appliance to
The technical parameters are indicated on the rating label.
make sure that the doses of ingredients are correct, the
The bread baking machine is a I class appliance equipped
dough is not too thick or thin, its quantity is appropriate
with a cord having a grounding wire with a grounding plug.
and the dough does not overow.
The appliance meets the requirements of the applicable
●
norms.
The appliance is in conformity with the requirements of the
directives:
●
Unplug the appliance when not in use and before
Low voltage appliance (LVD) – 2006/95/EC. –
cleaning.
Electromagnetic compatibility (EMC) – 2004/108/EC. –
●
Switch off the appliance before handling movable parts.
The appliance was marked by a CE sign on the rating label.
GW43-013_v02

139
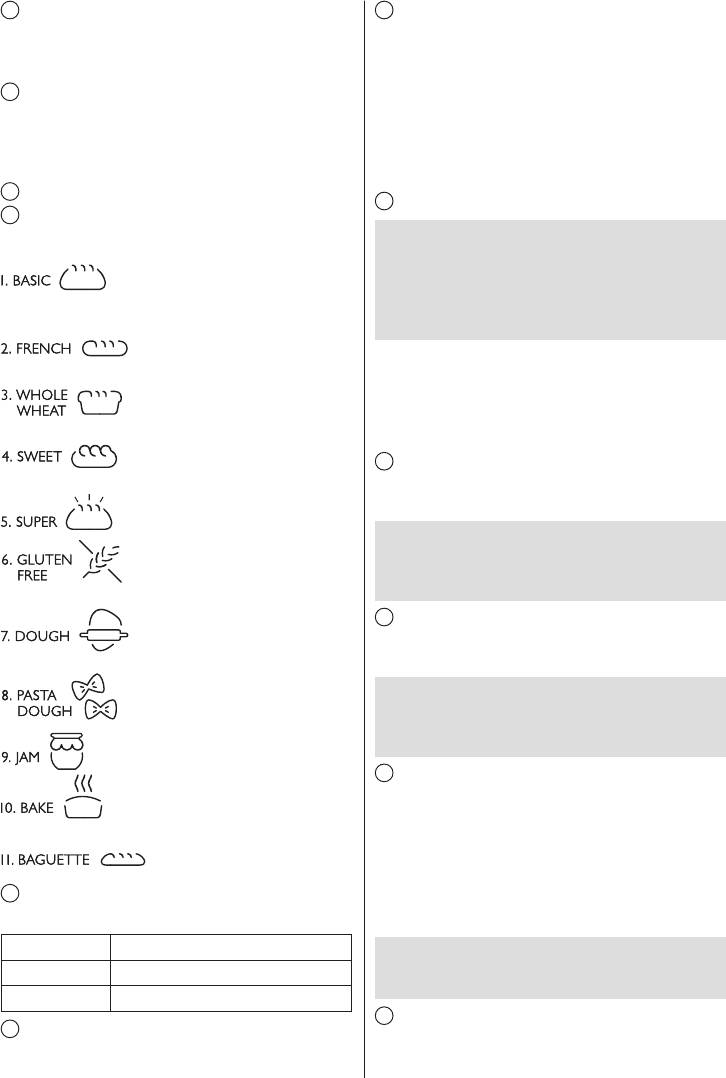
Appliance features (Fig. A)
CAUTION! After pressing the START/STOP button you
can turn off the sound. In order to do this press and
hold both of the TIMER buttons for approx. 2 seconds.
If you press and hold both of the TIMER buttons for
1
a second time, you will hear a sound signal informing
2
that sound is on again.
3
4
5
If there is a brief power cut of up to approximately 15 minutes
the program position is stored and the machine can continue
6
from this position when power is restored. This is possible
7
only if the program was stopped before the kneading phase
8
was reached. Otherwise you will have to start from the
beginning.
9
10
11
Within the cover of this device there is a dispenser of bulk
additives (4). Loose ingredients, such as fruits, nuts, raisins,
grains, may be added to baking. In order to this, you have
12
to place a given product in the dispenser before the baking
process (details provided in paragraph 4). The device
13
automatically adds products to a cake in an appropriate
14
moment during cake mixing and kneading.
Additional ingredients may also be added to sprinkle the
upper part of the cake. It is best to place these ingredients
15
into the dispenser for loose ingredients ca. 30 minutes
After connecting the bread maker to power, the display
before the end of the baking process. Adding the additional
shows a symbol “1 3:25”. The number “1” indicates the
ingredients shall be indicated by a sound signal. Programs in
selected program, the symbol “3:25” indicates the duration
which this feature is used, are described in tables referring to
of the selected program. The position of the two markings
phases of device operation.
indicates the selected browning level and the weight. The
default setting after switching the appliance on is “superior
weight” (1000 g) and “medium browning level” (MEDIUM).
If the temperature of the appliance is still too high to start
Information concerning the baking process will be shown on
a new program after using the appliance previously, the
the display while the appliance is operating. The time shown
symbol E 01 will appear on the display after you press the
on the display will gradually decrease. Other information
START button again, you will also hear a beep. In such
concerning the timer, preheating, kneading, pause, dough
a case, press and hold the START/STOP button until the
rising, baking, the keep warm function and the end of the
E 01 symbol disappears from the display and the basic
program will also appear on the display.
setting appears on the display. Remove the baking tin and
wait for the appliance to cool.
16
– starts and stops the program.
17
– sets the clock.
CAUTION! The BAKE program can be started
immediately even if the appliance is still hot.
18
– is used to set the desired browning
level.
19
– is used to select the program.
Operating instructions (Fig. B)
20
– setting the weight according to the
1
description below.
The baking tin is covered with a non-stick layer. Place
the baking tin exactly in the middle of the base inside the
Appliance functions
appliance. Turn gently the container clockwise until it is
blocked.
CAUTION! The handle is hot after baking. Use pot
The buzzer goes off:
holders.
●
When pressing the program buttons.
●
During operation a sound signal will come off informing
2
and reminding the user to add nuts, sunower seeds,
Insert the kneading peg by placing the shank of the baking
raisins etc.
tin in the opening of the kneading peg.
●
When the end of the program is reached.
GW43-013_v02
140
3
9
The ingredients must be put into the baking tin the order
specied in the relevant recipe. Examples of recipes can be
found in this instruction manual.
It is 8.30 p.m. and the bread must be ready for the next morning
4
by 7.00 a.m., i.e, in 10 hours and 30 minutes. Press the TIME
button until the symbol 10.30 appears on Press the program
In order to complement the dispenser, lift the lid of dispenser
selector buttons, until you see 10:30 on the LCD - it is the time
and pour the optimum amount of additives (fruit, nuts, raisins,
from now (20:30) to the moment, when the bread is ready.
beans). The quantity of additives depends on individual
When working with the timing function never use perishable
preferences. Then close the lid until you hear a click.
ingredients such as milk, eggs, fruits, yogurt, onions, etc.
5
10
6
CAUTION! After pressing the START/STOP button you
The MENU button is used to select the programs described
can turn off the sound. In order to do this press and
below.
hold both of the TIMER buttons for approx. 2 seconds.
If you press and hold both of the TIMER buttons for
For white, wheat and rye bread. This is the most commonly
a second time, you will hear a sound signal informing
used program.
that sound is on again.
The START/STOP button is also used to stop the program at
For the preparation of a particularly light white bread.
any time. In order to do so, press and hold the START/STOP
button for about 3 seconds until you hear a beep. The initial
position of the selected program will show on the display.
If you want to use a different program, select the program
For whole meal bread.
using the MENU button.
11
For preparing e.g. sweet leavened dough.
The bread baking machine mixes and kneads the dough
automatically until it reaches the right consistency.
NOTE: During the phase of stirring and kneading
of dough, the lid of the appliance should be closed.
During this phase it is possible to add small amounts
of water, liquid or other ingredients.
For making gluten free bread.
12
After the last kneading cycle the bread baking machine is
For making dough.
heated to the optimal temperature for the rising of the dough.
NOTE: During the dough growing phase close the lid
and do not open it until the end of baking bread. The
photos are only intended to present the phases of the
dough growth.
13
The bread baking machine automatically sets the baking
temperature and time. If the bread is too light at the end of
To brown bread or cakes.
program, use the BAKE program to brown the bread. In order
to do so, press and hold the START/STOP button for about
3 seconds (until you hear a beep). Then press the BAKE
button. When the desired browning level is reached, stop the
7
process by pressing and holding the START/STOP button for
is used to set the weight of the bread (see table):
about 3 seconds (until you hear a beep).
500 g = for small bread up to 500 g
NOTE: During dough baking phase lose the lid and do
not open it until the end of baking bread. The photos
750 g = for medium bread up to 750 g
are only intended to present the phase of baking.
1000 g = for large bread up to 1000 g
14
8
Once the baking process is over, the buzzer goes off to
The COLOR button is used to set the desired browning level.
signal that the bread can be taken out from the appliance.
LIGHT, MEDIUM, DARK, RAPID.
The 1 hour warming time starts immediately.
GW43-013_v02

141
15
20
After the end of operation, unplug the appliance.
The upper mould for baking should be hung on metal hooks
16
at the top of the baking chamber. Next close the lid and
follow the steps as in case of baking bread (phases 13 to 15)
17
or start the 10 BAKE program.
In order to prepare baguettes, you can also use the
NOTE: If the kneading peg remains inside the bread,
11 BAGUETTE program. This program is divided into
slightly cut the bread and remove the peg. You can
two stages. In the rst stage the dough is stirred and
also use the hook for taking out the kneading paddle.
kneaded, and then risen. In the second stage the
18
baguettes still are risen, and then nally baked until
crusty. After the rst stage the device stops, and emits
After preparing the dough using the program 7 DOUGHT, it
a sound signal informing the user to put the dough
should be put into the a mould cups for baguette baking (9)
into baguette molds. After putting the dough into the
and (10). Then, the moulds lled with the dough should be
molds (detailed description of the process can be
placed in cooking chamber instead of the container for baking.
found in paragraphs 18, 19, and 20), it is necessary
19
to resume the program by pressing the START/
After removing the container for baking, cake mould with the
STOP button. This starts the second stage. Detailed
containing dough should be pressed between the lower catches
information concerning the individual stages of the
in the baking chamber so as to rmly adhered to the catches.
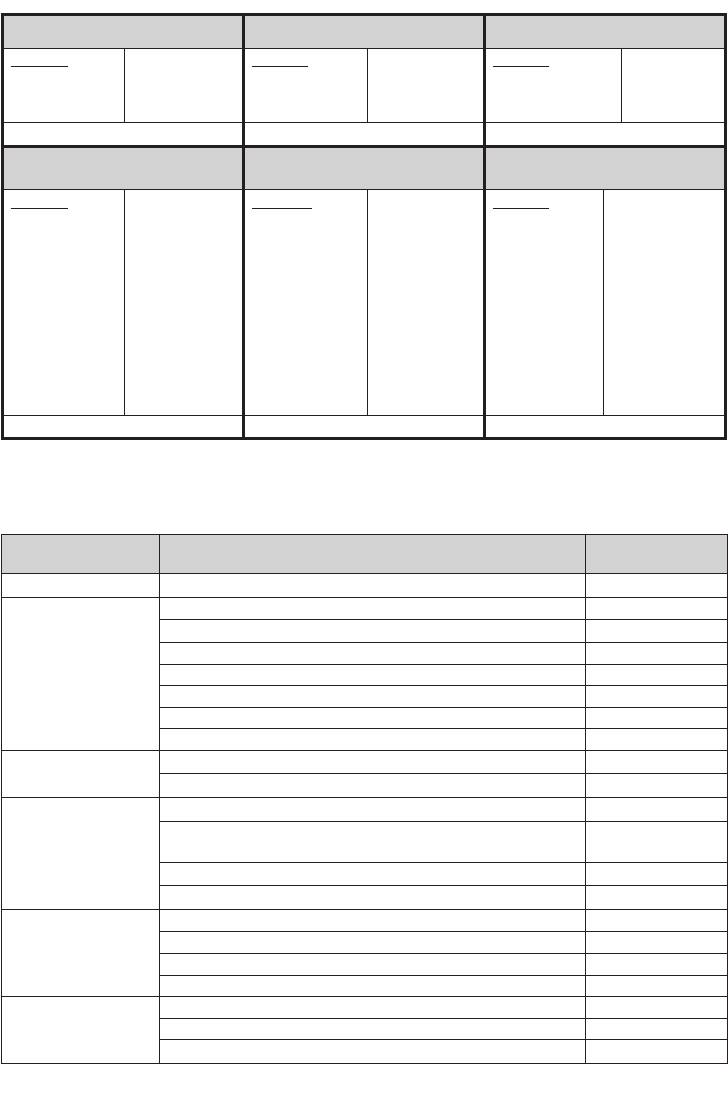
program are presented in the table entitled DEVICE
WORK STAGES.
CAUTION: When placing the molds in the bread-maker
make sure all the handles are lifted (perpendicularly
to the surface of molds). This will facilitate taking the
molds out of the device.
1
BAKING LIGHT MEDIUM DARK RAPID
LOAF 500 g 750 g 1000 g 500 g 750 g 1000 g 500 g 750 g 1000 g 500 g 750 g 1000 g
DELAY TIME 15:00 15:00 15:00 15:00 15:00 15:00 15:00 15:00 15:00 15:00 15:00 15:00
PREHEAT
KNEAD 1 5 m 5 m 5 m 5 m 5 m 5 m 5 m 5 m 5 m 5 m 5 m 5 m
REST 5 m 5 m 5 m 5 m 5 m 5 m 5 m 5 m 5 m 5 m 5 m 5 m
KNEAD 2 20 m 20 m 20 m 20 m 20 m 20 m 20 m 20 m 20 m 20 m 20 m 20 m
RISE 1 40 m 40 m 40 m 40 m 40 m 40 m 40 m 40 m 40 m 15 m 15 m 15 m
KNEAD 3 10 s 10 s 10 s 10 s 10 s 10 s 10 s 10 s 10 s 10 s 10 s 10 s
RISE 2 25 m 25 m 25 m 25 m 25 m 25 m 25 m 25 m 25 m 9 m 9 m 9 m
KNEAD 4 10 s 10 s 10 s 10 s 10 s 10 s 10 s 10 s 10 s 10 s 10 s 10 s
RISE 3 50 m 50 m 50 m 50 m 50 m 50 m 50 m 50 m 50 m 30 m 30 m 30 m
BAKE 46 m 51m 58 m 48 m 53 m 60 m 53 m 58 m 65 m 48 m 53 m 60 m
WARM 1 h 1 h 1 h 1 h 1 h 1 h 1 h 1 h 1 h 1 h 1 h 1 h
TOTAL TIME
GW43-013_v02

142
BAKING LIGHT MEDIUM DARK RAPID
LOAF 500 g 750 g 1000 g 500 g 750 g 1000 g 500 g 750 g 1000 g 500 g 750 g 1000 g
DELAY TIME 15:00 15:00 15:00 15:00 15:00 15:00 15:00 15:00 15:00 15:00 15:00 15:00
PREHEAT
KNEAD 1 5 m 5 m 5 m 5 m 5 m 5 m 5 m 5 m 5 m 5 m 5 m 5 m
REST 5 m 5 m 5 m 5 m 5 m 5 m 5 m 5 m 5 m 5 m 5 m 5 m
KNEAD 2 20 m 20 m 20 m 20 m 20 m 20 m 20 m 20 m 20 m 20 m 20 m 20 m
RISE 1 39 m 39 m 39 m 39 m 39 m 39 m 39 m 39 m 39 m 15 m 15 m 15 m
KNEAD 3 10 s 10 s 10 s 10 s 10 s 10 s 10 s 10 s 10 s 10 s 10 s 10 s
RISE 2 31 m 31 m 31 m 31 m 31 m 31 m 31 m 31 m 31 m 15 m 15 m 15 m
KNEAD 4 10 s 10 s 10 s 10 s 10 s 10 s 10 s 10 s 10 s 5 s 5 s 5 s
RISE 3 60 m 60 m 60 m 60 m 60 m 60 m 60 m 60 m 60 m 30 m 30 m 30 m
BAKE 48 m 50 m 53 m 50 m 52 m 55 m 55 m 57 m 60 m 50 m 52 m 55 m
WARM 1 h 1 h 1 h 1 h 1 h 1 h 1 h 1 h 1 h 1 h 1 h 1 h
TOTAL TIME
3
BAKING LIGHT MEDIUM DARK RAPID
LOAF 500 g 750 g 1000 g 500 g 750 g 1000 g 500 g 750 g 1000 g 500 g 750 g 1000 g
DELAY TIME 15:00 15:00 15:00 15:00 15:00 15:00 15:00 15:00 15:00 15:00 15:00 15:00
PREHEAT 30 m 30 m 30 m 30 m 30 m 30 m 30 m 30 m 30 m 5 m 5 m 5 m
KNEAD 1 5 m 5 m 5 m 5 m 5 m 5 m 5 m 5 m 5 m 5 m 5 m 5 m
REST 5 m 5 m 5 m 5 m 5 m 5 m 5 m 5 m 5 m 5 m 5 m 5 m
KNEAD 2 15 m 15 m 15 m 15 m 15 m 15 m 15 m 15 m 15 m 15 m 15 m 15 m
RISE 1 49 m 49 m 49 m 49 m 49 m 49 m 49 m 49 m 49 m 24 m 24 m 24 m
KNEAD 3 10 s 10 s 10 s 10 s 10 s 10 s 10 s 10 s 10 s 10 s 10 s 10 s
RISE 2 26 m 26 m 26 m 26 m 26 m 26 m 26 m 26 m 26 m 11 m 11 m 11 m
KNEAD 4 10 s 10 s 10 s 10 s 10 s 10 s 10 s 10 s 10 s 10 s 10 s 10 s
RISE 3 45 m 45 m 45 m 45 m 45 m 45 m 45 m 45 m 45 m 35 m 35 m 35 m
GW43-013_v02

143
3
BAKING LIGHT MEDIUM DARK RAPID
BAKE 48 m 50 m 53 m 50 m 52 m 55 m 55 m 57 m 60 m 50 m 52m 55 m
WARM 1 h 1 h 1 h 1 h 1 h 1 h 1 h 1 h 1 h 1 h 1 h 1 h
TOTAL TIME
4 9 10 11
GLUTEN
LIGHT MEDIUM DARK
LOAF 500 g 750 g 1000 g 1000 g - - - - - - - -
DELAY TIME 15:00 15:00 15:00 - - 15:00 - 15:00 - 15:00 15:00 15:00
PREHEAT 0 m
KNEAD 1 5 m 5 m 5 m 5 m 5 m 5 m 3 m 5 m 5 m 5 m 5 m
REST 5 m 5 m 5 m 0 m 5 m 0 m 0m 0 m 0m
KNEAD 2 20 m 20 m 20 m 15 m 10 m 20 m 11 m 10 m 20 m 20 m 20 m
RISE 1 39 m 39 m 39 m 12 m 0 m 60 m 0 m 55 m 55 m 55 m
KNEAD 3 10 s 10 s 10 s 0 0 s 0 s 0 s 0 s
RISE 2 26 m 26 m 26 m 0 0 0 m 0 m 0 m
KNEAD 4 5 s 5 s 5 s 0 0 s 0 s 0 s 0 s
RISE 3 52 m 52 m 52 m 60 m 0 m 0 15 m 15 m 15 m
BAKE 50 m 55 m 60 m 48 m 55 m 0 m 70 m 60-90 m 52 m 57 m 62 m
WARM 1 h 1 h 1 h 1 h 1 h - - 1 h 1 h 1h 1 h
TOTAL TIME
– Automatic dispenser for loose ingredients is available as an option.
●
Before storing or cleaning wait to cool down the bread
Cleaning and maintenance
maker. It takes about half an hour for the appliance to
Before using the device for the rst time, clean the
cool and to be ready again for baking and kneading.
●
baking container, the molds, and the stirring spatula
●
Unplug the appliance and wait until it cools down before
by means of a gentle detergent (DO NOT immerse the
cleaning. Use a mild detergent. Never use chemical
baking container in water).
cleaning agents, gasoline, oven cleaners or any
detergent that can scratch or damage the coating.
●
Before using the device for the rst time, grease the new
baking container, the molds, and the stirring spatula with
●
Remove all the ingredients and crumbs from the lid,
a heat-resistant grease, and preheat them in the oven
casing and baking compartment with a moist towel.
for ca. 10 minutes. After cooling down, remove the fat
Never immerse the appliance into water or ll the baking
from the baking tin using a paper towel. Thanks to this
compartment with water!
operation, the non-stick coating will be protected. Repeat
●
For easy cleaning the lid can be removed by positioning
this operation from time to time.
it vertically and pulling it out.
GW43-013_v02

144
●
Wipe the outside of the baking tin with a damp cloth. The
●
The baking tin has a non-stick coating. Do not use
inside of the tin can be washed with dishwashing liquid.
metal objects that could scratch the coating. The color
Do not immerse the tin into water.
of the coating will change during the course of use. This
is a normal situation. This change does not affect the
●
Clean the kneading pegs and the drive shaft immediately
after use. If the kneading pegs remain in the tin, it will
effectiveness of the coating in any way.
be difcult to remove them afterwards. In such a case ll
●
Make sure the appliance has completely cooled down
the container with warm water and leave for 30 minutes.
and is dry before storing. Store the appliance with the
Next remove the kneading pegs.
lid closed.
The ingredients stuck to the
Smoke comes out of the baking
Unplug the appliance and clean the outside of the baking tin or the
baking compartment or to the
compartment or the vents.
baking compartment.
outside of the baking tin.
The bread goes down in the
The bread was left for too long
Take the bread out off the baking tin before the end of the warming
middle and is moist on the
in the baking tin after baking
function.
bottom.
and warming.
Clean the kneading peg and shaft before the next time you bake
It is difcult to take the bread
The bottom of the total is stuck
bread. If necessary, ll the container with warm water and leave for
out of the baking tin.
to the kneading peg.
30 minutes. This way the kneading pegs can be easily removed and
cleaned.
Incorrect program setting. Check the selected menu and other settings.
The START/STOP button was
pressed while the machine was
Do not use the ingredients and start the whole process again.
working.
The lid can only be opened if the time left on the display is more than
The ingredients are not mixed
The lid opened several times
1:30 (this concerns only programs 1,2,3,4)
or the bread is not baked
while the machine was working.
Make sure the lid was closed properly.
properly.
Long blackout while the
Do not use the ingredients and start the whole process again.
machine was working.
Check if the kneading pegs are not blocked by for example grains, etc.
The rotation of the kneading
Pull out the baking tin and check if the drivers turn. If this is not the
pegs is blocked.
case, return the appliance to a service point.
Press and hold the START/STOP button until the normal program code
The appliance does not start.
The appliance is still hot after
appears on the display. Unplug the appliance. Take out the baking
The audible signal goes off. The
the previous baking process.
tin and leave to cool at room temperature. Plug in and restart the
display shows the symbol E 01.
appliance.
Start the test run. Press and hold the menu button, unplug the
appliance and then plug it in again. Release the button. The appliance
The display shows the symbol
Program or electronic error.
will perform a test run. Unplug the appliance again. The normal
“EEE”.
program code should appear on the display. If this is not the case,
return the appliance to a service point.
GW43-013_v02

145
(bread weight approx. 900 g)
(bread weight approx. 900 g)
Ingredients
Ingredients
Ready-made bread mixtures available
Water or milk
425 ml
Buttermilk
375 ml
in shops can be especially used in the
Salt
1½ teaspoon
Salt
1 teaspoon
appliance.
Sugar
1½ teaspoon
Sugar
1 teaspoon
Flour type 500
600 g
Flour type 500
500 g
Dry yeast
1 teaspoon
Dry yeast
1 teaspoon
Program: BASIC or FRENCH Program: BASIC or FRENCH
(bread weight approx. 900 g)
(bread weight approx. 900 g)
(bread weight approx. 700 g)
Ingredients
Ingredients
Ingredients
Water or milk
350 ml
Water
350 ml
Water or milk
300 ml
Margarine or butter
1 ½ tablespoon
Butter
1 tablespoon
Margarine or butter
1 ½ tablespoon
Salt
1 teaspoon
Flour type 550
540 g
Salt
1 teaspoon
Sugar
2 tablespoons
Sunower seeds
5 tablespoons
Sugar
2 ½ tablespoon
Flour type 500
540 g
Salt
1 teaspoon
Flour type 550
240 g
Dry yeast
1 teaspoon
Sugar
1 tablespoon
Whole wheat our
240 g
Raisins
100 g
Dry yeast
1 teaspoon
7-grain akes
60 g
Crushed nuts
3 tablespoons
Dry yeast
1 teaspoon
Program: BASIC
Tip: Sunower seeds can be replaced with
Program: WHOLE WHEAT
Program: BASIC
pumpkin seeds. Toast the seeds in a frying
When using whole grains, soak them rst.
pan to give them a more intense avor.
(bread weight approx. 900 g)
(bread weight approx. 900 g)
(bread weight approx. 700 g)
Ingredients
Ingredients
Ingredients
Water or milk
250 ml
Water or milk
300 ml
Water
275 ml
Margarine or butter
1 tablespoon
Margarine or butter
1½ tablespoon
Chocolate-nut
Salt
1 teaspoon
Eggs
1
spread
90 ml
Sugar
2 tablespoons
Salt
1 teaspoon
Salt
1½ teaspoons
Large, chopped onion
1
Sugar
2 teaspoons
Caster sugar
1½ teaspoons
Flour type 550
540 g
Flour type 550
360 g
Flour type 500
300 g
Dry yeast
1 teaspoon
Whole wheat our
180 g
Plain our
150 g
Dry yeast
1 teaspoon
Dry yeast
1 teaspoon
Program: WHOLEWHEAT
Program: BASIC
NOTE: While using the “DELAY TIMER”
Program: FRENCH
Bake this bread immediately.
program, add more water instead of eggs.
(bread weight approx. 900 g)
(ingredients for 3 pizzas)
Ingredients
Ingredients
Ingredients
Water
200 ml
Water
300 ml
Water
300 ml
Olive oil
1 tablespoon
Honey
1 tablespoon
Salt
¾
teaspoon
Fresh, chopped
Salt
1 teaspoon
Olive oil
1 tablespoon
rosemary
2 tablespoons
Sugar
1 teaspoon
Flour type 500
450 g
Garlic, peeled and
Flour type 550
540 g
Sugar
2 teaspoons
crushed
3 cloves
Dry yeast
1 teaspoon
Dry yeast
1 teaspoon
Flour type 500
350 g
Salt
1 teaspoon
Dry yeast
½ teaspoon
Program: DOUGH
Program: BAGUETTE
After the kneading process, spread the
After kneading split the prepared dough into
dough, form a round shape and leave to
Program: DOUGH
2-4 pieces. Form long loaves, and place
rest for 10 minutes. Spread the sauce and
them in molds. Make the diagonal incises on
add the desired lling. Bake in the oven for
the dough and place it in bread maker.
20 minutes.
GW43-013_v02
146
Ingredients
Ingredients
Ingredients
Oranges
400 g
Strawberries, washed
Fresh raspberries,
Lemons
100 g
and stalks removed
450 g
washed
450g
2:1 jellifying sugar
250 g
Jellifying sugar
450 g
Jellifying sugar
450g
Program JAM Program JAM Program JAM
(bread weight ca. 700 g)
(bread weight approx. 900 g)
Ingredients
Ingredients:
Ingredients
Fresh apricots,
Cherry juice
75 ml
Water or milk
425 ml
washed
450 g
Milk
20 ml
Salt
1½ teaspoon
Cold water
2 tablespoons
Honey
15 g
Sugar
1½ teaspoon
Jellifying sugar
450 g
Butter
15 g
Flour type 500
Gluten-free our
Grated rind and juice
from ½ lemon
Cherry yoghurt
135 g
500 g
Cherries without
Dry yeast
1 teaspoon
stones
20 g
Flour of 550 type
410 g
Dried yeast
1 tsp
Baking powder
½ tbsp
Salt
½ tsp
Sugar
1 tsp
Program JAM Program: BASIC or SWEET Program: BASIC or FRENCH
The tables include examples of recipes and approximate amounts of ingredients. These information should not be treated as a cookery book.
While baking we encourage everyone to use their own recipes or these found in specialist literature, and stick to one’s likings.
The bread rises too fast. - Too much yeast, too much our, not enough salt. a/b
- No or too little yeast. a/b
- Old or stale yeast. e
- Liquid too hot. c
The bread does not rise at all
- The yeast has come into contact with the liquid. d
or not enough.
- Wrong our type or stale our. e
- Too much or not enough liquid. a/b/g
- Not enough sugar. a/b
The dough rises too much
- If the water is too soft the yeast ferments more. f
and spills over the baking tin.
- Too much milk affects the fermentation of the yeast. c
- The dough volume is larger than the tin and the bread goes down. a/f
- The fermentation is too short or too fast due to the excessive temperature of the
The bread goes down in the
c/h/i
water or the baking chamber or due to the excessive moistness.
middle.
- No salt or not enough sugar. a/b
- Too much liquid. h
- Too much our or not enough liquid. a/b/g
Heavy, lumpy structure of
- Not enough yeast or sugar. a/b
bread.
- Too much fruit, whole meal our or another ingredient. b
- Old or stale our. e
- Too much or not enough liquid. a/b/g
The bread is not baked in
- Too much humidity. h
the center.
- Recipes with moist ingredients, e.g. yogurt. g
GW43-013_v02

147
- Too much water. g
Coarse structure or too many
- No salt. b
holes in bread.
- Great humidity, too hot water. h/i
- Too much liquid. c
- Bread volume too big for the tin. a/f
- Too much our, especially for white bread. f
Mushroom-like, unbaked
- Too much yeast or not enough salt. a/b
surface.
- Too much sugar. a/b
- Other sweet ingredients apart from sugar. b
The slices are uneven or
- The bread did not cool enough (the vapor has not escaped). j
there lumps in the middle.
Flour deposits on the bread
- The our was not worked well on the sides during kneading. g/i
crust.
phase timing function, it is advisable to use cold
a) Measure the ingredients correctly.
ingredients to avoid the yeast to start rising too soon.
b) Adjust the ingredient doses and check that all the
●
Margarine, butter and milk have an inuence on the
ingredients have been added.
avor of the bread.
c) Use another liquid or leave it to cool at room temperature.
●
Sugar can be reduced by 20% to make the crust lighter
The ingredients must added the order specied in the
and thinner without affecting the successful outcome of
relevant recipe. Make a small ditch in the middle of the
the baking. You can replace sugar with honey if you want
the crust to be softer and lighter.
our and put crumbled or dry yeast inside. Do not allow
the yeast to come into direct contact with the liquid.
●
Gluten which is produced in the our during the kneading
provides the structure of the bread. The ideal our
d) Use only fresh and properly stored ingredients.
mixture is composed of 40% whole meal our and 60%of
e) Reduce the total amount of the ingredients, do not use
white our.
more our than specied in the recipe. Reduce all the
●
If you wish to add cereals grains, leave them to soak
ingredients by ⅓.
overnight. Reduce the quantity of our and liquid (up to
f) Reduce the amount of liquid. Reduce the amount of
1/5 less).
liquid, if ingredients containing water are used.
●
It is necessary to use leaven with rye our. It contains
g) In case of very humid weather add 1-2 tablespoons of
milk and acetobacteria thanks to which the bread is
water less.
lighter and it ferments thoroughly. You can make leaven
h) In case of warm weather do not use the timing function.
by yourself, however it is time consuming. Therefore,
Use cool liquids.
concentrated leaven powder is used in the recipes
i) Take the bread out of the tin immediately after baking
below. The powder is sold in 15g packets (for 1 kg of
and leave to rest for at least 15 minutes before cutting.
our). We recommend to follow the recipes below (½, ¾
or 1 packet). The bread will crumble if you add less
j) Reduce the amount of yeast or all ingredients by ¼.
leaven than indicated in the recipe.
If leaven powder with a different concentration is used
Remarks on recipes
●
(100g packet for 1 kg of our) the quantity of our must
be reduced by 80g for 1 kg of our.
●
You can also use liquid leaven. Follow the doses
●
Since each ingredient plays a specic role for the
indicated on the package. Fill the measuring beaker with
successful baking of the bread, the correct measuring is
the liquid leaven and top it up with other liquid ingredients
just as important as the order in which the ingredients
in the right doses as specied in the recipe.
are added.
●
Wheat leaven is more often sold in the dry form.
●
The most important ingredients such as the liquid
It improves the workability of the dough, its freshness
our, salt, sugar and yeast (either dry or fresh yeast
and taste. It is also milder than rye leaven.
can be used) inuence the successful outcome of the
●
Use the NORMAL or WHOLE WHEAT program when
preparation of the dough and the bread. Always use the
baking leavened bread.
right quantities in the right proportions.
●
You can replace leaven with baking ferment. The only
●
Use lukewarm ingredients if the dough needs to be
difference is in the taste. You can use the ferment in the
prepared immediately. If you wish to set the program
bread baking machine.
GW43-013_v02

148
●
You can add wheat bran to the dough if you want the
●
Adding fruits, nuts or cereals. You can add these
bread to be lighter and richer in roughage. Add one
ingredients while using specied programs after you
tablespoon of bran for 500g of our and increase the
hear a beep. If you add these ingredients too early, they
amount of liquid by ½ tablespoon.
will be crushed during the kneading process.
●
Wheat gluten is a natural additive obtained from wheat
proteins. It makes the bread lighter, the bread also has
The above-mentioned recipes are for various bread sizes.
more volume. The bread falls more rarely and is easier to
The total weight should not exceed 1000 grams. If no specic
digest. The effect can be easily appreciated when baking
instructions concerning the weight are given, it means that
whole meal and other bakery products made of home-
both a small and a large amount of the ingredients may
milled our.
be used for the given program. In case of the super rapid
●
Black malt used is some recipes is dark-roasted barley
program the recommended weight of the loaf is about 750
malt. It is used to obtain a darker bread crust and soft
grams.
part (e.g. brown bread). You can also use rye malt, but it
is not as dark. Both products can be purchased in whole
food shops.
●
The weight of the bread is precisely indicated in the
●
Pure lecithin powder is a natural emulsier which
recipes. It is easy to see, that the weight of the pure
improves the bread volume, makes the soft part softer
weight bread is lower than the weight of whole meal
and lighter. The bread retains its freshness for longer.
bread. This is because white our rises more quickly,
therefore it is necessary to control the bread during the
baking process.
If the doses need to be increased or reduced, make sure
●
Despite the precise weight indications there may be slight
that the proportions of the original recipe are maintained.
differences. The actual weight of the bread depends
To obtain a perfect result, follow the rules on adjusting the
to a large extent on the air humidity in the room at the
amount of the ingredients below:
moment of preparation.
●
the dough should be soft (but not too
●
Breads with a large wheat content always have a large
soft) and easy to knead. The dough should not be
volume and they exceed the container edge after the
stringy. It should be possible to easily make a ball out
last rising phase even if the ingredients are precisely
of the dough. This is not the case with heavy dough like
measured. The bread does not spill over. The part of the
rye whole meal or cereal bread. Check the dough ve
bread outside the tin is more easily browned than the
minutes after the rst kneading phase. If it is too moist,
bread inside the tin.
add some our until it reaches the right consistency.
●
For the bread to be lighter, in the SUPER program
If the dough is too dry add a spoonful of water at a time
recommended for baking sweet bread, you can use
during the kneading process.
a smaller amount of ingredients than in the SWEET
●
When using ingredients containing
program.
liquid (e.g. crud cheese, yoghurt, etc.) the amount of
liquid added should be reduced. When adding eggs, beat
them in the measuring beaker and ll the beaker with
●
The result of the baking depends on the conditions
the other required liquids to control the amount. Dough
(the hardness of the water, air humidity, altitude, the
prepared in a place located at a high altitude (above
consistency of the ingredients, etc.). Therefore, the
750 meters) will rise faster. You can reduce the amount
recipe indications should serve rather as a reference
of yeast by ¼ to ½ teaspoon, to proportionally reduce
point, which can be modied depending on the
the rising of the dough. The same concerns places with
given conditions. Do not get discouraged in case of
particularly soft water.
unsuccessful baking attempts. Try to nd the cause of
the failure and try once again with changed proportions.
●
If the bread is not brown enough after baking, you can
leave it in the appliance and use the browning program.
●
Do
●
It is recommended to bake a test bread before setting
not allow the yeast to come into contact with liquid to
the timing function for baking overnight to make the
avoid fast rising of the yeast (especially when using the
necessary adjustments if needed.
timing function).
●
, that is measure the ingredients with the
included measuring spoon or spoons used at home, if the
recipe requires measuring the ingredients in tablespoons
and teaspoons.
●
Measure the ingredients given in grams correctly.
●
For the milliliter indications you can use the supplied
measuring beaker which has a graduated scale from 30
to 300 ml.
GW43-013_v02

149
Ecology – environment protection
Each user can protect the natural environment.
It is neither difcult nor expensive.
In order to do it: put the cardboard packing into
recycling paper container; put the polyethylene
(PE) bags into container for plastic.
When worn out, dispose the appliance to particular disposal
centre, because of the dangerous elements of this appliance,
which can be hazardous for natural environment.
Do not dispose into the domestic waste disposal!!!
The manufacturer/importer does not accept any liability for any
damages resulting from unintended use or improper handling.
The manufacturer/importer reserves his rights to modify the product
any time in order to adjust it to law regulations, norms, directives,
or due to construction, trade, aesthetic or other reasons, without
notifying in advance.
GW43-013_v02


