Konig Electronic Slim-Line induction cooker touch control 2000W: English
English: Konig Electronic Slim-Line induction cooker touch control 2000W
English
Use
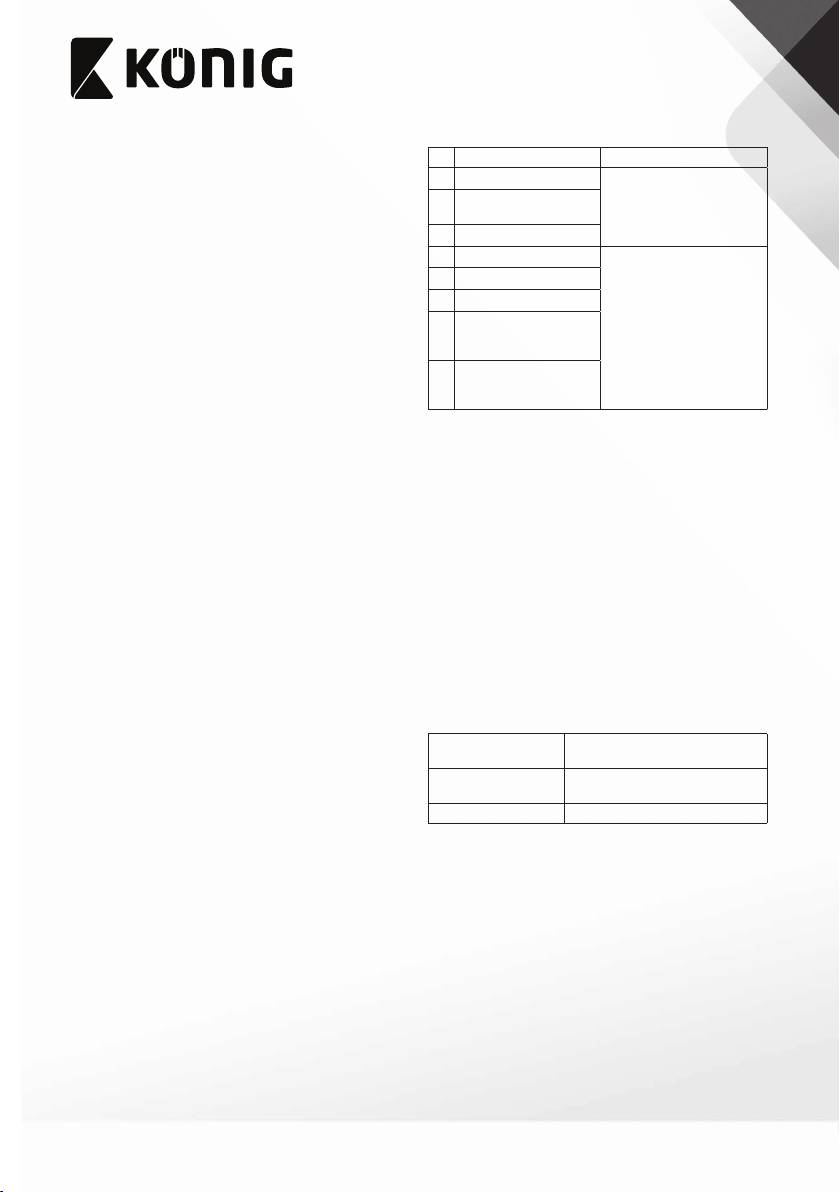
Error codes
Setting the power
Description Solution
• Press the function button until the power indicator
E0
Internal circuit error.
(1) Use suitable cookware.
comes on. The display shows “1600”.
(2) Switch o the device, allow
No cookware or unsuitable
E1
the device to cool down
• Turn the setting dial clockwise to increase the power.
cookware used.
completely and switch the
• Turn the setting dial counterclockwise to decrease the
E7
Top plate overheating.
device on again.
power.
E2
Internal overheating.
Setting the temperature
E3
Overvoltage.
• Press the function button until the temperature
indicator comes on. The display shows “200°”.
E4
Undervoltage.
• Turn the setting dial clockwise to increase the
Open-circuit error or
Contact the service centre.
temperature.
E5
short-circuit error
• Turn the setting dial counterclockwise to decrease the
(top plate sensor).
temperature.
Open-circuit error or
E6
short-circuit error
Setting the timer
(IGBT sensor).
• Press the function button until the timer indicator
comes on. The display shows “00:00”.
Cleaning and maintenance
• Turn the setting dial clockwise to set the hours.
Warning!
• Turn the setting dial counterclockwise to set the
minutes (1-minute steps).
• Before cleaning or maintenance, switch o the device,
• Press the function button to conrm or wait until the
remove the mains plug from the wall socket and wait
display stops ashing.
until the device has cooled down.
• At the end of the countdown, a beep will sound and
• Do not use cleaning solvents or abrasives.
the device will go to standby mode.
• Do not immerse the device in water or other liquids.
To cancel the function:
• Do not attempt to repair the device. If the device does
• Press the on/o button to go to standby mode. The
not operate correctly, replace it with a new device.
timer indicator goes o.
• Press and hold the function button to resume
• Clean the outside of the device using a soft, damp
operation with the set power or temperature settings.
cloth. If necessary, use a little neutral detergent.
The timer indicator goes o.
Thoroughly dry the outside of the device with a clean,
dry cloth.
Hints for use
• Clean the ventilation openings using a soft brush.
• Insert the mains plug into the wall socket. A beep will
sound and the indicators ash once. The on/o
Technical data
indicator starts to ash. The device is in standby mode.
• Place the cookware in the centre of the cooking zone.
300 W / 600 W / 900 W / 1200 W /
Power settings
• Press the on/o button to switch on the device. The
1400 W / 1600 W / 1800 W / 2000 W
on/o indicator lights continuously. The display shows
60 °C / 80 °C / 100 °C / 120 °C
Temperature settings
“----”.
140 °C / 160 °C / 180 °C / 200 °C
• Set the device according to your cooking requirements.
Timer settings 1 minute ~ 11 hours / 59 minutes
• After use, press the on/o button to set the device to
standby mode. The on/o indicator starts to ash.
• Remove the mains plug from the wall socket.
• Allow the device to cool down completely.
44

English
Warranty
Any changes and/or modications to the product will
void the warranty. We cannot accept any liability for
damage caused by incorrect use of the product.
Disposal
• The product is designated for separate collection at an
appropriate collection point.
Do not dispose of the product with household waste.
• For more information, contact the retailer or the local
authority responsible for waste management.
Documentation
The product has been manufactured and supplied in
compliance with all relevant regulations and directives,
valid for all member states of the European Union. The
product complies with all applicable specications and
regulations in the country of sales.
Formal documentation is available upon request. The
formal documentation includes, but is not limited to the
Declaration of Conformity, the Material Safety Data Sheet
and the product test report.
Disclaimer
Designs and specications are subject to change without
notice. All logos, brands and product names are
trademarks or registered trademarks of their respective
holders and are hereby recognized as such.
55
Оглавление
- KN-INDUC-20
- English
- English
- Nederlands
- Nederlands
- Deutsch
- Deutsch
- Español
- Español
- Français
- Français
- Italiano
- Italiano
- Português
- Português
- Dansk
- Dansk
- Norsk
- Norsk
- Svenska
- Svenska
- Suomi
- Suomi
- Ελληνικά
- Ελληνικά
- Polski
- Polski
- Česky
- Česky
- Slovenčina
- Slovenčina
- Magyar
- Magyar
- Eesti
- Eesti
- Latviešu
- Latviešu
- Lietuvių
- Lietuvių
- SIovenščina
- SIovenščina
- Hrvatski
- Hrvatski
- Română
- Română
- Български
- Български
- Русский
- Русский
- Türkçe
- Türkçe
")