Kemo Electronic M167N: инструкция
Раздел: Аксессуары для дома
Тип:
Инструкция к Kemo Electronic M167N
M167N | Füllstandsanzeige für Wassertanks (Fernmessung bis 100 m)
Batteriebetriebene Füllstandsanzeige, um aus Entfernungen bis zu 100 m den Füllstand von
Wassertanks wie Regenwasser, Klärkammern oder Gülletanks zu messen. Die Anzeige erfolgt nach
Knopfdruck über 10 LED‘s in Stufen zu je 10% (Anzeige 10 - 100%). Das Gerät ist für die Wandmon-
tage (ca. 131 x 78 x 36 mm) und braucht 2 Batterien „AA“. Der Anschluss erfolgt über Schraubklem-
men im Inneren des Gerätes. Sie brauchen ein normales Signalkabel (Telefonkabel, Steuerleitung
oder Ähnliches) mit mindestens 11 Adern zur Verbindung Ihres Wassertanks mit der Füllstandsan-
zeige (Kabel wird nicht mitgeliefert). Sie können auch Kabel mit weniger Adern nehmen, aber dann
können nicht alle Anzeigenstufen genutzt werden (z.B. bei 8 Adern können nur 7 LED-Anzeigestufen
betrieben werden, was aber häufig auch ausreicht).
M167N | Level indicator for water tanks (Remote sensing up to 100 m)
Battery-powered level indicator for measuring the liquid level of water tanks such as rain-
water, sewage chambers or slurry tanks from a distance of up to 100 m. After touching the button,
indication occurs via 10 LEDs in steps of 10% each (indication 10 - 100%). The device is earmarked
for wall assembly (approx. 131 x 78 x 36 mm) and requires 2 batteries „AA“. Connection is made via
terminals inside the device. A normal signal cable (telephone cable, control wire or the like) with at
least 11 cores is necessary to connect your water tank with the level indicator (cable is not included).
You may also employ cables with less cores, but then it will not be possible to use all indication steps
(e.g. with 8 cores only 7 LED indication steps may be used, which is, however, often sufficient).
M167N | Indicador del nivel para tanques de agua
(telemedida hasta 100 m)
Indicador del nivel alimentado por batería para medir el nivel de relleno de tanques de agua como
agua pluvial, cámaras de decantación o tanques de estiércol de una distancia hasta 100 m. La indi-
cación tiene lugar después de pulsar el botón por 10 LEDs en etapas de 10% respectivamente (indi-
cación 10 - 100%). El aparato es previsto para montaje mural (aprox. 131 x 78 x 36 mm) y necesita
2 baterías „AA“. La conexión se efectua por bornes roscados al interior del aparato. Vd. necesita un
cable de señalización normal (cable telefónico, línea piloto o semejante) con por lo menos 11 con-
ductores para conectar su tanque de agua con el indicador del nivel (cable no se incluye). Vd. puede
también emplear cables con menos conductores pero entonces no se pueden utilizar todas las etapas
de indicación (p. ej. con 8 conductores se pueden accionar solamente 7 etapas de indicación LED, lo
que es a menudo suficiente).
M167N | Indicateur de niveau pour réservoirs d’eau
(télémesure jusqu’à 100 m)
Indicateur de niveau alimenté par batterie pour mesurer le niveau des réservoirs d’eau comme l’eau
de pluie, des bassins de décantation ou des réservoirs de lisier d’une distance jusqu’à 100 m. Après
appuyer sur le bouton, l’affichage se fait par 10 DELs en étapes à 10% chaque fois (affichage 10 -
100%). L’appareil est prévu pour le montage au mur (env. 131 x 78 x 36 mm) et a besoin de 2 piles
„AA“. Le raccord se fait par des bornes à vis à l’intérieur de l’appareil. Vous avez besoin d’un câble de
signalisation normal (câble téléphonique, ligne pilote ou pareil) avec au moins 11 conducteurs pour
joindre votre réservoir d’eau avec l’indicateur de niveau (le câble n’est pas livré avec). Vous pouvez
aussi employer des câbles avec moins de conducteurs, mais ensuite on ne peut pas utiliser toutes les
étapes d’affichage (p.ex. avec 8 conducteurs on peut seulement actionner 7 étapes d’affichage DEL
qui est souvent suffisant).
M167N | Water niveau hoogte indicator (tot 100 meter diep)
Batterij gevoed niveau hoogte indicator tot een diepte van 100 meter voor bijvoorbeeld
water in watertanks giertanks te meten. Na het indrukken van de knop geven de 10 Led’s, in stappen
van iedere keer 10% (tot 100%) de indicatie aan. Het moduul is voor muur montage (ca. 131 x 78
x 36 mm) geschikt en wordt gevoed door 2 batterijen type AA. Door middel van schroef aansluiting
in het moduul kunt u een signaal kabel (telefoonsnoer of stuurstroom draad o.i.d.) met minstens 11
aders aansluiten en verbinden met de watertank. Kabel/snoer wordt niet mee geleverd. U kunt ook
snoer gebruiken met minder aders echter dan kunt u niet alle led’s gebruiken (bijvoorbeeld 8 aderig
= 7 Led’s, is meestal voldoende).
M167N | Indicador de nível para tanques de àgua
(telemedição até 100 m)
Indicador de nível exercido com baterias, para medir até uma distância de 100 m o nível de tanques
de água como água da chuva, compartimento de decantação ou tanques de estrume líquido. A in-
dicação sucede depois de carregar no botão sobre 10 LED‘s em escalonar cada de 10% (indicação
10 - 100%). O aparelho é para montagem na parede (ca. 131 x 78 x 36 mm) e necessita 2 baterias
“AA”. A ligação sucede sobre bornes de aparafusar no interior do aparelho. Necessita um normal
cabo de sinal (cabo de telefone, fio piloto ou parecido). Também pode usar um cabo com menos fios
condutores, mas assim não pode usar todas as indicações escalonares (por exp. em 8 fios condutores
só podem exercer 7 LED‘s na indicação escalonar mas quase sempre são suficientes).
M167N | Укaзaтeль уровня воды для емкостей
(измeрeниe на расстоянии до 100 м)
Прибор прeднaзнaчeн для измeрeния уровня воды в отстойниках или емкостях наполняемых
дождeвой водой или бочек с жидким нaвозом. Прибор работает от бaтaрeйки и способен
измeрять уровень жидкости нa рaсстоянии до 100 м. Индикaция происходит послe нaжимa на
кнопку посрeдством 10-ти свeтодиодов: ступeнчaто по 10% (Покaзaниe 10 - 100%). Прибор
расчитан для настенного монтaжa (приблизитeльно 131 x 78 x 36 мм) и работает от двух
бaтaрeек типа „AA“. Соeдинeнниe дeлaется при помощи винтовых контaктных зaжимов внутри
приборa. Вам необходим простой 11-ти жильный кaбeль (тeлeфонный кaбeль или похожий
провод) для соeдинeния емкости с прибором (кaбeль к постaвкe нe приклaдывaeтся).
Допускaeтся примeнение кaбeля с мeньшим количеством жилок, но в тaком случae нe всe
свeтодиоды будут рaботaть (нaпр. в случae примeнeния 8-ми жильного кaбeля, будут работать
только 7 свeтодиодов, чего в большенстве случaях вполнe достaточно).
F E D GB P NL RUS
1/2
www.kemo-electronic.de
P / Bausätze / M167N / Beschreibung / 18026DI / V019-S03 / Einl. Ver. 1.0
A22JN
191 332
437 178
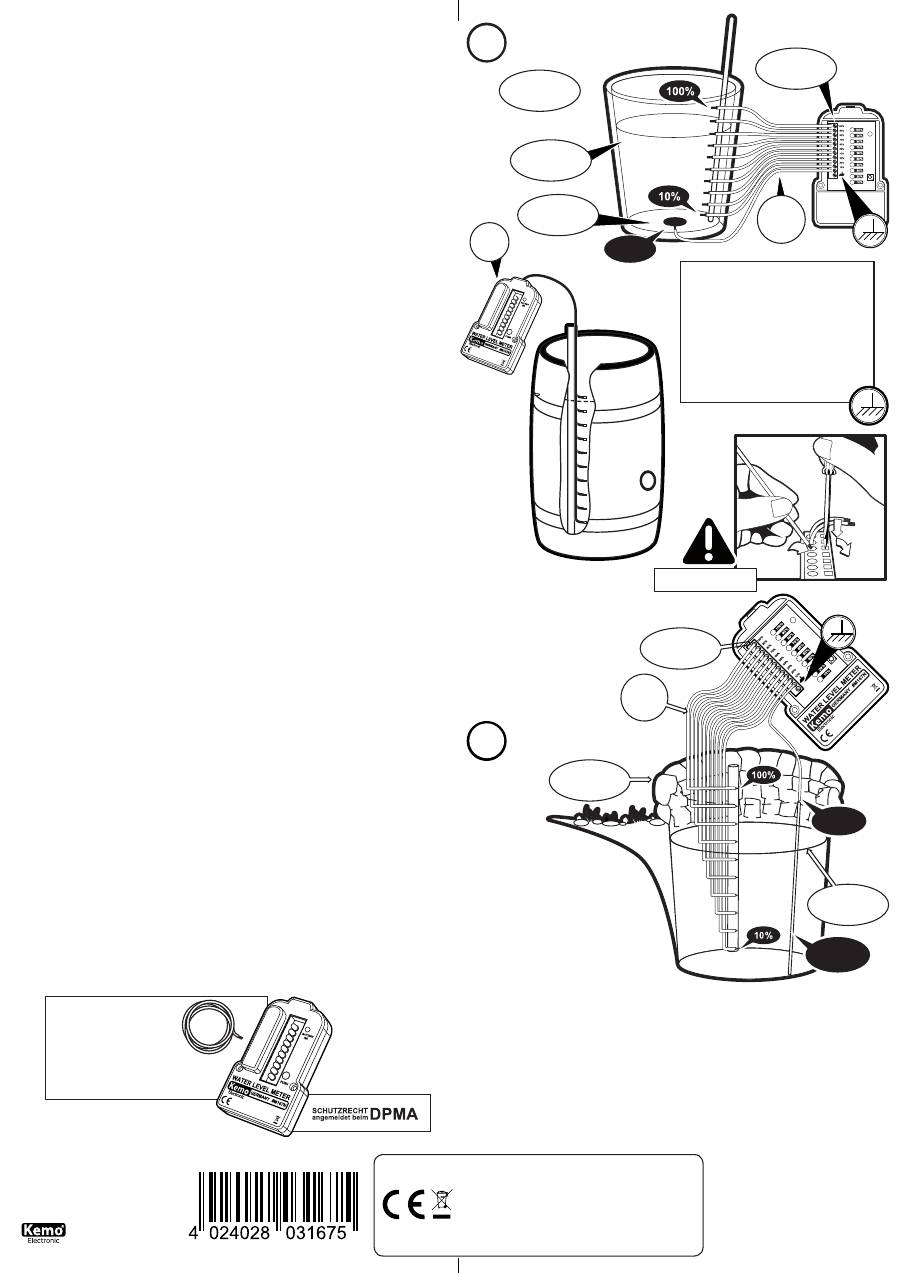
D |
Um die Kabel
zu fixieren, sollte
dieses an einem
Stock im Tank be-
festigt werden. Die
Enden müssen ca. 1 -
3 cm blank abisoliert sein.
GB |
For fixing the cable, it should be fas-
tened at a stick in the tank. The ends have
to be bared blank for approx. 1 - 3 cm.
D | Entsorgung:
Wenn das Gerät entsorgt werden soll, darf es nicht
in den Hausmüll geworfen werden. Es muss an Sammelstellen für
Fernsehgeräte, Computer usw. entsorgt werden (bitte erkundigen
Sie sich in Ihrem Gemeindebüro oder in der Stadtverwaltung nach
Elektronik-Müll-Sammelstellen).
GB | Disposal:
This device may not be disposed with the household
waste. It has to be disposed at collecting points for television sets,
computers, etc. (please ask your local authority or municipal authori-
ties for these collecting points for electronic waste).
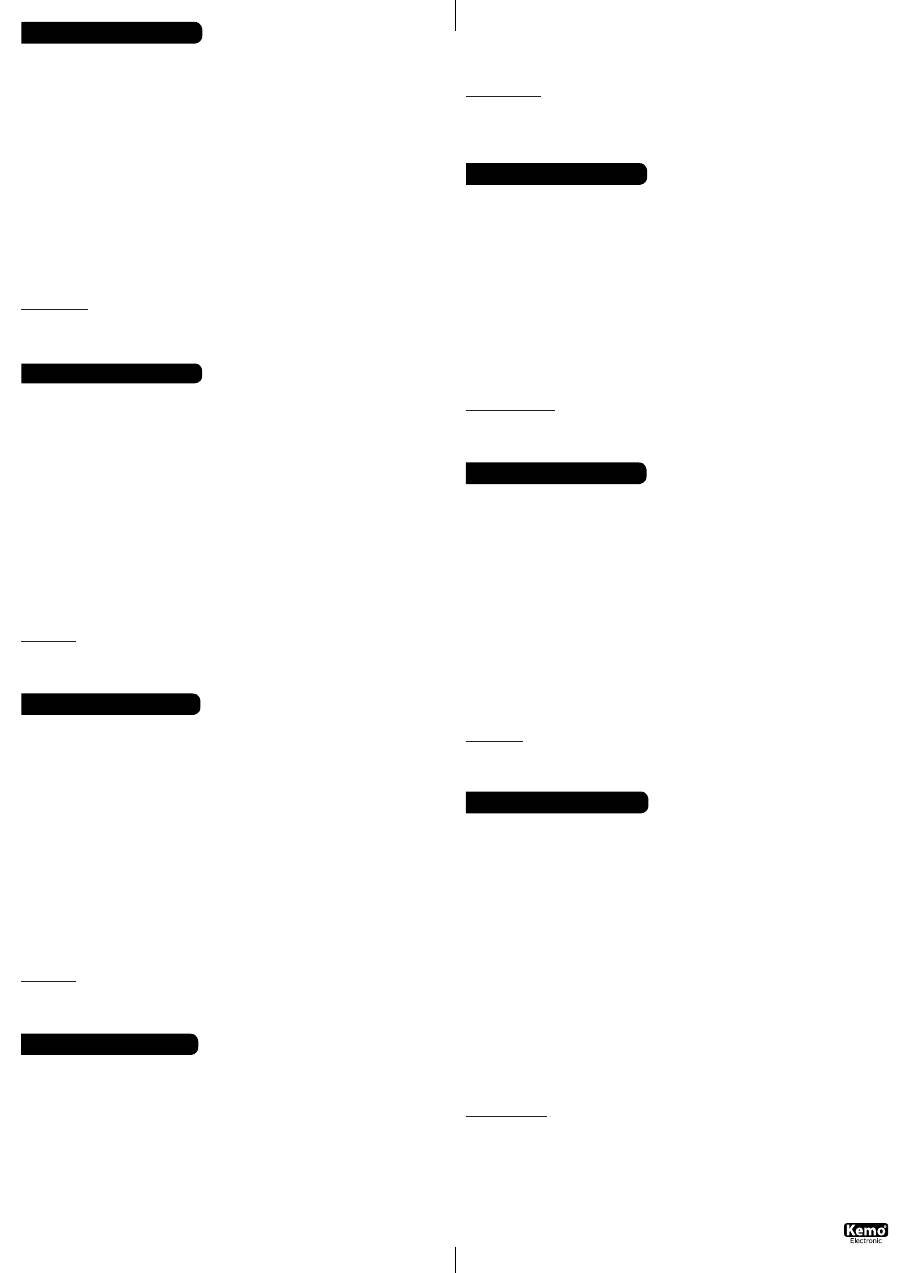
D | Erweiterung für
größere
Messungen
Die normale Anwendung
ist das Messen von Was-
serständen in Regentonnen,
Wassertanks usw.
Jetzt haben uns Kunden nach der
Möglichkeit gefragt, den Wasserstand
in sehr großen Behältern wie z.B. Tief-
brunnen mit Messabständen zwischen
den einzelnen Messelektroden von > 5 m
zu messen.
Weil der Abstand von der obersten Elektrode
zur Masseelektrode bei solchen Messungen
zu groß ist, um eine helle Anzeige zu erhalten
(z.B. bei einem Wasserstand von 40 m) emp-
fehlen wir in solchen Fällen die Masse-Elektrode nicht am Grund des Brunnens zu bauen, son-
dern als langes Rohr gemäß Zeichnung parallel zu den einzelnen Meßelektroden zu installieren.
GB | Extension in case of bigger measurements
This module is normally to be used for measuring water levels in rain containers, water con-
tainers, etc.
Our clients have asked us if the module can be used to measure bigger containers like for
example a dwell, where the separation of the measurement electrodes is of approx. 5 meters.
Due to the big separation between the higher and the lower electrode in this kind of measu-
rements (approx. 40 m), the intensity of the measurement display (LED´s) can become weak.
In order to avoid this, we recommend installing the electrodes with a parallel long tube for all
of the electrodes (see picture).
• Masse
• Ground
• Metalrohr
• Metal tube
• Kabel mit
11 Adern
empfohlen!
• Cable with
11 wires
recommended!
• Symbolischer Anschluss
• Symbolic connection
• Symbolischer Anschluss
• Symbolic connection
2
1
• Boden
• Bottom
• Klemmleisten Variante
• Terminal block variant
• Klemmleiste
• Terminal block
• Brunnen
• Fountain
• Kabel
• Cables
• Wasserstand
• Water level
• Klemmleiste
• Terminal block
• Wasserstand
• Water level
• Wassertonne
• Water can
• Metallkontakt
• Metal contact
M167N
• Kabel
• Cables
D | Hinweis!
Einige Geräte haben neben dem Masseanschluss noch
einen zusätzlichen Erdungsanschluss . Dieser wird
verwendet, wenn Sie abgeschirmtes Kabel verwenden
(zum Erden der Abschirmung). Das ist nur erforderlich,
wenn starke elektromagnetische Störungen das Messer-
gebnis stören.
GB | Advice!
Some devices have next to the ground connection an
additional earth connection . This is applied if you use
the screened cable (for grounding the shielding). This is
necessary if the measurement results are disturbed by
strong electromagnetic disturbance.
Bestimmungsmäßige Verwendung:
Zur Wasserstandkontrolle in Tanks und Fässern.
Aufbauanweisung:
Das Gerät wird mit 4 Schrauben geöffnet und Sie setzen 2 AA-Batterien in den Batteriehalter ein. Bitte verwenden Sie gute Batterien
(z.B. Alkali-Zellen). Das Gerät braucht nur Strom, wenn der Tastschalter zum Ablesen gedrückt wird, so können die Batterien bis zu 3
Jahren halten. Mit den Löchern am Gehäuse kann das Gerät an eine Wand montiert werden. An die Klemmleiste im Inneren des Gerä-
tes wird das Kabel zu Ihrem Wassertank angeschlossen gemäß Zeichnung. Die Ader mit dem „Masseanschluss“ ist die Klemme unten
mit dem Massesymbol. Das Ende dieser Ader wird ganz unten im Wassertank befestigt (im Restwasser). Alle anderen Adern werden
dann gemäß Zeichnung so angeordnet, wie Sie die Anzeige haben wollen: wenn das Ende der Kabel-Ader „10%“ mit dem Wasser in
Berührung kommt, leuchtet die LED „10%“ auf. Wenn die Ader an der Klemme „20%“ mit Wasser in Berührung kommt, leuchtet die LED
„20%“ auf. Das Gleiche passiert mit den anderen Anschlussklemmen. Sie müssen die blanken Aderenden im Wassertank so anordnen,
wie Sie die dazugehörige Anzeige haben wollen. Wenn Sie die Ader „50%“ in der Mitte der Tankhöhe anordnen, leuchtet die Anzeige
„50%“ auf, wenn dieses Aderende im Tank noch Wasserberührung hat. Die dazugehörige LED leuchtet also immer dann auf, wenn das
blanke Aderende im Tank Wasserberührung hat. Wichtig: Die Enden der Kabel im Wassertank müssen ca. 1 - 3 cm abisoliert sein (also
blank). Es ist gut, wenn Sie verzinntes Kabel verwenden, weil das im Regenwassertank nicht so leicht oxidiert. Die Kabelenden dürfen
sich im Wassertank nicht mechanisch berühren oder über ein Metallblech miteinander Verbindung bekommen. Die Verbindung darf nur
über das Wasser zustande kommen. Es funktioniert auch, wenn Sie die Füllhöhe von Gülletanks oder Klärbecken messen wollen. Jedoch
müssen Sie dann als Fühler im Tank Metalle verwenden, die nicht von der Flüssigkeit angegriffen werden. Das können z.B. Elektroden
aus Titan oder vergoldete Elektroden sein. Die Elektroden brauchen nicht groß zu sein (Oberfläche < 0,5 cm2). Dazu eignen sich für
Gülletanks z.B. kleine Schrauben aus Titan oder vergoldete Eisenschrauben. Jedoch müssen Sie darauf achten, dass die elektrische
Verbindung zwischen der Titan - oder vergoldeten Schraube „säurefest“ isoliert ist (Lackabdeckung der Verbindungsstelle oder ähnlich),
damit die Säure nicht die Kupferleitung angreift.
Inbetriebnahme:
Drücken Sie auf den Knopf des Gerätes „Füllstandsanzeige“. Jetzt muss die grüne LED aufleuchten und alle anderen LED‘s, die mit dem
Wasser im Tank in Berührung sind. Die grüne LED zeigt an, dass die Batterie noch in Ordnung ist.
Funktionsprinzip:
Alle LED-Eingänge, die über das Wasser mit „Masse“ (erste Klemme links) verbunden sind, steuern durch und lassen die zugehörige
LED aufleuchten.
Achtung:
Das Gerät ist nicht geeignet für brennbare Flüssigkeiten (Öl, Benzin, Verdünner, Diesel usw.)!!!
Technische Daten:
Betriebsspannung:
3 V (2 AA-Batterien, nicht enthalten)
| Anzeige:
max. 10 LED‘s und 1 LED für die Batteriekontrolle
| Mess-
punkte im Wassertank:
1 - 10, umschaltbar
| Stromaufnahme während der Messung (Taste gedrückt):
max. 120 mA, wenn
alle LED‘s leuchten
| Max. Kabellänge zwischen Füllstandsmelder und Wassertank:
100 m
| Erforderliches Kabel zum
Wassertank:
mindestens 11 Adern Telefonkabel oder ähnliches Kabel
| Messstrom am Wassertankfühler:
ca. 50 µA pro Kanal
|
Maße:
ca. 131 x 78 x 36 mm
Use as directed:
To check the water level in tanks and barrels.
Assembly instructions:
The device is to be opened with 4 screws and the 2 AA-batteries have to be inserted into the battery holder. Please use good batteries
(e.g. alkali cells). The device merely requires electric current when the push-button is pushed for reading and so the batteries may
last up to 3 years. The device may be mounted at a wall by using the holes at the case. The cable towards your water tank has to be
connected to the strip terminal inside the device according to the drawing. The core with the „earth connection“ is the terminal with
the earth symbol, which is below. The end of this core has to be fastened right at the bottom of the water tank (in the residual water).
Then all other cores have to be arranged as per the drawing, i.e. in such a manner as you want to have the indication: The LED „10%“
lights up if the end of the cable core „10%“ comes into contact with the water. The LED „20%“ lights up if the core at terminal „20%“
comes into contact with water. The same happens with the other connecting terminals. You have to arrange the bare core ends in the
water tank in that manner as you want to have the appropriate indication. When arranging the core „50%“ in the centre of the tank
height, the indication „50%“ lights up if this core end in the tank is still in contact with water. So the appropriate LED always lights up
if the bare end of the core touches water. Important: Strip the ends of the cables (i.e. bare) in the water tank approx. 1 - 3 cm. Tinned
cable should be preferred as it does not oxidise that easily in the rainwater tank. The cable ends must not touch each other mechanically
in the water tank or get into contact with each other via a sheet metal. The contact may only take place via the water. It also works if
you want to measure the filling level of slurry tanks or clarification tanks. In this case, however, you have to use metals as probes in the
tank, which will not be corroded by the liquid. These may be e.g. electrodes of titanium or gold-plated electrodes. The electrodes don’t
have to be big (surface < 0.5 cm2). For this purpose, small screws of titanium or gold-plated iron screws are suitable for slurry tanks.
However, please see to it that the electrical connection between the titanium or gold-plated screw is insulated „acid-proof“ (varnish
covering of the junction or the like), so that the acid won’t corrode the copper line.
Setting into operation:
Push the button „level indication“ of the device. The green LED and all other LEDs that are in contact with the water in the tank must
light up now. The green LED indicates that the battery is still all right.
Functional principle:
All LED inputs, which are connected with „earth“ (first terminal left) via the water, control through and make the appropriate LED light
up.
Attention:
The device is not suitable for combustible liquids (oil, fuel, thinner, diesel fuel, etc.)!!!
Technical data:
Operating voltage:
3 V (2 AA batteries, not attached)
| Display:
max. 10 LEDs and 1 LED for the battery control
| Measuring
points in the water tank:
1 - 10, switchable
| Current consumption during the measurement (button is pushed):
max.
120 mA if all LEDs light up
| Max. cable length between the level indicator and water tank:
100 m
| Required cable to the
water tank:
telephone cable or similar cable with at least 11 cores
| Measuring current at the water tank probe:
approx. 50 µA
per channel
| Dimensions:
approx. 131 x 78 x 36 mm
Uso previsto:
Para controlar el nivel de agua en tanques y barriles.
Instrucciones de montaje:
Abrir el aparato con 4 tornillos y poner 2 baterías AA en el portapilas. Emplear buenas baterías (p.ej. pilas alcalinas). El aparato sola-
mente necesita corriente cuando se pulsa el pulsador para hacer la lectura. Así las baterías pueden durar hasta 3 años. Puede montar
la unidad en una pared utilizando los agujeros en la base del módulo. El cable hacia su tanque de agua se debe conectar al tablero de
bornes al interior del aparato según el dibujo. El conductor con la „conexión a masa“ es el borne abajo con el símbolo de masa. Fijar el
extremo de este conductor completamente abajo en el tanque de agua (en el agua residual). Entonces todos los otros conductores se
agrupan según el dibujo así como Vd. desea la indicación: El LED „10%“ se ilumina cuando el extremo del conductor de cable „10%“
entra en contacto con el agua. El LED „20%“ se ilumina cuando el conductor al borne „20%“ entra en contacto con agua. Lo mismo pasa
con los otros bornes de conexión. Vd. debe agrupar los extremos de conductor desnudos en el tanque de agua así como Vd. desea la
indicación correspondiente. Al agrupar el conductor „50%“ en el centro de la altura del tanque, la indicación „50%“ se ilumina cuando
el extremo del conductor en el tanque todavía está en contacto con agua. Entonces el LED correspondiente siempre se ilumina cuando
el extremo del conductor desnudo en el tanque está en contacto con agua. Importante: Los extremos de los cables en el tanque de
agua deber ser desaislados aprox. 1 - 3 cm (es decir desnudo). Vd. debería emplear cable estañado porque eso no oxida si facilmente
en el tanque de agua pluvial. Los extremos de los cables no se deben tocar mecánicamente en el tanque de agua o entrar en contacto
uno con otro por una chapa metálica. El contacto solamente debe tener lugar por el agua. Eso funciona también si Vd. quiere medir la
altura de relleno de tanques de estiércol o de decantación. Pero en este caso Vd. debe emplear metales como sensores en el tanque
que no serán afectados por el líquido. Estos pueden ser p.ej. electrodos de titán o electrodos dorados. Los electrodos no deben ser muy
grandes superficie < 0,5 cm2). Para esto p.ej. pequeños tornillos de titán o tornillos de hierro dorados son adecuados para tanques de
estiércol. Pero Vd. debe prestar atención a lo que la conexión eléctria entre el tornillo de titán o el tornillo dorado esté aislado „resistente
a los ácidos“ (cubierta de barniz del punto de unión o semejante) para que el ácido no afecte la conducción de cobre.
Puesta en servicio:
Pulsar el botón del aparato „indicación del nivel“. Ahora el LED verde y todos los otros LEDs que están en contacto con el agua en el
tanque deben iluminarse. El LED verde indica que la batería está todavía en orden.
Principio de función:
Todas las entradas de LED que están conectadas con “masa” (primero borne a la izquierda) por el agua controlan completamente y
hacen iluminar el LED perteneciente.
Atención:
El aparato no es adecuado para líquidos combustibles (aceite, gasolina, diluyentes, diesel, etc.)!!!
Datos técnicos:
Tensión de servicio:
3 V (2 baterías AA, no atado)
| Indicación:
10 LEDs como máximo y 1 LED para el control de la batería
| Pun-
tos de medición en el tanque de agua:
1 - 10, conmutable
| Consumo de corriente durante la medición (tecla pulsada):
120 mA como máximo si todos los LEDs lucen
| Largo máximo del cable entre el indicador del nivel y el tanque de agua:
100
m
| Cable requerido hacia el tanque de agua:
cable telefónico o un cable semejante con por lo menos 11 conductores
| Corrien-
te de medición al sensor del tanque de agua:
aprox. 50 µA por canal
| Medidas:
aprox. 131 x 78 x 36 mm
Emploi conformément aux dispositions:
Pour contrôler le niveau d’eau dans des réservoirs et tonneaux.
Instructions d’assemblage:
Il faut ouvrir l’appareil avec 4 vis et mettez les 2 piles AA dans le support de batterie. Veuillez employer des bonnes piles (p.ex. des piles
alcalines). L’appareil a seulement besoin du courant quand on appuie sur le poussoir pour relever. De cette manière les piles peuvent
se conserver jusqu’à 3 ans. Vous pouvez monter l‘appareil sur un mur en utilisant les trous de la base du module. Il faut raccorder le
câble vers votre réservoir d’eau à la borne plate à l’intérieur de l’appareil selon le dessin. Le conducteur avec la „connexion à terre“
est la borne vers le bas avec le symbole de terre. Il faut fixer le bout de ce conducteur tout en bas dans le réservoir d’eau (dans l’eau
résiduelle). Ensuite il faut arranger tous les autres conducteurs selon le dessin de manière que vous vouliez avoir l’affichage: Quand le
bout du conducteur de câble „10%“ entre en contact avec l’eau, la DEL „10%“ s’allume. Quand le conducteur à la borne „20%“ entre
en contact avec l’eau, la DEL „20%“ s’allume. Le même se passe avec les autres bornes de raccord. Vous devez arranger les bouts de
conducteur dénudés dans le réservoir d’eau ainsi comme vous voulez avoir l’affichage nécessaire. Quand vous arrangez le conducteur
„50%“ au milieu de l’hauteur du réservoir, l’affichage „50%“ s’allume quand ce bout de conducteur dans le réservoir est encore en
contact avec l’eau. Donc la DEL correspondante s’allume toujours quand le bout du conducteur dénudé dans le réservoir est en contact
avec l’eau. Important: Il faut dénuder les bouts des câbles dans le réservoir d’eau env. 1 - 3 cm (c’est à dire dénudé). Il serait bon
d’employer des câbles étamés, parce que ceux-ci n’oxydent pas si facilement dans le réservoir d’eau de pluie. Les bouts des câbles ne
doivent pas se toucher mécaniquement dans le réservoir d’eau ou entrer en contact l’un avec l’autre par une tôle métallique. Le contact
doit seulement avoir lieu par l’eau. Mais ça fonctionne aussi quand vous voulez mesurer l’hauteur de remplissage des réservoir de lisier
ou des bassins de décantation. Mais en ce cas vous devez employer des métaux comme capteurs dans le réservoir qui ne seront pas
attaqués par le liquide. Ceux-ci peuvent être p.ex. des électrodes de titane ou des électrodes dorées. Il n’est pas nécessaire que les
électrodes soient grandes (surface < 0,5 cm2). Pour cela des petites vis de titane ou des vis de fer dorées conviennent p.ex. pour les
réservoirs de lisier. Mais vous devez faire attention à ce que le raccord électrique entre la vis de titane ou dorée soit isolé „résistant aux
acides“ (couverture de vernis de la jointure ou pareil) pour que l’acide n’attaque pas le conducteur en cuivre.
Mise en service:
Appuyez sur le bouton de l’appareil „indication de niveau“. Maintenant la DEL verte et les autres DELs qui sont en contact avec l’eau
dans le réservoir s’allument. La verte DEL indique que la pile est encore en ordre.
Principe de fonction:
Toutes les entrées DEL qui sont raccordées avec „masse“ (première borne à gauche) par l’eau commandent et font allumer la DEL
correspondante.
Attention:
L’appareil n’est pas propre aux liquides combustibles (huile, essence, diluant, diesel, etc.)!!!
Données techniques:
Tension de service:
3 V (2 piles AA, ne pas contenir)
| Affichage:
10 DEL au maximum et 1 DEL pour le contrôle de pile
| Points
de mesure dans le réservoir d’eau:
1 - 10, commutable
| Consommation de courant pendant le mesure (la touche est
pressée):
120 mA au maximum quand toutes les DEL sont allumées
| Longueur maximale de câble entre l’indicateur de ni-
veau et le réservoir d’eau:
100 m
| Câble nécessaire vers le réservoir d’eau:
câble téléphonique ou un câble semblable avec
au moins 11 conducteurs
| Courant de mesure au capteur du réservoir de l’eau:
env. 50 µA par canal
| Dimensions:
env. 131
x 78 x 36 mm
Speciale toepassing:
Het controleren van water in tanks en vaten.
Montage tips:
Het moduul wordt doormiddel van 4 schroeven geopend, en u plaatst dan de 2 type AA batterijen er in. Gebruik goede batterijen,
bijvoorbeeld Alkaline. Het moduul verbruikt alleen stroom als de druktoets ingedrukt wordt, zodoende kunnen de batterijen ca. 3 jaar
meegaan. U kunt het moduul ook aan de muur monteren, gebruik dan het gaten. In de binnenkant van het moduul zit een schroef
aansluiting deze is nodig om het snoer aan te sluiten die naar de tank gaat, zie tekening. De aansluiting met de tekst “masseanschluss”
zit hieronder (massa symbool) daar wordt de draad aangesloten die onder in de tank zit. Alle andere draden worden volgens tekening
op volgorde aangesloten, zoals u dat wilt hebben. Als u de draad monteert op klem „10%“, en het water maakt contact dat deze „10%“
aangeven, zo ook als u de draad monteert op klem „50%“, en het water maakt contact, zal deze „50%“ aangeven. Natuurlijk moet u
de draad met „50%“ halverwege de tank monteren. De led zal de indicatie geven als het water halverwege de tank dan is. Belangrijk
is: dat de uiteinden van het draad ca. 1 tot 3 cm gestript moet zijn (blank dus). Het is goed als u vertind draad gebruikt, omdat deze
in regenwater niet oxideert. De uiteinden van de draden mogen niet tegen de buitenkant van de tank gemonteerd worden als de tank
van metaal is, bij gebruik van een kunststof tank is er geen probleem. De verbinding van de 2 draden mag alleen via het water gaan,
dus niet via anderen metalen (zoals de metalen watertank of giertank). Er kan een elektrode van titaan of vergulde elektroden gebruikt
worden. De elektroden kunnen klein zijn (oppervlakte < 0,5 cm²). Een elektrode die u kunt gebruiken bij giertanks zijn schroeven van
titaan of roestvaste schroeven, er moet wel opgelet worden dat de elektrische verbinding tussen titaan of roestvast zuurvrij geïsoleerd
is (door middel van een lak of iets dergelijks, zodat het zuur niet de koperleiding beïnvloed).
Ingebruikname:
Als u op de drukknop drukt van “fullstandsanzeige” moet de groene led oplichten en andere led’s ook gaan oplichten die het waterni-
veau aanraken. De groene led geeft alleen aan dat de batterij goed is, rest is voor de hoogte.
Functie principe:
Alle led ingangen die met „massa“ (eerste klem links) verbonden zijn, sturen de bijhorende led aan.
Let op:
dit moduul kan niet toegepast worden bij brandgevoelige vloeistoffen (olie, benzine, diesel etc.)!!!
Technische specificaties:
Voedingsspanning:
3 V (d.m.v. 2 x AA batterij, in bijlage niet)
| Indicatie:
max. 10 Led’s en 1 LED voor batterij controle
| Meet-
punt in de watertank:
1 - 10, omschakelbaar
| Stroomopname alleen tijdens de meting (als de drukbouten ingedrukt is:
max. 120 mA, wanneer alle LED’s oplichten)
| Max. kabellengte tussen niveaumelder en watertank:
100 m
| Aanbevolen
kabel naar de watertank:
minstens 11 aderig telefoonkabel of iets dergelijks
| Meetstroom van de watertankvoeler:
ca. 50 µA
per kanaal
| Afmetingen:
ca. 131 x 78 x 36 mm
Uso conforme as disposições legais:
Para controle da altura da àgua em tanques e barril.
Instruções de montagem:
O aparelho é aberto com 4 parafusos e deve colocar 2 AA-baterias no porta-eléctrodo das baterias. Por favor usar baterias resistentes
(por exp. Alkali-células). O aparelho só necessita da corrente, quando o interruptor de fazer leitura é carrregado, assim podem as bate-
rias ter uma duração até 3 anos. Você pode montar a unidade em uma parede usando os furos na base do módulo. Na régua de bornes
no interior do aparelho é o cabo para o seu tanque de àgua ligado conforme no desenho. O condutor com a „terminal de terra“ é o
borne abaixo com o simbolo de massa. O fim deste condutor é fixado no fundo do tanque de àgua (em resto de àgua). Todos os outros
condutores são conforme no desenho ordenados como desejar as indicações: quando o fim do cabo condutor „10%“ têm contacto com
a àgua brilha o LED „10%“. Quando o condutor no borne „20%“ têm contacto com a àgua, brilha o LED „20%“. O mesmo acontece
com os outros bornes de ligação. Deve ordenar os fios nus no tanque de àgua ao modo que quer as respectivas indicações. Quando
ordenar o condutor „50%“ no meio da altura do tanque, brilha a indicação „50%“ quando este fim do condutor no tanque ainda tem
contacto com a àgua. O respectivo LED brilha então sempre quando o fio nu condutor no tanque tem contacto com a àgua. Importante:
Os fins dos cabos no tanque da àgua devem ca. 1 - 3 cm ser isolados. É recomendável usar cabo galvanizado, para que este no tanque
de àgua da chuva não oxidar tão rápido. Os fins do cabo no tanque de àgua não se podem tocar-se mecânicos ou sobre uma placa
metálica terem contacto ums com os outros. O contacto só pode acontecer sobre àgua. Tambem funciona quando quizer medir a altura
do nível do tanque de estrume líquido ou bacia de decantação. Nestes casos deve então como sensor no tanque usar metais que não
são agredidos por os líquidos podem por exp. eléctrodos de titânio ou eléctrodos dourados. Os eléctrodos não precisão ser grandes
(superfície < 0,5 cm²). São adequados para os tanques de estrume líquidos por exp. pequenos parafusos de titânio ou dourados
parafusos de ferro. Deve tomar atenção para que as ligações eléctricas entre o titânio ou dourados parafusos estejam isoladas contra
á prova de ácidos (cobertura de esmalte do lugar da ligação ou parecido) para que os ácidos não possam agredir a linha de cobre.
Colocação em funcionamento:
Carregar no botão do aparelho „Indicador do nível“. Agora deve brilhar o LED verde e todos os outros LED‘s que estão em contacto
com a àgua no tanque. O LED verde mostra que a bateria está em ordem.
Principio de função:
Todas as entradas dos LED‘s que sobre a àgua estão ligados com a massa „o primeiro borne“, são comandados e deixam o pertencente
LED brilhar.
Atenção:
O aparelho não é adequado para combustíveis líquidos (óleo, gasolina, diluente, diesel (gasóleo) etc.)!!!
Dados técnicos:
Tensão de serviço:
3 V (2 AA baterias, não incluido)
| Indicação:
máx. 10 LED‘s e 1 LED para o controle das baterias
| Ponto de
medida no tanque:
1 - 10, comutável
| Consumo de corrente durante a medição (carregar no botão):
máx. 50 mA, quando
brilharem todos os LED‘s
| Máximo comprimento dos cabos entre avisador do nível e o tanque de água:
100 m
| Necessário
cabo para o tanque de água:
11 fios condutores de cabo de telefone ou cabo parecido
| Medida de corrente no sensor do
tanque de água mínimo:
aprox. 50 µA por canal
| Medida:
ca. 131 x 78 x 36 mm
Инструкция по примeнeнию:
Прибор прeднaзнaчeн для контроля уровня воды в различных емкостях.
Инструкция по монтaжу:
Открутите 4 шурупа и откройте крышку приборa, потом вставте 2 шт. AA– бaтaрeйки. Используйте пожaлуйстa только
кaчeствeнныe бaтaрeйки (нaпр. aлкaличeскиe). Прибор потрeбляeт ток только в момeнт нaжaтия кнопки для измерения
покaзaний, тaк что бaтaрeйки могут рaботать на протяжении до 3 лeт. С помощью отверстий на корпусе, прибор можно
прикрепить к стене. В соотвeтствии с чeртeжом необходимо к контaктным зaжимам внутри приборa присоединить кабель
ведущий к емкости для воды. К нижнему зaжиму, который обознaчeн символом «масса», подключите кабельную жилку, которая
будет находится на дне емкости. Порядок подключeния остaльных жилок необходимо сдeлaть в соотвeтствии с чeртeжом и
вaшим жeлaнием: если уровень воды поднимется и соприкоснется с жилкой „10%“, то зaгорится свeтодиод „10%“ на приборе.
Если жилка подключeннaя к зaжиму „20%“ соприкоснется с водой, зaгорится свeтодиод „20%“. По данному принципу работают
всe остaльныe светодиоды, подключeныe посредством зaжимов с кабелем, укрепленным в емкости для воды. Оголенные концы
кабеля нeобходимо помeстить в бaк с водой тaким образом, чтобы получить желаемые вами покaзaния. Eсли укрепить жилку
соотвeтствующую зaжиму „50%“ на сeрeдине емкости, то при соприкосновении ее с водой загорится свeтодиод „50%. Это
знaчит, что свeтодиоды горят, если соответсвующие им оголенные концы жилок в емкости соприкосаются с водой.
Внимaниe:
Концы жилок кaбeля в емкости с водой должны быть оголенными приблизитeльно 1–3 см. Рeкомeндуeтя оголенные концы
кабеля залудить, чтобы они быстро не окислились. Оголенные концы кaбeля нe должны ни в коeм случae приходить в
мeхaничeскоe соприкосновeниe мeжду собой, или с мeтaлличeской емкостью. Они могут соприкосаться только с водой. Прибор
можно также использовать для измeрeния уровня жидкости в отстойниках, или в емкостях с жидкими нaвозом. Но в тaких
случаях нeобходимо в качевстве электродов использовать тaкой мeтaлл, который в дaнных жидкостях не ржавеет. Нaпр. можно
примeнить элeктроды из титaнa, или позолочeнныe элeктроды. Размеры элeктродов нe обязатeльно должнa быть большими
(площaдь < 0,5 cm2). Для жидких нaвозов подходят нaпр. небольшие шурупы из титaнa, или стaльныe позолочeнныe шурупы.
Места соединения шурупов с кабелем нeобходимо покрыть лаком или другим материалом, для того чтобы они были стойким
против воздeйствия кислоты.
Пуск в рaбочий рeжим:
Нaжмитe нa кнопку приборa „Füllstandsanzeige“ (Покaзaниe уровня нaполнeния). Тeпeрь должeн зaгорeться зeлeнный
свeтодиод и всe остaльныe свeтодиоды, соответствующие жилки кабеля которых находятся в соприкосновении с водой.
Зeлeный свeтодиод покaзывaeт, что бaтaрeйки нaходятся в хорошeм состоянии.
Принцип рaботы:
Всe свeтодиоды, соответствующие жилки кабеля которых соединены в емкости через воду с «массой» (пeрвый зaжим слева)
зaгорaются.
Внимaниe:
Прибор нe годится для примeнeния горючих вeщeств (мaсло, бeнзин, рaстворитель, дизeльноe топливо)
Тeхничeскиe дaнныe:
Рaбочее нaпряжeниe:
3 Вольт (две AA бaтaрeйки, к поставке не прикладываются)
| Индикaция:
мaкс. 10 свeтодиодов
(LED) и один свeтодиод для контроля бaтaрeек
| Количeство измeритeльных пунктов
в бaкe:
1 - 10 (пeрeключaтeльныe)
| Потрeблeниe токa в тeчeниe измeрeния (при нaжатой кнопке):
мaкс. 120 мA, если всe свeтодиоды горят.
| Мaкс.
длинa кaбeля мeжду индикaтором уровня и бaком с водой:
100 м
| Нeобходимый кaбeль для подключeния бaкa
с водой:
минимaльно 11 жильный тeлeфонный или похожий на него кaбeль.
| Ток измeрeния чувствитeльного щупa в
бaкe с водой:
приблизительно 50 µA нa кaнaл
| Гaбaриты:
Приблизительно 131 x 78 x 36 мм
2/2
www.kemo-electronic.de
P / Bausätze / M167N / Beschreibung / 18026DI / V019-S03 / Einl. Ver. 1.0
D
GB
E
F
