Hotpoint-Ariston CE 6V P6 EU/HA: S tart - up and use
S tart - up and use: Hotpoint-Ariston CE 6V P6 EU/HA

1
8
G
B
S tart - up and use
The first time you use your appliance, heat the empty
oven with its door closed at its ma
x
imum temperature
for at least half an hour. Ensure that the room is well
ventilated before switching the oven off and opening
the oven door. The appliance may emit a slightly
unpleasant odour caused by protective substances
used during the manufacturing process burning away.
Should the appliance be equipped with an electronic
programmer, to use the electric oven, just press the
and
buttons at the same time (the symbol
will appear on the display) before selecting the
desired cooking function.
B
efore operating the product, remove all plastic film
from the sides of the appliance.
S
ettin
g
t
h
e
ti
m
e
*
Press the
PROGRAMMER knob
and turn it in an
anticlockwise direction
to set the correct time.
The clock can only be set if the oven is connected to
the electricity mains. In case of a power failure, the
PROGRAMMER will stop: it will be necessary to re-set
the correct time once the power has returned.
S
ta
r
tin
g
t
h
e
o
v
en
1. Select the desired cooking mode by turning the
SELECTOR knob.
2. Select the recommended temperature for the
cooking mode or the desired temperature by turning
the T
H
ERMOSTAT knob.
A list detailing cooking modes and suggested cooking
temperatures can be found in the relevant table (
see
Oven cooking advice table
).
D
uring cooking it is always possible to:
Change the cooking mode by turning the
SELECTOR knob.
Change the temperature by turning the
T
H
ERMOSTAT knob.
Set the total cooking time and the cooking end time
(
see below
).
Stop cooking by turning the SELECTOR knob to the
0 position.
N
ever put objects directly on the bottom of the oven;
this will prevent the enamel coating from being
damaged. Only use position 1 in the oven when
cooking with the rotisserie spit.
Always place cookware on the rack(s) provided.
T
H
ER
M
O
ST
A
T
in
d
icator
light
W
hen this is illuminated, the oven is generating heat. It
switches off when the inside of the oven reaches the
selected temperature. At this point the light illuminates
and switches off alternately, indicating that the
thermostat is working and is maintaining the
temperature at a constant level.
O
v
en
light
This is switched on by turning the SELECTOR knob to
any position other than 0. It remains lit as long as the
oven is operating.
B
y selecting
8
with the knob, the
light is switched on without any of the heating
elements being activated.
C
ooling
v
entilation
In order to cool down the e
x
ternal temperature of the oven,
a cooling fan blows air between the control panel and the
oven door.
Once cooking has been completed, the cooling fan
continues to operate until the oven has cooled down
sufficiently.
12
3
6
9
*
O
nl
y
a
v
a
il
a
ble
in
ce
r
t
a
in
mo
dels.
GB
1
9
C
oo
k
in
g
m
o
d
e
s
A temperature value between 50°C and MAX can be
set for all cooking modes e
x
cept the following:
GRILL (recommended: set only to MAX power level)
GRATI
N
(recommended: do not e
x
ceed 200°C).
TR
A
D
ITI
ON
A
L
O
V
E
N
mode
B
oth the top and bottom heating elements will be
activated.
W
hen using this traditional cooking mode, it
is best to use one cooking rack only. If more than one
rack is used, the heat will be distributed in an uneven
manner.
O
V
E
N
B
A
K
I
N
G
mode
The rear heating element and the fan are switched on,
thus guaranteeing the distribution of heat in a delicate
and uniform manner throughout the entire oven. This
mode is ideal for baking and cooking temperature
sensitive foods (such as cakes that need to rise) and
for the preparation of pastries on 3 shelves
simultaneously.
F
A
ST
COOK
I
N
G
mode
The heating elements and the fan are activated,
guaranteeing the distribution of heat consistently and
uniformly throughout the oven.
Preheating is not necessary for this cooking mode.
This mode is particularly suitable for cooking pre-
packed food quickly (frozen or pre-cooked). The best
results are achieved using one cooking rack only.
M
U
L
TI
L
E
V
E
L
mode
All the heating elements (top, bottom and circular), as
well as the fan, will be activated. Since the heat
remains constant throughout the oven, the air cooks
and browns food in a uniform manner. A ma
x
imum of
two racks may be used at the same time.
P
I
ZZ
A
O
V
E
N
mode
The circular heating elements and the elements at the
bottom of the oven are switched on and the fan is
activated. This combination heats the oven rapidly by
producing a considerable amount of heat, particularly
from the element at the bottom. If you use more than
one rack at a time, switch the position of the dishes
halfway through the cooking process.
GRI
LL
mode
The central part of the top heating element and the
rotisserie spit (where present) are activated. The high
and direct temperature of the grill is recommended for
food that requires a high surface temperature (veal
and beef steaks, fillet steak and entrecôte). This
cooking mode uses a limited amount of energy and is
ideal for grilling small dishes. Place the food in the
centre of the rack, as it will not be cooked properly if it
is placed in the corners.
GR
A
TI
N
mode
The top heating element and the rotisserie (where
present) are activated and the fan begins to operate.
This combination of features increases the
effectiveness of the unidirectional thermal radiation
provided by the heating elements through forced
circulation of the air throughout the oven. This helps
prevent food from burning on the surface and allows
the heat to penetrate right into the food.
The GRILL and GRATI
N
cooking modes must be
performed with the oven door shut.
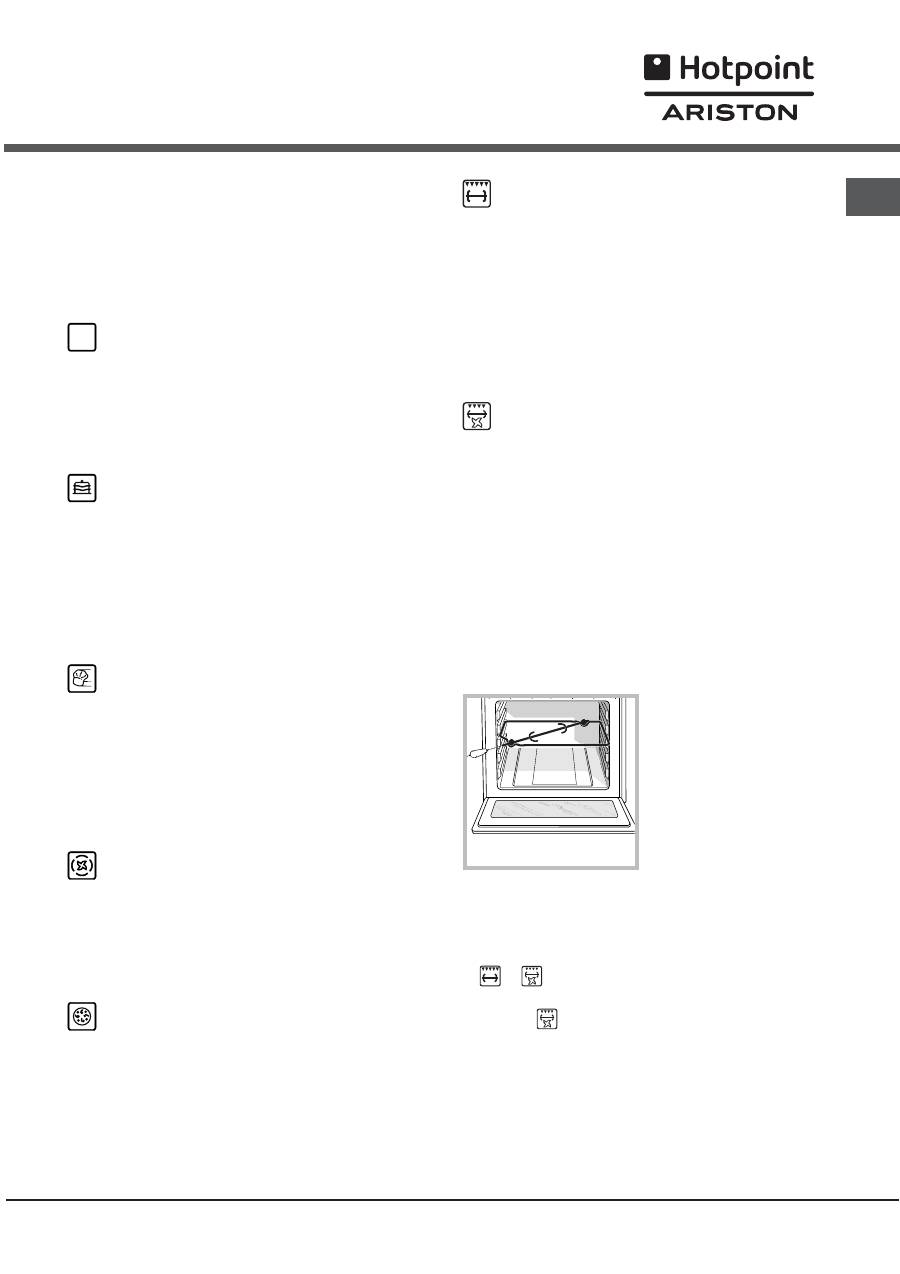
Spit
roast
(only available in certain models)
To operate the spit roast
function (
see diagram
)
proceed as follows:
1. Place the dripping pan in position 1.
2. Place the rotisserie support in position 3 and insert
the spit in the hole provided on the back panel of
the oven.
3. Start the rotisserie using the knob to select MO
D
E
or
.
!
W
hen the
mode is activated, the spit will stop if
the door is opened.

2
0
G
B
*
O
nl
y
a
v
a
il
a
ble
in
ce
r
t
a
in
mo
dels.
P
r
a
c
ti
c
al
c
oo
k
in
g
a
dv
i
c
e
D
o not place racks in position 1 or 5 during fan-
assisted cooking. E
x
cessive direct heat can burn
temperature sensitive foods.
MULTILEVEL
Use positions 2 and 4, placing the food which
requires more heat on the rack in position 2.
Place the dripping pan on the bottom and the rack
on top.
GRILL
W
hen using the GRILL cooking mode, place the
rack in position 5 and the dripping pan in position 1
to collect cooking residues (fat and
/
or grease).
W
hen using the GRATI
N
cooking mode, place the
rack in position 2 or 3 and the dripping pan in
position 1 to collect cooking residues.
W
e recommend that the power level is set to
ma
x
imum. The top heating element is regulated by
a thermostat and may not always operate
constantly.
PIZZA OVE
N
Use a light aluminium pizza pan. Place it on the
rack provided.
For a crispy crust, do not use the dripping pan as it
prevents the crust from forming by e
x
tending the
total cooking time.
If the pizza has a lot of toppings, we recommend
adding the mozzarella cheese on top of the pizza
halfway through the cooking process.
P
lannin
g c
oo
k
in
g w
it
h
t
h
e
ele
c
t
r
oni
c
p
r
o
g
r
a
mm
e
r
*
S
ettin
g
t
h
e
c
lo
c
k
After the appliance has been connected to the power
supply, or after a powercut, the clock display will
automatically reset to 0:00 and begin to blink.
To set the time:
1. Press the COOKI
N
G TIME button
$
and the
COOKI
N
G E
ND
TIME
%
simultaneously.
2.
W
ithin 4 seconds of having pressed these buttons,
set the e
x
act time by pressing the
*
and
)
buttons.
The
*
button advances the hours and the
)
button
decreases the hours.
Once the time has been set, the programmer
automatically switches to manual mode.
Setting
the
timer
The timer enables a countdown to be set, when the
time has elapsed a buzzer sounds.
To set the timer proceed as follows:
1. press the TIMER button
H
. The display shows:
N
2. Press the
*
and
buttons to set the desired time.
3.
W
hen the buttons are released the timer begins
counting down and the current time appears on the
display.
R
4. After the time has elapsed a buzzer will sound, and
this can be switched off by pressing any button
(e
x
cept the
*
and
)
buttons). The symbol
H
will
switch off.
T
he
timer
does
not
s
w
itch
the
oven
on
or
off.
A
d
j
usting
the
v
olume
o
f
the
b
u
zz
er
After selecting and confirming the clock settings, use
the
)
button to adjust the volume of the alarm buzzer.
Setting
the
coo
k
ing
time
w
ith
a
d
ela
y
e
d
start
First decide which cooking mode you wish to use and
set a suitable temperature using the SELECTOR and
T
H
ERMOSTAT knobs on the oven.
At this point it is possible to set the cooking time:
1. Press the COOKI
N
G TIME button
$
.
2.
W
ithin 4 seconds of having pressed this button, set
the desired amount of time by pressing the
*
and
)
buttons. If, for e
x
ample, you wish to set a cooking time of
30 minutes, the display will show:
N
3. 4 seconds after the buttons are released, the
current time (for e
x
ample 10.00) reappears on the
display with the symbol
m
and the letter A (AUTO).
N
e
x
t the desired cooking end time must be set:
4. Press the E
ND
COOKI
N
G TIME button
%
.
5.
W
ithin 4 seconds of having pressed this button,
adjust the cooking end time by pressing the
*
and
)
buttons. If, for e
x
ample, you want cooking to end at
13.00, the display shows:
O
6. 4 seconds after the buttons are released, the
current time (for e
x
ample 10.00) reappears on the
display with the letter A (AUTO).

GB
2
1
*
O
nl
y
a
v
a
il
a
ble
in
ce
r
t
a
in
mo
dels.
P
lannin
g c
oo
k
in
g w
it
h
t
h
e
analo
gu
e
p
r
o
g
r
a
mm
e
r
*
P
r
o
g
r
a
mm
in
g c
oo
k
in
g
ti
m
e
w
it
h
i
mm
e
d
iate
s
ta
r
t
1. Turn the PROGRAMMER knob in an anticlockwise
direction until the desired cooking time is displayed.
2. Pull the PROGRAMMER knob and turn it in an
anticlockwise direction until the marker corresponds
with the current time. A click will indicate the end of
the programming phase.
3. Select the desired cooking mode using the
SELECTOR knob. The oven switches on immediately
and remains on for the entire duration of the set
cooking time.
4.
W
hen the set time has elapsed, a buzzer will sound.
To stop the process, turn the PROGRAMMER knob in
an anticlockwise direction until the symbol
9
is
displayed.
5. Turn the SELECTOR knob to the 0 position.
For e
x
ample: it is 9:00 a.m. and a time of 1 hour
and 15 minutes is programmed. The programme
will stop automatically at 10:15 a.m.
P
rogramming
a
d
ela
y
e
d
coo
k
ing
time
1. Turn the PROGRAMMER knob in an anticlockwise
direction until the desired cooking time is displayed.
2. Pull the PROGRAMMER knob and turn it in an
anticlockwise direction until the marker corresponds
with the desired cooking start time.
3. Select the desired cooking mode using the
SELECTOR knob. The oven will switch on at the set
cooking start time and will remain on for the entire
duration of the set cooking time.
4.
W
hen the set time has elapsed, a buzzer will sound.
To stop the process, turn the PROGRAMMER knob in
an anticlockwise direction until the symbol
9
is
displayed.
5. Turn the SELECTOR knob to the 0 position.
For e
x
ample: it is 9:00 a.m., a time of 1 hour and 15
minutes is programmed and the start time is set to
11:00 a.m. The programme will start automatically
at 11:00 and will end at 12:15.
To cancel programming, turn the PROGRAMMER
knob anticlockwise until the symbol
9
is displayed.
At this point, the oven is programmed to switch on
automatically at 12:30 and switch off after 30 minutes,
at 13.00.
Setting
the
coo
k
ing
time
w
ith
an
imme
d
iate
start
Follow the above procedure for setting the cooking
time (points 1-3).
W
hen the letter A appears, this indicates that both the
cooking time and the end cooking time have been
programmed in AUTO mode. To restore the oven to
manual operation, after each AUTO cooking mode
press the COOKI
N
G TIME
$
and E
ND
COOKI
N
G
TIME
%
buttons simultaneously.
The symbol
m
will remain lit, along with the oven, for
the entire duration of the cooking programme.
The set cooking duration can be displayed at any time
by pressing the COOKI
N
G TIME button
$
, and the
cooking end time may be displayed by pressing the
E
ND
COOKI
N
G TIME button
%
.
W
hen the cooking
time has elapsed a buzzer sounds. To stop it, press
any button apart from the
*
and
)
buttons.
C
ancelling
a
pre
v
iousl
y
set
coo
k
ing
programme
Press the COOKI
N
G TIME button
$
and the
COOKI
N
G E
ND
TIME
%
simultaneously.
C
orrecting
or
cancelling
pre
v
iousl
y
set
d
ata
The data entered can be changed at any time by
pressing the corresponding button (TIMER, COOKI
N
G
TIME or COOKI
N
G E
ND
TIME) and the
*
or
)
button.
W
hen the cooking time data is cancelled, the cooking
end time data is also cancelled automatically, and
vice versa.
If the oven has already been programmed, it will not
accept cooking end times which are before the start of
the programmed cooking process.

22
G
B
O
ven
cooking
advice
table
Cooking
modes
Foods Weight
(in kg)
Rack Position Pre-heating
time
(minutes)
Recommended
temperature
Cooking
time
(minutes)
Traditional
Oven
D
uc
k
Roast
veal
or
beef
Por
k
roast
Biscuits
(short
pastr
y
)
Tarts
1
1
1
-
1
3
3
3
3
3
15
15
15
15
15
200
200
200
1
8
0
1
8
0
65
-7
5
7
0
-7
5
7
0
-8
0
15
-
20
30
-
35
Baking
Mode
Tarts
Fruit
ca
k
es
Plum
ca
k
e
Sponge
ca
k
e
Stuffed
panca
k
es
(on
2
rac
k
s)
Small
ca
k
es
(on
2
rac
k
s)
Cheese
puffs
(on
2
rac
k
s)
Cream
puffs
(on
3
rac
k
s)
Biscuits
(on
3
rac
k
s)
Meringues
(on
3
rac
k
s)
0.5
1
0.
7
0.5
1.2
0.6
0.4
0.
7
0.
7
0.5
3
2
or
3
3
3
2
and
4
2
and
4
2
and
4
1
and
3
and
5
1
and
3
and
5
1
and
3
and
5
15
15
15
15
15
15
15
15
15
15
1
8
0
1
8
0
1
8
0
160
200
190
210
1
8
0
1
8
0
90
20
-
30
40
-
45
40
-
50
25
-
30
30
-
35
20
-
25
15
-
20
20
-
25
20
-
25
1
8
0
Fro
z
e
n
n
f
oo
d
Pizza
Courgette
and
pra
w
n
pie
Countr
y
st
y
le
spinach
pie
Turnovers
Lasagne
Golden
Rolls
Chic
k
en
morsels
0.3
0.4
0.5
0.3
0.5
0.4
0.4
2
2
2
2
2
2
2
-
-
-
-
-
-
-
250
200
220
200
200
1
8
0
220
12
20
30
-
35
25
35
25
-
30
15
-
20
P
re-cooke
d
d
f
oo
d
Golden
chic
k
en
w
ings
0.4
2
-
200
20
-
25
Fast
cooking
Fresh Foo
d
Biscuits
(short
pastr
y
)
Plum
ca
k
e
Cheese
puffs
0.3
0.6
0.2
2
2
2
-
-
-
200
1
8
0
210
15
-
1
8
45
10
-
12
Multi-
cooking
Pizza
(on
2
rac
k
s)
Lasagne
Lamb
Roast
chic
k
en
+
potatoes
Mac
k
erel
Plum
ca
k
e
Cream
puffs
(on
2
rac
k
s)
Biscuits
(on
2
rac
k
s)
Sponge
ca
k
e
(on
1
rac
k
)
Sponge
ca
k
e
(on
2
rac
k
s)
Savour
y
pies
1
1
1
1
+
1
1
1
0.5
0.5
0.5
1
1.5
2
and
4
3
2
2
and
4
2
2
2
and
4
2
and
4
2
2
and
4
3
15
10
10
15
10
10
10
10
10
10
15
230
1
8
0
1
8
0
200
1
8
0
1
7
0
190
1
8
0
1
7
0
1
7
0
200
15
-
20
30
-
35
40
-
45
60
-7
0
30
-
35
40
-
50
20
-
25
10
-
15
15
-
20
20
-
25
25
-
30
Pizza Mode
Pizza
Roast
veal
or
beef
Chic
k
en
0.5
1
1
3
2
2
or
3
15
10
10
220
220
1
8
0
15
-
20
25
-
30
60
-7
0
Soles
and
cuttlefish
Squid
and
pra
w
n
k
ebabs
Cuttlefish
Cod
filet
Grilled
vegetables
Veal
stea
k
Sausages
H
amburgers
Mac
k
erels
Toasted
sand
w
iches
(or
toast)
0.
7
0.6
0.6
0.
8
0.4
0.
8
0.6
0.6
1
4 and 6
4
4
4
4
3
or
4
4
4
4
4
4
-
-
-
-
-
-
-
-
-
-
Max
Max
Max
Max
Max
Max
Max
Max
Max
Max
10
-
12
8-
10
10
-
15
10
-
15
15
-
20
15
-
20
15
-
20
10
-
12
15
-
20
3
-
5
Barbecue
W
it
h
roti
ss
erie
(
w
here
present)
Veal
on
the
spit
Chic
k
en
on
the
spit
Lamb
on
the
spit
1.0
1.5
1.0
-
-
-
5
5
5
Max
Max
Max
8
0
-
90
7
0
-8
0
7
0
-8
0
Grilled
chic
k
en
Cuttlefish
1.5
1.5
2
2
10
10
200
200
55
-
60
30
-
35
Gratin
W
it
h
roti
ss
erie
(
w
here
present)
Veal
on
the
spit
Lamb
on
the
spit
Chic
k
en
(on
the
spit)
+
potatoes
(roasted)
1.5
1.5
1.5
-
-
2
2
2
5
5
5
5
200
200
200
200
7
0
-8
0
7
0
-8
0
7
0
-7
5
7
0
-7
5
Оглавление
- I n s t allazione
- Descrizionedellapparecchio
- A vv io e u t ilizzo
- U tili zz o d el p iano c ott u r a v et r o c e r ami c a
- P r e c auzioni e c on s i g li
- M anu t enzione e c u r a
- A ss i s t enza
- Op e r a t in g I n s t r uc t ion s
- I n s t alla t ion
- D e s c r i p t ion of t h e a pp lian c e
- S tart - up and use
- U s in g t h e g la ss c e r a m i c h ob
- P recautions and tips
- C a r e an d m ain t enan c e
- M o d e d e m p loi
- I n s t alla t ion
- D e s c r i p t ion d e l a pp a r eil
- M ise en marc h e et utilisation
- U t ili s a t ion d u p lan d e cu i ss on v i t r o cé r a m i qu e
- P récautions et conseils
- N e tt o y a g e e t en t r e t ien
- Ð óêîâîäñòâî ïî ýêñïëóàòàöèè
- Ì î íò à æ
- Î ï èñà í èå è çä åëè ÿ
- Âêëþ÷åíèå è ýêñïëóàòàöèÿ
- Ñ òåêë î êåðà ì è÷åñêàÿ âàð î ÷íàÿ ïàíåë ü
- Ï ðå ä î ñò î ð î æ í î ñòè è ðåê î ì åí ä àöèè
- Ò å õ íè÷åñê î å î á ñëó æ èâàíèå è ó õ î ä
- Poky ny pro pouití
- I n s tala c e
- P o p is z ar í z e n í
- S p u t e n í a p o ui t í
- P o ui t í sk lo k e ra mi c k é varn é d e sk y
- O p atr e n í a ra d y
- Ú d r b a a péc e
- B r u k s an v i s nin g
- I n s t alla t ion
- B e s k r i v nin g a v m a s k inen
- S tart och anv ä ndning
- Användning avglaskeramikhällen
- S ä k erhetsf ö res k rifter och r å d
- U n d e r h å ll o ch s k ö t s el


