Acer AO756 – страница 3
Инструкция к Ноутбуку Acer AO756
21
English
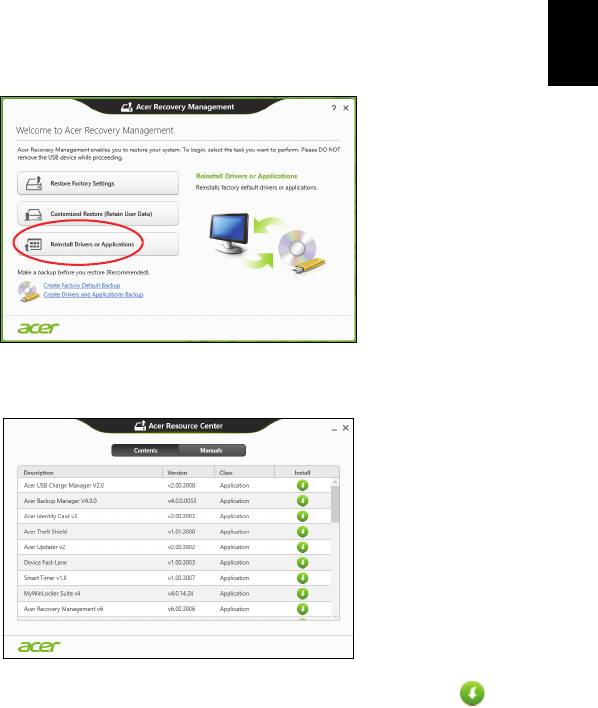
If you are reinstalling using Windows and the recovery information stored
on your computer:
• From Start, type 'Recovery' and then click Acer Recovery
Management in the list of apps.
• Click Reinstall Drivers or Applications.
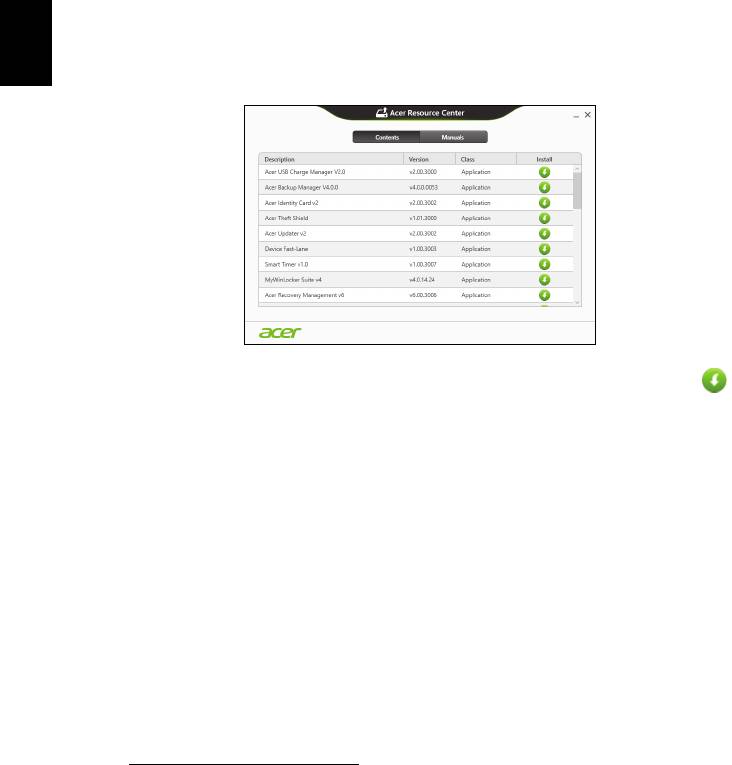
• You should see the Contents section of the Acer Resource Center.
• Click the install icon for the item you want to install, then follow
the onscreen instructions to complete the installation. Repeat
this step for each item you want to reinstall.
If you are reinstalling from a Drivers and Applications Backup on a DVD or
USB drive:
1. Insert the Drivers and Applications Backup into the disc drive or
connect it to a free USB port.
• If you inserted a DVD wait for Acer Resource Center to start.
• If Acer Resource Center does not start automatically, press the
Windows key + <E>, then double-click on the optical drive icon.
22
Recovery
English
• If you are using a USB drive, press the Windows key + <E>, then
double-click on the drive that contains the backup. Double-click on
ResourceCenter.
2. You should see the Contents section of the Acer Resource Center.
3. Click the install icon for the item you want to install, then follow the
onscreen prompts to complete the installation. Repeat this step for
each item you want to reinstall.
Returning to an earlier system snapshot
Microsoft System Restore periodically takes a 'snapshot' of your system
settings and saves them as restore points. In most cases of hard-to-
resolve software problems, you can return to one of these restore points to
get your system running again.
Windows automatically creates an additional restore point each day, and
also each time you install software or device drivers.
Note: For more information about using Microsoft System Restore,
from Start, type 'Help' and then click Help and Support in the list of
apps. Type 'Windows system restore' in the Search Help box, then
press Enter.
Returning to a restore point
1. From Start, type 'Control Panel' and then click Control Panel in the list
of apps.
2. Click System and Security > Action Center, then click Recovery at
the bottom of the window.
3. Click Open System Restore, then Next.
4. Click the latest restore point (at a time when your system worked
correctly), click Next, then Finish.

23
English
5. A confirmation window appears; click Yes. Your system is restored
using the restore point you specified. This process may take several
minutes, and may restart your computer.
Returning your system to its factory condition
If your computer experiences problems that are not recoverable by other
methods, you may need to reinstall everything to return your system to its
factory condition. You can recover from either your hard drive or the
recovery backup you have created.
• If you can still run Windows and have not deleted the recovery partition,
see "Recovering from Windows" on page 23.
• If you cannot run Windows, your original hard drive has been completely
re-formatted or you have installed a replacement hard drive, see
"Recovering from a recovery backup" on page 25.
Recovering from Windows
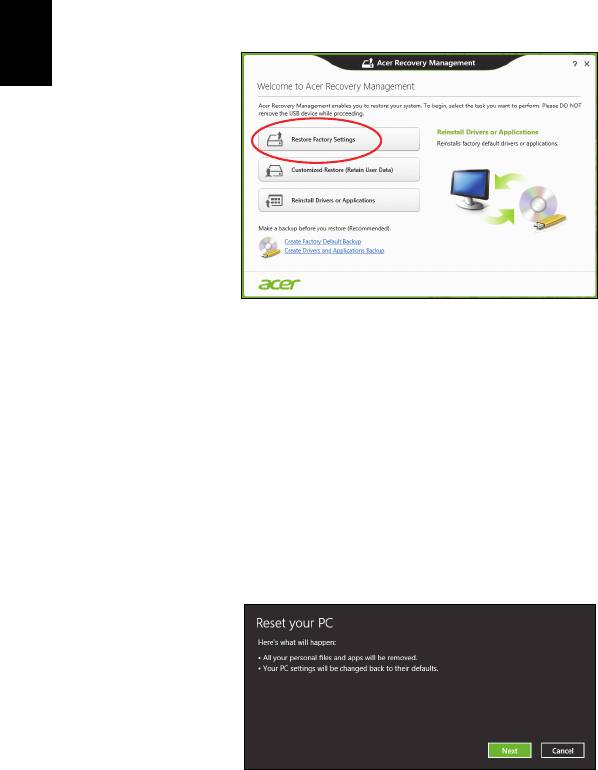
Start Acer Recovery Management:
• From Start, type 'Recovery' and then click Acer Recovery
Management in the list of apps.
Two options are available, Restore Factory Settings (Reset my PC) or
Customized Restore (Refresh my PC).
Restore Factory Settings deletes everything on your hard drive, then
reinstalls Windows and all software and drivers that were pre-installed on
your system. If you can access important files on your hard drive, back
them up now. See "Restore Factory Settings with Acer Recovery
Management" on page 24.
Customized Restore will attempt to retain your files (user data) but will
reinstall all software and drivers. Software installed since you purchased
your PC will be removed (except software installed from the Windows
Store). See "Customized Restore with Acer Recovery Management"
on page 25.
24
Recovery
English
Restore Factory Settings with Acer Recovery Management
1. Click Restore Factory Settings.
Caution: 'Restore Factory Settings' will erase all files on your
hard drive.
2. If your computer is configured with two operating systems (only
available on certain systems), a window opens with the option to restore
either Windows 7 or Windows 8. If you choose Windows 7, your
computer will restart and restore Windows 7. If you choose Windows 8,
Reset your PC opens, as described below.
Note: To fully enjoy Windows 8 features after changing from Windows
7, enter the BIOS (press <F2> when starting your computer) and
change Boot Mode to UEFI. If you reinstall Windows 7, you must
change Boot Mode back to Legacy before restarting your computer.
3. The Reset your PC window opens.
Images for reference only.
4. Click Next, then choose how to erase your files:
a. Just remove my files quickly erases all files before restoring your
computer and takes about 30 minutes.
b. Fully clean the drive completely cleans the drive after each file is
erased, so no files can be viewed after the recovery. Cleaning the
drive takes much longer, up to 5 hours, but is much more secure as
old files are completely removed.

25
English
5. Click Reset.
6. The recovery process begins by restarting your computer, then
continues by copying files to your hard drive.
7. After the recovery has finished, you can start using your computer by
repeating the first-start process.
Customized Restore with Acer Recovery Management
1. Click Customized Restore (Retain User Data).
2. The Refresh your PC window opens.
3. Click Next, then Refresh.
4. The recovery process begins by restarting your computer, then continues
by copying files to your hard drive. This process takes about 30 minutes.
Recovering from a recovery backup
To recover from a recovery backup on a USB drive:
1. Find your recovery backup.
2. Plug in the USB drive and turn on your computer.
3. If it is not already enabled, you must enable the F12 Boot Menu:
a. Press <F2> when starting your computer.
b. Use the left or right arrow keys to select the Main menu.

26
Recovery
English
c. Press the down key until F12 Boot Menu is selected, press <F5> to
change this setting to Enabled.
d. Use the left or right arrow keys to select the Exit menu.
e. Depending on the type of BIOS your computer uses, select Save
Changes and Exit or Exit Saving Changes and press Enter. Select
OK or Yes to confirm.
f. Your computer will restart.
4. During startup, press <F12> to open the boot menu. The boot menu
allows you to select which device to start from, select the USB drive.
a. Use your arrow keys to select USB Device, then press Enter.
b. Windows starts from the recovery backup instead of the normal
startup process.
5. Select your keyboard type.
6. Select Troubleshoot and then choose the type of recovery to use:
a. Click Advanced then System Restore to start Microsoft System
Restore:
Microsoft System Restore periodically takes a 'snapshot' of your
system settings and saves them as restore points. In most cases of
hard-to-resolve software problems, you can return to one of these
restore points to get your system running again.
b. Click Reset your PC to start the reset process:
Reset your PC deletes everything on your hard drive, then reinstalls
Windows and all software and drivers that were pre-installed on your
system. If you can access important files on your hard drive, back
them up now. See "Reset your PC from the recovery backup" on
page 27.
c. Click Refresh your PC to start the refresh process:
Refresh your PC will attempt to retain your files (user data) but will
reinstall all software and drivers. Software installed since you
purchased your PC will be removed (except software installed from
the Windows Store). See "Refresh your PC from the recovery
backup" on page 28.

27
English
Reset your PC from the recovery backup
Caution: Reset your PC will erase all files on your hard drive.
1. The Reset your PC window opens.
Images for reference only.
2. Click Next.
3. Select the operating system to recover (normally only one option is
available).
4. Choose to keep any changes to the hard drive:
a. If you have deleted the recovery partition or otherwise changed the
partitions on the hard drive and want to keep these changes, select
No
.
b. To completely restore your computer to Factory Settings, select Yes.
5. Choose how to erase your files:
a. Just remove my files quickly erases all files before restoring your
computer and takes about 30 minutes.
b. Fully clean the drive completely cleans the drive after each file is
erased, so no files can be viewed after the recovery. Cleaning the
drive takes much longer, up to 5 hours, but is much more secure as
old files are completely removed.
6. Click Reset.
7. After the recovery has finished, you can start using your computer by
repeating the first-start process.

28
Recovery
English
Refresh your PC from the recovery backup
1. The Refresh your PC window opens.
2. Click Next.
3. Select the operating system to recover (normally only one option is
available).
4. Click Refresh.
5. The recovery process begins by restarting your computer, then continues
by copying files to your hard drive. This process takes about 30 minutes.
29
English
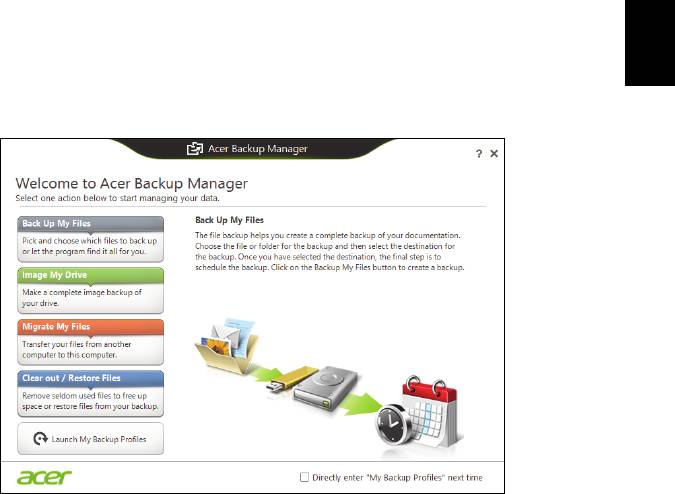
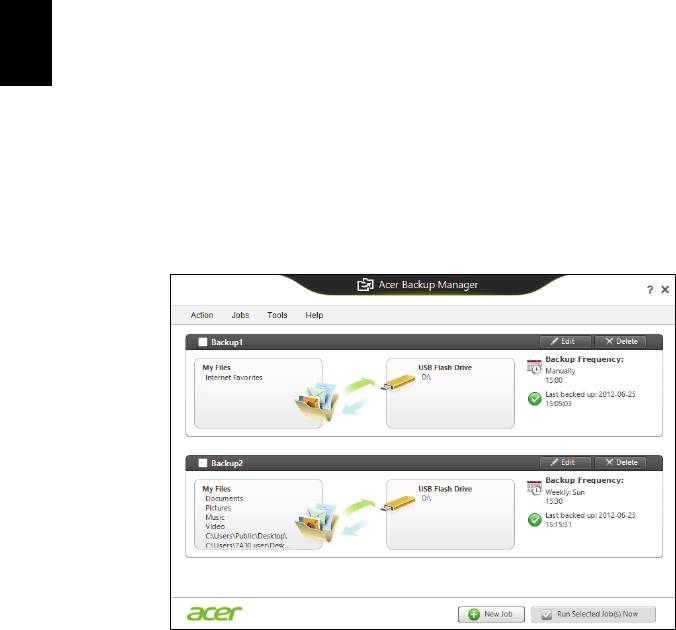
Acer Backup Manager
Note: This feature is only available on certain models.
Acer Backup Manager is a utility that enables you to do a variety of
backup functions each accomplished in only three simple steps. You can
even set these functions to automatically recur as often as your like.
To start Acer Backup Manager in Windows 8, simply start typing "Backup
Manager". Alternatively, in Desktop mode, select Acer Backup Manager.
This opens the Welcome screen; from this screen you can select the type
of backup you’d like to create.
• Back Up My Files: Select files to back up.
• Image My Drive: Create a backup file for the entire drive. You can burn
this file to a DVD, save them to another drive on your computer*, or
save them to removable media (i.e. a flash drive) to restore your
computer at a later time.
• Migrate My Files: Allows you to copy files to a USB device so that you
can migrate files from your old computer to your new one or any other
computer with Acer Backup Manager.
• Clear out / Restore Files: Remove seldom used files to free up disk
space or restore files from your backup.
Select the backup type you’d like to make and select the files or drive you
want to back up, then follow the onscreen instructions:
1. Select the content you want to back up. The less content you select, the
quicker the process will be, but it will increase your risks of losing data.
30
Acer Backup Manager
English
2. Select where you want the backup copies to be stored. Your options
include removable media, a drive on your computer*, CD/DVD media, a
remote PC, or the cloud using Microsoft SkyDrive.
3. Select how often you want Acer Backup Manager to create backups.
Once you have finished these three steps, backups will be created
according to the schedule.
*NOTE: You will need to select an external drive or your D: drive; Acer
Backup Manager cannot store a backup on the source drive.
If you wish to change your settings at any time, go to the Acer Backup
Manager profiles screen. To get there from the Acer Backup Manager
welcome screen, click Launch My Backup Profiles.
From here you can edit or delete existing backup profiles.

31
English
Power management
This computer has a built-in power management unit that monitors system
activity. System activity refers to any activity involving one or more of the
following devices: keyboard, mouse, hard disk, peripherals connected to
the computer, and video memory. If no activity is detected for a period of
time, the computer stops some or all of these devices in order to conserve
energy.
Saving power
Disable Fast startup
Your computer uses Fast startup to start quickly, but also uses a small
amount of power to check for signals to start. These checks will slowly
drain your computer’s battery.
If you prefer to reduce your computer’s power requirements and
environmental impact, turn off Fast startup:
Note: If Fast startup is off, your computer will take longer to start from
Sleep. If your computer features Acer Instant On or Acer Always
Connect, these will also be turned off.
Your computer will also not start if it receives an instruction to start
over a network (Wake on LAN).
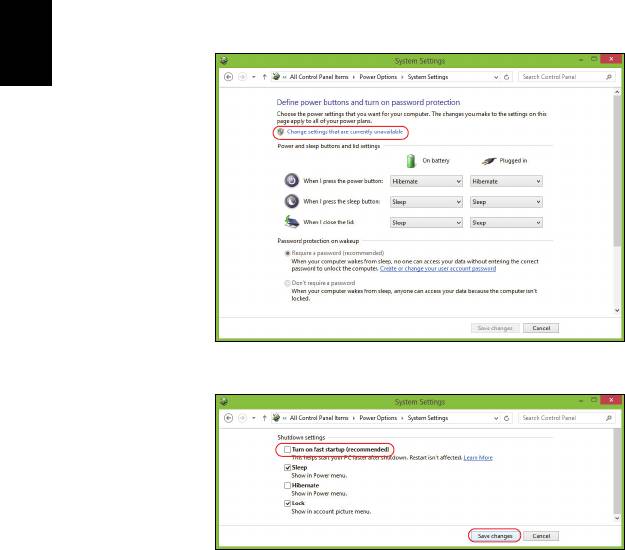
1. Open the Desktop.
2. Click Power Options in the Notification area.
3. Select More Power Options.
4. Select Choose what the power buttons do.
32
Power management
English
5. To access Shutdown Settings, select Change settings that are
currently unavailable.
6. Scroll down and disable Turn on fast startup.
7. Select Save changes.

33
English
Battery pack
The computer uses a battery pack that gives you long use between
charges.
Battery pack characteristics
The battery pack has the following characteristics:
• Employs current battery technology standards.
• Delivers a battery-low warning.
The battery is recharged whenever you connect the computer to the AC
adapter. Your computer supports charge-in-use, enabling you to recharge
the battery while you continue to operate the computer. However,
recharging with the computer turned off results in a significantly faster
charge time.
The battery will come in handy when you travel or during a power failure. It
is advisable to have an extra fully charged battery pack available as
backup. Contact your dealer for details on ordering a spare battery pack.
Charging the battery
To charge the battery, first make sure that it is correctly installed in the
battery bay. Plug the AC adapter into the computer, and connect to a
mains power outlet. You can continue to operate your computer on AC
power while your battery is charging. However, charging the battery with
the computer turned off results in a significantly faster charge time.
Note: You are advised to charge the battery before retiring for the day.
Charging the battery overnight before traveling enables you to start
the next day with a fully charged battery.
Conditioning a new battery pack
Before you use a battery pack for the first time, there is a conditioning
process that you should follow:
1. Insert the new battery without turning the computer on.
2. Connect the AC adapter and fully charge the battery.
3. Disconnect the AC adapter.
4. Turn on the computer and operate using battery power.
5. Fully deplete the battery until the battery-low warning appears.
6. Reconnect the AC adapter and fully charge the battery again.

34
Battery pack
English
Follow these steps again until the battery has been charged and
discharged three times.
Use this conditioning process for all new batteries, or if a battery hasn't
been used for a long time. If the computer is to be stored for more than
two weeks, you are advised to remove the battery pack from the unit.
Warning! Do not expose battery packs to temperatures below 0°
C (32° F) or above 45° C (113° F). Extreme temperatures may
adversely affect the battery pack.
By following the battery conditioning process you condition your battery to
accept the maximum possible charge. Failure to follow this procedure will
prevent you from obtaining the maximum battery charge, and will also
shorten the effective lifespan of the battery.
In addition, the useful lifespan of the battery is adversely affected by the
following usage patterns:
• Using the computer on constant AC power with the battery inserted. If
you want to use constant AC power, you are advised to remove the
battery pack after it is fully charged.
• Not discharging and recharging the battery to its extremes, as described
above.
• Frequent use; the more you use the battery, the faster it will reach the
end of its effective life. A standard computer battery has a life span of
about 300 charges.
Optimizing battery life
Optimizing battery life helps you get the most out of battery operation,
prolonging the charge/recharge cycle and improving recharging efficiency.
You are advised to follow the suggestions set out below:
• Purchase an extra battery pack.
• Use AC power whenever possible, reserving battery for on-the-go use.
• Eject a PC Card if it is not being used, as it will continue to draw power
(for selected models).
• Store the battery pack in a cool, dry place. The recommended
temperature is 10° C (50° F) to 30° C (86° F). Higher temperatures
cause the battery to self-discharge faster.
• Excessive recharging decreases the battery life.
• Look after your AC adapter and battery.

35
English
Checking the battery level
The Windows power meter indicates the current battery level. Rest the
cursor over the battery/power icon on the taskbar to see the battery's
present charge level.
Battery-low warning
When using battery power pay attention to the Windows power meter.
Warning! Connect the AC adapter as soon as possible after the
battery-low warning appears. Data will be lost if the battery to
become fully depleted and the computer shuts down.
When the battery-low warning appears, the recommended course of
action depends on your situation:
Situation Recommended Action
1. Plug the AC adapter into the computer, and then
connect to the mains power supply.
The AC adapter
2. Save all necessary files.
and a power outlet
3. Resume work.
are available.
Turn off the computer if you want to recharge the
battery rapidly.
1. Save all necessary files.
An extra fully
2. Close all applications.
charged battery
3. Turn off the computer.
pack is available.
4. Replace the battery pack.
5. Turn on the computer and resume work.
The AC adapter or
a power outlet is
1. Save all necessary files.
unavailable. You
2. Close all applications.
have no spare
3. Turn off the computer.
battery pack.
Installing and removing the battery pack
Important: Before removing the battery from the unit, connect
the AC adapter if you want to continue using your computer.
Otherwise, turn off the computer first.

36
Battery pack
English
To install a battery pack:
1. Align the battery with the open battery bay; make sure that the end with
the contacts will enter first, and that the top surface of the battery is
facing up.
2. Slide the battery into the battery bay and gently push until the battery
locks in place.
To remove a battery pack:
1. Slide the battery release latch to release the battery.
2. Pull the battery from the battery bay.

37
English
Traveling with your computer
This section gives you tips and hints to consider when moving around or
traveling with your computer.
Disconnecting from the desktop
Follow these steps to disconnect your computer from external
accessories:
1. Save any open files.
2. Remove discs from optical drive(s).
3. Shut down the computer.
4. Close the display cover.
5. Disconnect the cord from the AC adapter.
6. Disconnect the keyboard, pointing device, printer, external monitor and
other external devices.
7. Disconnect the Kensington lock if you are using one to secure the
computer.
Moving around
When you are just moving within short distances, for example, from your
office desk to a meeting room.
Preparing the computer
Before moving the computer, close and latch the display cover to place it
in Sleep mode. You can now safely take the computer anywhere you go
within the building. To bring the computer out of Sleep mode, open the
display; then press and release the power button.
If you are taking the computer to a client's office or a different building, you
may choose to shut down the computer:
Press the Windows key + <C> and click Settings > Power then click Shut
Down.
Or:
You can put the computer in Sleep mode by pressing <Fn> + <F4>. Then
close the display.
When you are ready to use the computer again, open the display; then
press and release the power button.

38
Traveling with your computer
English
Note: The computer may enter Hibernation or Deep Sleep mode after
being in Sleep mode for a period of time.
What to bring to meetings
If your meeting is relatively short, you probably do not need to bring
anything with you other than your computer. If your meeting will be longer,
or if your battery is not fully charged, you may want to bring the AC
adapter with you to plug in your computer in the meeting room.
If the meeting room does not have an electrical outlet, reduce the drain on
the battery by putting the computer in Sleep mode. Press <Fn> + <F4> or
close the display cover whenever you are not actively using the computer.
Taking the computer home
When you are moving from your office to your home or vice versa.
Preparing the computer
After disconnecting the computer from your desktop, follow these steps to
prepare the computer for the trip home:
• Check that you have removed all media and compact discs from the
drive(s). Failure to remove the media can damage the drive head.
• Pack the computer in a protective case that can prevent the computer
from sliding around and cushion it if it should fall.
Caution: Avoid packing items next to the top cover of the
computer. Pressure against the top cover can damage the screen.
What to take with you
Unless you have some items at home, take the following items with you:
• AC adapter and power cord.
• The printed setup poster.
Special considerations
Follow these guidelines to protect your computer while traveling to and
from work:
• Minimize the effects of temperature changes by keeping the computer
with you.

39
English
• If you need to stop for an extended period of time and cannot carry the
computer with you, leave the computer in the trunk of the car to avoid
exposing the computer to excessive heat.
• Changes in temperature and humidity can cause condensation. Allow
the computer to return to room temperature, and inspect the screen for
condensation before turning on the computer. If the temperature change
is greater than 10° C (18° F), allow the computer to come to room
temperature slowly. If possible, leave the computer for 30 minutes in an
environment with a temperature between outside and room temperature.
Setting up a home office
If you frequently work on your computer at home, you may want to
purchase a second AC adapter for use at home. With a second AC
adapter, you can avoid carrying the extra weight to and from home.
If you use your computer at home for significant periods of time, you might
also want to add an external keyboard, monitor or mouse.
Traveling with the computer
When you are moving within a larger distance, for instance, from your
office building to a client's office building or traveling locally.
Preparing the computer
Prepare the computer as if you were taking it home. Make sure that the
battery in the computer is charged. Airport security may require you to turn
on your computer when carrying it into the gate area.
What to take with you
Take the following items with you:
• AC adapter
• Spare, fully-charged battery pack(s)
• Additional printer driver files if you plan to use another printer
Special considerations
In addition to the guidelines for taking the computer home, follow these
guidelines to protect your computer while traveling:
• Always take the computer as carry-on luggage.

40
Traveling with your computer
English
• If possible, have the computer inspected by hand. Airport security X-ray
machines are safe, but do not put the computer through a metal detector.
Traveling internationally with the computer
When you are moving from country to country.
Preparing the computer
Prepare the computer as you would normally prepare it for traveling.
What to bring with you
Bring the following items with you:
• AC adapter.
• Power cords that are appropriate for the country to which you are
traveling.
• Spare, fully-charged battery packs.
• Additional printer driver files if you plan to use another printer.
• Proof of purchase, in case you need to show it to customs officials.
• International Travelers Warranty passport.
Special considerations
Follow the same special considerations as when traveling with the
computer.
In addition, these tips are useful when traveling internationally:
• When traveling in another country, check that the local AC voltage and
the AC adapter power cord specifications are compatible. If not,
purchase a power cord that is compatible with the local AC voltage. Do
not use converter kits sold for appliances to power the computer.
• If you are using the modem, check if the modem and connector are
compatible with the telecommunications system of the country you are
traveling in.
- 1
- 2
- 3
- 4
- 5
- 6
- 7
- 8
- 9
- 10
- 11
- 12
- 13
- 14
- 15
- 16
- 17
- 18
- 19
- 20
- 21
- 22
- 23
- 24
- 25
- 26
- 27
- 28
- 29
- 30
- 31
- 32
- 33
- 34
- 35
- 36
- 37
- 38
- 39
- 40
- 41
- 42
- 43
- 44
- 45
- 46
- 47
- 48
- 49
- 50
- 51
- 52
- 53
- 54
- 55
- 56
- 57
- 58
- 59
- 60
- 61
- 62
- 63
- 64
- 65
- 66
- 67
- 68
- 69
- 70
- 71
- 72
- 73
- 74
- 75
- 76
- 77
- 78
- 79
- 80
- 81
- 82
- 83
- 84
- 85
- 86
- 87
- 88
- 89
- 90
- 91
- 92
- 93
- 94
- 95
- 96
- 97
- 98
- 99
- 100
- 101
- 102
- 103
- 104
- 105
- 106
- 107
- 108
- 109
- 110
- 111
- 112
- 113
- 114
- 115
- 116
- 117
- 118
- 119
- 120
- 121
- 122
- 123
- 124
- 125
- 126
- 127
- 128
- 129
- 130
- 131
- 132
- 133
- 134
- 135
- 136
- 137
