Philips Rasoir NIVEA FOR MEN: instruction
Class: Health products
Type:
Manual for Philips Rasoir NIVEA FOR MEN
HS8460
2
3
1
2
3
5
7
A
B
C
1
8
9
10
11
12
13
D
4
6
E
F
G

4
6
15
25
34
43
53
63
72
80
89
99
108
118
127
136
한국어 146
155
164
173
182
191
200
209
218
227
237
246
254
263
ภาษาไทย 272
279
288
298
繁體中文 307
简体中文 315
338
265

6
Congratulations on your purchase and welcome to Philips! To fully benet from the support that
Philips offers, register your product at www.philips.com/welcome.
Please read this user manual, as it contains information about the wonderful features of this shaver
as well as some tips to make shaving easier and more enjoyable.
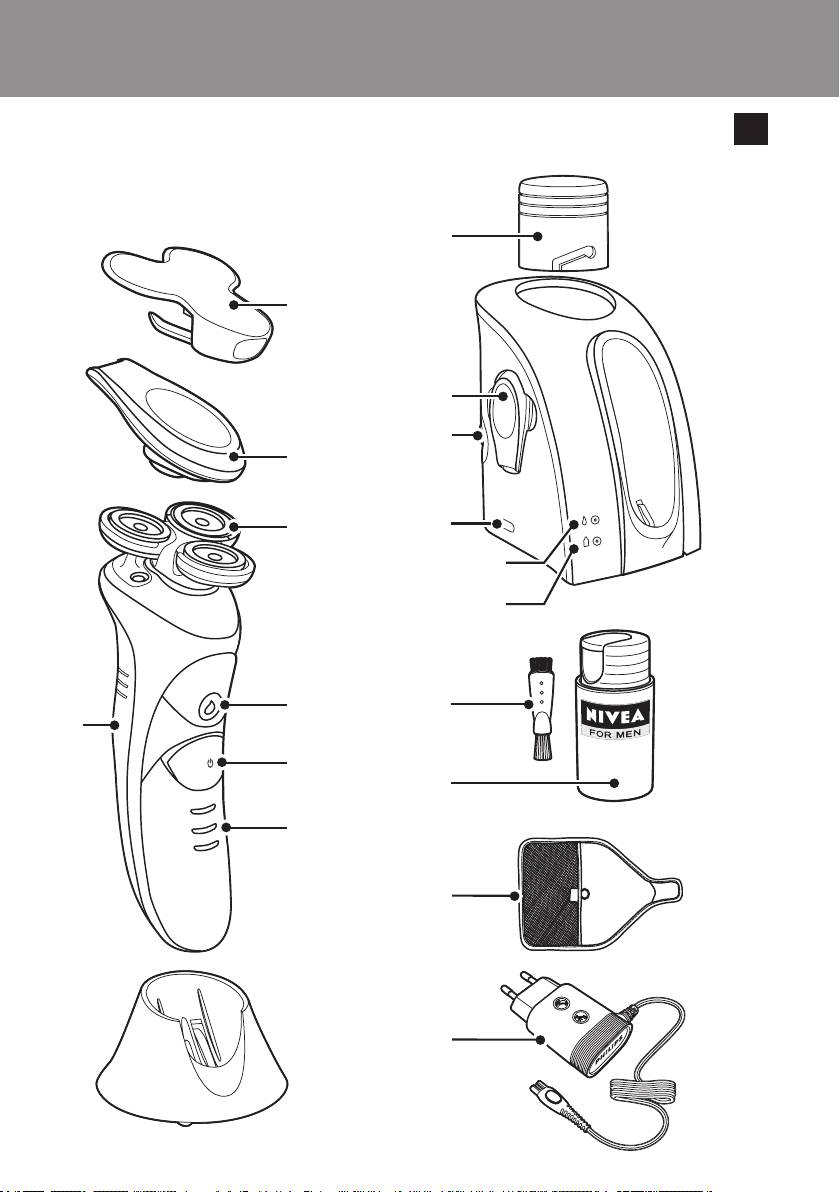
Shaver
Protection cap
Trimmer
Shaving unit
Shaving conditioner cartridge
Shaving conditioner button
On/off button
Charging lights
Charger
Rell & charge station
Cap of the rell & charge station
Trimmer storage recess
Back panel
Socket for small plug
’Filling conditioner cartridge’ light
Conditioner bottle light
Cleaning brush
NIVEA FOR MEN shaving conditioner bottle
Pouch
Adapter (your adapter may differ from the one shown in the gure)
Read this user manual carefully before you use the appliance and save it for future reference.
- Make sure the adapter does not get wet (your adapter may differ from the one shown in the
gure) (Fig. 2).
- Be careful with hot water. Always check if the water is not too hot, to avoid burning your hands.
- The adapter contains a transformer. Do not cut off the adapter to replace it with another plug,
as this causes a hazardous situation.
- This appliance is not intended for use by persons (including children) with reduced physical,
sensory or mental capabilities, or lack of experience and knowledge, unless they have been given
supervision or instruction concerning use of the appliance by a person responsible for their
safety.
- Children should be supervised to ensure that they do not play with the appliance.
- Never immerse the rell & charge station in water nor rinse it under the tap (Fig. 3).
- Never immerse the charger in water nor rinse it under the tap (Fig. 4).
- Always place and use the rell & charge station and the charger on a surface that is uid-
resistant.
- Use, charge and store the appliances at a temperature between 5°C and 35°C.
- Always put the protection cap on the shaver to protect the shaving heads when you are
travelling.

7
- The shaver and the other accessories are not dishwasher-proof.
- Never use water hotter than 80°C to rinse the shaver.
- Only use the adapter, charger and the rell & charge station supplied.
- Do not use the rell & charge station if the adapter or the station itself is damaged.
- Do not use the shaver or the charger if it is damaged.
- If the adapter is damaged, always have it replaced with one of the original type in order to avoid
a hazard.
- This shaver complies with the internationally approved safety regulations and can be safely used
in the bath or shower and cleaned under the tap (Fig. 5).
- This Philips appliance complies with all standards regarding electromagnetic elds (EMF). If
handled properly and according to the instructions in this user manual, the appliance is safe to
use based on scientic evidence available today.
- The adapter transforms 100-240 volts to a safe low voltage of less than 24 volts.
1 Remove the tab of the NIVEA FOR MEN shaving conditioner bottle (Fig. 6).
2 Turn the cap of the conditioner bottle clockwise (‘click’) (Fig. 7).
, The cap moves downwards and the conditioner nozzle appears.
3 Turn the cap of the rell & charge station anticlockwise to remove it.
4 Remove the packaging from the bottle docking hole in the rell & charge station.
5 Place the conditioner bottle in the docking hole with the nozzle pointing downwards (Fig. 8).
6 Place the cap back onto the rell & charge station (1) and turn the cap clockwise to x it
(2) (Fig. 9).
7 Put the small plug in the socket of the rell & charge station and put the adapter in the wall
socket (Fig. 10).
8 Put the shaver in the rell & charge station and push it backwards (‘click’) (Fig. 11).
Note: The shaver is charged and lled with shaving conditioner automatically.
9 Charge the shaver for 90 minutes. (Fig. 12)
Note: Charge the shaver before you use it for the rst time or when the charging light indicates that the
battery is empty (see section ‘Charge indications’).
Note: A fully charged shaver has a shaving time of up to 40 minutes.
1 Put the small plug in the charger and put the adapter in the wall socket.
2 Put the shaver in the charger (Fig. 13).
, The shaver is being charged.
3 Charge the shaver for 1.5 hours.
Note: Charge the shaver before you use it for the rst time or when the charging light indicates that the
battery is empty (see section ‘Charge indications’).
Note: A fully charged shaver has a shaving time of up to 40 minutes.

8
You can also rell the shaving conditioner cartridge without using the rell & charge station:
1 Place the nozzle of the conditioner bottle in the lling opening of the conditioner cartridge.
2 Move the bottle up and down approx. 5 times to pump shaving conditioner into the cartridge
until you see that the cartridge is full (Fig. 14).
- The charging lights indicate to what level the battery has been charged. During charging, the
bottom charging light rst ashes orange and then goes out. The top charging light then starts to
ash white and nally lights up white continuously.
- After the shaver has charged for 9 minutes, the bottom charging light goes out and the top
charging light starts to ash white, to indicate that the shaver contains enough energy for one
shave.
Note: Quick charging is only possible when you have already charged the shaver for 1.5 hours minutes
once.
- The amount of energy left in the battery is indicated by the number of charging lights that are
on. The remaining battery capacity is visible for a few seconds when you switch the shaver on or
off (Fig. 15).
- When the battery is low, the bottom charging light lights up orange during shaving and ashes
orange when you switch off the shaver. (Fig. 16)
- When the battery is fully charged, all charging lights light up white continuously (Fig. 15).
- After approx. 1 hour, the white charging lights go out, to save energy.
, When the conditioner bottle light ashes orange, there are two possibilities: (Fig. 17)
- There is no conditioner bottle in the rell & charge station or the bottle has not been placed
properly.
- The conditioner bottle is empty.
, The ‘lling conditioner cartridge’ light signals three different things: (Fig. 18)
- When the conditioner cartridge is being lled, the white ‘lling conditioner cartridge’ light ashes.
- When the shaving conditioner cartridge is full, the white ‘lling conditioner cartridge’ light is
on continuously.
- If the conditioner bottle becomes empty while the conditioner cartridge is being lled, the white
‘lling conditioner cartridge’ light goes out and the conditioner bottle lights ashes red.
Note: Your skin may need 2 to 3 weeks to get accustomed to a new shaving system.
1 Make sure there is sufcient shaving conditioner in the shaving conditioner cartridge.
9
2 Press the on/off button to switch on the shaver.
3 Make sure the shaver is sufciently charged (see chapter ‘Preparing for use’, section ‘Charge
indications’).
4 Gently move the shaving unit in circles over your skin and press the shaving conditioner
button until there is enough shaving conditioner on your skin for a comfortable
shave. (Fig. 19)
- When you release the shaving conditioner button, the appliance stops dispensing conditioner.
- If you briey press the shaving conditioner button, the appliance automatically applies a certain
amount of conditioner.
- Press the shaving conditioner button again to apply more shaving conditioner during shaving to
ensure that the shaving unit continues to glide smoothly over your skin.
Note: The shaving conditioner button only works when the shaver is switched on.
Note: This shaver can be used in a way similar to a razor blade: you can use the shaver on a wet face.
Unlike a conventional electric shaver, this appliance has no hair chamber that collects stubble. To prevent
stubble from falling on your clothes, apply sufcient shaving conditioner while shaving.
5 Thoroughly clean the shaver after every use (see chapter ‘Cleaning and maintenance’).
6 Slide the protection cap onto the shaver to prevent damage (Fig. 20).
- Gently move the shaver in circles over your skin.
- Do not exert too much pressure on the shaver, as this may cause skin irritation.
- To ensure proper gliding, apply shaving conditioner regularly.
- You can also use the shaver in the bath or shower.
Note: Because of the new open design, you hear the cutting action of the trimmer more clearly than with
other trimmers. This is normal.
1 Pull the shaving unit off the shaver (Fig. 21).
2 Take the trimmer out of the trimmer holder on the charger and put it on the shaver
(‘click’) (Fig. 22).
3 Press the on/off button to switch on the shaver.
4 Use the trimmer to groom your sideburns and/or moustache.
5 Thoroughly clean the trimmer after use (see chapter ‘Cleaning and maintenance’).
6 Remove the trimmer and put it back into the trimmer holder.
7 Put the shaving unit back onto the shaver (‘click’) (Fig. 23).
8 Slide the protection cap onto the shaver to prevent damage (Fig. 20).
Never use scouring pads, abrasive cleaning agents or aggressive liquids such as alcohol, petrol or
acetone to clean the appliance.
Clean the shaver and the trimmer after every use.
Be careful with hot water. Always check if the water is not too hot, to avoid burning your hands.

10
Never dry the shaving unit with a towel or tissue, as this may damage the shaving heads.
Note: The shaver is watertight and can be cleaned with water.
1 Press the on/off button to switch on the shaver.
Note: Clean the shaver while it is switched on.
2 Immerse the shaving unit/trimmer in hot water for at least 30 seconds (Fig. 24).
3 Switch off the shaver and shake off excess water.
4 Slide the protection cap onto the shaver to prevent damage (Fig. 20).
Note: If the shaver does not shave as well as it used to and you are unable to solve this with the cleaning
method described in this chapter, consult chapter ‘Troubleshooting’ for an extra-thorough cleaning
method.
1 Lubricate the trimmer teeth with a drop of sewing machine oil every six months.
1 Store the shaver in the rell & charge station.
2 If you are going to travel or if you do not want to store the shaver in the rell & charge
station, put the protection cap on the shaver and store the shaver in the pouch (Fig. 20).
If you are going to store the shaver for a longer period or if you are going to travel, it is possible to
lock the shaver. The travel lock prevents the shaver from being switched on by accident.
1 Make sure the shaver is switched off.
2 Press and hold the shaving conditioner button (1) and simultaneously press the on/off button
with your other hand (2) (Fig. 25).
3 Hold both buttons for 6 seconds. Wait until the shaver produces a brief humming sound and
the middle charging light on the shaver ashes a few times.
, The travel lock is now activated.
Note: If you accidently press the on/off button rst, the shaver starts working . If this happens, press the
on/off button again to switch off the shaver.
Note: If you press the on/off button when the travel lock is activated, the middle charging light ashes
white to indicate that the shaver is locked.
Tip: Press the on/off button to check if the travel lock is activated. If the travel lock is activated, the
shaver does not go on.
1 Press and hold the shaving conditioner button (1) and simultaneously press the on/off button
with your other hand (2) (Fig. 25).
2 Hold both buttons for 6 seconds. Wait until the shaver produces a brief humming sound and
the middle charging light on the shaver ashes a few times.
, The travel lock is now deactivated.
11
Note: You can also deactivate the travel lock by placing the shaver back into the charger.
If you are going to travel and you don’t want to take the rell & charge station with you, you can
take the charger with you, to charge the shaver when necessary.
For hygienic reasons, we advise you to replace the shaving conditioner cartridge once a year. A new
cartridge is packed with each NIVEA FOR MEN shaving conditioner bottle 3-pack, and with the
replacement kit (which contains a new HS85 shaving unit and a new cartridge).
1 Remove the shaving conditioner cartridge from the shaver (Fig. 26).
2 Insert the lug at the top of the new shaving conditioner cartridge into the slot in the rim of
the shaver (1). Then press the bottom part of the cartridge with your thumb (2) to attach the
cartridge to the shaver (‘click’) (Fig. 27).
3 Fill the shaving conditioner cartridge (see chapter ‘Getting started’).
Replace the shaving unit every year for optimal shaving results.
Only replace the shaving unit with an HS85 Philips Shaving Unit.
1 Pull the old shaving unit off the shaver (Fig. 21).
2 Put the new shaving unit on the shaver (‘click’) (Fig. 23).
Only use NIVEA FOR MEN shaving conditioner bottles.
1 Remove the tab of the NIVEA FOR MEN shaving conditioner bottle (Fig. 6).
2 Turn the cap of the conditioner bottle clockwise (‘click’) (Fig. 7).
, The cap moves downwards and the conditioner nozzle appears.
3 Turn the cap of the rell & charge station anticlockwise to remove it.
4 Put the conditioner bottle in the bottle docking hole with the nozzle pointing
downwards (Fig. 8).
5 Push the cap back onto the rell & charge station (1) and turn it clockwise (2) to x
it (Fig. 9).
- Do not throw away the appliance with the normal household waste at the end of its life, but
hand it in at an ofcial collection point for recycling. By doing this, you help to preserve the
environment (Fig. 28).
- The built-in rechargeable battery contains substances that may pollute the environment. Always
remove the battery before you discard and hand in the appliance at an ofcial collection point.
Dispose of the battery at an ofcial collection point for batteries. If you have trouble removing
the battery, you can also take the appliance to a Philips service centre. The staff of this centre
will remove the battery for you and will dispose of it in an environmentally safe way.

12
Only remove the rechargeable battery when you discard the shaver. Make sure the battery
is completely empty when you remove it.
Be careful, the battery strips are sharp.
1 Remove the shaving conditioner cartridge from the shaver (Fig. 26).
2 Undo the three screws at the back of the shaver (Fig. 29).
3 Remove the back panel of the housing with a screwdriver (Fig. 30).
4 Cut the wires and remove the rechargeable battery.
If you need service or information or if you have a problem, please visit the Philips website at
www.philips.com/supportor contact the Philips Consumer Care Centre in your country (you nd
its phone number in the worldwide guarantee leaet). If there is no Consumer Care Centre in your
country, go to your local Philips dealer.
The shaving unit (cutters and guards) is not covered by the terms of the international guarantee
because they are subject to wear.
The conditioner cartridge is a disposable item and is not covered by the terms of the international
guarantee.

13
This chapter summarises the most common problems you could encounter with the appliance. If
you are unable to solve the problem with the information below, contact the Consumer Care
Centre in your country.
Problem Possible cause Solution
The shaver does
You have not applied
Press the shaving conditioner button until a
not glide
enough shaving
sufcient amount of NIVEA FOR MEN shaving
smoothly over
conditioner.
conditioner has been released. This makes the
my skin.
shaving unit glide smoothly over your skin again.
The shaver does
You have not cleaned
Clean the shaver thoroughly (see chapter ‘Cleaning
not shave as well
the shaver properly.
and maintenance’).
as it used to.
Long hairs obstruct the
Clean the shaving heads by following the steps of
shaving heads.
the extra-thorough cleaning method described
below.
The shaving unit is
Replace the shaving unit (see chapter
damaged or worn.
‘Replacement’).
The shaver does
The rechargeable
Recharge the battery (see chapter ‘Preparing for
not work when I
battery is empty.
use’).
press the on/off
button.
The travel lock is
Deactivate the travel lock (see chapter ‘Storage’).
activated.
Dried shaving
Clean the shaver thoroughly before you continue
conditioner blocks the
shaving (see chapter ‘Cleaning’).
shaving heads in the
shaving unit.
You have not
When you reassemble the shaving unit, make sure
reassembled the shaving
you turn each guard anticlockwise until it locks into
unit properly after
position.
extra-thorough cleaning.
Little shaving
One of the conditioner
Rinse or soak the shaving unit. If this does not
conditioner
holes is blocked.
work, pump shaving conditioner into the shaving
comes out of the
conditioner cartridge until conditioner starts to
holes even
come out of the blocked hole. If this does not
though there is
work either, try the following method: 1) Switch off
enough
the shaver 2) Pull the shaving unit off the shaver 3)
conditioner in the
Put your nger on the hole that is not blocked 4)
cartridge.
Switch on the shaver 5) Press the shaving
conditioner button several seconds until
conditioner starts to come out of the blocked hole
again.

14
Problem Possible cause Solution
You have not put the
Make sure you put the shaving head without
shaving heads back into
conditioner hole in the correct holder. This is the
their original holders.
holder that is closest to the on/off button when
One of the shaving
the shaving unit is assembled on the shaver.
heads does not have a
shaving conditioner hole
in its centre and needs
to be placed in a
specic holder.
No shaving
The shaving cartridge is
Rell the shaving conditioner cartridge (see
conditioner
almost empty.
chapter ‘Preparing for use’).
comes out of the
holes when I
press the shaving
conditioner
button.
The trimmer
This trimmer has an
Due to the new open design, you hear the cutting
makes more
open design.
action of the trimmer more clearly than is the case
noise than other
with other trimmers. This is normal and does not
trimmers.
mean that there is something wrong with the
trimmer.
Make sure the appliance is switched off.
1 Pull the shaving unit off the shaver (Fig. 31).
2 Turn the guard clockwise and lift it from the shaving unit (Fig. 32).
Note: Only remove one shaving head at a time. This ensures that you always put the shaving head back
into its original holder, which is necessary because two of the shaving heads have special holes for the
shaving conditioner. This also ensures that you do not mix up the cutters and guards of different shaving
heads, which affects the shaving performance.
3 If necessary, remove the cutter from the guard.
4 Clean the cutter and guard with the brush supplied.
5 After cleaning, place the cutter back into the shaving unit with the cutter legs
pointing upwards.
6 Place the guard back onto the shaving head holder (over the cutter) (Fig. 33).
7 Turn the guard anticlockwise until it locks into position (Fig. 34).
8 Put the shaving unit back onto the shaver (‘click’) (Fig. 35).

15
Поздравления за вашата покупка и добре дошли във Philips! За да се възползвате изцяло от
предлаганата от Philips поддръжка, регистрирайте продукта си на www.philips.com/welcome.
Прочетете внимателно това ръководство за потребителя, тъй като то съдържа информация
за прекрасните функции на тази самобръсначка, а също и някои съвети, които ще направят
бръсненето ви по-бързо и по-приятно.
Самобръсначка
Предпазна капачка
Машинка за подстригване
Бръснещ блок
Касета с омекотител за бръснене
Бутон за омекотителя за бръснене
Бутон за вкл./изкл.
Светлинни индикатори за зареждане
Зарядно устройство
Стойка за пълнене и зареждане
Капачка на стойката за пълнене и зареждане
Отделение за съхранение на приставката за подстригване
Заден панел
Гнездо за малък жак
Индикатор “Пълнене на касетата с омекотител”
Индикатор на бутилката с омекотител
Четка за почистване
Бутилка с омекотител за бръснене NIVEA FOR MEN
Торбичка
Адаптер (вашият адаптер може да се различава от показания на фигурата)
Преди да използвате уреда, прочетете внимателно това ръководство за експлоатация и го
запазете за справка в бъдеще.
- Внимавайте адаптерът да не се намокри (вашият адаптер може да се различава от
показания на фигурата) (фиг. 2).
- Внимавайте с горещата вода. Винаги проверявайте дали водата не е прекалено гореща, за
да не изгорите ръцете си.
- В адаптера има трансформатор. Не отрязвайте адаптера, за да го замените с друг щепсел,
тъй като това носи опасност.
- Този уред не е предназначен за ползване от хора с намалени физически усещания или
умствени недостатъци или без опит и познания, включително деца, ако са оставени без
наблюдение и не са инструктирани от страна на отговарящо за тяхната безопасност лице
относно начина на използване на уреда.
- Наглеждайте децата, за да не си играят с уреда.
- Никога не потапяйте стойката за пълнене и зареждане във вода и не я плакнете с течаща
вода (фиг. 3).
- Никога не потапяйте зарядното устройство във вода и не го плакнете под
чешмата (фиг. 4).

16
- Винаги поставяйте стойката за пълнене и зареждане и зарядното устройство върху
устойчива на течности повърхност.
- Използвайте, зареждайте и съхранявайте уредите при температура между 5°C и 35°C.
- За да предпазите бръснещите глави при пътуване, винаги поставяйте предпазната капачка
на самобръсначката.
- Самобръсначката и другите принадлежности не може да се почистват в съдомиялна
машина.
- Никога не използвайте вода, по-гореща от 80°C, за да изплаквате самобръсначката.
- Използвайте само приложените адаптер, зарядно устройство и стойка за пълнене и
зареждане.
- Не използвайте стойката за пълнене и зареждане, ако са повредени адаптерът или самата
стойка.
- Не използвайте самобръсначката или зарядното устройство, ако са повредени.
- С оглед на предотвратяване на злополука, винаги заменяйте повредения адаптер само с
оригинален такъв.
- Тази -самобръсначка съответства на международно одобрените норми за безопасност и
може да се използва безопасно в банята или под душа, както и да се мие с течаща
вода (фиг. 5).
- Този уред Philips е в съответствие с всички стандарти по отношение на
електромагнитните излъчвания (EMF). Ако се употребява правилно и съобразно
напътствията в Ръководството, уредът е безопасен за използване според наличните
досега научни факти.
- Адаптерът преобразува 100-240 волта в безопасно ниско напрежение под 24 волта.
1 Извадете стопера от бутилката с омекотител за бръснене NIVEA FOR MEN (фиг. 6)
2 Завъртете капачката на бутилката с омекотител надясно (с щракване) (фиг. 7).
, Капачката се премества надолу и се появява гърлото на омекотителя.
3 Завъртете капачката на стойката за пълнене и зареждане наляво, за да я свалите.
4 Свалете опаковката от отвора за закрепване на стойката за пълнене и зареждане.
5 Поставете бутилката с омекотител в отвора за закрепване, като гърлото сочи
надолу (фиг. 8).
6 Поставете капачката обратно на стойката за пълнене и зареждане (1) и завъртете
капачката по посока на часовниковата стрелка, за да я застопорите (2) (фиг. 9).
7 Поставете малкия жак в гнездото на стойката за пълнене и зареждане и включете
адаптера в контакта (фиг. 10).
8 Поставете самобръсначката в стойката за пълнене и зареждане и я натиснете назад
(щракване) (фиг. 11).
Забележка: Самобръсначката автоматично се зарежда и напълва с омекотител за бръснене.
9 Зареждайте самобръсначката 90 минути. (фиг. 12)
Забележка: Заредете самобръсначката, преди да я използвате за първи път и когато
индикаторът за зареждане покаже, че батерията е изтощена (вж. раздела “Индикации за
зареждане”).
17
Забележка: Напълно заредената самобръсначка може да се използва за бръснене в
продължение на 40 минути.
1 Поставете малкия жак в зарядното устройство и включете адаптера в контакта.
2 Сложете самобръсначката в зарядното устройство (фиг. 13).
, Самобръсначката се зарежда.
3 Зареждайте самобръсначката 1,5 часа.
Забележка: Заредете самобръсначката, преди да я използвате за първи път и когато
индикаторът за зареждане покаже, че батерията е изтощена (вж. раздела “Индикации за
зареждане”).
Забележка: Напълно заредената самобръсначка може да се използва за бръснене в
продължение на 40 минути.
Можете да пълните касетата с омекотител за бръснене и без да използвате стойката за
пълнене и зареждане.
1 Поставете гърлото на бутилката с омекотител в отвора за пълнене на касетата с
омекотител.
2 Преместете бутилката нагоре и надолу около 5 пъти, за да изпомпате омекотител за
бръснене в касетата, докато видите, че касетата е пълна (фиг. 14).
- Индикаторите за зареждане показват до какво ниво е заредена батерията. По време на
зареждане долният индикатор за зареждане мига в оранжево, а после изгасва. След това
горният индикатор за зареждане започва да мига в бяло и накрая започва да свети
постоянно в бяло.
- След като самобръсначката се е зареждала в продължение на 9 минути, долният
индикатор за зареждане изгасва, а горният индикатор за зареждане започва да мига в
бяло, за да покаже, че самобръсначката разполага с достатъчно заряд за едно бръснене.
Забележка: Бързо зареждане е възможно само ако вече сте заредили самобръсначката веднъж
в продължение на 1,5 часа.
- Оставащата енергия на батерията се вижда от броя индикатори за зареждане, които
светят. Тя се показва за няколко секунди когато включвате или изключвате
самобръсначката (фиг. 15).
- Когато батерията е изтощена, долният индикатор за зареждане свети в оранжево по
време на бръснене и мига в оранжево, когато изключите самобръсначката. (фиг. 16)
- Когато батерията е напълно заредена, всички индикатори за зареждане светват
постоянно в бяло (фиг. 15).
- След около 1 час белите индикатори за зареждане угасват, за да се пести енергия.
18
, Когато индикаторът на бутилката с омекотител мига в оранжево, има две
възможности: (фиг. 17)
- Няма бутилка с омекотител в стойката за пълнене и зареждане или бутилката не е
поставена правилно.
- Бутилката с омекотител е празна.
, Индикаторът “Пълнене на касетата с омекотител” сигнализира за три различни
неща: (фиг. 18)
- Когато касетата с омекотител се пълни, белият индикатор “Пълнене на касетата с
омекотител” мига.
- Когато касетата с омекотител за бръснене е пълна, белият индикатор “Пълнене на
касетата с омекотител” свети постоянно.
- Ако бутилката с омекотител се изпразни, докато касетата с омекотител се пълни, белият
индикатор “Пълнене на касетата с омекотител” угасва и индикаторите на бутилката с
омекотител започват да мигат в червено.
Забележка: На кожата ви може би ще са необходими 2 до 3 седмици, за да свикне с новата
система за бръснене.
1 Уверете се, че има достатъчно омекотител за бръснене в касетата с омекотител.
2 Натиснете бутона вкл./изкл., за да включите самобръсначката.
3 Уверете се, че самобръсначката е заредена достатъчно (вижте глава “Подготовка за
употреба”, раздел “Индикации за зареждане”).
4 Леко движете бръснещия блок в кръгове върху кожата и натискайте бутона за
омекотител за бръснене, докато върху кожата се нанесе достатъчно омекотител за
комфортно бръснене. (фиг. 19)
- Когато използвате отпуснете бутона за омекотител за бръснене, уредът спира да нанася
омекотител.
- Ако натиснете бутона за омекотител за бръснене за кратко време, уредът нанася малко
количество омекотител.
- Натискайте бутона за омекотител за бръснене отново, за да нанесете още омекотител
през време на бръсненето, за да гарантирате, че бръснещият блок ще продължи да се
плъзга гладко по кожата.
Забележка: Бутонът за омекотител за бръснене работи само когато самобръсначката е
включена.
Забележка: Тази самобръсначка може да се използва по начин, подобен на самобръсначка с
ножче: можете да използвате самобръсначката върху мокро лице. За разлика от
обикновените електрически самобръсначки, този уред няма отделение за косми, в което да се
събира обръснатото. За да не пада обръснатото върху дрехите ви, нанасяйте достатъчно
омекотител при бръсненето.
5 Почиствайте обстойно самобръсначката след всяка употреба (вижте раздел
“Почистване и поддръжка”).
6 За да избегнете повреди, поставяйте предпазната капачка на самобръсначката (фиг. 20).
19
- Движете самобръсначката леко и на кръгове по кожата си.
- Не упражнявайте прекомерен натиск върху самобръсначката, за да се избегне възпаление
на кожата.
- За гарантиране на доброто плъзгане нанасяйте редовно омекотител за бръснене.
- Можете да използвате самобръсначката и във ваната или под душа.
Забележка: Поради новата, отворена конструкция, вие чувате режещото действие на
приставката за подстригване по-ясно, отколкото при други машинки за подстригване. Това е
нормално.
1 Извадете бръснещия блок от самобръсначката (фиг. 21).
2 Извадете приставката за подстригване от отделението за съхранение зарядното
устройство и я поставете на самобръсначката (с щракване) (фиг. 22).
3 Натиснете бутона вкл./изкл., за да включите самобръсначката.
4 Използвайте приставката за подстригване, за да оформите бакенбардите и мустаците.
5 Почиствайте обстойно приставката за подстригване след употреба (вижте раздел
“Почистване и поддръжка”).
6 Извадете приставката за подстригване и я поставете отново в отделението за
приставката.
7 Сложете бръснещия блок обратно върху самобръсначката (с щракване) (фиг. 23).
8 За да избегнете повреди, поставяйте предпазната капачка на самобръсначката (фиг. 20).
Никога не използвайте за почистване на уреда фибро гъби, абразивни почистващи
препарати или агресивни течности, като спирт, бензин или ацетон.
Почиствайте самобръсначката и приставката за подстригване след всяка употреба.
Внимавайте с горещата вода. Винаги проверявайте дали водата не е прекалено гореща, за
да не изгорите ръцете си.
Никога не подсушавайте бръснещия блок с кърпа за баня или хартиени салфетки, защото
това може да повреди бръснещите глави.
Забележка: Самобръсначката е водонепропусклива и може да се мие с вода.
1 Натиснете бутона вкл./изкл., за да включите самобръсначката.
Забележка: Почиствайте самобръсначката, докато е включена.
2 Потопете бръснещия блок/приставката за подстригване в гореща вода най-малко за 30
секунди (фиг. 24).
3 Изключете самобръсначката и изтръскайте излишната вода.
4 За да избегнете повреди, поставяйте предпазната капачка на самобръсначката (фиг. 20).

20
Забележка: Ако самобръсначката не бръсне така добре, както преди, и не можете да
разрешите проблема с метода за почистване, описан в този раздел, направете справка в
раздела “Отстраняване на неизправности” за метод за цялостно почистване.
1 Смазвайте зъбците на машинката за подстригване с капка фино машинно масло на
всеки шест месеца.
1 Съхранявайте самобръсначката в стойката за пълнене и зареждане.
2 Ако ще пътувате или не искате да съхранявате самобръсначката в стойката за пълнене
и зареждане, поставете предпазната капачка върху самобръсначката и я съхранявайте в
чантичката (фиг. 20).
Ако ще прибирате самобръсначката за по-дълго време или ще пътувате, можете да заключите
самобръсначката. Заключването при пътуване предпазва самобръсначката от случайно
включване.
1 Уверете се, че самобръсначката е изключена.
2 Натиснете и задръжте бутона за омекотител за бръснене (1) и в същото време
натиснете с другата ръка бутона за вкл./изкл. (2) (фиг. 25).
3 Задръжте и двата бутона за 6 секунди. Изчакайте, докато самобръсначката издаде
кратък бръмчащ звук и средният индикатор за зареждане на самобръсначката премигне
няколко пъти.
, Заключването при пътуване е включено.
Забележка: Ако случайно натиснете първо бутона вкл./изкл., самобръсначката започва да
работи. Ако това се случи, натиснете отново бутона вкл./изкл., за да изключите
самобръсначката.
Забележка: Ако случайно натиснете бутона вкл./изкл., когато заключването при пътуване е
включено, средният индикатор за зареждане мига в бяло, за да покаже, че самобръсначката е
заключена.
Съвет: Натиснете бутона вкл./изкл., за да проверите дали заключването при пътуване е
включено. Ако е включено, самобръсначката не се включва.
1 Натиснете и задръжте бутона за омекотител за бръснене (1) и в същото време
натиснете с другата ръка бутона за вкл./изкл. (2) (фиг. 25).
2 Задръжте и двата бутона за 6 секунди. Изчакайте, докато самобръсначката издаде
кратък бръмчащ звук и средният индикатор за зареждане на самобръсначката премигне
няколко пъти.
, Заключването при пътуване е изключено.
Забележка: Можете да изключите заключването при пътуване и като поставите
самобръсначката обратно в зарядното устройство.
21
Ако ще пътувате и не искате да взимате стойката за пълнене и зареждане със себе си,
можете да вземете зарядното устройство, за да зареждате самобръсначката, когато е
необходимо.
По хигиенни съображения препоръчваме смяната на касетата с омекотител за бръснене
веднъж годишно. Нова касета се съдържа във всеки комплект от 3 бутилки с омекотител за
бръснене NIVEA FOR MEN, както и в комплекта за замяна, който съдържа нов бръснещ блок
HS85 и нова касета.
1 Извадете касетата с омекотител за бръснене от самобръсначката (фиг. 26).
2 Вкарайте издатината отгоре на новата касета с омекотител за бръснене в жлеба отгоре
на самобръсначката (1). След това натиснете долната част на касетата с палец (2), за да
закрепите касетата към самобръсначката (с щракване) (фиг. 27).
3 Напълнете касетата с омекотител за бръснене (вж. раздела “Запознаване”).
Сменяйте бръснещия блок всяка година, за да постигнете оптимални резултати при бръснене.
Подменяйте бръснещия блок само с бръснещ блок HS85 Philips.
1 Извадете стария бръснещ блок от самобръсначката (фиг. 21).
2 Сложете новия бръснещ блок обратно върху самобръсначката (с щракване) (фиг. 23).
Използвайте само бутилки с омекотител за бръснене NIVEA FOR MEN.
1 Извадете стопера от бутилката с омекотител за бръснене NIVEA FOR MEN (фиг. 6)
2 Завъртете капачката на бутилката с омекотител надясно (с щракване) (фиг. 7).
, Капачката се премества надолу и се появява гърлото на омекотителя.
3 Завъртете капачката на стойката за пълнене и зареждане наляво, за да я свалите.
4 Поставете бутилката с омекотител в отвора за закрепване на бутилката, като гърлото
сочи надолу (фиг. 8).
5 Натиснете капачката отново върху стойката за пълнене и зареждане (1) и я завъртете
надясно (2), за да я закрепите (фиг. 9).
- След края на срока на експлоатация на уреда не го изхвърляйте заедно с нормалните
битови отпадъци, а го предайте в официален пункт за събиране, където да бъде
рециклиран. По този начин вие помагате за опазването на околната среда (фиг. 28).
- Вградената акумулаторна батерия съдържа вещества, които замърсяват околната среда.
Винаги изваждайте батерията, преди да изхвърлите уреда или да го предадете в
официален пункт за събиране. Изхвърляйте батерията в официален пункт за събиране на
батерии. Ако имате проблеми при изваждане на батерията, можете също да занесете
уреда в сервизен център на Philips. Там служителите ще извадят батерията и ще я
изхвърлят по начин, опазващ околната среда.
22
Изваждайте акумулаторната батерия само когато ще изхвърляте самобръсначката. Трябва
да сте сигурни, че батерията е напълно изтощена, когато я изваждате.
Внимавайте, планките на батерията са остри.
1 Извадете касетата с омекотител за бръснене от самобръсначката (фиг. 26).
2 Развийте трите винта на гърба на самобръсначката (фиг. 29).
3 Свалете задния панел на корпуса с отвертка (фиг. 30).
4 Срежете проводниците и извадете акумулаторната батерия.
Ако се нуждаете от сервизно обслужване или информация или имате проблем, посетете уеб
сайта на Philips на адрес www.philips.com/support или се обърнете към Центъра за
обслужване на потребители на Philips във вашата държава (телефонния му номер ще
намерите в международната гаранционна карта). Ако във вашата държава няма Център за
обслужване на потребители, обърнете се към местния търговец на уреди на Philips.
Условията на международната гаранция не важат за бръснещия блок (ножчета и
предпазители), тъй като те подлежат на амортизация.
Касетата с омекотител е консуматив и не се покрива от условията на международната
гаранция.
В този раздел са обобщени най-често срещаните проблеми, на които можете да се натъкнете
при ползване на този уред. Ако не можете да разрешите проблема с помощта на долните
указания, свържете се с Центъра за обслужване на потребители във вашата страна.
Проблем Възможна причина Решение
Самобръсначката
Не сте нанесли
Натиснете бутона за омекотител за бръснене,
не се движи гладко
достатъчно
докато се нанесе достатъчно количество
по кожата.
омекотител за
омекотител за бръснене NIVEA FOR MEN. Така
бръснене.
бръснещият блок ще се движи отново гладко
по кожата ви.
Самобръсначката
Не сте почистили
Почистете щателно самобръсначката (вижте
не бръсне толкова
добре
раздел “Почистване и поддръжка”).
добре, колкото
самобръсначката.
преди.
Дълги косми са
Почистете бръснещите глави, като следвате
блокирали
стъпките на метода за цялостно почистване,
бръснещите глави.
описан по-долу.
Бръснещият блок е
Сменете бръснещия блок (вижте раздел
повреден или
“Замяна”).
износен.

23
Проблем Възможна причина Решение
Самобръсначката
Акумулаторната
Презаредете батерията (вижте раздел
не работи, когато
батерия е изтощена.
“Подготовка за употреба”).
натисна бутона за
вкл./изкл.
Заключването при
Изключете заключването при пътуване (вижте
пътуване е
раздел “Съхранение”).
включено.
Засъхнал
Почистете добре самобръсначката, преди да
омекотител за
продължите бръсненето (вижте раздел
бръснене блокира
“Почистване”).
бръснещите глави в
бръснещия блок.
Не сте сглобили
Когато сглобявате бръснещия блок, трябва да
правилно бръснещия
завъртите всеки предпазител обратно на
блок след цялостно
часовниковата стрелка, докато се застопори на
почистване.
мястото си.
От отворите не
Един от отворите за
Промийте или потопете във вода бръснещия
излиза достатъчно
омекотител е
блок. Ако това не помогне, изпомпайте
омекотител за
запушен.
омекотител за бръснене в касетата за
бръснене, въпреки
омекотител за бръснене, докато омекотителят
че в касетата има
не започне да излиза от запушения отвор. Ако
достатъчно
и това не помогне, опитайте следния метод: 1)
омекотител.
Изключете самобръсначката; 2) Свалете
бръснещия блок от самобръсначката; 3)
Сложете пръст на отвора, който не е запушен;
4) Включете самобръсначката; 5) Натиснете
бутона за омекотител за бръснене за няколко
секунди, докато омекотителят не започне да
излиза отново от запушения отвор.
Не сте поставили
Погрижете се да поставите бръснещата глава
бръснещите глави в
без отвор за омекотител в правилното
първоначалните им
отделение. Това е отделението най-близо до
отделения. Една от
бутона за вкл./изкл., когато бръснещият блок се
бръснещите глави
сглобява към самобръсначката.
няма отвор за
омекотител за
бръснене в средата
и трябва да се
постави в точно
определено
отделение.
От отворите не
Касетата за
Напълнете касетата за омекотител за бръснене
излиза омекотител
омекотител е почти
(вижте раздел “Подготовка за употреба”).
за бръснене, когато
празна.
натисна бутона за
омекотител за
бръснене.

24
Проблем Възможна причина Решение
Приставката за
Тази приставка за
Поради новата, отворена конструкция, вие
подстригване
подстригване има
чувате режещото действие на приставката за
издава повече шум
отворена
подстригване по-ясно, отколкото при други
от други машинки
конструкция.
такива машинки. Това е нормално и не означава,
за подстригване.
че има повреда на машинката за подстригване.
Уверете се, че уредът е изключен.
1 Извадете бръснещия блок от самобръсначката (фиг. 31).
2 Завъртете предпазителя надясно и го повдигнете от бръснещия блок (фиг. 32).
Забележка: Изваждайте бръснещите глави само една по една. Това гарантира, че винаги ще
поставяте бръснещата глава на нейното място, което е необходимо, защото две от
бръснещите глави имат специални отвори за омекотител за бръснене. С това се гарантира и
че няма да объркате ножовете и предпазителите на различните бръснещи глави, което
влошава бръсненето.
3 Ако е необходимо, свалете ножа от предпазителя.
4 Почистете ножа и предпазителя с включената в комплекта четчица.
5 След почистване поставете ножа отново в бръснещия блок, като крачетата сочат
нагоре.
6 Поставете предпазителя отново върху отделението на бръснещата глава (върху
ножа) (фиг. 33).
7 Завъртете предпазителя наляво, докато се фиксира на място (фиг. 34).
8 Сложете бръснещия блок обратно върху самобръсначката (с щракване) (фиг. 35).

25
Blahopřejeme vám k nákupu a vítáme vás ve společnosti Philips. Abyste mohli plně využít podpory,
kterou Philips poskytuje, zaregistrujte svůj výrobek na adrese www.philips.com/welcome.
Přečtěte si tuto uživatelskou příručku. Naleznete zde informace o úžasných funkcích tohoto holicího
strojku i několik tipů, díky nimž bude holení snazší a radostnější.
Holicí strojek
Ochranný kryt
Zastřihovač
Holicí jednotka
Zásobník s kondicionérem
Tlačítko kondicionéru
Vypínač
Kontrolky nabíjení
Nabíječka
Základna pro nabíjení a doplňování
Uzávěr základny pro nabíjení a doplňování
Otvor pro uložení zastřihovače
Zadní panel
Zásuvka pro malou zástrčku
Indikátor doplňování zásobníku s kondicionérem
Indikátor lahvičky s kondicionérem
Čisticí kartáč
Lahvička s kondicionérem NIVEA FOR MEN
Pouzdro
Adaptér (váš adaptér se může lišit od adaptéru znázorněného na obrázku)
Před použitím přístroje si důkladně přečtěte tuto uživatelskou příručku a uschovejte ji pro budoucí
použití.
- Zajistěte, aby nedošlo k namočení adaptéru (váš adaptér se může lišit od adaptéru na
obrázku) (Obr. 2).
- Při použití horké vody buďte opatrní. Abyste si neopařili ruce, vždy předem zkontrolujte, zda
voda není příliš horká.
- Adaptér obsahuje transformátor. Proto tento adaptér nikdy nenahrazujte jinou zástrčkou,
protože by mohla vzniknout nebezpečná situace.
- Osoby (včetně dětí) s omezenými fyzickými, smyslovými nebo duševními schopnostmi nebo
nedostatkem zkušeností a znalostí by neměly s přístrojem manipulovat, pokud nebyly o používání
přístroje předem poučeny nebo nejsou pod dohledem osoby zodpovědné za jejich bezpečnost.
- Dohlédněte na to, aby si s přístrojem nehrály děti.
- Neponořujte základnu pro nabíjení a doplňování do vody ani ji neumývejte pod tekoucí
vodou (Obr. 3).
- Nabíječku nikdy neponořujte do vody ani ji neoplachujte pod tekoucí vodou (Obr. 4).
- Základna pro nabíjení a doplňování a nabíječka by měla být vždy umístěna a používána na
povrchu, který je odolný vůči tekutinám.
- Přístroj používejte, nabíjejte a uchovávejte při teplotě mezi 5 °C a 35 °C.
26
- Před cestováním vždy nasaďte na holicí strojek ochranný kryt, aby byly chráněny holicí hlavy.
- Holicí strojek a jiné příslušenství nelze mýt v myčce na nádobí.
- Pro oplachování holicího strojku nikdy nepoužívejte vodu teplejší než 80 °C.
- Používejte pouze dodaný adaptér, nabíječku a základnu pro nabíjení a doplňování.
- Pokud jsou adaptér nebo základna poškozeny, základnu pro nabíjení a doplňování nepoužívejte.
- Holicí strojek nebo nabíječku nepoužívejte, pokud jsou poškozené.
- Pokud byl poškozen adaptér, musí být vždy nahrazen originálním typem, abyste předešli
možnému nebezpečí.
- Tento přístroj odpovídá mezinárodním bezpečnostním předpisům a lze jej bez obav používat
ve vaně nebo ve sprše a čistit pod tekoucí vodou (Obr. 5).
- Tento přístroj společnosti Philips odpovídá všem normám týkajícím se elektromagnetických polí
(EMP). Pokud je správně používán v souladu s pokyny uvedenými v této uživatelské příručce, je
jeho použití podle dosud dostupných vědeckých poznatků bezpečné.
- Adaptér transformuje 100 V až 240 V na bezpečné nízké napětí nižší než 24 V.
1 Odstraňte pásek z lahvičky kondicionéru NIVEA FOR MEN (Obr. 6).
2 Otočte uzávěr lahvičky kondicionéru ve směru hodinových ručiček (ozve se
„klapnutí“) (Obr. 7).
, Uzávěr se posune směrem dolů a objeví se hubice kondicionéru.
3 Otočením uzávěru základny pro nabíjení a doplňování proti směru hodinových ručiček uzávěr
odstraňte.
4 Odstraňte obal z otvoru pro vložení lahvičky na základně pro nabíjení a doplňování.
5 Vložte lahvičku kondicionéru do tohoto otvoru s hubicí směřující dolů (Obr. 8).
6 Vložte uzávěr zpět do základny pro nabíjení a doplňování (1) a upevněte jej otočením ve
směru hodinových ručiček (2) (Obr. 9).
7 Zasuňte malou zástrčku do zdířky v základně pro nabíjení a doplňování a připojte adaptér do
zásuvky ve zdi (Obr. 10).
8 Vložte holicí strojek do základny pro nabíjení a doplňování a zatlačte jej směrem dozadu
(ozve se „klapnutí“) (Obr. 11).
Poznámka: Holicí strojek se automaticky nabíjí a doplňuje kondicionérem.
9 Holicí strojek se nabíjí po dobu 90 minut. (Obr. 12)
Poznámka: Před prvním použitím holicího strojku nebo v případě rozsvícení indikátoru nabití označujícího,
že akumulátor je vybitý (viz část „Indikátory nabití“), je nutné holicí strojek nabít.
Poznámka: Plně nabitý holicí strojek vystačí až na 40 minut holení.
1 Zasuňte malou zástrčku do nabíječky a adaptér do zásuvky ve zdi.
2 Vložte přístroj do nabíječky (Obr. 13).
, Holicí strojek se nabíjí.
3 Holící strojek nabíjejte po dobu 1,5 hodiny.

27
Poznámka: Před prvním použitím holicího strojku nebo v případě rozsvícení indikátoru nabití označujícího,
že akumulátor je vybitý (viz část „Indikátory nabití“), je nutné holicí strojek nabít.
Poznámka: Plně nabitý holicí strojek vystačí až na 40 minut holení.
Zásobník kondicionéru můžete doplnit také bez použití základny pro nabíjení a doplňování:
1 Vložte hubici lahvičky kondicionéru do otvoru v zásobníku kondicionéru.
2 Pohybujte s lahvičkou nahoru a dolů přibližně pětkrát, takto můžete pumpovat kondicionér
do zásobníku, dokud není zásobník plný (Obr. 14).
- Kontrolky nabíjení indikují míru, do jaké je akumulátor nabitý. Spodní kontrolka nabíjení bliká
v průběhu nabíjení nejprve oranžově a poté zhasne. Následně začne horní kontrolka
nabíjení blikat bíle a nakonec zůstane trvale bíle svítit.
- Po nabíjení holicího strojku po dobu 9 minut dolní indikátor nabíjení zhasne a horní indikátor
začne bíle blikat, což znamená, že má holicí strojek dostatek energie na jedno oholení.
Poznámka: Rychlé nabíjení je možné provést pouze pokud jste holicí strojek již alespoň jednou nabíjeli po
dobu 1,5 hodiny.
- Množství zbývající energie v akumulátoru je označeno počtem rozsvícených indikátorů nabíjení.
Zbývající kapacita akumulátoru je zobrazena po dobu několika sekund při zapnutí a vypnutí
holicího strojku (Obr. 15).
- Pokud je akumulátor vybitý, spodní indikátor svítí během holení oranžově a po vypnutí holicího
strojku oranžově bliká. (Obr. 16)
- Jakmile je akumulátor plně nabitý, všechny kontrolky stavu akumulátoru se trvale
rozsvítí (Obr. 15).
- Po přibližně 1 hodině bílé kontrolky nabíjení zhasnou, aby šetřily energii.
, Pokud indikátor lahvičky s kondicionérem bliká oranžově, může to označovat dvě
situace: (Obr. 17)
- V základně pro nabíjení a doplňování není lahvička kondicionéru nebo lahvička není správně
vložena.
- Lahvička kondicionéru je prázdná.
, Indikátor doplňování zásobníku s kondicionérem označuje tři různé situace: (Obr. 18)
- Během doplňování zásobníku s kondicionérem bílý indikátor zásobníku s kondicionérem bliká.
- Pokud je zásobník kondicionéru holení plný, bílý indikátor zásobníku s kondicionérem trvale svítí.
- Jestliže se lahvička s kondicionérem během doplňování zásobníku s kondicionérem vyprázdní,
přestane bílý indikátor doplňování zásobníku s kondicionérem svítit a indikátor lahvičky
s kondicionérem se červeně rozbliká.
28
Poznámka: Je možné, že pokožka se bude novému systému holení přizpůsobovat po dobu 2 až 3 týdnů.
1 Ujistěte se, že v zásobníku s kondicionérem je dostatek kondicionéru.
2 Stisknutím tlačítka pro zapnutí/vypnutí holicí strojek zapněte.
3 Ujistěte se, že holicí strojek je dostatečně nabitý (viz kapitola „Příprava k použití“, část
„Indikátory nabíjení“).
4 Kruhovými pohyby jemně pohybujte holicí jednotkou po pokožce a stisknutím tlačítka
kondicionéru aplikujte dostatečné množství kondicionéru pro pohodlné holení. (Obr. 19)
- Po uvolnění tlačítka kondicionéru přístroj přestane aplikovat kondicionér.
- Pokud tlačítko kondicionéru stisknete krátce, přístroj automaticky aplikuje určité množství
kondicionéru.
- Opětovným stisknutím tlačítka kondicionéru můžete během holení aplikovat více kondicionéru,
čímž je zajištěno, že holicí jednotka se po pokožce pohybuje hladce.
Poznámka: Tlačítko kondicionéru funguje, pouze pokud je holicí strojek zapnutý.
Poznámka: Tento holicí strojek je možné použít podobným způsobem jako břitvu. Holicí strojek lze použít
na vlhkou tvář. Narozdíl od běžných elektrických holicích strojků, nemá tento přístroj žádnou komoru pro
oholené vousy. Aplikováním dostatečného množství kondicionéru zabráníte padání oholených vousů na
oblečení.
5 Po každém použití holicí strojek důkladně vyčistěte (viz kapitola „Čištění a údržba“).
6 Nasaďte na přístroj ochranný kryt, abyste předešli poškození (Obr. 20).
- Kruhovými pohyby jemně pohybujte holicí jednotkou po pokožce.
- Nevyvíjejte přílišný tlak na holicí strojek, mohlo by dojít k podráždění pokožky.
- K zajištění hladkého pohybu holicí jednotky aplikujte pravidelně kondicionér.
- Holicí strojek můžete také používat ve vaně nebo ve sprše.
Poznámka: Z důvodu nového otevřeného designu přístroje je zastřihování více slyšitelné, než u ostatních
zastřihovačů. To je normální.
1 Sejměte z holicího strojku holicí jednotku (Obr. 21).
2 Vyjměte zastřihovač z držáku zastřihovače v nabíječce a vložte jej do holicího strojku (ozve
se „klapnutí“) (Obr. 22).
3 Stisknutím tlačítka pro zapnutí/vypnutí holicí strojek zapněte.
4 Zastřihovač lze použít k úpravě kotlet a kníru.
5 Po použití zastřihovač důkladně vyčistěte (viz kapitola „Čištění a údržba“).
6 Vyjměte zastřihovač a vložte jej znovu do držáku.
7 Holicí jednotku nasaďte zpět na strojek (ozve se „klapnutí“) (Obr. 23).
8 Nasaďte na přístroj ochranný kryt, abyste předešli poškození (Obr. 20).
29
K čištění přístroje nikdy nepoužívejte kovové žínky, abrazivní čisticí prostředky ani agresivní
tekuté přípravky, jako je například líh, benzín nebo aceton.
Holicí strojek a zastřihovač po každém použití vyčistěte.
Při použití horké vody buďte opatrní. Abyste si neopařili ruce, vždy předem zkontrolujte, zda
voda není příliš horká.
Holicí jednotku nikdy nesušte ručníkem nebo jinou tkaninou, vyvarujete se tak poškození holicích
hlav.
Poznámka: Holicí strojek je vodotěsný a lze jej čistit vodou.
1 Stisknutím tlačítka pro zapnutí/vypnutí holicí strojek zapněte.
Poznámka: Čistěte zapnutý holicí strojek.
2 Ponořte holicí jednotku/zastřihovač do horké vody po dobu minimálně 30 sekund (Obr. 24).
3 Vypněte holicí strojek a vytřepejte z něj vodu.
4 Nasaďte na přístroj ochranný kryt, abyste předešli poškození (Obr. 20).
Poznámka: Pokud již holicí strojek neholí tak dobře, jak jste byli zvyklí, a tento problém nelze vyřešit
pomocí metody čištění popsané v této kapitole, informace o důkladnějším čištění naleznete v kapitole
„Odstraňování problémů“.
1 Na lišty zastřihovače kápněte každých šest měsíců kapku oleje na šicí stroje.
1 Holicí strojek skladujte v základně pro nabíjení a doplňování.
2 Pokud se chystáte na cesty nebo pokud nechcete holicí strojek skladovat v základně pro
nabíjení a doplňování, nasuňte na holicí strojek ochranný kryt a skladujte jej
v pouzdře (Obr. 20).
Pokud přístroj na delší dobu ukládáte nebo pokud hodláte s přístrojem cestovat, je vhodné ho
zajistit. Cestovní zámek brání jeho náhodnému zapnutí.
1 Přesvědčte se, že je přístroj vypnutý.
2 Stiskněte a podržte tlačítko kondicionéru (1), druhou rukou současně stiskněte tlačítko pro
zapnutí/vypnutí (2) (Obr. 25).
3 Obě tlačítka držte po dobu 6 sekund. Počkejte, dokud neuslyšíte krátký bzučivý zvuk a
prostřední indikátor dobíjení na holicím strojku několikrát neblikne.
, Cestovní zámek je nyní zapnutý.
Poznámka: Jestliže omylem nejdříve stisknete tlačítko pro zapnutí/vypnutí, holicí strojek se spustí. Pokud
k této situaci dojde, stiskněte tlačítko pro zapnutí/vypnutí znovu a vypněte holicí strojek.
30
Poznámka: Pokud stisknete tlačítko pro zapnutí/vypnutí v době, kdy je aktivován cestovní zámek, začne
prostřední indikátor dobíjení blikat bíle, což znamená, že je holicí strojek je zamknutý.
Tip: Stisknutím tlačítka pro zapnutí/vypnutí můžete zkontrolovat, zda je cestovní zámek aktivován. Pokud
je cestovní zámek aktivován, holicí strojek se nespustí.
1 Stiskněte a podržte tlačítko kondicionéru (1), druhou rukou současně stiskněte tlačítko pro
zapnutí/vypnutí (2) (Obr. 25).
2 Obě tlačítka držte po dobu 6 sekund. Počkejte, dokud neuslyšíte krátký bzučivý zvuk a
prostřední indikátor dobíjení na holicím strojku několikrát neblikne.
, Cestovní zámek je nyní vypnutý.
Poznámka: Cestovní zámek lze také vypnout vložením holicího strojku do nabíječky.
Jestliže se chystáte cestovat a nechcete s sebou brát základnu pro nabíjení a doplňování, můžete
s sebou vzít nabíječku pro případné nabití holicího strojku.
Z hygienických důvodů doporučujeme zásobník s kondicionérem jednou ročně vyměnit. Nový
zásobník je součástí každého trojbalení kondicionéru NIVEA FOR MEN a také výměnné sady
(obsahuje novou holicí jednotku HS85 a nový zásobník).
1 Vyjměte zásobník kondicionéru z holicího strojku (Obr. 26).
2 Zasuňte kolík v horní části nového zásobníku s kondicionérem do otvoru na okraji holicího
strojku (1). Potom zatlačte dolní část zásobníku palcem (2), tím připevníte zásobník
k holicímu strojku (ozve se „klapnutí“) (Obr. 27).
3 Naplňte zásobník s kondicionérem (viz kapitola „Začínáme“).
Pro dosažení optimálních výsledků vyměňte každý rok holicí jednotku.
Holicí jednotku vyměňte pouze za jednotku Philips HS85.
1 Starou holicí jednotku sejměte z holicího strojku (Obr. 21).
2 Vložte novou holicí jednotku do holicího strojku (ozve se „klapnutí“) (Obr. 23).
Používejte pouze lahvičky s kondicionérem NIVEA FOR MEN.
1 Odstraňte pásek z lahvičky kondicionéru NIVEA FOR MEN (Obr. 6).
2 Otočte uzávěr lahvičky kondicionéru ve směru hodinových ručiček (ozve se
„klapnutí“) (Obr. 7).
, Uzávěr se posune směrem dolů a objeví se hubice kondicionéru.
3 Otočením uzávěru základny pro nabíjení a doplňování proti směru hodinových ručiček uzávěr
odstraňte.
4 Vložte lahvičku kondicionéru do otvoru s hubicí směřující dolů (Obr. 8).
5 Zasuňte uzávěr základny pro nabíjení a doplňování zpět na místo (1) a zajistěte jej otočením
ve směru hodinových ručiček (2) (Obr. 9).
31
- Až přístroj doslouží, nevyhazujte jej do běžného komunálního odpadu, ale odevzdejte jej do
sběrny určené pro recyklaci. Pomůžete tím chránit životní prostředí (Obr. 28).
- Vestavěný akumulátor obsahuje látky, které mohou škodit životnímu prostředí. Před vyhozením
přístroje nebo odevzdáním na ociálním sběrném místě z něj vždy vyjměte akumulátor.
Akumulátor odevzdejte na ociálním sběrném místě pro akumulátory. Nedaří-li se vám
akumulátor vyjmout, můžete přístroj zanést do servisního střediska společnosti Philips.
Zaměstnanci centra akumulátor vyjmou a zajistí jeho bezpečnou likvidaci.
Akumulátor z přístroje vyjměte pouze tehdy, až budete holicí strojek likvidovat. Budete-li
akumulátor vyjímat, ujistěte se, že je zcela vybitý.
Pozor, pásky od akumulátoru jsou ostré.
1 Vyjměte zásobník kondicionéru z holicího strojku (Obr. 26).
2 Odšroubujte tři šrouby na zadní straně holicího strojku (Obr. 29).
3 Pomocí šroubováku odstraňte zadní panel krytu (Obr. 30).
4 Odstřihněte dráty a vyjměte akumulátor.
Potřebujete-li servis, informace nebo dojde-li k potížím, navštivte webovou stránku společnosti
Philips www.philips.com/support, nebo se obraťte na středisko péče o zákazníky společnosti Philips
ve své zemi (příslušné telefonní číslo najdete v letáčku s celosvětovou zárukou). Pokud se ve vaší
zemi středisko péče o zákazníky nenachází, kontaktujte místního dodavatele výrobků Philips.
Holicí jednotka (nožové věnce a ochranné korunky) podléhá opotřebení, a podmínky mezinárodní
záruky se tak na ni nevztahují.
Kazeta balzámu na holení je předmětem na jedno použití a nevztahují se na ni podmínky
mezinárodní záruky.
V této kapitole jsou shrnuty nejběžnější problémy, se kterými se můžete u přístroje setkat. Pokud se
vám nepodaří problém vyřešit podle následujících informací, kontaktujte Středisko péče o zákazníky
ve své zemi.
Problém Možná příčina Řešení
Holicí strojek se
Neaplikovali jste
Tlačítko kondicionéru držte stisknuté tak dlouho,
po pokožce
dostatečné množství
dokud se neuvolní dostatečné množství kondicionéru
nepohybuje
kondicionéru.
NIVEA FOR MEN. Holicí jednotka se pak bude po
hladce.
pokožce pohybovat hladce.
Holicí strojek
Holicí strojek není
Holicí strojek důkladně vyčistěte (viz kapitola „Čištění
neholí tak dobře
dostatečně vyčištěný.
a údržba“).
jako dříve.
Dlouhé vousy blokují
Holicí hlavy vyčistěte podle kroků popsaných v níže
holicí hlavy.
uvedeném postupu pro velmi důkladné čistění.

32
Problém Možná příčina Řešení
Střihací jednotka je
Vyměňte holicí jednotku (viz kapitola „Výměna“).
poškozená nebo
opotřebovaná.
Holicí strojek po
Akumulátor je vybitý. Dobijte akumulátor (viz kapitola „Příprava k použití“).
stisknutí tlačítka
zapnutí/vypnutí
nepracuje.
Cestovní zámek je
Vypněte cestovní zámek (viz kapitola „Skladování“).
zapnutý.
Zaschlý kondicionér
Před dalším holením přístroj důkladně vyčistěte (viz
blokuje holicí hlavy
kapitola „Čištění“).
v holicí jednotce.
Po velmi důkladném
Při sestavování holicí jednotky se ujistěte, že každý
čištění jste holicí
kryt otočíte proti směru hodinových ručiček, dokud
jednotku nesestavili
nezapadne na místo.
správně.
Z otvorů se
Jeden z otvorů pro
Holicí jednotku vypláchněte nebo namočte. Pokud to
uvolňuje malé
uvolňování
nepomůže, pumpujte kondicionér do zásobníku,
množství
kondicionéru je
dokud se kondicionér nezačne z ucpaného otvoru
kondicionéru,
ucpaný.
uvolňovat. Jestliže nepomůže ani to, zkuste následující:
přestože je ho
1) Holicí strojek vypněte 2) Z holicího strojku
v zásobníku
vyjměte holicí jednotku 3) Na otvor, který není
dostatek.
ucpaný, položte prst 4) Holicí strojek zapněte
5) Tlačítko kondicionéru podržte po dobu několika
sekund, dokud se kondicionér nezačne z ucpaného
otvoru opět uvolňovat.
Holicí hlavy jste
Ujistěte se, že jste holicí hlavu bez otvoru pro
nenasadili zpět do
kondicionér nasadili do správného držáku. Pokud
původních držáků.
holicí jednotku skládáte na holicím strojku, jedná se o
Jedna z holicích hlav
držák, jenž je umístěn nejblíže tlačítku pro zapnutí/
nemá otvor pro
vypnutí.
kondicionér ve svém
středu a je třeba ji
umístit do správného
držáku.
Když stisknu
Zásobník
Doplňte zásobník s kondicionérem (viz kapitola
tlačítko
s kondicionérem je
„Příprava k použití“).
kondicionéru,
téměř prázdný.
z otvorů se
neuvolňuje žádný
kondicionér.
Zastřihovač je
Tento zastřihovač se
Zastřihování je slyšitelnější než u jiných zastřihovačů
hlučnější než jiné
vyznačuje otevřeným
z důvodu nového otevřeného designu. To je normální
zastřihovače.
designem.
a neznamená to, že došlo k nějakému problému se
zastřihovačem.
33
Přesvědčte se, že je přístroj vypnutý.
1 Sejměte z holicího strojku holicí jednotku (Obr. 31).
2 Otočte kryt ve směru hodinových ručiček a zvedněte jej z holicí jednotky (Obr. 32).
Poznámka: Odstraňte vždy pouze jednu holicí hlavici. Tím zajistíte, že hlavici vložíte zpět do původního
držáku, což je nutné, protože dvě holicí hlavice mají speciální otvory pro uvolnění kondicionéru. Tímto
postupem je také zajištěno, že nedojde k záměně střihacích jednotek a krytů různých holicích hlavic, což
má vliv na holicí výkon.
3 V případě potřeby vyjměte střihací jednotku z krytu.
4 Vyčistěte střihací jednotku a kryt přiloženým kartáčkem.
5 Po vyčištění vložte střihací jednotku zpět do holicí jednotky tak, aby výstupky střihací
jednotky směřovaly nahoru.
6 Vložte kryt zpět na držák holicí hlavice (nad střihací jednotku) (Obr. 33).
7 Otočte kryt proti směru hodinových ručiček, dokud nezapadne na místo (Obr. 34).
8 Holicí jednotku nasaďte zpět na strojek (ozve se „klapnutí“) (Obr. 35).

34
Tillykke med dit køb og velkommen til Philips! For at få fuldt udbytte af den support, Philips tilbyder,
skal du registrere dit produkt på www.philips.com/welcome.
Vi beder dig læse brugervejledningen igennem, da den indeholder oplysninger om shaverens unikke
funktioner og tips til at gøre barbering nemmere og sjovere.
Shaver
Beskyttelseskappe
Trimmer
Skærenhed
Indsats til barberlotion
Udløserknap til barberlotion
On/off-knap
Opladeindikatorer
Oplader
Påfyldnings- og opladestander
Låg til påfyldnings- og opladestander
Opbevaringsholder til trimmer
Bagpanel
Lille strømstik
Lysindikator for “Påfyldning af lotionindsats”
Lotionaske-indikator
Rensebørste
NIVEA FOR MEN barberlotionaske
Etui
Adapter (din adapter kan se anderledes ud end den, der er vist på guren).
Læs denne brugsvejledning omhyggeligt igennem, inden apparatet tages i brug, og gem den til
eventuelt senere brug.
- Sørg for, at adapteren ikke bliver våd (din adapter kan se anderledes ud end den, der er vist i
guren) (g. 2).
- Vær forsigtig med varmt vand. Kontroller altid, at vandet ikke er for varmt, så du ikke skolder
dine hænder.
- Adapteren indeholder en transformer og må ikke klippes af og udskiftes med et andet stik, da
dette kan være meget risikabelt.
- Dette apparat er ikke beregnet til at blive brugt af personer (herunder børn) med nedsatte
fysiske og mentale evner, nedsat følesans eller manglende erfaring og viden, medmindre de er
blevet vejledt eller instrueret i apparatets anvendelse af en person, der er ansvarlig for deres
sikkerhed.
- Apparatet bør holdes uden for børns rækkevidde for at sikre, at de ikke kan komme til at lege
med det.
- Påfyldnings- og opladestanderen må aldrig kommes ned i vand eller skylles under
vandhanen (g. 3).
- Opladeren må aldrig kommes ned i vand eller skylles under vandhanen (g. 4).
35
- Påfyldnings- og opladestanderen samt opladeren skal altid placeres og anvendes på et
vandafvisende underlag.
- Brug, oplad og opbevar altid apparatet ved en temperatur på mellem 5°C og 35°C.
- Sæt altid beskyttelseskappen på shaveren for at beskytte skærene, når du rejser.
- Shaveren og det øvrige tilbehør tåler ikke opvaskemaskine.
- Rens aldrig shaveren med vand, der er varmere end 80° C.
- Brug kun medfølgende adapter, oplader og påfyldnings- og opladestander.
- Brug ikke påfyldnings- og opladestanderen, hvis adapteren eller selve standeren er beskadiget.
- Brug ikke shaveren eller opladeren, hvis en af delene er beskadiget.
- Hvis adapteren beskadiges, skal den altid udskiftes med en original adapter af samme type for at
undgå enhver risiko.
- Denne shaver overholder de internationalt godkendte sikkerhedsregler og kan bruges i badet
eller bruseren og rengøres under vandhanen uden sikkerhedsrisiko (g. 5).
- Dette Philips-apparat overholder alle standarder for elektromagnetiske felter (EMF). Ved korrekt
anvendelse i overensstemmelse med instruktionerne i denne brugervejledning, er apparatet
sikkert at anvende ifølge den videnskabelige viden, der er tilgængelig i dag.
- Adapteren omformer 100 -240 V til en sikker lavspænding under 24 V.
1 Fjern forseglingen fra asken med NIVEA FOR MEN barberlotion (g. 6).
2 Drej askens låg højre om (“klik”) (g. 7).
, Låget nedsænkes, og lotion-dysen kommer til syne.
3 Drej låget på påfyldnings- og opladestanderen venstre om for at tage det af.
4 Fjern emballagen fra koblingshullet i påfyldnings- og opladestanderen.
5 Placér lotionasken i koblingshullet med dysen nedad (g. 8).
6 Sæt låget tilbage på påfyldnings- og opladestanderen (1), og drej låget højre om, så det
fastlåses (2) (g. 9).
7 Sæt det lille stik i kontakten på påfyldnings- og opladestanderen, og sæt adapteren i
stikkontakten (g. 10).
8 Sæt shaveren i påfyldnings- og opladestanderen, og skub den tilbage(“klik”) (g. 11).
Bemærk: Shaveren oplades og fyldes automatisk med barberlotion.
9 Oplad shaveren i 90 minutter. (g. 12)
Bemærk: Oplad shaveren, før du tager den i brug første gang, eller når lysindikatoren viser, at batteriet er
aadet (se afsnittet “Opladningsindikationer”).
Bemærk: En fuldt opladet shaver giver op til 40 minutters brugstid.
1 Sæt det lille stik i opladeren, og sæt adapteren i en stikkontakt.
2 Sæt shaveren i opladeren (g. 13).
, Shaveren oplades nu.
3 Oplad shaveren i 1,5 timer.

36
Bemærk: Oplad shaveren, før du tager den i brug første gang, eller når lysindikatoren viser, at batteriet er
aadet (se afsnittet “Opladningsindikationer”).
Bemærk: En fuldt opladet shaver giver op til 40 minutters brugstid.
Du kan også genopfylde barberlotionindsatsen uden at bruge påfyldnings- og opladestanderen:
1 Placér lotionaskens dyse over påfyldningsåbningen på lotionindsatsen.
2 Bevæg asken op og ned ca. 5 gange for at pumpe barberlotion ned i indsatsen, indtil du kan
se, at indsatsen er fuld (g. 14).
- Opladeindikatorerne indikerer den aktuelle batterikapacitet. Under opladning blinker den
nederste opladeindikator først orange, og derefter går den ud. Herefter begynder den øverste
opladeindikator at blinke hvidt og lyser til sidst hvidt konstant.
- Efter at shaveren er blevet opladet i 9 minutter, går den nederste opladeindikator ud, og den
øverste opladeindikator begynder at blinke hvidt for at angive, at shaveren har tilstrækkelig
batterikapacitet til én barbering.
Bemærk: Hurtig opladning er kun mulig, når shaveren mindst én gang har været opladet i 1,5 timer.
- Antallet af tændte opladeindikatorer indikerer, hvor meget strøm der er tilbage i batteriet. Den
resterende batterikapacitet vises et par sekunder, idet du tænder eller slukker shaveren (g. 15).
- Når batteriet er ved at være brugt op, lyser den nederste opladeindikator orange under
barberingen og blinker orange, når du slukker shaveren. (g. 16)
- Når batteriet er fuldt opladet, lyser alle indikatorer for batteriniveau konstant hvidt (g. 15).
- Efter ca. 1 time slukkes de hvide lys for at spare energi.
, Når lotionaskeindikatoren blinker orange, er der to muligheder: (g. 17)
- Der er ingen lotionaske i påfyldnings- og opladestanderen, eller asken er ikke sat ordentligt på.
- Lotionasken er tom.
, Indikatoren for “Påfyldning af lotionindsats” kan signalere tre forskellige ting: (g. 18)
- Når lotionindsatsen påfyldes, blinker den hvide lysindikator for “Påfyldning af lotionindsats”.
- Når barberlotionindsatsen er fuld, lyser indikatoren for “Påfyldning af lotionindsats” konstant
hvidt.
- Hvis lotionasken løber tør under påfyldning af lotionindsatsen, slukker den hvide lysindikator for
“Påfyldning af lotionindsats”, og lotionaske-indikatoren blinker rødt.
Bemærk: Din hud kan godt være 2 til 3 uger om at vænne sig til et nyt barberingssystem.
1 Du skal sikre dig, at der er nok barberlotion i lotionindsatsen.
37
2 Tryk en gang på on/off-knappen for at tænde for shaveren.
3 Kontroller, at der ikke er lav batterikapacitet (se afsnittet “Klargøring” under
“Opladningsindikatorer”).
4 Bevæg forsigtigt skærhovedet i cirkelbevægelser hen over huden, indtil der er nok
barberlotion på til at give en behagelig barbering. (g. 19)
- Når knappen til barberlotion slippes, lukkes for tilførsel af lotion.
- Hvis du trykker en enkelt gang på lotionknappen, vil apparatet automatisk fordele en vis
mængde lotion.
- Tryk på lotionknappen igen for at påføre mere lotion under barberingen for at sikre, at
skærhovedet fortsat glider glat hen over huden.
Bemærk: Lotionknappen virker kun, når shaveren er tændt.
Bemærk: Denne shaver kan bruges på samme måde som en skraber: Du kan bruge shaveren på våd
hud. I modsætning til en almindelig elektrisk shaver har dette apparat ikke noget skægkammer til
opsamling af skægstubbe. Brug godt med lotion under barberingen for at undgå at få skægstubbe på
tøjet.
5 Gør shaveren grundigt ren efter brug (se afsnittet “Rengøring og vedligeholdelse”).
6 Sæt beskyttelseskappen på shaveren, så den ikke beskadiges (g. 20).
- Bevæg forsigtigt shaveren i cirkelbevægelser hen over huden.
- Tryk ikke shaveren for hårdt mod huden, da det kan give hudirritation.
- Påfør barberlotion med jævne mellemrum for at sikre optimal glideeffekt.
- Du kan også bruge shaveren i badet eller under bruseren.
Bemærk: På grund af det nye, åbne design høres trimmerens skærefunktion tydeligere end hos andre
trimmere. Dette er helt normalt.
1 Tag skærhovedet af shaveren (g. 21).
2 Tag trimmeren ud af dens holder på opladeren, og sæt den på shaveren (“klik”) (g. 22).
3 Tryk en gang på on/off-knappen for at tænde for shaveren.
4 Trimmeren kan bruges til pleje af bakkenbarter og overskæg.
5 Gør trimmeren grundigt ren efter brug (se afsnittet “Rengøring og vedligeholdelse”).
6 Fjern trimmeren, og sæt den tilbage i holderen.
7 Sæt skærhovedet tilbage på shaveren (“klik”) (g. 23).
8 Sæt beskyttelseskappen på shaveren, så den ikke beskadiges (g. 20).
Brug aldrig skuresvampe eller skrappe rengøringsmidler såsom sprit, benzin eller acetone til
rengøring af apparatet.
Rengør altid shaveren og trimmeren efter brug.
Vær forsigtig med varmt vand. Kontroller altid, at vandet ikke er for varmt, så du ikke skolder
dine hænder.
38
Skærenheden må ikke tørres med et håndklæde eller køkkenrulle, da dette kan beskadige
skærhovederne.
Bemærk: Shaveren er vandtæt og kan rengøres med vand.
1 Tryk en gang på on/off-knappen for at tænde for shaveren.
Bemærk: Rengør shaveren, mens den er tændt.
2 Læg skærhovedet/trimmeren i varmt vand i mindst 30 sekunder (g. 24).
3 Sluk shaveren, og ryst vandet af.
4 Sæt beskyttelseskappen på shaveren, så den ikke beskadiges (g. 20).
Bemærk: Hvis shaveren ikke barberer lige så godt, som den plejer, og du ikke kan løse problemet ved
hjælp af den rengøringsmetode, der er beskrevet i dette kapitel, kan du se kapitlet “Fejlnding” for at få
en beskrivelse af en ekstra grundig rengøringsmetode.
1 Smør trimmerens tænder med en dråbe symaskineolie hver 6. måned.
1 Opbevar shaveren i påfyldnings- og opladestanderen.
2 Hvis du skal ud at rejse, eller hvis du ikke ønsker at opbevare shaveren i påfyldnings- og
opladestanderen, skal du sætte beskyttelseshætten på shaveren og opbevare den i
etuiet (g. 20).
Skal du opbevare shaveren i en længere periode eller have den med på rejse, har du mulighed for at
låse shaveren. Rejselåsen sikrer, at shaveren ikke tænder ved et tilfælde.
1 Kontrollér, at apparatet er slukket.
2 Tryk på barberlotionknappen, og hold den nede (1), og tryk samtidig på on/off-knappen med
den anden hånd (2) (g. 25).
3 Hold begge knapper nede i 6 sekunder. Vent, indtil shaveren siger en kort brummelyd, og
shaverens midterste opladeindikator blinker et par gange.
, Rejselåsen er nu aktiveret.
Bemærk: Kommer du utilsigtet til at trykke på on/off-knappen først, vil shaveren gå i gang. Sker dette,
tryk på on/off-knappen igen for at slukke shaveren.
Bemærk: Hvis du trykker på on/off-knappen, når rejselåsen er aktiveret, blinker den midterste
opladeindikator hvidt for at indikere, at shaveren er låst.
Tip: Tryk på on/off-knappen for at kontrollere, om rejselåsen er aktiveret. Hvis rejselåsen er aktiveret, vil
shaveren ikke tænde.
1 Tryk på barberlotionknappen, og hold den nede (1), og tryk samtidig på on/off-knappen med
den anden hånd (2) (g. 25).
2 Hold begge knapper nede i 6 sekunder. Vent, indtil shaveren siger en kort brummelyd, og
shaverens midterste opladeindikator blinker et par gange.
39
, Rejselåsen er nu deaktiveret.
Bemærk: Du kan også deaktivere rejselåsen ved at sætte shaveren tilbage i opladeren.
Hvis du skal ud at rejse og ikke ønsker at medbringe påfyldnings- og opladestanderen, kan du nøjes
med at tage opladeren med, så du om nødvendigt kan oplade shaveren.
Af hensyn til hygiejnen anbefaler vi, at du udskifter indsatsen til barberlotion en gang om året. Der
følger en ny indsats med hver NIVEA FOR MEN barberlotion i 3-pak og med udskiftningssættet
(som indeholder en ny HS85 skærenhed og en ny indsats).
1 Fjern barberlotionindsatsen fra shaveren (g. 26).
2 Sæt den lille tap øverst på den nye barberlotionindsats ind i indhakket på siden af
shaveren (1). Tryk derefter med tommelngeren på den nederste del af indsatsen (2) for at
fastgøre indsatsen til shaveren (“klik”) (g. 27).
3 Fyld indsatsen til barberlotion (se afsnittet “Sådan kommer du i gang”).
Udskift skærenheden en gang årligt for at opnå det bedste barberingsresultat.
Skærhovedet må kun udskiftes med en HS85 Philips Shaving Unit.
1 Tag den gamle skærenhed af shaveren (g. 21).
2 Sæt det nye skærhoved på shaveren (“klik”) (g. 23).
Brug kun NIVEA FOR MEN barberlotionasker.
1 Fjern forseglingen fra asken med NIVEA FOR MEN barberlotion (g. 6).
2 Drej askens låg højre om (“klik”) (g. 7).
, Låget nedsænkes, og lotion-dysen kommer til syne.
3 Drej låget på påfyldnings- og opladestanderen venstre om for at tage det af.
4 Placér lotionasken i koblingshullet med dysen nedad (g. 8).
5 Skub låget tilbage på påfyldnings- og opladestanderen (1), og drej det højre om (2), så det
fastgøres (g. 9).
- Apparatet må ikke smides ud sammen med almindeligt husholdningsaffald, når det til sin tid
kasseres. Aevér det i stedet på en kommunal genbrugsstation. På den måde er du med til at
beskytte miljøet (g. 28).
- Det indbyggede genopladelige batteri indeholder stoffer, der kan forurene miljøet. Fjern altid
batteriet, før du kasserer apparatet, og aeverer det på en genbrugsstation. Aevér batteriet på
et ofcielt indsamlingssted for brugte batterier. Kan du ikke få batteriet ud, kan du aevere
apparatet til Philips, som vil sørge for at tage batteriet ud og bortskaffe det på en miljømæssig
forsvarlig måde.

40
Tag ikke batteriet ud, før shaveren til sin tid skal kasseres. Sørg for, at batteriet er fuldstændigt
aadet, inden det tages ud.
Pas på - strimlerne på batteriet er meget skarpe.
1 Fjern barberlotionindsatsen fra shaveren (g. 26).
2 Fjern skruerne på shaverens bagside (g. 29).
3 Fjern kabinettets bagbeklædning med en skruetrækker (g. 30).
4 Klip ledningerne over, og tag det genopladelige batteri ud.
Hvis du har brug for hjælp eller oplysninger, eller hvis der opstår et problem, skal du besøge Philips’
websted på www.philips.com/support eller kontakte dit lokale Philips Kundecenter (telefonnumre
ndes i vedlagte “worldwide guarantee”-folder). Hvis der ikke ndes et kundecenter i dit land, bedes
du kontakte din lokale Philips-forhandler.
Skærenheden (knive og lamelkapper) er ikke omfattet af den internationale garanti, da de udsættes
for slitage.
Indsatsen til barberlotion kan smides ud, og dækkes ikke af de internationale garantibestemmelser/
reklamationsret.

41
Dette kapitel opsummerer de mest almindelige problemer, du kan støde på ved brug af apparatet.
Hvis du ikke kan løse problemet ved hjælp af nedenstående oplysninger, bedes du kontakte Philips
Kundeservice.
Problem Mulig årsag Løsning
Shaveren glider ikke
Du har ikke påført
Tryk på barberlotionknappen, indtil du har fået
glat hen over huden.
nok barberlotion.
påført en passende mængde NIVEA FOR MEN
barberlotion, så skærenheden igen glider glat
hen over huden.
Shaveren barberer ikke
Du har ikke rengjort
Rengør shaveren grundigt (se afsnittet
så godt, som den
shaveren godt nok.
“Rengøring og vedligeholdelse”).
gjorde til at begynde
med.
Der sidder lange hår i
Rengør skærene ved at følge instruktionerne i
vejen for skærene.
den ekstra grundige rengøringsmetode, der er
beskrevet nedenfor.
Skærenheden er
Udskift skærenheden (se afsnittet “Udskiftning”).
beskadiget eller slidt.
Shaveren virker ikke,
Det genopladelige
Genoplad batteriet (se afsnittet “Klargøring”).
når jeg trykker på on-/
batteri er aadet.
off-knappen.
Rejselåsen er aktiveret. Deaktiver rejselåsen (se afsnittet “Opbevaring”).
Størknet barberlotion
Rengør shaveren omhyggeligt, før barberingen
blokerer skærene i
fortsættes (se afsnittet “Rengøring”).
skærenheden.
Du har ikke samlet
Når du samler skærenheden, skal du huske at
skærenheden korrekt
dreje alle lamelkapper mod uret, indtil de låses
efter den ekstra
på plads.
grundige rengøring.
Der kommer kun lidt
Et af hullerne til lotion
Skyl skærenheden, eller læg den i blød. Hvis det
barberlotion ud af
er blokeret.
ikke hjælper, kan du pumpe barberlotion ind i
hullerne, selvom der er
indsatsen, indtil der begynder at komme lotion
rigeligt lotion i
ud af det tilstoppede hul. Hjælper det heller
indsatsen?
ikke, kan du prøve følgende: 1) Sluk shaveren 2)
Tag skærenheden af shaveren 3) Stik ngeren
ned i det hul, der ikke er tilstoppet 4) Tænd
shaveren 5) Hold knappen til barberlotion
nede i nogle sekunder, indtil der igen kommer
lotion ud af det tilstoppede hul.
42
Problem Mulig årsag Løsning
Du har ikke sat
Kontrollér, at du sætter skæret uden hul til
skærene tilbage i deres
barberlotion i den rigtige holder, nemlig
oprindelige holdere.
holderen, som er tættest på on/off-knappen,
Det ene skær har ikke
når det samlede skærhoved sidder på shaveren.
noget hul til
barberlotion i midten
og skal derfor sættes i
en speciel holder.
Der kommer ikke
Lotionindsatsen er
Fyld indsatsen til barberlotion (se afsnittet
noget barberlotion ud
næsten tom.
“Klargøring”).
af hullerne, når jeg
trykker på
barberlotionknappen.
Trimmeren larmer
Denne trimmer har et
Det nye, åbne design gør, at du kan høre
mere end andre
åbent design.
skærefunktionen tydeligere end med andre
trimmere.
trimmere. Dette er helt normalt, og det
betyder ikke, at der er noget galt med
trimmeren.
Kontrollér, at apparatet er slukket.
1 Træk skærenheden af shaveren (g. 31).
2 Drej lamelkappen højre om og løft den ud af skærhovedet (g. 32).
Bemærk: Du må kun fjerne et skær ad gangen. Dette sikrer, at du altid sætter skæret tilbage i dets
originale holder, hvilket er nødvendigt, da to af skærene har specielle huller til barberlotion. Dette sikrer
også, at du ikke kommer til at blande knive og lamelkapper fra forskellige skær, hvilket kan påvirke
barberingsevnen.
3 Hvis det er nødvendigt, skal du fjerne kniven fra lamelkappen.
4 Rengør kniven og lamelkappen med den medfølgende børste.
5 Efter rengøring skal du sætte kniven tilbage i skærhovedet med skæresiden opad.
6 Sæt lamelkappen tilbage i skærholderen (oven på kniven) (g. 33).
7 Drej lamelkappen venstre om, indtil den låses på plads (g. 34).
8 Sæt skærhovedet tilbage på shaveren (“klik”) (g. 35).

43
Herzlichen Glückwunsch zu Ihrem Kauf und willkommen bei Philips! Um die Unterstützung von
Philips optimal nutzen zu können, registrieren Sie Ihr Produkt bitte unter www.philips.com/welcome.
Lesen Sie diese Bedienungsanleitung sorgfältig durch, da sie nützliche Informationen zu den
Funktionen dieses Rasierers sowie Tipps für eine einfache und angenehme Rasur enthält.
Rasierer
Schutzkappe
Langhaarschneider
Schereinheit
Shaving Conditioner-Kartusche
Shaving Conditioner-Taste
Ein-/Ausschalter
Ladeanzeige
Ladegerät
Nachfüll- und Ladestation
Kappe der Nachfüll- und Ladestation
Aussparung zur Aufbewahrung des Langhaarschneiders
Rückwärtige Blende
Buchse für kleinen Stecker
Conditioner-Kartusche-Füllanzeige
Conditioner-Flasche-Anzeige
Reinigungsbürste
NIVEA FOR MEN Shaving Conditioner-Flasche
Tasche
Adapter (Ihr Adapter ist ggf. nicht mit dem Adapter auf der Abbildung identisch).
Lesen Sie diese Bedienungsanleitung vor dem Gebrauch des Geräts aufmerksam durch, und
bewahren Sie sie für eine spätere Verwendung auf.
- Achten Sie darauf, dass der Adapter nicht nass wird (Ihr Adapter ist ggf. nicht mit dem Adapter
auf der Abbildung identisch) (Abb. 2).
- Gehen Sie vorsichtig mit heißem Wasser um. Achten Sie darauf, dass das Wasser nicht zu heiß
ist und Sie sich nicht die Hände verbrühen.
- Der Adapter enthält einen Transformator. Ersetzen Sie den Adapter keinesfalls durch einen
anderen Stecker. Dies kann den Benutzer gefährden.
- Dieses Gerät ist für Benutzer (einschl. Kinder) mit eingeschränkten physischen, sensorischen
oder psychischen Fähigkeiten bzw. ohne jegliche Erfahrung oder Vorwissen nur dann geeignet,
wenn eine angemessene Aufsicht oder ausführliche Anleitung zur Benutzung des Geräts durch
eine verantwortliche Person sichergestellt ist.
- Achten Sie darauf, dass Kinder nicht mit dem Gerät spielen.
- Tauchen Sie die Nachfüll- und Ladestation niemals in Wasser; spülen Sie sie auch nicht unter
ießendem Wasser ab (Abb. 3).
- Tauchen Sie das Ladegerät niemals in Wasser; spülen Sie es auch nicht unter ießendem Wasser
ab (Abb. 4).

44
- Stellen Sie die Nachfüll- und Ladestation sowie das Ladegerät immer auf eine
wasserundurchlässige Oberäche.
- Benutzen und laden Sie die Geräte bei Temperaturen zwischen 5 °C und 35 °C. Bewahren Sie
sie auch in diesem Temperaturbereich auf.
- Um eine Beschädigung der Scherköpfe zu vermeiden, sollten Sie auf Reisen immer die
Schutzkappe auf den Rasierer setzen.
- Der Rasierer und anderes Zubehör sind nicht spülmaschinengeeignet.
- Das Wasser zur Reinigung des Rasierers darf nicht heißer als 80°C sein.
- Verwenden Sie ausschließlich den mitgelieferten Adapter und die mitgelieferte Nachfüll- und
Ladestation.
- Benutzen Sie die Nachfüll- und Ladestation nicht, wenn der Adapter oder die Station selbst
beschädigt ist.
- Verwenden Sie den Rasierer und das Ladegerät nicht, wenn Beschädigungen daran erkennbar
sind.
- Wenn der Adapter defekt oder beschädigt ist, darf er nur durch ein Original-Ersatzteil
ausgetauscht werden, um Gefährdungen zu vermeiden.
- Dieser Rasierer erfüllt die internationalen Sicherheitsvorschriften und kann ohne Bedenken
unter der Dusche oder in der Badewanne benutzt sowie unter ießendem Wasser gereinigt
werden (Abb. 5).
- Dieses Philips Gerät erfüllt sämtliche Normen bezüglich elektromagnetischer Felder (EMF). Nach
aktuellen wissenschaftlichen Erkenntnissen ist das Gerät sicher im Gebrauch, sofern es
ordnungsgemäß und entsprechend den Anweisungen in dieser Bedienungsanleitung gehandhabt
wird.
- Der Adapter wandelt Netzspannungen von 100 bis 240 Volt in eine sichere Betriebsspannung
von unter 24 Volt um.
1 Entfernen Sie den Verschluss der Flasche NIVEA FOR MEN Shaving Conditioner (Abb. 6).
2 Drehen Sie die Kappe der Flasche im Uhrzeigersinn, bis Sie ein Klicken hören (Abb. 7).
, Die Kappe bewegt sich nach unten und die Conditioner-Düse tritt hervor.
3 Drehen Sie die Kappe der Nachfüll- und Ladestation gegen den Uhrzeigersinn, um sie
abzunehmen.
4 Entfernen Sie die Verpackung von der Flaschenanschlussöffnung in der Nachfüll- und
Ladestation.
5 Setzen Sie die Conditioner-Flasche mit nach unten zeigender Düse in die Anschlussöffnung
ein (Abb. 8).
6 Setzen Sie die Kappe wieder auf die Nachfüll- und Ladestation (1), und drehen Sie sie im
Uhrzeigersinn fest (2) (Abb. 9).
7 Stecken Sie den kleinen Stecker in die Buchse der Nachfüll- und Ladestation und den Adapter
in die Steckdose (Abb. 10).
8 Setzen Sie den Rasierer in die Nachfüll- und Ladestation und drücken Sie ihn nach hinten, bis
Sie ein Klicken hören (Abb. 11).
Hinweis: Der Rasierer wird automatisch geladen und mit Shaving Conditioner befüllt.
9 Laden Sie den Rasierer 90 Minuten lang auf. (Abb. 12)
45
Hinweis: Laden Sie den Rasierer vor dem ersten Gebrauch auf oder wenn die Ladeanzeige am Rasierer
anzeigt, dass der Akku leer ist (siehe Abschnitt “Ladeanzeigen”).
Hinweis: Mit einem vollständig geladenen Rasierer können Sie sich bis zu 40 Minuten lang rasieren.
1 Stecken Sie den kleinen Stecker in das Ladegerät und den Adapter in die Steckdose.
2 Stellen Sie den Rasierer in das Ladegerät (Abb. 13).
, Der Rasierer wird geladen.
3 Laden Sie den Rasierer 1,5 Stunden lang auf.
Hinweis: Laden Sie den Rasierer vor dem ersten Gebrauch auf oder wenn die Ladeanzeige am Rasierer
anzeigt, dass der Akku leer ist (siehe Abschnitt “Ladeanzeigen”).
Hinweis: Mit einem vollständig geladenen Rasierer können Sie sich bis zu 40 Minuten lang rasieren.
Sie können die Shaving Conditioner-Kartusche auch ohne die Nachfüll- und Ladestation nachfüllen:
1 Setzen Sie die Düse der Conditioner-Flasche auf die Einfüllöffnung der Conditioner-
Kartusche.
2 Bewegen Sie die Flasche 5 Mal auf und ab, um Shaving Conditioner in die Kartusche zu
pumpen, bis Sie sehen, dass die Kartusche voll ist (Abb. 14).
- Die Ladeanzeigen zeigen den momentanen Ladestand des Akkus an. Während des Ladevorgangs
blinkt die untere Ladeanzeige zunächst orange und erlischt dann. Daraufhin blinkt die obere
Ladeanzeige weiß und leuchtet schließlich dauerhaft weiß.
- Nachdem das Gerät 9 Minuten aufgeladen wurde, erlischt die untere Ladeanzeige. Anschließend
blinkt die obere Ladeanzeige weiß, um anzuzeigen, dass die Akkukapazität für eine Rasur
ausreicht.
Hinweis: Eine Schnellauadung ist nur möglich, wenn Sie den Rasierer bereits einmal 1,5 Stunden lang
aufgeladen haben.
- Die verbleibende Akkukapazität wird durch die Anzahl der leuchtenden Ladeanzeigen angezeigt.
Dies wird für einige Sekunden beim Ein- und Ausschalten des Rasierers angezeigt (Abb. 15).
- Wenn der Akku fast leer ist, leuchtet die untere Ladeanzeige während der Rasur orange auf und
blinkt orange, wenn Sie den Rasierer ausgeschaltet haben. (Abb. 16)
- Wenn der Akku vollständig aufgeladen wurde, leuchten alle Ladestandsanzeigen weiß (Abb. 15).
- Nach ca. einer Stunde erlöschen die weißen Ladestandsanzeigen, um Energie zu sparen.
, Wenn die Anzeige für die Conditioner-Flasche orange blinkt, gibt es zwei
Möglichkeiten: (Abb. 17)
- Es bendet sich keine Conditioner-Flasche in der Nachfüll- und Ladestation oder die Flasche
wurde nicht korrekt eingesetzt.

46
- Die Conditioner-Flasche ist leer.
, Die Füllanzeige für die Conditioner-Kartusche zeigt drei verschiedene Dinge an: (Abb. 18)
- Wenn die Conditioner-Kartusche befüllt wird, blinkt die weiße Füllanzeige für die Conditioner-
Kartusche.
- Wenn die Shaving Conditioner-Kartusche voll ist, leuchtet die weiße Füllanzeige für die
Conditioner-Kartusche dauerhaft.
- Wenn die Conditioner-Flasche während des Nachfüllens der Kartusche leer wird, erlischt die
weiße Füllanzeige, und die Anzeige für die Conditioner-Flasche blinkt rot.
Hinweis: Es kann 2 bis 3 Wochen dauern, bis sich Ihre Haut an ein neues Rasiersystem gewöhnt hat.
1 Vergewissern Sie sich, dass sich genügend Shaving Conditioner in der Shaving Conditioner-
Kartusche bendet.
2 Zum Einschalten des Rasierers drücken Sie den Ein-/Ausschalter.
3 Vergewissern Sie sich, dass der Rasierer ausreichend geladen ist (siehe Kapitel “Für den
Gebrauch vorbereiten”, Abschnitt “Ladeanzeigen”).
4 Führen Sie den Rasierer sanft mit kreisenden Bewegungen über die Haut. Halten Sie dabei die
Shaving Conditioner-Taste so lange gedrückt, bis sich genügend Shaving Conditioner für eine
angenehme Rasur auf Ihrer Haut bendet. (Abb. 19)
- Wenn Sie die Shaving Conditioner-Taste loslassen, wird kein Conditioner mehr abgegeben.
- Wenn Sie die Shaving Conditioner-Taste kurz drücken, trägt das Gerät automatisch eine
bestimmte Menge Conditioner auf.
- Drücken Sie die Shaving Conditioner-Taste während der Rasur erneut, um mehr Conditioner
aufzutragen und zu gewährleisten, dass die Schereinheit sanft über die Haut gleitet.
Hinweis: Die Taste für den Shaving Conditioner funktioniert nur bei eingeschaltetem Rasierer.
Hinweis: Dieser Rasierer kann wie ein Nassrasierer auf dem angefeuchteten Gesicht benutzt werden.
Anders als herkömmliche elektrische Rasierer verfügt dieses Gerät über keine Haarauffangkammer.
Damit keine Bartstoppeln auf Ihre Kleidung fallen, sollten Sie während der Rasur genügend Shaving
Conditioner auftragen.
5 Reinigen Sie den Rasierer sorgfältig nach jedem Gebrauch (siehe Kapitel “Reinigung und
Wartung”).
6 Setzen Sie die Schutzkappe auf den Rasierer, um Beschädigungen zu vermeiden (Abb. 20).
- Führen Sie den Rasierer sanft mit kreisenden Bewegungen über die Haut.
- Üben Sie nicht zu viel Druck auf den Rasierer aus, da dies zu Hautirritationen führen kann.
- Damit der Rasierer gut über die Haut gleiten kann, tragen Sie regelmäßig Shaving Conditioner
auf.
- Sie können den Rasierer auch in der Badewanne oder unter der Dusche verwenden.
Hinweis: Aufgrund des neuen, offenen Designs hören Sie den Schneidvorgang deutlicher als bei anderen
Langhaarschneidern. Das ist normal.
1 Ziehen Sie die Schereinheit vom Rasierer ab (Abb. 21).
47
2 Nehmen Sie den Langhaarschneider aus seiner Halterung am Ladegerät und setzen Sie ihn
auf den Rasierer, sodass er mit einem Klicken einrastet (Abb. 22).
3 Zum Einschalten des Rasierers drücken Sie den Ein-/Ausschalter.
4 Der Langhaarschneider eignet sich zum Schneiden von Koteletten und Schnurrbart.
5 Reinigen Sie den Langhaarschneider sorgfältig nach jedem Gebrauch (siehe Kapitel “Reinigung
und Wartung”).
6 Nehmen Sie den Langhaarschneider vom Gerät ab, und setzen Sie ihn in seine Halterung
zurück.
7 Setzen Sie die Schereinheit wieder auf den Rasierer. Sie rastet mit einem Klicken
ein (Abb. 23).
8 Setzen Sie die Schutzkappe auf den Rasierer, um Beschädigungen zu vermeiden (Abb. 20).
Benutzen Sie zum Reinigen des Geräts keine Scheuerschwämme und -mittel oder aggressive
Flüssigkeiten wie Alkohol, Benzin oder Azeton.
Reinigen Sie den Rasierer und den Langhaarschneider nach jedem Gebrauch.
Gehen Sie vorsichtig mit heißem Wasser um. Achten Sie darauf, dass das Wasser nicht zu heiß ist
und Sie sich nicht die Hände verbrühen.
Trocknen Sie die Schereinheit niemals mit einem Tuch ab, um Beschädigungen der Scherköpfe zu
vermeiden.
Hinweis: Der Rasierer ist wasserdicht und kann mit Wasser gereinigt werden.
1 Zum Einschalten des Rasierers drücken Sie den Ein-/Ausschalter.
Hinweis: Reinigen Sie den Rasierer, während er eingeschaltet ist.
2 Tauchen Sie die Schereinheit bzw. den Langhaarschneider mindestens 30 Sekunden lang in
heißes Wasser (Abb. 24).
3 Schalten Sie dann den Rasierer aus und schütteln Sie überschüssiges Wasser ab.
4 Setzen Sie die Schutzkappe auf den Rasierer, um Beschädigungen zu vermeiden (Abb. 20).
Hinweis: Sollte die Leistung des Rasierers nachlassen und sich dieses Problem mithilfe der hier
beschriebenen Reinigungsmethoden nicht beheben lassen, nden Sie im Kapitel “Fehlerbehebung” Tipps
für eine besonders gründliche Reinigung.
1 Ölen Sie die Zähne des Langhaarschneiders alle sechs Monate mit einem Tropfen
Nähmaschinenöl.
1 Bewahren Sie den Rasierer in der Nachfüll- und Ladestation auf.
48
2 Auf Reisen oder wenn Sie den Rasierer nicht in der Nachfüll- und Ladestation aufbewahren
möchten, setzen Sie die Schutzkappe auf den Rasierer und bewahren Sie ihn in der
mitgelieferten Tasche auf (Abb. 20).
Wenn Sie den Rasierer für längere Zeit nicht benutzen oder auf Reisen gehen, können Sie das Gerät
sichern. Die Reisesicherung verhindert, dass der Rasierer versehentlich eingeschaltet wird.
1 Achten Sie darauf, dass das Gerät ausgeschaltet ist.
2 Halten Sie die Shaving Conditioner-Taste (1) gedrückt, und drücken Sie gleichzeitig mit der
anderen Hand den Ein-/Ausschalter (2) (Abb. 25).
3 Halten Sie beide Tasten 6 Sekunden lang gedrückt. Warten Sie, bis ein kurzes summendes
Geräusch ertönt und die mittlere Ladeanzeige am Rasierer einige Male blinkt.
, Die Reisesicherung ist nun aktiviert.
Hinweis: Sollten Sie versehentlich zuerst den Ein-/Ausschalter drücken, wird der Rasierer eingeschaltet.
Wenn das passiert, drücken Sie erneut den Ein-/Ausschalter, um den Rasierer auszuschalten.
Hinweis: Wenn Sie den Ein-/Ausschalter drücken, während die Reisesicherung aktiviert ist, blinkt die
mittlere Ladeanzeige weiß, um anzuzeigen, dass der Rasierer gesichert ist.
Tipp: Drücken Sie den Ein-/Ausschalter, um zu überprüfen, ob die Reisesicherung aktiviert ist. Ist dies der
Fall, lässt sich der Rasierer nicht einschalten.
1 Halten Sie die Shaving Conditioner-Taste (1) gedrückt, und drücken Sie gleichzeitig mit der
anderen Hand den Ein-/Ausschalter (2) (Abb. 25).
2 Halten Sie beide Tasten 6 Sekunden lang gedrückt. Warten Sie, bis ein kurzes summendes
Geräusch ertönt und die mittlere Ladeanzeige am Rasierer einige Male blinkt.
, Die Reisesicherung ist nun deaktiviert.
Hinweis: Sie können die Reisesicherung auch deaktivieren, indem Sie den Rasierer zurück in das
Ladegerät stellen.
Wenn Sie die Nachfüll- und Ladestation nicht mit auf Reisen nehmen möchten, können Sie das
Ladegerät mitnehmen, um den Rasierer unterwegs bei Bedarf aufzuladen.
Aus hygienischen Gründen empehlt sich einmal pro Jahr ein Austausch der Shaving Conditioner-
Kartusche. In jedem 3er-Pack NIVEA FOR MEN Shaving Conditioner-Flaschen ist auch eine neue
Kartusche enthalten, genau wie im Ersatzset (enthält eine neue HS85 Schereinheit und eine
Kartusche).
1 Nehmen Sie die Shaving Conditioner-Kartusche aus dem Rasierer (Abb. 26).
2 Setzen Sie die Führung am oberen Ende der neuen Shaving Conditioner-Kartusche in den
Schlitz am Rand des Rasierers (1). Drücken Sie dann mit dem Daumen gegen die Unterseite
der Kartusche (2), bis sie mit einem Klicken am Rasierer einrastet (Abb. 27).
3 Befüllen Sie die Shaving Conditioner-Kartusche (siehe Kapitel “Für den Gebrauch
vorbereiten”).
49
Tauschen Sie die Schereinheit jährlich aus, um auch weiterhin optimale Rasierergebnisse zu erzielen.
Ersetzen Sie die Schereinheit ausschließlich durch eine HS85 Philips Schereinheit.
1 Ziehen Sie die alte Schereinheit vom Rasierer ab (Abb. 21).
2 Setzen Sie die neue Schereinheit auf den Rasierer, sodass sie mit einem Klicken
einrastet (Abb. 23).
Benutzen Sie ausschließlich NIVEA FOR MEN Shaving Conditioner-Flaschen.
1 Entfernen Sie den Verschluss der Flasche NIVEA FOR MEN Shaving Conditioner (Abb. 6).
2 Drehen Sie die Kappe der Flasche im Uhrzeigersinn, bis Sie ein Klicken hören (Abb. 7).
, Die Kappe bewegt sich nach unten und die Conditioner-Düse tritt hervor.
3 Drehen Sie die Kappe der Nachfüll- und Ladestation gegen den Uhrzeigersinn, um sie
abzunehmen.
4 Setzen Sie die Conditioner-Flasche mit nach unten zeigender Düse in die Anschlussöffnung
ein (Abb. 8).
5 Setzen Sie die Kappe wieder auf die Nachfüll- und Ladestation (1) und drehen Sie sie im
Uhrzeigersinn fest (2) (Abb. 9).
- Werfen Sie das Gerät am Ende der Lebensdauer nicht in den normalen Hausmüll. Bringen Sie es
zum Recycling zu einer ofziellen Sammelstelle. Auf diese Weise helfen Sie, die Umwelt zu
schonen (Abb. 28).
- Der integrierte Akku enthält Substanzen, die die Umwelt gefährden können. Entfernen Sie den
Akku, bevor Sie das Gerät an einer ofziellen Recyclingstelle abgeben. Geben Sie den
gebrauchten Akku bei einer Batteriesammelstelle ab. Falls Sie beim Entfernen des Akkus
Probleme haben, können Sie das Gerät auch an ein Philips Service-Center geben. Dort wird der
Akku umweltgerecht entsorgt.
Nehmen Sie den Akku nur zur Entsorgung des Rasierers heraus. Vergewissern Sie sich, dass der
Akku beim Herausnehmen vollständig entladen ist.
Vorsicht: Die Schienen am Akku sind scharf!
1 Nehmen Sie die Shaving Conditioner-Kartusche aus dem Rasierer (Abb. 26).
2 Lösen Sie die drei Schrauben auf der Rückseite des Rasierers (Abb. 29).
3 Entfernen Sie das rückwärtige Gehäuse mit einem Schraubendreher (Abb. 30).
4 Durchtrennen Sie die Drähte, und entfernen Sie den Akku.
Benötigen Sie weitere Informationen oder treten Probleme auf, besuchen Sie bitte die Philips
Website www.philips.com/support, oder setzen Sie sich mit einem Philips Service-Center in Ihrem
Land in Verbindung (Telefonnummer siehe internationale Garantieschrift). Sollte es in Ihrem Land
kein Service-Center geben, wenden Sie sich bitte an Ihren Philips Händler.

50
Die Schereinheit (Schermesser und Scherkörbe) unterliegt nicht den Bedingungen der
internationalen Garantie, da sie einem normalen Verschleiß ausgesetzt ist.
Die Conditioner-Kartusche ist ein Einweg-Artikel und unterliegt somit nicht den Bedingungen der
internationalen Garantie.
In diesem Kapitel sind die häugsten Probleme aufgeführt, die beim Gebrauch Ihres Geräts auftreten
können. Sollten Sie ein Problem mithilfe der nachstehenden Informationen nicht beheben können,
wenden Sie sich bitte an das Philips Service-Center in Ihrem Land.
Problem Mögliche Ursache Lösung
Der Rasierer
Sie haben nicht genug
Halten Sie die Shaving Conditioner-Taste so lange
gleitet nicht sanft
Shaving Conditioner
gedrückt, bis eine ausreichende Menge NIVEA FOR
über meine Haut.
aufgetragen.
MEN Shaving Conditioner abgegeben wurde. So
kann die Schereinheit wieder sanft über Ihre Haut
gleiten.
Der Rasierer
Sie haben den
Reinigen Sie den Rasierer gründlich (siehe Kapitel
rasiert nicht mehr
Rasierer nicht richtig
“Reinigung und Wartung”).
so gut wie bisher.
gereinigt.
Lange Haare
Reinigen Sie die Scherköpfe, indem Sie die unten
blockieren die
beschriebene, besonders gründliche
Scherköpfe.
Reinigungsmethode anwenden.
Die Schereinheit ist
Wechseln Sie die Schereinheit aus (siehe Kapitel
beschädigt oder
“Ersatz”).
abgenutzt.
Der Rasierer
Der Akku ist leer. Laden Sie den Akku (siehe Kapitel “Für den
funktioniert nicht,
Gebrauch vorbereiten”).
wenn ich den Ein-/
Ausschalter
drücke.
Die Reisesicherung
Deaktivieren Sie die Reisesicherung (siehe Kapitel
ist aktiviert.
“Aufbewahrung”).
Getrockneter Shaving
Reinigen Sie den Rasierer gründlich, bevor Sie die
Conditioner verstopft
Rasur fortsetzen (siehe Kapitel “Reinigung”).
die Scherköpfe in der
Schereinheit.
Sie haben die
Achten Sie beim Wiedereinsetzen der Schereinheit
Schereinheit nach der
darauf, jeden Scherkorb gegen den Uhrzeigersinn zu
besonders
drehen, bis er einrastet.
gründlichen Reinigung
nicht richtig
zusammengesetzt.

51
Problem Mögliche Ursache Lösung
Trotz befüllter
Eine der Öffnungen
Spülen Sie die Schereinheit ab, oder weichen Sie sie
Conditioner-
für den Shaving
ein. Sollte das nicht funktionieren, pumpen Sie
Kartusche kommt
Conditioner ist
Shaving Conditioner in die Kartusche, bis
nur wenig Shaving
verstopft.
Conditioner aus der verstopften Öffnung ießt.
Conditioner aus
Sollte auch das nicht funktionieren, versuchen Sie die
den Öffnungen.
folgende Methode: 1) Schalten Sie den Rasierer aus.
2) Ziehen Sie die Schereinheit vom Rasierer ab. 3)
Legen Sie einen Finger auf die Öffnung, die nicht
verstopft ist. 4) Schalten Sie den Rasierer ein. 5)
Halten Sie die Shaving Conditioner-Taste einige
Sekunden lang gedrückt, bis wieder Conditioner aus
der verstopften Öffnung ießt.
Sie haben die
Achten Sie darauf, dass Sie den Scherkopf ohne
Scherköpfe nicht
Conditioner-Öffnung in den richtigen
wieder in die
Scherkopfhalter einsetzen. Dieser bendet sich am
dazugehörigen
nächsten neben dem Ein-/Ausschalter, wenn die
Scherkopfhalter
Schereinheit auf dem Rasierer angebracht ist.
eingesetzt. Einer der
Scherköpfe hat in der
Mitte keine Shaving
Conditioner-Öffnung
und gehört in einen
bestimmten
Scherkopfhalter.
Wenn ich die
Die Shaving
Füllen Sie die Shaving Conditioner-Kartusche auf
Shaving
Conditioner-
(siehe Kapitel “Für den Gebrauch vorbereiten”).
Conditioner-Taste
Kartusche ist fast leer.
drücke, wird kein
Conditioner
abgegeben.
Der
Dieser
Aufgrund des neuen, offenen Designs hören Sie den
Langhaarschneider
Langhaarschneider
Schneidvorgang deutlicher als bei anderen
ist lauter als
verfügt über ein
Langhaarschneidern. Das ist normal und deutet nicht
vergleichbare
offenes Design.
darauf hin, dass der Langhaarschneider beschädigt ist.
Geräte.
Vergewissern Sie sich, dass das Gerät ausgeschaltet ist.
1 Ziehen Sie die Schereinheit vom Rasierer ab (Abb. 31).
2 Drehen Sie den Scherkorb im Uhrzeigersinn und nehmen Sie ihn aus der Schereinheit
heraus (Abb. 32).
Hinweis: Entfernen Sie jeweils nur einen Scherkopf. Damit stellen Sie sicher, dass Sie den Scherkopf auch
wieder in den entsprechenden Scherkopfhalter zurücksetzen. Dies ist umso wichtiger, da zwei der
Scherköpfe über spezielle Öffnungen für Shaving Conditioner verfügen. Gleichzeitig wird sichergestellt,
dass Sie die Schermesser und Scherkörbe der verschiedenen Scherköpfe nicht vertauschen. Dies hätte
negative Auswirkungen auf die Rasierergebnisse.
3 Entfernen Sie, falls notwendig, das Schermesser vom Scherkorb.

52
4 Reinigen Sie das Schermesser und den Scherkorb mit der beiliegenden Bürste.
5 Setzen Sie nach dem Reinigen das Schermesser mit den Vorsprüngen nach oben wieder in die
Schereinheit.
6 Setzen Sie den Scherkorb wieder auf den Scherkopfhalter (über das Schermesser) (Abb. 33).
7 Drehen Sie den Scherkorb entgegen dem Uhrzeigersinn, bis er einrastet (Abb. 34).
8 Setzen Sie die Schereinheit wieder auf den Rasierer. Sie rastet mit einem Klicken
ein (Abb. 35).

53
Συγχαρητήρια για την αγορά σας και καλώς ήρθατε στη Philips! Για να επωφεληθείτε πλήρως
από την υποστήριξη που παρέχει η Philips, καταχωρήστε το προϊόν σας στην ιστοσελίδα www.
philips.com/welcome.
Παρακαλούμε διαβάστε αυτό το εγχειρίδιο χρήσης, καθώς περιέχει πληροφορίες για τα
εκπληκτικά χαρακτηριστικά αυτής της ξυριστικής μηχανής, καθώς και συμβουλές για
ευκολότερο και πιο ευχάριστο ξύρισμα.
Ξυριστική μηχανή
Προστατευτικό κάλυμμα
Φαβοριτοκόπτης
Μονάδα ξυρίσματος
Υποδοχέας λοσιόν ξυρίσματος
Κουμπί για λοσιόν ξυρίσματος
Κουμπί on/off
Λυχνίες φόρτισης
Βάση φόρτισης
Μονάδα αναπλήρωσης και φόρτισης
Καπάκι μονάδας αναπλήρωσης και φόρτισης
Εσοχή αποθήκευσης φαβοριτοκόπτη
Οπίσθιο κάλυμμα
Υποδοχή για μικρό βύσμα
Λυχνία ‘πλήρωσης υποδοχέα λοσιόν’
Λυχνία μπουκαλιού λοσιόν
Βουρτσάκι καθαρισμού
Μπουκάλι λοσιόν ξυρίσματος NIVEA FOR MEN
Θήκη
Μετασχηματιστής (ο μετασχηματιστής σας ενδέχεται να διαφέρει από αυτόν που φαίνεται
στην εικόνα)
Διαβάστε αυτό το εγχειρίδιο χρήσης προσεκτικά πριν χρησιμοποιήσετε τη συσκευή και
φυλάξτε το για μελλοντική αναφορά.
- Φροντίζετε να μη βραχεί ο μετασχηματιστής (ο μετασχηματιστής σας ενδέχεται να
διαφέρει από αυτόν που φαίνεται στην εικόνα) (Εικ. 2).
- Να προσέχετε με το ζεστό νερό. Ελέγχετε πάντα τη θερμοκρασία του νερού προκειμένου
να μην κάψετε τα χέρια σας.
- Μην κόψετε το βύσμα του μετασχηματιστή για να το αντικαταστήσετε με άλλο, καθώς
αυτό προκαλεί επικίνδυνες καταστάσεις.
- Αυτή η συσκευή δεν προορίζεται για χρήση από άτομα (συμπεριλαμβανομένων των
παιδιών) με περιορισμένες σωματικές, αισθητήριες ή διανοητικές ικανότητες ή από άτομα
χωρίς εμπειρία και γνώση, εκτός και εάν τη χρησιμοποιούν υπό επιτήρηση ή έχουν λάβει
οδηγίες σχετικά με τη χρήση της συσκευής από άτομο υπεύθυνο για την ασφάλειά τους.
- Τα παιδιά θα πρέπει να επιβλέπονται προκειμένου να διασφαλιστεί ότι δεν θα παίζουν με
τη συσκευή.

54
- Μην βυθίζετε ποτέ τη μονάδα αναπλήρωσης και φόρτισης σε νερό και μην την ξεπλένετε
με νερό βρύσης (Εικ. 3).
- Μην βυθίζετε ποτέ τη βάση φόρτισης σε νερό και μην την ξεπλένετε με νερό
βρύσης (Εικ. 4).
- Τοποθετείτε και χρησιμοποιείτε πάντα τη μονάδα αναπλήρωσης και φόρτισης και τη βάση
φόρτισης σε επιφάνειες ανθεκτικές στα υγρά.
- Χρησιμοποιείτε, φορτίζετε και αποθηκεύετε τις συσκευές σε θερμοκρασία μεταξύ 5°C και
35°C.
- Τοποθετείτε πάντα το προστατευτικό κάλυμμα στην ξυριστική μηχανή για προστασία των
ξυριστικών κεφαλών όταν ταξιδεύετε.
- Η ξυριστική μηχανή και τα άλλα εξαρτήματα δεν πλένονται στο πλυντήριο πιάτων.
- Μην χρησιμοποιείτε ποτέ νερό σε θερμοκρασία υψηλότερη των 80°C για να ξεπλύνετε την
ξυριστική μηχανή.
- Χρησιμοποιείτε μόνο το μετασχηματιστή, τη βάση φόρτισης και τη μονάδα αναπλήρωσης
και φόρτισης που παρέχονται.
- Μην χρησιμοποιείτε τη μονάδα αναπλήρωσης και φόρτισης, εάν ο μετασχηματιστής ή η
ίδια η μονάδα έχουν υποστεί βλάβη.
- Μην χρησιμοποιείτε την ξυριστική μηχανή ή τη βάση φόρτισης εάν έχουν υποστεί βλάβη.
- Εάν ο μετασχηματιστής υποστεί βλάβη, θα πρέπει να αντικατασταθεί μόνο με αυθεντικό
προς αποφυγή κινδύνου.
- Η συγκεκριμένη ξυριστική μηχανή συμμορφώνεται με τους διεθνώς εγκεκριμένους
κανονισμούς ασφαλείας και μπορεί να χρησιμοποιηθεί με ασφάλεια στο μπάνιο ή το ντους,
καθώς και να καθαριστεί με νερό βρύσης (Εικ. 5).
- Η συγκεκριμένη συσκευή της Philips συμμορφώνεται με όλα τα πρότυπα που αφορούν τα
ηλεκτρομαγνητικά πεδία (EMF). Εάν γίνει σωστός χειρισμός και σύμφωνος με τις οδηγίες
του παρόντος εγχειριδίου χρήσης, η συσκευή είναι ασφαλής στη χρήση βάσει των
επιστημονικών αποδείξεων που είναι διαθέσιμες μέχρι σήμερα.
- Ο μετασχηματιστής μετατρέπει τα 100-240 V σε ασφαλή χαμηλή τάση, μικρότερη των 24 V.
1 Αφαιρέστε το αποσπώμενο τμήμα του καπακιού από το μπουκάλι της λοσιόν
ξυρίσματος NIVEA FOR MEN (Εικ. 6).
2 Γυρίστε το καπάκι του μπουκαλιού λοσιόν δεξιόστροφα (‘κλικ’) (Εικ. 7).
, Το καπάκι μετακινείται προς τα κάτω και το στόμιο εμφανίζεται.
3 Γυρίστε το καπάκι της μονάδας αναπλήρωσης και φόρτισης αριστερόστροφα και
αφαιρέστε το.
4 Αφαιρέστε τα υλικά συσκευασίας από την οπή σύνδεσης του μπουκαλιού στη μονάδα
αναπλήρωσης και φόρτισης.
5 Τοποθετήστε το μπουκάλι λοσιόν στην οπή σύνδεσης με το στόμιο να δείχνει προς τα
κάτω (Εικ. 8).
6 Επανατοποθετήστε το καπάκι στη μονάδα αναπλήρωσης και φόρτισης (1) και γυρίστε
το δεξιόστροφα για να το στερεώσετε (2) (Εικ. 9).
7 Συνδέστε το μικρό βύσμα στην υποδοχή της μονάδας αναπλήρωσης και φόρτισης και το
μετασχηματιστή στην πρίζα (Εικ. 10).
55
8 Τοποθετήστε την ξυριστική μηχανή στη μονάδα αναπλήρωσης και φόρτισης και
σπρώξτε τη προς τα πίσω (‘κλικ’) (Εικ. 11).
Σημείωση: Η ξυριστική μηχανή φορτίζεται και γεμίζει αυτόματα με λοσιόν ξυρίσματος.
9 Φορτίστε την ξυριστική μηχανή για 90 λεπτά. (Εικ. 12)
Σημείωση: Φορτίστε την ξυριστική μηχανή πριν από την πρώτη χρήση ή όταν η λυχνία φόρτισης
υποδεικνύει ότι η μπαταρία έχει αδειάσει (δείτε την ενότητα ‘Ενδείξεις φόρτισης’).
Σημείωση: Μια πλήρως φορτισμένη ξυριστική μηχανή επιτρέπει έως και 40 λεπτά αυτονομίας.
1 Συνδέστε το μικρό βύσμα στη βάση φόρτισης και το μετασχηματιστή στην πρίζα.
2 Τοποθετήστε την ξυριστική μηχανή στη βάση φόρτισης (Εικ. 13).
, Η ξυριστική μηχανή φορτίζεται.
3 Φορτίστε την ξυριστική μηχανή για 1,5 ώρες.
Σημείωση: Φορτίστε την ξυριστική μηχανή πριν από την πρώτη χρήση ή όταν η λυχνία φόρτισης
υποδεικνύει ότι η μπαταρία έχει αδειάσει (δείτε την ενότητα ‘Ενδείξεις φόρτισης’).
Σημείωση: Μια πλήρως φορτισμένη ξυριστική μηχανή επιτρέπει έως και 40 λεπτά αυτονομίας.
Μπορείτε επίσης να αναπληρώσετε τον υποδοχέα λοσιόν ξυρίσματος χωρίς να
χρησιμοποιήσετε τη μονάδα αναπλήρωσης και φόρτισης:
1 Τοποθετήστε το στόμιο του μπουκαλιού λοσιόν στο άνοιγμα πλήρωσης του υποδοχέα
λοσιόν.
2 Ανακινείστε το μπουκάλι πάνω κάτω περίπου 5 φορές για να αντλήσετε λοσιόν
ξυρίσματος μέσα στον υποδοχέα μέχρι αυτός να γεμίσει (Εικ. 14).
- Οι λυχνίες φόρτισης υποδεικνύουν το επίπεδο φόρτισης της μπαταρίας. Κατά τη διάρκεια
της φόρτισης, η κάτω λυχνία φόρτισης αρχικά αναβοσβήνει με πορτοκαλί χρώμα και,
έπειτα, σβήνει. Κατόπιν, η επάνω λυχνία φόρτισης ξεκινά να αναβοσβήνει με λευκό χρώμα
και, τέλος, ανάβει με λευκό χρώμα συνεχόμενα.
- Αφού η ξυριστική μηχανή έχει φορτιστεί για 9 λεπτά, η κάτω λυχνία φόρτισης σβήνει και η
επάνω λυχνία φόρτισης αρχίζει να αναβοσβήνει με λευκό χρώμα, υποδεικνύοντας ότι η
ξυριστική μηχανή έχει αρκετή ενέργεια για ένα ξύρισμα.
Σημείωση: Η γρήγορη φόρτιση είναι δυνατή μόνο όταν έχετε ήδη φορτίσει μία φορά την ξυριστική
μηχανή για 1,5 ώρα.
- Η υπολειπόμενη ισχύς στην μπαταρία υποδεικνύεται από τον αριθμό των λυχνιών
φόρτισης που είναι αναμμένες. Η υπολειπόμενη ισχύς της μπαταρίας είναι ορατή για λίγα
δευτερόλεπτα όταν ενεργοποιείτε ή απενεργοποιείτε την ξυριστική μηχανή (Εικ. 15).
- Όταν η ισχύς της μπαταρίας είναι χαμηλή, η κάτω λυχνία φόρτισης ανάβει με πορτοκαλί
χρώμα κατά τη διάρκεια του ξυρίσματος και αναβοσβήνει με πορτοκαλί χρώμα
όταν απενεργοποιείτε την ξυριστική μηχανή. (Εικ. 16)

56
- Όταν η μπαταρία φορτιστεί πλήρως, όλες οι λυχνίες φόρτισης ανάβουν με λευκό φως
συνεχόμενα (Εικ. 15).
- Μετά από περίπου 1 ώρα, οι λυχνίες φόρτισης λευκού χρώματος σβήνουν για
εξοικονόμηση ενέργειας.
, Όταν η λυχνία του μπουκαλιού λοσιόν αναβοσβήνει με πορτοκαλί χρώμα, δύο είναι οι
πιθανότητες: (Εικ. 17)
- Δεν έχει τοποθετηθεί μπουκάλι λοσιόν στη μονάδα αναπλήρωσης και φόρτισης ή το
μπουκάλι δεν έχει τοποθετηθεί σωστά.
- Το μπουκάλι λοσιόν είναι άδειο.
, Η λυχνία ‘πλήρωσης υποδοχέα λοσιόν’ δείχνει τρία διαφορετικά πράγματα: (Εικ. 18)
- Όταν ο υποδοχέας λοσιόν γεμίζει, η λευκή λυχνία ‘πλήρωσης υποδοχέα λοσιόν΄
αναβοσβήνει.
- Όταν ο υποδοχέας λοσιόν ξυρίσματος είναι γεμάτος, η λευκή λυχνία ‘πλήρωσης υποδοχέα
λοσιόν’ παραμένει σταθερά αναμμένη.
- Εάν το μπουκάλι λοσιόν αδειάσει ενώ ο υποδοχέας λοσιόν γεμίζει, η λευκή λυχνία
‘πλήρωσης υποδοχέα λοσιόν’ σβήνει και οι λυχνίες του μπουκαλιού λοσιόν αναβοσβήνουν
με κόκκινο χρώμα.
Σημείωση: Το δέρμα σας ενδέχεται να χρειάζεται 2 με 3 εβδομάδες για να συνηθίσει στο καινούριο
σύστημα ξυρίσματος.
1 Φροντίστε να υπάρχει επαρκής λοσιόν ξυρίσματος μέσα στον υποδοχέα λοσιόν
ξυρίσματος.
2 Πιέστε το κουμπί on/off για να ενεργοποιήσετε την ξυριστική μηχανή.
3 Βεβαιωθείτε ότι η ξυριστική μηχανή είναι επαρκώς φορτισμένη (δείτε το κεφάλαιο
‘Προετοιμασία για χρήση’, ενότητα ‘Ενδείξεις φόρτισης’).
4 Μετακινήστε τη μονάδα ξυρίσματος απαλά, με κυκλικές κινήσεις πάνω στο δέρμα σας
και πιέστε το κουμπί για τη λοσιόν ξυρίσματος μέχρι στο δέρμα σας να υπάρχει αρκετή
ποσότητα λοσιόν για ένα άνετο ξύρισμα. (Εικ. 19)
- Όταν αφήνετε το κουμπί για τη λοσιόν ξυρίσματος, η συσκευή σταματά να διανέμει λοσιόν.
- Εάν πιέσετε στιγμιαία το κουμπί για τη λοσιόν ξυρίσματος, από τη συσκευή θα βγει
αυτόματα μια μικρή ποσότητα λοσιόν.
- Πιέστε ξανά το κουμπί για τη λοσιόν ξυρίσματος για να βγει περισσότερη λοσιόν
ξυρίσματος κατά το ξύρισμα και να εξασφαλίσετε ότι η μονάδα ξυρίσματος θα
εξακολουθεί να γλιστρά απαλά πάνω στο δέρμα σας.
Σημείωση: Το κουμπί για τη λοσιόν ξυρίσματος λειτουργεί μόνο όταν η ξυριστική μηχανή είναι
ενεργοποιημένη.
Σημείωση: Αυτή η ξυριστική μηχανή μπορεί να χρησιμοποιηθεί με τρόπο ανάλογο όπως και μια
ξυριστική λεπίδα: μπορείτε να χρησιμοποιήσετε την ξυριστική μηχανή σε υγρό πρόσωπο. Σε αντίθεση
με μια συμβατική ηλεκτρική ξυριστική μηχανή, αυτή η συσκευή δεν διαθέτει χώρο συλλογής τριχών
που να συλλέγει τις κομμένες τρίχες. Για να αποτρέψετε τις τρίχες από το να πέσουν στα ρούχα
σας, απλώστε αρκετή λοσιόν ξυρίσματος κατά το ξύρισμα.
57
5 Καθαρίζετε σχολαστικά την ξυριστική μηχανή μετά από κάθε χρήση (δείτε το κεφάλαιο
‘Καθαρισμός και συντήρηση’).
6 Τοποθετήστε το προστατευτικό κάλυμμα στην ξυριστική μηχανή προς αποφυγή
φθορών (Εικ. 20).
- Μετακινείτε την ξυριστική μηχανή απαλά, με κυκλικές κινήσεις πάνω στο δέρμα σας.
- Μην ασκείτε μεγάλη πίεση στην ξυριστική μηχανή, καθώς αυτό μπορεί να προκαλέσει
ερεθισμούς.
- Για να εξασφαλίσετε σωστή ολίσθηση, απλώνετε τακτικά λοσιόν ξυρίσματος.
- Μπορείτε επίσης να χρησιμοποιείτε την ξυριστική μηχανή στο μπάνιο ή το ντους.
Σημείωση: Εξαιτίας του νέου ανοικτού σχεδιασμού της ξυριστικής μηχανής, ο ήχος κοπής του
φαβοριτοκόπτη κατά την κοπή ακούγεται πιο έντονα σε σχέση με άλλους φαβοριτοκόπτες. Αυτό είναι
φυσιολογικό.
1 Τραβήξτε τη μονάδα ξυρίσματος από την ξυριστική μηχανή (Εικ. 21).
2 Πάρτε το φαβοριτοκόπτη από την υποδοχή φαβοριτοκόπτη στη βάση φόρτισης και
τοποθετήστε τον πάνω στην ξυριστική μηχανή (‘κλικ’) (Εικ. 22).
3 Πιέστε το κουμπί on/off για να ενεργοποιήσετε την ξυριστική μηχανή.
4 Χρησιμοποιήστε το φαβοριτοκόπτη για να περιποιηθείτε τις φαβορίτες και/ή το
μουστάκι σας.
5 Καθαρίζετε σχολαστικά το φαβοριτοκόπτη μετά από κάθε χρήση (δείτε το κεφάλαιο
‘Καθαρισμός και συντήρηση’).
6 Αφαιρέστε το φαβοριτοκόπτη και τοποθετήστε τον ξανά στην υποδοχή του.
7 Τοποθετήστε ξανά τη μονάδα ξυρίσματος στην ξυριστική μηχανή (΄κλικ’) (Εικ. 23).
8 Τοποθετήστε το προστατευτικό κάλυμμα στην ξυριστική μηχανή προς αποφυγή
φθορών (Εικ. 20).
Μην χρησιμοποιείτε ποτέ συρμάτινα σφουγγαράκια, σκληρά καθαριστικά ή υγρά με μεγάλη
οξύτητα, όπως οινόπνευμα, πετρέλαιο ή ασετόν για τον καθαρισμό της συσκευής.
Καθαρίζετε την ξυριστική μηχανή και το φαβοριτοκόπτη μετά από κάθε χρήση.
Να προσέχετε με το ζεστό νερό. Ελέγχετε πάντα τη θερμοκρασία του νερού προκειμένου να
μην κάψετε τα χέρια σας.
Μην στεγνώνετε ποτέ τη μονάδα ξυρίσματος με πετσέτα ή χαρτομάντηλο, καθώς αυτό
μπορεί να προκαλέσει βλάβη στις ξυριστικές κεφαλές.
Σημείωση: Η ξυριστική μηχανή είναι αδιάβροχη και μπορεί να καθαριστεί με νερό.
1 Πιέστε το κουμπί on/off για να ενεργοποιήσετε την ξυριστική μηχανή.
Σημείωση: Καθαρίστε την ξυριστική μηχανή ενώ είναι ενεργοποιημένη.
2 Βυθίστε τη μονάδα ξυρίσματος/ φαβοριτοκόπτη σε ζεστό νερό για τουλάχιστον 30
δευτερόλεπτα (Εικ. 24).

58
3 Απενεργοποιήστε την ξυριστική μηχανή και τινάξτε τυχόν νερό που έχει απομείνει.
4 Τοποθετήστε το προστατευτικό κάλυμμα στην ξυριστική μηχανή προς αποφυγή
φθορών (Εικ. 20).
Σημείωση: Εάν η ξυριστική μηχανή δεν ξυρίζει τόσο καλά όσο παλαιότερα και δεν μπορείτε να
επιλύσετε το πρόβλημα με τη μέθοδο καθαρισμού που περιγράφεται σε αυτό το κεφάλαιο,
συμβουλευτείτε το κεφάλαιο ‘Οδηγός ανεύρεσης/επίλυσης προβλημάτων’ για τη μέθοδο εξαιρετικά
σχολαστικού καθαρισμού.
1 Λιπαίνετε τα δοντάκια του φαβοριτοκόπτη με μια σταγόνα λάδι ραπτομηχανής κάθε έξι
μήνες.
1 Αποθηκεύστε την ξυριστική μηχανή στη μονάδα αναπλήρωσης και φόρτισης.
2 Εάν πρόκειται να ταξιδέψετε ή εάν δεν θέλετε να αποθηκεύσετε την ξυριστική μηχανή
στη μονάδα αναπλήρωσης και φόρτισης, τοποθετήστε το προστατευτικό κάλυμμα στην
ξυριστική μηχανή και αποθηκεύστε τη στη θήκη (Εικ. 20).
Εάν πρόκειται να αποθηκεύσετε την ξυριστική κεφαλή για μεγάλο χρονικό διάστημα ή εάν
πρόκειται να ταξιδέψετε, μπορείτε να κλειδώσετε την ξυριστική μηχανή. Το κλείδωμα ταξιδίου
αποτρέπει την κατά λάθος ενεργοποίηση της ξυριστικής μηχανής.
1 Βεβαιωθείτε ότι η ξυριστική μηχανή είναι απενεργοποιημένη.
2 Πατήστε παρατεταμένα το κουμπί για λοσιόν ξυρίσματος (1) και ταυτόχρονα πατήστε το
κουμπί on/off με το άλλο χέρι (2) (Εικ. 25).
3 Κρατήστε πατημένα και τα δύο κουμπιά για 6 δευτερόλεπτα. Περιμένετε μέχρι να
ακουστεί ένας σύντομος βόμβος από την ξυριστική μηχανή και να αναβοσβήσει μερικές
φορές η μεσαία λυχνία φόρτισης της ξυριστικής μηχανής.
, Το κλείδωμα ταξιδίου ενεργοποιήθηκε.
Σημείωση: Εάν κατά λάθος πατήσετε πρώτα το κουμπί on/off, η ξυριστική μηχανή θα αρχίσει να
λειτουργεί .. Εάν συμβεί αυτό, πατήστε το κουμπί on/off ξανά για να απενεργοποιήσετε την ξυριστική
μηχανή.
Σημείωση: Εάν πατήσετε το κουμπί on/off ενώ είναι ενεργοποιημένο το κλείδωμα ταξιδίου, η μεσαία
λυχνία φόρτισης αναβοσβήνει με λευκό χρώμα, υποδεικνύοντας ότι η ξυριστική μηχανή είναι
κλειδωμένη.
Συμβουλή: Πατήστε το κουμπί on/off για να ελέγξετε εάν είναι ενεργοποιημένο το κλείδωμα ταξιδίου.
Εάν είναι ενεργοποιημένο, η ξυριστική μηχανή δεν ενεργοποιείται.
1 Πατήστε παρατεταμένα το κουμπί για λοσιόν ξυρίσματος (1) και ταυτόχρονα πατήστε το
κουμπί on/off με το άλλο χέρι (2) (Εικ. 25).
2 Κρατήστε πατημένα και τα δύο κουμπιά για 6 δευτερόλεπτα. Περιμένετε μέχρι να
ακουστεί ένας σύντομος βόμβος από την ξυριστική μηχανή και να αναβοσβήσει μερικές
φορές η μεσαία λυχνία φόρτισης της ξυριστικής μηχανής.
59
, Το κλείδωμα ταξιδίου απενεργοποιήθηκε.
Σημείωση: Μπορείτε επίσης να απενεργοποιήσετε το κλείδωμα ταξιδίου τοποθετώντας την
ξυριστική μηχανή στη βάση φόρτισης.
Εάν πρόκειται να ταξιδέψετε και δεν θέλετε να πάρετε μαζί σας τη μονάδα αναπλήρωσης και
φόρτισης, μπορείτε να πάρετε τη βάση φόρτισης για να φορτίζετε την ξυριστική μηχανή όταν
χρειάζεται.
Για λόγους υγιεινής, σας συνιστούμε να αντικαθιστάτε τον υποδοχέα λοσιόν ξυρίσματος κάθε
χρόνο. Ένας νέος υποδοχέας συμπεριλαμβάνεται σε κάθε συσκευασία μπουκαλιών λοσιόν
ξυρίσματος NIVEA FOR MEN 3 τεμαχίων, και στο ανταλλακτικό κιτ (το οποίο περιέχει μια νέα
μονάδα ξυρίσματος HS85 και ένα νέο υποδοχέα).
1 Αφαιρέστε τον υποδοχέα λοσιόν ξυρίσματος από την ξυριστική μηχανή (Εικ. 26).
2 Εισαγάγετε την προεξοχή που βρίσκεται στο επάνω μέρος του νέου υποδοχέα λοσιόν
ξυρίσματος στην υποδοχή που βρίσκεται στο χείλος της ξυριστικής μηχανής (1). Έπειτα,
πιέστε το κάτω μέρος του υποδοχέα με τον αντίχειρά σας (2) για να προσαρτήσετε τον
υποδοχέα στην ξυριστική μηχανή (‘κλικ’) (Εικ. 27).
3 Γεμίστε τον υποδοχέα λοσιόν ξυρίσματος (δείτε το κεφάλαιο ‘Έναρξη’).
Αντικαθιστάτε τη μονάδα ξυρίσματος κάθε χρόνο για βέλτιστα αποτελέσματα ξυρίσματος.
Αντικαθιστάτε τη μονάδα ξυρίσματος μόνο με τη μονάδα ξυρίσματος HS85 της Philips.
1 Τραβήξτε την παλιά μονάδα ξυρίσματος από την ξυριστική μηχανή (Εικ. 21).
2 Τοποθετήστε τη νέα μονάδα ξυρίσματος στην ξυριστική μηχανή (‘κλικ’) (Εικ. 23).
Χρησιμοποιείτε μόνο μπουκάλια λοσιόν ξυρίσματος NIVEA FOR MEN
1 Αφαιρέστε το αποσπώμενο τμήμα του καπακιού από το μπουκάλι της λοσιόν
ξυρίσματος NIVEA FOR MEN (Εικ. 6).
2 Γυρίστε το καπάκι του μπουκαλιού λοσιόν δεξιόστροφα (‘κλικ’) (Εικ. 7).
, Το καπάκι μετακινείται προς τα κάτω και το στόμιο εμφανίζεται.
3 Γυρίστε το καπάκι της μονάδας αναπλήρωσης και φόρτισης αριστερόστροφα και
αφαιρέστε το.
4 Τοποθετήστε το μπουκάλι λοσιόν στην οπή σύνδεσης του μπουκαλιού με το στόμιο να
δείχνει προς τα κάτω (Εικ. 8).
5 Τοποθετήστε το καπάκι στη μονάδα αναπλήρωσης και φόρτισης (1) και γυρίστε το
δεξιόστροφα (2) για να το στερεώσετε (Εικ. 9).
- Στο τέλος της ζωής της συσκευής μην την πετάξετε μαζί με τα συνηθισμένα απορρίμματα
του σπιτιού σας, αλλά παραδώστε τη σε ένα επίσημο σημείο συλλογής για ανακύκλωση.
Με αυτόν τον τρόπο, θα βοηθήσετε στην προστασία του περιβάλλοντος (Εικ. 28).
60
- Η ενσωματωμένη επαναφορτιζόμενη μπαταρία περιέχει ουσίες που ενδέχεται να μολύνουν
το περιβάλλον. Να αφαιρείτε πάντα την μπαταρία πριν απορρίψετε τη συσκευή και την
παραδώσετε σε ένα επίσημο σημείο συλλογής. Να απορρίπτετε την μπαταρία σε επίσημο
σημείο συλλογής για μπαταρίες. Εάν αντιμετωπίσετε δυσκολίες στην αφαίρεση της
μπαταρίας, μπορείτε να απευθυνθείτε σε ένα εξουσιοδοτημένο κέντρο σέρβις της Philips,
όπου θα αφαιρέσουν την μπαταρία για εσάς και θα την απορρίψουν με τρόπο ασφαλή για
το περιβάλλον.
Αφαιρέστε την επαναφορτιζόμενη μπαταρία μόνο όταν πρόκειται να απορρίψετε την
ξυριστική μηχανή. Βεβαιωθείτε ότι η μπαταρία είναι εντελώς άδεια όταν πρόκειται να την
αφαιρέσετε.
Να είστε προσεκτικοί καθώς οι επαφές της μπαταρίας είναι κοφτερές.
1 Αφαιρέστε τον υποδοχέα λοσιόν ξυρίσματος από την ξυριστική μηχανή (Εικ. 26).
2 Ξεβιδώστε τις τρεις βίδες στο πίσω μέρος της ξυριστικής μηχανής (Εικ. 29).
3 Αφαιρέστε το οπίσθιο τμήμα του περιβλήματος με ένα κατσαβίδι (Εικ. 30).
4 Κόψτε τα καλώδια και αφαιρέστε την επαναφορτιζόμενη μπαταρία.
Εάν χρειάζεστε σέρβις ή πληροφορίες ή εάν αντιμετωπίζετε κάποιο πρόβλημα, παρακαλούμε
επισκεφτείτε την ιστοσελίδα της Philips στη διεύθυνση www.philips.com/support ή
επικοινωνήστε με το Κέντρο Εξυπηρέτησης Καταναλωτών της Philips στη χώρα σας (θα βρείτε
το τηλέφωνο στο φυλλάδιο διεθνούς εγγύησης). Εάν δεν υπάρχει Κέντρο Εξυπηρέτησης
Καταναλωτών στη χώρα σας, απευθυνθείτε στον τοπικό αντιπρόσωπό σας της Philips.
Η μονάδα ξυρίσματος (κόπτες και οδηγοί) δεν καλύπτεται από τους όρους της διεθνούς
εγγύησης, καθώς υπόκειται σε φθορά.
Ο υποδοχέας λοσιόν είναι αντικαταστατός και δεν καλύπτεται από τους όρους της διεθνούς
εγγύησης.
Σε αυτό το κεφάλαιο συνοψίζονται τα πιο συνηθισμένα προβλήματα που μπορεί να
αντιμετωπίσετε με τη συσκευή. Εάν δεν μπορείτε να επιλύσετε το πρόβλημα βάσει των
παρακάτω πληροφοριών, επικοινωνήστε με το Κέντρο Εξυπηρέτησης Καταναλωτών στη χώρα
σας.
Πρόβλημα Πιθανή αιτία Λύση
Η ξυριστική
Δεν έχετε απλώσει αρκετή
Πιέστε το κουμπί για τη λοσιόν
μηχανή δεν
λοσιόν ξυρίσματος.
ξυρίσματος μέχρι να απελευθερωθεί
γλιστράει ομαλά
επαρκής ποσότητα λοσιόν
πάνω στο δέρμα
ξυρίσματος NIVEA FOR MEN. Έτσι, η
μου.
μονάδα ξυρίσματος θα γλιστράει και
πάλι ομαλά πάνω στο δέρμα σας.

61
Πρόβλημα Πιθανή αιτία Λύση
Η ξυριστική
Δεν έχετε καθαρίσει καλά την
Καθαρίστε την ξυριστική μηχανή
μηχανή δεν
ξυριστική μηχανή.
σχολαστικά (δείτε το κεφάλαιο
ξυρίζει τόσο
‘Καθαρισμός και συντήρηση’).
καλά όσο
παλαιότερα.
Μακριές τρίχες εμποδίζουν
Καθαρίστε τις ξυριστικές κεφαλές
τις ξυριστικές κεφαλές.
ακολουθώντας τα βήματα της μεθόδου
εξαιρετικά σχολαστικού καθαρισμού
που περιγράφεται παρακάτω.
Η μονάδα ξυρίσματος είναι
Αντικαταστήστε τη μονάδα ξυρίσματος
χαλασμένη ή φθαρμένη.
(δείτε το κεφάλαιο ‘Αντικατάσταση’).
Η ξυριστική
Η επαναφορτιζόμενη μπαταρία
Επαναφορτίστε την μπαταρία (δείτε το
μηχανή δεν
είναι άδεια.
κεφάλαιο ‘Προετοιμασία για χρήση’).
λειτουργεί όταν
πιέζω το κουμπί
on/off.
Το κλείδωμα ταξιδιού είναι
Απενεργοποιήστε το κλείδωμα ταξιδιού
ενεργοποιημένο.
(δείτε το κεφάλαιο ‘Αποθήκευση’).
Ξεραμένη λοσιόν ξυρίσματος
Καθαρίστε σχολαστικά την ξυριστική
μπλοκάρει τις ξυριστικές
μηχανή προτού συνεχίσετε το ξύρισμα
κεφαλές στη μονάδα
(δείτε το κεφάλαιο ‘Καθαρισμός’).
ξυρίσματος.
Δεν έχετε συναρμολογήσει
Όταν συναρμολογείτε ξανά τη μονάδα
σωστά τη μονάδα ξυρίσματος
ξυρίσματος, βεβαιωθείτε ότι γυρίζετε
μετά τον εξαιρετικά
κάθε οδηγό αριστερόστροφα μέχρι να
σχολαστικό καθαρισμό.
ασφαλίσει στη θέση του.
Βγαίνει μικρή
Μία από τις οπές του
Ξεπλύνετε ή μουλιάστε τη μονάδα
ποσότητα
στομίου έχει μπλοκάρει.
ξυρίσματος. Εάν αυτό δεν έχει
λοσιόν
αποτέλεσμα, αντλήστε λοσιόν
ξυρίσματος από
ξυρίσματος μέσα στον υποδοχέα λοσιόν
τις οπές παρόλο
ξυρίσματος μέχρι να αρχίσει να βγαίνει
που υπάρχει
λοσιόν από την μπλοκαρισμένη οπή. Εάν
αρκετή
ούτε αυτό δεν έχει αποτέλεσμα,
ποσότητα μέσα
δοκιμάστε την εξής μέθοδο: 1)
στον υποδοχέα.
Απενεργοποιήστε την ξυριστική μηχανή
2) Τραβήξτε τη μονάδα ξυρίσματος από
την ξυριστική μηχανή 3) Βάλτε το
δάχτυλό σας στην οπή που δεν είναι
μπλοκαρισμένη 4) Ενεργοποιήστε την
ξυριστική μηχανή 5) Πιέστε το κουμπί
για τη λοσιόν ξυρίσματος για αρκετά
δευτερόλεπτα μέχρι να αρχίσει να
βγαίνει ξανά λοσιόν από την
μπλοκαρισμένη οπή.

62
Πρόβλημα Πιθανή αιτία Λύση
Δεν επανατοποθετήσατε τις
Βεβαιωθείτε ότι τοποθετείτε την
ξυριστικές κεφαλές στις
ξυριστική κεφαλή, που δεν έχει οπή
αρχικές υποδοχές τους. Μία
παροχής λοσιόν, στη σωστή υποδοχή.
από τις ξυριστικές κεφαλές
Αυτή είναι η υποδοχή που βρίσκεται πιο
δεν έχει οπή παροχής λοσιόν
κοντά στο κουμπί on/off, όταν η μονάδα
ξυρίσματος στο κέντρο της
ξυρίσματος είναι προσαρτημένη στην
και πρέπει να τοποθετηθεί σε
ξυριστική μηχανή.
συγκεκριμένη υποδοχή.
Δεν βγαίνει
Ο υποδοχέας λοσιόν
Γεμίστε τον υποδοχέα λοσιόν
καθόλου λοσιόν
ξυρίσματος είναι σχεδόν
ξυρίσματος (δείτε το κεφάλαιο
ξυρίσματος από
άδειος.
‘Προετοιμασία για χρήση’).
τις οπές όταν
πιέζω το κουμπί
για τη λοσιόν
ξυρίσματος.
Ο
Αυτός ο φαβοριτοκόπτης έχει
Εξαιτίας του νέου ανοικτού σχεδιασμού
φαβοριτοκόπτης
νέο ανοικτό σχεδιασμό.
της ξυριστικής μηχανής, ο ήχος κοπής
κάνει
του φαβοριτοκόπτη κατά την κοπή
περισσότερο
ακούγεται πιο έντονα σε σχέση με
θόρυβο από
άλλους φαβοριτοκόπτες. Αυτό είναι
άλλους
φυσιολογικό και δεν σημαίνει ότι ο
φαβοριτοκόπτες.
φαβοριτοκόπτης παρουσιάζει κάποιο
πρόβλημα.
Βεβαιωθείτε ότι η συσκευή είναι απενεργοποιημένη.
1 Τραβήξτε τη μονάδα ξυρίσματος από την ξυριστική μηχανή (Εικ. 31).
2 Γυρίστε τον οδηγό δεξιόστροφα και σηκώστε τον από τη μονάδα ξυρίσματος (Εικ. 32).
Σημείωση: Αφαιρείτε μία ξυριστική κεφαλή τη φορά. Έτσι εξασφαλίζετε ότι επανατοποθετείτε πάντα
την ξυριστική κεφαλή στην αρχική της υποδοχή, που είναι απαραίτητο καθώς δύο από τις
ξυριστικές κεφαλές έχουν τις ειδικές οπές για τη λοσιόν ξυρίσματος. Έτσι εξασφαλίζετε επίσης ότι
δεν θα μπερδέψετε τους κόπτες και τους οδηγούς διαφορετικών ξυριστικών κεφαλών, το οποίο
επηρεάζει την απόδοση στο ξύρισμα.
3 Εάν είναι απαραίτητο, αφαιρέστε τον κόπτη από τον οδηγό.
4 Καθαρίστε τον κόπτη και τον οδηγό με το βουρτσάκι που παρέχεται.
5 Μετά τον καθαρισμό, τοποθετήστε ξανά τον κόπτη στη μονάδα ξυρίσματος με τις
προεξοχές του κόπτη να δείχνουν προς τα επάνω.
6 Τοποθετήστε τον οδηγό ξανά στην υποδοχή της ξυριστικής κεφαλής (πάνω από τον
κόπτη) (Εικ. 33).
7 Γυρίστε τον οδηγό αριστερόστροφα μέχρι να κλειδώσει στη θέση του (Εικ. 34).
8 Τοποθετήστε ξανά τη μονάδα ξυρίσματος στην ξυριστική μηχανή (΄κλικ’) (Εικ. 35).

63
Enhorabuena por la compra de este producto y bienvenido a Philips. Para sacar el mayor partido de
la asistencia que Philips le ofrece, registre su producto en www.philips.com/welcome.
Lea atentamente este manual de usuario, en el cual encontrará información sobre las excelentes
características de esta afeitadora, así como algunos consejos para que el afeitado le resulte más fácil
y agradable.
Afeitadora
Tapa protectora
Cortapatillas
Unidad de afeitado
Cartucho de loción de afeitado
Botón de loción de afeitado
Botón de encendido/apagado
Pilotos de carga
Cargador
Centro de carga y rellenado
Tapa del centro de carga y rellenado
Soporte para el cortapatillas
Panel posterior
Toma para clavija pequeña
Piloto de “llenado del cartucho de loción”
Piloto del frasco de loción
Cepillo de limpieza
Frasco de loción de afeitado NIVEA FOR MEN
Funda
Adaptador (es posible que el adaptador de su aparato sea diferente al que se muestra en el
dibujo)
Antes de usar el aparato, lea atentamente este manual de usuario y consérvelo por si necesitara
consultarlo en el futuro.
- Asegúrese de que el adaptador no se moje (es posible que el adaptador de su aparato sea
diferente al que se muestra en el dibujo) (g. 2).
- Tenga cuidado con el agua caliente. Compruebe siempre que el agua no esté demasiado
caliente para evitar quemarse las manos.
- El adaptador incorpora un transformador. No corte el adaptador para sustituirlo por otra clavija,
ya que podría provocar situaciones de peligro.
- Este aparato no debe ser usado por personas (adultos o niños) con su capacidad física, psíquica
o sensorial reducida, ni por quienes no tengan los conocimientos y la experiencia necesarios, a
menos que sean supervisados o instruidos acerca del uso del aparato por una persona
responsable de su seguridad.
- Asegúrese de que los niños no jueguen con este aparato.
- No sumerja nunca el centro de carga y rellenado en agua ni lo enjuague bajo el grifo (g. 3).
- No sumerja nunca el cargador en agua ni lo enjuague bajo el grifo (g. 4).
64
- Coloque y utilice siempre el centro de carga y rellenado, así como el cargador, sobre una
supercie resistente a los líquidos.
- Utilice, cargue y guarde los aparatos a una temperatura entre 5 °C y 35 °C.
- Siempre que lleve la afeitadora de viaje, póngale su tapa protectora con el n de proteger los
cabezales de afeitado.
- La afeitadora y sus accesorios no se pueden lavar en el lavavajillas.
- No utilice nunca agua a una temperatura superior a 80 °C para enjuagar la afeitadora.
- Utilice sólo el adaptador, el cargador y el centro de carga y rellenado suministrados.
- No utilice el centro de carga y rellenado si el adaptador o el propio centro están dañados.
- No utilice la afeitadora ni el cargador si están dañados.
- Si el adaptador está dañado, sustitúyalo siempre por otro del modelo original para evitar
situaciones de peligro.
- Esta afeitadora cumple las normas de seguridad aprobadas internacionalmente, se puede utilizar
de manera segura en el baño o en la ducha y se puede lavar bajo el grifo (g. 5).
- Este aparato Philips cumple todos los estándares sobre campos electromagnéticos (CEM). Si se
utiliza correctamente y de acuerdo con las instrucciones de este manual, el aparato se puede
usar de forma segura según los conocimientos cientícos disponibles hoy en día.
- El adaptador transforma la corriente de 100 - 240 voltios en un bajo voltaje de seguridad
inferior a 24 voltios.
1 Retire la lengüeta del frasco de loción de afeitado NIVEA FOR MEN (g. 6).
2 Gire el tapón del frasco de loción de afeitado en el sentido de las agujas del reloj
(“clic”) (g. 7).
, El tapón se desplaza hacia abajo y aparece la boquilla de loción de afeitado.
3 Gire la tapa del centro de carga y rellenado en sentido contrario al de las agujas del reloj
para quitarla.
4 Retire la protección del oricio de acoplamiento del frasco en el centro de carga y rellenado.
5 Coloque el frasco de loción en el oricio de acoplamiento con la boquilla orientada hacia
abajo (g. 8).
6 Vuelva a poner la tapa en el centro de carga y rellenado (1) y gírela en el sentido de las agujas
del reloj para jarla (2) (g. 9).
7 Introduzca la clavija pequeña en la toma del centro de carga y rellenado y enchufe el
adaptador a la toma de corriente (g. 10).
8 Coloque la afeitadora en el centro de carga y rellenado, y empújela hacia atrás
(“clic”) (g. 11).
Nota: La afeitadora se carga y se llena de loción de afeitado automáticamente.
9 Cargue la afeitadora durante 90 minutos. (g. 12)
Nota: Cargue la afeitadora antes de utilizarla por primera vez o cuando el piloto de carga indique que la
batería está agotada (consulte la sección “Indicaciones de carga”).
Nota: Una afeitadora completamente cargada proporciona un tiempo de afeitado de hasta 40 minutos.
1 Enchufe la clavija pequeña al cargador y conecte el adaptador a la red.
65
2 Coloque la afeitadora en el cargador (g. 13).
, La afeitadora se está cargando.
3 Cargue la afeitadora durante 1 hora y media.
Nota: Cargue la afeitadora antes de utilizarla por primera vez o cuando el piloto de carga indique que la
batería está agotada (consulte la sección “Indicaciones de carga”).
Nota: Una afeitadora completamente cargada proporciona un tiempo de afeitado de hasta 40 minutos.
También puede rellenar el cartucho de loción de afeitado sin utilizar el centro de carga y rellenado:
1 Introduzca la boquilla del frasco de loción de afeitado en la abertura de llenado del cartucho
de loción.
2 Mueva el frasco hacia arriba y hacia abajo unas 5 veces para bombear la loción de afeitado al
interior del cartucho hasta que vea que éste está lleno (g. 14).
- Los pilotos de carga indican el nivel al que se ha cargado la batería. Durante la carga, el piloto
inferior de carga parpadea primero en naranja y después se apaga. A continuación, el piloto
superior de carga parpadea en blanco y luego se queda encendido en blanco de forma continua.
- Tras un tiempo de carga de 9 minutos, el piloto inferior de carga se apaga y el piloto superior
de carga comienza a parpadear en blanco para indicar que la afeitadora dispone de energía
suciente para un afeitado.
Nota: La carga rápida sólo es posible cuando ya se ha cargado una vez la afeitadora durante 1 hora y
media.
- La carga disponible en la batería está indicada por el número de pilotos de carga encendidos. La
carga disponible en la batería es visible durante unos segundos al encender o apagar la
afeitadora (g. 15).
- Cuando la batería tiene poca carga, el piloto inferior de carga se ilumina en naranja durante el
afeitado, y parpadea en el mismo color cuando apaga la afeitadora. (g. 16)
- Cuando la batería está completamente cargada, todos los pilotos de nivel de la batería se
iluminan en blanco de forma continua (g. 15).
- Después de aproximadamente 1 hora, el piloto de carga blanco se apaga para ahorrar energía.
, Cuando el piloto de frasco de loción parpadea en naranja, puede deberse a dos
motivos: (g. 17)
- No hay frasco de loción en el centro de carga y rellenado o, si lo hay, no se ha colocado
correctamente.
- El frasco de loción está vacío.
, El piloto de “llenado del cartucho de loción” puede indicar tres situaciones
diferentes: (g. 18)

66
- Mientras se está llenando el cartucho de loción, el piloto blanco de “llenado del cartucho de
loción” parpadea.
- Cuando el cartucho de loción de afeitado está lleno, el piloto blanco de “llenado del cartucho
de loción” se ilumina de manera continua.
- Si el frasco de loción se vacía mientras se está rellenando el cartucho de loción, el piloto blanco
de “llenado del cartucho de loción” se apaga y el piloto del frasco de loción parpadea en rojo.
Nota: Su piel puede necesitar de 2 a 3 semanas para acostumbrarse a un nuevo sistema de afeitado.
1 Asegúrese de que haya suciente loción de afeitado en el cartucho de loción.
2 Pulse el botón de encendido/apagado para encender la afeitadora.
3 Asegúrese de que la afeitadora esté sucientemente cargada (consulte la sección
“Indicaciones de carga” del capítulo “Preparación para su uso”).
4 Desplace suavemente la afeitadora en círculos sobre la piel y pulse el botón de loción de
afeitado hasta aplicarse suciente loción sobre la piel para un afeitado cómodo. (g. 19)
- Al soltar el botón de loción de afeitado, la afeitadora deja de dispensar loción.
- Si pulsa brevemente el botón de loción de afeitado, el aparato dispensa automáticamente una
cierta cantidad de loción.
- Pulse de nuevo el botón de loción de afeitado para aplicar una mayor cantidad de loción
durante el afeitado y asegurarse de que la unidad de afeitado se deslice suavemente sobre su
piel.
Nota: El botón de loción de afeitado sólo funciona cuando la afeitadora está encendida.
Nota: El uso de esta afeitadora es similar al de una cuchilla de afeitar: puede utilizarla sobre la cara
humedecida. A diferencia de las afeitadoras eléctricas convencionales, este aparato no dispone de cámara
de recogida del pelo. Con el n de evitar que los restos de barba caigan sobre su ropa, aplique una
cantidad de loción suciente durante el afeitado.
5 Limpie a fondo la afeitadora después de cada uso (consulte el capítulo “Limpieza y
mantenimiento”).
6 Para evitar deterioros y daños, coloque la tapa protectora en la afeitadora (g. 20).
- Desplace suavemente la afeitadora en círculos sobre la piel.
- No ejerza demasiada presión sobre la afeitadora, ya que podría causar irritación en la piel.
- Con el n de asegurar un deslizamiento adecuado, aplique loción de afeitado con regularidad.
- También puede utilizar la afeitadora en el baño o en la ducha.
Nota: Debido a su nuevo diseño abierto, el sonido producido por la acción de corte del cortapatillas se
oirá más que con otros cortapatillas. Esto es normal.
1 Quite la unidad de afeitado de la afeitadora (g. 21).
2 Saque el cortapatillas de su soporte en el cargador y colóquelo en la afeitadora
(“clic”) (g. 22).
3 Pulse el botón de encendido/apagado para encender la afeitadora.
4 Puede utilizar el cortapatillas para recortar las patillas y/o el bigote.
67
5 Limpie bien el cortapatillas después de cada uso (consulte el capítulo “Limpieza y
mantenimiento”).
6 Quite el cortapatillas y colóquelo de nuevo en el soporte.
7 Coloque de nuevo la unidad de afeitado en la afeitadora (“clic”) (g. 23).
8 Para evitar deterioros y daños, coloque la tapa protectora en la afeitadora (g. 20).
No utilice estropajos, agentes abrasivos ni líquidos agresivos, como alcohol, gasolina o acetona,
para limpiar el aparato.
Limpie la afeitadora y el cortapatillas después de cada uso.
Tenga cuidado con el agua caliente. Compruebe siempre que el agua no esté demasiado caliente
para evitar quemarse las manos.
No seque nunca la unidad de afeitado con una toalla o un paño, ya que esto podría dañar los
cabezales de afeitado.
Nota: La afeitadora es hermética y puede lavarse con agua.
1 Pulse el botón de encendido/apagado para encender la afeitadora.
Nota: Limpie la afeitadora mientras está encendida.
2 Sumerja la unidad de afeitado o el cortapatillas en agua caliente durante al menos
30 segundos (g. 24).
3 Apague la afeitadora y sacúdala para eliminar el exceso de agua.
4 Para evitar deterioros y daños, coloque la tapa protectora en la afeitadora (g. 20).
Nota: Si la afeitadora no afeita tan bien como solía hacerlo, y no puede solucionar el problema con el
método de limpieza descrito en este capítulo, consulte el capítulo “Solución de problemas” para obtener
información sobre un método de limpieza más exhaustivo.
1 Cada seis meses lubrique los dientes del cortapatillas con una gota de aceite de máquina de
coser.
1 Guarde la afeitadora en el centro de carga y rellenado.
2 Si va a viajar o simplemente no desea guardar la afeitadora en el centro de carga y rellenado,
coloque la tapa protectora en la afeitadora y guárdela dentro de la funda (g. 20).
Si no va a utilizar la afeitadora durante un largo periodo de tiempo o si va a viajar, puede bloquear la
afeitadora. El bloqueo para viajes evita el encendido accidental del aparato.
1 Asegúrese de que la afeitadora esté apagada.

68
2 Mantenga pulsado el botón de loción de afeitado (1) y simultáneamente pulse el botón de
encendido/apagado con la otra mano (2) (g. 25).
3 Mantenga pulsados los dos botones durante 6 segundos. Espere hasta que la afeitadora emita
un breve zumbido y el piloto central de carga de la afeitadora parpadee varias veces.
, El bloqueo para viajes está ahora activado.
Nota: Si pulsa accidentalmente el botón de encendido/apagado en primer lugar, la afeitadora se pondrá
en funcionamiento. En ese caso, pulse de nuevo el botón de encendido/apagado para apagarla.
Nota: Si pulsa el botón de encendido/apagado mientras el bloqueo para viajes está activado, el piloto
central de carga parpadea en blanco para indicar que la afeitadora está bloqueada.
Consejo: Pulse el botón de encendido/apagado para comprobar si el bloqueo para viajes está activado. Si
lo estuviera, la afeitadora no se encenderá.
1 Mantenga pulsado el botón de loción de afeitado (1) y simultáneamente pulse el botón de
encendido/apagado con la otra mano (2) (g. 25).
2 Mantenga pulsados los dos botones durante 6 segundos. Espere hasta que la afeitadora emita
un breve zumbido y el piloto central de carga de la afeitadora parpadee varias veces.
, El bloqueo para viajes está ahora desactivado.
Nota: También puede desactivar el bloqueo para viajes colocando de nuevo la afeitadora en el cargador.
Si va a viajar y no desea llevar consigo el centro de carga y rellenado, puede llevarse el cargador
para cargar la afeitadora siempre que lo necesite.
Por razones de higiene, le recomendamos que sustituya el cartucho de loción de afeitado una vez al
año. Se suministra un cartucho nuevo con cada conjunto de 3 unidades de frascos de loción de
afeitado NIVEA FOR MEN y con cada kit de recambio (que contiene una unidad de afeitado HS85
y un cartucho nuevos).
1 Quite el cartucho de loción de afeitado de la afeitadora (g. 26).
2 Inserte el saliente de la parte superior del nuevo cartucho de loción en la ranura del borde
de la afeitadora (1). A continuación, presione la parte inferior del cartucho con el pulgar (2)
para jar el cartucho a la afeitadora (“clic”) (g. 27).
3 Llene el cartucho de loción de afeitado (consulte el capítulo “Antes de empezar”).
Reemplace la unidad de afeitado anualmente para obtener unos resultados óptimos.
Para sustituir la unidad de afeitado, utilice únicamente una unidad de afeitado Philips HS85.
1 Quite la unidad de afeitado usada de la afeitadora (g. 21).
2 Coloque la unidad de afeitado nueva en la afeitadora (“clic”) (g. 23).
Utilice únicamente frascos de loción de afeitado NIVEA FOR MEN.
1 Retire la lengüeta del frasco de loción de afeitado NIVEA FOR MEN (g. 6).
69
2 Gire el tapón del frasco de loción de afeitado en el sentido de las agujas del reloj
(“clic”) (g. 7).
, El tapón se desplaza hacia abajo y aparece la boquilla de loción de afeitado.
3 Gire la tapa del centro de carga y rellenado en sentido contrario al de las agujas del reloj
para quitarla.
4 Coloque el frasco de loción de afeitado en el oricio de acoplamiento del frasco, con la
boquilla orientada hacia abajo (g. 8).
5 Ponga de nuevo la tapa en el centro de carga y rellenado (1) y gírela en el sentido de las
agujas del reloj (2) para jarla (g. 9).
- Al nal de su vida útil, no tire el aparato junto con la basura normal del hogar. Llévelo a un
punto de recogida ocial para su reciclado. De esta manera ayudará a conservar el medio
ambiente (g. 28).
- La batería recargable incorporada contiene sustancias que pueden contaminar el medio
ambiente. Quite siempre la batería antes de deshacerse del aparato o de llevarlo a un punto de
recogida ocial. Deposite la batería en un lugar de recogida ocial. Si no puede sacar la batería,
puede llevar el aparato a un servicio de asistencia técnica de Philips. El personal del servicio de
asistencia extraerá las baterías y se deshará de ellas de forma no perjudicial para el medio
ambiente.
Quite la batería únicamente cuando deseche la afeitadora. Asegúrese de que la batería esté
completamente descargada cuando la quite del aparato.
Tenga cuidado con las tiras de la batería ya que están aladas.
1 Quite el cartucho de loción de afeitado de la afeitadora (g. 26).
2 Desenrosque los tres tornillos de la parte posterior de la afeitadora (g. 29).
3 Quite el panel posterior de la carcasa con un destornillador (g. 30).
4 Corte los cables y extraiga la batería recargable.
Si necesita información o si tiene algún problema, visite la página Web de Philips en
www.philips.com/support, o póngase en contacto con el Servicio de Atención al Cliente de Philips
en su país (hallará el número de teléfono en el folleto de la garantía mundial). Si no hay Servicio de
Atención al Cliente de Philips en su país, diríjase a su distribuidor local Philips.
Las unidades de afeitado (cuchillas y protectores) no están cubiertas por las condiciones de la
garantía internacional debido a que están sujetos a desgaste.
El cartucho de loción es un elemento desechable y no está cubierto por las condiciones de la
garantía internacional.

70
En este capítulo se resumen los problemas más frecuentes que pueden surgir. Si no puede resolver
el problema con la siguiente información, póngase en contacto con el Servicio de Atención al
Cliente de su país.
Problema Posible causa Solución
La afeitadora no
Es posible que no haya
Pulse el botón de loción de afeitado hasta que se
se desliza
aplicado suciente
haya aplicado una cantidad suciente de loción
suavemente
loción de afeitado.
NIVEA FOR MEN. Esto hará que la afeitadora
sobre mi piel.
vuelva a deslizarse suavemente sobre su piel.
La afeitadora no
No ha limpiado bien la
Limpie bien la afeitadora (consulte el capítulo
afeita tan bien
afeitadora.
“Limpieza y mantenimiento”).
como antes.
Hay pelos largos
Limpie los cabezales de afeitado siguiendo los
obstruyendo los
pasos del método de limpieza más exhaustivo que
cabezales de afeitado.
se describe más adelante.
La unidad de afeitado
Sustituya la unidad de afeitado (consulte el capítulo
está gastada o
“Sustitución”).
deteriorada.
La afeitadora no
La batería recargable
Recargue la batería (consulte el capítulo
funciona cuando
está descargada.
“Preparación para su uso”).
pulso el botón de
encendido/
apagado.
El bloqueo para viajes
Desactive el bloqueo para viajes (consulte el
está activado.
capítulo “Almacenamiento”).
La loción seca puede
Limpie a fondo la afeitadora antes de seguir
bloquear los cabezales
utilizándola (consulte el capítulo “Limpieza”).
de la unidad de afeitado.
No ha montado bien la
Al montarla, asegúrese de girar cada protector en
unidad de afeitado tras
sentido contrario al de las agujas del reloj hasta
realizar la limpieza más
que encaje en su sitio.
exhaustiva.
Sale poca
Uno de los oricios de
Enjuague o sumerja la unidad de afeitado en agua.
cantidad de
la loción está obstruido.
Si este método no diera resultado, bombee loción
loción de afeitado
de afeitado al interior del cartucho hasta que
por los oricios a
comience a salir de nuevo loción por el oricio
pesar de que hay
bloqueado. Si este método tampoco diera
suciente loción
resultado, intente lo siguiente: 1) Apague la
en el cartucho.
afeitadora 2) Quite la unidad de afeitado de la
afeitadora 3) Coloque un dedo sobre el oricio
que no esté bloqueado 4) Encienda la afeitadora 5)
Pulse el botón de loción de afeitado durante varios
segundos hasta que comience a salir de nuevo
loción por el oricio bloqueado.
71
Problema Posible causa Solución
No ha colocado los
Asegúrese de que coloca el cabezal sin oricio en
cabezales de afeitado
el soporte adecuado, es decir, en el que está más
en sus soportes
cerca del botón de encendido/apagado cuando la
originales. Uno de los
unidad de afeitado está montada en la afeitadora.
cabezales de afeitado
no tiene oricio para la
loción en su parte
central y debe
colocarse en un
soporte especíco.
No sale loción de
El cartucho de loción
Rellénelo (consulte el capítulo “Preparación para su
afeitado por los
de afeitado está casi
uso”).
oricios al pulsar
vacío.
el botón de
loción de
afeitado.
El cortapatillas es
Este cortapatillas
Debido a su nuevo diseño abierto, el sonido de
más ruidoso que
dispone de un diseño
corte del cortapatillas se oye más que con otros
otros
abierto.
cortapatillas. Esto es normal y no signica que
cortapatillas.
tenga ningún problema.
Asegúrese de que el aparato está apagado.
1 Quite la unidad de afeitado de la afeitadora (g. 31).
2 Gire el protector en el sentido de las agujas del reloj y levántelo de la unidad de
afeitado (g. 32).
Nota: Quite los cabezales de uno en uno, así se asegurará de colocarlos siempre en su soporte original.
Esto es importante, ya que dos de ellos tienen unos oricios especiales para la loción de afeitado.
Además, evitará que se mezclen las cuchillas y los protectores de los diferentes cabezales, lo cual afecta
al rendimiento de afeitado.
3 Quite la cuchilla del protector si fuera necesario.
4 Limpie la cuchilla y el protector con el cepillo que se suministra.
5 Una vez limpia, vuelva a colocar la cuchilla en la unidad de afeitado con las hojas hacia arriba.
6 Vuelva a colocar el protector en el soporte del cabezal de afeitado (sobre la cuchilla) (g. 33).
7 Gire el protector en sentido contrario al de las agujas del reloj hasta que encaje en su
sitio (g. 34).
8 Coloque de nuevo la unidad de afeitado en la afeitadora (“clic”) (g. 35).

72
Õnnitleme teid ostu puhul ning tere tulemast kasutama Philipsi tooteid! Philipsi klienditoe
tõhusamaks kasutamiseks registreerige toode veebilehel www.philips.com/welcome.
Palun lugege see pardli oivalisi omadusi tutvustav kasutusjuhend läbi. Sellest leiate ka näpunäiteid,
kuidas raseerimist kergemaks ja nauditavamaks teha.
Pardel
Kaitsev kate
Piirel
Pardlipea
Raseerimispalsami mahuti
Raseerimispalsami nupp
On/off (Sisse/välja) nupp
Laadimistuled
Laadija
Täitmis- ja laadimisjaam
Täitmis-ja laadimisjaama kork
Piirlihoiustamispesa
Tagumine paneel
Väikese pistiku pesa
Märgutuli „Palsami mahuti täitmine”
Palsami pudeli märgutuli
Puhastusharjake
Raseerimispalsam NIVEA FOR MEN
Kott
Adapter (pildil olev adapter võib erineda teie omast)
Enne seadme kasutamist lugege hoolikalt kasutusjuhendit ja hoidke see edaspidiseks alles.
- Kindlustage, et adapter ei saaks märjaks (pildil olev adapter võib erineda teie omast) (Jn 2).
- Olge tulise veega ettevaatlik. Kontrollige alati, et vesi ei oleks liiga tuline, vastasel korral võite
põletushaavu saada.
- Adapteris on voolumuundur. Ärge lõigake adapterit ära selle asendamiseks mõne teise pistikuga.
See võib põhjustada ohtlikke olukordi.
- Seda seadet ei tohi kasutada füüsiliste ja vaimsete puuetega isikud (lisaks lapsed) nii kogemuste
kui ka teadmiste puudumise tõttu, välja arvatud nende ohutuse eest vastutava isiku juuresolekul
või kui neile on seadme kasutamise kohta antud vastavad juhiseid.
- Lapsi tuleks jälgida, et nad ei mängiks seadmega.
- Ärge kunagi kastke täitmis- ja laadimise jaama vette ega loputage seda kraani all (Jn 3).
- Ärge kunagi kastke laadijat vette ega loputage seda voolava vee all (Jn 4).
- Pange ja kasutage täitmis- ja laadimisjaama ning laadijat veekindlal pinnal.
- Kasutage, laadige ja hoiustage seadmed temperatuurivahemikus 5 °C kuni 35 °C.
- Lõikepeade kaitseks reisimisel katke pardlipea kaitsva kattega.
- Pardel ja muud tarvikud ei ole nõudepesumasinas pestavad.
- Ärge kunagi kasutage pardli loputamiseks 80 °C kuumemat vett.
- Kasutage ainult komplektisolevat adapterit, laadijat ning täitmis- ja laadimisjaama.
73
- Ärge kasutage täitmis- ja laadimisjaama, kui adapter või jaam ise on kahjustatud.
- Ärge kasutage kahjustatud pardlit või laadijat.
- Ohtlike olukordade vältimiseks vahetage kahjustatud adapter ainult originaalmudeli vastu.
- Seade vastab rahvusvaheliselt tunnustatud ohutuseeskirjadele ning seda võib turvaliselt kasutada
nii vannis kui ka duši all, aga ka kraani all puhastada (Jn 5).
- See Philipsi seade vastab kõikidele elektromagnetilisi välju (EMV) käsitlevatele standarditele. Kui
seadet käsitsetakse õigesti ja käesolevale kasutusjuhendile vastavalt, on seadet tänapäeval
käibelolevate teaduslike teooriate järgi ohutu kasutada.
- Adapter muundab 100–240 voldise pinge ohutuks vähem kui 24-voldiseks pingeks.
1 Eemaldage raseerimispalsami NIVEA FOR MEN kinnitus (Jn 6).
2 Keera korki päripäeva (Jn 7).
, Kork liigub alla ja ilmub täitmisotsak.
3 Eemaldage täitmis- ja laadimise jaama kork, keerates seda vastupäeva.
4 Eemaldage täitmis- ja laadimisjaama pudeli dokkimisavalt pakend.
5 Pange palsami pudel dokkimisavasse pihustusotsakuga allapoole (Jn 8).
6 Pange kork tagasi täitmis- ja laadimisjaamale (1) ning kinnitamiseks keerake seda päripäeva
(2) (Jn 9).
7 Sisestage väike pistik täitmis- ja laadimisjaama pessa ning adapter seinakontakti (Jn 10).
8 Asetage pardel täitmis- ja laadimisjaama ning suruge seda tahapoole (kuulete
klõpsatust) (Jn 11).
Märkus: Pardlit hakatakse automaatselt. laadima ja raseerimispalsamiga täitma.
9 Laadige pardlit 90 minutit. (Jn 12)
Märkus: Laadige pardlit enne selle esmakordset kasutamist või siis, kui laadimise märgutuli näitab, et aku
on tühi (vt lõiku „Laadimise tähised”).
Märkus: Täislaetud aku võimaldab ajada habet ilma toitejuhtmeta kuni 40 minuti jooksul.
1 Sisestage väike pistik laadijasse ja adapter seinakontakti.
2 Asetage seade laadijasse (Jn 13).
, Seadet laetakse.
3 Laadige pardlit 1,5 tundi.
Märkus: Laadige pardlit enne selle esmakordset kasutamist või siis, kui laadimise märgutuli näitab, et aku
on tühi (vt lõiku „Laadimise tähised”).
Märkus: Täislaetud aku võimaldab ajada habet ilma toitejuhtmeta kuni 40 minuti jooksul.
Raseerimispalsami mahutit saate uuesti täita ka ilma täitmis- ja laadimisjaama kasutamata:
1 lükake palsamipudeli otsak palsami mahuti täitmisavasse;

74
2 Liigutage pudelit üles-alla umbes 5 korda, et pumbata raseerimispalsamit mahutisse selle
täitumiseni (Jn 14).
- Laadimise märgutuli näitab, millise tasemeni on aku laetud. Laadimise ajal hakkab alumine
märgutuli alguses oranžilt vilkuma ning seejärel kustub. Ülemine laadimistuli hakkab
seejärel valgelt vilkuma, lõpuks aga hakkab pidevalt valgelt põlema.
- Pärast 9-minutilist laadimist kustub alumine laadimistuli ning ülemine laadimistuli hakkab valgelt
vilkuma, mis näitab, et pardlis on üheks laadimiskorraks piisavalt energiat.
Märkus: Kiirlaadimine on võimalik ainult pärast seda, kui olete pardlit juba kord 1,5 tundi laadinud.
- Akusse jäänud energia vastab süttinud laadimise märgutulede arvule. Aku
jääkmahtuvust näidatakse pardli sisse-välja lülitamise ajal mõne sekundi jooksul (Jn 15).
- Kui aku hakkab tühjaks saama, siis läheb raseerimise ajal alumine laadimistuli oranžiks ja
hakkab pärast pardli väljalülitamist oranžilt vilkuma. (Jn 16)
- Kui aku on täis laetud, hakkavad kõik laadimistuled pidevalt valgelt põlema (Jn 15).
- Pärast umbes ühte tundi kustub valge laadimise märgutuli energiasäästmise eesmärgil.
, Kui palsami pudeli märgutuli hakkab oranžilt vilkuma, siis on kaks võimalust: (Jn 17)
- täitmis- ja laadimisjaama pudelis pole palsamit või pole pudel korralikult paigas;
- palsami pudel on tühi.
, „Palsami mahuti täitmine” märgutuli näitab kolme erinevat asja: (Jn 18)
- kui palsami mahuti täidetakse, siis valge märgutuli „Palsami mahuti täitmine” vilgub;
- kui palsami mahuti on täis, siis põleb märgutuli „Palsami mahuti täitmine” pidevalt valgelt;
- kui palsami pudel saab palsami mahuti täitmise ajal tühjaks, kustub valge märgutuli „Palsami
mahuti täitmine” ning palsami pudeli märgutuli hakkab punaselt vilkuma.
Märkus: Teie nahk võib vajada 2 kuni 3 nädalat uue habemeajamissüsteemiga harjumiseks.
1 Veenduge, et mahutis oleks piisavalt raseerimispalsamit.
2 Pardli sisselülitamiseks vajutage korra sisse/välja nupule.
3 Veenduge, et pardel oleks piisavalt laetud (vt ptk „Ettevalmistused kasutamiseks”, osa
„Laadimise tähised”).
4 Liigutage raseerijat õrnalt mööda nahka, tehes ringjaid liigutusi ja vajutage raseerimispalsami
nuppu, kuni teie nahal on mugavaks habemeajamiseks piisavalt palsamit. (Jn 19)
- Seade lõpetab palsami eritamise raseerimispalsami nupu vabastamisel.
- Kui te vajutate raseerimispalsami nuppu põgusalt, siis eritab seade automaatselt teatud hulga
palsamit.
75
- Kindlustamaks et pardel liigub habemeajamise käigus sujuvalt mööda teie nahka, vajutage
raseerimispalsami nuppu uuesti, et eritada rohkem palsamit.
Märkus: Raseerimispalsami nupp töötab ainult siis, kui pardel on sisse lülitatud.
Märkus: Seda raseerijat saab kasutada sarnaselt žiletiga: raseerijat võib kasutada märjal näol. Erinevalt
tavapärastest raseerijatest puudub sellel seadmel karvade koguja. Ennetamaks karvade kukkumist teie
riietele, kandke raseerimise ajal peale piisav kogus raseerimispalsamit.
5 Puhastage pardel põhjalikult pärast iga kasutamist (vt ptk „Puhastamine ja hooldus”).
6 Vigastuste vältimiseks pange seadmele kaitsekaas peale (Jn 20).
- Liigutage raseerijat õrnalt mööda nahka, tehes ringjaid liigutusi.
- Raseerijat ei tohi vajutada vastu nahka liiga tugevasti, see võib põhjustada nahaärritust.
- Kindlustamaks sujuvat liikumist, kasutage piisavalt raseerimispalsamit.
- Seda pardlit tohite ka duši all või vannis kasutada.
Märkus: Uue disaini tõttu kuulete terade lõikumist selgemini kui teiste raseerijatega. See on normaalne.
1 Tõmmake pardlipea pardli küljest ära (Jn 21).
2 Võtke piirel piirlihoidjast ja kinnitage see raseerija külge (kuulete klõpsatust) (Jn 22).
3 Pardli sisselülitamiseks vajutage korra sisse/välja nupule.
4 Piirlit saate kasutada põskhabeme ja vuntside kujundamiseks.
5 Puhastage piirel põhjalikult pärast iga kasutamist (vt ptk „Puhastamine ja hooldus”).
6 Eemaldage piirel ja asetage see piirlihoidjasse.
7 Pange pardlipea pardlile tagasi (kuulete klõpsatust) (Jn 23).
8 Vigastuste vältimiseks pange seadmele kaitsekaas peale (Jn 20).
Ärge kunagi kasutage seadme puhastamiseks küürimiskäsna, abrasiivseid puhastusvahendeid ega
ka agressiivseid vedelikke nagu bensiini või atsetooni.
Puhastage pardlit ja piirlit pärast iga kasutamist.
Olge tulise veega ettevaatlik. Kontrollige alati, et vesi ei oleks liiga tuline, vastasel korral võite
põletushaavu saada.
Ärge kunagi kasutage paberist käterätte või salvrätikuid, sest need võivad rikkuda lõikepäid.
Märkus: Seade on veekindel ja seda võib pesta veega.
1 Pardli sisselülitamiseks vajutage korra sisse/välja nupule.
Märkus: Puhastage pardlit siis, kui see on sisse lülitatud.
2 kastke pardlipea/piirel kuuma vette vähemalt 30 sekundiks (Jn 24).
3 Lülitage pardel välja ja raputage liigne vesi maha.
4 Vigastuste vältimiseks pange seadmele kaitsekaas peale (Jn 20).

76
Märkus: Kui pardel ei raseeri sama hästi kui varem ja selles peatükis kirjeldatud puhastamismeetod ei
paranda tulemust, siis lugege peatükki „Veaotsing” eriti põhjaliku puhastamismeetodi jaoks.
1 Määrige piirli hambaid iga kuue kuu tagant tilga õmblusmasinaõliga.
1 Hoidke pardlit täitmis- ja laadimisjaamas.
2 Kui lähete reisima või kui te ei soovi pardlit täitmis- ja laadimisjaamas hoida, siis pange
kaitsekate pardlile ja hoidke pardlit kotis (Jn 20).
Kui te ei kasuta pardlit pikemat aega või lähete reisima, on võimalik pardel lukustada. Lukustuseha
väldite seadme juhuslikku sisselülitamist.
1 Kontrollige, et pardel oleks välja lülitatud.
2 Hoidke raseerimispalsami nuppu (1) all ning samaaegselt vajutage teise käega sisse/välja nuppu
(2) (Jn 25).
3 Hoidke mõlemat nuppu 6 sekundit all. Oodake, kuni pardel suriseb hetkeks ja keskmine
laadimistuli vilgub paar korda.
, Reisilukk on nüüd aktiveeritud.
Märkus: Kui vajutate kogemata sisse/välja nuppu esimesena, hakkab pardel tööle . Kui see juhtub,
vajutage veel kord sisse/välja nuppu, et pardel välja lülitada.
Märkus: Kui vajutate sisse/välja nuppu ja reisilukk on aktiveeritud, vilgub keskmine laadimistuli valgelt,
mis näitab, et pardel on lukustatud.
Näpunäide: Vajutage sisse/välja nuppu, et kontrollida, kas reisilukk on aktiveeritud. Kui reisilukk on
aktiveeritud, siis pardel ei hakka tööle.
1 Hoidke raseerimispalsami nuppu (1) all ning samaaegselt vajutage teise käega sisse/välja nuppu
(2) (Jn 25).
2 Hoidke mõlemat nuppu 6 sekundit all. Oodake, kuni pardel suriseb hetkeks ja keskmine
laadimistuli vilgub paar korda.
, Reisilukk on nüüd maha võetud.
Märkus: Reisiluku võtab maha ka pardli asetamine laadijasse.
Kui soovite minna reisima, kuid ei soovi täitmis- ja laadimisjaama kaasa võtta, siis võite pardli vajaduse
korral laadimiseks laadija kaasa võtta.
Hügieenipõhjustel soovitame raseerimispalsami mahutit vahetada kord aastas. Uue mahutiga ning
asenduskomplektiga (mis sisaldab uut HS85 pardlipead ja uut mahutit) on kaasas NIVEA FOR MEN
raseerimispalsami kolmikpakk.
77
1 Eemaldage raseerimispalsami mahuti pardli küljest (Jn 26).
2 Sisestage uue raseerimispalsami mahuti sang pardli ääres olevasse lõhesse (1). Vajutage
pöidlaga mahuti põhjale (2), et kinnitada mahuti pardli külge (Jn 27).
3 Täitke raseerimispalsami mahuti (vt ptk “Alustamine”).
Parimate raseerimistulemuste saavutamiseks vahetage pardlipead iga aasta.
Asendage pardlipea ainult Philipsi pardlipeaga HS85.
1 Tõmmake pardlipea pardli küljest ära (Jn 21).
2 Kinnitage uus pardlipea pardli külge (Jn 23).
Kasutage ainult raseerimispalsamit NIVEA FOR MEN.
1 Eemaldage raseerimispalsami NIVEA FOR MEN kinnitus (Jn 6).
2 Keera korki päripäeva (Jn 7).
, Kork liigub alla ja ilmub täitmisotsak.
3 Eemaldage täitmis- ja laadimise jaama kork, keerates seda vastupäeva.
4 Asetage raseerimispalsami pudel dokkimisavasse pihustusotsakuga allapoole (Jn 8).
5 Lükake kork täitmis- ja laadimisjaamale (1) ja kinnitamiseks keerake seda päripäeva (2) (Jn 9).
- Seadme kasutusaja lõppedes ärge visake seda minema tavalise majapidamisprügi hulgas, vaid viige
see ringlussevõtuks kogumispunkti. Nii toimides aitate te hoida loodust (Jn 28).
- Seadmesse sisseehitatud laetav aku sisaldab keskkonda saastavaid aineid. Enne seadme kasutusest
kõrvaldamist ja ametlikus kogumispunktis käitlemist peate alati akud seadmest eemaldama. Akud
tuleb utiliseerimiseks viia ametlikku akude kogumispunkti. Kui Te ei suuda akut ise eemaldada,
võite seadme Philipsi hoolduskeskusesse viia, kus aku eemaldatakse ja keskkonda kahjustamata
utiliseeritakse.
Võtke akud seadmest ära ainult pardli kasutusest kõrvaldamisel. Veenduge selles, et akud
oleksid eemaldamisel täiesti tühjad.
Ettevaatust, aku klemmiribade ääred on väga teravad.
1 Eemaldage raseerimispalsami mahuti pardli küljest (Jn 26).
2 Keerake kolm pardli tagaküljel olevat kruvi lahti (Jn 29).
3 Eemaldage korpuse paneel kruvikeeraja abil (Jn 30).
4 Lõigake juhtmed ning eemaldage laetavad akud.

78
Kui vajate hooldust, teavet või teil on probleem, külastage Philipsi veebilehte
www.philips.com/support või pöörduge oma riigi Philipsi klienditeeninduskeskusesse (telefoninumbri
leiate ülemaailmselt garantiilehelt). Kui teie riigis ei ole klienditeeninduskeskust, pöörduge Philipsi
kohaliku müügiesindaja poole.
Lõikepeade (nii lõiketerade kui ka võrede) asendamine pole rahvusvahelise garantiitingimustega
reguleeritud, sest need on kuluvad osad.
Palsami mahuti on ühekordselt kasutatav ega kuulu rahvusvaheliste garantiitingimuste alla.
Käesolev peatükk esitab kokkuvõtte seadmel esinevatest enamlevinud probleemidest. Kui te ei suuda
probleemi alloleva info abil lahendada, võtke ühendust oma riigi klienditeeninduskeskusega.
Probleem Võimalik põhjus Lahendus
Pardel ei liigu sujuvalt
Te pole kasutanud
Vajutage raseerimispalsami nuppu seni, kuni teie
mööda nahka.
piisavalt
nahal on piisavalt NIVEA FOR MEN
raseerimispalsamit.
raseerimispalsamit. Piisav kogus palsamit aitab
pardlil uuesti sujuvalt mööda nahka liikuda.
Miks pardel ei aja
Pardel ei ole
Puhastage pardel põhjalikult (vt ptk „Puhastamine
habet nii hästi nagu
korralikult puhastatud.
ja hooldus”).
tavaliselt?
Pikad karvad on
Puhastage lõikepead, järgides eriti põhjaliku
lõikepea ummistanud.
puhastamise meetodit, mida kirjeldatakse allpool.
Pardlipead on
Asendage pardlipead (vt ptk “Asendamine”’).
kahjustatud või
kulunud.
Pardel ei tööta, kui
Akupatarei on tühi. Laadige aku (vt ptk „Ettevalmistused
ma vajutan sisse/välja
kasutamiseks”).
nupule
Reisilukk on
Võtke reisilukk maha (vt ptk „Hoiustamine”).
aktiveeritud.
Kuivanud
Enne raseerimise jätkamist puhastage pardlit
raseerimispalsam
põhjalikult. (vt ptk “Puhastamine”).
ummistab lõikepäid
pardlipeas.
Te ei ole pärast eriti
Pardlipea kokkupanekul keerake kindlasti iga
põhjalikku puhastamist
võret vastupäeva, kuni see kohale lukustub.
pardlipead korralikult
kokku pannud.

79
Probleem Võimalik põhjus Lahendus
Aukudest tuleb vähe
Üks palsami avadest
Loputage või kastke pardlipea vette. Kui see ei
raseerimispalsamit,
on ummistunud.
aita, siis pumbake raseerimispalsamit mahutisse
kuigi mahutis on
seni, kuni palsam hakkab ummistunud avast
palsamit piisavalt.
väljuma. Kui ka see ei aita, katsetage järgmist viisi:
1) lülitage pardel välja; 2) tõmmake pardlipea
pardlist välja; 3) pange oma sõrm avale, mis pole
ummistunud; 4) lülitage pardel sisse; 5) vajutage
mitme sekundi jooksul raseerimispalsami nupule,
kuni palsamit hakkab ummistunud august uuesti
väljuma.
Te ei pannud
Vaadake, et palsamiavata raseerimispea oleks
raseerimispäid nende
õiges hoidjas. See on hoidik, mis on sisse/välja
õigetesse kohtadesse.
nupule kõige lähemal, kui pardlipea on kinnitatud
Ühel raseerimispeal
pardli külge.
puudub keskel palsami
auk ja see
raseerimispea tuleb
panna spetsiaalsesse
hoidikusse.
Kui ma vajutan
Raseerimispalsami
Täitke raseerimispalsami mahuti uuesti (vt ptk
raseerimispalsami
mahuti on peaaegu
„Ettevalmistused kasutuseks”)
nuppu, ei tule
tühi.
aukudest palsamit.
See piirel teeb
Trimlil on avatud
Uue disaini tõttu kuulete terade lõikumist
rohkem häält kui
ehitus.
selgemini kui teiste raseerijatega. See on
teised piirlid.
normaalne ega tähenda, et pardlil oleks midagi
viga.
Kontrollige, et seade oleks välja lülitatud.
1 Tõmmake pardlipea pardli küljest ära (Jn 31).
2 Keerake võret päripäeva ja tõstke see pardlipea küljest ära (Jn 32).
Märkus: Eemaldage ainult üks lõiketera korraga. See kindlustab, et panete lõiketerad nende õigetesse
kohtadesse tagasi, mis on vajalik, kuna kahel teral on spetsiaalsed augud raseerimispalsami jaoks. See
tagab ka selle, et te ei pane terasid ja võresid valedele lõikepeadele, kuna see mõjutab habemeajamise
tulemust.
3 Kui vajalik, eemaldage lõiketera võrest.
4 Puhastage terad ja võred kaasasoleva harjaga.
5 Pärast puhastamist asetage lõiketerad raseerimispeade hoidikutesse nii, et lõiketerade haarad
osutavad üles.
6 Asetage võred raseerimispea hoidikute peale (lõiketerade peale) (Jn 33).
7 Keerake võret vastupäeva seni, kuni see kohale lukustub (Jn 34).
8 Pange pardlipea pardlile tagasi (kuulete klõpsatust) (Jn 35).

80
Onnittelut ostoksestasi ja tervetuloa Philips-tuotteiden käyttäjäksi! Hyödynnä Philipsin tuki ja
rekisteröi tuotteesi osoitteessa www.philips.com/welcome.
Lue tämä käyttöopas, sillä siinä on tietoa parranajokoneen hyödyllisistä ominaisuuksista sekä vinkkejä,
joiden avulla ajat partasi helpommin ja mukavammin.
Parranajokone
Ajopään suojus
Trimmeri
Ajopää
Parranajoemulsiopatruuna
Parranajoemulsiopainike
Käynnistyspainike
Latauksen merkkivalot
Laturi
Täyttö- ja latausteline
Täyttö- ja lataustelineensuojus
Trimmerin säilytyssyvennys
Takapaneeli
Liitäntä pienelle liittimelle
Parranajoemulsion täyttövalo
Emulsiopullon valo
Puhdistusharja
NIVEA FOR MEN -parranajoemulsiopullo
Pussi
Verkkolaite (verkkolaite saattaa olla erilainen kuin kuvassa oleva)
Lue tämä käyttöopas huolellisesti ennen käyttöä ja säilytä se vastaisen varalle.
- Suojaa verkkolaite kosteudelta (verkkolaite saattaa olla erilainen kuin kuvan laite) (Kuva 2).
- Ole varovainen kuuman veden kanssa. Varmista aina, ettei vesi ole liian kuumaa, ettet polta käsiäsi.
- Latauslaite sisältää jännitemuuntajan. Älä vaihda latauslaitteen tilalle toisenlaista pistoketta, jotta et
aiheuta vaaratilannetta.
- Laitetta ei ole tarkoitettu lasten tai sellaisten henkilöiden käyttöön, joiden fyysinen tai henkinen
toimintakyky on rajoittunut tai joilla ei ole kokemusta tai tietoa laitteen käytöstä, muuten kuin
heidän turvallisuudestaan vastaavan henkilön valvonnassa ja ohjauksessa.
- Pienten lasten ei saa antaa leikkiä laitteella.
- Älä koskaan upota täyttö- ja lataustelinettä veteen tai huuhtele sitä juoksevalla vedellä (Kuva 3).
- Älä koskaan upota lataustelinettä veteen äläkä huuhtele sitä vesihanan alla (Kuva 4).
- Aseta täyttö- ja latausteline ja verkkolaite käyttöä varten aina tasaiselle alustalle, joka on
puhdistusaineen kestävä.
- Käytä, lataa ja säilytä laitteita 5 - 35 °C:n lämpötilassa.
- Suojaa ajopäät matkoilla asettamalla suojus ajopäähän.
- Parranajokone ja lisätarvikkeet eivät ole konepesunkestäviä.
- Huuhtele parranajokone korkeintaan 80-asteisella vedellä.
- Käytä vain laitteen mukana toimitettavaa verkkolaitetta, laturia ja täyttö- ja lataustelinettä.

81
- Älä käytä täyttö- ja lataustelinettä, jos verkkolaite tai teline on vahingoittunut.
- Älä käytä vahingoittunutta parranajokonetta tai laturia.
- Jos latauslaite on vaurioitunut, vaihda vaaratilanteiden välttämiseksi tilalle aina alkuperäisen
tyyppinen latauslaite.
- Parranajokone täyttää kansainvälisesti hyväksytyt turvamääräykset ja sitä voidaan käyttää
turvallisesti kylvyssä tai suihkussa (Kuva 5).
- Tämä Philips-laite vastaa kaikkia, sähkömagneettisia kenttiä (EMF) koskevia standardeja. Jos
laitetta käytetään oikein ja tämän käyttöohjeen ohjeiden mukaisesti, sen käyttäminen on
turvallista tämänhetkisen tutkimustiedon perusteella.
- Latauslaite muuttaa 100 - 240 voltin jännitteen turvalliseksi alle 24 voltin jännitteeksi.
1 Poista korkki NIVEA FOR MEN -parranajoemulsiopullosta (Kuva 6).
2 Kierrä emulsiopullon korkkia myötäpäivään, kunnes kuulet napsahduksen (Kuva 7).
, Korkki kiertyy alaspäin ja näkyviin tulee suutin.
3 Poista täyttö- ja lataustelineen kansi kiertämällä sitä vastapäivään.
4 Poista pakkaus täyttö- ja lataustelineen pulloaukosta.
5 Aseta emulsiopullo pulloaukkoon suutin alaspäin (Kuva 8).
6 Aseta täyttö- ja lataustelineen (1) kansi takaisin ja kiinnitä se paikalleen kiertämällä
myötäpäivään (2) (Kuva 9).
7 Aseta pieni liitin täyttö- ja lataustelineeseen ja liitä verkkolaite pistorasiaan (Kuva 10).
8 Aseta parranajokone täyttö- ja lataustelineeseen ja työnnä sitä taaksepäin, kunnes kuulet
napsahduksen (Kuva 11).
Huomautus: Parranajokone latautuu ja täyttyy parranajoemulsiolla automaattisesti.
9 Lataa parranajokonetta 90 minuuttia. (Kuva 12)
Huomautus: Lataa parranajokone ennen ensimmäistä käyttökertaa, tai kun merkkivalo ilmoittaa akun
tyhjenemisestä (katso kohta Latausilmaisimet).
Huomautus: Täyteen ladatulla parranajokoneella voi ajaa enintään 40 minuuttia.
1 Työnnä pieni liitin laturiin ja kytke verkkolaite pistorasiaan.
2 Aseta laite laturiin (Kuva 13).
, Parranajokone latautuu.
3 Lataa parranajokonetta 1,5 tuntia.
Huomautus: Lataa parranajokone ennen ensimmäistä käyttökertaa, tai kun merkkivalo ilmoittaa akun
tyhjenemisestä (katso kohta Latausilmaisimet).
Huomautus: Täyteen ladatulla parranajokoneella voi ajaa enintään 40 minuuttia.
Voit täyttää parranajoemulsiopatruunan myös ilman täyttö- ja lataustelinettä:
1 Aseta emulsiopullon suutin emulsiopatruunan täyttöaukkoon.
82
2 Liikuta pulloa ylös ja alas noin 5 kertaa, jotta parranajoemulsio siirtyy patruunaan. Lopeta, kun
patruuna on täynnä (Kuva 14).
- Latausvalot ilmaisevat akun latausasteen. Latauksen aikana alimmainen latausvalo vilkkuu ensin
oranssina ja sammuu. Tämän jälkeen ylimmäinen latausvalo alkaa vilkkua valkoisena ja jää lopulta
palamaan valkoisena.
- 9 minuutin latauksen jälkeen alimmainen latausvalo sammuu ja ylimmäinen latausvalo vilkkuu
valkoisena. Laitteessa on nyt tarpeeksi virtaa parranajoon.
Huomautus: Pikalataus onnistuu vain, jos parranajokone on jo kerran ladattu täyteen 1,5 tunnin ajan.
- Akun jäljellä olevan varaukseen osoittaa palavien latausvalojen määrä. Jäljellä oleva varaus näkyy
hetken ajan, kun parranajokoneeseen kytketään virta ja kun siitä katkaistaan virta (Kuva 15).
- Kun akun lataus on vähissä, alimmainen latausvalo palaa oranssina parranajon aikana ja vilkkuu
oranssina, kun laitteen virta katkaistaan. (Kuva 16)
- Kun akku on ladattu täyteen, kaikki latausvalot palavat valkoisina (Kuva 15).
- Noin 1 tunnin kuluttua valkoiset latausvalot sammuvat energian säästämiseksi.
, Kun emulsiopullon merkkivalo vilkkuu oranssina, siihen on kaksi syytä: (Kuva 17)
- Täyttö- ja lataustelineessä ei ole emulsiopulloa tai pullo ei ole kunnolla paikallaan.
- Emulsiopullo on tyhjä.
, Parranajoemulsion täyttövalo ilmaisee kolmenlaisia tilanteita: (Kuva 18)
- Valkoinen täyttövalo vilkkuu, kun emulsiopatruunaa täytetään.
- Valkoinen täyttövalo palaa jatkuvasti, kun parranajoemulsiopatruuna on täynnä.
- Jos emulsiopullo tyhjenee emulsiopatruunan täyttämisen aikana, valkoinen täyttövalo sammuu ja
emulsiopullon merkkivalo vilkkuu punaisena.
Huomautus: Iho sopeutuu uuteen parranajojärjestelmään 2 - 3 viikossa.
1 Varmista, että emulsiopatruunassa on tarpeeksi parranajoemulsiota.
2 Paina parranajokoneen päällä olevaa virtapainiketta.
3 Varmista, että parranajokoneessa on tarpeeksi latausta jäljellä (katso Latausilmaisimet
kohdassa Käyttöönotto).
4 Paina ajopäätä kevyesti ihoa vasten ja tee pyörivää liikettä. Paina parranajoemulsiopainiketta,
kunnes iholla on tarpeeksi emulsiota miellyttävää parranajoa varten. (Kuva 19)
- Kun vapautat parranajoemulsiopainikkeen, emulsiota ei enää levity iholle.
- Jos painat parranajoemulsiopainiketta lyhyesti, emulsiota tulee iholle pieni määrä.
- Paina parranajoemulsiopainiketta uudelleen, jos haluat iholle lisää parranajoemulsiota. Varmista,
että ajopää liukuu tasaisesti iholla.
83
Huomautus: Parranajoemulsiopainike toimii vain, kun parranajokoneeseen on kytketty virta.
Huomautus: Parranajokonetta voi käyttää partakoneen terien tavoin: voit käyttää laitetta myös, kun iho
on märkä. Tässä laitteessa ei ole partakarvakammiota, kuten perinteisissä sähköparranajokoneissa. Jotta
partakarvoja ei tipu vaatteille, käytä partaa ajaessasi riittävästi parranajoemulsiota.
5 Puhdista parranajokone huolellisesti jokaisen käyttökerran jälkeen (katso kohtaa Puhdistus ja
hoito).
6 Liu’uta suojus ajopään päälle suojaamaan teräyksiköitä (Kuva 20).
- Liikuta parranajokonetta kevyesti iholla pyörivin liikkein.
- Älä paina parranajokonetta liian voimakkaasti ihoa vasten, koska silloin iho saattaa ärtyä.
- Lisää parranajoemulsiota säännöllisesti, jotta ajopää liikkuu tasaisesti.
- Voit käyttää parranajokonetta myös kylvyssä tai suihkussa.
Huomautus: Uuden avoimen muotoilun takia trimmerin leikkausääni kuuluu muita trimmereitä
selkeämmin. Tämä on normaalia.
1 Vedä ajopää irti parranajokoneesta (Kuva 21).
2 Ota trimmeri laturiin trimmerin pidikkeestä ja napsauta se paikalleen
parranajokoneeseen (Kuva 22).
3 Paina parranajokoneen päällä olevaa virtapainiketta.
4 Voit käyttää trimmeriä pulisonkien ja/tai viiksien siistimiseen.
5 Puhdista trimmeri huolellisesti käytön jälkeen (katso kohtaa Puhdistus ja hoito).
6 Irrota trimmeri ja aseta se takaisin trimmerin pidikkeeseen.
7 Kiinnitä ajopää takaisin parranajokoneeseen niin, että se napsahtaa paikalleen (Kuva 23).
8 Liu’uta suojus ajopään päälle suojaamaan teräyksiköitä (Kuva 20).
Älä käytä naarmuttavia tai syövyttäviä puhdistusaineita tai -välineitä laitteen puhdistamiseen
(kuten alkoholia, bensiiniä tai asetonia).
Puhdista parranajokone ja trimmeri jokaisen käyttökerran jälkeen.
Ole varovainen kuuman veden kanssa. Varmista aina, ettei vesi ole liian kuumaa, ettet polta käsiäsi.
Älä kuivaa ajopäätä pyyheliinalla tai paperipyyhkeellä, ettet vahingoita teräyksiköitä.
Huomautus: Parranajokone on vesitiivis ja sen voi puhdistaa vedellä.
1 Paina parranajokoneen päällä olevaa virtapainiketta.
Huomautus: Puhdista parranajokone, kun virta on kytketty.
2 Upota ajopää tai trimmeri kuumaan veteen vähintään 30 sekunniksi (Kuva 24).
3 Katkaise parranajokoneesta virta ja ravistele ylimääräinen vesi pois.
4 Liu’uta suojus ajopään päälle suojaamaan teräyksiköitä (Kuva 20).

84
Huomautus: Jos parranajokone ei toimi niin hyvin kuin aluksi eivätkä ohessa kuvaillut puhdistustavat
auta, katso ohjeet erittäin huolelliseen puhdistukseen kohdasta Vianmääritys.
1 Levitä trimmerin terään pisara ompelukoneöljyä kerran puolessa vuodessa.
1 Säilytä parranajokonetta täyttö- ja lataustelineessä.
2 Jos olet lähdössä matkalle tai et halua säilyttää parranajokonetta täyttö- ja lataustelineessä,
aseta suojus ajopään päälle ja säilytä parranajokonetta säilytyspussissa (Kuva 20).
Jos aiot säilyttää parranajokonetta pitkään tai jos aiot ottaa sen mukaan matkalle, voit lukita
parranajokoneen. Matkalukitus estää parranajokoneen käynnistymisen vahingossa.
1 Varmista, että parranajokoneesta on katkaistu virta.
2 Paina parranajoemulsiopainiketta (1) ja pidä se painettuna. Paina samanaikaisesti
virtapainiketta toisella kädellä (2) (Kuva 25).
3 Pidä molempia painikkeita painettuna 6 sekuntia. Odota, että parranajokoneesta kuuluu lyhyt
huriseva ääni ja että keskimmäinen latausvalo vilkkuu muutaman kerran.
, Matkalukitus on nyt käytössä.
Huomautus: Jos painat vahingossa ensin käynnistyspainiketta, parranajokone käynnistyy. Jos näin
tapahtuu, katkaise parranajokoneesta virta painamalla käynnistyspainiketta uudelleen.
Huomautus: Jos painat käynnistyspainiketta matkalukituksen ollessa käytössä, keskimmäinen latausvalo
vilkkuu valkoisena ja ilmaisee parranajokoneen olevan lukittu.
Vinkki: Tarkista, onko matkalukitus käytössä painamalla käynnistyspainiketta. Jos lukko on käytössä,
parranajokone ei käynnisty.
1 Paina parranajoemulsiopainiketta (1) ja pidä se painettuna. Paina samanaikaisesti
virtapainiketta toisella kädellä (2) (Kuva 25).
2 Pidä molempia painikkeita painettuna 6 sekuntia. Odota, että parranajokoneesta kuuluu lyhyt
huriseva ääni ja että keskimmäinen latausvalo vilkkuu muutaman kerran.
, Matkalukitus on nyt pois käytöstä.
Huomautus: Voit avata matkalukituksen asettamalla parranajokone takaisin laturiin.
Jos olet lähdössä matkalle etkä halua ottaa täyttö- ja lataustelinettä mukaasi, voit käyttää laturia
parranajokoneen lataamiseen.
Suosittelemme hygieniasyistä, että vaihdat parranajoemulsiopatruunan kerran vuodessa. Uusi
patruuna toimitetaan jokaisen 3 NIVEA FOR MEN -parranajoemulsiopullon pakkauksen mukana
sekä vaihtopakkauksen (joka sisältää uuden HS85-ajopään ja uuden patruunan) mukana.
85
1 Irrota parranajoemulsiopatruuna parranajokoneesta (Kuva 26).
2 Aseta uuden parranajoemulsiopatruunan yläreunassa oleva kieleke parranajokoneen reunassa
olevaan koloon (1). Kiinnitä patruuna parranajokoneeseen painamalla patruunan alareunaa
peukalolla (2), kunnes se napsahtaa paikalleen (Kuva 27).
3 Täytä parranajoemulsiopatruuna (katso kohta Käyttöönotto).
Vaihda ajopää vuosittain parhaan tuloksen saamiseksi.
Korvaa ajopää vain HS85 Philips -ajopäällä.
1 Vedä vanha ajopää irti parranajokoneesta (Kuva 21).
2 Aseta uusi ajopää parranajokoneeseen niin, että se napsahtaa paikalleen (Kuva 23).
Käytä vain NIVEA FOR MEN -parranajoemulsiopulloja.
1 Poista korkki NIVEA FOR MEN -parranajoemulsiopullosta (Kuva 6).
2 Kierrä emulsiopullon korkkia myötäpäivään, kunnes kuulet napsahduksen (Kuva 7).
, Korkki kiertyy alaspäin ja näkyviin tulee suutin.
3 Poista täyttö- ja lataustelineen kansi kiertämällä sitä vastapäivään.
4 Aseta emulsiopullo pulloaukkoon suutin alaspäin (Kuva 8).
5 Työnnä suojus täyttö- ja lataustelineeseen (1) ja kiinnitä se paikalleen kiertämällä
myötäpäivään (2) (Kuva 9).
- Älä hävitä vanhoja laitteita tavallisen talousjätteen mukana, vaan toimita ne valtuutettuun
kierrätyspisteeseen. Näin autat vähentämään ympäristölle aiheutuvia haittavaikutuksia (Kuva 28).
- Laitteen kiinteät ladattavat akut sisältävät ympäristölle haitallisia aineita. Poista akku aina ennen
laitteen toimittamista valtuutettuun keräyspisteeseen, ja toimita se valtuutettuun akkujen
keräyspisteeseen. Jos et pysty irrottamaan akkua laitteesta, voit toimittaa laitteen Philipsin
huoltopalveluun, jossa akku poistetaan ja laite hävitetään ympäristöystävällisellä tavalla.
Poista ladattavat akut ennen parranajokoneen hävittämistä. Varmista, että akut ovat täysin tyhjät,
kun poistat ne.
Ole varovainen, sillä akun metalliliuskat ovat teräviä.
1 Irrota parranajoemulsiopatruuna parranajokoneesta (Kuva 26).
2 Irrota parranajokoneen takana olevat kolme ruuvia (Kuva 29).
3 Irrota kuoren takapaneeli ruuvimeisselillä (Kuva 30).
4 Katkaise johdot ja irrota ladattava akku.

86
Jos haluat lisätietoja tai laitteen kanssa ilmenee ongelmia, tutustu Philipsin sivustoon osoitteessa
www.philips.com/support tai kysy neuvoa Philipsin asiakaspalvelusta (puhelinnumero on
kansainvälisessä takuulehtisessä). Jos maassasi ei ole asiakaspalvelua, ota yhteyttä Philipsin
jälleenmyyjään.
Kansainvälinen takuu ei koske ajopäitä (terät ja teräsäleiköt), koska ne kuluvat käytössä.
Parranajoemulsiopatruuna on kertakäyttötuote, eikä kansainvälinen takuu kata sitä.

87
Tässä luvussa kuvataan tavallisimmat laitteen käyttöön liittyvät ongelmat. Ellet onnistu ratkaisemaan
ongelmaa alla olevien ohjeiden avulla, ota yhteys Philipsin maakohtaiseen asiakaspalveluun.
Ongelma Mahdollinen syy Ratkaisu
Parranajokone ei liu’u iholla
Et ole ehkä käyttänyt
Paina parranajoemulsiopainiketta,
tasaisesti.
tarpeeksi
kunnes iholla on tarpeeksi NIVEA
parranajoemulsiota.
FOR MEN -parranajoemulsiota.
Emulsion ansiosta ajopää liikkuu iholla
tasaisesti.
Parranajokone ei toimi
Et ole ehkä puhdistanut
Puhdista parranajokone
enää niin hyvin kuin aluksi.
parranajokonetta kunnolla.
perusteellisesti (katso kohtaa
Puhdistus ja hoito).
Pitkät karvat haittaavat
Puhdista teräyksiköt noudattamalla
teräyksikön toimintaa.
alla olevia erittäin huolellisen
puhdistuksen ohjeita.
Ajopää on vaurioitunut tai
Vaihda ajopää (katso kohtaa
kulunut.
Varaosat).
Parranajokone ei käynnisty,
Ladattava akku on tyhjä. Lataa akku (katso kohtaa
kun virtakytkintä painetaan.
Käyttöönotto).
Matkalukitus on käytössä. Poista matkalukitus käytöstä (katso
kohtaa Säilytys).
Ajopäässä voi olla
Puhdista parranajokone
kuivunutta
perusteellisesti, ennen kuin jatkat
parranajoemulsiota.
parranajoa (katso kohta
Puhdistaminen).
Ajopäätä ei ehkä ole koottu
Kun kokoat ajopäätä, käännä jokaista
oikein erittäin huolellisen
teräsäleikköä vastapäivään, kunnes se
puhdistuksen jälkeen.
napsahtaa paikoilleen.
Rei’istä tulee vain vähän
Toinen rei’istä on tukossa. Huuhtele ajopää tai upota se veteen.
parranajoemulsiota, vaikka
Jos tämä ei auta, pumppaa
patruunassa on tarpeeksi
parranajoemulsiota
emulsiota.
parranajoemulsiopatruunaan, kunnes
emulsiota tulee tukkeutuneesta
reiästä. Jos tämäkään ei auta, kokeilee
seuraavaa keinoa: 1) Katkaise
parranajokoneesta virta 2) Vedä
ajopää irti laitteesta 3) Aseta sormesi
sellaisen reiän päälle, joka ei ole
tukossa 4) Kytke parranajokoneeseen
virta 5) Paina
parranajoemulsiopainiketta usean
sekunnin ajan, kunnes tukkeutuneesta
reiästä tulee emulsiota.
88
Ongelma Mahdollinen syy Ratkaisu
Ajopäitä ei ole asetettu
Varmista, että asetat reiättömän
takaisin alkuperäisiin
ajopään oikeaan pidikkeeseen. Tämä
pidikkeisiinsä. Yhdessä
pidike on lähimpänä
ajopäässä ei ole keskellä
käynnistyspainiketta, kun ajopää on
reikää parranajoemulsiota
koottu.
varten, joten se on
asetettava omaan
pidikkeeseensä.
Rei’istä ei tule yhtään
Parranajoemulsiopatruuna
Täytä parranajoemulsiopatruuna
parranajoemulsiota, kun
on melkein tyhjä.
(katso kohtaa Käyttöönotto).
painan
parranajoemulsiopainiketta.
Trimmeristä lähtee kovempi
Trimmerin muotoilu on
Uuden avoimen muotoilun takia
ääni kuin muista
avoin.
trimmerin leikkausääni kuuluu muita
trimmereistä.
trimmereitä selkeämmin. Tämä on
normaalia ja trimmeri on täysin
kunnossa.
Varmista, että laitteesta on katkaistu virta.
1 Vedä ajopää irti parranajokoneesta (Kuva 31).
2 Käännä teräsäleikköä myötäpäivään ja vedä se irti ajopäästä (Kuva 32).
Huomautus: Irrota vain yksi ajopää kerrallaan. Näin varmistat, että asetat aina ajopään takaisin
alkuperäiseen pidikkeeseensä. Tämä on tarpeellista, sillä kahdessa ajopäässä on erityinen reikä
parranajoemulsiota varten. Näin varmistat myös, että eri ajopäiden terät ja teräsäleiköt eivät mene
sekaisin keskenään, sillä tämä vaikuttaa ajotulokseen.
3 Irrota tarvittaessa terä teräsäleiköstä.
4 Puhdista terä ja teräsäleikkö mukana tulevalla harjalla.
5 Aseta puhdistuksen jälkeen terä takaisin ajopäähän siten, että terävä pää osoittaa ylöspäin.
6 Aseta teräsäleikkö takaisin ajopään pidikkeeseen (terän päälle) (Kuva 33).
7 Käännä teräsäleikköä vastapäivään, kunnes se napsahtaa paikoilleen (Kuva 34).
8 Kiinnitä ajopää takaisin parranajokoneeseen niin, että se napsahtaa paikalleen (Kuva 35).

89
Félicitations pour votre achat et bienvenue dans l’univers Philips ! Pour proter pleinement de
l’assistance Philips, enregistrez votre produit sur le site à l’adresse suivante : www.philips.com/
welcome.
Veuillez lire ce mode d’emploi, qui contient des informations sur les fonctionnalités remarquables de
ce rasoir, ainsi que des conseils pour un rasage plus facile et plus agréable.
Rasoir
Coque de protection
Tondeuse
Unité de rasage
Cartouche de lotion de rasage
Bouton de lotion de rasage
Bouton marche/arrêt
Voyants de charge
Chargeur
Socle de remplissage et de recharge
Couvercle du socle de remplissage et de recharge
Logement pour la tondeuse
Panneau arrière
Prise pour petite che
Voyant de remplissage de la cartouche de lotion de rasage
Voyant du acon de lotion de rasage
Brosse de nettoyage
Flacon de lotion de rasage NIVEA FOR MEN
Étui
Adaptateur (votre adaptateur peut être différent de celui présenté sur la gure)
Lisez attentivement ce mode d’emploi avant d’utiliser l’appareil et conservez-le pour un usage
ultérieur.
- Veillez à ce que l’adaptateur ne soit pas en contact avec de l’eau (votre adaptateur peut être
différent de celui présenté sur la gure) (g. 2).
- Veillez à ce que l’eau ne soit pas trop chaude pour ne pas vous brûler.
- L’adaptateur secteur contient un transformateur. An d’éviter tout accident, n’essayez pas de
remplacer la che de l’adaptateur.
- Cet appareil n’est pas destiné à être utilisé par des personnes (notamment des enfants) dont les
capacités physiques, sensorielles ou intellectuelles sont réduites, ou par des personnes manquant
d’expérience ou de connaissances, à moins que celles-ci ne soient sous surveillance ou qu’elles
n’aient reçu des instructions quant à l’utilisation de l’appareil par une personne responsable de
leur sécurité.
- Veillez à ce que les enfants ne puissent pas jouer avec l’appareil.
- Ne plongez jamais le socle de remplissage et de recharge dans l’eau et ne le rincez pas sous le
robinet (g. 3).
- Ne plongez jamais le chargeur dans l’eau et ne le rincez pas sous le robinet (g. 4).
90
- Placez toujours le socle de remplissage et de recharge ainsi que le chargeur sur une surface
imperméable.
- Utilisez, rechargez et conservez l’appareil à une température comprise entre 5 °C et 35 °C.
- Placez toujours le capot de protection sur le rasoir an de protéger les têtes de rasoir lorsque
vous êtes en voyage.
- Le rasoir et les autres accessoires ne sont pas résistants au lave-vaisselle.
- N’utilisez jamais une eau dont la température est supérieure à 80 °C pour rincer le rasoir.
- Employez exclusivement l’adaptateur, le chargeur et le socle de remplissage et de recharge
fournis.
- N’utilisez pas le socle de remplissage et de recharge si l’adaptateur ou le socle lui-même est
endommagé.
- N’utilisez pas le rasoir/chargeur s’il est endommagé.
- Si l’adaptateur secteur est endommagé, remplacez-le toujours par un adaptateur secteur de
même type pour éviter tout accident.
- Ce rasoir est conforme aux normes internationales de sécurité. Il peut être utilisé dans le bain
ou sous la douche et nettoyé à l’eau courante en toute sécurité (g. 5).
- Cet appareil Philips est conforme à toutes les normes relatives aux champs électromagnétiques
(CEM). Il répond aux règles de sécurité établies sur la base des connaissances scientiques
actuelles s’il est manipulé correctement et conformément aux instructions de ce mode d’emploi.
- L’adaptateur transforme la tension de 100-240 V en une tension de sécurité de moins de 24 V.
1 Enlevez la languette du acon de lotion de rasage NIVEA FOR MEN (g. 6).
2 Tournez le bouchon du acon de rasage dans le sens des aiguilles d’une montre (clic) (g. 7).
, Le bouchon glisse vers le bas et l’embout apparaît.
3 Tournez le couvercle du socle de remplissage et de recharge dans le sens inverse des aiguilles
d’une montre et ôtez-le.
4 Enlevez le acon vide du socle de remplissage et de recharge.
5 Glissez le nouveau acon de lotion de rasage dans son logement, embout pointé vers le
bas (g. 8).
6 Remettez en place le couvercle du socle de remplissage et de recharge (1), puis fermez-le en
le tournant dans le sens des aiguilles d’une montre (2) (g. 9).
7 Insérez la petite che dans la prise du socle de remplissage et de recharge, et branchez
l’adaptateur sur la prise secteur (g. 10).
8 Insérez le rasoir dans le socle de remplissage et de recharge, et poussez-le vers l’arrière
(clic) (g. 11).
Remarque : Le rasoir se charge et se remplit de lotion de rasage automatiquement.
9 Laissez charger le rasoir pendant 90 minutes. (g. 12)
Remarque : Chargez le rasoir avant la première utilisation ou lorsque le voyant de batterie faible s’allume
(voir la section « Informations relatives à la charge »).
Remarque : Un rasoir complètement chargé offre une autonomie de rasage de 40 minutes environ.
1 Enfoncez la petite che dans le chargeur et l’adaptateur dans la prise secteur.
91
2 Placez le rasoir dans le chargeur (g. 13).
, Le rasoir est en cours de charge.
3 Chargez le rasoir pendant 1,5 heure.
Remarque : Chargez le rasoir avant la première utilisation ou lorsque le voyant de batterie faible s’allume
(voir la section « Informations relatives à la charge »).
Remarque : Un rasoir complètement chargé offre une autonomie de rasage de 40 minutes environ.
Vous pouvez aussi remplir la cartouche de lotion de rasage sans utiliser le socle de remplissage et
de recharge :
1 Placez l’embout du acon de lotion de rasage dans l’orice de remplissage de la cartouche.
2 Agitez le acon de haut en bas 5 fois environ de manière à ce que la lotion de rasage s’écoule
dans la cartouche jusqu’à ce que cette dernière soit remplie (g. 14).
- Les voyants de charge indiquent le niveau de charge de la batterie. En cours de charge, le voyant
inférieur clignote tout d’abord en orange, puis s’éteint. Ensuite, le voyant de charge supérieur se
met à clignoter en blanc pour nalement rester allumé.
- Après 9 minutes de charge, le voyant inférieur s’éteint et le voyant supérieur se met à clignoter
en blanc, an d’indiquer que le rasoir est sufsamment chargé pour une séance de rasage.
Remarque : La charge rapide n’est possible que si le rasoir a été chargé une première fois pendant
1,5 heure.
- Le nombre de voyants allumés vous renseigne sur le niveau de charge de la batterie. La capacité
restante est indiquée quelques secondes lorsque vous allumez ou éteignez le rasoir (g. 15).
- Lors d’une séance de rasage, si le niveau de charge de la batterie est insufsant, le voyant
inférieur s’allume en orange. Il se met à clignoter en orange lorsque vous éteignez le
rasoir. (g. 16)
- Lorsque la batterie est entièrement chargée, tous les voyants de charge restent allumés en
blanc (g. 15).
- Après environ 1 heure, les voyants de charge allumés en blanc s’éteignent pour économiser
l’énergie.
, Le voyant du acon de lotion de rasage peut se mettre à clignoter en orange pour deux
raisons : (g. 17)
- Aucun acon de lotion de rasage n’est présent dans le socle de remplissage et de recharge ou
le acon n’a pas été inséré correctement.
- Le acon de lotion de rasage est vide.
, Le voyant de remplissage de la cartouche de lotion de rasage peut signaler trois situations
différentes : (g. 18)

92
- Au moment du remplissage de la cartouche de lotion de rasage, le voyant blanc correspondant
clignote.
- Dès que la cartouche de lotion de rasage est remplie, le voyant de remplissage de la cartouche
de lotion de rasage reste allumé en blanc.
- Si le acon de lotion de rasage se vide en cours de remplissage de la cartouche de lotion de
rasage, le voyant blanc de remplissage de la cartouche de lotion de rasage s’éteint et le voyant
du acon de lotion de rasage clignote en rouge.
Remarque : La peau a besoin de 2 ou 3 semaines pour s’habituer à un nouveau système de rasage.
1 Vériez que la cartouche contient sufsamment de lotion de rasage.
2 Mettez le rasoir en marche en appuyant sur le bouton marche/arrêt.
3 Assurez-vous que le rasoir est sufsamment chargé (voir le chapitre « Avant utilisation »,
section « Informations relatives à la charge »).
4 Faites glisser l’unité de rasage sur votre peau en effectuant des mouvements circulaires et en
appuyant sur le bouton de lotion de rasage jusqu’à ce que votre peau en soit sufsamment
enduite pour un rasage tout en confort. (g. 19)
- Dès que vous relâchez le bouton de lotion de rasage, l’apport de lotion cesse.
- Si vous appuyez brièvement sur le bouton de lotion de rasage, l’appareil applique
automatiquement une certaine quantité de lotion.
- Appuyez de nouveau sur le bouton de lotion de rasage pour en appliquer davantage durant le
rasage si vous sentez que cela est nécessaire, et ce, an que le rasoir puisse continuer à glisser
en douceur sur votre peau.
Remarque : Ce bouton fonctionne uniquement lorsque le rasoir est en marche.
Remarque : Ce rasoir peut s’utiliser sur le même principe qu’un rasoir mécanique : vous pouvez
l’employer sur une peau humide. Contrairement à un rasoir électrique classique, cet appareil ne dispose
pas d’un compartiment à poils de barbe. Pour éviter d’en avoir sur vos vêtements, appliquez de la lotion
en sufsance en cours de rasage.
5 Nettoyez soigneusement le rasoir après chaque utilisation (voir le chapitre « Nettoyage et
entretien »).
6 Placez le capot de protection sur le rasoir pour éviter tout dommage (g. 20).
- Faites doucement glisser le rasoir sur votre peau en effectuant des mouvements circulaires.
- N’exercez pas une pression trop forte sur le rasoir car cela pourrait entraîner des irritations de
la peau.
- Appliquez uniformément la lotion pour un rasage tout en douceur.
- Le rasoir peut aussi s’utiliser sous la douche ou dans le bain.
Remarque : L’action de coupe de la tondeuse est plus clairement audible que sur les autres modèles. Ce
bruit parfaitement normal s’explique par son nouveau concept ouvert.
1 Détachez l’unité de rasage du rasoir (g. 21).
2 Retirez la tondeuse du support pour tondeuse situé sur le chargeur, puis placez-la sur le
rasoir (clic) (g. 22).
3 Mettez le rasoir en marche en appuyant sur le bouton marche/arrêt.
93
4 Servez-vous de la tondeuse pour tailler les favoris et la moustache.
5 Nettoyez soigneusement la tondeuse après utilisation (voir le chapitre « Nettoyage et
entretien »).
6 Retirez la tondeuse et replacez-la dans son support.
7 Replacez l’unité de rasage sur le rasoir (clic) (g. 23).
8 Placez le capot de protection sur le rasoir pour éviter tout dommage (g. 20).
N’utilisez jamais de tampons à récurer, de produits abrasifs ou de détergents agressifs tels que de
l’alcool, de l’essence ou de l’acétone pour nettoyer l’appareil.
Nettoyez le rasoir et la tondeuse après chaque utilisation.
Veillez à ce que l’eau ne soit pas trop chaude pour ne pas vous brûler.
Ne séchez jamais l’unité de rasage à l’aide d’une serviette au risque d’endommager les têtes de
rasoir.
Remarque : En raison de son étanchéité, le rasoir peut être nettoyé à l’eau courante.
1 Mettez le rasoir en marche en appuyant sur le bouton marche/arrêt.
Remarque : Nettoyez le rasoir en veillant à ce qu’il soit allumé.
2 Plongez l’unité de rasage/tondeuse dans l’eau chaude pendant au moins 30 secondes (g. 24).
3 Éteignez le rasoir et secouez-le pour retirer l’excès d’eau.
4 Placez le capot de protection sur le rasoir pour éviter tout dommage (g. 20).
Remarque : Si les résultats de rasage ne sont pas aussi satisfaisants que d’habitude et que vous ne
parvenez pas à résoudre le problème à l’aide de la méthode de nettoyage décrite dans ce chapitre,
reportez-vous au chapitre « Dépannage » pour plus de précisions sur le nettoyage en profondeur du
rasoir.
1 Tous les six mois, appliquez une goutte d’huile pour machine à coudre sur la tondeuse.
1 Rangez le rasoir dans son socle de remplissage et de recharge.
2 Si vous devez partir en voyage et ne souhaitez pas ranger le rasoir dans son socle de
remplissage et de recharge, placez le capot de protection sur le rasoir et rangez ce dernier
dans sa housse (g. 20).
Si vous n’utilisez pas le rasoir pendant une longue période ou si vous voulez l’emporter en voyage,
vous avez la possibilité de le verrouiller. Ainsi, il ne risque pas de se mettre en marche
accidentellement.

94
1 Assurez-vous que le rasoir est éteint.
2 Maintenez le bouton de lotion de rasage enfoncé (1) tout en appuyant sur le bouton marche/
arrêt avec l’autre main (2) (g. 25).
3 Maintenez les deux boutons enfoncés pendant 6 secondes. Attendez que le rasoir émette un
bref bourdonnement et que le voyant de charge central du rasoir clignote à plusieurs
reprises.
, Le verrouillage est alors activé.
Remarque : Si, par mégarde, vous appuyez d’abord sur le bouton marche/arrêt, le rasoir se met en route.
Dans un tel cas, appuyez de nouveau sur le bouton marche/arrêt pour éteindre le rasoir.
Remarque : Si vous appuyez sur le bouton marche/arrêt alors que le verrouillage est activé, le voyant de
charge central clignote en blanc, ce qui indique que le rasoir est verrouillé.
Conseil : Pour vous assurer que le rasoir est verrouillé, appuyez sur le bouton marche/arrêt. Si le
verrouillage est activé, le rasoir ne se met pas en marche.
1 Maintenez le bouton de lotion de rasage enfoncé (1) tout en appuyant sur le bouton marche/
arrêt avec l’autre main (2) (g. 25).
2 Maintenez les deux boutons enfoncés pendant 6 secondes. Attendez que le rasoir émette un
bref bourdonnement et que le voyant de charge central du rasoir clignote à plusieurs
reprises.
, Le verrouillage est alors désactivé.
Remarque : Vous pouvez aussi désactiver le verrouillage en plaçant simplement le rasoir dans le chargeur.
Si vous partez en voyage et que vous ne voulez pas emporter le socle de remplissage et de
recharge avec vous, emportez le chargeur ; vous pourrez ainsi charger le rasoir quand vous en aurez
besoin.
Pour des raisons d’hygiène, il est conseillé de changer la cartouche de lotion de rasage une fois par
an. Une cartouche neuve est fournie avec chaque paquet de 3 acons de lotion de rasage NIVEA
FOR MEN ainsi qu’avec le kit de remplacement (composé d’une nouvelle unité de rasage HS85 et
d’une cartouche de remplacement).
1 Retirez la cartouche de lotion de rasage du rasoir (g. 26).
2 Insérez la languette supérieure de la nouvelle cartouche de lotion de rasage dans la fente
située au bord du rasoir (1). Appuyez ensuite avec votre pouce (2) sur la partie inférieure de
la cartouche an de solidariser la cartouche au rasoir (clic) (g. 27).
3 Remplissez la cartouche de lotion de rasage (voir le chapitre « Pour démarrer »).
Pour obtenir un résultat de rasage optimal, remplacez l’unité de rasage chaque année.
Remplacez l’unité de rasage uniquement par une unité de rasage HS85 Philips.
1 Détachez l’ancienne unité de rasage du rasoir (g. 21).
95
2 Placez une unité de rasage neuve sur le rasoir (clic) (g. 23).
Employez exclusivement des acons de lotion de rasage NIVEA FOR MEN.
1 Enlevez la languette du acon de lotion de rasage NIVEA FOR MEN (g. 6).
2 Tournez le bouchon du acon de rasage dans le sens des aiguilles d’une montre (clic) (g. 7).
, Le bouchon glisse vers le bas et l’embout apparaît.
3 Tournez le couvercle du socle de remplissage et de recharge dans le sens inverse des aiguilles
d’une montre et ôtez-le.
4 Glissez le nouveau acon de lotion de rasage dans son logement, embout pointé vers le
bas (g. 8).
5 Remettez en place le couvercle du socle de remplissage et de recharge (1) et fermez-le en le
tournant dans le sens des aiguilles d’une montre (2) (g. 9).
- Lorsqu’il ne fonctionnera plus, ne jetez pas l’appareil avec les ordures ménagères, mais déposez-
le à un endroit assigné à cet effet, où il pourra être recyclé. Vous contribuerez ainsi à la
protection de l’environnement (g. 28).
- La batterie rechargeable intégrée contient des substances qui peuvent nuire à l’environnement.
Veillez à toujours retirer la batterie avant de mettre l’appareil au rebut ou de le déposer à un
endroit assigné à cet effet. Déposez la batterie usagée à un endroit assigné à cet effet. Si vous
n’arrivez pas à retirer la batterie, vous pouvez apporter l’appareil dans un
Centre Service Agréé Philips qui prendra toute l’opération en charge pour préserver
l’environnement.
Retirez la batterie rechargeable uniquement lorsque vous mettez le rasoir au rebut. Assurez-vous
que la batterie est complètement déchargée lorsque vous la retirez.
Soyez prudent car les languettes de la batterie sont coupantes.
1 Retirez la cartouche de lotion de rasage du rasoir (g. 26).
2 Dévissez les trois vis à l’arrière du rasoir (g. 29).
3 Retirez la plaque arrière du logement de batterie à l’aide d’un tournevis (g. 30).
4 Coupez les ls de connexion, puis retirez la batterie rechargeable.

96
Si vous souhaitez obtenir des informations supplémentaires, faire réparer l’appareil ou si vous
rencontrez un problème, rendez-vous sur le site Web de Philips à l’adresse
www.philips.com/support ou contactez le Service Consommateurs Philips de votre pays (vous
trouverez le numéro de téléphone correspondant sur le dépliant de garantie internationale). S’il
n’existe pas de Service Consommateurs Philips dans votre pays, renseignez-vous auprès de votre
revendeur Philips local.
Étant susceptible de s’user, l’unité de rasage (lames et grilles) n’est pas couverte par la garantie
internationale.
La cartouche de lotion de rasage est un consommable et n’est pas couverte par la garantie
internationale.
Ce chapitre présente les problèmes les plus courants que vous pouvez rencontrer avec votre
appareil. Si vous ne parvenez pas à résoudre le problème à l’aide des informations ci-dessous,
contactez le Service Consommateurs Philips de votre pays.
Problème Cause possible Solution
L’unité de rasage
Vous n’avez pas
Appuyez sur le bouton de lotion de rasage jusqu’à
ne glisse pas en
appliqué assez de
ce qu’une quantité sufsante de lotion de rasage
douceur sur ma
lotion de rasage.
NIVEA FOR MEN ait été libérée. L’unité de rasage
peau.
glissera de nouveau en douceur sur votre peau.
Les résultats de
Vous n’avez pas
Nettoyez soigneusement le rasoir (voir le chapitre
rasage ne sont
nettoyé le rasoir
« Nettoyage et entretien »).
pas aussi
correctement.
satisfaisants que
d’habitude.
Les têtes de rasoir
Pour nettoyer les têtes de rasoir, suivez les
sont bloquées par de
instructions décrites dans la section « Méthode de
longs poils.
nettoyage en profondeur » ci-dessous.
L’unité de rasage est
Remplacez l’unité de rasage (voir le chapitre
endommagée ou usée.
« Remplacement »).
Le rasoir ne
La batterie
Rechargez la batterie (voir le chapitre « Avant
fonctionne pas
rechargeable est vide.
utilisation »).
lorsque j’appuie
sur le bouton
marche/arrêt.
Le verrouillage est
Désactivez le verrouillage (voir le chapitre
activé.
« Rangement »).
Les têtes de rasoir
Nettoyez l’appareil à fond avant de continuer le
sont obstruées par de
rasage (voir le chapitre « Nettoyage »).
la lotion de rasage
séchée.

97
Problème Cause possible Solution
Vous n’avez pas
Lorsque vous remontez l’unité de rasage, tournez
remonté correctement
les grilles dans le sens inverse des aiguilles d’une
l’unité de rasage après
montre jusqu’à ce qu’elles s’enclenchent.
un nettoyage en
profondeur.
La lotion de
L’un des orices de
Rincez l’unité de rasage ou faites-la tremper. Si le
rasage s’écoule
distribution de lotion
problème persiste, agitez le acon de lotion de
difcilement par
de rasage est obstrué.
rasage jusqu’à ce que celle-ci recommence à
les orices alors
s’écouler par l’orice préalablement bouché. Si le
que la cartouche
problème n’est toujours pas résolu, essayez la
en contient
méthode suivante : 1) Éteignez le rasoir. 2) Retirez
sufsamment.
l’unité de rasage du rasoir. 3) Placez votre doigt sur
l’orice non bouché. 4) Allumez le rasoir. 5)
Appuyez pendant plusieurs secondes sur le bouton
de lotion de rasage jusqu’à ce que celle-ci
recommence à s’écouler par l’orice préalablement
bouché.
Vous n’avez pas
Assurez-vous que vous avez placé la tête de rasoir
remonté les têtes de
qui n’a pas d’orice central de distribution de lotion
rasoir sur leur support
sur le support le plus proche du bouton marche/
d’origine. La tête de
arrêt lorsque l’unité de rasage est installée sur le
rasoir qui n’a pas
rasoir.
d’orice central de
distribution de lotion
doit être placée sur un
support précis.
La lotion de
La cartouche de lotion
Remplissez à nouveau la cartouche de lotion de
rasage ne
de rasage est presque
rasage (voir le chapitre « Avant utilisation »).
s’écoule pas
vide.
lorsque j’appuie
sur le bouton de
lotion de rasage.
La tondeuse est
La tondeuse amovible
L’action de coupe de la tondeuse est plus
plus bruyante
est dotée d’un concept
clairement audible que sur les autres modèles. Ce
que les autres
ouvert.
bruit parfaitement normal s’explique par son
tondeuses.
nouveau concept ouvert ; il n’indique pas un
quelconque dysfonctionnement de la tondeuse.
Assurez-vous que l’appareil est éteint.
1 Détachez l’unité de rasage du rasoir (g. 31).
2 Tournez la grille dans le sens des aiguilles d’une montre et retirez-la de l’unité de
rasage (g. 32).
Remarque : Ne retirez qu’une seule tête de rasage à la fois. Vous éviterez ainsi de remonter une tête de
rasage sur un support inapproprié, ce qui est important car deux têtes de rasage ont des orices
spéciaux de distribution pour lotion de rasage. De cette façon, vous ne pourrez pas non plus intervertir

98
les lames et les grilles de différentes têtes de rasage, ce qui pourrait affecter les performances de
l’appareil.
3 Si nécessaire, retirez la lame de la grille.
4 Nettoyez la lame et la grille à l’aide de la brosse fournie.
5 Après le nettoyage, replacez la lame sur l’unité de rasage en orientant le bloc tondeuse vers
le haut.
6 Replacez la grille sur le support de la tête de rasage (sur la lame) (g. 33).
7 Tournez la grille dans le sens inverse des aiguilles d’une montre jusqu’à ce qu’elle
s’enclenche (g. 34).
8 Replacez l’unité de rasage sur le rasoir (clic) (g. 35).

99
Čestitamo na kupnji i dobro došli u Philips! Kako biste u potpunosti iskoristili podršku koju nudi
tvrtka Philips, registrirajte svoj proizvod na: www.philips.com/welcome.
Pročitajte ove upute za korištenje jer sadrže informacije o praktičnim funkcijama aparata za brijanje
te savjete za jednostavnije i ugodnije brijanje.
Aparat za brijanje
Zaštitni poklopac
Trimer
Jedinica za brijanje
Spremnik s regeneratorom za brijanje
Gumb za propuštanje regeneratora za brijanje
Gumb za uključivanje/isključivanje
Indikatori punjenja
Punjač
Baza za ponovno punjenje i napajanje
Poklopac baze za ponovno punjenje i napajanje
Utor za spremanje trimera
Stražnja ploča
Utičnica za mali utikač
Indikator punjenja spremnika za regenerator
Indikator bočice s regeneratorom
Četka za čišćenje
Bočica regeneratora za brijanje NIVEA FOR MEN
Torbica
Adapter (adapter koji imate možda se razlikuje od adaptera prikazanog na slici)
Prije korištenja aparata pažljivo pročitajte ovaj korisnički priručnik i spremite ga za buduće potrebe.
- Pazite da se adapter ne smoči (adapter koji imate možda se razlikuje od adaptera prikazanog na
slici) (Sl. 2).
- Budite oprezni s vrućom vodom. Uvijek pazite da voda ne bude prevruća kako ne biste opekli
ruke.
- Adapter sadrži transformator. Nikada ne zamjenjujte adapter nekim drugim jer je to opasno.
- Ovaj aparat nije namijenjen osobama (uključujući djecu) sa smanjenim zičkim ili mentalnim
sposobnostima niti osobama koje nemaju dovoljno iskustva i znanja, osim ako im je osoba
odgovorna za njihovu sigurnost dala dopuštenje ili ih uputila u korištenje aparata.
- Malu djecu potrebno je nadzirati kako se ne bi igrala s aparatom.
- Bazu za ponovno punjenje i napajanje nemojte nikada uranjati u vodu niti ispirati pod mlazom
vode (Sl. 3).
- Punjač nemojte nikada uranjati u vodu niti ga ispirati pod mlazom vode (Sl. 4).
- Punjač i bazu za ponovno punjenje i napajanje uvijek stavljajte i koristite na površini otpornoj na
tekućine.
- Aparate koristite, punite i odlažite pri temperaturi između 5°C i 35°C.
- Prilikom putovanja na aparat za brijanje obavezno stavite zaštitni poklopac kako biste zaštitili
glave za brijanje.
100
- Aparat za brijanje i druga dodatna oprema ne mogu se prati u stroju za pranje posuđa.
- Za ispiranje aparata za brijanje nikada ne koristite vodu temperature više od 80°C.
- Koristite isključivo adapter, punjač i bazu za ponovno punjenje i napajanje isporučene s aparatom.
- Bazu za ponovno punjenje i napajanje nemojte koristiti ako je adapter ili sama baza oštećena.
- Aparat za brijanje ili punjač nemojte koristiti ako je oštećen.
- Ako je adapter oštećen, uvijek ga zamijenite originalnim kako biste izbjegli potencijalno opasne
situacije.
- Ovaj aparat za brijanje zadovoljava međunarodno prihvaćene sigurnosne norme i može se
sigurno koristiti u kadi ili pod tušem i prati pod mlazom vode iz slavine (Sl. 5).
- Ovaj proizvod tvrtke Philips sukladan je svim standardima koji se tiču elektromagnetskih polja
(EMF). Ako aparatom rukujete ispravno i u skladu s ovim uputama, prema dostupnim
znanstvenim dokazima on će biti siguran za korištenje.
- Adapter za napajanje pretvara napon od 100 - 240 V u siguran niski napon manji od 24 V.
1 Uklonite jezičac bočice s regeneratorom za brijanje NIVEA FOR MEN (Sl. 6).
2 Poklopac bočice s regeneratorom okrenite u smjeru kazaljke na satu (“klik”) (Sl. 7).
, Poklopac će se spustiti i pojavit će se brizgaljka za regenerator.
3 Poklopac baze za ponovno punjenje i napajanje okrenite u smjeru suprotnom od kazaljke na
satu kako biste je uklonili.
4 Uklonite ambalažu s otvora za umetanje bočice na bazi za ponovno punjenje i napajanje.
5 Bočicu s regeneratorom stavite u otvor tako da brizgaljka bude okrenuta prema dolje (Sl. 8).
6 Vratite poklopac na bazu za ponovno punjenje i napajanje (1) i okrenite ga u smjeru kazaljke
na satu kako biste ga pričvrstili (2) (Sl. 9).
7 Mali utikač umetnite u utičnicu na bazi za ponovno punjenje i napajanje, a adapter u zidnu
utičnicu (Sl. 10).
8 Aparat za brijanje stavite u bazu za ponovno punjenje i napajanje i gurnite ga da sjedne na
mjesto (“klik”) (Sl. 11).
Napomena: Aparat se automatski počinje napajati i puniti regeneratorom za brijanje.
9 Aparat punite 90 minuta. (Sl. 12)
Napomena: Bateriju aparata napunite prije prvog korištenja ili kada indikator napajanja pokaže da je
prazna (pogledajte odjeljak “Indikatori punjenja”).
Napomena: Potpuno napunjen aparat za brijanje može se koristiti do 40 minuta.
1 Mali utikač umetnite u punjač, a adapter u zidnu utičnicu.
2 Aparat stavite u punjač (Sl. 13).
, Aparat se puni.
3 Aparat za brijanje punite 1,5 sati.
Napomena: Bateriju aparata napunite prije prvog korištenja ili kada indikator napajanja pokaže da je
prazna (pogledajte odjeljak “Indikatori punjenja”).
Napomena: Potpuno napunjen aparat za brijanje može se koristiti do 40 minuta.
101
Spremnik regeneratora za brijanje možete ponovo napuniti bez korištenja baze za ponovno
punjenje i napajanje:
1 Brizgaljku bočice s regeneratorom stavite u otvor za punjenje na spremniku regeneratora.
2 Bočicu pomičite gore i dolje (oko 5 puta) kako biste regenerator za brijanje ubrizgali u
spremnik sve dok ne primijetite da je spremnik pun (Sl. 14).
- Indikatori punjenja pokazuju razinu napunjenosti baterije. Tijekom punjenja donji indikator
punjenja prvo treperi narančasto, a zatim se isključuje. Nakon toga gornji indikator
punjenja treperi bijelo te zatim svijetli bijelo.
- Nakon 9 minuta punjenja donji indikator punjenja se gasi, a gornji počinje treperiti bijelo, što
znači da aparat za brijanje ima dovoljno energije za jedno brijanje.
Napomena: Brzo punjenje moguće je samo ako ste aparat već jednom punili 1,5 sati.
- Preostalu količinu energije u bateriji označava broj indikatora koji svijetle. Preostali kapacitet
baterije može se vidjeti nekoliko sekundi prilikom uključivanja ili isključivanja aparata za
brijanje (Sl. 15).
- Kada je baterija pri kraju, donji indikator svijetli narančasto tijekom brijanja i treperi narančasto
prilikom isključivanja aparata za brijanje. (Sl. 16)
- Kada je baterija u potpunosti napunjena, svi indikatori punjenja neprestano svijetle bijelo (Sl. 15).
- Nakon približno 1 sata bijeli indikatori punjenja se isključuju kako bi se smanjila potrošnja
energije.
, Kada indikator bočice s regeneratorom treperi narančasto, postoje dvije mogućnosti: (Sl. 17)
- U bazi za ponovno punjenje i napajanje nema bočice s regeneratorom ili bočica nije ispravno
postavljena.
- U bočici nema regeneratora.
, Indikator punjenja spremnika za regenerator označava tri različite stvari: (Sl. 18)
- Dok se spremnik za regenerator puni, indikator punjenja spremnika za regenerator treperi bijelo.
- Kad se spremnik za regenerator napuni, indikator punjenja spremnika za regenerator
stalno svijetli bijelo.
- Ako se bočica s regeneratorom isprazni tijekom punjenja spremnika za regenerator, indikator
punjenja spremnika koji svijetli bijelo se isključuje, a indikator bočice s regeneratorom počinje
treperiti crveno.
Napomena: Koži će možda trebati 2 do 3 tjedna da se privikne na novi sustav brijanja.
1 Provjerite ima li u spremniku dovoljno regeneratora za brijanje.
102
2 Pritisnite gumb za uključivanje/isključivanje kako biste uključili aparat za brijanje.
3 Provjerite ima li aparat za brijanje dovoljno energije (pogledajte poglavlje “Priprema za
korištenje”, odjeljak “Indikatori punjenja”).
4 Jedinicu za brijanje nježno kružno pomičite po koži, a gumb za propuštanje regeneratora za
brijanje pritišćite dok na koži ne bude dovoljno regeneratora za ugodno brijanje. (Sl. 19)
- Kada otpustite gumb za propuštanje regeneratora za brijanje, aparat prestaje propuštati
regenerator.
- Ako gumb za propuštanje regeneratora kratko pritisnete, aparat automatski nanosi određenu
količinu regeneratora.
- Ponovo pritisnite gumb za propuštanje regeneratora kako biste nanijeli više regeneratora
tijekom brijanja i tako osigurali glatko klizenje jedinice za brijanje po koži.
Napomena: Gumb za propuštanje regeneratora radi samo dok je aparat za brijanje uključen.
Napomena: Ovaj aparat može se koristiti slično kao britvica: na mokrom licu. Za razliku od uobičajenih
električnih aparata za brijanje, ovaj aparat nema spremište za sakupljane dlačica. Kako biste spriječili
rasipanje dlačica po odjeći, nanesite dovoljno regeneratora za brijanje tijekom brijanja.
5 Aparat za brijanje temeljito očistite nakon svake upotrebe (pogledajte poglavlje “Čišćenje i
održavanje”).
6 Gurnite zaštitni poklopac na aparat za brijanje kako biste spriječili oštećenja (Sl. 20).
- Aparat za brijanje nježno pomičite po koži kružnim pokretima.
- Nemojte previše pritiskati jer to može nadražiti kožu.
- Kako biste osigurali optimalno klizenje, redovito nanosite regenerator za brijanje.
- Aparat za brijanje možete koristiti i u kadi ili pod tušem.
Napomena: Zbog novog otvorenog dizajna trimer se prilikom podrezivanja čuje jasnije od ostalih trimera.
To je normalno.
1 Jedinicu za brijanje povucite s aparata (Sl. 21).
2 Trimer izvadite iz držača na punjaču i stavite ga na aparat za brijanje (“klik”) (Sl. 22).
3 Pritisnite gumb za uključivanje/isključivanje kako biste uključili aparat za brijanje.
4 Trimer možete koristiti za podrezivanje zalizaka i/ili brkova.
5 Trimer temeljito očistite nakon svake upotrebe (pogledajte poglavlje “Čišćenje i održavanje”).
6 Odvojite trimer i vratite ga na držač.
7 Jedinicu za brijanje vratite na aparat (“klik”) (Sl. 23).
8 Gurnite zaštitni poklopac na aparat za brijanje kako biste spriječili oštećenja (Sl. 20).
Za čišćenje aparata nemojte nikada koristiti spužvice za ribanje, abrazivna sredstva za čišćenje ili
agresivne tekućine poput alkohola, benzina ili acetona.
Aparat za brijanje i trimer očistite nakon svake upotrebe.
103
Budite oprezni s vrućom vodom. Uvijek pazite da voda ne bude prevruća kako ne biste opekli
ruke.
Nikada nemojte sušiti jedinicu za brijanje frotirskim ili papirnatim ručnikom jer to može oštetiti
glave za brijanje.
Napomena: Aparat je vodootporan i može se čistiti vodom.
1 Pritisnite gumb za uključivanje/isključivanje kako biste uključili aparat za brijanje.
Napomena: Aparat za brijanje čistite dok je uključen.
2 Jedinicu za brijanje/trimer držite u vrućoj vodi najmanje 30 sekundi (Sl. 24).
3 Isključite aparat za brijanje i otresite višak vode.
4 Gurnite zaštitni poklopac na aparat za brijanje kako biste spriječili oštećenja (Sl. 20).
Napomena: Ako aparat ne radi dobro kao prije i taj problem ne možete riješiti metodom za čišćenje
opisanom u ovom poglavlju, potražite upute o metodama za vrlo temeljito čišćenje u poglavlju
“Rješavanje problema”.
1 Svakih šest mjeseci podmažite zupce trimera jednom kapi strojnog ulja.
1 Aparat za brijanje spremite u bazu za ponovno punjenje i napajanje.
2 Ako namjeravate putovati ili aparat za brijanje ne želite spremati u bazu, stavite zaštitni
poklopac na aparat i spremite ga u torbicu (Sl. 20).
Ako aparat za brijanje ne namjeravate koristiti duže vrijeme ili namjeravate putovati, aparat se može
zaključati. Putno zaključavanje sprječava slučajno uključivanje aparata za brijanje.
1 Provjerite je li aparat isključen.
2 Pritisnite i zadržite gumb za propuštanje regeneratora za brijanje (1) i istovremeno drugom
rukom pritisnite gumb za uključivanje/isključivanje (2) (Sl. 25).
3 Oba gumba zadržite 6 sekundi. Pričekajte da aparat proizvede kratki zvučni signal i srednji
indikator punjenja zatreperi nekoliko puta.
, Putno zaključavanje sada je aktivirano.
Napomena: Ako slučajno prvo pritisnete gumb za uključivanje/isključivanje, aparat će početi raditi. Ako se
to dogodi, ponovo pritisnite gumb za uključivanje/isključivanje kako biste isključili aparat.
Napomena: Ako pritisnete gumb za uključivanje/isključivanje dok je putno zaključavanje aktivno, srednji
indikator punjenja zatreperit će bijelo, što znači da je aparat zaključan.
Savjet: Pritisnite gumb za uključivanje/isključivanje kako biste provjerili je li putno zaključavanje aktivirano.
Ako je putno zaključavanje aktivirano, aparat za brijanje se ne uključuje.
1 Pritisnite i zadržite gumb za propuštanje regeneratora za brijanje (1) i istovremeno drugom
rukom pritisnite gumb za uključivanje/isključivanje (2) (Sl. 25).

104
2 Oba gumba zadržite 6 sekundi. Pričekajte da aparat proizvede kratki zvučni signal i srednji
indikator punjenja zatreperi nekoliko puta.
, Putno zaključavanje sada je deaktivirano.
Napomena: Putno zaključavanje možete deaktivirati i tako da aparat za brijanje vratite na punjač.
Ako namjeravate putovati i ne želite ponijeti bazu za ponovno punjenje i napajanje, možete ponijeti
punjač kako biste aparat mogli puniti po potrebi.
Iz higijenskih razloga preporučamo vam da jednom godišnje zamijenite spremnik s regeneratorom za
brijanje. Novi spremnik nalazi se u svakom pakiranju od tri bočice NIVEA FOR MEN regeneratora
te u svakom zamjenskom kompletu (u kojem se nalazi nova HS85 jedinica za brijanje i novi
spremnik).
1 Spremnik za regenerator odvojite od aparata (Sl. 26).
2 Izbočeni jezičac na vrhu novog spremnika za regenerator umetnite u utor na rubu aparata za
brijanje (1). Zatim palcem pritisnite donji dio spremnika (2) kako biste spremnik
pričvrstili na aparat za brijanje (“klik”) (Sl. 27).
3 Napunite spremnik za regenerator (pogledajte poglavlje “Početak korištenja”).
Jedinicu za brijanje mijenjajte svake godine za optimalne rezultate brijanja.
Jedinicu za brijanje zamijenite isključivo jedinicom HS85 tvrtke Philips.
1 Staru jedinicu za brijanje skinite s aparata (Sl. 21).
2 Novu jedinicu za brijanje stavite na aparat za brijanje (“klik”) (Sl. 23).
Koristite isključivo bočice s regeneratorom NIVEA FOR MEN.
1 Uklonite jezičac bočice s regeneratorom za brijanje NIVEA FOR MEN (Sl. 6).
2 Poklopac bočice s regeneratorom okrenite u smjeru kazaljke na satu (“klik”) (Sl. 7).
, Poklopac će se spustiti i pojavit će se brizgaljka za regenerator.
3 Poklopac baze za ponovno punjenje i napajanje okrenite u smjeru suprotnom od kazaljke na
satu kako biste je uklonili.
4 Bočicu s regeneratorom stavite u odgovarajući otvor tako da brizgaljka bude okrenuta prema
dolje (Sl. 8).
5 Poklopac gurnite natrag na bazu za ponovno punjenje i napajanje (1) i okrenite je u smjeru
kazaljke na satu (2) kako biste je pričvrstili (Sl. 9).
- Aparat koji se više ne može koristiti nemojte odlagati s uobičajenim otpadom iz kućanstva, nego
ga odnesite u predviđeno odlagalište na recikliranje. Time ćete pridonijeti očuvanju
okoliša (Sl. 28).
- Ugrađena baterija s mogućnošću punjenja sadrži tvari štetne za okoliš. Uvijek izvadite bateriju
prije odlaganja aparata u otpad i predaje na službenom mjestu za sakupljanje otpada. Bateriju
predajte na službenom mjestu za odlaganje baterija. Ako imate problema prilikom vađenja
105
baterije, možete odnijeti aparat u ovlašteni Philips servisni centar, gdje će izvaditi bateriju umjesto
vas i odložiti je na ekološki prihvatljivom odlagalištu.
Bateriju koja se može puniti vadite samo prilikom bacanja aparata. Prije no što je izvadite,
povjerite je li potpuno prazna.
Budite oprezni, stranice baterija su vrlo oštre.
1 Spremnik za regenerator odvojite od aparata (Sl. 26).
2 Odvijte tri vijka koji se nalaze na stražnjoj strani aparata za brijanje (Sl. 29).
3 Stražnju ploču kućišta odvojite pomoću odvijača (Sl. 30).
4 Prerežite žice i izvadite punjivu bateriju.
U slučaju da vam je potreban servis ili informacija ili imate neki problem, posjetite web-stranicu
tvrtke Philips, www.philips.com/support, ili se obratite centru za potrošače tvrtke Philips u svojoj
državi (broj telefona nalazi se u priloženom međunarodnom jamstvu). Ako u vašoj državi ne postoji
centar za potrošače, obratite se lokalnom prodavaču proizvoda tvrtke Philips.
Uvjeti međunarodnog jamstva ne pokrivaju jedinicu za brijanje (rezače i štitnike) jer je ona podložna
trošenju.
Spremnik za regenerator je element koje se redovito mijenja i nije pokriven međunarodnim
jamstvom.

106
U ovom poglavlju opisani su najčešći problemi s kojima biste se mogli susresti prilikom korištenja
aparata. Ako ne možete riješiti problem uz informacije u nastavku, obratite se centru za korisničku
podršku u svojoj državi.
Problem Mogući uzrok Rješenje
Aparat za
Niste nanijeli dovoljno
Pritišćite gumb za propuštanje regeneratora dok ne
brijanje ne klizi
regeneratora za
nanesete dovoljnu količinu regeneratora za brijanje
glatko po koži.
brijanje.
NIVEA FOR MEN. Na taj način jedinica za brijanje
ponovo će glatko kliziti po koži.
Aparat za brijanje
Niste ispravno očistili
Temeljito očistite aparat za brijanje (pogledajte
više ne radi
aparat za brijanje.
poglavlje “Čišćenje i održavanje”).
učinkovito kao
prije.
Duge dlake ometaju
Očistite glave za brijanje prateći korake za vrlo
rad glava za brijanje.
temeljito čišćenje u nastavku.
Jedinica za brijanje je
Zamijenite jedinicu za brijanje (pogledajte poglavlje
oštećena ili istrošena.
“Zamjena”).
Aparat za brijanje
Baterija koja se može
Napunite bateriju (pogledajte poglavlje “Priprema
se ne uključuje
puniti je prazna.
za korištenje”).
kad pritisnem
gumb za
uključivanje/
isključivanje.
Putno zaključavanje je
Deaktivirajte putno zaključavanje (pogledajte
aktivirano.
poglavlje “Spremanje”).
Osušeni regenerator za
Prije nastavka brijanja temeljito očistite aparat
brijanje blokirao je
(pogledajte “Čišćenje”).
glave za brijanje u
jedinici za brijanje.
Jedinicu za brijanje niste
Prilikom ponovnog sastavljanja jedinice za brijanje
ispravno sastavili nakon
svaki štitnik svakako okrenite suprotno od smjera
vrlo temeljitog čišćenja.
kazaljke na satu dok ne sjedne na mjesto.
Iz otvora izlazi
Jedan od otvora za
Isperite ili namočite jedinicu za brijanje. Ako to ne
mala količina
regenerator je
riješi problem, pumpajte regenerator za brijanje u
regeneratora za
začepljen.
spremnik sve dok regenerator ne počne izlaziti iz
brijanje, iako u
blokiranog otvora. Ako ni to ne riješi problem,
spremniku ima
pokušajte sljedeće: 1) Isključite aparat za brijanje 2)
dovoljno
Povucite jedinicu za brijanje s aparata 3) Stavite prst
regeneratora.
na otvor koji nije blokiran 4) Uključite aparat za
brijanje 5) Pritisnite gumb za propuštanje
regeneratora nekoliko sekundi dok regenerator ne
počne ponovo izlaziti iz blokiranog otvora.
107
Problem Mogući uzrok Rješenje
Glave za
Provjerite jeste li glavu za brijanje bez otvora za
brijanje niste ponovo
regenerator stavili u odgovarajući držač. To je držač
postavili u odgovarajuće
koji je najbliži gumbu za uključivanje/isključivanje kad
držače. Jedna glava za
je jedinica za brijanje pričvršćena na aparat za
brijanje nema otvor za
brijanje.
regenerator i mora se
staviti u poseban držač.
Regenerator za
Spremnik za
Ponovo napunite spremnik za regenerator
brijanje ne izlazi iz
regenerator gotovo je
(pogledajte poglavlje “Početak korištenja”).
otvora kada
prazan.
pritisnem gumb
za propuštanje
regeneratora.
Trimer je bučniji
Ovo je trimer
Zbog novog otvorenog dizajna trimer se prilikom
od drugih trimera.
otvorenog dizajna.
podrezivanja čuje jasnije od ostalih trimera. To je
normalno i ne znači da s trimerom nešto nije u
redu.
Provjerite je li aparat isključen.
1 Jedinicu za brijanje skinite s aparata (Sl. 31).
2 Štitnik okrenite u smjeru kazaljke na satu i podignite ga iz jedinice za brijanje (Sl. 32).
Napomena: Istovremeno vadite samo jednu glavu za brijanje. Tako ćete glavu za brijanje uvijek vratiti u
odgovarajući držač, što je potrebno jer dvije glave za brijanje imaju posebne otvore za regenerator za
brijanje. Također ćete biti sigurni da se rezači i štitnici glava za brijanje neće izmiješati jer to utječe na
rad aparata.
3 Ako je potrebno, rezač izvadite iz štitnika.
4 Očistite rezač i štitnik priloženom četkicom.
5 Nakon čišćenja rezač vratite u jedinicu za brijanje tako da izbočine na rezaču budu okrenute
prema gore.
6 Štitnik vratite na držač jedinice za brijanje (preko rezača) (Sl. 33).
7 Štitnik okrećite u smjeru suprotnom od kazaljke na satu dok ne sjedne na mjesto (Sl. 34).
8 Jedinicu za brijanje vratite na aparat (“klik”) (Sl. 35).

108
Köszönjük, hogy Philips terméket vásárolt! A Philips által biztosított teljes körű támogatáshoz
regisztrálja termékét a www.philips.com/welcome oldalon.
Kérjük, olvassa el ezt a kézikönyvet, amelyben a borotva fantasztikus funkcióról tájékozódhat, valamint
néhány tippet tudhat meg a borotválkozás könnyebbé és élvezetesebbé tételéről.
Borotva
Védősapka
Vágókészülék
Borotvaegység
Borotválkozási kondicionálót tartalmazó patron
Borotválkozási kondicionálót adagoló gomb
Be-/kikapcsoló gomb
Töltésjelző fények
Töltő
Újratöltő- és töltőegység
Újratöltő- és töltőegység kupakja
Mélyedés a vágókészülék tárolására
Hátlap
Aljzat kis méretű dugaszhoz
„Kondicionálópatron töltése” jelzőfény
Kondicionálót tartalmazó akon jelzőfény
Tisztítókefe
NIVEA FOR MEN borotválkozási kondicionálót tartalmazó akon
Hordtáska
Adapter (előfordulhat, hogy az Ön adaptere eltér az ábrán szereplőtől)
A készülék első használata előtt gyelmesen olvassa el a használati útmutatót és őrizze meg későbbi
használatra.
- Vigyázzon, hogy a hálózati adaptert ne érje víz (előfordulhat, hogy az Ön hálózati adaptere eltér
az ábrán szereplőtől) (ábra 2).
- Óvatosan bánjon a meleg vízzel. Mindig ellenőrizze, hogy a víz ne legyen túl forró, nehogy
leforrázza a kezeit.
- A hálózati adapterben transzformátor van. Ne vágja le az adaptert a vezetékről, és ne kössön
másik dugót a vezetékre, mert ez veszélyes lehet.
- Nem javasoljuk a készülék használatát csökkent zikai, érzékelési, szellemi képességekkel
rendelkezők, tapasztalatlan, nem kellő ismeretekkel rendelkező személyek (beleértve
gyermekeket is) számára, csak a biztonságukért felelős személy felvilágosítása után, felügyelet
mellett.
- Vigyázzon, hogy a gyermekek ne játsszanak a készülékkel.
- Soha ne merítse az újratöltő- és töltőegységet vízbe, és ne öblítse le vízcsap alatt (ábra 3).
- Soha ne merítse a töltőt vízbe és ne öblítse le vízcsap alatt (ábra 4).
- Az újratöltő- és töltőegységet, valamint a töltőt mindig vízálló felületen használja.
- A készülékeket 5 és 35 °C közötti hőmérsékleten használja, töltse és tárolja.
- Utazás közben mindig tegye fel a borotvára a védősapkát, hogy a borotvafejet óvja a sérüléstől.
109
- A borotva és egyéb tartozékok nem tisztíthatók mosogatógépben.
- Soha ne használjon 80 °C-nál melegebb vizet a borotva leöblítéséhez.
- Csak a mellékelt adaptert, töltőt, illetve újratöltő- és töltőegységet használja.
- Ne használja az újratöltő- és töltőegységet, ha a hálózati adapter vagy maga az egység sérült.
- Ne használja a borotvát vagy a töltőt, ha az megsérült.
- Ha az adapter meghibásodott, a kockázatok elkerülése érdekében mindig eredeti típusúra
cseréltesse ki.
- Ez a borotva megfelel a nemzetközileg jóváhagyott biztonsági előírásoknak, és biztonságosan
használható fürdőkádban vagy zuhany alatt, továbbá folyó víz alatt tisztítható (ábra 5).
- Ez a Philips készülék megfelel az elektromágneses mezőkre (EMF) vonatkozó szabványoknak.
Amennyiben a használati útmutatóban foglaltaknak megfelelően üzemeltetik, a tudomány mai
állása szerint a készülék biztonságos.
- Az adapter a 100–240 voltos feszültséget biztonságos, legfeljebb 24 voltos feszültségre alakítja át.
1 Távolítsa el a NIVEA FOR MEN borotválkozási kondicionáló akonjának kupakját (ábra 6).
2 Fordítsa a kondicionáló akonjának kupakját az óramutató járásával megegyező irányba
kattanásig (ábra 7).
, A kupak lefelé mozdul el, és megjelenik a kondicionáló fúvócsöve.
3 Az óramutató járásával ellentétes irányba fordítva távolítsa el az újratöltő- és töltőegység
kupakját.
4 Távolítsa el a csomagolást az újratöltő- és töltőegység akondokkoló nyílásáról.
5 Helyezze a kondicionálót tartalmazó akont a dokkolónyílásba, hogy az adagolócső lefelé
mutasson (ábra 8).
6 Helyezze vissza a kupakot az újratöltő- és töltőegységre (1), majd rögzítse a kupakot az
óramutató járásával megegyező irányba fordítva (2) (ábra 9).
7 Csatlakoztassa a kis méretű csatlakozót az újratöltő- és töltőegység csatlakozóaljzatába, az
adaptert pedig a fali aljzatba (ábra 10).
8 Helyezze a borotvát az újratöltő- és töltőegységbe, majd nyomja hátrafelé
kattanásig (ábra 11).
Megjegyzés: A borotva töltése és borotválkozási kondicionálóval való feltöltése automatikus.
9 Töltse a borotvát 90 percig. (ábra 12)
Megjegyzés: Töltse a borotvát az első használat előtt, valamint akkor, ha a töltést jelző fény azt jelzi, hogy
az akkumulátor lemerült (lásd a „Töltésjelzés” című részt).
Megjegyzés: A teljesen feltöltött borotva akár 40 perc borotválkozást is lehetővé tesz.
1 Dugja a kis méretű dugaszt a töltőbe, és csatlakoztassa az adaptert a fali aljzatba.
2 Helyezze a borotvát a töltőbe (ábra 13).
, Megkezdődik a borotva töltése.
3 Töltse a borotvát 1,5 órán át.

110
Megjegyzés: Töltse a borotvát az első használat előtt, valamint akkor, ha a töltést jelző fény azt jelzi, hogy
az akkumulátor lemerült (lásd a „Töltésjelzés” című részt).
Megjegyzés: A teljesen feltöltött borotva akár 40 perc borotválkozást is lehetővé tesz.
A borotválkozási kondicionálót tartalmazó patron az újratöltő- és töltőegység használata nélkül is
feltölthető:
1 Helyezze a kondicionálót tartalmazó akon fúvócsövét a kondicionálót tartalmazó patron
töltőnyílásába.
2 Mozgassa a akont felfelé és lefelé körülbelül ötször, a borotválkozási kondicionálót a
patronba pumpálva, egészen addig, amíg a patron meg nem telik (ábra 14).
- A töltést jelző fények az akkumulátor töltöttségi szintjét jelzik. Töltés közben az alsó töltésjelző
fény először narancssárgán villog, majd kialszik. A felső töltésjelző ezt követően fehéren villog,
majd folyamatosan kezd világítani.
- Miután a borotva 9 percig töltődött, az alsó töltésjelző fény kialszik, és a felső töltésjelző fehéren
kezd villogni, jelezve, hogy a borotva már rendelkezik egy borotválkozáshoz elegendő
töltöttséggel.
Megjegyzés: A gyorstöltés csak akkor lehetséges, ha egyszer már töltötte 1,5 óráig a borotvát.
- Az akkumulátorban lévő energiát a még világító töltésjelzők száma jelzi. A borotva be- és
kikapcsolásakor néhány másodpercre láthatóvá válik az akkumulátor töltöttségi szintje (ábra 15).
- Ha az akkumulátor lemerülőben van, az alsó töltésjelző borotválkozás közben narancssárgán
világítani kezd, a borotva kikapcsolásakor pedig narancssárgán villog. (ábra 16)
- Ha az akkumulátor teljesen feltöltődött, az összes töltöttségjelző fény folyamatos fehér
fénnyel világít (ábra 15).
- Kb. 1 óra után a fejér töltésjelző fények az energiatakarékosság érdekében kialszanak.
, Ha a kondicionálót tartalmazó akon jelzőfény narancssárgán villog, annak két oka
lehet: (ábra 17)
- Nincs kondicionálót tartalmazó akon az újratöltő- és töltőegységben, vagy a akon nem
megfelelően van behelyezve.
- A kondicionálót tartalmazó akon üres.
, A „Kondicionálópatron töltése” jelzőfény három különböző dolgot jelez: (ábra 18)
- Amikor a kondicionálópatron töltése folyik, a fehér „Kondicionálópatron töltése” jelzőfény villog.
- Amikor a borotválkozási kondicionálót tartalmazó patron megtelt, a fehér „Kondicionálópatron
töltése” jelzőfény folyamatosan világít.
- Ha a kondicionálót tartalmazó akon kifogy a kondicionálópatron töltése közben, a fehér
„Kondicionálópatron töltése” jelzőfény kialszik, és a kondicionálót tartalmazó akon jelzőfény
vörösen villog.

111
Megjegyzés: Előfordulhat, hogy az Ön bőrének akár 2–3 hét is szükséges az új borotválkozási rendszer
megszokásához.
1 Ellenőrizze, hogy van-e elegendő borotválkozási kondicionáló a borotválkozási kondicionálót
tartalmazó patronban.
2 A be-/kikapcsoló gombbal kapcsolja be a borotvát.
3 Ellenőrizze, hogy a borotva kellően fel van-e töltve (lásd az „Előkészítés” című fejezet
„Töltésjelzés” című részét.)
4 Óvatosan, körkörös vonalban mozgassa a borotvaegységet a bőrén, és nyomja a
borotválkozási kondicionálót adagoló gombot, amíg úgy nem érzi, hogy elegendő
borotválkozási kondicionáló van a bőrén. (ábra 19)
- Amikor felengedi a borotválkozási kondicionálót adagoló gombot, a készülék abbahagyja a
kondicionáló adagolását.
- Ha röviden megnyomja a borotválkozási kondicionálót adagoló gombot, a készülék
automatikusan kiad bizonyos mennyiségű kondicionálót.
- Ha a borotválkozás közben több borotválkozási kondicionáló szükséges ahhoz, hogy a
borotvaegység könnyedén mozogjon a bőrén, nyomja meg ismételten a borotválkozási
kondicionálót adagoló gombot.
Megjegyzés: A borotválkozási kondicionálót adagoló gomb csak a borotva bekapcsolt állapotában
működik.
Megjegyzés: Ez a borotva a borotvapengékhez hasonló módon, nedves arcon használható. A
hagyományos elektromos borotváktól eltérően ez a készülék nem rendelkezik a rövid szőrszálakat
összegyűjtő kamrával. Annak érdekében, hogy a rövid szőrszálak ne hulljanak a ruhájára, borotválkozás
közben használjon kellő mennyiségű borotválkozási kondicionálót.
5 A borotvát minden egyes használat után alaposan tisztítsa ki („Tisztítás és karbantartás”).
6 Csúsztassa fel a borotvára a védősapkát, hogy óvja a sérüléstől (ábra 20).
- A borotvát óvatosan, körkörös vonalban mozgassa a bőrén.
- Ne nyomja túl erősen a bőrére a borotvát, mert az bőrirritációt okozhat.
- A borotva megfelelő futásának biztosítása érdekében rendszeresen adagolja a borotválkozási
kondicionálót.
- A borotvát fürdőkádban vagy zuhany alatt is használhatja.
Megjegyzés: Az új, nyitott kialakítás miatt a vágókészülék vágómozgása hangosabb, mint más
vágókészülékek esetében. Ez normális jelenség.
1 Vegye le a borotvaegységet a borotváról (ábra 21).
2 Vegye ki a vágókészüléket a töltőn található vágókészülék-tartóból és helyezze fel a borotvára
kattanásig (ábra 22).
3 A be-/kikapcsoló gombbal kapcsolja be a borotvát.
4 A vágókészülék segítségével borotválhatja oldalszakállát, illetve bajuszát.
5 A vágókészüléket minden egyes használat után alaposan tisztítsa ki („Tisztítás és
karbantartás”).
112
6 Távolítsa el a vágókészüléket, és helyezze vissza a vágókészülék-tartóba.
7 Helyezze vissza a borotvaegységet a borotvára kattanásig (ábra 23).
8 Csúsztassa fel a borotvára a védősapkát, hogy óvja a sérüléstől (ábra 20).
A készülék tisztításához ne használjon dörzsszivacsot, súrolószert vagy maró hatású tisztítószert
(pl. alkoholt, benzint vagy acetont).
A borotvát és a vágókészüléket minden egyes használat után tisztítsa meg.
Óvatosan bánjon a meleg vízzel. Mindig ellenőrizze, hogy a víz ne legyen túl forró, nehogy
leforrázza a kezeit.
Ne szárítsa a borotvaegységet törülközővel vagy papírzsebkendővel, mivel ezek megsérthetik a
körkéseket.
Megjegyzés: A borotva vízálló kialakítású, ezért vízzel tisztítható.
1 A be-/kikapcsoló gombbal kapcsolja be a borotvát.
Megjegyzés: A borotvát bekapcsolt állapotában tisztítsa.
2 Merítse a borotvaegységet és a vágókészüléket forró vízbe legalább 30
másodpercre (ábra 24).
3 Kapcsolja ki a borotvát és rázza le a róla a vizet.
4 Csúsztassa fel a borotvára a védősapkát, hogy óvja a sérüléstől (ábra 20).
Megjegyzés: Ha a borotva nem borotvál olyan tökéletesen, mint korábban, és ez a probléma nem
szüntethető meg az ebben a fejezetben bemutatott tisztítási módszerek segítségével, olvassa el a
„Hibaelhárítás” című fejezetben a különösen alapos tisztítási módszer leírását.
1 Félévente olajozza meg a pajeszvágó fogait egy csepp műszerolajjal.
1 A borotvát az újratöltő- és töltőegységben tárolja.
2 Ha utazásra készül, vagy ha nem kívánja a borotvát az újratöltő- és töltőegységben tárolni,
tegye fel a borotvára a védőkupakot, és tárolja a borotvát a hordtáskában (ábra 20).
Ha hosszabb ideig kívánja tárolni a borotvát, vagy utazásra készül, lezárhatja a borotvát. Az utazózár
megakadályozza a borotva véletlen bekapcsolódását.
1 Kapcsolja ki a borotvát.
2 Nyomja meg és tartsa lenyomva a borotválkozási kondicionálót adagoló gombot (1), másik
kezével pedig nyomja meg a be-/kikapcsolás gombot (2) (ábra 25).
113
3 Mindkét gombot tartsa lenyomva 6 másodpercig. Várjon, amíg a borotva rövid zümmögő
hangot ad és a borotván található felső töltésjelző fény néhányszor felvillan.
, Az utazózár most be van kapcsolva.
Megjegyzés: Ha véletlenül előbb a be-/kikapcsolás gombot nyomja meg, a borotva működni kezd . Ebben
az esetben nyomja meg ismét a be-/kikapcsolás gombot a borotva kikapcsolásához.
Megjegyzés: Ha az utazózár bekapcsolt állapotában megnyomja a be-/kikapcsolás gombot, a középső
töltésjelző fény fehéren villogva jelzi, hogy a borotva lezárt állapotát.
Tipp: A be-/kikapcsolás gomb megnyomásával ellenőrizze, hogy be van-e kapcsolva az utazózár. Ha az
utazózár be van kapcsolva, a borotva nem kapcsolható be.
1 Nyomja meg és tartsa lenyomva a borotválkozási kondicionálót adagoló gombot (1), másik
kezével pedig nyomja meg a be-/kikapcsolás gombot (2) (ábra 25).
2 Mindkét gombot tartsa lenyomva 6 másodpercig. Várjon, amíg a borotva rövid zümmögő
hangot ad és a borotván található felső töltésjelző fény néhányszor felvillan.
, Az utazózár ekkor ki van kapcsolva.
Megjegyzés: Az utazózár úgy is kikapcsolható, hogy a borotvát visszahelyezi a töltőbe.
Ha elutazik, és nem kívánja magával vinni az újratöltő- és töltőegységet, akkor a töltővel szükség
szerint feltöltheti a borotva akkumulátorát.
Higéniai okokból javasoljuk, hogy a borotválkozási kondicionálót tartalmazó patront évente cserélje.
A 3 darabos NIVEA FOR MEN borotválkozási kondicionáló palackhoz jár egy új patron és egy
cserekészlet (amely tartalmaz egy HS85 borotvaegységet és egy új patront is).
1 Vegye ki a borotválkozási kondicionálót tartalmazó patront a borotvából (ábra 26).
2 Helyezze az új kondicionálópatronon található nyelvet a borotva peremén található
nyílásba (1). Majd nyomja meg a patron alsó részét a hüvelykujjával (2), és rögzítse a patront a
borotvához (kattanásig) (ábra 27).
3 Töltse fel a borotválkozási kondicionálót tartalmazó patront (lásd az „Előkészítés” című
fejezetet).
Az optimális borotválás érdekében évente cserélje le a borotvaegységet.
A borotvaegységet kizárólag HS85 Philips borotvaegységre cserélje le.
1 Húzza le a készülékről a régi borotvaegységet (ábra 21).
2 Illessze az új borotvaegységet a borotvára kattanásig (ábra 23).
Kizárólag NIVEA FOR MEN jelölésű borotválkozási kondicionálót tartalmazó akont használjon.
1 Távolítsa el a NIVEA FOR MEN borotválkozási kondicionáló akonjának kupakját (ábra 6).
2 Fordítsa a kondicionáló akonjának kupakját az óramutató járásával megegyező irányba
kattanásig (ábra 7).
, A kupak lefelé mozdul el, és megjelenik a kondicionáló fúvócsöve.

114
3 Az óramutató járásával ellentétes irányba fordítva távolítsa el az újratöltő- és töltőegység
kupakját.
4 Helyezze a kondicionálót tartalmazó akont a akondokkoló nyílásba úgy, hogy a fúvócső
lefelé mutasson (ábra 8).
5 Nyomja vissza a kupakot az újratöltő- és töltőegységre (1), majd az óramutató járásával
megegyező irányba elfordítva rögzítse (2) (ábra 9).
- A feleslegessé vált készülék szelektív hulladékként kezelendő. Kérjük, hivatalos újrahasznosító
gyűjtőhelyen adja le, így hozzájárul környezete védelméhez (ábra 28).
- A beépített akkumulátor környezetszennyező anyagokat tartalmaz. A készülék hivatalos
gyűjtőhelyen történő leadása előtt, vagy leselejtezéskor távolítsa el belőle az akkumulátort. Az
akkumulátort hivatalos akkumulátor-gyűjtőhelyen adja le. Ha az akkumulátor eltávolítása gondot
okozna, elviheti készülékét valamelyik Philips szervizbe is, ahol eltávolítják és környezetkímélő
módon kiselejtezik az akkumulátort.
Kizárólag a borotva leselejtezésekor vegye ki a készülékből az akkumulátort. Előtte győződjön
meg róla, hogy az akkumulátor teljesen lemerült-e.
Legyen óvatos, mert az akkumulátor szélei élesek.
1 Vegye ki a borotválkozási kondicionálót tartalmazó patront a borotvából (ábra 26).
2 Csavarja ki a borotva hátulján található három csavart (ábra 29).
3 Csavarhúzó segítségével távolítsa el a készülék hátlapját (ábra 30).
4 Vágja le a vezetékeket és távolítsa el az akkumulátort.
Ha javításra vagy információra van szüksége, vagy ha valamilyen probléma merült fel, látogasson el a
Philips weboldalára www.philips.com/support, vagy forduljon az adott ország Philips
vevőszolgálatához (a telefonszámot megtalálja a világszerte érvényes garancialevélen). Ha országában
nem működik ilyen vevőszolgálat, forduljon a Philips helyi szaküzletéhez.
A nemzetközi garanciafeltételek nem vonatkoznak a fogyóeszköznek számító borotvaegységre
(körkések és sziták).
A kondicionálópatron fogyóeszköznek számít, így a nemzetközi garancia feltételei nem vonatkoznak
rá.

115
Ez a fejezet összefoglalja a készülékkel kapcsolatban leggyakrabban felmerülő problémákat. Ha nem
sikerül megoldania a problémát az alábbi információk alapján, forduljon a helyi Philips
vevőszolgálathoz.
Probléma Lehetséges ok Megoldás
A borotva nem
Előfordulhat, hogy nem
Nyomja meg a borotválkozási kondicionálót
siklik noman a
vitt fel elég
adagoló gombot, amíg a készülék nem visz fel kellő
bőrömön.
borotválkozási
mennyiségű NIVEA FOR MEN borotválkozási
kondicionálót.
kondicionálót a bőrére. Ezáltal a borotvaegység
ismét simán fut majd a bőrén.
Miért nem a
Valószínűleg nem
Tisztítsa ki a borotvát (lásd a „Tisztítás és
megszokott
megfelelően tisztította
karbantartás” c. részt).
módon működik
meg a borotvát.
a borotva?
A hosszú szőrszálak
Tisztítsa meg a borotvafejeket az alábbiakban leírt
eltömítik a
különösen alapos tisztítási módszer segítségével.
borotvafejeket.
A borotvaegység
Cserélje ki a borotvaegységet (tekintse meg a
megsérült vagy
„Csere” című fejezetet).
elhasználódott.
Miért nem
Lemerült az
Töltse fel az akkumulátort. (tekintse meg az
működik a
akkumulátor.
„Előkészítés” című fejezetet).
borotva, ha
megnyomom a
be-/kikapcsoló
gombot?
Az utazózár be van
Nyissa ki az utazózárat (tekintse meg a „Tárolás”
kapcsolva.
című fejezetet).
Előfordulhat, hogy a
Mielőtt folytatná a borotválkozást, tisztítsa meg
beszáradt
alaposan a borotvát (lásd a „Tisztítás” című részt).
borotválkozási
kondicionáló
akadályozza a
borotvaegység
borotvafejeinek
mozgását.
Előfordulhat, hogy a
A borotvaegység összeszerelésekor minden egyes
különösen alapos
szitát fordítson el az óramutató járásával ellenkező
tisztítást követően nem
irányba, amíg nem rögzülnek a helyükön.
megfelelően szerelte
össze a
borotvaegységet.

116
Probléma Lehetséges ok Megoldás
Úgy tűnik, elég
Előfordulhat, hogy a
Öblítse le vagy áztassa be a borotvaegységet. Ha ez
kondicionáló van
kondicionáló
nem segít, pumpáljon borotválkozási kondicionálót
a patronban,
kijuttatására szolgáló
a borotválkozási kondicionálót tartalmazó patronba,
azonban mégis
valamelyik nyílás
amíg a kondicionáló az elzáródott nyíláson át is
kevés
eltömődött.
folyni nem kezd. Ha ez sem segít, próbálja ki az
borotválkozási
alábbi módszert: 1) Kapcsolja ki a borotvát. 2)
kondicionáló jön
Húzza le a borotváról a borotvaegységet. 3)
ki a nyílásokon.
Helyezze az ujját arra a nyílásra, amelyik nincs
eltömődve. 4) Kapcsolja be a borotvát. 5) Nyomja
a borotválkozási kondicionálót adagoló gombot
több másodpercig, amíg a kondicionáló ismét
távozik az elzáródott nyíláson is.
Előfordulhat, hogy a
Ellenőrizze, hogy a kondicionáló adagolására
borotvafejeket nem az
szolgáló nyílással nem rendelkező borotvafejet a
eredeti tartójukba
megfelelő tartóba helyezte-e. Ez az a tartó, amely a
helyezte vissza. A
legközelebb van a ki-/bekapcsolás gombhoz, amikor
borotvafejek egyikének
a borotvaegység fel van szerelve a borotvára.
közepén nincsen nyílás
a borotválkozási
kondicionáló
adagolásához, és az ilyen
borotvafejet speciális
tartóba kell helyezni.
A borotválkozási
A borotva patronja
Töltse fel a borotválkozási kondicionálót tartalmazó
kondicionáló
valószínűleg üres.
patront (tekintse meg az „Előkészítés a használatra”
gombjának
című fejezetet).
megnyomását
követően nem
jön ki a
kondicionáló a
lyukakon.
A vágóegység
A vágóegység nyitott
Az új, nyitott kialakítás miatt a vágókészülék
zajosabb a
kialakítású.
vágómozgása hangosabb, mint más vágókészülékek
többinél.
esetében. Ez normális jelenség, és jelenti azt, hogy
probléma lenne a vágókészülékkel.
Kapcsolja ki a készüléket.
1 Vegye le a borotvaegységet a borotváról (ábra 31).
2 Fordítsa el a fésűt az óramutató járásával megegyező irányba, majd emelje le a
borotvaegységről (ábra 32).
Megjegyzés: Egyszerre csak egy borotvafejet távolítson el. Ezzel biztosíthatja, hogy a borotvafej mindig az
eredeti tartójára kerüljön vissza, amely azért fontos, mert két borotvafej speciális, a kondicionáló
adagolására szolgáló lyukkal rendelkezik. Ezen kívül azt is biztosítja, hogy ne cserélje fel a különböző
borotvafejek körkéseit és fésűit, ami hatással lenne a borotválási teljesítményre.
3 Szükség esetén távolítsa el a körkést a fésűről.

117
4 Tisztítsa meg a körkést és a szitát a készülékhez mellékelt kefével.
5 A tisztítást követően helyezze vissza a körkést a borotvaegységbe, a körkés lábaival felfelé.
6 Helyezze a fésűt a borotvafej-tartóra (a körkés fölé) (ábra 33).
7 Fordítsa el a fésűt az óramutató járásával ellentétes irányba, amíg nem rögzül a
helyén (ábra 34).
8 Helyezze vissza a borotvaegységet a borotvára kattanásig (ábra 35).

118
Selamat atas pembelian Anda dan selamat datang di Philips! Untuk memanfaatkan sepenuhnya
dukungan yang ditawarkan Philips, daftarkan produk Anda di www.philips.com/welcome.
Baca petunjuk pengguna ini yang berisi informasi mengenai berbagai tur menarik serta sejumlah
saran agar lebih mudah dan menyenangkan dalam menggunakan alat cukur ini.
Alat cukur
Tutup pelindung
Pemangkas
Unit cukur
Kartrid conditioner cukur
Tombol conditioner cukur
Tombol on/off
Lampu pengisian daya
Pengisi daya
Stasiun pengisian daya & isi ulang
Tutup stasiun pengisian daya & isi ulang
Reses penyimpanan pemangkas
Panel belakang
Soket untuk steker kecil
Lampu ‘Mengisi kartrid conditioner’
Lampu botol conditioner
Sikat pembersih
Botol conditioner cukur NIVEA FOR MEN
Kantung
Adaptor (adaptor Anda mungkin berbeda dengan yang ditampilkan dalam gambar)
Bacalah petunjuk pengguna ini secara saksama sebelum Anda menggunakan alat dan simpan untuk
referensi di kemudian hari.
- Pastikan jangan sampai adaptor basah (adaptor Anda mungkin berbeda dengan yang ada dalam
gambar) (Gbr. 2).
- Hati-hati dengan air panas. Selalu periksa apakah air tidak terlalu panas agar tangan Anda tidak
terbakar.
- Adaptor berisi trafo. Jangan memotong adaptor dan menggantinya dengan steker lain,
karena dapat membahayakan.
- Alat ini tidak dimaksudkan untuk digunakan oleh orang (termasuk anak-anak) dengan cacat sik,
indera atau kecakapan mental yang kurang, atau kurang pengalaman dan pengetahuan, kecuali
jika mereka diberikan pengawasan atau petunjuk mengenai penggunaan alat oleh orang yang
bertanggung jawab bagi keselamatan mereka.
- Anak kecil harus diawasi untuk memastikan mereka tidak bermain-main dengan alat ini.
- Jangan merendam stasiun isi ulang atau pengisinya di dalam air ataupun membilasnya di bawah
keran (Gbr. 3).
- Jangan merendam pengisi daya dalam air, ataupun membilasnya di bawah keran (Gbr. 4).
- Pasanglah dan gunakan selalu stasiun isi ulang & pengisian pada permukaan tahan terhadap
cairan.

119
- Gunakan, isi baterai dan simpan alat pada suhu antara 5°C dan 35°C.
- Selalu kenakan tutup pelindung pada alat cukur untuk melindungi kepala cukur sewaktu Anda
bepergian.
- Alat cukur dan aksesori lain tidak tahan terhadap mesin pencuci piring.
- Jangan menggunakan air yang lebih panas dari 80 °C untuk membilas alat cukur.
- Hanya gunakan adaptor, pengisi daya dan stasiun isi ulang & pengisian yang disediakan.
- Jangan gunakan stasiun isi ulang & pengisian jika adaptor atau stasiunnya sendiri sudah rusak.
- Jangan gunakan pencukur atau pengisi daya jika sudah rusak.
- Jika adaptor rusak, gantilah selalu dengan salah satu tipe yang asli agar terhindar dari bahaya.
- Pencukur ini mematuhi peraturan keselamatan yang disetujui secara internasional dan bisa
digunakan dengan aman saat mandi atau bersiram dan dibersihkan di bawah keran (Gbr. 5).
- Alat Philips ini mematuhi semua standar yang berkenaan dengan medan elektromagnet (EMF).
Jika ditangani dengan benar dan sesuai dengan instruksi petunjuk pengguna ini, alat tersebut
aman digunakan berdasarkan pada bukti ilmiah yang kini tersedia.
- Adaptor mengubah tegangan 100-240 volt menjadi tegangan rendah yang aman di bawah 24
volt.
1 Lepas tab pada botol conditioner cukur NIVEA FOR MEN (Gbr. 6).
2 Putar tutup botol conditioner searah jarum jam (‘klik’) (Gbr. 7).
, Tutup akan turun ke bawah dan muncul nozel conditioner.
3 Putar tutup stasiun pengisian daya & isi ulang berlawanan arah jarum jam untuk melepasnya.
4 Lepas kemasannya dari lubang dok botol dalam stasiun pengisian daya & isi ulang.
5 Pasang botol conditioner di lubang dok dengan nozel mengarah ke bawah (Gbr. 8).
6 Pasang kembali tutup pada stasiun pengisian daya & isi ulang (1) kemudian putar tutupnya
searah jarum jam untuk menguncinya (2) (Gbr. 9).
7 Masukkan steker kecil ke soket pada stasiun pengisian daya & isi ulang kemudian pasang
adaptor di stopkontak (Gbr. 10).
8 Pasang pencukur di stasiun pengisian daya & isi ulang dan tekan ke belakang (‘klik’) (Gbr. 11).
Catatan: Daya pencukur dan conditioner cukur diisi secara otomatis.
9 Isi baterai pencukur selama 90 menit. (Gbr. 12)
Catatan: Isilah baterai pencukur sebelum menggunakannya untuk pertama kali atau bila lampu
pengisian baterai menunjukkan baterainya habis (lihat bagian ‘Indikator pengisian’).
Catatan: Pencukur yang terisi penuh dapat digunakan selama 40 menit.
1 Pasang steker kecil di pengisi daya dan masukkan adaptor ke stopkontak di dinding.
2 Masukkan pencukur di pengisi daya (Gbr. 13).
, Pencukur sedang diisi.
3 Isi daya alat cukur selama 1,5 jam.
Catatan: Isilah baterai pencukur sebelum menggunakannya untuk pertama kali atau bila lampu
pengisian baterai menunjukkan baterainya habis (lihat bagian ‘Indikator pengisian’).

120
Catatan: Pencukur yang terisi penuh dapat digunakan selama 40 menit.
Anda juga bisa mengisi ulang kartrid conditioner cukur tanpa menggunakan stasiun pengisian daya &
isi ulang:
1 Pasang nozel botol conditioner dalam lubang pengisian pada kartrid conditioner.
2 Gerakkan botol ke atas dan ke bawah kurang lebih 5 kali untuk memompa conditioner cukur
ke kartrid hingga Anda melihat kartridnya penuh (Gbr. 14).
- Lampu pengisian menunjukkan hingga level berapa baterai sudah diisi. Selama pengisian, lampu
pengisian bawah akan berkedip jingga dulu kemudian mati. Lampu pengisian atas lalu
mulai berkedip putih dan akhirnya menyala putih seterusnya.
- Setelah pencukur diisi selama 9 menit, lampu pengisian bawah terus padam dan lampu pengisian
atas mulai berkedip putih, menunjukkan bahwa daya pencukur cukup untuk sekali bercukur.
Catatan: Pengisian cepat hanya dapat dilakukan bila Anda telah mengisi pencukur selama 1,5 jam
dalam sekali isi.
- Jumlah energi yang tersisa dalam baterai ditunjukkan oleh jumlah lampu yang menyala. Kapasitas
baterai yang tersisa terlihat selama beberapa detik ketika Anda mematikan atau menghidupkan
pencukur (Gbr. 15).
- Bila baterai tinggal sedikit, lampu bawah akan terus menyala jingga selama mencukur dan
berkedip jingga bila Anda mematikan pencukur. (Gbr. 16)
- Apabila baterai terisi penuh, semua lampu pengisian menyala terus menerus (Gbr. 15).
- Setelah kurang lebih 1 jam, lampu pengisian putih akan mati untuk menghemat energi.
, Bila lampu botol conditioner menyala jingga, maka ada dua kemungkinan: (Gbr. 17)
- Tidak ada botol conditioner di stasiun pengisian daya & isi ulang atau botol tersebut tidak
dipasang dengan benar.
- Botol conditioner kosong.
, Lampu ‘Mengisi kartrid conditioner’ menandakan tiga macam hal: (Gbr. 18)
- Bila kartrid conditioner sedang diisi, lampu putih ‘Mengisi kartrid conditioner’ akan berkedip.
- Bila kartrid conditioner cukur sudah penuh, lampu putih ‘Mengisi kartrid conditioner’ akan
terus menyala.
- Jika botol conditioner mulai kosong sementara kartrid conditioner sedang diisi, lampu putih
‘Mengisi kartrid conditioner’ segera padam dan lampu botol conditioner berkedip merah.
Catatan: Kulit Anda mungkin butuh 2 s/d 3 minggu untuk terbiasa dengan sistem cukur baru ini.
121
1 Pastikan tersedia conditioner cukur dalam jumlah memadai dalam kartrid conditioner cukur.
2 Tekan tombol on/off untuk menghidupkan pencukur.
3 Pastikan pencukur telah diisi dayanya dengan cukup (lihat bab ‘Persiapan pemakaian’, bagian
‘Indikator pengisian’).
4 Gerakkan unit cukur dengan lembut dalam gerak melingkar pada kulit Anda dan tekan tombol
conditioner cukur hingga conditionernya keluar dengan cukup pada kulit Anda demi
kenyamanan bercukur. (Gbr. 19)
- Bila Anda melepas tombol conditioner cukur, alat akan berhenti mengeluarkan conditioner.
- Jika Anda menekan cepat tombol conditioner cukur, alat secara otomatis akan mengeluarkan
conditioner dalam jumlah tertentu.
- Tekan lagi tombol conditioner cukur untuk mengenakan conditioner lebih banyak selama
bercukur agar unit cukur tetap meluncur mulus di atas kulit Anda.
Catatan: Tombol conditioner cukur hanya bekerja bila pencukurnya dihidupkan.
Catatan: Pencukur ini bisa digunakan dengan cara yang mirip dengan silet: Anda bisa menggunakan
pencukur pada muka yang basah. Tidak seperti halnya cukur listrik biasa, alat ini tidak memiliki
penampung yang mengumpulkan potongan bulu. Agar potongan bulu tidak jatuh pada pakaian, kenakan
conditioner secukupnya saat bercukur.
5 Selalu bersihkan pencukur dengan saksama setelah selesai digunakan (lihat bagian
‘Pembersihan dan perawatan’).
6 Geser tutup pelindung pada pencukur untuk mencegah kerusakan (Gbr. 20).
- Gerakkan dengan perlahan pencukur dalam gerak melingkar di atas kulit Anda.
- Jangan terlalu keras menekan pencukur, karena dapat menyebabkan iritasi kulit.
- Untuk meluncur dengan mulus, kenakan conditioner cukur secara teratur.
- Anda juga bisa menggunakan pencukur di saat mandi atau bersiram.
Catatan: Karena desain baru yang terbuka, Anda akan mendengar bunyi pemangkas yang sedang
digunakan dengan lebih jelas daripada pemangkas lain. Ini adalah normal.
1 Lepaskan unit pencukur dari alat cukur (Gbr. 21).
2 Lepas pemangkas dari penahannya pada pengisi daya dan pasang pada pencukur (berbunyi
‘klik’) (Gbr. 22).
3 Tekan tombol on/off untuk menghidupkan pencukur.
4 Anda dapat menggunakan pemangkas untuk merapikan janggut dan/atau kumis.
5 Bersihkan pemangkas dengan saksama setelah selesai digunakan (lihat bagian ‘Pembersihan
dan perawatan’).
6 Lepaskan pemangkas dan pasang kembali pada penyimpanan pemangkas.
7 Pasang kembali unit cukur pada pencukur (‘klik’) (Gbr. 23).
8 Geser tutup pelindung pada pencukur untuk mencegah kerusakan (Gbr. 20).
Jangan sekali-kali menggunakan sabut gosok, bahan pembersih abrasif atau cairan agresif seperti
alkohol, bensin atau aseton untuk membersihkan alat.
122
Bersihkan pencukur dan pemangkas setiap selesai menggunakan.
Hati-hati dengan air panas. Selalu periksa apakah air tidak terlalu panas agar tangan Anda tidak
terbakar.
Jangan sekali-kali mengeringkan unit pencukur dengan handuk atau kertas tisu, karena dapat
merusak kepala pencukur.
Catatan: Alat ini kedap air dan dapat dibersihkan dengan air.
1 Tekan tombol on/off untuk menghidupkan pencukur.
Catatan: Bersihkan pencukur saat sedang dihidupkan.
2 Rendam unit cukur/pemangkas dalam air panas sekurangnya selama 30 detik (Gbr. 24).
3 Matikan pencukur dan kibaskan sisa air.
4 Geser tutup pelindung pada pencukur untuk mencegah kerusakan (Gbr. 20).
Catatan: Jika pencukur tidak berfungsi seperti biasa dan Anda tidak bisa mengatasinya dengan metode
pembersihan yang dijelaskan dalam bab ini, lihat bab ‘Pemecahan Masalah’ untuk metode pembersihan
yang ekstra seksama.
1 Lumasi gigi pemangkas dengan satu tetes minyak mesin jahit setiap enam bulan.
1 Simpan pencukur di stasiun pengisian daya & isi ulang.
2 Jika Anda ingin bepergian atau jika ingin menyimpan pencukur di stasiun pengisian daya & isi
ulang, pasang tutup pelindung pencukur dan simpan pencukur dalam kantungnya (Gbr. 20).
Jika Anda akan menyimpan alat cukur untuk waktu yang agak lama atau jika sedang bepergian, Anda
dapat mengunci alat cukur. Travel lock mencegah pengaktifan alat cukur yang tidak disengaja.
1 Pastikan pencukur telah dimatikan.
2 Tekan dan tahan tombol conditioner cukur (1) tekan tombol on/off secara bersamaan dengan
tangan Anda yang satunya (2) (Gbr. 25).
3 Tahan kedua tombol selama 6 detik. Tunggu hingga pencukur mengeluarkan dengungan singkat
dan lampu pengisian tengah pada pencukur berkedip beberapa kali.
, Travel lock sekarang diaktifkan.
Catatan: Jika Anda tidak sengaja menekan tombol on/off dulu, pencukur akan mulai bekerja. Jika ini
terjadi, tekan lagi tombol on/off untuk mematikannya.
Catatan: Jika Anda menekan tombol on/off ketika travel lock diaktifkan, lampu pengisian tengah berkedip
putih untuk menandakan pencukur telah dikunci.
Tip: Tekan tombol on/off untuk memeriksa apakah travel lock diaktifkan. Jika travel lock diaktifkan,
pencukur tidak akan hidup.
123
1 Tekan dan tahan tombol conditioner cukur (1) tekan tombol on/off secara bersamaan dengan
tangan Anda yang satunya (2) (Gbr. 25).
2 Tahan kedua tombol selama 6 detik. Tunggu hingga pencukur mengeluarkan dengungan singkat
dan lampu pengisian atas pada pencukur berkedip beberapa kali.
, Travel lock sekarang dinonaktifkan.
Catatan: Anda juga bisa menonaktifkan travel lock dengan memasang kembali pencukur pada pengisian
daya.
Jika Anda akan bepergian dan tidak ingin membawa stasiun pengisian daya & isi ulang, Anda bisa
membawa pengisi dayanya, untuk mengisi baterai pencukur bila diperlukan.
Untuk alasan kebersihan, kami menyarankan agar Anda mengganti kartrid conditioner cukur sekali
setahun. Kartrid baru disertakan bersama botol kondisioner cukur NIVEA FOR MEN 3 pak, dan
bersama kit pengganti (yang berisi unit pencukur HS85 baru dan satu kartrid baru).
1 Lepaskan kartrid conditionernya dari pencukur (Gbr. 26).
2 Masukkan tarikannya di bagian atas kartrid conditioner cukur yang baru ke slot di tepi
pencukur (1). Kemudian tekan bagian bawah kartrid dengan jempol (2) untuk memasang
kartrid ke pencukur (‘klik’) (Gbr. 27).
3 Isilah kartrid conditioner cukur (lihat bab ‘Memulai’).
Gantilah unit cukur setiap tahun agar hasil cukur optimal.
Gantilah unit cukur hanya dengan HS85 Philips Shaving Unit.
1 Lepaskan unit cukur lama dari pencukur (Gbr. 21).
2 Pasang unit cukur baru pada pencukur (berbunyi ‘klik’) (Gbr. 23).
Hanya gunakan botol conditioner cukur NIVEA FOR MEN.
1 Lepas tab pada botol conditioner cukur NIVEA FOR MEN (Gbr. 6).
2 Putar tutup botol conditioner searah jarum jam (‘klik’) (Gbr. 7).
, Tutup akan turun ke bawah dan muncul nozel conditioner.
3 Putar tutup stasiun pengisian daya & isi ulang berlawanan arah jarum jam untuk melepasnya.
4 Pasang botol conditioner di lubang dok botol dengan nozel mengarah ke bawah (Gbr. 8).
5 Tekan tutupnya ke belakang stasiun pengisian daya & isi ulang (1) dan putar searah jarum jam
(2) supaya erat (Gbr. 9).
- Jangan membuang alat bersama limbah rumah tangga biasa jika alat sudah tidak dapat dipakai lagi,
tetapi serahkan ke tempat pengumpulan barang bekas yang resmi untuk didaur ulang. Dengan
melakukan hal ini, Anda ikut membantu melestarikan lingkungan (Gbr. 28).
124
- Baterai isi-ulang yang terpasang mengandung bahan yang dapat mencemari lingkungan. Selalu
keluarkan baterai sebelum membuang alat atau membawanya ke tempat pengumpulan resmi.
Buang baterai bekas di tempat pengumpulan resmi untuk baterai. Jika Anda sulit mengeluarkan
baterai, Anda pun dapat membawa alat tersebut ke pusat servis Philips yang akan membantu
mengeluarkan baterai dan membuangnya dengan cara yang aman bagi lingkungan.
Hanya keluarkan baterai isi ulang apabila Anda akan membuang pencukur. Pastikan baterai
benar-benar habis sewaktu Anda mengeluarkannya.
Berhati-hatilah, strip baterai tajam.
1 Lepaskan kartrid conditionernya dari pencukur (Gbr. 26).
2 Lepaslah ketiga sekrup di belakang pencukur (Gbr. 29).
3 Lepas panel belakang pada rangkanya dengan obeng (Gbr. 30).
4 Potong kabel dan lepaskan baterai isi ulang.
Jika Anda membutuhkan servis atau informasi atau mengalami masalah, harap kunjungi situs web
Philips di www.philips.com/support atau hubungi Pusat Layanan Pelanggan Philips di negara Anda
(Anda dapat menemukan nomor teleponnya dalam leaet garansi internasional). Jika tidak ada Pusat
Layanan Pelanggan di negara Anda, kunjungi dealer Philips setempat.
Unit cukur (pemotong dan pelindung) tidak tercakup oleh ketentuan garansi internasional karena
mudah aus.
Kartrid conditioner adalah barang sekali pakai dan tidak termasuk dalam ketentuan garansi
internasional.
Bab ini merangkum masalah-masalah paling umum yang mungkin Anda temui pada alat. Jika Anda
tidak mampu mengatasi masalah dengan informasi di bawah, hubungi Pusat Layanan Konsumen di
negara Anda.
Masalah Kemungkinan penyebab Solusi
Pencukur tidak
Anda belum mengenakan
Tekan tombol conditioner cukur hingga
meluncur mulus
kondisioner cukur.
conditioner cukur NIVEA FOR MEN keluar
pada kulit saya.
secukupnya. Ini akan membuat unit cukur
meluncur mulus kembali di atas kulit Anda.
Mengapa alat
Anda tidak
Bersihkan alat cukur dengan seksama (Lihat bab
cukur tidak
membersihkan pencukur
‘Pembersihan dan pemeliharaan’.
mencukur sebaik
dengan baik.
biasanya?
Rambut yang panjang
Bersihkan kepala cukur dengan mengikuti langkah-
menghalangi kepala cukur.
langkah metode pembersihan dengan seksama
yang dijelaskan berikut.
Unit cukur rusak atau aus. Ganti unit cukur (lihat bab ‘Penggantian’).

125
Masalah Kemungkinan penyebab Solusi
Alat cukur tidak
Baterai isi ulangnya habis. Isi ulang baterai (lihat bab ‘Persiapan penggunaan’).
mau hidup
sewaktu saya
menekan tombol
on/off.
Travel lock diaktifkan. Nonaktifkan travel lock (lihat bab ‘Penyimpanan’).
Conditioner cukur yang
Bersihkan pencukur secara seksama sebelum
mengering menghalangi
Anda meneruskan pencukuran (lihat bab
kepala cukur di dalam
‘Membersihkan’).
unit cukur.
Anda belum memasang
Ketika memasang kembali unit cukur, pastikan
kembali unit cukur
Anda memutar tiap pelindung berlawanan jarum
dengan benar setelah
jam hingga terkunci di posisinya.
membersihkan dengan
seksama.
Conditioner
Salah satu lubang
Bilas dan siram unit cukur tersebut. Jika tidak
cukur hanya
conditioner tersumbat.
berhasil, pompa conditioner ke kartrid conditioner
keluar sedikit dari
cukur hingga conditioner mulai keluar dari lubang
lubang sekalipun
yang tersumbat. Jika ini juga tidak berhasil, coba
conditioner masih
ikuti metode berikut: 1) Matikan pencukur 2)
cukup banyak
Lepas unit cukur dari pencukur 3) Letakkan jari
dalam kartrid.
Anda pada lubang yang tidak tersumbat 4)
Hidupkan pencukur 5) Tekan tombol conditioner
cukur beberapa detik hingga conditioner mulai
keluar lagi dari lubang yang tersumbat.
Anda belum memasang
Pastikan Anda telah memasang kepala cukur tanpa
kepala cukur kembali ke
lubang conditioner pada penahan yang tepat. Ini
penahannya semula. Salah
adalah penahan yang terdekat dengan tombol on/
satu kepala cukur tidak
off saat unit cukur dipasang pada pencukur.
mempunyai lubang
conditioner cukur di
bagian tengah dan harus
dipasangkan pada
penahan khusus.
Conditioner
Kartrid cukur hampir
Isi ulang kartrid kondisioner cukur (lihat bab
cukur tidak keluar
kosong.
‘Persiapan penggunaan’).
dari lubangnya
saat saya
menekan tombol
conditioner cukur.
Pemangkas
Pemangkas ini berdesain
Dikarenakan desain baru yang terbuka, Anda akan
bersuara lebih
terbuka.
mendengar pemangkas yang sedang bekerja lebih
keras
jelas daripada pemangkas lain. Ini adalah normal
dibandingkan
dan tidak berarti ada sesuatu yang salah pada
pemangkas lain.
pemangkas.

126
Pastikan alat telah dimatikan.
1 Lepaskan unit pencukur dari alat cukur (Gbr. 31).
2 Putar pelindungnya searah jarum jam dan angkat dari unit cukur (Gbr. 32).
Catatan: Lepas satu kepala cukurnya satu per satu. Ini untuk memastikan Anda selalu mengembalikan
kepala cukur ke penahannya semula, yang mana diperlakukan karena dua dari kepala cukur memiliki
lubang khusus untuk conditioner cukur. Ini juga memastikan bahwa Anda tidak mencampur pemotong
dan pelindungnya dari kepala cukur yang berbeda, karena akan mempengaruhi kinerja pencukuran.
3 Jika perlu, lepas pemotongnya dari pelindungnya.
4 Bersihkan pemotong dan pelindungnya dengan sikat yang disertakan.
5 Setelah membersihkan, pasang pemotongnya kembali ke unit cukur dengan kaki pemotong
mengarah ke atas.
6 Pasang kembali pelindungnya pada penahan kepala cukur (di atas pemotongnya) (Gbr. 33).
7 Putar pelindungnya berlawanan arah jarum jam hingga terkunci ke posisinya (Gbr. 34).
8 Pasang kembali unit cukur pada pencukur (‘klik’) (Gbr. 35).

127
Congratulazioni per l’acquisto e benvenuti in Philips! Per trarre il massimo vantaggio dall’assistenza
Philips, registrate il vostro prodotto su www.philips.com/welcome.
Il presente manuale per l’utente contiene informazioni sulle straordinarie funzioni di questo rasoio e
utili suggerimenti per rendere la rasatura più semplice e confortevole.
Rasoio
Cappuccio di protezione
Rinitore
Unità di rasatura
Cartuccia per la lozione di rasatura
Pulsante per l’erogazione della lozione
Pulsante on/off
Spie di ricarica
Caricabatterie
Supporto di riempimento e ricarica
Cappuccio del supporto di riempimento e ricarica
Rientranza rinitore
Pannello posteriore
Presa spinotto
Spia di riempimento del serbatoio della crema
Spia bottiglietta crema
Spazzolina per la pulizia
Bottiglietta crema NIVEA FOR MEN
Custodia morbida
Adattatore (l’adattatore potrebbe essere diverso da quello illustrato nella gura)
Prima di utilizzare l’apparecchio, leggete attentamente il presente manuale e conservatelo per
eventuali riferimenti futuri.
- Assicuratevi che l’adattatore non si bagni (l’adattatore potrebbe essere diverso da quello
illustrato nella gura) (g. 2).
- Prestate particolare attenzione quando utilizzate l’acqua calda: vericate sempre che non sia
troppo calda per evitare di scottarvi.
- L’adattatore contiene un trasformatore. Non tagliate l’adattatore per sostituirlo con un’altra
spina onde evitare situazioni pericolose.
- L’apparecchio non è destinato a persone (inclusi bambini) con capacità mentali, siche o
sensoriali ridotte, fatti salvi i casi in cui tali persone abbiano ricevuto assistenza o formazione per
l’uso dell’apparecchio da una persona responsabile della loro sicurezza.
- Adottate le dovute precauzioni per evitare che i bambini giochino con l’apparecchio.
- Non immergete mai il supporto di riempimento e ricarica nell’acqua né sciacquarlo sotto
l’acqua corrente (g. 3).
- Non immergete mai il caricabatterie nell’acqua e non risciacquatelo sotto l’acqua
corrente (g. 4).
- Posizionate e usate il supporto di riempimento e il caricabatterie su una supercie resistente ai
liquidi.

128
- Utilizzate, ricaricate e riponete l’apparecchio a una temperatura compresa tra 5 °C e 35 °C.
- Riponete sempre il cappuccio di protezione sul rasoio per proteggere le testine di rasatura
durante gli spostamenti.
- Il rasoio e gli altri accessori non possono essere lavati in lavastoviglie.
- Non utilizzate acqua ad una temperatura superiore a 80°C per sciacquare il rasoio.
- Usate esclusivamente l’adattatore, il caricabatterie e il supporto di riempimento e ricarica forniti
con l’apparecchio.
- Non utilizzate il supporto di riempimento e ricarica se l’adattatore o il supporto stesso sono
danneggiati.
- Non utilizzate il rasoio o il caricabatterie se sono danneggiati.
- Nel caso in cui l’adattatore fosse danneggiato, dovrà essere sostituito esclusivamente con un
adattatore originale al ne di evitare situazioni pericolose.
- L’apparecchio è conforme alle norme di sicurezza approvate a livello internazionale e può essere
utilizzato tranquillamente nel bagno o sotto la doccia (g. 5).
- Questo apparecchio Philips è conforme a tutti gli standard relativi ai campi elettromagnetici
(EMF). Se utilizzato in modo appropriato seguendo le istruzioni contenute nel presente manuale
utente, l’apparecchio consente un utilizzo sicuro come confermato dai risultati scientici
attualmente disponibili.
- L’adattatore trasforma la tensione a 100-240 volt in una tensione più bassa e sicura inferiore ai
24 volt.
1 Rimuovete la linguetta dalla bottiglietta di crema NIVEA FOR MEN (g. 6).
2 Ruotate in senso orario il tappo della bottiglietta facendola scattare in posizione (g. 7).
, Il tappo si apre verso il basso scoprendo l’ugello dell’erogatore
3 Ruotate il cappuccio del supporto di riempimento e ricarica in senso antiorario e
rimuovetelo.
4 Rimuovete la confezione dal foro di aggancio della bottiglietta nel supporto di riempimento e
ricarica.
5 Posizionate la bottiglietta della crema nel foro di aggancio con l’ugello rivolto verso il
basso (g. 8).
6 Riposizionate il cappuccio sul supporto di riempimento e ricarica (1) e ruotatelo in senso
orario per ssarlo (2) (g. 9).
7 Inserite lo spinotto nella presa del supporto di riempimento e ricarica e collegate l’adattatore
alla presa a muro (g. 10).
8 Posizionate il rasoio nel supporto di riempimento e ricarica spingendolo indietro (g. 11).
Nota Il rasoio viene automaticamente caricato e riempito con la crema.
9 Il tempo di carica del rasoio è di 90 minuti. (g. 12)
Nota Il caricabatterie deve essere caricato prima di utilizzare l’apparecchio per la prima volta e quando
la spia di ricarica indica che la batteria è scarica (vedere la sezione “Istruzioni di ricarica”).
Nota Un rasoio completamente carico ha un’autonomia di rasatura di circa 40 minuti.
1 Inserite lo spinotto nel caricabatterie e collegate l’adattatore a una presa di corrente.
129
2 Posizionate il rasoio nel caricabatterie (g. 13).
, Il rasoio viene ricaricato.
3 Il tempo di ricarica del rasoio è di 1,5 ore.
Nota Il caricabatterie deve essere caricato prima di utilizzare l’apparecchio per la prima volta e quando
la spia di ricarica indica che la batteria è scarica (vedere la sezione “Istruzioni di ricarica”).
Nota Un rasoio completamente carico ha un’autonomia di rasatura di circa 40 minuti.
Il serbatoio della crema di rasatura può essere riempito anche senza utilizzare il supporto di
riempimento e ricarica:
1 Posizionate l’ugello della bottiglietta della crema nell’apertura di riempimento della cartuccia
della crema.
2 Spingete la bottiglietta su e giù circa 5 volte per pompare la crema di rasatura nella cartuccia
n quando non è piena (g. 14).
- Le spie di ricarica indicano il livello di carica della batteria. Durante la ricarica, la spia inferiore
lampeggia in arancione per poi spegnersi. Quindi, la spia superiore lampeggia in bianco per poi
rimanere a luce bianca ssa.
- Quando il rasoio rimane in carica per 9 minuti, la spia di ricarica inferiore si spegne e quella
superiore inizia lampeggiare in bianco a indicare che il rasoio ha un’autonomia sufciente per
una rasatura.
Nota La ricarica rapida può essere effettuata dopo aver caricato già una volta il rasoio per 1,5 ore.
- La batteria residua è indicata dal numero di spie accese. La batteria residua viene indicata per
alcuni secondi solo quando il rasoio viene acceso o spento (g. 15).
- Quando la batteria è quasi scarica, la spia di ricarica inferiore si accende in arancione durante la
rasatura e lampeggia in arancione quando il rasoio spento. (g. 16)
- Quando la batteria è completamente carica, tutte le spie di ricarica emettono una luce bianca
ssa (g. 15).
- Dopo 1 ora circa, la spia di ricarica bianca si spegne, per risparmiare energia.
, Quando la spia della bottiglietta della crema lampeggia in arancione possono vericarsi le due
seguenti condizioni: (g. 17)
- Nel supporto di riempimento e ricarica non è presente la bottiglietta oppure questa non è stata
sostituita correttamente.
- La bottiglietta della crema è vuota.
, La spia di riempimento del serbatoio della crema indica tre differenti condizioni: (g. 18)
- Durante il riempimento del serbatoio della crema, la relativa spia bianca lampeggia.
- Quando il serbatoio della crema è pieno, la relativa spia bianca emette una luce ssa.

130
- Se la bottiglietta della crema si esaurisce durante il riempimento del serbatoio della crema, la
relativa spia bianca si spegne e la spia della bottiglietta della crema lampeggia in rosso.
Nota Può essere necessario un periodo di adattamento di 2 o 3 settimane per consentire alla pelle di
abituarsi al sistema di rasatura.
1 Accertarsi che nel serbatoio della crema di rasatura sia presente una quantità sufciente di
crema.
2 Premete il pulsante on/off per accendere il rasoio.
3 Accertatevi che il rasoio sia sufcientemente carico (vedere capitolo “Predisposizione
dell’apparecchio”, alla sezione “Istruzioni di ricarica”).
4 Spostate delicatamente il rasoio con movimenti circolari sulla pelle e premete il pulsante di
erogazione della crema in modo che la quantità di crema sulla pelle sia sufciente per una
piacevole rasatura. (g. 19)
- Quando rilasciate il pulsante di erogazione della crema, l’unità interrompe l’erogazione della
crema.
- Premendo brevemente il pulsante di erogazione della crema, il rasoio applica automaticamente
una quantità ssa di crema.
- Premete nuovamente il pulsante di erogazione per applicare una quantità maggiore di lozione
durante la rasatura, al ne di ottenere un’azione più delicata del rasoio sulla pelle.
Nota Il pulsante di erogazione della lozione funziona solo se il rasoio è acceso.
Nota Il rasoio è stato concepito per essere utilizzato come una lametta e pertanto potete usarlo sulla
pelle bagnata. A differenza dei comuni rasoi elettrici, questo apparecchio non è dotato di vaschetta di
raccolta dei peli. Per evitare che i peli cadano sugli abiti, applicate una quantità sufciente di crema
durante la rasatura.
5 Pulite a fondo l’apparecchio ogni volta che lo usate (vedere il capitolo “Pulizia e
manutenzione”).
6 Inserite il cappuccio di protezione sul rasoio per evitare di danneggiarlo (g. 20).
- Spostate delicatamente il rasoio sulla pelle compiendo movimenti circolari.
- Non premete troppo sul rasoio per evitare di irritare la pelle.
- Per ottenere la giusta scorrevolezza, applicate regolarmente la lozione.
- Potete utilizzare il rasoio nella vasca o nella doccia.
Nota Il nuovo design aperto permette di percepire l’azione di taglio dei peli del rinitore in modo più
nitido. Si tratta di una condizione normale.
1 Estraete l’unità di rasatura dal rasoio (g. 21).
2 Estraete il rinitore dal relativo vano nel caricabatterie e fatelo scattare in posizione sul
rasoio (g. 22).
3 Premete il pulsante on/off per accendere il rasoio.
4 Potete utilizzare il rinitore di precisione per regolare basette e baf.
5 Pulite a fondo il rinitore dopo l’uso (vedere il capitolo “Pulizia e manutenzione”).
131
6 Rimuovete il rinitore e riposizionatelo nell’apposito vano.
7 Mettete l’unità di rasatura sul rasoio (g. 23).
8 Inserite il cappuccio di protezione sul rasoio per evitare di danneggiarlo (g. 20).
Non usate prodotti o sostanze abrasive o detergenti aggressivi, come benzina o acetone, per
pulire l’apparecchio.
Pulite sempre il rasoio e il rinitore dopo l’uso.
Prestate particolare attenzione quando utilizzate l’acqua calda: vericate sempre che non sia
troppo calda per evitare di scottarvi.
Non asciugate l’unità di rasatura con un panno o asciugamano per evitare di danneggiare le
testine di rasatura.
Nota Il rasoio è impermeabile e può essere lavato con acqua.
1 Premete il pulsante on/off per accendere il rasoio.
Nota Pulite il rasoio quando è acceso.
2 Immergete l’unità di rasatura/tagliabasette in acqua calda per almeno 30 secondi (g. 24).
3 Spegnete il rasoio e rimuovete l’acqua residua scuotendolo
4 Inserite il cappuccio di protezione sul rasoio per evitare di danneggiarlo (g. 20).
Nota Se il rasoio non funziona correttamente e non riuscite a risolvere il problema con il metodo di
pulizia descritto in questo capitolo, consultate il capitolo “Risoluzione dei problemi” per un metodo di
pulizia a fondo.
1 Lubricate i dentini del rinitore ogni sei mesi, utilizzando una goccia di olio per macchina da
cucire.
1 Conservate il rasoio nel supporto di riempimento e ricarica.
2 Se dovete partire e non volete conservare il rasoio nel supporto di riempimento e ricarica,
posizionare il cappuccio protettivo sul rasoio e conservarlo nella custodia morbida (g. 20).
Se dovete riporre il rasoio per un periodo prolungato o se state partendo, potete utilizzare la
funzione di blocco. Il blocco da viaggio impedisce di accendere accidentalmente il rasoio.
1 Controllate che l’apparecchio sia spento.
2 Tenete premuto il pulsante per l’erogazione della lozione (1) e premete
contemporaneamente il pulsante on/off con l’altra mano (2) (g. 25).

132
3 Tenete premuti i due pulsanti per 6 secondi no a quando il rasoio non emette un breve
segnale acustico simile a un ronzio e la spia di ricarica centrale del rasoio non inizia a
lampeggiare più volte.
, Il blocco da viaggio è attivo.
Nota Se premete involontariamente il pulsante on/off per primo, il rasoio si accende. In tal caso, premete
nuovamente il pulsante on/off e il rasoio si spegne.
Nota Se premete il pulsante on/off quando il blocco da viaggio è attivato, la spia di ricarica
centrale diventa bianca e lampeggia a indicare che il rasoio è bloccato.
Consiglio Se premete il pulsante on/off per accertarvi che il blocco da viaggio sia attivato. Se il blocco da
viaggio è attivato, il rasoio non si accende.
1 Tenete premuto il pulsante per l’erogazione della lozione (1) e premete
contemporaneamente il pulsante on/off con l’altra mano (2) (g. 25).
2 Tenete premuti i due pulsanti per 6 secondi no a quando il rasoio non emette un breve
segnale acustico simile a un ronzio e la spia di ricarica centrale del rasoio non inizia a
lampeggiare più volte.
, Il blocco da viaggio è disattivato.
Nota Potete disattivare il blocco da viaggio posizionando il rasoio sul caricabatterie.
Se dovete partire in viaggio e non volete portare il supporto di riempimento, potete portare il
caricabatterie per ricaricare il rasoio.
Per motivi di igiene, consigliamo di sostituire il serbatoio contenente la crema di rasatura una volta
l’anno. Con la confezione da 3 bottigliette di crema NIVEA FOR MEN e con il kit di sostituzione
(contenente un nuova unità di rasatura HS85 e una nuova cartuccia) viene fornita una nuova
cartuccia.
1 Rimuovete la cartuccia della lozione dal rasoio (g. 26).
2 Inserite l’aletta posta sulla parte superiore del serbatoio della crema nella scanalatura sul
bordo del rasoio (1). Premete la parte inferiore del serbatoio con il pollice (2) per inserirlo
nel rasoio facendolo scattare in posizione (g. 27).
3 Riempite il serbatoio della crema (vedere capitolo “Messa in funzione”).
Sostituite l’unità di rasatura ogni anno per avere sempre degli ottimi risultati di rasatura.
Sostituite l’unità di rasatura solo con il modello HS85 di Philips.
1 Estraete la vecchia unità di rasatura dal rasoio (g. 21)
2 Inserite la nuova unità di rasatura sul rasoio facendola scattare in posizione (g. 23).
Si consiglia di utilizzare soltanto le bottigliette di crema NIVEA FOR MEN.
1 Rimuovete la linguetta dalla bottiglietta di crema NIVEA FOR MEN (g. 6).
2 Ruotate in senso orario il tappo della bottiglietta facendola scattare in posizione (g. 7).
133
, Il tappo si apre verso il basso scoprendo l’ugello dell’erogatore
3 Ruotate il cappuccio del supporto di riempimento e ricarica in senso antiorario e
rimuovetelo.
4 Posizionate la bottiglietta della crema nel foro di aggancio con l’ugello rivolto verso il
basso (g. 8).
5 Riposizionate il cappuccio nel supporto di riempimento e ricarica (1) e ruotatelo in senso
orario (2) per ssarlo (g. 9).
- Per contribuire alla tutela dell’ambiente, non smaltite l’apparecchio insieme ai riuti domestici,
ma consegnatelo a un centro di raccolta ufciale (g. 28).
- La batteria ricaricabile integrata contiene sostanze potenzialmente nocive per l’ambiente.
Rimuovete sempre la batteria prima di smaltire l’apparecchio e consegnarlo a un centro di
raccolta ufciale. Smaltite la batteria in un apposito centro di raccolta. In caso di difcoltà
durante la rimozione della batteria, consegnate l’apparecchio a un centro di assistenza Philips,
che si occuperà della rimozione della batteria e dello smaltimento dell’apparecchio.
rimuovete la batteria ricaricabile solo quando avete deciso di gettare il rasoio. Prima di
rimuoverla, assicuratevi che sia completamente scarica.
Attenzione: le estremità delle batterie sono molto aflate!
1 Rimuovete la cartuccia della lozione dal rasoio (g. 26).
2 Svitate le tre viti sul retro del rasoio (g. 29).
3 Rimuovete il pannello posteriore dell’alloggiamento con un cacciavite (g. 30).
4 Tagliate i li e rimuovete la batteria ricaricabile.
Per assistenza o informazioni e in caso di problemi, visitate il sito Web Philips
www.philips.com/support oppure contattate il Centro Assistenza Clienti Philips del vostro paese
(per conoscere il numero di telefono, consultate l’opuscolo della garanzia internazionale). Se nel
vostro paese non esiste un Centro Assistenza Clienti, rivolgetevi al vostro rivenditore Philips.
L’unità di rasatura (lame e portalame) non è coperta dalla garanzia internazionale perché è un
componente soggetto a usura.
La cartuccia che contiene la crema è un articolo usa e getta e non è coperto dai termini della
garanzia internazionale.

134
In questo capitolo vengono riportati i problemi più ricorrenti legati all’uso dell’apparecchio. Se non
riuscite a risolvere i problemi con le informazioni seguenti, vi preghiamo di contattare il Centro
Assistenza Clienti Philips del vostro paese.
Problema Possibile causa Soluzione
Il rasoio non
Non avete applicato
Premete il pulsante di erogazione no a ottenere la
scorre in modo
una quantità sufciente
quantità sufciente della lozione NIVEA FOR MEN.
uniforme sulla
di lozione per rasatura.
In tal modo l’unità di rasatura potrà scorrere
pelle.
delicatamente sulla pelle.
Perché il rasoio
Forse non avete pulito
Pulite il rasoio a fondo (vedere il capitolo “Pulizia e
non funziona
correttamente il rasoio.
manutenzione”).
come al solito?
I peli/capelli lunghi
Pulite le testine di rasatura seguendo i passaggi
possono ostruire le
della pulizia a fondo riportati di seguito.
testine di rasatura.
L’unità di rasatura è
Sostituite l’unità di rasatura (vedere il capitolo
danneggiata o usurata.
“Sostituzione”).
Il rasoio non
La batteria ricaricabile è
Sostituire la batteria (vedere il capitolo
funziona
scarica.
“Predisposizione dell’apparecchio”).
premendo il
pulsante on/off.
Il blocco da viaggio è
Disattivate il blocco da viaggio (vedere il capitolo
attivo.
“Come riporre l’apparecchio”).
La lozione di rasatura
Pulite il rasoio accuratamente prima di continuare
esaurita blocca le
la rasatura (vedere il capitolo “Pulizia”).
testine nell’unità di
rasatura.
Non avete rimontato
Quando rimontate l’unità di rasatura, assicuratevi di
correttamente l’unità di
ruotare ciascun dispositivo di protezione in senso
rasatura dopo la pulizia
antiorario nché non scatta in posizione.
a fondo.
Dai fori fuoriesce
Uno dei fori
Sciacquate o mettete in ammollo l’unità di rasatura.
solo una minima
dell’erogatore potrebbe
Se il problema non si risolve, aggiungete la crema
quantità di
essere ostruito.
nel serbatoio no a quando non inizia a fuoriuscire
lozione anche se
dal foro ostruito. Se il problema non si risolve
la cartuccia è
provate a: 1) Spegnere il rasoio 2) Estrarre l’unità di
piena.
rasatura dal rasoio 3) Posizionare un dito sul foro
non ostruito 4) Accendere il rasoio 5) Premere il
pulsante di erogazione per qualche secondo no a
quando dal foro ostruito non fuoriesce
nuovamente la lozione.
135
Problema Possibile causa Soluzione
Le testine di rasatura
Assicuratevi di posizionare la testina di rasatura
non sono state inserite
priva di foro per l’erogatore nel supporto corretto,
nei supporti originali.
ossia quello più vicino al pulsante on/off quando
Una delle testine di
l’unità di rasatura è ssata sul rasoio.
rasatura non ha il foro
dell’erogatore al centro
e deve essere
posizionata nell’apposito
supporto.
Dai fori di
La cartuccia di rasatura
Riempite il serbatoio con la crema (vedere il
erogazione non
è quasi vuota.
capitolo “Predisposizione dell’apparecchio”).
fuoriesce la
lozione quando si
preme il pulsante
di erogazione.
Il rinitore è più
Il rinitore ha un design
Il nuovo design aperto permette di percepire
rumoroso di altri
aperto.
l’azione di taglio dei peli del rinitore in modo più
modelli.
nitido. Si tratta di una condizione normale e non
indica un malfunzionamento del rinitore.
Controllate che l’apparecchio sia spento.
1 Estraete l’unità di rasatura dal rasoio (g. 31).
2 Ruotate il dispositivo di protezione in senso orario e sollevatelo dall’unità di rasatura (g. 32).
Nota Rimuovete solo una testina di rasatura alla volta, in modo che possiate rimontare la testina sul
supporto originale, operazione importante per le testine con speciali fori per l’erogatore. In questo modo,
eviterete anche di mischiare le lame e i dispositivi di protezione delle diverse testine e preservare le
prestazioni di rasatura.
3 Se necessario, rimuovete la lama dal dispositivo di protezione.
4 Pulite la lama e il dispositivo di protezione con la spazzola in dotazione.
5 Dopo la pulizia, posizionate la lama di nuovo nell’unità di rasatura con i piedini rivolti verso
l’alto.
6 Posizionate il dispositivo di protezione nel supporto della testina di rasatura (al di sopra della
lama) (g. 33).
7 Ruotate il dispositivo di protezione in senso antiorario nché non scatta in posizione (g. 34).
8 Mettete l’unità di rasatura sul rasoio (g. 35).

136
Өнімді сатып алуыңызбен құттықтаймыз және Philips компаниясына қош келдіңіз! Philips
компаниясы ұсынатын қолдауды толығымен пайдалану үшін өніміңізді www.philips.com/
welcome веб-бетіне тіркеңіз.
Мына пайдаланушы нұсқаулығын оқыңыз, мұнда осы ұстараның керемет мүмкіндіктері туралы,
қырынуды жеңіл әрі жағымды ететін жақсы кеңестер туралы ақпарат берілген.
Ұстара
Қорғаныс қақпақ
Кесетін қайшы
Қырыну бөлігі
Қырыну кондиционер картриджі
Қырыну кондиционер түймесі
Қосу/өшіру түймесі
Зарядталып жатыр дегенді білдіретін жарық
Зарядтау құрылғысы
Қайта толтыру және зарядтаушы негізі
Қайта толтыру және зарядтаушы негізінің қақпағы
Қайшы сақтау орны
Артқы панелі
Кішкене шанышқыға арналған розетка
«Кондиционер картриджін толтыру» жарығы
Кондиционер бөтелкесі жарығы
Тазалайтын тарақ
NIVEA FOR MEN қырыну кондиционер бөтелкесі
Дорба
Адаптор (сіздің адапторыңыз суретте көрсетілгеннен басқа болуы мүмкін).
Құрылғыны қолданбастан бұрын осы пайдаланушы нұсқаулығын мұқият оқып шығыңыз да, оны
анықтамалық құрал ретінде сақтап қойыңыз.
- Адаптердің су болып қалмауын қадағалаңыз (сіздегі адаптер суретте көрсетілгеннен
басқаша болуы мүмкін) (Cурет 2).
- Ыстық судан абай болыңыз. Қолыңызды күйдіріп алмас үшін, әрдайым судың тым ыстық
еместігіне көз жеткізіп отырыңыз.
- Адаптерде трансформер бар. Адаптерды кесіп алып тастап, оның орнына басқа шанышқы
қоюға болмайды, себебі бұл өте қауіпті жағдай туғызады.
- Мүмкіндігі мен ойлау қабілеті шектеулі және білімі мен тәжірибесі аз адамдар (балаларды
қоса) бұл құралды олардың қауіпсіздігіне жауап беретін адамның қадағалауымен немесе
құралдың қалай пайдалану жөнінде нұсқау берілген жағдайда ғана қолдануына болады.
- Балалардың құралмен ойнамауын қадағалаңыз.
- Қайта толтыру және зарядтаушы негізін ешқашан суға батырмаңыз немесе ағын су астында
шәймаңыз (Cурет 3).
- Зарядтаушы қондырғыны суға батыруға немесе ағын су астында шәюға
болмайды (Cурет 4).
- Қайта толтыру және зарядтаушы негізін әрдайым суға төзімді бетте ұстап, қолданыңыз.

137
- Құралды тек 5°C және 35°C температурасы аралығында ғана зарядтауға, қолдануға және
сақтауға болады.
- Сапар шегіп жүргенде қырыну бастарын зақымдап алмау үшін, оған қорғаныс қақпағын
кигізіп қойыңыз.
- Ұстара және басқа бөлшектерді ыдыс жуғышта жууға болмайды.
- Ұстараны шәю үшін 80°C тан ыстық суды қолдануға болмайды.
- Тек қосымша берілген адаптерді, зарядтау құрылғысын, қайта толтыру және зарядтаушы
негізін ғана қолданыңыз.
- Егер адаптер, зарядтау құрылғысы, қайта толтыру немесе зарядтаушы негізі зақымдалған
болса, оларды қолдануға болмайды.
- Ұстара немесе зарядтаушы құрал зақымдалған болса, олармен қолдануға болмайды.
- Егер адаптер зақымдалған болса, қауіпті жағдай туғызбас үшін оны түпнұсқалық түрімен
ғана ауыстырған жөн.
- Бұл құрал бекітілген халықаралық қауіпсіздік ережелерге сәйкес, сондықтан оны еш алаңсыз
ваннада немесе душта қолдануға болады. (Cурет 5)
- Philips компаниясы шығарған бұл құралы электромагниттік өрістерге (ЭМӨ) қатысты
барлық стандарттарға сай келеді. Дұрыс әрі осы пайдаланушы нұсқаулығына сәйкес
қолданылса, қазіргі кездегі белгілі ғылыми дәлелдерге негізделе отырып құралды қолдану
қауіпсіз деуге болады.
- Адаптор 100-240 вольтты қауіпсіз 24 вольттен төмен вольтажға алмастырады.
1 NIVEA FOR MEN қырыну кондиционер бөтелкесінен құлақша қағазын алып
тастаңыз (Cурет 6)
2 Қырыну кондиционер бөтелкесінің қақпағын сағат бағытына бұраңыз («сырт» ете
түседі) (Cурет 7).
, Қақпақ төмен қарай жылжып, кондиционер саптамасы пайда болады.
3 Қайта толтыру және зарядтаушы негізінің қақпағын алып тастау үшін, оны сағат
бағытына қарсы бұраңыз.
4 Қайта толтыру және зарядтаушы негізіндегі бөтелкені орнататын шұқырдағы ораманы
алып тастаңыз.
5 Кондиционер бөтелкесін орнату шұқырына саптамасын төмен қаратып
орнатыңыз (Cурет 8).
6 Қайта толтыру және зарядтаушы негізінің қақпағын орнына қойып (1), оны сағат
бағытына қарай бұраңыз (2) (Cурет 9).
7 Қайта толтыру және зарядтаушы негізіндегі розеткаға кішкене шанышқыны қосып,
адапторды қабырғадағы розеткаға қосыңыз (Cурет 10).
8 Ұстараны қайта толтыру және зарядтаушы негізіне қойып, оны артқа қарай итеріңіз
(«сырт» ете түседі) (Cурет 11).
Ескертпе: Бұл ұстара қырыну кондиционерімен автоматты түрде зарядталып, қайта
толтырылады.
9 Ұстараны 90 минут бойы зарядтаңыз. (Cурет 12)

138
Ескертпе: Ұстараны алғаш қолданар алдында немесе зарядтаушы жарығы батареялар
таусылды дегенді білдіргенде қайта зарядтаңыз. («Зарядтау көрсеткіштері» тармағын
қараңыз).
Ескертпе: Ұстара толығымен зарядталғанда, ол 40 минут бойы тоқ сымысыз жұмыс жасайды.
1 Кішкене шанышқыны зарядтаушы қондырғыға енгізіп, адапторды қабырғадағы розеткаға
енгізіңіз.
2 Ұстараны зарядтаушы құралға қойыңыз (Cурет 13).
, Ұстара зарядталып жатыр.
3 Ұстараны 1,5 сағат зарядтау қажет.
Ескертпе: Ұстараны алғаш қолданар алдында немесе зарядтаушы жарығы батареялар
таусылды дегенді білдіргенде қайта зарядтаңыз. («Зарядтау көрсеткіштері» тармағын
қараңыз).
Ескертпе: Ұстара толығымен зарядталғанда, ол 40 минут бойы тоқ сымысыз жұмыс жасайды.
Сіз, сонымен қатар, қырыну кондиционер картриджін қайта толтыру және зарядтаушы негізін
қолданбастан ақ толтыра аласыз:
1 Кондиционер бөтелкесінің саптамасын кондиционер картриджіндегі толтыру
тесікшесіне орнатыңыз.
2 Қырыну кондиционерін картриджге босату үшін, картридж толғанын көргенше,
бөтелкені шамамен 5 реттей жоғары төмен жылжытыңыз (Cурет 14).
- Зарядтау жарықтары зарядталған батарея деңгейін көрсетеді. Зарядтау кезінде төменгі
зарядтау жарығы алдымен қызғылт болып жыпылықтайды да, кейін сөніп қалады.
Енді жоғарғы зарядтау жарығы ақ болып жыпылықтай бастайды да, ақырында үздіксіз ақ
түспен жанып тұрады.
- Ұстара 9 минут зарядталғаннан кейін, төменгі зарядтау жарығы сөнеді де, жоғарғы
зарядтау жарығы ақ болып жыпылықтай бастайды, бұл ұстарада бір рет қырыну үшін
жеткілікті қуат бар екендігін көрсетеді.
Ескертпе: Жылдам зарядтау ұстараны бұдан бұрын 1,5 сағат зарядтаған жағдайда
ғана мүмкін болады.
- Батареяда қалған қуат деңгейі жанып тұрған зарядтаушы жарықтар саны арқылы
көрсетіледі. Қалған батарея қуат мөлшері ұстараны қосқан немесе сөндірген уақытта
бірнеше секунд аралығында көрініп тұрады (Cурет 15).
- Батарея отыра бастағанда, төменгі зарядтау жарығы қырыну барысында қызғылт болып
жанып тұрады да, ұстараны сөндірген кезде, қызғылт түспен жыпылықтайды. (Cурет 16)
- Батарея толығымен зарядталғанда, барлық зарядтау жарықтары үздіксіз жанып
тұрады (Cурет 15).
139
- Шамамен 1 сағаттан соң электр қуатын үнемдеу мақсатында ақ түсті зарядтау жарығы
сөніп қалады.
, Кондиционер бөтелкесінің жарығы қызғылт түспен жыпылықтаса, екі жағдайдың
болғанын білдіреді: (Cурет 17)
- Қайта толтыру және зарядтаушы негізінде кондиционер бөтелкесі жоқ немесе бөтелке
дұрыс орнатылмаған.
- Кондиционер бөтелкесі бос.
, «Кондиционер картриджін толтыру» жарығы үш түрлі жағдайды білдіреді: (Cурет 18)
- Кондиционер картриджі толтырылып жатқанда «Кондиционер картриджін толтыру»
жарығы ақ болып жыпылықтайды.
- Қырыну кондиционер картриджі толық болғанда, «Кондиционер картриджін толтыру»
жарығы үздіксіз ақ болып жанып тұрады.
- Егер кондиционер бөтелкесі кондиционер картриджін толтырып жатқанда босаған болса,
онда ақ «Кондиционер картриджін толтыру» жарығы сөнеді де, кондиционер бөтелкесінің
жарығы қызыл болып жыпылықтай бастайды.
Ескертпе: Сіздің теріңіз жаңа қырыну жүйесіне дағдылануы үшін 2-3 апта керек болады.
1 Қырыну кондиционер картриджінде жеткілікті мөлшерде қырыну кондиционері бар
екендігін қамтамасыз етіңіз.
2 Ұстараны қосу үшін қосу/өшіру түймесін бір мәрте басыңыз.
3 Ұстараның жеткілікті деңгейде зарядталғанына көз жеткізіңіз («Қолдануға дайындау»
тарауындағы «Зарядтау көрсеткіштері» бөлімін қараңыз).
4 Қырыну бөлігін жәймен оралымдатып теріңіздің үстінен жүргізіп отырыңыз, әрі қырыну
кондиционер түймесін қолайлы қырынуға жеткілікті кондиционер теріңізге барып
тұрғанша басып отырыңыз. (Cурет 19)
- Қырыну кондиционер түймесін босатқан болсаңыз, онда құрал кондиционер шығаруын
тоқтатады.
- Егер сіз қырыну кондиционер түймесін үздік-үздік бассаңыз, онда құрал автоматты түрде
белгілі мөлшерде кондиционер шығаратын болады.
- Қырыну кондиционер түймесін тағы басып, тағы қосымша кондиционер шығаруыңызға
болады. Ең бастысы, қырыну бөлігі сіздің теріңізде жұмсақ түрде сырғып отыруы тиіс.
Ескертпе: Қырыну кондиционер түймесі тек ұстара қосулы болса ғана жұмыс жасайды.
Ескертпе: Бұл ұстараны кәдімгі алмас ұстарасы тәрізді қолдануға болады: сіз ұстараны сулы
бетіңізге қолдануыңызға болады. Әдеттегі электр ұстаралары тәрізді бұл құралда шашты
жинап алатын орын жоқ. Шаш қылшақтарын киіміңізге түсуден сақтау үшін, қырынып
жатқанда қажетті мөлшерде қырыну кондиционерін жағып отырыңыз.
5 Ұстараны қолданғаннан кейін, оны әрдайым мұқият тазалап отырыңыз («Тазалау және
күтіп ұстау» тарауын қараңыз).
6 Қырыну бастарын зақымдамас үшін, қорғаныс қақпағын қырыну бөлігіне сырғытып
кигізіңіз (Cурет 20).
140
- Ұстараны жәймендеп оралымдатып теріңіздің үстінен жүргізіп отырыңыз.
- Ұстараны қатты баспаңыз, себебі ол теріңізді тітіркендіруі мүмкін.
- Дұрыс сырғуы үшін, жиірек кондиционер шығарып отырыңыз.
- Сіз, сонымен қатар, ұстараны ваннада немесе душта қолдануыңызға болады.
Ескертпе: Жаңа ашық жобасына байланысты, қайшының кесу әрекетін басқа қайшыларға
қарағанда анығырақ етіп естисіз. Ол әдеттегі нәрсе.
1 Қырыну бөлігін қырыну ұстарасынан тартып алыңыз (Cурет 21).
2 Қайшыны зарядтаушыдағы қайшы ұстағыштан алып , ұстараға салыңыз («сырт» ете
түседі) (Cурет 22).
3 Ұстараны қосу үшін қосу/өшіру түймесін бір мәрте басыңыз.
4 Сіз қайшыны мұрттарыңыз бен жақ сақалыңызды тарау үшін қолдануыңызға болады.
5 Қайшыны қолданғаннан кейін, оны әрдайым мұқият тазалап отырыңыз («Тазалау және
күтіп ұстау» тарауын қараңыз).
6 Қайшына алып, оны қайтадан қайшы ұстағышына салып қойыңыз.
7 Қырыну бөлігін қайтадан ұстараға салыңыз («Сырт» ете түседі) (Cурет 23).
8 Қырыну бастарын зақымдамау үшін, қорғаныс қақпағын ұстараға сырғытып
кигізіңіз (Cурет 20).
Қырғыш жөке, қырғыш тазалағыш құралдарды, немесе жанар май, немесе ацетон тәріздес
агрессивті сұйықтықтарды құралды тазалау үшін қолдануға болмайды.
Ұстараны және қайшыны әр қолданған сайын тазалап отырыңыз.
Ыстық судан абай болыңыз. Қолыңызды күйдіріп алмау үшін, әрдайым судың тым ыстық
еместігіне көз жеткізіп отырыңыз.
Ұстараның қыратын бөлігін сүлгімен немесе шүберекпен сүртпеңіз, себебі бұл қыратын
бастарға зақым келтіруі мүмкін.
Ескертпе: Ұстараны сумен жууға болады.
1 Ұстараны қосу үшін қосу/өшіру түймесін бір мәрте басыңыз.
Ескертпе: Ұстараны қосулы тұрған кезінде тазалаңыз.
2 Ұстара/қайшыны ыстық суға кем дегенде 30 секундқа батырыңыз (Cурет 24).
3 Ұстараны сөндіріп, артық суын сілкіп жіберіңіз.
4 Қырыну бастарын зақымдамас үшін, қорғаныс қақпағын қырыну бөлігіне сырғытып
кигізіңіз (Cурет 20).
Ескертпе: Егер ұстара әдеттегідей жақсы қырмаса және ол мәселе осы тармақта көрсетілген
тазалау әдістері арқылы шешілмесе, «Ақаулықтарды жою» тармағындағы қосымша мұқият
тазалау әдістерін қараңыз.
141
1 Әрбір алты ай сайын, бір тамшы машина майымен кесетін қайшы тістерін майлап
тұрыңыз.
1 Ұстараны қайта толтыру және зарядтаушы негізінде сақтаңыз.
2 Егер сіз сапар шекпекші болсаңыз, немесе ұстараны қайта толтыру және зарядтаушы
негізінде сақтағыңыз келмесе, қорғаныс қақпағын ұстараға қойып, оны дорба ішінде
сақтаңыз. (Cурет 20)
Егер сіз ұстараны ұзағырақ уақытқа сақтап қойғыңыз келсе, немесе сапар шекпекші болсаңыз,
онда ұстараны бекітіп қоюға болады. Сапар шегу бекітпесі ұстараның абайсызда қосылып
кетуінен сақтайды.
1 Ұстара сөндірулі екендігін тексеріп алыңыз.
2 Қырыну кондиционер түймесін басып тұрып (1), екінші қолыңызбен қосу/өшіру
түймесін басыңыз (2) (Cурет 25).
3 Екі түймені де 6 секунд бойы басып тұрыңыз. Ұстара бір сәтке быжылдаған дыбыс
шығарғанша және ортаңғы зарядтау жарығы бірнеше рет жыпылықтағанша күтіңіз.
, Сапар шегу бекітпесі белсендірілді деген сөз.
Ескертпе: Егер сіз абайсызда қосу/өшіру түймесін алдымен басып қойған болсаңыз, ұстара
жұмыс жасай бастайды . Ондай жағдайда, қосу/өшіру түймесін тағы бір рет басып, ұстараны
сөндіріңіз.
Ескертпе: Егер сіз қосу/өшіру түймесін сапар шегу бекітпесі белсенді кезінде басқан болсаңыз,
ортаңғы зарядтау жарығы ақ болып жыпылықтап, ұстараның бекітулі екендігін білдіреді.
Кеңес: Қосу/өшіру түймесін басып, сапар шегу бекітпесі белсендірілген екендігін тексеріңіз. Егер
сапар шегу бекітпесі белсендірілген болса, онда ұстара қосылмайды.
1 Қырыну кондиционер түймесін басып тұрып (1), екінші қолыңызбен қосу/өшіру
түймесін басыңыз (2) (Cурет 25).
2 Екі түймені де 6 секунд бойы басып тұрыңыз. Ұстара бір сәтке быжылдаған дыбыс
шығарғанша және ортаңғы зарядтау жарығы бірнеше рет жыпылықтағанша күтіңіз.
, Сапар шегу бекітпесі сөндірілді деген сөз.
Ескертпе: Сіз, сонымен қатар, сапар шегу бекітпесін ұстараны зарядтаушыға қою арқылы
сөндіре аласыз.
Егер сіз сапар шекпекші болсаңыз, әрі қайта толтыру және зарядтаушы негізін өзіңізбен
тасығыңыз келмесе, сіз ұстараны керек кезде зарядтау үшін, тек зарядтаушыны ғана алсаңыз
болады.
142
Гигиенаны сақтау мақсатында қырыну кондиционер картриджін жылына бір рет ауыстырып
отыруға кеңес береміз. Жаңа картридж әр NIVEA FOR MEN 3-pack қырыну кондиционер
бөтелкесімен және ауыстыру жабдығымен (ішінде HS85 қырыну бөлігі және жаңа картридж
бар) бірге бір орамаға салынған.
1 Ұстарадан қырыну кондиционер картриджін алыңыз (Cурет 26).
2 Жаңа қырыну кондиционер картриджінің төбесіндегі құлақшаны ұстараның жиегіндегі
тесікшеге кіргізіңіз (1). Содан соң, картридждің төменгі жағын бас бармағыңызбен
басып (2) картриджді ұстараға жапсырыңыз («сырт» ете түседі) (Cурет 27).
3 Қырыну кондиционер картриджін толтырыңыз («Қалай бастау керек» тармағын
қараңыз).
Тиімді қырыну нәтиже алу үшін, қырыну бөлігін жыл сайын алмастырып отырыңыз.
Қырыну бөлігін тек қана HS85 Philips Қырыну Бөлігімен ғана алмастырыңыз.
1 Ескі қырыну бөлігін ұстарадан тартып шығарыңыз (Cурет 21).
2 Жаңа қырыну бөлігін ұстараға қойыңыз («сырт» ете түседі) (Cурет 23).
Теқұқана NIVEA FOR MEN қырыну кондиционер бөтелкелерін ғана қолданыңыз.
1 NIVEA FOR MEN қырыну кондиционер бөтелкесінен құлақша қағазын алып
тастаңыз (Cурет 6)
2 Қырыну кондиционер бөтелкесінің қақпағын сағат бағытына бұраңыз («сырт» ете
түседі) (Cурет 7).
, Қақпақ төмен қарай жылжып, кондиционер саптамасы пайда болады.
3 Қайта толтыру және зарядтаушы негізінің қақпағын алып тастау үшін, оны сағат
бағытына қарсы бұраңыз.
4 Кондиционер бөтелкесін орнату шұқырына саптамасын төмен қаратып
орнатыңыз (Cурет 8).
5 Қайта толтыру және зарядтаушы негізінің қақпағын қайтадан итеріп (1), оны сағат
бағытында бұрап бекітіңіз (2) (Cурет 9).
- Қызмет мерзімі аяқталғанда, құрылғыны кәдімгі қоқыспен бірге тастамаңыз, оның орнына
ресми жинау орнына тапсырыңыз. Осылайша, сіз қоршаған ортаны сақтауға
көмектесесіз (Cурет 28).
- Ішіне орнатылған қайта зарядталып отыратын батарея құрамында қоршаған айналаға
тигізер зиянды заттар бар. Құралды тастар немесе арнайы жинап алатын орынға берер
алдында батареяны алып тастаңыз. Батареяны арнайы батареялар жинайтын орынға
өткізіңіз. Егер сіз батареяны шығару сіздің қолыңыздан келмесе, құралды Philips қызмет
орталығына апаруыңызға болады, ондағы адамдар батареяны сіз үшін алып, оны қоршаған
айналаға зияны тимейтін жағдайда оның көзін жояды.
143
Батареяны тек ұстараны тастар алдында ғана алыңыз. Батареяны алар алдында оның
толығымен таусылғандығын тексеріңіз.
Абай болыңыз, батарея ленталары өте өткір болады.
1 Ұстарадан қырыну кондиционер картриджін алыңыз (Cурет 26).
2 Ұстараның артындағы үш бұрауышты босатыңыз (Cурет 29).
3 Батарея орнының артқы панелін бұрауышпен босатыңыз (Cурет 30).
4 Сымдарды кесіп, қайта зарядталатын батареяны алып тастаңыз.
Егер ақпарат қажет болса немесе бір проблема туындаса, Philips компаниясының
www.philips.com/support веб-сайтына кіріңіз немесе өз еліңіздегі Philips тұтынушылар
орталығына хабарласыңыз (оның телефон нөмірін дүние жүзі бойынша берілетін кепілдік
кітапшасынан табасыз). Еліңізде тұтынушылар орталығы болмаған жағдайда, жергілікті Philips
дилеріне барыңыз.
Қырыну бөлігі (кескіштер мен қорғаныштар) тез тозатындықтан, оларға халықаралық кепілдік
шарттары қолданылмайды.
Кондиционер картриджі бір рет қана қолданылатын зат болғандықтан, оған халықаралық
кепілдік берілмейді.
Бұл тарауда құралда пайда болуы мүмкін ең көп кездесетін ақаулықтар жинақталған. Егер
төменде берілген ақпараттың көмегімен ақаулықты жоя алмасаңыз, еліңіздегі тұтынушы
орталығына хабарласыңыз.
Ақаулық Ықтимал себептер Шешімі
Ұстара тері
Қырыну кондиционері
Қырыну кондиционерінің түймесін NIVEA
үстімен бір
жеткіліксіз мөлшерде
FOR MEN қырыну кондиционері
қалыпты жұмсақ
жағылған болар.
жеткілікті мөлшерде шыққанша басыңыз.
сырғымайды.
Бұл әрекет қырыну бөлігінің тері үстімен
бір қалыпты жұмсақ сырғуын қамтамасыз
етеді.
Ұстара
Ұстара дұрыс тазаланбаған
Ұстараны мұқият тазалаңыз («Тазалау
бұрынғыдай
болар.
және күтіп ұстау» тарауын қараңыз).
жақсы
қырмайды.
Қыру бастарына ұзын шаштар
Қырыну бастарын төменде көрсетілген
тұрып қалған болар.
қосымша мұқият тазалау әдістері
бойынша тазалап көріңіз.
Қырыну бөлігі зақымдалған
Қырыну бөлігін алмастырыңыз
немесе тозған болар.
(«Алмастыру» тарауын қараңыз).

144
Ақаулық Ықтимал себептер Шешімі
Қосу/өшіру
Қайта зарядталатын батарея
Батареяны зарядтаңыз («Қолдануға
түймесін
босап қалған.
дайындау» тарауын қараңыз).
басқанда, ұстара
қосылмайды.
Сапар шегу бекітпесінің қазір
Сапар шегу бекітпесін ашыңыз («Сақтап
белсенді екенін білдіреді.
қою» тарауын қараңыз).
Құрғап кеткен қырыну
Қырынуды жалғастырар алдында
кондиционері қырыну
ұстараны мұқият тазалаңыз. («Тазалау»
бөлігіндегі қырыну бастарын
тарауын қараңыз).
бітеп тастайды.
Қырыну бөлігі қосымша
Қырыну бөлігін орнына салған кезде, әр
мұқият тазалаудан кейін
қорғаныс өз орнына толық орнатылғанша
орнына дұрыс салынбаған
сағат бағытына қарсы бұраңыз.
болар.
Картридж
Кондиционер
Қырыну бөлігін шайып немесе суға
ішіндегі
тесіктерінің бірі бекітіліп
батырып көріңіз. Егер бұдан еш нәтиже
кондиционер
қалған болар.
шықпаса, бекітілген тесіктен шыққанша
мөлшері
кондиционерді картридж ішіне құя
жеткілікті болса
беріңіз. Егер бұдан да ешқандай нәтиже
да, тесіктерден
шықпаса, мына әдісті пайдаланыңыз: 1)
кондиционер
Ұстараны өшіріңіз. 2) Қырыну бөлігін
өте аз
ұстарадан алыңыз. 3) Саусағыңызды
мөлшерде ғана
бекітілмеген тесікшеге қойыңыз. 4)
шығады.
Ұстараны қосыңыз. 5) Қырыну
кондиционер түймесін бекітілген
тесікшеден кондиционер шыққанша
бірнеше секунд бойы басып тұрыңыз.
Қырыну бастары өз
Кондиционер тесігі жоқ қырыну басы
ұстағыштарына қойылмаған
қажетті ұстағышқа салынғанына көз
болар. Қырыну бастарының
жеткізіңіз. Бұл — қырыну бөлігі ұстараға
біреуінің ортасында
салынған кездегі қосу/өшіру түймесіне ең
кондиционер тесігі жоқ,
жақын орналасқан ұстағыш.
сондықтан арнайы ұстағышқа
орнатпаса болмайды.
Қырыну
Қырыну картриджі босап
Қырыну кондиционері картриджін
кондиционері
қалған болар.
толтырыңыз («Қолдануға дайындау»
түймесін
тарауын қараңыз).
басқанда,
тесіктерден
кондиционер
шықпайды.
Қайшы даусы
Бұл ашық жобалы қайшы
Жаңа ашық жобасына байланысты,
басқа
болып табылады.
қайшының кесу әрекетін басқа
қайшыларға
қайшыларға қарағанда анығырақ етіп
қарағанда
естисіз. Ол әдеттегі нәрсе, және
қаттырақ
қайшыңызға ештеңе болған жоқ.
шығады.
145
Құралды міндетті түрде өшіру керек
1 Қырыну бөлігін қырыну ұстарасынан тартып алыңыз (Cурет 31).
2 Қорғанысты сағат бағытына бұрап, қырыну бөлігінен тартып алыңыз (Cурет 32).
Ескертпе: Бір дегенде тек бір қырыну басын ғана алып отырыңыз. Осының арқасында сіз қырыну
басын өзінің түп нұсқалы орнына қоясыз. Бұл өте маңызды, себебі екі қырыну басында арнайы
кондиционер шығару тсікшелері бар. Және де осының арқасында сіз, қырыну нәтижесіне көп
әсер беретін, әртүрлі қырыну бастардың қорғаныстары мен кескіштерін шатастырмайсыз.
3 Егер керек болса, кескішті қорғаныстан алып тастаңыз.
4 Кескіштер мен қорғаушы бөліктерін қосымша берілген қылшақпен тазалаңыз.
5 Тазалап болғаннан соң, кескішті қайтадан қырыну бөлігіне кескіш аяқтарын
жоғары қаратып орнатыңыз.
6 Қорғаныстарды қайтадан қырыну бастардың ұстағышына салыңыз (кескіштердің
үстінен) (Cурет 33).
7 Қорғаныстарды орнына бекітілгенше сағат бағытына қарсы бұраңыз (Cурет 34).
8 Қырыну бөлігін қайтадан ұсатараға салыңыз («Сырт» ете түседі) (Cурет 35).

146
한국어
제품 소개
필립스 제품을 구입해 주셔서 감사합니다! 필립스가 드리는 지원 혜택을 받으실 수
있도록 www.philips.co.kr에서 제품을 등록하십시오.
이 사용 설명서에는 이 면도기의 뛰어난 기능에 대한 정보뿐 아니라 면도를 보다 쉽고 즐
겁게 할 수 있는 방법이 나와 있으므로 참고하시기 바랍니다.
각 부의 명칭 (그림 1)
면도기
보호 뚜껑
트리머
쉐이빙 유닛
쉐이빙 컨디셔너 카트리지
쉐이빙 컨디셔너 버튼
전원 버튼
충전 표시등
충전기
리필 및 충전 스테이션
리필 및 충전 스테이션 뚜껑
트리머 보관 위치
뒤쪽 패널
소형 플러그 콘센트
’컨디셔너 카트리지 보충’ 표시등
컨디셔너 용기 표시등
세척용 브러시
니베아포맨 쉐이빙 컨디셔너 용기
주머니
어댑터(사용하는 어댑터의 모양은 그림과 다를 수 있습니다)
중요사항
본 제품을 사용하기 전에 이 사용 설명서를 주의 깊게 읽고 나중에 참조할 수 있도록 잘
보관하십시오.
위험
- 어댑터가 물에 젖지 않도록 주의하십시오(사용하는 어댑터의 모양은 그림과 다를 수
있습니다) (그림 2).
경고
- 뜨거운 물을 사용하는 경우 주의하십시오. 손을 데지 않도록 물이 너무 뜨겁지
않은지 항상 확인하십시오.
- 어댑터에는 변압기가 내장되어 있습니다. 위험할 수 있으므로, 어댑터를 잘라내고
다른 플러그로 교체하지 마십시오.
- 신체적인 감각 및 정신적인 능력이 떨어지거나 경험과 지식이 풍부하지 않은 사용자(
어린이 포함)는 혼자 제품을 사용하지 말고 제품 사용과 관련하여 안전에 책임질 수
있도록 지시사항을 충분히 숙지한 사람의 지도와 도움을 받으십시오.
- 어린이가 제품을 가지고 놀지 못하도록 지도해 주십시오.
주의
- 리필 및 충전 스테이션을 절대로 물에 담그거나 헹구지 마십시오 (그림 3).
- 충전기를 절대로 물에 담그거나 헹구지 마십시오 (그림 4).
- 리필 및 충전 스테이션과 충전기는 반드시 액체가 닿아도 손상되지 않는 표면에 놓고
사용하십시오.
- 제품은 5°C - 35°C 사이의 온도에서 사용, 충전 및 보관하는 것이 적합합니다.
- 여행 시에는 항상 보호 캡을 덮어 쉐이빙 헤드를 보호하십시오.
한국어 147
- 면도기 및 기타 액세서리는 식기세척기에서 세척할 수 없습니다.
- 80°C보다 뜨거운 물로 면도기를 세척하지 마십시오.
- 반드시 제품과 함께 제공된 어댑터, 충전기, 리필 및 충전 스테이션을 사용하십시오.
- 어댑터 또는 스테이션 자체가 손상된 경우에는 리필 및 충전 스테이션을 사용하지
마십시오.
- 면도기 또는 충전기가 손상되었다면 제품을 사용하지 마십시오.
- 어댑터에 손상 부위가 있으면, 위험할 수 있으므로 반드시 정품으로 교체하여
사용하십시오.
기준 지원
- 본 제품은 국제적으로 공인 받은 안전 기준을 따르고 있으며, 목욕이나 샤워 중에도
안전하게 사용할 수 있고 수돗물로 물 세척이 가능합니다 (그림 5).
- 이 필립스 제품은 전자기장(EMF)과 관련된 모든 기준을 준수합니다. 이 사용
설명서의 지침에 따라 적절하게 취급할 경우 이 제품은 안전하게 사용할 수 있으며
이는 현재까지의 과학적 증거에 근거하고 있습니다.
일반
- 어댑터는 100-240V의 전압을 24V 이하의 안전한 저전압으로 변환해 줍니다.
사용 전 준비
1 니베아포맨 쉐이빙 컨디셔너 용기의 탭을 제거하십시오 (그림 6).
2 컨디셔너 용기의 뚜껑을 ‘찰칵’ 소리가 날 때까지 시계 방향으로 돌립니다 (
그림 7).
, 뚜껑을 아래 쪽으로 밀면 컨디셔너 노즐이 나타납니다.
3 리필 및 충전 스테이션의 뚜껑을 시계 반대 방향으로 돌려 분리하십시오.
4 리필 및 충전 스테이션의 삽입구 포장을 분리하십시오.
5 노즐이 아래쪽으로 가도록 컨디셔너 용기를 삽입구에 넣습니다 (그림 8).
6 리필 및 충전 스테이션의 뚜껑을 다시 닫고(1) 시계 방향으로 돌려서 고정하십시오
(2) (그림 9).
7 리필 및 충전 스테이션의 콘센트에 소형 플러그를 꽂은 다음 어댑터를 벽면 콘센트에
꽂으십시오 (그림 10).
8 리필 및 충전 스테이션에 면도기를 끼우고 ‘찰칵’ 소리가 날 때까지 뒤쪽으로 밀어
넣으십시오 (그림 11).
참고: 면도기가 충전되고 쉐이빙 컨디셔너가 자동으로 채워집니다.
9 90분 동안 면도기를 충전합니다. (그림 12)
참고: 제품을 처음 사용하기 전 또는 충전등에 배터리 방전 상태가 표시되면 면도기를
충전해야 합니다(‘충전 표시’란 참조).
참고: 완전히 충전된 면도기는 최대 40분까지 면도 가능합니다.
충전기를 이용하여 충전
1 충전기에 소형 플러그를 꽂은 다음 어댑터를 벽면 콘센트에 꽂으십시오.
2 충전기에 면도기를 끼웁니다 (그림 13).
, 면도기를 충전합니다
3 면도기는 1.5시간 동안 충전하십시오.
참고: 제품을 처음 사용하기 전 또는 충전등에 배터리 방전 상태가 표시되면 면도기를
충전해야 합니다(‘충전 표시’란 참조).

한국어148
참고: 완전히 충전된 면도기는 최대 40분까지 면도 가능합니다.
사용 설명서 보충
리필 및 충전 스테이션을 사용하지 않고 쉐이빙 컨디셔너 카트리지를 보충할 수
있습니다.
1 컨디셔너 카트리지의 주입구에 컨디셔너 용기의 노즐을 놓으십시오.
2 카트리지가 가득 차는 것을 확인 할 때까지 용기를 위 아래로 약 5회 정도 펌프하여
쉐이빙 컨디셔너가 카트리지에 들어가게 합니다 (그림 14).
면도기 표시등
충전
- 충전 표시등이 배터리 충전 수준을 표시합니다. 충전하는 동안 아래쪽 충전 표시등이
주황색으로 깜박이다가 꺼집니다. 그런 다음 위쪽 충전 표시등이 흰색으로 켜진 후
깜빡이다가 계속 켜진 채로 유지됩니다.
고속 충전
- 면도기를 9분 간 충전한 후에는 아래쪽의 충전 표시등이 꺼지고 위쪽 충전 표시등이
흰색으로 깜빡이며 면도기의 전원이 1회 면도하기에 충분하다는 것을 알려줍니다.
참고: 고속 충전은 면도기를 1.5시간 동안 충전한 적이 한 번이라도 있어야만
가능합니다.
남은 배터리 용량
- 배터리의 남은 에너지의 양은 켜진 충전 표시등의 숫자로 알 수 있습니다. 배터리의
남은 용량은 면도기의 전원을 켜거나 끌 때 몇 초 동안 확인할 수 있습니다 (
그림 15).
배터리 부족
- 배터리가 부족하면 면도 도중 아래쪽 충전 표시등이 주황색으로 켜지고 면도기를 끌
때 주황색으로 깜박거립니다. (그림 16)
배터리 만충전
- 배터리가 완전히 충전되면 충전 표시등이 흰색으로 켜진 상태로 유지됩니다 (
그림 15).
- 약 1시간 후 에너지를 절약하기 위해 흰색 충전 표시등이 꺼집니다.
리필 및 충전 스테이션 표시등
컨디셔너 용기 표시등
, 컨디셔너 용기 표시등이 주황색으로 깜빡이면 다음과 같은 두 가지 경우가 가능합니
다 (그림 17).
- 리필 및 충전 스테이션에 컨디셔너 용기가 없거나 용기가 제대로 놓여 있지
않습니다.
- 컨디셔너 용기가 비었습니다.
’컨디셔너 카트리지 보충’ 표시등
, ’컨디셔너 카트리지 보충’ 표시등은 세 가지의 다른 신호를 표시합니다 (그림 18).
- 컨디셔너 카트리지를 보충할 시기에는 흰색 ‘컨디셔너 카트리지 보충’ 표시등이
깜빡입니다.
- 쉐이빙 컨디셔너 카트리지가 가득 차면 ‘컨디셔너 카트리지 보충’ 표시등이
흰색을 유지합니다.
- 컨디셔너 카트리지를 보충하는 동안 컨디셔너 용기가 비면, ‘컨디셔너 카트리지
보충’ 흰색 표시등이 꺼지고 컨디셔너 용기 표시등이 적색으로 깜빡입니다.
한국어 149
제품 사용
면도
참고: 새로운 면도 시스템에 피부가 익숙해지려면 약 2-3주 정도 걸립니다.
1 쉐이빙 컨디셔너 카트리지에 쉐이빙 컨디셔너가 충분한지 확인하십시오.
2 전원 버튼을 눌러 면도기를 켜십시오.
3 면도기를 충분히 충전했는지 확인하십시오(‘사용 전 준비’란의 ‘충전 표시’
참조).
4 쉐이빙 유닛을 피부에 대고 원을 그리며 천천히 움직이면서 편안한 면도를 위한
충분한 쉐이빙 컨디셔너가 도포될 때까지 버튼을 누르십시오. (그림 19)
- 쉐이빙 컨디셔너 버튼을 놓으면 제품이 컨디셔너 분사를 멈춥니다.
- 쉐이빙 컨디셔너 버튼을 가볍게 누르면 제품이 자동으로 일정량의 컨디셔너를
도포합니다.
- 쉐이빙 컨디셔너 버튼을 다시 눌러 쉐이빙 유닛이 피부 위에서 부드럽게 움직일 수
있도록 쉐이빙 컨디셔너를 발라주십시오.
참고: 쉐이빙 컨디셔너 버튼은 면도기의 전원이 켜져 있을 때에만 사용할 수 있습니다.
참고: 본 면도기는 일반 칼날 면도기와 비슷한 방법으로 사용할 수 있습니다. 피부에 물
기가 있는 상태에서 면도기를 사용할 수 있습니다. 기존 전기 면도기와 다르게 이 제품에
는 수염을 받아주는 수염받이가 없습니다. 옷에 수염 그루터기가 떨어지는 것을 막으려
면 충분한 쉐이빙 컨디셔너를 바르고 면도해야 합니다.
5 사용 후에는 면도기를 청소하십시오(‘청소 및 유지관리’란 참조).
6 면도기가 손상을 입지 않도록 보호용 캡을 조절하십시오 (그림 20).
최적의 움직임 및 부드러운 면도를 할 수 있는 사용 도움말
- 면도기를 피부에 대고 원을 그리며 천천히 움직입니다.
- 피부 자극의 원인이 될 수도 있으므로 면도기에 너무 강한 압력을 가하지 마십시오.
- 적절한 움직임을 위해 쉐이빙 컨디셔너를 정기적으로 발라주십시오.
- 목욕이나 샤워 중에도 면도기를 사용할 수 있습니다.
트리머 사용법
참고: 새로운 개방형 디자인으로 인해 트리머의 절삭 동작을 다른 트리머에 비해 좀 더
선명하게 듣게 됩니다. 이는 일반적인 현상입니다.
1 쉐이빙 유닛을 밀어 면도기에서 분리하십시오 (그림 21).
2 충전기에 있는 트리머 홀더에서 트리머를 분리하여 면도기에 끼우십시오(‘딸깍’
소리가 남) (그림 22).
3 전원 버튼을 눌러 면도기를 켜십시오.
4 트리머를 사용하여 구레나룻 및 콧수염을 다듬습니다.
5 사용 후에는 트리머를 청소하십시오(‘청소 및 유지관리’란 참조).
6 트리머를 분리하고 트리머 홀더에 다시 넣으십시오.
7 쉐이빙 유닛을 ‘딸깍’ 소리가 나도록 다시 면도기에 결합하십시오 (그림 23).
8 면도기가 손상을 입지 않도록 보호용 캡을 조절하십시오 (그림 20).
한국어150
청소 및 유지관리
청소
제품을 세척할 때 수세미, 연마성 세제나 알콜, 휘발유, 아세톤과 같은 강력 세제를
사용하지 마십시오.
면도기/트리머
사용 후에는 면도기와 트리머를 청소하십시오.
뜨거운 물을 사용하는 경우 주의하십시오. 손을 데지 않도록 물이 너무 뜨겁지 않은지
항상 확인하십시오.
절대로 수건이나 휴지로 쉐이빙 유닛의 물기를 닦아내지 마십시오. 쉐이빙 헤드가
손상될 수 있습니다.
참고: 이 면도기는 방수 제품이므로 물 세척이 가능합니다.
1 전원 버튼을 눌러 면도기를 켜십시오.
참고: 면도기를 켠 채로 세척하십시오.
2 뜨거운 물에 30초 이상 쉐이빙 유닛/트리머를 담그십시오 (그림 24).
3 면도기의 전원을 끄고 면도기를 흔들어 물기를 털어내십시오.
4 면도기가 손상을 입지 않도록 보호용 캡을 조절하십시오 (그림 20).
참고: 면도기가 예전처럼 잘 작동하지 않고 이 장에서 설명하는 세척 방법으로 문제를
해결할 수 없는 경우 ‘문제 해결’ 장에서 설명하는 부품별 청소 방법을 참조하십시오.
유지관리
1 6개월마다 트리머의 날 부분에 재봉틀용 기름을 한 방울씩 치십시오.
보관
보관
1 리필 및 충전 스테이션에 면도기 보관
2 여행 시 면도기를 휴대할 경우에 리필 및 충전 스테이션에 면도기 보관을 원하지
않을 경우 면도기에 보호용 캡을 씌우고 파우치에 보관합니다 (그림 20).
휴대
면도기를 오랫동안 사용하지 않거나 여행 시 휴대할 경우에 잠금 기능으로 면도기를
잠가 실수로 면도기가 켜지는 것을 방지할 수 있습니다.
잠금 기능 작동
1 면도기의 전원이 꺼져 있는지 확인하십시오.
2 쉐이빙 컨디셔너 버튼을 누른 채로 잠시 기다립니다(1). 다른 손으로 전원 버튼을
동시에 누르십시오(2) (그림 25).
3 두 버튼을 6초 동안 누르고 있습니다. 면도기에서 ‘웅’하는 소리가 나면 면도기의
중간 충전 표시등이 몇 차례 깜박입니다.
, 현재 잠금 기능이 작동하고 있습니다.
참고: 실수로 전원 버튼을 처음 누르면 면도기가 작동하기 시작합니다. 만약 이런 일이
발생하면 전원 버튼을 다시 눌러 면도기를 끄십시오.
참고: 잠금 기능이 작동할 때 전원 버튼을 누르면 중간 충전 표시등이 흰색으로 깜박이
며 면도기가 잠겨 있음을 나타냅니다.
한국어 151
도움말: 잠금 기능이 작동하면 확인하기 위해 전원 버튼을 누르십시오.
잠금 기능 해제
1 쉐이빙 컨디셔너 버튼을 누른 채로 잠시 기다립니다(1). 다른 손으로 전원 버튼을
동시에 누르십시오(2) (그림 25).
2 두 버튼을 6초 동안 누르고 있습니다. 면도기에서 ‘웅’하는 소리가 나면 면도기의
중간 충전 표시등이 몇 차례 깜박입니다.
, 현재 잠금 기능이 비활성화되어 있습니다.
참고: 면도기를 충전기에 다시 삽입해도 잠금 기능이 해제됩니다.
여행
여행 시 리필 및 충전 스테이션 휴대를 원하지 않으면 필요 시 면도기를 충전하기 위해
충전기를 가져갈 수 있습니다.
교체
쉐이빙 컨디셔너 카트리지
보다 위생적인 사용을 위해 쉐이빙 컨디셔너 카트리지를 1년마다 교체하실 것을
권장합니다. 새 카트리지는 각각의 니베아포맨 쉐이빙 컨디셔너 용기 3팩 및 교체용
키트(새 HS85 쉐이빙 유닛 및 새 카트리지 포함)로 구성되어 있습니다.
1 면도기에서 쉐이빙 컨디셔너 카트리지를 분리하십시오 (그림 26).
2 (1)새 쉐이빙 컨디셔너 카트리지의 상부가 면도기의 테두리에 있는 홈에 꼭 낄
때까지 결합하십시오. 그리고 나서 (2)엄지손가락으로 카트리지의 하단 부분을 눌러
‘딸깍’ 소리가 나도록 면도기에 카트리지를 장착하십시오 (그림 27).
3 쉐이빙 컨디셔너 카트리지 채우기(‘시작하기’란 참조).
쉐이빙 유닛
최상의 면도 효과를 얻으려면 매년 쉐이빙 유닛을 교체하십시오.
HS85 필립스 쉐이빙 유닛으로만 쉐이빙 유닛을 교체하십시오.
1 오래된 쉐이빙 유닛을 밀어 면도기에서 분리하십시오 (그림 21).
2 새로운 쉐이빙 유닛을 면도기에 끼우십시오(‘딸깍’ 소리가 남) (그림 23).
니베아포맨 쉐이빙 컨디셔너 용기
니베아포맨 쉐이빙 컨디셔너 용기만을 사용하십시오.
1 니베아포맨 쉐이빙 컨디셔너 용기의 탭을 제거하십시오 (그림 6).
2 컨디셔너 용기의 뚜껑을 ‘찰칵’ 소리가 날 때까지 시계 방향으로 돌립니다 (
그림 7).
, 뚜껑을 아래 쪽으로 밀면 컨디셔너 노즐이 나타납니다.
3 리필 및 충전 스테이션의 뚜껑을 시계 반대 방향으로 돌려 분리하십시오.
4 노즐이 아래쪽으로 가도록 컨디셔너 용기를 삽입구에 넣습니다. (그림 8)
5 (1)리필 및 충전 스테이션의 뚜껑을 다시 닫고 (2)시계 방향으로 돌려서
고정하십시오 (그림 9).
환경
- 수명이 다 된 제품은 일반 가정용 쓰레기와 함께 버리지 마시고 지정된 재활용 수거
장소에 버리십시오. 이런 방법으로 환경 보호에 동참하실 수 있습니다 (그림 28).
한국어152
- 내장형 충전식 배터리에는 환경을 오염시키는 물질이 들어 있습니다. 제품을 버리기
전에 항상 배터리를 분리하거나 지정된 수거함에 버려 주십시오. 배터리는 지정된
배터리 수거함에 버리십시오. 배터리를 분리하기 어려울 경우 필립스 서비스 센터에
제품을 가져오시면 배터리를 분리하여 안전한 방법으로 폐기해 드립니다.
충전식 배터리를 분리하십시오
면도기를 폐기할 때에만 충전식 배터리를 분리하십시오. 분리 시 배터리가 완전히
방전되었는지 확인하십시오.
배터리의 면이 날카로우니 조심하십시오.
1 면도기에서 쉐이빙 컨디셔너 카트리지를 분리하십시오 (그림 26).
2 면도기 뒤쪽의 나사 세 개를 돌리십시오 (그림 29).
3 드라이버로 케이스의 뒤쪽 패널을 분리하십시오 (그림 30).
4 전선을 자른 후 충전식 배터리를 분리하십시오.
품질 보증 및 서비스
보다 자세한 정보가 필요하거나 사용상의 문제가 있을 경우에는, 필립스전자
홈페이지www.philips.com/support를 방문하시거나 필립스 고객 상담실로
문의하십시오. 전국 서비스센터 안내는 제품 보증서를 참조하십시오. *(주)필립스전자:
(02)709-1200 *고객 상담실: (080)600-6600(수신자부담)
보증 제한
쉐이빙 유닛(안쪽날 및 바깥날)은 소모품이므로 보증에 해당되지 않습니다.
컨디셔너 카트리지는 교체형 품목이므로 해외 보증 조건에서 제외됩니다.
문제 해결
이 란은 제품을 사용하면서 가장 일반적으로 경험하게 되는 문제와 그 해결 방법을
제시합니다. 발생한 문제를 아래 정보로 해결할 수 없는 경우에는 필립스 고객 상담실로
문의하십시오.
문제점 가능한 원인 해결책
면도기가 피부
충분한 양의 쉐이빙 컨
충분한 양의 니베아포맨 쉐이빙 컨디셔너가
위에서 부드럽
디셔너를 바르지 않았
나올 때까지 쉐이빙 컨디셔너 버튼을 누르십
게 움직이지 않
기 때문입니다.
시오. 이는 다시 피부를 따라 쉐이빙 유닛이
습니다.
부드럽게 움직일 수 있도록 합니다.
면도기가
면도기가 깨끗하게
면도기를 깨끗하게 청소하십시오(‘청소 및
예전처럼 잘
청소되지 않았습니다.
유지관리’란 참조).
작동하지
않습니다.
긴 체모가 쉐이빙 헤드
아래에서 설명하는 면도기 부품별 청소 방법
에 걸렸을 수 있습니
을 참조하여 쉐이빙 헤드를 청소하십시오.
다.
쉐이빙 유닛이
쉐이빙 유닛을 교체하십시오(‘교체’란
손상되거나
참조).
마모되었습니다.

한국어 153
문제점 가능한 원인 해결책
전원 버튼을 눌
충전식 배터리가 방전
배터리를 재충전하십시오(‘제품 사용 전
러도 면도기가
되었습니다.
준비’란 참조).
작동하지 않습
니다.
잠금 기능이 작동하고
잠금 기능을 해제하십시오(‘보관’란
있습니다.
참조).
건조된 쉐이빙 컨디셔
면도를 계속하기 전에 면도기를 깨끗하게 청
너로 인해 쉐이빙 유닛
소하십시오 (‘청소’란 참조).
의 쉐이빙 헤드가 막혔
을 수 있습니다.
부품별 청소 후에
쉐이빙 유닛을 끼울 때에는 각 보호대가
쉐이빙 유닛을 제대로
제자리에 고정될 때까지 시계 반대 방향으로
장착하지 않았습니다.
돌리십시오.
카트리지에 충
컨디셔너 구멍 중 하나
쉐이빙 유닛을 헹구거나 물에 담구십시오.
분한 양의 컨디
가 막혔습니다.
그래도 작동하지 않으면 막힌 구멍에서 컨디
셔너가 있는데
셔너가 나오기 시작할 때까지 쉐이빙 컨디셔
구멍에서 소량
너를 쉐이빙 컨디셔너 카트리지로 펌프합니
의 쉐이빙 컨디
다. 이러한 방법을 사용해도 작동하지 않으
셔너만 나옵니
면 다음과 같은 방법을 시도하십시오. (1)면
다.
도기의 전원을 끄고 (2)쉐이빙 유닛을 면도
기에서 분리하십시오. (3)손가락이 구멍을
막지 않도록 올려놓고 (4)면도기의 전원을
켭니다. (5)막혀진 구멍에서 다시 컨디셔너
가 나오기 시작할 때까지 쉐이빙 컨디셔너
버튼을 몇 초간 누릅니다.
쉐이빙 헤드를 올바른
컨디셔너 구멍이 없는 쉐이빙 헤드를 올바른
홀더에 끼우지
홀더에 끼웠는지 확인하십시오. 이 홀더는
않았습니다. 쉐이빙
쉐이빙 유닛을 면도기에 끼웠을 때 전원
헤드 중 하나는 중앙에
버튼 가까이에 있는 홀더입니다.
쉐이빙 컨디셔너
구멍이 없어 특정
홀더에 끼우도록 되어
있습니다.
쉐이빙 컨디셔
쉐이빙 카트리지가 거
쉐이빙 컨디셔너 카트리지를 보충하십시오
너 버튼을 눌러
의 소모되었습니다.
(‘사용 전 준비’란 참조).
도 구멍에서 쉐
이빙 컨디셔너
가 나오지 않습
니다.
트리머에서
이 트리머는
새로운 개방형 디자인으로 인해 트리머의
다른 트리머에
개방형으로 디자인된
절삭 동작이 다른 트리머의 경우보다 좀 더
비해 소음이
제품입니다.
선명하게 들립니다. 이는 일반적인 현상으로
많이 납니다.
트리머에 이상이 있다는 표시는 아닙니다.
부품별 청소 방법
제품의 전원이 꺼져 있는지 확인하십시오.
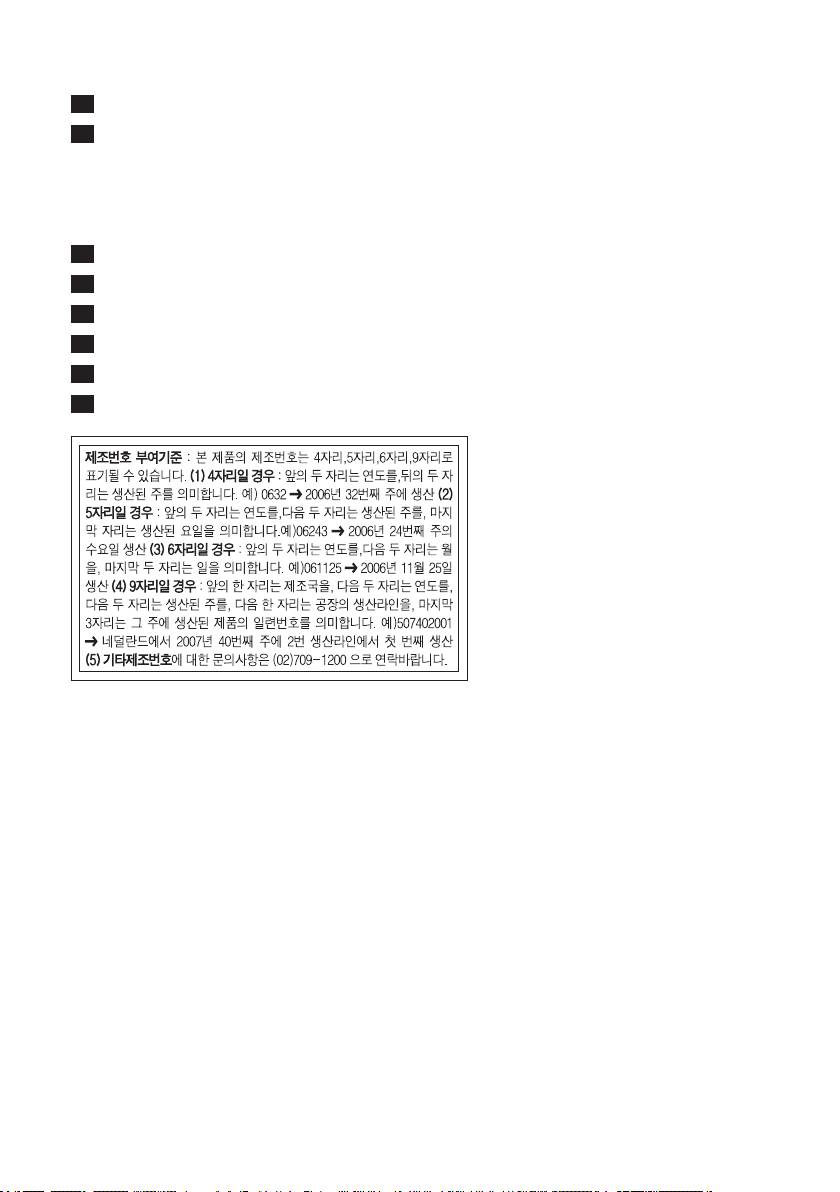
한국어154
1 쉐이빙 유닛을 밀어 면도기에서 분리하십시오 (그림 31).
2 보호대를 시계 방향으로 돌려 쉐이빙 유닛에서 들어올리십시오 (그림 32).
참고: 쉐이빙 헤드는 한 번에 하나씩 분리하십시오. 그렇지 않으면 쉐이빙 헤드를
올바른 홀더에 끼우지 못할 수 있습니다. 두 개의 쉐이빙 헤드는 쉐이빙 컨디셔너용
구멍이 각각 다르기 때문에 반드시 올바른 홀더에 끼워야 합니다. 또한 다른 쉐이빙
헤드의 칼날과 보호대가 서로 바뀔 수 있어 면도 성능에 영향을 줍니다.
3 필요한 경우 보호대에서 커터를 꺼내십시오.
4 쉐이빙 헤드의 칼날과 보호대를 면도기와 함께 제공된 브러시로 청소하십시오.
5 청소한 후에는 칼날 끝이 위를 향하도록 칼날을 쉐이빙 헤드에 다시 끼우십시오.
6 칼날 위로 보호대를 쉐이빙 헤드 홀더에 다시 끼우십시오 (그림 33).
7 보호대가 제 자리에 고정될 때까지 시계 반대 방향으로 돌리십시오 (그림 34).
8 쉐이빙 유닛을 ‘딸깍’ 소리가 나도록 다시 면도기에 결합하십시오 (그림 35).

155
Sveikiname įsigijus pirkinį ir sveiki atvykę į „Philips“! Norėdami naudotis visu „Philips“ palaikymu, savo
gaminį registruokite adresu www.philips.com/welcome.
Perskaitykite šį vartotojo vadovą, nes jame yra informacijos apie puikias šios barzdaskutės funkcijas,
taip pat keletas patarimų, kurie skutimąsi padarys lengvesnį ir malonesnį.
Barzdaskutė
Apsauginis dangtelis
Kirptuvas
Skutimo įtaisas
Skutimosi kondicionieriaus kasetė
Skutimosi kondicionieriaus mygtukas
Įjungimo / išjungimo mygtukas
Įkrovimo lemputės
Kroviklis
Pildymo ir įkrovimo blokas
Pildymo ir įkrovimo bloko dangtelis
Kirptuvo laikymo griovelis
Galinis skydelis
Lizdas mažam kištukui
Kondicionieriaus kasetės pildymo indikatorius
Kondicionieriaus buteliuko indikatorius
Valymo šepetėlis
NIVEA FOR MEN skutimosi kondicionieriaus buteliukas
Krepšelis
Adapteris (jūsų adapteris gali skirtis nuo parodyto paveikslėlyje)
Prieš naudodami prietaisą, atidžiai perskaitykite šį vadovą ir laikykite jį, kad galėtumėte pasinaudoti šia
informacija vėliau.
- Patikrinkite, ar adapteris nesudrėkęs (jūsų adapteris gali skirtis nuo parodyto
paveikslėlyje) (Pav. 2).
- Būkite atsargūs su karštu vandeniu. Visada patikrinkite, ar vanduo nėra per karštas, kad
nenusiplikytumėte rankų.
- Adapteryje yra transformatorius. Kad nesukeltumėte pavojingų situacijų, jokiu būdu nenupjaukite
adapterio, norėdami jį pakeisti kitu kištuku.
- Šis prietaisas neskirtas naudoti asmenims (įskaitant vaikus) su ribotomis zinėmis, sensorinėmis ar
psichinėmis galimybėmis arba asmenims, neturintiems pakankamai patirties ir žinių, nebent juos
prižiūri arba naudotis prietaisu apmoko už jų saugą atsakingas asmuo.
- Prižiūrėkite vaikus, kad jie nežaistų su prietaisu.
- Niekada nenardinkite pildymo ir įkrovimo bloko į vandenį ir neskalaukite jo po iš čiaupo tekančiu
vandeniu (Pav. 3).
- Niekada nenardinkite kroviklio į vandenį ir neskalaukite po iš čiaupo tekančiu vandeniu (Pav. 4).
- Pildymo ir įkrovimo bloką bei kroviklį visada dėkite ir naudokite ant skysčiui atsparaus paviršiaus.
- Naudokite, kraukite ir laikykite prietaisą nuo 5 °C iki 35 °C temperatūroje.
156
- Kai keliaujate, visada ant barzdaskutės uždėkite apsauginį dangtelį, kad būtų apsaugotos skutimo
galvutės.
- Barzdaskutė ir kiti priedai neatsparūs indų plovikliui.
- Barzdaskutės niekada neskalaukite šiltesniu už 80°C vandeniu.
- Naudokite tik rinkinyje esantį adapterį, kroviklį ir pildymo ir įkrovimo bloką.
- Nenaudokite pildymo ir krovimo bloko, jei adapteris arba pats blokas pažeistas.
- Nenaudokite barzdaskutės arba kroviklio, jeigu jie sugadinti.
- Jei adapteris pažeistas, kad išvengtumėte pavojaus, visada pakeiskite jį originaliu adapteriu.
- Ši barzdaskutė atitinka patvirtintus tarptautinius saugumo reikalavimus ir ja galima saugiai
naudotis vonioje arba duše ir plauti po tekančiu vandeniu (Pav. 5).
- Šis „Philips“ prietaisas atitinka visus elektromagnetinių laukų (EMF) standartus. Tinkamai
eksploatuojant prietaisą pagal šiame vartotojo vadove pateiktus nurodymus, remiantis dabartine
moksline informacija, jį yra saugu naudoti.
- Adapteris transformuoja 100–240 V įtampą į saugią, žemesnę nei 24 V, įtampą.
1 Pašalinkite NIVEA FOR MEN skutimosi kondicionieriaus kasetės auselę (Pav. 6).
2 Pasukite kondicionieriaus dangtelį pagal laikrodžio rodyklę (išgirsite spragtelėjimą) (Pav. 7).
, Dangtelis pajudės žemyn ir pasirodys kondicionieriaus antgalis.
3 Pasukdami pildymo ir įkrovimo bloko dangtelį prieš laikrodžio rodyklę jį nuimkite.
4 Nuimkite pakuotę nuo pildymo ir įkrovimo bloko angos, skirtos buteliukui įdėti.
5 Kondicionieriaus buteliuką įkiškite į statymo angą antgaliu nukreiptu žemyn (Pav. 8).
6 Uždėkite atgal pildymo ir įkrovimo bloko dangtelį (1) ir pasukite jį pagal laikrodžio rodyklę,
kad jis užsiksuotų (2) (Pav. 9).
7 Mažąjį kištuką įkiškite į pildymo ir įkrovimo bloko lizdą, o adapterį įjunkite į sieninį el.
lizdą (Pav. 10).
8 Barzdaskutę įstatykite į pildymo ir įkrovimo bloką ir pastumkite jį atgal (pasigirs
trakštelėjimas) (Pav. 11).
Pastaba: Barzdaskutė yra įkraunama ir pripildoma skutimosi kondicionieriumi automatiškai.
9 Barzdaskutę kraukite 90 minučių. (Pav. 12)
Pastaba: Įkraukite barzdaskutę prieš naudodami ją pirmą kartą arba kai įkrovimo lemputė rodo, kad
baterija išsikrovusi (žr. skyrių „Įkrovimo rodmenys“).
Pastaba: Barzdaskute su visiškai įkrauta baterija galima skustis iki 40 minučių.
1 Įkiškite mažą kištuką į kroviklį, o adapterį – į sieninį el. lizdą.
2 Barzdaskutę įstatykite į kroviklį (Pav. 13).
, Barzdaskutė kraunama.
3 Kraukite barzdaskutę 1,5 valandas.
Pastaba: Įkraukite barzdaskutę prieš naudodami ją pirmą kartą arba kai įkrovimo lemputė rodo, kad
baterija išsikrovusi (žr. skyrių „Įkrovimo rodmenys“).
Pastaba: Barzdaskute su visiškai įkrauta baterija galima skustis iki 40 minučių.

157
Skutimosi kondicionieriaus kasetę galite pildyti ir nenaudodami pildymo ir įkrovimo bloko:
1 Kondicionieriaus buteliuko antgalį įkiškite į kondicionieriaus kasetės pildymo angą.
2 Pajudinkite buteliuką aukštyn ir žemyn maždaug 5 kartus, kad skutimosi kondicionierius
subėgtų į kasetę, kol pamatysite, jog kasetė pilna (Pav. 14).
- Įkrovimo lemputė rodo baterijos įkrovimo lygį. Įkrovimo metu apatinė įkrovimo lemputė vieną
kartą sumirksi oranžine spalva ir paskui užgęsta. Tada viršutinė įkrovimo
lemputė pradeda mirksėti baltai, o paskui ima nuolat degti baltai.
- Įkrovus barzdaskutę 9 minutes, įkrovimo lemputė apačioje užgęsta ir įkrovimo lemputė viršuje
pradeda mirksėti baltai, rodydama, kad energijos užteks vienam skutimuisi.
Pastaba: Greitas įkrovimas galimas tik tada, jei barzdaskutė jau buvo vieną kartą įkrauta 1,5 valandos.
- Likusį baterijos energijos kiekį galima nustatyti pagal degančių įkrovimo lempučių skaičių. Likusi
baterijos įkrova rodoma keletą sekundžių barzdaskutę įjungus arba išjungus (Pav. 15).
- Kai baterija senka, skutimosi metu apatinė įkrovimo lemputė pradeda degti oranžine spalva ir
pradeda mirksėti, kai išjungiate barzdaskutę. (Pav. 16)
- Kai maitinimo elementai yra visiškai įkrauti, visos maitinimo elemento įkrovos lemputės pradeda
degti baltai pastoviai (Pav. 15).
- Po maždaug 1 valandos, balta šviesa užgęsta, kad būtų sutaupyta energijos.
, Kai kondicionieriaus buteliuko indikatorius mirksi oranžine spalva, gali būti dvi
priežastys: (Pav. 17)
- Į pildymo ir įkrovimo bloką neįstatytas kondicionieriaus buteliukas arba jis įstatytas netinkamai.
- Kondicionieriaus buteliukas tuščias.
, Kondicionieriaus kasetės pildymo indikatorius rodo tris skirtingus dalykus: (Pav. 18)
- Kai kondicionieriaus kasetė pildoma, mirksi baltas kondicionieriaus kasetės pildymo indikatorius.
- Kai skutimosi kondicionieriaus kasetė pilna, ištisai dega baltas kondicionieriaus kasetės pildymo
indikatorius.
- Jei kondicionieriaus buteliukas ištuštėja kondicionieriaus kasetės pildymo metu, baltas
kondicionieriaus kasetės pildymo indikatorius užgęsta ir kondicionieriaus buteliuko indikatoriai
mirksi raudonai.
Pastaba: Jūsų odai gali prireikti 2–3 savaičių, kad priprastų prie šios skutimosi sistemos.
1 Patikrinkite, ar skutimosi kondicionieriaus kasetėje yra pakankamai skutimosi
kondicionieriaus.

158
2 Barzdaskutę įjunkite paspausdami įjungimo / išjungimo mygtuką.
3 Patikrinkite, ar barzdaskutė pakankamai įkrauta (žr. skyriaus „Paruošimas naudoti“ skirsnį
„Įkrovimo rodmenys“).
4 Sukamaisiais judesiais švelniai braukite skutimo įtaisu per odą ir spauskite skutimosi
kondicionieriaus mygtuką, kol ant jūsų odos bus pakankamai skutimosi kondicionieriaus
patogiam skutimui. (Pav. 19)
- Kai atleidžiate skutimosi kondicionieriaus mygtuką, prietaisas nebeišskiria kondicionieriaus.
- Jei trumpai paspausite skutimosi kondicionieriaus mygtuką, prietaisas automatiškai išskirs šiek tiek
kondicionieriaus.
- Dar kartą paspauskite skutimosi kondicionieriaus mygtuką, jei skutimosi metu prireikia daugiau
skutimosi kondicionieriaus, kad skutimo įtaisas ir toliau lengvai slystų jūsų oda.
Pastaba: Skutimosi kondicionieriaus mygtukas veikia tik tada, kai barzdaskutė yra įjungta.
Pastaba: Ši barzdaskutė gali būti naudojama panašiai kaip ir skutimosi peiliukas: galite naudoti
barzdaskutę skusdami drėgną veidą. Priešingai nei įprasta elektrinė barzdaskutė, šis prietaisas neturi
plaukų skyrelio, kuris surenka plaukelius. Norėdami, kad skutimosi metu plaukeliai nekristų ant drabužių,
naudokite pakankamai skutimosi kondicionieriaus.
5 Po kiekvieno naudojimo kruopščiai išvalykite barzdaskutę (žr. skyrių „Valymas ir priežiūra“).
6 Norėdami išvengti pažeidimų, ant barzdaskutės užstumkite apsauginį gaubtelį (Pav. 20).
- Sukamaisiais judesiais švelniai braukite skutimo įtaisu per odą.
- Nespauskite barzdaskutės per stipriai, kad nesudirgintumėte odos.
- Norėdami užtikrinti tinkamą slydimą, nuolat naudokite skutimosi kondicionierių.
- Barzdaskutę taip pat galite naudoti vonioje arba duše.
Pastaba: Dėl naujos atviros konstrukcijos veikiantį kirptuvą girdėsite aiškiau nei kitus kirptuvus. Tai yra
normalu.
1 Nuimkite barzdaskutės skutimo įtaisą (Pav. 21).
2 Išimkite kirptuvą iš kirptuvo laikiklio, esančio ant įkroviklio ir uždėkite ant barzdaskutės
(išgirsite spragtelėjimą) (Pav. 22).
3 Barzdaskutę įjunkite paspausdami įjungimo / išjungimo mygtuką.
4 Kirptuvą galite naudoti žandenoms ir / arba ūsams padailinti.
5 Po kiekvieno naudojimo kruopščiai išvalykite kirptuvą (žr. skyrių „Valymas ir priežiūra“).
6 Nuimkite kirptuvą ir įstatykite jį atgal į kirptuvo laikiklį.
7 Ant barzdaskutės vėl uždėkite skutimo įtaisą (išgirsite spragtelėjimą) (Pav. 23).
8 Norėdami išvengti pažeidimų, ant barzdaskutės užstumkite apsauginį gaubtelį (Pav. 20).
niekada nenaudokite šiurkščių kempinių, šlifuojamųjų valiklių arba ėsdinančių skysčių, pvz., benzino
arba acetono prietaisui valyti.
Po kiekvieno naudojimo išvalykite barzdaskutę ir kirptuvą.
159
Būkite atsargūs su karštu vandeniu. Visada patikrinkite, ar vanduo nėra per karštas, kad
nenusiplikytumėte rankų.
Niekada nevalykite skutimo įtaiso rankšluosčiu arba audiniu, nes tai gali pakenkti skutimo galvutei.
Pastaba: Barzdaskutė yra atspari vandeniui, todėl ją galima plauti vandeniu.
1 Barzdaskutę įjunkite paspausdami įjungimo / išjungimo mygtuką.
Pastaba: Barzdaskutę plaukite įjungtą.
2 Panardinkite skutimo įtaisą / kirptuvą į karštą vandenį mažiausiai 30 sekundžių (Pav. 24).
3 Išjunkite barzdaskutę ir nupurtykite likusį vandenį.
4 Norėdami išvengti pažeidimų, ant barzdaskutės užstumkite apsauginį gaubtelį (Pav. 20).
Pastaba: Jei barzdaskutė skuta prasčiau negu anksčiau, o jums nepavyksta išspręsti šios problemos šiame
skyriuje aprašytais valymo būdais, dėl itin kruopštaus valymo būdo žr. skyrių „Trikčių šalinimas“.
1 Kas šešis mėnesius kirptuvo dantelius sutepkite lašu mašininės alyvos.
1 Barzdaskutę laikykite pildymo ir įkrovimo bloke.
2 Jeigu ruošiatės į kelionę ar nenorite laikyti barzdaskutės pildymo ir įkrovimo bloke, ant
barzdaskutės uždėkite apsauginį dangtelį ir laikykite ją maišelyje (Pav. 20).
Jei barzdaskutę laikysite ilgą laiką nenaudodami ar keliausite, ją galima užrakinti. Užrakinimas
transportuojant užtikrins, kad barzdaskutė atsitiktinai neįsijungs.
1 Patikrinkite, ar barzdaskutė išjungta.
2 Paspauskite ir palaikykite skutimosi kondicionieriaus mygtuką (1), o kita ranka paspauskite
įjungimo / išjungimo mygtuką (2) (Pav. 25).
3 Palaikykite nuspaudę abu mygtukus 6 sekundes. Palaukite, kol barzdaskutė pradės skleisti
zvimbiantį garsą ir viršutinė įkrovimo lemputė sumirksės kelis kartus.
, Užrakinimas transportuojant suaktyvintas.
Pastaba: Jei netyčia pirmiausia paspausite įjungimo / išjungimo mygtuką, barzdaskutė pradės veikti. Jei
taip atsitiko, dar kartą paspauskite įjungimo / išjungimo mygtuką, kad išjungtumėte barzdaskutę.
Pastaba: Jei paspausite įjungimo / išjungimo mygtuką, kai yra suaktyvintas užrakinimas transportuojant,
vidurinė įkrovimo lemputė mirksės baltai rodydama, kad barzdaskutė užrakinta.
Patarimas: Paspauskite įjungimo / išjungimo mygtuką, kad patikrintumėte, ar užrakinimas transportuojant
suaktyvintas. Jei užrakinimas transportuojant suaktyvintas, barzdaskutė neįsijungs.
1 Paspauskite ir palaikykite skutimosi kondicionieriaus mygtuką (1), o kita ranka paspauskite
įjungimo / išjungimo mygtuką (2) (Pav. 25).
2 Palaikykite nuspaudę abu mygtukus 6 sekundes. Palaukite, kol barzdaskutė pradės skleisti
zvimbiantį garsą ir viršutinė įkrovimo lemputė sumirksės kelis kartus.
160
, Užrakinimas transportuojant išjungtas.
Pastaba: Užrakinimas transportuojant taip pat gali būti išjungtas įstačius barzdaskutę į kroviklį.
Jeigu ruošiatės į kelionę ir nenorite imti pildymo ir įkrovimo bloko, galite pasiimti kroviklį barzdaskutei
įkrauti.
Kad būtų higieniška, patariame skutimosi kondicionieriaus kasetę keisti du kartus per metus. Nauja
kasetė yra kiekvienoje NIVEA FOR MEN pakuotėje kartu su 3 skutimosi kondicionieriaus buteliukais,
ir keičiamame rinkinyje (įeina naujas HS85 skutimo įtaisas ir nauja kasetė).
1 Iš barzdaskutės išimkite skutimosi kondicionieriaus kasetę (Pav. 26).
2 Įkiškite ąselę naujos skutimosi kondicionieriaus kasetės viršuje į lizdą, esantį barzdaskutės
briaunoje (1). Tada nykščiu paspauskite apatinę kasetės dalį (2), kad pritvirtintumėte
kasetę prie barzdaskutės (išgirsite spragtelėjimą) (Pav. 27).
3 Užpildykite skutimosi kondicionieriaus kasetę (žr. skyrių „Pradžia“).
Barzdaskutė veiks optimaliai, jei skutimo įtaisą keisite kasmet.
Skutimo įtaisą pakeiskite tik „HS85 Philips“ skutimo įtaisu.
1 Nuo barzdaskutės nuimkite seną skutimo įtaisą (Pav. 21).
2 Įstatykite skutimo įtaisą į barzdaskutę (išgirsite spragtelėjimą) (Pav. 23).
Naudokite tik NIVEA FOR MEN skutimosi kondicionieriaus buteliukus.
1 Pašalinkite NIVEA FOR MEN skutimosi kondicionieriaus kasetės auselę (Pav. 6).
2 Pasukite kondicionieriaus dangtelį pagal laikrodžio rodyklę (išgirsite spragtelėjimą) (Pav. 7).
, Dangtelis pajudės žemyn ir pasirodys kondicionieriaus antgalis.
3 Pasukdami pildymo ir įkrovimo bloko dangtelį prieš laikrodžio rodyklę jį nuimkite.
4 Kondicionieriaus buteliuką įkiškite į buteliuko statymo angą antgaliu nukreiptu žemyn (Pav. 8).
5 Uždėkite atgal pildymo ir įkrovimo bloko dangtelį (1) ir pasukite jį pagal laikrodžio rodyklę
(2), kad jis užsiksuotų (Pav. 9).
- Pasibaigus eksploatacijos laikui neišmeskite lygintuvo kartu su įprastomis namų ūkio atliekomis,
bet priduokite jį į ocialų perdirbimo punktą. Taip prisidėsite prie aplinkos išsaugojimo (Pav. 28).
- Įdėtoje, įkraunamoje baterijoje yra medžiagų, kurios gali teršti aplinką. Prieš išmesdami prietaisą
arba atiduodami į surinkimo punktą, būtinai išimkite baterijas. Jas atiduokite į baterijų surinkimo
punktą. Jei baterijos išimti nepavyksta, prietaisą galite nunešti į „Philips“ techninės priežiūros
centrą. Centro darbuotojai išims baterijas ir išmes jas neteršdami aplinkos.
Įkraunamą bateriją išimkite tik išmesdami barzdaskutę. Išimdami bateriją patikrinkite, ar ji yra
visiškai išsikrovusi.

161
Būkite atsargūs – baterijos juostelės yra aštrios.
1 Iš barzdaskutės išimkite skutimosi kondicionieriaus kasetę (Pav. 26).
2 Atsukite tris varžtelius, esančius galinėje barzdaskutės dalyje (Pav. 29).
3 Naudodami atsuktuvą, nuimkite galinį korpuso skydelį (Pav. 30).
4 Nukirpkite laidus ir išimkite įkraunamą bateriją.
Prireikus techninio aptarnavimo paslaugų, informacijos arba jei iškilo problema, apsilankykite „Philips“
tinklapyje adresu www.philips.com/support arba susisiekite su jūsų šalyje esančiu „Philips“ pagalbos
vartotojams centru (jo telefono numerį rasite garantiniame lapelyje, kuriame yra informacija apie
punktus visame pasaulyje). Jei jūsų šalyje nėra pagalbos vartotojams centro, kreipkitės į „Philips“
produkcijos vietos platintoją.
Skutimo įtaisams (skutikliams ir apsaugoms) netaikomos tarptautinės garantijos sąlygos, nes šios dalys
dėvisi.
Kondicionieriaus kasetė yra vienkartinė ir jai nesuteikiamas tarptautinėje garantijoje nustatytas
garantinis laikas.

162
Šiame skyriuje apibendrinamos problemos, dažniausiai pasitaikančios naudojantis šiuo prietaisu. Jei
žemiau pateikiama informacija nepadės išspręsti problemos, kreipkitės į jūsų šalyje esantį Pagalbos
vartotojams centrą.
Problema Galima priežastis Sprendimas
Skutiklis neslysta
Naudojote per mažai
Spauskite skutimosi kondicionieriaus mygtuką,
švelniai mano
skutimosi kondicionieriaus.
kol išsiskirs pakankamai NIVEA FOR MEN
oda.
skutimosi kondicionieriaus. Tai privers skutimo
įtaisą vėl lengvai slysti jūsų oda.
Barzdaskutė skuta
Tinkamai neišvalėte
Kruopščiai išvalykite barzdaskutę (žr. skyrių
prasčiau negu
barzdaskutės.
„Valymas ir priežiūra“).
anksčiau.
Ilgi plaukai apsivelia aplink
Išvalykite skutimo galvutes šiais itin kruopštaus
skutimo galvutes.
valymo būdo žingsniais.
Sugadintas arba susidėvėjęs
Pakeiskite skutimo bloką (žr. skyrių „Keitimas“).
skutimo blokas.
Barzdaskutė
Įkraunama baterija yra
Įkraukite bateriją (žr. skyrių „Paruošimas
neįsijungia, kai
išsikrovusi.
naudoti“).
paspaudžiu
įjungimo /
išjungimo
mygtuką.
Užrakinimas transportuojant
Išjunkite transportavimo užraktą (žr. skyrių
suaktyvintas.
„Laikymas“).
Sudžiūvęs skutimo
Prieš vėl skusdamiesi kruopščiai išplaukite
kondicionierius užkemša
barzdaskutę (žr. skyrių „Valymas“).
skutimo įtaise esančias
skutimo galvutes.
Netinkamai surinkote
Kai surenkate skutimo įtaisą, patikrinkite, ar
skutimo įtaisą po itin
kiekvieną apsaugą pasukote prieš laikrodžio
kruopštaus valymo.
rodyklę, kol ji užsiksavo.
Iš skylučių
Viena iš snapelio
Išplaukite ar pamirkykite skutimo įtaisą. Jei tai
išsiskiria mažai
skylučių užsikišusi.
nepadeda, pumpuokite kondicionierių į
skutimosi
kondicionieriaus kasetę, kol kondicionierius
kondicionieriaus
pradeda bėgti pro užsikimšusią skylutę. Jei ir tai
net ir tada, kai
nepadeda, pabandykite tokį būdą: 1) Išjunkite
kondicionieriaus
barzdaskutę 2) Ištraukite skutimo įtaisą iš
kasetėje yra
barzdaskutės 3) Įkiškite pirštą į skylutę, kuri
pakankamai.
nėra užblokuota 4) Įjunkite barzdaskutę 5)
Paspauskite skutimosi kondicionieriaus mygtuką
keletą sekundžių, kol kondicionierius pradeda
bėgti iš užsikimšusios skylutės.
163
Problema Galima priežastis Sprendimas
Tikriausiai neįstatėte skutimo
Patikrinkite, ar skutimo galvutę be skutimo
galvučių atgal į jų laikiklius.
kondicionieriaus skylutės įstatėte į tinkamą
Viena iš skutimo galvučių
laikiklį. Tai laikiklis, kuris yra arčiausiai įjungimo /
viduryje neturi skutimo
išjungimo mygtuko, kai skutimo įtaisas yra
kondicionieriaus skylutės,
prijungtas prie barzdaskutės.
todėl ją reikia įstatyti į
tinkamą laikiklį.
Iš skylučių
Skutimosi kondicionieriaus
Pripildykite skutimosi kondicionieriaus kasetę
neišsiskiria
kasetė beveik tuščia.
(žr. skyrių „Paruošimas naudoti“).
skutimosi
kondicionieriaus,
kai paspaudžiu
skutimosi
kondicionieriaus
mygtuką.
Kirptuvas
Šis kirptuvas yra atviros
Dėl naujos atviros konstrukcijos veikiantį
skleidžia daugiau
konstrukcijos.
kirptuvą girdėsite aiškiau nei kitus kirptuvus. Tai
triukšmo nei kiti
yra normalu ir nereiškia, kad kirptuvui kažkas
kirptuvai.
negerai.
Patikrinkite, ar prietaisas išjungtas.
1 Nuimkite barzdaskutės skutimo įtaisą (Pav. 31).
2 Pasukite apsaugą pagal laikrodžio rodyklę ir nuimkite ją nuo skutimo įtaiso (Pav. 32).
Pastaba: Vienu metu nuimkite tik vieną skutimo galvutę. Taip būsite tikri, kad kiekvieną skutimo galvutę
įstatysite į jai skirtą laikiklį, o tai yra būtina, nes dvi skutimo galvutės turi specialias skylutes, skirtas
skutimosi kondicionieriui. Taip pat tokiu būdu nesumaišysite skirtingų skutimo galvučių skutiklių ir
apsaugų, nes tai pakenktų skutimo veiksmingumui.
3 Jei reikia, nuo apsaugos nuimkite skutiklį.
4 Rinkinyje esančiu šepetėliu išvalykite skutiklį ir apsaugą.
5 Po valymo įstatykite skutiklį atgal į skutimo įtaisą taip, kad skutiklio kojelės būtų nukreiptos į
viršų.
6 Įstatykite apsaugą į skutimo galvutės laikiklį (virš skutiklio) (Pav. 33).
7 Sukite apsaugą prieš laikrodžio rodyklę, kol ji užsiksuos (Pav. 34).
8 Ant barzdaskutės vėl uždėkite skutimo įtaisą (išgirsite spragtelėjimą) (Pav. 35).

164
Apsveicam ar pirkumu un laipni lūdzam Philips! Lai pilnībā gūtu labumu no Philips piedāvātā atbalsta,
reģistrējiet savu izstrādājumu www.philips.com/welcome.
Lūdzu, izlasiet šo lietotāja rokasgrāmatu, jo tā satur informāciju par šī skuvekļa brīnišķīgajām
iespējām un arī dažādus padomus, kā padarīt skūšanos daudz patīkamāku.
Skuveklis
Aizsarguzgalis
Trimmeris
Skūšanas bloks
Skūšanās balzama kasetne
Skūšanās balzama padeves poga
Ieslēgšanas/izslēgšanas poga
Lādēšanas signāllampiņas
Lādētājs
Uzpildīšanas un uzlādēšanas stacija
Uzpildīšanas un uzlādēšanas stacijas vāciņš
Trimmera uzglabāšanas sprauga
Aizmugures panelis
Mazās kontaktdakšas kontaktligzda
Signāllampiņa ‘Notiek balzama kasetnes uzpildīšana’
Balzama pudeles signāllampiņa
Tīrīšanas suka
NIVEA FOR MEN skūšanās balzama pudele
Somiņa
Adapteris (jūsu adapteris var atšķirties no attēlā redzamā).
Pirms ierīces lietošanas uzmanīgi izlasiet šo lietošanas pamācību un saglabājiet to, lai vajadzības
gadījumā varētu ieskatīties tajā arī turpmāk.
- Pārliecinieties, ka adapteris nekļūst mitrs (jūsu adapteris var atšķirties no attēlā
redzamā) (Zīm. 2).
- Esiet piesardzīgi, kad lietojat karstu ūdeni. Lai neapplaucētu rokas, vienmēr pārbaudiet, vai ūdens
nav pārāk karsts.
- Adapterī ir iekļauts strāvas pārveidotājs. Nenogrieziet adapteri, lai to nomainītu ar citu
kontaktdakšu, jo tādējādi tiks izraisīta bīstama situācija.
- Šo ierīci nevar izmantot personas (tai skaitā bērni) ar ziskiem, maņu vai garīgiem traucējumiem
vai ar nepietiekamu pieredzi un zināšanām, kamēr par viņu drošību atbildīgā persona nav īpaši
viņus apmācījusi izmantot šo ierīci.
- Jānodrošina, lai ar ierīci nevarētu rotaļāties mazi bērni.
- Nekad neiemērciet uzpildīšanas un uzlādēšanas staciju ūdenī, kā arī neskalojiet to tekošā
ūdenī (Zīm. 3).
- Nekad neiegremdējiet lādētāju ūdenī, kā arī neskalojiet to tekošā ūdenī (Zīm. 4).
- Vienmēr novietojiet un lietojiet uzpildīšanas un uzlādēšanas staciju vai lādētāju uz virsmas, kas ir
ūdensnecaurlaidīga.
- Lietojiet, uzlādējiet un glabājiet ierīci no 5 °C līdz 35 °C temperatūrā.
165
- Vienmēr uzlieciet aizsargvāciņu uz skuvekļa, lai aizsargātu skūšanas galvas kamēr ceļojat.
- Skuveklis un citi piederumi nav paredzēti mazgāšanai trauku mazgājamā mašīnā.
- Nekad neskalojiet skuvekli ar ūdeni, kura temperatūra pārsniedz 80 °C.
- Izmantojiet tikai komplektā iekļauto adapteri, lādētāju un uzpildīšanas un uzlādēšanas staciju.
- Nelietojiet uzpildīšanas un uzlādēšanas staciju, ja adapteris, vai pati stacija ir bojāta.
- Nelietojiet skuvekli vai lādētāju, ja tas bojāts.
- Ja adapteris ir bojāts, nomainiet to ar vienu no oriģinālām detaļām, lai izvairītos no bīstamām
situācijām.
- Šis skuveklis atbilst starptautiski atzītajiem drošības noteikumiem, un to var droši lietot dušā vai
vannā un mazgāt zem tekoša krāna ūdens (Zīm. 5).
- Šī Philips ierīce atbilst visiem standartiem saistībā ar elektromagnētiskiem laukiem (EMF). Ja
rīkojaties atbilstoši un saskaņā ar instrukcijām šajā rokasgrāmatā, ierīce ir droši izmantojama
saskaņā ar mūsdienās pieejamajiem zinātniskiem datiem.
- Barošanas kontaktdakša pārveido 100-240 voltu spriegumu uz drošu spriegumu, kas ir mazāks
par 24 voltiem.
1 Noņemiet NIVEA FOR MEN skūšanās balzama pudeles aizsarguzlīmi (Zīm. 6).
2 Pagrieziet balzama pudeles vāciņu pulksteņa rādītāja virzienā (atskan klikšķis) (Zīm. 7).
, Vāciņš virzās uz leju un parādās balzama sprausla.
3 Pagrieziet vāciņu uz uzpildīšanas un uzlādēšanas stacijas pretēji pulksteņa rādītāja virzienam,
lai to noņemtu.
4 Noņemiet iepakojumu no pudeles novietošanas atveres uzpildīšanas un uzlādēšanas stacijā.
5 Ievietojiet pudeli novietošanas atverē ar sprauslu lejupvērstā virzienā (Zīm. 8).
6 Uzlieciet vāciņu atpakaļ uz uzpildīšanas un uzlādēšanas stacijas (1), un pagrieziet to pulksteņa
rādītāja virzienā, lai nostiprinātu (2) (Zīm. 9).
7 Iespraudiet mazo kontaktdakšu uzpildīšanas un uzlādēšanas stacijas kontaktligzdā un adapteru
sienas kontaktligzdā (Zīm. 10).
8 Ievietojiet skuvekli uzpildīšanas un uzlādēšanas stacijā, un nospiediet to uz aizmuguri (atskan
klikšķis) (Zīm. 11).
Piezīme: Skuveklis tiek automātiski uzlādēts un uzpildīts ar skūšanās balzamu.
9 Lādējiet skuvekli 90 minūtes. (Zīm. 12)
Piezīme: Lādējiet skuvekli pirms pirmās lietošanas reizes, vai, kad lādēšanas signāllampiņa norāda, ka
akumulators ir tukšs (skatiet sadaļu ‘Lādēšanas rādījumi’).
Piezīme: Pilnībā uzlādēts skuveklis nodrošina skūšanās laiku līdz 40 minūtēm.
1 Ievietojiet mazo kontaktdakšu lādētājā un adapteri sienas kontaktligzdā.
2 Ievietojiet skuvekli lādētājā (Zīm. 13).
, Skuveklis tiek uzlādēts.
3 Lādējiet skuvekli 1,5 h.

166
Piezīme: Lādējiet skuvekli pirms pirmās lietošanas reizes, vai, kad lādēšanas signāllampiņa norāda, ka
akumulators ir tukšs (skatiet sadaļu ‘Lādēšanas rādījumi’).
Piezīme: Pilnībā uzlādēts skuveklis nodrošina skūšanās laiku līdz 40 minūtēm.
Jūs arī varat uzpildīt skūšanās balzama kasetni neizmantojot uzpildīšanas un uzlādēšanas staciju:
1 Ievietojiet balzama pudeles sprauslu balzama kasetnes iepildīšanas atverē.
2 Kustiniet pudeli augšup un lejup aptuveni 5 reizes, lai iesūknētu skūšanās balzamu kasetnē, līdz
redzat, ka kasetne ir pilna (Zīm. 14).
- Lādēšanas signāllampiņas norāda akumulatora uzlādes līmeni. Lādēšanas laikā apakšējā lādēšanas
signāllampiņa vispirms mirgo oranžā krāsā un pēc tam izdziest. Augšējā lādēšanas signāllampiņa
sāk mirgot baltā krāsā un tad turpina degt pastāvīgi baltā krāsā.
- Pēc lādēšanas 9 minūtēm, apakšējā lādēšanas signāllampiņa izdziest un augšējā lādēšanas
signāllampiņa sāk mirgot baltā krāsā, tā parādot, ka skuveklī pietiek enerģijas vienai skūšanās reizei.
Piezīme: Ātrā lādēšana ir iespējama tikai, kad jau esat vienu reizi 90 minūtes lādējuši skuvekli.
- Enerģijas daudzums, kas atlicis akumulatorā, tiek parādīts ar iedegto lādēšanas signāllampiņu
skaitu. Atlikusī akumulatora ietilpība ir redzama dažas sekundes, kad ieslēdzat vai izslēdzat
skuvekli (Zīm. 15).
- Kad akumulators ir gandrīz izlādējies, skūšanās laikā apakšējā lādēšanas signāllampiņa iedegas
oranžā krāsā un turpina mirgot oranžā krāsā, kad izslēdzat skuvekli. (Zīm. 16)
- Kad akumulators ir pilnībā uzlādēts, visi akumulatora līmeņa indikatori nepārtraukti deg (Zīm. 15).
- Pēc aptuveni 1 stundas baltās lādēšanas signāllampiņas izdziest, lai taupītu enerģiju.
, Kad balzama pudeles signāllampiņa mirgo oranžā krāsā, pastāv divas iespējas: (Zīm. 17)
- Uzpildīšanas un uzlādēšanas stacijā nav ievietota balzama pudele, vai arī tā ievietota nepareizi.
- Balzama pudele ir tukša.
, Signāllampiņa ‘Notiek balzama kasetnes uzpildīšana’ norāda trīs dažādas lietas: (Zīm. 18)
- Kad tiek uzpildīta balzama kasetne, mirgo baltā signāllampiņa ‘Notiek balzama kasetnes
uzpildīšana’.
- Kad skūšanās balzama kasetne ir pilna, nepārtraukti deg baltā signāllampiņa ‘Notiek balzama
kasetnes uzpildīšana’.
- Ja balzama pudele iztukšojas balzama kasetnes uzpildīšanas laikā, baltā signāllampiņa ‘Notiek
balzama kasetnes uzpildīšana’ izdziest, un balzama pudeles signāllampiņas mirgo sarkanā krāsā.
Piezīme: Jūsu ādai var būt nepieciešamas 2 līdz 3 nedēļas, lai pierastu pie jaunās skūšanās sistēmas.
167
1 Pārliecinieties, ka skūšanās balzama kasetnē ir pietiekošo daudz skūšanās balzama.
2 Lai ieslēgtu ierīci, nospiediet ieslēgšanas/izslēgšanas pogu.
3 Pārliecinieties, ka skuveklis ir pietiekoši uzlādēts (skatīt nodaļas ‘Sagatavošana lietošanai’
sadaļu ‘Lādēšanas rādījumi’).
4 Maigi virziet skūšanas bloku apļos pāri ādai, un nospiediet skūšanās balzama pogu, līdz uz jūsu
ādas ir pietiekoši daudz skūšanās balzama, lai veiktu komfortablu skūšanos. (Zīm. 19)
- Kad atlaižat skūšanās balzama pogu, ierīce pārstāj izdalīt balzamu.
- Ja viegli nospiežat skūšanās balzama pogu, ierīce automātiski izmanto zināmu daudzumu balzama.
- Nospiediet skūšanas balzama pogu vēlreiz, lai skūšanās laikā pielietotu papildus skūšanās balzamu
un nodrošinātu, ka skūšanas bloks gludi slīd pa ādu.
Piezīme: Skūšanās balzama poga strādā tikai, kad skuveklis ir ieslēgts.
Piezīme: Šis skuveklis var tikt lietots līdzīgā veidā kā žiletes: varat lietot skuvekli uz mitras sejas. Pretēji
parastajam skuveklim, šai ierīcei nav matiņu nodalījuma, kas savāc noskūto bārdu. Lai izvairītos no
bārdas rugāju nonākšanas uz jūsu apģērba skūšanās laikā, lietojiet pietiekošu daudzumu skūšanās
balzama.
5 Rūpīgi iztīriet skuvekli pēc katras lietošanas reizes (skatīt nodaļu ‘Tīrīšana un apkope’)
6 Uzlieciet skuveklim aizsarg vāciņu, lai pasargātu to no bojājumiem (Zīm. 20).
- Maigi apļojiet skuvekli pār ādu.
- Nepielietojiet pārāk lielu spiedienu uz skuvekļa, jo tas var izraisīt ādas kairinājumu.
- Regulāri pielietojiet skūšanās balzamu, lai nodrošinātu pareizu slīdēšanu.
- Skuvekli varat izmantot arī vannā vai dušā.
Piezīme: Pateicoties jaunakai vaļēja tipa konstrukcijai, jūs skaidrāk kā citiem trimmeriem dzirdat
trimmera griešanas darbības skaņu. Tas ir normāli.
1 Izvelciet skūšanas bloku ārā no skuvekļa (Zīm. 21).
2 Izņemiet trimmeri no trimmera turētāja uz lādētāja, un uzlieciet to uz skuvekļa (atskan
klikšķis) (Zīm. 22).
3 Lai ieslēgtu ierīci, nospiediet ieslēgšanas/izslēgšanas pogu.
4 Jūs varat lietot trimmeri, lai savu ūsu vaigubārdu un/vai ūsas.
5 Rūpīgi iztīriet trimmeri pēc katras lietošanas reizes (skatīt nodaļu ‘Tīrīšana un apkope’)
6 Noņemiet trimmeri, un novietojiet to atpakaļ uz trimmera turētāja.
7 Uzlieciet skūšanas bloku atpakaļ uz skuvekļa (‘atskan klikšķis’) (Zīm. 23).
8 Uzlieciet skuveklim aizsargvāciņu, lai pasargātu to no bojājumiem (Zīm. 20).
Ierīces tīrīšanai nekad nelietojiet beržamās sukas, abrazīvus tīrīšanas līdzekļus vai agresīvus
šķidrumus, piemēram, spirtu, benzīnu vai acetonu.
Tīriet skuvekli un trimmeri pēc katras lietošanas.
168
Esiet piesardzīgi, kad lietojat karstu ūdeni. Lai neapplaucētu rokas, vienmēr pārbaudiet, vai ūdens
nav pārāk karsts.
Nekad neslaukiet skūšanas bloku ar dvieli vai papīra salveti, jo tā var sabojāt skūšanas galviņas.
Piezīme: Skuveklis ir ūdensdrošs un to var tīrīt ar ūdeni.
1 Lai ieslēgtu ierīci, nospiediet ieslēgšanas/izslēgšanas pogu.
Piezīme: Tīriet skuvekli, kamēr tas ir ieslēgts.
2 Iemērciet skuvekli/trimmeri karstā ūdenī uz vismaz 30 sekundēm (Zīm. 24).
3 Izslēdziet skuvekli un nokratiet no tā ūdeni.
4 Uzlieciet skuveklim aizsarg vāciņu, lai pasargātu to no bojājumiem (Zīm. 20).
Piezīme: Ja skuveklis vairs neskuj kā agrāk un jūs nevarat to atrisināt izmantojot tīrīšanas metodi, kas
aprakstīta šajā nodaļā, skatiet nodaļu ‘Traucējummeklēšana’, lai uzzinātu par papildus tīrīšanas metodi.
1 Reizi sešos mēnešos ieeļļojiet trimmera zobiņus ar pilienu šujmašīnu eļļas.
1 Uzglabājiet skuvekli uzpildīšanas un uzlādēšanas stacijā.
2 Ja taisāties ceļot, vai ja nevēlaties uzglabāt skuvekli uzpildīšanas un uzlādēšanas stacijā, uzlieciet
aizsargvāciņu uz skuvekļa, un uzglabājiet to maisiņā (Zīm. 20).
Ja plānojat skuvekli ilgāku laiku nelietot vai doties ceļojumā, skuvekli iespējams aizslēgt. Ceļojumu
bloķētājs neļauj skuvekli nejauši ieslēgties.
1 Raugieties, lai skuveklis būtu izslēgts.
2 Nospiediet un turiet nospiestu skūšanās balzama pogu (1), vienlaicīgi ar otru roku nospiežot
ieslēgšanas/izslēgšanas pogu (2) (Zīm. 25).
3 Turiet abas pogas nospiestas aptuveni 6 sekundes. Uzgaidiet līdz skuveklis rada īsu dūcošu
skaņu un vidējā lādēšanas signāllampiņa uz skuvekļa nomirgo vairākas reizes.
, Ceļojuma bloķētājs tagad ir aktivizēts.
Piezīme: Ja nejauši nospiežat vispirms ieslēgšanas/izslēgšanas pogu, skuveklis sāk strādāt . Ja tas notiek,
nospiediet ieslēgšanas/izslēgšanas pogu vēlreiz, lai izslēgtu skuvekli.
Piezīme: Ja nospiežat ieslēgšanas/izslēgšanas pogu, kad ceļojumu bloķētājs ir aktivēts, vidējā lādēšanas
signāllampiņa mirgos baltā krāsā, parādot, ka skuveklis ir bloķēts.
Padoms. Nospiediet ieslēgšanas/izslēgšanas pogu, lai pārbaudītu vai ceļojuma bloķētājs ir aktivizēts. Ja
ceļojuma bloķētājs ir aktivizēts, tad skuveklis neieslēdzās.
1 Nospiediet un turiet nospiestu skūšanās balzama pogu (1), vienlaicīgi ar otru roku nospiežot
ieslēgšanas/izslēgšanas pogu (2) (Zīm. 25).
2 Turiet abas pogas nospiestas aptuveni 6 sekundes. Uzgaidiet līdz skuveklis rada īsu dūcošu
skaņu un vidējā lādēšanas signāllampiņa uz skuvekļa nomirgo vairākas reizes.
169
, Ceļojuma bloķētājs tagad ir izslēgts.
Piezīme: Jūs varat izslēgt ceļojuma bloķētāju arī novietojot skuvekli lādētājā.
Ja ceļosiet un nevēlaties ņemt līdzi uzpildīšanas un uzlādēšanas staciju, varat paņemt līdzi lādētāju, lai
uzlādētu skuvekli, kad nepieciešams.
Higiēnisku apsvērumu dēļ, iesakām mainīt skūšanās balzama kasetni reizi gadā. Jauna kasetne ir
ietverta katrā NIVEA FOR MEN skūšanās losjona trīs iepakojumu komplektā kopā ar nomaiņa
komplektu (kurā ietilpst jauns HS85 skūšanas bloks un jauna kasetne).
1 Noņemiet skūšanās balzama kasetni no skuvekļa (Zīm. 26).
2 Ievietojiet īscauruli, kas atrodas jaunas skūšanās balzama kasetnes augšpusē spraugā, kas
atrodas skuvekļa sānos (1). Tad uzspiediet ar pirkstgalu uz kasetnes apakšpuses(2) , lai
piestiprinātu kasetni pie skuvekļa (atskan klikšķis) (Zīm. 27).
3 Uzpildiet skūšanās balzama kasetni (skatiet nodaļu ‘Uzsākšana’).
Lai iegūtu optimālus skūšanās rezultātus , reizi gadā mainiet skūšanas bloku.
Nomainiet skūšanas bloku tikai ar HS85 Philips skūšanas bloku.
1 Izvelciet skūšanas bloku no skuvekļa (Zīm. 21).
2 Ielieciet jaunu skūšanas bloku skuveklī (atskan klikšķis) (Zīm. 23).
Lietojiet tikai NIVEA FOR MEN skūšanās balzama pudeles.
1 Noņemiet NIVEA FOR MEN skūšanās balzama pudeles aizsarg uzlīmi (Zīm. 6).
2 Pagrieziet balzama pudeles vāciņu pulksteņa rādītāja virzienā (atskan klikšķis) (Zīm. 7).
, Vāciņš virzās uz leju un parādās balzama sprausla.
3 Pagrieziet vāciņu uz uzpildīšanas un uzlādēšanas stacijas pretēji pulksteņa rādītāja virzienam,
lai to noņemtu.
4 Ievietojiet balzama pudeli pudeles novietošanas caurumā ar sprauslu lejupvērstā
virzienā (Zīm. 8).
5 Uzspiediet vāciņu atpakaļ uz uzpildīšanas un uzlādēšanas stacijas (1) un, lai nostiprinātu,
pagrieziet to pulksteņa rādītāja virzienā (2) (Zīm. 9).
- Pēc ierīces kalpošanas laika beigām, neizmetiet to kopā ar sadzīves atkritumiem, bet nododiet to
ociālā savākšanas punktā pārstrādei. Tādā veidā jūs palīdzēsit saudzēt apkārtējo vidi (Zīm. 28).
- Iebūvētā atkārtoti uzlādējamā baterija satur vielas, kas var piesārņot vidi. Pirms baterijas
izmešanas vai nodošanas ociālā savākšanas punktā vienmēr izņemiet to. Bateriju nododiet
ociālā bateriju savākšanas punktā. Ja baterijas izņemšana sagādā grūtības, dodieties ar šo ierīci uz
Philips Servisa centru, kur bateriju izņems un atbrīvosies no tā videi drošā veidā.

170
Akumulatora baterijas izņemiet tikai tad, kad izmetat ierīci. Izņemot bateriju, pārliecinieties,
ka baterija ir pilnīgi tukša.
Uzmanieties, akumulatoru baterijas malas ir asas!
1 Noņemiet skūšanās balzama kasetni no skuvekļa (Zīm. 26).
2 Atskrūvējiet trīs skrūves skuvekļa aizmugurē (Zīm. 29).
3 Noņemiet ietvara aizmugurējo paneli, izmantojot skrūvgriezi (Zīm. 30).
4 Pārgrieziet vadus un izņemiet akumulatora bateriju.
Ja jums nepieciešama informācija vai palīdzība, lūdzu, apmeklējiet Philips tīmekļa vietni
www.philips.com/support vai sazinieties ar Philips klientu apkalpošanas centru savā valstī (tā tālruņa
numurs atrodams pasaules garantijas brošūrā). Ja jūsu valstī nav klientu apkalpošanas centra, vērsieties
pie vietējā Philips preču izplatītāja.
Skūšanas bloks (griezēji un aizsargi) netiek nosegti ar starptautisko garantiju, jo tās nolietojās.
Balzama kasetne ir vienreizlietojama, un uz to neattiecas starptautiskās garantijas nosacījumi.

171
Šajā nodaļā ir apkopotas visizplatītākās problēmas, ar kurām varat sastapties, izmantojot ierīci. Ja
nevarat tās atrisināt, izmantojot zemāk redzamo informāciju, sazinieties ar savas valsts Klientu
apkalpošanas centru.
Problēma Iespējamais iemesls Atrisinājums
Skuveklis neslīd pa
Nav uzklāts
Spiediet skūšanās balzama pogu, līdz izdalās
ādu vienmērīgi.
pietiekams daudzums
pietiekošs daudzums NIVEA FOR MEN skūšanās
skūšanās balzama.
balzama. Tas ļaus skūšanas blokam atkal labi slīdēt pa
ādu.
Skuveklis vairs
Tas nav kārtīgi iztīrīts. Rūpīgi iztīriet skuvekli (skatiet nodaļu ‘Tīrīšana un
nefunkcionē tik labi
apkope’).
kā iepriekš.
Gari mati nosprosto
Iztīriet skūšanas galviņas, veicot tālāk aprakstītās
skuvekļa galviņas.
papildu tīrīšanas metodes darbības.
Skūšanas bloks ir
Nomainiet skūšanas bloku (skatīt nodaļu ‘Nomaiņa’).
bojāts vai nodilis.
Nospiežot
Akumulatora baterija
Atkāroti uzlādējiet bateriju (skatīt nodaļu
ieslēgšanas/
ir tukša.
‘Sagatavošana lietošanai’).
izslēgšanas pogu,
skuveklis
nedarbojas.
Ceļojuma bloķētājs ir
Deaktivizējiet ceļojuma bloķētāju (skatīt nodaļu
aktivizēts.
‘Uzglabāšana’).
Sakaltis skūšanās
Pirms turpināt skūšanos, rūpīgi iztīriet skuvekli (skatīt
balzams nosprosto
nodaļu ‘Tīrīšana’).
skūšanas bloka
galviņas.
Skūšanas bloks nav
Saliekot skūšanas bloku, pārliecinieties, ka katrs
pareizi salikts pēc
aizsargs tiek pagriezts pretēji pulksteņa rādītāja
veiktās papildu
virzienam, līdz tas noksējas vietā.
tīrīšanas.
Kāpēc pa skūšanas
Viena no atverēm ir
Izskalojiet vai izmērcējiet skūšanas bloku. Ja tas
bloka atverēm
aizsērējusi.
nepalīdz, sūknējiet skūšanās balzamu kasetnē līdz
izplūst tik man
balzams sāk izplūst pa bloķēto atveri. Ja arī tas
skūšanās balzama,
nepalīdz, izmēģiniet sekojošu metodi: 1) izslēdziet
kaut arī kasetnē ir
skuvekli; 2) izņemiet skūšanas bloku no skuvekļa; 3)
pietiekošs
uzlieciet pirkstu uz atveres, kas nav aizsērējusi; 4)
daudzums balzama?
ieslēdziet skuvekli; 5) pāris sekundes turiet nospiestu
skūšanās balzama padeves pogu, līdz balzams sāk no
jauna izplūst pa aizsērējušo atveri.
172
Problēma Iespējamais iemesls Atrisinājums
Skūšanas galviņas nav
Pārliecinieties, ka skūšanas galviņa bez balzama
ievietotas atbilstošajos
padeves atveres tiek ievietota tai paredzētajā
turētājos. Vienas no
turētājā. Tas ir turētājs, kas atrodas vistuvāk
skūšanas galviņām
ieslēgšanas/izslēgšanas pogai, kad skūšanas bloks ir
centrā nav skūšanās
pievienots skuveklim.
balzama padeves
atveres, un tā ir
jāievieto atbilstošajā
turētājā.
Spiežot skūšanās
Skūšanās balzama
Uzpildiet skūšanās losjona kasetni (skatīt nodaļu
balzama padeves
kasetne ir gandrīz
‘Sagatavošana lietošanai’).
pogu, balzams
tukša.
neizplūst pa
atverēm.
Šis trimmeris ir
Trimmera konstrukcija
Dēļ jaunā atvērtā dizaina, jūs skaidrāk kā citiem
skaļāks nekā citi
ir vaļēja tipa.
trimmeriem dzirdat trimmera griešanas darbības
trimmeri.
skaņu. Tas ir normāli un nenozīmē, ka kaut kas nav
kārtībā ar trimmeri.
Raugieties, lai ierīce būtu izslēgta.
1 Izvelciet skūšanas bloku ārā no skuvekļa (Zīm. 31).
2 Pagrieziet aizsargu pulksteņa rādītāja virzienā, un izceliet to no skūšanas bloka (Zīm. 32).
Piezīme: Vienlaicīgi izņemiet tikai vienu skūšanas galvu. Tas nodrošina to, ka vienmēr atliksiet skūšanas
galvu atpakaļ tā oriģinālajā turētājā, kas ir svarīgi, jo divām skūšanas galvām ir speciāli caurumi skūšanās
balzamam. Tas nodrošina arī to, ka jūs nesajauksiet dažādu skūšanas galvu asmeņus un aizsargus, kas
ietekmē skūšanas veiktspēju.
3 Ja nepieciešams, noņemiet asmeņus no aizsarga.
4 Notīriet asmeņus un aizsargus ar komplektā esošo birstīti.
5 Pēc tīrīšanas, ielieciet asmeņus atpakaļ skūšanas blokā ar asmeņu kājiņām uz augšu.
6 Uzlieciet aizsargu atpakaļ uz skūšanas galvas turētāja (pāri asmeņiem) (Zīm. 33).
7 Pagrieziet aizsargu pretēji pulksteņa rādītāja virzienam, līdz tas noslēdzās savā
pozīcijā (Zīm. 34).
8 Uzlieciet skūšanas bloku atpakaļ uz skuvekļa (atskan klikšķis) (Zīm. 35).

173
Tahniah atas pembelian anda, dan selamat datang ke Philips! Untuk mendapat manfaat sepenuhnya
daripada sokongan yang ditawarkan oleh Philips, daftarkan produk anda di www.philips.com/
welcome.
Sila baca manual pengguna ini, kerana ia mengandungi maklumat mengenai ciri hebat pencukur
ini serta beberapa petua untuk mencukur dengan lebih mudah dan menyeronokkan.
Pencukur
Tukup perlindungan
Perapi
Unit pencukur
Katrij perapi pencukuran
Butang Perapi Pencukuran
Butang hidup/mati
Lampu pengecas
Pengecas
Stesen isi semula & cas
Penutup stesen isi semula & cas
Penyimpanan ruang perapi
Panel belakang
Soket untuk plag kecil
Lampu ‘Katrij perapi isian’
Lampu botol perapi
Berus pembersih
Botol perapi pencukuran NIVEA UNTUK LELAKI
Beg kecil
Penyesuai (penyesuai anda mungkin berbeza daripada yang ditunjukkan dalam rajah)
Baca manual pengguna ini dengan teliti sebelum anda menggunakan perkakas dan simpan untuk
rujukan masa depan.
- Pastikan plag penyesuai tidak basah (plag penyesuai anda mungkin berbeza daripada yang
ditunjukkan dalam rajah) (Gamb. 2).
- Berhati-hati dengan air panas. Sentiasa periksa agar air tidak begitu panas, untuk mengelakkan
tangan anda daripada luka terbakar.
- Plag penyesuai mengandungi pengubah. Jangan potong plag penyesuai untuk menggantikannya
dengan plag yang lain kerana ini akan menimbulkan situasi berbahaya.
- Perkakas ini tidak dimaksudkan untuk digunakan oleh orang (termasuk kanak-kanak) yang kurang
upaya dari segi zikal, deria atau mental, atau kurang berpengalaman dan pengetahuan, kecuali
mereka diawasi atau diberi arahan berkenaan penggunaan perkakas ini oleh orang yang
bertanggungjawab atas keselamatan mereka.
- Kanak-kanak hendaklah diselia untuk memastikan mereka tidak bermain dengan perkakas ini.
- Jangan sesekali tenggelamkan stesen isi semula & cas di dalam air mahupun membilasnya di
bawah air paip (Gamb. 3).
- Jangan sesekali tenggelamkan pengecas atau membilasnya di bawah air paip (Gamb. 4).
174
- Sentiasa tempatkan dan guna stesen isi semula & cas dan pengecas di atas permukaan yang
tahan bendalir.
- Guna, cas dan simpan perkakas pada suhu antara 5°C dan 35°C.
- Sentiasa pasang tukup perlindungan pada pencukur bagi melindungi kepala pencukur semasa
anda dalam perjalanan.
- Pencukur dan aksesori lain tidak kalis mesin basuh pinggan mangkuk.
- Jangan sekali-kali gunakan air yang lebih panas daripada 80°C untuk membilas pencukur tersebut.
- Hanya gunakan plag penyesuai, pengecas dan stesen isi semula & cas yang disediakan.
- Jangan gunakan stesen isi semula & cas sekiranya plag penyesuai atau stesen itu sendiri telah
rosak.
- Jangan gunakan pencukur atau pengecas sekiranya ianya rosak.
- Jika plag penyesuai rosak, sentiasa gantikan dengan jenis asli bagi mengelakkan bahaya.
- Pencukur ini mematuhi kelulusan antarabangsa dengan keselamatan pengawalan dan boleh
digunakan dengan selamat semasa mandi atau mandi hujan dan membersihkan bawah pili
air (Gamb. 5).
- Perkakas Philips ini mematuhi semua piawai yang berhubung dengan medan elektromagnet
(EMF). Jika dikendalikan dengan betul dan mematuhi arahan dalam manual pengguna ini, perkakas
selamat untuk digunakan menurut bukti saintik yang boleh didapati pada masa ini.
- Penyesuai mengubah 100-240 volt kepada voltan rendah dan selamat tidak melebihi 24 volt.
1 Tanggalkan tab botol perapi pencukuran NIVEA UNTUK LELAKI (Gamb. 6).
2 Pusingkan penutup botol perapi ke arah jam (‘klik’) (Gamb. 7).
, Penutup bergerak ke bawah dan muncung perapi muncul.
3 Pusingkan penutup stesen isi semula & cas ke arah lawan jam untuk menanggalkannya.
4 Keluarkan bungkusan daripada lubang botol dok di dalam stesen isi semula & cas.
5 Tempatkan botol perapi di dalam lubang dok dengan muncungnya menghadap ke
bawah (Gamb. 8).
6 Tempatkan kembali tukup pada stesen isi semula & cas (1) dan pusing tukup mengikut arah
jam untuk mengetatkannya (2) (Gamb. 9).
7 Letakkan plag kecil di dalam soket stesen isi semulal & cas dan letakkan plag penyesuai di
dalam soket dinding (Gamb. 10).
8 Letakkan pencukur di dalam stesen isi semula & cas dan tolakkan ke belakang
(‘klik’) (Gamb. 11).
Nota: Pencukur dicas dan diisi dengan perapi automatik.
9 Cas pencukur selama 90 minit. (Gamb. 12)
Nota: Cas pencukur sebelum anda menggunakannya untuk kali pertama atau bila lampu pengecas
menunjukkan bateri kosong (lihat bahagian ‘Penunjuk cas’).
Nota: Pencukur yang dicas penuh mempunyai masa pencukuran sehingga kira-kira 40 minit.
1 Letakkan plag yang kecil di pengecas dan letakkan plag penyesuai di soket dinding.
2 Letakkan pencukur di atas pengecas (Gamb. 13).

175
, Pencukur sedang di cas.
3 Cas pencukur selama 1.5 jam.
Nota: Cas pencukur sebelum anda menggunakannya untuk kali pertama atau bila lampu pengecas
menunjukkan bateri kosong (lihat bahagian ‘Penunjuk cas’).
Nota: Pencukur yang dicas penuh mempunyai masa pencukuran sehingga kira-kira 40 minit.
Anda juga boleh mengisi semula katrij perapi pencukur tanpa menggunakan stesen isi semula & cas:
1 Letakkan muncung botol perapi di dalam bukaan isian katrij perapi.
2 Gerakkan botol ke atas dan ke bawah sebanyak 5 kali untuk mengepam perapi pencukur ke
dalam katrij sehingga anda melihat katrij itu penuh (Gamb. 14).
- Lampu pengecasan menandakan sehingga takat mana bateri telah dicas. Semasa pengecasan,
lampu pengecasan bawah mula-mula berkelip jingga dan kemudian padam. Lampu pengecasan
atas kemudian mula berkelip putih dan akhirnya menyala putih dengan berterusan.
- Selepas pencukur telah dicas selama 9 minit, lampu pengecasan bawah akan padam dan lampu
pengecasan atas mula berkelip putih, untuk menandakan bahawa pencukur mengandungi cukup
tenaga untuk satu cukuran.
Nota: Pengecasan pantas hanya mungkin berlaku apabila anda sudah mengecas pencukur sekali
selama 1.5 jam.
- Jumlah kuasa yang tinggal dalam bateri ditunjukkan dengan bilangan lampu pengecasan yang
hidup. Baki kapasiti bateri kelihatan selama beberapa saat apabila anda menghidupkan atau
mematikan pencukur (Gamb. 15).
- Apabila bateri lemah, lampu pengecasan bawah menyala jingga semasa mencukur dan berkelip
jingga apabila anda mematikan pencukur. (Gamb. 16)
- Apabila bateri telah dicas sepenuhnya, semua lampu pengecasan menyala putih dengan
berterusan (Gamb. 15).
- Selepas anggaran 1 jam, lampu pengecasan putih akan padam, untuk menjimatkan tenaga.
, Apabila lampu botol perapi berkelip jingga, terdapat dua kemungkinan: (Gamb. 17)
- Tiada botol perapi dalam stesen isi semula & cas atau botol tidak diganti dengan betul.
- Botol perapi kosong.
, Lampu ‘Katrij perapi’ isian menandakan tiga perkara yang berbeza: (Gamb. 18)
- Semasa katrij perapi diisi, lampu ‘katrij perapi isian’ putih berkelip.
- Apabila katrij perapi pencukuran penuh, lampu ‘katrij perapi isian’ putih menyala secara
berterusan.
- Sekiranya botol perapi kosong semasa katrij perapi sedang diisi, lampu ‘katrij perapi isian’ putih
akan padam dan lampu botol perapi berkelip merah.
176
Nota: Kulit anda mungkin memerlukan 2 hingga 3 minggu untuk dibiasakan dengan sistem cukuran
yang baru.
1 Pastikan terdapat perapi pencukuran yang mencukupi di dalam katrij perapi cukuran.
2 Tekan butang hidup/mati sekali untuk menghidupkan pencukur.
3 Pastikan pencukur dicas secukupnya (lihat bab ‘Bersedia untuk menggunakan’, bahagian
‘Penunjuk cas’).
4 Gerakkan unit pencukur secara bulatan pada kulit anda dan tekan butang perapi cukuran
sehingga terdapat perapi cukuran yang mencukupi pada kulit anda untuk mendapatkan
cukuran yang selesa. (Gamb. 19)
- Apabila anda melepaskan butang perapi pencukur, perkakas berhenti mendispens perapi.
- Sekiranya anda tekan sebentar butang perapi pencukur, perkakas secara automatik menggunakan
jumlah tertentu perapi.
- Tekan butang perapi pencukur sekali lagi untuk menggunakan lebih banyak perapi pencukur
semasa mencukur untuk memastikan unit cukuran terus luncur dengan licin pada kulit anda.
Nota: Butang perapi pencukur hanya berfungsi apabila pencukur dihidupkan.
Nota: Pencukur ini boleh digunakan secara yang sama untuk pisau tajam: anda boleh menggunakan
pencukur pada muka yang basah. Tidak seperti pencukur elektrik konvensional, perkakas ini tiada ruang
mengumpul janggut. Untuk mengelakkan janggut daripada jatuh di atas pakaian anda, sapukan perapi
pencukur secukupya semasa mencukur.
5 Bersihkan pencukur dengan menyeluruh selepas setiap kali penggunaan (lihat bab
‘Pembersihan dan penyelenggaraan’).
6 Luncurkan penutup pelindungpada alat pencukur untuk mengelakkan kerosakan (Gamb. 20).
- Gerakkan alat pencukur dengan perlahan-lahan secara membulat pada kulit anda.
- Jangan beri terlalu banyak tekanan pada pencukur, kerana ini boleh menyebabkan kerengsaan
kulit.
- Untuk memastikan peluncuran yang betul, sapukan perapi pencukur dengan kerap.
- Anda juga boleh menggunakan pencukur semasa mandi atau mandi hujan.
Nota: Disebabkan reka bentuk terbuka yang baru, anda akan mendengar tindakan pemotongan perapi
dengan lebih jelas daripada perapi yang lain. Ini perkara biasa.
1 Tarik unit pencukur dari alat pencukur (Gamb. 21).
2 Angkat perapi keluar dari pemegang perapi pada pengecas dan letakkannya pada pencukur
(‘klik’) (Gamb. 22).
3 Tekan butang hidup/mati sekali untuk menghidupkan pencukur.
4 Anda boleh menggunakan perapi untuk merapikan jambang dan misai anda.
5 Bersihkan perapi dengan menyeluruh selepas setiap kali penggunaan (lihat bab ‘Pembersihan
dan penyelenggaraan’).
6 Tanggalkan perapi dan letakkannya semula ke dalam pemegang perapi.
7 Kembalikan unit pencukur kepada pencukur (‘klik’) (Gamb. 23).
177
8 Luncurkan penutup pelindungpada alat pencukur untuk mengelakkan kerosakan (Gamb. 20).
Jangan sekali-kali gunakan pad penyental, agen pembersih yang melelas atau cecair yang agresif
seperti alkohol, petrol atau aseton untuk membersihkan perkakas.
Bersihkan pencukur dan perapi setiap kali digunakan.
Berhati-hati dengan air panas. Sentiasa periksa agar air tidak begitu panas, untuk mengelakkan
tangan anda daripada luka terbakar.
Jangan keringkan unit pencukur dengan tuala atau tisu, kerana ini akan merosakkan kepala alat
pencukur.
Nota: Pencukur adalah kedap air dan boleh dibersihkan dengan air.
1 Tekan butang hidup/mati sekali untuk menghidupkan pencukur.
Nota: Bersihkan alat pencukur semasa ia dihidupkan.
2 Tenggelamkan unit pencukur/perapi di dalam air panas sekurang-kurangnya selama 30
saat (Gamb. 24).
3 Matikan pencukur dan goncangkan untuk mengeluarkan lebihan air.
4 Luncurkan penutup pelindungpada alat pencukur untuk mengelakkan kerosakan (Gamb. 20).
Nota: Jika alat pencukur tidak mencukur dengan baik seperti biasa dan anda tidak dapat menyelesaikan
masalah ini dengan kaedah pembersihan yang dihuraikan dalam bab ini, rujuk bab ‘Menyelesaikan
masalah’ untuk mendapatkan kaedah pembersihan yang lebih menyeluruh.
1 Lincirkan gigi perapi setiap enam bulan dengan setitik minyak mesin jahit.
1 Simpan pencukur didalam stesen isi semula & cas.
2 Sekiranya anda membuat lawatan atau jika anda tidak mahu menyimpan pencukur di dalam
stesen isi semula & cas, letakkan penutup pelindung pada pencukur dan simpan pencukur di
dalam pau (Gamb. 20).
Sekiranya anda hendak menyimpan bagi tempoh yang lebih lama atau sekiranya anda hendak
berjalan-jalan, alat pencukur itu boleh dikunci. Kunci kembara menghalang alat pencukur daripada
dihidupkan secara tidak sengaja.
1 Pastikan pencukur dimatikan.
2 Tekan dan tahan butang perapi pencukuran (1) dan dengan serentak tekan butang hidup/mati
menggunakan tangan yang sebelah lagi (2) (Gamb. 25).
3 Tahan kedua-kedua butang selama 6 saat. Tunggu sehingga pencukur mengeluarkan bunyi
dengung sebentar lampu pengecasan tengah pada pencukur berkelip beberapa kali.
178
, Kunci kembara kini aktif.
Nota: Jika anda tidak sengaja menekan butang hidup/mati dahulu, pencukur mula berfungsi . Jika ini
berlaku, tekan butang hidup/mati sekali lagi untuk mematikan pencukur.
Nota: Jika anda tekan butang hidup/mati semasa kunci kembara aktif, lampu pengecasan tengah
berkelip putih untuk menunjukkan pencukur itu dikunci.
Petua: Tekan butang hidup/mati untuk memeriksa jika kunci kembara aktif. Jika kunci kembara aktif,
pencukur tidak akan berfungsi.
1 Tekan dan tahan butang perapi pencukuran (1) dan dengan serentak tekan butang hidup/mati
menggunakan tangan yang sebelah lagi (2) (Gamb. 25).
2 Pegang kedua-kedua butang selama 6 saat. Tunggu sehingga pencukur mengeluarkan bunyi
dengung sebentar dan lampu pengecasan tengah pada pencukur berkelip beberapa kali.
, Kunci kembara kini aktif.
Nota: Anda juga boleh menyahaktifkan kunci kembara dengan meletakkan pencukur kembali ke dalam
pengecas.
Jika anda membuat lawatan dan anda tidak mahu membawa stesen isi semula & cas bersama
anda, anda boleh membawa pengecas bersama anda, untuk mengecas pencukur apabila perlu.
Atas sebab-sebab kebersihan, kami nasihatkan agar anda menukar kartrij perapi pencukuran sekali
setahun. Kartrij baru disertakan bersama setiap bungkusan 3 pek botol perapi pencukuran NIVEA
UNTUK LELAKI, dan dengan kit penggantian (yang mengandungi unit pencukur HS85 baru dan
kartrij baru).
1 Alihkan katrij perapi pencukur daripada pencukur (Gamb. 26).
2 Masukkan pemegang di bahagian atas katrij perapi pencukuran baru ke dalam slot tepi
pencukur (1). Kemudian tekan bahagian bawah kartrij dengan ibu jari anda (2) untuk
menyambungkan katrij pada pencukur (‘click’) (Gamb. 27).
3 Isikan katrij perapi pencukuran (lihat bahagian ‘Mulakan’).
Gantikan unit pencukuran setiap tahun untuk mendapatkan hasil cukuran yang optimum.
Hanya gantikan unit pencukur dengan Unit Pencukur Philips HS85.
1 Tarik unit pencukuran yang lama dari pencukur (Gamb. 21).
2 Letakkan unit pencukuran baru pada pencukur (‘kilk’) (Gamb. 23).
Hanya gunakan botol perapi pencukuran NIVEA UNTUK LELAKI.
1 Tanggalkan tab botol perapi pencukuran NIVEA UNTUK LELAKI (Gamb. 6).
2 Pusingkan penutup botol perapi ke arah jam (‘klik’) (Gamb. 7).
, Penutup bergerak ke bawah dan muncung perapi muncul.
3 Pusingkan penutup stesen isi semula & cas ke arah lawan jam untuk menanggalkannya.
179
4 Tempatkan botol perapi di dalam lubang dok botol dengan muncunyg menghadap ke
bawah (Gamb. 8).
5 Tolak penutup kembali ke stesen isi semula & cas (1) dan pusingkan arah jam (2) untuk
mengetatkannya (Gamb. 9).
- Jangan buang perkakas bersama sampah rumah pada akhir hayatnya, tetapi bawanya ke pusat
pungutan rasmi untuk dikitar semula. Dengan melakukan sedemikian anda akan membantu
memelihara alam sekitar (Gamb. 28).
- Bateri boleh dicas semula binaan dalam mengandungi bahan yang mungkin mencemari alam
sekitar. Sentiasa keluarkan bateri sebelum membuangnya dan bawa perkakas ke pusat pungutan
rasmi. Jika anda menghadapi kesulitan mengeluarkan bateri, anda boleh juga membawa perkakas
tersebut ke pusat servis Philips. Kakitangan pusat ini akan mengeluarkan bateri untuk anda dan
akan melupuskannya dengan cara yang selamat alam sekitar.
Hanya keluarkan bateri boleh cas apabila anda membuang pencukur. Pastikan baterinya benar-
benar kosong semasa anda mengeluarkannya.
Berhati-hati, jalur bateri sangat tajam.
1 Alihkan katrij perapi pencukur daripada pencukur (Gamb. 26).
2 Longgarkan tiga skru dibelakang pencukur (Gamb. 29).
3 Tanggalkan panel belakang perumah dengan pemutar skru (Gamb. 30).
4 Potong wayar dan keluarkan bateri boleh cas semula.
Jika anda memerlukan perkhidmatan atau maklumat atau jika anda menghadapi masalah, sila lawati
laman web Philips di www.philips.com/support atau hubungi Pusat Layanan Pelanggan Philips di
negara anda (anda boleh mendapatkan nombor telefonnya di dalam risalah jaminan sedunia). Jika
Pusat Layanan Pelanggan tidak terdapat di negara anda, hubungi wakil penjual Philips tempatan anda.
Kepala pencukur (pemotong dan adangan) tidak dilindungi oleh terma jaminan antarabangsa kerana
ia akan menjadi haus.
Kartrij perapi adalah item pakai buang dan tidak dilindungi oleh terma jaminan antarabangsa.
Bab ini meringkaskan masalah yang paling kerap berlaku yang mungkin anda hadapi dengan perkakas
ini. Jika anda tidak dapat menyelesaikannya dengan maklumat di bawah, sila hubungi Pusat Layanan
Pelanggan di negara anda.
Masalah Kemungkinan punca Penyelesaian
Pencukur tidak
Anda telah
Tekan butang perapi pencukur sehingga perapi
meluncur dengan
menggunakan perapi
pencukuran NIVEA UNTUK LELAKI yang
rata di atas kulit
pencukuran yang tidak
mencukupi telah dikeluarkan. Ini membuatkan unit
saya.
mencukupi.
pencukur meluncur dengan lebih rata pada kulit
anda semula.

180
Masalah Kemungkinan punca Penyelesaian
Alat pencukur
Anda telah tidak
Bersihkan pencukur dengan menyeluruh (lihat bab
tidak mencukur
membersihkan
‘Pembersihan dan penyelenggaraan’).
sebaik sebelum
pencukur dengan betul.
ini.
Rambut yang panjang
Bersihkan kepala pencukur dengan mengikuti
menghalang kepala
langkah kaedah pencucian lebih menyeluruh yang
pencukur.
diterangkan di bawah.
Unit pencukur rosak
Ganti unit pencukur (lihat bab ‘Penggantian’).
atau haus.
Pencukur tidak
Punca: bateri kosong. Cas bateri semula (lihat bab ‘Bersedia untuk
berfungsi apabila
menggunakan’).
saya menekan
butang hidup/
mati.
Kunci kembara kini aktif. Nyahaktifkan kunci kembara (lihat bab
‘Penyimpanan’).
Perapi pencukuran yang
Bersihkan alat pencukur dengan menyeluruh
kering menghalang
sebelum anda terus mencukur (lihat bab
kepala pencukur dalam
‘Pembersihan’).
unit pencukur.
Anda belum lagi
Apabila anda memasang semula unit pencukur,
memasang semula unit
pastikan anda memusing setiap adangan melawan
pencukur dengan betul
arah jam sehingga ia terkunci pada tempatnya.
selepas pembersihan
lebih menyeluruh.
Hanya sedikit
Salah satu lubang
Bilas atau rendam unit pencukur. Jika ini tidak
perapi yang
perapi telah tersumbat.
berkesan, pam perapi pencukuran ke dalam katrij
keluar dari
perapi pencukuran sehingga perapi mula keluar dari
lubangnya
lubang yang tersumbat. Jika ini tidak berkesan juga,
walaupun
cuba kaedah berikut: 1) Matikan pencukur 2) Tarik
terdapat perapi
keluar unit pencukur daripada pencukur 3) Letak
yang cukup di
jari anda pada lubang yang tidak tersumbat 4)
dalam katrij.
Hidupkan pencukur 5) Tekan butang perapi pecukur
untuk beberapa saat sehingga perapi mula keluar
semula dari lubang yang tersumbat.
181
Masalah Kemungkinan punca Penyelesaian
Anda telah tidak
Pastikan anda meletakkan kepala pencukur tanpa
meletakkan kepala
lubang perapi di dalam pemegang yang betul. Ini
pencukur kembali ke
adalah pemegang yang paling rapat dengan butang
dalam pemegang
hidup/mati apabila unit pencukur dipasang pada
asalnya. Salah satu
pencukur.
kepala pencukur tidak
mempunyai lubang
perapi pencukuran di
tengahnya dan perlu
diletakkan di dalam
pemegang yang
tertentu.
Perapi
Kartrij pencukuran
Isi semula kartrij perapi pencukuran (lihat bab
pencukuran tidak
hampir kosong.
‘Bersedia untuk menggunakan’).
keluar dari lubang
apabila saya
menekan butang
perapi
pencukuran.
Perapi ini
Perapi ini mempunyai
Disebabkan reka bentuk terbuka yang baru, anda
mengeluarkan
reka bentuk yang
akan mendengar tindakan pemotongan perapi
bunyi lebih kuat
terbuka.
dengan lebih jelas daripada perapi yang lain. Ini
berbanding
perkara biasa dan tidak bermakna bahawa perapi
perapi lain.
rosak.
Pastikan perkakas dimatikan.
1 Tarik unit pencukur dari alat pencukur (Gamb. 31).
2 Pusingkan adang mengikut arah jam dan angkatkannya dari unit pencukur (Gamb. 32).
Nota: Hanya keluarkan satu kepala pencukur pada satu-satu masa. Ini memastikan anda sentiasa
meletakkan kepala pencukur kembali pada pemegangnya yang asal, dan ini sangat perlu kerana dua
daripada kepala pencukur mempunyai lubang khas untuk perapi pencukur. Ini juga memastikan anda
tidak mencampur adukkan pemotong dan adang bagi kepala yang berlainan, yang akan menjejaskan
prestasi pencukuran.
3 Jika perlu, keluarkan pemotong dari adang.
4 Bersihkan pemotong dan adang dengan berus yang dibekalkan.
5 Selepas mencuci, letakkan pemotong kembali pada unit pencukur dengan kaki pemotong
menghadap ke atas.
6 Letakkan adang kembali pada pemegang kepala pencukur (di atas pemotong) (Gamb. 33).
7 Pusingkan adang melawan arah jam sehingga ia terkunci pada kedudukannya (Gamb. 34).
8 Kembalikan unit pencukur kepada pencukur (‘klik’) (Gamb. 35).

182
Gefeliciteerd met uw aankoop en welkom bij Philips! Als u volledig wilt proteren van de
ondersteuning die Philips biedt, registreer uw product dan op www.philips.com/welcome.
Lees deze gebruiksaanwijzing door, want deze bevat informatie over de geweldige kenmerken van
dit scheerapparaat en een aantal tips om het scheren gemakkelijker en prettiger te maken.
Scheerapparaat
Beschermkap
Trimmer
Scheerunit
Scheerconditionercartridge
Scheerconditionerknop
Aan/uitknop
Oplaadlampjes
Oplader
Rell&Charge-station
Kap van Rell&Charge-station
Uitsparing voor trimmer
Achterpaneel
Aansluitopening voor kleine stekker
’Vult conditionercartridge’-lampje
Lampje voor conditioneres
Schoonmaakborsteltje
Fles met NIVEA FOR MEN-scheerconditioner
Opbergetui
Adapter (uw adapter kan afwijken van die getoond in de afbeelding)
Lees deze gebruiksaanwijzing zorgvuldig door voordat u het apparaat gaat gebruiken. Bewaar de
gebruiksaanwijzing om deze indien nodig te kunnen raadplegen.
- Voorkom dat de adapter nat wordt (uw adapter kan afwijken van die getoond in de
afbeelding) (g. 2).
- Wees voorzichtig met heet water. Controleer altijd of het water niet te heet is om te
voorkomen dat u uw handen brandt.
- De adapter bevat een transformator. Knip de adapter niet af om deze te vervangen door een
andere stekker, aangezien dit een gevaarlijke situatie oplevert.
- Dit apparaat is niet bedoeld voor gebruik door personen (waaronder kinderen) met
verminderde lichamelijke, zintuiglijke of geestelijke vermogens, of die gebrek aan ervaring of
kennis hebben, tenzij iemand die verantwoordelijk is voor hun veiligheid toezicht op hen houdt
of hen heeft uitgelegd hoe het apparaat dient te worden gebruikt.
- Houd toezicht op jonge kinderen om te voorkomen dat ze met het apparaat gaan spelen.
- Dompel het Rell&Charge-station nooit in water. Spoel het ook niet af onder de kraan (g. 3).
- Dompel de oplader nooit in water en spoel deze nooit af onder de kraan (g. 4).
- Plaats en gebruik het Rell&Charge-station en de oplader altijd op een oppervlak dat
vloeistofbestendig is.
- Laad de apparaten op en gebruik en bewaar deze bij een temperatuur tussen 5°C en 35°C.
183
- Plaats altijd de beschermkap op het scheerapparaat om de scheerhoofden te beschermen
wanneer u op reis bent.
- Het scheerapparaat en de andere accessoires zijn niet vaatwasmachinebestendig.
- Gebruik nooit water met een temperatuur hoger dan 80°C om het scheerapparaat schoon te
spoelen.
- Gebruik alleen de adapter, de oplader en het Rell&Charge-station die zijn meegeleverd.
- Gebruik het Rell&Charge-station niet als de adapter of het station zelf beschadigd is.
- Gebruik het scheerapparaat of de oplader niet als deze beschadigd zijn.
- Als de adapter beschadigd is, moet u deze altijd laten vervangen door een adapter van het
oorspronkelijke type om gevaar te voorkomen.
- Het scheerapparaat voldoet aan de internationaal erkende veiligheidsvoorschriften en kan veilig
onder de douche en in bad worden gebruikt en onder de kraan worden schoongemaakt (g. 5).
- Dit Philips-apparaat voldoet aan alle richtlijnen met betrekking tot elektromagnetische velden
(EMV). Mits het apparaat op de juiste wijze en volgens de instructies in deze gebruiksaanwijzing
wordt gebruikt, is het veilig te gebruiken volgens het nu beschikbare wetenschappelijke bewijs.
- De adapter zet 100-240 volt om in een veilige laagspanning van minder dan 24 volt.
1 Verwijder het lipje van de es met NIVEA FOR MEN-scheerconditioner (g. 6).
2 Draai de dop van de conditioneres rechtsom (‘klik’) (g. 7).
, De dop beweegt omlaag en de tuit van de es wordt zichtbaar.
3 Draai de kap van het Rell&Charge-station linksom om deze te verwijderen.
4 Verwijder het verpakkingsmateriaal uit de opening voor de es in het Rell&Charge-station.
5 Plaats de conditioneres in de opening met de tuit naar beneden gericht (g. 8).
6 Plaats de kap terug op het Rell&Charge-station (1) en draai de kap rechtsom om deze vast
te zetten (2) (g. 9).
7 Steek de kleine stekker in de aansluitopening van het Rell&Charge-station en steek de
adapter in het stopcontact (g. 10).
8 Plaats het scheerapparaat in het Rell&Charge-station en duw het naar achteren
(‘klik’) (g. 11).
Opmerking: Het scheerapparaat wordt automatisch opgeladen en gevuld met scheerconditioner.
9 Laad het scheerapparaat 90 minuten op. (g. 12)
Opmerking: Laad het scheerapparaat op voordat u het voor de eerste keer gebruikt of als het
oplaadlampje aangeeft dat de accu leeg is (zie ‘Oplaadaanduidingen’).
Opmerking: Een volledig opgeladen scheerapparaat biedt een scheertijd tot 40 minuten.
1 Steek de kleine stekker in de oplader en steek de adapter in het stopcontact.
2 Plaats het scheerapparaat in de oplader (g. 13).
, Het scheerapparaat wordt opgeladen.
3 Laad het scheerapparaat 1,5 uur op.

184
Opmerking: Laad het scheerapparaat op voordat u het voor de eerste keer gebruikt of als het
oplaadlampje aangeeft dat de accu leeg is (zie ‘Oplaadaanduidingen’).
Opmerking: Een volledig opgeladen scheerapparaat biedt een scheertijd tot 40 minuten.
U kunt de scheerconditionercartridge ook bijvullen zonder het Rell&Charge-station te gebruiken:
1 Plaats de tuit van de conditioneres in de vulopening van de conditionercartridge.
2 Beweeg de es ongeveer 5 keer omhoog en omlaag om scheerconditioner in de cartridge te
pompen tot u ziet dat de cartridge vol is (g. 14).
- De oplaadlampjes geven aan in hoeverre de accu is opgeladen. Tijdens het opladen knippert het
onderste oplaadlampje eerst oranje, waarna het uit gaat. Daarna gaat het bovenste oplaadlampje
wit knipperen. Dit lampje blijft ten slotte wit branden.
- Als u het scheerapparaat 9 minuten hebt opgeladen, gaat het onderste oplaadlampje uit en
begint het bovenste oplaadlampje wit te knipperen om aan te geven dat het scheerapparaat
voldoende energie bevat voor één scheerbeurt.
Opmerking: Snel opladen is alleen mogelijk als u het scheerapparaat al eens 1,5 uur hebt opgeladen.
- Het aantal brandende oplaadlampjes toont de hoeveelheid energie die nog in de accu zit. De
resterende accucapaciteit wordt enkele seconden zichtbaar als u het scheerapparaat in- of
uitschakelt (g. 15).
- Als de accu bijna leeg is, licht het onderste oplaadlampje oranje op tijdens het scheren en
knippert het oranje als u het scheerapparaat uitschakelt. (g. 16)
- Wanneer de accu volledig is opgeladen, branden alle oplaadlampjes continu wit (g. 15).
- Na ongeveer 1 uur gaan de witte oplaadlampjes uit om energie te besparen.
, Als het lampje voor de conditioneres oranje knippert, zijn er twee mogelijkheden: (g. 17)
- Er bevindt zich geen conditioneres in het Rell&Charge-station of de es is niet juist geplaatst.
- De conditioneres is leeg.
, Het lampje ‘Vult conditionercartridge’ geeft drie verschillende dingen aan: (g. 18)
- Als de conditionercartridge wordt bijgevuld, knippert het lampje voor het vullen van de
conditionercartridge.
- Als de conditionercartridge vol is, brandt dit lampje.
- Als de conditioneres leegraakt terwijl de conditionercartridge wordt bijgevuld, gaat het witte
lampje voor het vullen van de conditionercartridge uit en knippert het lampje voor de
conditioneres rood.
185
Opmerking: Uw huid kan 2 tot 3 weken nodig hebben om aan een nieuw scheersysteem te wennen.
1 Controleer of er voldoende scheerconditioner in de scheerconditionercartridge zit.
2 Druk op de aan/uitknop om het scheerapparaat in te schakelen.
3 Zorg ervoor dat het scheerapparaat voldoende is opgeladen (zie Oplaadaanduidingen’ in
hoofdstuk ‘Klaarmaken voor gebruik’).
4 Beweeg de scheerunit voorzichtig met ronddraaiende bewegingen over uw huid en druk op
de scheerconditionerknop tot er zich voldoende scheerconditioner op uw huid bevindt voor
een comfortabele scheerbeurt. (g. 19)
- Als u de scheerconditionerknop loslaat, stopt het apparaat met het doseren van conditioner.
- Als u kort op de scheerconditionerknop drukt, brengt het apparaat automatisch een bepaalde
hoeveelheid conditioner aan.
- Druk tijdens het scheren opnieuw op de scheerconditionerknop om meer scheerconditioner
aan te brengen. Zo zorgt u ervoor dat de scheerunit soepel over uw huid blijft glijden.
Opmerking: De scheerconditionerknop werkt alleen als het scheerapparaat is ingeschakeld.
Opmerking: U kunt dit scheerapparaat op dezelfde manier gebruiken als een scheermesje. Dit wil zeggen
dat u het scheerapparaat op een nat gezicht kunt gebruiken. In tegenstelling tot een conventioneel
elektrisch scheerapparaat heeft dit apparaat geen haarkamer waarin de afgeschoren haartjes worden
verzameld. Als u wilt voorkomen dat deze haartjes op uw kleding terechtkomen, gebruik dan voldoende
scheerconditioner tijdens het scheren.
5 Maak het scheerapparaat na elk gebruik grondig schoon (zie hoofdstuk ‘Schoonmaken en
onderhoud’).
6 Schuif de beschermkap op het scheerapparaat om beschadigingen te voorkomen (g. 20).
- Beweeg het scheerapparaat voorzichtig met ronddraaiende bewegingen over uw huid.
- Oefen niet te veel druk uit op het scheerapparaat. Dit kan huidirritatie veroorzaken.
- Breng regelmatig scheerconditioner aan zodat het scheerapparaat soepel over de huid glijdt.
- U kunt het scheerapparaat ook in bad of onder de douche gebruiken.
Opmerking: Vanwege het nieuwe open ontwerp, hoort u het knippen van deze trimmer duidelijker dan bij
andere trimmers. Dit is normaal.
1 Trek de scheerunit van het scheerapparaat (g. 21).
2 Haal de trimmer uit de trimmerhouder op de oplader en plaats de trimmer op het
scheerapparaat (‘klik’) (g. 22).
3 Druk op de aan/uitknop om het scheerapparaat in te schakelen.
4 Gebruik de trimmer voor het bijwerken van uw bakkebaarden en/of snor.
5 Maak de trimmer na gebruik grondig schoon (zie hoofdstuk ‘Schoonmaken en onderhoud’).
6 Verwijder de trimmer en plaats deze terug in de trimmerhouder.
7 Plaats de scheerunit terug op het scheerapparaat (‘klik’) (g. 23).
8 Schuif de beschermkap op het scheerapparaat om beschadigingen te voorkomen (g. 20).
186
Gebruik nooit schuursponzen, schurende schoonmaakmiddelen of agressieve vloeistoffen zoals
alcohol, benzine of aceton om het apparaat schoon te maken.
Maak het scheerapparaat en de trimmer na elk gebruik schoon.
Wees voorzichtig met heet water. Controleer altijd of het water niet te heet is om te
voorkomen dat u uw handen brandt.
Droog de scheerunit nooit met een handdoek of een papieren doekje omdat de scheerhoofden
hierdoor beschadigd kunnen raken.
Opmerking: Het scheerapparaat is waterdicht en kan met water worden schoongemaakt.
1 Druk op de aan/uitknop om het scheerapparaat in te schakelen.
Opmerking: Maak het scheerapparaat schoon terwijl het is ingeschakeld.
2 Dompel de scheerunit/trimmer minimaal 30 seconden in warm water (g. 24).
3 Schakel het scheerapparaat uit en schud het overtollige water eraf.
4 Schuif de beschermkap op het scheerapparaat om beschadigingen te voorkomen (g. 20).
Opmerking: Als het scheerapparaat minder goed scheert dan voorheen en u er niet in slaagt om dit
probleem op te lossen met behulp van de schoonmaakmethode in dit hoofdstuk, raadpleeg dan
hoofdstuk ‘Problemen oplossen’ voor een extra grondige schoonmaakmethode.
1 Smeer elke zes maanden de tanden van de trimmer met een druppeltje naaimachineolie.
1 Berg het scheerapparaat op in het Rell&Charge-station.
2 Als u gaat reizen of als u het scheerapparaat niet in het Rell&Charge-station wilt opbergen,
plaats dan de beschermkap op het scheerapparaat en berg het scheerapparaat op in het
etui (g. 20).
Als u het scheerapparaat voor langere tijd wilt opbergen of wilt meenemen op reis, dan kunt u het
apparaat vergrendelen. Deze reisvergrendeling zorgt ervoor dat het apparaat niet per ongeluk kan
worden ingeschakeld.
1 Zorg ervoor dat het scheerapparaat is uitgeschakeld.
2 Houd de scheerconditionerknop (1) ingedrukt en druk tegelijkertijd met uw andere hand op
de aan/uitknop (2) (g. 25).
3 Houd beide knoppen 6 seconden ingedrukt. Wacht tot het scheerapparaat een kort zoemend
geluid maakt en het middelste oplaadlampje op het scheerapparaat enkele keren knippert.
, De reisvergrendeling is nu geactiveerd.
187
Opmerking: Als u per ongeluk eerst op de aan/uitknop drukt, begint het scheerapparaat te werken.Druk
in dit geval opnieuw op de aan/uitknop om het scheerapparaat uit te schakelen.
Opmerking: Als u op de aan/uitknop drukt als de reisvergrendeling is geactiveerd, knippert het middelste
oplaadlampje wit om aan te geven dat het scheerapparaat is vergrendeld.
Tip: Druk op de aan/uitknop als u wilt controleren of de reisvergrendeling is geactiveerd. Als de
reisvergrendeling is geactiveerd, kan het scheerapparaat niet worden ingeschakeld.
1 Houd de scheerconditionerknop (1) ingedrukt en druk tegelijkertijd met uw andere hand op
de aan/uitknop (2) (g. 25).
2 Houd beide knoppen 6 seconden ingedrukt. Wacht tot het scheerapparaat een kort zoemend
geluid maakt en het middelste oplaadlampje op het scheerapparaat enkele keren knippert.
, De reisvergrendeling is nu uitgeschakeld.
Opmerking: U kunt de reisvergrendeling ook uitschakelen door het scheerapparaat terug te plaatsen in
de oplader.
Als u het Rell&Charge-station niet wilt meenemen op reis, kunt u de oplader meenemen om het
scheerapparaat indien nodig op te laden.
Om hygiënische redenen adviseren wij u een keer per jaar de scheerconditionercartridge te
vervangen. Er zit een nieuwe cartridge in elk pak van 3 essen NIVEA FOR MEN-scheerconditioner
en in de vervangingsset (die een nieuwe HS85-scheerunit en een nieuwe cartridge bevat).
1 Verwijder de scheerconditionercartridge van het scheerapparaat (g. 26).
2 Plaats het nokje aan de bovenzijde van de nieuwe cartridge in de sleuf in de rand van het
scheerapparaat (1). Druk vervolgens met uw duim op het onderste gedeelte van de cartridge
(2) om de cartridge op het scheerapparaat te bevestigen (‘klik’) (g. 27).
3 Vul de scheerconditionercartridge (zie hoofdstuk ‘Het apparaat in gebruik nemen’).
Vervang de scheerunit elk jaar voor een optimaal scheerresultaat.
Vervang de scheerunit alleen door een HS85 Philips-scheerunit.
1 Trek de oude scheerunit van het scheerapparaat (g. 21).
2 Plaats de nieuwe scheerunit op het scheerapparaat (‘klik’) (g. 23).
Gebruik alleen essen met NIVEA FOR MEN-scheerconditioner.
1 Verwijder het lipje van de es met NIVEA FOR MEN-scheerconditioner (g. 6).
2 Draai de dop van de conditioneres rechtsom (‘klik’) (g. 7).
, De dop beweegt omlaag en de tuit van de es wordt zichtbaar.
3 Draai de kap van het Rell&Charge-station linksom om deze te verwijderen.
4 Plaats de conditioneres in de opening voor de es met de tuit naar beneden gericht (g. 8).
188
5 Duw de kap terug op het Rell&Charge-station (1) en draai de kap rechtsom (2) om deze
vast te zetten (g. 9).
- Gooi het apparaat aan het einde van zijn levensduur niet weg met het normale huisvuil, maar
lever het in op een door de overheid aangewezen inzamelpunt om het te laten recyclen. Op die
manier levert u een bijdrage aan een schonere leefomgeving (g. 28).
- De ingebouwde accu bevat stoffen die schadelijk kunnen zijn voor het milieu. Verwijder altijd de
accu voordat u het apparaat afdankt en inlevert op een door de overheid aangewezen
inzamelpunt. Lever de accu in op een ofcieel inzamelpunt voor batterijen. Als u problemen
ondervindt bij het verwijderen van de accu, kunt u met het apparaat ook naar een Philips-
servicecentrum gaan. Medewerkers van dit centrum verwijderen dan de accu voor u en zorgen
ervoor dat deze op milieuvriendelijke wijze wordt verwerkt.
Verwijder de accu alleen wanneer u het scheerapparaat afdankt. Zorg ervoor dat de accu
helemaal leeg is wanneer u deze verwijdert.
Pas op, de accustrips zijn scherp.
1 Verwijder de scheerconditionercartridge van het scheerapparaat (g. 26).
2 Draai de drie schroeven aan de achterzijde van het scheerapparaat los (g. 29).
3 Verwijder het achterpaneel van de behuizing met een schroevendraaier (g. 30).
4 Knip de draden door en verwijder de accu.
Als u service of informatie nodig hebt of als u een probleem ondervindt, bezoek dan de
ondersteuningspagina op de Philips-website www.philips.com/support of neem contact op met het
Philips Consumer Care Centre in uw land (u vindt het telefoonnummer in het ‘worldwide
guarantee’-vouwblad). Als er geen Consumer Care Centre in uw land is, ga dan naar uw lokale
Philips-dealer.
De scheerunit (mesjes en kapjes) valt niet onder de voorwaarden van de internationale garantie
omdat deze onderhevig is aan slijtage.
De conditionercartridge is een wegwerpartikel en valt niet onder de internationale garantie.
Dit hoofdstuk behandelt in het kort de problemen die u kunt tegenkomen tijdens het gebruik van
het apparaat. Als u er niet in slaagt het probleem op te lossen met behulp van de onderstaande
informatie, neem dan contact op met het Consumer Care Centre in uw land.
Probleem Mogelijke oorzaak Oplossing
Het scheerapparaat
U hebt niet genoeg
Druk op de scheerconditionerknop tot
glijdt niet soepel over
scheerconditioner gebruikt.
er voldoende NIVEA FOR MEN-
mijn huid.
scheerconditioner is aangebracht.
Hierdoor zal de scheerunit weer soepel
over uw huid glijden.

189
Probleem Mogelijke oorzaak Oplossing
Het scheerapparaat
U hebt het scheerapparaat
Maak het scheerapparaat grondig
scheert minder goed
niet goed schoongemaakt.
schoon (zie hoofdstuk ‘Schoonmaken en
dan eerst.
onderhoud’).
Er zitten lange haren in de
Maak de scheerhoofden schoon door
scheerhoofden.
de hieronder beschreven stappen van
de extra grondige schoonmaakmethode
te volgen.
De scheerunit is beschadigd
Vervang de scheerunit (zie hoofdstuk
of versleten.
‘Vervangen’).
Het scheerapparaat
De accu is leeg. Laad de accu opnieuw op (zie
werkt niet als ik op de
hoofdstuk ‘Klaarmaken voor gebruik’).
aan/uitknop druk.
De reisvergrendeling is
Schakel de reisvergrendeling uit (zie
geactiveerd.
hoofdstuk ‘Opbergen’).
De scheerhoofden in de
Maak het scheerapparaat grondig
scheerunit worden
schoon voordat u verder gaat met
geblokkeerd door
scheren (zie hoofdstuk ‘Schoonmaken’).
opgedroogde
scheerconditioner.
Na de extra grondige
Wanneer u de scheerunit weer in elkaar
reiniging hebt u de
zet, zorg er dan voor dat u elk kapje
scheerunit niet goed in
linksom draait totdat het vastklikt.
elkaar gezet.
Er komt weinig
Een van de
Spoel de scheerunit schoon of laat deze
scheerconditioner uit de
conditioneropeningen zit
weken. Als dit niet werkt, pompt u
openingen, hoewel er
verstopt.
scheerconditioner in de cartridge tot er
voldoende conditioner
weer conditioner uit de geblokkeerde
in de cartridge zit.
opening komt. Als dit ook niet werkt,
kunt u de volgende methode proberen:
1) Schakel het scheerapparaat uit 2)
Trek de scheerunit van het
scheerapparaat 3) Plaats uw vinger op
de opening die niet is geblokkeerd 4)
Schakel het scheerapparaat in 5) Druk
enkele seconden op de
scheerconditionerknop tot er weer
conditioner uit de geblokkeerde
opening komt.

190
Probleem Mogelijke oorzaak Oplossing
U hebt de scheerhoofden
Zorg ervoor dat u het scheerhoofd
niet in hun oorspronkelijke
zonder conditioneropening in de juiste
houders teruggeplaatst. Een
houder plaatst. Dit is de houder die zich
van de scheerhoofden heeft
het dichtst bij de aan/uitknop bevindt
in het midden geen
wanneer de scheerunit op het
scheerconditioneropening
scheerapparaat zit.
en dit scheerhoofd moet in
een specieke houder
worden geplaatst.
Er komt geen
De
Vul de scheerconditionercartridge
scheerconditioner uit de
scheerconditionercartridge
opnieuw (zie hoofdstuk ‘Klaarmaken
openingen wanneer ik
is bijna leeg.
voor gebruik’).
op de
scheerconditionerknop
druk.
De trimmer maakt meer
Deze trimmer heeft een
Vanwege het nieuwe open ontwerp
geluid dan andere
open ontwerp.
hoort u het knippen van de trimmer
trimmers.
duidelijker dan het geval is bij andere
trimmers. Dit is normaal en betekent
niet dat er iets mis is met de trimmer.
Zorg ervoor dat het apparaat is uitgeschakeld.
1 Trek de scheerunit van het scheerapparaat af (g. 31).
2 Draai het kapje rechtsom en verwijder het kapje van de scheerunit (g. 32).
Opmerking: Verwijder maar één scheerhoofd per keer. Hierdoor bent u er zeker van dat u het
scheerhoofd altijd terugplaatst in de oorspronkelijke houder. Dit is belangrijk, omdat twee scheerhoofden
speciale openingen hebben voor de scheerconditioner. Bovendien zorgt dit ervoor dat u de messen en de
kapjes van de verschillende scheerhoofden niet verwisselt. Dit heeft namelijk een negatief effect op de
scheerprestaties.
3 Haal indien nodig het mes uit het kapje.
4 Maak het mes en het kapje schoon met het bijgeleverde borsteltje.
5 Plaats het mes na het schoonmaken terug in de scheerunit met de mespootjes naar boven
gericht.
6 Plaats het kapje terug op de scheerhoofdhouder (over het mes) (g. 33).
7 Draai het kapje linksom totdat het vastklikt (g. 34).
8 Plaats de scheerunit terug op het scheerapparaat (‘klik’) (g. 35).

191
Gratulerer med kjøpet og velkommen til Philips! Du får best mulig nytte av støtten som Philips tilbyr,
hvis du registrerer produktet ditt på www.philips.com/welcome.
Les denne brukerveiledningen nøye. Den inneholder informasjon om de otte funksjonene denne
barbermaskinen har. I tillegg får du tips som kan gjøre barberingen enklere og bedre.
Barbermaskin
Beskyttelsesdeksel
Trimmer
Skjæreenhet
Kassett for barberingslotion
Knapp for barberingslotion
Av/på-knapp
Ladelamper
Lader
Påfyllings- og ladestasjon
Hette på påfyllings- og ladestasjon
Oppbevaringsfordypning for trimmer
Bakpanel
Uttak for liten kontakt
Lampe for påfylling av lotionkassett
Lampe for lotionaske
Rengjøringsbørste
NIVEA FOR MEN barberingslotionaske
Etui
Adapter (adapteren din er kanskje annerledes enn den som er vist på guren)
Les denne brukerveiledningen nøye før du bruker apparatet, og ta vare på den for senere referanse.
- Kontroller at adapteren ikke blir våt (adapteren kan være annerledes enn den som vises på
guren) (g. 2).
- Vær forsiktig med varmt vann. Pass på at vannet ikke er så varmt at du brenner deg på hendene.
- Adapteren inneholder en omformer. Ikke klipp av adapteren for å erstatte den med et annet
støpsel. Dette kan føre til farlige situasjoner.
- Dette apparatet er ikke tiltenkt bruk av personer (inkludert barn) som har nedsatt sanseevne
eller fysisk eller psykisk funksjonsevne, eller personer som ikke har erfaring eller kunnskap,
unntatt hvis de får tilsyn eller instruksjoner om bruk av apparatet av en person som er ansvarlig
for sikkerheten.
- Pass på at barn er under tilsyn, slik at de ikke leker med apparatet.
- Senk aldri påfyllings- og ladestasjonen i vann, eller skyll den under springen (g. 3).
- Laderen må aldri senkes ned i vann eller skylles under springen (g. 4).
- Plasser og bruk alltid påfyllings- og ladestasjonen og laderen på en overate som tåler væske.
- Apparatene skal brukes, lades og oppbevares ved en temperatur mellom 5 og 35 °C.
- Sett alltid beskyttelsesdekselet på barbermaskinen for å beskytte skjærehodene når du er ute og
reiser.
- Barbermaskinen og det andre tilbehøret kan ikke vaskes i oppvaskmaskin.
192
- Barbermaskinen må aldri rengjøres med vann som er varmere enn 80 °C.
- Bruk bare adapteren, laderen og påfyllings- og ladestasjonen som følger med.
- Ikke bruk påfyllings- og ladestasjonen hvis adapteren eller selve stasjonen er skadet.
- Ikke bruk barbermaskinen eller laderen hvis de er skadet.
- Hvis adapteren er skadet, må du alltid sørge for å bytte den ut med en av original type for å
unngå at det oppstår farlige situasjoner.
- Denne barbermaskinen overholder de internasjonalt godkjente sikkerhetskravene, og den kan
trygt brukes i badekaret eller dusjen og rengjøres under springen (g. 5).
- Dette Philips-apparatet overholder alle standarder som gjelder for elektromagnetiske felt (EMF).
Hvis det håndteres riktig og i samsvar med instruksjonene i denne brukerveiledningen, er det
trygt å bruke det ut fra den kunnskapen vi har per dags dato.
- Adapteren omformer 100–240 V til en sikker lavspenning på under 24 V.
1 Ta av iken på NIVEA FOR MEN barberingslotionasken (g. 6).
2 Vri hetten på lotionasken med klokken til du hører et klikk (g. 7).
, Hetten går nedover og åpningen for lotion vises.
3 Vri hetten på påfyllings- og ladestasjonen mot klokken for å fjerne den.
4 Ta bort emballasjen fra dokkinghullet for asken i påfyllings- og ladestasjonen.
5 Plasser lotionasken i dokkinghullet med åpningen nedover (g. 8).
6 Sett hetten tilbake på påfyllings- og ladestasjonen (1), og vri hetten med klokken for å feste
den (2) (g. 9).
7 Plasser det lille støpselet i kontakten på påfyllings- og ladestasjonen, og sett adapteren i
veggkontakten (g. 10).
8 Sett barbermaskinen i påfyllings- og ladestasjonen, og trykk den bakover til du hører et
klikk (g. 11).
Merk: Barbermaskinen lades og fylles med barberingslotion automatisk.
9 Lad barbermaskinen i 90 minutter. (g. 12)
Merk: Lad barbermaskinen før du bruker den for første gang, eller når ladelampen viser at batteriet er
tomt (se avsnittet Anvisninger for lading).
Merk: En fulladet barbermaskin har en barberingstid på opptil 40 minutter.
1 Koble den lille kontakten til laderen, og koble adapteren til veggkontakten.
2 Sett barbermaskinen i laderen (g. 13).
, Barbermaskinen lades.
3 Lad opp barbermaskinen i 1,5 timer.
Merk: Lad barbermaskinen før du bruker den for første gang, eller når ladelampen viser at batteriet er
tomt (se avsnittet Anvisninger for lading).
Merk: En fulladet barbermaskin har en barberingstid på opptil 40 minutter.
193
Du kan også fylle kassetten for barberingslotion uten å bruke påfyllings- og ladestasjonen:
1 Plasser åpningen på lotionasken i påfyllingsåpningen på lotionkassetten.
2 Beveg asken opp og ned cirka fem ganger for å pumpe barberingslotion inn i kassetten til du
ser at den er full (g. 14).
- Ladelampene viser hvilket nivå batteriet er ladet til. Under ladingen blinker den nederste
ladelampen først oransje og deretter slukkes den. Den øverste ladelampen begynner deretter å
blinke hvitt, og til slutt lyser den kontinuerlig hvitt.
- Når barbermaskinen har ladet i 9 minutter, slukkes den nederste ladelampen, og den øverste
ladelampen begynner å blinke hvitt for å vise at barbermaskinen har nok strøm til én barbering.
Merk: Hurtiglading er bare mulig når du allerede har ladet barbermaskinen én gang i 90 minutter.
- Mengden strøm som er igjen på batteriet, vises med antallet ladelamper som lyser. Gjenværende
batterikapasitet er synlig i noen sekunder når du slår barbermaskinen av eller på (g. 15).
- Når batterikapasiteten er lav, lyser den nederste ladelampen oransje under barberingen, og den
blinker oransje når du slår av barbermaskinen. (g. 16)
- Når batteriet er fulladet, lyser alle ladelampene kontinuerlig hvitt (g. 15).
- Etter ca. én time slukkes de hvite ladelampene for å spare energi.
, Når lampen for lotionaske blinker oransje, kan det være to grunner til det: (g. 17)
- Det står ingen lotionaske i påfyllings- og ladestasjonen, eller asken er ikke plassert riktig.
- Lotionasken er tom.
, Lampen for påfylling av lotionkassett kan indikere tre forskjellige ting: (g. 18)
- Når lotionkassetten fylles, blinker lampen for påfylling av lotionkassett hvitt.
- Når kassetten for barberingslotion er full, lyser lampen for påfylling av lotionkassett hvitt
kontinuerlig.
- Hvis lotionasken blir tom mens lotionkassetten fylles, slukkes lampen for påfylling av
lotionkassett, og lampen for lotionasken blinker rødt.
Merk: Huden din trenger kanskje to til tre uker for å bli vant til et nytt barberingssystem.
1 Kontroller at det er nok barberingslotion i kassetten for barberingslotion.
2 Trykk på av/på-knappen for å slå på barbermaskinen.
3 Kontroller at barbermaskinen er tilstrekkelig ladet (se delen Anvisninger for lading i avsnittet
Før bruk).
194
4 Beveg skjæreenheten forsiktig i sirkler over huden, og trykk på barberingslotionknappen til
det er nok barberingslotion på huden for en komfortabel barbering. (g. 19)
- Når du slipper barberingslotionknappen, slutter apparatet å fordele lotion.
- Hvis du trykker kort på barberingslotionknappen, fordeler apparatet automatisk en bestemt
mengde lotion.
- Trykk på barberingslotionknappen igjen for å fordele mer barberingslotion under barberingen
for å sikre at skjæreenheten fortsetter å gli mykt over huden.
Merk: Barberingslotionknappen fungerer bare når barbermaskinen er slått på.
Merk: Denne barbermaskinen kan brukes på lignende måte som barberblad: Du kan bruke
barbermaskinen på våt hud. I motsetning til tradisjonelle elektriske barbermaskiner har ikke dette
apparatet et skjeggkammer som samler opp skjegget. For å forhindre at skjegget faller ned på klærne,
må du bruke nok barberingslotion når du barberer deg.
5 Rengjør barbermaskinen godt etter hver bruk (se avsnittet Rengjøring og vedlikehold).
6 Skyv beskyttelseshetten på barbermaskinen for å unngå skade (g. 20).
- Beveg skjæreenheten forsiktig i sirkler over huden.
- Ikke trykk for hardt. Det kan føre til hudirritasjon.
- Bruk barberingslotion regelmessig for å sikre at maskinen glir lett.
- Du kan også bruke barbermaskinen i badekaret eller i dusjen.
Merk: På grunn av den nye åpne utformingen hører du skjæringen fra trimmeren tydeligere enn med
andre trimmere. Dette er normalt.
1 Trekk skjæreenheten av barbermaskinen (g. 21).
2 Ta trimmeren ut av trimmerholderen på laderen og sett den på barbermaskinen (du vil høre
et klikk) (g. 22).
3 Trykk på av/på-knappen for å slå på barbermaskinen.
4 Bruk trimmeren til kinnskjegg og/eller barter.
5 Rengjør trimmeren godt etter bruk (se avsnittet Rengjøring og vedlikehold).
6 Ta av trimmeren og sett den tilbake i trimmerholderen.
7 Sett skjæreenheten tilbake på barbermaskinen med et klikk (g. 23).
8 Skyv beskyttelseshetten på barbermaskinen for å unngå skade (g. 20).
Bruk aldri skurebørster, skuremidler eller væsker som alkohol, bensin eller aceton til å rengjøre
apparatet.
Rengjør barbermaskinen og trimmeren etter hver bruk.
Vær forsiktig med varmt vann. Pass på at vannet ikke er så varmt at du brenner deg på hendene.
Tørk aldri skjæreenheten med et håndkle eller tørkepapir. Det kan skade skjærehodene.
Merk: Barbermaskinen er vanntett og kan rengjøres med vann.

195
1 Trykk på av/på-knappen for å slå på barbermaskinen.
Merk: Rengjør barbermaskinen mens den er slått på.
2 Senk skjæreenheten/trimmeren ned i varmt vann i minst 30 sekunder (g. 24).
3 Slå av barbermaskinen og rist av overødig vann.
4 Skyv beskyttelseshetten på barbermaskinen for å unngå skade (g. 20).
Merk: Hvis barbermaskinen ikke barberer så godt som den gjorde tidligere, og du ikke greier å løse
problemet med rengjøringsmetoden som står beskrevet i dette avsnittet, kan du lese om en ekstra
grundig rengjøringsmetode i avsnittet Feilsøking.
1 Smør tennene på trimmeren med en dråpe symaskinolje hver sjette måned.
1 Oppbevar barbermaskinen i påfyllings- og ladestasjonen.
2 Hvis du skal reise eller du ikke vil oppbevare barbermaskinen i påfyllings- og ladestasjonen,
setter du beskyttelseshetten på barbermaskinen og oppbevarer den i etuiet (g. 20).
Hvis du skal oppbevare barbermaskinen i lengre tid eller ta den med på reise, kan du låse
barbermaskinen. Transportlåsen hindrer at barbermaskinen blir slått på ved et uhell.
1 Kontroller at apparatet er slått av.
2 Trykk på og hold nede barberingslotionknappen (1), og trykk på av/på-knappen med den
andre hånden samtidig (2) (g. 25).
3 Hold begge knappene nede i seks sekunder. Vent til barbermaskinen lager en kort summelyd,
og den midterste ladelampen på barbermaskinen blinker noen ganger.
, Transportlåsen er nå aktivert.
Merk: Hvis du ved et uhell trykker på av/på-knappen først, slås barbermaskinen på. Hvis det skjer,
trykker du på av/på-knappen igjen for å slå av barbermaskinen.
Merk: Hvis du trykker på av/på-knappen når transportlåsen er aktivert, blinker den midterste
ladelampen hvitt for å vise at barbermaskinen er låst.
Tips: Trykk på av/på-knappen for å kontrollere at transportlåsen er aktivert. Hvis transportlåsen er
aktivert, slås ikke barbermaskinen på.
1 Trykk på og hold nede barberingslotionknappen (1), og trykk på av/på-knappen med den
andre hånden samtidig (2) (g. 25).
2 Hold begge knappene nede i seks sekunder. Vent til barbermaskinen lager en kort summelyd,
og den midterste ladelampen på barbermaskinen blinker noen ganger.
, Transportlåsen er nå deaktivert.
Merk: Du kan også deaktivere transportlåsen ved å sette barbermaskinen tilbake i laderen.
196
Hvis du skal reise og ikke vil ta med deg påfyllings- og ladestasjonen, kan du ta med deg laderen for
å lade barbermaskinen når det blir nødvendig.
Av hygieniske årsaker anbefaler vi at du bytter kassett for barberingslotion én gang i året. En ny
kassett følger med hver 3-pakning med NIVEA FOR MEN-barberingslotion og med utskiftningssettet
(som inneholder en ny HS85-skjæreenhet og en ny kassett).
1 Ta kassetten for barberingslotion ut av barbermaskinen (g. 26).
2 Sett inn tappen på toppen av den nye kassetten for barberingslotion i sporet i kanten på
barbermaskinen (1). Trykk deretter på bunnen av kassetten med tommelen (2) for å feste
kassetten til barbermaskinen med et klikk (g. 27).
3 Fyll kassetten for barberingslotion (se avsnittet Komme i gang).
Bytt skjæreenhet hvert år for å få optimalt barberingsresultat.
Erstatt skjæreenheten bare med en HS85 Philips-skjæreenhet.
1 Trekk den gamle skjæreenheten av barbermaskinen (g. 21).
2 Sett den nye skjæreenheten på barbermaskinen (du vil høre et klikk) (g. 23).
Bruk bare NIVEA FOR MEN barberingslotionasker.
1 Ta av iken på NIVEA FOR MEN barberingslotionasken (g. 6).
2 Vri hetten på lotionasken med klokken til du hører et klikk (g. 7).
, Hetten går nedover og åpningen for lotion vises.
3 Vri hetten på påfyllings- og ladestasjonen mot klokken for å fjerne den.
4 Plasser lotionasken i dokkinghullet for asken med åpningen nedover (g. 8).
5 Trykk hetten tilbake på påfyllings- og ladestasjonen (1) og vri den med klokken (2) for å feste
den (g. 9).
- Ikke kast apparatet som vanlig husholdningsavfall når det ikke kan brukes lenger. Lever det på en
gjenvinningsstasjon. Slik bidrar du til å ta vare på miljøet (g. 28).
- Det innebygde oppladbare batteriet inneholder stoffer som kan forurense miljøet. Ta alltid ut
batteriet før du kaster apparatet eller leverer det på en gjenvinningsstasjon. Lever batteriet på en
gjenvinningsstasjon for batterier. Hvis du har problemer med å ta ut batteriet, kan du også ta
apparatet med til et Philips-servicesenter. Der vil de ta ut batteriet for deg og behandle det på
en miljøvennlig måte.
Det oppladbare batteriet skal bare tas ut når du avhender barbermaskinen. Kontroller at
batteriet er helt utladet når du fjerner det.
Vær forsiktig! Batteristrimlene er skarpe.

197
1 Ta kassetten for barberingslotion ut av barbermaskinen (g. 26).
2 Skru opp de tre skruene bak på barbermaskinen (g. 29).
3 Ta av bakpanelet på kabinettet med en skrutrekker (g. 30).
4 Klipp ledningene, og fjern det oppladbare batteriet.
Hvis du trenger service eller informasjon, eller hvis du har et problem med produktet, kan du gå til
nettstedet til Philips på www.philips.com/support. Du kan også ta kontakt med Philips’
forbrukertjeneste der du bor (du nner telefonnummeret i garantiheftet). Hvis det ikke nnes noen
forbrukertjeneste i nærheten, kan du kontakte din lokale Philips-forhandler.
Skjæreenheten (kniver og lamelltopper) dekkes ikke av vilkårene i den internasjonale garantien fordi
de er slitedeler.
Lotionkassetten er et engangsprodukt, og den dekkes ikke av vilkårene i den internasjonale garantien.

198
Dette avsnittet oppsummerer de vanligste problemene som kan oppstå med apparatet. Hvis du ikke
klarer å løse problemet med informasjonen nedenfor, kan du ta kontakt med Philips’
forbrukertjeneste der du bor.
Problem Mulig årsak Løsning
Barbermaskinen
Du har ikke brukt
Trykk på barberingslotionknappen til en dekkende
glir ikke mykt over
nok barberingslotion.
mengde NIVEA FOR MEN barberingslotion er
huden.
fordelt. Dette gjør at skjæreenheten glir mykt over
huden igjen.
Barbermaskinen
Du har ikke rengjort
Rengjør barbermaskinen nøye (se avsnittet
barberer ikke så
barbermaskinen
Rengjøring og vedlikehold).
godt som den
ordentlig.
gjorde tidligere.
Lange hår dekker
Rengjør skjærehodene ved å følge trinnene i den
skjærehodene.
ekstra grundige rengjøringsmetoden som beskrives
nedenfor.
Skjæreenheten er
Bytt skjæreenheten (se avsnittet Utskifting).
ødelagt eller slitt.
Barbermaskinen
Batteriet er utladet. Lad opp batteriet (se avsnittet Før bruk).
virker ikke når jeg
trykker på av/på-
knappen.
Transportlåsen er
Deaktiver transportlåsen (se avsnittet Oppbevaring).
aktivert.
Størknet
Rengjør maskinen grundig før du fortsetter
barberingslotion
barberingen (se avsnittet Rengjøring).
blokkerer
skjærehodene i
skjæreenheten.
Du har ikke satt
Når du setter sammen skjæreenheten, må du
sammen
kontrollere at du vrir hver lamelltopp mot klokken til
skjæreenheten riktig
den låses på plass.
etter den ekstra
grundige rengjøringen.
Det kommer lite
Ett av lotionhullene er
Skyll eller legg skjæreenheten i vann. Hvis det ikke
barberingslotion
tette.
hjelper, pumper du barberingslotion inn i kassetten
ut av hullene selv
for barberingslotion til det begynner å komme ut
om det er nok
lotion av det tilstoppede hullet. Hvis dette heller ikke
lotion i kassetten.
hjelper, kan du prøve følgende fremgangsmåte: 1) Slå
av barbermaskinen. 2) Ta skjæreenheten av
barbermaskinen. 3) Plasser ngeren din på det hullet
som ikke er tilstoppet. 4) Slå på barbermaskinen. 5)
Trykk på knappen for barberingslotion i ere
sekunder til det begynner å komme ut lotion av det
tilstoppede hullet igjen.
199
Problem Mulig årsak Løsning
Du har ikke satt
Kontroller at du satte skjærehodet uten lotionhull i
skjærehodene tilbake
riktig holder. Dette er den holderen som er nærmest
i de opprinnelige
av/på-knappen når skjæreenheten sitter på
holderne. Ett av
barbermaskinen.
skjærehodene har
ikke noe lotionhull i
midten, og det må
plasseres i en
bestemt holder.
Det kommer ikke
Barberingskassetten
Fyll opp kassetten for barberingslotion (se avsnittet
noe
er nesten tom.
Før bruk).
barberingslotion
ut av hullene når
jeg trykker på
knappen for
barberingslotion.
Trimmeren lager
Denne trimmeren
På grunn av den nye åpne utformingen hører du
mer støy enn
har en åpen design.
skjæringen fra trimmeren tydeligere enn med andre
andre trimmere.
trimmere. Dette er normalt og betyr ikke at det er
noe galt med trimmeren.
Pass på at apparatet er slått av.
1 Trekk skjæreenheten av barbermaskinen (g. 31).
2 Vri lamelltoppen med klokken og løft den av skjæreenheten (g. 32).
Merk: Fjerne kun ett skjærehode om gangen. Slik vil du alltid sette skjærehodet tilbake i holderen sin, og
dette er viktig siden to av skjærehodene har spesielle hull for barberingslotion. Slik unngår du også å
blande kniver og lamelltopper fra ulike skjærehoder, noe som påvirker barberingsresultatet.
3 Fjern om nødvendig kniven fra lamelltoppen.
4 Rengjør knivene og lamelltoppene med børsten som følger med.
5 Etter rengjøring setter du kniven tilbake i skjæreenheten med knivene pekende oppover.
6 Sett lamelltoppen tilbake på barberhodeholderen (over kniven) (g. 33).
7 Vri lamelltoppen mot klokken til den sitter ordentlig på plass (g. 34).
8 Sett skjæreenheten tilbake på barbermaskinen med et klikk (g. 35).

200
Gratulujemy zakupu i witamy wśród użytkowników produktów Philips! Aby w pełni skorzystać z
oferowanej przez rmę Philips pomocy, zarejestruj swój produkt na stronie www.philips.com/
welcome.
Prosimy o zapoznanie się z niniejszą instrukcją obsługi, gdyż zawiera ona informacje na temat funkcji
golarki oraz wskazówki jak można szybciej i przyjemniej się golić.
Golarka
Nasadka zabezpieczająca
Trymer
Element golący
Wkład z balsamem do golenia
Przycisk balsamu do golenia
Wyłącznik
Wskaźniki ładowania
Ładowarka
Stacja ładująca
Nasadka stacji ładującej
Miejsce na trymer
Panel tylny
Gniazdo do podłączenia małej wtyczki
Wskaźnik napełniania wkładu z balsamem
Wskaźnik buteleczki z balsamem
Szczoteczka do czyszczenia
Buteleczka z balsamem do golenia NIVEA FOR MEN
Etui
Zasilacz (zasilacz może wyglądać nieco inaczej od pokazanego na rysunku)
Przed pierwszym użyciem urządzenia zapoznaj się dokładnie z jego instrukcją obsługi i zachowaj ją na
wypadek konieczności użycia w przyszłości.
- Zabezpiecz zasilacz przed możliwością zamoknięcia (zasilacz może wyglądać nieco inaczej od
pokazanego na rysunku) (rys. 2).
- Uważaj na gorącą wodę. Zawsze należy sprawdzić jej temperaturę, aby nie poparzyć rąk.
- Zasilacz sieciowy zawiera transformator. Ze względów bezpieczeństwa nie wymieniaj wtyczki
zasilacza na inną.
- Urządzenie nie jest przeznaczone do użytku przez osoby (w tym dzieci) o ograniczonych
zdolnościach zycznych, sensorycznych lub umysłowych, a także nieposiadające wiedzy lub
doświadczenia w użytkowaniu tego typu urządzeń, chyba że będą one nadzorowane lub zostaną
poinstruowane na temat korzystania z tego urządzenia przez opiekuna.
- Nie pozwalaj dzieciom bawić się urządzeniem.
- Nigdy nie zanurzaj ani nie płucz stacji ładującej w wodzie (rys. 3).
- Nigdy nie zanurzaj ładowarki w wodzie ani nie płucz jej pod kranem (rys. 4).
- Korzystaj ze stacji ładującej ustawionej na wodoodpornej powierzchni.
- Używaj, ładuj i przechowuj urządzenia w temperaturze od 5°C do 35°C.
- Na czas podróży zawsze załóż na golarkę nasadkę zabezpieczającą głowice golące.

201
- Golarki i innych akcesoriów nie można myć w zmywarce.
- Nie spłukuj golarki wodą o temperaturze przekraczającej 80°C.
- Korzystaj wyłącznie z dołączonego zasilacza, ładowarki oraz stacji ładującej.
- Nie korzystaj ze stacji ładującej, jeśli uszkodzony jest zasilacz lub sama stacja.
- Nie używaj golarki lub ładowarki w przypadku ich uszkodzenia.
- Ze względów bezpieczeństwa w przypadku uszkodzenia zasilacza wymień go na oryginalny
zasilacz tego samego typu.
- Golarka spełnia międzynarodowe normy bezpieczeństwa i może być używana w kąpieli i pod
prysznicem oraz może być myta pod bieżącą wodą (rys. 5).
- Niniejsze urządzenie rmy Philips spełnia wszystkie normy dotyczące pól elektromagnetycznych.
W przypadku prawidłowej obsługi zgodnie z zaleceniami zawartymi w instrukcji urządzenie jest
bezpieczne w użytkowaniu, co potwierdzają badania naukowe dostępne na dzień dzisiejszy.
- Zasilacz przekształca napięcie 100–240 V na bezpieczne napięcie poniżej 24 V.
1 Usuń zatyczkę z buteleczki z balsamem do golenia NIVEA FOR MEN (rys. 6).
2 Przekręć nasadkę buteleczki z balsamem w prawo (usłyszysz „kliknięcie”) (rys. 7).
, Nasadka przesunie się w dół i pojawi się wylot balsamu.
3 Przekręć nasadkę stacji napełniająco-ładującej w lewo i zdejmij ją.
4 Usuń opakowanie z otworu dokującego na buteleczkę znajdującego się w stacji ładującej.
5 Umieść buteleczkę z balsamem w otworze dokującym wylotem skierowanym w dół (rys. 8).
6 Załóż nasadkę z powrotem na stację ładującą (1) i przekręć w prawo, aby ją zamocować
(2) (rys. 9).
7 Włóż małą wtyczkę do gniazda w stacji ładującej i podłącz zasilacz do gniazdka
elektrycznego (rys. 10).
8 Umieść golarkę w stacji ładującej i popchnij ją do tyłu (usłyszysz „kliknięcie”) (rys. 11).
Uwaga: Golarka jest automatycznie ładowana i napełniania balsamem do golenia.
9 Ładuj golarkę przez 90 minut. (rys. 12)
Uwaga: Golarkę należy naładować przed pierwszym użyciem oraz wtedy, gdy wskaźnik golarki informuje
o rozładowaniu się akumulatora (patrz część „Wskazówki dotyczące ładowania”).
Uwaga: W pełni naładowana golarka może działać do 40 minut.
1 Włóż małą wtyczkę do gniazda w ładowarce i podłącz zasilacz do gniazdka elektrycznego.
2 Umieść golarkę w ładowarce (rys. 13).
, Trwa ładowanie golarki.
3 Ładuj golarkę przez 1,5 godziny.
Uwaga: Golarkę należy naładować przed pierwszym użyciem oraz wtedy, gdy wskaźnik golarki informuje
o rozładowaniu się akumulatora (patrz część „Wskazówki dotyczące ładowania”).
Uwaga: W pełni naładowana golarka może działać do 40 minut.

202
Wkład z balsamem można także napełnić bez korzystania ze stacji ładującej:
1 Umieść wylot buteleczki z balsamem w otworze wlewowym wkładu.
2 Wykonaj buteleczką około 5 ruchów w górę i w dół, aby wpompować balsam do golenia do
wkładu, aż do jego napełnienia (rys. 14).
- Wskaźniki ładowania wskazują stopień naładowania akumulatora. W trakcie ładowania dolny
wskaźnik ładowania miga na pomarańczowo, po czym gaśnie. Wtedy górny wskaźnik ładowania
zaczyna migać na biało i w końcu świeci na biało w sposób ciągły.
- Po ładowaniu golarki przez 9 minut dolny wskaźnik ładowania gaśnie, a górny wskaźnik miga na
biało, co oznacza, że golarka jest gotowa na jedno golenie.
Uwaga: Szybkie ładowanie jest dostępne tylko wtedy, jeśli golarka była już raz ładowana przez
1,5 godziny.
- Liczba świecących wskaźników wskazuje poziom energii dostępnej w akumulatorze. Poziom
naładowania akumulatora jest widoczny tylko przez kilka sekund podczas włączania i wyłączania
golarki (rys. 15).
- Gdy akumulator jest już niemal całkowicie rozładowany, podczas golenia dolny wskaźnik
ładowania świeci na pomarańczowo, a po wyłączeniu golarki miga na pomarańczowo. (rys. 16)
- Gdy akumulator jest w pełni naładowany, wszystkie wskaźniki poziomu naładowania akumulatora
świecą się na biało w sposób ciągły (rys. 15).
- Po ok. 1 godzinie świecące na biało wskaźniki ładowania zgasną w celu oszczędzenia energii.
, Miganie tego wskaźnika na pomarańczowo może mieć dwie przyczyny: (rys. 17)
- W stacji ładującej nie umieszczono buteleczki z balsamem lub została ona umieszczona
nieprawidłowo.
- Buteleczka z balsamem jest pusta.
, Wskaźnik napełniania wkładu może wskazywać jedną z trzech sytuacji: (rys. 18)
- Gdy wkład z balsamem jest napełniany, wskaźnik miga na biało.
- Gdy wkład z balsamem jest pełny, wskaźnik świeci na biało w sposób ciągły.
- Gdy buteleczka z balsamem zostanie opróżniona w trakcie napełniania wkładu, świecący się na
biało wskaźnik napełniania wkładu zgaśnie, a zaświeci się na czerwono wskaźnik buteleczki z
balsamem.
Uwaga: Skóra twarzy może potrzebować 2–3 tygodni, aby przyzwyczaić się do nowego sposobu golenia.
1 Upewnij się, że we wkładzie znajduje się wystarczająca ilość balsamu do golenia.

203
2 Naciśnij wyłącznik, aby włączyć golarkę.
3 Upewnij się, że golarka jest wystarczająco naładowana (patrz rozdział „Przygotowanie do
użycia”, część „Wskazówki dotyczące ładowania”).
4 Ostrożnie przesuwaj element golący po skórze, wykonując ruchy okrężne, oraz naciśnij i
przytrzymaj przycisk balsamu do golenia, aby nałożyć na skórę odpowiednią ilość
balsamu. (rys. 19)
- Zwolnij przycisk balsamu do golenia, aby urządzenie przestało go wydzielać.
- Krótkie naciśnięcie tego przycisku powoduje, że urządzenie automatycznie nakłada określoną
ilość balsamu.
- Ponownie naciśnij przycisk balsamu do golenia, aby nałożyć go więcej i zapewnić łagodne
przesuwanie się elementu golącego po skórze.
Uwaga: Przycisk balsamu do golenia działa tylko wtedy, gdy golarka jest włączona.
Uwaga: Z golarki tej można korzystać w sposób podobny do maszynki do golenia: można jej używać na
mokrej skórze. W odróżnieniu od typowej golarki elektrycznej, golarka ta nie ma komory na włosy, w
której zbierałby się ścięty zarost. Aby zapobiec spadaniu ściętego zarostu na ubranie, należy nałożyć
odpowiednią ilość balsamu do golenia.
5 Po każdym użyciu dokładnie umyj golarkę (patrz rozdział „Czyszczenie i konserwacja”).
6 Wsuń na golarkę nasadkę zabezpieczającą urządzenie przed uszkodzeniem (rys. 20).
- Ostrożnie przesuwaj golarkę po skórze, wykonując ruchy okrężne.
- Nie naciskaj zbyt mocno golarki, gdyż może to spowodować podrażnienie skóry.
- Aby ułatwić przesuwanie się golarki po skórze, regularnie nakładaj balsam do golenia.
- Golarki można także używać podczas kąpieli lub pod prysznicem.
Uwaga: Nowa, otwarta konstrukcja sprawia, że odgłosy wydawane przez trymer są głośniejsze niż w
innych trymerach. Jest to zjawisko normalne.
1 Zdejmij element golący z golarki (rys. 21).
2 Wyjmij trymer z uchwytu w ładowarce i załóż go na golarkę (usłyszysz „kliknięcie”) (rys. 22).
3 Naciśnij wyłącznik, aby włączyć golarkę.
4 Za pomocą trymera można przycinać bokobrody i wąsy.
5 Po użyciu dokładnie umyj trymer (patrz rozdział „Czyszczenie i konserwacja”).
6 Zdejmij trymer i umieść go z powrotem w uchwycie.
7 Załóż element golący z powrotem na golarkę (usłyszysz „kliknięcie”) (rys. 23).
8 Wsuń na golarkę nasadkę zabezpieczającą urządzenie przed uszkodzeniem (rys. 20).
Do czyszczenia urządzenia nigdy nie używaj czyścików, środków ściernych ani żrących płynów,
takich jak alkohol, benzyna lub aceton.
Po każdym użyciu wyczyść golarkę i trymer.
Uważaj na gorącą wodę. Zawsze należy sprawdzić jej temperaturę, aby nie poparzyć rąk.
204
Nidy nie wycierać elementu golącego ręcznikiem ani chusteczką higieniczną, gdyż może to
spowodować uszkodzenie głowic golących.
Uwaga: Golarka jest wodoszczelna i można ją czyścić wodą.
1 Naciśnij wyłącznik, aby włączyć golarkę.
Uwaga: Czyść golarkę, gdy jest włączona.
2 Zanurz element golący/trymer w gorącej wodzie na przynajmniej 30 sekund (rys. 24).
3 Wyłącz golarkę i strząśnij resztki wody.
4 Wsuń na golarkę nasadkę zabezpieczającą urządzenie przed uszkodzeniem (rys. 20).
Uwaga: Jeżeli golarka nie goli tak dobrze jak wcześniej i nie można rozwiązać tego problemu za pomocą
metody czyszczenia opisanej w tym rozdziale, należy ją bardzo dokładnie wyczyścić zgodnie z opisem w
rozdziale „Rozwiązywanie problemów”.
1 Nasmaruj trymer jedną kroplą oleju do konserwacji maszyn do szycia (raz na pół roku).
1 Przechowuj golarkę w stacji ładującej.
2 Jeśli wybierasz się w podróż lub jeśli nie chcesz przechowywać golarki w stacji ładującej,
przechowuj golarkę w etui, z założoną nasadką zabezpieczającą (rys. 20).
Jeśli zamierzasz przechowywać golarkę przez dłuższy czas lub jeśli wybierasz się w podróż, możliwe
jest zablokowanie golarki. Blokada golarki zapobiega przypadkowemu włączeniu urządzenia.
1 Upewnij się, że golarka jest wyłączona.
2 Naciśnij i przytrzymaj przycisk balsamu do golenia (1) i jednocześnie drugą ręką naciśnij
wyłącznik (2) (rys. 25).
3 Przytrzymaj oba przyciski przez 6 sekund. Zaczekaj, aż golarka wyemituje krótki
charakterystyczny szum, a środkowy wskaźnik ładowania zamiga kilka razy.
, Blokada podróżna jest teraz włączona.
Uwaga: Przypadkowe naciśnięcie wyłącznika jako pierwszego spowoduje włączenie golarki. W takim
przypadku należy ponownie nacisnąć wyłącznik, aby ją wyłączyć.
Uwaga: Naciśnięcie wyłącznika, podczas gdy włączona jest blokada podróżna, spowoduje miganie
środkowego wskaźnika ładowania na biało, co sygnalizuje aktywną blokadę.
Wskazówka: Naciśnij wyłącznik, aby sprawdzić czy blokada podróżna jest włączona. Jeśli blokada jest
aktywna, golarka się nie włączy.
1 Naciśnij i przytrzymaj przycisk balsamu do golenia (1) i jednocześnie drugą ręką naciśnij
włącznik (2) (rys. 25).
2 Przytrzymaj oba przyciski przez 6 sekund. Zaczekaj, aż golarka wyemituje krótki
charakterystyczny szum, a środkowy wskaźnik ładowania zamiga kilka razy.
, Blokada podróżna jest teraz wyłączona.
205
Uwaga: Blokadę podróżną można także wyłączyć poprzez umieszczenie golarki w ładowarce.
Jeśli wybierasz się w podróż i nie chcesz zabierać ze sobą stacji ładującej, możesz zabrać ze sobą
tylko ładowarkę, aby móc w razie potrzeby doładować golarkę.
Ze względów higienicznych zalecamy wymieniać wkład z balsamem raz do roku. Nowe wkłady
znaleźć można w kompletach zawierających 3 buteleczki z balsamem NIVEA FOR MEN oraz w
zestawach wymiennych (zawierających nowy element golący HS85 oraz nowy wkład).
1 Wyjmij wkład z balsamem z golarki (rys. 26).
2 Włóż występ na górnej części nowego wkładu z balsamem do szczeliny w krawędzi golarki
(1). Następnie dociśnij dolną część wkładu kciukiem (2), aby zamocować wkład w golarce
(usłyszysz „kliknięcie”) (rys. 27).
3 Napełnij wkład balsamem (patrz rozdział „Czynności wstępne”).
Aby uzyskać najlepsze rezultaty golenia, element golący należy wymieniać raz do roku.
Element golący należy wymieniać tylko na oryginalny element golący HS85 Philips.
1 Zdejmij stary element golący z golarki (rys. 21).
2 Załóż nowy element golący na golarkę (usłyszysz „kliknięcie”) (rys. 23).
Korzystaj tylko z buteleczek z balsamem do golenia NIVEA FOR MEN.
1 Usuń zatyczkę z buteleczki z balsamem do golenia NIVEA FOR MEN (rys. 6).
2 Przekręć nasadkę buteleczki z balsamem w prawo (usłyszysz „kliknięcie”) (rys. 7).
, Nasadka przesunie się w dół i pojawi się wylot balsamu.
3 Przekręć nasadkę stacji napełniająco-ładującej w lewo i zdejmij ją.
4 Umieść buteleczkę z balsamem w otworze dokującym wylotem skierowanym w dół (rys. 8).
5 Załóż nasadkę z powrotem na stację napełniająco-ładującą (1) i przekręć w prawo (2), aby ją
zamocować (rys. 9).
- Zużytego urządzenia nie należy wyrzucać wraz ze zwykłymi odpadami gospodarstwa
domowego — należy oddać je do punktu zbiórki surowców wtórnych w celu utylizacji.
Stosowanie się do tego zalecenia pomaga w ochronie środowiska (rys. 28).
- Akumulatory i baterie zawierają substancje szkodliwe dla środowiska naturalnego. Przed
wyrzuceniem lub oddaniem urządzenia do punktu zbiórki surowców wtórnych należy pamiętać
o ich wyjęciu. Akumulatory i baterie należy wyrzucać w wyznaczonych punktach zbiórki
surowców wtórnych. W przypadku problemów z wyjęciem akumulatora lub baterii urządzenie
można dostarczyć do centrum serwisowego rmy Philips, którego pracownicy wyjmą i usuną
akumulator lub baterię w sposób bezpieczny dla środowiska naturalnego.

206
Akumulator należy wyjąć tylko wtedy, gdy chcesz wyrzucić golarkę. Przed wyjęciem akumulatora
należy upewnić się, że jest on całkowicie rozładowany.
Należy zachować ostrożność, gdyż styki akumulatora są ostre.
1 Wyjmij wkład z balsamem z golarki (rys. 26).
2 Odkręć trzy śruby w tylnej części golarki (rys. 29).
3 Zdejmij panel tylny obudowy za pomocą śrubokrętu (rys. 30).
4 Przetnij przewody i wyjmij akumulator.
W razie konieczności naprawy, jakichkolwiek pytań lub problemów prosimy odwiedzić naszą stronę
internetową www.philips.com/supportlub skontaktować się z Centrum Obsługi Klienta rmy Philips
(numer telefonu znajduje się w ulotce gwarancyjnej). Jeśli w kraju Państwa zamieszkania nie ma
takiego Centrum, o pomoc należy zwrócić się do sprzedawcy produktów rmy Philips.
Element golący (nożyki i osłonki) nie jest objęty warunkami gwarancji międzynarodowej, ponieważ
ulega on zużyciu.
Wkład z balsamem jest jednorazowego użytku i nie jest objęty warunkami gwarancji
międzynarodowej.

207
W tym rozdziale opisano najczęstsze problemy, z którymi można się zetknąć, korzystając z
urządzenia. Jeśli poniższe wskazówki okażą się niewystarczające do rozwiązania problemu, należy
skontaktować się z Centrum Obsługi Klienta.
Problem Prawdopodobna
Rozwiązanie
przyczyna
Golarka nie
Nałożono zbyt mało
Naciskaj przycisk balsamu, aż nałożysz wystarczającą
przesuwa się
balsamu do golenia.
ilość balsamu do golenia NIVEA FOR MEN. Dzięki
swobodnie po
temu element golący znów będzie swobodnie
skórze.
przesuwał się po skórze.
Golarka goli
Golarka nie została
Wyczyść starannie golarkę (patrz rozdział
gorzej niż na
dokładnie
„Czyszczenie i konserwacja”).
początku.
wyczyszczona.
Długie włoski blokują
Bardzo dokładnie wyczyść głowice, postępując
głowice golące.
zgodnie z poniższym opisem.
Element golący jest
Wymień element golący (patrz rozdział
uszkodzony lub zużyty.
„Wymiana”).
Golarka nie działa
Akumulator jest
Naładuj akumulator (patrz rozdział „Przygotowanie
po naciśnięciu
rozładowany.
do użycia”).
wyłącznika.
Blokada podróżna jest
Wyłącz blokadę podróżną (patrz rozdział
włączona.
„Przechowywanie”).
Zaschnięty balsam do
Wyczyść starannie golarkę, zanim znowu przystąpisz
golenia blokuje głowice
do golenia (patrz rozdział „Czyszczenie”)
w elemencie golącym.
Element golący został
Przy składaniu elementu golącego pamiętaj, aby
nieprawidłowo złożony
przekręcić każdą osłonkę w lewo, aż zatrzaśnie się
po bardzo dokładnym
w odpowiedniej pozycji.
czyszczeniu.
Z otworów
Jeden z otworów na
Opłucz lub zamocz element golący. Jeśli to nie
wydostaje się
balsam jest zatkany.
zadziała, pompuj balsam do golenia do wkładu, aż
niewielka ilość
zacznie wychodzić przez zatkany otwór. Jeśli to
balsamu, pomimo
także nie zadziała, wykonaj następujące czynności: 1)
że we wkładzie
Wyłącz golarkę; 2) Wyciągnij element golący z
jest go
golarki; 3) Połóż palec na otworze, który nie jest
odpowiednio
zatkany; 4) Włącz golarkę; 5) Naciskaj przycisk
dużo.
balsamu przez kilka sekund, aż balsam znowu
zacznie wypływać przez zatkany otwór.
208
Problem Prawdopodobna
Rozwiązanie
przyczyna
Głowice golące nie
Upewnij się, że głowica goląca bez otworu jest
zostały prawidłowo
umieszczona w prawidłowym uchwycie. Jest to
umieszczone w
uchwyt, który znajduje się najbliżej wyłącznika, gdy
uchwytach. Jedna z
element golący jest założony na golarkę.
głowic nie ma pośrodku
otworu na balsam i
powinna być
umieszczana w
konkretnym uchwycie.
Po naciśnięciu
Wkład jest prawie
Napełnij wkład balsamem (patrz rozdział
przycisku balsamu
pusty.
„Przygotowanie do użycia”).
do golenia z
otworów nie
wypływa balsam.
Trymer jest
Ten typ trymera ma
Nowa, otwarta konstrukcja sprawia, że odgłosy
głośniejszy od
konstrukcję otwartą.
wydawane przez trymer są głośniejsze niż w innych
innych trymerów.
trymerach. Jest to zjawisko normalne i nie oznacza,
że trymer działa nieprawidłowo.
Upewnij się, że urządzenie jest wyłączone.
1 Zdejmij element golący z golarki (rys. 31).
2 Przekręć osłonkę w prawo i zdejmij ją z elementu golącego (rys. 32).
Uwaga: Należy wyjmować tylko jedną głowicę golącą na raz. Dzięki temu każda głowica zawsze zostanie
umieszczona w prawidłowym uchwycie, co jest bardzo ważne, gdyż dwie z głowic mają specjalne otwory
na balsam. Pozwoli to również zapobiec wymieszaniu nożyków i osłonek różnych głowic, co może mieć
wpływ na sprawność działania golarki.
3 W razie potrzeby wyjmij nożyk z osłonki.
4 Za pomocą dołączonej do zestawu szczoteczki wyczyść nożyk i osłonkę.
5 Po zakończeniu czyszczenia włóż nożyk z powrotem do elementu golącego ostrzami
zwróconymi w górę.
6 Załóż osłonkę z powrotem na głowicę golącą (nad nożykiem) (rys. 33).
7 Przekręć osłonkę w lewo tak, aby zatrzasnęła się w odpowiedniej pozycji (rys. 34).
8 Załóż element golący z powrotem na golarkę (usłyszysz „kliknięcie”) (rys. 35).

209
Parabéns pela sua compra e bem-vindo à Philips! Para tirar todo o partido da assistência fornecida
pela Philips, registe o seu produto em www.philips.com/welcome.
Leia este manual do utilizador, pois contém informações sobre as magnícas funções desta máquina
de barbear, bem como algumas sugestões para se barbear de forma mais fácil e agradável.
Máquina de barbear
Tampa de protecção
Aparador
Unidade de corte
Cartucho do hidratante para a barba
Botão do hidratante para a barba
Botão de ligar/desligar
Luzes de carga
Carregador
Estação de encher e carregar
Tampa da estação de encher e carregar
Reentrância de arrumação do aparador
Painel traseiro
Tomada para cha pequena
Luz avisadora ‘A encher cartucho do hidratante’
Luz avisadora da embalagem de hidratante
Escova de limpeza
Embalagem de hidratante para a barba NIVEA FOR MEN
Bolsa
Adaptador (o seu adaptador pode ser diferente do indicado na gura)
Leia cuidadosamente este manual do utilizador antes de utilizar o aparelho e guarde-o para
consultas futuras.
- Certique-se de que o adaptador não se molha (o seu adaptador pode ser diferente do
indicado na gura) (g. 2).
- Tenha cuidado com a água quente. Verique sempre se não está demasiado quente para evitar
queimar as mãos.
- O adaptador contém um transformador. Não corte o adaptador para o substituir por outro,
porque isso poderá dar origem a situações de perigo.
- Este aparelho não se destina a ser utilizado por pessoas (incluindo crianças) com capacidades
físicas, sensoriais ou mentais reduzidas, ou com falta de experiência e conhecimentos, salvo se
tiverem recebido supervisão ou instruções sobre o uso do aparelho por alguém responsável
pela sua segurança.
- As crianças devem ser supervisionadas para garantir que não brincam com o aparelho.
- Nunca mergulhe a estação de encher e carregar em água, nem a enxagúe à torneira. (g. 3)
- Nunca mergulhe o carregador dentro de água nem o enxagúe à torneira (g. 4).
- Coloque e utilize sempre a estação de encher e carregar e o carregador sobre uma superfície
que seja resistente a uidos.
- Utilize, carregue e guarde os aparelhos a uma temperatura entre 5°C e 35°C.
210
- Coloque sempre a tampa de protecção na máquina de barbear para proteger as cabeças de
corte quando viaja.
- A máquina de barbear e restantes acessórios não se podem lavar na máquina.
- Não lave a máquina de barbear em água de temperatura superior a 80 ºC.
- Utilize apenas o adaptador, o carregador e a estação de encher e carregar fornecidos.
- Não utilize a estação de encher e carregar se o adaptador ou a própria estação estiverem
danicados.
- Não utilize a máquina de barbear ou o carregador se estiverem danicados.
- Se o transformador se danicar, só deverá ser substituído por uma peça de origem para evitar
situações de perigo.
- Esta máquina de barbear está em conformidade com as regulamentações de segurança
aprovadas internacionalmente, podendo ser utilizada no banho ou no duche e lavada à torneira
com total segurança (g. 5).
- Este aparelho Philips cumpre com todas as normas correspondentes a campos
electromagnéticos (CEM). Se manuseado correctamente e de acordo com as instruções
fornecidas neste manual do utilizador, o aparelho pode ser utilizado em segurança com base em
provas cientícas disponíveis actualmente.
- O adaptador transforma 100-240 volts numa tensão segura e baixa inferior a 24 volts.
1 Retire a patilha da embalagem de hidratante para a barba NIVEA FOR MEN (g. 6).
2 Rode a tampa da embalagem de hidratante para a direita (‘clique’) (g. 7).
, A tampa move-se para baixo e aparece o bocal do hidratante.
3 Rode a tampa da estação de encher e carregar para a esquerda para a retirar.
4 Retire o invólucro do orifício base da embalagem na estação de encher e carregar.
5 Coloque a embalagem de hidratante no orifício base com o bocal virado para baixo (g. 8).
6 Coloque a tampa novamente na estação de encher e carregar (1) e rode a tampa para a
direita para a xar (2). (g. 9)
7 Coloque a cha pequena na entrada da estação de encher e carregar e coloque o adaptador
na tomada eléctrica (g. 10).
8 Coloque a máquina de barbear na estação de encher e carregar e empurre-a para trás
(‘clique’) (g. 11).
Nota: A máquina de barbear é carregada e cheia automaticamente com hidratante para a barba.
9 Carregue a máquina durante 90 minutos. (g. 12)
Nota: Carregue a máquina de barbear antes de a utilizar pela primeira vez ou quando a luz avisadora
de carga indicar que a bateria está vazia (consulte a secção ‘Indicações de carga’).
Nota: Estando com carga total, a máquina de barbear tem até 40 minutos de autonomia.
1 Coloque a cha pequena no carregador e introduza o adaptador numa tomada eléctrica.
2 Coloque a máquina de barbear no carregador (g. 13).
, A máquina de barbear está a ser carregada.
3 Carregue a máquina durante 1,5 horas.

211
Nota: Carregue a máquina de barbear antes de a utilizar pela primeira vez ou quando a luz avisadora
de carga indicar que a bateria está vazia (consulte a secção ‘Indicações de carga’).
Nota: Estando com carga total, a máquina de barbear tem até 40 minutos de autonomia.
Também pode encher o cartucho do hidratante para a barba sem utilizar a estação de encher e
carregar:
1 Coloque o bocal da embalagem do hidratante na abertura de enchimento do cartucho do
hidratante.
2 Mova a embalagem para cima e para baixo cerca de 5 vezes para bombear o hidratante para
a barba para o interior do cartucho, até ver que este está cheio (g. 14).
- As luzes avisadoras de carga indicam a que nível a bateria foi carregada. Durante a carga, a luz
de carga inferior ca primeiro intermitente a laranja e depois apaga-se. A luz de
carga superior começa então a piscar a branco e, por m, acende-se a branco continuamente.
- Depois de a máquina de barbear ter sido carregada durante 9 minutos, a luz de carga inferior
apaga-se e a luz de carga superior começa a piscar a branco, para indicar que a máquina contém
energia suciente para fazer a barba uma vez.
Nota: A carga rápida apenas é possível quando já tiver carregado a máquina durante 1,5 horas uma vez.
- A quantidade de energia que resta na bateria é indicada pelo número de luzes de carga acesas.
A capacidade restante da bateria é visível durante alguns segundos quando liga ou desliga a
máquina de barbear (g. 15).
- Quando a bateria estiver fraca, a luz de carga inferior acende-se a laranja durante o barbear e
ca intermitente a branco quando desliga a máquina. (g. 16)
- Quando a bateria está completamente carregada, todas as luzes de carregamento acendem a
branco de forma contínua (g. 15).
- Após aproximadamente 1 hora, a luz de carregamento branca apaga-se para poupar energia.
, Quando a luz do recipiente de hidratante ca intermitente a laranja, existem duas possibilida
des: (g. 17)
- Não está nenhuma embalagem de hidratante na estação de encher e carregar, ou a embalagem
não foi devidamente colocada.
- A embalagem do hidratante está vazia.
, A luz avisadora ‘a encher cartucho do hidratante’ assinala três hipóteses diferentes: (g. 18)
- Quando o cartucho do hidratante está a ser enchido, a luz branca ‘a encher cartucho do
hidratante’ ca intermitente.
- Quando o cartucho do hidratante para a barba está cheio, a luz branca ‘a encher cartucho do
hidratante’ ca acesa continuamente.

212
- Se a embalagem do hidratante car vazia enquanto o cartucho do hidratante estiver a ser
enchido, a luz branca ‘a encher cartucho do hidratante’ apaga-se e a luz da embalagem do
hidratante ca intermitente a vermelho.
Nota: A sua pele poderá precisar de 2 a 3 semanas para se adaptar a um novo sistema de barbear.
1 Certique-se de que existe hidratante para a barba suciente no cartucho do hidratante.
2 Prima o botão ligar/desligar para ligar a máquina de barbear.
3 Certique-se de que a máquina de barbear está sucientemente carregada (consulte o
capítulo ‘Preparar para a utilização’, secção ‘Indicações de carga’).
4 Mova suavemente a unidade de corte em círculos sobre a pele e prima o botão do hidratante
para a barba até existir hidratante suciente na pele para um barbear confortável. (g. 19)
- Quando soltar o botão do hidratante para a barba, o aparelho interrompe a aplicação do
hidratante.
- Se premir por breves instantes o botão do hidratante para a barba, o aparelho aplica
automaticamente uma determinada quantidade de hidratante.
- Prima novamente o botão do hidratante para a barba para aplicar mais hidratante enquanto faz
a barba, para garantir que a unidade de corte continua a deslizar suavemente pela pele.
Nota: O botão do hidratante para a barba apenas funciona quando a máquina está ligada.
Nota: Esta máquina de barbear pode ser utilizada de forma semelhante a uma lâmina de barbear: pode
utilizar a máquina sobre o rosto molhado. Ao contrário de uma máquina de barbear eléctrica
convencional, este aparelho não possui câmara de recolha para os pêlos curtos. Para evitar que estes
pêlos caiam sobre a roupa, aplique hidratante suciente enquanto faz a barba.
5 Limpe cuidadosamente a máquina de barbear após cada utilização (consulte o capítulo
‘Limpeza e manutenção’).
6 Coloque a tampa de protecção na máquina de barbear para evitar danos (g. 20).
- Mova suavemente a máquina de barbear em círculos sobre a pele.
- Não exerça demasiada pressão sobre a máquina de barbear, pois pode provocar irritações na
pele.
- Para garantir um deslizar adequado, aplique regularmente hidratante para a barba.
- Pode também utilizar a máquina de barbear no banho ou no duche.
Nota: Graças ao novo design aberto, pode ouvir a acção de corte do aparador com maior nitidez do que
noutros aparadores, o que é normal.
1 Retire a unidade de corte da máquina de barbear (g. 21).
2 Retire o aparador do respectivo suporte no carregador e coloque-o na máquina de barbear
(‘clique’) (g. 22).
3 Prima o botão ligar/desligar para ligar a máquina de barbear.
4 Utilize o aparador para retocar as patilhas e/ou o bigode.
5 Limpe cuidadosamente o aparador após cada utilização (consulte o capítulo ‘Limpeza e
manutenção’).
213
6 Retire o aparador e coloque-o novamente no suporte para o aparador.
7 Volte a colocar a unidade de corte na máquina de barbear (‘clique’) (g. 23).
8 Coloque a tampa de protecção na máquina de barbear para evitar danos (g. 20).
Nunca utilize esfregões, agentes de limpeza abrasivos ou líquidos agressivos, tais como álcool,
petróleo ou acetona, para limpar o aparelho.
Limpe a máquina de barbear e o aparador após cada utilização.
Tenha cuidado com a água quente. Verique sempre se não está demasiado quente para evitar
queimar as mãos.
Nunca seque a unidade de corte com uma toalha ou tecido, pois pode danicar as cabeças de
corte.
Nota: A máquina de barbear é à prova de água e pode ser lavada com água.
1 Prima o botão ligar/desligar para ligar a máquina de barbear.
Nota: Limpe a máquina de barbear com ela ligada.
2 Mergulhe a unidade de corte/o aparador em água quente durante, pelo menos, 30
segundos (g. 24).
3 Desligue a máquina de barbear e sacuda o excesso de água.
4 Coloque a tampa de protecção na máquina de barbear para evitar danos (g. 20).
Nota: Se a máquina de barbear não barbeia tão bem como anteriormente e se não conseguir resolver o
problema através do método de limpeza descrito neste capítulo, consulte o capítulo ‘Resolução de
problemas’ para obter informações sobre um método de limpeza mais profunda.
1 A cada seis meses, lubrique os dentes do aparador com uma gota de óleo para máquinas de
costura.
1 Arrume a máquina na estação de encher e carregar.
2 Se for viajar ou se não quiser guardar a máquina na estação de encher e carregar, coloque a
tampa de protecção na máquina e guarde-a na bolsa (g. 20).
Se pretender guardar a máquina de barbear durante um período prolongado ou se a levar em
viagem, é possível bloquear a máquina. O bloqueio de viagem evita que a máquina se ligue
acidentalmente.
1 Certique-se de que a máquina está desligada.

214
2 Mantenha o botão do hidratante para a barba (1) sob pressão e prima sem soltar o botão de
ligar/desligar com a outra mão (2) (g. 25).
3 Prima ambos os botões durante 6 segundos. Aguarde até a máquina de barbear emitir um
breve zumbido e a luz de carga intermédia da máquina piscar algumas vezes.
, O bloqueio de viagem encontra-se agora activado.
Nota: Se, acidentalmente, premir primeiro o botão ligar/desligar, a máquina de barbear começa a
trabalhar . Se isto acontecer, prima novamente o botão ligar/desligar para desligar a máquina.
Nota: Se premir o botão ligar/desligar quando o bloqueio de viagem estiver activado, a luz de carga
intermédia pisca a branco para indicar que a máquina de barbear está bloqueada.
Sugestão: Prima o botão ligar/desligar para vericar se o bloqueio de viagem está activado. Se o bloqueio
de viagem estiver activado, a máquina de barbear não funciona.
1 Mantenha o botão do hidratante para a barba (1) sob pressão e prima sem soltar o botão de
ligar/desligar com a outra mão (2) (g. 25).
2 Prima ambos os botões durante 6 segundos. Aguarde até a máquina de barbear emitir um
breve zumbido e a luz de carga intermédia da máquina piscar algumas vezes.
, O bloqueio de viagem encontra-se agora desactivado.
Nota: Pode também desactivar o bloqueio de viagem colocando a máquina de barbear novamente no
carregador.
Se for viajar e não quiser levar consigo a estação de encher e carregar, pode levar o carregador para
carregar a máquina de barbear quando necessário.
Por razões de higiene, aconselha-se que substitua o cartucho do hidratante para a barba uma vez
por ano. É fornecido um novo cartucho do hidratante para a barba com cada pack de 3 embalagens
de hidratante para a barba NIVEA FOR MEN, bem como com o kit de substituição (que contém
uma nova unidade de barbear HS85 e um novo cartucho).
1 Retire o cartucho do hidratante para a barba da máquina (g. 26).
2 Introduza a saliência no topo do novo cartucho de hidratante para a barba na ranhura no
bordo da máquina de barbear (1). Depois prima a parte inferior do cartucho com o polegar
(2) para montar o cartucho na máquina (‘clique’) (g. 27).
3 Encha o cartucho do hidratante (consulte o capítulo ‘Começar a usar o seu aparelho’).
A unidade de corte deve ser substituída todos os anos para manter a ecácia da máquina de
barbear.
Substitua apenas a unidade de corte por uma Unidade de Corte Philips HS85.
1 Retire a antiga unidade de corte da máquina de barbear (g. 21).
2 Coloque a nova unidade de corte na máquina de barbear (‘clique’) (g. 23).
Utilize apenas embalagens de hidratante para a barba NIVEA FOR MEN.
215
1 Retire a patilha da embalagem de hidratante para a barba NIVEA FOR MEN (g. 6).
2 Rode a tampa da embalagem de hidratante para a direita (‘clique’) (g. 7).
, A tampa move-se para baixo e aparece o bocal do hidratante.
3 Rode a tampa da estação de encher e carregar para a esquerda para a retirar.
4 Coloque a embalagem de hidratante no orifício base da embalagem com o bocal virado para
baixo (g. 8).
5 Empurre a tampa para trás na estação de encher e carregar (1) e rode-a para a direita (2)
para a xar (g. 9).
- Não deite fora o aparelho juntamente com o lixo doméstico normal no nal da sua vida útil e
entregue-o num ponto de recolha autorizado para reciclagem. Ao fazê-lo, ajuda a preservar o
meio ambiente (g. 28).
- A bateria recarregável incorporada contém substâncias que podem poluir o ambiente. Retire
sempre a bateria antes de se desfazer do aparelho e entregue o aparelho num ponto de
recolha ocial. Para eliminar a bateria, coloque-a num ponto de recolha ocial para baterias. Se
tiver problemas na remoção da bateria, pode também levar o aparelho a um centro de
assistência Philips, que poderá remover a bateria por si e eliminá-la de forma segura para o
ambiente.
Retire apenas a bateria recarregável quando se deszer da máquina de barbear. Certique-se de
que a bateria está completamente vazia quando a retirar.
Tenha cuidado porque as bandas da pilha são aguçadas.
1 Retire o cartucho do hidratante para a barba da máquina (g. 26).
2 Desaparafuse os três parafusos na parte traseira da máquina de barbear (g. 29).
3 Retire o painel traseiro do corpo com uma chave de parafusos (g. 30).
4 Corte os os e retire a bateria recarregável.
Se precisar de assistência ou informações, ou se tiver algum problema, visite o Web site da Philips
em www.philips.com/support ou contacte o Centro de Assistência ao Consumidor da Philips no
seu país (poderá encontrar o número de telefone no folheto de garantia mundial). Se não houver
um Centro de Assistência ao Consumidor no seu país, dirija-se ao representante local da Philips.
As cabeças de corte (lâminas e guardas) não estão abrangidas pelos termos da garantia
internacional, uma vez que estão sujeitas a desgaste.
A embalagem da emulsão é um artigo descartável e não é abrangida pelos termos da garantia
internacional.
Este capítulo resume os problemas mais comuns que pode ter com o aparelho. Se não conseguir
resolver o problema com as informações fornecidas a seguir, contacte o Centro de Assistência ao
Cliente do seu país.

216
Problema Causa provável Solução
A máquina de
Não aplicou
Prima o botão do hidratante até que uma
barbear não
hidratante para a
quantidade suciente do hidratante NIVEA FOR
desliza
barba suciente.
MEN tenha sido aplicada. Assim, a unidade de corte
suavemente pela
desliza novamente de forma suave pela sua pele.
minha pele.
O desempenho
Não limpou a
Limpe a máquina de barbear minuciosamente
da máquina de
máquina de barbear
(consulte o capítulo “Limpeza e manutenção”).
barbear
correctamente.
deteriorou-se.
Os pêlos mais longos
Limpe as cabeças de corte seguindo os passos
obstruem as cabeças
descritos no método de limpeza mais profunda.
de corte.
A máquina de barbear
Substitua a unidade de corte (consulte o capítulo
está danicada ou
‘Substituição’).
desgastada.
A máquina de
A bateria recarregável
Recarregue a bateria (consulte o capítulo
barbear não
está vazia.
‘Preparação para a utilização’).
funciona quando
primo o botão
de ligar/desligar.
O bloqueio de viagem
Desactive o bloqueio de viagem (consulte o capítulo
encontra-se activado.
‘Arrumação’).
As cabeças de corte
Limpe a máquina de barbear minuciosamente antes
da unidade de corte
de continuar a fazer a barba (consulte o capítulo
estão bloqueadas com
‘Limpeza’).
hidratante para a
barba seco.
Não montou a
Quando montar a unidade de corte, certique-se de
unidade de corte
que roda cada guarda para a esquerda até car bem
correctamente após
encaixada.
uma limpeza mais
profunda.
Sai pouco
Um dos orifícios de
Enxagúe ou mergulhe a unidade de corte. Se isto
hidratante para a
saída do hidratente
não resultar, introduza hidratante para a barba no
barba dos
está obstruído.
cartucho do hidratante para a barba até que
orifícios mesmo
comece a sair hidratante pelo orifício bloqueado. Se
havendo
isto também não resultar, tente o seguinte método:
hidratante
1) Desligue a máquina de barbear 2) Retire a
suciente no
unidade de corte da máquina de barbear 3)
cartucho.
Coloque o dedo no orifício que não está bloqueado
4) Ligue a máquina 5) Prima o botão do hidratante
durante vários segundos até que o hidratante
comece a sair novamente pelo orifício bloqueado.
217
Problema Causa provável Solução
Não voltou a colocar
Certique-se de que coloca a cabeça de corte sem
as cabeças de corte
o orifício para hidratante para a barba no suporte
nos suportes originais.
correcto. O suporte correcto para esta cabeça de
Uma das cabeças de
corte é o que se encontra mais próximo do botão
corte não tem um
ligar/desligar quando a unidade de corte está
orifício para hidratante
montada na máquina de barbear.
para a barba no
centro e tem de ser
colocada num suporte
especíco.
Não sai
O cartucho do
Encha o depósito do hidratante para a barba
hidratante para a
hidratante está quase
(consulte o capítulo ‘Preparar para a utilização’).
barba dos
vazio.
orifícios quando
primo o botão
do hidratante.
O aparador faz
Este aparador tem um
Devido ao novo design aberto, ouve a acção de
mais ruído do
design aberto.
corte do aparador com maior nitidez do que no
que outros
caso de outros aparadores. Isto é normal e não
aparadores.
signica que se passa algo de errado com o
aparador.
Certique-se de que o aparelho está desligado.
1 Retire a unidade de corte da máquina de barbear (g. 31).
2 Rode a guarda para a direita e retire-a da unidade de corte (g. 32).
Nota: Remova uma cabeça de corte de cada vez. Desta forma, garante que coloca sempre a cabeça de
corte no suporte original. Este procedimento é necessário, uma vez que duas das cabeças de corte
possuem orifícios especiais para o hidratante para a barba. Desta forma, também garante que não
altera os conjuntos das lâminas e guardas de diferentes cabeças de corte, o que afecta o desempenho
da máquina.
3 Se necessário, remova a lâmina da guarda.
4 Limpe a lâmina e a guarda com a escova fornecida.
5 Depois da limpeza, volte a colocar a lâmina na unidade de corte com os pernos da
lâmina voltados para cima.
6 Volte a colocar a guarda no suporte da cabeça de corte (sobre a lâmina) (g. 33).
7 Rode a guarda para a esquerda para a xar correctamente (g. 34).
8 Volte a colocar a unidade de corte na máquina de barbear (‘clique’) (g. 35).

218
Felicitări pentru achiziţie şi bun venit la Philips! Pentru a benecia pe deplin de asistenţa oferită de
Philips, înregistraţi-vă produsul la www.philips.com/welcome.
Citiţi acest manual al utilizatorului, deoarece conţine informaţii despre caracteristicile impresionante
ale acestui aparat de bărbierit, precum şi câteva sfaturi pentru a uşura bărbieritul şi a-l face mai
confortabil.
Aparat de bărbierit
Capac de protecţie
Dispozitiv de tundere
Unitate de bărbierire
Cartuşul de gel de bărbierit
Buton pentru gel de bărbierit
Buton Pornit/Oprit
Leduri de încărcare
Unitate de încărcare
Stativ de reumplere şi încărcare
Capacul stativului de reumplere şi încărcare
Compartimentul dispozitivului de tundere
Panou posterior
Mufă pentru conector mic
LED-ul ‘Umplere cartuş de gel’
LED-ul aconului de gel
Perie de curăţat
Flacon de gel de bărbierit NIVEA FOR MEN
Husă
Adaptor (adaptorul dvs. poate diferit de cel prezentat în gură)
Citiţi cu atenţie acest manual de utilizare şi păstraţi-l pentru consultare ulterioară.
- Aveţi grijă ca adaptorul să nu se ude (adaptorul dvs. poate diferit de cel prezentat în
gură) (g. 2).
- Aveţi grijă ca apa să nu e foarte erbinte, pentru a nu vă frige.
- Adaptorul conţine un transformator. Nu încercaţi să înlocuiţi ştecherul adaptorului, întrucât acest
lucru duce la situaţii periculoase.
- Acest aparat nu trebuie utilizat de către persoane (inclusiv copii) care au capacităţi zice,
mentale sau senzoriale reduse sau sunt lipsite de experienţă şi cunoştinţe, cu excepţia cazului în
care sunt supravegheaţi sau instruiţi cu privire la utilizarea aparatului de către o persoană
responsabilă pentru siguranţa lor.
- Copiii trebuie supravegheaţi pentru a nu se juca cu aparatul.
- Nu scufundaţi niciodată în apă stativul de reumplere şi încărcare şi nici nu-l clătiţi sub jet de
apă (g. 3).
- Nu introduceţi niciodată încărcătorul în apă şi nici nu-l clătiţi sub jet de apă (g. 4).
- Aşezaţi şi utilizaţi întotdeauna stativul de reumplere şi încărcare, precum şi încărcătorul, pe o
suprafaţă rezistentă la umezeală.
- Utilizaţi, încărcaţi şi păstraţi aparatele la o temperatură cuprinsă între 5°C şi 35°C.
219
- Puneţi întotdeauna capacul de protecţie pe aparatul de bărbierit, pentru a proteja capetele de
bărbierire când călătoriţi.
- Aparatul de bărbierit şi alte accesorii nu pot spălate în maşina de spălat vase.
- Nu utilizaţi niciodată apă mai erbinte de 80°C pentru a clăti aparatul de bărbierit.
- Utilizaţi numai adaptorul, încărcătorul şi stativul de reumplere şi încărcare livrate.
- Nu folosiţi stativul de reumplere şi încărcare dacă adaptorul sau stativul sunt deteriorate.
- Nu folosiţi aparatul de bărbierit sau încărcătorul dacă sunt deteriorate.
- Dacă adaptorul este deteriorat, înlocuiţi-l întotdeauna cu unul original pentru a evita orice
accident.
- Acest aparat de bărbierit corespunde normelor de securitate aprobate pe plan internaţional şi
poate folosit în siguranţă în cadă sau în duş şi poate curăţat sub jet de apă (g. 5).
- Acest aparat Philips respectă toate standardele referitoare la câmpuri electromagnetice (EMF).
Dacă este manevrat corespunzător şi în conformitate cu instrucţiunile din acest manual, aparatul
este sigur conform dovezilor ştiinţice disponibile în prezent.
- Adaptorul transformă tensiunea de 100-240 volţi într-o tensiune sub 24 volţi.
1 Înlăturaţi sigiliul de pe aconul cu gel de bărbierit NIVEA FOR MEN (g. 6).
2 Rotiţi capacul aconului de gel în sens orar (“clic”) (g. 7).
, Capacul se deplasează în jos şi apare duza de aplicare a gelului.
3 Rotiţi capacul stativului de reumplere şi încărcare în sens invers acelor de ceasornic pentru
a-l înlătura.
4 Înlăturaţi ambalajul de pe oriciul de xare a aconului în stativul de reumplere şi încărcare.
5 Amplasaţi aconul de gel în oriciul de xare cu duza îndreptată în jos (g. 8).
6 Puneţi la loc capacul stativului de reumplere şi încărcare (1) şi rotiţi-l în sens orar pentru a-l
xa (2) (g. 9).
7 Racordaţi şa mică la mufa stativului de reumplere şi încărcare şi conectaţi adaptorul la
priză (g. 10).
8 Aşezaţi aparatul de bărbierit în stativul de reumplere şi încărcare şi împingeţi-l înapoi
(“clic”) (g. 11).
Notă: Aparatul de bărbierit este încărcat şi umplut cu gel de bărbierit în mod automat.
9 Încărcaţi aparatul de bărbierit timp de 90 de minute. (g. 12)
Notă: Încărcaţi aparatul de bărbierit înainte de a-l utiliza pentru prima dată sau atunci când LED-ul de
încărcare indică faptul că bateria este descărcată (consultaţi secţiunea “Indicaţii de încărcare”).
Notă: Un aparat de bărbierit complet încărcat oferă o autonomie de funcţionare de până la 40 de
minute.
1 Racordaţi şa mică la încărcător şi conectaţi adaptorul la priză.
2 Aşezaţi aparatul de bărbierit în încărcător (g. 13).
, Aparatul de bărbierit se va încărca.
3 Încărcaţi aparatul de bărbierit 1,5 ore.

220
Notă: Încărcaţi aparatul de bărbierit înainte de a-l utiliza pentru prima dată sau atunci când LED-ul de
încărcare indică faptul că bateria este descărcată (consultaţi secţiunea “Indicaţii de încărcare”).
Notă: Un aparat de bărbierit complet încărcat oferă o autonomie de funcţionare de până la 40 de
minute.
Puteţi reumple cartuşul de gel de bărbierit şi fără a utiliza stativul de reumplere şi încărcare:
1 Aşezaţi duza aconului de gel în oriciul d umplere al cartuşului de gel.
2 Deplasaţi aconul în sus şi în jos de circa 5 ori pentru a pompa gelul de bărbierit în cartuş,
până când observaţi că acesta este plin (g. 14).
- LED-urile de încărcare indică la ce nivel a fost încărcată bateria. În timpul încărcării, LED-ul de
încărcare inferior clipeşte întâi portocaliu şi apoi se stinge. LED-ul de încărcare superior începe
apoi să clipească alb şi în nal luminează alb continuu.
- După încărcarea aparatului de bărbierit timp de 9 minute, LED-ul de încărcare inferior se stinge,
iar cel superior începe să clipească alb, pentru a indica faptul că aparatul de bărbierit conţine
sucientă energie pentru un bărbierit.
Notă: Încărcarea rapidă este posibilă numai dacă aţi încărcat deja o dată aparatul de bărbierit timp
de 1,5 ore.
- Cantitatea de energie disponibilă în baterie este indicată de numărul de LED-uri de încărcare
aprinse. Capacitatea disponibilă a bateriei este vizibilă timp de câteva secunde atunci când
porniţi sau opriţi aparatul de bărbierit (g. 15).
- Când capacitatea bateriei este redusă, LED-ul de încărcare inferior se aprinde portocaliu în
timpul bărbieritului şi clipeşte portocaliu atunci când opriţi aparatul de bărbierit. (g. 16)
- Când bateria este încărcată complet, toate LED-urile de încărcare se aprind alb
continuu (g. 15).
- După aprox. 1 oră, LED-urile de încărcare albe se sting, pentru a economisi energia.
, Atunci când LED-ul aconului de gel clipeşte portocaliu, există două posibilităţi: (g. 17)
- Nu există acon de gel în stativul de reumplere şi încărcare sau aconul nu a fost poziţionat
corect.
- Flaconul de gel este gol.
, LED-ul “Umplere cartuş de gel” semnalează trei situaţii diferite: (g. 18)
- Când se umple cartuşul de gel, LED-ul alb “Umplere cartuş de gel” clipeşte.
- Când cartuşul de gel de bărbierit este plin, LED-ul alb “Umplere cartuş de gel” rămâne
aprins continuu.
- Dacă aconul de gel se goleşte în timpul umplerii cartuşului de gel, LED-ul alb “Umplere cartuş
de gel” se stinge şi LED-urile aconului de gel clipesc roşu.
221
Notă: Pielea dvs. poate avea nevoie de 2 până la 3 săptămâni pentru a se acomoda cu un nou sistem de
bărbierit.
1 Aveţi grijă să existe sucient gel de bărbierit în cartuşul de gel de bărbierit.
2 Apăsaţi butonul de pornire/oprire pentru a porni aparatul de bărbierit.
3 Asiguraţi-vă că aparatul de bărbierit este sucient de încărcat (consultaţi capitolul “Pregătirea
pentru utilizare”, secţiunea “Indicaţii de încărcare”).
4 Deplasaţi lent unitatea de bărbierit pe pielea dvs. prin mişcări circulare şi apăsaţi butonul
pentru gel de bărbierit până când există sucient gel de bărbierit pe pielea dvs. pentru un
bărbierit confortabil. (g. 19)
- Când eliberaţi butonul pentru gel de bărbierit, aparatul întrerupe aplicarea gelului de bărbierit.
- Dacă apăsaţi scurt butonul pentru gel de bărbierit, aparatul va aplica automat o anumită
cantitate de gel.
- Apăsaţi din nou butonul pentru gel de bărbierit ca să aplicaţi mai mult gel de bărbierit în timpul
bărbieritului, pentru a asigura o glisare uşoară a unităţii de bărbierit pe pielea dvs.
Notă: Butonul pentru gel de bărbierit funcţionează numai atunci când aparatul de bărbierit este pornit.
Notă: Acest aparat de bărbierit poate utilizat în mod similar utilizării unei lame de bărbierit: puteţi
folosi aparatul de bărbierit pe pielea udă. Spre deosebire de un aparat de bărbierit electric obişnuit, acest
aparat nu dispune de un compartiment pentru colectarea părului. Pentru a preveni scuturarea părului pe
hainele dvs., aplicaţi o cantitate sucientă de gel de bărbierit în timpul bărbieritului.
5 Curăţaţi riguros aparatul de bărbierit după ecare utilizare (consultaţi capitolul ‘Curăţare şi
întreţinere’).
6 Aplicaţi capacul de protecţie pe aparatul de bărbierit pentru a preveni deteriorarea (g. 20).
- Deplasaţi lent aparatul de bărbierit pe pielea dvs., prin mişcări circulare.
- Nu apăsaţi prea puternic pe aparatul de bărbierit, deoarece acest lucru poate provoca iritarea
pielii.
- Pentru a asigura o glisare adecvată, aplicaţi în mod regulat gel de bărbierit.
- Puteţi utiliza aparatul de bărbierit chiar şi în cadă sau în duş.
Notă: Datorită noului concept deschis, veţi auzi acţiunea de tăiere a dispozitivului de tundere mai clar
decât în cazul altor dispozitive de tundere. Acest lucru este normal.
1 Scoateţi unitatea de bărbierit de pe aparat (g. 21).
2 Scoateţi dispozitivul de tundere din suportul său de pe încărcător şi puneţi-l pe aparatul de
bărbierit (‘clic’) (g. 22).
3 Apăsaţi butonul de pornire/oprire pentru a porni aparatul de bărbierit.
4 Utilizaţi dispozitivul de tundere pentru a ajusta perciunii şi/sau mustaţa.
5 Curăţaţi riguros dispozitivul de tundere după utilizare (consultaţi capitolul ‘Curăţare şi
întreţinere’).
6 Înlăturaţi dispozitivul de tundere şi reintroduceţi-l în suportul dispozitivului de tundere.
7 Reinstalaţi unitatea de bărbierit pe aparatul de bărbierit (“clic”) (g. 23).
222
8 Aplicaţi capacul de protecţie pe aparatul de bărbierit pentru a preveni deteriorarea (g. 20).
Nu folosiţi niciodată bureţi de sârmă, agenţi de curăţare abrazivi sau lichide agresive cum ar
alcoolul, benzina sau acetona pentru a curăţa aparatul.
Curăţaţi aparatul de bărbierit şi dispozitivul de tundere după ecare utilizare.
Aveţi grijă ca apa să nu e foarte erbinte, pentru a nu vă frige.
Nu ştergeţi niciodată unitatea cu un prosop sau un şerveţel, deoarece aţi putea deteriora
capetele.
Notă: Aparatul de bărbierit este etanş şi poate curăţat cu apă.
1 Apăsaţi butonul de pornire/oprire pentru a porni aparatul de bărbierit.
Notă: Curăţaţi aparatul de bărbierit în timp ce este pornit.
2 Scufundaţi aparatul de bărbierit/dispozitivul de tundere în apă erbinte timp de minim 30 de
secunde (g. 24).
3 Opriţi aparatul de bărbierit şi scuturaţi excesul de apă.
4 Aplicaţi capacul de protecţie pe aparatul de bărbierit pentru a preveni deteriorarea (g. 20).
Notă: Dacă aparatul de bărbierit nu mai bărbiereşte la fel de bine ca de obicei şi nu puteţi rezolva
această situaţie prin metoda de curăţare descrisă în acest capitol, consultaţi capitolul ‘Depanare’ pentru
o metodă de curăţare minuţioasă.
1 Ungeţi dinţii dispozitivului de tundere cu puţin ulei pentru maşina de cusut o dată la şase luni.
1 Depozitaţi aparatul de bărbierit în stativul de reumplere şi încărcare.
2 Dacă plecaţi în călătorie sau dacă nu doriţi să depozitaţi aparatul de bărbierit în stativul de
reumplere şi încărcare, puneţi capacul de protecţie pe aparatul de bărbierit şi depozitaţi
aparatul de bărbierit în husă (g. 20).
Dacă doriţi să depozitaţi aparatul de bărbierit pentru o perioadă mai lungă sau dacă plecaţi în
călătorie, este posibilă blocarea aparatului de bărbierit. Mecanismul de blocare previne pornirea
accidentală a aparatului de bărbierit.
1 Asiguraţi-vă că aparatul de bărbierit este oprit.
2 Apăsaţi şi menţineţi butonul pentru gel de bărbierit (1) şi apăsaţi simultan butonul Pornit/
Oprit cu cealaltă mână (2) (g. 25).
3 Menţineţi ambele butoane apăsate timp de 6 secunde. Aşteptaţi până când aparatul de
bărbierit emite un bâzâit scurt şi LED-ul de încărcare superior de pe aparatul de bărbierit
clipeşte de câteva ori.
223
, Mecanismul de blocare este acum activat.
Notă: Dacă apăsaţi accidental mai întâi butonul de pornire/oprire, aparatul de bărbierit începe să
funcţioneze . În acest caz, apăsaţi din nou butonul de pornire/oprire pentru a opri aparatul de bărbierit.
Notă: Dacă apăsaţi butonul de pornire/oprire când mecanismul de blocare este activat, LED-ul de
încărcare central clipeşte alb pentru a indica faptul că aparatul de bărbierit este blocat.
Sugestie: Apăsaţi butonul de pornire/oprire pentru a verica dacă mecanismul de blocare este activat.
Dacă mecanismul de blocare este activat, aparatul de bărbierit nu porneşte.
1 Apăsaţi şi menţineţi butonul pentru gel de bărbierit (1) şi apăsaţi simultan butonul Pornit/
Oprit cu cealaltă mână (2) (g. 25).
2 Menţineţi ambele butoane apăsate timp de 6 secunde. Aşteptaţi până când aparatul de
bărbierit emite un bâzâit scurt şi LED-ul de încărcare central de pe aparatul de bărbierit
clipeşte de câteva ori.
, Mecanismul de blocare este acum dezactivat.
Notă: De asemenea, puteţi dezactiva dispozitivul de blocare pentru transport, aşezând aparatul de
bărbierit înapoi în încărcător.
Dacă plecaţi în călătorie şi nu doriţi să luaţi cu dvs. stativul de reumplere şi încărcare, puteţi lua cu
dvs. încărcătorul pentru a încărca aparatul de bărbierit în caz de necesitate.
Din motive de igienă, vă recomandăm să înlocuiţi cartuşul de gel de bărbierit o dată pe an. Un
cartuş nou este ambalat cu ecare pachet de 3 sticle de gel de bărbierit NIVEA FOR MEN şi cu
setul de schimb (care conţine o nouă unitate de bărbierit HS85 şi un nou cartuş).
1 Scoateţi cartuşul de gel de bărbierit din aparatul de bărbierit (g. 26).
2 Introduceţi proeminenţa din partea superioară a noului cartuş de gel de bărbierit în fanta din
carcasa aparatului de bărbierit (1). Apoi apăsaţi partea inferioară a cartuşului cu degetul
(2) pentru a ataşa cartuşul la aparatul de bărbierit (“clic”) (g. 27).
3 Umpleţi cartuşul de gel de bărbierit (consultaţi capitolul “Primii paşi”).
Înlocuiţi unitatea de bărbierit o dată pe an pentru a benecia de un bărbierit optim.
Înlocuiţi unitatea de bărbierit numai cu o unitate de bărbierit Philips HS85.
1 Scoateţi unitatea de bărbierit de pe aparat (g. 21).
2 Instalaţi noua unitate de bărbierit pe aparatul de bărbierit (‘clic’) (g. 23).
Utilizaţi numai acoane de gel de bărbierit NIVEA FOR MEN.
1 Înlăturaţi sigiliul de pe aconul cu gel de bărbierit NIVEA FOR MEN (g. 6).
2 Rotiţi capacul aconului de gel în sens orar (“clic”) (g. 7).
, Capacul se deplasează în jos şi apare duza de aplicare a gelului.
224
3 Rotiţi capacul stativului de reumplere şi încărcare în sens invers acelor de ceasornic pentru
a-l înlătura.
4 Aşezaţi aconul de gel în oriciul de xare cu duza îndreptată în jos (g. 8).
5 Împingeţi capacul înapoi pe stativul de reumplere şi încărcare (1) şi rotiţi-l în sens orar (2)
pentru a-l xa (g. 9).
- Nu aruncaţi aparatul împreună cu gunoiul menajer la sfârşitul duratei de funcţionare, ci predaţi-l
la un punct de colectare autorizat pentru reciclare. În acest fel, ajutaţi la protejarea mediului
înconjurător (g. 28).
- Bateria reîncărcabilă integrată conţine substanţe care pot polua mediul. Scoateţi întotdeauna
bateria înainte de a scoate din uz aparatul şi de a-l preda la un centru de colectare ocial.
Predaţi bateria la un punct de colectare ocial pentru baterii. Dacă nu reuşiţi să scoateţi bateria,
puteţi duce aparatul la un centru de service Philips. Personalul de la acest centru va îndepărta
bateria şi o va recicla în conformitate cu normele de protecţie a mediului.
Scoateţi bateria numai atunci când scoateţi aparatul de bărbierit din uz. Asiguraţi-vă că bateria
este descărcată complet atunci când o scoateţi.
Atenţie: benzile de contact ale bateriei sunt foarte ascuţite.
1 Scoateţi cartuşul de gel de bărbierit din aparatul de bărbierit (g. 26).
2 Deşurubaţi cele două şuruburi din partea posterioară a aparatului de bărbierit (g. 29).
3 Înlăturaţi panoul posterior al carcasei cu o şurubelniţă (g. 30).
4 Tăiaţi rele şi îndepărtaţi bateria reîncărcabilă.
Dacă aveţi nevoie de informaţii sau întâmpinaţi probleme, vizitaţi site-ul Web Philips la adresa
www.philips.com/supportsau contactaţi centrul Philips de asistenţă pentru clienţi din ţara dvs.
(găsiţi numărul de telefon în garanţia internaţională). Dacă în ţara dvs. nu există un astfel de centru,
deplasaţi-vă la furnizorul dvs. Philips local.
Unitatea de bărbierire (cuţitele şi sitele) nu este acoperită de garanţia internaţională, deoarece este
considerată consumabil.
Cartuşul de balsam este un articol de unică folosinţă şi nu este acoperit de termenii garanţiei
internaţionale.
Acest capitol descrie cele mai frecvente problemele care pot apărea în utilizarea aparatului. Dacă nu
reuşiţi să rezolvaţi problema folosind informaţiile de mai jos, contactaţi centrul de asistenţă pentru
clienţi din ţara dvs.

225
Problemă Cauză posibilă Soluţie
Aparatul de bărbierit nu
Nu aţi aplicat
Apăsaţi butonul pentru gel de bărbierit până
glisează lin pe piele.
sucient gel de
când se eliberează o cantitate sucientă de gel
bărbierit.
de bărbierit NIVEA FOR MEN. Acesta va
permite din nou glisarea lină a unităţii de
bărbierit pe pielea dvs.
Aparatul de bărbierit nu
Nu aţi curăţat corect
Curăţaţi riguros aparatul de bărbierit (consultaţi
mai bărbiereşte la fel de
aparatul de bărbierit.
capitolul ‘Curăţare şi întreţinere’).
bine.
Firele lungi de păr
Curăţaţi capetele de bărbierire urmând paşii
blochează capetele
metodei de curăţare foarte riguroasă descrise
de bărbierire.
mai jos.
Unitatea de
Înlocuiţi unitatea de bărbierire (consultaţi
bărbierire este
capitolul ‘Înlocuire’).
deteriorată sau uzată.
Aparatul de bărbierit nu
Bateria reîncărcabilă
Reîncărcaţi bateria (consultaţi capitolul
porneşte când apăs pe
este goală.
‘Pregătirea pentru utilizare’).
butonul Pornit/Oprit.
Mecanismul de
Dezactivaţi mecanismul de blocare (consultaţi
blocare este activat.
capitolul ‘Depozitare’).
Gelul de bărbierit
Curăţaţi riguros aparatul înainte de a continua
uscat blochează
bărbierirea (consultaţi capitolul ‘Curăţare’).
capetele de
bărbierire în unitatea
de bărbierire.
Nu aţi reasamblat
Când reasamblaţi unitatea de bărbierire,
corect unitatea de
asiguraţi-vă că rotiţi ecare protecţie în sens
bărbierire după
antiorar până se xează.
curăţarea foarte
riguroasă.
Iese doar o cantitate
Unul dintre oriciile
Clătiţi sau înmuiaţi unitatea de bărbierit. Dacă
mică de gel de bărbierit
de aplicare a gelului
problema persistă, pompaţi gel de bărbierit în
prin oricii, cu toate că
de bărbierit este
cartuşul de gel de bărbierit până când gelul de
există sucient gel de
blocat.
bărbierit începe să iasă prin oriciul blocat.
bărbierit în cartuş.
Dacă problema persistă în continuare, încercaţi
următoarea metodă: 1) Opriţi aparatul de
bărbierit 2) Extrageţi unitatea de bărbierit de
pe aparatul de bărbierit 3) Aplicaţi un deget pe
oriciul care nu este blocat 4) Porniţi aparatul
de bărbierit 5) Apăsaţi butonul pentru gel de
bărbierit timp de mai multe secunde până când
gelul de bărbierit începe să iasă din nou prin
oriciul blocat.
226
Problemă Cauză posibilă Soluţie
Nu aţi pus capetele
Asiguraţi-vă că aşezaţi capul de bărbierire fără
de bărbierire înapoi
oriciu pentru gel în suportul corect. Acesta
în suporturile
este cel mai apropiat suport de butonul Pornit/
originale. Unul dintre
Oprit când unitatea de bărbierire este
capetele de
asamblată pe aparat.
bărbierire nu are un
oriciu de aplicare a
gelului în centru şi
trebuie aşezat într-un
anume suport.
Nu iese gel de bărbierit
Cartuşul de bărbierit
Reumpleţi cartuşul de gel de bărbierit
din oricii când apăs
este aproape gol.
(consultaţi capitolul ‘Pregătirea pentru utilizare’).
butonul pentru gel de
bărbierit.
Dispozitivul de tundere
Acest dispozitiv de
Datorită noului concept deschis, veţi auzi
emite mai mult zgomot
tundere are un
acţiunea de tăiere a dispozitivului de tundere
decât alte dispozitive de
design deschis.
mai clar decât în cazul altor dispozitive de
tundere.
tundere. Acest lucru este normal şi nu
înseamnă că există o problemă la dispozitivul
de tundere.
Aparatul trebuie să e oprit.
1 Scoateţi unitatea de bărbierit de pe aparat (g. 31).
2 Rotiţi sita de protecţie în sens orar şi ridicaţi-o de pe unitatea de bărbierit (g. 32).
Notă: Scoateţi numai un singur cap de bărbierit odată. Acest lucru vă permite să aşezaţi întotdeauna
capul de bărbierit înapoi în suportul original, lucru necesar deoarece două dintre capetele de bărbierit
dispun de oricii speciale pentru aplicarea gelului de bărbierit. De asemenea, acest lucru vă împiedică să
inversaţi cuţitele şi sitele diferitelor capete de bărbierit, ceea ce ar afecta performanţele bărbieritului.
3 Dacă este necesar, înlăturaţi cuţitul de pe sita de protecţie.
4 Curăţaţi cuţitul şi sita de protecţie cu periuţa livrată.
5 După curăţare, aşezaţi cuţitul înapoi în unitatea de bărbierit cu picioruşele cuţitului
îndreptate în sus.
6 Aşezaţi sita de protecţie înapoi pe suportul capului de bărbierit (deasupra cuţitului) (g. 33).
7 Rotiţi sita de protecţie în sens anti-orar până când se blochează în poziţie (g. 34).
8 Reinstalaţi unitatea de bărbierit pe aparatul de bărbierit (“clic”) (g. 35).

227
Поздравляем с покупкой продукции Philips! Для получения полной поддержки, оказываемой
компанией Philips, зарегистрируйте прибор на веб-сайте www.philips.com/welcome.
Прочтите данное руководство, содержащее сведения об удивительных возможностях
бритвы , а также некоторые советы, которые сделают использование бритвы более приятным.
Бритва
Защитный колпачок
Триммер
Бритвенный блок
Картридж с кондиционером для бритья
Кнопка включения подачи кондиционера для бритья
Кнопка питания
Индикаторы зарядки
Зарядное устройство
Станция для заполнения и зарядки
Крышка станции для заполнения и зарядки
Отсек для хранения триммера
Задняя панель
Гнездо для маленького штекера
Индикатор заполнения картриджа для кондиционера
Индикатор флакона для кондиционера
Щеточка для очистки
Флакон с кондиционером для бритья NIVEA FOR MEN
Чехол
Адаптер (ваш адаптер может отличаться от изображенного на рисунке)
Перед началом эксплуатации прибора внимательно ознакомьтесь с настоящим руководством
и сохраните его для дальнейшего использования в качестве справочного материала.
- Убедитесь, что в адаптер не попала вода (ваш адаптер может отличаться от
изображенного на рисунке) (Рис. 2).
- Соблюдайте осторожность при обращении с горячей водой. Проверяйте температуру
воды, чтобы избежать ожогов.
- В конструкцию адаптера входит трансформатор. Запрещается заменять адаптер или
присоединять к нему другие штекеры: это опасно.
- Данный прибор не предназначен для использования лицами (включая детей) с
ограниченными возможностями сенсорной системы или ограниченными умственными или
физическими способностями, а также лицами с недостаточным опытом и знаниями, кроме
как под контролем и руководством лиц, ответственных за их безопасность.
- Не позволяйте детям играть с прибором.
- Запрещается погружать станцию для заполнения и зарядки в воду или промывать ее под
струей водопроводной воды (Рис. 3).
- Запрещается погружать зарядное устройство в воду или мыть его под струей
воды (Рис. 4).

228
- Станцию для заполнения и зарядки следует обязательно устанавливать на
водоустойчивую поверхность.
- Использование приборов, их зарядка и хранение должны производится при температуре
от 5°C до 35°C.
- Для предотвращения повреждений во время поездок надевайте на бритву защитный
колпачок.
- Бритву и другие аксессуары нельзя мыть в посудомоечной машине.
- Запрещается промывать бритву водой с температурой выше 80°C.
- Пользуйтесь только адаптером, зарядным устройством и станцией для заполнения и
зарядки, входящими в комплект поставки.
- Запрещается пользоваться станцией для заполнения и зарядки, если поврежден адаптер
станции или сама станция.
- Не используйте бритву или зарядное устройство, если они повреждены.
- Если адаптер поврежден, заменяйте его только таким же адаптером, чтобы обеспечить
безопасную эксплуатацию прибора.
- Бритва соответствует принятому международному стандарту по технике безопасности, и
ей можно пользоваться в ванной или под душем и чистить ее под струей воды (Рис. 5).
- Данный прибор Philips соответствует всем стандартам в отношении электромагнитных
полей (ЭМП). В соответствии с современными научными данными при правильном
обращении согласно инструкциям, приведенным в руководстве пользователя, применение
прибора безопасно.
- Адаптер преобразует напряжение 100-240 вольт до безопасного напряжения ниже
24 вольт.
1 Снимите крышку с флакона с кондиционером для бритья NIVEA FOR MEN (Рис. 6).
2 Поверните колпачок флакона с кондиционером для бритья по часовой стрелке
(должен прозвучать щелчок) (Рис. 7).
, Крышка опустится вниз и появится насадка флакона.
3 Чтобы снять крышку станции для заполнения и зарядки, поверните ее против часовой
стрелки.
4 Снимите упаковочный материал с отверстия для фиксации флакона на станции для
заполнения и зарядки.
5 Поместите флакон для кондиционера в отверстие для фиксации так, чтобы насадка
была направлена вниз (Рис. 8).
6 Снова поместите крышку на станцию для заполнения и зарядки (1) и поверните
крышку по часовой стрелке, чтобы зафиксировать (2) (Рис. 9).
7 Вставьте маленький штекер в гнездо станции для заполнения и зарядки и подключите
адаптер к розетке электросети (Рис. 10).
8 Поместите бритву в станцию для заполнения и зарядки и нажмите на нее от себя
(должен прозвучать щелчок) (Рис. 11).
Примечание. Бритва автоматически заряжается и заполняется кондиционером для бритья.
9 Заряжайте бритву в течение 90 минут. (Рис. 12)

229
Примечание. Заряжайте бритву перед использованием в первый раз или когда индикатор
зарядки сигнализирует о том, что аккумулятор разряжен (см. раздел “Индикаторы зарядки”).
Примечание. Полностью заряженная бритва может работать до 40мин.
1 Вставьте маленький штекер в зарядное устройство и подключите адаптер к розетке
электросети.
2 Поместите бритву в зарядное устройство (Рис. 13).
, Бритва заряжается.
3 Заряжайте бритву 1,5 часа.
Примечание. Заряжайте бритву перед использованием в первый раз или когда индикатор
зарядки сигнализирует о том, что аккумулятор разряжен (см. раздел “Индикаторы зарядки”).
Примечание. Полностью заряженная бритва может работать до 40мин.
Также можно заполнять картридж для кондиционера без помощи станции для заполнения и
зарядки:
1 Поместите насадку флакона для кондиционера в наливное отверстие картриджа для
кондиционера.
2 Поднимайте и опускайте флакон (примерно 5 раз), чтобы перелить кондиционер для
бритья в картридж, пока вы не увидите, что картридж полон (Рис. 14).
- Индикаторы зарядки показывают уровень зарядки аккумулятора. В время зарядки нижний
индикатор зарядки сначала мигает оранжевым светом, затем гаснет. Верхний индикатор
зарядки начнет мигать белым светом а затем горит постоянно.
- После зарядки бритвы в течение 9 минут нижний индикатор зарядки гаснет, а верхний
индикатор зарядки начинает мигать белым, чтобы показать, что энергии достаточно для
одного бритья.
Примечание. Быстрая зарядка возможна только в том случае, если бритва уже однажды
заряжалась в течение 90 минут.
- Уровень зарядки аккумулятора отображается с помощью количества горящих
индикаторов зарядки. Оставшийся заряд аккумулятора отображается в течение
нескольких секунд при включении или выключении бритвы (Рис. 15).
- При разрядке аккумулятора нижний индикатор зарядки горит оранжевым во время
бритья и мигает оранжевым при выключении бритвы. (Рис. 16)
- Когда аккумулятор полностью заряжен, все индикаторы заряда аккумулятора горят белым
светом непрерывно (Рис. 15).
- После прибл. 1 часа индикаторы гаснут для экономии энергии.

230
, Индикатор флакона для кондиционера загорается оранжевым в двух случаях: (Рис. 17)
- В станции для заполнения и зарядки нет флакона для кондиционера или флакон
установлен неправильно.
- Флакон для кондиционера пуст.
, Индикатор заполнения картриджа для кондиционера может отображать три
состояния: (Рис. 18)
- В процессе заполнения картриджа для кондиционера индикатор заполнения картриджа
мигает белым.
- После заполнения картриджа для кондиционера индикатор заполнения картриджа
светится белым светом.
- Если в процессе заполнения картриджа для кондиционера во флаконе заканчивается
кондиционер, зеленый индикатор заполнения картриджа гаснет, а индикаторы флакона
для кондиционера начинают мигать красным.
Примечание. Для привыкания к этой бритвенной системе коже может потребоваться 2-3
недели.
1 Убедитесь, что в картридже для кондиционера достаточное количество кондиционера
для бритья.
2 Нажмите кнопку включения/выключения для включения бритвы.
3 Убедитесь, что зарядки аккумулятора бритвы достаточно (см. главу “Начало работы”,
раздел “Индикация зарядки”).
4 Мягко перемещайте бритвенный блок круговыми движениями по поверхности кожи и
нажимайте кнопку подачи кондиционера, пока на вашей коже не станет достаточно
кондиционера для комфортного бритья. (Рис. 19)
- Когда вы отпустите кнопку подачи кондиционера для бритья, прибор прекратит подачу
кондиционера.
- При кратком нажатии кнопки подачи кондиционера для бритья автоматически будет
подано определенное количество кондиционера.
- Нажмите кнопку подачи кондиционера для бритья еще раз для нанесения
дополнительного количества кондиционера для бритья во время бритья, чтобы
бритвенный блок продолжал легко скользить по поверхности кожи.
Примечание. Кнопка подачи кондиционера для бритья работает только, когда бритва
включена.
Примечание. Эту бритву можно использовать как бритвенный станок: ее можно использовать
на смоченной коже. В отличие от обычной электробритвы, у этого прибора нет отсека для
волос, в который собирается щетина. Для предотвращения попадания щетины на одежду,
пользуйтесь достаточным количеством кондиционера для бритья.
5 Тщательно очищайте бритву после каждого использования (см. главу ‘Чистка и уход’).
6 Для предотвращения повреждений надевайте на электробритву защитный
колпачок (Рис. 20).

231
- Мягко перемещайте бритву круговыми движениями по поверхности кожи.
- Не нажимайте на бритву слишком сильно, поскольку это может привести к раздражению
на коже.
- Для безупречного скольжения регулярно применяйте кондиционер для бритья.
- Бритву можно также использовать в ванне или душе.
Примечание. Благодаря новому открытому дизайну звук триммера слышен более отчетливо,
чем звуки других триммеров. Это нормально.
1 Снимите бритвенный блок с бритвы (Рис. 21).
2 Снимите триммер с держателя для триммера на зарядном устройстве и наденьте его на
бритву (должен прозвучать щелчок) (Рис. 22).
3 Нажмите кнопку включения/выключения для включения бритвы.
4 Триммер можно использовать для подравнивания усов и/или висков.
5 Тщательно очищайте триммер после каждого использования (см. главу ‘Чистка и уход’).
6 Снимите триммер и поместите его обратно в держатель для триммера.
7 Вставьте бритвенный блок обратно в бритву (должен прозвучать щелчок) (Рис. 23).
8 Для предотвращения повреждений надевайте на электробритву защитный
колпачок (Рис. 20).
Запрещается использовать для чистки прибора губки с абразивным покрытием, абразивные
чистящие средства или растворители типа бензина или ацетона.
Очищайте бритву и триммер после каждого использования.
Соблюдайте осторожность при обращении с горячей водой. Проверяйте температуру
воды, чтобы избежать ожогов.
Запрещается вытирать бритвенный блок полотенцем или салфеткой. Это может повредить
бритвенные головки.
Примечание. Бритва водонепроницаемая, ее можно очищать водой.
1 Нажмите кнопку включения/выключения для включения бритвы.
Примечание. Очищайте бритву в включенном состоянии.
2 Поместите бритвенный блок/триммер в горячую воду по крайней мере на 30
секунд (Рис. 24).
3 Выключите бритву и вытряхните оставшуюся воду.
4 Для предотвращения повреждений надевайте на электробритву защитный
колпачок (Рис. 20).
Примечание. Если бритва бреет не так хорошо, как раньше, и вы не можете с этим
справиться при помощи методов очистки, описанных в этой главе, см. главу “Устранение
неполадок”, чтобы узнать дополнительный метод тщательной очистки.

232
1 Смазывайте зубцы триммера каплей швейного масла каждые шесть месяцев.
1 Храните бритву в станции для заполнения и зарядки.
2 Если вы собираетесь в поездку или не хотите хранить бритву в станции для заполнения
и зарядки, установите на бритву защитный колпачок и поместите бритву в
футляр (Рис. 20).
Если вы не намереваетесь пользоваться бритвой в течение длительного времени или
собираетесь в поездку, можно запереть бритву. Замок для поездок предохраняет бритву от
случайного включения.
1 Убедитесь, что бритва выключена.
2 Нажмите и удерживайте кнопку кондиционера (1) и одновременно нажмайте кнопку
вкл./выкл. другой рукой (2) (Рис. 25).
3 Удерживайте обе кнопки в течение 6 секунд. Подождите пока бритва не
издаст короткий гудок и верхний индикатор зарядки аккумулятора на бритве не
мигнет несколько раз.
, Теперь дорожная блокировка включена.
Примечание. Если вы сначала случайно нажали кнопку включения/выключения, бритва начинает
работать . В этом случае, нажмите кнопку включения/выключения еще раз для выключения
бритвы.
Примечание. Если вы нажали кнопку вкл./выкл. при включенной дорожной блокировке, средний
индикатор зарядки аккумулятора мигнет белым, чтобы показать, что блокировка включена.
Совет. Нажмите кнопку включения/выключения, чтобы убедиться, что дорожная блокировка
включена. Если дорожная блокировка включена, бритва не продолжит работу.
1 Нажмите и удерживайте кнопку кондиционера (1) и одновременно нажмайте кнопку
вкл./выкл. другой рукой (2) (Рис. 25).
2 Удерживайте обе кнопки в течение 6 секунд. Подождите пока бритва не
издаст короткий гудок и верхний индикатор зарядки аккумулятора на бритве не мигнет
несколько раз.
, Теперь дорожная блокировка выключена.
Примечание. Вы можете также выключить дорожную блокировку, поместив бритву в зарядное
устройство.
Если вы собираетесь в поездку и не хотите брать с собой станцию для заполнения и
зарядки, вы можете взять с собой зарядное устройство, чтобы при необходимости зарядить
бритву.
233
По гигиеническим соображениям мы рекомендуем заменять картридж кондиционера раз в
год. Новый картридж включен в каждый набор из 3 флаконов кондиционера NIVEA FOR MEN
и в сменный набор (в него входят новые бритвенный блок HS85 и картридж).
1 Выньте картридж для кондиционера для бритья из бритвы (Рис. 26).
2 Вставьте выступ в верхней части нового картриджа для кондиционера для бритья в паз
на краю бритвы (1). Затем нажмите пальцем на верхнюю часть картриджа (2) для
фиксации картриджа в бритве (должен прозвучать щелчок) (Рис. 27).
3 Наполните картридж для кондиционера для бритья (см. главу “Начало работы”).
Заменяйте бритвенный блок каждый год для оптимальных результатов бритья.
Заменяйте бритвенный блок на бритвенный блок HS85 от Philips.
1 Снимите старый бритвенный блок с бритвы (Рис. 21).
2 Вставьте новый бреющий блок в бритву (должен прозвучать щелчок) (Рис. 23).
Используйте только кондиционеры для бритья NIVEA FOR MEN.
1 Снимите крышку с флакона с кондиционером для бритья NIVEA FOR MEN (Рис. 6).
2 Поверните колпачок флакона с кондиционером для бритья по часовой стрелке
(должен прозвучать щелчок) (Рис. 7).
, Крышка опустится вниз и появится насадка флакона.
3 Чтобы снять крышку станции для заполнения и зарядки, поверните ее против часовой
стрелки.
4 Поместите флакон для кондиционера в отверстие для фиксации так, чтобы насадка
была направлена вниз (Рис. 8).
5 Поместите крышку на станцию для заполнения и зарядки, сдвинув ее назад, (1) и
поверните крышку по часовой стрелке, (2) чтобы зафиксировать (Рис. 9).
- После окончания срока службы не выбрасывайте прибор вместе с бытовыми отходами.
Передайте его в специализированный пункт для дальнейшей утилизации. Этим
вы поможете защитить окружающую среду (Рис. 28).
- Аккумулятор содержит вещества, загрязняющие окружающую среду. После окончания
срока службы прибора и передачи его для утилизации аккумулятор необходимо извлечь.
Аккумулятор следует утилизировать в специализированных пунктах. Если при извлечении
аккумулятора возникли затруднения, можно передать прибор в сервисный центр Philips,
где аккумулятор извлекут и утилизируют безопасным для окружающей среды способом.
Перед утилизацией бритвы извлеките из нее аккумуляторы. Убедить в полной разрядке
аккумуляторов перед извлечением.
Будьте осторожны - контактные полосы аккумулятора острые.

234
1 Выньте картридж для кондиционера для бритья из бритвы (Рис. 26).
2 Отвинтите 3 винта на задней панели бритвы (Рис. 29).
3 Снимите заднюю панель корпуса с помощью отвертки (Рис. 30).
4 Перережьте провода и вытащите аккумулятор.
Для получения дополнительной информации или обслуживания или в случае возникновения
проблем посетите веб-сайт Philips www.philips.com/support или обратитесь в Центр
поддержки потребителей Philips в вашей стране (номер телефона центра указан на
гарантийном талоне). Если в Вашей стране подобный центр отсутствует, обратитесь в
местную торговую организацию Philips.
Действие международной гарантии не распространяется на бритвенные головки
(вращающиеся и неподвижные ножи), так как они подвержены износу.
Условия международной гарантии не распространяются на сменный картридж для
кондиционера.
Данная глава посвящена наиболее общим вопросам по использованию прибора. Если
самостоятельно справиться с возникшими проблемами не удается, обратитесь в центр
поддержки потребителей в вашей стране.
Проблема Возможная причина Способы решения
Бритва не
Вы нанесли недостаточно
Нажимайте кнопку подачи кондиционера
прилегает
кондиционера для бритья
для бритья пока не увлажните кожу
вплотную к
достаточным количеством
коже.
кондиционера NIVEA FOR MEN. Это
поможет бритвенному блоку легко
скользить по коже.
Бритва стала
Вы не очистили бритву как
Очистите бритву (см. “Очистка и уход”).
работать хуже,
следует
чем раньше.
Бритвенные головки
Очистите головки, следуя инструкциям по
забиты длинными
улучшенному методу очистки.
волосами.
Бритвенный блок
Замените блок (см. “Замена”).
поврежден или изношен.
При нажатии
Аккумулятор разряжен. Зарядите аккумулятор (см. “Подготовка к
кнопки вкл./выкл.
использованию”).
бритва не
включается.
Дорожная блокировка
Отключите блокировку (см. “Хранение”).
включена.

235
Проблема Возможная причина Способы решения
Засохший
Тщательно очистите электробритву,
кондиционер блокирует
прежде чем продолжать бритье (см. раздел
работу бритвенных
«Очистка»).
головок.
Вы неправильно собрали
При сборе бритвы убедитесь, что все
бритву после улучшенной
насадки повернуты против часовой стрелки
очистки.
до упора.
Из отверстий
Одно из отверстий носика
Одно из отверстий для кондиционера
выливается
засорилось.
может быть засорено. Промойте или
маленькое
замочите бритвенный блок. Если это не
количество
поможет, закачивайте кондиционер для
кондиционера,
бритья в картридж до тех пор, пока
хотя в
кондиционер не начнет выходить из
картридже его
засоренного отверстия. Если и это не
достаточно.
поможет, попробуйте следующее: 1)
Выключите бритву 2) Снимите бритвенный
блок с бритвы 3) Закройте пальцем
незасоренное отверстие 4) Включите
бритву 5) Нажмите и удерживайте кнопку
подачи кондиционера для бритья в течение
нескольких секунд, пока из засоренного
отверстия не начнет выходить
кондиционер.
Вы не
Убедитесь, что бритвенная головка без
поместили бритвенные
отверстия для кондиционера встала на
головки на место. Одна из
место. Ее держатель находится ближе к
головок не имеет
кнопке вкл/выкл при присоединении
отверстия для
бритвенного блока к бритве.
кондиционера в центре, ее
необходимо помещать на
место.
Кондиционер не
Картридж пуст. Заполните картридж (см. “Подготовка к
выходит из
использованию”).
отверстий при
нажатии на
кнопку
кондиционера.
Триммер шумит
Это из-за открытого
Из-за нового открытого дизайна вы
больше других
дизайна триммера.
слышите звук работы триммера более
триммеров.
отчетливо, чем звук других триммеров. Это
нормально и не означает, что триммер
поврежден.
Прибор должен быть выключен.
1 Снимите бритвенный блок с бритвы (Рис. 31).

236
2 Поверните неподвижный нож по часовой стрелке и снимите его с бритвенного
блока (Рис. 32).
Примечание. Снимайте по одной бритвенной головке. Это гарантирует, что бритвенная
головка установится в исходный держатель; это необходимо, так как в двух бритвенные
головки имеются специальные отверстия для кондиционера для бритья. Это также
гарантирует, что вращающиеся ножи и неподвижные ножи различных бритвенных головок не
перепутаются, что повлияет на качество бритья.
3 При необходимости выньте вращающийся нож из неподвижного ножа.
4 Очистите вращающиеся и неподвижные ножи, пользуясь входящей в комплект
щеточкой.
5 После очистки установите вращающийся нож на место в бритвенный блок так, чтобы
опоры вращающегося ножа были направлены вверх.
6 Установите неподвижный нож на держатель бритвенной головки (над вращающимся
ножом) (Рис. 33).
7 Поворачивайте неподвижный нож против часовой стрелки, пока он не встанет на свое
место (Рис. 34).
8 Вставьте бритвенный блок обратно в бритву (должен прозвучать щелчок) (Рис. 35).

237
Gratulujeme Vám ku kúpe a vitajte medzi zákazníkmi spoločnosti Philips! Ak chcete využiť všetky
výhody zákazníckej podpory spoločnosti Philips, zaregistrujte svoj výrobok na adrese www.philips.
com/welcome.
Prečítajte si tento návod na použitie, pretože obsahuje informácie o vynikajúcich vlastnostiach tohto
holiaceho strojčeka, ako aj niekoľko tipov, ktoré Vám umožnia urýchliť a spríjemniť holenie.
Holiaci strojček
Ochranný kryt
Zastrihávač
Holiaca jednotka
Kazeta s kondicionérom na holenie
Tlačidlo dávkovania kondicionéru na holenie
Vypínač
Indikátory nabíjania
Nabíjačka
Jednotka na doplnenie a nabíjanie
Kryt jednotky na doplnenie a nabíjanie
Výklenok na uloženie zastrihávača
Zadný panel
Konektor pre malú koncovku
Kontrolné svetlo „napĺňania kazety s kondicionérom“
Kontrolné svetlo fľaštičky kondicionéru
Čistiaca kefka
Fľaštička kondicionéru na holenie NIVEA FOR MEN
Puzdro
Adaptér (Váš adaptér sa môže odlišovať od adaptéra znázorneného na obrázku)
Pred použitím zariadenia si pozorne prečítajte tento návod na použitie a uschovajte si ho na použitie
v budúcnosti.
- Uistite sa, že sa adaptér nenamočí (Váš adaptér sa môže odlišovať od adaptéra znázorneného
na obrázku) (Obr. 2).
- Dajte pozor na horúcu vodu. Vždy skontrolujte, či nie je príliš horúca, aby ste si nepopálili ruky.
- Súčasťou adaptéra je transformátor. Adaptér nesmiete oddeliť a vymeniť za iný typ zástrčky,
lebo by ste mohli spôsobiť nebezpečnú situáciu.
- Spotrebič nie je určený na používanie osobami (vrátane detí) so zníženými fyzickými, zmyslovými
alebo mentálnymi schopnosťami alebo s nedostatkom skúseností a vedomostí, pokiaľ im osoba
zodpovedná za ich bezpečnosť neposkytuje dohľad alebo ich nepoučila o používaní spotrebiča.
- Deti musia byť pod dozorom, aby sa nehrali so zariadením.
- Jednotku na doplnenie a nabíjanie nikdy neponárajte do vody, ani ju neoplachujte tečúcou
vodou (Obr. 3).
- Nabíjačku nikdy nesmiete ponoriť do vody, ani ju umývať tečúcou vodou (Obr. 4).
- Jednotku na doplnenie a nabíjanie a nabíjačku vždy umiestnite a používajte na povrchoch, ktoré
sú odolné voči kvapalinám.
- Zariadenia používajte, nabíjajte a skladujte pri teplotách 5°C až 35°C.
238
- Na holiaci strojček vždy nasaďte ochranný kryt, ktorý ochráni holiace hlavy pri cestovaní.
- Holiaci strojček a ostatné príslušenstvo nemôžete čistiť v umývačke na riad.
- Na opláchnutie holiaceho strojčeka nikdy nepoužívajte vodu teplejšiu ako 80 °C.
- Používajte len dodaný adaptér, nabíjačku a jednotku na doplnenie a nabíjanie.
- Ak sú adaptér alebo samotná jednotka poškodené, nepoužívajte jednotku na doplnenie a
nabíjanie.
- Holiaci strojček alebo nabíjačku nepoužívajte, ak sú poškodené.
- Ak je poškodený adaptér, nechajte ho vymeniť za niektorý z originálnych typov, aby ste predišli
nebezpečným situáciám.
- Tento holiaci strojček vyhovuje medzinárodným bezpečnostným predpisom a môžete ho
bezpečne používať vo vani alebo v sprche a čistiť ho pod tečúcou vodou (Obr. 5).
- Tento výrobok Philips vyhovuje všetkým normám týkajúcim sa elektromagnetických polí (EMF).
Ak budete zariadenie používať správne a v súlade s pokynmi v tomto návode na použitie, bude
jeho použitie bezpečné podľa všetkých v súčasnosti známych vedeckých poznatkov.
- Adaptér transformuje napätie 100-240 V na bezpečné napätie nižšie ako 24 V.
1 Odpojte kryt z fľaštičky kondicionéru na holenie NIVEA FOR MEN (Obr. 6).
2 Otočte kryt fľaštičky s kondicionérom v smere pohybu hodinových ručičiek
(„kliknutie“) (Obr. 7).
, Kryt sa pohne nadol a objaví sa hubica na dávkovanie kondicionéru.
3 Otočte kryt jednotky na doplnenie a nabíjanie proti smeru pohybu hodinových ručičiek, aby
ste ho odpojili.
4 Vyberte baliaci materiál z otvoru na upevnenie fľaštičky v jednotke na doplnenie a nabíjanie.
5 Do otvoru na upevnenie vložte fľaštičku s kondicionérom s hubicou smerujúcou
nadol (Obr. 8).
6 Na jednotku na doplnenie a nabíjanie (1) položte kryt a upevnite ho otočením v smere
pohybu hodinových ručičiek (2) (Obr. 9).
7 Malú koncovku pripojte do zásuvky jednotky na doplnenie a nabíjanie a adaptér do
siete (Obr. 10).
8 Holiaci strojček položte do jednotky na doplnenie a nabíjanie a zatlačte ho dozadu
(„kliknutie“) (Obr. 11).
Poznámka: Holiaci strojček sa automaticky dobije a naplní sa kondicionérom na holenie.
9 Batériu holiaceho strojčeka nabíjajte 90 minút. (Obr. 12)
Poznámka: Batériu holiaceho strojčeka nabite pred prvým použitím alebo vtedy, keď indikátor nabíjania
naznačuje, že batéria je vybitá (pozrite si časť „Ukazovatele nabíjania“).
Poznámka: Holiaci strojček s plne nabitou batériou umožňuje až 40 minút holenia.
1 Malú koncovku pripojte do nabíjačky a adaptér do siete.
2 Holiaci strojček vložte do nabíjačky (Obr. 13).
, Batéria holiaceho strojčeka sa nabíja.
3 Batériu holiaceho strojčeka nabíjajte 1,5 hodiny.

239
Poznámka: Batériu holiaceho strojčeka nabite pred prvým použitím alebo vtedy, keď indikátor nabíjania
naznačuje, že batéria je vybitá (pozrite si časť „Ukazovatele nabíjania“).
Poznámka: Holiaci strojček s plne nabitou batériou umožňuje až 40 minút holenia.
Kazetu holiaceho strojčeka môžete doplniť kondicionérom na holenie aj bez použitia jednotky na
doplnenie a nabíjanie:
1 Hubicu fľaštičky s kondicionérom vložte do plniaceho otvoru na kazete s kondicionérom.
2 Fľaštičkou pohnite približne 5-krát nahor a nadol, aby ste kondicionérom na holenie naplnili
kazetu (Obr. 14).
- Indikátory nabíjania signalizujú úroveň, na ktorú je nabitá batéria. Počas nabíjania spodný indikátor
nabíjania najskôr bliká oranžovou farbou a potom zhasne. Horný indikátor nabíjania
potom začne blikať bielou farbou a nakoniec začne neprerušovane svietiť bielou farbou.
- Potom, ako sa holiaci strojček nabíjal 9 minút, spodný indikátor nabíjania zhasne a horný
indikátor nabíjania začne blikať bielou farbou, čím signalizuje, že batéria holiaceho strojčeka
obsahuje dostatočné množstvo energie na jedno oholenie.
Poznámka: Rýchle nabíjanie je možné len v prípade, ak ste už holiaci strojček nabíjali aspoň raz po dobu
1,5 hodiny.
- Zostávajúcu kapacitu batérie určuje počet rozsvietených svetiel. Stav batérie sa na niekoľko
sekúnd zobrazí, keď holiaci strojček zapnete alebo vypnete (Obr. 15).
- Keď je batéria takmer vybitá, spodný indikátor nabíjania bude počas holenia svietiť oranžovou
farbou, a keď holiaci strojček vypnete, bude blikať oranžovou farbou. (Obr. 16)
- Keď je batéria plne nabitá, všetky indikátory nabíjania sa neprerušovane rozsvietia bielou
farbou (Obr. 15).
- Po približne 1 hodine biele indikátory nabíjania z dôvodu šetrenia energiou zhasnú.
, Keď bliká kontrolné svetlo fľaštičky kondicionéru naoranžovo, signalizuje tým dve
možnosti: (Obr. 17)
- V jednotke na doplnenie a nabíjanie nie je žiadna fľaštička kondicionéru alebo nie je vložená
správne.
- Fľaštička kondicionéru je prázdna.
, Kontrolné svetlo „napĺňania kazety s kondicionérom“ signalizuje tri rôzne veci: (Obr. 18)
- Keď sa kazeta s kondicionérom napĺňa, bliká biele kontrolné svetlo „napĺňania kazety s
kondicionérom“.
- Keď je kazeta s kondicionérom na holenie plná, nepretržite svieti biele kontrolné svetlo
„napĺňania kazety s kondicionérom“.

240
- Ak sa počas napĺňania kazety s kondicionérom vyprázdni fľaštička kondicionéru, biele kontrolné
svetlo „napĺňania kazety s kondicionérom“ sa vypne a kontrolné svetlá fľaštičky kondicionéru
začnú blikať načerveno.
Poznámka: Vašej pokožke môže 2 až 3 týždne trvať, kým si privykne na nový spôsob holenia.
1 Uistite sa, že v kazete s kondicionérom na holenie je dostatočné množstvo kondicionéru.
2 Stlačením vypínača zapnite holiaci strojček.
3 Uistite sa, že je batéria holiaceho strojčeka dostatočne nabitá (pozrite si kapitolu „Príprava na
použitie“, časť „Ukazovatele nabíjania“).
4 Holiacou jednotkou jemne pohybujte krúživými pohybmi po pokožke a držte stlačené tlačidlo
dávkovania kondicionéru na holenie, kým nebudete mať na pokožke dostatočné množstvo
kondicionéru umožňujúce pohodlné holenie. (Obr. 19)
- Keď uvoľníte tlačidlo dávkovania, zariadenie prestane dávkovať kondicionér na holenie.
- Ak na krátky čas stlačíte tlačidlo dávkovania, zariadenie automaticky nanesie určité množstvo
kondicionéru na holenie.
- Tlačidlo dávkovania stlačte vždy, keď chcete počas holenia naniesť viac kondicionéru, aby sa
holiaca jednotka aj naďalej hladko kĺzala po pokožke.
Poznámka: Tlačidlo dávkovania kondicionéru na holenie funguje len vtedy, keď je holiaci strojček zapnutý.
Poznámka: Tento holiaci strojček sa dá používať spôsobom, ktorý je podobný používaniu žiletky: holiaci
strojček môžete používať na holenie vlhkej pokožky. Na rozdiel od bežného elektrického holiaceho
strojčeka nemá toto zariadenie žiadny zásobník na chĺpky, ktorý zberá oholené chĺpky. Aby ste predišli
padaniu oholených chĺpkov na Vaše oblečenie, počas holenia použite dostatočné množstvo kondicionéru
na holenie.
5 Holiaci strojček po každom použití dôkladne vyčistite (pozrite si kapitolu „Čistenie a
údržba“).
6 Aby ste predišli poškodeniu, nasaďte na holiaci strojček ochranný kryt (Obr. 20).
- Holiacim strojčekom jemne prechádzajte po pokožke krúživými pohybmi.
- Na holiaci strojček veľmi netlačte, pretože to môže spôsobiť podráždenie pokožky.
- Aby sa zaistilo správne kĺzanie, pravidelne nanášajte kondicionér na holenie.
- Holiaci strojček môžete tiež používať vo vani alebo v sprche.
Poznámka: Príčinou, prečo je zvuk pracujúceho zastrihávača počuť viac ako v prípade iných holiacich
strojčekov, je jeho nový otvorený dizajn. Je to normálny jav.
1 Z holiaceho strojčeka odpojte holiacu jednotku (Obr. 21).
2 Zastrihávač vyberte z jeho nosiča na nabíjačke a pripojte ho na holiaci strojček
(„kliknutie“) (Obr. 22).
3 Stlačením vypínača zapnite holiaci strojček.
4 Zastrihávač použite na strihanie bokombrád a/alebo fúzov.
5 Zastrihávač po použití dôkladne vyčistite (pozrite si kapitolu „Čistenie a údržba“).
241
6 Zastrihávač odpojte a vložte ho späť do jeho nosiča.
7 Holiacu jednotku nasaďte späť na strojček („kliknutie“) (Obr. 23).
8 Aby ste predišli poškodeniu, nasaďte na holiaci strojček ochranný kryt (Obr. 20).
Na čistenie zariadenia nikdy nepoužívajte drsný materiál, drsné čistiace prostriedky ani agresívne
kvapaliny ako alkohol, benzín alebo acetón.
Holiaci strojček a zastrihávač vyčistite po každom použití.
Dajte pozor na horúcu vodu. Vždy skontrolujte, či nie je príliš horúca, aby ste si nepopálili ruky.
Holiacu jednotku nesmiete sušiť pomocou uteráka ani inej tkaniny, pretože by ste mohli poškodiť
holiace hlavy.
Poznámka: Holiaci strojček je vodotesný a môžete ho umývať vodou.
1 Stlačením vypínača zapnite holiaci strojček.
Poznámka: Holiaci strojček čistite, keď je zapnutý.
2 Holiacu jednotku/zastrihávač ponorte aspoň na 30 sekúnd do horúcej vody (Obr. 24).
3 Vypnite holiaci strojček a otraste z neho zvyšnú vodu.
4 Aby ste predišli poškodeniu, nasaďte na holiaci strojček ochranný kryt (Obr. 20).
Poznámka: Ak už holiaci strojček neholí tak účinne ako zvyčajne a nedokážete tento problém vyriešiť tak,
že ho vyčistíte podľa postupu uvedeného v tejto kapitole, pozrite si kapitolu „Riešenie problémov“, kde
nájdete informácie o dôkladnejšom spôsobe čistenia.
1 Každých šesť mesiacov namažte zúbky zastrihávača kvapkou oleja na šijacie stroje.
1 Holiaci strojček odložte do jednotky na doplnenie a nabíjanie.
2 Ak sa chystáte na cesty alebo ak nechcete odložiť holiaci strojček do jednotky na doplnenie a
nabíjanie, nasaďte na holiaci strojček ochranný kryt a odložte ho do puzdra (Obr. 20).
Ak chcete holiaci strojček na dlhší čas odložiť, alebo ak budete cestovať, môžete ho uzamknúť.
Cestovný zámok zabráni, aby sa holiaci strojček náhodne zapol.
1 Uistite sa, že holiaci strojček je vypnutý.
2 Stlačte a držte tlačidlo dávkovania kondicionéru na holenie (1) a druhou rukou súčasne
stlačte vypínač (2) (Obr. 25).
3 Obidve tlačidlá podržte 6 sekúnd stlačené. Počkajte, kým holiaci strojček nevydá krátke
bzučanie a stredný indikátor nabíjania na holiacom strojčeku niekoľkokrát nezabliká.
, Cestovný zámok je teraz aktivovaný.

242
Poznámka: Ak náhodou najskôr stlačíte vypínač, holiaci strojček sa zapne. V tom prípade znova stlačte
vypínač, aby ste holiaci strojček vypli.
Poznámka: Ak stlačíte vypínač, keď je aktivovaný cestovný zámok, stredný indikátor nabíjania bude blikať
bielou farbou, čím signalizuje, že holiaci strojček je uzamknutý.
Tip Stlačte vypínač, aby ste skontrolovali, či je cestovný zámok aktivovaný. Ak je cestovný zámok
aktivovaný, holiaci strojček sa nezapne.
1 Stlačte a držte tlačidlo dávkovania kondicionéru na holenie (1) a druhou rukou súčasne
stlačte vypínač (2) (Obr. 25).
2 Obidve tlačidlá podržte 6 sekúnd stlačené. Počkajte, kým holiaci strojček nevydá krátke
bzučanie a stredný indikátor nabíjania na holiacom strojčeku niekoľkokrát nezabliká.
, Cestovný zámok je teraz vypnutý.
Poznámka: Cestovný zámok môžete tiež vypnúť tak, že holiaci strojček položíte späť na nabíjačku.
Ak sa chystáte na cesty a nechcete si so sebou zobrať jednotku na doplnenie a nabíjanie, môžete si
so sebou zobrať nabíjačku, aby ste holiaci strojček v prípade potreby nabili.
Z hygienických dôvodov odporúčame vymieňať kazetu s kondicionérom na holenie raz ročne. Nová
kazeta je pribalená ku každému 3-baleniu fľaštičky kondicionéru na holenie NIVEA FOR MEN a ku
každej náhradnej súprave (ktorá obsahuje novú holiacu jednotu HS85 a novú kazetu).
1 Odpojte kazetu s kondicionérom na holenie od holiaceho strojčeka (Obr. 26).
2 Zasuňte výstupok na hornej strane novej kazety s kondicionérom na holenie do priečinku na
okraji holiaceho strojčeka (1). Potom zatlačte spodnú časť kazety pomocou palca (2), aby ste
ju upevnili k holiacemu strojčeku („kliknutie“) (Obr. 27).
3 Kazetu naplňte kondicionérom na holenie (pozrite si kapitolu „Začíname“).
Na dosiahnutie optimálnych výsledkov holenia vymieňajte holiacu jednotku každý rok.
Holiacu jednotku vymeňte len za holiacu jednotku HS85 značky Philips.
1 Starú holiacu jednotku vytiahnite z holiaceho strojčeka (Obr. 21).
2 Na holiaci strojček nasaďte novú holiacu jednotku („kliknutie“) (Obr. 23).
Používajte len fľaštičky kondicionéru na holenie NIVEA FOR MEN.
1 Odpojte kryt z fľaštičky kondicionéru na holenie NIVEA FOR MEN (Obr. 6).
2 Otočte kryt fľaštičky s kondicionérom v smere pohybu hodinových ručičiek
(„kliknutie“) (Obr. 7).
, Kryt sa pohne nadol a objaví sa hubica na dávkovanie kondicionéru.
3 Otočte kryt jednotky na doplnenie a nabíjanie proti smeru pohybu hodinových ručičiek, aby
ste ho odpojili.
243
4 Do otvoru na upevnenie vložte fľaštičku s kondicionérom s hubicou smerujúcou
nadol (Obr. 8).
5 Kryt zatlačte späť na jednotku na doplnenie a nabíjanie (1) a otočte ním v smere pohybu
hodinových ručičiek (2), aby ste ho upevnili (Obr. 9).
- Zariadenie na konci jeho životnosti neodhadzujte spolu s bežným komunálnym odpadom, ale
kvôli recyklácii ho zaneste na miesto ociálneho zberu. Pomôžete tak chrániť životné
prostredie (Obr. 28).
- Zabudované dobíjateľné batérie obsahujú látky, ktoré môžu znečistiť životné prostredie. Pred
likvidáciou zariadenia, alebo jeho odovzdaním na mieste ociálneho zberu, batérie vyberte.
Batérie odovzdajte na mieste ociálneho zberu. Ak máte problémy s vybratím batérií, zariadenie
môžete zaniesť do Servisného centra spoločnosti Philips, kde batérie vyberú a odstránia
spôsobom, ktorý je bezpečný pre životné prostredie.
Batériu smiete vybrať len keď likvidujete holiaci strojček. Pri vyberaní batérie skontrolujte, či je
úplne vybitá.
Dajte pozor, pretože pásiky batérie sú ostré.
1 Odpojte kazetu s kondicionérom na holenie od holiaceho strojčeka (Obr. 26).
2 Odskrutkujte tri skrutky na zadnej strane holiaceho strojčeka (Obr. 29).
3 Pomocou skrutkovača odpojte zadný panel puzdra (Obr. 30).
4 Prerežte vodiče a odstráňte nabíjateľnú batériu.
Ak potrebujete servis, informácie alebo máte problém, navštívte webovú stránku spoločnosti Philips
na adrese www.philips.com/support, alebo sa obráťte na Stredisko starostlivosti o zákazníkov
spoločnosti Philips vo Vašej krajine (telefónne číslo strediska nájdete v priloženom celosvetovo
platnom záručnom liste). Ak sa vo Vašej krajine toto stredisko nenachádza, obráťte sa na miestneho
predajcu výrobkov Philips.
Na holiacu jednotku (rezače a zdvíhače) sa nevzťahujú podmienky medzinárodnej záruky, pretože
podliehajú opotrebeniu.
Kazeta s kondicionérom je spotrebný materiál a nevzťahuje sa na ňu medzinárodná záruka.

244
Táto kapitola obsahuje zhrnutie najbežnejších problémov, ktoré sa môžu vyskytnúť pri používaní
zariadenia. Ak neviete problém vyriešiť pomocou nižšie uvedených informácií, obráťte sa na
Stredisko starostlivosti o zákazníkov vo Vašej krajine.
Problém Možná príčina Riešenie
Holiaci strojček nekĺže
Možno ste
Podržte stlačené tlačidlo dávkovania, kým sa
hladko po mojej
nenaniesli
neuvoľní dostatočné množstvo kondicionéru na
pokožke.
dostatočné
holenie NIVEA FOR MEN. Kondicionér zaistí, že sa
množstvo
holiaca jednotka bude znova hladko kĺzať po
kondicionéru na
pokožke.
holenie.
Holiaci strojček už
Holiaci strojček ste
Holiaci strojček dôkladne vyčistite (pozrite si
neholí tak dobre ako
nevyčistili dôkladne.
kapitolu „Čistenie a údržba“).
kedysi.
Dlhé fúzy
Holiace hlavy vyčistite podľa jednotlivých krokov
zablokovali holiace
pri dôkladnom čistení strojčeka, ktoré sú uvedené
hlavy.
nižšie.
Holiaca jednotka je
Vymeňte holiacu jednotku (pozrite si kapitolu
poškodená alebo
„Výmena“).
opotrebovaná.
Holiaci
Nabíjateľná batéria
Nabite batériu (pozrite si kapitolu „Príprava na
strojček nefunguje, keď
je vybitá.
použitie“).
stlačím vypínač.
Cestovný zámok je
Deaktivujte cestovný zámok (pozrite si kapitolu
aktivovaný.
„Odkladanie“).
Zaschnutý
Skôr, ako budete pokračovať v holení, dôkladne
kondicionér
vyčistite holiaci strojček (pozrite si časť „Čistenie“).
na holenie blokuje
holiace hlavy v
holiacej jednotke.
Holiacu jednotku
Keď znova skladáte holiacu jednotku, dbajte na to,
ste po výnimočne
aby ste každý kryt otočili proti smeru pohybu
dôkladnom čistení
hodinových ručičiek, až kým nezapadne na svoje
nezostavili správne.
miesto.
Z otvorov vychádza
Jeden z otvorov na
Holiacu jednotku opláchnite alebo namočte. Ak to
len malé množstvo
kondicionér je
nepomôže, nadávkujte kondicionér na holenie do
kondicionéru na
zablokovaný.
kazety s kondicionérom, až kým nezačne zo
holenie aj napriek
zablokovaného otvoru vychádzať kondicionér. Ak
tomu, že v kazete je
ani toto nepomáha, vyskúšajte nasledujúcu
dostatočné množstvo
metódu: 1) Vypnite holiaci strojček 2) Vyberte
kondicionéru.
holiacu jednotku z holiaceho strojčeka 3) Položte
prst na otvor, ktorý nie je zablokovaný 4) Zapnite
holiaci strojček 5) Na niekoľko sekúnd stlačte
tlačidlo dávkovania kondicionéru na holenie, až
kým zo zablokovaného otvoru znova nezačne
vychádzať kondicionér.
245
Problém Možná príčina Riešenie
Neumiestnili
Dbajte na to, aby holiaca hlava bez otvoru na
ste holiace hlavy
dávkovanie kondicionéru bola uložená v správnom
späť do ich
nosiči. Je to nosič, ktorý sa nachádza najbližšie
pôvodných nosičov.
k vypínaču, keď je holiaca hlava nasadená na
Jedna z holiacich
holiacom strojčeku.
hláv nemá vo
svojom strede
otvor na
dávkovanie
kondicionéru na
holenie a musíte ju
umiestniť do
konkrétneho
nosiča.
Pri stlačení tlačidla
Kazeta na holenie
Doplňte kazetu s kondicionérom na holenie
dávkovania nevychádza
je takmer prázdna.
(pozrite si kapitolu „Príprava na použitie“).
z otvorov žiadny
kondicionér na holenie.
Zastrihávač vytvára
Tento zastrihávač
Príčinou, prečo je zvuk pracujúceho zastrihávača
viac hluku ako iné
má otvorený dizajn.
počuť viac ako v prípade iných holiacich strojčekov,
zastrihávače.
je jeho nový otvorený dizajn. Je to normálny jav a
neznamená to, že by bol zastrihávač poškodený.
Dbajte, aby bolo strojček vypnutý.
1 Vytiahnite holiacu jednotku z holiaceho strojčeka (Obr. 31).
2 Zdvíhač otočte v smere pohybu hodinových ručičiek a vyberte ho z holiacej
jednotky (Obr. 32).
Poznámka: Súčasne demontujte len jednu holiacu hlavu. Týmto sa zaručí, že holiacu hlavu vždy vložíte
naspäť do jej pôvodného nosiča. Je to nutné z toho dôvodu, že dve z holiacich hláv majú špeciálne otvory
na dávkovanie kondicionéru na holenie. Tým sa tiež zaručí, že nepomiešate rezače a zdvíhače rôznych
holiacich hláv, čo by malo vplyv na účinnosť holenia.
3 Ak treba, vyberte rezač zo zdvíhača.
4 Rezač a zdvíhače očistite dodanou kefkou.
5 Po vyčistení umiestnite rezač späť do holiacej jednotky s nožičkami smerujúcimi nahor.
6 Zdvíhač položte späť na nosič holiacej hlavy (na rezač) (Obr. 33).
7 Zdvíhačom otočte proti smeru pohybu hodinových ručičiek, až kým sa neuzamkne na svojom
mieste (Obr. 34).
8 Holiacu jednotku nasaďte späť na strojček („kliknutie“) (Obr. 35).

246
Čestitamo vam za nakup in dobrodošli pri Philipsu! Če želite popolnoma izkoristiti podporo, ki jo
nudi Philips, registrirajte izdelek na www.philips.com/welcome.
Preberite ta uporabniški priročnik, saj vsebuje informacije o čudovitih funkcijah brivnika in nasvete za
hitrejše ter prijetnejše britje.
Brivnik
Zaščitni pokrovček
Prirezovalnik
Brivna enota
Vložek z balzamom za britje
Gumb za balzam
Gumb za vklop/izklop
Indikatorji polnjenja
Polnilnik
Polnilna postaja
Pokrovček polnilne postaje
Vboklina za shranjevanje prirezovalnika
Hrbtna plošča
Vtičnica za majhen vtikač
Indikator polnjenja vložka z balzamom
Indikator stekleničke balzama
Ščetka za čiščenje
Steklenička z balzamom za britje NIVEA FOR MEN
Torbica
Adapter (lahko se razlikuje od prikazanega na sliki).
Pred uporabo aparata natančno preberite uporabniški priročnik in ga shranite za poznejšo uporabo.
- Pazite, da ne zmočite adapterja (lahko se razlikuje od prikazanega na sliki) (Sl. 2).
- Pri uporabi vroče vode bodite previdni. Najprej preverite, ali ni morda prevroča, da si ne
opečete rok.
- V adapter je vgrajen transformator. Odstranitev in menjava adapterja z drugim nista dovoljeni, saj
lahko pride do nevarne situacije.
- Aparat ni namenjen uporabi s strani otrok in oseb z zmanjšanimi telesnimi, čutnimi ali duševnimi
sposobnostmi ali oseb s pomanjkljivimi izkušnjami in znanjem, razen če jih pri uporabi nadzoruje
ali jim svetuje oseba, ki je odgovorna za njihovo varnost.
- Otroci naj se ne igrajo z aparatom.
- Polnilne postaje ne potapljajte v vodo in je ne spirajte pod tekočo vodo (Sl. 3).
- Polnilnika ne potapljajte v vodo in ga ne spirajte pod tekočo vodo (Sl. 4).
- Polnilno postajo in polnilnik postavljajte in uporabljajte na nevpojni površini.
- Aparate uporabljajte, polnite in hranite pri temperaturi med 5 °C in 35 °C.
- Na brivnik namestite zaščitni pokrovček, da na poti zaščitite brivne glave.
- Brivnik in drugi pribor nista primerna za pomivanje v pomivalnem stroju.
- Za spiranje brivnika ne uporabljajte vode z višjo temperaturo od 80 °C.
- Uporabljajte samo adapter, polnilnik in polnilno postajo, ki so priloženi.
247
- Polnilne postaje ne uporabljajte, če je poškodovan adapter ali sama postaja.
- Ne uporabljajte poškodovanega brivnika ali polnilnika.
- Če je adapter poškodovan, ga lahko zamenjate le z originalnim adapterjem iste vrste, da se
izognete nevarnosti.
- Ta brivnik ustreza mednarodno sprejetim varnostnim predpisom in ga lahko varno uporabljate v
kadi ali pod prho in čistite pod tekočo vodo (Sl. 5).
- Ta Philipsov aparat ustreza vsem standardom glede elektromagnetnih polj (EMF). Če z aparatom
ravnate pravilno in v skladu z navodili v tem uporabniškem priročniku, je njegova uporaba glede
na danes veljavne znanstvene dokaze varna.
- Adapter omrežno napetost 100-240 V pretvori v varno nizko napetost, nižjo od 24 V.
1 Odstranite jeziček stekleničke z balzamom za britje NIVEA FOR MEN (Sl. 6).
2 Pokrovček stekleničke z balzamom obrnite v desno (“klik”) (Sl. 7).
, Pokrovček se premakne navzdol in prikaže se šoba za balzam.
3 Obrnite pokrovček polnilne postaje levo, da ga odstranite.
4 Odstranite embalažo z odprtine za priklop stekleničke v polnilni postaji.
5 V odprtino za priklop postavite stekleničko z balzamom, šoba naj bo obrnjena navzdol (Sl. 8).
6 Pokrovček namestite nazaj na polnilno postajo (1) in ga obrnite v desno, da ga pritrdite
(2) (Sl. 9).
7 Manjši vtikač vstavite v vtičnico polnilne postaje, adapter pa v omrežno vtičnico (Sl. 10).
8 Postavite brivnik v polnilno postajo in ga potisnite nazaj (“klik”) (Sl. 11).
Opomba: Brivnik se samodejno napolni z energijo in istočasno tudi z balzamom za britje.
9 Brivnik polnite 90 minut. (Sl. 12)
Opomba: Brivnik napolnite pred prvo uporabo ali ko indikator polnjenja kaže, da je baterija prazna
(oglejte si razdelek “Prikaz polnjenja”).
Opomba: Povsem napolnjen brivnik zadostuje za do 40 minut britja.
1 Manjši vtikač vstavite v polnilnik, adapter pa vključite v omrežno vtičnico.
2 Brivnik postavite v polnilnik (Sl. 13).
, Brivnik se polni.
3 Brivnik polnite 90 minut.
Opomba: Brivnik napolnite pred prvo uporabo ali ko indikator polnjenja kaže, da je baterija prazna
(oglejte si razdelek “Prikaz polnjenja”).
Opomba: Povsem napolnjen brivnik zadostuje za do 40 minut britja.
Vložek z balzamom za britje lahko ponovno napolnite tudi brez polnilne postaje.
1 Vstavite šobo stekleničke z balzamom v režo za polnjenje na vložku z balzamom.

248
2 Stekleničko približno petkrat premaknite navzgor in navzdol in tako črpajte balzam za britje v
vložek, dokler ta ni poln (Sl. 14).
- Indikatorji polnjenja označujejo, koliko je baterija napolnjena. Spodnji indikator polnjenja med
polnjenjem najprej utripa oranžno in nato neha svetiti. Zgornji indikator polnjenja nato začne
utripati in nato svetiti belo.
- Ko se brivnik polni 9 minut, spodnji indikator polnjenja neha svetiti, zgornji indikator polnjenja pa
začne utripati belo, kar pomeni, da ima brivnik dovolj energije za eno britje.
Opomba: Hitro polnjenje je mogoče samo, če ste brivnik pred tem vsaj enkrat polnili 90 minut.
- Količino preostale energije v bateriji označuje število vklopljenih indikatorjev polnjenja. Koliko
energije je še v bateriji, lahko vidite nekaj sekund po vklopu in izklopu brivnika (Sl. 15).
- Ko je baterija skoraj prazna, spodnji indikator polnjenja med britjem sveti oranžno, po izklopu
brivnika pa začne utripati oranžno. (Sl. 16)
- Ko je baterija napolnjena, vsi indikatorji polnjenja svetijo belo (Sl. 15).
- Po približno 1 uri beli indikatorji polnjenja zaradi varčevanja z energijo nehajo svetiti.
, Indikator stekleničke z balzamom utripa oranžno iz naslednjih dveh možnih razlogov: (Sl. 17)
- V polnilni postaji ni stekleničke z balzamom ali pa slednja ni pravilno nameščena.
- Steklenička z balzamom je prazna.
, Indikator polnjenja vložka z balzamom označuje tri različne stvari: (Sl. 18)
- Ko se vložek z balzamom polni, beli indikator polnjenja vložka z balzamom utripa.
- Ko je vložek z balzamom poln, beli indikator polnjenja vložka z balzamom sveti.
- Če se steklenička z balzamom izprazni med polnjenjem vložka z balzamom, beli indikator
polnjenja vložka z balzamom neha svetiti in indikator stekleničke z balzamom začne utripati
rdeče.
Opomba: Koža bo morda potrebovala 2 do 3 tedne, da se privadi na novi sistem britja.
1 V vložku z balzamom za britje mora vedno biti dovolj balzama.
2 Za vklop brivnika pritisnite gumb za vklop/izklop.
3 Brivnik mora biti dovolj napolnjen (oglejte si poglavje “Priprava za uporabo”, razdelek
“Oznake polnjenja”).
4 Brivno enoto nežno krožno pomikajte po koži in držite gumb za balzam, dokler na koži ni
dovolj balzama za udobno britje. (Sl. 19)
- Ko sprostite gumb za balzam, ga aparat preneha izločati.
- Če hitro pritisnete gumb za balzam, aparat na kožo samodejno nanese določeno količino
balzama.
249
- Ponovno pritisnite gumb za balzam, če med britjem želite nanesti še nekaj balzama, da bo brivna
enota gladko drsela po koži.
Opomba: Gumb za balzam deluje samo, če je brivnik vklopljen.
Opomba: Brivnik lahko uporabljate zelo podobno kot britvico: uporabljate ga lahko na mokri koži. Ta
aparat za razliko od običajnih električnih brivnikov nima predalčka za obrite dlake. Da dlake ne bodo
padale na oblačila, med britjem nanesite dovolj balzama.
5 Brivnik po vsaki uporabi temeljito očistite (oglejte si poglavje “Čiščenje in vzdrževanje”).
6 Na brivnik potisnite zaščitni pokrovček, da preprečite poškodbe (Sl. 20).
- Brivnik nežno krožno pomikajte po koži.
- Na brivnik ne pritiskajte premočno, ker lahko povzročite razdraženje kože.
- Da bo brivnik gladko drsel, redno nanašajte balzam.
- Brivnik lahko uporabljate tudi v kadi ali pod prho.
Opomba: Zaradi nove odprte zasnove so premiki prirezovalnika bolj slišni kot pri drugih brivnikih. To je
normalno.
1 Brivno enoto odstranite z brivnika (Sl. 21).
2 Prirezovalnik vzemite iz nosilca na polnilniku in ga namestite na brivnik (“klik”) (Sl. 22).
3 Za vklop brivnika pritisnite gumb za vklop/izklop.
4 S prirezovalnikom lahko oblikujete zalizce in/ali brke.
5 Prirezovalnik po uporabi temeljito očistite (oglejte si poglavje “Čiščenje in vzdrževanje”).
6 Prirezovalnik odstranite in ga namestite nazaj v nosilec.
7 Brivno enoto namestite nazaj na brivnik (“klik”) (Sl. 23).
8 Na brivnik potisnite zaščitni pokrovček, da preprečite poškodbe (Sl. 20).
Aparata ne čistite s čistilnimi gobicami, jedkimi čistili ali agresivnimi tekočinami, kot so alkohol,
bencin ali aceton.
Brivnik in prirezovalnik očistite po vsaki uporabi.
Pri uporabi vroče vode bodite previdni. Najprej preverite, ali ni morda prevroča, da si ne opečete
rok.
Brivne enote nikoli ne brišite z brisačo ali papirnatim robčkom, saj lahko s tem poškodujete
brivne glave.
Opomba: Brivnik je vodotesen, zato ga lahko čistite z vodo.
1 Za vklop brivnika pritisnite gumb za vklop/izklop.
Opomba: Brivnik čistite, ko je vklopljen.
2 Brivno enoto/prirezovalnik za vsaj 30 sekund potopite v vročo vodo (Sl. 24).
3 Izklopite brivnik in otresite preostalo vodo.

250
4 Na brivnik potisnite zaščitni pokrovček, da preprečite poškodbe (Sl. 20).
Opomba: Če se učinkovitost brivnika zmanjša in težave ne morete odpraviti s čiščenjem, opisanim v tem
poglavju, si navodila za posebej temeljito čiščenje oglejte v poglavju “Odpravljanje težav”.
1 Zobce prirezovalnika vsakih šest mesecev namažite s kapljico olja za šivalne stroje.
1 Brivnik shranite v polnilno postajo.
2 Če greste na potovanje ali če brivnika ne želite shraniti v polnilni postaji, nanj namestite
zaščitni pokrovček in ga shranite v torbico (Sl. 20).
Če brivnik želite shraniti za dlje časa ali če se odpravljate na pot, ga lahko zaklenete. Potovalna zaščita
preprečuje nenameren vklop brivnika.
1 Brivnik mora biti izklopljen.
2 Pritisnite in držite gumb za balzam (1) ter z drugo roko hkrati pritisnite gumb za vklop/izklop
(2) (Sl. 25).
3 Oba gumba držite pritisnjena 6 sekund. Počakajte, da brivnik odda kratek brneč zvok in da
srednji indikator polnjenja na brivniku nekajkrat utripne.
, Potovalni zaklep je tako aktiviran.
Opomba: Če pomotoma najprej pritisnite gumb za vklop/izklop, brivnik začne delovati. V tem primeru
ponovno pritisnite gumb za vklop/izklop, da izklopite brivnik.
Opomba: Če pritisnete gumb za vklop/izklop, ko je aktiviran potovalni zaklep, srednji indikator polnjenja
utripa belo, kar pomeni, da je brivnik zaklenjen.
Nasvet: Pritisnite gumb za vklop/izklop in preverite, ali je potovalni zaklep aktiviran. Če je aktiviran, se
brivnik ne vklopi.
1 Pritisnite in držite gumb za balzam (1) ter z drugo roko hkrati pritisnite gumb za vklop/izklop
(2) (Sl. 25).
2 Oba gumba držite pritisnjena 6 sekund. Počakajte, da brivnik odda kratek brneč zvok in da
srednji indikator polnjenja na brivniku nekajkrat utripne.
, Potovalni zaklep je deaktiviran.
Opomba: Potovalni zaklep lahko deaktivirate tudi tako, da brivnik namestite nazaj v polnilnik.
Če greste na potovanje in s seboj ne želite vzeti polnilne postaje, lahko vzamete polnilnik in brivnik
polnite po potrebi.
251
Iz higienskih razlogov priporočamo, da vložek z balzamom za britje zamenjate enkrat letno. Nov
vložek je priložen vsem kompletom treh stekleničk z balzamom za britje NIVEA FOR MEN in
kompletom nadomestnih delov (z novo brivno enoto HS85 in novim vložkom).
1 Vložek z balzamom za britje odstranite z brivnika (Sl. 26).
2 Zatič na vrhu novega vložka z balzamom za britje vstavite v režo na robu brivnika (1). Nato s
palcem pritisnite na spodnji del vložka (2), da ga pritrdite na brivnik (“klik”) (Sl. 27).
3 Napolnite vložek z balzamom za britje (oglejte si poglavje “Začetni koraki”).
Za optimalne rezultate britja brivno enoto zamenjajte enkrat letno.
Brivno enoto zamenjajte samo s Philipsovo brivno enoto HS85.
1 Brivno enoto odstranite z brivnika (Sl. 21).
2 Na brivnik namestite novo brivno enoto (“klik”) (Sl. 23).
Uporabljajte le stekleničke z balzamom za britje NIVEA FOR MEN.
1 Odstranite jeziček stekleničke z balzamom za britje NIVEA FOR MEN (Sl. 6).
2 Pokrovček stekleničke z balzamom obrnite v desno (“klik”) (Sl. 7).
, Pokrovček se premakne navzdol in prikaže se šoba za balzam.
3 Obrnite pokrovček polnilne postaje levo, da ga odstranite.
4 V odprtino za priklop stekleničke postavite stekleničko z balzamom, šoba naj bo obrnjena
navzdol (Sl. 8).
5 Potisnite pokrovček nazaj na polnilno postajo (1) in ga obrnite desno (2), da ga
pritrdite (Sl. 9).
- Aparata po preteku življenjske dobe ne zavrzite skupaj z običajnimi gospodinjskimi odpadki,
temveč ga odložite na uradnem zbirnem mestu za recikliranje. Tako pripomorete k ohranitvi
okolja (Sl. 28).
- Vgrajena akumulatorska baterija vsebuje snovi, ki lahko onesnažijo okolje. Preden aparat zavržete
in oddate na uradnem zbirnem mestu, odstranite baterijo. Baterijo odložite na uradnem zbirnem
mestu za baterije. Če imate z odstranitvijo baterije težave, lahko aparat odnesete na Philipsov
pooblaščeni servis, kjer jo bodo odstranili in zavrgli na okolju prijazen način.
Akumulatorsko baterijo odstranite samo, če boste brivnik zavrgli. Ko baterijo odstranite, mora
biti popolnoma prazna.
Previdno, baterijski kontakti so ostri.
1 Vložek z balzamom za britje odstranite z brivnika (Sl. 26).
2 Odvijte tri vijake na zadnji strani brivnika (Sl. 29).
3 Z izvijačem odstranite hrbtno ploščo ohišja (Sl. 30).
252
4 Prerežite žice in odstranite akumulatorsko baterijo.
Za servis, informacije ali v primeru težav obiščite Philipsovo spletno stran na naslovu
www.philips.com/support ali pa se obrnite na Philipsov center za pomoč uporabnikom v svoji državi
(telefonsko številko najdete na mednarodnem garancijskem listu). Če v vaši državi ni takšnega centra,
se obrnite na lokalnega Philipsovega prodajalca.
Mednarodna garancija ne krije brivne enote (rezil in ležišč), ker je to obrabni del.
Vložek z balzamom je za enkratno uporabo in zanj pogoji mednarodne garancije ne veljajo.
To poglavje vsebuje povzetek najpogostejših težav, ki se lahko pojavijo pri uporabi aparata. Če težav s
temi nasveti ne morete odpraviti, se obrnite na center za pomoč uporabnikom v vaši državi.
Težava Možni vzrok Rešitev
Brivnik po koži
Niste nanesli dovolj
Držite gumb za balzam in na kožo nanesite dovolj
ne drsi gladko.
balzama za britje.
balzama za britje NIVEA FOR MEN. Tako bo
brivna enota spet gladko drsela po koži.
Brivnik ne brije
Brivnika niste dobro
Temeljito očistite brivnik (oglejte si poglavje
več tako dobro,
očistili.
“Čiščenje in vzdrževanje”).
kot je včasih.
Daljše dlačice ovirajo
Očistite brivne glave po postopku temeljitega
brivne glave.
čiščenja, ki je opisan spodaj.
Brivna enota je
Zamenjajte brivno enoto (oglejte si poglavje
poškodovana ali
“Zamenjava”).
obrabljena.
Brivnik se ob
Akumulatorska baterija
Napolnite baterijo (oglejte si poglavje “Priprava za
pritisku gumba za
je prazna.
uporabo”).
vklop/izklop ne
vklopi.
Aktiviran je potovalni
Deaktivirajte potovalni zaklep (oglejte si poglavje
zaklep.
“Shranjevanje”).
Zasušen balzam za britje
Temeljito očistite brivnik, preden nadaljujete z
blokira brivne glave v
britjem (oglejte si poglavje “Čiščenje”).
brivni enoti.
Po temeljitem čiščenju
Pri sestavljanju brivne enote vsa ležišča obrnite v
niste pravilno sestavili
levo, da se zaskočijo.
brivne enote.
253
Težava Možni vzrok Rešitev
Iz odprtin teče
Ena od odprtin za
Sperite ali namočite brivno enoto. Če s tem težave
majhna količina
balzam je zamašena.
ne odpravite, v vložek nalijte toliko balzama, da ta
balzama, čeprav
začne teči iz zamašene odprtine. Če tudi s tem
ga je v vložku
težave ne odpravite, poskusite naslednje: 1)
dovolj.
Izklopite brivnik 2) Z brivnika odstranite brivno
enoto 3) Na odprtino, ki ni zamašena, postavite
prst 4) Vklopite brivnik 5) Nekaj sekund držite
pritisnjen gumb za balzam, dokler ta ne začne teči
iz zamašene odprtine.
Brivnih glav niste
Brivno glavo brez odprtine za balzam namestite v
namestili nazaj v prave
pravi nosilec. Ta je najbližji gumbu za vklop/izklop,
nosilce. Ena od brivnih
ko je brivna enota nameščena na brivnik.
glav v sredini nima
odprtine za balzam, zato
jo morate namestiti v
pravi nosilec.
Ko pritisnem
Vložek z balzamom za
Ponovno napolnite vložek z balzamom za britje
gumb za balzam,
britje je skoraj prazen.
(oglejte si poglavje “Priprava za uporabo”).
iz odprtin ne
izteče nič
balzama za britje.
Prirezovalnik je v
Ta prirezovalnik ima
Zaradi nove odprte zasnove so premiki
primerjavi z
odprto zasnovo.
prirezovalnika bolj slišni kot pri drugih
drugimi glasnejši.
prirezovalnikih. To je normalno in ne pomeni, da je
s prirezovalnikom kaj narobe.
Aparat mora biti izklopljen.
1 Brivno enoto odstranite z brivnika (Sl. 31).
2 Ležišče obrnite v desno in dvignite z brivne enote (Sl. 32).
Opomba: Hkrati odstranite samo eno brivno glavo. Tako boste brivno glavo zagotovo namestili nazaj v
pravi nosilec, kar je nujno, saj imata dve brivni glavi posebni reži za balzam. Tako tudi ne boste pomešali
rezil in ležišč različnih brivnih glav, kar vpliva na učinkovitost britja.
3 Če je potrebno, rezilo odstranite z ležišča.
4 S priloženo ščetko očistite rezilo in ležišče.
5 Rezilo po čiščenju namestite nazaj v brivno enoto tako, da so vstavki obrnjeni navzgor.
6 Ležišče namestite nazaj na nosilec brivne glave (čez rezilo) (Sl. 33).
7 Ležišče obrnite v levo, da se zaskoči na mesto (Sl. 34).
8 Brivno enoto namestite nazaj na brivnik (“klik”) (Sl. 35).

254
Čestitamo vam na kupovini i dobrodošli u Philips! Da biste imali sve pogodnosti podrške koju pruža
Philips, registrujte svoj proizvod na www.philips.com/welcome.
Pročitajte ovo uputstvo za upotrebu jer sadrži informacije o izvanrednim karakteristikama ovog
aparata za brijanje, kao i savete kako da učinite brijanje lakšim i prijatnijim.
Aparat za brijanje
Zaštitni poklopac
Trimer
Jedinica za brijanje
Patrona sa losionom za brijanje
Dugme za losion za brijanje
Dugme za uključivanje/isključivanje
Indikatori punjenja
Punjač
Baza za dopunu losiona i punjenje
Poklopac baze za dopunu losiona i punjenje
Udubljenje za odlaganje trimera
Zadnja ploča
Utičnica za mali utikač
Indikator ‘Punjenje patrone sa losionom’
Indikator nivoa losiona u bočici
Četka za čišćenje
Bočica sa losionom za brijanje NIVEA FOR MEN
Torbica
Adapter (adapter vašeg aparata možda se razlikuje od adaptera na slici)
Pre upotrebe aparata pažljivo pročitajte ovo uputstvo i sačuvajte ga za buduće potrebe.
- Pazite da se adapter ne pokvasi (adapter ovog aparata možda se razlikuje od onog prikazanog
na slici) (Sl. 2).
- Pazite sa vrućom vodom. Uvek proverite da voda ne bude prevruća da biste izbegli opekotine
na rukama.
- Adapter ima ugrađen transformator. Ne uklanjajte adapter da biste ga zamenili drugim
priključkom, jer se na taj način izlažete opasnosti.
- Ovaj aparat nije namenjen za upotrebu od strane osoba (uključujući i decu) sa smanjenim
zičkim, senzornim ili mentalnim sposobnostima, ili nedostatkom iskustva i znanja, osim pod
nadzorom ili na osnovu instrukcija za upotrebu aparata datih od strane osobe koja odgovara za
njihovu bezbednost.
- Deca moraju da budu pod nadzorom da se ne bi igrala sa aparatom.
- Nikada ne uranjajte bazu za dopunu losiona i punjenje u vodu i ne perite je pod česmom (Sl. 3).
- Nikada ne uranjajte punjač u vodu i ne ispirajte ga ispod slavine (Sl. 4).
- Bazu za dopunu losiona i punjenje i punjač uvek postavite i koristite na površini koja je otporna
na vodu.
- Koristite, punite i odlažite aparat na temperaturi od 5°C do 35°C.
- Uvek stavite zaštitni poklopac na aparat da biste zaštitili glave za brijanje kada putujete.
255
- Aparat za brijanje i ostali dodaci ne smeju da se peru u mašini za pranje posuđa.
- Za ispiranje aparate za brijanje nemojte koristiti vodu topliju od 80°C.
- Koristite samo adapter, punjač i bazu za dopunu losiona i punjenje koji se nalaze u kompletu.
- Nemojte koristiti bazu za dopunu losiona i punjenje ako su sam adapter ili baza oštećeni.
- Nemojte koristiti aparat za brijanje niti punjač ako su oštećeni.
- Ako je adapter oštećen, uvek ga zamenite originalnim da bi se izbegla opasnost.
- Ovaj aparat za brijanje je u skladu sa međunarodno priznatim propisima o bezbednosti i može
se bezbedno koristiti u kadi i pod tušem i prati pod česmom (Sl. 5).
- Ovaj Philips aparat je usklađen sa svim standardima u vezi sa elektromagnetnim poljima (EMF).
Ako se aparatom rukuje na odgovarajući način i u skladu sa uputstvima iz ovog priručnika, aparat
je bezbedan za upotrebu prema naučnim dokazima koji su danas dostupni.
- Adapter za napajanje pretvara 100 - 240 V u bezbedan niski napon manji od 24 V.
1 Uklonite poklopac bočice sa losionom za brijanje NIVEA FOR MEN (Sl. 6).
2 Okrenite poklopac bočice sa losionom za brijanje u smeru kretanja kazaljke na satu
(‘klik’) (Sl. 7).
, Poklopac će se pomeriti nadole i pojaviće se otvor za losion.
3 Da biste izvadili bazu za dopunu losiona i punjenje, poklopac baze okrenite u suprotnom
smeru od kretanja kazaljke na satu.
4 Izvadite bočicu iz baze za dopunu losiona i punjenje.
5 Novu bočicu losiona postavite u bazu tako da otvor bude okrenut nadole (Sl. 8).
6 Vratite poklopac na bazu za dopunu losiona i punjenje (1) i okrenite poklopac u smeru
kretanja kazaljke na satu da biste ga zatvorili (2) (Sl. 9).
7 Uključite mali utikač u utičnicu na bazi za dopunu losiona i punjenje, pa uključite adapter u
zidnu utičnicu (Sl. 10).
8 Aparat za brijanje postavite u bazu za dopunu losiona i punjenje i gurnite ga unazad
(‘klik’) (Sl. 11).
Napomena: Aparat za brijanje se automatski puni i dopunjava losionom za brijanje.
9 Aparat za brijanje punite 90 minuta. (Sl. 12)
Napomena: Aparat za brijanje punite pre prve upotrebe ili kada indikator punjenja pokazuje da je
baterija prazna (pogledajte odeljak ‘Oznake punjenja’).
Napomena: Potpuno napunjen aparat za brijanje ima vreme brijanja od oko 40 minuta.
1 Uključite mali utikač u punjač i uključite adapter u zidnu utičnicu.
2 Stavite aparat za brijanje u punjač (Sl. 13).
, Aparat za brijanje se puni.
3 Aparat za brijanje punite 1,5 sati.
Napomena: Aparat za brijanje punite pre prve upotrebe ili kada indikator punjenja pokazuje da je
baterija prazna (pogledajte odeljak ‘Oznake punjenja’).
Napomena: Potpuno napunjen aparat za brijanje ima vreme brijanja od oko 40 minuta.

256
Patronu sa losionom za brijanje možete dopuniti i bez baze za dopunu losiona i punjenje:
1 Otvor bočice losiona postavite u otvor za punjenje na patroni sa losionom.
2 Pomerite bočicu gore-dole oko 5 puta da biste upumpali losion za brijanje u patronu dok se
patrona ne napuni (Sl. 14).
- Indikatori punjenja pokazuju koliko je baterija puna. Tokom punjenja, donji indikator punjenja
prvo trepće narandžasto, zatim se isključuje. Gornji indikator punjenja zatim počinje da trepće
belo i na kraju neprekidno svetli belo.
- Nakon 9 minuta punjenja aparata, donji indikator punjenja se isključuje, a gornji indikator
punjenja počinje da trepće belo, što znači da aparat za brijanje ima dovoljno energije za jedno
brijanje.
Napomena: Brzo punjenje je moguće samo nakon što se aparat za brijanje već jednom punio 1,5 sati.
- Količina preostale energije u bateriji prikazana je brojem uključenih indikatora. Preostali kapacitet
baterije može se videti nekoliko sekundi nakon uključivanja ili isključivanja aparata za
brijanje (Sl. 15).
- Kada je baterija skoro prazna, donji indikator svetli narandžasto tokom brijanja, a kada se aparat
za brijanje isključi, trepće narandžasto. (Sl. 16)
- Kada je baterija potpuno napunjena, svi indikatori neprekidno svetle belo (Sl. 15).
- Nakon približno 1 sata isključiće se indikatori koji svetle belo da bi se uštedela energija.
, Kada indikator nivoa losiona u bočici trepće narandžasto, moguće je da: (Sl. 17)
- U bazi za dopunu losiona i punjenje nema bočice sa losionom ili bočica nije pravilno postavljena.
- Bočica sa losionom je prazna.
, Indikator ‘Punjenje patrone sa losionom’ može označavati tri različita stanja: (Sl. 18)
- Kada se patrona sa losionom puni, beli indikator ‘Punjenje patrone sa losionom’ trepće.
- Kada je patrona sa losionom puna, beli indikator ‘Punjenje patrone sa losionom’ neprekidno
svetli.
- Ako se tokom punjenja patrone sa losionom bočica sa losionom isprazni, gasi se beli indikator
‘Punjenje patrone sa losionom’ i trepće crveni indikator nivoa losiona u bočici.
Napomena: Vašoj koži će možda biti potrebno 2 ili 3 nedelje da se navikne na novi sistem brijanja.
1 Obavezno proverite da li u patroni sa losionom za brijanje ima dovoljno losiona za brijanje.
2 Pritisnite jednom dugme za uključivanje/isključivanje da biste uključili aparat za brijanje.
257
3 Obavezno proverite da li je aparat za brijanje dovoljno napunjen (pogledajte poglavlje ‘Pre
upotrebe’, odeljak ‘Oznake punjenja’).
4 Kružnim pokretima lagano prelazite jedinicom za brijanje preko kože i pritiskajte dugme za
oslobađanje losiona za brijanje dok na koži bude dovoljno losiona za prijatno brijanje. (Sl. 19)
- Kada otpustite dugme za oslobađanje losiona za brijanje, aparat prestaje da oslobađa losion.
- Ako na kratko pritisnete dugme za oslobađanje losiona za brijanje, aparat automatski nanosi
izvesnu količinu losiona.
- Tokom brijanja ponovo pritisnite dugme za oslobađanje losiona za brijanje da biste naneli još
losiona i omogućili jedinici za brijanje da glatko klizi po koži.
Napomena: Dugme za oslobađanje losiona za brijanje radi samo ako je aparat za brijanje uključen.
Napomena: Ovaj aparat za brijanje se može koristiti slično kao i žileti: aparat za brijanje možete da
koristite na mokroj koži. Za razliku od standardnih električnih aparata za brijanje, ovaj nema komoru u
kojoj se sakupljaju kratke dlake. Da dlake ne bi padale na odeću, tokom brijanja nanesite dovoljno
losiona.
5 Dobro očistite aparat za brijanje nakon svake upotrebe (pogledajte poglavlje „Čišćenje i
održavanje“).
6 Postavite zaštitni poklopac na aparat za brijanje da biste sprečili oštećenja (Sl. 20).
- Kružnim pokretima lagano pomerajte aparat za brijanje po koži.
- Nemojte suviše da pritiskate aparat za brijanje jer tako može doći do iritacije kože.
- Da biste omogućili odgovarajuće klizanje, redovno nanosite losion za brijanje.
- Aparat za brijanje možete koristiti pod tušem i za vreme kupanja.
Napomena: Zbog novog otvorenog dizajna, rad trimera se jače čuje nego kod ostalih trimera. To je
normalno.
1 Povucite jedinicu za brijanje sa aparata (Sl. 21).
2 Izvucite trimer iz udubljenja za odlaganje trimera na bazi za punjenje i postavite ga na aparat
za brijanje (‘klik’) (Sl. 22).
3 Pritisnite jednom dugme za uključivanje/isključivanje da biste uključili aparat za brijanje.
4 Koristite trimer za podrezivanje zulufa i/ili brkova.
5 Dobro očistite trimer nakon svake upotrebe (pogledajte poglavlje „Čišćenje i održavanje“).
6 Skinite trimer i vratite ga na držač trimera.
7 Vratite jedinicu za brijanje na aparat za brijanje (‘klik’) (Sl. 23).
8 Postavite zaštitni poklopac na aparat za brijanje da biste sprečili oštećenja (Sl. 20).
Za čišćenje aparata nemojte koristiti jastučiće za ribanje i abrazivna sredstva za čišćenje niti
agresivne tečnosti kao što su alkohol, benzin ili aceton.
Aparat za brijanje i trimer čistite nakon svake upotrebe.

258
Pazite sa vrućom vodom. Uvek proverite da voda ne bude prevruća da biste izbegli opekotine na
rukama.
Nikad nemojte da brišete jedinicu za brijanje peškirom ili papirnim ubrusom, jer to može da
ošteti glave za brijanje.
Napomena: Aparat za brijanje ne propušta vodu i može da se pere vodom.
1 Pritisnite jednom dugme za uključivanje/isključivanje da biste uključili aparat za brijanje.
Napomena: Aparat za brijanje čistite dok je uključen.
2 Potopite jedinicu za brijanje/trimer u vrelu vodu najmanje 30 sekundi (Sl. 24).
3 Isključite aparat za brijanje i otresite vodu.
4 Postavite zaštitni poklopac na aparat za brijanje da biste sprečili oštećenja (Sl. 20).
Napomena: Ako aparat za brijanje više ne brije dobro, a ne možete da rešite taj problem pomoću načina
čišćenja opisanih u ovom poglavlju, u poglavlju ‘Rešavanje problema’ potražite način za izuzetno temeljno
čišćenje.
1 Svakih šest meseci podmažite zupce trimera jednom kapi ulja za šivaću mašinu.
1 Aparat za brijanje odložite na bazu za dopunu losiona i punjenje.
2 Ako nameravate da putujete ili ne želite da odlažete aparat za brijanje na bazu za dopunu
losiona i punjenje, postavite zaštitni poklopac na aparat i odložite aparat u torbicu (Sl. 20).
Ako nameravate aparat da odložite na duže vreme ili ako nameravate da putujete, možete da
zaključate aparat. Zaključavanje za vreme putovanja sprečava da se aparat slučajno uključi.
1 Proverite da li ste isključili aparat za brijanje.
2 Pritisnite i zadržite dugme za oslobađanje losiona za brijanje (1), a drugom rukom pritisnite
dugme za uključivanje/isključivanje (2) (Sl. 25).
3 Oba dugmeta zadržite 6 sekundi. Sačekajte da se začuje kratko zujanje i da srednji indikator
punjenja na aparatu za brijanje nekoliko puta zatreperi.
, Aktivirano je zaključavanje za vreme putovanja.
Napomena: Ako slučajno prvo pritisnete dugme za uključivanje/isključivanje, aparat za brijanje se
uključuje . Ako se ovo dogodi, ponovo pritisnite dugme za uključivanje/isključivanje da biste isključili aparat
za brijanje.
Napomena: Ako dugme za uključivanje/isključivanje pritisnete kada je aktivirano zaključavanje za vreme
putovanja, srednji indikator punjenja treperi belo, što znači da je aparat za brijanje zaključan.
Savet: Pritisnite dugme za uključivanje/isključivanje da biste proverili da li je aktivirano zaključavanje za
vreme putovanja. Ako je zaključavanje za vreme putovanja aktivirano, aparat za brijanje se neće uključiti.
1 Pritisnite i zadržite dugme za oslobađanje losiona za brijanje (1), a drugom rukom pritisnite
dugme za uključivanje/isključivanje (2) (Sl. 25).
259
2 Oba dugmeta zadržite 6 sekundi. Sačekajte da se začuje kratko zujanje i da srednji indikator
punjenja na aparatu za brijanje nekoliko puta zatreperi.
, Zaključavanje za vreme putovanja je deaktivirano.
Napomena: Zaključavanje za vreme putovanja možete deaktivirati i postavljanjem aparata za brijanje
na punjač.
Ako nameravate da putujete, a ne želite sa sobom da nosite bazu za dopunu losiona i
punjenje, možete poneti punjač da biste po potrebi napunili aparat za brijanje.
Iz higijenskih razloga, savetuje se da se patrona sa losionom za brijanje zameni jednom godišnje.
Nova patrona se nalazi u svakom pakovanju od tri bočice NIVEA FOR MEN losiona te u svakom
zamenskom kompletu (u kojem se nalazi nova HS85 jedinica za brijanje i nova patrona).
1 Izvadite patronu sa losionom za brijanje iz aparata za brijanje (Sl. 26).
2 Umetnite ušicu pri vrhu nove patrone sa losionom za brijanje u prorez na rubu aparata za
brijanje (1). Zatim palcem pritisnite donji deo patrone (2) da biste pričvrstili
patronu za aparat za brijanje (‘klik’) (Sl. 27).
3 Punjenje patrone sa losionom za brijanje (pogledajte poglavlje ‘Početak rada’).
Jedinicu za brijanje zamenite na godinu dana da biste dobili optimalne rezultate brijanja.
Jedinicu za brijanje možete zameniti samo HS85 Philips jedinicom za brijanje.
1 Povucite staru jedinicu za brijanje sa aparata (Sl. 21).
2 Postavite novu jedinicu za brijanje na aparat za brijanje (‘klik’) (Sl. 23).
Koristite samo bočice losiona za brijanje NIVEA FOR MEN.
1 Uklonite poklopac bočice sa losionom za brijanje NIVEA FOR MEN (Sl. 6).
2 Okrenite poklopac bočice sa losionom za brijanje u smeru kretanja kazaljke na satu
(‘klik’) (Sl. 7).
, Poklopac će se pomeriti nadole i pojaviće se otvor za losion.
3 Da biste izvadili bazu za dopunu losiona i punjenje, poklopac baze okrenite u suprotnom
smeru od kretanja kazaljke na satu.
4 Novu bočicu losiona postavite u bazu tako da otvor bude okrenut nadole (Sl. 8).
5 Gurnite poklopac unazad na bazi za dopunu losiona i punjenje (1) i okrenite ga u smeru
kretanja kazaljke na satu (2) da biste ga pričvrstili (Sl. 9).
- Aparat koji se više ne može upotrebljavati nemojte da odlažete u kućni otpad, već ga predajte
na zvaničnom mestu prikupljanja za reciklažu. Tako ćete doprineti zaštiti okoline (Sl. 28).
- Ugrađena punjiva baterija sadrži supstancije koje mogu da zagade okolinu. Uvek uklonite bateriju
pre nego što bacite aparat i predate ga na službenom odlagalištu. Baterije odlažite na službenom
mestu za odlaganje baterija. Ako imate problema sa uklanjanjem baterije, aparat možete da
260
odnesete u Philips servisni centar. Osoblje centra će ukloniti bateriju i odložiti je tako da ne
zagađuje okolinu.
Bateriju uklanjajte samo pre odlaganja uređaja na otpad. Pazite da baterija bude potpuno prazna
pri uklanjanju.
Budite oprezni, strane baterije su vrlo oštre.
1 Izvadite patronu sa losionom za brijanje iz aparata za brijanje (Sl. 26).
2 Odvrnite tri zavrtnja sa zadnje strane aparata (Sl. 29).
3 Odvijačem uklonite zadnju ploču kućišta (Sl. 30).
4 Presecite žice i izvadite punjivu bateriju.
Ukoliko vam je potreban servis, informacije ili imate neki problem, posetite Web lokaciju kompanije
Philips na adresi www.philips.com/support ili se obratite centru za korisničku podršku kompanije
Philips u svojoj zemlji (broj telefona ćete pronaći u međunarodnom garantnom listu). Ako u vašoj
zemlji ne postoji predstavništvo, obratite se ovlašćenom prodavcu Philips proizvoda.
Jedinica za brijanje (rezači i štitnici) nisu obuhvaćene uslovima međunarodne garancije jer su
podložne habanju.
Patrona sa regeneratorom je element koji se redovito zamenjuje i nije pokrivena internacionalnom
garancijom.

261
Ovo poglavlje sumira najčešće probleme sa kojima se možete sresti prilikom upotrebe
aparata. Ukoliko niste u mogućnosti da rešite određeni problem pomoću sledećih informacija,
kontaktirajte Centar za brigu o potrošačima u vašoj zemlji.
Problem Mogući uzrok Rešenje
Aparat za
Niste naneli dovoljno
Pritisnite dugme za oslobađanje losiona za brijanje
brijanje ne klizi
losiona za brijanje.
dok se ne oslobodi dovoljna količina losiona za
glatko preko
brijanje NIVEA FOR MEN. Tako će jedinica za brijanje
kože.
ponovo glatko da klizi po koži.
Aparat ne brije
Niste dobro očistili
Dobro očistite aparat za brijanje (pogledajte poglavlje
dobro kao ranije.
aparat za brijanje.
‘Čišćenje i održavanje’).
Duge dlake smetaju
Očistite glave za brijanje prateći korake metoda za
glavama za brijanje.
izuzetno temeljno čišćenje koji je opisan u nastavku
teksta.
Jedinica za brijanje je
Zamenite jedinicu za brijanje (pogledajte poglavlje
oštećena ili pohabana.
‘Zamena delova’).
Aparat se
Punjiva baterija je
Napunite bateriju (pogledajte poglavlje “Pre
ne uključuje kada
prazna.
upotrebe”).
pritisnem dugme
za uključivanje/
isključivanje.
Aktivirano je
Deaktivirajte zaključavanje za vreme putovanja
zaključavanje za
(pogledajte poglavlje „Odlaganje“).
vreme putovanja.
Sasušen losion za
Temeljno očistite aparat pre nego nastavite sa
brijanje blokira glave
brijanjem (pogledajte odeljak “Čišćenje”).
za brijanje jedinice za
brijanje.
Niste dobro sastavili
Kada ponovo sastavljate jedinicu za brijanje, obavezno
jedinicu za brijanje
svaki štitnik okrenite u smeru suprotnom od kretanja
nakon temeljnog
kazaljke na satu dok ne dođe u pravi položaj.
čišćenja.
Losion za brijanje
Jedan otvor
Isperite ili potopite jedinicu za brijanje u vodu. Ako
slabo izlazi kroz
je začepljen.
time niste rešili problem, upumpavajte losion za
otvore čak i kada
brijanje u patronu sa losionom za brijanje sve dok
ima dovoljno
losion ne počne da izlazi iz začepljenog otvora. Ako ni
losiona u patroni.
time niste rešili problem, pokušajte nešto od
navedenog: 1) Isključite aparat za brijanje 2) Skinite
jedinicu za brijanje sa aparata za brijanje 3) Stavite
prst na otvor koji nije začepljen 4) Uključite aparat za
brijanje 5) Pritisnite dugme za otpuštanje losiona za
brijanje na nekoliko sekundi sve dok losion ponovo
ne počne da izlazi iz začepljenog otvora.
262
Problem Mogući uzrok Rešenje
Niste vratili glave za
Obavezno stavite glavu za brijanje koja nema otvor za
brijanje u njihove
losion u odgovarajući držač. To je onaj držač koji je
držače. Jedna glava za
najbliži dugmetu za uključivanje/isključivanje kada se
brijanje nema otvor
jedinica za brijanje postavi na aparat za brijanje.
za ispuštanje losiona
za brijanje u sredini i
mora se postaviti u
tačno određeni držač.
Iz otvora ne izlazi
Patrona sa losionom
Napunite patronu sa losionom za brijanje (pogledajte
losion za brijanje
za brijanje je skoro
poglavlje “Pre upotrebe”).
kad pritisnem
prazna.
dugme za
oslobađanje
losiona za
brijanje.
Trimer je glasniji
Ovo je trimer
Zbog novog otvorenog dizajna, rad trimera se jače
od drugih
otvorenog dizajna.
čuje nego što je to slučaj sa drugim trimerima. To je
trimera.
normalno i ne znači da nešto nije u redu sa trimerom.
Proverite da li ste isključili aparat.
1 Povucite jedinicu za brijanje sa aparata (Sl. 31).
2 Okrenite štitnik u smeru kretanja kazaljke na satu i podignite ga sa jedinice za brijanje (Sl. 32).
Napomena: Uklanjajte jednu po jednu glavu za brijanje. Time se omogućava vraćanje glava za brijanje na
tačno određeni držač što je neophodno zato što dve glave za brijanje imaju posebne otvore za ispuštanje
losiona za brijanje. Time se takođe obezbeđuje da se ne pomešaju rezači i štitnici za određenu glavu za
brijanje što utiče na rad aparata za brijanje.
3 Ako je potrebno, izvadite rezač iz štitnika.
4 Rezač i štitnik čistite četkom koja se nalazi u kompletu.
5 Nakon čišćenja, vratite rezač u jedinicu za brijanje tako da nogari rezača budu
okrenuti nagore.
6 Vratite štitnik na držač glave za brijanje (preko rezača) (Sl. 33).
7 Okrećite štitnik u smeru suprotnom od kretanja kazaljke na satu sve dok ne legne na
mesto (Sl. 34).
8 Vratite jedinicu za brijanje na aparat za brijanje (‘klik’) (Sl. 35).

263
Grattis till inköpet och välkommen till Philips! För att dra maximal nytta av den support som Philips
erbjuder kan du registrera din produkt på www.philips.com/welcome.
Läs den här användarhandboken, som innehåller information om rakapparatens fantastiska funktioner
samt några tips som gör det enklare och behagligare att raka sig.
Rakapparat
Skyddskåpa
Trimsaxen
Skärhuvud
Raklotionspatron
Raklotionsknapp
På/av-knapp
Laddningslampor
Laddare
Påfyllnings- och laddningsstation
Lock till påfyllnings- och laddningsstationen
Fördjupning för förvaring av trimsax
Bakpanel
Anslutning för liten kontakt
Indikatorlampa för påfyllning av raklotion
Lampa för raklotionsaska
Rengöringsborste
Flaska med NIVEA FOR MEN-raklotion
Fodral
Adapter (den aktuella adaptern kan skilja sig något från den som visas på bilden)
Läs användarhandboken noggrant innan du använder apparaten och spara den för framtida bruk.
- Se till att adaptern aldrig blir blöt (den aktuella adaptern kan skilja sig något från den som visas
på bilden) (Bild 2).
- Var försiktig med varmt vatten. Kontrollera alltid att vattnet inte är för varmt så att du inte
bränner händerna.
- Adaptern innehåller en transformator. Byt inte ut adaptern mot någon annan typ av kontakt,
eftersom fara då kan uppstå.
- Apparaten är inte avsedd för användning av personer (inklusive barn) med olika funktionshinder,
eller av personer som inte har kunskap om hur apparaten används, om de inte övervakas eller
får instruktioner angående användning av apparaten av en person som är ansvarig för deras
säkerhet.
- Små barn ska övervakas så att de inte kan leka med apparaten.
- Sänk aldrig ned påfyllnings- och laddningsstationen i vatten och skölj den inte under
kranen (Bild 3).
- Sänk aldrig ned laddaren i vatten och skölj den inte under kranen (Bild 4).
- Placera och använd alltid påfyllnings- och laddningsstationen och laddaren på en vätsketålig yta.
- Använd, ladda och förvara enheterna vid en temperatur på mellan 5 °C och 35 °C.
- Sätt på skyddskåpan på rakapparaten för att skydda rakhuvudena när du reser.
264
- Rakapparaten och de övriga tillbehören kan inte diskas i diskmaskin.
- Använd aldrig vatten som är varmare än 80 °C när du sköljer rakapparaten.
- Använd endast den medföljande adaptern, laddaren och påfyllnings- och laddningsstationen.
- Använd inte påfyllnings- och laddningsstationen om adaptern eller själva stationen är skadad.
- Använd inte rakapparaten eller laddaren om de är skadade.
- Om adaptern är skadad ska den alltid ersättas med en av originaltyp för att farliga situationer
inte ska uppstå.
- Den här rakapparaten uppfyller internationellt godkända säkerhetsföreskrifter och kan användas
säkert i badet eller duschen och rengöras under vattenkranen (Bild 5).
- Den här apparaten från Philips uppfyller alla standarder för elektromagnetiska fält (EMF). Om
apparaten hanteras på rätt sätt och enligt instruktionerna i den här användarhandboken är den
säker att använda enligt de vetenskapliga belägg som nns i dagsläget.
- Adaptern omvandlar 100–240 V till en säker låg spänning på under 24 V.
1 Ta bort iken till askan med NIVEA FOR MEN-raklotion (Bild 6).
2 Vrid locket till askan med raklotion medurs (ett klickljud hörs) (Bild 7).
, Locket trycks nedåt och lotionsmunstycket kommer fram.
3 Lossa locket till påfyllnings- och laddningsstationen genom att vrida det moturs.
4 Ta bort paketeringsmaterialet från dockningsutrymmet för askan i påfyllnings- och
laddningsstationen.
5 Placera lotionsaskan i dockningsutrymmet med munstycket riktat nedåt (Bild 8).
6 Sätt tillbaka locket på påfyllnings- och laddningsstationen (1) och skruva fast det medurs
(2) (Bild 9).
7 Sätt i den lilla kontakten i uttaget på påfyllnings- och laddningsstationen och anslut adaptern
till ett vägguttag (Bild 10).
8 Placera rakapparaten i påfyllnings- och laddningsstationen och skjut den bakåt (ett klickljud
hörs) (Bild 11).
Obs! Rakapparaten laddas och fylls med raklotion automatiskt.
9 Ladda rakapparaten i 90 minuter. (Bild 12)
Obs! Ladda rakapparaten innan du använder den första gången eller när laddningslampan anger att
batteriet är urladdat (mer information nns i avsnittet Laddningsindikering).
Obs! En fulladdad rakapparat har en rakningstid på upp till 40 minuter.
1 Sätt in den lilla kontakten i laddaren och anslut adaptern till ett vägguttag.
2 Placera rakapparaten i laddaren (Bild 13).
, Rakapparaten laddas.
3 Ladda rakapparaten i 1,5 timme.
Obs! Ladda rakapparaten innan du använder den första gången eller när laddningslampan anger att
batteriet är urladdat (mer information nns i avsnittet Laddningsindikering).
Obs! En fulladdad rakapparat har en rakningstid på upp till 40 minuter.
265
Du kan även fylla på raklotionspatronen utan att använda påfyllnings- och laddningsstationen:
1 Placera munstycket till lotionsaskan i påfyllningsöppningen till lotionspatronen.
2 Rör askan upp och ned (cirka fem gånger) för att pumpa raklotion till patronen. Du kan
pumpa tills du ser att patronen är full (Bild 14).
- Laddningslamporna anger till vilken nivå batteriet har laddats. Under laddning blinkar den nedre
laddningslampan först orange och släcks sedan. Den övre laddningslampan börjar sedan blinka
med vitt sken och lyser sedan vitt.
- När rakapparaten har laddats i nio minuter släcks den nedre laddningslampan och den övre
laddningslampan börjar blinka vitt för att visa att rakapparaten är tillräckligt laddad för en rakning.
Obs! Snabbladdning är möjlig endast när du redan har laddat rakapparaten i 1,5 timme en gång
tidigare.
- Återstående batterikapacitet visas av antalet tända laddningslampor. Den återstående
batterikapaciteten visas i några sekunder när du slår på eller stänger av rakapparaten (Bild 15).
- När batteriet börjar bli urladdat lyser den nedre laddningslampan orange under rakningen och
blinkar orange när du stänger av rakapparaten. (Bild 16)
- När batteriet är fulladdat lyser alla laddningslampor med vitt sken (Bild 15).
- Efter cirka en timme slocknar de vita laddningslamporna för att spara energi.
, När lampan för raklotionsaskan blinkar orange gäller något av följande två
alternativ: (Bild 17)
- Det nns ingen lotionsaska i påfyllnings- och laddningsstationen eller så har askan inte
placerats på rätt sätt i stationen.
- Lotionsaskan är tom.
, Indikatorlampan för påfyllning av raklotion anger tre olika saker: (Bild 18)
- När lotionspatronen fylls på blinkar den vita indikatorlampan för påfyllning av raklotion.
- När raklotionspatronen är full lyser indikatorlampan för påfyllning av raklotion med ett fast vitt
sken.
- Om lotionsaskan töms medan lotionspatronen fylls på släcks den vita indikatorlampan för
påfyllning av raklotion och lamporna för lotionsaskan börjar blinkar rött.
Obs! Huden kan behöva två till tre veckor för att vänja sig vid en ny rakmetod.
1 Se till att det nns tillräckligt med raklotion i raklotionspatronen.
2 Slå på rakapparaten genom att trycka på på/av-knappen.

266
3 Se till att rakapparaten är tillräckligt laddad (se kapitlet Förberedelser inför användning,
avsnittet Laddningsindikering).
4 Rör skärhuvudet försiktigt i cirklar över huden och tryck på raklotionsknappen för att
applicera tillräckligt med raklotion på huden för att rakningen ska kännas behaglig. (Bild 19)
- När du släpper raklotionsknappen avbryts appliceringen av raklotion.
- Om du trycker kort på raklotionsknappen appliceras en viss mängd lotion automatiskt.
- Tryck på raklotionsknappen en gång till om du vill applicera mer raklotion under rakningen för
att se till att skärhuvudet glider mjukt över huden.
Obs! Raklotionsknappen fungerar bara när rakapparaten är påslagen.
Obs! Den här rakapparaten kan användas ungefär som ett rakblad; du kan använda den när ansiktet är
blött. Till skillnad från en vanlig elektrisk rakapparat har den här apparaten ingen hårbehållare där strån
samlas. Förhindra att du får hår på kläderna genom att applicera tillräckligt med raklotion medan du
rakar dig.
5 Rengör rakapparaten noggrant efter varje användning (se kapitlet Rengöring och underhåll).
6 Sätt på skyddskåpan på rakapparaten så undviker du att den skadas (Bild 20).
- Rör rakapparaten försiktigt i cirklar över huden.
- Tryck inte rakapparaten för hårt mot huden eftersom det kan leda till hudirritation.
- Se till att rakapparaten glider mjukt över huden genom att applicera ett jämnt lager med
raklotion.
- Du kan även använda rakapparaten i badet eller duschen.
Obs! På grund av den nya öppna designen kan du höra hur trimsaxen arbetar tydligare än med andra
rakapparater. Det är normalt.
1 Dra loss skärhuvudet från rakapparaten (Bild 21).
2 Ta ut trimsaxen från trimsaxhållaren på laddaren och placera den på rakapparaten (ett
klickljud hörs) (Bild 22).
3 Slå på rakapparaten genom att trycka på på/av-knappen.
4 Du kan ansa polisonger och mustasch med trimsaxen.
5 Rengör trimmern noggrant efter användning (se kapitlet Rengöring och underhåll).
6 Ta bort trimsaxen och sätt tillbaka den i trimsaxhållaren.
7 Sätt tillbaka skärhuvudet på rakapparaten (ett klickljud hörs) (Bild 23).
8 Sätt på skyddskåpan på rakapparaten så undviker du att den skadas (Bild 20).
Använd aldrig skursvampar, slipande rengöringsmedel eller vätskor som alkohol, bensin eller
aceton till att rengöra enheten.
Rengör rakapparaten och trimsaxen efter varje användning.
Var försiktig med varmt vatten. Kontrollera alltid att vattnet inte är för varmt så att du inte
bränner händerna.

267
Torka aldrig skärhuvudet med handduk eller papper, eftersom det kan skada rakhuvudena.
Obs! Rakapparaten är vattentät och kan rengöras med vatten.
1 Slå på rakapparaten genom att trycka på på/av-knappen.
Obs! Rengör rakapparaten när den är påslagen.
2 Håll skärhuvudet/trimsaxen under varmt vatten i minst 30 sekunder (Bild 24).
3 Stäng av rakapparaten och skaka av det vatten som nns kvar.
4 Sätt på skyddskåpan på rakapparaten så undviker du att den skadas (Bild 20).
Obs! Om rakapparaten inte fungerar lika bra som tidigare och du inte kan lösa problemet med hjälp av
rengöringsmetoderna som beskrivs i det här kapitlet kan du läsa om extra grundlig rengöring i kapitlet
Felsökning.
1 Smörj trimsaxens tänder med en droppe symaskinsolja var sjätte månad.
1 Förvara rakapparaten i påfyllnings- och laddningsstationen.
2 Om du benner dig på resande fot eller inte vill förvara rakapparaten i påfyllnings- och
laddningsstationen använder du skyddslocket till rakapparaten och förvarar rakapparaten i
fodralet (Bild 20).
Om du ska förvara rakapparaten under längre tid eller om du ska resa kan det vara en god idé att
låsa rakapparaten. Reselåset förhindrar att rakapparaten startas av misstag.
1 Kontrollera att rakapparaten är avstängd.
2 Håll ned knappen för raklotion (1) och tryck samtidigt in på/av-knappen med den andra
handen (2) (Bild 25).
3 Håll båda knapparna intryckta i 6 sekunder. Vänta tills ett kort surrande ljud hörs och den
mellersta laddningslampan på rakapparaten blinkar några gånger.
, Reselåset är nu aktiverat.
Obs! Om du trycker på på/av-knappen först av misstag startar rakapparaten. I så fall kan du stänga av
rakapparaten genom att trycka på på/av-knappen igen.
Obs! Om du trycker på på/av-knappen när reselåset är aktiverat blinkar den mellersta laddningslampan
vitt för att visa att rakapparaten är låst.
Tips: Tryck på på/av-knappen om du vill kontrollera om reselåset är aktiverat. Om reselåset är aktiverat
startar inte rakapparaten.
1 Håll ned knappen för raklotion (1) och tryck samtidigt in på/av-knappen med den andra
handen (2) (Bild 25).
2 Håll båda knapparna intryckta i 6 sekunder. Vänta tills ett kort surrande ljud hörs och den
mellersta laddningslampan på rakapparaten blinkar några gånger.
, Reselåset är nu avaktiverat.
268
Obs! Du kan även avaktivera reselåset genom att sätta tillbaka rakapparaten i laddaren.
Om du ska resa och inte vill ta med dig påfyllnings- och laddningsstationen kan du bara ta med dig
laddaren så att du kan ladda rakapparaten när det behövs.
Av hygieniska skäl rekommenderar vi att du byter ut raklotionspatronen en gång om året. En ny
patron levereras med varje trepack askor med NIVEA FOR MEN-raklotion och med utbytessatsen
(som innehåller ett nytt HS85-skärhuvud och en ny patron).
1 Ta bort raklotionspatronen från rakapparaten (Bild 26).
2 För in iken längst upp på den nya raklotionspatronen i spåret på kanten på rakapparaten (1).
Tryck sedan fast patronen genom att trycka på den nedre delen av patronen med tummen
(2) (ett klickljud hörs) (Bild 27).
3 Fyll raklotionspatronen (mer information nns i kapitlet Så här gör du).
Byt ut skärhuvudet en gång om året för att se till att du alltid får bästa möjliga rakresultat.
Byt inte ut skärhuvudet mot någon annan typ av skärhuvud än HS85 Philips-skärhuvud.
1 Dra loss det gamla skärhuvudet från rakapparaten (Bild 21).
2 Placera det nya skärhuvudet på rakapparaten (ett klickljud hörs) (Bild 23).
Använd endast askor med NIVEA FOR MEN-raklotion.
1 Ta bort iken till askan med NIVEA FOR MEN-raklotion (Bild 6).
2 Vrid locket till askan med raklotion medurs (ett klickljud hörs) (Bild 7).
, Locket trycks nedåt och lotionsmunstycket kommer fram.
3 Lossa locket till påfyllnings- och laddningsstationen genom att vrida det moturs.
4 Placera lotionsaskan i dockningsutrymmet för askan med munstycket riktat nedåt (Bild 8).
5 Skjut tillbaka locket på påfyllnings- och laddningsstationen (1) och skruva fast det medurs
(2) (Bild 9).
- Kasta inte apparaten i hushållssoporna när den är förbrukad. Lämna in den för återvinning vid en
ofciell återvinningsstation, så hjälper du till att skydda miljön (Bild 28).
- Det inbyggda laddningsbara batteriet innehåller ämnen som kan vara skadliga för miljön. Ta alltid
ur batteriet innan du kasserar apparaten och lämnar in den vid en ofciell återvinningsstation.
Lämna batteriet vid en ofciell återvinningsstation för batterier. Om du har problem med att få
ur batteriet kan du också ta med apparaten till ett Philips-serviceombud. Personalen där kan
hjälpa dig att ta ur batteriet och kassera det på ett miljövänligt sätt.
Ta endast ur det laddningsbara batteriet när du ska slänga rakapparaten. Se till att batteriet är
helt urladdat när du tar ur det.

269
Var försiktig, batteriskenorna är vassa.
1 Ta bort raklotionspatronen från rakapparaten (Bild 26).
2 Lossa skruvarna på rakapparatens baksida (Bild 29).
3 Ta bort höljets baksida med hjälp av en skruvmejsel (Bild 30).
4 Klipp av trådarna och ta bort det laddningsbara batteriet.
Om du behöver service eller information eller har problem med apparaten kan du besöka Philips
webbplats på www.philips.com/supporteller kontakta Philips kundtjänst i ditt land (du hittar
telefonnumret i garantibroschyren). Om det inte nns någon kundtjänst i ditt land vänder du dig till
din lokala Philips-återförsäljare.
Skärhuvudet (knivar och skydd) omfattas inte av de internationella garantivillkoren eftersom det
utsätts för slitage.
Raklotionspatronen är en engångsenhet och täcks inte av villkoren i den internationella garantin.

270
I det här kapitlet nns en översikt över de vanligaste problemen som kan uppstå med apparaten.
Om du inte kan lösa problemet med hjälp av nedanstående information kan du kontakta kundtjänst i
ditt land.
Problem Möjlig orsak Lösning
Rakapparaten glider
Du har inte använt
Tryck på raklotionsknappen tills en tillräcklig
inte mjukt över
tillräckligt mycket
mängd NIVEA FOR MEN-raklotion har applicerats
huden.
raklotion.
på huden. Skärhuvudet kommer nu att glida mjukt
över huden igen.
Rakapparaten
Du har inte rengjort
Rengör rakapparaten noggrant (se kapitlet
fungerar inte lika bra
rakapparaten
Rengöring och underhåll).
som den gjorde
ordentligt.
tidigare.
Långa hårstrån sitter
Rengör rakhuvudena genom att följa stegen i det
fast i rakhuvudena.
extra grundliga rengöringsprogrammet som
beskrivs nedan.
Skärhuvudet är skadat
Byt ut skärhuvudet (se kapitlet Byten).
eller utslitet.
Rakapparaten slås
Det laddningsbara
Ladda batteriet (se kapitlet Förberedelser inför
inte på när jag
batteriet är urladdat.
användning).
trycker på på/av-
knappen.
Reselåset är aktiverat. Avaktivera reselåset (se kapitlet Förvaring).
Torkad raklotion
Rengör rakapparaten ordentligt innan du
blockerar
fortsätter rakningen (se kapitlet Rengöring).
rakhuvudena i
skärhuvudet.
Du har inte satt ihop
När du sätter ihop skärhuvudet ser du till att vrida
skärhuvudet ordentligt
skydden moturs tills de låses på plats.
efter att ha utfört en
extra grundlig
rengöring.
Bara lite raklotion
En av
Skölj eller blötlägg skärhuvudet. Om det inte
kommer ut ur
lotionsöppningarna är
fungerar pumpar du raklotion in i
öppningarna trots
tilltäppt.
raklotionspatronen tills raklotion kommer ut ur
att det nns
den blockerade öppningen. Om inte det heller
tillräckligt med
fungerar försöker du med följande metod: 1) Slå
raklotion i patronen.
av rakapparaten 2) Ta bort skärhuvudet från
rakapparaten 3) Sätt ngret över den öppning
som inte är blockerad 4) Slå på rakapparaten 5)
Tryck på raklotionsknappen i några sekunder tills
raklotion kommer ut ur den blockerade
öppningen igen.
271
Problem Möjlig orsak Lösning
Du har inte satt
Se till att du sätter rakhuvudet utan lotionsöppning
tillbaka rakhuvudena i
i rätt hållare. Det är den hållare som sitter närmast
de ursprungliga
på/av-knappen när skärhuvudet är fastsatt på
hållarna. Ett av
rakapparaten.
rakhuvudena har
ingen
raklotionsöppning i
mitten och måste
placeras i en särskild
hållare.
Det kommer inte ut
Raklotionspatronen är
Fyll raklotionspatronen (se kapitlet Förberedelser
någon raklotion ur
nästan tom.
inför användning).
hålen när jag trycker
på
raklotionsknappen.
Trimmern låter
Den här trimmern har
På grund av den nya öppna designen kan du höra
högre än andra
en öppen design.
hur trimsaxen arbetar tydligare än med andra
trimsaxar.
rakapparater. Det är normalt och innebär inte att
det uppstått något fel med trimsaxen.
Kontrollera att apparaten är avstängd.
1 Dra loss skärhuvudet från rakapparaten (Bild 31).
2 Vrid skyddet medurs och lyft av det från skärhuvudet (Bild 32).
Obs! Ta bort ett rakhuvud i taget. På så sätt ser du till att du alltid sätter tillbaka rakhuvudet i
originalhållaren, vilket är nödvändigt eftersom två av rakhuvudena har särskilda öppningar för
raklotionen. Dessutom blandar du inte ihop knivarna och skydden till olika rakhuvuden, vilket skulle
påverka rakningsresultatet.
3 Ta bort kniven från skyddet om det behövs.
4 Rengör kniven och skyddet med den medföljande borsten.
5 Efter rengöringen sätter du tillbaka kniven i skärhuvudet med skärdelen riktad uppåt.
6 Sätt tillbaka skyddet på rakhuvudshållaren (över kniven) (Bild 33).
7 Vrid skyddet moturs tills det låses på plats (Bild 34).
8 Sätt tillbaka skärhuvudet på rakapparaten (ett klickljud hörs) (Bild 35).

272
ภาษาไทย
บทนำา
ขอแสดงความยินดีที่คุณสั่งซื้อและยินดีตอนรับสผลิตภัณฑของ Philips! เพื่อใหคุณไดรับประโยชนอยางเต็มที่จากบริการที่ Philips มอบให โปรดลงทะเบียนผลิตภัณฑของ
คุณที่ www.philips.com/welcome
โปรดอานคมือการใชเลมนี้เนื่องจากมีเนื้อหาเกี่ยวกับคุณสมบัติที่ดีเยี่ยมของเครื่องโกนหนวดนี้ รวมทั้งคำาแนะนำาที่จะชวยใหการโกนหนวดของคุณเปนไปอยางงายดายและเ
พลิดเพลินมากยิ่งขึ้น
สวนประกอบ (รูปที่ 1)
A เครื่องโกนหนวด
1 ฝาครอบปองกัน
2 ที่กันจอน
3 ชุดหัวโกน
4 ตลับครีมโกนหนวด
5 ปุ่มครีมโกนหนวด
6 ปุ่มเปด/ปด
7 สัญญาณไฟแสดงการชารจแบตเตอรี่
B แทนชารจแบตเตอรี่
C แทนชารจและที่เติมครีมโกนหนวด
1 ฝาปดแทนชารจและที่เติมครีมโกนหนวด
2 สวนเวาสำาหรับเก็บที่กันจอน
3 แผงดานหลัง
4 ชองสำาหรับปลั๊กขนาดเล็ก
5 สัญญาณไฟ ‘Filling conditioner cartridge’
6 สัญญาณไฟขวดครีมโกนหนวด
D แปรงสำาหรับทำาความสะอาด
E ขวดครีมโกนหนวด NIVEA FOR MEN
F กระเปา
G อะแดปเตอร (อะแเดปเตอรของคุณอาจแตกตางจากภาพที่แสดง)
ขอควรจำา
ควรอานคมืออยางละเอียดกอนใชงานและเก็บไวเพื่อใชอางอิงในครั้งตอไป
อันตราย
- โปรดตรวจดูใหแนใจวาอะแดปเตอรไมเปยกชื้น (อะแเดปเตอรของคุณอาจแตกตางจากภาพที่แสดง) (รูปที่ 2)
คำาเตือน
- ไมควรใชนรอนเกินไปทำาความสะอาดเครื่องโกนหนวด เพื่อปองกันไมใหมือพุพอง
- ภายในอะแดปเตอรประกอบดวยตัวแปลงไฟ ดังนั้นไมควรทุบทำาลายหรือนำาไปใชแทนปลั๊กอื่นๆ เพราะอาจกอใหเกิดอันตรายได
- ไมควรใหบุคคล (รวมทั้งเด็กเล็ก) ที่มีสภาพรางกายไมแข็งแรงหรือสภาพจิตใจไมปกติ หรือขาดประสบการณและความรความเขาใจ นำาผลิตภัณฑนี้ไปใชงาน
เวนแตจะอยในการควบคุมดูแลหรือไดรับคำาแนะนำาในการใชงานโดยผที่รับผิดชอบในดานความปลอดภัย
- เด็กเล็กควรไดรับการดูแลเพื่อปองกันไมใหเด็กนำาผลิตภัณฑนี้ไปเลน
ขอควรระวัง
- หามจมแทนชารจและที่เติมครีมโกนหนวดลงในน หรือนำาไปลางใตกอกน (รูปที่ 3)
- หามจมที่ชารจแบตเตอรี่ลงในน หรือนำาไปลางใตกอกน (รูปที่ 4)
- วางและใชแทนชารจและที่เติมครีมโกนหนวดและที่ชารจแบตเตอรี่บนพื้นผิวที่ทนตอของเหลวเสมอ
- ใชงาน ชารจไฟ และจัดเก็บเครื่องโกนหนวดที่อุณหภูมิระหวาง 5°C และ 35°C
- ปดฝาครอบเครื่องโกนหนวดทุกครั้งเพื่อปกปองหัวโกนขณะที่คุณพกพา
- เครื่องโกนหนวด และอุปกรณเสริมอื่น ๆ ไมสามารถใชกับเครื่องลางจานได
- หามใชนที่มีอุณหภูมิเกิน 80°C ลางเครื่องโกนหนวด
- ใชอะแดปเตอร, ที่ชารจแบตเตอรี่ และแทนชารจและที่เติมครีมโกนหนวดเฉพาะที่ใหมาเทานั้น
- หามใชแทนชารจและที่เติมครีมโกนหนวด หากอะแดปเตอรหรือตัวแทนชารจชำารุดเสียหาย
- หามใชเครื่องโกนหนวดหรือที่ชารจแบตเตอรี่ที่ชำารุดเสียหาย
- ในกรณีที่อะแดปเตอรเกิดความชำารุดเสียหาย คุณตองดำาเนินการเปลี่ยนอะแดปเตอรเปนชนิดเดียวกับอะแดปเตอรเดิมเสมอ เพื่อปองกันการเกิดอันตราย
ภาษาไทย 273
ความสอดคลองกับมาตรฐาน
- เครื่องโกนหนวดนี้ไดมาตรฐานตามขอกำาหนดความปลอดภัยที่ไดรับการรับรองในระดับสากล และสามารถใชงานในอางอาบนหรือฝกบัว และลางทำาความสะอาด
ใตกอกนไดอยางปลอดภัย (รูปที่ 5)
- ผลิตภัณฑของฟลิปสไดมาตรฐานดานคลื่นแมเหล็กไฟฟา (EMF) หากมีการใชงานอยางเหมาะสมและสอดคลองกับคำาแนะนำาในคมือนี้ คุณสามา
รถใชผลิตภัณฑไดอยางปลอดภัยตามขอพิสูจนทางวิทยาศาสตรในปจจุบัน
ทั่วไป
- อะแดปเตอรสามารถแปลงแรงดันไฟฟาขนาด 100-240 โวลตเปนแรงดันไฟตกวา 24 โวลตได
การเตรียมตัวกอนใชงาน
1 ถอดตัวล็อคขวดครีมโกนหนวด NIVEA FOR MEN ออก (รูปที่ 6)
2 หมุนฝาขวดครีมโกนหนวดตามเข็มนาฬิกา (เสียงดัง ‘คลิก’) (รูปที่ 7)
, ฝาขวดจะเลื่อนลงและมองเห็นหัวฉีดครีม
3 หมุนฝาปดแทนชารจและที่เติมครีมโกนหนวดทวนเข็มนาฬิกาเพื่อถอดฝาออก
4 นำาบรรจุภัณฑออกจากชองใสขวดของแทนชารจและที่เติมครีมโกนหนวด
5 ใสขวดครีมโกนหนวดลงในชองใสขวด โดยหันหัวฉีดครีมไปทางดานหนา (รูปที่ 8)
6 ใสฝาปดแทนชารจและที่เติมครีมโกนหนวดกลับเขาที่ (1) แลวหมุนฝาตามเข็มนาฬิกาจนแนน (2) (รูปที่ 9)
7 เสียบปลั๊กขนาดเล็กเขาที่ชองเสียบของแทนชารจและที่เติมครีมโกนหนวด และเสียบอะแดปเตอรเขากับเตารับบนผนัง (รูปที่ 10)
8 เสียบเครื่องโกนหนวดเขากับแทนชารจและที่เติมครีมโกนหนวด แลวดันเครื่องไปดานหลัง (เสียงดัง ‘คลิก’) (รูปที่ 11)
หมายเหตุ: เครื่องโกนหนวดจะชารจไฟและเติมครีมโกนหนวดเองโดยอัตโนมัติ
9 ใหชารจเครื่องโกนหนวดเปนเวลา 90 นาที (รูปที่ 12)
หมายเหตุ: ใหชารจเครื่องโกนหนวดกอนการใชงานครั้งแรก หรือเมื่อสัญญาณไฟแสดงการชารจแบตเตอรี่แสดงวาแบตเตอรี่หมด (ดูขอมูลในสวน
‘สัญญาณไฟแสดงการชารจแบตเตอรี่’)
หมายเหตุ: เมื่อชารจแบตเตอรี่เครื่องโกนหนวดเต็มแลว จะใชงานไดนานถึง 40 นาที
การชารจโดยใชที่ชารจแบตเตอรี่
1 เสียบปลั๊กขนาดเล็กเขากับที่ชารจแบตเตอรี่ และเสียบอะแดปเตอรเขากับเตารับบนผนัง
2 เสียบเครื่องโกนหนวดเขากับที่ชารจแบตเตอรี่ (รูปที่ 13)
, เครื่องโกนหนวดจะเริ่มชารจไฟ
3 ชารจเครื่องโกนหนวด 1.5 ชั่วโมง
หมายเหตุ: ใหชารจเครื่องโกนหนวดกอนการใชงานครั้งแรก หรือเมื่อสัญญาณไฟแสดงการชารจแบตเตอรี่แสดงวาแบตเตอรี่หมด (ดูขอมูลในสวน
‘สัญญาณไฟแสดงการชารจแบตเตอรี่’)
หมายเหตุ: เมื่อชารจแบตเตอรี่เครื่องโกนหนวดเต็มแลว จะใชงานไดนานถึง 40 นาที
การเติมครีมโกนหนวดดวยตนเอง
คุณสามารถเติมครีมโกนหนวดในตลับครีมโดยไมใชแทนชารจและที่เติมครีมโกนหนวดได
1 โดยเสียบหัวฉีดครีมของขวดครีมโกนหนวดเขากับรูสำาหรับเติมของตลับครีมโกนหนวด
2 ดันขวดขึ้นและลงประมาณ 5 ครั้ง เพื่อป๊มครีมโกนหนวดเขาไปในตลับครีมจนเต็มตลับ (รูปที่ 14)
สัญญาณไฟบนเครื่องโกนหนวด
การชารจแบตเตอรี่
- สัญญาณไฟแสดงการชารจแบตเตอรี่จะแสดงระดับแบตเตอรี่ที่ชารจ ในระหวางการชารจไฟสัญญาณดวงลางสุดจะกะพริบเปนสีสมแลวดับไป จากนั้นไฟดานบน
สุดจะเริ่มกะพริบเปนสีขาว แลวจึงสวางเปนสีขาวอยางตอเนื่อง
ภาษาไทย274
ชารจไฟอยางรวดเร็ว
- เมื่อชารจแบตเตอรี่เครื่องโกนหนวดครบ 9 นาทีแลว สัญญาณไฟดวงลางจะดับลง จากนั้นสัญญาณไฟดวงบนจะเริ่มกะพริบเปนสีขาว เพื่อแสดงวาเครื่องโกนหนวด
มีพลังงานเพียงพอตอการใชงานหนึ่งครั้ง
หมายเหตุ: การชารจไฟอยางรวดเร็ว สามารถทำาไดก็ตอเมื่อคุณชารจเครื่องโกนหนวดเปนเวลา 1.5 ชั่วโมงแลวหนึ่งครั้ง
ระดับพลังงานที่เหลืออยในแบตเตอรี่
- ระดับพลังงานที่เหลืออยในแบตเตอรี่จะแสดงใหทราบโดยจำานวนสัญญาณไฟแสดงการชารจแบตเตอรี่ที่สวางขึ้น สัญญาณไฟแสดงระดับพลังงานที่เหลืออยใน
แบตเตอรี่นี้จะปรากฏอยนานสองสามวินาที เมื่อคุณเปดหรือปดเครื่องโกนหนวด (รูปที่ 15)
แบตเตอรี่เหลือนอย
- เมื่อแบตเตอรี่เหลือนอย สัญญาณไฟดวงลางสุดจะสวางเปนสีสมขณะโกนหนวด และกะพริบเปนสีสมเมื่อปดสวิตชการทำางาน (รูปที่ 16)
แบตเตอรี่เต็ม
- เมื่อแบตเตอรี่ชารจเต็มแลว ไฟแสดงการชารจแบตเตอรี่ทั้งหมดจะสวางเปนสีขาวอยางตอเนื่อง (รูปที่ 15)
- หลังจากนั้นประมาณ 1 ชั่วโมง ไฟแสดงการชารจสีขาวจะดับลงเพื่อประหยัดพลังงาน
สัญญาณไฟบนแทนชารจและที่เติมครีมโกนหนวด
สัญญาณไฟขวดครีมโกนหนวด
, เมื่อสัญญาณไฟขวดครีมโกนหนวดกะพริบเปนสีสม มีความหมายไดสองอยางคือ (รูปที่ 17)
- ไมไดใสขวดครีมโกนหนวดไวในแทนชารจและที่เติมครีมโกนหนวด หรือใสขวดไมเขาที่
- ครีมโกนหนวดในขวดหมด
สัญญาณไฟ ‘Filling conditioner cartridge’
, สัญญาณไฟ ‘Filling conditioner cartridge’ แสดงความหมายได 3 อยางคือ (รูปที่ 18)
- ขณะกำาลังเติมครีมโกนหนวดในตลับ สัญญาณไฟ ‘Filling conditioner cartridge’ จะกะพริบเปนสีขาว
- เมื่อครีมโกนหนวดเต็มตลับ สัญญาณไฟ ‘Filling conditioner cartridge’ จะสวางอยางตอเนื่องเปนสีขาว
- หากครีมโกนหนวดในขวดหมดลงขณะกำาลังเติมครีมในตลับ สัญญาณไฟ ‘Filling conditioner cartridge’ สีขาวจะดับลง และสัญญาณไฟขวดครีมโกนหนวดจะกะ
พริบเปนสีแดง
การใชงาน
การโกนขน
หมายเหตุ: ผิวหนาของคุณอาจตองใชเวลาปรับสภาพใหคนเคยกับระบบการโกนหนวดใหม 2-3 สัปดาห
1 ตรวจดูใหแนใจวาตลับครีมโกนหนวดมีครีมอยเพียงพอ
2 กดปุ่มเปด/ปดเพื่อเปดเครื่องโกนหนวด
3 ตรวจดูใหแนใจวาเครื่องโกนหนวดชารจไฟไวเพียงพอ (ดูไดจากบท ‘การเตรียมตัวกอนใชงาน’ หัวขอ ‘สัญญาณไฟแสดงการชารจแบตเตอรี่’)
4 คอยๆ เลื่อนชุดหัวโกนไปบนผิวหนาเปนวงกลม และกดปุ่มครีมโกนหนวดจนมีปริมาณครีมโกนหนวดบนผิวหนาเพียงพอที่จะทำาใหโกนไดอยาง
สบายผิว (รูปที่ 19)
- เมื่อคุณปลอยมือจากปุ่มครีมโกนหนวด เครื่องจะหยุดจายครีม
- หากคุณกดปุ่มครีมโกนหนวดอยางรวดเร็ว เครื่องจะจายครีมโกนหนวดในปริมาณที่กำาหนดไวใหโดยอัตโนมัติ
- กดปุ่มครีมโกนหนวดอีกครั้งในระหวางโกนหนวดเพื่อเพิ่มครีมโกนหนวด เพื่อใหเลื่อนชุดหัวโกนบนผิวหนาไดลื่นมือ
หมายเหตุ: ปุ่มครีมโกนหนวดจะทำางานเมื่อเปดเครื่องโกนหนวดแลวเทานั้น
หมายเหตุ: เครื่องโกนหนวดนี้สามารถใชงานเหมือนการโกนหนวดดวยใบมีดโกนได นั่นคือคุณสามารถโกนหนวดบนผิวหนาที่เปยกได เครื่องโกนหนวดร
นนี้ไมมีชองเก็บเศษหนวดเหมือนอยางเครื่องโกนหนวดไฟฟาทั่วไป คุณควรใชครีมโกนหนวดในระหวางโกนใหเพียงพอเพื่อปองกันไมใหเศษหนวดรวง
ติดเสื้อผา
5 ทำาความสะอาดเครื่องโกนหนวดใหสะอาดภายหลังใชงาน (ดูไดจากบท ‘การทำาความสะอาดและการบำารุงรักษา’)
6 เลื่อนฝาปดปองกันบนเครื่องโกนหนวดเพื่อปองกันการชำารุดเสียหาย (รูปที่ 20)
เคล็ดลับเพื่อการโกนหนวดที่เรียบลื่นและโกนไดเกลี้ยงเกลา
- คอยๆ เลื่อนเครื่องโกนหนวดไปบนผิวหนาเปนวงกลม
- ไมควรออกแรงกดเครื่องโกนหนวดมากเกินไป เพราะอาจทำาใหผิวเกิดการระคายเคืองได
ภาษาไทย 275
- เพื่อการโกนอยางมีประสิทธิภาพ ควรใชครีมโกนหนวดเปนประจำา
- คุณสามารถใชเครื่องโกนหนวดในอางอาบนหรือการอาบนดวยฝกบัวได
ที่กันจอน
หมายเหตุ: เนื่องจากการออกแบบใหมที่เนนความโปรงโลง คุณจึงไดยินเสียงการทำางานของที่กันจอนชัดกวาที่กันจอนรนอื่นๆ ซึ่งถือเปนเรื่องปกติ
1 ดึงชุดหัวโกนออกจากเครื่องโกนหนวด (รูปที่ 21)
2 ดึงที่กันจอน ออกจากที่ใสบนแทนชารจ จากนั้นประกอบลงบนเครื่องโกนหนวดใหเขาที่ (เสียงดัง ‘คลิก’) (รูปที่ 22)
3 กดปุ่มเปด/ปดเพื่อเปดเครื่องโกนหนวด
4 คุณสามารถใชที่กันจอนเพื่อกันจอนและ/หรือหนวดของคุณ
5 ทำาความสะอาดที่กันจอนใหสะอาดภายหลังใชงาน (ดูไดจากบท ‘การทำาความสะอาดและการบำารุงรักษา’)
6 ถอดที่กันจอนออกและเก็บไวในที่ใสที่ตามเดิม
7 ประกอบชุดหัวโกนเขากับเครื่องโกนหนวดตามเดิม (เสียงดัง ‘คลิก’) (รูปที่ 23)
8 เลื่อนฝาปดปองกันบนเครื่องโกนหนวดเพื่อปองกันการชำารุดเสียหาย (รูปที่ 20)
การทำาความสะอาดและการบำารุงรักษา
การทำาความสะอาด
หามใชแผนใย อุปกรณที่มีความคม หรือของเหลวที่มีฤทธิ์รุนแรง เชน แอลกอฮอล นมัน หรืออะซีโทน ทำาความสะอาดเครื่องเปนอันขาด
เครื่องโกนหนวด/ที่กันจอน
ทำาความสะอาดเครื่องโกนหนวดและที่กันจอนทุกครั้งหลังใชงาน.
ไมควรใชนรอนเกินไปทำาความสะอาดเครื่องโกนหนวด เพื่อปองกันไมใหมือพุพอง
หามใชผาหรือกระดาษทิชชเช็ดหัวโกน เพราะอาจทำาใหชุดหัวโกนชำารุดได
หมายเหตุ: เครื่องโกนหนวดเปนระบบกันนและสามารถทำาความสะอาดดวยนได
1 กดปุ่มเปด/ปดเพื่อเปดเครื่องโกนหนวด
หมายเหตุ: ทำาความสะอาดเครื่องโกนหนวด ขณะที่เปดเครื่องโกนหนวดอย
2 แชชุดหัวโกนและที่กันจอนในนรอนนานอยางนอย 30 วินาที (รูปที่ 24)
3 ปดเครื่องโกนหนวด และเขยาใหนที่คางอยออก
4 เลื่อนฝาปดปองกันบนเครื่องโกนหนวดเพื่อปองกันการชำารุดเสียหาย (รูปที่ 20)
หมายเหตุ: หากเครื่องโกนหนวดทำางานไดไมดีเทาเดิม และคุณไมสามารถแกไขปญหานี้ไดดวยวิธีการทำาความสะอาดที่อธิบายไวในบทนี้ โปรดศึกษา
วิธีการทำาความสะอาดโดยทั่วถึงเปนพิเศษที่ ‘การแกปญหา’
การบำารุงรักษา
1 ทุกๆ หกเดือน ควรหยดนมันจักรเพื่อหลอลื่นซี่ฟนของที่กันจอน
การจัดเก็บ
การจัดเก็บ
1 จัดเก็บเครื่องโกนหนวดในแทนชารจและที่เติมครีมโกนหนวด
2 หากคุณตองเดินทางหรือไมตองการจัดเก็บเครื่องโกนหนวดในแทนชารจและที่เติมครีมโกนหนวด ใหใสฝาปดปองกันไวที่เครื่องโกนหนวด และ
เก็บเครื่องไวในกระเปา (รูปที่ 20)

ภาษาไทย276
การพกพา
ในกรณีที่ตองออกเดินทางหรือไมตองการใชเครื่องเปนระยะเวลาหนึ่ง สามารถเลือกใชระบบล็อคเครื่องสำาหรับการเดินทางได โดยระบบล็อคเครื่องนี้จะชวยปองกัน
ไมใหเกิดการเปดสวิตชเครื่องโดยมิไดตั้งใจ
การเปดใชงานระบบล็อคเครื่องโกนหนวดขณะพกพา
1 ตรวจดูใหแนใจวาปดสวิตชเครื่องโกนหนวดแลว
2 กดคางที่ปุ่มครีมโกนหนวด (1) จากนั้นกดปุ่มเปด/ปดพรอมๆ กันดวยมืออีกขางหนึ่ง (2) (รูปที่ 25)
3 กดปุ่มทั้งสองคางไว 6 วินาที จนไดยินเสียงฮึมสั้นๆ จากเครื่องโกนหนวด และสัญญาณไฟแสดงการชารจแบตเตอรี่ดวงกลางบนเครื่องโกนหนวดก
ะพริบ 2-3 ครั้ง
, ขณะนี้ระบบล็อคเครื่องโกนหนวดขณะพกพาทำางานแลว
หมายเหตุ: หากคุณเผลอกดปุ่มเปด/ปดกอน เครื่องโกนหนวดจะเริ่มทำางาน ใหกดปุ่มเปด/ปดอีกครั้งเพื่อปดเครื่อง
หมายเหตุ: หากคุณกดปุ่มเปด/ปดหลังจากระบบล็อคเครื่องโกนหนวดขณะพกพาทำางานแลว สัญญาณไฟแสดงการชารจแบตเตอรี่ดวงกลางจะกะพริบเ
ปนสีขาว ซึ่งหมายความวาเครื่องโกนหนวดถูกล็อคอย
เคล็ดลับ: กดปุ่มเปด/ปดเพื่อตรวจสอบวาระบบล็อคเครื่องโกนหนวดขณะพกพาทำางานหรือไม หากระบบล็อคทำางาน เครื่องโกนหนวดจะไมทำางาน
การปดระบบล็อคเครื่องโกนหนวดขณะพกพา
1 กดคางที่ปุ่มครีมโกนหนวด (1) จากนั้นกดปุ่มเปด/ปดพรอมๆ กันดวยมืออีกขางหนึ่ง (2) (รูปที่ 25)
2 กดปุ่มทั้งสองคางไว 6 วินาที จนไดยินเสียงฮึมสั้นๆ จากเครื่องโกนหนวด และสัญญาณไฟแสดงการชารจแบตเตอรี่ดวงกลางบนเครื่องโกนหนวด
กะพริบ 2-3 ครั้ง
, ขณะนี้ระบบล็อคเครื่องโกนหนวดขณะพกพาปดการทำางานแลว
หมายเหตุ: คุณสามารถปดการทำางานของระบบล็อคเครื่องโกนหนวดขณะพกพา ดวยการเสียบเครื่องโกนหนวดเขากับดานหลังของที่ชารจได
เดินทาง
หากคุณตองเดินทางและไมตองการนำาแทนชารจและที่เติมครีมโกนหนวดติดตัวไปดวย คุณสามารถนำาที่ชารจแบตเตอรี่ไปแทนไดเพื่อใชชารจเครื่องโกนหนวด
การเปลี่ยนอะไหล
ตลับครีมโกนหนวด
เพื่อใหถูกสุขอนามัย ขอแนะนำาใหคุณเปลี่ยนตลับครีมโกนหนวดปละครั้ง ตลับใหมประกอบดวยขวดครีมโกนหนวด NIVEA FOR MEN 3 แพ็ค และชุดอะไหลสำารอง
(ซึ่งมีชุดหัวโกน HS85 และตลับใหม)
1 ถอดตลับครีมโกนหนวดออกจากเครื่องโกนหนวด (รูปที่ 26)
2 เสียบหูดานบนของตลับครีมโกนหนวดตลับใหมเขากับชองดานขางของเครื่องโกนหนวด (1) จากนั้นใชนิ้วหัวแมมือกดสวนลางของตลับ (2) เพื่อป
ระกอบตลับครีมเขากับเครื่องโกนหนวด (เสียงดัง ‘คลิก’) (รูปที่ 27)
3 เติมครีมโกนหนวดในตลับ (ดูที่บท ‘เริ่มใชงาน’)
ชุดหัวโกน
คุณควรเปลี่ยนชุดหัวโกนทุกปเพื่อการโกนที่ไดผลดีที่สุด
ชุดหัวโกนที่ใชเปลี่ยนตองเปนชุดหัวโกน HS85 ของ Philips เทานั้น
1 ดึงชุดหัวโกนเกาออกจากเครื่องโกนหนวด (รูปที่ 21)
2 ประกอบชุดหัวโกนใหมเขากับเครื่องโกนหนวด (เสียงดัง ‘คลิก’) (รูปที่ 23)
ขวดครีมโกนหนวด NIVEA FOR MEN
โปรดใชขวดครีมโกนหนวด NIVEA FOR MEN เทานั้น
1 ถอดตัวล็อคขวดครีมโกนหนวด NIVEA FOR MEN ออก (รูปที่ 6)
2 หมุนฝาขวดครีมโกนหนวดตามเข็มนาฬิกา (เสียงดัง ‘คลิก’) (รูปที่ 7)
, ฝาขวดจะเลื่อนลงและมองเห็นหัวฉีดครีม
ภาษาไทย 277
3 หมุนฝาปดแทนชารจและที่เติมครีมโกนหนวดทวนเข็มนาฬิกาเพื่อถอดฝาออก
4 ใสขวดครีมโกนหนวดลงในชองใสขวด โดยหันหัวฉีดครีมไปทางดานหนา (รูปที่ 8)
5 ดันฝาปดแทนชารจและที่เติมครีมโกนหนวดกลับเขาที่ (1) แลวหมุนฝาตามเข็มนาฬิกา (2) จนแนน (รูปที่ 9)
สภาพแวดลอม
- หามทิ้งผลิตภัณฑนี้รวมกับขยะในครัวเรือนทั่วไป เมื่อหมดอายุการใชงานแลว ควรทิ้งลงในถังขยะสำาหรับนำากลับไปใชใหมได (รีไซเคิล) เพื่อชวยรักษาสภาวะสิ่ง
แวดลอมที่ดี (รูปที่ 28)
- แบตเตอรี่ที่ชารจใหมไดที่อยภายในอุปกรณตัดผมอาจมีสารที่กอใหเกิดมลพิษตอสิ่งแวดลอม ใหถอดแบตเตอรี่ออกกอนทิ้งอุปกรณตัดผมหรือกอนสงไปที่จุดรวบรวม
การทิ้งอยางเปนทางการ ทิ้งแบตเตอรี่ไวที่จุดรวบรวมการทิ้งแบตเตอรี่ หากคุณพบปญหาในการถอดแบตเตอรี่ คุณสามารถนำาอุปกรณตัดผมไปที่ศูนยบริการของ
ฟลิปส ซึ่งจะชวยคุณถอดแบตเตอรี่ออก และทิ้งในสถานที่ที่ปลอดภัยตอสิ่งแวดลอม
การถอดแบตเตอรี่ที่สามารถชารจไฟได
ถอดแบตเตอรี่ที่ชารจใหมไดออกเมื่อตองการทิ้งเครื่องโกนหนวดเทานั้น ทั้งนี้ตรวจสอบใหแนใจวาไมมีประจุไฟหลงเหลืออยในแบตเตอรี่แลว
ควรระมัดระวัง เนื่องจากดานขางของแบตเตอรี่มีความคมมาก
1 ถอดตลับครีมโกนหนวดออกจากเครื่องโกนหนวด (รูปที่ 26)
2 ไขสกรู 3 ตัวที่ดานหลังของเครื่องโกนหนวดออก (รูปที่ 29)
3 ใชไขควงถอดแผงดานหลังของเครื่อง (รูปที่ 30)
4 ตัดสายไฟและถอดแบตเตอรี่ชนิดชารจไดในตัวออก
การรับประกันและบริการ
หากคุณตองการขอรับบริการหรือตองการทราบขอมูลหรือหากคุณมีปญหา โปรดเขาชมเว็บไซตของ Philips ไดที่ www.philips.com/support หรือติดตอศูนยบริการ
ดูแลลูกคาของบริษัท Philips ในประเทศของคุณ (หมายเลขโทรศัพทของศูนยบริการลูกคา อยในเอกสารแผนพับเกี่ยวกับการรับประกันทั่วโลก) หากในประเทศของคุณไ
มมีศูนยบริการลูกคา โปรดติดตอตัวแทนจำาหนายผลิตภัณฑของบริษัท Philips ในประเทศ
ขอจำากัดการรับประกัน
ชุดหัวโกน (ใบมีดและฝาครอบ) ไมอยในเงื่อนไขการรับประกันทั่วโลก เนื่องจากเปนสินคาที่ตองสึกหรอตามปกติอันเนื่องมาจากการใชงาน
ตลับครีมโกนหนวดเปนตลับแบบใชแลวทิ้ง และไมครอบคลุมอยในเงื่อนไขของการรับประกันระหวางประเทศ
การแกปญหา
ในหัวขอนี้ไดรวบรวมปญหาทั่วไปที่เกี่ยวกับเตารีดซึ่งคุณอาจพบได หากยังไมสามารถแกไขปญหาตามขอมูลดานลางที่ใหมาได กรุณาติดตอศูนยบริการลูกคาในประเทศ
ของคุณ
ปญหา สาเหตุ การแกปญหา
เครื่องโกนหนวดทำางานสะดุด
คุณใชครีมโกนหนวดนอยเกินไป ใหกดขวดครีมโกนหนวดจนกระทั่งครีมโกนหนวด NIVEA FOR MEN
ไมเรียบลื่น
มีปริมาณเพียงพอ เพื่อชวยใหชุดหัวโกนทำางานไดลื่นไมสะดุด
เครื่องโกนหนวดทำางานไดไมดีเ
คุณทำาความสะอาดเครื่องโกนหนวดไ
ควรทำาความสะอาดเครื่องโกนหนวดใหทั่วถึง (ดูไดจากบท ‘การทำาความสะอาดและการ
ทาเดิม
ดไมดีเพียงพอ
บำารุงรักษา’)
มีเศษหนวดที่มีความยาวอุดตันหัวโกน ทำาความสะอาดหัวโกนตามขั้นตอนวิธีการทำาความสะอาดโดยทั่วถึงเปนพิเศษที่อธิบายไ
วดานลาง
ชุดหัวโกนชำารุดหรือสึกหรอ เปลี่ยนชุดหัวโกน (ดูที่บท ‘การเปลี่ยนอะไหล’)
เครื่องโกนหนวดไมทำางาน
แบตเตอรี่ที่ชารจใหมไดไมมีไฟ ใหชารจแบตเตอรี่ใหม (ดูไดที่บท ‘การเตรียมตัวกอนใชงาน’)
เมื่อกดปุ่มเปด/ปด
ขณะนี้ระบบล็อคเครื่องโกนหนวดขณ
ปดการทำางานระบบล็อคเครื่องโกนหนวดขณะพกพา (ดูไดที่บท ‘การจัดเก็บ’)
ะพกพาทำางานแลว
ภาษาไทย278
ปญหา สาเหตุ การแกปญหา
อาจมีครีมโกนหนวดแหงอุดตันหัวโกน ควรทำาความสะอาดเครื่องโกนหนวดอยางทั่วถึงกอนที่จะใชโกนหนวดตอไป (ดูไดที่บท
“การทำาความสะอาด”)
คุณยังไมไดประกอบชุดหัวโกนกลับใ
เมื่อประกอบชุดหัวโกนใหเขาที่แลว ใหตรวจดูวาคุณหมุนฝาครอบในทิศทางทวนเข็ม
หเขาที่ หลังจากทำาความสะอาดโดย
นาฬิกาจนกวาจะล็อคเขาที่
ทั่วถึงเปนพิเศษ
มีครีมโกนหนวดออกจากชองจาย
รูจายครีมโกนหนวดรูใดรูหนึ่งอาจอุดตั
ใหลางหรือแชชุดหัวโกน หากยังไมดีขึ้น ใหป๊มครีมเขาไปในตลับจนกวาครีมจะเริ่มไหล
เพียงเล็กนอย ทั้งที่ตลับครีมยังมีค
น
ออกมาจากรูที่อุดตัน หากยังไมดีขึ้นอีก ใหลองวิธีตอไปนี้ 1) ปดเครื่องโกนหนวด 2) ดึง
รีมโกนหนวดเหลืออยเพียงพอ
ชุดหัวโกนออกจากเครื่อง 3) ใชนิ้วมืออุดปากรูที่ไมอุดตัน 4) เปดเครื่องโกนหนวดอีกครั้
ง 5) กดปุ่มครีมโกนหนวดสองสามวินาที จนกวาครีมจะเริ่มไหลออกมาจากรูที่อุดตัน
คุณยังไมไดใสหัวโกนกลับเขาที่ หัว
ตรวจสอบใหแนใจวาคุณใสหัวโกนที่ไมมีรูจายครีมโกนหนวดในตำาแหนงที่ถูกตอง ซึ่ง
โกนหนึ่งหัวไมมีรูสำาหรับจายครีมโกน
อยบริเวณใกลกับปุ่มเปด/ปดที่สุดเมื่อประกอบชุดหัวโกนบนเครื่องโกนหนวดแลว
หนวดตรงกลางและตองใสใหที่ที่ระบุ
ไวเทานั้น
ไมมีครีมโกนหนวดออกมาจากรูจ
ครีมโกนหนวดในตลับเกือบหมดแลว เติมตลับครีมโกนหนวด (ดูไดที่บท ‘การเตรียมตัวกอนใชงาน’)
าย เมื่อกดปุ่มครีมโกนหนวด
ที่กันจอนทำางานเสียงดังกวาที่กัน
ที่กันจอนนี้ออกแบบมาใหเปดโลง เนื่องจากการออกแบบใหมที่เนนความโปรงโลง คุณจึงไดยินเสียงการทำางานของที่กัน
จอนเครื่องอื่น
จอนชัดกวาที่กันจอนรนอื่นๆ จึงเปนเรื่องปกติและไมไดหมายความวามีสิ่งผิดปกติเกิด
ขึ้นแตอยางใด
วิธีการทำาความสะอาดโดยทั่วถึงเปนพิเศษ
ตรวจดูใหแนใจวาปดสวิตชเครื่องแลว
1 ดึงชุดหัวโกนออกจากเครื่องโกนหนวด (รูปที่ 31)
2 หมุนฝาครอบตามเข็มนาฬิกา และนำาออกจากชุดหัวโกน (รูปที่ 32)
หมายเหตุ: ถอดหัวโกนออกเพียงครั้งละหนึ่งหัวเทานั้น เพื่อใหแนใจวาคุณจะใสหัวโกนกลับเขาที่ในชองใสเดิมทุกครั้ง ซึ่งเปนสิ่งที่จำาเปน เนื่องจากหัว
โกนสองหัวมีรูพิเศษสำาหรับจายครีมโกนหนวด รวมทั้งยังมั่นใจไดวาคุณจะไมใสใบมีดและฝาครอบของหัวโกนแตละหัวสลับกัน ซึ่งจะสงผลตอประสิทธิ
ภาพในการโกนหนวด
3 หากจำาเปน ถอดใบมีดออกจากฝาครอบ
4 ทำาความสะอาดใบมีดและฝาครอบดวยแปรงที่จัดมาให
5 หลังการทำาความสะอาด ใหวางใบมีดกลับไปในชุดหัวโกนโดยใหขาใบมีดชี้ขึ้น
6 วางฝาครอบลงบนชองใสหัวโกน (เหนือใบมีด) (รูปที่ 33)
7 หมุนฝาครอบในทิศทางทวนเข็มนาฬิกา จนกระทั่งล็อคเขาที่ (รูปที่ 34)
8 ประกอบชุดหัวโกนเขากับเครื่องโกนหนวดตามเดิม (เสียงดัง ‘คลิก’) (รูปที่ 35)

279
Ürünümüzü satın aldığınız için teşekkür ederiz; Philips’e hoş geldiniz! Philips’in sunduğu destekten
faydalanabilmek için lütfen ürününüzü şu adresten kaydedin: www.philips.com/welcome.
Bu tıraş makinesinin harika özellikleri hakkındaki bilgilerin yanı sıra, tıraşı kolaylaştıran ve daha
eğlenceli bir hale getiren bazı ipuçları içerdiğinden, bu kullanıcı kılavuzunu lütfen okuyun.
Tıraş makinesi
Koruma kapağı
Düzeltici
Tıraş ünitesi
Tıraş kremi kartuşu
Tıraş kremi düğmesi
Açma/kapama düğmesi
Şarj ışıkları
Şarj Cihazı
Doldurma ve şarj standı
Doldurma ve şarj standının kapağı
Düzeltici yuvası
Arka panel
Küçük ş için soket
’Krem kartuşu doluyor’ ışığı
Krem şişesi ışığı
Temizleme fırçası
NIVEA FOR MEN tıraş kremi şişesi
Kılıf
Adaptör (adaptörünüz şekilde gösterilenden farklı olabilir)
Cihazı kullanmadan önce bu kullanım kılavuzunu okuyun ve gelecekte de başvurmak üzere saklayın.
- Adaptörün ıslanmasına izin vermeyin (adaptörünüz şekilde gösterilenden farklı olabilir) (Şek. 2).
- Sıcak suya dikkat edin. Ellerinizin yanmaması için daima suyun çok sıcak olup olmadığını kontrol
edin.
- Adaptörde bir dönüştürücü bulunmaktadır. Tehlikeli bir duruma sebep olabileceğinden, adaptörü
başka bir şle değiştirmek için kesmeyin.
- Bu cihaz, güvenliklerinden sorumlu kişilerin nezareti veya talimatı olmadan, ziksel, sinirsel ya da
zihinsel becerileri gelişmemiş veya bilgi ve tecrübe açısından yetersiz kişiler tarafından (çocuklar
da dahil) kullanılmamalıdır.
- Küçük çocukların cihazla oynamaları engellenmelidir.
- Doldurma ve şarj standını suya batırmayın ya da musluk altında yıkamayın (Şek. 3).
- Şarj cihazını kesinlikle suya batırmayın veya musluk altında durulamayın (Şek. 4).
- Doldurma ve şarj standını ve şarj cihazını her zaman sıvı geçirmeyen bir yüzeyde bırakın ve
kullanın.
- Cihazlar, 5°C - 35°C arasında kullanılmalı, şarj edilmeli ve saklanmalıdır.
- Seyahat ederken, tıraş başlıklarını korumak için koruyucu kapağı tıraş makinesine takın.
- Tıraş makinesi ve diğer aksesuarlar bulaşık makinesinde yıkanamaz.
- Tıraş makinesini durulamak için asla 80°C’den sıcak su kullanmayın.
280
- Sadece ürünle birlikte verilen şi, şarj cihazını ve doldurma ve şarj standını kullanın.
- Adaptör veya stand hasar görmüşse, doldurma ve şarj standını kullanmayın.
- Hasarlanmış tıraş makinesini veya şarj cihazını kullanmayın.
- Adaptör hasarlıysa, bir tehlikeyi önlemek için mutlaka orijinal modeli ile değiştirildiğinden emin
olun.
- Bu tıraş makinesi uluslararası onaylanmış güvenlik kurallarına uygun olup, banyo veya duşta
güvenle kullanılabilir, musluk altında yıkanabilir (Şek. 5).
- Bu Philips cihazı elektromanyetik alanlarla (EMF) ilgili tüm standartlara uygundur. Bu cihaz, gereği
gibi ve bu kılavuzdaki talimatlara uygun şekilde kullanıldığında, bugünün bilimsel verilerine göre
kullanımı güvenlidir.
- Adaptör 100-240 volt’u güvenli seviye olan 24 volttan daha düşük değerlere çevirmektedir.
1 NIVEA FOR MEN tıraş kremi şişesinin tırnağını açın (Şek. 6).
2 Krem şişesinin kapağını saat yönünde çevirin (‘klik’) (Şek. 7).
, Kapak aşağı kayar ve krem başlığı görünür.
3 Doldurma ve şarj standının kapağını saat yönünün tersine çevirerek çıkarın.
4 Doldurma ve şarj standındaki şişe takma deliğinin ambalajını açın.
5 Krem şişesini, başlığı aşağı gelecek şekilde yuvaya takın (Şek. 8).
6 Kapağı tekrar doldurma ve şarj standına yerleştirin (1) ve saat yönünde çevirerek kapatın
(2) (Şek. 9).
7 Doldurma ve şarj istasyonunun soketinin küçük şini takın ve adaptörü prize takın (Şek. 10).
8 Tıraş makinesini doldurma ve şarj standına yerleştirin ve arkaya bastırın (‘klik’) (Şek. 11).
Dikkat: Tıraş makinesi otomatik olarak şarj olur ve tıraş kremi otomatik olarak dolar.
9 Tıraş makinesini 90 dakika şarj edin. (Şek. 12)
Dikkat: Tıraş makinesini ilk kez kullanmadan önce ya da pilin boş olduğunu gösteren şarj ışığı yandığında
şarj edin (bkz. ‘Şarj göstergeleri’ bölümü).
Dikkat: Tamamen şarj olmuş bir tıraş makinesinin 40 dakikaya kadar tıraş süresi vardır.
1 Küçük şi şarj cihazına takın ve adaptörü de prize takın.
2 Tıraş makinesini şarj cihazına takın (Şek. 13).
, Tıraş makinesi şarj olacaktır.
3 Tıraş makinesini 1,5 saat şarj edin.
Dikkat: Tıraş makinesini ilk kez kullanmadan önce ya da pilin boş olduğunu gösteren şarj ışığı yandığında
şarj edin (bkz. ‘Şarj göstergeleri’ bölümü).
Dikkat: Tamamen şarj olmuş bir tıraş makinesinin 40 dakikaya kadar tıraş süresi vardır.
Tıraş kremi kartuşunu doldurma ve şarj standı olmadan da doldurabilirsiniz:
1 Krem şişesinin başlığını krem kartuşunun doldurma deliğine yerleştirin.
281
2 Kartuşun dolduğunu görene kadar şişeyi yaklaşık 5 kez yukarı aşağı hareket ettirerek kartuşa
tıraş kremi pompalayın (Şek. 14).
- Şarj ışıkları, pilin şarj seviyesini gösterir. Şarj sırasında alttaki şarj ışığı önce turuncu renkte yanıp
söner ve kapanır. Üstteki şarj ışığı önce beyaz renkte yanıp söner ve ardından sürekli beyaz renkte
yanar.
- Tıraş makinesi 9 dakika şarj olduktan sonra, alttaki şarj ışığı söner ve üstteki şarj ışığı, tıraş
makinesinin bir tıraşlık yeterli enerjiyi depoladığını göstermek için beyaz renkte yanıp sönmeye
başlar.
Dikkat: Tıraş makinesini daha önce bir kez 1,5 saat şarj ettiyseniz, hızlı şarj özelliğini kullanabilirsiniz.
- Pilde kalan güç miktarı, yanar şarj ışıklarının sayısıyla gösterilir. Tıraş makinesini açtığınızda ya da
kapattığınızda, kalan pil kapasitesi birkaç saniye gösterilir (Şek. 15).
- Pil azaldığında, alttaki ışık tıraş sırasında turuncu yanar ve tıraş makinesini kapattığınızda turuncu
yanıp sönmeye başlar. (Şek. 16)
- Pil tamamen şarj olduğunda, tüm şarj ışıkları sürekli beyaz renkte yanar (Şek. 15).
- Yaklaşık 1 saat sonra beyaz şarj ışığı enerji tasarrufu için söner.
, Krem şişesi ışığının turuncu renkte yanıp sönmesinin iki anlamı vardır: (Şek. 17)
- Doldurma ve şarj standında krem şişesi yoktur veya şişe düzgün takılmamıştır.
- Krem şişesi boştur.
, ’Krem kartuşu doluyor’ ışığı üç farklı durumu gösterir: (Şek. 18)
- Krem kartuşu doldurulurken, beyaz renkli ‘krem kartuşu doluyor’ ışığı yanıp söner.
- Tıraş kremi kartuşu dolduğunda, beyaz renkli ‘krem kartuşu doluyor’ ışığı sürekli yanar.
- Tıraş kremi kartuşu doldurulurken krem şişesi biterse, beyaz renkli ‘krem kartuşu doluyor’ ışığı
söner ve krem şişesi ışığı kırmızı renkte yanıp sönmeye başlar.
Dikkat: Cildinizin yeni bir tıraş sistemine alışması 2-3 hafta sürebilir.
1 Tıraş kremi kartuşunda yeterli miktarda tıraş kremi olduğundan emin olun.
2 Tıraş makinesini çalıştırmak için açma/kapama düğmesine basın.
3 Şarj cihazında yeterli şarj olduğundan emin olun (bkz. ‘Kullanıma hazırlama’ bölümü, ‘Şarj
göstergeleri’).
4 Tıraş makinesini cildiniz üzerinde daireler çizerek hafçe hareket ettirin ve cildinizde rahat bir
tıraş için yeterli miktarda tıraş kremi olana kadar tıraş kremi şişesine bastırın. (Şek. 19)
- Tıraş kremi düğmesini bıraktığınızda, cihaz krem dağıtmayı durdurur.
- Tıraşa başlarken tıraş kremi düğmesine kısa süreyle bastığınızda, cihaz otomatik olarak belirli bir
miktar krem çıkarır.
282
- Tıraş ünitesinin cildinizde rahatça hareket etmesini sağlamak amacıyla daha fazla tıraş kremi
uygulamak için tıraş kremi düğmesine tekrar basabilirsiniz.
Dikkat: Tıraş kremi düğmesi sadece tıraş makinesi açıkken çalışır.
Dikkat: Bu tıraş makinesi tıraş bıçağına benzer şekilde kullanılabilir: tıraş makinesini ıslak bir cilt üzerinde
kullanabilirsiniz. Klasik elektrikli tıraş makinelerinin aksine, bu cihazda kılları toplayan bir hazne yoktur.
Kılların giysilerinize dökülmesini engellemek için tıraş sırasında yeterli miktarda tıraş kremi uygulayın.
5 Her kullanım sonrası tıraş makinesini iyice temizleyin (bkz. ‘Temizlik ve bakım’ bölümü).
6 Hasar oluşmasını önlemek için tıraş makinesinin koruma kapağını kapatın (Şek. 20).
- Tıraş makinesini cildiniz üzerinde daireler çizerek hafçe hareket ettirin.
- Tıraş makinesine çok fazla güç uygulamayın, aksi takdirde cildiniz tahriş olabilir.
- Tıraş makinesinin düzgün hareket etmesi için tıraş kremini düzenli olarak uygulayın.
- Tıraş makinesini banyoda veya duşta da kullanabilirsiniz.
Dikkat: Yeni açık tasarımı nedeniyle düzelticinin yaptığı kesme hareketi, diğer düzelticilere göre daha net
duyulur. Bu durum normaldir.
1 Tıraş ünitesini tıraş makinesinden çekip çıkarın (Şek. 21).
2 Şarj cihazındaki düzeltici saklama yuvasından düzelticiyi çıkarıp alın ve tıraş makinesine takın
(‘klik’) (Şek. 22).
3 Tıraş makinesini çalıştırmak için açma/kapama düğmesine basın.
4 Favorilerinizi ve/veya bıyığınızı düzeltmek için düzelticiyi kullanabilirsiniz.
5 Kullandıktan sonra düzelticiyi iyice temizleyin (bkz. ‘Temizlik ve bakım’ bölümü).
6 Düzelticiyi çıkarın ve düzeltici saklama yuvasına geri takın.
7 Tıraş ünitesini tekrar tıraş makinesine takın (‘klik’) (Şek. 23).
8 Hasar oluşmasını önlemek için tıraş makinesinin koruma kapağını kapatın (Şek. 20).
Cihazı temizlemek için ovma telleri, alkol, benzin veya aseton gibi aşındırıcı temizlik ürünleri veya
zarar verici sıvılar kullanmayın.
Tıraş makinesini ve düzelticiyi her kullanımdan sonra temizleyin.
Sıcak suya dikkat edin. Ellerinizin yanmaması için daima suyun çok sıcak olup olmadığını kontrol
edin.
Tıraş ünitesini kuruturken kesinlikle havlu veya peçete kullanmayın. Tıraş başlıklarına zarar
verebilirsiniz.
Dikkat: Tıraş makinesi su geçirmez olup, suyla temizlenebilir.
1 Tıraş makinesini çalıştırmak için açma/kapama düğmesine basın.
Dikkat: Tıraş makinesini çalışır durumdayken de temizleyebilirsiniz.
2 Tıraş ünitesini/düzelticiyi en az 30 saniye sıcak suya daldırın (Şek. 24).
283
3 Tıraş makinesini kapatın ve kalan suyu sallayarak boşaltın.
4 Hasar oluşmasını önlemek için tıraş makinesinin koruma kapağını kapatın (Şek. 20).
Dikkat: Tıraş makinesi eskisi gibi iyi tıraş etmiyor ve sorun bu bölümde açıklanan temizleme yöntemleriyle
çözülemiyorsa, ekstra derinlemesine temizlik yöntemi için ‘Sorun giderme’ bölümüne başvurun.
1 Düzelticinin dişlerini her altı ayda bir, bir damla dikiş makinesi yağıyla yağlayın.
1 Tıraş makinesini doldurma ve şarj standında saklayın.
2 Seyahate çıkacaksanız ya da tıraş makinesini doldurma ve şarj standında saklamak
istemiyorsanız, tıraş makinesinin koruyucu kapağını takın ve tıraş makinesini kılıfına
yerleştirin (Şek. 20).
Tıraş makinesi uzun süre kullanılmayacaksa veya seyahatte kullanılacaksa, tıraş makinesini kilitlemek
mümkündür. Seyahat kilidi, tıraş makinesinin istemeden çalışmasını önler.
1 Tıraş makinesinin kapalı olduğundan emin olun.
2 Tıraş kremi düğmesine basın ve basılı tutun (1), aynı anda diğer elinizle açma/kapama
düğmesine basın (2) (Şek. 25).
3 Her iki düğmeyi de 6 saniye basılı tutun. Tıraş makinesi kısa bir uğultu sesi çıkarana ve tıraş
makinesinin üzerindeki ortadaki şarj ışığı birkaç kez yanıp sönene kadar bekleyin .
, Seyahat kilidi artık devrededir.
Dikkat: Yanlışlıkla önce açma/kapama düğmesine basarsanız, tıraş makinesi çalışmaya başlar. Bu
durumda, tıraş makinesini kapatmak için açma/kapama düğmesine tekrar basın.
Dikkat: Seyahat kilidi devredeyken açma/kapama düğmesine basarsanız, ortadaki şarj ışığı tıraş
makinesinin kilitli olduğunu göstermek için beyaz renkte yanıp söner.
İpucu: Seyahat kilidinin devrede olup olmadığını anlamak için açma/kapama düğmesine basın. Seyahat
kilidi devredeyse, tıraş makinesi çalışmaz.
1 Tıraş kremi düğmesine basın ve basılı tutun (1), aynı anda diğer elinizle açma/kapama
düğmesine basın (2) (Şek. 25).
2 Her iki düğmeyi de 6 saniye basılı tutun. Tıraş makinesi kısa bir uğultu sesi çıkarana ve tıraş
makinesinin üzerindeki ortadaki şarj ışığı birkaç kez yanıp sönene kadar bekleyin .
, Seyahat kilidi artık devre dışıdır.
Dikkat: Seyahat kilidini tıraş makinesini şarj cihazına yerleştirerek de devre dışı bırakabilirsiniz.
Seyahate çıkarken doldurma ve şarj standını yanınıza almak istememeniz halinde, şarj cihazını alarak
tıraş makinesini gerektiğinde şarj edebilirsiniz.
284
Hijyen nedeniyle yılda bir kez tıraş kremi kartuşunu değiştirmenizi tavsiye ediyoruz. 3’lü NIVEA FOR
MEN tıraş kremi şişelerinde ve değiştirme setinde bir yeni kartuş bulunmaktadır (bu sette yeni HS85
tıraş ünitesi ve yeni kartuş bulunur).
1 Tıraş kremi kartuşunu tıraş makinesinden çıkarın (Şek. 26).
2 Yeni tıraş kremi kartuşunun üst kısmındaki menteşeyi tıraş makinesi gövdesi üzerindeki
yuvaya takın (1). Sonra, kartuşu tıraş makinesine takmak için başparmağınızla (2) kartuşun alt
kısmına bastırın (‘klik’) (Şek. 27).
3 Tıraş kremi kartuşunu doldurun (bkz. ‘Başlangıç’ bölümü).
En iyi tıraş sonuçlarını elde etmek için tıraş ünitesini her yıl değiştirin.
Tıraş ünitesini sadece HS85 Philips Tıraş Ünitesi ile değiştirin.
1 Eski tıraş ünitesini tıraş makinesinden çekip çıkarın (Şek. 21).
2 Yeni tıraş ünitesini tıraş makinesine yerleştirin (‘klik’) (Şek. 23).
Sadece NIVEA FOR MEN tıraş kremi şişelerini kullanın.
1 NIVEA FOR MEN tıraş kremi şişesinin tırnağını açın (Şek. 6).
2 Krem şişesinin kapağını saat yönünde çevirin (‘klik’) (Şek. 7).
, Kapak aşağı kayar ve krem başlığı görünür.
3 Doldurma ve şarj standının kapağını saat yönünün tersine çevirerek çıkarın.
4 Krem şişesini, başlığı aşağı gelecek şekilde şişe yuvasına takın (Şek. 8).
5 Kapağı doldurma ve şarj standına doğru bastırın (1) ve takmak için saat yönünde çevirin
(2) (Şek. 9).
- Kullanım ömrü sonunda, cihazı normal evsel atıklarınızla birlikte atmayın; bunun yerine, geri
dönüşüm için resmi toplama noktalarına teslim edin. Böylece, çevrenin korunmasına yardımcı
olursunuz (Şek. 28).
- Dahili şarj edilebilir pil, çevreyi kirletebilecek maddeler içermektedir. Cihazı atmadan ya da resmi
toplama noktasına teslim etmeden önce mutlaka pili çıkarın. Pili, piller için resmi toplama
noktasına teslim edin. Pili çıkarmakta güçlük çekiyorsanız, cihazı bir Philips servis merkezine de
verebilirsiniz. Bu merkezin personeli pili sizin için çıkaracak ve atık işlemleri çevreye zarar
vermeyecek şekilde gerçekleştirilecektir.
Şarj edilebilir pilleri, sadece tıraş makinesini atacağınız zaman çıkarın. Pilleri çıkarırken tamamen
boş olduklarından emin olun.
Pil şeritleri keskindir, dikkatli olun.
1 Tıraş kremi kartuşunu tıraş makinesinden çıkarın (Şek. 26).
2 Tıraş makinesinin arkasındaki üç vidayı sökün (Şek. 29).

285
3 Bir tornavida kullanarak muhafazanın arka panelini çıkarın (Şek. 30).
4 Kabloları kesin ve şarj edilebilir pili çıkarın.
Servise ya da daha fazla bilgiye ihtiyaç duyarsanız veya bir sorunla karşılaşırsanız,
www.philips.com/support adresindeki Philips Internet sitesini ziyaret edin veya ülkenizde bulunan
Philips Müşteri Merkezi ile iletişim kurun (telefon numarasını dünya çapında geçerli garanti belgesinde
bulabilirsiniz). Ülkenizde bir Müşteri Merkezi yoksa, yerel Philips bayiine başvurun.
Tıraş ünitesi (bıçaklar ve koruyucular) yıpranabildiğinden, uluslararası garanti kapsamında değildir.
Tıraş kremi kartuşu, tek kullanımlık bir parçadır ve uluslararası garanti koşulları kapsamında değildir.

286
Bu bölümde, cihazda en sık karşılaşabileceğiniz sorunlar özetlenmektedir. Sorunu aşağıdaki bilgilerle
çözemiyorsanız, bulunduğunuz ülkedeki Müşteri Hizmetleri Merkezi ile iletişim kurun.
Sorun Nedeni Çözüm
Tıraş
Yeterince tıraş kremi
Yeterli miktarda NIVEA FOR MEN tıraş kremi
makinesi cildim
uygulamamış
çıkana kadar tıraş kremi düğmesine basın. Bu sayede
üzerinde yumuşak
olabilirsiniz.
tıraş ünitesi cildinizde yumuşak bir şekilde hareket
bir şekilde
edecektir.
hareket etmiyor.
Tıraş makinesi
Tıraş makinesi düzgün
Tıraş makinesini iyice temizleyin (Bkz. “Temizlik ve
eskisi gibi iyi tıraş
şekilde
bakım’” bölümü).
etmiyor.
temizlenmemiştir.
Uzun kıllar tıraş
Aşağıda açıklanan eksta derinlemesine temizlik
başlıklarını
yöntemlerini kullanarak tıraş başlıklarını temizleyin.
engellemektedir.
Tıraş ünitesi hasarlı ya
Tıraş ünitesini değiştirin (bkz. ‘Değiştirme’ bölümü).
da yıpranmış.
Açma/kapama
Şarj edilebilir pil
Pili şarj edin (bkz.’Kullanıma hazırlama’ bölümü)
düğmesine
bitmiştir.
bastığımda tıraş
makinesi
çalışmıyor.
Seyahat kilidi
Seyahat kilidini devre dışı bırakın (bkz. ‘Saklama’
devrededir.
bölümü).
Kuruyan tıraş kremi
Tıraşa devam etmeden önce, tıraş makinesini iyice
tıraş ünitesindeki tıraş
temizleyin (bkz. ‘Temizleme’ bölümü).
başlıklarını engelliyor.
Ekstra derinlemesine
Tıraş ünitesini tekrar birleştirirken her muhafazayı
temizlikten sonra tıraş
yerine kilitlenene kadar saat yönünün tersine
ünitesi düzgün
çevirmeniz gerekir.
birleştirilmemiştir.
Kartuşta yeterli
Krem deliklerinden biri
Tıraş ünitesini yıkayın veya suda bekletin. Eğer bu
miktarda krem
tıkanmış olabilir.
yöntem işe yaramazsa, tıkanmış delikten krem
olmasına rağmen
çıkmaya başlayana kadar tıraş kremi kartuşuna tıraş
deliklerden az
kremi pompalayın. Eğer bu yöntem de işe yaramazsa,
miktarda tıraş
aşağıdaki yöntemi deneyin: 1) Tıraş makinesini
kremi geliyor.
kapayın 2) Tıraş ünitesini tıraş makinesinden çıkarın
3) Parmağınızı tıkanmamış delik üzerine yerleştirin 4)
Tıraş makinesini çalıştırın 5) Krem tıkanmış delikten
tekrar çıkmaya başlayana kadar tıraş kremi
düğmesine birkaç saniye basın.
287
Sorun Nedeni Çözüm
Tıraş başlıklarını orijinal
Krem deliği olmayan tıraş başlığını doğru yuvaya
yuvalarına
yerleştirdiğinizden emin olun. Bu, tıraş ünitesi tıraş
yerleştirmemiş
makinesine takıldığında açma/kapama düğmesine en
olabilirsiniz. Tıraş
yakın olan yuvadır.
başlıklarının birinin
ortasında tıraş kremi
deliği yoktur ve özel bir
yuvaya yerleştirilmesi
gerekir.
Tıraş kremi
Tıraş kremi kartuşu
Tıraş kremi kartuşunu doldurun (bkz. ‘Kullanıma
düğmesine
bitmek üzeredir.
hazırlama’ bölümü).
bastığımda
deliklerden neden
tıraş kremi
gelmiyor?
Düzeltici
Düzeltici açık bir
Yeni açık tasarım nedeniyle, düzelticinin sesini diğer
diğerlerine göre
tasarıma sahiptir.
düzelticilerden daha net duyabilirsiniz. Bu durum
daha fazla ses
normaldir ve düzelticide bir sorun olduğu anlamına
çıkarıyor.
gelmez.
Cihazın kapalı olduğundan emin olun.
1 Tıraş ünitesini tıraş makinesinden çekip çıkarın (Şek. 31).
2 Koruyucuyu saat yönünde çevirin ve tıraş ünitesinden kaldırarak çıkarın (Şek. 32).
Dikkat: Her seferinde sadece bir tıraş başlığını çıkarın. Bu sayede, tıraş başlığını her zaman kendi orijinal
yuvasına takabilirsiniz; iki tıraş başlığında da özel tıraş kremi delikleri bulunduğundan, bu gereklidir. Ayrıca,
farklı tıraş başlıklarının kesicilerini ve koruyucularını karıştırmamış ve bu sayede tıraş performansını
etkilememiş olursunuz.
3 Gerekiyorsa, kesiciyi koruyucudan çıkarın.
4 Birlikte verilen fırça ile kesiciyi ve koruyucuyu temizleyin.
5 Temizledikten sonra, kesici ayakları yukarı bakacak şekilde kesiciyi tıraş ünitesine takın .
6 Koruyucuyu tıraş başlığı yuvasının üzerine yerleştirin (kesicinin üzerinden) (Şek. 33).
7 Koruyucuyu yerine sabitlenene kadar saat yönünün tersine çevirin (Şek. 34).
8 Tıraş ünitesini tekrar tıraş makinesine takın (‘klik’) (Şek. 35).

288
Вітаємо Вас із покупкою та ласкаво просимо до клубу Philips! Щоб уповні скористатися
підтримкою, яку пропонує Philips, зареєструйте свій виріб на веб-сайті www.philips.com/
welcome.
Прочитайте цей посібник користувача з інформацією про дивовижні функції цієї бритви, а
також порадами щодо простішого та приємнішого гоління.
Бритва
Захисний ковпачок
Тример
Бритвений блок
Картридж для кондиціонера для гоління
Кнопка кондиціонера для гоління
Кнопка “увімк./вимк.”
Індикатори зарядження
Зарядний блок
Станція наповнення й зарядження
Ковпачок станції наповнення й зарядження
Паз для зберігання тримера
Задня панель
Роз’єм для малої вилки
Індикатор “наповнення картриджа”
Індикатор пляшки з кондиціонером
Щітка для чищення
Пляшка з кондиціонером для гоління NIVEA FOR MEN
Футляр
Адаптер (Ваш адаптер може відрізнятися від зображеного на малюнку)
Уважно прочитайте цей посібник користувача перед тим, як використовувати пристрій, та
зберігайте його для майбутньої довідки.
- До адаптера не повинна потрапляти волога (Ваш адаптер може відрізнятися від
зображеного на малюнку) (Мал. 2).
- Будьте обережні з гарячою водою. Завжди перевіряйте, чи вода не надто гаряча, щоб не
обпекти руки.
- Вилка-адаптер містить трансформатор. Не від’єднуйте адаптер для заміни іншим, оскільки
це може спричинити небезпечну ситуацію.
- Цей пристрій не призначено для користування особами (включаючи дітей) з
послабленими фізичними відчуттями чи розумовими здібностями, або без належного
досвіду та знань, крім випадків користування під наглядом чи за вказівками особи, яка
відповідає за безпеку їх життя.
- Дорослі повинні стежити, щоб діти не бавилися пристроєм.
- Ніколи не занурюйте станцію наповнення й зарядження у воду, а також не мийте її під
краном (Мал. 3).
- Ніколи не занурюйте зарядний пристрій у воду та не мийте його під краном (Мал. 4).

289
- Завжди ставте і використовуйте станцію наповнення й зарядження та зарядний пристрій
на водостійкій поверхні.
- Використовуйте, заряджайте і зберігайте пристрої за температури від 5°C до 35°C.
- Завжди встановлюйте на бритву захисний ковпачок для запобігання пошкодженню
бритвених головок під час подорожей.
- Бритву та інші аксесуари не можна мити у посудомийній машині.
- Ніколи не промивайте бритву водою, температура якої перевищує 80°C.
- Використовуйте лише адаптер, зарядний пристрій та станцію наповнення й зарядження,
які входять у комплект.
- Не використовуйте станцію наповнення й зарядження, якщо адаптер чи саму станцію
пошкоджено.
- Не використовуйте пошкоджені бритву чи зарядний пристрій.
- Якщо адаптер пошкоджено, для уникнення небезпеки його обов’язково слід замінити
оригінальним.
- Бритва відповідає міжнародним нормативним актам із безпеки, і її можна безпечно
використовувати у ванній кімнаті або душі та мити під краном (Мал. 5).
- Цей пристрій Philips відповідає усім стандартам електромагнітних полів (ЕМП). Згідно з
останніми науковими дослідженнями, пристрій є безпечним у використанні за умов
правильної експлуатації у відповідності з інструкціями, поданими у цьому посібнику
користувача.
- Адаптер перетворює напругу 100-240 В у безпечну низьку напругу менше 24 В.
1 Зніміть захисну кришку з пляшки із кондиціонером для гоління NIVEA FOR
MEN (Мал. 6).
2 Поверніть ковпачок пляшки з кондиціонером за годинниковою стрілкою, щоб
прозвучало клацання (Мал. 7).
, Ковпачок опускається, і з’являється випускний отвір кондиціонера.
3 Поверніть ковпачок станції наповнення й зарядження проти годинникової стрілки і
зніміть його.
4 Зніміть пакувальний матеріал із отвору стикування пляшки на станції наповнення й
зарядження.
5 Встановіть пляшку з кондиціонером в отвір стикування випускним отвором
донизу (Мал. 8).
6 Встановіть ковпачок назад на станцію наповнення й зарядження (1) і поверніть його за
годинниковою стрілкою для фіксації (2) (Мал. 9).
7 Під’єднайте малу вилку до роз’єму станції наповнення й зарядження, а адаптер - до
розетки електромережі (Мал. 10).
8 Встановіть бритву на станцію наповнення й зарядження і посуньте її назад до
фіксації (Мал. 11).
Примітка: Бритва заряджається і наповнюється кондиціонером для гоління автоматично.
9 Заряджайте бритву протягом 90 хвилин. (Мал. 12)
Примітка: Заряджайте бритву перед першим використанням або коли індикатор заряду
повідомить про низький заряд батареї (див. розділ “Індикація підзарядки”).
290
Примітка: Повністю заряджений пристрій забезпечує до 40 хвилин гоління.
1 Вставте малу вилку в зарядний пристрій, а адаптер - в розетку на стіні.
2 Поставте бритву на зарядний пристрій (Мал. 13).
, Бритва заряджається.
3 Заряджайте бритву 1,5 години.
Примітка: Заряджайте бритву перед першим використанням або коли індикатор заряду
повідомить про низький заряд батареї (див. розділ “Індикація підзарядки”).
Примітка: Повністю заряджений пристрій забезпечує до 40 хвилин гоління.
Картридж можна також наповнити кондиціонером для гоління без використання станції
наповнення й зарядження:
1 Вставте випускний отвір пляшки з кондиціонером в отвір наповнення картриджа.
2 Підніміть та опустіть пляшку приблизно 5 разів, щоб подати кондиціонер для гоління в
картридж, доки не буде видно, що картридж повний (Мал. 14).
- Індикатори зарядження вказують, до якого рівня заряджено батарею. Під час зарядження
нижній індикатор зарядження спочатку блимає оранжевим світлом, а потім згасає. Після
цього верхній індикатор зарядження починає блимати білим світлом, а потім продовжує
світитися без блимання.
- Після зарядження бритви протягом 9 хвилин нижній індикатор зарядження згасає, а
верхній починає блимати білим світлом, повідомляючи, що бритва достатньо заряджена
для одного сеансу гоління.
Примітка: Швидке зарядження можливе лише тоді, коли бритву попередньо заряджали
1,5 години.
- Залишок заряду батареї позначається кількістю індикаторів зарядження, які світяться.
Залишок заряду батареї видно протягом кількох секунд, якщо бритву увімкнути чи
вимкнути (Мал. 15).
- Коли заряд батареї вичерпується, нижній індикатор зарядження світиться оранжевим
світлом під час гоління і блимає, якщо бритву вимкнути. (Мал. 16)
- Коли батарея повністю зарядиться, усі індикатори зарядження світитимуться білим світлом
без блимання (Мал. 15).
- Прибл. через 1 годину ці індикатори зарядження згаснуть для заощадження енергії.
, Якщо індикатор пляшки з кондиціонером блимає оранжевим світлом, цьому є два
пояснення: (Мал. 17)
291
- у станції наповнення й зарядження немає пляшки з кондиціонером або її не було
встановлено належним чином.
- Пляшка з кондиціонером порожня.
, Індикатор “наповнення картриджа” повідомляє про три різні речі: (Мал. 18)
- Коли картридж для кондиціонера наповнюється, блимає білий індикатор “наповнення
картриджа”.
- Коли картридж для кондиціонера наповнено, білий індикатор “наповнення картриджа”
світиться без блимання.
- Якщо пляшка з кондиціонером стає порожньою під час наповнення картриджа, білий
індикатор “наповнення картриджа” згасає, а індикатори пляшки з кондиціонером блимають
червоним світлом.
Примітка: Вашій шкірі, можливо, знадобиться 2-3 тижні, щоб звикнути до нової системи
гоління.
1 Перевіряйте, чи у картриджі достатньо кондиціонера для гоління.
2 Щоб увімкнути бритву, натисніть кнопку “увімк./вимк.”
3 Бритва має бути достатньо заряджена (див. розділ “Підготовка до використання”,
підрозділ “Індикація підзарядки”).
4 Легенько ведіть бритвеним блоком по шкірі по колу і натискайте кнопку кондиціонера
для гоління, доки на шкірі не буде достатньо кондиціонера для забезпечення
комфортного гоління. (Мал. 19)
- Якщо відпустити кнопку кондиціонера для гоління, пристрій припинить подавати
кондиціонер.
- Якщо коротко натиснути кнопку кондиціонера для гоління, пристрій автоматично подасть
певну кількість кондиціонера.
- Натисніть кнопку кондиціонера для гоління ще раз, щоб нанести більше кондиціонера під
час гоління для забезпечення гладкого ковзання бритвеного блока по шкірі.
Примітка: Кнопка кондиціонера для гоління працює лише тоді, коли бритва увімкнена.
Примітка: Цією бритвою можна голити вологе обличчя, ніби бритвою з лезом. На відміну від
традиційної електробритви, цей пристрій не має відділення для волосся, де збирається
щетина. Щоб щетина не спадала на одяг, під час гоління слід нанести достатньо кондиціонера
для гоління.
5 Ретельно чистіть бритву після кожного використання (див. розділ “Чищення та догляд”).
6 Насуньте на бритву захисний ковпачок для запобігання пошкодження (Мал. 20).
- Легенько ведіть бритвою по шкірі по колу.
- Не натискайте на бритву надто сильно, оскільки це може спричинити подразнення шкіри.
- Для забезпечення належного ковзання регулярно наносьте кондиціонер для гоління.
- Бритву можна також використовувати у ванні чи душі.
Примітка: У зв’язку з новим дизайном бритви, Ви чутимете зрізання тримера чіткіше, ніж у
випадку з іншими тримерами. Це нормальне явище.
292
1 Витягніть бритвений блок із бритви (Мал. 21).
2 Вийміть тример із тримача тримера на зарядному пристрої і встановіть його на бритву
до фіксації (Мал. 22).
3 Щоб увімкнути бритву, натисніть кнопку “увімк./вимк.”
4 Використовуйте тример для підстригання бакенбардів та/або вусів.
5 Ретельно чистіть тример після використання (див. розділ “Чищення та догляд”).
6 Зніміть тример і вставте його назад у тримач.
7 Вставте бритвений блок назад у бритву до фіксації (Мал. 23).
8 Насуньте на бритву захисний ковпачок для запобігання пошкодження (Мал. 20).
Ніколи не використовуйте для чищення пристрою жорстких губок, абразивних засобів чи
рідин для чищення, таких як спирт, бензин чи ацетон.
Чистіть бритву та тример після кожного використання.
Будьте обережні з гарячою водою. Завжди перевіряйте, чи вода не надто гаряча, щоб не
обпекти руки.
Ніколи не протирайте бритвений блок рушником чи тканиною, адже це може пошкодити
бритвені головки.
Примітка: Бритва є водонепроникною, тому її можна мити у воді.
1 Щоб увімкнути бритву, натисніть кнопку “увімк./вимк.”
Примітка: Чистіть бритву, коли її увімкнено.
2 Занурте бритвений блок/тример у гарячу воду щонайменше на 30 секунд (Мал. 24).
3 Вимкніть бритву і витрусіть воду, що залишилася.
4 Насуньте на бритву захисний ковпачок для запобігання пошкодження (Мал. 20).
Примітка: Якщо бритва не голить так, як раніше, і Ви не можете усунути цю проблему за
допомогою наведених у цьому розділі способів чищення, інформацію про спосіб надретельного
чищення див. у розділі “Усунення несправностей”.
1 Один раз на шість місяців змащуйте зубці тримера краплею машинного мастила.
1 Зберігайте бритву на станції наповнення й зарядження.
2 Якщо Ви маєте намір подорожувати чи не хочете зберігати бритву на станції
наповнення й заряджання, встановіть захисний ковпачок на бритву і зберігайте її у
футлярі (Мал. 20).
293
Якщо Ви маєте намір відкласти бритву на зберігання протягом тривалого часу або бажаєте
взяти її зі собою у подорож, можна заблокувати бритву. Блокування для транспортування
запобігає випадковому увімкненню бритви.
1 Перевірте, чи бритва вимкнена.
2 Натисніть і утримуйте кнопку кондиціонера для гоління (1), одночасно натиснувши й
утримуючи іншою рукою кнопку “увімк./вимк.” (2) (Мал. 25).
3 Утримуйте обидві кнопки натисненими 6 секунд. Зачекайте, доки із бритви не надійде
коротке гудіння і середній індикатор зарядження на бритві не блимне кілька разів.
, Блокування для транспортування було активовано.
Примітка: Якщо Ви випадково натиснете спочатку на кнопку “увімк./вимк.”, бритва почне
працювати . Якщо це станеться, натисніть кнопку “увімк./вимк.” ще раз, щоб вимкнути бритву.
Примітка: Якщо натиснути кнопку “увімк./вимк.”, коли увімкнено блокування для
транспортування, середній індикатор зарядження блиматиме білим світлом, повідомляючи, що
бритву заблоковано.
Порада: Натисніть кнопку “увімк./вимк.”, щоб перевірити, чи активоване блокування для
транспортування. Якщо блокування для транспортування активоване, бритва не увімкнеться.
1 Натисніть і утримуйте кнопку кондиціонера для гоління (1), одночасно натиснувши й
утримуючи іншою рукою кнопку “увімк./вимк.” (2) (Мал. 25).
2 Утримуйте обидві кнопки натисненими 6 секунд. Зачекайте, доки із бритви не надійде
коротке гудіння і середній індикатор зарядження на бритві не блимне кілька разів.
, Блокування для транспортування було вимкнено
Примітка: Можна також вимкнути блокування для транспортування, встановивши бритву на
зарядний пристрій.
Якщо Ви маєте намір подорожувати і не хочете брати станцію наповнення й зарядження,
можна взяти зі собою зарядний пристрій, щоб за необхідності заряджати бритву.
З міркувань гігієни рекомендуємо заміняти картридж для кондиціонера один раз на рік. Новий
картридж входить у комплект кожної пляшки з кондиціонером для гоління NIVEA FOR MEN
(3 шт.) та запасного набору (з новим бритвеним блоком HS85 та новим картриджем).
1 Зніміть картридж для кондиціонера для гоління з бритви (Мал. 26).
2 Вставте виступ вгорі нового картриджа для кондиціонера у виїмку на краю бритви (1).
Потім натисніть нижню частину картриджа великим пальцем (2), щоб під’єднати
картридж до бритви до фіксації (Мал. 27).
3 Наповніть картридж кондиціонером для гоління (див. розділ “Початок роботи”).
Заміняйте бритвений блок щороку для досягнення оптимальних результатів гоління.
294
Заміняйте бритвений блок лише бритвеним блоком Philips HS85.
1 Витягніть старий бритвений блок із бритви (Мал. 21).
2 Вставте в бритву новий бритвений блок до фіксації (Мал. 23).
Використовуйте лише пляшки з кондиціонером для гоління NIVEA FOR MEN.
1 Зніміть захисну кришку з пляшки із кондиціонером для гоління NIVEA FOR
MEN (Мал. 6).
2 Поверніть ковпачок пляшки з кондиціонером за годинниковою стрілкою, щоб
прозвучало клацання (Мал. 7).
, Ковпачок опускається, і з’являється випускний отвір кондиціонера.
3 Поверніть ковпачок станції наповнення й зарядження проти годинникової стрілки і
зніміть його.
4 Встановіть пляшку з кондиціонером в отвір стикування пляшки випускним отвором
донизу (Мал. 8).
5 Встановіть ковпачок на станцію наповнення й зарядження (1) і поверніть її за
годинниковою стрілкою (2) для фіксації (Мал. 9).
- Не викидайте пристрій разом із звичайними побутовими відходами, а здавайте його в
офіційний пункт прийому для повторної переробки. Таким чином, Ви допомагаєте
захистити довкілля (Мал. 28).
- Вбудована акумуляторна батарея містить речовини, які можуть забруднювати навколишнє
середовище. Перед утилізацією пристрою або передачею в офіційний пункт прийому,
завжди виймайте батарею. Батарею віддайте в офіційний пункт прийому батарей. Якщо Ви
не можете вийняти батареї, візьміть пристрій з собою до сервісного центру Philips, де
батарею виймуть і утилізують в безпечний для навколишнього середовища спосіб.
Виймайте акумуляторну батарею лише тоді, коли викидаєте бритву. Перед тим, як вийняти
батарею, перевірте, чи вона повністю розряджена.
Будьте обережні: вузькі сторони батареї гострі.
1 Зніміть картридж для кондиціонера для гоління з бритви (Мал. 26).
2 Викрутіть три гвинти на задній панелі бритви (Мал. 29).
3 За допомогою викрутки зніміть задню панель корпуса (Мал. 30).
4 Переріжте дроти і вийміть акумуляторну батарею.

295
Якщо Вам необхідна інформація чи обслуговування або ж виникла проблема, відвідайте
веб-сайт компанії Philips www.philips.com/supportабо зверніться до Центру обслуговування
клієнтів компанії Philips у своїй країні (телефон можна знайти у гарантійному талоні). Якщо у
Вашій країні немає Центру обслуговування клієнтів, зверніться до місцевого дилера Philips.
Умови міжнародної гарантії не поширюються на бритвений блок (леза та захисні сітки),
оскільки він зношується.
Картридж із кондиціонером - одноразового використання, тому умови міжнародної гарантії
на нього не поширюються.

296
У цьому розділі зведено основні проблеми, які можуть виникнути під час використання
пристрою. Якщо Ви не в змозі вирішити проблему за допомогою інформації, поданої нижче,
зверніться до Центру обслуговування клієнтів у Вашій країні.
Проблема Можлива причина Вирішення
Бритва не
Нанесено малу
Натисніть і утримуйте кнопку кондиціонера для
рухається гладко
кількість кондиціонера
гоління, доки не вийде достатня кількість
по шкірі.
для гоління.
кондиціонера NIVEA FOR MEN. Це відновить
гладке ковзання бритвеного блока по шкірі.
Бритва вже не
Бритву не почищено
Ретельно почистіть бритву (див. розділ
голить так
належним чином.
“Чищення та догляд”).
добре, як колись.
Довгі волоски
Почистіть бритвені головки, виконавши вказівки
заважають бритвеним
для надретельного чищення, описані нижче.
головкам.
Бритвений блок
Замініть бритвений блок (див. розділ “Заміна”).
пошкоджений або
зношений.
Бритва не
Акумуляторна батарея
Зарядіть батарею (див. розділ “Підготовка до
працює після
розрядилася.
використання”).
натиснення
кнопки “увімк./
вимк.”.
Увімкнено блокування
Вимкніть блокування для транспортування (див.
для транспортування.
розділ “Зберігання”).
Висохлий кондиціонер
Перед тим як продовжувати гоління, ретельно
для гоління блокує
почистіть бритву (див. “Чищення”).
бритвені головки у
бритвеному блоці.
Бритвений блок не
Збираючи бритвений блок, не забудьте
зібрано належним
повернути кожну сітку проти годинникової
чином після
стрілки до фіксації.
надретельного
чищення.
З отворів
Один із отворів для
Сполосніть або замочіть бритвений блок. Якщо
виходить мало
кондиціонера
це не допоможе, наповнюйте картридж
кондиціонера
заблоковано.
кондиціонером для гоління, доки він не почне
для гоління,
виходити із заблокованого отвору. Якщо це
навіть якщо
також не допоможе, спробуйте поданий метод:
його достатньо
1) вимкніть бритву; 2) вийміть бритвений блок із
у картриджі.
бритви; 3) прикладіть палець до отвору, який не
заблоковано; 4) увімкніть бритву; 5) натисніть
кнопку кондиціонера для гоління й утримуйте її
кілька секунд, доки кондиціонер не почне
виходити із заблокованого отвору.
297
Проблема Можлива причина Вирішення
Бритвені головки не
Встановіть бритвену головку без отвору для
встановлено у
кондиціонера у відповідний тримач. Це тримач,
відповідні для них
який розташовано найближче до кнопки “увімк./
тримачі. Одна із
вимк.”, коли бритвений блок встановлено на
бритвених головок не
бритву.
має отвору для
кондиціонера
посередині, тому її
потрібно встановити у
спеціальний тримач
Кондиціонер
Картридж для
Наповніть картридж кондиціонером для гоління
для гоління не
кондиціонера для
(див. розділ “Підготовка до використання”).
виходить із
гоління практично
отворів після
порожній.
натиснення
кнопки
кондиціонера
для гоління.
Цей тример
Цей тример має
Відповідно до нового відкритого дизайну Ви
створює більше
відкритий дизайн.
чутимете роботу тримера чіткіше, ніж з іншими
шуму, ніж інші
тримерами. Це нормальне явище і не означає,
тримери.
що з тримером щось не так.
Перевірте, чи пристрій вимкнений.
1 Витягніть бритвений блок із бритви (Мал. 31).
2 Поверніть захисну сітку за годинниковою стрілкою і вийміть її з бритвеного
блока (Мал. 32).
Примітка: Виймайте лише одну захисну сітку за раз. Таким чином, Ви завжди зможете
встановити кожну бритвену головку в її оригінальний тримач, адже дві бритвені головки
мають спеціальні отвори для кондиціонера для гоління. Це також не дозволить Вам поплутати
леза та захисні сітки різних бритвених головок, що може вплинути на ефективність гоління.
3 За потреби зніміть лезо із захисної сітки.
4 Почистіть лезо та сітку щіткою, що додається.
5 Після чищення встановіть лезо назад у бритвений блок ріжучою стороною догори.
6 Встановіть захисну сітку в тримач бритвеної головки (над лезом) (Мал. 33).
7 Поверніть захисну сітку проти годинникової сітки, щоб зафіксувати її (Мал. 34).
8 Вставте бритвений блок назад у бритву до фіксації (Мал. 35).

298
Chúc mừng bạn đã mua được sản phẩm Philips mới và chào mừng bạn đến với Philips! Để có được
lợi ích đầy đủ từ sự hỗ trợ do Philips cung cấp, hãy đăng ký sản phẩm tại www.philips.com/welcome.
Vui lòng đọc hướng dẫn sử dụng này, vì nó có những thông tin về các tính năng tuyệt với của máy
cạo râu này cũng như một số mẹo giúp cạo râu đơn giản và thoải mái hơn.
A Máy cạo
1 Nắp bảo vệ
2 Tông-đơ
3 Bộ phn cạo
4 Hộp dưỡng chất cạo râu
5 Nút dưỡng chất cạo râu
6 Nút bt/tắt
7 Đèn báo sạc
B Bộ sạc
C Đế & đế sạc
1 Nắp đế & đế sạc
2 Khung bảo quản tông-đơ
3 Mặt sau
4 Ổ cắm cho phích cắm nhỏ
5 Đèn báo ‘Filling conditioner cartridge’ (Đổ hộp dưỡng chất)
6 Đèn báo lọ dưỡng chất
D Bàn chải làm sạch
E Lọ dưỡng chất cạo râu NIVEA FOR MEN
F Bao da
G Bộ nối tiếp (bộ nối tiếp của bạn có thể khác với bộ nối tiếp trong hình)
Hãy đọc kỹ hướng dẫn sử dụng này trước khi sử dụng thiết bị và cất giữ để tiện tham khảo sau này.
- Đảm bảo bộ nối tiếp không bị ướt (bộ nối tiếp của bạn có thể khác với bộ nối tiếp trong
hình) (Hình 2).
- Nên thn trọng với nước nóng. Luôn kiểm tra xem nước có quá nóng không để tránh làm bỏng
tay bạn.
- Trong bộ biến thế có một biến áp. Không cắt bỏ bộ biến thế này để thay bng bộ biến thế khác,
vì làm như vy s gây ra tình huống nguy hiểm.
- Thiết bị này không dành cho ngưi dùng (bao gồm cả trẻ em) có sức khỏe kém, khả năng giác
quan hoặc có dấu hiệu tâm thần, hoặc thiếu kinh nghiệm và kiến thức, trừ khi họ được giám sát
hoặc hướng dẫn sử dụng thiết bị bởi ngưi có trách nhiệm đảm bảo an toàn cho họ.
- Trẻ em phải được giám sát để đảm bảo rng chúng không chơi đùa với thiết bị này.
- Không nhúng đế & đế sạc vào nước hoặc rửa dưới vòi nước (Hình 3).
- Không nhúng bộ sạc vào trong nước hoặc rửa dưới vòi nước (Hình 4).
- Luôn đặt đế & đế sạc và bộ sạc trên mặt phẳng chịu nước.
- Sử dụng, sạc và bảo quản thiết bị ở nhiệt độ từ 5°C đến 35°C.
- Luôn đy nắp bảo vệ vào máy cạo râu để bảo vệ các đầu cạo khi di chuyển.
- Máy cạo râu và các phụ kiện khác không thể dùng với máy rửa chén.
- Không sử dụng nước nóng quá 80°C để rửa máy cạo râu.
299
- Chỉ sử dụng bộ nối tiếp, bộ sạc và đế & đế sạc đi kèm với máy.
- Không sử dụng đế & đế sạc nếu bộ nối tiếp hoặc chính đế bị hư.
- Không sử dụng máy cạo râu hoặc bộ sạc nếu nó bị hư.
- Luôn thay bộ nối tiếp cùng loại và đúng tiêu chuẩn như loại của máy nếu phích cắm điện bị
hỏng để tránh nguy hiểm
- Máy cạo râu này tuân thủ các qui định về an toàn của quốc tế và có thể sử dụng an toàn trong
bồn tắm hoặc dưới vòi tắm và có thể được làm sạch dưới vòi nước (Hình 5).
- Thiết bị Philips này tuân thủ tất cả các tiêu chuẩn liên quan đến các từ trưng điện (EMF). Nếu
được sử dụng đúng và tuân thủ các hướng dẫn trong sách hướng dẫn này, theo các bng chứng
khoa học hiện nay, việc sử dụng thiết bị này là an toàn.
- Bộ nối tiếp chuyển đổi điện áp từ 100-240 vôn xuống mức điện áp thấp an toàn dưới 24 vôn.
1 Tháo đầu bịt của lọ dưỡng chất cạo râu NIVEA FOR MEN (Hnh 6).
2 Xoay nắp lọ dưỡng chất theo chiều kim đồng hồ (nghe ting ‘click’) (Hnh 7).
, Nắp sẽ di chuyển xuống dưới và vòi dưỡng chất sẽ lồi ra.
3 Xoay nắp của nắp đ đổ lại & sạc ngược chiều kim đồng hồ để tháo nó ra.
4 Tháo bao gói khỏi lỗ giữ lọ trong đ đổ lại & sạc.
5 Đặt lọ dưỡng chất vào lỗ giữ với vòi hướng xuống dưới (Hnh 8).
6 Đặt nắp trở lại vào đ đổ lại & sạc và xoay nắp theo chiều kim đồng hồ để cố định
nó (Hnh 9).
7 Cắm phích cắm nhỏ vào ổ điện của đ đổ lại & sạc và cắm bộ nối tip vào ổ điện trên
tường (Hnh 10).
8 Đặt máy cạo râu vào đ đổ lại & sạc và ấn xuống (nghe ting ‘click’) (Hnh 11).
Lưu ý: Máy cạo râu sẽ tự động được sạc và đổ dưỡng chất cạo râu.
9 Sạc máy cạo râu trong 90 phút. (Hnh 12)
Lưu ý: Sạc máy cạo râu trước khi sử dụng lần đầu tiên hoặc khi đèn báo sạc cho biết pin yếu (xem mục
‘Chỉ báo sạc’).
Lưu ý: Một máy cạo râu đ được sạc đầy pin c th hoạt động ti đa 40 pht.
1 Cắm phích cắm nhỏ vào bộ sạc và cắm bộ nối tip vào ổ điện.
2 Cắm máy cạo râu vào bộ sạc (Hnh 13).
, Máy cạo râu đang được sạc.
3 Sạc máy cạo khoảng 1 ting rưỡi.
Lưu ý: Sạc máy cạo râu trước khi sử dụng lần đầu tiên hoặc khi đèn báo sạc cho biết pin yếu (xem mục
‘Chỉ báo sạc’).
Lưu ý: Một máy cạo râu đ được sạc đầy pin c th hoạt động ti đa 40 pht.
Bạn có thể đổ hộp dưỡng chất cạo râu không cần dùng đế & đế sạc:

300
1 Đặt vòi của lọ dưỡng chất vào lỗ của hộp dưỡng chất.
2 Di chuyển hộp lên và xuống khoảng 5 lần để bơm dưỡng chất cạo râu vào hộp cho tới khi
bạn nhn thấy hộp đầy (Hnh 14).
- Đèn báo sạc cho biết mức pin nào đã được sạc. Trong khi sạc, đèn báo sạc ở dưới cùng đầu tiên
s nhấp nháy màu da cam rồi sau đó tắt. Đèn báo sạc ở trên cùng khi đó s bắt đầu nhấp nháy
màu trắng rồi cuối cùng sáng trắng liên tục.
- Sau khi máy cạo râu đã được sạc trong 9 phút, đèn báo sạc ở dưới cùng s tắt và đèn báo sạc ở
trên cùng s bắt đầu nhấp nháy màu trắng, để cho biết máy cạo râu đã có đủ năng lượng cho
một lần cạo.
Lưu ý: Chỉ c th sạc nhanh khi bạn đ sạc máy cạo râu 1 tiếng rưỡi một lần.
- Lượng năng lượng còn lại trong pin được chỉ báo bởi số đèn báo sạc còn sáng. Năng lượng pin
còn lại vẫn hiển thị trong vài giây khi tắt hoặc bt máy cạo râu (Hình 15).
- Khi pin yếu, đèn báo sạc ở dưới cùng s sáng màu da cam trong khi cạo và nhấp nháy màu da
cam khi tắt máy cạo râu. (Hình 16)
- Khi pin đã được sạc đầy, tất cả các đèn báo sạc s sáng trắng liên tục (Hình 15).
- Khoảng một gi sau khi sạc, tất cả đèn đều tắt để tiết kiệm điện.
, Khi đèn chỉ báo lọ dưỡng chất nhấp nháy màu da cam, có hai khả năng có thể xảy
ra: (Hnh 17)
- Không có lọ dưỡng chất trong đế & đế sạc hoặc lọ được đặt không đúng cách.
- Lọ dưỡng chất đã hết.
, Khi đèn chỉ báo ‘lling conditioner cartridge’ (đổ hộp dưỡng chất) (đổ hộp dưỡng chất) nhấp
nháy, có ba tnh huống: (Hnh 18)
- Khi hộp dưỡng chất đang được đổ, đèn chỉ báo ‘lling conditioner cartridge’ (đổ hộp dưỡng
chất) màu trắng s nhấp nháy.
- Khi hộp dưỡng chất cạo râu đầy, đèn chỉ báo ‘lling conditioner cartridge’ (đổ hộp dưỡng chất)
màu trắng s sáng liên tục.
- Nếu lọ dưỡng chất hết khi hộp dưỡng chất đang được đổ, đèn chỉ báo ‘lling conditioner
cartridge’ (đổ hộp dưỡng chất) màu trắng s tắt và lọ dưỡng chất s nhấp nháy màu đỏ.
Lưu ý: Da của bạn c th cần từ 2 đến 3 tuần đ làm quen với hệ thng cạo râu mới.
1 Đảm bảo có đủ dưỡng chất cạo râu trong hộp dưỡng chất cạo râu.
2 Bấm nút on/off (bật/tắt) để bật máy cạo râu.
3 Đảm bảo pin đã được sạc đủ (xem mục ‘Chỉ báo sạc’ trong chương ‘Cách chun bị s dụng
máy’).
301
4 Nhẹ nhàng di chuyển bộ phận cạo theo vòng tròn trên da và nhấn nút dưỡng chất cạo râu
cho tới khi có đủ dưỡng chất cạo râu trên da để cạo một cách thoải mái. (Hnh 19)
- Khi nhả nút dưỡng chất cạo râu, máy s ngừng xả dưỡng chất.
- Nếu bấm nhanh nút dưỡng chất cạo râu, máy s tự động xả một lượng dưỡng chất nhất định.
- Bấm nút dưỡng chất cạo râu lại một lần nữa để xả thêm dưỡng chất cạo râu trong kkhi cạo để
đảm bảo bộ phn cạo liên tục trượt trơn tru trên da.
Lưu ý: Nt dưỡng chất cạo râu chỉ hoạt động khi máy cạo râu được bật.
Lưu ý: Máy cạo râu này c th được sử dụng theo cách tương tự như lưỡi dao cạo: bạn c th sử dụng
máy cạo râu trên mặt ướt. Không ging như máy cạo râu điện thông thường, thiết bị này không c ngăn
tc thu thập râu. Đ tránh không cho râu rơi vào quần áo, hy xả đủ dưỡng chất cạo râu trong khi cạo.
5 Làm sạch kỹ máy cạo râu sau mỗi lần s dụng (xem chương ‘Vệ sinh và bảo dưỡng máy’).
6 Trượt nắp bảo vệ vào máy cạo râu để tránh làm hư đầu cạo (Hnh 20).
- Nhẹ nhàng di chuyển máy cạo râu theo vòng tròn trên da.
- Không dùng quá nhiều lực lên máy cạo râu, vì làm như vy có thể làm kích thích da.
- Để đảm bảo trượt đúng cách, thưng xuyên xả dưỡng chất cạo râu.
- Bạn cũng có thể sử dụng máy cạo râu trong bồn tắm hoặc dưới vòi tắm.
Lưu ý: Vì thiết kế mở mới, bạn sẽ nghe thấy thao tác cắt của tông-đơ rõ hơn so với các tông-đơ khác.
Điầu này là bình thường.
1 Tháo bộ phận cạo ra khỏi máy cạo râu (Hnh 21).
2 Tháo tông-đơ ra khỏi bộ phận giữ tông-đơ trên bộ sạc và đặt nó vào máy cạo râu (nghe
ting ‘click’) (Hnh 22).
3 Bấm nút on/off (bật/tắt) để bật máy cạo râu.
4 S dụng tông-đơ để cắt tỉa tóc mai và/hoặc ria.
5 Làm sạch kỹ tông-đơ sau khi s dụng (xem chương ‘Vệ sinh và bảo dưỡng máy’).
6 Tháo tông-đơ ra và đặt nó trở lại vào bộ phận giữ tông-đơ.
7 Lắp bộ phận cạo vào lại trong máy (nghe ting ‘click’) (Hnh 23).
8 Trượt nắp bảo vệ vào máy cạo râu để tránh làm hư đầu cạo (Hnh 20).
Không s dụng ming ty ra, chất ty ra có tính ăn mòn hoặc những chất lỏng mạnh như là
cồn, xăng hoặc axêtôn để lau chùi thit bị.
Làm sạch máy cạo râu và tông-đơ sau mỗi lần sử dụng.
Nên thận trọng với nước nóng. Luôn kiểm tra xem nước có quá nóng không để tránh làm bỏng
tay bạn.
Không được dùng khăn bông hay khăn giấy để lau khô bộ phận cạo v chúng có thể làm hư phần
dao cạo.
Lưu ý: Máy cạo râu không kín nước và c th rửa sạch với nước.

302
1 Bấm nút on/off (bật/tắt) để bật máy cạo râu.
Lưu ý: Lau chùi máy cạo râu khi đ tắt máy.
2 Nhúng bộ phận cạo/tông-đơ vào trong nước nóng trong ít nhất 30 giây (Hnh 24).
3 Tắt máy cạo râu và lắc sạch nước.
4 Trượt nắp bảo vệ vào máy cạo râu để tránh làm hư đầu cạo (Hnh 20).
Lưu ý: Nếu máy cạo râu không cạo tt như trước đây và bạn không th khắc phục vấn đề này bằng các
phương pháp lau chùi được nêu trong chương này, hy tham khảo chương ‘Xử lý sự c’ đ biết phương
pháp lau chùi kỹ hơn.
1 Bôi trơn răng tông-đơ bng một giọt dầu máy may cứ sáu tháng một lần.
1 Bảo quản máy cạo râu trong đ & đ sạc.
2 Nu bạn đi du lịch hoặc nu bạn muốn bảo quản máy cạo râu trong đ & đ sạc, lắp nắp bảo
vệ vào máy cạo râu và bảo quản máy cạo râu trong bóp (Hnh 20).
Nếu bạn dự định đi du lịch hoặc cất giữ máy trong một thi gian dài, bạn có thể khóa máy. Khóa di
chuyển ngăn việc vô tình bt máy.
1 Đảm bảo máy cạo râu đã được tắt.
2 Bấm và giữ nút dưỡng chất cạo râu (1) và đồng thời bấm nút on/off (bật/tắt) bng tay kia
(2) (Hnh 25).
3 Giữ cả hai nút trong 6 giây. Chờ cho tới khi máy cạo râu phát ra một âm thanh vo ve ngắn và
đèn báo sạc giữa trên máy cạo râu nhấp nháy vài lần.
, Khóa di chuyển bây giờ đã được kích hoạt.
Lưu ý: Nếu bạn vô tình bấm nt on/off (bật/tắt) trước, máy cạo râu sẽ bắt đầu hoạt động . Nếu điều này
xảy ra, bấm nt on/off (bật/tắt) một lần nữa đ tắt máy cạo râu.
Lưu ý: Nếu bạn bấm nt on/off (bật/tắt) khi chế độ kha di chuyn được kích hoạt, đèn báo sạc ở
giữa sẽ nhấp nháy màu trắng đ cho biết máy cạo râu đang bị kha.
Mo: Bấm nt on/off (bật/tắt) đ kim tra xem kha di chuyn đ được kích hoạt chưa. Nếu kha di
chuyn đ được kích hoạt, máy cạo râu sẽ không bật.
1 Bấm và giữ nút dưỡng chất cạo râu (1) và đồng thời bấm nút on/off (bật/tắt) bng tay kia
(2) (Hnh 25).
2 Giữ cả hai nút trong 6 giây. Chờ cho tới khi máy cạo râu phát ra một âm thanh vo ve ngắn và
đèn báo sạc giữa trên máy cạo râu nhấp nháy vài lần.
, Khóa di chuyển bây giờ đã được tắt.
Lưu ý: Bạn cũng c th tắt chế độ kha di chuyn bằng cách đặt máy cạo râu trở lại bộ sạc.
303
Nếu bạn dự định đi du lịch và bạn không muốn mang theo đế & đế sạc, bạn có thể mang theo bộ
sạc, để sạc máy cạo râu khi cần thiết.
Để bảo đảm vệ sinh, chúng tôi khuyên bạn nên thay hộp dưỡng chất cạo râu mỗi năm một lần. Một
hộp mới được đóng gói cùng với một lọ dưỡng chất cạo râu NIVEA FOR MEN và một bộ thay thế
(bao gồm một bộ phn cạo mới HS85 và một tuýp kem mới).
1 Tháo hộp dưỡng chất cạo râu ra khỏi máy cạo râu (Hnh 26).
2 Lắp vấu ở phía trên cùng của hộp dưỡng chất cạo râu mới vào rãnh trên mép của máy cạo
râu (1). Sau đó ấn phần dưới cùng của hộp này bng ngón tay cái (2) để gắn hộp vào máy cạo
râu (nghe ting ‘click’) (Hnh 27).
3 Đổ hộp dưỡng chất cạo râu (xem chương ‘Bắt đầu s dụng’).
Thay bộ phn cạo mỗi năm một lần để có hiệu quả cạo râu tối ưu.
Chỉ thay bộ phn cạo bng Bộ Phn Cạo HS85 Philips.
1 Tháo bộ phận cạo cũ ra khỏi máy cạo râu (Hnh 21).
2 Lắp bộ phận cạo mới vào máy cạo râu (nghe ting ‘click’) (Hnh 23).
Chỉ sử dụng lọ dưỡng chất cạo râu NIVEA FOR MEN.
1 Tháo đầu bịt của lọ dưỡng chất cạo râu NIVEA FOR MEN (Hnh 6).
2 Xoay nắp lọ dưỡng chất theo chiều kim đồng hồ (nghe ting ‘click’) (Hnh 7).
, Nắp sẽ di chuyển xuống dưới và vòi dưỡng chất sẽ lồi ra.
3 Xoay nắp của nắp đ đổ lại & sạc ngược chiều kim đồng hồ để tháo nó ra.
4 Đặt lọ dưỡng chất vào lỗ giữ lọ với vòi hướng xuống dưới (Hnh 8).
5 Nhấn nắp trở lại vào đ đổ lại & sạc (1) và xoay theo chiều kim đồng hồ (2) để cố định
nó (Hnh 9).
- Không vứt thiết bị này cùng chung với chất thải gia đình thông thưng khi ngừng sử dụng nó.
Hãy đem nó đến điểm thu gom chính thức để tái chế. Làm như thế, bạn s giúp bảo vệ môi
trưng (Hình 28).
- Pin tích hợp, có thể sạc lại có chứa những chất có thể gây ô nhim môi trưng. Luôn tháo pin
trước khi vứt bỏ thiết bị hoặc mang thiết bị tới một điểu thu chính thức. Vứt bỏ pin tại một
điểm thu chính thức dành cho pin. Nếu bạn gặp vấn đề với việc tháo pin, bạn cũng có thể mang
thiết bị tới một trung tâm dịch vụ của Philips, trung tâm này s giúp bạn tháo pin và s vứt bỏ
pin theo cách an toàn cho môi trưng.
Chỉ tháo pin sạc khi vứt bỏ máy cạo râu. Đảm bảo pin hoàn toàn ht điện khi tháo pin.
Hãy cn thận, các dải pin rất bén.

304
1 Tháo hộp dưỡng chất cạo râu ra khỏi máy cạo râu (Hnh 26).
2 Tháo ba ốc vít trên mặt sau của máy cạo râu (Hnh 29).
3 S dụng tô vít để tháo panen mặt sau của nắp (Hnh 30).
4 Cắt dây điện và tháo pin sạc.
Nếu bạn cần biết dịch vụ, thông tin hay gặp trục trặc, vui lòng vào website của Philips tại
www.philips.com/supporthoặc liên hệ với Trung Tâm Chăm Sóc Khách Hàng của Philips ở nước
bạn (bạn s tìm thấy số điện thoại của Trung tâm trong t bảo hành khắp thế giới). Nếu không có
Trung Tâm Chăm Sóc Khách Hàng tại quốc gia của bạn, hãy liên hệ với đại lý Philips tại địa phương
bạn.
Bộ phn cạo (lưỡi cắt và bảo vệ) không được bảo hành theo các điều khoản bảo hành quốc tế vì
chúng có thể bị mài mòn.
Hộp dưỡng chất là bộ phn dùng một lần và không thuộc phạm vi bảo hành quốc tế.

305
Chương này tóm tắt các sự cố thưng gặp phải với thiết bị này. Nếu bạn không thể giải quyết được
vấn đề sau khi tham khảo thông tin dưới đây, hãy liên hệ với Trung Tâm Chăm Sóc Khách Hàng của
Philips tại nước bạn.
Vấn đề Nguyên nhân có thể Giải pháp
Máy cạo không
Có thể bạn chưa xả đủ
Bấm nút dưỡng chất cạo râu cho tới khi đã xả đủ
trượt trơn tru
dưỡng chất cạo râu.
lượng dưỡng chất cạo râu NIVEA FOR MEN. Làm
trên da.
như vy s giúp cho bộ phn cạo trượt trơn tru
trên da.
Máy cạo râu
Có thể bạn chưa rửa
Chùi rửa máy cạo râu (xem chương ‘Cách chùi rửa
không hoạt động
sạch kỹ máy cạo râu.
và bảo dưỡng máy’).
tốt như trước đây.
Tóc dài làm tắc các đầu
Lau chùi các đầu cạo bng cách thực hiện theo các
cạo.
bước trong phương pháp lau chùi kỹ hơn được nêu
dưới đây.
Bộ phn cạo có thể bị
Thay bộ phn cạo mới (xem chương ‘Thay thế phụ
hư hoặc mòn.
kiện’).
Máy cạo râu
Hết pin sạc. Sạc lại pin (xem chương ‘Cách chuẩn bị sử dụng
không hoạt động
máy’).
khi tôi bấm nút
bt/tắt.
Khóa di chuyển đã
Tắt khóa di chuyển (xem chương ‘Bảo quản’).
được kích hoạt.
Dưỡng chất cạo râu
Chùi rửa máy tht kỹ rồi mới tiếp tục cạo (xem
khô có thể làm tắc các
chương ‘Cách lau chùi’).
đầu cạo trong bộ phn
cạo.
Có thể bạn chưa lắp lại
Khi lắp lại bộ phn cạo, đảm bảo rng bạn xoay nắp
bộ phn cạo theo đúng
bảo vệ ngược chiều kim đống hồ cho tới khi nó
cách sau khi lau chùi kỹ.
khớp vào vị trí.
Có rất ít dưỡng
Một trong những lỗ
Rửa sạch hoặc ngâm bộ phn cạo trong nước. Nếu
chất cạo râu
dưỡng chất có thể bị
nó không có tác dụng, hãy bơm dưỡng chất cạo râu
thoát ra từ các lỗ
tắc.
vào hộp dưỡng chất cạo râu cho tới khi dưỡng chất
mặc dù có đủ
bắt đầu thoát ra từ lỗ bị tắc. Nếu làm theo bước
dưỡng chất trong
này vẫn không được, hãy thử phương pháp sau: 1)
hộp.
Tắt máy cạo râu 2) Kéo bộ phn cạo ra khỏi máy
cạo râu 3) Cho ngón tay vào lỗ bị tắc 4) Bt máy
cạo râu 5) Bấm nút dưỡng chất cạo râu trong vài
giây cho tới khi dưỡng chất thoát ra từ lỗ bị tắc.
306
Vấn đề Nguyên nhân có thể Giải pháp
Có thể bạn chưa đặt
Đảm bảo bạn đặt đầu cạo không có lỗ cho dưỡng
các đầu cạo trở lại các
chất vào đúng bộ phn giữ. Đây là bộ phn giữ gần
bộ phn giữ ban đầu
nút on/off (bt/tắt) nhất khi bộ phn cạo được lắp
của chúng. Một trong
vào máy cạo râu.
số các đầu cạo không
có lỗ cho dưỡng chất
cạo râu ở giữa đầu cạo
này và cần được đặt
trong một bộ phn giữ
riêng.
Không có chút
Hộp dưỡng chất sắp
Đổ hộp dưỡng chất cạo râu (xem chương ‘Cách
dưỡng chất cạo
hết.
chuẩn bị sử dụng máy’).
râu nào thoát ra
từ các lỗ mặc dù
tôi bấm nút
dưỡng chất cạo
râu.
Tông-đơ phát ra
Tông-đơ này dùng thiết
Do thiết kế mở mới, bạn s nghe thấy thao tác cắt
nhiều tiếng ồn
kế mở.
tông-đơ rõ ràng hơn so vơi các tông-đơ khác. Điều
hơn các tông-đơ
này là bình thưng và không có nghĩa là có vấn đề
khác.
gì đó với tông-đơ.
Đảm bảo thit bị đã được tắt.
1 Tháo bộ phận cạo ra khỏi máy cạo râu (Hnh 31).
2 Xoay nắp bảo vệ theo chiều kim đồng hồ và nhấc nó ra khỏi bộ phận cạo (Hnh 32).
Lưu ý: Chỉ tháo từng đầu cạo một. Làm như vậy đ đảm bảo rằng bạn luôn đặt đầu cạo trở lại đng bộ
phận giữ ban đầu của n, điều này là cần thiết vì c hai đầu cạo c các lỗ đặc biệt dành cho dưỡng chất
cạo râu. Điều này cũng đảm bảo rằng bạn không gắn nhầm lưỡi dao cạo và nắp bảo vệ của các đầu cạo
khác nhau, nếu gắn nhầm sẽ ảnh hưởng đến hiệu suất cạo.
3 Nu cần, tháo lưỡi dao cạo ra khỏi nắp bảo vệ.
4 Làm sạch lưỡi dao cạo và nắp bảo vệ bng bàn chải cấp kèm với máy.
5 Sau khi lau chùi, hãy đặt lưỡi dao cạo trở lại bộ phận cạo với chân lưỡi hướng lên.
6 Đặt nắp bảo vệ trở lại phía trên bộ phận giữ đầu cạo (trên lưỡi dao cạo) (Hnh 33).
7 Xoay nắp bảo vệ ngược chiều kim đồng hồ cho tới khi nó khớp vào vị trí (Hnh 34).
8 Lắp bộ phận cạo vào lại trong máy (nghe ting ‘click’) (Hnh 35).

繁體中文
307
簡介
恭喜您購買本產品並歡迎加入飛利浦!請於 www.philips.com/welcome 註冊您的產品,
以善用飛利浦提供的支援。
請閱讀本使用手冊,其中內容不僅說明本電鬍刀的超強功能,也提供一些秘訣,幫助您享
受更加輕鬆、愉快的刮鬍過程。
一般說明 (圖 1)
電鬍刀
保護蓋
鬢角刀
電鬍刀組
刮鬍乳液補充匣
刮鬍乳液按鈕
開/關 (On/Off) 按鈕
充電指示燈
充電器
補充暨充電座
補充暨充電座的上蓋
鬢角刀收藏槽
背板
小插頭插座
「填充乳液補充匣」指示燈
乳液瓶指示燈
清潔刷
妮維亞男用刮鬍乳液瓶
收納袋
電源轉換器 (您的電源轉換器外觀可能與圖示不同)
重要事項
在使用本產品前,請先仔細閱讀本使用手冊,並保留說明以供日後參考。
危險
- 請確定電源轉換器沒有弄濕 (您的電源轉換器外觀可能與圖示不同)。 (圖 2)
警示
- 請小心使用熱水。隨時檢查熱水是否太燙,以避免手部燙傷。
- 電源變壓器內含一個轉換器。請勿切斷電源變壓器而以其他的插頭取代,否則會造成
危險。
- 基於安全考慮,在缺乏監督及適當指示之下,本產品不適用於孩童及任何身體、知
覺、或心理功能障礙者,或缺乏使用經驗及知識者。
- 請勿讓孩童使用本產品或當成玩具。
警告
- 不可將補充暨充電座浸泡在水中,也不可在水龍頭下沖洗。 (圖 3)
- 不可將充電器浸泡在水中,或者在水龍頭下沖洗。 (圖 4)
- 務必將補充暨充電座和充電器放置在防水的平面上使用。
- 請在 5°C 到 35°C 間使用、充電、存放本產品。
- 當您出外旅行時,請隨時為電鬍刀加上保護蓋,以保護電鬍刀刀頭。
- 電鬍刀和其他配件均不可放入洗碗機清洗。
- 切勿使用超過 80°C 的熱水沖洗電鬍刀。
- 僅可使用原廠提供的電源轉換器、充電器和補充暨充電座。
- 電源轉換器或座台本身損壞時,不可使用補充暨充電座。
- 電鬍刀或充電器損壞時,即不可使用。
繁體中文308
- 如果電源變壓器損壞,請務必使用原型號的變壓器進行更換,以免發生危險。
符合標準
- 本電鬍刀符合國際公認安全標準,可以在沐浴或淋浴時安全使用,亦可放心以水龍頭
沖洗。 (圖 5)
- 本飛利浦產品符合電磁波 (Electromagnetic fields,EMF) 所有相關標準。只要使用方
式正確並依照本使用手冊之說明進行操作,根據現有的科學研究資料,使用本產品並
無安全顧慮。
一般
- 電源轉換器可將 100-240 伏特的電壓轉換為低於 24 伏特的安全低電壓。
使用前準備
1 將妮維亞男用刮鬍乳液瓶的拉片取下。 (圖 6)
2 以順時針方向旋轉乳液瓶的蓋子 (會聽見喀噠一聲)。 (圖 7)
, 蓋子就會向下移動,並出現乳液噴嘴。
3 以逆時針方向旋轉補充暨充電座的上蓋,將上蓋取下。
4 將補充暨充電座中,乳液瓶放置孔的包裝拆除。
5 乳液瓶的噴嘴朝下,將乳液瓶插入放置孔。 (圖 8)
6 將補充暨充電座的上蓋放回 (1),並以順時針方向旋轉旋轉上蓋,加以固定 (2)。 (圖 9)
7 將小插頭插入補充暨充電座的插孔,再將電源轉換器接到牆壁的插座。 (圖 10)
8 將電鬍刀放入補充暨充電座,接著往後推 (會聽見喀噠一聲)。 (圖 11)
注意: 電鬍刀可自動充電,並填充刮鬍乳液。
9 請將電鬍刀充電 90 分鐘。 (圖 12)
注意: 請在初次使用之前,和充電指示燈指出電池電量用盡時 (參閱「充電指示」章節)
為電鬍刀充電。
注意: 完全充電的電鬍刀可持續刮鬍約 40 分鐘。
以充電器充電
1 將小插頭插入充電器中,再將電源轉換器接到牆壁的插座。
2 將電鬍刀放入充電器中。 (圖 13)
, 即可開始為電鬍刀充電。
3 電鬍刀需充電 1.5 小時。
注意: 請在初次使用之前,和充電指示燈指出電池電量用盡時 (參閱「充電指示」章節)
為電鬍刀充電。
注意: 完全充電的電鬍刀可持續刮鬍約 40 分鐘。
徒手補充
您也可以不使用補充暨充電座,自行填充刮鬍乳液補充匣:
1 將乳液瓶的噴嘴放入乳液補充匣的填充口內。
2 將乳液瓶上下移動大約 5 次,以將刮鬍乳液汲取到補充包中,至看出補充包裝滿為
止。 (圖 14)
繁體中文 309
電鬍刀上的指示
充電
- 充電指示燈會指出電池充電程度。充電期間,最下方的充電指示燈會先閃爍橘光,然
後熄滅。接著,最上方的充電指示燈會開始閃爍白光,最後白光持續亮起。
快速充電
- 電鬍刀充電 9 分鐘後,最下方的充電指示燈就會熄滅,然後最上方的充電指示燈開始
閃白光,表示電鬍刀有足夠電力可供刮鬍一次。
注意: 唯有已為電鬍刀充電過 1.5 小時後,才能進行快速充電。
剩餘電池電量
- 電池的剩餘電量會以亮起的充電指示燈數目來表示。當您開啟/關閉電鬍刀的電源時,
剩餘的電池電量會顯示數秒時間。 (圖 15)
電量不足
- 當電池電量不足時,刮鬍時最下方的充電指示燈會亮橘光,關閉電鬍刀電源時,則閃
爍橘光。 (圖 16)
電量已滿
- 電池充飽電力時,所有充電指示燈都會持續亮白光。 (圖 15)
- 約 1 小時候,白色充電指示燈會熄滅以節省電力。
補充暨充電座上的指示
乳液瓶指示燈
, 乳液瓶指示燈閃爍橘光時,可能表示的情形有兩種: (圖 17)
- 補充暨充電座中欠缺乳液瓶,或乳液瓶未放妥。
- 乳液瓶已空。
「填充乳液補充匣」指示燈
, 「填充乳液補充包」指示燈可能表示的情形有三種: (圖 18)
- 乳液補充包正填充時,「填充乳液補充包」指示燈會閃爍白光。
- 刮鬍乳液補充匣已滿時,「填充乳液補充包」指示燈會持續亮白光。
- 如果在乳液補充匣的填充過程中乳液瓶倒空,白色的「填充乳液補充包」指示燈會熄
滅,乳液瓶指示燈則閃紅光。
使用此產品
刮鬍
注意: 皮膚適應新的刮鬍系統時約需 2-3 週。
1 請確定刮鬍乳液補充匣中有充足的刮鬍乳液。
2 按下開關 (on/off) 按鈕,開啟電鬍刀電源。
3 確定電鬍刀充電充足 (請參閱「使用前準備」單元的「充電指示」章節)。
4 將電鬍刀組以小圈旋轉方式輕輕在皮膚上移動,並按下刮鬍乳液按鈕,使皮膚上的刮
鬍乳液量足以達到刮鬍舒適的效果。 (圖 19)
- 當您放開刮鬍乳液按鈕時,本產品就會停止釋出乳液。
- 如果短暫地按下刮鬍乳液按鈕,本產品會自動塗抹定量的乳液。
- 刮鬍過程中,再度按下刮鬍乳液按鈕可塗抹更多刮鬍乳液,以確保電鬍刀組持續在皮
膚上平順移動。
注意: 刮鬍乳液按鈕只在電鬍刀電源啟動時有效。
繁體中文310
注意: 本電鬍刀可以類似刀片方式使用:可在濕潤的臉部使用本電鬍刀。不同於傳統電鬍
刀,本產品並無可收集鬍渣的鬍渣室。若要防止鬍渣掉落在衣服上,請在刮鬍時塗抹充足
的刮鬍乳液。
5 每次使用後,請徹底清潔本電鬍刀 (請參閱「清潔與保養」單元)。
6 請蓋上電鬍刀保護蓋,以避免損壞。 (圖 20)
提示:如何達到最佳滑順刮鬍效果
- 讓電鬍刀以小圈旋轉方式輕輕在皮膚上移動。
- 不可對電鬍刀過度施加壓力,以免刺激皮膚。
- 為確保達到適度的滑順,請時時塗抹刮鬍乳液。
- 也可在泡澡或淋浴時使用本電鬍刀。
修剪
注意: 由於新的開放式設計,本產品鬢角刀的刮鬍聲響可能比它種鬢角刀清晰,此為正常
現象。
1 將電鬍刀組從電鬍刀抽出。 (圖 21)
2 將鬢角刀從充電器上的鬢角刀固定座取出,放置到電鬍刀上 (會聽見「喀噠」一聲)。 (
圖 22)
3 按下開關 (on/off) 按鈕,開啟電鬍刀電源。
4 您可以使用鬢角刀修整鬢腳與鬍髭。
5 使用後,請徹底清潔本鬢角刀 (請參閱「清潔與保養」單元)。
6 將鬢角刀取下,放回鬢角刀固定座。
7 將電鬍刀組裝回電鬍刀上 (會聽到喀噠一聲)。 (圖 23)
8 請蓋上電鬍刀保護蓋,以避免損壞。 (圖 20)
清潔與維護
清潔
切勿使用鋼絲絨、磨蝕性的清潔劑或侵蝕性的液體 (例如酒精、汽油或丙酮) 清潔本產品。
電鬍刀/鬢角刀
每回使用電鬍刀和鬢角刀後,請加以清潔。
請小心使用熱水。隨時檢查熱水是否太燙,以避免手部燙傷。
切勿使用毛巾或紙巾擦乾電鬍刀組,因為此舉可能會造成電鬍刀刀頭損害。
注意: 本電鬍刀具有極佳的防水性,可以用水清洗。
1 按下開關 (on/off) 按鈕,開啟電鬍刀電源。
注意: 開啟電源時清理電鬍刀。
2 將電鬍刀組/鬢角刀浸泡在熱水中至少 30 秒。 (圖 24)
3 關閉電鬍刀的電源,甩乾多餘的水份。
4 請蓋上電鬍刀保護蓋,以避免損壞。 (圖 20)
注意: 若電鬍刀無法如往常般刮鬍,而且您參考此章節的清潔方法之後仍無法解決此問
題,請參閱「故障排除」單元,查看超徹底清潔的方法。
繁體中文 311
保養
1 請每 6 個月以一滴縫紉機油來潤滑鬢角刀的刀齒。
收納
收納
1 請將電鬍刀收藏在補充暨充電座中。
2 如果您即將出門旅行,或不想把電鬍刀收藏在補充暨充電座中,請將保護蓋放在電鬍
刀上,再將電鬍刀收藏在套袋中。 (圖 20)
攜帶
如果要長期存放電鬍刀或是外出旅行,可以將電鬍刀鎖定。旅行鎖定後可以避免意外開啟
電鬍刀電源。
啟動旅行鎖定
1 確定電鬍刀的電源已經關閉。
2 按住刮鬍乳液按鈕 (1),另一手同時按下開/關按鈕 (2)。 (圖 25)
3 同時將兩個按鈕按住 6 秒。等待電鬍刀發出短促的嗡嗡聲,且電鬍刀中央的充電指示
燈閃爍數次。
, 這時即已啟動旅行鎖定。
注意: 如果不小心先按下開/關按鈕,電鬍刀會開始操作。若發生此情形,請再按一次開/
關按鈕,將電鬍刀的電源關閉。
注意: 旅行鎖定啟動後,若按下開/關按鈕,中間的充電指示燈會閃白光,指示電鬍刀已
經鎖定。
提示: 可利用按下開/關按鈕的方式檢查旅行鎖定是否啟動。如果旅行鎖定已經啟動,即
無法開啟電鬍刀的電源。
解除旅行鎖定
1 按住刮鬍乳液按鈕 (1),另一手同時按下開/關按鈕 (2)。 (圖 25)
2 同時將兩個按鈕按住 6 秒。等待電鬍刀發出短促的嗡嗡聲,且電鬍刀中央的充電指示
燈閃爍數次。
, 這時即已關閉旅行鎖定。
注意: 您也可以將電鬍刀放回充電器中,以關閉旅行鎖定。
旅行
如果您要外出旅行,但不想攜帶補充暨充電座,可攜帶充電器,以適時為電鬍刀充電。
更換
刮鬍乳液補充匣
基於衛生考量,我們建議您每年更換一次刮鬍乳液補充匣。妮維亞男用刮鬍乳液瓶 3 瓶裝
與更換套件均附一全新補充匣 (更換套件內含新品 HS85 電鬍刀組和補充匣)。
1 將刮鬍乳液補充匣自電鬍刀取下。 (圖 26)
2 將新刮鬍乳液補充匣上方的突耳插入電鬍刀邊緣的槽 (1),再用拇指按補充匣的底部
(2) 以將補充包連接到電鬍刀 (會聽見喀噠一聲)。 (圖 27)
3 填充刮鬍乳液補充匣 (參閱「使用入門」單元)。
繁體中文312
電鬍刀組
請每年更換一次電鬍刀組,以確保維持最佳的刮鬍效果。
僅能使用型號 HS85 的飛利浦電鬍刀組來進行更換。
1 將舊的電鬍刀組從電鬍刀抽出。 (圖 21)
2 將新的電鬍刀組裝到電鬍刀上 (會聽見「喀噠」一聲)。 (圖 23)
妮維亞男用刮鬍乳液瓶
只能使用妮維亞男用刮鬍乳液瓶。
1 將妮維亞男用刮鬍乳液瓶的拉片取下。 (圖 6)
2 以順時針方向旋轉乳液瓶的蓋子 (會聽見喀噠一聲)。 (圖 7)
, 蓋子就會向下移動,並出現乳液噴嘴。
3 以逆時針方向旋轉補充暨充電座的上蓋,將上蓋取下。
4 乳液瓶的噴嘴朝下,將乳液瓶插入放置孔。 (圖 8)
5 將上蓋推回補充暨充電座上 (1) 再以順時針方向旋轉 (2) 加以固定。 (圖 9)
環境保護
- 本產品壽命結束時請勿與一般家庭廢棄物一併丟棄。請將該產品放置於政府指定的回
收站,此舉能為環保盡一份心力。 (圖 28)
- 本產品內建的充電式電池可能含有會污染環境的物質。丟棄本產品或是將本產品放到
政府指定回收站前,請務必先取出電池,並且將電池送到政府指定的電池回收站。若
您無法取出電池,可將本產品拿到飛利浦服務中心,服務中心的人員會為您卸下電
池,並以對環境無害的方式處理電池。
取出充電電池
棄置本電鬍刀前,請先取出充電電池。當您要取出電池時,請確認其電力已完全耗盡。
電池固定帶非常銳利,請小心。
1 將刮鬍乳液補充匣自電鬍刀取下。 (圖 26)
2 鬆開電鬍刀背面的三枚螺絲。 (圖 29)
3 用螺絲起子拆下握柄的背板。 (圖 30)
4 剪斷電線並取出充電電池。
保證書與服務
若您需要相關服務或資訊,或是有任何問題,請瀏覽飛利浦網站:
www.philips.com/support,或聯絡當地的飛利浦客戶服務中心 (您可以在全球保證書上找到
聯絡電話)。若您當地沒有客戶服務中心,請洽詢當地的飛利浦經銷商。
保固限制
電鬍刀組 (刀具和刀網) 由於其磨損性,因此不在全球保固範圍內。
刮鬍乳液補充匣為拋棄式消耗品,並未涵蓋在全球保固範圍內。

繁體中文 313
故障排除
本單元概述您使用本產品時最常遇到的問題。如果您無法利用以下資訊解決您遇到的問
題,請聯絡您所在國家/地區的顧客服務中心。
問題 可能原因 解決方法
電鬍刀刮起來不順
您塗抹的刮鬍乳液
請按刮鬍乳液按鈕,釋出足夠的妮維亞男用刮
暢。
不足。
鬍乳液。如此即可使電鬍刀再度在皮膚上平順
移動。
電鬍刀不像平常一
您沒有妥善清潔刮
請徹底清潔電鬍刀 (請參閱「清潔與保養」單
樣運作。
鬍刀。
元)。
長鬍鬚卡住電鬍刀
請依照下列的超徹底清潔方法清潔刀頭。
頭。
電鬍刀組已損壞或
更換電鬍刀組 (請參閱「更換」單元)。
磨損。
我按下開/關按鈕
充電式電池沒電。 為電池充電 (請參閱「使用前準備」單元)。
時,電鬍刀沒有反
應。
旅行鎖已啟動。 關閉旅行鎖 (請參閱「收納」單元)。
乾掉的刮鬍乳液堵
在您繼續刮鬍之前,請徹底清潔電鬍刀。請參
塞電鬍刀組的刀
閱「清潔」單元。
頭。
完成超徹底清潔
當您重新安裝電鬍刀組時,請務必將每個刀網
後,您未將電鬍刀
朝逆時針方向旋轉,直到卡入定位為止。
組重新裝好。
補充匣中明明有足
乳液出孔可能堵塞
請沖洗或浸泡電鬍刀組。如果並未奏效,將刮
夠的刮鬍乳液,擠
了。
鬍乳液汲取到刮鬍乳液補充匣中,至乳液開始
壓出來的乳液卻很
從堵塞的孔洞流出為止。如果還是無效,請嘗
少。
試以下方法:1) 關閉電鬍刀的電源 2) 將電鬍刀
組從電鬍刀抽出 3) 將手指放在未堵塞的孔洞上
4) 開啟電鬍刀的電源 5) 按下刮鬍乳液按鈕數
秒,至乳液再度開始從堵塞的孔洞流出為止。
您未將電鬍刀刀頭
請確定您將無乳液孔的刀頭放置在正確的固定
放回原來的固定座
座上;將電鬍刀組裝到電鬍刀上時,此固定座
上。其中一個刀頭
最接近開/關按鈕。
的中央沒有刮鬍乳
液孔,必須放置在
特定的固定座上。
當我按下刮鬍乳液
刮鬍乳液補充匣已
請填充刮鬍乳液補充匣 (參閱「使用前準備」單
按鈕時,完全沒有
將要用盡。
元)。
刮鬍乳液從出孔流
出。
此鬢角刀的聲音比
此鬢角刀採用開放
由於新的開放式設計,本產品鬢角刀的刮鬍聲
其他鬢角刀更大。
式設計。
響可能比它種鬢角刀清晰。此為正常現象,不
代表鬢角刀有問題。

繁體中文314
超徹底清潔方法
確定關閉本產品的電源。
1 將電鬍刀組從電鬍刀抽出。 (圖 31)
2 將刀網朝順時針方向旋轉,並從電鬍刀組中拿起。 (圖 32)
注意: 一次僅可移除一個電鬍刀刀頭。此舉可確保您永遠將刀頭放回原來的固定座上,其
中兩個刀頭具有專為刮鬍乳液設計的特殊孔洞,因此務必遵照說明操作。如此一來可確保
不同刀頭的刀網與刀片不會被混淆使用,進而影響刮鬍效能。
3 如有需要,請從刀網移除刀片。
4 請使用隨附的毛刷清潔刀片及刀網。
5 清潔後,請將刀片放回電鬍刀組,使刀片腳朝上。
6 請將刀網放回電鬍刀刀頭固定座 (置於刀片之上)。 (圖 33)
7 將刀網朝逆時針旋轉,直到卡入定位。 (圖 34)
8 將電鬍刀組裝回電鬍刀上 (會聽到喀噠一聲)。 (圖 35)

简体中文
315
产品简介
感谢您的惠顾,欢迎光临飞利浦!为了您能充分享受飞利浦提供的支持,请注册您的产
品,网址为 www.philips.com/welcome。
请阅读本用户手册,因为手册包含有关此剃须刀各种功能的信息,并提供了一些使用技巧
来帮助您获得更轻松、更舒适的剃须体验。
一般说明 (图 1)
剃须刀
保护盖
修剪器
剃须刀头部件
剃须调理液筒
剃须调理液按钮
开/关按钮
充电指示灯
充电器
加液及充电底座
加液及充电底座盖子
修剪器存放凹槽
后面板
小插头的转换插座
“填充调理液筒”指示灯
调理液筒指示灯
清洁刷
NIVEA FOR MEN 剃须调理液瓶
精美软袋
电源适配器(您的电源适配器可能与图中所示的电源适配器不同)。
注意事项
使用产品之前,请仔细阅读本使用说明书,并妥善保管以备日后参考。
危险
- 确保电源适配器干燥(适配器可能与图中显示的适配器不同)。 (图 2)
警告
- 使用热水时一定要小心。切记先检查水温是否太高,以防手被烫伤。
- 电源适配器内含有一个变压器。切勿将其剪断,而用另一个插头代替,否则将导致严
重后果。
- 本产品不打算由肢体不健全、感觉或精神上有障碍或缺乏相关经验和知识的人(包括
儿童)使用,除非有负责他们安全的人对他们使用本产品进行监督或指导。
- 应照看好儿童,确保他们不玩耍该产品。
注意
- 切勿将加液及充电底座浸在水中,也不要在自来水龙头下冲洗。 (图 3)
- 切勿将充电器浸入水中,也不要在自来水龙头下冲洗。 (图 4)
- 请务必在抗有机溶剂腐蚀的表面上放置和使用加液及充电底座。
- 必须在 5 摄氏度至 35 摄氏度之间的温度下使用、存放和为本产品充电。
- 旅行携带时,应确保将保护盖盖在剃须刀上,以保护剃须刀头。
- 剃须刀及其它配件不能用洗碗机清洗。
- 切勿使用温度高于 80°C 的热水冲洗剃须刀。
- 只能使用所提供的适配器、充电器和加液及充电底座。
- 如果适配器或加液及充电底座本身已损坏,请勿继续使用。
- 如果剃须刀或充电器已损坏,请不要使用。
