Philips LivingColors Conique noir: instruction
Class: Lighting
Type:
Manual for Philips LivingColors Conique noir

LivingColors
Generation2
Led Lamp
69166/**/**
1
Content
EN
.............17
ES
..............43
HU
............73
SL
............103
FR
..............20
PT
.............. 47
LV
..............76
MK
..........106
DE
............. 23
IT
...............50
LT
..............80
BG
...........111
NL
.............27
EL
..............54
ET
.............. 84
HR
...........115
NO
...........30
TR
.............58
RU
.............87
SR
............119
DA
.............34
PL
..............62
UK
.............91
AR............122
SV
..............37
CS
.............66
KK
.............95
FI................40
SK
.............. 69
RO
.............99
2
AA A
A
AA
AAA
AAA
A
AA
AAA
3
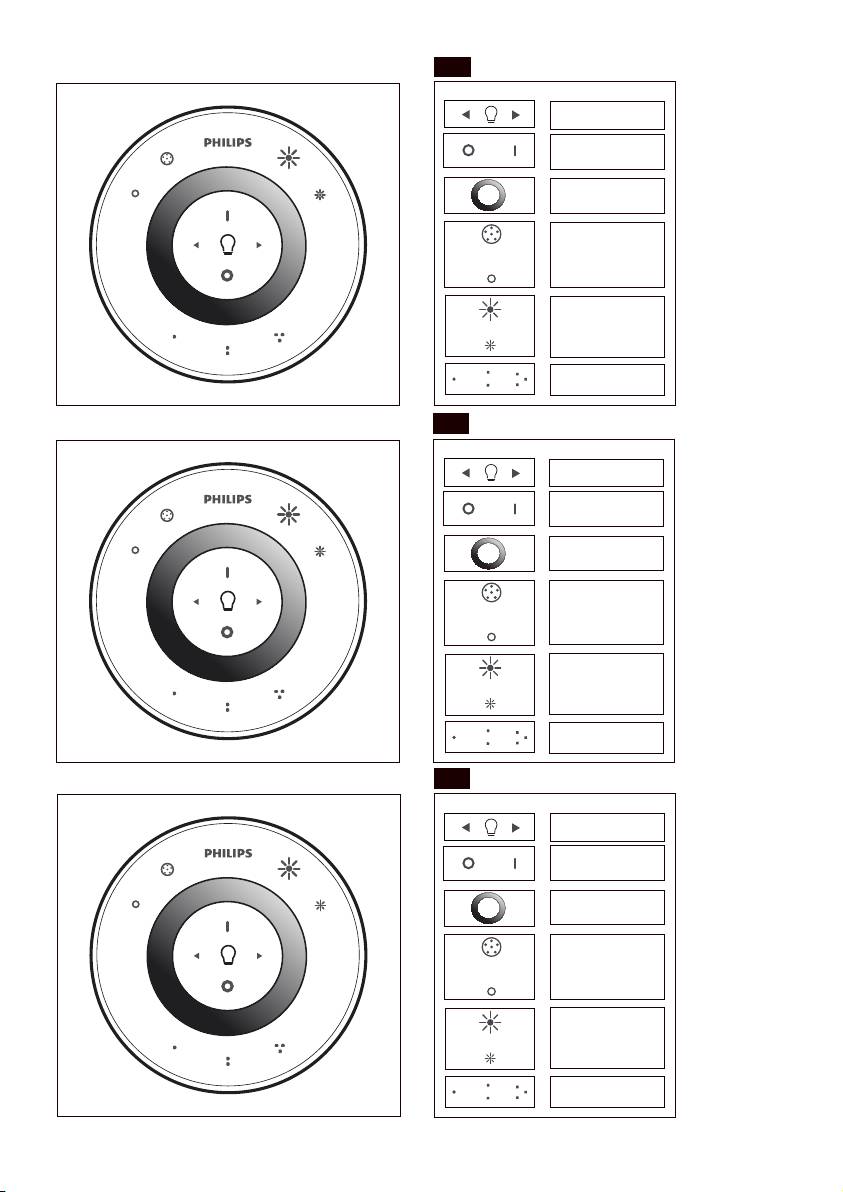
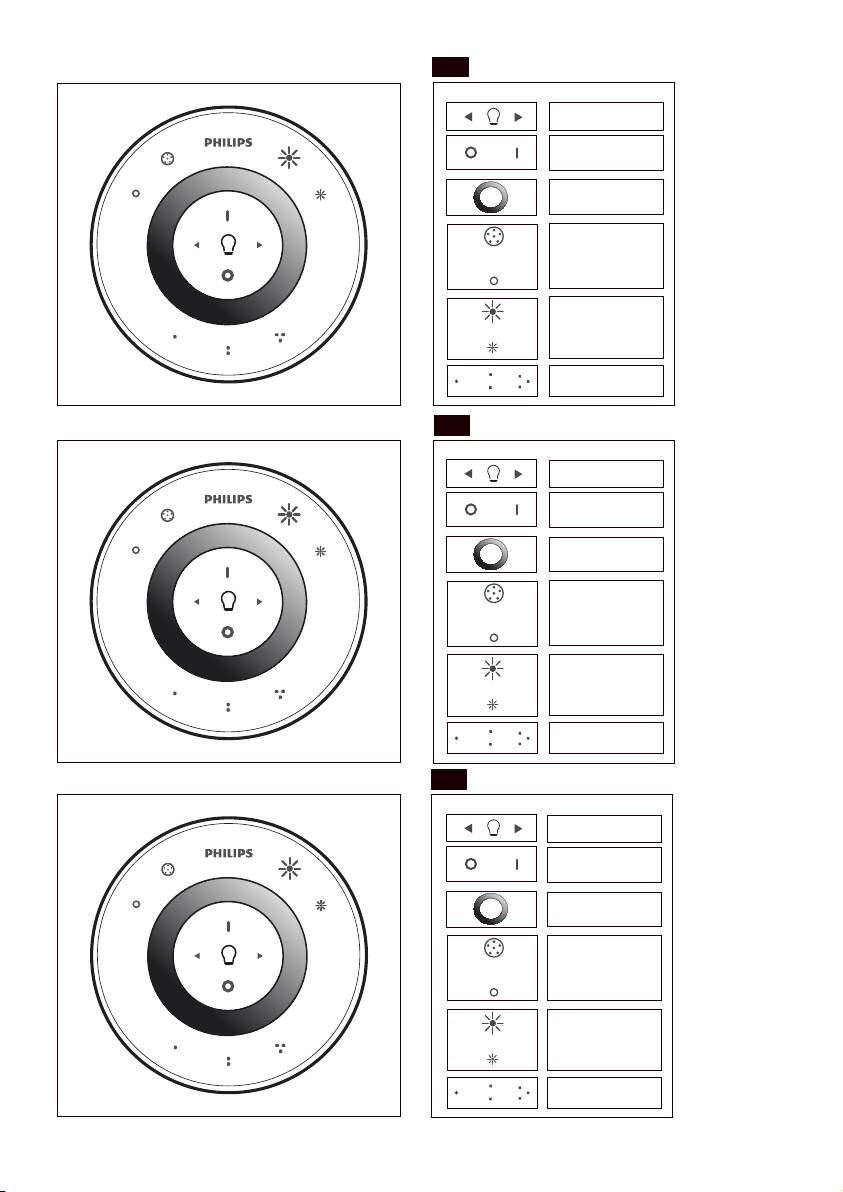
EN
Remote Control
Light Selection
Off/On
Colour
selection
Saturation Up
Saturation Down
Dim Up
Dim Down
Scene
Buttons
FR
Télécommande
Sélection lampe
Off/On
Sélection couleur
Saturation+
/ Saturation-
Luminosité+
Luminosité-
(gradation)
Boutons
d’ambiance
DE
Fernbedienung
Lichtauswahl
Ein/ Aus
Farbauswahl
Sättigung
erhöhen
Sättigung
verringern
Hochdimmen
Herunterdimmen
Moditasten
4

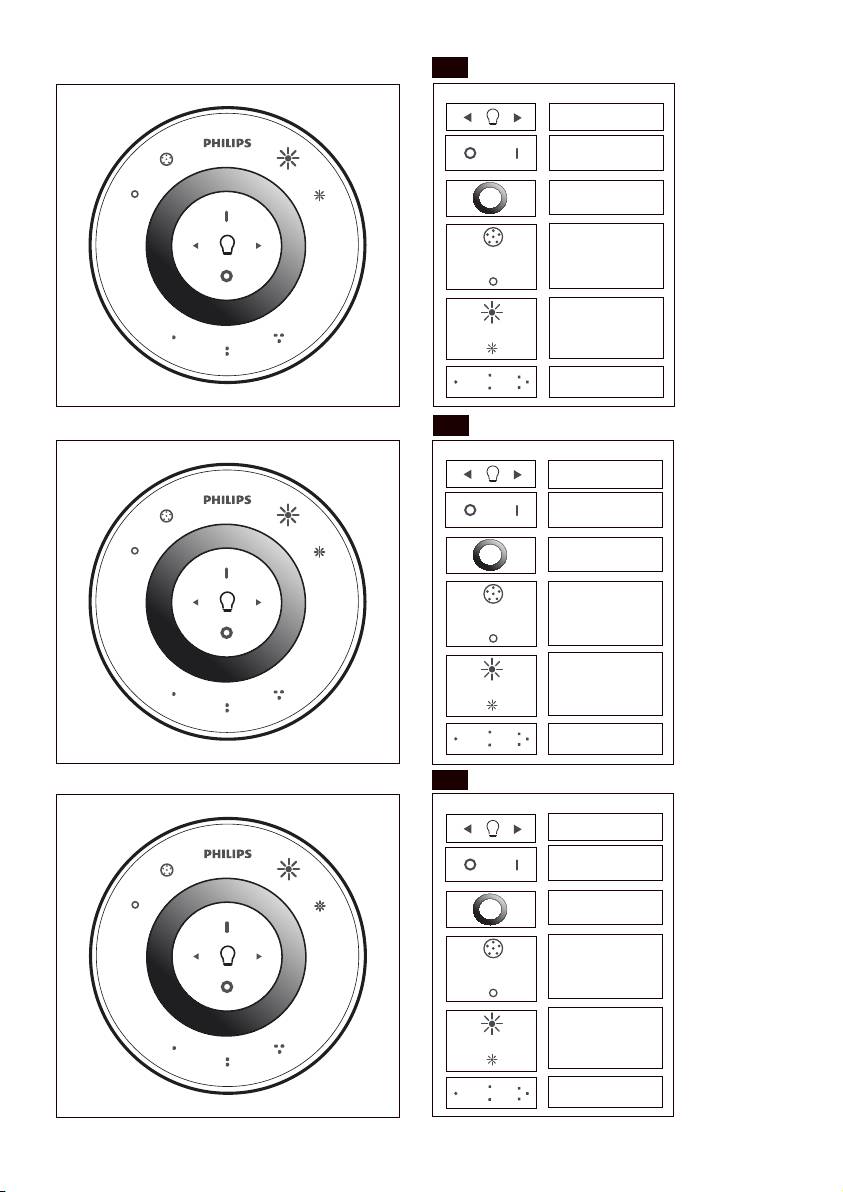
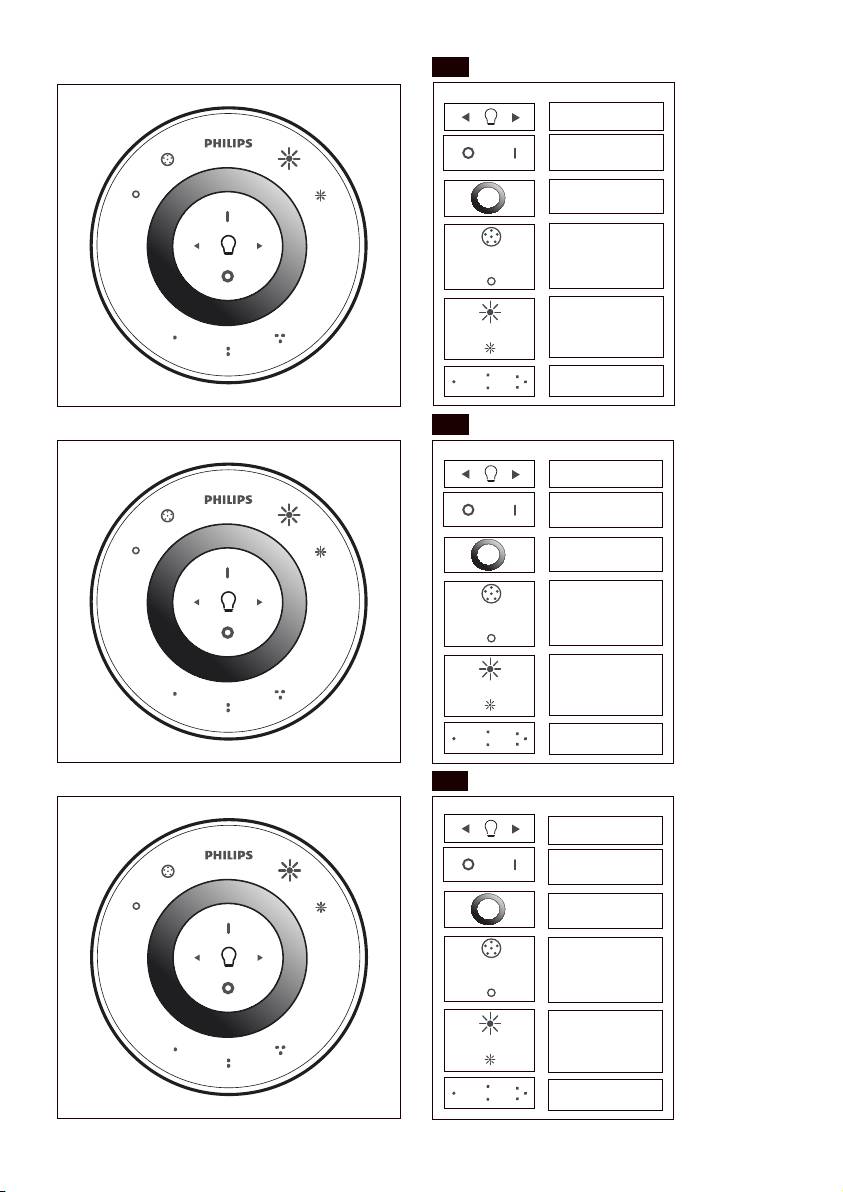
NL
Afstandsbediening
Lichtselectie
Uit / Aan
Kleurselectie
Minder wit
Meer wit
Hogere
lichtintensiteit
Lagere
lichtintensiteit
Scèneknoppen
NO
Fjernkontroll
Valg av lys
Av/på
Valg av farge
Mer metning Min-
dre metning
Sterkere
dimming
Svakere
dimming
Sceneknapper
DA
Fjernbetjening
Valg af pære
Fra/Til
Farvevalg
5
Mætning op
Mætning ned
Blænd op
Blænd ned
Sceneknapper
5

SV
Fjärrkontroll
Belysningsalternativ
Av / På
Färgalternativ
Mer
färgmättnad
Mindre
färgmättnad
Dimma upp
Dimma ned
Knappar för
belysningseffekt
FI
Kaukosäädin
Valon valinta
Pois/Käytössä
Värin valinta
Lisää/vähemmän
värikylläisyyttä
Lisää/vähemmän
voimakkuutta
Valaistuspainikkeet
ES
Mando a distancia
Selección de luz
Encendido
/ apagado
Selección de color
Aumento de
saturación
Disminución de
saturación
Aumento de
intensidad
Disminución de
intensidad
Botones para crear
ambiente
6

PT
Telecomando
Selecção de luz
Desligar/ Ligar
Selecção de cor
Aumentar a
saturação
Diminuir a
saturação
Aumentar a
intensidade da luz
Diminuir a
intensidade da luz
Botões de efeitos
de luz
IT
Telecomando
Selezione luce
Off/On
Selezione colore
Aumento/
diminuzione
saturazione
Aumento/
diminuzione
intensità luminosa
Pulsanti combina-
zioni luminose
EL
Τηλεχειριστήριο
Επιλογή φωτός
Off / On
Επιλογή χρώματος
Αύξηση / μείωση
κορεσμού
Αύξηση / μείωση
έντασης φωτός
Κουμπιά
σκηνής
7

TR
Uzaktan kumanda
Işık seçimi
Kapalı / Açık
Renk seçimi
Doygunluk artırma
Doygunluk azaltma
Işık açma
Işık kısma
Sahne düğmeleri
PL
Pilot zdalnego sterowania
Wybór światła
Wył. / Wł.
Wybór koloru
Zwiększenie nasycenia
Zmniejszenie nasycenia
Jaśniejsze światło
Ciemniejsze światło
Przyciski efektów
CS
Dálkový ovladač
Výběr světla
Off / On
Výběr barvy
Zvýšení sytosti
Snížení sytosti
Větší ztlumení
Menší ztlumení
Tlačítka scény
8
SK
Diaľkové ovládanie
Výber svetla
Vyp./Zap.
Výber farby
Zvýšenie sýtosti/
Zníženie sýtosti
Zosilnenie
Stlmenie
Tlačidlá scény
HU
Távvezérlő
Fényválasztó
Off / On (ki/be)
Színválasztó
Telítettség növelése
Telítettség csökkentése
Fényintenzitás
növelése
Fényintenzitás
csökkentése
Fénybeállítás-választó
gombok
LV
Tālvadības pults
Gaismas atlasīšana
Ieslēgt/Izslēgt
Krāsas atlasīšana
Palielināt piesātinājumu
Samazināt iesātinājumu
Gaišāka/tumšāka
Ainas pogas
9

LT
Nuotolinis valdymas
Šviesos pasirinkimas
Išjungti / Įjungti
Spalvų pasirinkimas
Soties padidinimas /
sumažinimas
Pritemdyti / pašviesinti
Scenų mygtukai
ET
Kaugjuhtimispult
Valguse valik
Väljas / sees
Värvi valik
Küllastatust juurde /
Küllastatust vähemaks
Hämarust juurde /
Hämarust vähemaks
Stseeninupud
RU
Пульт ДУ
Выбор лампы
Вык / Вкл
Выбор цвета
Насыщенность вкл./
насыщенность выкл.
Затемнение вкл. /
затемнение выкл.
Кнопки переключения
режима
10
UK
Пульт дистанційного керування
Вибір світла
Увімк./вимк.
Вибір кольору
Збільшення/
зменшення насичення
Збільшення/
зменшення яскравості
Кнопки ефекту
освітлення
KK
Қашықтан басқару құралы
Жарықты таңдау
Өшіру / қосу
Түсті таңдау
Түс қанықтығын
арттыру / түс
қанықтығын азайту
Жарықтығын
арттыру /
жарықтығын азайту
Реңк түймелері
RO
Telecomandă
Selectare lumină
Oprit / Pornit
Selectare culoare
Creştere/reducere
saturaţie
Creştere/reducere
intensitate luminii
Butoane pentru scenă
11

SL
Daljinski upravljalnik
Izbira svetlobe
Vklop/izklop
Izbira barve
Več nasičenosti
/manj nasičenosti
Bolj zatemnjeno
/manj zatemnjeno
Gumbi za prizore
MK
Далечински управувач
Избор на светилка
Исклучување /
Вклучување
Избор на боја
Зголемување
/ намалување на
заситеност
Зголемување
/ намалување на
придушување
Копчиња за сцена
BG
Дистанционно управление
Избор на светлина
Изкл. / Вкл.
Избор на цвят
Увеличаване на
наситеността /
Намаляване на
наситеността
Увеличаване на
затъмняването /
Намаляване на
затъмняването
Бутони за сцени
12
HR
Daljinski upravljač
Odabir svjetla
Isključeno / Uključeno
Odabir boje
Povećanje / smanjenje
zasićenosti
Povećanje / smanjenje
prigušenja
Gumbi za odabir scene
SR
Daljinski upravljač
Izbor svetla
Isključeno/uključeno
Izbor boje
Povećavanje/
smanjivanje zasićenosti
Povećavanje/
smanjivanje
zatamnjenosti
Dugmad za izbor scene
AR
13
ﺪﻌﺑ ﻦﻋ ﻢﻜﺤﺘﻟﺍ ﺯﺎﻬﺟ
ءﻮﻀﻟﺍ ﺪﻳﺪﺤﺗ
ﻞﻴﻐﺸﺘﻟﺍ ﻑﺎﻘﻳﺇ /ﻞﻴﻐﺸﺗ
ﻥﻮﻠﻟﺍ ﺪﻳﺪﺤﺗ
ﻊﺒﺸﺘﻟﺍ ﺓﺩﺎﻳﺯ /ﻊﺒﺸﺘﻟﺍ ﻒﻴﻔﺨﺗ
ﺖﻴﻔﺨﺘﻟﺍ ﺓﺩﺎﻳﺯ /ﺖﻴﻔﺨﺘﻟﺍ ﻒﻴﻔﺨﺗ
ﺪﻬﺸﻤﻟﺍ ﺭﺍﺭﺯﺃ
ﺪﻌﺑ ﻦﻋ ﻢﻜﺤﺘﻟﺍ ﺯﺎﻬﺟ
ءﻮﻀﻟﺍ ﺪﻳﺪﺤﺗ
ﻞﻴﻐﺸﺘﻟﺍ ﻑﺎﻘﻳﺇ /ﻞﻴﻐﺸﺗ
ﻥﻮﻠﻟﺍ ﺪﻳﺪﺤﺗ
ﻊﺒﺸﺘﻟﺍ ﺓﺩﺎﻳﺯ /ﻊﺒﺸﺘﻟﺍ ﻒﻴﻔﺨﺗ
ﺖﻴﻔﺨﺘﻟﺍ ﺓﺩﺎﻳﺯ /ﺖﻴﻔﺨﺘﻟﺍ ﻒﻴﻔﺨﺗ
ﺪﻬﺸﻤﻟﺍ ﺭﺍﺭﺯﺃ
ﺪﻌﺑ ﻦﻋ ﻢﻜﺤﺘﻟﺍ ﺯﺎﻬﺟ
ءﻮﻀﻟﺍ ﺪﻳﺪﺤﺗ
ﻞﻴﻐﺸﺘﻟﺍ ﻑﺎﻘﻳﺇ /ﻞﻴﻐﺸﺗ
ﻥﻮﻠﻟﺍ ﺪﻳﺪﺤﺗ
ﻊﺒﺸﺘﻟﺍ ﺓﺩﺎﻳﺯ /ﻊﺒﺸﺘﻟﺍ ﻒﻴﻔﺨﺗ
ﺖﻴﻔﺨﺘﻟﺍ ﺓﺩﺎﻳﺯ /ﺖﻴﻔﺨﺘﻟﺍ ﻒﻴﻔﺨﺗ
ﺪﻬﺸﻤﻟﺍ ﺭﺍﺭﺯﺃ
ﺪﻌﺑ ﻦﻋ ﻢﻜﺤﺘﻟﺍ ﺯﺎﻬﺟ
ءﻮﻀﻟﺍ ﺪﻳﺪﺤﺗ
ﻞﻴﻐﺸﺘﻟﺍ ﻑﺎﻘﻳﺇ /ﻞﻴﻐﺸﺗ
ﻥﻮﻠﻟﺍ ﺪﻳﺪﺤﺗ
ﻊﺒﺸﺘﻟﺍ ﺓﺩﺎﻳﺯ /ﻊﺒﺸﺘﻟﺍ ﻒﻴﻔﺨﺗ
ﺖﻴﻔﺨﺘﻟﺍ ﺓﺩﺎﻳﺯ /ﺖﻴﻔﺨﺘﻟﺍ ﻒﻴﻔﺨﺗ
ﺪﻬﺸﻤﻟﺍ ﺭﺍﺭﺯﺃ
ﺪﻌﺑ ﻦﻋ ﻢﻜﺤﺘﻟﺍ ﺯﺎﻬﺟ
ءﻮﻀﻟﺍ ﺪﻳﺪﺤﺗ
ﻞﻴﻐﺸﺘﻟﺍ ﻑﺎﻘﻳﺇ /ﻞﻴﻐﺸﺗ
ﻥﻮﻠﻟﺍ ﺪﻳﺪﺤﺗ
ﻊﺒﺸﺘﻟﺍ ﺓﺩﺎﻳﺯ /ﻊﺒﺸﺘﻟﺍ ﻒﻴﻔﺨﺗ
ﺖﻴﻔﺨﺘﻟﺍ ﺓﺩﺎﻳﺯ /ﺖﻴﻔﺨﺘﻟﺍ ﻒﻴﻔﺨﺗ
ﺪﻬﺸﻤﻟﺍ ﺭﺍﺭﺯﺃ
ﺪﻌﺑ ﻦﻋ ﻢﻜﺤﺘﻟﺍ ﺯﺎﻬﺟ
ءﻮﻀﻟﺍ ﺪﻳﺪﺤﺗ
ﻞﻴﻐﺸﺘﻟﺍ ﻑﺎﻘﻳﺇ /ﻞﻴﻐﺸﺗ
ﻥﻮﻠﻟﺍ ﺪﻳﺪﺤﺗ
ﻊﺒﺸﺘﻟﺍ ﺓﺩﺎﻳﺯ /ﻊﺒﺸﺘﻟﺍ ﻒﻴﻔﺨﺗ
ﺖﻴﻔﺨﺘﻟﺍ ﺓﺩﺎﻳﺯ /ﺖﻴﻔﺨﺘﻟﺍ ﻒﻴﻔﺨﺗ
ﺪﻬﺸﻤﻟﺍ ﺭﺍﺭﺯﺃ
ﺪﻌﺑ ﻦﻋ ﻢﻜﺤﺘﻟﺍ ﺯﺎﻬﺟ
ءﻮﻀﻟﺍ ﺪﻳﺪﺤﺗ
ﻞﻴﻐﺸﺘﻟﺍ ﻑﺎﻘﻳﺇ /ﻞﻴﻐﺸﺗ
ﻥﻮﻠﻟﺍ ﺪﻳﺪﺤﺗ
ﻊﺒﺸﺘﻟﺍ ﺓﺩﺎﻳﺯ /ﻊﺒﺸﺘﻟﺍ ﻒﻴﻔﺨﺗ
ﺖﻴﻔﺨﺘﻟﺍ ﺓﺩﺎﻳﺯ /ﺖﻴﻔﺨﺘﻟﺍ ﻒﻴﻔﺨﺗ
ﺪﻬﺸﻤﻟﺍ ﺭﺍﺭﺯﺃ
ﺪﻌﺑ ﻦﻋ ﻢﻜﺤﺘﻟﺍ ﺯﺎﻬﺟ
ءﻮﻀﻟﺍ ﺪﻳﺪﺤﺗ
ﻞﻴﻐﺸﺘﻟﺍ ﻑﺎﻘﻳﺇ /ﻞﻴﻐﺸﺗ
ﻥﻮﻠﻟﺍ ﺪﻳﺪﺤﺗ
ﻊﺒﺸﺘﻟﺍ ﺓﺩﺎﻳﺯ /ﻊﺒﺸﺘﻟﺍ ﻒﻴﻔﺨﺗ
ﺖﻴﻔﺨﺘﻟﺍ ﺓﺩﺎﻳﺯ /ﺖﻴﻔﺨﺘﻟﺍ ﻒﻴﻔﺨﺗ
ﺪﻬﺸﻤﻟﺍ ﺭﺍﺭﺯﺃ
ﺪﻌﺑ ﻦﻋ ﻢﻜﺤﺘﻟﺍ ﺯﺎﻬﺟ
ءﻮﻀﻟﺍ ﺪﻳﺪﺤﺗ
ﻞﻴﻐﺸﺘﻟﺍ ﻑﺎﻘﻳﺇ /ﻞﻴﻐﺸﺗ
ﻥﻮﻠﻟﺍ ﺪﻳﺪﺤﺗ
ﻊﺒﺸﺘﻟﺍ ﺓﺩﺎﻳﺯ /ﻊﺒﺸﺘﻟﺍ ﻒﻴﻔﺨﺗ
ﺖﻴﻔﺨﺘﻟﺍ ﺓﺩﺎﻳﺯ /
ﺖﻴﻔﺨﺘﻟﺍ ﻒﻴﻔﺨﺗ
ﺪﻬﺸﻤﻟﺍ ﺭﺍﺭﺯﺃ
ﺪﻌﺑ ﻦﻋ ﻢﻜﺤﺘﻟﺍ ﺯﺎﻬﺟ
ءﻮﻀﻟﺍ ﺪﻳﺪﺤﺗ
ﻞﻴﻐﺸﺘﻟﺍ ﻑﺎﻘﻳﺇ /ﻞﻴﻐﺸﺗ
ﻥﻮﻠﻟﺍ ﺪﻳﺪﺤﺗ
ﻊﺒﺸﺘﻟﺍ ﺓﺩﺎﻳﺯ /ﻊﺒﺸﺘﻟﺍ ﻒﻴﻔﺨﺗ
ﺖﻴﻔﺨﺘﻟﺍ ﺓﺩﺎﻳﺯ /ﺖﻴﻔﺨﺘﻟﺍ ﻒﻴﻔﺨﺗ
ﺪﻬﺸﻤﻟﺍ ﺭﺍﺭﺯﺃ
2
ON
5sec
60min
± 4sec
14
3.1
± 5sec
± 5sec ± 5sec
+
+
+
3.3
+
± 5sec
± 5sec
3
2
1
-
-
± 10sec
± 10sec
15
3.3
3.4
4
3
1
1
1
± 10sec
2
2
16
EN Instruction for Use
LivingColors Instructions for Use
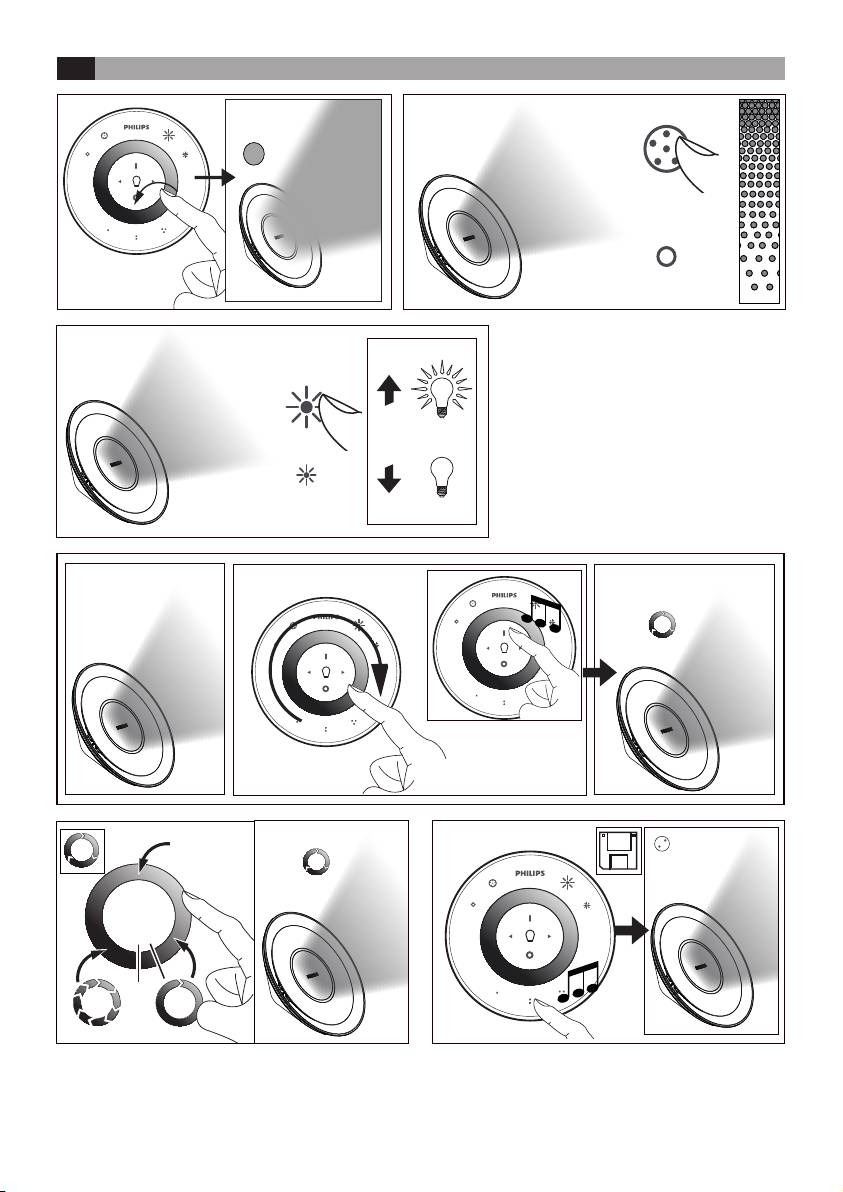
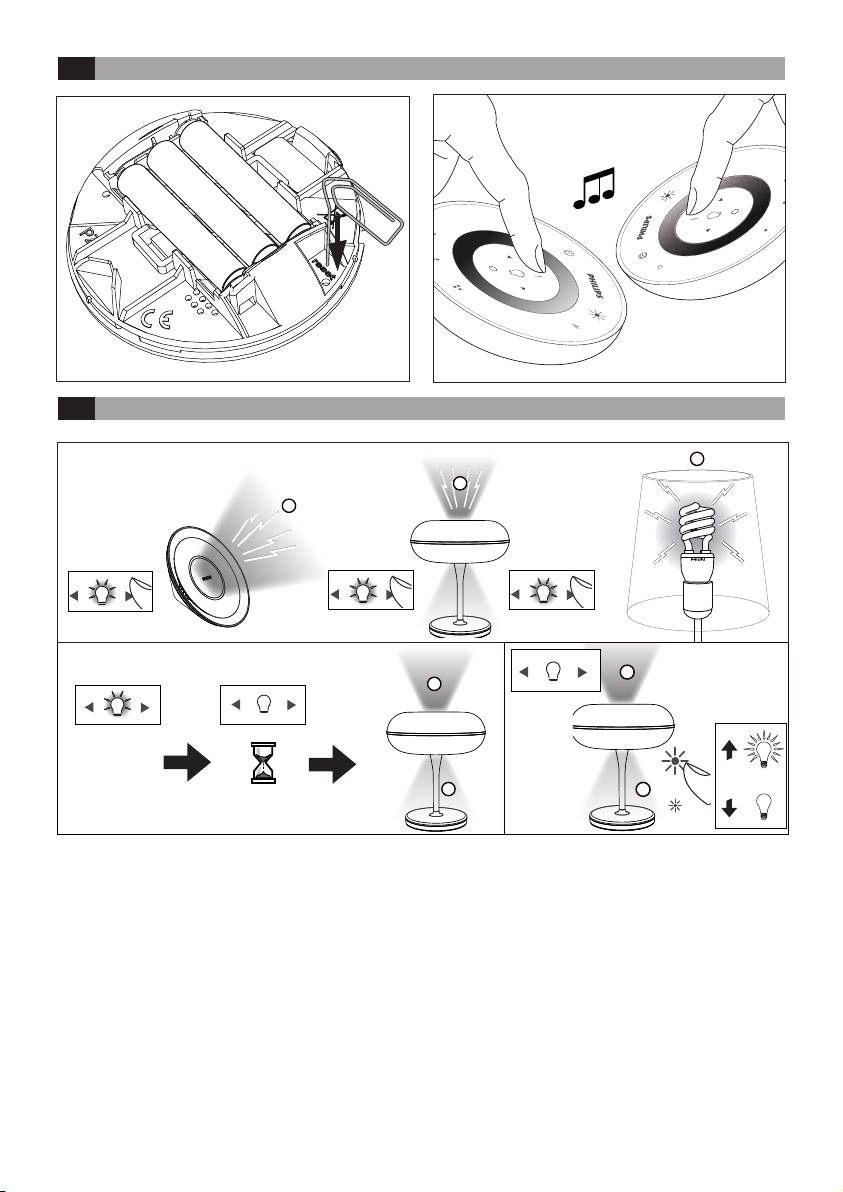
will switch to the automatic colour-changing
mode and the lamp will start changing colours
Thank you for buying Philips LivingColors!
automatically.
LivingColors has been especially designed to create
You can adjust the speed at which colours
your own ambience at home through coloured light.
change. Speed can be adjusted clockwise, from
fast (dark blue colour on the colour wheel)
When using LivingColors for the rst time, please
to slow (purple). You can tap anywhere on
read these instructions carefully and save them for
the colour wheel. While in the automatic
future reference. By following our guidelines, you will
colour-changing mode, you can also adjust the
enjoy the full functionality of Philips LivingColors.
saturation and brightness of the colours.
Important:
To switch back to static colour mode, sweep
- Carefully remove the parts from the packaging.
around the colour wheel again and then press
- Check that all parts are available.
"0". Alternatively, you can switch LivingColors off
("0") and on ("I") again.
This manual will help you to…
- If you like a particular light setting (for example,
1. Get started
red slightly dimmed), you can store this scene
2. Create your own ambience with LivingColors
for easy recall: press and hold one of the Scene
3. Connect LivingColors to other Philips
buttons until the remote control makes a
LivingAmbiance products
beeping sound. Your scene is now stored under
4. Answer frequently asked questions
the Scene button you have pressed. You can
5. Get additional support
also store a certain speed of automatic colour-
changing mode in this way.
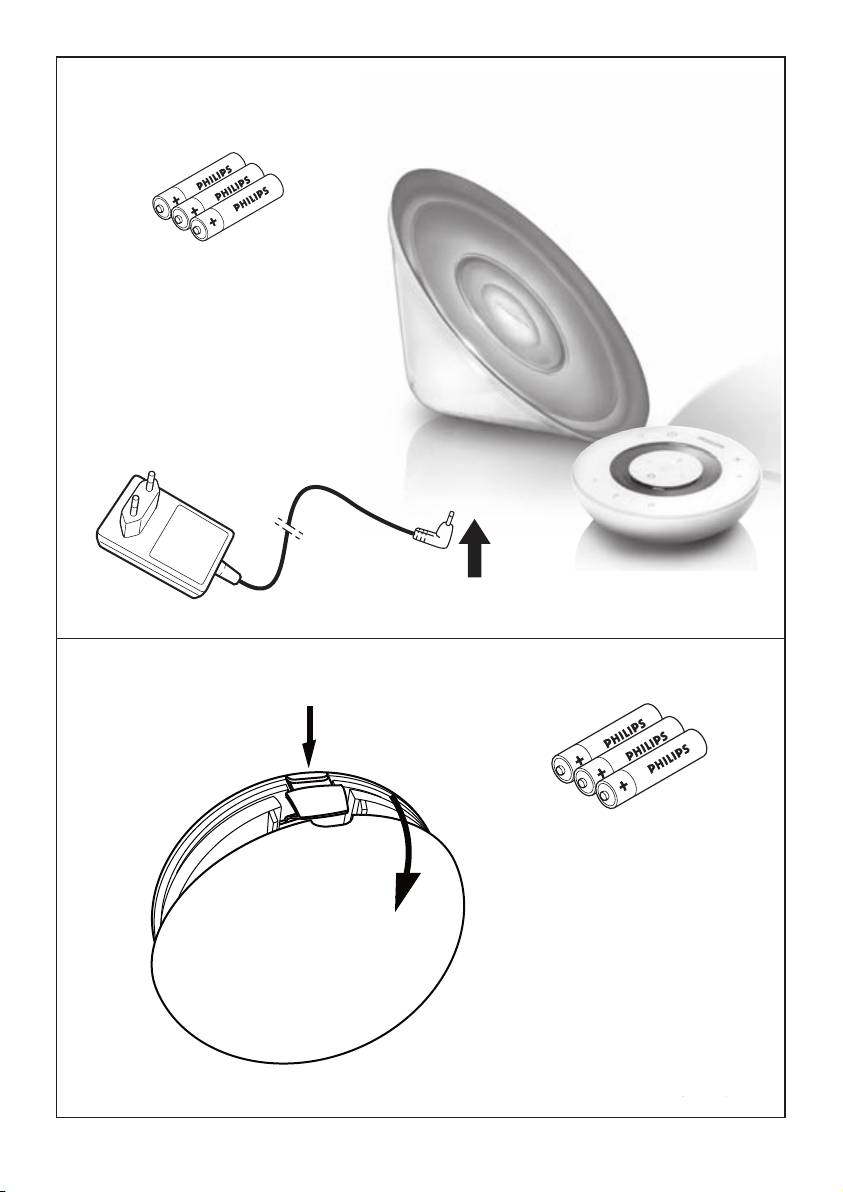
1. Getting started:
You can continue adjusting the lights as you wish.
- Open the battery compartment of the remote
Whenever you want to go back to your stored
control by sliding the button at the back. Insert 3
scene, just press the Scene button you pressed
AAA batteries (+ and – as indicated).
when storing it. That Scene button will light up
briey to show that the scene is selected, and
- Place LivingColors in a selected location on a
the LivingColors will go to your stored settings.
at and stable surface.
You can store up to 3 scenes (one for each
- Direct LivingColors towards the wall (the
Scene button).
optimal distance is 50 cm), insert the connection
plug into the lamp and then plug it into the wall
Switch off LivingColors by pressing the "0" (off)
socket.
button briey. LivingColors will remember your
last setting for the next time you use it. To switch
2. Create your own ambience by:
it on again, press "I" (on).
- Touching the desired colour on the colour
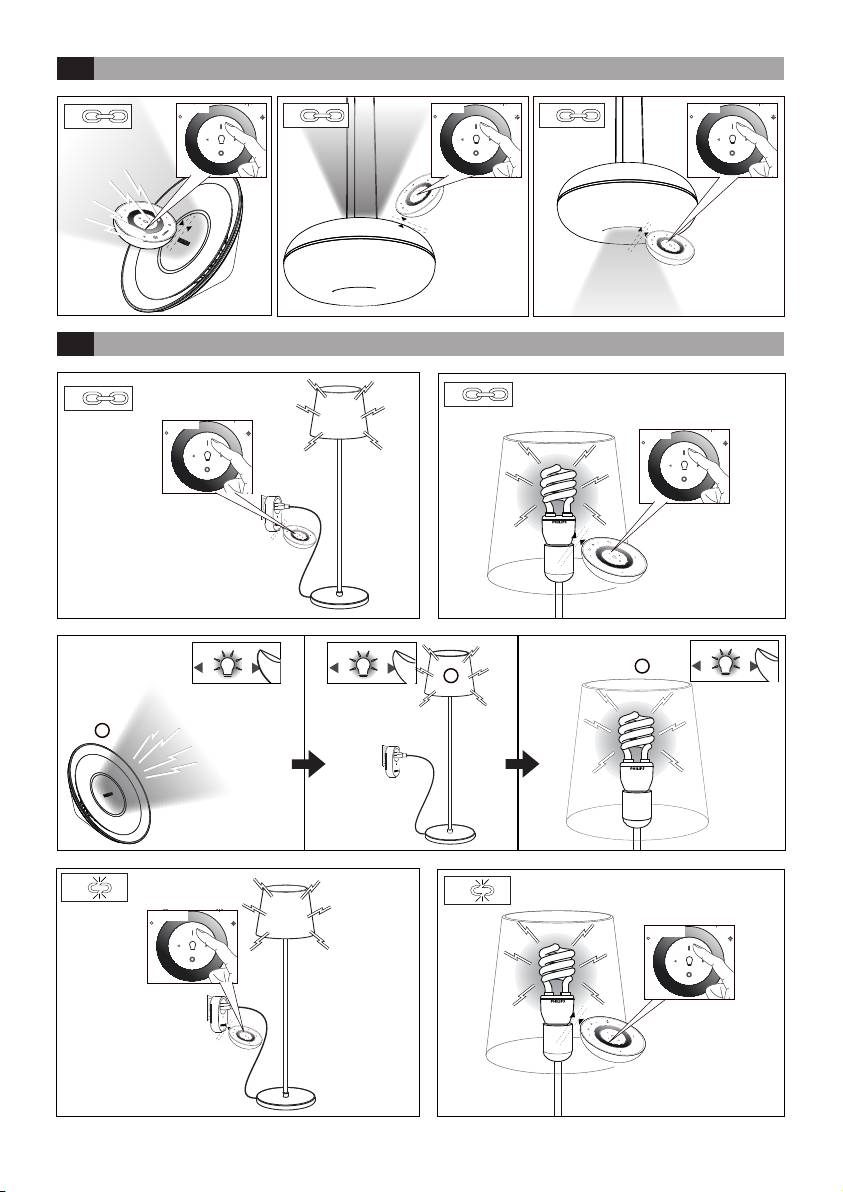
3. Connect LivingColors to other Philips
wheel. You can move your nger over the colour
LivingAmbiance products
wheel to rene the colour.
You can connect different products from the Philips
- Changing the colour saturation (adding
LivingAmbiance range to the remote control of your
more white to the current colour). Press the
LivingColors. This way, you will be able to adjust all
saturation up button for a deep colour or the
the connected products together or each of them
saturation down button for a more pastel colour.
individually – all with the same remote control.
If you keep pressing the saturation down button,
you will ultimately reach white.
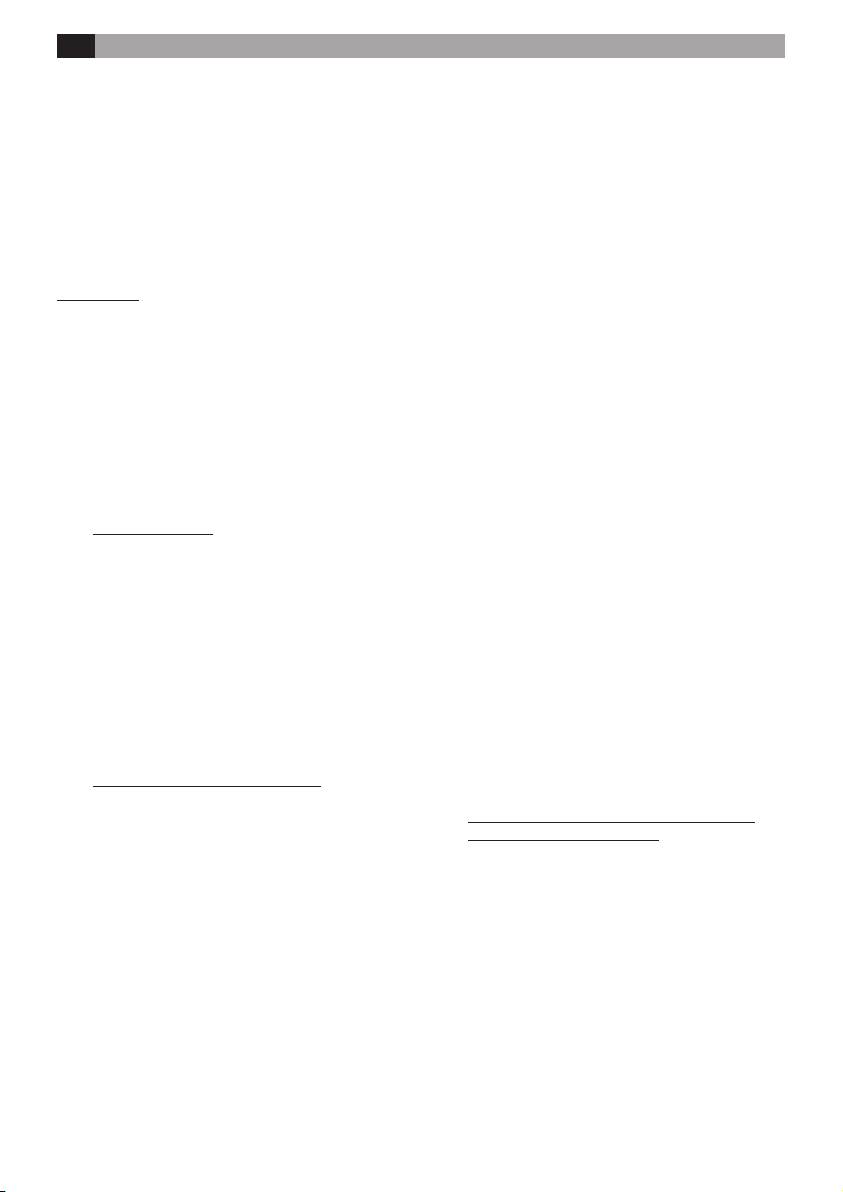
1. You can connect other Philips LivingColors
lamps to your remote control. Most Philips
- Dimming. Increase or decrease the light intensity
LivingColors will work with this remote: just
via the dimming buttons.
check if there is a SmartLink logo on the
LivingColors you would like to link. All products
- Letting colours change automatically. Sweep
with a SmartLink logo can be connected to your
your nger around the colour wheel (one full
remote control.
circle) and briey press "I" ("On"); LivingColors
17

To add a Philips LivingColors lamp to the remote
remotes until the remotes play a sound. The
control, bring the remote close to the lamp,
remotes are now connected – this means that
then press and hold the "I" button. The lamp will
you can now connect the same lamps to the new
ash 3 times. Hold the "I" button until you hear
remote control and control all lamps with either
a beep from the remote; the lamp will shortly
of the remotes.
ash in green. It is now connected to the remote
c. If the remote you are adding is round, you can
control and will turn to its last "on" setting.
now also copy it: you can immediately have
it connected to the same lamps your original
For a LivingColors coloured and white light
remote is connected to. In order to copy the
lamp, please make sure that you also connect the
remote, repeat the procedure described in point
white light. You can do this in the same way as
b.
LivingWhites products described in point 2.
Once you have connected one or more lamps
If you would like to disconnect a LivingColors
to your Philips LivingColors remote control, you
lamp from the remote, bring the remote close to
can control all of these lamps together or each
the lamp, then press and hold the "0" button. The
one individually.
lamp will ash 3 times. Hold the "0" button until
you hear a beep from the remote. The lamp will
To control a single lamp, you need to select it
now slowly fade to off.
(please note that for LivingColors coloured and
white light, coloured and white light need to be
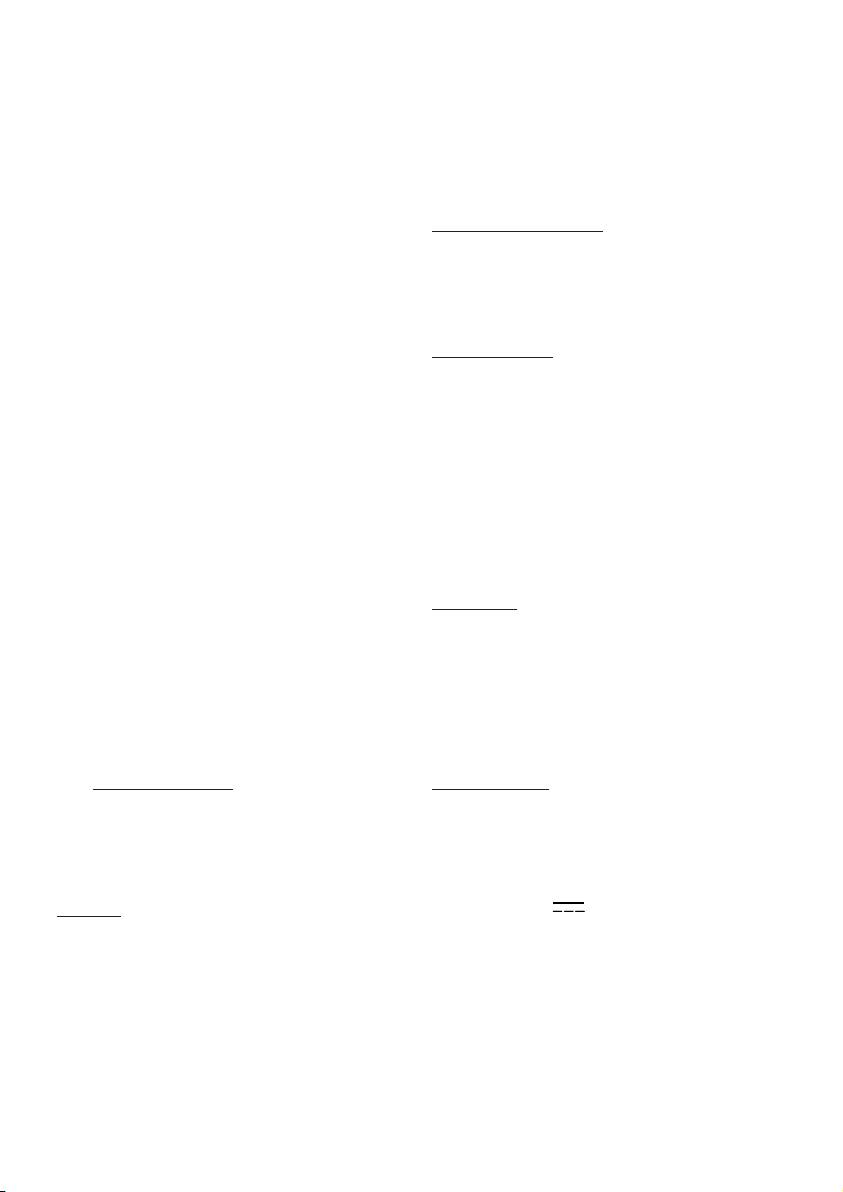
2. You can also connect Philips LivingWhites
selected separately). You can do this using one
products (plugs, energy savers and luminaires)
of the light selection buttons. When you press
to your remote control. To add a Philips
and hold one of the light selection buttons, the
LivingWhites product, bring the remote close
selected lamp will start blinking. If this is not
to it, then press and hold the "I" button. The
the lamp you would like to adjust, release the
lamp will ash 3 times. Hold the "I" button until
button and press it again; another lamp will
you hear a beep from the remote; the lamp will
start blinking. When a lamp is selected, the light
rapidly ash twice. It is now connected to the
selection indicator on the remote control (light
remote control and will turn to its last "on"
bulb) will light up. This means you can now adjust
setting.
the selected lamp only.
If you would like to disconnect a LivingWhites
When no light is selected (light selection
product from the remote, bring the remote
indicator is off), all your adjustments will apply to
close to the product, then press and hold the "0"
all lights connected to the remote control (for
button. The lamp will ash 3 times. Hold the "0"
example, you can dim all lights in the room).
button until you hear a beep from the remote.
The lamp will now slowly fade to off.
If you like a particular combination of light
settings of different luminaires, you can also
3. You can also connect your remote control
store it as a scene in the same way as described
to another remote control from the Philips
in section 2 of this manual.
LivingAmbiance range. Any LivingColors or
LivingWhites remote with a SmartLink logo on
4. Frequently asked questions
it can be connected to your remote control.
Connecting another remote control will allow
What to do if…
you to control the same lamps with two
different remotes. You could, for example, create
• The LivingColors is not providing light
6 different lighting scenes—3 on one remote
o Check the connections of the cord to the lamp.
and 3 on the other—with the same lamps.
Check that the plug is correctly placed in the
To add an extra LivingColors or LivingWhites
wall socket.
remote control, do the following:
o Remove the power cord and put it back. If the
LivingColors changes several colours and then
a. Reset the remote control you would like to
goes off, use the remote control to switch it
add: open its battery compartment and press
back on.
the RESET button for a few seconds (e.g. with
a paper clip). Make sure that the batteries are
• The LivingColors is not responding to the
in. The remote will play a sound to show it has
remote control
been reset.
o Check the batteries in the remote control. The
b. Hold the remote you have reset close to your
batteries should be correctly inserted (+ and -)
current remote. Press the "I" button on both
and should be charged. If the remote control is
18
still not working, try replacing the batteries.
• The failure is caused by damage, faulty
o Link the remote to the LivingColors by following
connections or abuse.
the procedure described in section 3.1 of this
• A defect is caused by extreme circumstances
manual.
not inherent to the LivingColors, for example,
• Buttons are ashing after I have used the remote
lightning, ooding, re, incorrect use or
control
negligence.
o This means that the batteries in the remote
• The LivingColors has been opened or
control are (almost) empty and need to be
disassembled.
replaced.
Cleaning and maintenance:
• I cannot start the automatic colour-changing
Remove the plug from the wall socket.
mode
To avoid scratching, the LivingColors lamp, remote
o It could be that the remote control did not
control and adapter should only be cleaned with a
understand your "sweep" movement. Please
soft dry cloth.
try again, making sure that your nger is on the
Do not use cleaning agents.
colour wheel during the full circle movement
Safety instructions:
• I would like to connect the LivingColors to a
Keep the plug and LivingColors away from liquids and
timer. Is this possible?
humidity.
o Yes. You can use Philips LivingColors with a timer
• LivingColors is for indoor use only. Do not use
(not included). When switched on with a timer,
in wet locations, e.g. bathrooms or outdoors
the LivingColors will show your last setting
• LivingColors is not a toy designed to be played
(static colour or automatic colour-changing
with by children.
mode). Please make sure that your last setting is
• Do not place on hot surfaces
not "off".
• For safety reasons and under the terms of the
warranty, the LivingColors and plug must not be
• I cannot connect additional lamps to the
opened.
LivingColors remote control
• Only use the adapter supplied: using a different
o Please make sure that the product you are
adapter can damage your LivingColors.
trying to connect has a SmartLink logo on it.
Only products with a SmartLink logo can be
Environment:
connected to this remote control.
If you discard the appliance in due course, dispose
o Try repeating the procedure described in section
of it in accordance with the instructions of the local
3 of this manual. Make sure you do hear the
authority. Remove the batteries when you discard
sounds and see the ashes as described there.
the remote control. Do not throw the batteries away
with normal household waste. They must be handed
• My question is not listed here
in at an ofcial collection point or at a Philips Dealer,
o Please contact Philips for assistance (see section
both of which will dispose of the batteries in an
5 "Additional support").
environmentally friendly way.
5. Additional support
Plug specication:
AC adapter
For information and in the event of any problem,
Model: EADP-10EB C (EU type)
please visit the Philips website at www.philips.com or
EADP-10EB D (UK type + Singapore)
contact the Philips Lighting Contact Centre free of
EADP-10EB E (Australia type)
charge in the: 00800-PHILIPSL or 00800-74454775
Input: 110–240 V ~ 0.3 A 50 Hz
Warranty:
Output: 18.5 V 0.83 A
The Philips two-year warranty is valid if the product
is used in accordance with the instructions and for
Power consumption of the luminaire: up to 15.4 W
its intended purpose. Claims will only be accepted on
submission of the original proof of purchase (invoice,
Remote Control:
sales slip or receipt) stating the purchase date, the
Batteries: 3 x Philips Powerlife Alkaline AAA LR03,
name of the dealer and a description of the product.
1.5 V.
The Philips warranty lapses if:
Wireless specication:
• Anything has been changed, crossed out, deleted
Wireless RF mode frequency band:
or rendered illegible on the purchase docket or
2405~2475 MHz
product description.
Wireless communications protocol:IEEE 802.15.4)
19

Operating channels:channel 11, 15, 20 or 25
Temperature (operation): 0–40°C
Temperature (Storage): -25–60°C
Relative humidity: 5–95% non-condensing
Environmental specication:
FR Instructions d’utilisation de LivingColors
Instructions d'utilisation de LivingColors
- Modiez la saturation des couleurs (ajoutez plus
de blanc à la couleur actuelle). Appuyez sur le
Merci d'avoir acheté le LivingColors Philips.
bouton saturation + pour obtenir des couleurs
intenses ou sur le bouton saturation - pour des
LivingColors a été spécialement conçu pour vous
couleurs pastel. Si vous continuez à appuyer sur
permettre de créer, chez vous, une ambiance de
le bouton saturation -, vous nirez par atteindre
lumière colorée.
la couleur blanche.
Avant la première utilisation de LivingColors,
- Créez des gradations. Augmentez ou diminuez
veuillez lire ces instructions attentivement et les
l'intensité de la lumière à l'aide du bouton de
conserver pour une consultation ultérieure. Suivez
gradation.
les instructions pour proter au maximum des
fonctionnalités de Philips LivingColors.
- Changez automatiquement de couleurs.
Déplacez votre doigt autour de la roue des
Important :
couleurs (effectuez un tour complet) et appuyez
- Retirez avec précaution les éléments de leur
brièvement sur « I » (marche). LivingColors
emballage.
passe alors en mode de changement de couleur
- Assurez-vous que tous les éléments sont bien
automatique : la lampe se met à changer de
présents.
couleur automatiquement.
Ce manuel vous aidera à…
Vous pouvez régler la vitesse de changement
des couleurs. Vous pouvez régler la vitesse dans
1. Mettre en route votre produit Philips
le sens des aiguilles d'une montre, de la plus
2. Créer votre propre ambiance avec LivingColors
rapide (bleu foncé sur la roue des couleurs)
3. Connecter LivingColors à d'autres produits
à la plus lente (violet). Vous pouvez appuyer
Philips LivingAmbiance
n'importe où sur la roue des couleurs. En mode
4. Consulter la foire aux questions.
de changement de couleur automatique, vous
5. Bénécier d'une assistance supplémentaire
pouvez également régler la saturation et la
luminosité des couleurs.
1. Mise en route :
Pour revenir au mode de couleur statique,
sélectionnez à nouveau une couleur sur la roue,
- Ouvrez le compartiment à piles de la
puis appuyez sur « 0 ». Vous pouvez également
télécommande en faisant glisser le bouton situé
éteindre « 0 » et rallumer « I » LivingColors.
à l'arrière. Insérez 3 piles AAA (en respectant la
polarité + et - comme indiqué).
- Si vous appréciez un réglage particulier de
lumière (par exemple rouge légèrement tamisé),
- Placez LivingColors sur une surface plane et
vous pouvez mémoriser cette ambiance pour
stable.
y accéder facilement : maintenez enfoncé l'un
des boutons d'ambiance, jusqu'à ce que la
- Orientez LivingColors vers le mur (distance
télécommande émette un bip sonore. Votre
optimale : 50 cm), insérez le connecteur dans la
ambiance est maintenant mémorisée et associée
lampe, puis branchez LivingColors sur la prise
au bouton d'ambiance que vous venez de choisir.
secteur.
Cette méthode vous permet aussi de mémoriser
un certain mode de changement automatique
2. Créez votre propre ambiance de la
de couleur.
manière suivante :
Vous pouvez continuer à régler l'éclairage à
- Sélectionnez la couleur souhaitée d'un simple
votre gré. Lorsque vous souhaitez revenir à votre
contact avec la roue des couleurs. Déplacez
ambiance mémorisée, il vous suft d'appuyer
votre doigt sur la roue pour afner la couleur.
sur le bouton d'ambiance qui y est associé.
Ce bouton d'ambiance s'allume brièvement
20
