Philips AVENT Vigilabebés DECT: instruction
Class: Children Products
Type:
Manual for Philips AVENT Vigilabebés DECT
SCD580
EN User manual 3
LV Lietotājarokasgrāmata 230
BG Ръководствозапотребителя30
PL Instrukcjaobsługi 257
CS Příručkaprouživatele 61
RO Manualdeutilizare 286
ET Kasutusjuhend 88
RU Руководствопользователя315
HR Korisničkipriručnik 115
SK Príručkaužívateľa 345
HU Felhasználóikézikönyv 143
SL Uporabniškipriročnik 373
KK Қолданушының нұсқасы 172
SR Korisničkipriručnik 400
LT Vartotojovadovas 203
UK Посібниккористувача 428

8 Neck strap 26
Table of contents
9 Cleaning and maintenance 26
ENGLISH
1 Introduction 3
10 Storage 26
2 Overview 4
11 Ordering accessories 26
3 Preparing for use 4
12 Guarantee and support 27
3.1 Babyunit 4
3.2 Parentunit 6
13 Frequently asked questions 27
4 Using the baby monitor 7
4.1 Positioningthebabymonitor 7
4.2 Linkingparentunitandbabyunit 7
1 Introduction
5 Functions and feedback on
Congratulations on your purchase and welcome
the baby unit 9
to Philips AVENT! To fully benet from the
5.1 Nightlight 9
support that Philips AVENT offers, register your
5.2 Lullabyfunction 9
product at www.philips.com/welcome.
5.3 Projector 10
Philips AVENT is dedicated to producing
5.4 Pagingtheparentunit 10
caring, reliable products that give parents the
5.5 Batterystatuslight 11
reassurance they need. This Philips AVENT baby
monitor provides round-the-clock support
6 Functions and feedback on the
by ensuring you can always hear your baby
parent unit 11
clearly without any distracting noise. The DECT
6.1 Soothingmenu 11
technology guarantees zero interference and a
6.2 Volume 14
crystal clear sound between the baby unit and the
6.3 Talkfunction 15
parent unit.
6.4 Nightdimmode 15
The temperature sensor enables you to monitor
6.5 Babyunitbatterylowalert 16
the temperature in your baby’s room, and offers
6.6 Batterystatusindications 16
you personalised settings to help keep your baby’s
6.7 Signalstrengthindicator 18
room comfortable.
6.8 Reset 18
This baby monitor has a baby unit with a
projector and a parent unit with a special soothing
7 Menu of the parent unit 19
screen that allows you control the soothing
7.1 Navigatingthemenu 19
options (nightlight, lullabies and projector) on the
7.2 Sensitivity 19
baby unit from a distance.
7.3 EcoMaxmode 20
7.4 Feedtimer 21
7.5 Temperature 22
7.6 Humidity 23
7.7 Cryalert 24
7.8 Clock 24
7.9 Language 24
7.10 Keylock 25
3

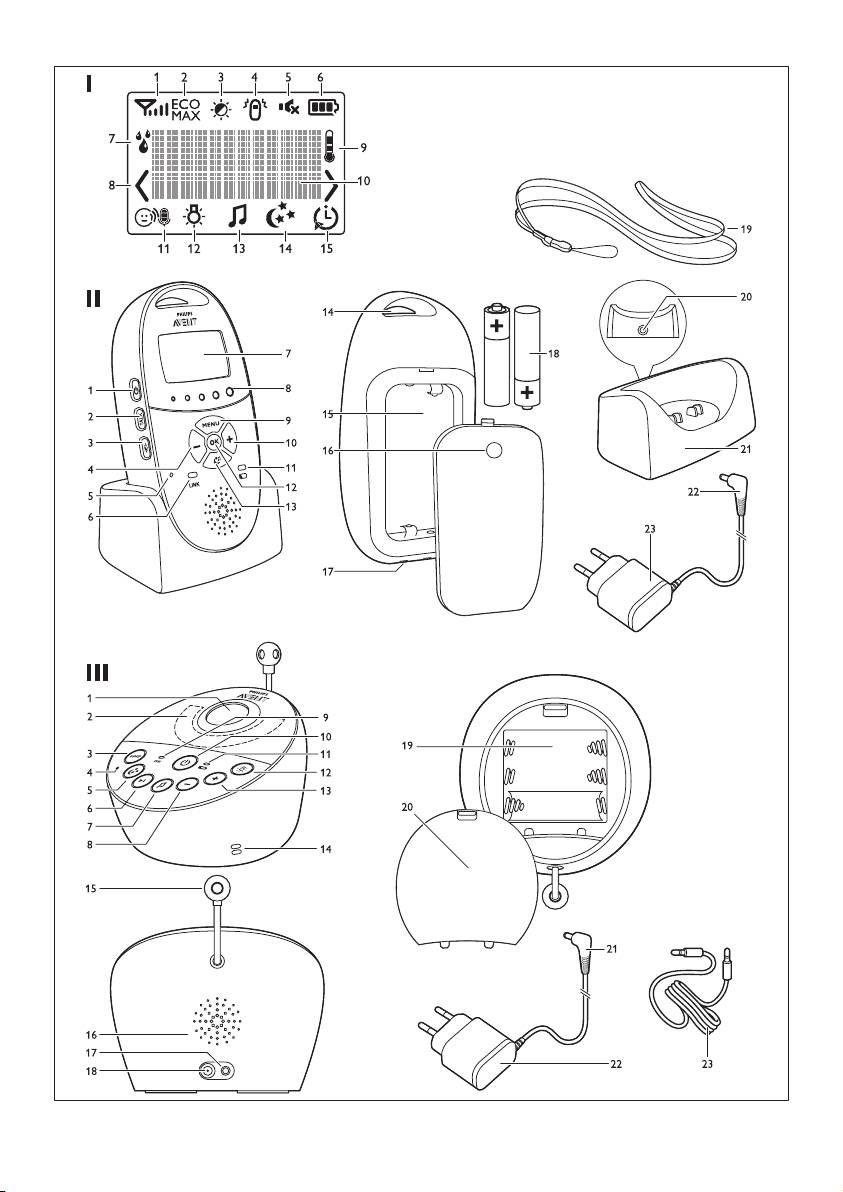
• III Baby unit
2 Overview
1 Projector
2 Nightlight
• I Display
3 FIND button
1 Signal strength indicator
4 Microphone
2 Eco Max indicator
5 Projector on/off button
3 Night dim mode symbol
6 Next lullaby button
4 Cry alert indicator
7 Lullaby play/stop button
5 Mute symbol
8 Volume - button
6 Battery status indicator
9 Power-on light
7 Humidity alert symbol
10 On/off button
8 Navigation arrow
11 Battery status light
9 Temperature symbol
12 Nightlight on/off button
10 Message eld
13 Volume + button
11 Microphone sensitivity indicator
14 Humidity sensor
12 Nightlight symbol
15 Temperature sensor
13 Lullaby symbol
16 Loudspeaker
14 Projector symbol
17 Socket for audio appliance
15 Timer or timer repeat symbol
18 Socket for small plug of adapter
• II Parent unit
19 Compartment for non-rechargeable
1 On/off button
batteries
2 TALK button
20 Lid of compartment for non-rechargeable
3 Night dim button
batteries
4 - button to scroll backwards
21 Small plug of adapter
5 Microphone
22 Adapter
6 ’link’ light
23 Auxiliary cable
7 Display
8 Sound level lights
9 MENU button
10 + button to scroll forwards
3 Preparing for use
11 Battery status light
12 OK button
IMPORTANT: Read the safety instructions
13 Soothing button
carefully before you use the baby monitor
14 Handgrip/attachment hole for neck strap
and keep them for future reference.
15 Compartment for rechargeable batteries
16 Lid of compartment for rechargeable
3.1 Baby unit
batteries
Use the baby unit from the mains. To guarantee
17 Connection points for charging
automatic power backup in case of mains failure,
18 Rechargeable batteries
we advise you to insert non-rechargeable
19 Neck strap
batteries.
20 Socket for small plug of adapter
21 Charger
22 Small plug of adapter
23 Adapter
4
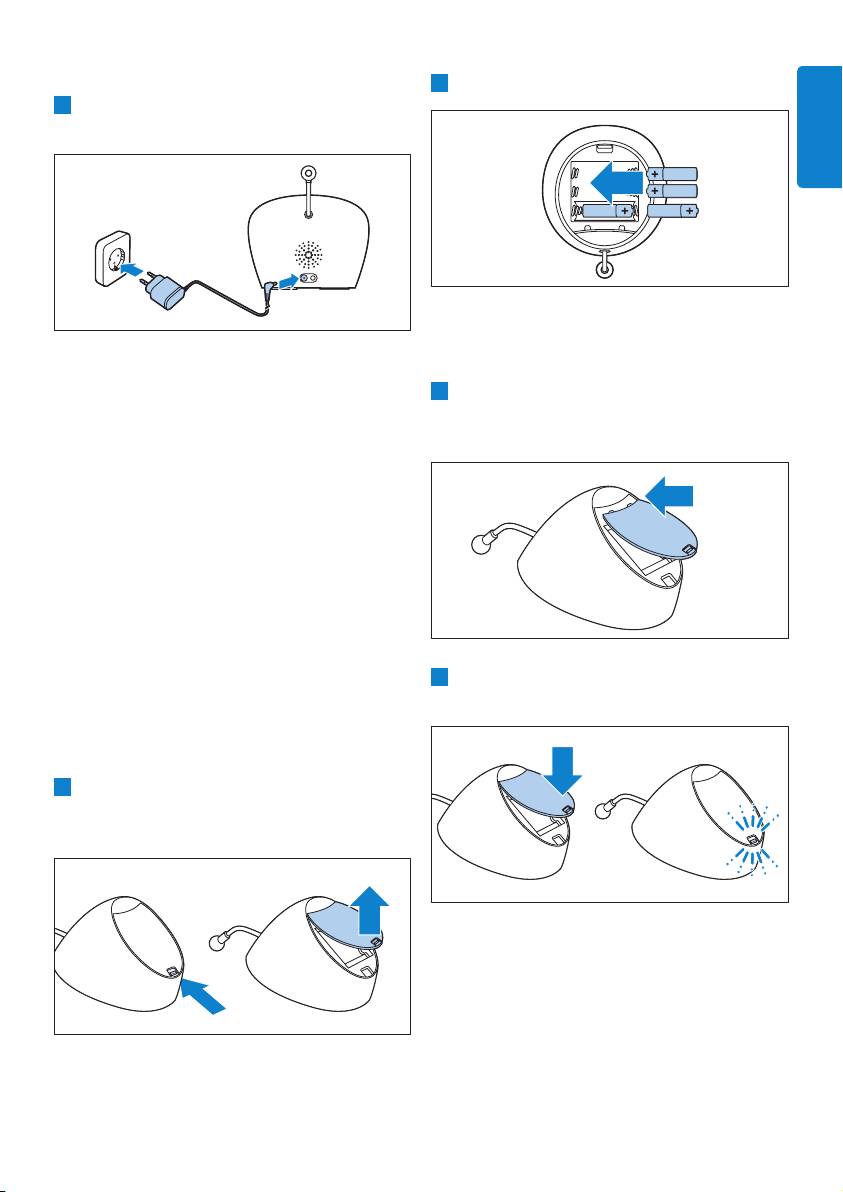
3.1.1 Mains operation
2 Insert four non-rechargeable batteries.
1 Put the adapter in a wall socket and insert the
small appliance plug into the baby unit.
ENGLISH
D
Note:
Make sure the + and - poles point in the right
3.1.2 Placing the non-rechargeable batteries
direction.
In case of mains failure the baby unit can run on
3 To reattach the lid, rst insert the lugs into the
four 1.5V R6 AA alkaline batteries (not included).
openings in the rim of the compartment for
Do not use rechargeable batteries. The baby
non-rechargeable batteries.
unit does not have a charging function and
rechargeable batteries discharge slowly when they
are not in use.
B
Warning:
Unplugthebabyunitandmakesureyourhands
andtheunitaredrywhenyouinsertnon-
rechargeablebatteries.
D
Note:
We advise you to use the baby unit on mains
4 Then push down the lid until the lock closes
power, as the baby unit has a limited operating
with a click.
time when you use it on non-rechargeable alkaline
batteries. The operating time on non-rechargeable
batteries is 24 hours.
1 Push the lock to release the lid of the
compartment for non-rechargeable batteries
and remove the lid.
5
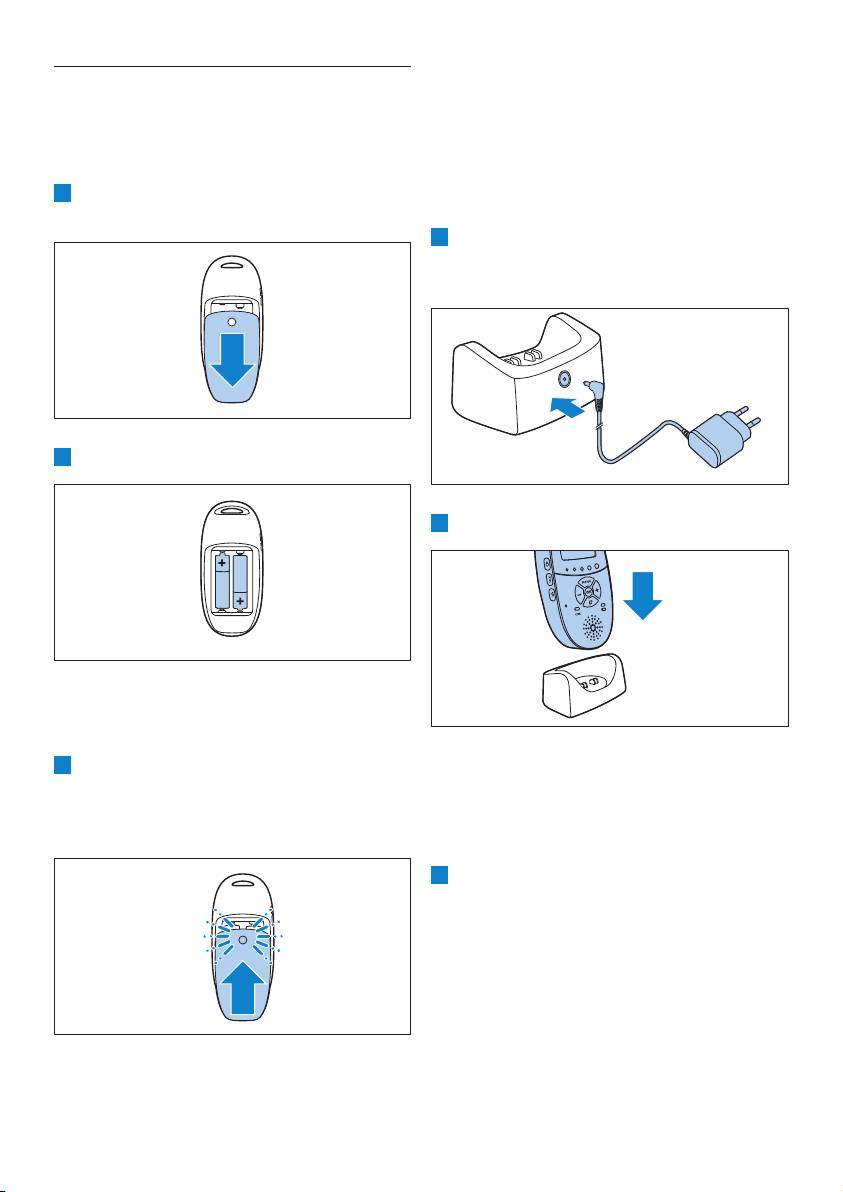
3.2 Parent unit
3.2.2 Charging the parent unit
The parent unit runs on two rechargeable
Charge the parent unit before you use it for the
batteries that are supplied with the baby monitor.
rst time or when the parent unit indicates that
the batteries are low.
3.2.1 Inserting the rechargeable batteries
Important: You have to charge the parent
1 Slide the lid of the compartment for the
unit for the full 10 hours to have a cordless
rechargeable batteries off the parent unit.
operating time of 18 hours.
1 Insert the small appliance plug of the adapter
in the socket on the back of the charger. Put
the adapter in a wall socket.
2 Insert the rechargeable batteries.
2 Put the parent unit in the charger.
D
Note:
Make sure the + and - poles of the batteries
point in the right direction.
3 Slide the lid of the compartment for the
• The display goes on and the battery status
rechargeable batteries back onto the parent
indications show that the parent unit is
unit. Push the lid home until it locks into place
charging. For battery status indications,
with a click.
see ‘Battery charge indications’ in chapter
‘Functions and feedback on the parent unit’.
3 Leave the parent unit in the plugged-in
charger until the rechargeable batteries
are fully charged.
D
Note:
When you start using the baby monitor, it takes
four charge and discharge cycles before the
rechargeable batteries reach their full capacity.
6
