Philips AVENT Vigilabebés DECT – page 2
Manual for Philips AVENT Vigilabebés DECT
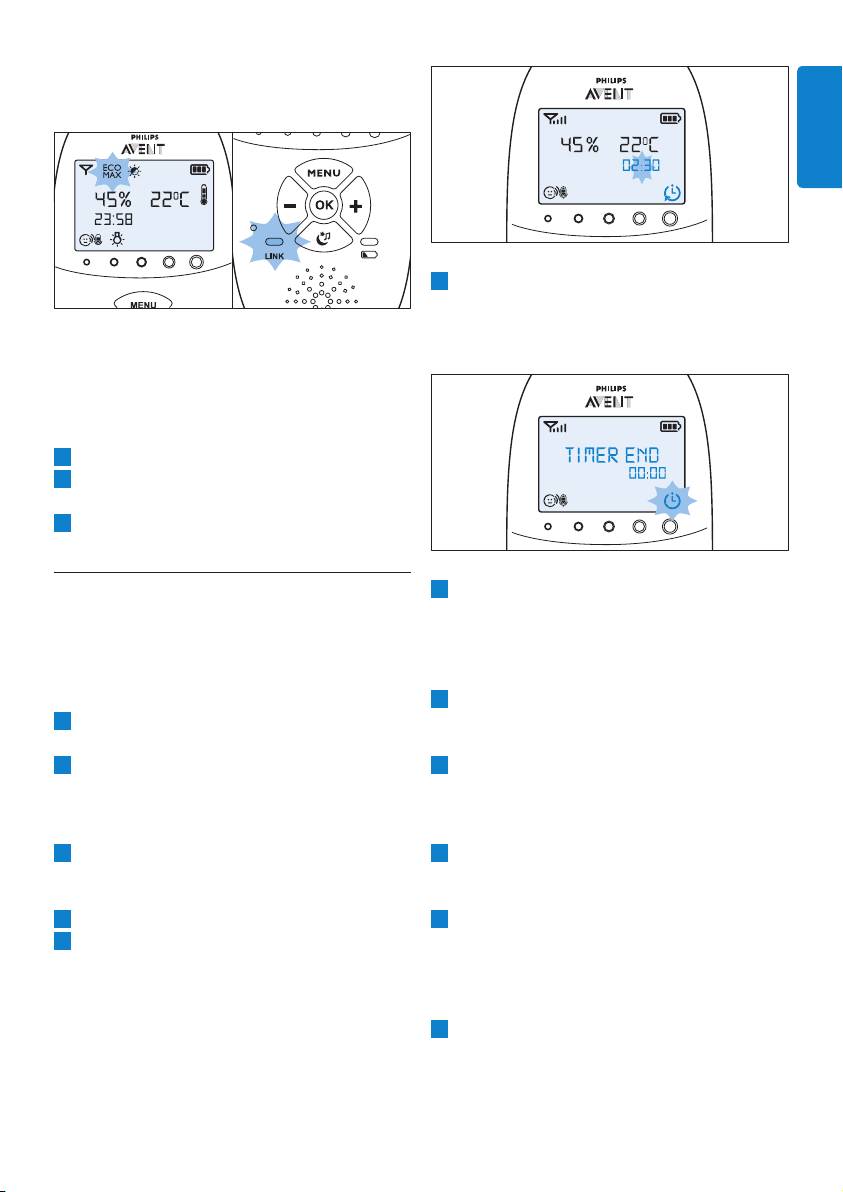
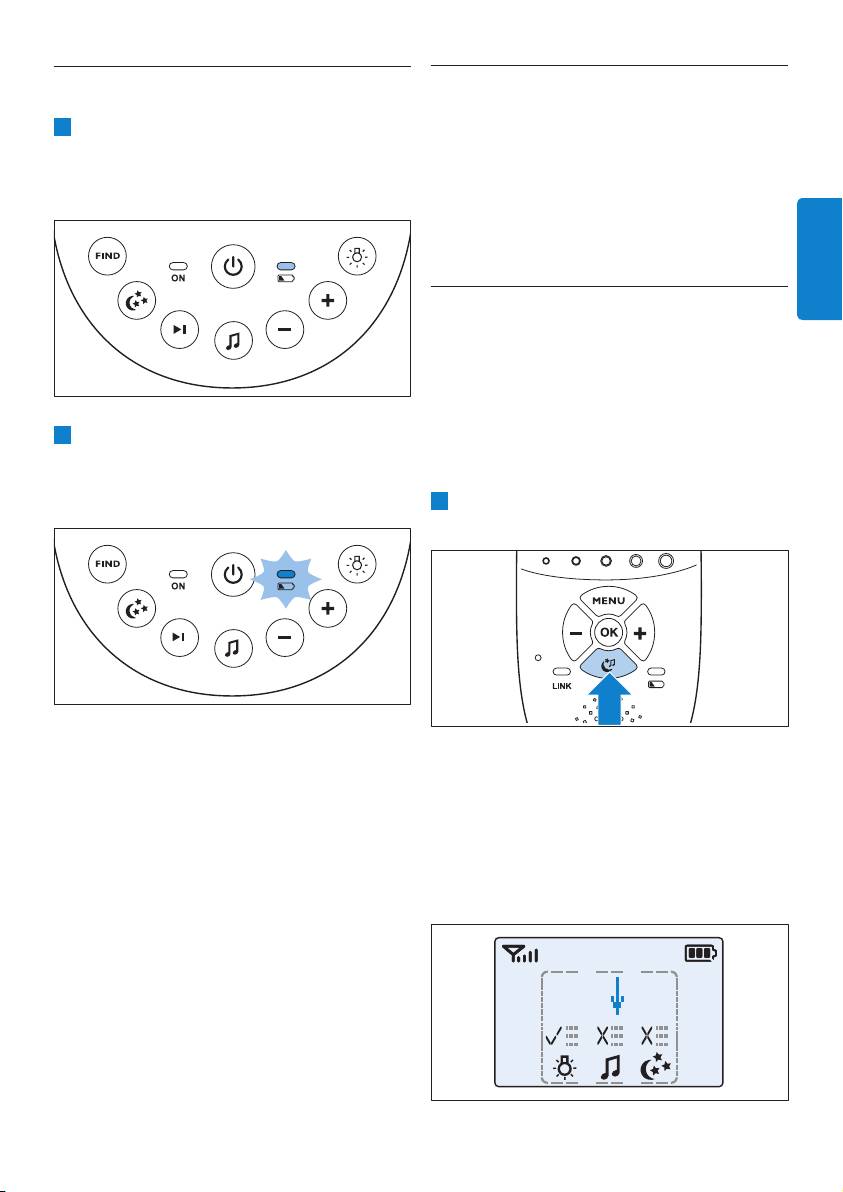
• The Eco Max indication ashes on the
display. The ‘link’ light ashes green slowly.
ENGLISH
6 When the timer has reached 00:00, the feed
timer alert goes off, the timer symbol starts
ashing on the display and the message
• When the parent unit receives a signal from
‘TIMER END’ scrolls across the display.
the baby unit because the baby makes a
sound, the ‘link’ light turns solid green again.
7.3.3 Deactivating Eco Max mode
1 Press the MENU button
2 Use the + and - buttons to select ‘Eco Max’
and press OK to conrm.
3 Use the + and - buttons to select ‘Turn Off’
and press OK to conrm.
7.4 Feed timer
7 Press any key to stop the alert. If you do not
You can set the feed timer to alert you that it is
stop the alert, it stops automatically after 2
time to feed your baby. The timer can be set from
minutes.
1 minute to 23 hours and 59 minutes.
7.4.2 Setting the feed timer alert
7.4.1 Setting and using the feed timer
1 After step 5 in ‘Setting and using the feed
1 Select ‘Feed Timer’ in the menu with the +
timer’, select ‘Timer Alert’ with the + and -
and - buttons and press OK to conrm.
buttons. Press OK to conrm.
2 Select ‘Set Timer’ with the + and - buttons and
2 Use the + and - buttons to choose one of the
press OK to start setting the timer.
alert options. The options available are sound
• The hour indication starts ashing on the
only, sound and vibration and vibration only.
display.
Press OK to conrm.
3 Set the hour and press OK to conrm.
3 Select ‘xx:xx Start’ with the + and - buttons
• The minutes indication starts ashing on the
and press OK to activate the feed timer
display.
function.
4 Set the minutes and press OK to conrm.
4 When the feed timer alert goes off, press any
5 Select ‘xx:xx Start’ with the + and - buttons.
key to stop the feed timer and the feed timer
Press OK to conrm.
alert.
• The timer symbol appears on the display.
• The timer starts counting down.
7.4.3 Repeat the feed timer
1 After step 5 in ‘Setting and using the feed
timer’ or after setting the feed timer alert,
21
select ‘Timer repeat’ with the + and - buttons.
• The maximum temperature indication starts
Press OK to conrm.
ashing on the display.
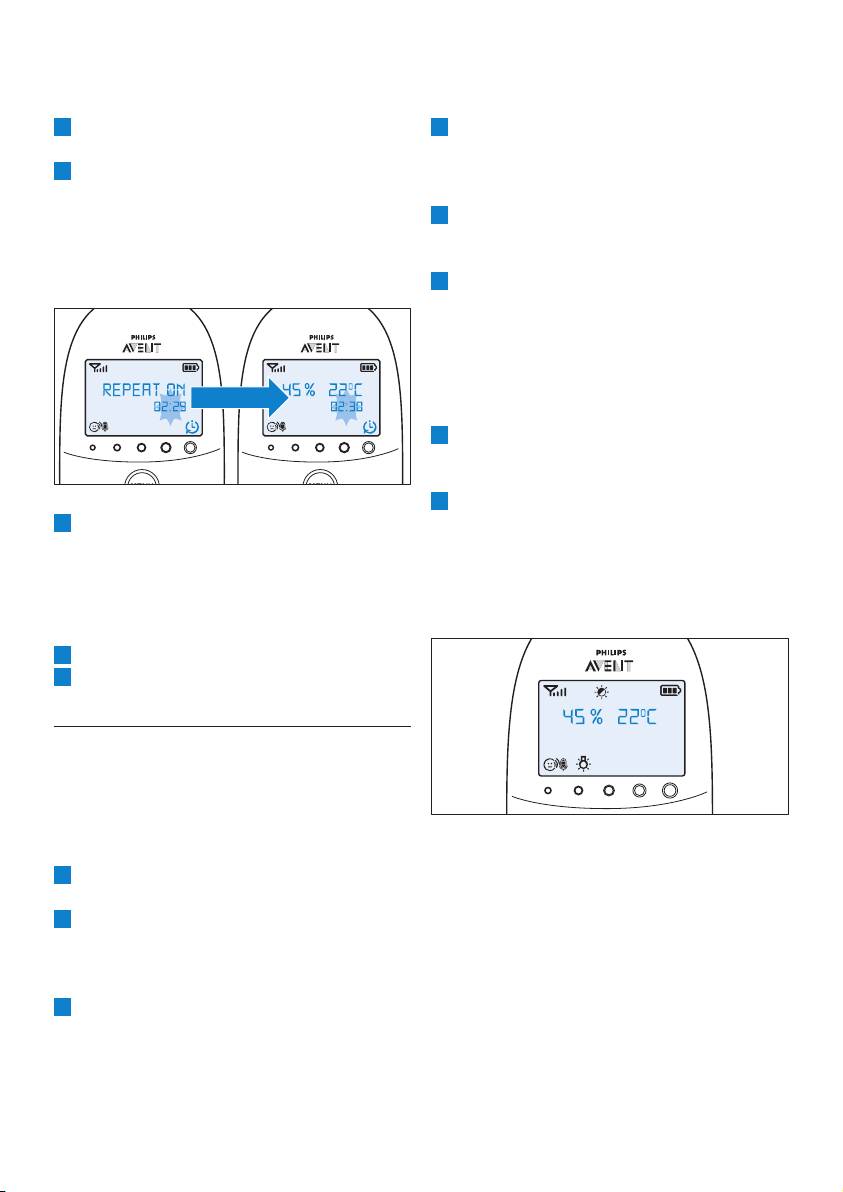
2 Choose ‘Repeat ON’ or ‘Repeat OFF’ and
4 Use the + and - buttons to set the
press OK to conrm.
maximum temperature range between
3 Select ‘xx:xx Start’ with the + and - buttons
22°C/72°F and 37°C/99°F. Press OK to
and press OK to activate the feed timer
conrm.
repeat function.
5 Select ‘Alert’ with the + and - buttons. Press
• Instead of the normal timer symbol, the
OK to conrm and to start setting the
timer repeat on symbol appears on the
temperature alert option.
display.
6 Use the + and - buttons to select one of the
alert options. The options available are sound
only, sound and vibration, vibration only and
display only. Press OK to conrm.
• After you have conrmed your choice of the
alert option, the temperature alert symbol
appears on the display.
7 Select ‘Temp Scale’ with the + and - buttons.
Press OK to conrm and to start setting the
temperature scale.
8 Select ‘Celsius’ or ‘Fahrenheit’ and press OK to
4 When you press any key to stop the feed
conrm.
timer alert or if the alert stops automatically
• The temperature in the set scale appears
after 2 minutes, the feed timer starts counting
on the display. If the temperature is within
down again.
the set range, the temperature alert symbol
has two segments.
7.4.4 Stopping the timer
1 Press the menu button and select ‘Feed Timer’.
2 Use the + and - buttons to select ‘Stop &
Reset’ and press OK to conrm.
7.5 Temperature
A baby sleeps comfortably at a temperature range
between 16°C/61°F and 20°C/68°F. You can set
a minimum and maximum temperature range
and an alert to warn you that the temperature is
outside the set minimum and maximum range.
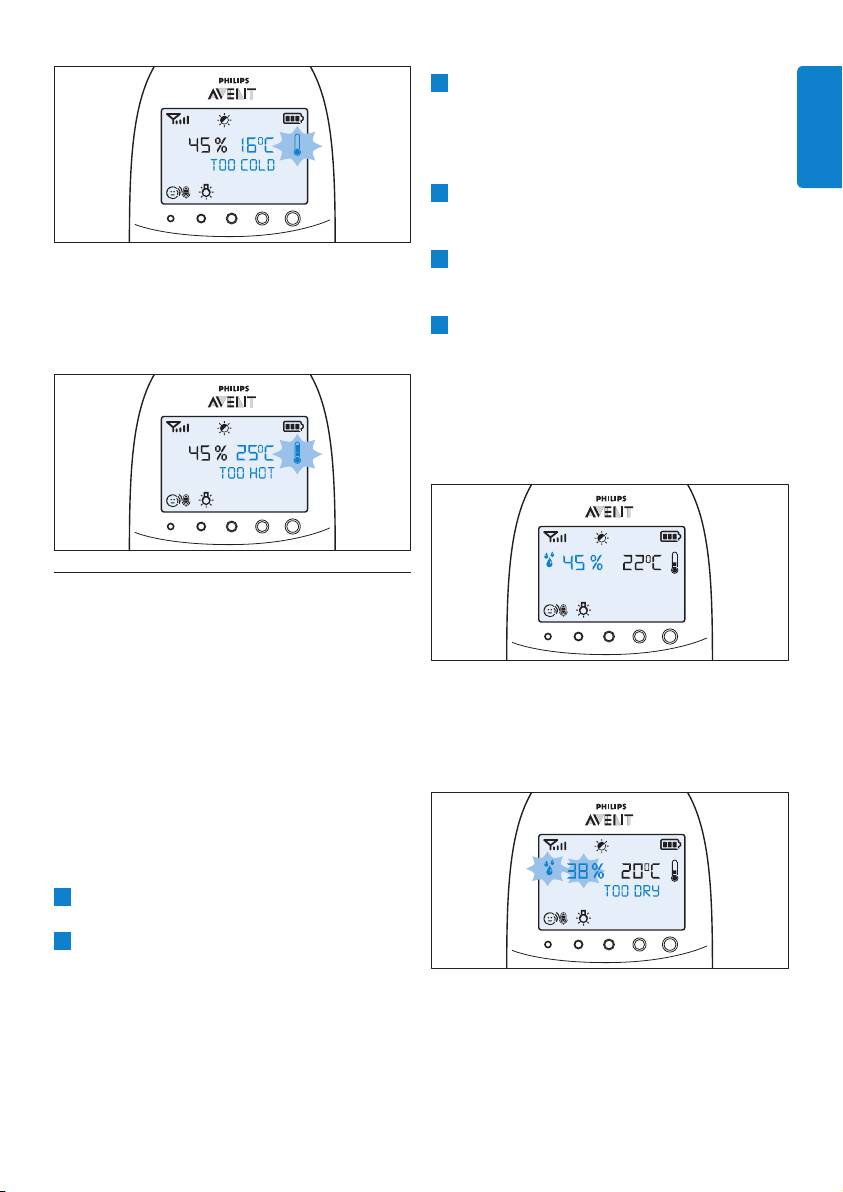
• If the temperature is below the set range,
1 Select ‘Temperature’ in the menu with the +
the temperature alert symbol on the
and - buttons and press OK to conrm.
display has only one segment and ashes.
2 Select ‘Temp Range’ with the + and - buttons
The message ‘TOO COLD’ appears on the
and press OK to conrm.
display.
• The minimum temperature indication starts
ashing on the display.
3 Use the + and - buttons to set the minimum
temperature range between 10°C/50°F and
19°C/66°F. Press OK to conrm.
22
3 Use the + and - buttons to set the minimum
humidity range between 20% and 50%. Press
OK to conrm.
• The maximum humidity indication starts
ENGLISH
ashing on the display.
4 Use the + and - buttons to set the
maximum humidity range between 51% and
70%. Press OK to conrm.
5 Select ‘Alert’ with the + and - buttons. Press
• If the temperature is above the set range,
OK to conrm and to start setting the
the temperature alert symbol on the
humidity alert option.
display has three segments and ashes. The
6 Use the + and - buttons to select one of the
message ‘TOO HOT’ appears on the display.
alert options. The options available are sound
only, sound and vibration, vibration only and
display only. Press OK to conrm.
• After you have conrmed your choice of
the alert option, the humidity alert symbol
appears on the display.
7.6 Humidity
The optimal humidity level is between 40%
and 60%. It is very important to maintain the
correct humidity level as it helps to protect your
baby from irritation of the mucous membranes,
dry and itchy skin, chapped lips and a dry, sore
• If the humidity is below the set range, the
throat. When the mucous membranes do not
humidity alert symbol and the humidity
function optimally, they cannot give your baby full
measured ash on the display. The message
protection from all kinds of germs. This increases
‘TOO DRY’ appears on the display.
the chance of your baby catching a cold or the
u, and reduces its resistance to infections from
mould and bacteria. You can set a humidity range
and an alert to warn you that the humidity is
outside the set range.
1 Select ‘Humidity’ in the menu with the + and -
buttons and press OK to conrm.
2 Select ‘Hum Range’ with the + and - buttons
and press OK to conrm.
• The minimum humidity indication starts
ashing on the display.
23
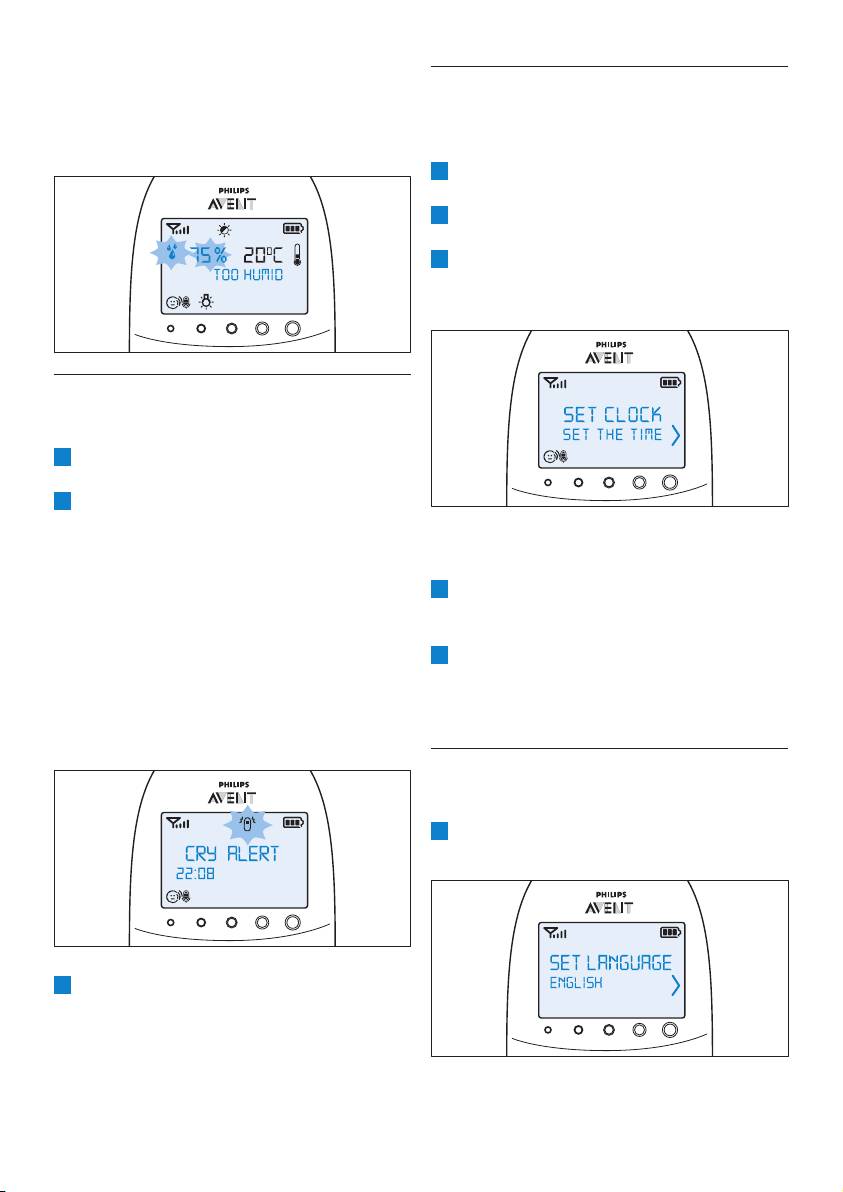
• If the humidity is above the set range, the
7.8 Clock
humidity alert symbol and the humidity
The default setting for the clock is hidden. You can
measured ash on the display. The message
choose to show the clock and set the clock time
‘TOO HUMID’ appears on the display.
in the menu of the parent unit.
1 Select ‘Set clock’ in the menu with the + and -
buttons and press OK to conrm.
2 Use the + or - button to select ‘Show Time’
and press OK to conrm.
3 Select ‘Set the time’ with the + and - buttons.
Press OK to conrm and to start setting the
clock.
7.7 Cry alert
You can set a cry alert to warn you that the baby
is crying.
1 Select ‘Cry alert’ in the menu with the + and -
buttons and press OK to conrm.
2 Select ‘Vibration ON’ with the + and -
buttons. Press OK to conrm.
• The cry alert indicator appears on the
• The hour indication starts ashing on the
display.
display.
• The cry alert goes off when the sound in
4 Set the hour and press OK to conrm.
the baby room is loud enough to make the
• The minutes indication starts ashing on the
fourth sound level light go on. The parent
display.
unit vibrates and the message ‘Cry alert’
5 Set the minutes and press OK to conrm.
appears on the display for 4 seconds. The
• The clock time alternates with other
cry alert repeats every 8 seconds until the
indications in the message eld of the
sound becomes less loud or you deactivate
display.
the cry alert.
7.9 Language
You can use this menu option to change the
language setting.
1 Select ‘Set language’ in the menu with the +
and - buttons and press OK to conrm.
3 To deactivate the cry alert, select ‘Cry alert’ in
the menu and select ‘Vibration OFF’ with the
+ and - buttons.
24
2 Use the + and - buttons to select your
3 To deactivate the key lock, press OK. When
language and press OK to conrm.
the display shows the instruction message,
press the + button within 2 seconds.
D
Note:
ENGLISH
This option automatically appears on the
display when you switch on the parent unit
for the rst time and after a reset.
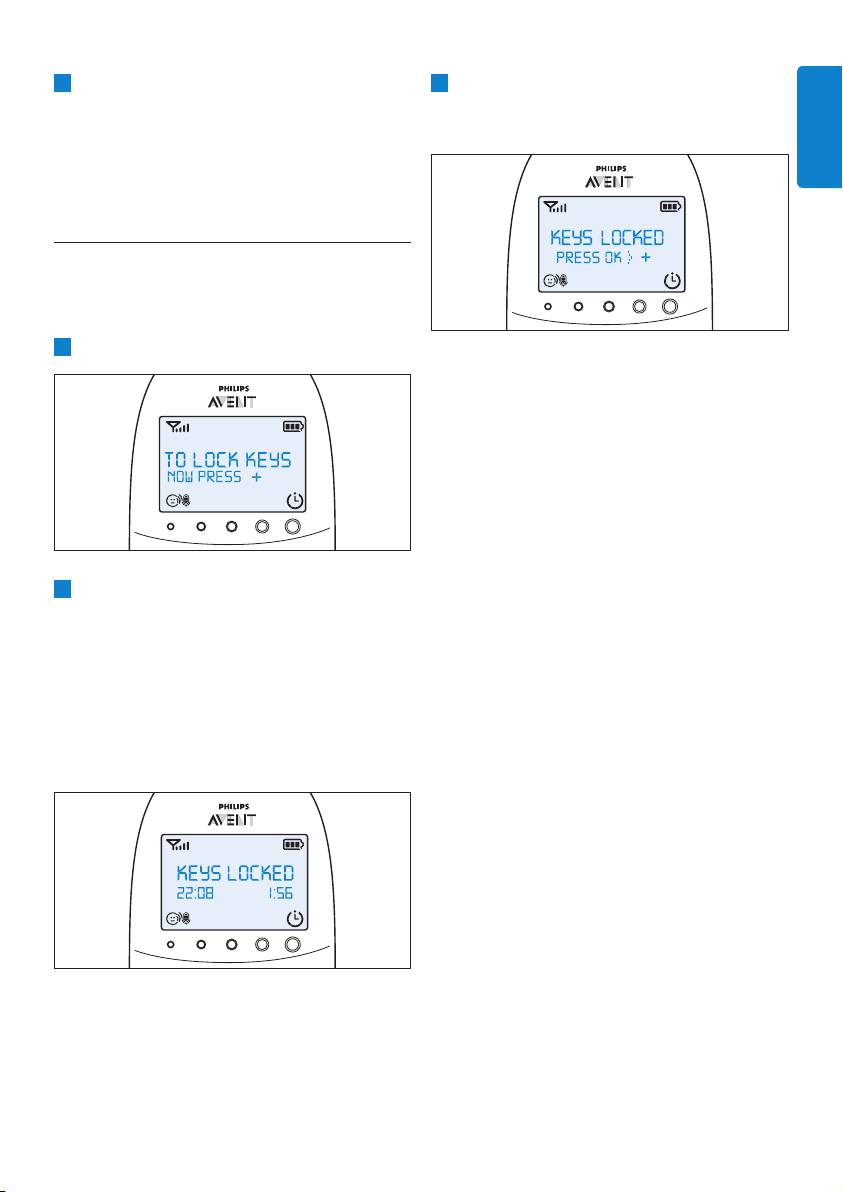
7.10 Key lock
You can activate the key lock to prevent the
buttons from being pressed accidentally while you
carry the parent unit around.
1 To activate the key lock, press OK.
7.10.1 Notes
• When you press a button other than OK
while the key lock is active, the display goes
on and the second line on the display tells you
how to deactivate the key lock.
• When you press OK while the key lock is
active, the second line on the display tells you
what second step is necessary to unlock the
buttons.
• When the key lock is active, you can stop the
2 Press the + button within 2 seconds.
paging and feed timer alert by pressing OK. In
that case the key lock remains active.
D
Note:
• When the cry alert, the temperature alert or
If you do not press the + button within 2
the humidity alert go off while the key lock is
seconds, the instruction remains on the display.
active, rst deactivate the key lock and then
• After you have pressed the + button, the
deactivate the cry alert or the temperature
message ‘Keys locked’ appears on the
alert through the menu.
display instead of the temperature and
humidity indications.
25
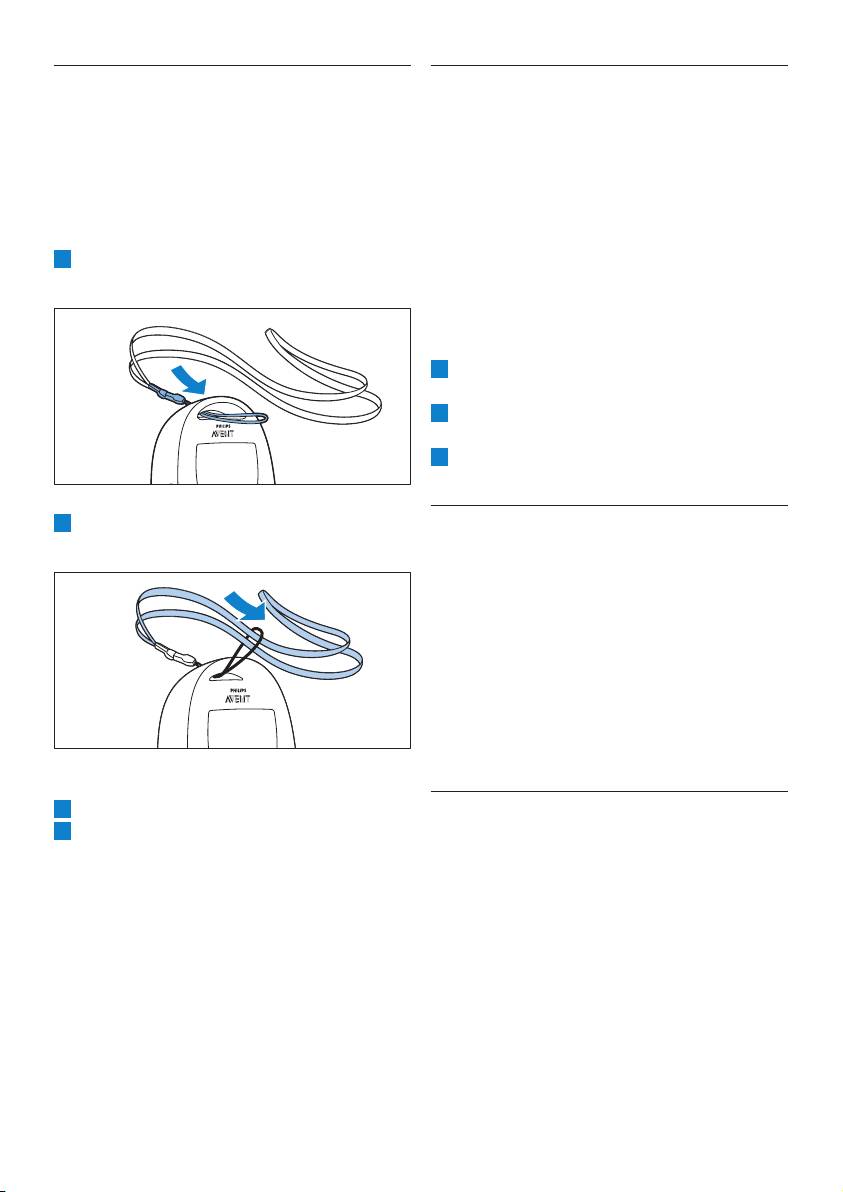
8 Neck strap
9 Cleaning and
A convenient neck strap is supplied with the baby
maintenance
monitor. It allows you to carry the parent unit
around with you.
B Warning:
8.0.1 Connecting the neck strap
Donotimmersetheparentunit,thebabyunit
1 Insert the end loop of the neck strap through
andthechargeroftheparentunitinwaterand
the opening at the top of the parent unit.
donotcleanthemunderthetap.
B
Warning:
Donotusecleaningsprayorliquidcleaners.
1 Unplug the baby unit and the charger if they
are connected to the mains.
2 Clean the parent unit, the charger and the
baby unit with a dry cloth.
3 Clean the adapters with a dry cloth.
2 Thread the neck strap through the end loop
and pull the neck strap tight.
10 Storage
If you are not going to use the baby monitor for
some time, do the following:
• Remove the non-rechargeable batteries from
the baby unit.
• Remove the rechargeable batteries from the
parent unit.
• Store the parent unit, the baby unit and the
adapters in a cool and dry place.
8.0.2 Disconnecting the neck strap
1 Pass the neck strap though the end loop.
2 Pull the end loop out of the opening at the
11 Ordering accessories
top of the parent unit.
To buy accessories or spare parts, visit
www.shop.philips.com/service or go to your
Philips dealer. You can also contact the Philips
Consumer Care Centre in your country (see the
worldwide guarantee leaet for contact details).
If there is no Consumer Care Centre in your
country, go to your local Philips dealer or a Philips
service centre.
26

• Perhaps the non-rechargeable batteries of the
12 Guarantee and
baby unit are empty and the baby unit is not
connected to the mains. Replace the non-
support
rechargeable batteries or connect the baby unit
ENGLISH
to the mains. Then press the on/off button to
If you need information or support, please visit the
establish connection with the parent unit.
Philips website at www.philips.com/support
• If the ‘link’ light on the parent unit still does not
or contact the Philips Consumer Care Centre in
start ashing red, use the reset function to reset
your country (see the worldwide guarantee leaet
the units to their default settings.
for contact details). If there is no Consumer Care
Centre in your country, go to your local Philips
Whydoesthe‘link’lightontheparentunitash
dealer or a Philips service centre.
redcontinuouslyandwhyisthemessage‘NOT
LINKED’or‘IAMLINKING’shownonthe
display?
• The baby unit and the parent unit are out
13 Frequently asked
of range of each other. Move the parent unit
closer to the baby unit.
questions
• The baby unit may be switched off. Switch on
the baby unit.
This chapter lists the questions most frequently
asked about the appliance. If you cannot nd the
Whydoesthebatterystatuslightonthebaby
answer to your question, visit www.philips.com/
unitashred?
support for more frequently asked questions
• The non-rechargeable batteries of the baby unit
or contact the Consumer Care Centre in your
are running low. Replace the non-rechargeable
country.
batteries or connect the baby unit to the mains
(see chapter ‘Preparing for use’).
WhatisEcoMaxmode?Howdoesthismode
helptheenvironment?
Whydoestheparentunitbeep?
• The Eco Max mode has been developed to
• If the parent unit beeps while the ‘link’ light
enable you to reduce the energy consumption
ashes red continuously and the message ‘NOT
of your baby monitor. When you monitor your
LINKED’ or ‘I AM LINKING’ is shown on the
baby from a small distance, you can activate the
display, the connection with the baby unit is lost.
Eco Max mode. By switching on the Eco Max
Move the parent unit closer to the baby unit or
mode, your baby monitor uses less energy and
switch the baby unit on, if it was off.
is therefore more environment-friendly.
• If the parent unit beeps and the battery symbol
on the display is empty, the rechargeable
Whydon’tthepower-onlightofthebabyunit
batteries of the parent unit are running low.
andthe‘link’lightoftheparentunitcomeon
Recharge the batteries.
whenIpresstheon/offbuttonsoftheunits?
• If you have set the room temperature range on
• Perhaps the rechargeable batteries of the
the parent unit and the temperature alert is on,
parent unit are empty and the parent unit is not
the parent unit beeps when the temperature
plugged in. Insert the small appliance plug into
drops below the set minimum temperature
the parent unit and put the adapter in a wall
range or when the temperature rises above the
socket. Then press the on/off button to establish
set maximum temperature range.
connection with the baby unit.
27

• If you have set the humidity range on the
• The Eco Max mode is on and the baby unit
parent unit and the humidity alert is on, the
only switches on the DECT signal when the
parent unit beeps when the humidity drops
baby makes sounds. Switch off the Eco Max
below the set minimum humidity range
mode to make the baby unit transmit DECT
or when the humidity rises above the set
signals continuously and to make the parent unit
maximum humidity range.
respond more quickly to your baby’s sounds.
• The baby unit may be switched off. Switch on
the baby unit.
Whydothenon-rechargeablebatteriesofthe
babyunitrunlowquickly?
Whydoestheapplianceproduceahigh-pitched
• The microphone sensitivity level of the baby
noise?
unit may be too high, which causes the baby
• The units may be too close to each other. Make
unit to transmit more often. Decrease the
sure the parent unit and the baby unit are at
microphone sensitivity level in the menu of the
least 1 metre/3.5 feet away from each other.
parent unit.
• The volume of the parent unit may be too high.
• The volume on the baby unit may be too high,
Decrease the volume of the parent unit.
which causes the baby unit to consume a lot of
energy. Decrease the volume of the baby unit.
Whydon’tIhearasound/Whycan’tIhear
• You may have set a maximum temperature
mybabycry?
range that is lower than the actual room
• The volume of the parent unit may be too low
temperature or a minimum temperature range
or may be switched off. Increase the volume of
that is higher than the actual room temperature.
the parent unit.
The baby unit continues to send data to the
• The microphone sensitivity level of the baby
parent unit and therefore uses more power.This
unit may be too low. Set the microphone
causes the non-rechargeable batteries of the
sensitivity level to a higher level in the menu of
baby unit to run low quickly.
the parent unit.
• You may have set a maximum humidity range
• The baby unit and the parent unit may be out
that is lower than the actual humidity level or
of range of each other. Reduce the distance
a minimum humidity range that is higher than
between the units.
the actual humidity level in the room. The baby
unit continues to send data to the parent unit
Whydoestheparentunitreacttooquicklyto
and therefore uses more power.This causes the
othersounds?
non-rechargeable batteries of the baby unit to
• The baby unit also picks up other sounds than
run low quickly.
those of your baby. Move the baby unit closer
• Perhaps you switched on the nightlight. If you
to the baby (but observe the minimum distance
want to use the nightlight, we advise you to run
of 1 metre/3.5 feet).
the baby unit on mains power.
• The microphone sensitivity level of the baby
unit may be too high. Decrease the microphone
Whydoesthechargingtimeoftheparentunit
sensitivity level in the menu of the parent unit.
exceed10hours?
• The parent unit may be switched on during
Whydoestheparentunitreactslowlytothe
charging. Switch off the parent unit during
baby’scrying?
charging.
• The microphone sensitivity level of the baby
unit may be too low. Increase the microphone
sensitivity level of the baby unit in the menu of
the parent unit.
28

Thespeciedoperatingrangeofthebaby
• The volume of the parent unit may be too high,
monitoris330metres/1000feet.Whydoesmy
which causes the parent unit to consume a lot
babymonitormanageamuchsmallerdistance
of energy. Decrease the volume of the parent
thanthat?
unit
ENGLISH
• The specied range is only valid outdoors in
• The microphone sensitivity level of the baby
open air. Inside your house, the operating range
unit may be too high, which causes the parent
is limited by the number and type of walls and/
unit to consume a lot of energy. Decrease the
or ceilings in between. Inside the house, the
microphone sensitivity level in the menu of the
operating range is up to 50 metres/150 feet.
parent unit.
Whyistheconnectionlosteverynowandthen?
Whydoesittakesometimeforthebattery
Whyaretheresoundinterruptions?
statusindicatortoappearonthedisplaywhen
• The baby unit and the parent unit are probably
Istartchargingtheparentunitwhileitisoff?
close to the outer limits of the operating
• This is normal. The parent unit needs a few
range. Try a different location or decrease the
seconds to wake up when you connect it to
distance between the units. Please note that
the mains while it is switched off. When it is
it takes about 30 seconds each time before a
connected, the parent unit rst needs to detect
connection between the units is established.
that it is charging and it has to measure the
• You may have placed the unit next to a
battery charge level before the battery status
transmitter or other DECT appliance, such as
indicator can be displayed.
a DECT telephone or other 1.8GHz/1.9GHz
baby monitor. Move the unit away from the
Whydotherechargeablebatteriesoftheparent
other appliances until the connection is re-
unitrunlowquickly?
established.
• The rechargeable batteries have reached the
end of their life. You have to replace them. To
Whathappensduringapowerfailure?
order new rechargeable batteries, see chapter
• If the parent unit is sufciently charged,
‘Ordering accessories’.
it continues to operate during a power failure.
If there are batteries in the baby unit, it also
continues to operate during a power failure.
Ismybabymonitorsecurefromeavesdropping
andinterference?
• The DECT technology of this baby monitor
guarantees no interference from other
equipment and no eavesdropping.
Theoperatingtimeoftheparentunitis
supposedtobeupto18hours.Whyis
theoperatingtimeofmyparentunitshorter?
• When the parent unit has been charged for the
rst time, the operating time is less than
18 hours. The rechargeable batteries only reach
their full capacity after you have charged and
discharged them at least four times.
29

БЪЛГАРСКИ
7.5 Температура 51
Съдържание
7.6 Относителнавлажност 52
7.7 Сигнализациязаплач 53
7.8 Часовник 54
1 Въведение 30
7.9 Език 54
7.10 Ключалка 55
2 Общпреглед 31
8 Лентазаврат 56
3 Подготовказаупотреба 32
3.1 Устройствозабебето 32
9 Почистванеиподдръжка 56
3.2 Родителскоустройство 33
10 Съхранение 56
4 Използваненабебефона 34
4.1 Разполаганенабебефона 34
11 Поръчваненааксесоари 57
4.2 Свързваненародителското
устройствоиустройствотозабебето34
12 Гаранцияиподдръжка 57
5 Функциииобратнавръзкана
13 Честозадаванивъпроси 57
устройствотозабебето 36
5.1 Нощнасветлина 36
5.2 Функция“приспивнапесен” 37
5.3 Проектор 37
1 Въведение
5.4 Намираненародителското
устройство 38
Поздравления за вашата покупка и добре
5.5 Светлинениндикаторзасъстоянието
дошли във Philips AVENT! За да се възползвате
набатерията 39
изцяло от предлаганата от Philips AVENT
поддръжка, регистрирайте продукта си на
6 Функциииобратнавръзкана
www.philips.com/welcome.
родителскотоустройство 39
Усилията на Philips AVENT са съсредоточени
6.1 Меню“Успокояване” 39
върху производството на грижовни и
6.2 Силаназвука 43
надеждни изделия, които дават на родителите
6.3 Функциязаговорене 43
сигурността, от която се нуждаят. Този
6.4 Режимнанощнозатъмнение 44
бебефон Philips AVENT ви дава денонощна
6.5 Сигналзаизтощенабатерияна
подкрепа, като гарантира, че винаги ще можете
устройствотозабебето 44
да чувате бебето си ясно и без смущаващи
6.6 Индикациизасъстояниетона
шумове. Технологията DECT гарантира
батерията 45
нулеви смущения и кристално ясен звук между
6.7 Индикаторзасиланасигнала 46
родителското устройство и устройството за
6.8 Нулиране 47
бебето.
Температурният сензор ви позволява да
7 Менюнародителското
контролирате температурата в стаята на
устройство 47
бебето и предлага персонализирани настройки,
7.1 Навигациявменюто 47
за да можете да поддържате комфортна
7.2 Чувствителност 48
стаята на бебето.
7.3 РежимEcoMax 49
7.4 Таймерзачаснахранене 50
30

Този бебефон има устройство за бебето
14 Отвор на дръжка/приставка за лента за
с проектор и родителско устройство със
врат
специален екран “Успокояване”, който ви
15 Отделение за акумулаторни батерии
позволява да контролирате опциите за
16 Капак на отделението за акумулаторни
успокояване (нощна светлина, приспивни песни
батерии
и проектор) на устройството за бебето от
17 Точки на свързване за зареждане
разстояние.
18 Акумулаторни батерии
19 Лента за врат
20 Гнездо за малък жак на адаптер
21 Зарядно устройство
БЪЛГАРСКИ
2 Общпреглед
22 Малък жак на адаптер
23 Адаптер
• IДисплей
• IIIУстройствозабебето
1 Индикатор за сила на сигнала
1 Проектор
2 Индикатор Eco Max
2 Нощна светлина
3 Символ за режим на нощно затъмнение
3 Бутон FIND (НАМЕРИ)
4 Индикатор за сигнализация при плач
4 Микрофон
5 Символ за изключен звук
5 Бутон за вкл./изкл. на проектора
6 Индикатор за състояние на батерията
6 Бутон за следваща приспивна песен
7 Символ за сигнализация за влажност
7 Бутон за възпроизвеждане и спиране
8 Стрелка за навигация
на приспивна песен
9 Символ за температура
8 Бутон за намаляване на силата на звука
10 Поле за съобщения
9 Индикатор за включено устройство
11 Индикатор за чувствителността на
10 Бутон за вкл./изкл.
микрофона
11 Светлинен индикатор за състоянието
12 Символ за нощна светлина
на батерията
13 Символ за приспивна песен
12 Бутон за вкл./изкл. на нощната светлина
14 Символ на проектор
13 Бутон за увеличаване на силата на звука
15 Символ на таймер или таймер за
14 Датчик за влажност
повторение
15 Температурен сензор
• IIРодителскоустройство
16 Високоговорител
1 Бутон за вкл./изкл.
17 Гнездо за аудио устройство
2 Бутон TALK (ГОВОР)
18 Гнездо за малък жак на адаптер
3 Бутон за нощно затъмнение
19 Отделение за обикновени батерии
4 – бутон за превъртане назад
20 Капак на отделението за обикновени
5 Микрофон
батерии
6 светлинен индикатор “link” (връзка)
21 Малък жак на адаптер
7 Дисплей
22 Адаптер
8 Индикатори за ниво на звука
23 Допълнителен кабел
9 Бутон MENU (МЕНЮ)
10 + бутон за превъртане напред
11 Светлинен индикатор за състоянието
на батерията
12 Бутон OK
13 Бутон “Успокояване”
31
DЗабележка:
3 Подготовказа
Ние ви съветваме да използвате устройството
за бебето със захранване от електрическата
употреба
мрежа, тъй като то има ограничено време
на работа, ако го използвате с обикновени
ВАЖНО:Предидаизползвате
алкални батерии. Времето на работа с
бебефона,прочететевнимателно
обикновени батерии е 24 часа.
инструкциитезабезопасностиги
1 Избутайте заключването, за да освободите
запазетезасправкавбъдеще.
капака от отделението за обикновени
батерии и свалете капака.
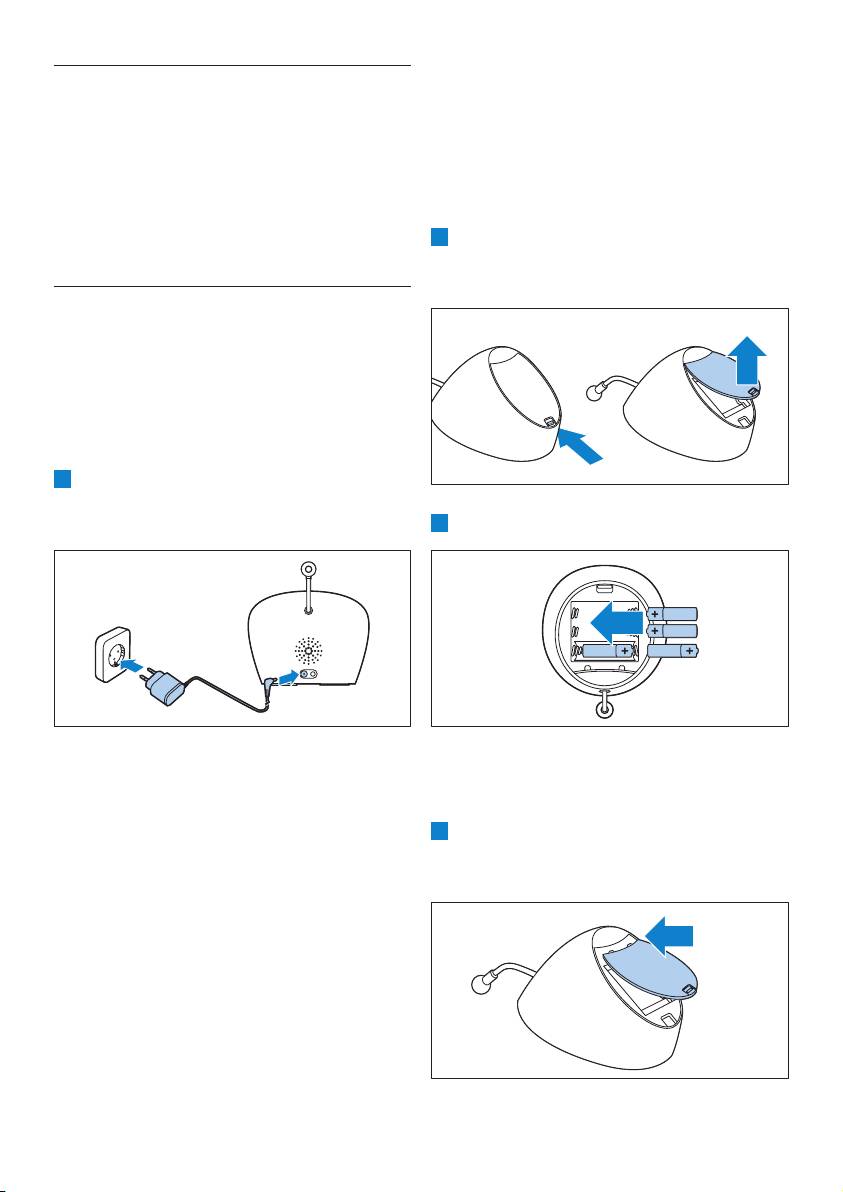
3.1Устройствозабебето
Използвайте устройството за бебето със
захранване от мрежата. За да осигурите
непрекъснатата му работа, дори при спиране
на тока, ви съветваме да поставите обикновени
батерии.
3.1.1Работасъсзахранванеотмрежата
1 Поставете адаптера в контакта и
поставете малкия жак в устройството за
бебето.
2 Поставете четири обикновени батерии.
3.1.2Поставяненаобикновенибатерии
D
Забележка:
В случай на прекъсване на
Убедете се, че полюсите “+” и “-” на
електрозахранването, устройството за бебето
батериите са правилно ориентирани.
може да работи с четири алкални батерии
3 За повторно поставяне на капака първо
R6 AA от 1,5 волта (не са приложени в
вкарайте езичетата в отворите в ръба на
комплекта).
отделението за обикновени батерии.
Не използвайте акумулаторни батерии.
Устройството за бебето няма функция за
зареждане и акумулаторните батерии бавно се
разреждат, когато не се използват.
B
Предупреждение:
Изключетеустройствотозабебетоот
контактаивнимавайтеръцетевидасасухи
припоставянетонаобикновенитебатерии.
32
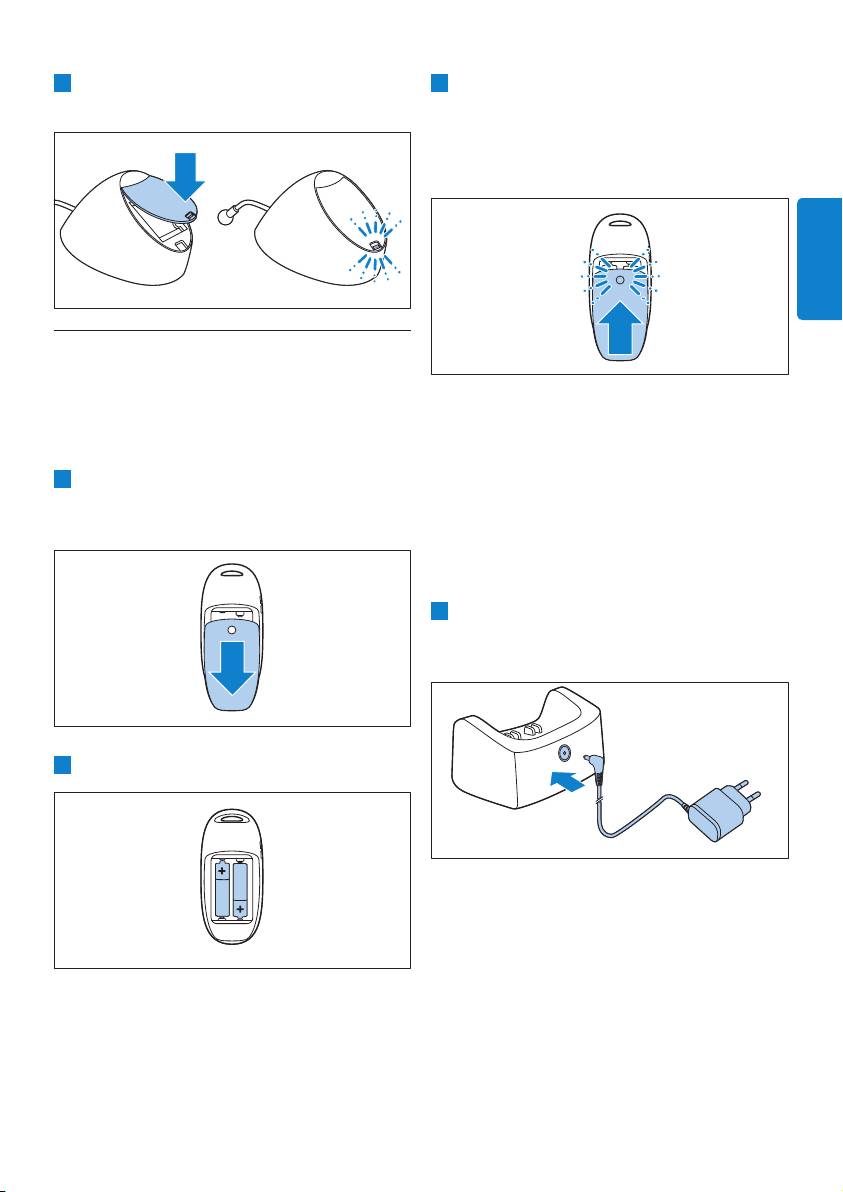
4 След това избутайте надолу капака, докато
3 Плъзнете капака на отделението за
заключването не се затвори с прищракване.
акумулаторни батерии обратно върху
родителското устройство. Избутайте
капака обратно, докато не се заключи с
прищракване.
БЪЛГАРСКИ
3.2Родителскоустройство
Родителското устройство работи с две
акумулаторни батерии, които са приложени
към бебефона.
3.2.2Зарежданенародителското
устройство
3.2.1Поставяненаакумулаторнибатерии
Заредете родителското устройство, преди да
1 Плъзнете капачето на отделението за
го използвате за първи път, или когато покаже,
акумулаторни батерии, за да го махнете от
че батериите са изтощени.
родителското устройство.
Важно:Трябвадазаредите
родителскотоустройствозапълния
цикълот10часа,задаразполагатес
18часавременабезжичнаработа.
1 Поставете малкия жак на адаптера в
гнездото от задната страна на зарядното
устройство. Поставете адаптера в контакта.
2 Поставете акумулаторните батерии.
D
Забележка:
Убедете се, че полюсите “+” и “-” на
батериите са правилно ориентирани.
33
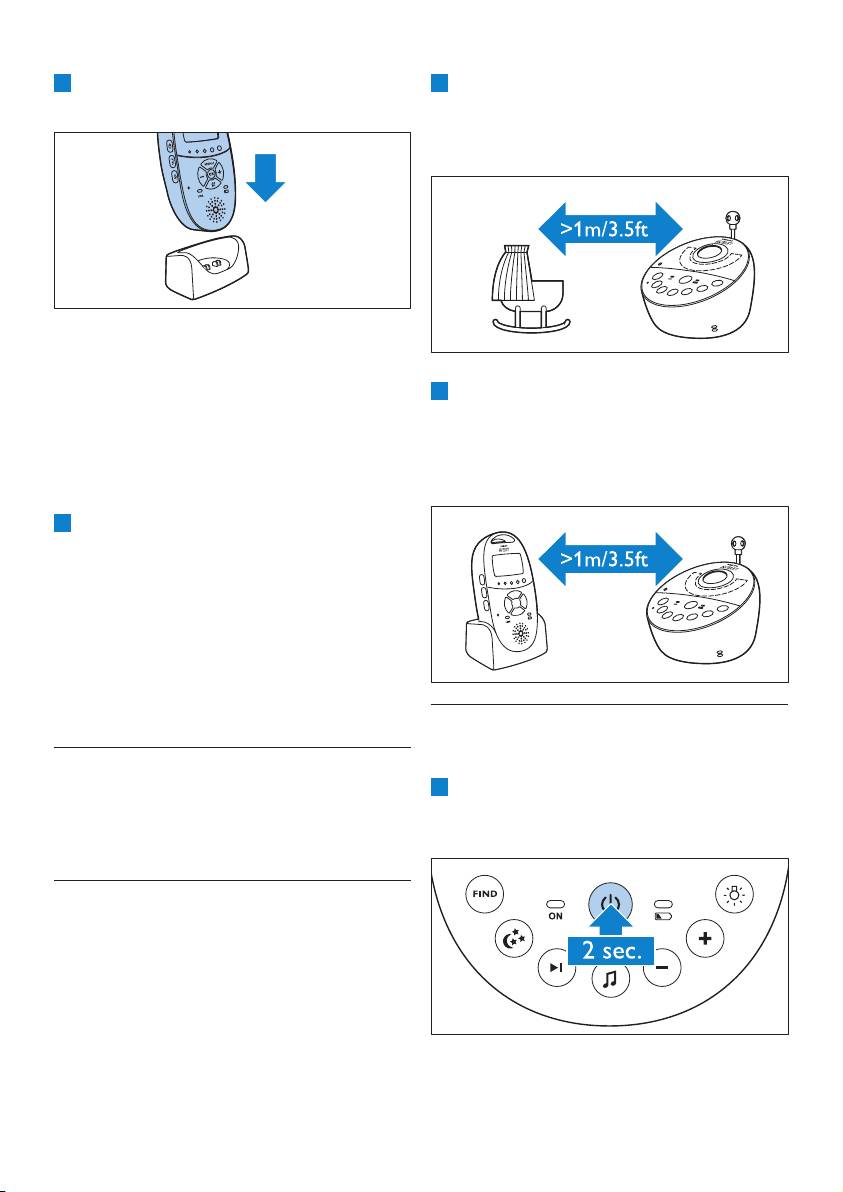
2 Поставете родителското устройство в
1 Тъй като кабелът на бебефона създава
зарядното устройство.
потенциална опасност от задушаване,
дръжте устройството за бебето и кабела
му на поне 1 метър/3,5 фута от бебето.
• Дисплеят светва и индикациите
за статус на батерията показват,
че родителското устройство се
2 За да предотвратите издаването на
зарежда. За индикациите на статуса
твърде висок звук от едното или двете
на батерията вж. “Индикации за
устройства, погрижете се родителското
зареждане на батерията” в глава
устройство да е на поне 1 метър/3,5 фута
“Функции и обратна връзка на
от устройството за бебето.
родителското устройство”.
3 Оставете родителското устройство във
включеното зарядно устройство, докато
батериите бъдат заредени напълно.
D
Забележка:
Когато започнете да използвате бебефона,
акумулаторните батерии се нуждаят от четири
цикъла на зареждане и изтощаване, преди да
достигнат максималния си капацитет.
4.2Свързванена
родителскотоустройство
иустройствотозабебето
4 Използванена
1 Натиснете и задръжте бутона за вкл./
изкл. 3 върху устройството за бебето за 2
бебефона
секунди.
4.1Разполаганенабебефона
BПредупреждение:
Пазетеустройствотозабебетоизвън
обсеганабебето.Никоганепоставяйте
устройствотозабебетовбебешкотолегло
иликошарка.
34
• Нощната светлина, светлинният
индикатор за състоянието на
батерията и индикаторът за включено
устройство светват за кратко.
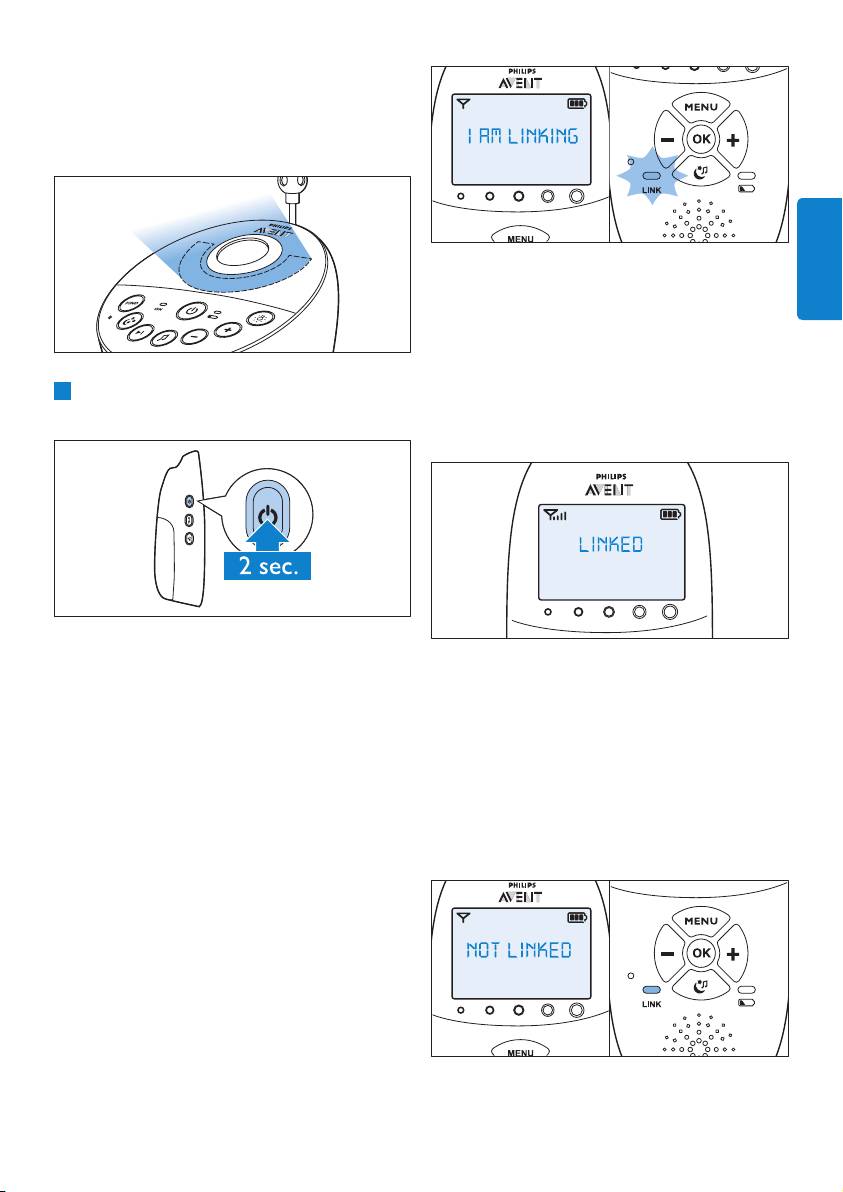
• Когато се осъществи връзка
БЪЛГАРСКИ
между устройството за бебето
и родителското устройство,
индикаторът за връзка започва да
свети постоянно в зелено. На дисплея
2 Натиснете и задръжте бутона вкл./изкл. 3
се показват индикаторът за сила
на родителското устройство за 2 секунди.
на сигнала и съобщението “LINKED”
(“СВЪРЗАНИ”).
• Дисплеят светва и за кратко показва
всички индикатори и символи. След
• Ако не се установи връзка в рамките
това индикаторите и символите
на 10 секунди, съобщението “NOT
избледняват, и се появява индикаторът
LINKED” (“НЯМА ВРЪЗКА”) на дисплея
за състоянието на батерията.
се редува с “I AM LINKING” (“В ПРОЦЕС
НА СВЪРЗВАНЕ”). Ако след 30 секунди
D
Забележка:
все още няма връзка, родителското
Когато включвате за пръв път
устройство започва да издава звуков
родителското устройство или след
сигнал и се показва само съобщението
нулиране, трябва да изберете своя
“NOT LINKED”.
предпочитан език на дисплея (вж.
“Език” в глава “Меню на родителското
устройство”).
• Светлинният индикатор “link” (връзка)
на родителското устройство започва
да мига в червено и на дисплея се
появява съобщението “I AM LINKING”
(“В ПРОЦЕС НА СВЪРЗВАНЕ”).
35

Сухи материали Дебелина на
Загуба на
Какводанаправите,аконесе
материала
радиус на
установивръзка
действие
• Родителското устройство може да
е извън обсега на устройството за
Железобетон < 30 см (12
30-100%
бебето. Преместете родителското
инча)
устройство по-близо до
Метални мрежи или
< 1 см (0,4
90-100%
устройството за бебето, но не по-
решетки
инча)
близо от 1 метър/3,5 фута.
Метални или
< 1 см (0,4
100%
• Ако устройството за бебето или
алуминиеви листове
инча)
родителското устройство са твърде
близо до друго цифрово безжично
комуникационно устройство (напр.
безжичен телефон) и загубят
5 Функциии
връзка помежду си, изключете
това устройство или преместете
обратнавръзкана
устройството за бебето или
родителското устройство по-далеч
устройствотоза
от него.
• Устройството за бебето може да е
бебето
изключено. Включете устройството
за бебето.
5.1Нощнасветлина
4.2.1Работенобхват
Нощната светлина създава меко сияние, което
• Както в стандартен работен режим
успокоява бебето.
със Smart Eco, така и в режим Eco Max,
1 Натиснете бутона за вкл./изкл. на нощната
радиусът на действие е 330 метра/1000
светлина на устройството за бебето, за да
фута на открито и до 50 метра/150 фута на
включите нощната светлина.
закрито.
• Работният обхват на бебефона варира
в зависимост от околната среда и други
причиняващи смущения фактори. При
смущения, причинени от влажни и мокри
материали, загубата на обхват е до 100%.
За смущения, причинени от сухи материали,
вижте таблицата по-долу
Сухи материали Дебелина на
Загуба на
материала
радиус на
• Q се показва на дисплея на
действие
родителското устройство.
Дърво, фазер,
< 30 см (12
0-10%
2 Натиснете бутона за вкл./изкл. на нощната
шперплат, стъкло
инча)
светлина отново, за да изключите нощната
(без метал,
светлина.
армировка или
• Нощната светлина постепенно
олово)
намалява, докато се изключи изцяло.
Тухла, гипс < 30 см (12
5-35%
• Q изчезва от дисплея на родителското
инча)
устройство.
36
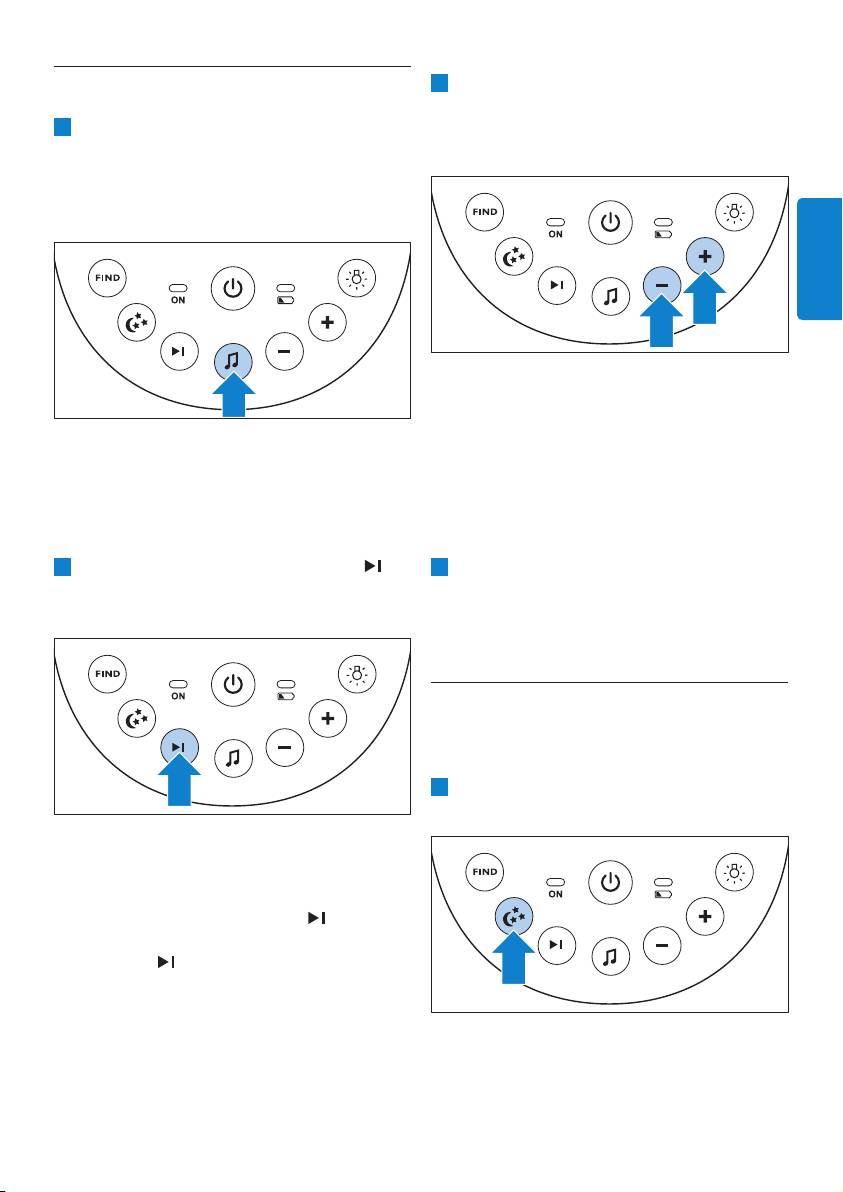
5.2Функция“приспивна
3 За да регулирате нивото на звука на
песен”
приспивната песен, натиснете бутона “+”
1 Натиснете бутона за възпроизвеждане
или “-” за сила на звука на устройството за
и спиране на приспивна песен
бебето.
K на устройството за бебето за
възпроизвеждане на последната избрана
приспивна песен.
БЪЛГАРСКИ
D
Забележка:
Можете да променяте силата на звука на
устройството за бебето само когато е
• Избраната приспивна песен се повтаря
пусната приспивна песен. Ако увеличите
за зададеното време.
силата на звука на приспивната песен,
• Ако преди това не е била избрана
звукът ще бъде по-силен също и при
приспивна песен, ще се пусне песен
използване на функцията за говорене на
номер 1.
родителското устройство.
2 Натиснете бутона за следваща песен
4 За да спрете изпълнението на приспивната
, за да изберете друга приспивна песен от
песен, преди да е изтекло зададеното
списъка.
време, натиснете бутона за пускане
и спиране на приспивна песен K на
устройството за бебето.
5.3Проектор
Можете да успокоите бебето с цветни
светлинни шарки, проектирани на тавана, като
включите проектора.
1 Натиснете бутона за включване/изключване
на проектора, за да включите проектора.
• Ако не се възпроизвежда приспивна
песен, последно избраната приспивна
песен стартира при натискане на
бутона за следваща песен
.
• Когато натиснете бутона за следваща
песен
докато се възпроизвежда
песен, следващата песен започва да се
възпроизвежда.
37
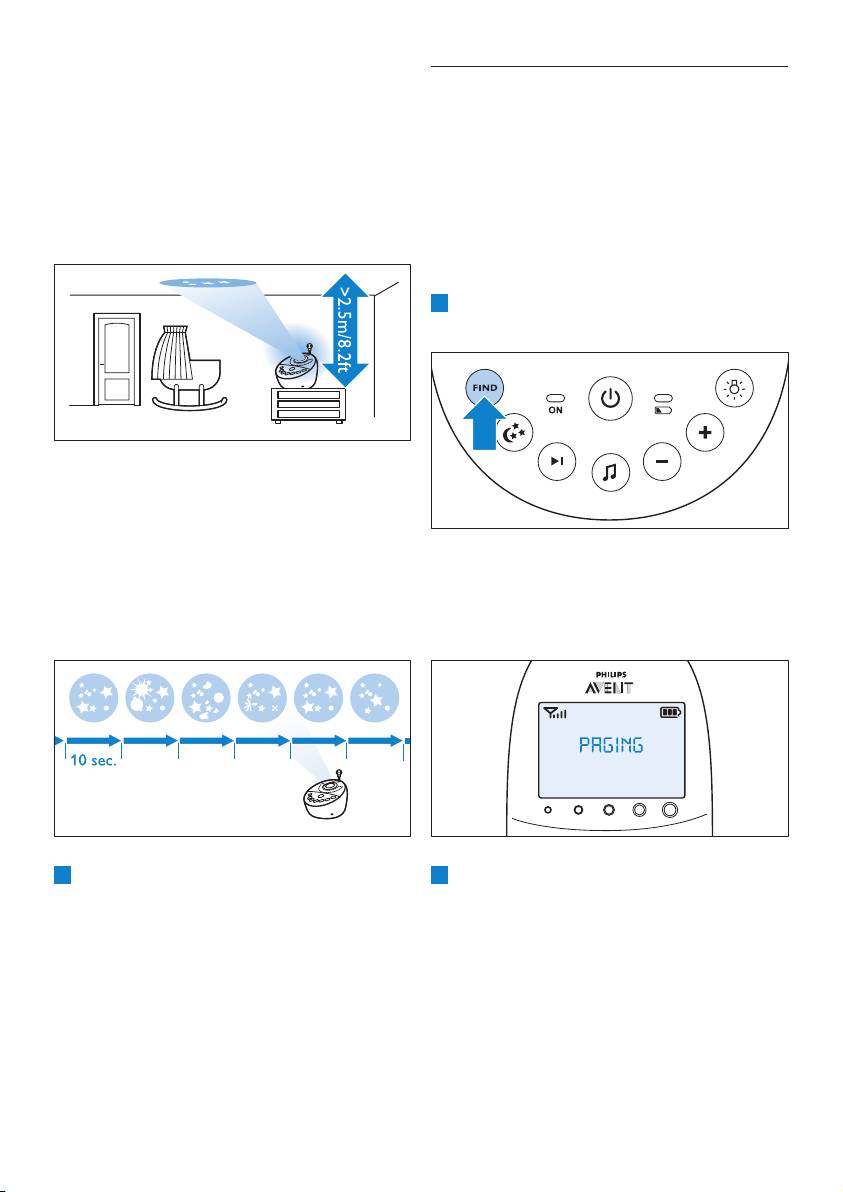
• На дисплея на родителското
5.4Намиранена
устройство се появява символът на
родителскотоустройство
проектора.
Ако сте загубили родителското устройство,
• Първата шарка постепенно се проявява
можете да използвате бутона FIND (НАМЕРИ)
до пълен интензитет след 2 секунди.
на устройството за бебето, за да намерите
Проектира се за 8 секунди и изчезва
родителското устройство.
постепенно за 2 секунди, докато се
появява следващата шарка.
D
Забележка:
Функцията “пейджинг” работи само когато
родителското устройство е включено.
1 Натиснете бутона FIND (НАМЕРИ) на
устройството за бебето.
• Има шест различни шарки и всяка
от тях се проектира за 10 секунди.
След като се изредят всичките шест
шарки, проекторът ги показва отново,
като започва от шарка 1. Шарките се
• Съобщението “PAGING” (ПЕЙДЖИНГ)
повтарят за зададеното време (вж.
се появява на дисплея на родителското
“Проектор” в глава “Функции и обратна
устройство и то генерира
връзка на родителското устройство”).
предупредителен сигнал.
2 За да изключите проектора, преди да е
2 За да спрете предупредителния
изтекло зададеното време, натиснете
сигнал, натиснете повторно бутона
бутона за вкл./изкл. на проектора отново.
FIND (НАМЕРИ) на устройството за
• Шарката изчезва постепенно и
бебето или натиснете произволен бутон на
проекторът се изключва.
родителското устройство.
• Символът на проектора изчезва от
дисплея.
D
Забележка:
Предупредителният сигнал спира
автоматично след 2 минути.
38
5.5Светлинениндикаторза
състояниетонабатерията
6 Функциии
1 Индикаторът за състоянието на батерията
свети постоянно в зелено, когато
обратнавръзка
устройството за бебето работи на батерии
и батериите имат достатъчен заряд.
народителското
устройство
БЪЛГАРСКИ
6.1Меню“Успокояване”
Родителското устройство има отделно
меню “Успокояване” за всички функции за
успокояване: нощна светлина, приспивна песен
и проектор. За да го отворите, натиснете
бутона “Успокояване”. Това меню ви позволява
2 Индикаторът за състоянието на батерията
да управлявате дистанционно нощната
мига бързо в червено, когато батериите се
светлина, приспивните песни и проектора на
изтощят, докато устройството за бебето
устройството за бебето.
работи на батерии.
1 За да отворите меню “Успокояване”,
натиснете бутона “Успокояване”.
• Сменяйте батериите, когато са
изтощени.
• Показва се менюто “Успокояване”.
• Ако батериите се изтощят докато
Този екран показва три функции
устройството за бебето работи на
на устройството за бебето: нощна
батерии, устройството се изключва и
светлина, приспивна песен и проектор.
родителското устройство губи връзка
За всяка функция има два сегмента:
с него.
полето за избор на вкл./изкл. и полето
на менюто с опции.
D
Забележка:
Ние ви съветваме да използвате устройството
за бебето със захранване от електрическата
мрежа, тъй като то има ограничено време
на работа, ако го използвате с обикновени
алкални батерии. Времето на работа с
обикновени батерии е 24 часа.
39
DЗабележка:
5 Използвайте бутоните “-” и “+”, за да
Ако не натиснете никакъв бутон до 7
се придвижите по списъка с опции и
секунди, менюто “Успокояване” се затваря
натиснете OK, за да изберете една от тях.
и дисплеят се връща в нормално състояние.
6 За да излезете от меню “Успокояване”,
2 Използвайте бутоните “+” и “-”, за да
натиснете бутона “Успокояване”.
поставите стрелката на определена
функция за успокояване.
6.1.1Нощнасветлина
Тази функция за успокояване ви позволява да
включвате или изключвате нощната светлина и
да настройвате таймера за нощна светлина.
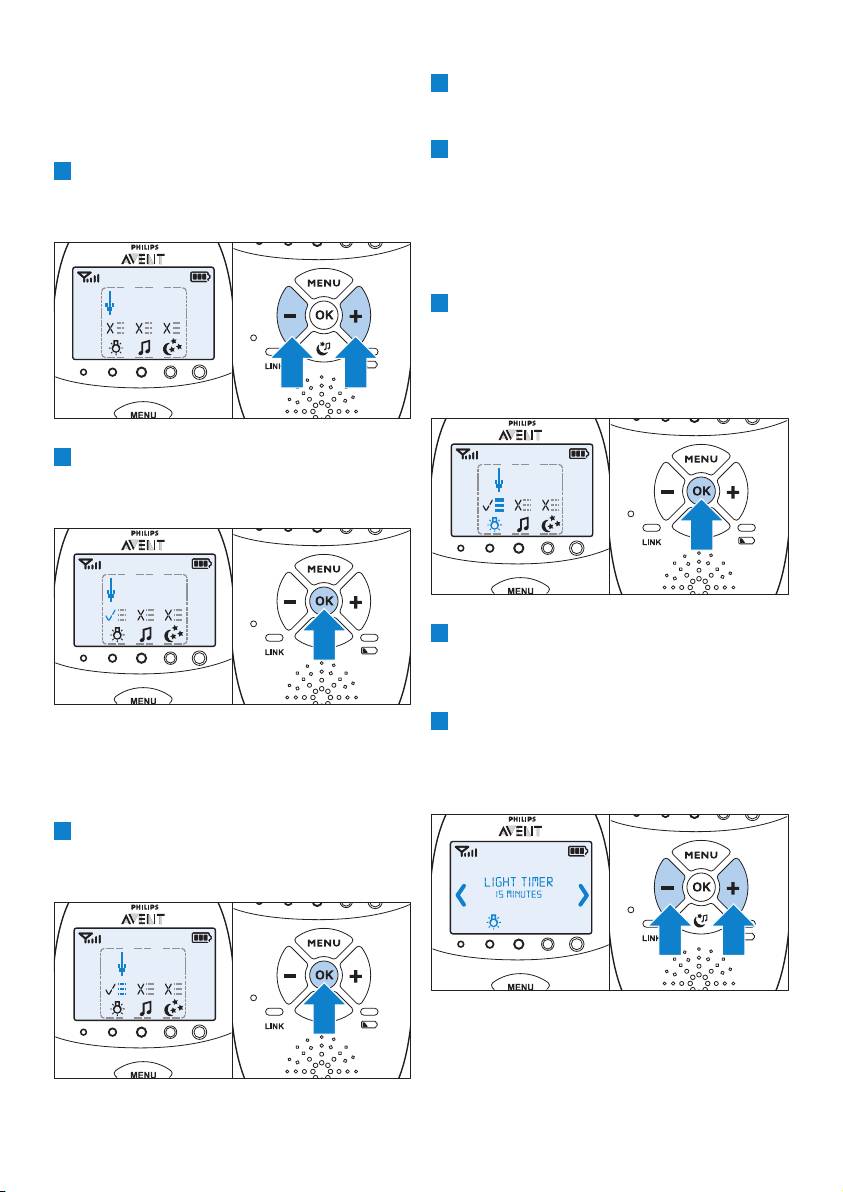
1 За да изберете функцията за нощна
светлина, използвайте бутоните “+” и “-”,
за да преместите стрелката над символа за
нощна светлина, и натиснете OK за вкл. или
изкл. на нощната светлина.
3 За да включите функция за успокояване,
когато е изключена, или да я изключите,
когато е включена, натиснете OK.
2 За да отворите менюто с опции за нощна
светлина, насочете стрелката към полето
на менюто с опции и натиснете OK за
потвърждение.
3 Може да настроите таймера за нощна
• Ако функцията е включена, има
светлина на 5 до 20 минути или може да
отметка над символа на функцията.
зададете нощната светлина да е постоянно
• Ако функцията е изключена, има кръст
включена. Натиснете OK за потвърждение.
над символа на функцията.
4 За да отворите менюто с опциите на
функцията, преместете стрелката над
полето на менюто с опции и натиснете OK.
40
