Philips LivingColors Grand lampadaire noir: instruction
Class: Lighting
Type:
Manual for Philips LivingColors Grand lampadaire noir
LivingColors
Generation2
Led Lamp
69175/**/**
69176/**/**
1
Content
EN .............19
ES ..............44
HU ............71
SL ..............97
FR ..............22
PT ..............47
LV ..............74
MK ..........100
DE .............25
IT ...............51
LT ..............77
BG ...........104
NL .............29
EL ..............54
ET ..............80
HR ...........107
NO ...........32
TR .............58
RU .............83
SR ............110
DA .............35
PL ..............61
UK .............87
AR............114
SV ..............38
CS .............64
KK .............90
FI................41
SK ..............67
RO .............94
2
1
AA A
A
AA
AAA
A A A
A
AA
A AA
3

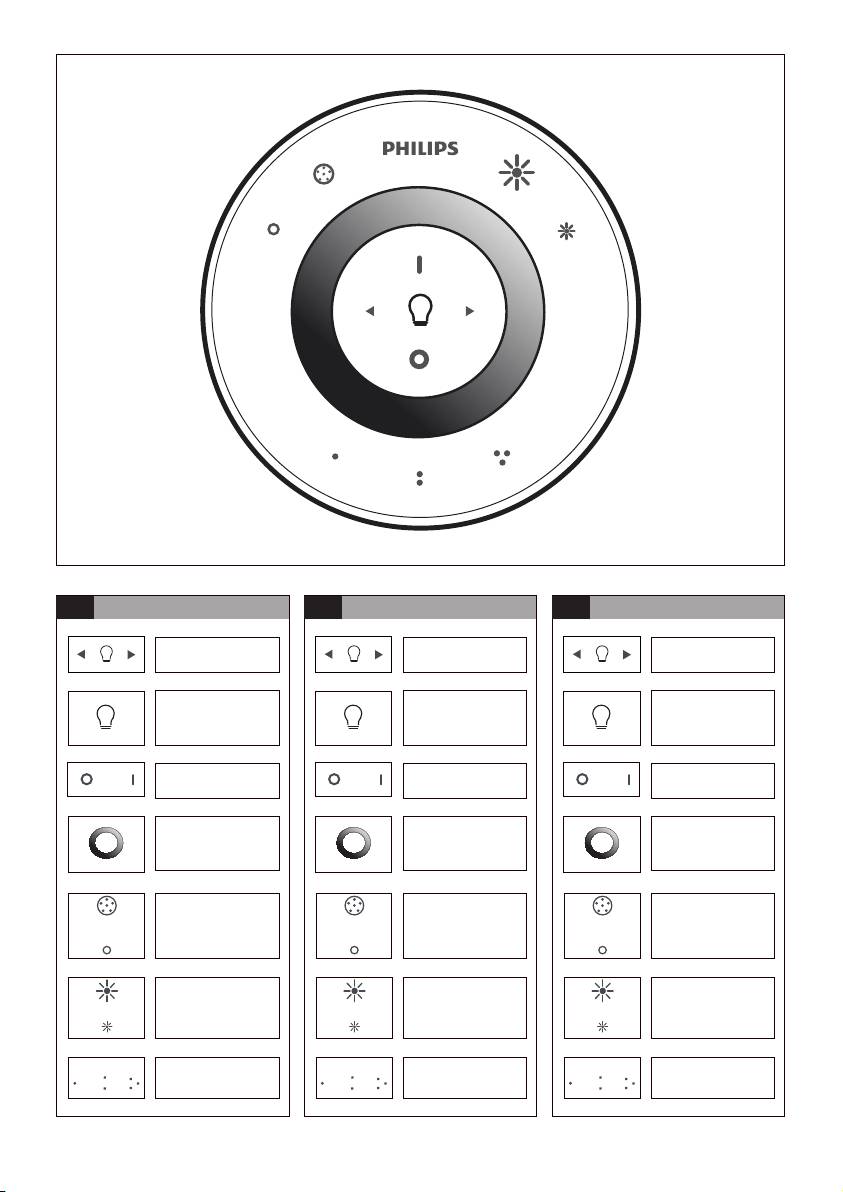
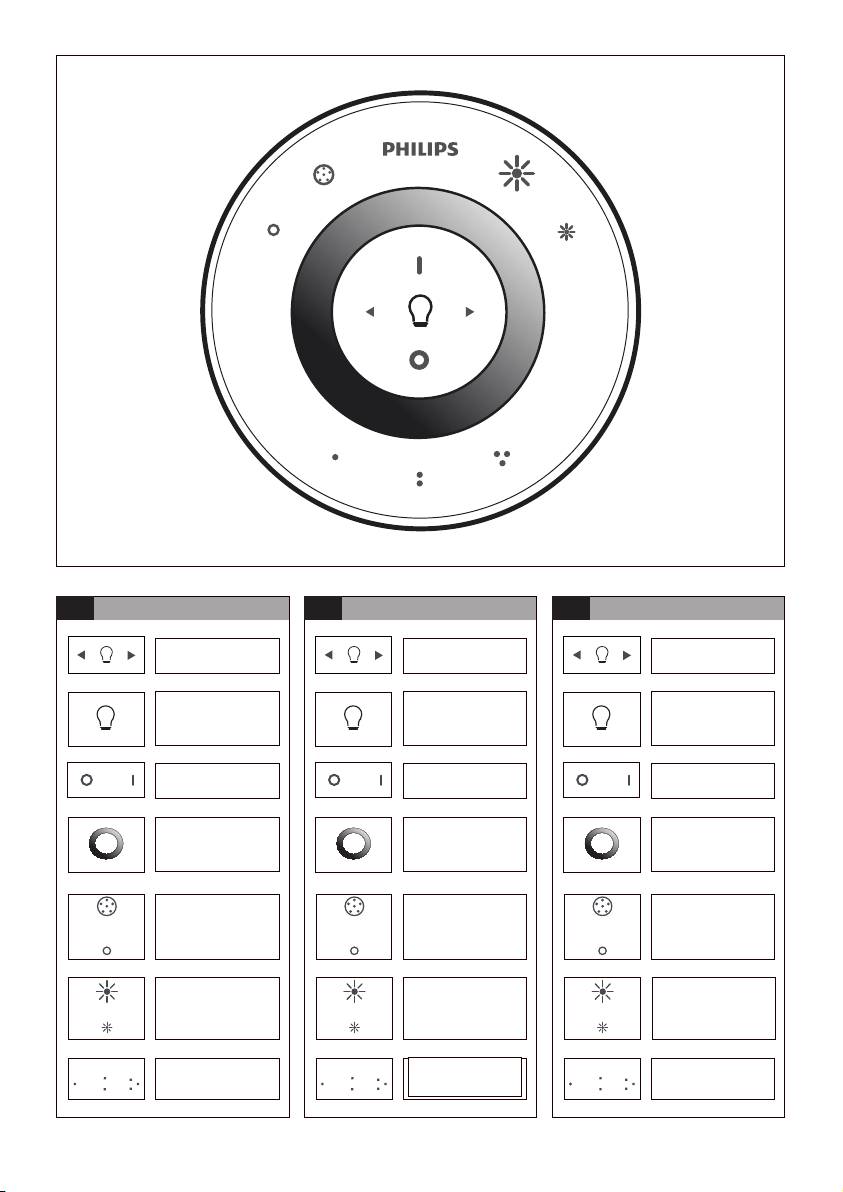
EN Remote Control
FR Télécommande
DE Fernbedienung
Light Selection
Sélection lampe
Lichtauswahl
Light Selection
Témoin de sélection
Anzeige für die
Indicator
de lampe
Lichtauswahl
Off/On
Off/On
Aus/Ein
Colour
Sélection couleur
Farbauswahl
selection
Sättigung
Saturation Up
Saturation+
erhöhen
Saturation Down
/ Saturation-
Sättigung
verringern
Luminosité+
Dim Up
Hochdimmen
Luminosité-
Dim Down
Herunterdimmen
(gradation)
Scene
Boutons
Moditasten
Buttons
d’ambiance
4

NL Remote Control
NO Fjernkontroll
DA Fjernbetjening
Lichtselectie
Valg af pære
Valg av lys
Lampselectie-
Lysvelgerindikator
Indikator for valg af
indicator
pære
Uit / Aan
Av/på
Fra/Til
Kleurselectie
Valg av farge
Farvevalg
Minder wit
Mer metning
Mætning op
Meer wit
Mindre metning
Mætning ned
Hogere
Sterkere
lichtintensiteit
dimming
Blænd op
Lagere
Svakere
Blænd ned
lichtintensiteit
dimming
Scèneknoppen
Sceneknapper
Sceneknapper
5
SV Fjärrkontroll
FI Kaukosäädin
ES Fernbedienung
Belysningsalternativ
Valon valinta
Selección de luz
Light Selection
Valon valinnan
Anzeige für die
Indicator
merkkivalo
Lichtauswahl
Encendido
Av / På
Pois/Käytössä
/ apagado
Färgalternativ
Värin valinta
Selección de color
Mer
Aumento de
färgmättnad
Lisää/vähemmän
saturación
Mindre
värikylläisyyttä
Disminución de
färgmättnad
saturación
Aumento de
Lisää/vähemmän
Dimma upp
intensidad
voimakkuutta
Dimma ned
Disminución de
intensidad
Knappar för
Botones para crear
Valaistuspainikkeet
belysningseffekt
ambiente
6

PT Telecomando
IT Telecomando
EL Τηλεχειριστήριο
Selecção de luz
Selezione luce
Επιλογή φωτός
Indicador de
Ενδεικτική λυχνία
Indicatore di scelta
selecção da luz
επιλογής φωτός
della luce
Desligar/ Ligar
Off/On
Off/On
Selecção de cor
Selezione colore
Επιλογή χρώματος
Aumentar a
Aumento/
Αύξηση / μείωση
saturação
diminuzione
κορεσμού
Diminuir a
saturazione
saturação
Aumentar a
Aumento/
intensidade da luz
Αύξηση / μείωση
diminuzione
Diminuir a
έντασης φωτός
intensità luminosa
intensidade da luz
Botões de efeitos
Pulsanti combina-
Κουμπιά
de luz
zioni luminose
σκηνής
7

TR Uzaktan kumanda
PL Pilot zdalnego sterowania
CS Dálkový ovladač
Işık seçimi
Wybór światła
Výběr světla
Işık seçimi
Wskaźnik wyboru
Indikátor výběru
göstergesi
światła
světla
Kapalı / Açık
Wył. / Wł.
Off/On
Renk seçimi
Wybór koloru
Výběr barvy
Zwiększenie nasycenia
Zvýšení sytosti
Doygunluk artırma
Zmniejszenie nasycenia
Snížení sytosti
Doygunluk azaltma
Işık açma
Jaśniejsze światło
Větší ztlumení
Işık kısma
Ciemniejsze światło
Menší ztlumení
Sahne
Przyciski
Tlačítka scény
düğmeleri
efektów
8
SK Diaľkové ovládanie
HU Távvezérlő
LV Tālvadības pults
Výber svetla
Fényválasztó
Gaismas atlasīšana
Anzeige für die
Indikátor výberu
Fényforrásválasztó
Lichtauswahl
zdroja svetla
gomb
Vyp./Zap.
Off / On (ki/be)
Ieslēgt/Izslēgt
Színválasztó
Krāsas atlasīšana
Výber farby
Telítettség növelése
Palielināt piesātinājumu
Zvýšenie sýtosti/
Zníženie sýtosti
Telítettség csökkentése
Samazināt iesātinājumu
Fényintenzitás
Zosilnenie
növelése
Stlmenie
Gaišāka/tumšāka
Fényintenzitás
csökkentése
Fénybeállítás-
Tlačidlá scény
választó gombok
Ainas pogas
9

LT Nuotolinis valdymas
ET Kaugjuhtimispult
RU Пульт ДУ
Šviesos pasirinkimas
Valguse valik
Выбор лампы
Šviesos pasirinkimo
Valguse valiku
Индикатор выбора
indikatorius
indikaator
светильника
Išjungti / Įjungti
Väljas / sees
Вык / Вкл
Spalvų pasirinkimas
Värvi valik
Выбор цвета
Küllastatust juurde/
Soties padidinimas /
Насыщенность вкл./
Küllastatust
sumažinimas
насыщенность выкл.
vähemaks
Pritemdyti /
Hämarust juurde /
Затемнение вкл. /
pašviesinti
Hämarust vähemaks
затемнение выкл.
Кнопки
Stseeninupud
переключения
Scenų mygtukai
режима
10

UK Пульт дистанційного керування
KK Қашықтан басқару құралы
RO Telecomandă
Жарықты таңдау
Selectare lumină
Вибір світла
Індикатор вибору
Шам таңдау
Indicator de
світла
көрсеткіші
selectare a luminii
Oprit / Pornit
Увімк./вимк.
Өшіру / қосу
Вибір кольору
Түсті таңдау
Selectare culoare
Түс қанықтығын
Збільшення/зменшення
Creştere/reducere
арттыру / түс
насичення
қанықтығын азайту
saturaţie
Жарықтығын
Збільшення/
Creştere/reducere
арттыру /
зменшення яскравості
жарықтығын азайту
intensitate luminii
Кнопки ефекту
Реңк түймелері
Butoane pentru
освітлення
scenă
11

SL Daljinski upravljalnik
MK Далечински управувач
BG Дистанционно управление
Izbira svetlobe
Избор на светилка
Избор на светлина
Indikator izbire
Индикатор за избор
Anzeige für die
svetlobe
на светилка
Lichtauswahl
Vklop/izklop
Исклучување /
Изкл. / Вкл.
Вклучување
Izbira barve
Избор на боја
Избор на цвят
Več nasičenosti
Зголемување
Увеличаване на
/manj nasičenosti
/ намалување на
наситеността /
заситеност
Намаляване на
наситеността
Увеличаване на
Bolj zatemnjeno
Зголемување
затъмняването /
/manj zatemnjeno
/ намалување на
Намаляване на
придушување
затъмняването
Gumbi za
Копчиња
prizore
за сцена
Бутони за сцени
12

HR Daljinski upravljač
SR Daljinski upravljač
AR
Odabir svjetla
Izbor svetla
Indikator za odabir
Indikator za izbor
svjetla
svetla
Isključeno /
Isključeno /
Uključeno
Uključeno
Odabir boje
Izbor boje
Povećanje /
Povećavanje/
smanjenje
smanjivanje
zasićenosti
zasićenosti
Povećanje /
Povećavanje/
smanjenje
smanjivanje
prigušenja
zatamnjenosti
Gumbi za odabir
Dugmad za izbor
scene
scene
13
ﺪﻌﺑ ﻦﻋ ﻢﻜﺤﺘﻟﺍ ﺯﺎﻬﺟ
ءﻮﻀﻟﺍ ﺪﻳﺪﺤﺗ
ﻞﻴﻐﺸﺘﻟﺍ ﻑﺎﻘﻳﺇ /ﻞﻴﻐﺸﺗ
ﻥﻮﻠﻟﺍ ﺪﻳﺪﺤﺗ
ﻊﺒﺸﺘﻟﺍ ﺓﺩﺎﻳﺯ /ﻊﺒﺸﺘﻟﺍ ﻒﻴﻔﺨﺗ
ﺖﻴﻔﺨﺘﻟﺍ ﺓﺩﺎﻳﺯ /ﺖﻴﻔﺨﺘﻟﺍ ﻒﻴﻔﺨﺗ
ﺪﻬﺸﻤﻟﺍ ﺭﺍﺭﺯﺃ
ﺪﻌﺑ ﻦﻋ ﻢﻜﺤﺘﻟﺍ ﺯﺎﻬﺟ
ءﻮﻀﻟﺍ ﺪﻳﺪﺤﺗ
ﻞﻴﻐﺸﺘﻟﺍ ﻑﺎﻘﻳﺇ /ﻞﻴﻐﺸﺗ
ﻥﻮﻠﻟﺍ ﺪﻳﺪﺤﺗ
ﻊﺒﺸﺘﻟﺍ ﺓﺩﺎﻳﺯ /ﻊﺒﺸﺘﻟﺍ ﻒﻴﻔﺨﺗ
ﺖﻴﻔﺨﺘﻟﺍ ﺓﺩﺎﻳﺯ /ﺖﻴﻔﺨﺘﻟﺍ ﻒﻴﻔﺨﺗ
ﺪﻬﺸﻤﻟﺍ ﺭﺍﺭﺯﺃ
ﺪﻌﺑ ﻦﻋ ﻢﻜﺤﺘﻟﺍ ﺯﺎﻬﺟ
ءﻮﻀﻟﺍ ﺪﻳﺪﺤﺗ
ﻞﻴﻐﺸﺘﻟﺍ ﻑﺎﻘﻳﺇ /ﻞﻴﻐﺸﺗ
ﻥﻮﻠﻟﺍ ﺪﻳﺪﺤﺗ
ﻊﺒﺸﺘﻟﺍ ﺓﺩﺎﻳﺯ /ﻊﺒﺸﺘﻟﺍ ﻒﻴﻔﺨﺗ
ﺖﻴﻔﺨﺘﻟﺍ ﺓﺩﺎﻳﺯ /ﺖﻴﻔﺨﺘﻟﺍ ﻒﻴﻔﺨﺗ
ﺪﻬﺸﻤﻟﺍ ﺭﺍﺭﺯﺃ
ﺪﻌﺑ ﻦﻋ ﻢﻜﺤﺘﻟﺍ ﺯﺎﻬﺟ
ءﻮﻀﻟﺍ ﺪﻳﺪﺤﺗ
ﻞﻴﻐﺸﺘﻟﺍ ﻑﺎﻘﻳﺇ /ﻞﻴﻐﺸﺗ
ﻥﻮﻠﻟﺍ ﺪﻳﺪﺤﺗ
ﻊﺒﺸﺘﻟﺍ ﺓﺩﺎﻳﺯ /ﻊﺒﺸﺘﻟﺍ ﻒﻴﻔﺨﺗ
ﺖﻴﻔﺨﺘﻟﺍ ﺓﺩﺎﻳﺯ /ﺖﻴﻔﺨﺘﻟﺍ ﻒﻴﻔﺨﺗ
ﺪﻬﺸﻤﻟﺍ ﺭﺍﺭﺯﺃ
ﺪﻌﺑ ﻦﻋ ﻢﻜﺤﺘﻟﺍ ﺯﺎﻬﺟ
ءﻮﻀﻟﺍ ﺪﻳﺪﺤﺗ
ﻞﻴﻐﺸﺘﻟﺍ ﻑﺎﻘﻳﺇ /ﻞﻴﻐﺸﺗ
ﻥﻮﻠﻟﺍ ﺪﻳﺪﺤﺗ
ﻊﺒﺸﺘﻟﺍ ﺓﺩﺎﻳﺯ /ﻊﺒﺸﺘﻟﺍ ﻒﻴﻔﺨﺗ
ﺖﻴﻔﺨﺘﻟﺍ ﺓﺩﺎﻳﺯ /ﺖﻴﻔﺨﺘﻟﺍ ﻒﻴﻔﺨﺗ
ﺪﻬﺸﻤﻟﺍ ﺭﺍﺭﺯﺃ
ﺪﻌﺑ ﻦﻋ ﻢﻜﺤﺘﻟﺍ ﺯﺎﻬﺟ
ءﻮﻀﻟﺍ ﺪﻳﺪﺤﺗ
ﻞﻴﻐﺸﺘﻟﺍ ﻑﺎﻘﻳﺇ /ﻞﻴﻐﺸﺗ
ﻥﻮﻠﻟﺍ ﺪﻳﺪﺤﺗ
ﻊﺒﺸﺘﻟﺍ ﺓﺩﺎﻳﺯ
/ﻊﺒﺸﺘﻟﺍ ﻒﻴﻔﺨﺗ
ﺖﻴﻔﺨﺘﻟﺍ ﺓﺩﺎﻳﺯ /ﺖﻴﻔﺨﺘﻟﺍ ﻒﻴﻔﺨﺗ
ﺪﻬﺸﻤﻟﺍ ﺭﺍﺭﺯﺃ
ﺪﻌﺑ ﻦﻋ ﻢﻜﺤﺘﻟﺍ ﺯﺎﻬﺟ
ءﻮﻀﻟﺍ ﺪﻳﺪﺤﺗ
ﻞﻴﻐﺸﺘﻟﺍ ﻑﺎﻘﻳﺇ /ﻞﻴﻐﺸﺗ
ﻥﻮﻠﻟﺍ ﺪﻳﺪﺤﺗ
ﻊﺒﺸﺘﻟﺍ ﺓﺩﺎﻳﺯ /
ﻊﺒﺸﺘﻟﺍ ﻒﻴﻔﺨﺗ
ﺪﻬﺸﻤﻟﺍ ﺭﺍﺭﺯﺃ
ﺖﻴﻔﺨﺘﻟﺍ ﺓﺩﺎﻳﺯ /ﺖﻴﻔﺨﺘﻟﺍ ﻒﻴﻔﺨﺗ
ﺪﻌﺑ ﻦﻋ ﻢﻜﺤﺘﻟﺍ ﺯﺎﻬﺟ
ءﻮﻀﻟﺍ ﺪﻳﺪﺤﺗ
ﻞﻴﻐﺸﺘﻟﺍ ﻑﺎﻘﻳﺇ /ﻞﻴﻐﺸﺗ
ﻥﻮﻠﻟﺍ ﺪﻳﺪﺤﺗ
ﻊﺒﺸﺘﻟﺍ ﺓﺩﺎﻳﺯ /ﻊﺒﺸﺘﻟﺍ ﻒﻴﻔﺨﺗ
ﺖﻴﻔﺨﺘﻟﺍ ﺓﺩﺎﻳﺯ
/ﺖﻴﻔﺨﺘﻟﺍ ﻒﻴﻔﺨﺗ
ﺪﻬﺸﻤﻟﺍ ﺭﺍﺭﺯﺃ
ﺪﻌﺑ ﻦﻋ ﻢﻜﺤﺘﻟﺍ ﺯﺎﻬﺟ
ءﻮﻀﻟﺍ ﺪﻳﺪﺤﺗ
ﻞﻴﻐﺸﺘﻟﺍ ﻑﺎﻘﻳﺇ /ﻞﻴﻐﺸﺗ
ﻥﻮﻠﻟﺍ ﺪﻳﺪﺤﺗ
ﻊﺒﺸﺘﻟﺍ ﺓﺩﺎﻳﺯ /ﻊﺒﺸﺘﻟﺍ ﻒﻴﻔﺨﺗ
ﺖﻴﻔﺨﺘﻟﺍ ﺓﺩﺎﻳﺯ /
ﺖﻴﻔﺨﺘﻟﺍ ﻒﻴﻔﺨﺗ
ﺪﻬﺸﻤﻟﺍ ﺭﺍﺭﺯﺃ
ﺪﻌﺑ ﻦﻋ ﻢﻜﺤﺘﻟﺍ ﺯﺎﻬﺟ
ءﻮﻀﻟﺍ ﺪﻳﺪﺤﺗ
ﻞﻴﻐﺸﺘﻟﺍ ﻑﺎﻘﻳﺇ /ﻞﻴﻐﺸﺗ
ﻥﻮﻠﻟﺍ ﺪﻳﺪﺤﺗ
ﻊﺒﺸﺘﻟﺍ ﺓﺩﺎﻳﺯ /ﻊﺒﺸﺘﻟﺍ ﻒﻴﻔﺨﺗ
ﺖﻴﻔﺨﺘﻟﺍ ﺓﺩﺎﻳﺯ /ﺖﻴﻔﺨﺘﻟﺍ ﻒﻴﻔﺨﺗ
ﺪﻬﺸﻤﻟﺍ ﺭﺍﺭﺯﺃ
ءﻮﻀﻟﺍ ﺪﻳﺪﺤﺗ ﺮﺷﺆﻣ
1
2
3
4
14
5
15
2
ON
5sec
60min
± 4sec
16
3.1
± 5sec
± 5sec ± 5sec
+
+
+
3.3
+
± 5sec
± 5sec
3
2
1
-
-
± 10sec
± 10sec
17

3.3
3.4
4
3
1
1
1
± 10sec
2
2
18
EN Instruction for Use
Thank you for buying the Philips LivingColors oor
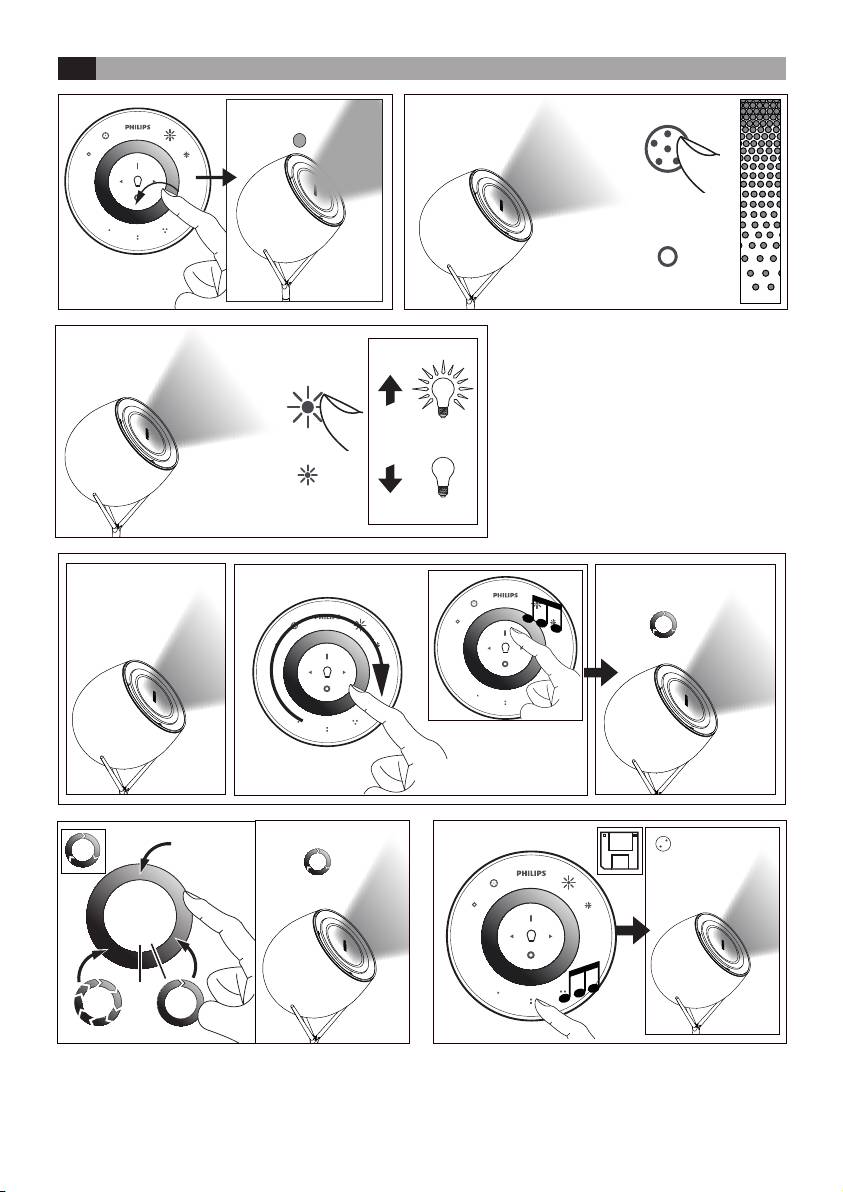
- Letting colours change automatically. Sweep
lamp!
your nger around the colour wheel (one full
circle) and briey press "I" ("On"); LivingColors
LivingColors has been especially designed to create
will switch to the automatic colour-changing
your own ambience at home, through colour and light.
mode and the lamp will start changing colours
When using LivingColors for the rst time, please
automatically.
read these instructions carefully and save them for
future reference. By following our guidelines, you will
You can adjust the speed at which colours change.
enjoy the full functionality of Philips LivingColors.
Speed can be adjusted clockwise, from fast
(dark blue colour on the colour wheel) to slow
Register your product at www.philips.com/welcome
(purple). You can tap anywhere on the colour
to stay up to date about new Philips LivingAmbiance
wheel. While in the automatic colour-changing
products
mode, you can also adjust the saturation and
brightness of the colours.
This manual will help you to…
To switch back to static colour mode, sweep
1. Get started
around the colour wheel again and then press "0".
2. Create your own ambience with LivingColors
Alternatively, you can switch LivingColors off ("0")
3. Connect LivingColors to other Philips
and on ("I") again.
LivingAmbiance products
4. Answer frequently asked questions
- If you like a particular light setting (for example,
5. Get additional support
red slightly dimmed), you can store this scene
for easy recall: press and hold one of the Scene
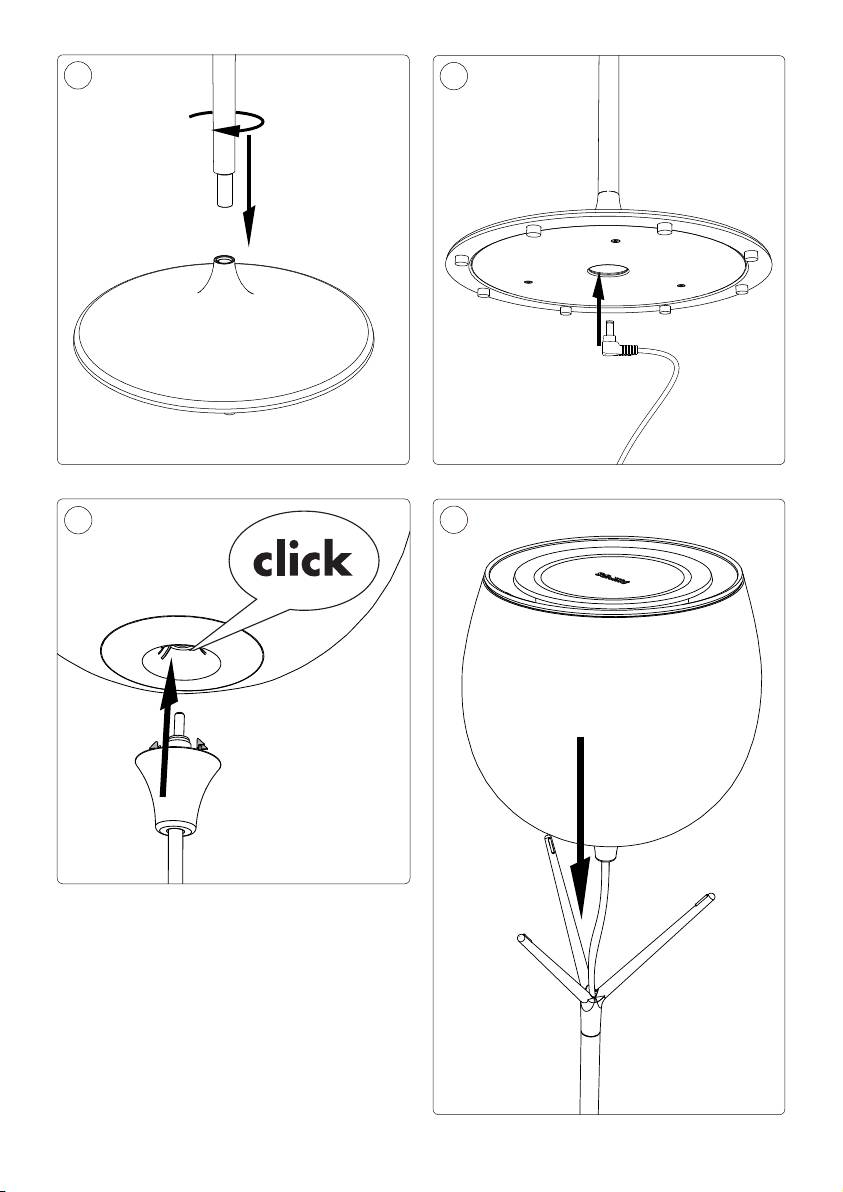
1. Getting started
buttons until the remote control makes a beeping
sound. Your scene is now stored under the Scene
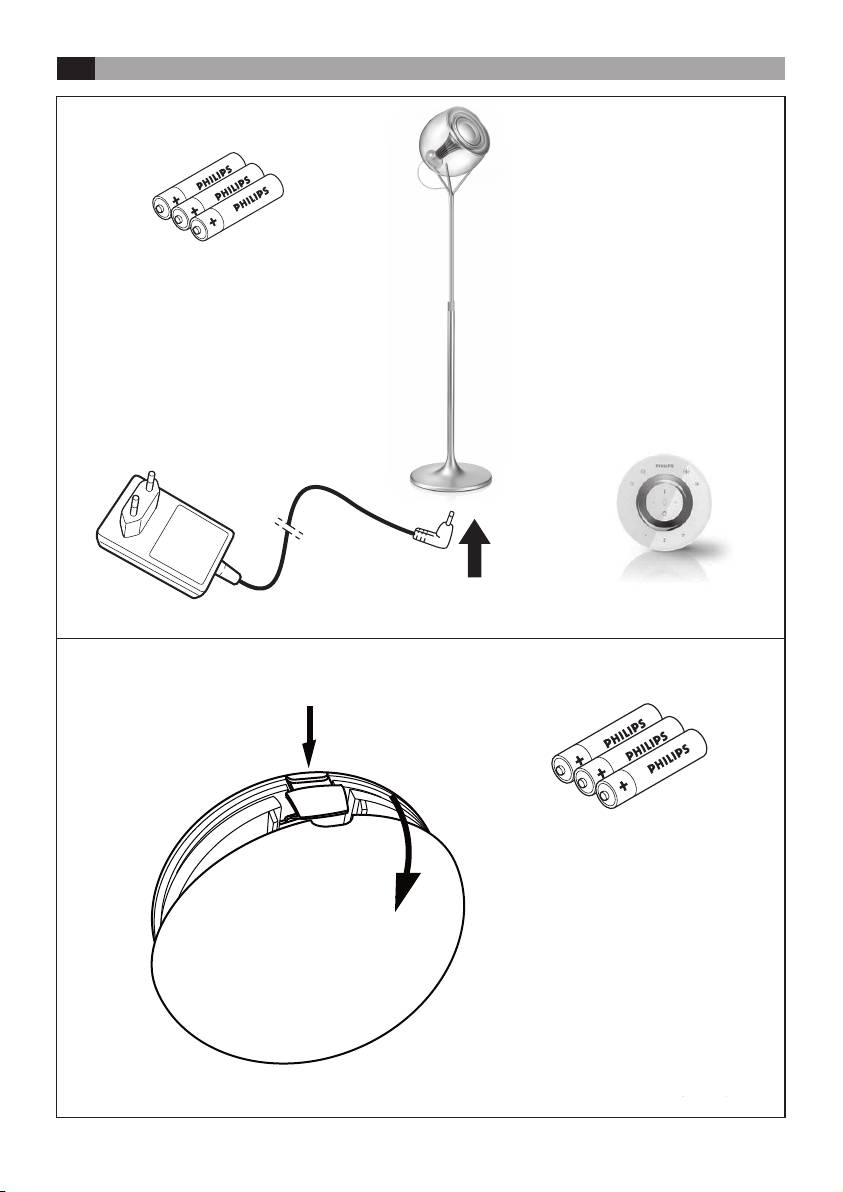
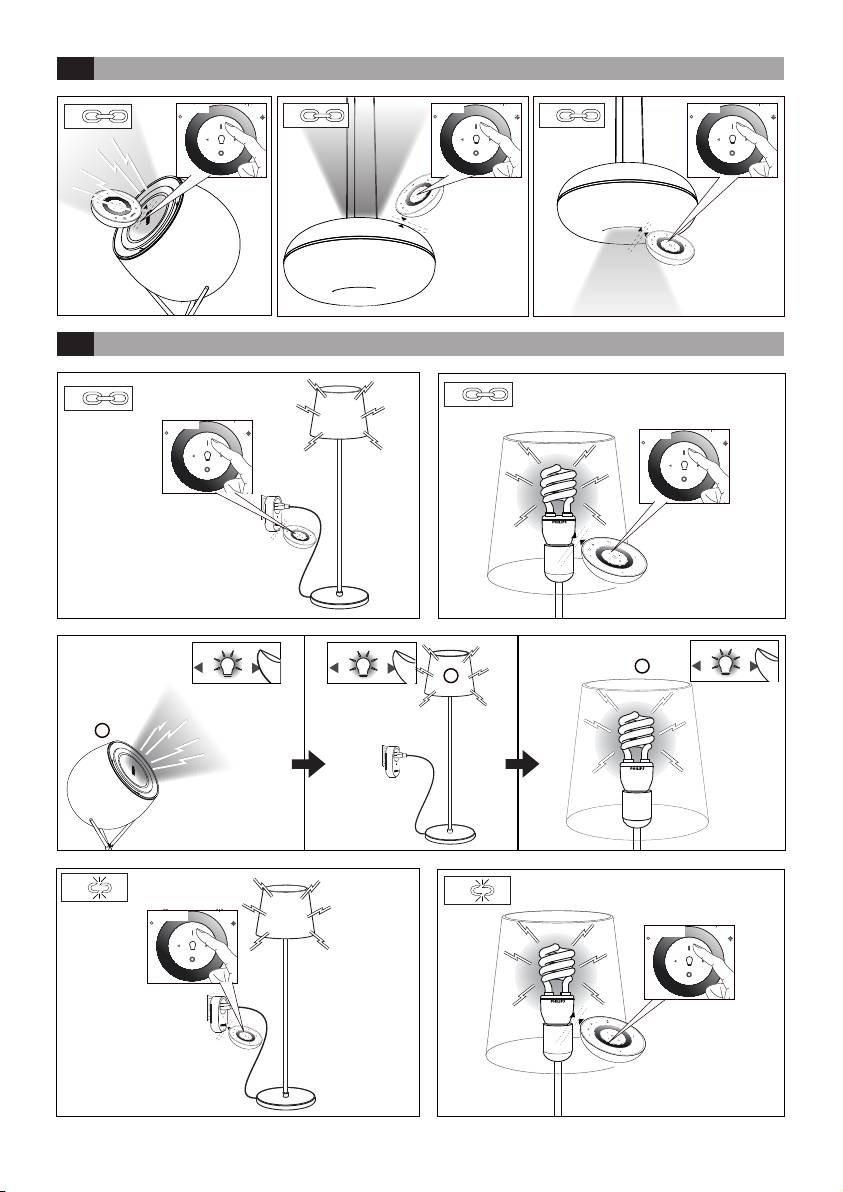
− Insert the pole into the foot, and then turn the
button you have pressed. You can also store a
pole clockwise until you cannot turn it any more.
certain speed of automatic colour-changing mode
− Insert the connection plug into the opening under
in this way.
the foot of the lamp and plug its other end into
the wall socket.
You can continue adjusting the lights as you wish.
− Insert the connection plug on top of the stand
Whenever you want to go back to your stored
into the lamp – make sure you hear a click.
scene, just press the Scene button you pressed
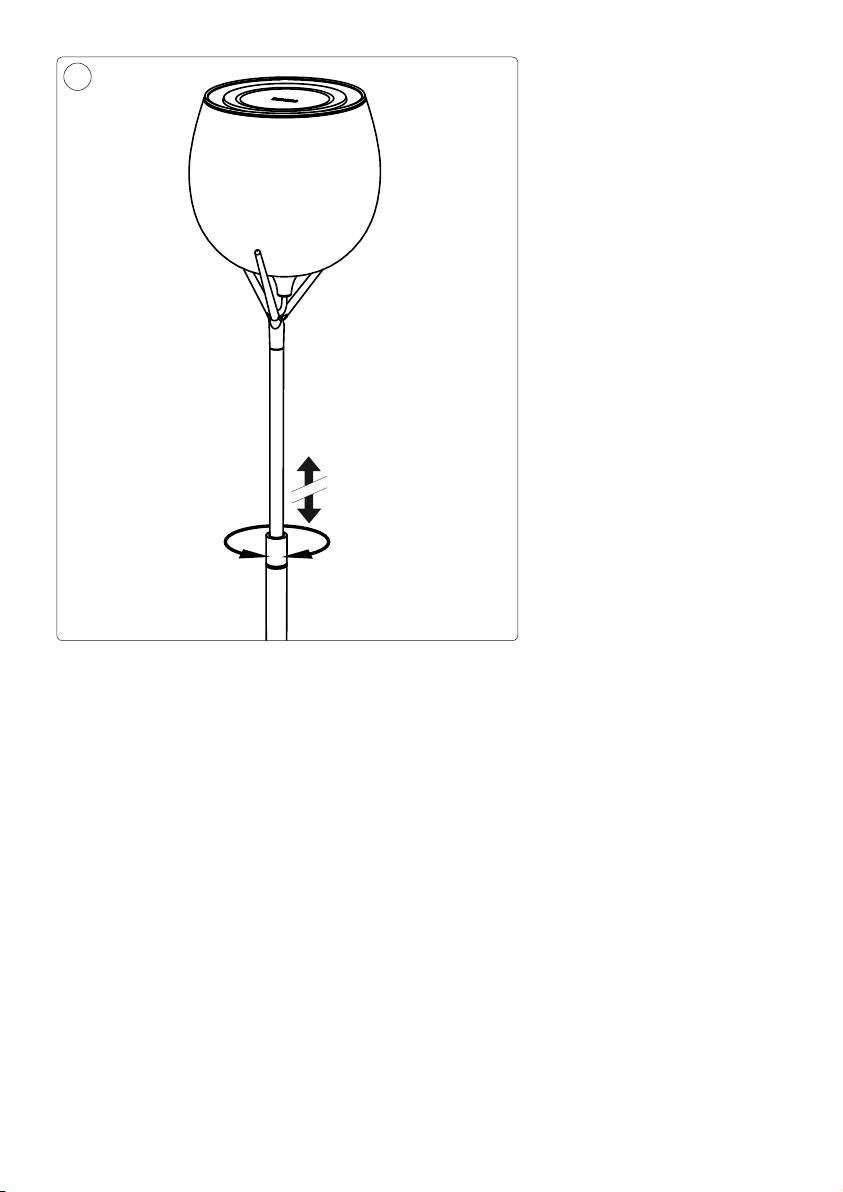
− Position the lamp on the stand and direct
when storing it. That Scene button will light up
LivingColors towards the wall (the optimal
briey to show that the scene is selected, and the
distance is 50 cm). You can adjust the height of
LivingColors will go to your stored settings.
the luminaire by turning the ring in the middle of
You can store up to 3 scenes (one for each
the stand, pulling the top part of the stand to the
Scene button).
desired height, then turning the ring back to x
the position.
Switch off LivingColors by pressing the "0" (off)
− Open the battery compartment of the remote
button briey. LivingColors will remember your
control by sliding the button at the back. Insert 3
last setting for the next time you use it. To switch
AAA batteries (+ and – as indicated).
it on again, press "I" (on).
2. Create your own ambience by
3. Connect LivingColors to other Philips
LivingAmbiance products
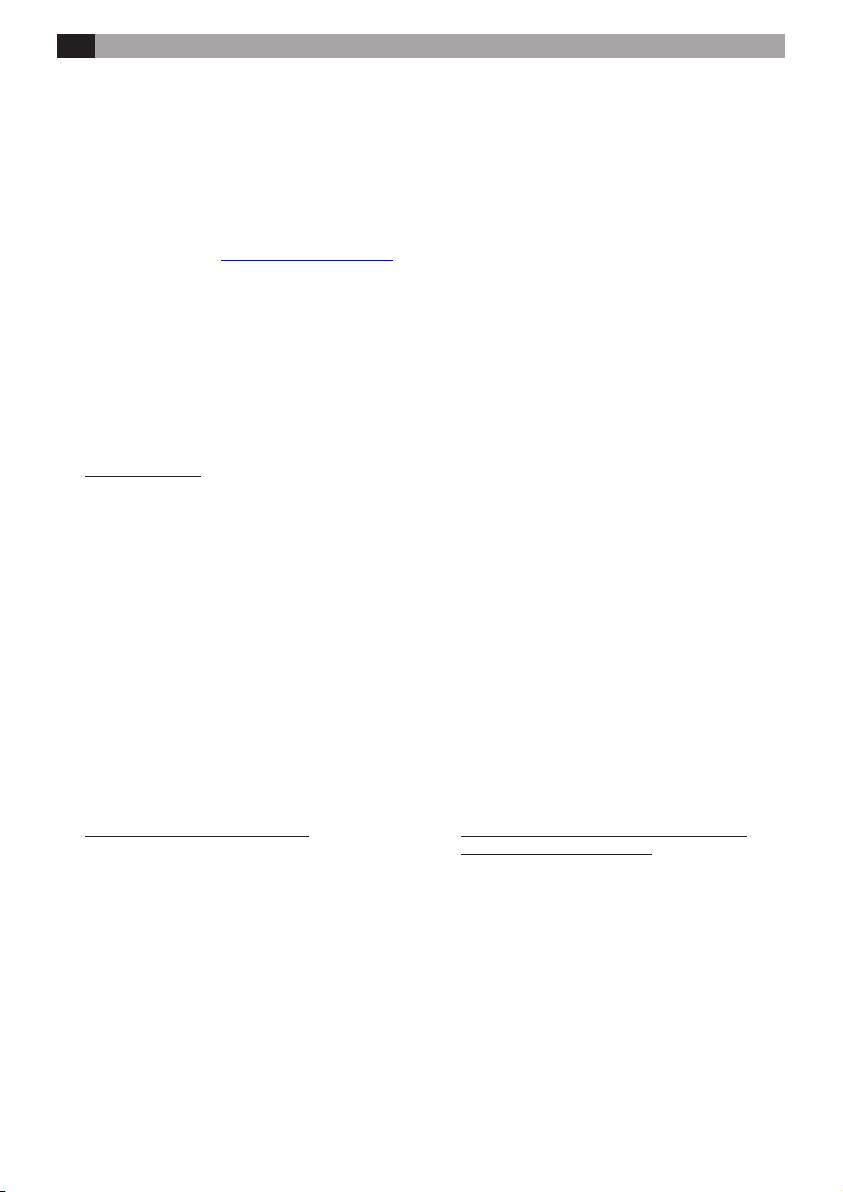
- Touching the desired colour on the colour
wheel. You can move your nger over the colour
You can connect different products from the Philips
wheel to rene the colour.
LivingAmbiance range to the remote control of your
LivingColors. This way, you will be able to adjust all
- Changing the colour saturation (adding more
the connected products together or each of them
white to the current colour). Press the saturation
individually – all with the same remote control.
up button for a deep colour or the saturation
down button for a more pastel colour. If you
1.You can connect other Philips LivingColors
keep pressing the saturation down button, you will
lamps to your remote control. Most Philips
ultimately reach white.
LivingColors will work with this remote: just
check if there is a SmartLink logo on the
- Dimming. Increase or decrease the light
LivingColors you would like to link. All products
intensity via the dimming buttons.
with a SmartLink logo can be connected to your
remote control.
19

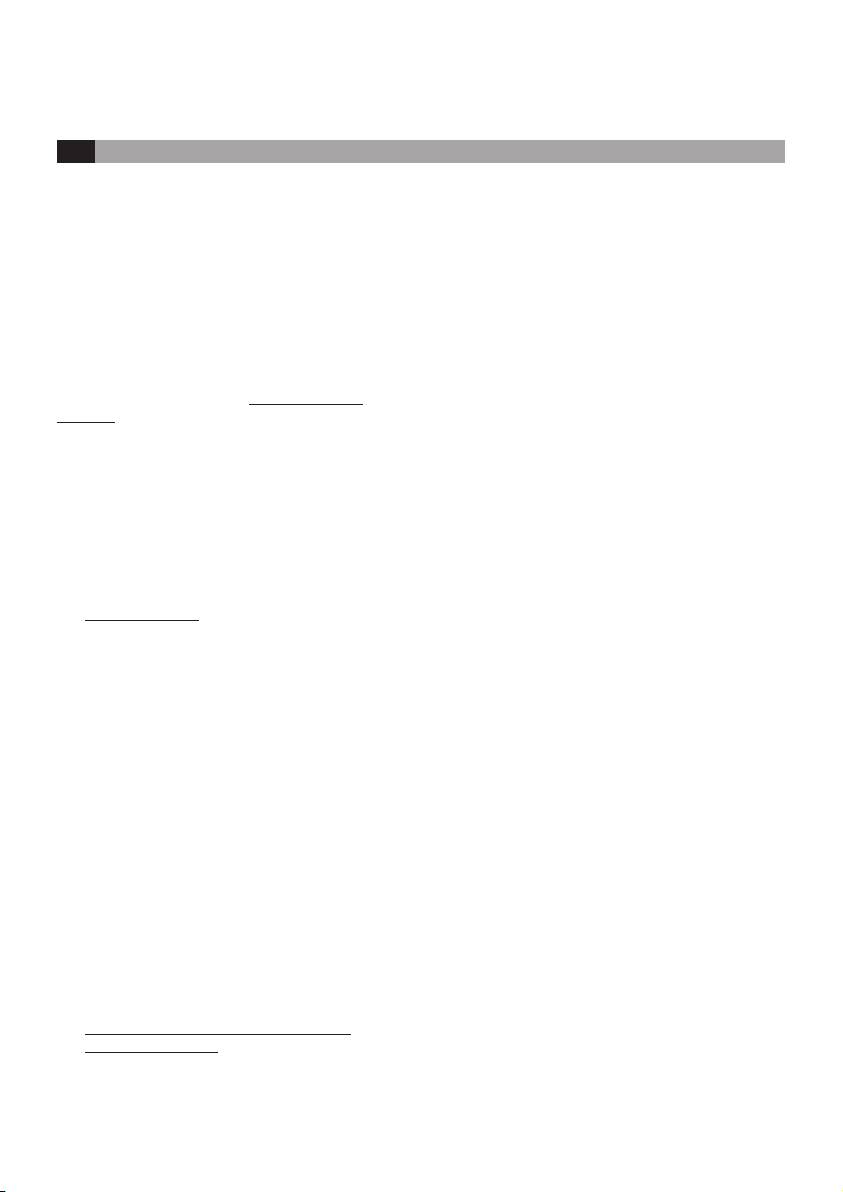
To add a Philips LivingColors lamp to the remote
remotes until the remotes play a sound. The
control, bring the remote close to the lamp, then
remotes are now connected – this means that
press and hold the "I" button. The lamp will ash
you can now connect the same lamps to the new
3 times. Hold the "I" button until you hear a beep
remote control and control all lamps with either
from the remote; the lamp will shortly ash in
of the remotes.
green. It is now connected to the remote control
c.If the remote you are adding is round, you can
and will turn to its last "on" setting.
now also copy it: you can immediately have
it connected to the same lamps your original
For a LivingAmbiance lamp, please make sure
remote is connected to. In order to copy the
that you also connect the white light. You can do
remote, repeat the procedure described in point
this in the same way as LivingWhites products
b.
described in point 2.
Once you have connected one or more lamps to your
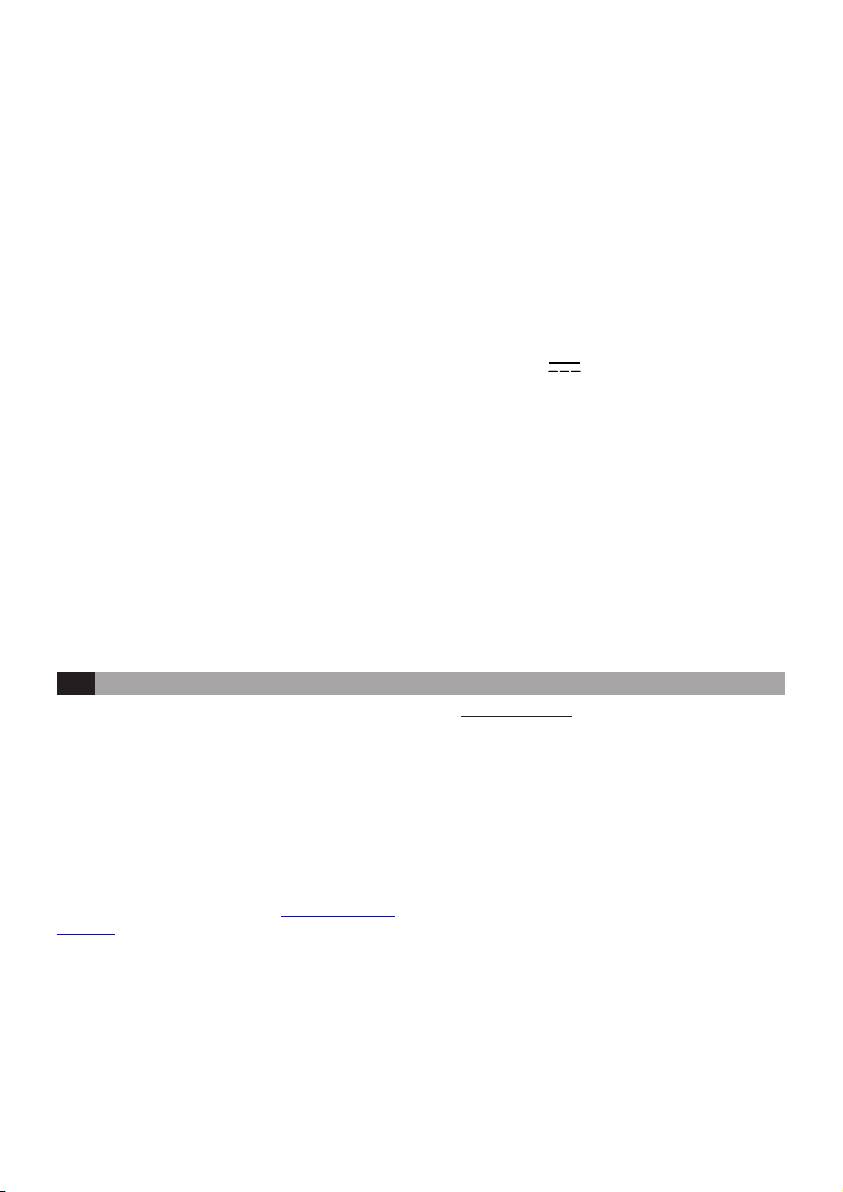
If you would like to disconnect a LivingColors
Philips LivingColors remote control, you can control
lamp from the remote, bring the remote close to
all of these lamps together or each one individually.
the lamp, then press and hold the "0" button. The
lamp will ash 3 times. Hold the "0" button until
To control a single lamp, you need to select it (please
you hear a beep from the remote. The lamp will
note that for LivingColors coloured and white
now slowly fade to off.
light, coloured and white light need to be selected
separately). You can do this using one of the light
2.You can also connect Philips LivingWhites
selection buttons. When you press and hold one of
products (plugs, energy savers and luminaires)
the light selection buttons, the selected lamp will start
to your remote control. To add a Philips
blinking. If this is not the lamp you would like to
LivingWhites product, bring the remote close
adjust, release the button and press it again; another
to it, then press and hold the "I" button. The
lamp will start blinking. When a lamp is selected, the
lamp will ash 3 times. Hold the "I" button until
light selection indicator on the remote control (light
you hear a beep from the remote; the lamp will
bulb) will light up. This means you can now adjust the
rapidly ash twice. It is now connected to the
selected lamp only.
remote control and will turn to its last "on"
setting.
When no light is selected (light selection indicator is off),
all your adjustments will apply to all lights connected
If you would like to disconnect a LivingWhites
to the remote control (for example, you can dim all
product from the remote, bring the remote
lights in the room).
close to the product, then press and hold the "0"
button. The lamp will ash 3 times. Hold the "0"
If you like a particular combination of light settings of
button until you hear a beep from the remote.
different luminaires, you can also store it as a scene in
The lamp will now slowly fade to off.
the same way as described in section 2 of this manual.
3.You can also connect your remote control to
4. Frequently asked questions
another remote control from the Philips
LivingAmbiance range. Any LivingColors or
What to do if…
LivingWhites remote with a SmartLink logo on
o The LivingColors is not providing light
it can be connected to your remote control.
o Check the connections of the cord to the
Connecting another remote control will allow
lamp. Check that the plug is correctly placed
you to control the same lamps with two different
in the wall socket.
remotes. You could, for example, create 6 different
o Remove the power cord and put it back. If the
lighting scenes—3 on one remote and 3 on the
LivingColors changes several colours and then
other—with the same lamps. To add an extra
goes off, use the remote control to switch it
LivingColors or LivingWhites remote control, do
back on.
the following:
o The LivingColors is not responding to the
a.Reset the remote control you would like to
remote control
add: open its battery compartment and press
o Check the batteries in the remote control.
the RESET button for a few seconds (e.g. with a
The batteries should be correctly inserted (+
paper clip). Make sure that the batteries are in.
and -) and should be charged. If the remote
The remote will play a sound to show it has been
control is still not working, try replacing the
reset.
batteries.
b.Hold the remote you have reset close to your
current remote. Press the "I" button on both
20

o Link the remote to the LivingColors by
The Philips warranty lapses if:
following the procedure described in section
- Anything has been changed, crossed out, deleted
3.1 of this manual.
or rendered illegible on the purchase docket or
product description.
o Buttons are ashing after I have used the
remote control
- The failure is caused by damage, faulty connections
o This means that the batteries in the remote
or abuse.
control are (almost) empty and need to be
replaced.
- A defect is caused by extreme circumstances not
inherent to the LivingColors, for example, lightning,
o I cannot start the automatic colour-
ooding, re, incorrect use or negligence.
changing mode
o It could be that the remote control did not
- The LivingColors has been opened or disassembled.
understand your "sweep" movement. Please
try again, making sure that your nger is
Cleaning and maintenance:
on the colour wheel during the full circle
Remove the plug from the wall socket.
movement
To avoid scratching, the LivingColors lamp, remote
control and adapter should only be cleaned with a
o I would like to connect the LivingColors
soft dry cloth.
to a timer. Is this possible?
Do not use cleaning agents.
o Yes. You can use Philips LivingColors with a
timer (not included). When switched on with
Safety instructions:
a timer, the LivingColors will show your last
-Keep the plug and LivingColors away from liquids
setting (static colour or automatic colour-
and humidity.
changing mode). Please make sure that your
-LivingColors is for indoor use only. Do not use in
last setting is not "off".
wet locations, e.g. bathrooms or outdoors.
-LivingColors is not a toy designed to be played with
o I cannot connect additional lamps to the
by children.
LivingColors remote control
-Do not place on hot surfaces
o Please make sure that the product you are
-For safety reasons and under the terms of the
trying to connect has a SmartLink logo on it.
warranty, the LivingColors and plug must not be
Only products with a SmartLink logo can be
opened.
connected to this remote control.
-Only use the adapter supplied: using a different
o Try repeating the procedure described in
adapter can damage your LivingColors.
section 3 of this manual. Make sure you
do hear the sounds and see the ashes as
Environment:
described there.
If you discard the appliance in due course, dispose
of it in accordance with the instructions of the local
o My question is not listed here
authority. Remove the batteries when you discard
o Please contact Philips for assistance (see
the remote control. Do not throw the batteries away
section 5 "Additional support").
with normal household waste. They must be handed
in at an ofcial collection point or at a Philips Dealer,
5. Additional support
both of which will dispose of the batteries in an
environmentally friendly way.
For information and in the event of any problem,
please visit the Philips website at www.philips.com
Plug specication:
or contact the Philips Lighting Contact Centre free
AC adapter
of charge in the U.S.: 00800-PHILIPSL or 00800-
Model: EADP-10EB C (EU type)
74454775
EADP-10EB D (UK type +
Singapore)
Warranty:
EADP-10EB E (Australia type)
The Philips two-year warranty is valid if the product
Input: 220–240 V ~ 0.3 A 50 Hz
is used in accordance with the instructions and for
Output: 18.5 V 0.83 A
its intended purpose. Claims will only be accepted on
submission of the original proof of purchase (invoice,
Power consumption of the luminaire: up to 15.4 W
sales slip or receipt) stating the purchase date, the
name of the dealer and a description of the product.
Remote Control:
Batteries: 3 x Philips Powerlife Alkaline AAA LR03, 1.5
V.
21
Wireless specication:
Environmental specication:
Wireless RF mode frequency band: 2405–2475 MHz
Temperature (operation): 0...40 °C
Wireless communications protocol: IEEE 802.15.4)
Temperature (Storage): -25...60 °C
Operating channels: channels 11, 15, 20 or 25
Relative humidity: 5...95 % non condensing
FR Instructions d’utilisation
Merci d'avoir acheté ce lampadaire LivingColors
doigt sur la roue pour afner la couleur.
Philips.
- Modiez la saturation des couleurs (ajoutez
LivingColors a été spécialement conçu pour vous
plus de blanc à la couleur actuelle). Appuyez sur
permettre de créer, chez vous, une ambiance de
le bouton saturation + pour obtenir des couleurs
lumière et de couleurs. Avant la première utilisation
intenses ou sur le bouton saturation - pour des
de LivingColors, veuillez lire ces instructions
couleurs pastel. Si vous continuez à appuyer sur
attentivement et les conserver pour une consultation
le bouton saturation -, vous nirez par atteindre la
ultérieure. Suivez les instructions pour proter au
couleur blanche.
maximum des fonctionnalités du LivingColors de
Philips.
- Créez des gradations. Augmentez ou diminuez
l'intensité de la lumière à l'aide du bouton de
Enregistrez votre produit sur www.philips.com/
gradation.
welcome pour recevoir des informations sur les
nouveaux produits Philips LivingAmbiance.
- Changez automatiquement de couleurs.
Déplacez votre doigt autour de la roue des
Ce manuel vous aidera à…
couleurs (effectuez un tour complet) et appuyez
1. Mettre en route votre produit Philips
brièvement sur « I » (marche). LivingColors
2. Créer votre propre ambiance avec LivingColors
passe alors en mode de changement de couleur
3. Connecter LivingColors à d'autres produits Philips
automatique : la lampe se met à changer de
LivingAmbiance
couleur automatiquement.
4. Consulter la foire aux questions
5. Bénécier d'une assistance supplémentaire
Vous pouvez régler la vitesse de changement des
couleurs. Vous pouvez régler la vitesse dans le
1. Mise en route :
sens des aiguilles d'une montre, de la plus rapide
(bleu foncé sur la roue des couleurs) à la plus
− Insérez le poteau dans le pied, puis tournez le
lente (violet). Vous pouvez appuyer n'importe où
poteau dans le sens des aiguilles d'une montre
sur la roue des couleurs. En mode de changement
jusqu'à ce qu'il se bloque.
de couleur automatique, vous pouvez également
− Insérez le connecteur dans l'orice situé sous le
régler la saturation et la luminosité des couleurs.
pied du lampadaire et l'autre extrémité dans la
prise secteur.
Pour revenir au mode de couleur statique,
− Insérez le connecteur situé à l'extrémité
sélectionnez à nouveau une couleur sur la roue,
supérieure du pied dans le lampadaire, jusqu'à ce
puis appuyez sur « 0 ». Vous pouvez également
que vous entendiez un clic.
éteindre « 0 » et rallumer « I » LivingColors.
− Placez la lampe sur le pied et orientez
LivingColors vers le mur (distance optimale :
- Si vous appréciez un réglage particulier de
50 cm). Vous pouvez régler la hauteur du
lumière (par exemple rouge légèrement tamisé),
luminaire en tournant l'anneau situé au milieu du
vous pouvez mémoriser cette ambiance
pied et en étirant la partie supérieure jusqu'à la
pour y accéder facilement : maintenez enfoncé
hauteur souhaitée. Tournez ensuite l'anneau dans
l'un des boutons d'ambiance, jusqu'à ce que la
l'autre sens pour remettre le lampadaire en place.
télécommande émette un bip sonore. Votre
− Ouvrez le compartiment à piles de la
ambiance est maintenant mémorisée et associée
télécommande en faisant glisser le bouton situé
au bouton d'ambiance que vous venez de choisir.
à l'arrière. Insérez 3 piles AAA (en respectant la
Cette méthode vous permet aussi de mémoriser
polarité + et - comme indiqué).
un certain mode de changement automatique de
couleur.
2. Créez votre propre ambiance de la
manière suivante :
Vous pouvez continuer à régler l'éclairage à
votre gré. Lorsque vous souhaitez revenir à votre
- Sélectionnez la couleur souhaitée d'un simple
ambiance mémorisée, il vous suft d'appuyer sur
contact avec la roue des couleurs. Déplacez votre
le bouton d'ambiance qui y est associé. Ce bouton
22

d'ambiance s'allume brièvement pour indiquer
produit LivingWhites de Philips, rapprochez
que l'ambiance est sélectionnée ; LivingColors
la télécommande de l'appareil, puis maintenez
applique alors vos réglages d'éclairage.
enfoncé le bouton « I ». La lampe clignote 3 fois.
Maintenez le bouton « I » enfoncé jusqu'à ce que
Vous pouvez mémoriser jusqu'a 3 ambiances
la télécommande émette un bip sonore ; la lampe
(une par bouton d'ambiance).
clignote alors 2 fois rapidement. Elle est à présent
Appuyez brièvement sur « 0 » (arrêt) pour
connectée à la télécommande et applique le
éteindre LivingColors. LivingColors gardera en
dernier réglage « on » (marche) sélectionné.
mémoire le dernier réglage sélectionné pour la
prochaine utilisation. Pour rallumer LivingColors,
Si vous souhaitez déconnecter un produit
appuyez sur « I » (marche).
LivingWhites de la télécommande, approchez
la télécommande du produit, puis maintenez
3. Connecter LivingColors à d'autres produits
enfoncé le bouton « 0 ». La lampe clignote 3 fois.
Philips LivingAmbiance
Maintenez le bouton « 0 » enfoncé jusqu'à ce que
la télécommande émette un bip sonore. La lampe
Vous pouvez connecter différents produits
s'éteindra alors progressivement.
de la gamme LivingAmbiance de Philips à la
télécommande de votre LivingColors. Ainsi,
3.Vous pouvez également connecter votre
vous pourrez régler tous les produits connectés,
télécommande à une autre télécommande de
ensemble ou séparément, avec la même
la gamme LivingAmbiance de Philips. Vous
télécommande.
pouvez connecter à votre télécommande toutes
les télécommandes LivingColors ou LivingWhites
1.Vous pouvez connecter d'autres lampes
sur lesquelles gure le logo « SmartLink ». Si
LivingColors de Philips à votre télécommande.
vous connectez une autre télécommande, vous
La plupart des lampes LivingColors de Philips
pourrez ainsi contrôler les mêmes lampes avec
fonctionne avec cette télécommande : il vous
deux télécommandes différentes. Vous pourrez,
suft de vérier que le logo « SmartLink » gure
par exemple, créer 6 ambiances d'éclairage
bien sur la lampe LivingColors que vous souhaitez
différentes, 3 sur une télécommande et 3 sur
connecter. Tous les produits sur lesquels gure
l'autre, avec les mêmes lampes. Pour ajouter une
le logo « SmartLink » peuvent être connectés à
télécommande LivingColors ou LivingWhites
votre télécommande.
supplémentaire, procédez comme suit :
Pour ajouter une lampe LivingColors Philips à une
a.Réinitialisez la télécommande que vous souhaitez
télécommande, approchez la télécommande de
ajouter : ouvrez son compartiment à piles et
la lampe ; puis maintenez enfoncé le bouton « I ».
appuyez sur le bouton RESET pendant quelques
La lampe clignote 3 fois. Maintenez le bouton
secondes (par exemple, à l'aide d'un trombone).
« I » enfoncé jusqu'à ce que vous entendiez le
Vériez que les piles sont bien en place. La
bip sonore émis par la télécommande ; la lampe
télécommande émet alors un son pour indiquer
clignote alors rapidement en vert. Elle est à
qu'elle a été réinitialisée.
présent connectée à la télécommande et applique
b.Approchez la télécommande que vous venez
le dernier réglage « on » (marche) sélectionné.
de réinitialiser de votre télécommande
actuelle. Appuyez sur le bouton « I » des deux
Pour une lampe LivingAmbiance, veillez à
télécommandes jusqu'à ce qu'elles émettent
également connecter la lampe blanche. Vous
un son. Les télécommandes sont à présent
pouvez la connecter de la même façon que les
connectées. Vous pouvez donc connecter les
produits LivingWhites décrits à la section 2.
mêmes lampes à la nouvelle télécommande et
contrôler toutes les lampes avec l'une ou l'autre
Si vous souhaitez déconnecter une lampe
des télécommandes.
LivingColors de la télécommande, approchez
c.Si la télécommande que vous essayez d'ajouter
la télécommande de la lampe, puis maintenez
est ronde, vous pouvez également la copier :
enfoncé le bouton « 0 ». La lampe clignote 3 fois.
vous pouvez immédiatement la connecter
Maintenez le bouton « 0 » enfoncé jusqu'à ce que
aux mêmes lampes que celles connectées à
la télécommande émette un bip sonore. La lampe
votre télécommande d'origine. Pour copier la
s'éteindra alors progressivement.
télécommande, répétez la procédure décrite à la
section b.
2.Vous pouvez également connecter des
produits LivingWhites de Philips (prises,
Une fois que vous avez connecté une ou plusieurs
lampes à économie d'énergie et luminaires)
lampes à votre LivingColors de Philips, vous pouvez
à votre télécommande. Pour ajouter un
contrôler toutes les lampes ensemble ou séparément.
23

Pour contrôler une seule lampe, vous devez la
o Il est possible que la télécommande n'ait pas
sélectionner (notez que pour les LivingColors
reconnu le mouvement que vous avez effectué
double éclairage blanc/couleurs, les couleurs et le
sur la roue des couleurs. Recommencez
blanc doivent être sélectionnés séparément). Pour
l'opération, en veillant à ce que votre doigt
ce faire, vous pouvez utiliser les boutons de sélection
reste bien en contact avec la roue des
de lampe. Lorsque vous maintenez l'un des boutons
couleurs lorsque vous effectuez le tour
de sélection de lampe enfoncé, la lampe sélectionnée
complet.
commence à clignoter. Si ce n'est pas la lampe que
vous souhaitiez régler, relâcher le bouton et appuyez
o J'aimerais connecter LivingColors à une
à nouveau dessus. Une autre lampe se met alors
minuterie. Est-ce possible ?
à clignoter. Lorsqu'une lampe est sélectionnée, le
o Oui. Vous pouvez utiliser LivingColors Philips
témoin de sélection de lampe de la télécommande
avec une minuterie (non fournie). Dans ce
(ampoule) s'allume. Vous pouvez alors régler la lampe
cas, LivingColors applique le dernier réglage
sélectionnée uniquement.
sélectionné (couleur statique ou mode
de changement de couleur automatique).
Si vous ne sélectionnez aucune lampe (témoin
Assurez-vous que le dernier réglage
de sélection de lampe éteint), tous vos réglages
sélectionné n'est pas « arrêt ».
s'appliquent à l'ensemble des lampes connectées à la
télécommande (par exemple, vous pouvez diminuer la
o Je ne parviens pas à connecter de lampes
luminosité des lampes de la pièce).
supplémentaires à la télécommande
LivingColors.
Si vous désirez une combinaison particulière de
o Assurez-vous que le produit que vous essayez
réglages de lumière des différents luminaires, vous
de connecter porte le logo « SmartLink ».
pouvez également les mémoriser comme ambiance,
Seuls les produits sur lesquels gure le logo
tel que décrit dans la section 2 de ce manuel.
« SmartLink » peuvent être connectés à cette
télécommande.
4.Questions/Réponses
o Essayez de reproduire la procédure décrite
à la section 3 du présent manuel. Assurez-
Que faire si…
vous de bien entendre les sons et de voir les
o Ma lampe LivingColors ne s'allume pas.
clignotements qui y sont décrits.
o Vériez les connexions du cordon
d'alimentation avec la lampe. Vériez que
o Ma question n'est pas répertoriée ici.
le cordon d'alimentation est correctement
o Veuillez contacter Philips pour obtenir
inséré dans la prise secteur.
de l'aide (voir section 5 « Assistance
o Débranchez le cordon d'alimentation et
supplémentaire»).
rebranchez-le. Si le luminaire LivingColors
change plusieurs fois de couleur avant de
5. Assistance supplémentaire
s'éteindre, utilisez la télécommande pour le
rallumer.
Pour plus d'informations ou en cas de problème,
veuillez consulter le site Web Philips à l'adresse :
o Mon LivingColors ne répond pas à la
www.philips.com ou contactez le service clientèle de
télécommande.
Philips Lighting au numéro : 00800-PHILIPSL ou au
o Vériez les piles de la télécommande. Les piles
numéro 00800-74454775 (numéros gratuits).
doivent être positionnées en respectant la
polarité (+ et -) et doivent être chargées. Si
Garantie :
la télécommande ne fonctionne toujours pas,
La garantie Philips de deux ans est valable si le
remplacez les piles.
produit est utilisé conformément aux instructions et
o Connectez la télécommande à LivingColors
uniquement dans le but pour lequel il a été créé. Les
en suivant la procédure décrite à la section 3.1
réclamations sont acceptées sur présentation de la
du présent manuel.
preuve d'achat d'origine (facture, ticket de caisse ou
reçu) indiquant la date de l'achat, le nom du revendeur
o Les boutons clignotent alors que je
et une description du produit.
n'utilise plus la télécommande.
o Cela signie que les piles de la télécommande
La garantie Philips n'est pas valable si :
sont (presque) épuisées et qu'elles doivent
- des informations de la preuve d'achat ou de la
être remplacées.
description du produit ont été modiées, rayées,
effacées ou rendues illisibles ;
o Je n'arrive pas à lancer le mode de
changement de couleur automatique.
24
- l'appareil a été endommagé, n'a pas été
Environnement :
correctement connecté ou a été utilisé de manière
Si vous souhaitez mettre au rebut l'appareil usagé,
abusive ;
respectez la réglementation locale. Retirez les piles
- un défaut non inhérent à LivingColors a été causé
lorsque vous mettez la télécommande au rebut.
dans des circonstances extrêmes (éclairage,
Ne jetez pas les piles avec les déchets ménagers
inondation, incendie, utilisation inappropriée ou
normaux. Déposez-les dans un point de collecte
négligence, par exemple) ;
ofciel ou auprès de votre revendeur Philips. Les
- LivingColors a été ouvert ou désassemblé.
piles seront alors mises au rebut dans le respect de
l'environnement.
Nettoyage et entretien :
Retirez l’adaptateur de la prise murale.
Caractéristiques de la prise :
Pour éviter de rayer la lampe LivingColors,
Adaptateur CA
la télécommande et l'adaptateur, nettoyez-les
Modèle : EADP-10EB C (type UE)
exclusivement à l'aide d'un chiffon doux et sec.
EADP-10EB D (type Royaume-Uni +
N'utilisez pas de produits de nettoyage.
Singapour)
EADP-10EB E (type Australie)
Instructions de sécurité :
Entrée : 220 - 240 V ~ 0,3 A 50 Hz
-Conservez le cordon d'alimentation et LivingColors
Sortie : 18,5 V 0,83 A
à l'abri de l'humidité et de tout liquide.
-LivingColors est conçu pour un usage domestique
Consommation d'énergie du luminaire : jusqu'à 15,4 W
uniquement. Évitez d'utiliser LivingColors dans
des pièces humides telles que la salle de bain ou à
Télécommande :
l'extérieur.
Piles : 3 piles alcalines AAA Philips Powerlife LR03 ;
-LivingColors n'est pas un jouet et doit être
1,5 V.
conservé hors de portée des enfants.
-Évitez tout contact avec des surfaces chaudes.
Caractéristiques sans l :
-Pour des raisons de sécurité et conformément aux
Bande de fréquence RF sans l : 2 405~2 475 MHz
termes de la garantie, LivingColors et le cordon
Protocole de communication sans l :IEEE 802.15.4)
d'alimentation ne doivent pas être ouverts.
Canaux disponibles : canaux 11, 15, 20 ou 25
-Utilisez uniquement l'adaptateur fourni : l'utilisation
d'un autre adaptateur risque d'endommager votre
Caractéristiques de l'environnement :
LivingColors.
Température de fonctionnement : 0...40 °C
Température de stockage : -25...60 °C
Humidité relative : 5...95 % non-condensée
DE Bedienungsanleitung
Vielen Dank, dass Sie sich für die Philips LivingColors
1. Erste Schritte:
Standleuchte entschieden haben.
− Schieben Sie die Stange in den Fuß, und drehen
LivingColors wurde speziell entwickelt, damit Sie
Sie sie im Uhrzeigersinn, bis sie sich nicht mehr
sich durch Licht und Farbe zu Hause Ihr eigenes
weiter drehen lässt.
Ambiente schaffen können. Lesen Sie diese Anleitung
− Verbinden Sie den Stecker mit dem Anschluss an
sorgfältig durch, bevor Sie LivingColors das erste Mal
der Unterseite des Leuchtenfußes, und stecken
verwenden, und bewahren Sie sie auf. Wenn Sie unsere
Sie den Stecker in die Steckdose.
Hinweise befolgen, werden Sie Philips LivingColors in
− Verbinden Sie den Stecker am oberen Ende der
seiner ganzen Funktionsfähigkeit genießen können.
Stange mit der Leuchte, und achten Sie darauf,
dass er hörbar einrastet.
Registrieren Sie Ihr Produkt unter www.philips.com/
− Setzen Sie die Leuchte dann auf die Halterung,
welcome, und erhalten Sie immer brandaktuelle
und richten Sie LivingColors zur Wand aus (der
Informationen zu neuen LivingAmbiance Produkten.
optimale Abstand beträgt 50 cm). Sie können die
Höhe der Leuchte anpassen, indem Sie den Ring
In dieser Anleitung nden Sie folgende Hinweise:
in der Mitte der Halterung drehen, den oberen
1. Erste Schritte
Teil der Halterung bis zur gewünschten Länge
2. Erzeugen Sie Ihr eigenes Ambiente mit LivingColors
herausziehen und anschließend den Ring wieder
3. Schließen Sie LivingColors an weitere Philips
festdrehen.
LivingAmbiance Produkte an
− Öffnen Sie die Batterieabdeckung der
4. Antworten auf FAQs
Fernbedienung, indem Sie die Abdeckung auf der
5. Weitere Unterstützung
Rückseite zurückschieben. Legen Sie 3 AAA-
Batterien ein (+ und - wie angezeigt).
25

2. Erzeugen Sie Ihr eigenes Ambiente:
und die LivingColors ändert sich gemäß der von
Ihnen gespeicherten Einstellung.
- Berühren Sie die gewünschte Farbe auf dem
Farbrad, und bewegen Sie Ihren Finger über das
Sie können bis zu 3 Modi speichern (einen pro
Farbrad, um die Farbe genau einzustellen.
Modustaste).
Schalten Sie die LivingColors aus, indem Sie kurz
- Ändern Sie die Farbsättigung (der aktuellen
auf "0" (Aus) drücken. Die LivingColors speichert
Farbe wird mehr Weiß hinzugefügt). Drücken Sie
die letzte Einstellung für die nächste Verwendung.
die Taste Sättigung erhöhen für einen intensiven
Um die LivingColors wieder einzuschalten,
Farbton oder die Taste Sättigung verringern für
drücken Sie auf "I" (Ein).
einen dezenteren pastellfarbenen Ton. Wenn Sie
die Taste Sättigung verringern gedrückt halten,
3. Schließen Sie LivingColors an weitere
erreichen Sie letztendlich einen weißen Farbton.
Philips LivingAmbiance Produkte an.
- Dimmen. Erhöhen oder verringern Sie die
Sie können verschiedene Philips LivingAmbiance
Lichtintensität über die Dimmertasten.
Produkte an die Fernbedienung der LivingColors
anschließen. So haben Sie die Möglichkeit, alle
- Nutzen Sie den automatischen
Produkte zusammen oder einzeln einzustellen – alles
Farbänderungsmodus. Bewegen Sie einmal den
mit derselben Fernbedienung.
Finger ganz über das Farbrad (ein vollständiger
Kreis), und drücken Sie kurz auf "I" (Ein). Dadurch
1. Sie können an die Fernbedienung auch weitere
wechselt die LivingColors in den automatischen
Philips LivingColors Leuchten anschließen.
Farbänderungsmodus: Die Leuchte ändert
Die meisten Philips LivingColors Leuchten
automatisch die Farbe.
funktionieren mit dieser Fernbedienung. Sehen
Sie nach, ob die LivingColors Leuchte, die Sie
Sie können festlegen, in welcher Geschwindigkeit
anschließen möchten, über ein SmartLink-Logo
die Farbe geändert werden soll. Die
verfügt. Alle Produkte mit einem SmartLink-Logo
Geschwindigkeit kann im Uhrzeigersinn angepasst
lassen sich über die Fernbedienung einstellen.
werden, von schnell (dunkelblau auf dem Farbrad)
bis langsam (lila). Sie können das Farbrad an einer
So fügen Sie Philips LivingColors Leuchten
beliebigen Stelle berühren. Im automatischen
zur Fernbedienung hinzu: Halten Sie die
Farbänderungsmodus können Sie auch die
Fernbedienung dicht an die Leuchte. Drücken Sie
Sättigung und Helligkeit der Farben anpassen.
auf "I", und halten Sie die Taste so lange gedrückt,
bis die Leuchte dreimal aueuchtet. Halten Sie die
Um zurück zum statischen Farbmodus zu
Taste "I" so lange gedrückt, bis die Fernbedienung
wechseln, bewegen Sie Ihren Finger erneut über
einen Signalton ausgibt und die Leuchte kurz
das Farbrad, und drücken Sie anschließend die
grün aueuchtet. Die Leuchte ist jetzt mit der
Taste "0". Sie können stattdessen die LivingColors
Fernbedienung verbunden und kehrt zur letzten
auch aus- ("0") und wieder einschalten ("I").
"Ein"-Einstellung zurück.
- Wenn Sie eine bestimmte Lichteinstellung
Bei einer LivingAmbiance Leuchte müssen Sie
wünschen (z. B. leicht gedimmtes, rotes Licht),
auch die weiße Lichtquelle verbinden. Gehen
können Sie diesen Modus speichern, um ihn
Sie dazu wie bei den in Punkt 2 beschriebenen
auf einfache Weise erneut aufrufen zu können:
LivingWhites Produkten vor.
Halten Sie eine der Modustasten gedrückt, bis die
Fernbedienung ein akustisches Signal ausgibt. Der
Wenn Sie eine LivingColors Leuchte von der
Modus ist nun unter der von Ihnen gedrückten
Fernbedienung trennen möchten, halten Sie die
Modustaste gespeichert. Auf diese Weise können
Fernbedienung dicht an die Leuchte, drücken
Sie auch eine bestimmte Geschwindigkeit des
Sie auf "0", und halten Sie die Taste gedrückt.
automatischen Farbwechsels speichern.
Die Leuchte leuchtet dreimal auf. Halten Sie die
"0"-Taste so lange gedrückt, bis die Fernbedienung
Sie können mit der Einstellung der Lichtquellen
einen Signalton ausgibt. Die Leuchte wird langsam
wie gewünscht fortfahren. Wenn Sie zum
heruntergedimmt.
gespeicherten Modus zurückkehren möchten,
drücken Sie einfach die Modustaste, die Sie beim
2. Sie können der Fernbedienung auch Philips
Speichern des Modus verwendet haben. Die
LivingWhites Produkte hinzufügen
entsprechende Modustaste leuchtet kurz auf, um
(Stecker, Energiesparlampen und Leuchten).
anzuzeigen, dass der Modus ausgewählt wurde,
Um ein Philips LivingWhites Produkt zur
Fernbedienung hinzuzufügen, halten Sie diese
26

dicht an die Leuchte. Drücken Sie auf "I", und
Wenn Sie eine oder mehrere Leuchten mit der Philips
halten Sie die Taste so lange gedrückt, bis sie
LivingColors Fernbedienung verbunden haben, können
dreimal aueuchtet. Halten Sie die "I"-Taste so
Sie alle diese Leuchten zusammen oder einzeln
lange gedrückt, bis die Fernbedienung einen
steuern.
Signalton ausgibt und die Leuchte zweimal
schnell aueuchtet. Die Leuchte ist jetzt mit der
Um eine einzelne Leuchte zu steuern, müssen Sie
Fernbedienung verbunden und kehrt zur letzten
sie auswählen (achten Sie darauf, dass Sie bei
"Ein"-Einstellung zurück.
LivingColors Leuchten mit farbigem und weißem
Licht, das farbige und weiße Licht gesondert
Wenn Sie ein LivingWhites Produkt von der
auswählen müssen). Das können Sie über die Tasten
Fernbedienung trennen möchten, halten Sie die
der Lichtauswahl tun. Wenn Sie eine der Tasten der
Fernbedienung dicht an das Produkt. Drücken Sie
Lichtauswahl gedrückt halten, beginnt die ausgewählt
auf "0", und halten Sie die Taste so lange gedrückt,
Leuchte zu blinken. Wenn das nicht die Leuchte ist,
bis sie dreimal aueuchtet. Halten Sie die
die Sie einstellen möchten, lassen Sie die Taste los, und
"0"-Taste so lange gedrückt, bis die Fernbedienung
drücken Sie die Taste erneut. Daraufhin beginnt eine
einen Signalton ausgibt. Die Leuchte wird langsam
andere Leuchte zu blinken. Bei einer ausgewählten
heruntergedimmt.
Leuchte leuchtet die Anzeige für die Lichtauswahl auf
der Fernbedienung (Lampe) auf. Das bedeutet, dass Sie
3. Sie können Ihre Fernbedienung auch mit
jetzt nur die ausgewählte Leuchte einstellen können.
einer weiteren Fernbedienung aus der
Philips LivingAmbiance Reihe verbinden.
Sind keine Lichtquellen ausgewählt (die Anzeige
Jede Fernbedienung für LivingColors oder
für die Lichtauswahl ist ausgeschaltet), werden Ihre
LivingWhites Produkte, das mit dem SmartLink-
Einstellungen auf alle Lichtquellen angewendet, die mit
Logo gekennzeichnet ist, kann mit Ihrer
der Fernbedienung verbunden sind (so können Sie
Fernbedienung verbunden werden. Das Verbinden
beispielsweise alle Lichtquellen im Zimmer gleichzeitig
einer weiteren Fernbedienung ermöglicht die
dimmen).
Steuerung von Leuchten mit zwei verschiedenen
Fernbedienungen. Sie könnten beispielsweise
Wenn Sie eine bestimmte Kombination von
6 verschiedene Beleuchtungsmodi für ein und
Lichteinstellungen verschiedener Leuchten
dieselbe Leuchte erstellen – 3 auf der einen und
wünschen, können Sie diese Kombination als Modus
3 auf der anderen Fernbedienung. So fügen Sie
speichern. Gehen Sie dazu wie in Abschnitt 2 dieser
eine zusätzliche LivingColors oder LivingWhites
Bedienungsanleitung vor.
Fernbedienung hinzu:
4. Häug gestellte Fragen (FAQ)
a. Setzen Sie die Fernbedienung zurück, die
Sie hinzufügen möchten. Öffnen Sie dazu
Wie gehe ich bei den folgenden Störungen vor?
die Batterieabdeckung, und drücken Sie die
o Die LivingColors spendet kein Licht.
Rückstelltaste (RESET) ein paar Sekunden lang
oÜberprüfen Sie die Kabelverbindung der
(z. B. mit einer Büroklammer). Achten Sie darauf,
Leuchte. Überprüfen Sie, ob der Stecker
dass Batterien eingesetzt sind. Die Fernbedienung
richtig in die Steckdose eingesteckt ist.
gibt ein akustisches Signal aus, wenn sie
oZiehen Sie das Netzkabel aus der Steckdose,
zurückgesetzt wurde.
und stecken Sie es wieder in die Steckdose.
b. Halten Sie die zurückgesetzte Fernbedienung
Wenn die LivingColors verschiedene Farben
nahe an die aktuelle Fernbedienung. Drücken Sie
durchläuft und sich dann ausschaltet, schalten
auf beiden Fernbedienungen die Taste "I", bis eine
Sie sie mit der Fernbedienung wieder ein.
der beiden Fernbedienungen einen Ton ausgibt.
Die Fernbedienungen sind jetzt verbunden.
o Die LivingColors reagiert nicht auf die
Sie können die Leuchten jetzt also auch mit
Fernbedienung.
der neuen Fernbedienung verbinden und alle
oÜberprüfen Sie die Batterien in der
Leuchten mit beiden Fernbedienungen steuern.
Fernbedienung. Sie sollten richtig eingelegt
c. Wenn die Fernbedienung, die Sie anschließen,
("+" und "-") und geladen sein. Wenn die
rund ist, handelt es sich um ein Modell, mit
Fernbedienung noch immer nicht funktioniert,
dem Sie auch Funktionen kopieren können. Sie
ersetzen Sie die Batterien.
können sie direkt mit den Leuchten verbinden,
oVerbinden Sie die Fernbedienung mit der
mit denen Ihre ursprüngliche Fernbedienung
LivingColors, indem Sie die in dieser Anleitung
verbunden war. Wiederholen Sie zum Kopieren
im Abschnitt 3.1 beschriebenen Schritte
der Fernbedienungsfunktionen die Schritte aus
ausführen.
Punkt b.
27

o Die Tasten blinken, nachdem ich die
Produktbeschreibung aufweist, geltend gemacht
Fernbedienung betätigt habe.
werden.
oDas bedeutet, dass die Batterien der
Fernbedienung (fast) leer sind und ersetzt
Die Philips Garantie erlischt, wenn:
werden müssen.
- Teile des Kaufbelegs oder der Produktbeschreibung
verändert, durchgestrichen oder unkenntlich
o Ich kann den automatischen
gemacht wurden.
Farbänderungsmodus nicht starten.
- Schäden durch falsche Anschlüsse oder Missbrauch
oEs könnte sein, dass die Fernbedienung Ihre
verursacht wurden.
Bewegung nicht richtig erfasst hat. Bitte
- bei Schäden durch extreme Einüsse, die nicht in die
versuchen Sie es erneut, und stellen Sie sicher,
Garantie von LivingColors eingeschlossen sind, z. B
dass sich Ihr Finger während der gesamten
Blitzschlag, Flut, Feuer,
Kreisbewegung auf dem Farbrad bendet.
unsachgemäße Handhabung oder Fahrlässigkeit.
- LivingColors geöffnet oder zerlegt wurde.
o Ich möchte die LivingColors mit einer
Zeitschaltuhr verbinden. Ist das möglich?
Pege und Wartung:
oJa. Sie können die Philips LivingColors mit
Ziehen Sie den Stecker aus der Steckdose.
einer Zeitschaltuhr (nicht im Lieferumfang
Um Kratzer zu vermeiden, sollten die LivingColors
enthalten) verwenden. Wenn die LivingColors
und der zugehörige Stecker mit einem trockenen Tuch
zusammen mit einer Zeitschaltuhr
gereinigt werden.
eingeschaltet wird, wird Ihre letzte Einstellung
Verwenden Sie keine Reinigungsmittel.
wiedergegeben (statischer Farbmodus oder
automatischer Farbänderungsmodus). Stellen
Sicherheitshinweise:
Sie sicher, dass die letzte Einstellung nicht auf
- Schützen Sie den Stecker und LivingColors vor
"Aus" gesetzt ist.
Flüssigkeiten und Feuchtigkeit.
- LivingColors ist nur für die Verwendung in Räumen
o Ich kann keine weiteren Leuchten zur
geeignet. Verwenden Sie es nicht an feuchten Orten,
LivingColors Fernbedienung hinzufügen.
wie z. B im Badezimmer, oder im Freien.
oAchten Sie darauf, dass das Produkt, das Sie
- LivingColors ist kein Spielzeug und daher nicht für
verbinden möchten, mit einem SmartLink-
Kinder geeignet.
Logo gekennzeichnet ist. Nur Produkte
- Stellen Sie LivingColors nicht auf heiße Flächen.
mit dem SmartLink-Logo können an diese
- Aus Sicherheits- und Garantiegründen dürfen die
Fernbedienung angeschlossen werden.
LivingColors und der zugehörige Stecker nicht
oWiederholen Sie die Schritte aus Abschnitt 3
geöffnet werden.
dieser Bedienungsanleitung. Achten Sie darauf,
- Es darf nur das mitgelieferte Netzteil verwendet
dass Sie die dort beschriebenen Signaltöne
werden. Die Nutzung eines anderen Netzteils kann
hören und das Aueuchten sehen.
zu Schäden an der LivingColors führen.
o Meine Frage ist hier nicht aufgelistet.
Umwelt:
oUm weitere Unterstützung zu erhalten,
Wenn Sie das Gerät am Ende seiner Lebensdauer
wenden Sie sich an Philips (siehe Abschnitt 5
entsorgen, achten Sie auf die Vorschriften Ihrer
"Weitere Unterstützung").
lokalen Behörde. Entfernen Sie die Batterien vor
der Entsorgung der Fernbedienung. Werfen Sie die
5. Weitere Unterstützung
Batterien nicht in den normalen Hausmüll. Geben Sie
sie bei einer ofziellen Sammelstelle oder beim Philips
Für weitere Informationen und falls Probleme
Händler ab, wo die Batterien auf umweltfreundliche
auftreten, besuchen Sie die Philips Website unter
Weise entsorgt werden.
www.philips.com oder wenden Sie sich unter der
gebührenfreien Hotline 00800-PHILIPSL oder 00800-
Stecker – Technische Daten:
74454775 an das Philips Lighting Contact Center.
Netzteil
Modell: EADP-10EB C (Europäischer Typ)
Garantie:
EADP-10EB D (UK-Typ + Singapur)
Die von Philips gewährleistete zweijährige Garantie
EADP-10EB E (Australischer Typ)
ist nur gültig, wenn das Produkt vorschriftsmäßig
Eingangsleistung: 220 - 240 V ~ 0,3 A 50 Hz
und für den vorgesehenen Zweck verwendet wird.
Ausgangsleistung: 18,5 V 0,83 A
Garantieansprüche können nur unter Vorlage des
Original-Kaufbelegs (Rechnung, Kassenbeleg), der
Stromverbrauch der Leuchte: bis zu 15,4 W
das Kaufdatum, den Namen des Händlers und eine
28

Fernbedienung:
Umgebungsbedingungen:
Batterien: 3 Philips Powerlife Alkaline AAA LR03, 1,5 V.
Temperatur (Betrieb): 0 - 40 °C
Temperatur (Lagerung): -25 - 60 °C
Wireless-Spezikation:
Relative Luftfeuchtigkeit: 5 - 95 %, nicht kondensierend
Frequenzband des drahtlosen RF-Modus:
2405 ~ 2475 MHz
Wireless-Kommunikationsprotokoll: IEEE 802.15.4
Betriebskanäle: Kanäle 11, 15, 20 oder 25
NL Gebruiksaanwijzing LivingColors
Bedankt voor uw aanschaf van de Philips LivingColors-
2. Creëer uw eigen sfeer door:
vloerlamp!
- De gewenste kleur op de kleurenring aan te
LivingColors is speciaal ontworpen om met kleur
raken. Beweeg uw vinger over de kleurenring om
en licht een persoonlijke sfeer in uw huis te creëren.
de kleur nauwkeuriger in te stellen.
Lees de instructies aandachtig door als u LivingColors
voor de eerste keer gebruikt en bewaar de instructies
- De kleurbalans te wijzigen (meer wit toe te
zodat u deze later nog eens kunt nalezen. Als u de
voegen aan de huidige kleur). Druk op de knop
aanwijzingen opvolgt, zult u optimaal genieten van
voor minder wit voor een diepere kleur of op de
Philips LivingColors.
knop voor meer wit voor een lichtere kleur. Als
u de knop voor meer wit lang genoeg ingedrukt
Registreer uw product via www.philips.com/welcome
houdt, wordt de kleur uiteindelijk wit.
om op de hoogte te blijven van nieuwe Philips
LivingAmbiance-producten
- Te dimmen. Verhoog of verlaag de
lichtintensiteit met behulp van de dimknoppen.
In deze handleiding vindt u de volgende
onderwerpen…
- Kleuren automatisch te laten veranderen.
1. Aan de slag
Beweeg uw vinger rond over de kleurenring (één
2. Uw eigen sfeer creëren met LivingColors
hele cirkel) en druk kort op "I" (aan). LivingColors
3. De LivingColors op andere Philips
schakelt over op de automatische kleurenloop: de
LivingAmbiance-producten aansluiten
kleuren van de lamp veranderen automatisch.
4. Veelgestelde vragen
5. Aanvullende ondersteuning
Het tempo van het kleurverloop aan te passen.
De snelheid kan met de klok mee worden
1. De LivingColors Mini aansluiten en
gewijzigd van snel (donkerblauwe kleur op
instellen:
de kleurenring) naar langzaam (paars). U kunt
overal op de kleurenring tikken. U kunt ook
- Plaats de staander in de voet en draai deze
de kleurbalans en helderheid van de kleuren
rechtsom totdat u niet verder kunt draaien.
aanpassen in de automatische kleurenloop.
- Steek het snoer in de opening aan de onderzijde
Om terug te keren naar de modus voor
van de lampvoet en sluit het andere uiteinde van
statische kleur, beweegt u uw vinger nogmaals
het snoer aan op het stopcontact.
langs de kleurenring en drukt u op “0”. U kunt
- Sluit het snoer aan de bovenzijde van de
de LivingColors ook uitschakelen en weer
standaard aan op de lamp – zorg ervoor dat u
inschakelen (door op "0" en vervolgens op "I" te
een klik hoort.
drukken).
- Plaats de lamp op de standaard en richt de
LivingColors naar de muur (de optimale afstand
- Als een bepaalde instelling uw voorkeur heeft
is 50 cm). U past de hoogte van de armatuur
(bijvoorbeeld enigszins gedimd rood licht), kunt
aan door de ring in het midden van de standaard
u deze instelling opslaan als een scène die u
los te draaien, het bovenste gedeelte van de
op een later tijdstip eenvoudig kunt oproepen:
standaard te verschuiven totdat de gewenste
houd een van de scèneknoppen ingedrukt totdat
hoogte is bereikt en vervolgens de ring weer vast
de afstandsbediening een piep laat horen. De
te draaien.
scène is nu opgeslagen onder de scèneknop die
- Open het batterijvakje van de afstandsbediening
u hebt ingedrukt. Op dezelfde wijze kunt u ook
door de knop op de achterzijde los te schuiven.
een specieke snelheid voor de automatische
Plaats drie AAA-batterijen (+ en - zoals
kleurenloop instellen.
aangegeven).
29

U kunt vervolgens doorgaan met het naar eigen
2. U kunt ook Philips LivingWhites-producten
wens aanpassen van de verlichting. Als u wilt
(stekkers, spaarlampen en armaturen) aan uw
terugkeren naar een opgeslagen scène, hoeft
afstandsbediening koppelen. Om een Philips
u alleen maar op de scèneknop te drukken
LivingWhites-product te koppelen, houdt
waaronder de desbetreffende instelling is
u de afstandsbediening in de buurt van het
opgeslagen. De scèneknop licht kort op om aan
desbetreffende product. Houd vervolgens de knop
te geven dat de scène is geselecteerd, waarna de
“I” ingedrukt. De lamp knippert drie keer. Houd
opgeslagen instelling wordt geactiveerd op de
“I” ingedrukt totdat de afstandsbediening een piep
LivingColors.
laat horen. De lamp knippert twee keer kort om
aan te geven dat deze aan de afstandsbediening
U kunt maximaal drie scènes opslaan (één
is gekoppeld en schakelt vervolgens over naar de
onder elke scèneknop).
laatstgekozen instelling in ingeschakelde toestand.
Schakel de LivingColors uit door op de knop "0"
Als u de koppeling van een LivingWhites-
(uit) te drukken. De LivingColors onthoudt de
product met de afstandsbediening ongedaan wilt
laatst gekozen instelling. Druk op “I” (aan) om de
maken, houdt u de afstandsbediening dicht bij
LivingColors weer in te schakelen.
het product en houdt u de knop “0” ingedrukt.
De lamp knippert drie keer. Houd de knop “0”
3. De LivingColors op andere Philips
ingedrukt totdat de afstandsbediening een piep
LivingAmbiance-producten aansluiten
laat horen. De lamp wordt langzaam gedimd
totdat deze is uitgeschakeld.
U kunt diverse producten uit de serie
Philips LivingAmbiance aansluiten op de
3. U kunt uw afstandsbediening ook aan een
afstandsbediening van uw LivingColors. Zo kunt
andere afstandsbediening uit de Philips
u alle aangesloten producten zowel gezamenlijk
LivingAmbiance-collectie koppelen.
als afzonderlijk aanpassen, en dat alles met een en
Alle LivingColors- of LivingWhites-
dezelfde afstandsbediening.
afstandsbedieningen met een SmartLink-logo
kunnen aan uw afstandsbediening worden
1. U kunt ook andere Philips LivingColors-
gekoppeld. Door het toevoegen van een
lampen aan uw afstandsbediening koppelen. De
afstandsbediening kunt u dezelfde lampen met
meeste Philips LivingColors zijn geschikt voor
twee verschillende afstandsbedieningen bedienen.
deze afstandsbediening; de enige voorwaarde
U zou voor dezelfde reeks lampen bijvoorbeeld
is dat er een SmartLink-logo staat op de
zes verschillende lichtscènes kunnen opslaan: drie
LivingColors die u wilt toevoegen. Alle producten
op de ene afstandsbediening en drie op de andere.
met een SmartLink-logo kunnen aan uw
Om een extra LivingColors- of LivingWhites-
afstandsbediening worden gekoppeld.
afstandsbediening toe te voegen, gaat u als volgt
te werk:
Om een Philips LivingColors-lamp aan de
afstandsbediening toe te voegen, houdt u de
a. Reset de afstandsbediening die u wilt toevoegen:
afstandsbediening met de knop “I” ingedrukt in
open het batterijvak en houd de resetknop een
de buurt van de desbetreffende lamp. De lamp
paar seconden ingedrukt (bijv. met een paperclip).
knippert drie keer. Houd “I” ingedrukt totdat de
De batterijen dienen in het batterijvak te zitten.
afstandsbediening een piep laat horen. De lamp
De afstandsbediening laat een geluid horen
knippert kort groen om aan te geven dat deze
wanneer deze is gereset.
aan de afstandsbediening is gekoppeld en schakelt
b. Houd de geresette afstandsbediening dicht bij de
vervolgens over naar de laatstgekozen instelling in
afstandsbediening die u momenteel gebruikt. Druk
ingeschakelde toestand.
op de knop “I” op beide afstandsbedieningen
Zorg er bij een LivingAmbiance voor dat u ook
totdat ze een geluid laten horen. De
de witte lamp koppelt. Dit doet u op dezelfde
afstandsbedieningen zijn nu gekoppeld. Dit
manier als beschreven voor LivingWhites-
houdt in dat u nu met beide afstandsbedieningen
producten bij punt 2.
dezelfde lampen kunt bedienen.
Als u de koppeling van een LivingColors-lamp
c. Als de extra afstandsbediening eenmaal is
met de afstandsbediening ongedaan wilt maken,
toegevoegd, kunt u de instellingen van de
houdt u de afstandsbediening dicht bij de lamp
oorspronkelijke afstandsbediening kopiëren en
en houdt u de knop “0” ingedrukt. De lamp
met de extra afstandsbediening direct dezelfde
knippert drie keer. Houd de knop “0” ingedrukt
lampen bedienen. Om een afstandsbediening te
totdat de afstandsbediening een piep laat horen.
kopiëren, herhaalt u de stappen bij punt b.
De lamp wordt langzaam gedimd totdat deze is
uitgeschakeld.
30

Zodra u een of meerdere lampen aan uw Philips
o Ik kan de automatische kleurenloop niet
LivingColors-afstandsbediening hebt gekoppeld, kunt
inschakelen
u deze lampen zowel gezamenlijk als afzonderlijk
o Mogelijk heeft de afstandsbediening uw
bedienen.
inschakelbeweging niet juist geïnterpreteerd.
Probeer het opnieuw en zorg ervoor dat uw
Om een lamp afzonderlijk te bedienen, moet u deze
vinger de kleurenring gedurende de volledige
eerst selecteren (houd er rekening mee dat bij
cirkelbeweging aanraakt.
LivingColors Colored & White de gekleurde en witte
lamp afzonderlijk moeten worden geselecteerd). Dit
o Ik wil de LivingColors op een timer
doet u met een van de lichtselectieknoppen. Als u een
aansluiten. Kan dit?
van de lichtselectieknoppen ingedrukt houdt, gaat de
o Ja. U kunt de Philips LivingColors gebruiken in
geselecteerde lamp knipperen. Als dit niet de gewenste
combinatie met een timer (niet meegeleverd).
lamp is, laat u de knop los en drukt u deze opnieuw in,
Als de LivingColors wordt ingeschakeld via
waarop een andere lamp gaat knipperen. Als een lamp
een timer, wordt de laatstgekozen instelling
is geselecteerd, gaat de lichtselectie-indicator (het lampje
toegepast (statische kleur of automatisch
in de vorm van een peertje) op de afstandsbediening
kleurenloop). Zorg ervoor dat deze instelling
branden. Dit houdt in dat u nu alleen de geselecteerde
niet “uit” is.
lamp kunt aanpassen.
o Ik kan geen extra lampen aan de
Als er geen lamp is geselecteerd (de lichtselectie-
LivingColors-afstandsbediening koppelen
indicator brandt niet), worden uw aanpassingen
o Controleer of het product dat u wilt koppelen
toegepast op alle lampen die aan de afstandsbediening
een SmartLink-logo heeft. Alleen producten
zijn gekoppeld (zo kunt u bijvoorbeeld alle lampen in
met een SmartLink-logo kunnen aan deze
de kamer tegelijkertijd dimmen).
afstandsbediening worden gekoppeld.
o Herhaal de stappen in sectie 3 van deze
Als een bepaalde combinatie van lichtinstellingen op
handleiding. Controleer of u de geluiden hoort
meerdere armaturen u bevalt, kunt u deze combinatie
en het knipperen ziet zoals in deze sectie
ook opslaan als een scène. Volg hiervoor de stappen in
wordt beschreven.
sectie 2 van deze handleiding.
o Mijn vraag staat niet in deze lijst
4. Veelgestelde vragen
o Neem contact op met Philips voor
ondersteuning (zie sectie 5: “Aanvullende
Wat doe ik in de volgende gevallen?
ondersteuning”).
o De LivingColors geeft geen licht
o Controleer of het snoer juist op de lamp
5. Aanvullende ondersteuning
is aangesloten en of de stekker goed in het
stopcontact zit.
Bezoek voor meer informatie of bij problemen de
o Haal het snoer los en sluit dit weer aan. Als
website van Philips op www.philips.com of neem gratis
de LivingColors een aantal keer van kleur
contact op met het Philips Lighting Contact Centre
verandert en vervolgens uitgaat, gebruikt u
via: 00800-PHILIPSL of 00800-74454775
de afstandsbediening om deze weer in te
schakelen.
Garantie:
De garantie van Philips is twee jaar geldig als u het
o De LivingColors reageert niet op de
product volgens de instructies en met het beoogde
afstandsbediening
doel gebruikt. Vergoedingsaanvragen worden
o Controleer de batterijen van de
alleen geaccepteerd na ontvangst van het originele
afstandsbediening. De batterijen dienen op
aankoopbewijs (factuur of kassabon) met daarop
de juiste manier te zijn geplaatst (+ en -) en
de aankoopdatum, de naam van de dealer en een
mogen niet leeg zijn. Vervang de batterijen als
beschrijving van het product.
de afstandsbediening nog steeds niet werkt.
o Koppel de afstandsbediening aan de
De Philips-garantie komt te vervallen indien:
LivingColors volgens de stappen in sectie 3.1
- er iets gewijzigd, doorgehaald, verwijderd of
van deze handleiding.
onleesbaar gemaakt is op het aankoopbewijs;
- het apparaat niet functioneert als gevolg van
o De knoppen knipperen als ik de
schade, onjuiste aansluiting of misbruik;
afstandsbediening heb gebruikt
- een defect is ontstaan als gevolg van extreme
o Dit wil zeggen dat de batterijen in de
omstandigheden waarvoor LivingColors niet
afstandsbediening (bijna) leeg zijn en moeten
bedoeld is, zoals onweer, overstroming, brand,
worden vervangen.
onjuist gebruik of nalatigheid;
31
- LivingColors is geopend of gedemonteerd.
weg met het normaal huishoudelijk afval, maar lever
ze in op een ofcieel verzamelpunt of bij een Philips-
Reiniging en onderhoud:
dealer. Daar worden ze op een verantwoorde manier
Haal de stekker uit het stopcontact.
vernietigd.
Voorkom krassen en reinig de LivingColors-lamp,
de afstandsbediening en de adapter alleen met een
Specicaties stekker:
zachte, droge doek.
AC-adapter
Gebruik geen schoonmaakmiddelen.
Model: EADP-10EB C (EU)
EADP-10EB D (VK + Singapore)
Veiligheidsinstructies:
EADP-10EB E (Australië)
- Houd de stekker en LivingColors vrij van vocht.
Invoer: 220 - 240 V ~ 0,3 A 50 Hz
- LivingColors is alleen bestemd voor gebruik
Uitvoer: 18,5 V 0,83 A
binnenshuis en in een droge omgeving (dus niet in
de badkamer of buitenshuis).
Stroomverbruik van de armatuur: max. 15,4 W
- De LivingColors is geen speelgoed.
- Plaats de lamp niet op hete oppervlakken.
Afstandsbediening:
- Voor uw eigen veiligheid en het behoud van de
Batterijen: 3 x Philips Powerlife Alkaline AAA LR03,
garantie dient u de LivingColors en de stekker
1,5 V.
niet te openen.
- Gebruik alleen de meegeleverde adapter. Als u
Draadloze specicatie:
een andere adapter gebruikt, kan uw LivingColors
Draadloze RF-frequentieband: 2405~2475 MHz
beschadigd raken.
Draadloos communicatieprotocol: IEEE 802.15.4)
Bedieningskanalen: kanaal 11, 15, 20 of 25
Milieu:
Als u het apparaat aan het einde van de levensduur
Omgevingsvereisten:
weggooit, dient u dit te doen in overeenstemming met
Temperatuur (bedrijf): 0...40 °C
de lokale regelgeving. Verwijder de batterijen als u de
Temperatuur (opslag): -25...60 °C
afstandsbediening weggooit. Gooi de batterijen niet
Relatieve vochtigheid: 5...95% niet-condenserend
NO LivingColors Brukerveiledning
Takk for at du kjøpte Philips LivingColors-gulvlampen.
stikkontakten.
- Sett koblingskontakten øverst på stativet inn i
LivingColors er spesielt utformet for at du skal kunne
lampen – pass på at du hører et klikk.
skape din egen atmosfære i hjemmet ved hjelp av farge
- Plasser lampen på stativet og rett LivingColors-
og lys. Les disse retningslinjene nøye før du tar i bruk
enheten mot veggen (den optimale avstanden er
LivingColors for første gang, og ta vare på dem til
50 cm). Du kan justere høyden på belysningen
en senere anledning. Ved å følge disse instruksjonene
ved å vri på ringen i midten av stativet, trekke
kan du glede deg over alle funksjonene ved Philips
den øvre delen av stativet ut til ønsket høyde, og
LivingColors.
deretter vri ringen tilbake for å feste posisjonen.
- Åpne batterirommet på fjernkontrollen ved å
Registrer produktet ditt på www.philips.com/welcome
skyve på knappen på baksiden. Sett inn 3 AAA-
for å holde deg oppdatert om nye LivingAmbiance-
batterier (+ og – som vist).
produkter
2. Skap din egen stemning ved å gjøre
Denne håndboken vil hjelpe deg å ...
følgende:
1. Komme i gang
2. Lage din egen stemning med LivingColors
- Berøre ønsket farge på fargehjulet. Du kan
3. Koble LivingColors til andre Philips
bevege ngeren over fargehjulet for å njustere
LivingAmbiance-produkter
fargen.
4. Få svar på vanlige spørsmål
5. Få ytterligere brukerstøtte
- Endre fargemetningen (legge mer hvitt til
den gjeldende fargen). Trykk på knappen for mer
1. Komme i gang:
metning hvis du vil ha en dypere farge, eller på
knappen for mindre metning hvis du vil ha en
- Plasser stangen i foten, og vri deretter stangen
lysere fargetone. Hvis du holder nede knappen for
med klokken til du ikke klarer å vri lenger.
mindre metning, får du til slutt hvitt lys.
- Sett koblingskontakten i åpningen under
lampefoten, og koble den andre enden inn i
- Dimme. Øk eller reduser lysintensiteten ved
32

hjelp av dimmeknappene.
holder nede I-knappen. Lampen blinker tre ganger.
- La fargene endres automatisk. Dra ngeren
Hold nede I-knappen til du hører en pipelyd fra
rundt på fargehjulet, (én fullstendig sirkel), og
fjernkontrollen – lampen blinker kort grønt. Den
trykk kort på l (på). LivingColors går da inn i
er nå koblet til fjernkontrollen og går til den siste
modus for automatisk fargeendring, og lampen
på-innstillingen.
begynner å endre fargene automatisk.
For LivingAmbiance-lamper må du sørge for at
du også kobler til det hvite lyset – du gjør det på
Du kan justere hastigheten for fargeendringene.
samme måte som for LivingWhites-produkter
Hastigheten kan justeres med klokken, fra raskt
beskrevet i punkt 2.
(mørk blå farge på fargehjulet) til langsomt (lilla).
Hvis du vil koble en LivingColors-lampe fra
Du kan trykke hvor som helst på fargehjulet. I
fjernkontrollen, må du holde fjernkontrollen
modus for automatisk fargeendring kan du også
tett inntil lampen. Trykk deretter på og hold
justere fargenes metning og lysstyrke.
nede 0-knappen. Lampen blinker tre ganger.
Du bytter tilbake til statisk fargemodus ved å
Hold nede 0-knappen til du hører en pipelyd fra
dra ngeren rundt på fargehjulet nok en gang og
fjernkontrollen. Lampen slås nå sakte av.
deretter trykke på 0. Eller du kan slå LivingColors
av (0) og på (I) igjen.
2. Du kan også koble Philips LivingWhites-
- Hvis du liker en bestemt lysinnstilling (for
produkter (støpsler, sparepærer og
eksempel rødt som er litt dimmet), kan du
belysning) til fjernkontrollen. Hvis du vil legge
lagre denne scenen slik at du enkelt kan
til et LivingWhites-produkt, må du holde
hente den frem igjen: trykk på og hold nede
fjernkontrollen tett inntil det og deretter trykke
én av sceneknappene, til fjernkontrollen piper.
på og holde nede I-knappen. Lampen blinker
Scenen er nå lagret under den sceneknappen du
tre ganger. Hold nede I-knappen til du hører en
trykket på. På denne måten kan du også lagre en
pipelyd fra fjernkontrollen – lampen blinker raskt
bestemt hastighet for modusen for automatisk
to ganger. Den er nå koblet til fjernkontrollen og
fargeendring.
går til den siste på-innstillingen.
Du kan fortsette å justere lysene slik du ønsker.
Hvis du vil koble et LivingWhites-produkt fra
Når du vil gå tilbake til den lagrede scenen,
fjernkontrollen, må du hold fjernkontrollen tett
trykker du bare på den sceneknappen du trykket
inntil produktet og deretter trykke på og holde
på da du lagret den. Den aktuelle sceneknappen
nede 0-knappen. Lampen blinker tre ganger.
lyser et kort øyeblikk for å vise at scenen er valgt,
Hold nede 0-knappen til du hører en pipelyd fra
og LivingColors vil gå til de lagrede innstillingene.
fjernkontrollen. Lampen slås nå sakte av.
Du kan lagre opptil tre scener (én for hver
sceneknapp).
3. Du kan også koble fjernkontrollen til en annen
Slå av LivingColors ved å trykke kort på
fjernkontroll fra Philips LivingAmbiance-
0-knappen (av). LivingColors husker den siste
serien. Alle LivingColors- eller LivingWhites-
innstillingen din til neste gang du skal bruke den.
fjernkontroller med en SmartLink-logo kan
Du slår den på igjen ved å trykke på I (på).
kobles til fjernkontrollen. Når du kobler til en
annen fjernkontroll, kan du kontrollere de samme
3. Koble LivingColors til andre Philips
lampene med to forskjellige fjernkontroller. Du
LivingAmbiance-produkter
kan for eksempel lage seks forskjellige lysscener
– tre på den ene fjernkontrollen og tre på den
Du kan koble forskjellige produkter fra Philips
andre – med de samme lampene. Hvis du vil legge
LivingAmbiance-serien til fjernkontrollen til
til en ekstra LivingColors- eller LivingWhites-
LivingColors. Dermed kan du justere alle
fjernkontroll, må du gjøre følgende:
tilkoblede produkter sammen eller hver for seg –
alt med en og samme fjernkontroll.
a. Tilbakestill den fjernkontrollen du vil legge til:
Åpne batterirommet og hold RESET-knappen inne
1. Du kan koble andre Philips LivingColors-
noen få sekunder (f.eks. med en binders). Påse at
lamper til fjernkontrollen. De este Philips
batteriene er satt i. Fjernkontrollen gir fra seg en
LivingColors-enheter fungerer med denne
lyd som indikerer at den er blitt tilbakestilt.
fjernkontrollen: bare kontroller om det er en
b. Hold fjernkontrollen du har tilbakestilt, tett inntil
SmartLink-logo på LivingColor-enheten som du vil
den gjeldende fjernkontrollen. Trykk på I-knappen
koble til. Alle produkter med en SmartLink-logo
på begge fjernkontrollene til fjernkontrollene
kan kobles til fjernkontrollen.
gir fra seg en lyd. Fjernkontrollene er nå koblet
Hvis du vil legge en Philips LivingColors-lampe
sammen – det betyr at du nå kan koble de samme
til fjernkontrollen, må du holde fjernkontrollen
lampene til den nye fjernkontrollen og kontrollere
tett inntil lampen, deretter trykker du på og
alle lampene med den ene eller den andre
33

fjernkontrollen.
(nesten) oppbrukte og må byttes ut.
c. Hvis det er en rund fjernkontroll som du skal
legge til, kan du nå også kopiere den – du kan
o Jeg får ikke startet modus for automatisk
umiddelbart koble den til de samme lampene som
fargeendring
den opprinnelige fjernkontrollen er koblet til. Følg
o Det er mulig at fjernkontrollen ikke oppfattet
fremgangsmåten beskrevet i punkt b for å kopiere
dra-bevegelsen din. Prøv igjen, og pass på at du
fjernkontrollen.
har ngeren på fargehjulet hele veien rundt
Når du har koblet til én eller ere lamper til Philips
o Jeg vil gjerne koble LivingColors til en
LivingColors-fjernkontrollen, kan du kontrollere alle
timer. Lar det seg gjøre?
disse lampene sammen eller hver for seg.
o Ja. Du kan bruke en timer sammen med
Philips LivingColors (ikke inkludert). Når
Hvis du vil kontrollere én enkelt lampe, må du velge
LivingColors er slått på med en timer, viser
den (vær oppmerksom på at for LivingColors farget
enheten deg den sist brukte innstillingen
eller hvit lys, må du velge farget og hvitt lys hver for
(modus for statisk farge eller automatisk
seg). Du kan gjøre det ved å bruke en av knappene for
fargeendring). Påse at den sist brukte
valg av lys. Når du trykker på og holder nede en av
innstillingen ikke er "av".
knappene for valg av lys, begynner den valgte lampen
å blinke. Hvis dette ikke er den lampen du vil justere,
o Jeg kan ikke koble til ere lamper på
slipper du knappen og trykker på den igjen – en annen
LivingColors-fjernkontrollen
lampe begynner å blinke. Når en lampe er valgt, lyser
o Kontroller at produktet du prøver å koble
lysvelgerindikatoren på fjernkontrollen (lyspære). Dette
til, har en SmartLink-logo. Kun produkter
betyr at du nå kan justere kun den valgte lampen.
med en SmartLink-logo kan kobles til denne
fjernkontrollen.
Når ingen av lyspærene er valgt (lysvelgerindikatoren
o Prøv å gjenta fremgangsmåten beskrevet i
er slått av), vil alle justeringer du foretar gjelde alle
avsnitt 3 i denne brukerhåndboken. Kontroller
lamper som er koblet til fjernkontrollen (du kan for
at du hører lydene og ser at det blinker som
eksempel dimme alle lysene i rommet).
det blir beskrevet.
Hvis du liker en bestemt kombinasjon av
lysinnstillinger for forskjellig belysningsenheter, kan du
o Jeg har et spørsmål som ikke står her
også lagre dem som en scene – på samme måte som
o Kontakt Philips for å få hjelp (se avsnitt 5
beskrevet i avsnitt 2 i denne håndboken.
Ytterligere brukerstøtte).
4. Vanlige spørsmål
5. Ytterligere brukerstøtte
Hva skal jeg gjøre hvis ...
Hvis du vil vite mer eller hvis du har problemer, kan
o LivingColors ikke lyser
du gå til Philips' webområde på www.philips.com, eller
o Kontroller koblingene for ledningen til
ta kontakt med servicesenteret for Philips-belysning
lampen. Kontroller om støpselet er satt inn i
på gratisnummeret 00800-PHILIPSL eller 00800-
kontakten på riktig måte.
74454775
o Trekk ut støpselet og sett det inn på nytt. Hvis
LivingColors endrer farge ere ganger før den
Garanti:
slukkes, kan du bruke fjernkontrollen til å slå
Philips' to års garanti er gyldig såfremt produktet
den på igjen.
brukes i henhold til instruksjonene og til beregnet
formål. Krav aksepteres kun mot fremlegg av
o LivingColors ikke reagerer på
opprinnelig kjøpsbevis (faktura, salgsnota eller
fjernkontrollen
kvittering) hvor kjøpsdatoen, navnet på forhandleren
o Kontroller batteriene i fjernkontrollen.
og en produktbeskrivelse klart fremgår.
Batteriene skal være plassert på riktig måte
(+ og -), og de skal være ladet opp. Hvis
Philips-garantien blir ugyldig hvis:
fjernkontrollen fremdeles ikke fungerer, kan du
- Noe har blitt endret, overstrøket, fjernet eller
prøve å bytte ut batteriene.
skrevet med uleselig skrift på kjøpsbeviset eller i
o Koble fjernkontrollen til LivingColors ved å
produktbeskrivelsen.
følge fremgangsmåten i avsnitt 3.1 i denne
- Feil som skyldes skadeverk, feilkoblinger eller
håndboken.
ureglementert bruk.
- En defekt er forårsaket av ekstreme forhold som
o Det er knapper som blinker etter at jeg har
ikke skyldes LivingColors-enheten, for eksempel
brukt fjernkontrollen
lynnedslag, om, brann, feil bruk eller uaktsomhet.
o Dette betyr at batteriene i fjernkontrollen er
34
- LivingColors-enheten har blitt åpnet eller skrudd
må leveres inn på et offentlig innsamlingssted eller hos
fra hverandre.
en Philips-forhandler. Der vil batteriene bli avhendet
på en miljøvennlig måte.
Rengjøring og vedlikehold:
Ta ut støpselet fra vegguttaket.
Støpselspesikasjon:
For å unngå riping bør LivingColors-lampen,
Vekselstrømsadapter
fjernkontrollen og adapteren bare rengjøres med en
Modell: EADP-10EB C (EU-type)
myk tørr klut.
EADP-10EB D (britisk type + Singapore)
Ikke bruk rengjøringsmidler.
EADP-10EB E (australsk type)
Inngang: 220–240 V ~ 0,3 A 50 Hz
Sikkerhetsinstruksjoner:
Utgang: 18,5 V 0,83 A
- Ikke utsett LivingColors-enheten eller -støpselet
for væske eller fuktighet.
Strømforbruk for belysningen: opptil 15,4 W
- LivingColors er bare beregnet til innendørs bruk.
Ikke bruk den på våte steder, f.eks. på badet eller
Fjernkontroll:
utendørs.
Batterier: 3 x Philips Powerlife alkaliske AAA-batterier
- LivingColors er ikke et leketøy for barn.
LR03, 1,5 V.
- Ikke plasser enheten på varme overater
- Av sikkerhetsgrunner og i henhold til betingelsene
Trådløs spesikasjon:
i garantien må ikke LivingColors-enheten eller
Frekvensbånd for trådløs RF-modus: 2405~2475 MHz
-støpselet åpnes.
Trådløs kommunikasjonsprotokoll: IEEE 802.15.4)
- Bruk bare den adapteren som følger med: bruk
Driftskanaler: kanaler 11, 15, 20 eller 25
av en annen adapter kan skade LivingColors-
enheten.
Miljøspesikasjon:
-
Temperatur (drift): 0...40 °C
Miljø:
Temperatur (lagring): -25...60 °C
Hvis du avhender apparatet etter hvert, må du
Relativ fuktighet: 5...95 % ikke-kondenserende
avhende det i samsvar med instruksjonene fra lokale
myndigheter. Fjern batteriene når du avhender
fjernkontrollen. Ikke kast batteriene i restavfallet. De
DA LivingColors Brugsvejledning
Tak for dit køb af en Philips LivingColors-gulvlampe!
lampefoden, og slut den anden ende til
stikkontakten.
LivingColors er specielt designet til via farve og lys
- Isæt tilslutningsstikket øverst på standeren i
at skabe en helt personlig stemning i dit hjem. Før du
lampen – kontroller, at du hører et klik.
bruger LivingColors første gang, skal du læse disse
- Placer lampen på standeren, og ret LivingColors
instruktioner omhyggeligt og gemme dem, så du har
mod væggen (den optimale afstand er 50 cm).
dem til senere brug. Ved at følge disse retningslinjer vil
Du kan justere højden af lyskilden ved at dreje
du få det fulde udbytte af Philips LivingColors.
på ringen på midten af standeren, trække den
øverste del af standeren til den ønskede længde
Registrer dit produkt på www.philips.com/
og derefter skrue ringen fast for at fastgøre
welcome for at holde dig opdateret omkring Philips
positionen.
LivingAmbiance-produkter:
- Åbn batterirummet på fjernbetjeningen ved at
skubbe på knappen bagpå. Indsæt 3 AAA-batterier
Denne vejledning indeholder følgende emner:
(+ og – som vist).
1. Kom godt i gang
2. Skab din egen atmosfære med LivingColors
2. Sådan skaber du din helt egen særlige
3. Tilslut LivingColors til andre Philips
atmosfære:
LivingAmbiance-produkter
4. Få svar på ofte stillede spørgsmål
- Tryk på den ønskede farve på farvehjulet. Du
5. Få yderligere support
kan bevæge din nger henover farvehjulet for at
njustere farven.
1. Kom i gang:
- Juster farvemætningen (tilføj mere hvidt til den
- Sæt stangen i foden, og drej stangen mod uret,
aktuelle farve). Tryk på knappen Mætning op for at
indtil den ikke kan komme længere.
få en dybere farve eller på knappen Mætning ned
- Isæt tilslutningsstikket i åbningen under
for at få en mere afdæmpet farve. Hvis du bliver
35

ved med at trykke på knappen Mætning ned, ender
SmartLink-logoet på den LivingColors-lampe,
farven med at være hvid.
du ønsker at tilslutte. Alle produkter med et
SmartLink-logo kan tilsluttes til fjernbetjeningen.
- Dæmpning. Øg eller reducer lysintensiteten vha.
dæmpningsknapperne.
Hvis du vil tilføje en Philips LivingColors-lampe til
en fjernbetjening, skal du holde den tæt på lampen
- Lad farverne skifte automatisk. Stryg med
og derefter holde knappen "I" nede. Lampen
ngeren rundt om farvehjulet (en hel omgang),
blinker tre gange. Hold "I"-knappen nede, indtil du
og tryk kortvarigt på "I" ("tændt"). LivingColors
hører et bip fra fjernbetjeningen. Lampen blinker
skifter derefter til automatisk farveskift: Lampen
derefter kortvarigt grønt. Den er nu tilsluttet til
begynder at skifte farve automatisk.
fjernbetjeningen og vender tilbage til den seneste
"til"-indstilling.
Du kan justere den hastighed, som farverne
Du skal sørge for også at tilslutte den hvide pære
skifter med. Hastigheden kan justeres i urets
for en LivingAmbiance-lampe- du kan gøre dette
retning, fra hurtig (den mørkeblå farve på
på samme måde som for LivingWhites-produkter,
farvehjulet) til langsom (lilla). Du kan trykke
der er beskrevet i punkt 2.
overalt på farvehjulet. I tilstanden automatisk
Hvis du gerne vil frakoble en LivingColors-lampe
farveskift kan du også justere mætningen og
fra fjernbetjeningen, skal du holde den tæt på
lysstyrken for farverne.
lampen og derefter holde knappen "0" nede.
Hvis du vil skifte tilbage til statisk farvetilstand,
Lampen blinker 3 gange. Hold "I"-knappen nede,
skal du stryge med ngeren rundt om farvehjulet
indtil du hører et bip fra fjernbetjeningen. Lampen
igen og derefter trykke på "0". Du kan også slukke
slukkes langsomt.
for LivingColors på "0" og tænde igen på "I".
2. Du kan også tilslutte Philips LivingWhites-
- Hvis du foretrækker en bestemt lysindstilling
produkter (lamper, stik, energispareenheder)
(f.eks. rødt lettere dæmpet), kan du gemme
til din fjernbetjening. Hvis du vil tilføje et
denne scene, så den er nem at nde: Hold en af
Philips LivingWhites-produkt, skal du holde
sceneknapperne nede, indtil der høres en biplyd fra
fjernbetjeningen tæt på produktet, og derefter
fjernbetjeningen. Din scene bliver nu lagret på den
holde knappen "I" nede. Lampen blinker tre gange.
sceneknap, du har trykket på. Du kan også lagre en
Hold "I"-knappen nede, indtil du hører et bip fra
bestemt tilstand for farveskift på denne måde.
fjernbetjeningen. Lampen blinker hurtigt to gange.
Den er nu tilsluttet til fjernbetjeningen og vender
Du kan fortsætte med at justere pærerne,
tilbage til den seneste "til"-indstilling.
som det passer dig. Når du vil vende tilbage
til den lagrede scene, skal du bare trykke på
Hvis du gerne vil frakoble en LivingWhites-lampe
den sceneknap, du trykkede på, da du lagrede
fra fjernbetjeningen, skal du holde den tæt på
den. Sceneknappen lyser kortvarigt for at vise,
produktet og derefter holde knappen "0" nede.
at scenen er blevet valgt. Herefter skifter
Lampen blinker 3 gange. Hold "I"-knappen nede,
LivingColors til den lagrede indstilling.
indtil du hører et bip fra fjernbetjeningen. Lampen
Du kan lagre op til 3 scener (en for hver
slukkes langsomt.
sceneknap).
Sluk LivingColors ved at trykke på knappen "0"
3. Du kan tilslutte fjernbetjeningen til en anden
(fra). LivingColors husker din sidste indstilling til
fjernbetjening fra Philips LivingAmbiance-
næste brug. Tryk på "I" (til) for at
serien. Alle LivingColors- eller LivingWhites-
tænde igen.
fjernbetjeninger med et SmartLink-logo kan
tilsluttes til fjernbetjeningen. Hvis du tilslutter
3. Tilslut LivingColors til andre Philips
en anden fjernbetjening, kan du styre de samme
LivingAmbiance-produkter
lamper med to forskellige fjernbetjeninger. Du
kunne f.eks. oprette 6 forskellige lysindstillinger
Du kan tilslutte forskellige produkter fra
- 3 på den ene fjernbetjening og 3 på den anden,
Philips LivingAmbiance-serien til LivingColors-
med de samme lamper. Du kan tilføje en ekstra
fjernbetjeningen. Derved kan du justere alle tilsluttede
fjernbetjening til LivingColors eller LivingWhites
produkter samtidig eller hver for sig - alt sammen
på følgende måder:
med den samme fjernbetjening.
a. Nulstil den fjernbetjening, du gerne vil tilføje: Åbn
1. Du kan tilslutte andre Philips LivingColors-
batterirummet, og tryk på RESET-knappen i et
lamper til fjernbetjeningen. De este
par sekunder (f.eks. med en papirclip). Sørg for, at
Philips LivingColors fungerer med denne
batterierne er i. Fjernbetjeningen afspiller en lyd
fjernbetjeningen: Du skal blot kontrollere
for at vise, at den er blevet nulstillet.
36

b. Hold den nulstillede fjernbetjening tæt på den
beskrevet i afsnit 3.1 i denne vejledning.
nuværende fjernbetjening. Tryk på knappen "I" på
begge fjernbetjeninger, indtil en af dem afspiller
o Knapperne blinker, efter at jeg har brugt
en lyd. Fjernbetjeningerne er nu tilsluttet - dette
fjernbetjeningen
betyder, at du nu kan tilslutte de samme lamper til
o Dette betyder, at batterierne i fjernbetjeningen
den nye fjernbetjening og styre alle lamperne med
(næsten) er tomme og skal udskiftes.
begge fjernbetjeningerne.
c. Hvis den fjernbetjening, du tilføjer, er rund, kan
o Jeg kan ikke starte det automatiske
du nu også kopiere den: du kan med det samme
farveskift
tilslutte den til de samme lamper, som den
o Det kan være, at fjernbetjeningen ikke
oprindelige fjernbetjening er sluttet til. Hvis du
opfattede din bevægelse. Prøv igen, og sørg for,
vil kopiere fjernbetjeningen, skal du gentage den
at din nger berører farvehjulet, når du laver
fremgangsmåde, der er beskrevet i punkt b.
cirkelbevægelsen
Når du har tilsluttet en eller ere lamper til Philips
o Jeg vil gerne tilslutte LivingColors til en
LivingColors-fjernbetjeningen, kan du styre alle disse
timer. Er det muligt?
lamper samtidig eller hver for sig.
o Ja. Du kan bruge Philips LivingColors med
For at styre en enkelt lampe skal du vælge den
farvet og hvidt lys med en timer (medfølger
(bemærk, at for LivingColors skal farvet og hvidt lys
ikke). Når LivingColors-enheden tændes
vælges separat). Det kan du gøre med knapperne til
med en tilkoblet timer, bruges den seneste
valg af pære. Når du holder en af knapperne til valg
indstilling (statisk farve eller automatisk
af pære nede, begynder den valgte lampe at blinke.
farveskift). Sørg for, at din sidste indstilling ikke
Hvis det ikke er den lampe, du ønsker at justere, skal
er "slukket".
du slippe knappen og trykke på den igen - en anden
lampe begynder at blinke. Når en lampe er valgt,
o Jeg kan ikke tilslutte yderligere lamper til
lyser indikatoren for valg af pære på fjernbetjeningen
LivingColors-fjernbetjeningen
(lyspæren) op. Dette betyder, at du nu udelukkende
o Sørg for, at det produkt, du forsøger at
kan justere den valgte lampe.
tilslutte, er udstyret med et SmartLink-logo.
Når der ikke er valgt en pære (indikatoren for valg af
Kun produkter med et SmartLink-logo kan
pære er slukket), gælder alle justeringer for alle de
tilsluttes til denne fjernbetjening.
lamper, der er sluttet til fjernbetjeningen (du kan f.eks.
o Prøv at gentage den fremgangsmåde, der er
dæmpe alt lys i rummet).
beskrevet i afsnit 3 i denne vejledning. Sørg
Hvis du foretrækker en bestemt kombination af
for, at du hører de lyde og ser de blink, der er
lysindstillinger for forskellige lamper, kan du også
beskrevet i afsnittet.
gemme den som en scene - på samme måde som
beskrevet i afsnit 2 i denne vejledning.
o Mit spørgsmål fremgår ikke her
o Kontakt Philips for at få hjælp (se afsnit 5
4. Ofte stillede spørgsmål
"Yderligere support").
Løsninger…
5. Yderligere support
o LivingColors lyser ikke
o Kontroller forbindelsen mellem lampen
For yderligere oplysninger og ved eventuelle
og ledningen. Kontroller, om stikket sidder
problemer kan du gå ind på Philips' hjemmeside
korrekt i stikkontakten.
på www.philips.com eller kontakte Philips Lighting
o Fjern netledningen, og sæt den i igen. Hvis
Contact Centre gratis på 00800-PHILIPSL eller 00800-
LivingColors skifter farve ere gange og
74454775
slukker, skal du bruge fjernbetjeningen til at
tænde den igen.
Garanti:
Philips' 2-års-garanti er gyldig, hvis produktet anvendes
o LivingColors reagerer ikke på
i henhold til vejledningerne og til det beregnede
fjernbetjeningen
formål. Krav bliver kun accepteret ved forevisning
o Kontroller batterierne i fjernbetjeningen.
af det originale købsbevis (faktura, salgsbevis eller
Batterierne skal placeres korrekt (+ og -)
kvittering), der angiver købsdato, navn på forhandler
og være opladede. Hvis fjernbetjeningen
og beskrivelse af produktet.
stadig ikke virker, skal du prøve at udskifte
batterierne.
Philips' garanti ophører, hvis:
o Tilslut fjernbetjeningen til LivingColors-
- Noget er ændret, overskrevet, slettet eller
enheden ved at følge proceduren, der er
ulæseligt på købsbeviset eller produktbeskrivelsen.
- Der er fejl som følge af beskadigelse, forkert
37
tilslutning eller mishandling.
de lokale myndigheder. Fjern batterierne, før du
- Der er en fejl, der skyldes ekstreme
kasserer fjernbetjeningen. Smid ikke batterierne ud
omstændigheder, som ikke er naturligt forbundet
sammen med almindeligt husholdningsaffald. De skal
med LivingColors, for eksempel lynnedslag,
aeveres på et ofcielt indsamlingssted eller hos en
oversvømmelse, ildebrand, forkert anvendelse
Philips-forhandler, som vil kassere batterierne på en
eller uagtsomhed.
miljøvenlig måde.
- LivingColors er blevet åbnet eller skilt ad.
Stik-specikationer:
Rengøring og vedligeholdelse:
AC-adapter
Tag stikket ud af stikkontakten.
Model: EADP-10EB C (EU)
For at undgå at ridse LivingColors, fjernbetjeningen og
EADP-10EB D (Storbritannien +
adapteren bør de kun rengøres med en blød, tør klud.
Singapore)
Undlad at benytte rengøringsmidler.
EADP-10EB E (Australien)
Input: 220 - 240 V ~ 0,3 A 50 Hz
Sikkerhedsinstruktioner:
Output: 18,5 V 0,83 A
- Undgå at stikket og LivingColors kommer i
kontakt med væsker og fugt.
Enhedens strømforbrug: op til 15,4 W
- LivingColors er kun til indendørs brug og må ikke
anvendes i våde omgivelser, f.eks. på badeværelser
Fjernbetjening:
eller udendørs.
Batterier: 3 x Philips Powerlife Alkaline AAA LR03,
- LivingColors er ikke legetøj og dermed ikke
1,5 V.
beregnet til, at børn leger med den.
- Må ikke placeres på varme overader
Trådløs specikation:
- Af sikkerhedsårsager og af hensyn til garantien må
Trådløs RF-frekvensbånd: 2405~2475 MHz
LivingColors og stikket ikke åbnes.
Trådløs kommunikationsprotokol: IEEE 802.15.4)
- Brug kun den medfølgende adapter: Brug af en
Betjeningskanaler: kanal 11, 15, 20 eller 25
anden adapter kan beskadige din LivingColors.
Miljømæssige specikationer:
Miljø:
Temperatur (betjening): 0...40 °C
Når du engang vil kassere apparatet, skal du bortskaffe
Temperatur (opbevaring): -25...60 °C
det i overensstemmelse med instruktionerne fra
Relativ luftfugtighed: 5...95 %, ingen kondensering
SV LivingColors – Användarinstruktioner
Tack för att du har köpt Philips LivingColors-
1. Komma igång:
golvlampa!
- Sätt i stången i foten och vrid sedan stången
LivingColors har utformats särskilt för att du ska
medsols tills den inte går att vrida längre.
kunna skapa en egen stämning i hemmet, med färg
- Sätt i kontakten i öppningen under lampans fot
och ljus. Läs igenom de här instruktionerna noggrant
och anslut den andra änden till vägguttaget.
innan du använder LivingColors för första gången, och
- Sätt i kontakten överst på stativet i lampan. Se till
spara dem för framtida bruk. Genom att följa våra
att du hör ett klickljud.
anvisningar kommer du att kunna dra nytta av samtliga
- Placera lampan på stativet och rikta LivingColors
funktioner hos Philips LivingColors.
mot väggen (det optimala avståndet är 50 cm). Du
kan justera höjden på armaturen genom att vrida
Registrera din produkt på www.philips.com/
på ringen mitt på stativet, dra den övre delen av
welcome och håll dig uppdaterad om nya Philips
foten till önskad höjd och sedan vrida tillbaka
LivingAmbiance-produkter
ringen för att låsa positionen.
- Öppna batterifacket på fjärrkontrollen genom att
I den här handboken hittar du information om hur du
skjuta på knappen på baksidan. Sätt i tre AAA-
kan …
batterier (+ och – enligt anvisningarna).
1. Komma igång
2. Skapa din egen stämning med LivingColors
2. Skapa en egen stämning genom att:
3. Anslut LivingColors till andra LivingAmbiance-
produkter från Philips
- Peka på önskad färg på färgratten. Du kan justera
4. Få svar på vanliga frågor
färgen genom att röra ngret längs färgratten.
5. Få mer hjälp
- färgmättnaden (lägg till mer vitt i den bentliga
färgen).Tryck på knappen för mer mättnad för
38

att få en djupare färg eller på knappen för mindre
1. Du kan ansluta andra Philips LivingColors-
mättnad om du vill ha en pastellton. Om du
lampor till fjärrkontrollen. De esta
fortsätter trycka in knappen för mindre mättnad
Philips LivingColors fungerar med den här
blir färgen till slut vit.
fjärrkontrollen: kontrollera bara om det nns en
SmartLink-logotyp på de LivingColors som du vill
- Dimmer. Öka eller minska ljusstyrkan med hjälp
koppla. Alla produkter med en SmartLink-logotyp
av dimmerknapparna.
kan anslutas till fjärrkontrollen.
- Låta färger ändras automatiskt. Dra med
Om du vill lägga till en LivingColors-lampa till
ngret runt färghjulet (en hel cirkel) och tryck
fjärrkontrollen håller du den nära lampan och
kort på "I" (på). LivingColors ändras då till det
håller sedan knappen "I" intryckt. Lampan blinkar
automatiska färgändringsläget. Lampan börjar
3 gånger. Håll sedan knappen "I" intryckt tills
ändra färg automatiskt.
ett pip hörs från fjärrkontrollen. Lampan börjar
då snart blinka grönt. Den är nu ansluten till
Du kan justera hastigheten för hur snabbt
fjärrkontrollen och övergår till den senaste "på"-
färgerna ska ändras. Hastigheten kan justeras
inställningen.
medurs, från snabb (mörkblått på färghjulet) till
Se till att du även ansluter den vita lampan om du
långsam (lila). Du kan trycka var som helst på
har en LivingColors-lampa. Det gör du på samma
färghjulet. I det automatiska färgändringsläget kan
sätt som med LivingWhites-produkter i punkt 2.
du även justera färgernas mättnad och styrka.
Om du vill koppla från en LivingColors-lampa
När du vill växla tillbaka till statiskt färgläge drar
från fjärrkontrollen håller du fjärrkontrollen nära
du runt färghjulet igen och trycker sedan på "0".
lampan och trycker på knappen "0". Lampan
Du kan även slå av "0" och på "I" LivingColors
blinkar 3 gånger. Håll knappen "0" intryckt tills ett
igen.
pip hörs från fjärrkontrollen. Lampan släcks nu
långsamt.
- Om du vill ha en särskild ljusinställning (t.ex.
något dämpat rött ljus) kan du lagra den här
2. Du kan även ansluta Philips LivingWhites-
belysningseffekten så att du lätt kommer åt
produkter (kontakter, lågenergilampor och
den senare: håll en av effektknapparna intryckt
armaturer) till fjärrkontroller. Om du vill lägga till
tills det hörs ett pip från fjärrkontrollen.
en LivingWhites-produkt håller du fjärrkontrollen
Effektinställningen har nu lagrats på den
nära den och håller sedan knappen "I" intryckt.
effektknapp som du tryckte in. På det här sättet
Lampan blinkar 3 gånger. Håll sedan knappen "I"
kan du även lagra ett särskilt automatiskt
intryckt tills ett pip hörs från fjärrkontrollen och
färgändringsläge.
lampan blinkar snabbt två gånger. Den har nu
anslutits till fjärrkontrollen och övergår till den
Du kan fortsätta anpassa ljusinställningarna efter
senaste "på"-inställningen.
önskemål. När som helst kan du återgå till den
lagrade belysningseffekten genom att helt enkelt
Om du vill koppla från en LivingWhites-produkt
trycka på respektive effektknapp. Den valda
från fjärrkontrollen håller du fjärrkontrollen nära
effektknappen tänds en kort stund för att visa att
produkten och trycker på knappen "0". Lampan
effekten har valts, och LivingColors ändras till
blinkar 3 gånger. Håll knappen "0" intryckt tills ett
dina lagrade inställningar.
pip hörs från fjärrkontrollen. Lampan släcks nu
Du kan lagra upp till 3 belysningseffekter (en
långsamt.
för varje effektknapp).
Slå av LivingColors genom att trycka kort på
3. Du kan även ansluta fjärrkontrollen till en annan
knappen "0" (av). LivingColors kommer ihåg din
fjärrkontroll från Philips LivingAmbiance-
senaste inställning inför nästa användning. Om du
sortimentet. Alla LivingColors- eller LivingWhites-
vill tända dem igen trycker du på "I" (på).
fjärrkontroller med en SmartLink-logotyp kan
anslutas till fjärrkontrollen. Genom att ansluta
3. Anslut LivingColors till andra
en annan fjärrkontroll kan du kontrollera samma
LivingAmbiance-produkter från Philips
lampor med två olika fjärrkontroller. Du kan till
exempel skapa 6 olika belysningseffekter – 3 på
Du kan ansluta olika produkter från Philips
en fjärrkontroll och 3 på den andra, med samma
LivingAmbiance-sortiment till fjärrkontrollen för
lampor. Om du vill lägga till en extra LivingColors-
LivingColors. På så sätt kan du justera alla anslutna
eller LivingWhites-fjärrkontroll gör du följande:
produkter samtidigt eller var och en för sig, allt med
en och samma fjärrkontroll.
a. Återställ fjärrkontrollen som du vill lägga till
genom att öppna batterifacket och hålla RESET-
knappen intryckt några sekunder (t.ex. med hjälp
39

av ett gem). Kontrollera att batterierna sitter i. Ett
fungerar.
ljud hörs från fjärrkontrollen som indikerar att
o Koppla fjärrkontrollen till LivingColors-lampan
den har återställts.
genom att följa anvisningarna i avsnitt 3.1 i den
b. Håll fjärrkontrollen som du har återställt nära den
här handboken.
aktuella fjärrkontrollen. Tryck på knappen "I" på
båda fjärrkontrollerna tills ett ljud hörs från dem.
o Knapparna blinkar efter att jag har använt
Fjärrkontrollerna är nu anslutna, vilket innebär
fjärrkontrollen
att du kan ansluta samma lampor till den nya
o Detta innebär att batterierna i fjärrkontrollen
fjärrkontrollen och kontrollera alla lampor med
(nästan) är förbrukade och behöver bytas ut.
någon av dem.
c. Om den fjärrkontroll du lägger till är rund
o Det inte går att starta det automatiska
kan du även kopiera den: du kan direktansluta
färgändringsläget
dem till samma lampor som den ursprungliga
o Det kan hända att fjärrkontrollen inte
fjärrkontrollen är ansluten till. Om du vill kopiera
registrerade din "svepande" rörelse. Försök
fjärrkontrollen upprepar du proceduren som
igen och se till att hålla ngret på färgratten
beskrivs i punkt b.
genom hela cirkeln.
När du har anslutit en eller era lampor till din Philips
o Jag vill ansluta min LivingColors till en
LivingColors-fjärrkontroll kan du kontrollera alla dessa
timer. Är det möjligt?
lampor samtidigt eller var och en för sig.
o Ja. Du kan använda Philips LivingColors-lampan
Om du vill kunna kontrollera en enda lampa måste du
med en timer (medföljer inte). När den tänds
välja den (observera att du måste välja färgat och vitt
med en timer visar LivingColors din senaste
ljus separat för LivingColors-lampor med färgat och
inställning (statisk färg eller automatiskt
vitt ljus). Det kan du göra genom att använda en av
färgändringsläge). Kontrollera att denna
knapparna för belysningsalternativ. När du håller en av
inställning inte är "av".
knapparna för belysningsalternativ intryckt börjar den
valda lampan att blinka. Om det inte är den lampan
o Jag kan inte ansluta ytterligare lampor till
som du vill justera släpper du knappen och trycker
LivingColors-fjärrkontrollen
ned igen – en annan lampa börjar blinka. När du har
o Kontrollera att den produkt du försöker
valt en lampa tänds indikatorn för belysningsalternativ
ansluta har en SmartLink-logotyp. Endast
på fjärrkontrollen (lampa). Det innebär att du nu kan
produkter med en SmartLink-logotyp kan
justera endast den valda lampan.
anslutas till den här fjärrkontrollen.
Om ingen lampa har valts (indikatorn för
o Försök göra om proceduren som beskrivs
belysningsalternativ är av) kommer dina inställningar
i avsnitt 3 i den här handboken. Kontrollera
att tillämpas på alla lampor som är anslutna till
att du hör ljuden och ser blinkningarna enligt
fjärrkontrollen. Du kan till exempel dimma alla lampor
beskrivningen.
i rummet.
Om du vill ha en särskild kombination av
o Jag inte hittar min fråga här
ljusinställningar för olika armaturer kan du även lagra
o Kontakta Philips om du vill ha mer hjälp (se
den som en effekt på samma sätt som beskrivs i
avsnitt 5 "Mer hjälp").
avsnitt 2 i den här handboken.
5. Mer hjälp
4. Vanliga frågor
Om du vill ha information eller om du har något
Vad gör jag om …
problem kan du besöka Philips webbplats på
o LivingColors-lampan inte lyser
www.philips.com eller kontakta Philips Lighting-
o Kontrollera att sladden är ordentligt ansluten
kontaktcentret avgiftsfritt: 00800-PHILIPSL eller
till lampan och till vägguttaget.
00800-74454775
o Koppla från nätsladden och anslut den igen.
Om LivingColors-lampan ändrar era färger
Garanti:
och sedan släcks kan du slå på den igen med
Philips tvåårsgaranti gäller om produkten används
fjärrkontrollen.
i enlighet med gällande anvisningar och för avsett
ändamål. Anspråk accepteras endast vid uppvisande
o LivingColors-lampan inte svarar på
av det ursprungliga inköpsbeviset (faktura eller
fjärrkontrollens kommandon
försäljningskvitto) där inköpsdatum, återförsäljarnamn
o Kontrollera batterierna i fjärrkontrollen.
och produktbeskrivning anges.
Batterierna ska vara laddade och placerade
åt rätt håll (+ och –). Prova att byta ut
Philips garanti gäller inte i följande fall:
batterierna om fjärrkontrollen fortfarande inte
- Något har ändrats, kryssats över, tagits bort
40
eller gjorts oläsligt på inköpsbeviset eller i
Miljö:
produktbeskrivningen.
Om du någon gång kasserar produkten ska det ske i
- Fel som orsakats av skada, felaktiga anslutningar
enlighet med kommunens anvisningar. Ta ur batterierna
eller missbruk.
när du kasserar fjärrkontrollen. Kasta inte batterierna
- En skada har orsakats av extrema förhållanden
med det vanliga hushållsavfallet. Du måste lämna in
som inte härrör från LivingColors egna
dem vid en ofciell återvinningsstation eller hos en
egenskaper, till exempel blixtnedslag,
Philips-återförsäljare. Båda kan kassera batterierna på
översvämning, brand, felaktig användning eller
ett miljövänligt sätt.
vårdslöshet.
- LivingColors har öppnats eller demonterats.
Specikation för kontakt:
Nätadapter
Rengöring och underhåll:
Modell: EADP-10EB C (EU)
Dra ut kontakten ur vägguttaget.
EADP-10EB D (Storbritannien +
LivingColors-lampan, fjärrkontrollen och adaptern
Singapore)
ska endast rengöras med en mjuk, torr duk så att du
EADP-10EB E (Australien)
undviker repor.
Ingång: 220 - 240V ~ 0,3 A 50 Hz
Använd inte rengöringsmedel.
Utgång: 18,5 V 0,83 A
Säkerhetsföreskrifter:
Armaturens strömförbrukning: upp till 15,4 W
- Se till att kontakten och LivingColors aldrig
kommer i kontakt med vätskor och fukt.
Fjärrkontroll:
- LivingColors är endast avsedd att användas
Batterier: 3 alkaliska Philips Powerlife AAA-batterier
inomhus. Använd den inte i våtutrymmen, t.ex. i
LR03, 1,5 V.
badrum, eller utomhus.
- LivingColors är ingen leksak och är inte avsedd
Specikationer för trådlöst:
att hanteras av barn.
Frekvensband i trådlöst RF-läge: 2 405~2 475 MHz
- Placera inte produkten på varma ytor
Trådlöst kommunikationsprotokoll: IEEE 802,15.4)
- Av säkerhetsskäl och enligt garantivillkoren ska
Driftkanaler: 11, 15, 20 eller 25
LivingColors och kontakten inte öppnas.
- Använd endast den medföljande adaptern. Om
Miljöspecikationer:
du använder en annan adapter kan LivingColors
Temperatur (drift): 0...40 °C
skadas.
Temperatur (förvaring): -25...60 °C
Relativ luftfuktighet: 5...95 % icke-kondenserande
FI LivingColors Käyttöohjeet
Kiitos, että ostit Philips LivingColors -lattiavalaisimen!
paikalleen myötäpäivään kiertämällä.
- Liitä virtajohdon liitin valaisimen jalan reiässä
LivingColors on suunniteltu erityisesti luomaan
olevaan liitäntäaukkoon ja pistoke pistorasiaan.
kotiisi persoonallista tunnelmaa väreillä ja valolla. Kun
- Liitä jalustan yläpään liitin valaisimeen niin, että
käytät LivingColorsia ensimmäistä kertaa, lue nämä
kuulet napsahduksen.
ohjeet huolellisesti ja säästä ne tulevaa käyttöä varten.
- Aseta valaisin jalustaan ja suuntaa LivingColors
Noudattamalla ohjeita saat käyttöösi kaikki Philips
seinää kohti (optimaalinen etäisyys on 50 cm). Voit
LivingColorsin toiminnot.
säätää valaisimen korkeutta avaamalla varressa
olevaa rengasta, vetämällä varren yläosan sopivaan
Rekisteröi tuote osoitteessa www.philips.com/
kohtaan ja kiristämällä lopuksi renkaan.
welcome, jotta pysyt ajan tasalla uusista Philips
- Avaa kaukosäätimen paristolokero liu'uttamalla
LivingAmbiance -tuotteista
säätimen taustapuolella olevaa painiketta.
Tämän oppaan avulla
Aseta paikalleen kolme AAA-paristoa (plus- ja
1. Aloita
miinusnavat kuvan mukaisesti).
2. luot oman tunnelmasi LivingColorsilla
3. Liitä LivingColors muihin Philips LivingAmbiance
2. Luo tunnelmaa:
-tuotteisiin
4. saat vastauksia usein esitettyihin kysymyksiin
- Kosketa haluamaasi väriä värirenkaassa. Säädä
5. saat lisätukea.
sävyä liikuttamalla sormeasi värirenkaan päällä.
1. Aloittaminen:
- Muuta värikylläisyyttä (lisää valkoista nykyiseen
väriin). Paina värikylläisyyden lisäämispainiketta, jos
- Aseta valaisimen varsi jalkaan ja kiristä se
haluat voimakkaamman värin, tai värikylläisyyden
41

vähentämispainiketta, jos haluat enemmän
Tarkista vain, että yhdistettävässä LivingColorsissa
pastellisävyä. Värikylläisyyden vähentämispainikkeen
on SmartLink-logo. Kaikki tuotteet, joissa
jatkuva painaminen muuttaa värin lopulta
on SmartLink-logo, voidaan yhdistää tähän
valkoiseksi.
kaukosäätimeen.
- Himmennä valoa. Lisää tai vähennä valon
Yhdistä Philips LivingColors -valaisin
voimakkuutta himmennyspainikkeilla.
kaukosäätimeen viemällä kaukosäädin valaisimen
lähelle ja pitämällä alhaalla I-painiketta. Valo
- Anna värien vaihtua automaattisesti. Siirrä
välähtää 3 kertaa. Paina I-painiketta, kunnes
sormea värirenkaan ympäri (yksi täysi kierros) ja
kaukosäätimestä kuuluu äänimerkki. Valo välähtää
paina virtapainikkeen I-osaa lyhyesti. LivingColors
vihreänä. Se on nyt yhdistetty kaukosäätimeen ja
siirtyy automaattiseen värinvaihtotilaan: valon väri
palaa viimeisimpään asetukseensa.
alkaa vaihtua automaattisesti.
Muista yhdistää myös LivingColors-valaisimen
valkoinen valo. Se yhdistetään samalla tavalla kuin
Värien vaihtumisnopeutta voi säätää. Nopeutta
kohdassa 2 kuvatut LivingWhites-tuotteet.
voi säätää myötäpäivään nopeasta (värirenkaan
Jos haluat poistaa LivingColors-valaisimen
tummansininen väri) hitaaseen (purppura).
kaukosäätimestä, vie kaukosäädin valaisimen
Kosketa mitä tahansa värirenkaan kohtaa.
lähelle ja paina 0-painiketta. Valo välähtää 3 kertaa.
Automaattisessa värinvaihtotilassa voit säätää
Paina 0-painiketta, kunnes kuulet kaukosäätimestä
myös värikylläisyyttä ja värien kirkkautta.
äänimerkin. Valo himmenee hitaasti.
Voit palata staattiseen väritilaan siirtämällä sormea
värirenkaan ympäri uudelleen ja painamalla
2. Voit yhdistää kaukosäätimeen myös Philips
virtapainikkeen 0-osaa. Vaihtoehtoisesti voit
LivingWhites -tuotteita (pistokkeita,
sammuttaa LivingColorsin (0) ja käynnistää sen
energiansäästölamppuja ja valaisimia). Yhdistä
uudelleen (I).
Philips LivingWhites tuote viemällä kaukosäädin
tuotteen lähelle ja pitämällä alhaalla I-painiketta.
- Jos pidät tietystä valoasetuksesta (esimerkiksi
Valo välähtää 3 kertaa. Paina I-painiketta,
hieman himmennetystä punaisesta), voit
kunnes kaukosäätimestä kuuluu äänimerkki ja
tallentaa tämän valaistuksen: Paina jotain
valo välähtää nopeasti kaksi kertaa. Se on nyt
valaistuspainiketta, kunnes kaukosäätimestä kuuluu
yhdistetty kaukosäätimeen ja palaa viimeisimpään
äänimerkki. Valaistus tallennetaan painamaasi
asetukseensa.
valaistuspainikkeeseen. Näin voit tallentaa myös
haluamasi automaattisen värinvaihdon nopeuden.
Jos haluat poistaa LivingWhites-valaisimen
kaukosäätimestä, vie kaukosäädin tuotteen lähelle
Voit jatkaa valojen säätämistä haluamallasi
ja paina 0-painiketta. Valo välähtää 3 kertaa. Paina
tavalla. Voit palata tallennettuun valaistukseen
0-painiketta, kunnes kuulet kaukosäätimestä
painamalla sitä valaistuspainiketta, johon valaistus
äänimerkin. Valo himmenee hitaasti.
on tallennettu. Painetun valaistuspainikkeen
merkkivalo syttyy hetkeksi valitun valaistuksen
3. Voit yhdistää kaukosäätimen myös toiseen
merkiksi, ja LivingColors alkaa palaa toivotulla
Philips LivingAmbiance -valikoiman
tavalla.
kaukosäätimeen. Kaikki LivingColors- tai
Voit tallentaa enintään 3 valaistusta (yhden
LivingWhites-kaukosäätimet, joissa on SmartLink-
kuhunkin valaistuspainikkeeseen).
logo, voidaan yhdistää tähän kaukosäätimeen.
Sammuta LivingColors painamalla virtapainikkeen
Yhdistämällä toisen kaukosäätimen voit ohjata
0-osaa lyhyesti. LivingColors muistaa viimeksi
samoja valoja kahdella eri kaukosäätimellä. Voit
käytetyn asetuksen. Sytytä valaisin painamalla
luoda esimerkiksi 6 erilaista valaistusta – 3 yhdellä
virtapainikkeen I-osaa.
kaukosäätimellä ja 3 toisella - samoilla lampuilla.
Lisää toinen LivingColors- tai LivingWhites-
3. Liitä LivingColors muihin Philips
kaukosäädin seuraavasti:
LivingAmbiance -tuotteisiin
a. Nollaa yhdistettävä kaukosäädin: Avaa
Voit yhdistää Philips LivingAmbiance -valikoiman
paristolokero ja paina RESET-painiketta muutaman
tuotteita LivingColorsin kaukosäätimeen. Niin voit
sekunnin ajan esimerkiksi paperiliittimellä.
ohjata kaikkia yhdistettyjä tuotteita yhdessä tai
Varmista, että säätimessä on paristot.
erikseen – samalla kaukosäätimellä.
Kaukosäätimestä kuuluu äänimerkki nollauksen
merkiksi.
1. Voit yhdistää muita Philips LivingColors
b. Pidä nollattua kaukosäädintä nykyisen
-valaisimia kaukosäätimeen. Useimpia Philips
kaukosäätimen lähellä. Paina kummankin
LivingColorseja voi ohjata tällä kaukosäätimellä.
kaukosäätimen I-painiketta, kunnes
42

kaukosäätimistä kuuluu äänimerkki. Kaukosäätimet
o Onko mahdollista liittää LivingColors
on yhdistetty. Voit nyt yhdistää samat valot uuteen
ajastimeen?
kaukosäätimeen ja ohjata valoja kummallakin
o Kyllä. Voit käyttää Philips LivingColors
kaukosäätimellä.
-valaisinta ajastimen kanssa (lisävaruste).
c. Jos lisäämäsi kaukosäädin on pyöreä, voit myös
Ajastimella sytytetty LivingColors siirtyy
kopioida sen: Voit yhdistää sen välittömästi
viimeisimpään asetukseen (staattiset värit tai
samoihin valoihin, joihin alkuperäinen kaukosäädin
automaattinen värinvaihto). Varmista, ettei valo
on yhdistetty. Kopioi kaukosäädin toistamalla
ole sammutettu viimeisimmässä asetuksessa.
vaiheessa b kuvatut toimet.
o En pysty yhdistämään lisälamppuja
Kun olet yhdistänyt ainakin yhden valon Philips
LivingColors-kaukosäätimeen
LivingColors -kaukosäätimeen, voit ohjata kaikkia
o Varmista, että yhdistettävässä tuotteessa on
valoja yhdessä tai kutakin erikseen.
SmartLink-logo. Tähän kaukosäätimeen voi
Jotta voit ohjata yhtä valoa, se on valittava (huomaa,
yhdistää vain tuotteita, joissa on SmartLink-
että värillisen ja valkoisen valon LivingColors-
logo.
valaisimen värillinen ja valkoinen valo on valittava
o Yritä toistaa tämän oppaan osassa 3 kuvattu
erikseen). Valitse valo valonvalintapainikkeilla. Kun pidät
toimi. Varmista, että äänimerkit kuuluvat ja
alhaalla jotain valonvalintapainiketta, valittu valo alkaa
välähdykset näkyvät kuvatulla tavalla.
vilkkua. Jos et halua säätää tätä valoa, vapauta painike
ja paina sitä uudelleen – toinen valo alkaa vilkkua. Kun
o Kysymystäni ei ole tässä luettelossa
valo on valittu, kaukosäätimen valon valinnan merkkivalo
o Ota yhteyttä Philipsiin (katso osa 5 Lisätuki).
syttyy. Tämä merkitsee, että nyt voit säätää pelkästään
tätä valoa.
5. Lisätuki
Jos valoa ei ole valittu (valon valinnan merkkivalo
ei pala), kaikki valinnat vaikuttavat kaikkiin
Ongelmatapauksissa saat tietoja Philipsin
kaukosäätimeen yhdistettyihin valoihin (voit
sivustosta osoitteessa www.philips.com tai
esimerkiksi himmentää kaikki huoneen valot).
soittamalla maksuttomaan Philips Lightingin
Jos pidät tietystä eri valaisimien valoasetusten
asiakaspalvelunumeroon: 00800-PHILIPSL tai 00800-
yhdistelmästä, voit tallentaa sen valaistuksena tämän
74454775
oppaan osassa 2 kuvatulla tavalla.
Takuu:
4. Usein esitetyt kysymykset
Philipsin kahden vuoden takuu on voimassa,
jos tuotetta käytetään ohjeiden mukaisesti ja
Mitä seuraavissa tilanteissa pitää tehdä
alkuperäiseen tarkoitukseen. Vaateet huomioidaan
o LivingColorsin valo ei pala
vain, jos niiden mukana toimitetaan alkuperäinen
o Tarkista valaisimen virtaliitännät. Varmista, että
ostotodistus (lasku tai ostokuitti), josta ilmenee
pistoke on kunnolla pistorasiassa.
ostopäivämäärä, myyjän nimi ja tuotteen kuvaus.
o Irrota virtajohto ja liitä se uudelleen. Jos
LivingColors vaihtaa useita värejä ja sammuu,
Philips-takuu ei ole voimassa seuraavissa tapauksissa:
sytytä se kaukosäätimellä.
- Ostotodistusta tai tuotekuvausta on muutettu,
siitä on pyyhitty tai poistettu jotain tai sitä ei voi
o LivingColors ei reagoi kaukosäätimeen
lukea.
o Tarkista kaukosäätimen paristot. Niiden pitää
- Viat aiheutuvat vahingoista, viallisista liitännöistä
olla oikein paikallaan (+ ja -) ja täynnä. Jos
tai tuotteen väärinkäytöstä.
kaukosäädin ei vieläkään toimi, vaihda paristot.
- LivingColorsin vian ovat aiheuttaneet laitteelle
o Yhdistä kaukosäädin LivingColors-valaisimeen
epäominaiset äärimmäiset olosuhteet, esimerkiksi
tämän oppaan osan 3.1 mukaan.
salamanisku, tulva, tuli, virheellinen käyttö tai
laiminlyönti.
o Painikkeet vilkkuvat kaukosäätimen käytön
- LivingColors on avattu tai purettu.
jälkeen
o Kaukosäätimen paristojen virta on melkein
Puhdistaminen ja huolto:
lopussa, ja paristot on vaihdettava.
Irrota virtapistoke pistorasiasta.
Käytä LivingColors-lampun, kaukosäätimen ja
o Automaattinen värinvaihto ei käynnisty
sovittimen puhdistamisessa vain pehmeää, kuivaa liinaa,
o Voi olla, ettei kaukosäädin ymmärtänyt sormen
jotta laitteet eivät naarmutu.
liikettä. Yritä uudelleen niin, että sormesi on
Älä käytä puhdistusaineita.
varmasti värirenkaalla koko liikkeen ajan
Turvallisuusohjeet:
- Suojaa pistoketta ja LivingColorsia nesteiltä ja
43
kosteudelta.
Tulo: 220–240 V ~ 0,3 A 50 Hz
- LivingColors on tarkoitettu vain sisäkäyttöön. Älä
Lähtö: 18,5 V 0,83 A
käytä sitä kosteissa tiloissa, kuten kylpyhuoneessa
tai ulkona.
Valaisimen virrankulutus: enintään 15,4 W
- LivingColors ei ole lasten käyttöön tarkoitettu
lelu.
Kaukosäädin:
- Älä aseta sitä kuumille pinnoille
Paristot: 3 x Philips Powerlife Alkaline AAA LR03, 1,5 V.
- LivingColorsia ja pistoketta ei saa avata
turvallisuus- ja takuusyistä.
Langattoman yhteyden tiedot:
- Käytä vain laitteen mukana toimitettua sovitinta:
Langattoman RF-tilan taajuuskaista: 2405~2475 MHz
vääränlaisen sovittimen käyttäminen voi
Langattoman yhteyden protokolla: IEEE 802.15.4)
vahingoittaa LivingColorsia.
Käyttökanavat: kanava 11, 15, 20 tai 25
Ympäristö:
Hävitä laite paikallisten viranomaisten ohjeiden
Ympäristötiedot:
mukaisesti. Poista paristot ennen laitteen hävittämistä.
Lämpötila (käyttö): 0...40 °C
Älä hävitä tyhjiä paristoja talousjätteen mukana, vaan
Lämpötila (säilytys): -25...60 °C
toimita ne valtuutettuun kierrätyspisteeseen.
Suhteellinen kosteus: 5...95 %, ei tiivistymistä
Pistokkeen tiedot:
Verkkolaite
Malli: EADP-10EB C (EU)
EADP-10EB D (Iso-Britannia ja Singapore)
EADP-10EB E (Australia)
ES LivingColors Instrucciones de uso
Gracias por comprar la lámpara de pie LivingColors
- Inserte el conector de la parte superior del
de Philips.
soporte en la lámpara y asegúrese de que oye
un clic.
LivingColors se ha diseñado especícamente para
- Coloque la lámpara LivingColors en el soporte
crear su propio ambiente en casa, mediante el color
y oriéntela hacia la pared (la distancia óptima es
y la luz. Si es la primera vez que utiliza LivingColors,
de 50 cm). Puede ajustar la altura de la lámpara
lea estas instrucciones atentamente y guárdelas
girando el anillo situado en la parte central del
para poder consultarlas en un futuro. Si sigue estas
soporte. Estire de la parte superior del soporte
orientaciones, podrá disfrutar de todas las funciones
hasta llegar a la altura deseada y después vuelva a
de la lámpara LivingColors de Philips.
girar el anillo para ajustar la posición.
- Abra el compartimento de las pilas del mando
Registre su producto en www.philips.com/welcome
a distancia deslizando el botón de la parte
para estar al día sobre los nuevos productos de
posterior. Inserte 3 pilas AAA tal y como se indica
LivingAmbiance de Philips
con las marcas + y –.
Este manual le ayudará a…
2. Cree su propio ambiente:
1. Empezar a usar el sistema
2. Crear su propio ambiente con LivingColors
- Toque el color que desee en el aro de colores.
3. Conectar LivingColors a otros productos de
Puede deslizar el dedo sobre el aro de colores
LivingAmbiance de Philips
para denir el color de forma más precisa.
4. Encontrar respuestas a las preguntas más
frecuentes
- Cambie la saturación del color (añadiendo
5. Obtener asistencia adicional
más blanco al color actual). Pulse el botón de
aumento de saturación para un color profundo
1. Introducción:
o el botón de disminución de saturación para un
tono más pastel. Si continúa pulsando el botón de
- Inserte la barra en el pie de la lámpara y
disminución de saturación, llegará al color blanco.
enrósquela del todo en el sentido de las agujas
del reloj.
- Intensidad. Aumente o disminuya la intensidad
- Inserte el conector en la abertura situada debajo
luminosa mediante los botones de intensidad.
del pie de la lámpara y conecte el otro extremo a
la toma de pared.
44

- Cambie los colores automáticamente.
este mando a distancia: simplemente compruebe
Deslice el dedo por el aro de colores (haga un
si hay un logotipo de SmartLink en la lámpara
círculo completo) y pulse “I” (encendido). A
LivingColors que le gustaría conectar. Todos
continuación, LivingColors cambiará al modo
los productos con un logotipo de SmartLink se
de cambio de color automático y la lámpara
pueden conectar al mando a distancia.
comenzará a cambiar de color automáticamente.
Para añadir una lámpara LivingColors de Philips al
Puede ajustar la velocidad con la que cambian
mando a distancia, acerque el mando a la lámpara
los colores. La velocidad puede ajustarse en
y, a continuación, mantenga pulsado el botón
el sentido de las agujas del reloj, desde rápida
“I”. La lámpara parpadeará 3 veces. Mantenga
(color azul oscuro en el aro de colores) a lenta
pulsado el botón “I” hasta que escuche un pitido
(violeta). Puede tocar en cualquier parte del aro
del mando a distancia; la lámpara parpadeará
de colores. Mientras se encuentra en el modo
brevemente en color verde. Ahora está conectada
de cambio de color automático, también puede
con el mando a distancia y volverá al último ajuste
ajustar la saturación y el brillo de los colores.
que tuviese antes de apagarse.
Para volver al modo de color estático, deslice
Para una lámpara LivingAmbiance, asegúrese de
el dedo por el aro de colores una vez más y, a
que también conecta la luz blanca: puede hacerlo
continuación, pulse "0". También puede apagar
de la misma forma descrita en el punto 2 para los
LivingColors "0" y volver a encenderlo "l".
productos LivingWhites.
Si desea desconectar una lámpara LivingColors
- Si le gusta algún ajuste de luminosidad en
del mando a distancia, acerque el mando a
concreto (por ejemplo, rojo ligeramente intenso),
distancia a la lámpara y, a continuación, mantenga
puede almacenar este ambiente para
pulsado el botón “0”. La lámpara parpadeará
recuperarlo fácilmente: mantenga pulsado uno
3 veces. Mantenga pulsado el botón “0” hasta
de los botones para crear ambiente hasta que el
que escuche un pitido del mando a distancia. La
mando a distancia emita un pitido. El ambiente
lámpara se apagará poco a poco.
está ahora guardado en el botón para crear
ambiente que ha pulsado. De este modo, también
2. Además, puede conectar otros productos
podrá guardar el modo de cambio de color
LivingWhites de Philips (enchufes, bombillas
automático con velocidad.
de bajo consumo y luminarias) al mando a
distancia. Para añadir un producto LivingWhites
Puede continuar ajustando las luces de la forma
de Philips, acerque el mando a distancia al
que desee. Cuando desee volver a su ambiente
producto y, a continuación, mantenga pulsado
guardado, simplemente pulse el botón para crear
el botón “I”. La lámpara parpadeará 3 veces.
ambiente que pulsó cuando lo guardó. El botón
Mantenga pulsado el botón “I” hasta que escuche
para crear ambiente se iluminará para mostrar
un pitido del mando a distancia y vea que la
que el ambiente se ha seleccionado y que
lámpara parpadea dos veces rápidamente. Ahora
LivingColors cambiará a los ajustes guardados.
está conectada con el mando a distancia y volverá
Puede guardar hasta 3 ambientes (uno por cada
al último ajuste que tuviese antes de apagarse.
botón para crear ambiente).
Apague la lámpara LivingColors pulsando
Si desea desconectar un producto LivingWhites
brevemente el botón “0” (apagado). LivingColors
del mando a distancia, acerque el mando a
recordará el último ajuste seleccionado cuando la
distancia al producto y, a continuación, mantenga
vuelva a utilizar. Para volver a encender la lámpara,
pulsado el botón “0”. La lámpara parpadeará
pulse "l" (encendido).
3 veces. Mantenga pulsado el botón “0” hasta
que escuche un pitido del mando a distancia. La
3. Conectar LivingColors a otros productos
lámpara se apagará poco a poco.
de LivingAmbiance de Philips
3. También puede conectar su mando a distancia
Puede conectar diferentes productos de la gama
a otro mando a distancia de la gama
LivingAmbiance de Philips al mando a distancia de
LivingAmbiance de Philips. Cualquier mando
LivingColors. De esta forma, podrá ajustar todos los
a distancia LivingColors o LivingWhites que tenga
productos conectados en conjunto o bien, cada uno
un logotipo de SmartLink se puede conectar a
de ellos de forma individual, y todo desde el mando a
su mando a distancia. Al conectar otro mando a
distancia.
distancia podrá controlar las mismas lámparas
con dos mandos a distancia diferentes. Por
1. Puede conectar otras lámparas LivingColors
ejemplo, podría crear 6 ambientes de iluminación
de Philips al mando a distancia. La mayoría de
diferentes (3 en un mando a distancia y 3 en el
lámparas LivingColors de Philips funcionarán con
otro) con las mismas lámparas. Para añadir un
45

mando a distancia LivingColors o LivingWhites
a enchufarlo. Si la lámpara LivingColors cambia
adicional, realice lo siguiente:
a varios colores y se apaga, utilice el mando a
distancia para volver a encenderla.
a. Restablezca el mando a distancia que desee
añadir: abra el compartimento de las pilas y pulse
o LivingColors no responde al mando a
el botón RESET durante unos segundos (por
distancia
ejemplo, con un clip). Asegúrese de que las pilas
o Compruebe las pilas del mando a distancia.
están dentro. El mando reproducirá un sonido
Las pilas deben estar colocadas correctamente
para indicar que se ha restablecido.
(según las indicaciones + y -) y deben tener
b. Acerque el mando a distancia que ha restablecido
energía. Si el mando a distancia sigue sin
al mando a distancia actual. Pulse el botón “I”
funcionar, sustituya las pilas.
en ambos mandos a distancia hasta que estos
o Vincule el mando a distancia a la lámpara
reproduzcan un sonido. Los mandos a distancia
LivingColors siguiendo el procedimiento que
están ahora conectados, lo que signica que podrá
se explica en la sección 3.1 de este manual.
conectar las mismas lámparas al nuevo mando a
distancia y controlar todas con cualquiera de los
o Los botones parpadean después de utilizar
mandos a distancia.
el mando a distancia
c. Si el mando a distancia que está añadiendo es
o Esto signica que las pilas del mando a
redondo, ahora también podrá copiarlo: puede
distancia están (casi) agotadas y necesitan
tenerlo conectado inmediatamente a las mismas
reemplazarse.
lámparas a las que está conectado el mando a
distancia original. Para copiar el mando a distancia,
o No puedo activar el modo de cambio de
repita el procedimiento descrito en el punto b.
color automático
o Puede que el mando a distancia no haya
Cuando hay conectado una o más lámparas al mando
captado el deslizamiento. Inténtelo de nuevo
a distancia LivingColors de Philips, podrá controlar
y asegúrese de que su dedo está en el aro de
todas estas lámparas en conjunto o bien cada una de
colores durante todo el movimiento circular
ellas de forma individual.
Para controlar una sola lámpara, necesita
o Me gustaría conectar la lámpara
seleccionarla (tenga en cuenta que para las lámparas
LivingColors a un temporizador. ¿Es
LivingColors con luz de color y blanca, éstas necesitan
posible?
seleccionarse por separado). Puede hacerlo mediante
o Sí. Puede utilizar la lámpara LivingColors de
uno de los botones de selección de luz. Cuando
Philips con un temporizador (no incluido).
mantenga pulsado uno de los botones de selección de
Cuando se enciende con un temporizador,
luz, la lámpara seleccionada empezará a parpadear.
LivingColors mostrará el último ajuste
Si esta no es la lámpara que desea ajustar, suelte el
(color estático o modo de cambio de color
botón y vuelva a pulsarlo; de esta forma, empezará
automático). Asegúrese de que el último ajuste
a parpadear otra lámpara. Cuando se selecciona una
no es “apagado”.
lámpara, el indicador de selección de luz del mando a
distancia (bombilla) se iluminará. Esto signica que ya
o No puedo conectar lámparas adicionales al
puede ajustar la luz seleccionada individualmente.
mando a distancia LivingColors
Cuando no hay ninguna luz seleccionada (el indicador
o Asegúrese de que el producto que está
de selección de luz está apagado), todos los ajustes
intentando conectar tiene el logotipo de
se aplicarán a todas las luces conectadas al mando a
SmartLink. Solo los productos con un logotipo
distancia (por ejemplo, puede regular todas las luces
de SmartLink se pueden conectar a este
de la habitación).
mando a distancia.
Si le gusta una combinación de ajuste de luz de
o Vuelva a realizar el proceso descrito en la
diferentes luminarias en concreto, también puede
sección 3 de este manual. Asegúrese de que
almacenarla como ambiente; se puede hacer de la
oye los sonidos y ve las luces parpadeantes tal
misma forma descrita en la sección 2 de este manual.
como se describe en esta sección.
4. Preguntas más frecuentes
o Mi pregunta no aparece aquí
o Póngase en contacto con Philips para obtener
Qué hacer si…
asistencia (consulte la sección 5 “Asistencia
o LivingColors no produce luz
adicional”).
o Compruebe las conexiones del cable a la
lámpara. Compruebe que la clavija esté
5. Asistencia adicional
enchufada correctamente en la toma de pared.
o Desconecte el cable de alimentación y vuelva
Para obtener información y en caso de que se
46
produzca algún problema, visite el sitio Web de Philips
- No la coloque en supercies calientes.
en www.philips.com o bien, póngase en contacto con
- Por razones de seguridad, y para conservar
el centro de atención al cliente de iluminación de
la garantía, no se pueden abrir ni la lámpara
Philips llamando al número gratuito: 00800-PHILIPSL o
LivingColors ni el enchufe.
00800-74454775
- Utilice únicamente el adaptador proporcionado:
si utiliza un adaptador distinto puede provocar
Garantía:
daños en la lámpara LivingColors.
La garantía de dos años de Philips será válida siempre
y cuando el producto se utilice según las instrucciones
Protección del medio ambiente:
y con la nalidad para la que fue creado. Se
Si decide desechar el aparato en un determinado
aceptarán únicamente aquellas reclamaciones previa
momento, hágalo de acuerdo con la normativa local.
presentación de la prueba de compra original (factura,
Quite las pilas cuando deseche el mando a distancia.
recibo o comprobante de compra) donde aparezca
No deseche las pilas con la basura normal del hogar.
la fecha de compra, el nombre del distribuidor y la
Deben depositarse en un punto de recogida ocial o
descripción del producto.
en un distribuidor de Philips, los cuales desecharán las
pilas de una forma respetuosa con el medio ambiente.
La garantía de Philips quedará anulada si:
- Algún dato de la etiqueta de compra o la
Especicaciones del enchufe:
descripción del producto se ha cambiado, tachado,
Adaptador de CA
borrado, o si ha quedado ilegible.
Modelo: EADP-10EB C (tipo UE)
- Se producen fallos por daños, conexiones
EADP-10EB D (tipo Reino Unido +
defectuosas o mal uso.
Singapur)
- Se ha producido un defecto debido a circunstancias
EADP-10EB E (tipo Australia)
extremas no inherentes a la lámpara LivingColors,
Entrada: 220 - 240 V ~ 0,3 A 50 Hz
por ejemplo, tormenta eléctrica, inundaciones, fuego,
Salida: 18,5 V 0,83 A
uso incorrecto o negligencia.
- Se ha abierto o desmontado la lámpara
Consumo de energía de la luminaria: hasta 15,4 W
LivingColors.
Mando a distancia:
Limpieza y mantenimiento:
Pilas: 3 pilas alcalinas Powerlife de Philips AAA LR03,
Desconecte el enchufe de la toma de alimentación.
1,5 V.
Para evitar arañazos, la lámpara LivingColors, el
mando a distancia y el adaptador se deben limpiar
Especicaciones de la tecnología inalámbrica:
únicamente con un paño suave y seco.
Banda de frecuencia de modo de radiofrecuencia
No utilice productos de limpieza.
inalámbrica: 2405~2475 MHz
Protocolo de comunicaciones inalámbricas: IEEE
Instrucciones de seguridad:
802.15.4)
- Mantenga el enchufe y la lámpara LivingColors
Canales de funcionamiento: canales 11, 15, 20 o 25
alejados de los líquidos y la humedad.
- La lámpara LivingColors es solo para uso en
Especicaciones medioambientales:
interiores, no la utilice en lugares con humedad,
Temperatura (funcionamiento): De 0 a 40 °C
como el cuarto de baño o en exteriores.
Temperatura (almacenamiento): de -25 a 60 °C
- La lámpara LivingColors no es un juguete para
Humedad relativa: entre 5 y 95 % sin condensación
niños.
PT LivingColors - Instruções de utilização
Obrigado por adquirir o candeeiro de pé Philips
para saber as novidades sobre os produtos Philips
LivingColors!
LivingAmbiance
O LivingColors foi especialmente concebido
Este manual ajudá-lo-á a…
para criar, através da luz e da cor, uma atmosfera
1. Começar
pessoal em sua casa. Quando utilizar um candeeiro
2. Crie o seu próprio ambiente com LivingColors
LivingColors pela primeira vez, leia estas instruções
3. Ligue o LivingColors a outros produtos Philips
com atenção e guarde-as para referência futura. Se
LivingAmbiance
respeitar as nossas orientações, poderá desfrutar ao
4. Responder a perguntas mais frequentes
máximo do Philips LivingColors.
5. Obter assistência adicional
Registe o seu produto em www.philips.com/welcome
47
1. Como iniciar:
(por exemplo, vermelho com luz ligeiramente
reduzida), pode guardar este efeito para uma
- Insira a haste na base e, em seguida, rode a haste
reactivação simples: mantenha um dos botões
para a direita até não ser possível continuar a
de efeitos de luz premido até este emitir um
rodá-la.
sinal sonoro. O seu efeito de luz encontra-se
- Insira a cha de ligação na abertura por baixo da
agora guardado no botão de efeitos de luz que
base do candeeiro e ligue a outra extremidade na
premiu. Desta forma também pode guardar uma
tomada eléctrica.
determinada velocidade do modo de mudança
- Insira a cha de ligação, que se encontra na parte
automática de cores.
superior do suporte, na lâmpada – certique-se
de que ouve um estalido.
Pode continuar a ajustar as luzes como preferir.
- Posicione a lâmpada no suporte e direccione o
Quando quiser regressar ao efeito de luz
LivingColors para a parede (a distância ideal é 50
guardado, basta premir o botão de efeitos de luz
cm). Pode ajustar a altura do candeeiro rodando
que premiu quando o guardou. Esse botão de
o anel no meio do suporte, puxando a parte
efeitos de luz acende por alguns momentos para
superior do suporte para a altura desejada e, de
indicar que o efeito de luz está seleccionado
seguida, volte a rodar o anel para xar a posição.
e o LivingColors muda para as suas denições
- Deslize o botão na parte posterior do
guardadas.
telecomando para abrir o compartimento
Pode guardar até 3 efeitos de luz (um para cada
das pilhas. Introduza 3 pilhas de tipo AAA
botão de efeitos de luz).
(polaridades + e – como indicado).
Para desligar o LivingColors, prima o botão “0”
(desligar) por breves instantes. O LivingColors
2. Crie o seu próprio ambiente:
memoriza a última conguração e utiliza-a quando
voltar a ser ligado. Para voltar a ligar, prima “I”
- Tocando na cor pretendida no anel de cores.
(ligar).
Pode deslocar o dedo pelo anel de cores para
ajustar a cor.
3. Ligue o LivingColors a outros produtos
Philips LivingAmbiance
- Alterando a saturação da cor (adicionando
branco à cor actual). Prima o botão para aumentar
Pode ligar vários produtos da gama Philips
a saturação para uma cor profunda ou o botão
LivingAmbiance ao telecomando do seu LivingColors.
para diminuir da saturação para um tom mais
Desta forma, pode ajustar todos os produtos ligados
pastel. Se continuar a premir o botão para
em conjunto ou individualmente – tudo com o
diminuir a saturação, obtém a cor branca.
mesmo telecomando.
- Regulando a intensidade da luz. Aumentar ou
1. Pode ligar outros candeeiros Philips
diminuir a intensidade da luz através dos botões de
LivingColors ao seu telecomando. A maioria
regulação da intensidade da luz.
dos Philips LivingColors funciona com este
telecomando: verique se o LivingColors que
- Permitindo que as cores mudem
pretende interligar tem um logótipo SmartLink.
automaticamente. Passe o dedo a toda a
Todos os produtos com um logótipo SmartLink
volta do anel de cores (um círculo completo) e
podem ser ligados ao seu telecomando.
prima o botão “I” (ligar) por breves momentos;
o LivingColors activa o modo de mudança
Para adicionar um candeeiro Philips LivingColors
automática de cor: o candeeiro começa a mudar
a um telecomando, aproxime o telecomando
de cor automaticamente.
do candeeiro; em seguida, mantenha o botão “I”
premido. O candeeiro apresenta 3 intermitências.
Pode ajustar a velocidade da mudança de cores.
Mantenha o botão “I” pressionado até ouvir
A velocidade pode ser ajustada para a direita, de
um sinal sonoro do telecomando; o candeeiro
rápida (cor azul escura no anel de cores) para
apresenta algumas intermitências, por breves
lenta (roxo). Pode tocar em qualquer ponto do
momentos, na cor verde. Este encontra-se
anel de cores. Enquanto o modo de mudança
agora ligado ao telecomando e regressa à última
automática de cores estiver activado, também
denição quando estava ligado.
pode ajustar a saturação e o brilho das cores.
No caso de se tratar de um candeeiro
Para voltar ao modo de cor estática, passe
LivingAmbiance, certique-se de que também liga
novamente o dedo pelo anel de cores e prima
a luz branca – pode fazê-lo da mesma forma que
“0”. Também pode simplesmente desligar “0” e
nos produtos LivingWhites, conforme descrito no
voltar a ligar “I” o LivingColors.
ponto 2.
- Se gostar de uma denição de luz em particular
48

Se pretender desligar um candeeiro LivingColors
telecomando, repita o procedimento descrito no
do telecomando, aproxime o telecomando do
ponto b.
candeeiro e, em seguida, mantenha o botão “0”
premido. O candeeiro emite 3 intermitências.
Depois de ligar um ou vários candeeiros ao
Mantenha o botão “0” premido até ouvir um sinal
seu telecomando Philips LivingColors, pode
sonoro do telecomando. O candeeiro diminui
controlar todos estes candeeiros em conjunto ou
gradualmente a intensidade até desligar.
individualmente.
Para controlar um único candeeiro, tem de o
2. Também pode ligar produtos Philips
seleccionar (tenha em atenção que para o
LivingWhites (chas, lâmpadas economizadoras
candeeiro LivingColors de luz colorida e branca, é
e candeeiros) ao seu telecomando. para adicionar
necessário seleccionar a luz colorida e a luz branca
um produto Philips LivingWhites, aproxime o
separadamente). Poderá fazê-lo através de um
comando; em segunda, mantenha o botão “I”
dos botões de selecção de luz. Quando mantém um
premido. O candeeiro apresenta 3 intermitências.
dos botões de selecção da luz premido, o candeeiro
Mantenha o botão “I” premido até ouvir um sinal
seleccionado ca intermitente. Se não for este
sonoro do telecomando; o candeeiro apresenta
o candeeiro que pretende regular, solte o botão
duas intermitências rápidas. Ele encontra-se
e prima-o novamente – ca intermitente outro
agora ligado ao telecomando e regressa à última
candeeiro. Quando é seleccionado um candeeiro, o
denição quando estava ligado.
indicador de selecção da luz no telecomando (lâmpada)
acende. Isto signica que agora pode regular apenas o
Se pretender desligar um produto LivingWhites
candeeiro seleccionado.
do telecomando, aproxime o telecomando do
Quando não é seleccionada nenhuma luz (indicador de
produto e, em seguida, mantenha o botão “0”
selecção da luz está desligado), todos os ajustes serão
premido. O candeeiro emite 3 intermitências.
aplicados a todas as luzes ligadas ao telecomando (por
Mantenha o botão “0” premido até ouvir um sinal
exemplo, pode reduzir a intensidade de todas as luzes
sonoro do telecomando. O candeeiro diminui
na divisão).
gradualmente a intensidade até desligar.
Se gostar de uma combinação em particular de
denições de luz de diferentes candeeiros, também
3. Também pode ligar o seu telecomando
pode guardá-lo como um efeito de luz – com o
a outro telecomando da gama Philips
procedimento descrito na secção 2 deste manual.
LivingAmbiance. Qualquer telecomando
LivingColors ou LivingWhites com um logótipo
4. Perguntas frequentes
SmartLink pode ser ligado ao seu telecomando.
A ligação de outro telecomando permite-lhe
O que fazer se…
controlar os mesmos candeeiros com dois
o O LivingColors não estiver a fornecer luz
telecomandos diferentes. Pode, por exemplo, criar
o Verique as ligações do cabo até ao candeeiro.
6 efeitos de luz diferentes – 3 num telecomando
Verique se a cha está correctamente
e 3 no noutro, com os mesmos candeeiros. Para
colocada na tomada.
adicionar um telecomando LivingColors ou
o Desligue o cabo de alimentação e volte a
LivingWhites extra, proceda da seguinte forma:
ligá-lo. Se o LivingColors alternar entre várias
cores e desligar, utilize o telecomando para o
a. Reponha o telecomando que pretende adicionar:
ligar novamente.
abra o compartimento das pilhas e prima o
botão RESET durante alguns segundos (p.ex. com
o O LivingColors não responde ao
um clipe). Certique-se de que as pilhas estão
telecomando
colocadas. O telecomando reproduz um som para
o Verique as pilhas do telecomando. As pilhas
indicar que foi reposto.
devem estar colocadas correctamente (+ e -)
b. Segure o telecomando reposto próximo do
e devem estar carregadas. Se o telecomando
seu telecomando actual. Prima o botão “I” nos
continuar a não funcionar, substitua as pilhas.
dois telecomandos até eles emitirem um sinal
o Ligue o telecomando ao LivingColors através
sonoro. Os telecomandos encontram-se ligados
do procedimento descrito no ponto 3.1 deste
– isto signica que agora pode ligar os mesmos
manual.
candeeiros ao novo telecomando e controlar
todos os candeeiros com qualquer um dos
o Os botões estão intermitentes depois de
telecomandos.
eu usar o telecomando
c. Se o telecomando que está a adicionar for
o Isto signica que as pilhas no telecomando
redondo, agora também pode copiá-lo: pode
estão (quase) vazias e precisam de ser
ligá-lo de imediato aos mesmos candeeiros que
substituídas.
o seu telecomando original. Para poder copiar o
49

o Não consigo activar o modo de mudança
Limpeza e manutenção:
automática de cores
Retire a cha da tomada.
o O telecomando poderá não ter compreendido
Para evitar riscos, o candeeiro LivingColors, o
o movimento do seu dedo. Tente novamente,
telecomando e o adaptador devem ser limpos com
certicando-se de que o seu dedo se encontra
um pano suave e seco.
no anel de cores durante o movimento
Não utilize agentes de limpeza.
completo da volta
Instruções de segurança:
o Eu gostaria de ligar o LivingColors a um
- Mantenha a cha e o LivingColors afastados de
temporizador. É possível?
líquidos e humidade.
o Sim. Pode utilizar o Philips LivingColors com
- O LivingColors destina-se apenas a utilização no
um temporizador (não incluído). Quando
interior. Não o ligue em locais húmidos como
ligado com um temporizador, o LivingColors
casas de banho ou no exterior.
apresenta a sua última denição (cor estática
- O LivingColors não é um brinquedo e não deve
ou mudança automática de cor). Certique-se
ser manuseado por crianças.
que a sua última denição não é “desligado”.
- Não o coloque sobre superfícies quentes.
- Por razões de segurança e nos termos da garantia,
o Não consigo ligar candeeiros adicionais ao
o LivingColors e a cha não podem ser abertos.
telecomando LivingColors
- Utilize apenas o adaptador fornecido: a utilização
o Certique-se que o produto que está a tentar
de um adaptador diferente pode danicar o seu
ligar tem um logótipo SmartLink. Só é possível
LivingColors.
ligar produtos com um logótipo SmartLink a
este telecomando.
Ambiente:
o Tente repetir o procedimento descrito na
Caso elimine este aparelho, faça-o respeitando as
secção 3 deste manual. Certique-se de que
instruções das autoridades locais. Retire as pilhas
ouve os sons e vê as intermitências descritas
antes de eliminar o telecomando. Não elimine as
aqui.
pilhas com os resíduos domésticos. Deverá entregá-las
num ponto de recolha ocial ou num representante
o A minha questão não está listada aqui
da Philips para que a sua eliminação seja feita de modo
o Entre em contacto com a Philips para obter
a proteger o ambiente.
assistência (consulte o ponto 5 “Assistência
adicional”).
Especicações da cha:
Adaptador de CA
5. Assistência adicional
Modelo: EADP-10EB C (UE)
EADP-10EB D (Reino Unido e Singapura)
Para obter mais informações e em caso de
EADP-10EB E (Austrália)
diculdades, visite o Web site da Philips em www.
Entrada: 220 - 240 V ~ 0,3 A 50 Hz
philips.com ou contacte o Centro de Assistência da
Saída: 18,5 V 0,83 A
Philips Lighting através das linhas gratuitas: 00800
PHILIPSL ou 00800 74454775
Consumo de energia do candeeiro: até 15,4 W
Garantia:
Telecomando:
A garantia de dois anos da Philips é válida se o
Pilhas: 3 x Philips Powerlife alcalinas AAA LR03, 1,5 V.
produto for utilizado de acordo com as instruções e
para o m a que se destina. Serão aceites reclamações
Especicações da ligação sem os:
após envio do comprovativo de compra original
Banda de frequência das comunicações sem os:
(factura, talão ou recibo) com indicação da data de
2405~2475 MHz
compra, nome do fornecedor e descrição do produto.
A garantia da Philips é invalidada se:
Protocolo de comunicações sem os: IEEE 802,15.4)
- Os dados do documento tiverem sido alterados,
Canais de funcionamento: canais 11, 15, 20 ou 25
riscados, apagados ou tornados ilegíveis.
- As falhas forem provocadas por danos, avarias nas
Especicações de ambiente de funcionamento:
ligações ou utilização indevida.
Temperatura (funcionamento): 0...40 °C
- A causa do defeito se dever a circunstâncias
Temperatura (armazenamento): -25...60 °C
extremas extrínsecas ao aparelho — por
Humidade relativa: 5...95% sem condensação
exemplo, trovoadas, inundações, incêndios, uso
incorrecto ou negligência.
- O LivingColors tiver sido aberto ou desmontado.
50

IT LivingColors: istruzioni per l’uso
Grazie per avere acquistato la lampada da pavimento
- Riducendo l'intensità luminosa. Aumentare o
Philips LivingColors!
diminuire l'intensità luminosa tramite i pulsanti di
attenuazione.
LivingColors è stata appositamente progettata per
creare un'atmosfera speciale in casa grazie ad effetti
- Impostando la modalità cambiacolore
di luce e colore. Se si usa LivingColors per la prima
automatica. Passare il dito sulla ghiera dei
volta, leggere attentamente le seguenti istruzioni
colori (con un movimento circolare completo)
e conservarle per riferimento futuro. Seguendo le
e premere brevemente "I" ("On"); LivingColors
nostre indicazioni, sarà possibile godere appieno di
passerà alla modalità cambiacolore automatica: la
tutte le funzionalità di Philips LivingColors.
lampada modicherà automaticamente i colori.
Registra il tuo prodotto su www.philips.com/welcome
È possibile regolare la velocità con la quale cambia
per avere sempre tutte le ultime notizie sui nuovi
il colore. La velocità può essere modicata in
prodotti Philips LivingAmbiance
senso orario, dall'impostazione veloce (colore blu
scuro sulla ghiera dei colori) a quella lenta (viola).
Il manuale tratta i seguenti argomenti:
È possibile toccare qualsiasi punto della ghiera dei
1. Operazioni preliminari
colori. Mentre è attiva la modalità cambiacolore
2. Crea la tua atmosfera con LivingColors
automatica, è anche possibile regolare la
3. Collega LivingColors ad altri prodotti Philips
saturazione e la luminosità dei colori.
LivingAmbiance
Per tornare alla modalità cromatica statica,
4. Risposta alle domande frequenti
passare il dito nuovamente sulla ghiera dei colori,
5. Assistenza aggiuntiva
quindi premere "0". In alternativa, è possibile
spegnere LivingColors ("0") e riaccenderla ("I").
1. Informazioni preliminari
- Se si desidera riutilizzare una determinata
- Inserire l'asta nella base e ruotarla in senso orario
impostazione luminosa (ad esempio con il
no al punto di arrivo.
colore rosso leggermente attenuato), è possibile
- Inserire lo spinotto di collegamento nell'apertura
salvare questa combinazione per richiamarla
sotto la base della lampada e collegare l'altra
in un secondo momento: tenere premuto uno
estremità alla presa a muro.
dei pulsanti delle combinazioni luminose no a
- Inserire lo spinotto di collegamento che si trova
quando il telecomando non emette un segnale
sulla parte superiore del supporto nella lampada,
acustico. La combinazione luminosa viene quindi
assicurandosi di udire un clic .
salvata in corrispondenza di uno dei pulsanti delle
- Posizionare la lampada sul supporto e direzionare
combinazioni luminose premuti. In questo modo
LivingColors verso la parete (la distanza
è anche possibile impostare una determinata
ottimale è 50 cm). È possibile regolare l'altezza
velocità della modalità cambiacolore automatica.
della lampada ruotando l'anello al centro del
supporto, tirando la parte superiore del supporto
È possibile continuare a regolare le luci a proprio
no all'altezza desiderata e successivamente
piacimento. Quando si desidera tornare alla
riportando l'anello nella posizione originaria.
combinazione luminosa salvata, basta premere
- Aprire il vano batterie del telecomando facendo
il pulsante della combinazione luminosa premuto
scorrere il pulsante sul retro. Inserire 3 batterie
al momento del salvataggio. Tale pulsante si
AAA (+ e – come indicato).
accenderà brevemente per mostrare che è
stata selezionata la relativa combinazione e
2. Creare l'atmosfera
LivingColors seguirà lo schema salvato.
È possibile salvare no a 3 combinazioni
- Toccando il colore prescelto sulla ghiera dei
luminose (una per ciascun pulsante).
colori. È possibile muovere il dito sull'anello
Spegnere LivingColors premendo brevemente il
colorato per ottenere la tonalità desiderata.
pulsante "0" (off). LivingColors ricorderà l'ultima
impostazione al momento dell'utilizzo successivo.
- Modicando la saturazione del colore
Per riaccenderla, premere il pulsante "I" (on).
(aggiungendo più bianco al colore attuale).
Premere il pulsante di aumento della saturazione
3. Collega LivingColors ad altri prodotti
per un colore intenso o quello di diminuzione della
Philips LivingAmbiance
saturazione per un colore pastello. Se si continua
a premere il pulsante di aumento della saturazione ,
È possibile collegare prodotti diversi della linea Philips
alla ne si otterrà il colore bianco.
LivingAmbiance al telecomando LivingColors. In
51

questo modo sarà possibile regolare tutti i prodotti
LivingColors o LivingWhites dotato di logo
collegati contemporaneamente o individualmente con
SmartLink può essere collegato al telecomando
un unico telecomando.
in uso. Collegando un altro telecomando è
possibile controllare le stesse lampade con due
1. È possibile collegare altre lampade Philips
telecomandi diversi. Sarà quindi possibile creare 6
LivingColors al telecomando. La maggior parte
combinazioni di luce diverse: 3 su un telecomando
dei prodotti Philips LivingColors è compatibile
e 3 sull'altro per ciascuna lampada. Per aggiungere
con questo telecomando. Per eseguire una
un ulteriore telecomando LivingColors o
verica, controllare che sul prodotto LivingColors
LivingWhites, procedere come segue:
che si desidera collegare sia presente il logo
SmartLink. Tutti i prodotti con il logo SmartLink
a. Ripristinare il telecomando che si desidera
possono essere collegati al telecomando.
aggiungere: aprire il vano batterie e premere il
pulsante RESET per alcuni secondi (ad esempio,
Per aggiungere una lampada Philips LivingColors
con una graffetta). Assicurarsi che le batterie siano
al telecomando, avvicinare quest'ultimo alla
presenti nel vano. Il telecomando emetterà un
lampada stessa quindi tenere premuto il pulsante
segnale acustico ad indicare che è stato effettuato
"I". La lampada lampeggerà 3 volte. Tenere
il ripristino.
premuto il pulsante "I" no a che il telecomando
b. Tenere il telecomando ripristinato in prossimità
non emette un segnale acustico; la lampada
del telecomando in uso. Premere il pulsante "I" su
lampeggerà brevemente con una luce di colore
entrambi i telecomandi no a che non emettono
verde. Quest'ultima risulta quindi collegata al
un segnale acustico. I telecomandi risultano ora
telecomando e tornerà all'ultima impostazione
collegati, le lampade sono abbinate al nuovo
attiva al momento dell'accensione.
telecomando ed è possibile controllarle tutte con
Nel caso delle lampade LivingColors, assicurarsi
entrambi i telecomandi.
di collegare anche la luce bianca: per eseguire
c. Se il telecomando che viene collegato è rotondo,
questa operazione, procedere nello stesso modo
è possibile eseguire su di esso la copia immediata
descritto per i prodotti LivingWhites al punto 2.
delle funzioni: è possibile infatti collegarlo subito
Se si desidera scollegare una lampada
alle stesse lampade collegate al telecomando
LivingColors dal telecomando, avvicinare
originale. Per eseguire la copia del telecomando,
quest'ultimo alla lampada stessa, quindi tenere
ripetere la procedura descritta al punto b.
premuto il pulsante "0". La lampada lampeggerà 3
volte. Tenere premuto il pulsante "0" no a che il
Una volta collegate una o più lampade al telecomando
telecomando non emette un segnale acustico. La
Philips LivingColors, possono essere controllate tutte
lampada si spegnerà lentamente.
contemporaneamente o singolarmente.
Per controllare un'unica lampada, è necessario
2. È possibile collegare al telecomando anche
selezionarla (per la linea LivingColors colored
prodotti Philips LivingWhites (prese,
and white light, la luce colorata e quella bianca
lampadine a risparmio energetico e sistemi
devono essere controllate separatamente). Per fare
di illuminazione). Per aggiungere un prodotto
questo, utilizzare uno dei pulsanti di scelta della luce.
Philips LivingWhites, avvicinarlo al telecomando
Quando viene tenuto premuto uno di questi pulsanti,
quindi tenere premuto il pulsante "I". La lampada
la lampada selezionata inizierà a lampeggiare. Se
lampeggerà 3 volte. Tenere premuto il pulsante "I"
la lampada che lampeggia non è quella desiderata,
no a che il telecomando non emette un segnale
rilasciare il pulsante e premerlo nuovamente: inizierà
acustico; la lampada lampeggerà rapidamente
a lampeggiare un'altra lampada. Quando viene
due volte. Quest'ultima risulta quindi collegata al
selezionata una lampada, la spia di selezione della luce
telecomando e tornerà all'ultima impostazione
sul telecomando (lampadina) si accende. Questo indica
attiva al momento dell'accensione.
che è possibile regolare solo la lampada selezionata.
Quando non viene selezionata alcuna luce (la spia
Se si desidera scollegare un prodotto
di selezione della luce è spenta), tutte le impostazioni
LivingColors dal telecomando, avvicinare
si applicano a tutte le luci collegate al telecomando
quest'ultimo al prodotto stesso, quindi tenere
(ad esempio, è possibile attenuare tutte le luci della
premuto il pulsante "0". La lampada lampeggerà 3
stanza).
volte. Tenere premuto il pulsante "0" no a che il
Se si desidera utilizzare una combinazione luminosa
telecomando non emette un segnale acustico. La
specica su sistemi di illuminazione diversi, è possibile
lampada si spegnerà lentamente.
salvarla come descritto nella sezione 2 di questo
manuale.
3. È inoltre possibile collegare il telecomando
a un altro telecomando della linea Philips
LivingAmbiance. Un qualsiasi telecomando
52

4. Domande frequenti
o La mia domanda non rientra in quelle
elencate
Cosa fare se…
o Contattare Philips per assistenza (consultare
o La lampada LivingColors non emette luce
la sezione 5 "Assistenza aggiuntiva").
o Vericare che il cavo sia collegato alla
lampada. Vericare che la spina sia collegata
5. Assistenza aggiuntiva
correttamente alla presa a muro.
o Rimuovere il cavo di alimentazione e
Per informazioni e in caso di problemi, visitare il sito
ricollegarlo. Se LivingColors cambia colore più
Web Philips all'indirizzo www.philips.com o chiamare
volte e poi si spegne, utilizzare il telecomando
il centro Philips Lighting Contact al numero gratuito:
per riaccenderla.
00800-PHILIPSL o 00800-74454775
o LivingColors non risponde al telecomando
Garanzia
o Controllare le batterie del telecomando. Le
La garanzia di due anni sui prodotti Philips è valida a
batterie devono essere cariche e inserite
condizione che il prodotto venga utilizzato secondo le
secondo la polarità corretta (+ e -). Se il
istruzioni e per lo scopo previsto. Eventuali richieste
telecomando continua a non funzionare,
di rimborso verranno prese in considerazione solo
provare a sostituire le batterie.
dietro presentazione della prova di acquisto originale
o Collegare il telecomando a LivingColors
(fattura, scontrino o ricevuta) sulla quale deve essere
seguendo la procedura descritta nella sezione
riportata la data di acquisto, il nome del rivenditore e
3.1 del manuale.
una descrizione del prodotto.
o I pulsanti lampeggiano dopo l'utilizzo del
La garanzia Philips non è valida se:
telecomando
- La ricevuta di acquisto o la descrizione del
o Questo signica che le batterie nel
prodotto è stata modicata, alterata, cancellata o
telecomando sono quasi scariche e devono
resa illeggibile.
essere sostituite.
- I guasti sono causati da danni, collegamenti errati
o uso improprio.
o Non è possibile avviare la modalità
- Il difetto è causato da circostanze non imputabili
cambiacolore automatica
al prodotto LivingColors, ad esempio fulmini,
o Il telecomando potrebbe non aver
allagamenti, incendi, uso errato o negligenza.
interpretato correttamente il movimento di
- LivingColors è stata aperta o smontata.
selezione effettuato con le dita. Riprovare
assicurandosi di posizionare il dito sulla ghiera
Pulizia e manutenzione
dei colori e di effettuare un movimento
Disinserite la spina dalla presa a muro.
circolare completo
Per evitare graf, si consiglia di pulire LivingColors,
il telecomando e l'adattatore solo con un panno
o È possibile collegare LivingColors a un
morbido e asciutto.
timer?
Non utilizzate detergenti.
o Sì. Philips LivingColors può essere utilizzata
con un timer (non incluso). Quando viene
Istruzioni di sicurezza
accesa con un timer, LivingColors mostra
- Tenere la spina e i sistemi LivingColors lontani da
l'ultima impostazione selezionata (modalità
liquidi e umidità.
colore statico o cambiacolore automatica).
- LivingColors è progettata esclusivamente per
Assicurarsi che l'ultima impostazione non sia
l'uso in interni: non utilizzatela in ambienti umidi,
quella di spegnimento.
ad esempio in bagno o all'aperto.
- LivingColors non è un giocattolo destinato ai
bambini.
o Non è possibile collegare altre lampade al
- Non collocatela su superci calde.
telecomando LivingColors
- Per motivi di sicurezza e nel rispetto dei termini
o Assicurarsi che il prodotto che si sta
di garanzia, è vietato aprire LivingColors e la
collegando sia dotato del logo SmartLink.
spina.
Solo i prodotti dotati di questo logo possono
- Utilizzare solo l'adattatore in dotazione per
essere collegati al telecomando.
evitare possibili danni a LivingColors.
o Rieseguire la procedura descritta nella sezione
3 di questo manuale. Accertarsi di udire i
Ambiente
segnali acustici e attendere che le lampade
Se è necessario procedere allo smaltimento
lampeggino come descritto nella sezione
dell'apparecchio al termine della sua vita utile,
stessa.
effettuare tale operazione nel rispetto delle
53
normative locali. Quando si esegue lo smaltimento
Telecomando:
del telecomando, rimuovere le batterie. Non gettare
Batterie: 3 batterie alcaline AAA LR03 Philips
le batterie insieme ai normali riuti domestici, ma
Powerlife da 1,5 V.
consegnarle presso un punto di raccolta ufciale
o presso un rivenditore Philips; questi ultimi
Speciche wireless
provvederanno a smaltire le batterie nel rispetto
Banda di frequenza wireless RF: 2405~2475 MHz
dell'ambiente.
Protocollo di comunicazione wireless: IEEE 802.15.4)
Canali operativi: canali 11, 15, 20 o 25
Caratteristiche spina
Adattatore CA
Speciche ambientali
Modello: EADP-10EB C (modello per l'Unione
Temperatura (funzionamento): 0...40°C
Europea)
Temperatura (spenta): 25...60°C
EADP-10EB D (modello per il Regno Unito
Umidità relativa: 5...95 % senza condensa
e Singapore)
EADP-10EB E (modello per l'Australia)
Ingresso: 220-240 V ~ 0,3 A 50 Hz
Uscita: 18,5V 0,83 A
Consumo energetico della lampada: 15,4 W max.
EL LivingColors Οδηγίες χρήσης
Σας ευχαριστούμε που αγοράσατε το φωτιστικό
κατευθύνετε το LivingColors προς τον τοίχο
δαπέδου LivingColors από τη Philips!
(η βέλτιστη απόσταση είναι 50 εκ.). Μπορείτε
να ρυθμίσετε το ύψος του φωτιστικού
Το LivingColors είναι ειδικά σχεδιασμένο για
περιστρέφοντας το δακτύλιο στη μέση της
να δημιουργείτε τη δική σας ατμόσφαιρα στο
βάσης, τραβώντας το επάνω μέρος της βάσης
σπίτι, αξιοποιώντας το χρώμα και το φως. Όταν
στο επιθυμητό ύψος και περιστρέφοντας ξανά
χρησιμοποιήσετε το LivingColors για πρώτη φορά,
το δακτύλιο για να το ασφαλίσετε στη θέση
διαβάστε προσεκτικά τις οδηγίες και φυλάξτε τις
του.
για μελλοντική αναφορά. Ακολουθώντας τις οδηγίες
- Για να ανοίξετε τη θήκη μπαταριών του
μας, θα απολαύσετε την πλήρη λειτουργικότητα του
τηλεχειριστηρίου, σύρετε το κουμπί που
Philips LivingColors.
βρίσκεται στην πίσω επιφάνεια. Τοποθετήστε
3 μπαταρίες AAA (όπως υποδεικνύεται από τα
Δηλώστε το προϊόν σας στη διεύθυνση www.philips.
σύμβολα + και –).
com/welcome για να ενημερώνεστε σχετικά με τα
νέα προϊόντα LivingAmbiance από τη Philips
2. Δημιουργήστε τη δική σας ατμόσφαιρα
ως εξής:
Το εγχειρίδιο αυτό περιλαμβάνει τις εξής ενότητες:
1. Ξεκινώντας
- Αγγίζοντας το επιθυμητό χρώμα στο δακτύλιο
2. Δημιουργήστε τη δική σας ατμόσφαιρα με το
χρωμάτων. Μπορείτε να μετακινήσετε το
LivingColors
δάκτυλό σας πάνω στο δακτύλιο χρωμάτων για
3. Συνδέστε το LivingColors με άλλα προϊόντα
να προσαρμόσετε το χρώμα στην απόχρωση
LivingAmbiance της Philips
που θέλετε .
4. Απαντήστε σε συχνές ερωτήσεις
5. Λάβετε επιπλέον υποστήριξη
- Αλλάζοντας τον κορεσμό χρωμάτων
(προσθήκη περισσότερου λευκού στο τρέχον
1. Ξεκινώντας:
χρώμα). Πατήστε το κουμπί αύξησης κορεσμού
για βαθύ χρώμα ή το κουμπί μείωσης κορεσμού
- Τοποθετήστε τον πόλο στη βάση και στη
για πιο παστέλ απόχρωση. Εάν πατήσετε
συνέχεια περιστρέψτε τον δεξιόστροφα μέχρι
παρατεταμένα το κουμπί μείωσης κορεσμού, στο
το τέρμα.
τέλος θα φτάσετε στο λευκό φως.
- Εισαγάγετε το βύσμα σύνδεσης στο άνοιγμα
κάτω από τη βάση του φωτιστικού και
- Αύξηση/μείωση έντασης φωτός. Αυξήστε ή
συνδέστε το άλλο άκρο στην πρίζα.
μειώστε την ένταση του χρωματιστού φωτός
- Εισαγάγετε το βύσμα σύνδεσης πάνω από τη
μέσω των κουμπιών αύξησης/μείωσης έντασης
βάση στο λαμπτήρα. Βεβαιωθείτε ότι ακούσατε
φωτός.
ένα κλικ.
- Τοποθετήστε το λαμπτήρα στη βάση και
- Αυτόματη αλλαγή χρωμάτων. Μετακινήστε
54

το δάκτυλό σας πάνω στο χρωματιστό
να ρυθμίζετε όλα τα συνδεδεμένα προϊόντα μαζί
δακτύλιο (μία πλήρη περιστροφή) και
ή καθένα από αυτά ξεχωριστά – όλα με το ίδιο
πατήστε στιγμιαία το “I” (“Ενεργοποίηση”).
τηλεχειριστήριο.
Το LivingColors θα μεταβεί σε λειτουργία
αυτόματης αλλαγής χρώματος: Η λάμπα θα
1. Μπορείτε να συνδέσετε άλλους λαμπτήρες
αρχίζει να αλλάζει χρώματα αυτόματα.
Philips LivingColors στο τηλεχειριστήριό σας.
Οι περισσότερες συσκευές Philips LivingColors
Μπορείτε να ρυθμίσετε την ταχύτητα αλλαγής
λειτουργούν με αυτό το τηλεχειριστήριο: Απλά
των χρωμάτων. Η ταχύτητα μπορεί να
ελέγξτε εάν υπάρχει το λογότυπο SmartLink
ρυθμιστεί δεξιόστροφα, από γρήγορη (σκούρο
στη συσκευή LivingColors που θέλετε να
μπλε χρώμα στο δακτύλιο χρωμάτων) σε αργή
συνδέσετε. Όλα τα προϊόντα με το λογότυπο
(μοβ). Μπορείτε να πατήσετε σε οποιοδήποτε
SmartLink μπορούν να συνδεθούν στο
σημείο του δακτυλίου χρωμάτων. Ενώ
τηλεχειριστήριό σας.
βρίσκεται στη λειτουργία αυτόματης αλλαγής
χρώματος, μπορείτε να ρυθμίσετε, επίσης, τον
Για να προσθέσετε ένα φωτιστικό Philips
κορεσμό και τη φωτεινότητα των χρωμάτων.
LivingColors στο τηλεχειριστήριο, πλησιάστε
Για να επιστρέψετε στη λειτουργία στατικού
το τηλεχειριστήριο στο φωτιστικό. Κατόπιν,
χρώματος, μετακινήστε ξανά το δάκτυλό σας
πατήστε παρατεταμένα το κουμπί "I". Ο
γύρω από το δακτύλιο χρωμάτων (μία πλήρη
λαμπτήρας θα αναβοσβήσει 3 φορές. Κρατήστε
περιστροφή) και πατήστε "0". Εναλλακτικά,
πατημένο το κουμπί “I” μέχρι να ακούσετε ένα
μπορείτε να απενεργοποιήσετε το LivingColors
μπιπ από το τηλεχειριστήριο. Ο λαμπτήρας θα
“0” και να το ενεργοποιήσετε “I” ξανά.
αναβοσβήσει για σύντομο χρονικό διάστημα με
- Εάν σας αρέσει μια συγκεκριμένη ρύθμιση
πράσινο χρώμα. Τώρα είναι συνδεδεμένος στο
φωτός (για παράδειγμα, ελαφρώς μειωμένης
τηλεχειριστήριο και θα μεταβεί στην τελευταία
έντασης κόκκινο), μπορείτε να αποθηκεύσετε
ρύθμιση “ενεργοποίησης”.
αυτή τη σκηνή για εύκολη ανάκτησή της:
Για το φωτιστικό LivingAmbiance, βεβαιωθείτε
Πατήστε παρατεταμένα ένα από τα κουμπιά
ότι έχετε συνδέσει και το λευκό φως. Μπορείτε
Σκηνής, μέχρι να ακουστεί ένα μπιπ από το
να το κάνετε με τον ίδιο τρόπο όπως και με τα
τηλεχειριστήριο. Η σκηνή σας έχει αποθηκευτεί
προϊόντα LivingWhites που περιγράφονται στο
στο κουμπί Σκηνής που πατήσατε. Με τον
σημείο 2.
τρόπο αυτό μπορείτε, επίσης, να αποθηκεύσετε
Εάν θέλετε να αποσυνδέσετε ένα φωτιστικό
μια συγκεκριμένη ταχύτητα λειτουργίας
LivingColors από το τηλεχειριστήριο, πλησιάστε
αυτόματης αλλαγής χρώματος.
το τηλεχειριστήριο στο φωτιστικό και πατήστε
παρατεταμένα το κουμπί "0" μέχρι να ακούσετε
Μπορείτε να συνεχίζετε να ρυθμίζετε τα φώτα
ένα μπιπ. Ο λαμπτήρας θα αναβοσβήσει 3
όπως επιθυμείτε. Όποτε θέλετε να επιστρέψετε
φορές. Κρατήστε το κουμπί "0" πατημένο
στην αποθηκευμένη σας σκηνή, απλά πατήστε
μέχρι να ακούσετε ένα χαρακτηριστικό ήχο
το Κουμπί σκηνής που πατήσατε κατά την
"μπιπ" από το τηλεχειριστήριο. Η ένταση του
αποθήκευσή της. Αυτό το Κουμπί σκηνής θα
λαμπτήρα τώρα θα μειώνεται αργά μέχρι να
ανάψει για σύντομο χρονικό διάστημα ώστε
σβήσει.
να υποδείξει ότι έχει επιλεγεί η σκηνή και το
LivingColors θα μεταβεί στις αποθηκευμένες
2. Μπορείτε επίσης να συνδέσετε προϊόντα
σας ρυθμίσεις.
Philips LivingWhites (σποτ, λάμπες
Μπορείτε να αποθηκεύσετε έως και 3 σκηνές
εξοικονόμησης ενέργειας και φωτιστικά
(μία για κάθε κουμπί Σκηνής).
σώματα) στο τηλεχειριστήριό σας. Για να
Απενεργοποιήστε το LivingColors πατώντας
προσθέσετε ένα προϊόν Philips LivingWhites,
το κουμπί “0” (απενεργοποίηση) για σύντομο
πλησιάστε το τηλεχειριστήριο σε αυτό και
χρονικό διάστημα. Το LivingColors θα θυμάται
πατήστε παρατεταμένα το κουμπί “I”. Ο
την τελευταία σας ρύθμιση την επόμενη
λαμπτήρας θα αναβοσβήσει 3 φορές. Κρατήστε
φορά που θα το χρησιμοποιήσετε. Για να
το κουμπί "I" πατημένο μέχρι να ακούσετε
το ενεργοποιήσετε ξανά, πατήστε το “I”
ένα χαρακτηριστικό ήχο "μπιπ" από το
(ενεργοποίηση).
τηλεχειριστήριο. Ο λαμπτήρας θα αναβοσβήνει
γρήγορα δύο φορές. Τώρα είναι συνδεδεμένος
3. Συνδέστε το LivingColors με άλλα
στο τηλεχειριστήριο και θα μεταβεί στην
προϊόντα LivingAmbiance της Philips
τελευταία ρύθμιση “ενεργοποίησης”.
Μπορείτε να συνδέετε διαφορετικά προϊόντα από
Εάν θέλετε να αποσυνδέσετε ένα προϊόν
τη σειρά Philips LivingAmbiance στο τηλεχειριστήριο
LivingWhites από το τηλεχειριστήριο,
του LivingColors. Με τον τρόπο αυτό, θα μπορείτε
πλησιάστε το τηλεχειριστήριο στο προϊόν
55

και πατήστε παρατεταμένα το κουμπί "0". Ο
παρατεταμένα ένα από τα κουμπιά επιλογής
λαμπτήρας θα αναβοσβήσει 3 φορές. Κρατήστε
φωτισμού, ο επιλεγμένος λαμπτήρας θα ξεκινήσει
το κουμπί "0" πατημένο μέχρι να ακούσετε
να αναβοσβήνει. Εάν αυτός δεν είναι ο λαμπτήρας
ένα χαρακτηριστικό ήχο "μπιπ" από το
που θέλετε να ρυθμίσετε, αφήστε το κουμπί και
τηλεχειριστήριο. Η ένταση του λαμπτήρα τώρα
πατήστε το ξανά – ένας άλλος λαμπτήρας θα
θα μειώνεται αργά μέχρι να σβήσει.
ξεκινήσει να αναβοσβήνει. Όταν ένας λαμπτήρας
είναι επιλεγμένος, η ένδειξη επιλογής φωτός
3. Μπορείτε επίσης να συνδέσετε το
στο τηλεχειριστήριο (λυχνία) θα ανάψει. Αυτό
τηλεχειριστήριο σε κάποιο άλλο
σημαίνει ότι μπορείτε να ρυθμίσετε ξεχωριστά το
τηλεχειριστήριο από τη σειρά Philips
επιλεγμένο φως.
LivingAmbiance. Κάθε τηλεχειριστήριο του
Όταν δεν έχει επιλεγεί κανένα φως (η ένδειξη
LivingColors ή του LivingWhites με το λογότυπο
επιλογής φωτός είναι απενεργοποιημένη), όλες οι
SmartLink σε αυτό μπορεί να συνδεθεί στο
ρυθμίσεις σας θα εφαρμοστούν σε όλα τα φώτα
τηλεχειριστήριό σας. Εάν συνδέσετε και κάποιο
που είναι συνδεδεμένα με το τηλεχειριστήριο
άλλο τηλεχειριστήριο, θα μπορείτε να ελέγχετε
(για παράδειγμα, μπορείτε να αυξήσετε/μειώσετε
τους ίδιους λαμπτήρες με δύο διαφορετικά
ταυτόχρονα την ένταση όλων των λαμπτήρων στο
τηλεχειριστήρια. Θα μπορούσατε, για
δωμάτιο).
παράδειγμα, να δημιουργήσετε 6 διαφορετικές
Εάν σας αρέσει ένας συγκεκριμένος συνδυασμός
σκηνές φωτισμού – 3 στο ένα τηλεχειριστήριο
ρυθμίσεων φωτός διαφορετικών φωτιστικών
και 3 στο άλλο, με τους ίδιους λαμπτήρες. Για
σωμάτων, μπορείτε επίσης να τον αποθηκεύσετε
να προσθέσετε ένα επιπλέον τηλεχειριστήριο
ως σκηνή – με τον ίδιο τρόπο που περιγράφεται
LivingColors ή LivingWhites, ακολουθήστε την
στην ενότητα 2 αυτού του εγχειριδίου.
εξής διαδικασία:
4. Συχνές ερωτήσεις
a. Πραγματοποιήστε επαναφορά του
τηλεχειριστηρίου που θέλετε να προσθέσετε:
Τι πρέπει να κάνω εάν…
Ανοίξτε τη θήκη μπαταριών και πιέστε το
o Η συσκευή LivingColors δεν παράγει φως
RESET κουμπί για λίγα δευτερόλεπτα (π.χ. με
o Ελέγξτε τις συνδέσεις του καλωδίου στο
ένα συνδετήρα). Βεβαιωθείτε ότι οι μπαταρίες
φωτιστικό. Ελέγξτε εάν το βύσμα έχει
βρίσκονται στο εσωτερικό. Το τηλεχειριστήριο
τοποθετηθεί σωστά στην πρίζα.
θα εκπέμψει έναν ήχο ώστε να επισημάνει την
o Βγάλτε το καλώδιο ρεύματος και
ολοκλήρωση της επαναφοράς.
τοποθετήστε το ξανά στην πρίζα. Αν η
b. Κρατήστε το τηλεχειριστήριο από το οποίο
συσκευή LivingColors αλλάξει αρκετά
πραγματοποιήθηκε επαναφορά κοντά στο
χρώματα και στη συνέχεια σβήσει,
υπάρχον τηλεχειριστήριο. Πατήστε το
χρησιμοποιήστε το τηλεχειριστήριο για να
κουμπί "I" και στα δύο τηλεχειριστήρια μέχρι
την ενεργοποιήσετε ξανά.
να ακούσετε έναν ήχο. Τα τηλεχειριστήρια
συνδέθηκαν, πράγμα που σημαίνει ότι μπορείτε
o Η συσκευή LivingColors δεν
να συνδέσετε τους ίδιους λαμπτήρες στο νέο
ανταποκρίνεται στο τηλεχειριστήριο
τηλεχειριστήριο και να ελέγχετε όλους τους
o Ελέγξτε τις μπαταρίες στο τηλεχειριστήριο.
λαμπτήρες και με τα δύο τηλεχειριστήρια.
Οι μπαταρίες πρέπει να είναι σωστά
c. Αν το τηλεχειριστήριο που προσθέτετε είναι
τοποθετημένες (+ και -) και πρέπει να
στρογγυλό, μπορείτε επίσης να το αντιγράψετε:
είναι φορτισμένες. Εάν το τηλεχειριστήριο
μπορείτε να το συνδέσετε αμέσως στους
συνεχίζει να μην λειτουργεί, δοκιμάστε να
ίδιους λαμπτήρες όπου είναι συνδεδεμένο το
αντικαταστήσετε τις μπαταρίες.
τηλεχειριστήριό σας. Για να αντιγράψετε το
o Συνδέστε το τηλεχειριστήριο στη συσκευή
τηλεχειριστήριο, επαναλάβετε τη διαδικασία
LivingColors ακολουθώντας τη διαδικασία
που περιγράφεται στο σημείο β.
που περιγράφεται στην ενότητα 3.1 του
εγχειριδίου.
Μόλις συνδέσετε έναν ή περισσότερους λαμπτήρες
στο τηλεχειριστήριο Philips LivingColors, μπορείτε
o Τα κουμπιά αναβοσβήνουν αφού
να ελέγχετε αυτούς τους λαμπτήρες μαζί ή τον
χρησιμοποιήσω το τηλεχειριστήριο
καθένα ξεχωριστά.
o Αυτό σημαίνει ότι οι μπαταρίες στο
Για να ελέγχετε ένα μεμονωμένο λαμπτήρα,
τηλεχειριστήριο είναι (σχεδόν) άδειες και
πρέπει να τον επιλέξετε (να θυμάστε ότι για το
πρέπει να αντικατασταθούν.
LivingColors χρωματιστού και λευκού φωτός, το
χρωματιστό και το λευκό φως πρέπει να επιλεγούν
o Δεν είναι δυνατή η έναρξη της λειτουργίας
ξεχωριστά). Αυτό μπορείτε να το κάνετε με ένα
αυτόματης αλλαγής χρώματος
από τα κουμπιά επιλογής φωτισμού. Όταν πατάτε
o Θα μπορούσε να οφείλεται στο γεγονός
56
ότι το τηλεχειριστήριο δεν μπόρεσε να
Η εγγύηση της Philips τερματίζεται εάν:
ερμηνεύσει την κίνησή σας. Δοκιμάστε ξανά,
- στην απόδειξη αγοράς ή την περιγραφή
αφού σιγουρευτείτε ότι το δάχτυλό σας
του προϊόντος παρατηρηθεί οποιαδήποτε
βρίσκεται επάνω στο δακτύλιο χρωμάτων
μεταβολή, διαγραφή ή απαλοιφή στοιχείων ή
κατά τη διάρκεια της κίνησης πλήρους
εάν τα στοιχεία έχουν καταστεί δυσανάγνωστα.
περιστροφής
- το προϊόν καθίσταται ανεπαρκές λόγω ζημίας,
ελαττωματικών συνδέσεων ή κακής χρήσης.
o Θέλω να συνδέσω τη συσκευή
- έχει προκληθεί δυσλειτουργία που οφείλεται
LivingColors σε ένα χρονοδιακόπτη.
σε ακραίες συνθήκες που δεν είναι εγγενείς με
Γίνεται;
τη λειτουργία του LivingColors, για παράδειγμα,
o Ναι. Μπορείτε να χρησιμοποιήσετε το
κεραυνός, πλημμύρα, πυρκαγιά, λανθασμένη
φωτιστικό Philips LivingColors με ένα
χρήση ή αμέλεια.
χρονοδιακόπτη (δεν περιλαμβάνεται). Κατά
- το LivingColors ανοιχτεί ή αποσυναρμολογηθεί.
την ενεργοποίηση με χρονοδιακόπτη, η
συσκευή LivingColors θα εμφανίσει την
Καθαρισμός και συντήρηση:
τελευταία σας ρύθμιση (λειτουργία στατικού
Αποσυνδέστε το βύσμα από την πρίζα.
χρώματος ή λειτουργία αυτόματης αλλαγής
Για να αποφύγετε τις γρατσουνιές, καθαρίζετε
χρώματος). Βεβαιωθείτε ότι η τελευταία σας
το LivingColors, το τηλεχειριστήριο και το
ρύθμιση δεν ήταν "απενεργοποιημένο".
τροφοδοτικό μόνο με μαλακό, στεγνό πανί.
Μην χρησιμοποιείτε καθαριστικά.
o Δεν μπορώ να συνδέσω πρόσθετους
λαμπτήρες στο τηλεχειριστήριο
Οδηγίες ασφαλείας:
LivingColors
- Διατηρείτε το βύσμα και το LivingColors μακριά
o Βεβαιωθείτε ότι το προϊόν που προσπαθείτε
από υγρά και υγρασία.
να συνδέσετε διαθέτει το λογότυπο
- Το LivingColors συνιστάται μόνο για χρήση σε
SmartLink. Μόνο τα προϊόντα με το
εσωτερικούς χώρους. Μην το χρησιμοποιείτε
λογότυπο SmartLink μπορούν να συνδεθούν
σε μέρη με υγρασία, π.χ. στο μπάνιο ή σε
στο συγκεκριμένο τηλεχειριστήριο.
εξωτερικούς χώρους.
o Δοκιμάστε να επαναλάβετε τη διαδικασία
- To LivingColors δεν σχεδιάστηκε για να
που περιγράφεται στην ενότητα 3 αυτού
χρησιμοποιείται ως παιχνίδι από παιδιά.
του εγχειριδίου. Βεβαιωθείτε ότι όντως
- Μην τοποθετείτε τη συσκευή πάνω σε θερμές
ακούτε τους ήχους και ότι βλέπετε τα φώτα
επιφάνειες.
που αναβοσβήνουν όπως περιγράφεται στο
- Για λόγους ασφαλείας και σύμφωνα με τους
παρόν.
όρους της εγγύησης, το LivingColors και το
βύσμα δεν πρέπει να ανοίγονται.
o Η ερώτησή μου δεν αναγράφεται εδώ
- Χρησιμοποιείτε μόνο τον παρεχόμενο
o Επικοινωνήστε με την Philips και ζητήστε
προσαρμογέα. Αν χρησιμοποιήσετε
βοήθεια (βλ. ενότητα 5 "Επιπλέον
διαφορετικό, ενδέχεται να προκληθεί βλάβη στο
υποστήριξη").
LivingColors.
5. Επιπλέον υποστήριξη
Περιβάλλον:
Εάν κάποια στιγμή χρειαστεί να απορρίψετε τη
Για περισσότερες πληροφορίες και σε περίπτωση
συσκευή, ακολουθήστε τις οδηγίες των τοπικών
που αντιμετωπίσετε κάποιο πρόβλημα,
αρχών. Πριν απορρίψετε το τηλεχειριστήριο,
επισκεφθείτε την τοποθεσία web της Philips στη
αφαιρέστε τις μπαταρίες. Μην απορρίπτετε τις
διεύθυνση www.philips.com ή επικοινωνήστε χωρίς
μπαταρίες μαζί με τα οικιακά απορρίμματα. Πρέπει
χρέωση με το Κέντρο επικοινωνίας Philips Lighting
να παραδοθούν σε επίσημο σημείο συλλογής ή σε
στον αριθμό: 00800-PHILIPSL ή 00800-74454775
αντιπρόσωπο της Philips, ώστε να απορριφθούν
κατά τρόπο φιλικό προς το περιβάλλον.
Εγγύηση:
Προδιαγραφές βύσματος:
Η εγγύηση δύο ετών της Philips ισχύει εφόσον το
Μετασχηματιστής AC
προϊόν χρησιμοποιείται σύμφωνα με τις οδηγίες και
Μοντέλο: EADP-10EB C (για ΕΕ)
για το σκοπό για τον οποίο προορίζεται. Η έγερση
EADP-10EB D (για Ηνωμένο Βασίλειο +
αξιώσεων γίνεται αποδεκτή μόνο με την υποβολή
Σιγκαπούρη)
αυθεντικής απόδειξης αγοράς (τιμολογίου, δελτίου
EADP-10EB E (για Αυστραλία)
πώλησης ή απόδειξης), όπου θα αναγράφεται η
Είσοδος: 220 - 240V ~ 0,3A 50 Hz
ημερομηνία αγοράς, το όνομα του αντιπροσώπου
Έξοδος: 18,5V 0,83 A
και η περιγραφή του προϊόντος.
57

Κατανάλωση ενέργειας λάμπας: έως 15,4 W
IEEE 802.15.4)
Τηλεχειριστήριο:
Κανάλια λειτουργίας: κανάλια 11, 15, 20 ή 25
Μπαταρίες: 3 x αλκαλικές μπαταρίες AAA Philips
Powerlife LR03, 1,5 V.
Περιβαλλοντικές προδιαγραφές:
Θερμοκρασία (λειτουργία): 0...40 °C
Προδιαγραφές ασύρματου δικτύου:
Θερμοκρασία (αποθήκευση): -25...60 °C
Ζώνη συχνοτήτων ασύρματης λειτουργίας RF:
Σχετική υγρασία: 5...95 % χωρίς υγροποίηση
2405~2475 MHz
Πρωτόκολλο ασύρματης επικοινωνίας:
TR LivingColors Kullanma Talimatları
Philips LivingColors zemin lambasını satın aldığınız için
Renk doygunluğunun değiştirilmesi (geçerli
teşekkür ederiz!
renge daha fazla beyaz eklemek). Daha koyu bir
renk için doygunluk artırma düğmesine veya daha
LivingColors, renkler ve ışığın yardımıyla evde kendi
pastel bir renk için doygunluk azaltma düğmesine
ambiyansınızı yaratabilmeniz için tasarlanmıştır.
basın. Doygunluk azaltma düğmesine sürekli
LivingColors'ı ilk kez kullanırken, lütfen bu talimatları
basarsanız, en sonunda beyaz renge ulaşırsınız.
dikkatle okuyun ve ileride kullanmak üzere saklayın.
Talimatlarımızı takip ederek, Philips LivingColors'ın
Işık ayarı. Işık ayarı düğmelerini kullanarak renkli
bütün fonksiyonlarının tadını çıkaracaksınız.
ışık yoğunluğunu artırabilir veya azaltabilirsiniz.
Philips LivingAmbiance ürünleriyle ilgili güncel bilgileri
Renkleri otomatik olarak değiştirerek.
almak için ürününüzü www.philips.com/welcome
Parmağınızı renk düğmesi çevresinde hareket
adresinde kaydedin:
ettirin (tam bir tur) ve “I” (“Açık”) düğmesine
kısaca basın; LivingColors otomatik renk
Bu kılavuzda ele alınan konular…
değiştirme moduna geçer: lamba renkleri
1. Başlarken
otomatik olarak değiştirmeye başlar.
2. LivingColors ile kendi ortamınızı yaratın
3. LivingColors'ı diğer Philips LivingAmbiance
Renk değiştirme hızını ayarlayabilirsiniz. Saat
ürünlerine bağlayın
yönünde yüksek (renk düğmesindeki lacivert)
4. Sıkça sorulan sorular
ve düşük (mor) arasında hızı ayarlayabilirsiniz.
5. Ek destek alma
Renk düğmesinin herhangi bir noktasına basın.
Otomatik renk değiştirme modundayken,
1. Başlangıç:
renklerin doygunluğunu ve parlaklığını da
ayarlayabilirsiniz.
- Direği ayağa takın ve daha fazla çeviremediğiniz
Sabit renk moduna geri dönmek için, parmağınızı
noktaya kadar saat yönünde çevirin.
tekrar renk düğmesi çevresinde hareket ettirin
- Bağlantı şini lamba ayağının altındaki boşluğa
ve “0” düğmesine basın. İsterseniz, LivingColors
sokun ve diğer ucunu prize takın.
ürününü “0” ile kapatabilir ve “I” ile tekrar
- Standın üst kısmındaki bağlantı şini lambaya takın;
açabilirsiniz.
'klik' sesi duyduğunuzdan emin olun.
- Lambayı stand üzerine yerleştirin ve LivingColors'ı
Belirli bir ışık ayarını (örneğin kırmızının haf
duvara yöneltin (optimum mesafe 50 cm'dir).
kısık olduğu bir ayar) sevdiyseniz, bu sahneyi
Armatürün yüksekliğini ayarlayabilirsiniz; standın
daha sonra kolayca tekrar kullanabilmek için
ortasındaki halkayı çevirin, standın üst kısmını
saklayabilirsiniz: Sahne düğmelerinden birine
istediğiniz yüksekliğe gelene kadar çekin ve
basın ve uzaktan kumandadan bir uyarı sesi
ardından halkayı tekrar sabitleme konumuna
duyulana kadar basılı tutun. Artık, ayarladığınız
çevirin.
sahne, bastığınız Sahne düğmesinin altına kaydedilir.
- Arkadaki düğmeyi kaydırarak uzaktan kumandanın
Bu yolla otomatik renk değiştirme modları için
pil bölmesini açın. 3 adet AAA pil takın (+ ve –
belirli bir hızı da hafızaya alabilirsiniz
işaretlerine uyun).
Işıkları istediğiniz şekilde ayarlayabilirsiniz.
2. Kendi ortamınızı oluşturun:
Hafızadaki ortama geri dönmek istediğinizde,
hafızaya aldığınız Sahne düğmesine basmanız yeterli
- Renk düğmesindeki istediğiniz renge dokunun.
olacaktır. Bastığınız Sahne düğmesi, sahnenin
Parmağınızı renk düğmesinde hareket ettirerek
seçildiğini göstermek için kısa süreli yanacak ve
renk ayarını tamamlayın.
LivingColors, hafızadaki ayarları alacaktır.
Bu yolla 3 adete kadar sahne hafızaya
58

alabilirsiniz (her bir Sahne düğmesi için bir tane).
kadar "0" düğmesini basılı tutun. Lamba yavaşça
LivingColors'ı kapatmak için “0” (kapalı)
kapanacaktır.
düğmesine kısaca basın. LivingColors bir sonraki
kullanımda son ayarları hatırlayacaktır. Tekrar
3. İsterseniz, uzaktan kumandanızı Philips
açmak için “I” (açık) düğmesine basın.
LivingAmbiance serisindeki başka bir uzaktan
kumandaya bağlayabilirsiniz. SmartLink logosu
3. LivingColors'ı diğer Philips LivingAmbiance
bulunan tüm LivingColors veya LivingWhites
ürünlerine bağlayın
uzaktan kumandası, uzaktan kumandanıza
bağlanabilir. Başka bir uzaktan kumanda
İsterseniz, Philips LivingAmbiance serisindeki
bağladığınızda, aynı lambaları iki farklı uzaktan
farklı ürünleri LivingColors uzaktan kumandasına
kumandayla kontrol edebilirsiniz. Örneğin, aynı
bağlayabilirsiniz. Bu yolla bağlı ürünlerin hepsini
lambaları kullanarak 3'ü bir uzaktan kumandada
birlikte ya da ayrı ayrı, aynı uzaktan kumandadan
ve 3'ü diğerinde olmak üzere 6 farklı aydınlatma
ayarlayabilirsiniz.
ortamı oluşturabilirsiniz. Fazladan bir LivingColors
veya LivingWhites uzaktan kumanda eklemek için
1. Uzaktan kumandanıza başka Philips
aşağıdaki yolu izleyin:
LivingColors lambalar da bağlayabilirsiniz.
Philips LivingColors ürünlerinin birçoğu bu
a. Eklemek istediğiniz uzaktan kumandayı sıfırlayın:
uzaktan kumandayla çalışır: bağlamak istediğiniz
pil bölmesini açın ve RESET (SIFIRLA) düğmesine
LivingColors ürününde SmartLink logosu olması
birkaç saniye (örneğin bir ataş kullanarak) basın.
yeterli. SmartLink logosu bulunan tüm ürünleri
Pillerin içeride olduğundan emin olun. Uzaktan
uzaktan kumandanıza bağlayabilirsiniz.
kumanda sıfırlandığında bir uyarı sesi duyulur.
b. Sıfırladığınız uzaktan kumandayı, kullandığınız
Bir uzaktan kumandaya Philips LivingColors
uzaktan kumandaya yaklaştırın. Uzaktan
lamba eklemek için uzaktan kumandayı lambaya
kumandalar bir uyarı sesi verene kadar her iki
yaklaştırın ve “I” düğmesi basılı tutun. Lamba 3 kez
kumanda üzerinde “I” düğmesini basılı tutun.
yanıp sönecektir. Uzaktan kumandadan bir uyarı
Uzaktan kumandalar artık bağlanmıştır. Bu sayede
sesi duyana kadar “I” düğmesini basılı tutun; lamba
aynı lambaları yeni uzaktan kumandaya bağlayabilir
yeşil renkte kısaca yanıp sönecektir. Artık lambanız
ve tüm lambaları istediğiniz uzaktan kumandayla
uzaktan kumandaya bağlanmıştır ve en son "açık"
kontrol edebilirsiniz.
ayarına dönecektir.
c. Eklediğiniz uzaktan kumanda yuvarlaksa, bunu
Bir LivingColors lamba için beyaz ışığı da
kopyalamanız da mümkündür: orijinal uzaktan
bağladığınızdan emin olun: bunu, 2. maddede
kumandanızın bağlı olduğu aynı lambalara anında
LivingWhites ürünleri için açıklananla aynı şekilde
bağlayabilirsiniz. Uzaktan kumandayı kopyalamak
yapabilirsiniz.
için b paragrafında açıklanan yolu izleyin.
Bir LivingColors lambanın uzaktan kumandayla
bağlantısını kesmek istiyorsanız, uzaktan
Bir veya daha fazla lambayı Philips LivingColors
kumandayı lambaya yaklaştırın, “0” düğmesini basılı
uzaktan kumandanıza bağladıktan sonra tüm lambaları
tutun. Lamba 3 kez yanıp sönecektir. Ardından,
ayrı ayrı veya birlikte kontrol edebilirsiniz.
uzaktan kumandadan bir uyarı sesi duyana
Bir lambayı kontrol etmek için önce lambayı
kadar "0" düğmesini basılı tutun. Lamba yavaşça
seçmeniz gerekir (LivingColors renkli ve beyaz ışıklı
kapanacaktır.
lambalarda renkli ve beyaz ışığın ayrı ayrı seçilmesi
gerektiğini lütfen unutmayın). Bunun için ışık seçme
2. İsterseniz, uzaktan kumandanıza Philips
düğmelerinden birini kullanabilirsiniz. Işık seçme
LivingWhites ürünleri (armatürler, şler,
düğmelerinden birini basılı tuttuğunuzda, seçilen lamba
enerji tasarrufu ürünleri) de ekleyebilirsiniz. Bir
yanıp sönmeye başlar. Ayarlamak istediğiniz lamba
Philips LivingWhites ürünü eklemek için uzaktan
bu değilse, düğmeyi bırakın ve tekrar basın; başka
kumandayı ürüne yaklaştırın ve “I” düğmesi basılı
bir lamba yanıp sönmeye başlayacaktır. Bir lamba
tutun. Lamba 3 kez yanıp sönecektir. Uzaktan
seçildikten sonra, uzaktan kumanda üzerindeki ışık
kumandadan bir uyarı sesi duyana kadar “I”
seçim göstergesi (ampul) yanacaktır. Bu, sadece seçilen
düğmesini basılı tutun; lamba iki kez hızla yanıp
lambayı ayarlayabileceğiniz anlamına gelir.
sönecektir. Artık ürününüz uzaktan kumandaya
Bir ışık seçilmezse (ışık seçme göstergesi kapalıyken),
bağlanmıştır ve en son "açık" ayarına dönecektir.
yaptığınız tüm ayarlar uzaktan kumandaya bağlı tüm
ışıklar için geçerli olur (örneğin bir odadaki tüm ışıkları
Bir LivingWhites ürününün uzaktan kumandayla
aynı anda kısıp açabilirsiniz).
bağlantısını kesmek istiyorsanız, uzaktan
Farklı armatürlerdeki ışık ayarlarının belirli bir
kumandayı ürüne yaklaştırın, “0” düğmesini basılı
kombinasyonunu kullanmak isterseniz, bunu kılavuzun
tutun. Lamba 3 kez yanıp sönecektir. Ardından,
2. bölümünde açıklanan yolla bir sahne olarak
uzaktan kumandadan bir uyarı sesi duyana
kaydedin.
59

4. Sıkça sorulan sorular
5. Ek destek
Sorunlar...
Daha ayrıntılı bilgi için ve bir sorun meydana gelmesi
o LivingColors ışık vermiyor
durumunda, www.philips.com adresinde bulunan
o Lamba ile kablo arasındaki tüm bağlantıları
Philips web sitesini ziyaret edin ya da 00800-PHILIPSL
kontrol edin. Fişin prize doğru şekilde takılıp
veya 00800-74454775 numaralı ücretsiz telefondan
takılmadığını kontrol edin.
Philips Aydınlatma Müşteri Hizmetlerini arayın.
o Güç kablosunu çıkarıp takın. LivingColors
birkaç kez renk değiştirip kapanırsa, tekrar
Garanti:
açmak için uzaktan kumandayı kullanın.
Ürünün burada verilen talimatlara uygun ve kullanım
amacına göre kullanılması halinde, Philips iki yıllık
o LivingColors uzaktan kumandaya yanıt
garanti sunmaktadır. Satın alma tarihini, bayi adını ve
vermiyor
ürün açıklamasını içeren satın alma belgesinin (fatura,
o Uzaktan kumandanın pillerini kontrol edin.
satış şi veya makbuz) orijinali olmadan bulunulan
Piller dolu ve doğru yerleştirilmiş (+ ve -)
garanti talepleri kabul edilmeyecektir.
olmalıdır. Uzaktan kumanda hala çalışmıyorsa,
pilleri değiştirmeyi deneyin.
Aşağıdaki durumlarda Philips garantisi geçersiz olur:
o Bu kılavuzda madde 3.1 altında açıklanan
- Satın alma belgesi veya ürün açıklamasında
prosedürü izleyerek uzaktan kumanda ile
yer alan bilgilerin değiştirilmesi, silinmesi veya
LivingColors arasında bağlantı kurun.
okunamaz hale getirilmesi.
- Hasar, hatalı bağlantılar veya kötü kullanımdan
o Uzaktan kumandayı kullandıktan sonra
kaynaklanan arızalar.
düğmelerin ışıkları yanıp sönüyor
- Yıldırım, sel, yangın, hatalı kullanım veya ihmal
o Bu, uzaktan kumandadaki pillerin bitmek
gibi LivingColors'ın neden olmadığı olağandışı
üzere olduğunu ve değiştirilmeleri gerektiğini
durumlardan kaynaklanan kusurlar.
gösterir.
- LivingColors'ın açılmış veya demonte edilmiş
olması.
o Otomatik renk değiştirme modunu
başlatamıyorum
Temizlik ve bakım:
o Uzaktan kumanda “kaydırma” hareketinizi
Fişi prizden çıkarın.
algılamamış olabilir. Lütfen tekrar deneyin
LivingColors'ı, uzaktan kumandayı ve adaptörü,
ve bu kez parmağınızın tam turluk kaydırma
çizilmelerini önlemek için yumuşak ve kuru bir bezle
hareketi süresince renk düğmesinde kalmasına
temizleyin.
dikkat edin.
Temizlik maddeleri kullanmayın.
o LivingColors'ı bir zamanlayıcıya bağlamak
Güvenlik talimatları:
istiyorum. Bu mümkün mü?
- Fişi ve LivingColors'ı sıvı ve nemden uzak tutun.
o Evet. Philips LivingColors'ı bir zamanlayıcı ile
- LivingColors sadece iç mekanlarda kullanılabilir.
birlikte kullanabilirsiniz (zamanlayıcı birlikte
Banyo gibi ıslak mekanlarda ve dış mekanlarda
verilmez). LivingColors bir zamanlayıcıyla
kullanmayın.
açıldığında, en son ayarınızı (sabit renk veya
- LivingColors, çocukların oynayacağı bir oyuncak
otomatik renk değiştirme modu) gösterecektir.
değildir.
Son ayarınız “kapalı” olmamalıdır.
- Cihazı sıcak yüzeylere koymayın.
- Güvenlik nedeniyle ve garanti koşulları uyarınca,
o LivingColors uzaktan kumandaya başka
LivingColors ve şi kesinlikle açılmamalıdır.
lamba bağlayamıyorum
- Sadece birlikte verilen adaptörü kullanın: Farklı bir
o Bağlamaya çalıştığınız üründe SmartLink logosu
adaptör kullanılması LivingColors ürününe zarar
olduğundan emin olun. Bu uzaktan kumandaya
verebilir.
sadece SmartLink logosu bulunan ürünler
bağlanabilir.
Çevre:
o Bu kılavuzun 3. bölümünde açıklanan
Cihazı atacağınız zaman yerel yetkili mercilerin
prosedürü tekrarlamayı deneyin. Bu bölümde
talimatlarına uygun hareket edin. Uzaktan kumandayı
açıklanan uyarı seslerini duyduğunuzdan ve
atacağınız zaman pilleri çıkarın. Pilleri normal ev
ışıkların yanıp söndüğünden emin olun.
atıklarınızla birlikte atmayın. Bunun yerine, resmi
toplama noktalarına ya da Philips servis merkezine
o Sorum buradaki listede yok
verin. Burada pillerin atık işlemleri çevreye zarar
o Lütfen yardım için Philips ile iletişime geçin
vermeyecek şekilde gerçekleştirilecektir.
(bkz. Bölüm 5 “Ek destek”).
60
Fiş teknik özellikleri:
Kablosuz özellikleri:
AC adaptör
Kablosuz RF modu frekans bandı: 2405~2475 MHz
Model: EADP-10EB C (AB tipi)
Kablosuz iletişim protokolü: IEEE 802,15.4)
EADP-10EB D (İngiltere tipi + Singapur)
Çalışma kanalları: 11, 15, 20 veya 25 numaralı kanallar
EADP-10EB E (Avustralya tipi)
Giriş: 220 - 240V ~ 0,3A 50 Hz
Çevresel özellikleri:
Çıkış: 18,5V 0,83 A
Sıcaklık (çalışma): 0...40 °C
Sıcaklık (Saklama): -25...60 °C
Armatürün güç tüketimi: 15,4 W' a kadar
Bağıl nem: % 5...95 yoğuşmasız
Uzaktan Kumanda:
Piller: 3 x Philips Powerlife Alkalin AAA LR03, 1,5 V.
PL LivingColors — instrukcja obsługi
Dziękujemy za zakup lampy podłogowej Philips
- Otwórz komorę baterii pilota zdalnego
LivingColors!
sterowania, przesuwając przycisk w tylnej części
urządzenia. Włóż 3 baterie AAA (zgodnie z
Lampa LivingColors umożliwia wykreowanie w domu
oznaczeniami + i –).
własnej i niepowtarzalnej atmosfery przy użyciu
koloru i światła. Przed rozpoczęciem korzystania z
2. Wykreuj wyjątkową atmosferę:
lampy dokładnie zapoznaj się z jej instrukcją obsługi
i zachowaj ją na przyszłość. Postępowanie zgodnie z
- Dotknięcie wybranego koloru na pierścieniu
naszymi wskazówkami pozwoli w pełni wykorzystać
sterującym kolorami. Przesuwaj palcem po
możliwości lampy Philips LivingColors.
pierścieniu, aby dokładnie ustawić kolor.
Zarejestruj swój produkt na stronie www.philips.
- Zmiana nasycenia koloru (dodanie bieli do
com/welcome, aby otrzymywać najnowsze informacje
aktualnie wybranego koloru). Naciśnij przycisk
na temat nowych produktów LivingAmbiance rmy
zwiększenia nasycenia w celu uzyskania głębokiego
Philips
koloru lub przycisk zmniejszenia nasycenia w
celu uzyskania bardziej pastelowego koloru.
Niniejsza instrukcja będzie przydatna przy
Przytrzymanie naciśniętego przycisku zmniejszenia
następujących czynnościach…
nasycenia pozwoli ostatecznie uzyskać biały kolor.
1. Zanim zaczniesz
2. Wykreuj wyjątkową atmosferę z lampą
- Przyciemnianie. Zwiększanie lub zmniejszanie
LivingColors
intensywności światła przy pomocy przycisków
3. Połącz lampkę LivingColors z innymi produktami z
przyciemniania.
gamy Philips LivingAmbiance
4. Odpowiedzi na często zadawane pytania
- Automatyczna zmiana kolorów. Przesuń
5. Dodatkowa pomoc techniczna
palcem po pierścieniu kolorów (jeden raz
dookoła) i naciśnij krótko przycisk „I”(„wł.”), co
1. Czynności wstępne:
spowoduje włączenie w lampce LivingColors
trybu automatycznej zmiany kolorów.
- Włóż słupek montażowy do podstawy
umieszczonej na podłodze, a następnie obracaj go
Szybkość zmiany kolorów można zmieniać.
w prawo aż do oporu.
Szybkość można regulować w prawo, od
- Włóż wtyczkę połączeniową do otworu
największej (kolor granatowy na pierścieniu
znajdującego się pod podstawą lampy, zaś drugi jej
sterującym kolorami) do najmniejszej (kolor
koniec włóż do gniazdka elektrycznego.
oletowy). Wystarczy dotknąć pierścienia
- Włóż wtyczkę połączeniową znajdującą się
sterującego kolorami w dowolnym miejscu. W
w górnej części stojaka do lampy – usłyszysz
trybie automatycznej zmiany kolorów można
„kliknięcie”.
także dostosować nasycenie i jasność kolorów.
- Umieść lampę LivingColors na stojaku, a
Aby przełączyć urządzenie z powrotem w tryb
następnie skieruj ją w stronę ściany (optymalna
zatrzymania barwy, przesuń ponownie palcem
odległość wynosi 50 cm). Aby dostosować
po pierścieniu sterującym kolorami i naciśnij
wysokość oprawy, obróć pierścień znajdujący się
przycisk „0”. Można także wyłączyć i włączyć
na środku stojaka lampy, rozciągnij górną część
lampkę LivingColors, ponownie naciskając kolejno
stojaka na odpowiednią wysokość, a następnie
przyciski „0” i „I”.
dokręć pierścień.
61

- Ulubione ustawienie światła (np. lekko
Aby usunąć powiązanie lampy LivingColors z
przyciemnione czerwone światło) można
pilotem zdalnego sterowania, zbliż pilota do lampy,
zachować w celu łatwego przywołania: naciśnij
a następnie naciśnij i przytrzymaj przycisk „0”.
i przytrzymaj jeden z przycisków efektów, aż pilot
Lampa błyśnie trzykrotnie. Trzymaj naciśnięty
zdalnego sterowania wyemituje sygnał dźwiękowy.
przycisk „0”, aż pilot zdalnego sterowania
Efekt zostanie zapisany pod naciśniętym
wyemituje sygnał dźwiękowy. Lampa będzie gasła
przyciskiem efektów. W ten sposób można także
powoli.
zapisać określoną prędkość trybu automatycznej
zmiany kolorów.
2. Z pilotem zdalnego sterowania lampy można
także powiązać produkty Philips LivingWhites
Jeśli istnieje taka potrzeba, można kontynuować
(wtyczki, lampy energooszczędne, oprawy). Aby
regulację światła. Aby przywołać zapisany efekt,
dodać produkt Philips LivingWhites, zbliż pilota
wystarczy nacisnąć przycisk efektu użyty do jego
do produktu, a następnie naciśnij i przytrzymaj
zapisania. Odpowiedni przycisk efektu zaświeci
przycisk „I”. Lampa błyśnie trzykrotnie. Trzymaj
krótko, sygnalizując wybranie efektu, a światła
naciśnięty przycisk „I”, aż pilot zdalnego
LivingColors zmienią się zgodnie z zapisanymi
sterowania wyemituje sygnał dźwiękowy; lampa
ustawieniami.
szybko błyśnie dwukrotnie. Od tej chwili produkt
Można zapisać maks. 3 efekty (po jednym na
jest powiązany z pilotem zdalnego sterowania i
każdy przycisk efektu).
włączy się z zachowaniem ostatniego ustawienia
Wyłącz lampę LivingColors, naciskając krótko
zastosowanego, gdy był włączony.
przycisk „0” (wył.). Ostatnie ustawienie zostanie
zapamiętane w urządzeniu. Aby ponownie ją
Aby usunąć powiązanie produktu LivingWhites
włączyć, naciśnij przycisk „I” („wł.”).
z pilotem zdalnego sterowania, zbliż pilota do
produktu, a następnie naciśnij i przytrzymaj
3. Połącz lampkę LivingColors z innymi
przycisk „0”. Lampa błyśnie trzykrotnie. Trzymaj
produktami z gamy Philips LivingAmbiance
naciśnięty przycisk „0”, aż pilot zdalnego
sterowania wyemituje sygnał dźwiękowy. Lampa
Z pilotem LivingColors można powiązać różne
będzie gasła powoli.
produkty z rodziny Philips LivingAmbiance. Dzięki
temu można dostosowywać wszystkie powiązane
3. Pilot zdalnego sterowania można także podłączyć
produkty razem lub osobno – a wszystko za pomocą
do innego pilota zdalnego sterowania z
jednego pilota zdalnego sterowania.
rodziny LivingAmbiance rmy Philips. Z
pilotem zdalnego sterowania można powiązać
1. Można powiązać inne lampy Philips
każdego pilota zdalnego sterowania LivingColors
LivingColors z pilotem zdalnego sterowania.
lub LivingWhites oznaczonego logo SmartLink.
Większość lamp Philips LivingColors będzie
Powiązanie z innym pilotem zdalnego sterowania
współpracowała z tym pilotem zdalnego
umożliwi sterowanie tymi samymi lampami za
sterowania: wystarczy sprawdzić, czy na danej
pomocą dwóch pilotów. Można na przykład
lampie LivingColors, którą chcesz powiązać,
stworzyć 6 różnych efektów świetlnych – 3 na
znajduje się logo SmartLink. Wszystkie produkty
jednym pilocie i 3 na drugim, wszystkie powiązane
z logo SmartLink można powiązać z pilotem
z tymi samymi lampami. Aby dodać dodatkowy
zdalnego sterowania.
pilot zdalnego sterowania LivingColors lub
LivingWhites, należy wykonać następujące
Aby dodać lampę Philips LivingColors do pilota
czynności:
zdalnego sterowania, zbliż pilota do lampy, a
następnie naciśnij i przytrzymaj przycisk „I”.
a. Zresetuj pilota zdalnego sterowania, który ma
Lampa błyśnie trzykrotnie. Trzymaj naciśnięty
zostać powiązany: otwórz jego komorę baterii,
przycisk „I”, aż pilot zdalnego sterowania
a następnie naciśnij na kilka sekund przycisk
wyemituje sygnał dźwiękowy; lampa błyśnie
resetowania (np. przy pomocy spinacza). Upewnij
na zielono. Od tego momentu lampa jest
się, że w pilocie są baterie. Na potwierdzenie
powiązana z pilotem zdalnego sterowania i
zresetowania pilot wyemituje sygnał dźwiękowy.
włączy się z zachowaniem ostatniego ustawienia
b. Zbliż zresetowanego pilota zdalnego sterowania
zastosowanego, gdy była włączona.
do aktualnie używanego pilota. Naciśnij przycisk
W przypadku lampy LivingAmbiance należy
„I” na obu pilotach, aż piloty wyemitują sygnał
pamiętać także o powiązaniu światła białego –
dźwiękowy. Od tej chwili piloty będą połączone
można to zrobić, wykonując te same czynności, co
– oznacza to, że można powiązać te same lampy
w przypadku produktów LivingWhites opisanych
z nowym pilotem zdalnego sterowania i sterować
w punkcie 2.
wszystkimi lampami za pomocą każdego z dwóch
pilotów zdalnego sterowania.
62

c. Teraz można także dodać i skopiować okrągłego
sterowania są (prawie) rozładowane i
pilota zdalnego sterowania, dzięki czemu będzie
wymagają wymiany.
on natychmiastowo powiązany z tymi samymi
lampami, z jakimi powiązany jest oryginalny pilot
o Nie można uruchomić trybu
zdalnego sterowania. Aby skopiować ustawienia
automatycznej zmiany kolorów
pilota, należy powtórzyć procedurę opisaną w
o Być może pilot zdalnego sterowania nie
punkcie b.
rozpoznał ruchu „przeciągnięcia”. Spróbuj
ponownie, przeciągając palcem po całym
Po powiązaniu z pilotem zdalnego sterowania Philips
pierścieniu sterującym kolorami (pełen obrót).
LivingColors jednej lub więcej lamp można sterować
wszystkimi powiązanymi lampami razem lub z osobna.
o Chcę podłączyć lampę LivingColors do
Aby sterować pojedynczą lampą, należy ją wybrać
wyłącznika czasowego. Czy jest to możliwe?
(należy pamiętać, że w przypadku lamp LivingColors
o Tak. Lampy LivingColors mogą być
emitujących światło białe i kolorowe, światło białe i
używane razem z wyłącznikiem czasowym
kolorowe należy wybrać osobno). Można to zrobić,
(niedołączony do zestawu). Po włączeniu
korzystając z jednego z przycisków wyboru światła.
lampy LivingColors za pomocą wyłącznika
Naciśnięcie i przytrzymanie jednego z przycisków
czasowego zostanie użyte ostatnie ustawienie
wyboru światła spowoduje, że wybrana lampa zacznie
(tryb zatrzymania barwy lub automatycznej
migać. Jeśli nie jest to lampa, którą chcesz dostosować,
zmiany kolorów). Upewnij się, że ostatnim
zwolnij przycisk i naciśnij go ponownie – zacznie
ustawieniem nie było „wyłączenie”.
migać inna lampa. Po wybraniu lampy zaświeci się
wskaźnik wyboru światła (żarówka) na pilocie zdalnego
o Nie mogę powiązać dodatkowych lamp z
sterowania. Oznacza to, że od tej chwili można
pilotem zdalnego sterowania LivingColors
dostosowywać wyłącznie wybraną lampę.
o Upewnij się, czy na produkcie, który chcesz
Jeśli nie zostało wybrane żadne światło (wskaźnik
powiązać z pilotem, znajduje się logo
wyboru światła nie świeci), regulacje będą dotyczyć
SmartLink. Do tego pilota zdalnego sterowania
wszystkich świateł powiązanych z pilotem zdalnego
można podłączyć tylko produkty oznaczone
sterowania (na przykład można jednocześnie
logo SmartLink.
przyciemnić wszystkie światła w pomieszczeniu).
o Spróbuj ponownie przeprowadzić procedurę
Ulubione połączenie ustawień światła różnych opraw
opisaną w części 3 niniejszej instrukcji.
można także zapisać jako efekt, wykonując czynności
Upewnij się, że słychać opisane sygnały
opisane w części 2 niniejszej instrukcji.
dźwiękowe oraz że lampa błyska w sposób
opisany w instrukcji.
4. Często zadawane pytania
o Mojego pytania nie ma na tej liście
Co zrobić, jeśli…
o Skontaktuj się z rmą Philips, aby uzyskać
o Lampa LivingColors nie świeci
pomoc (patrz część 5 „Dodatkowa pomoc
o Sprawdź połączenia przewodów lampy.
techniczna”).
Upewnij się, że wtyczka jest prawidłowo
włożona do gniazda sieciowego.
5. Dodatkowa pomoc techniczna
o Odłącz i ponownie podłącz przewód
zasilający. Jeśli lampa LivingColors kilkakrotnie
W przypadku problemów i w celu uzyskania
zmieni kolory, a następnie wyłączy się, włącz
szczegółowych informacji odwiedź stronę internetową
ją ponownie za pomocą pilota zdalnego
rmy Philips dostępną pod adresem www.philips.
sterowania.
com lub skontaktuj się z Centrum kontaktów
Philips Lighting pod bezpłatnym numerem telefonu:
o Lampa LivingColors nie reaguje na
00800-PHILIPSL lub 00800-74454775.
polecenia pilota zdalnego sterowania
o Sprawdź baterie w pilocie. Baterie powinny
Gwarancja:
być umieszczone prawidłowo (+ i -) oraz
Dwuletnia gwarancja rmy Philips jest ważna pod
naładowane. Jeśli pilot nadal nie działa, wymień
warunkiem, że produkt jest używany zgodnie
baterie.
z instrukcją i jego przeznaczeniem. Reklamacje
o Powiąż pilota zdalnego sterowania z lampą
będą przyjmowane wyłącznie po przedstawieniu
LivingColors, postępując zgodnie z procedurą
oryginalnego dowodu zakupu (faktury lub paragonu)
opisaną w części 3.1 tej instrukcji.
zawierającego datę zakupu, nazwę (lub imię i
nazwisko) sprzedawcy oraz opis produktu.
o Przyciski migają po użyciu pilota zdalnego
sterowania
Gwarancja rmy Philips traci ważność, jeśli:
o Oznacza to, że baterie w pilocie zdalnego
63
- cokolwiek zostało zmienione, skreślone, usunięte
Ochrona środowiska:
lub jest nieczytelne na dowodzie zakupu lub w
Pozbywając się urządzenia, postępuj zgodnie z
opisie produktu;
lokalnymi przepisami. Przed wyrzuceniem urządzenia
- dojdzie do usterki spowodowanej uszkodzeniem
wyjmij baterie. Nie wyrzucaj baterii wraz ze zwykłymi
lub nieprawidłowym podłączeniem urządzenia;
odpadami gospodarstwa domowego. Oddaj je do
- uszkodzenie powstało na skutek okoliczności
ocjalnego punktu zbiórki surowców wtórnych
niezwiązanych z lampką LivingColors, na przykład
lub sprzedawcy rmy Philips. W obu przypadkach
z powodu wyładowań atmosferycznych, powodzi,
utylizacja baterii zostanie dokonana w sposób
pożaru, nieprawidłowego użytkowania lub
przyjazny dla środowiska.
zaniedbania;
- lampka LivingColors została otwarta lub
Dane techniczne wtyczki:
rozłożona na części.
Zasilacz sieciowy
Model: EADP-10EB C (EU)
Czyszczenie i konserwacja:
EADP-10EB D (Wielka Brytania +
Wyjmij wtyczkę z gniazdka elektrycznego.
Singapur)
W celu uniknięcia ryzyka porysowania lampkę
EADP-10EB E (Australia)
LivingColors, pilota i zasilacz czyść miękką, suchą
Moc wejściowa: 220–240 V ~ 0,3 A 50 Hz
ściereczką.
Moc wyjściowa: 18,5 V, 0,83 A
Nie używaj środków czyszczących.
Zużycie energii przez oprawę: maks. 15,4 W
Wskazówki dotyczące bezpieczeństwa:
- Lampkę LivingColors i wtyczkę przechowuj z dala
Pilot zdalnego sterowania:
od płynów i wilgoci.
Baterie: 3 x Philips Powerlife Alkaline AAA LR03, 1,5 V.
- Lampka LivingColors jest przeznaczona wyłącznie
do użytku w pomieszczeniach. Nie używaj jej
Specykacja bezprzewodowa:
w wilgotnych miejscach, np. w łazience lub na
Pasmo częstotliwości dla trybu bezprzewodowego:
zewnątrz.
2405~2475 MHz
- Lampka LivingColors nie jest zabawką. Nie
Protokół komunikacji bezprzewodowej: IEEE 802.15.4)
pozwalaj dzieciom bawić się urządzeniem.
Obsługiwane kanały: kanały 11, 15, 20 lub 25
- Nie umieszczaj urządzenia na gorących
powierzchniach.
Specykacja środowiska:
- Ze względów bezpieczeństwa i zgodnie z
Temperatura (działania): 0–40 °C
warunkami gwarancji nie należy otwierać lampki
Temperatura (przechowywania): -25–60 °C
LivingColors ani wtyczki.
Wilgotność względna: 5–95% (bez skraplania)
- Należy korzystać wyłącznie z dołączonego
zasilacza – w przeciwnym wypadku może dojść
do uszkodzenia lampki LivingColors.
CS Pokyny pro použití svítidla LivingColors
Děkujeme, že jste si zakoupili podlahové svítidlo
Philips LivingAmbiance
LivingColors od společnosti Philips!
4. Odpovědět na často kladené dotazy
5. Získat další podporu
Svítidlo LivingColors bylo speciálně navrženo tak,
aby pomocí barev a světla vytvářelo v domácnosti
1. Začínáme:
Vaše vlastní prostředí. Před prvním použitím svítidla
LivingColors si pozorně přečtěte tento návod a
- Zasuňte tyč do podlahové části a poté jí otáčejte
uchovejte jej pro další použití. Dodržováním pokynů
po směru hodinových ručiček, dokud jí nebude
si budete moci vychutnat plnou funkčnost svítidla
možno dále otáčet.
LivingColors Mini společnosti Philips.
- Zasuňte zástrčku do otvoru pod podlahovou
Zaregistrujte svůj výrobek na adrese www.philips.
částí lampy a její druhý konec zapojte do síťové
com/welcome a buďte stále v obraze ohledně výrobků
zásuvky.
LivingAmbiance společnosti Philips
- Zástrčku v horní části stojanu zasuňte do lampy
– ujistěte se, že jste slyšeli „klapnutí“.
Tato příručka vám pomůže...
- Lampu umístěte na stojan a svítidlo LivingColors
1. Začít
nasměrujte na stěnu (optimální vzdálenost je
2. Vytvořit vlastní prostředí pomocí svítidla
50 cm). Výšku svítidla je možné nastavit otáčením
LivingColors
prstence ve středu stojanu, vytažením horní části
3. Propojit svítidla LivingColors s dalšími výrobky
do požadované výšky a následným otáčením
64

prstence zpět, kterým horní část upevníte v dané
Je možné uložit 3 scény (jednu pod každým
poloze.
tlačítkem scény).
- Posunutím tlačítka na zadní straně dálkového
Krátkým stisknutím tlačítka „0“ (vypnuto) svítidlo
ovladače otevřete přihrádku na baterie. Vložte
LivingColors vypnete. Svítidlo LivingColors si
3 baterie typu AAA (póly + a − umístěte tak, jak
bude pro příště pamatovat poslední nastavení.
je znázorněno na obrázku).
Chcete-li svítidlo znovu zapnout, stiskněte tlačítko
„I“ (zapnuto).
2. Vytvořte si své vlastní prostředí:
3. Propojit svítidla LivingColors s dalšími
- Dotkněte se požadované barvy na barevném
výrobky Philips LivingAmbiance
kolečku. Pohybem prstu po barevném kolečku
nastavte barvu.
K dálkovému ovladači svítidla LivingColors lze připojit
různé výrobky řady Philips LivingAmbiance. Takto
- Změna sytosti barev (přidání bílé do aktuální
budete moci nastavit všechny připojené výrobky
barvy). Hlubších barev dosáhnete stisknutím
současně nebo každý z nich zvlášť – to vše pomocí
tlačítka zvýšení sytosti. Stisknutím tlačítka snížení
jediného dálkového ovladače.
sytosti dosáhnete pastelovějších barev. Pokud
budete opakovaně tisknout tlačítko snížení sytosti,
1. K tomuto dálkovému ovladači můžete připojit
nakonec dosáhnete bílé barvy.
více svítidel LivingColors společnosti Philips.
Většina svítidel LivingColors společnosti Philips
- Ztlumení. Zvýšení nebo snížení intenzity světla
s tímto dálkovým ovladačem spolupracuje: pouze
pomocí tlačítek pro ztlumení.
zkontrolujte, zda je svítidlo LivingColors, které
chcete připojit, označeno logem SmartLink.
- Nastavení automatické změny barev. Přejeďte
K tomuto dálkovému ovladači lze připojit všechny
prstem po barevném kolečku (jeden plný kruh)
výrobky označené logem SmartLink.
a krátce stiskněte symbol „I“ („Zapnuto“);
svítidlo LivingColors se poté přepne do režimu
Chcete-li přidat svítidlo LivingColors od
automatické změny barev a svítidlo začne
společnosti Philips k dálkovému ovladači, přineste
automaticky měnit barvy.
dálkový ovladač do blízkosti daného svítidla. Poté
stiskněte a podržte tlačítko „I“. Svítidlo třikrát
Je možné upravit rychlost, s jakou dochází ke
blikne. Podržte tlačítko „I“, dokud se z dálkového
střídání barev. Rychlost lze upravit po směru
ovladače neozve zvukový signál. Svítidlo krátce
hodinových ručiček, a to od rychlé (tmavě modrá
blikne zeleně. Nyní je připojeno k dálkovému
barva na barevném kolečku) po pomalou (alová).
ovladači a zapne se podle posledního nastavení.
Klepnout lze kdekoli na barevném kolečku.
U lampy LivingAmbiance nezapomeňte připojit
V režimu automatické změny barev lze též
také bílé světlo. Postup připojení je stejný jako u
nastavit sytost a jas barev.
výrobků řady LivingWhites (viz popis v bodě 2).
Chcete-li svítidlo přepnout zpět do režimu
Chcete-li svítidlo LivingColors od dálkového
stálé barvy, přejeďte znovu prstem dokola
ovladače odpojit, přineste dálkový ovladač
po barevném kolečku a stiskněte tlačítko „0“.
do blízkosti daného svítidla. Potom stiskněte
Případně můžete svítidlo LivingColors vypnout
a podržte tlačítko „0“. Svítidlo třikrát blikne.
„0“ a znovu zapnout „I“.
Podržte tlačítko „0“, dokud se z dálkového
ovladače neozve zvukový signál. Nyní svítidlo
- Pokud se vám určité nastavení světla líbí
postupně přestane svítit.
(například mírně ztlumené červené světlo),
můžete uložit tuto scénu pro snadné použití:
2. K tomuto dálkovému ovladači je možné připojit
stiskněte a podržte jedno z tlačítek scény, dokud
také výrobky LivingWhites společnosti
se neozve zvukový signál dálkového ovladače.
Philips (zástrčky, úsporné zářivky a svítidla).
Nyní se scéna uloží pod stisknutým tlačítkem
Chcete-li přidat výrobek LivingWhites společnosti
scény. Takto lze uložit i určitou rychlost režimu
Philips, přineste dálkový ovladač do blízkosti
automatické změny barev.
tohoto výrobku. Potom stiskněte a podržte
tlačítko „I“. Svítidlo třikrát blikne. Podržte tlačítko
Světla můžete dále upravovat podle přání. Kdykoli
„I“, dokud se z dálkového ovladače neozve
se budete chtít vrátit k uložené scéně, stačí
zvukový signál a svítidlo dvakrát rychle neblikne.
stisknout tlačítko scény, které jste stiskli během
Nyní je připojeno k dálkovému ovladači a zapne
ukládání dané scény. Toto tlačítko scény se krátce
se podle posledního nastavení.
rozsvítí na znamení, že je scéna vybrána, a svítidlo
LivingColors se zapne podle uložených nastavení.
Chcete-li výrobek LivingWhites od dálkového
ovladače odpojit, přineste dálkový ovladač do
65

blízkosti daného výrobku. Potom stiskněte a
v místnosti).
podržte tlačítko „0“. Svítidlo třikrát blikne.
Jestliže se vám líbí určitá kombinace nastavení světla
Podržte tlačítko „0“, dokud se z dálkového
různých svítidel, můžete ji rovněž uložit jako scénu.
ovladače neozve zvukový signál. Nyní svítidlo
Použijte postup uvedený v části 2 této příručky.
postupně přestane svítit.
4. Často kladené dotazy
3. Tento dálkový ovladač lze připojit také
k dalšímu dálkovému ovladači z řady Philips
Co dělat, když...
LivingAmbiance. K vašemu dálkovému ovladači
o Svítidlo LivingColors nesvítí
je možné připojit jakýkoli dálkový ovladač svítidla
o Zkontrolujte připojení šňůry ke svítidlu.
LivingColors nebo LivingWhites označeného
Zkontrolujte, zda je zástrčka řádně zasunuta
logem SmartLink. Díky připojení dalšího
v síťové zásuvce.
dálkového ovladače budete moci stejná svítidla
o Vytáhněte napájecí šňůru a znovu ji zapojte.
ovládat dvěma různými dálkovými ovladači. Mohli
Pokud svítidlo LivingColors vystřídá několik
byste například u stejných svítidel vytvořit šest
barev a poté se vypne, znovu je zapněte
různých světelných scén: tři na jednom dálkovém
dálkovým ovladačem.
ovladači a tři na druhém. Chcete-li přidat další
dálkový ovladač LivingColors nebo LivingWhites,
o Svítidlo LivingColors nereaguje na dálkový
postupujte následovně:
ovladač
o Zkontrolujte baterie v dálkovém ovladači.
a. Resetujte dálkový ovladač, který chcete přidat:
Baterie by měly být v dálkovém ovladači a
otevřete přihrádku na baterie a na několik sekund
měly by být ve správné pozici (+ a -). Jestliže
stiskněte tlačítko RESET (např. kancelářskou
dálkový ovladač stále nefunguje, zkuste
sponkou). Ujistěte se, že jsou vloženy baterie.
vyměnit baterie.
Dálkový ovladač přehraje zvuk na znamení, že
o Dálkový ovladač propojte se svítidlem
bylo provedeno resetování.
LivingColors podle postupu v části 3.1 této
b. Přidržte resetovaný dálkový ovladač blízko
příručky.
současného dálkového ovladače. Stiskněte
tlačítko „I“ na obou dálkových ovladačích, dokud
o Po použití dálkového ovladače blikají
nepřehrají zvuk. Nyní jsou dálkové ovladače
tlačítka
připojeny, takže můžete připojit stejná svítidla
o To znamená, že baterie v dálkovém ovladači
k novému dálkovému ovladači a ovládat všechna
jsou (téměř) vybité a je třeba je vyměnit.
svítidla jedním i druhým ovladačem.
c. Pokud přidáváte kulatý ovladač, můžete ho nyní
o Nemohu spustit režim automatické změny
také kopírovat: je možné ho ihned připojit ke
barev
stejným svítidlům, k nimž je připojen váš původní
o Možná, že dálkový ovladač nerozpozná vaše
dálkový ovladač. Chcete-li dálkový ovladač
„přejetí“ po svítidle. Opakujte postup a
kopírovat, použijte postup uvedený v bodě b.
ujistěte se, že máte během pohybu v celém
kruhu prst na barevném kolečku
Jakmile k dálkovému ovladači svítidla LivingColors
společnosti Philips připojíte jedno nebo více svítidel,
o Chci připojit svítidlo LivingColors
můžete ovládat všechna tato svítidla současně nebo
k časovači. Je to možné?
každé zvlášť.
o Ano. Svítidlo LivingColors od společnosti
Chcete-li ovládat jedno svítidlo, je nutné ho vybrat
Philips lze použít s časovačem (není součástí
(upozorňujeme, že u svítidla LivingColors s barevným
dodávky). Pokud se svítidlo LivingColors zapne
a bílým světlem je třeba vybrat zvlášť barevné a
pomocí časovače, použije poslední nastavení
bílé světlo). Můžete to provést jedním z tlačítek pro
(režim stálé barvy nebo režim automatické
výběr světla. Když stisknete a podržíte jedno z tlačítek
změny barev). Ujistěte se, že poslední
pro výběr světla, vybrané svítidlo začne blikat. Pokud
nastavení není „vypnuto“.
se nejedná o svítidlo, které chcete upravit, tlačítko
uvolněte a stiskněte znovu: začne blikat další svítidlo.
o K dálkovému ovladači svítidla LivingColors
Až vyberete požadované svítidlo, rozsvítí se indikátor
nelze připojit další svítidla
výběru světla na dálkovém ovladači (ve tvaru žárovky).
o Ujistěte se, že výrobek, který chcete připojit,
To znamená, že nyní můžete upravit pouze toto
je označen logem SmartLink. K tomuto
svítidlo.
dálkovému ovladači lze připojit pouze výrobky
Pokud není vybráno žádné světlo (indikátor výběru
označené logem SmartLink.
světla je vypnutý), všechny provedené úpravy se použijí
o Zkuste zopakovat postup uvedený v části 3
na všechna světla připojená k dálkovému ovladači
této příručky. Zkontrolujte, zda jsou slyšet
(můžete například současně ztlumit všechna světla
66

popisované zvukové signály a zda svítidlo bliká
před tekutinami a vlhkostí.
podle popisu.
- Svítidlo LivingColors je určeno pouze pro vnitřní
použití. Nepoužívejte jej na vlhkých místech, např.
o Moje otázka zde není uvedena
v koupelně nebo venku.
o Obraťte se na společnost Philips s žádostí
- Svítidlo LivingColors není hračka určená dětem.
pomoc (viz část 5 „Další podpora“).
- Neumisťujte svítidlo na horký povrch
- Z bezpečnostních důvodů a podle záručních
5. Další podpora
podmínek nesmí dojít k otevření svítidla
LivingColors.
Pro informace a v případě jakýchkoliv problémů
- Používejte pouze dodaný adaptér: použití jiného
navštivte web společnosti Philips na adrese www.
adaptéru může způsobit poškození svítidla
philips.com nebo se obraťte na kontaktní středisko
LivingColors.
společnosti Philips Lighting na bezplatné lince:
00800-PHILIPSL nebo 00800-74454775
Životní prostředí:
Jestliže se budete zbavovat zařízení, zbavte se jej
Záruka:
podle pokynů místních úřadů. Před likvidací vyjměte
Dvouletá záruka společnosti Philips je platná, pokud
z dálkového ovládání baterie. Nevyhazujte baterie
byl výrobek používán v souladu s tímto návodem
společně s běžným domácím odpadem. Baterie je
k použití a k účelu, k jakému byl vyroben. Nárok bude
třeba odevzdat na ociálním sběrném místě nebo
uznán po předložení původního dokladu o nákupu
prodejci výrobků společnosti Philips. Takto budou
(faktura, účtenka nebo příjmový doklad), který
baterie zlikvidovány způsobem šetrným k životnímu
obsahuje datum nákupu, jméno prodejce a popis
prostředí.
výrobku.
Specikace zásuvky:
Záruka společnosti Philips je neplatná, jestliže:
AC adaptér
- Na dokladu o nákupu nebo popisu výrobku bylo
Model: EADP-10EB C (typ pro Evropu)
cokoliv změněno, přeškrtnuto, smazáno nebo
EADP-10EB D (typ pro Velkou Británii +
učiněno nečitelným.
Singapur)
- K chybám došlo v důsledku poškození, chybného
EADP-10EB E (typ pro Austrálii)
připojení nebo nesprávného použití.
Vstup: 220–240 V ~ 0,3 A 50 Hz
- Závada je způsobena extrémními okolnostmi,
Výstup: 18,5 V 0,83 A
které nesouvisí s přístrojem, jako například
bleskem, zatopením, ohněm, nesprávným použitím
Spotřeba energie svítidla: až 15,4 W
nebo z nedbalosti.
- Svítidlo LivingColors bylo otevřeno nebo
Dálkový ovladač:
rozebráno.
Baterie: 3 x alkalická baterie Philips Powerlife AAA
LR03, 1,5 V.
Čištění a údržba:
Vyjměte zástrčku ze síťové zásuvky.
Technické údaje o bezdrátovém přenosu:
Svítidlo LivingColors, dálkový ovladač a adaptér by
Frekvenční pásmo bezdrátového rádiového režimu:
měly být čištěny pouze suchým a měkkým hadříkem.
2405–2475 MHz
Předejdete tak poškrábání.
Protokol bezdrátové komunikace: IEEE 802.15.4)
Nepoužívejte čisticí prostředky.
Provozní kanály: kanály 11, 15, 20 nebo 25
Bezpečnostní pokyny:
Údaje o prostředí:
- Svítidlo LivingColors a síťovou šňůru chraňte
Teplota (provoz): 0...40 °C
Teplota (skladování): -25...60 °C
Relativní vlhkost: 5...95 % bez kondenzace
SK Návod na použitie svietidla LivingColors
Ďakujeme, že ste si zakúpili podlahové svietidlo Philips
prípad použitia v budúcnosti. Dodržiavaním našich
LivingColors!
pokynov si naplno vychutnáte všetky funkcie svietidla
Philips LivingColors.
Svietidlo LivingColors je špeciálne navrhnuté, aby vám
umožnilo vytvoriť vo vašej domácnosti atmosféru
Zaregistrujte svoj výrobok na lokalite www.philips.
presne podľa vašich predstáv, a to pomocou farby a
com/welcome, aby ste mali vždy aktuálne informácie o
svetla. Pred prvým použitím svietidla LivingColors si
výrobkoch LivingAmbiance
pozorne prečítajte tieto pokyny a odložte si ich pre
67

Tento návod vám pomôže v týchto oblastiach…
s automatickým prepínaním farby, môžete tiež
1. Začíname
nastaviť sýtosť a jas farieb.
2. Vytvorte si vlastnú atmosféru pomocou svietidiel
Ak chcete svietidlo prepnúť späť do režimu s
LivingColors
jednou nemennou farbou, znova prejdite prstom
3. Pripojte svietidlá LivingColors k iným výrobkom
dookola po farebnom kruhu a stlačte tlačidlo „0“.
radu Philips LivingAmbiance
Prípadne môžete svietidlo LivingColors vypnúť
4. Odpovede na najčastejšie otázky
„0“ a opäť zapnúť „I“.
5. Ďalšia podpora
- Ak sa vám páči konkrétne nastavenie osvetlenia
1. Začíname:
(napríklad mierne stlmené červené svetlo),
môžete si uložiť túto scénu a neskôr ju
- Zasuňte tyč do podstavca a otáčajte ňou v smere
jednoducho opäť vyvolať: stlačte a podržte jedno
hodinových ručičiek až na doraz.
z tlačidiel scény, až kým z diaľkového ovládania
- Zasuňte pripojovaciu zástrčku do otvoru pod
nezaznie pípnutie. Vaša scéna je teraz uložená
podstavcom svietidla a jej druhý koniec zapojte
pod tým tlačidlom scény, ktoré ste stlačili. Týmto
do elektrickej zásuvky.
spôsobom môžete uložiť aj určitú rýchlosť zmeny
- Zasuňte pripojovaciu zástrčku na vrchnej časti
farieb v režime automatického prepínania farby.
stojana do svietidla – musíte počuť, ako zaskočí
na miesto.
Aj naďalej môžete pokračovať v upravovaní
- Umiestnite svietidlo LivingColors na stojan a
zdrojov svetla podľa svojich predstáv. Keď sa
nasmerujte ho na stenu (optimálna vzdialenosť je
chcete vrátiť k uloženej scéne, stačí stlačiť tlačidlo
50 cm). Výšku svietidla môžete nastaviť otočením
scény, ktoré ste stlačili pri jej uložení. Toto tlačidlo
krúžku v strede stojana. Vrchnú časť stojana
scény sa nakrátko rozsvieti, čím signalizuje výber
potom vytiahnite do požadovanej výšky a zaistite
danej scény, a svietidlá LivingColors sa prepnú na
ho v tejto polohe otočením krúžku v opačnom
uložené nastavenia.
smere.
Uložiť môžete až 3 scény (jednu pre každé
- Posunutím tlačidla na zadnej strane diaľkového
tlačidlo scény).
ovládania otvorte priestor pre batérie. Vložte 3
Svietidlo LivingColors vypnete krátkym stlačením
batérie typu AAA (dodržte označenú polaritu +
tlačidla „0“ (Vyp.). Svietidlo LivingColors si
a –).
zapamätá posledné nastavenie a použije ho pri
nasledujúcom zapnutí. Ak chcete svietidlo opäť
2. Vlastnú atmosféru môžete vytvoriť:
zapnúť, stlačte tlačidlo „I“ (Zap.).
- Dotykom požadovanej farby na farebnom kruhu.
3. Pripojte svietidlá LivingColors k iným
Pohybom prsta po farebnom kruhu môžete jemne
výrobkom radu Philips LivingAmbiance
doladiť farbu.
K diaľkovému ovládaniu svietidiel LivingColors môžete
- Zmenou sýtosti farby (zvýšením intenzity bielej
pripojiť rôzne výrobky z radu Philips LivingAmbiance.
v aktuálnej farbe). Stlačením tlačidla zvýšenia sýtosti
Takto môžete nastaviť všetky pripojené výrobky
dosiahnete sýtejšiu farbu alebo stlačením tlačidla
súčasne alebo každý z nich samostatne – vždy
zníženia sýtosti získate viac pastelovú farbu. Ak
pomocou jedného diaľkového ovládania.
podržíte stlačené tlačidlo zníženia sýtosti, nakoniec
dosiahnete bielu farbu.
1. K diaľkovému ovládaniu možno pripojiť ďalšie
- Stlmením intenzity svetla. Intenzitu svetla
svietidlá Philips LivingColors. Väčšina
možno zvyšovať alebo znižovať pomocou tlačidiel
svietidiel Philips LivingColors funguje s týmto
na stlmenie intenzity.
ovládaním: stačí skontrolovať, či je svietidlo, ktoré
chcete prepojiť, označené logom SmartLink.
- Automatickým prepínaním farby. Prejdite
Všetky produkty s logom SmartLink možno
prstom dookola po farebnom kruhu (jeden
pripojiť k diaľkovému ovládaniu.
celý kruh) a krátko stlačte tlačidlo „I“ („Zap.“).
Svietidlo LivingColors sa prepne do režimu s
Ak chcete pridať svietidlo Philips LivingColors
automatickým prepínaním farby: svietidlo začne
k diaľkovému ovládaniu, umiestnite ovládanie
automaticky meniť farby.
do blízkosti svietidla, potom stlačte a podržte
tlačidlo „I“. Svietidlo 3-krát zabliká. Podržte
Môžete nastaviť rýchlosť zmeny farby. Rýchlosť
tlačidlo „I“, až kým nebudete počuť pípnutie z
možno nastaviť v smere hodinových ručičiek od
diaľkového ovládania a neuvidíte svietidlo krátko
vysokej (tmavomodrá farba na farebnom kruhu)
bliknúť nazeleno. Svietidlo je teraz pripojené
až po nízku (alová). Môžete poklepať kdekoľvek
k diaľkovému ovládaniu a prepne sa na svoje
na farebnom kruhu. Keď je svietidlo v režime
posledné nastavenie v zapnutom režime.
68

Pri svietidle LivingAmbiance nezabudnite pripojiť
teraz prepojené – môžete teda pripojiť rovnaké
aj biely zdroj svetla – urobíte to tým istým
svietidlá k novému diaľkovému ovládaniu a
spôsobom, ako pri výrobkoch LivingWhites,
ovládať všetky svietidlá ktorýmkoľvek z týchto
opísaným v bode 2.
diaľkových ovládaní.
Ak by ste chceli odpojiť svietidlo LivingColors
c. Ak pridávate okrúhle diaľkové ovládanie, môžete
od diaľkového ovládania, umiestnite diaľkové
tiež kopírovať jeho nastavenie: môžete ho tak
ovládanie do jeho blízkosti, potom stlačte a
okamžite pripojiť k tým svietidlám, ku ktorým je
podržte tlačidlo „0“. Svietidlo 3-krát zabliká.
pripojené aktuálne používané diaľkové ovládanie.
Podržte tlačidlo „0“, až kým nebudete počuť
Ak chcete kopírovať nastavenie diaľkového
pípnutie z diaľkového ovládania. Svietidlo potom
ovládania, zopakujte postup uvedený v bode b.
pomaly zhasne.
Po pripojení jedného alebo viacerých svietidiel k
2. K diaľkovému ovládaniu môžete pripojiť
diaľkovému ovládaniu Philips LivingColors môžete
aj výrobky radu Philips LivingWhites
ovládať všetky pripojené svietidlá naraz alebo každé
(koncovky, úsporné žiarivky a svietidlá). Ak chcete
samostatne.
pridať výrobok z radu Philips LivingWhites
Ak chcete ovládať jedno svietidlo, musíte ho
k diaľkovému ovládaniu, umiestnite diaľkové
najskôr vybrať (upozorňujeme, že pri svietidlách
ovládanie do jeho blízkosti, potom stlačte a
LivingColors s farebným a bielym svetlom je potrebné
podržte tlačidlo „I“. Svietidlo 3-krát zabliká.
vybrať zdroj farebného a bieleho svetla osobitne).
Podržte tlačidlo „I“, až kým nebudete počuť
Urobíte tak pomocou jedného z tlačidiel výberu zdroja
pípnutie z diaľkového ovládania a neuvidíte
svetla. Keď stlačíte a podržíte jedno z tlačidiel výberu
svietidlo dvakrát rýchlo bliknúť. Výrobok je teraz
zdroja svetla, vybraté svietidlo začne blikať. Ak to nie
pripojený k diaľkovému ovládaniu a prepne sa na
je svietidlo, ktoré chcete nastaviť, uvoľnite tlačidlo a
svoje posledné nastavenie v zapnutom režime.
znovu ho stlačte – začne blikať ďalšie svietidlo. Keď
vyberiete niektoré svietidlo, rozsvieti sa indikátor
Ak by ste chceli odpojiť výrobok LivingWhites
výberu zdroja svetla na diaľkovom ovládaní (žiarovka).
od diaľkového ovládania, umiestnite diaľkové
Signalizuje, že teraz môžete nastaviť iba toto svietidlo.
ovládanie do jeho blízkosti, potom stlačte a
Keď nie je vybratý zdroj svetla (indikátor výberu zdroja
podržte tlačidlo „0“. Svietidlo 3-krát blikne.
svetla nesvieti), všetky nastavenia sa budú vzťahovať na
Podržte tlačidlo „0“, až kým nebudete počuť
všetky zdroje svetla pripojené k diaľkovému ovládaniu
pípnutie z diaľkového ovládania. Svietidlo potom
(môžete napríklad súčasne stlmiť všetky svietidlá v
pomaly zhasne.
miestnosti).
Ak sa vám páči určitá kombinácia nastavenia svetla
3. Diaľkové ovládanie môžete pripojiť aj k ďalšiemu
rôznych svietidiel, môžete si ju tiež uložiť ako scénu
diaľkovému ovládaniu z radu výrobkov Philips
– rovnakým spôsobom, ako je uvedené v časti 2 tohto
LivingAmbiance. K diaľkovému ovládaniu
návodu.
možno pripojiť akékoľvek diaľkové ovládanie
LivingColors alebo LivingWhites označené logom
4. Často kladené otázky
SmartLink. Pripojením ďalšieho diaľkového
ovládania môžete ovládať tie isté svietidlá dvomi
Ako postupovať, ak…
rôznymi diaľkovými ovládaniami. Môžete napríklad
o Svietidlo LivingColors nesvieti
pomocou rovnakých svietidiel vytvoriť 6 rôznych
o Skontrolujte pripojenie kábla ku svietidlu.
svetelných scén – 3 na jednom diaľkovom
Skontrolujte, či je zástrčka správne zapojená v
ovládaní a 3 na druhom. Ak chcete pridať
elektrickej zásuvke.
ďalšie diaľkové ovládanie LivingColors alebo
o Odpojte napájací kábel a opäť ho pripojte.
LivingWhites, postupujte nasledovne:
Ak svietidlo LivingColors niekoľkokrát zmení
farbu a potom sa vypne, pomocou diaľkového
a. Vynulujte nastavenie diaľkového ovládania, ktoré
ovládania ho opäť zapnite.
chcete pridať: otvorte jeho priestor pre batérie a
na niekoľko sekúnd stlačte tlačidlo RESET (napr.
o Svietidlo LivingColors nereaguje na
pomocou sponky na papier). Uistite sa, že sú v
diaľkové ovládanie
ňom vložené batérie. Diaľkové ovládanie vydá
o Skontrolujte batérie v diaľkovom ovládaní.
zvukový signál, ktorý signalizuje vynulovanie jeho
Je potrebné, aby boli vložené so správnou
nastavenia.
polaritou (+ a -) a boli nabité. Ak diaľkové
b. Podržte diaľkové ovládanie, na ktorom ste
ovládanie aj napriek tomu nefunguje, skúste
vynulovali jeho nastavenie, v blízkosti aktuálne
vymeniť batérie.
používaného diaľkového ovládania. Stlačte tlačidlo
o Prepojte diaľkové ovládanie so svietidlom
„I“ na oboch diaľkových ovládaniach, až kým obe
LivingColors podľa postupu v časti 3.1 tohto
nevydajú zvukový signál. Diaľkové ovládania sú
návodu.
69

o Po použití diaľkového ovládania tlačidlá
nečitateľným,
blikajú
- sa vyskytli zlyhania spôsobené poškodením,
o Znamená to, že batérie v diaľkovom ovládaní
chybnými pripojeniami alebo zneužitím,
sú (takmer) vybité a je potrebné ich vymeniť.
- chybu spôsobili extrémne okolnosti nesúvisiace
so svietidlom LivingColors, napríklad zásah
o Nemožno spustiť režim s automatickým
bleskom, záplava, požiar, nesprávne použitie alebo
prepínaním farby
nedbalosť,
o Príčinou môže byť to, že diaľkové ovládanie
- svietidlo LivingColors bolo otvárané alebo
nerozpoznalo váš pohyb prstom. Skúste to
rozoberané.
znova, pričom dbajte na to, aby sa prst dotýkal
farebného kruhu počas celého pohybu po
Čistenie a údržba:
kruhu.
Vytiahnite sieťový adaptér zo zásuvky.
Aby nedošlo k poškriabaniu, svietidlo LivingColors,
o Chcel(a) by som pripojiť svietidlo
diaľkové ovládanie a adaptér čistite len jemnou a
LivingColors k časovaču. Je to možné?
suchou tkaninou.
o Áno. Svietidlo Philips LivingColors môžete
Nepoužívajte čistiace prostriedky.
používať s časovačom (nie je súčasťou
dodávky). Pri zapnutí pomocou časovača sa
Bezpečnostné pokyny:
na svietidle LivingColors obnoví posledné
- Adaptér a svietidlo LivingColors uchovávajte
nastavenie (režim s jednou nemennou farbou
mimo dosahu tekutín a vlhkosti.
alebo s automatickým prepínaním farby).
- Svietidlo LivingColors je určené len pre
Uistite sa, že posledné nastavenie nie je
interiérové použitie. Nepoužívajte ho na vlhkých
„vypnuté“.
miestach, napr. v kúpeľniach alebo v exteriéri.
- Svietidlo LivingColors nie je hračka pre deti.
o K diaľkovému ovládaniu LivingColors
- Nepokladajte na horúce povrchy
nemôžem pripojiť ďalšie svietidlá
- Z bezpečnostných dôvodov a v súlade so
o Uistite sa, že výrobok, ktorý sa snažíte pripojiť,
záručnými podmienkami nesmiete svietidlo
je označený logom SmartLink. K diaľkovému
LivingColors ani adaptér otvárať.
ovládaniu možno pripojiť len výrobky
- Používajte len priložený adaptér: pri použití iného
označené logom SmartLink.
adaptéra môže dôjsť k poškodeniu svietidla
o Skúste znovu vykonať postup popísaný v časti
LivingColors.
3 tohto návodu. Uistite sa, že počujete zvuky
a že svietidlá blikajú tak, ako je to opísané v
Životné prostredie:
tejto časti.
Pri vyradení zariadenie zlikvidujte v súlade s pokynmi
miestnych orgánov. Pri likvidácii diaľkového ovládania
o Moja otázka tu nie je uvedená
vyberte batérie. Batérie nevyhadzujte spolu s bežným
o Požiadajte o pomoc spoločnosť Philips
domácim odpadom, ale ich odovzdajte na mieste
(pozrite si časť 5, „Ďalšia podpora“).
ociálneho zberu alebo u predajcu spoločnosti Philips,
kde budú zlikvidované spôsobom šetrným pre životné
5. Ďalšia podpora
prostredie.
Na získanie informácií a v prípade akéhokoľvek
Technické údaje sieťového adaptéra:
problému navštívte webovú stránku spoločnosti
Sieťový adaptér
Philips na lokalite www.philips.com alebo sa obráťte
Model: EADP-10EB C (typ pre EÚ)
na kontaktné stredisko spoločnosti Philips Lighting
EADP-10EB D (typ pre Veľkú Britániu a
na bezplatnom čísle: 00800-PHILIPSL alebo 00800-
Singapur)
74454775
EADP-10EB E (typ pre Austráliu)
Vstup: 220 – 240 V ~ 0,3 A 50 Hz
Záruka:
Výstup: 18,5 V 0,83 A
Dvojročná záruka spoločnosti Philips platí, ak sa
produkt používa v súlade s pokynmi a na jeho určený
Spotreba energie svietidla: max. 15,4 W
účel. Záručné nároky sa akceptujú len na základe
predloženia originálneho dokladu o kúpe (faktúra,
Diaľkové ovládanie:
pokladničný doklad alebo účtenka), ktorý obsahuje
Batérie: 3 x Philips Powerlife alkalické AAA LR03, 1,5 V.
dátum zakúpenia, názov predajcu a popis produktu.
Špecikácie bezdrôtového pripojenia:
Záruka spoločnosti Philips zaniká, ak:
Frekvenčné pásmo bezdrôtového režimu RF:
- sa na doklade o zakúpení alebo v popise produktu
2405~2475 MHz
čokoľvek zmenilo, vyčiarklo, odstránilo alebo stalo
Protokol bezdrôtovej komunikácie: IEEE 802.15.4)
70

Operačné kanály: kanály 11, 15, 20 alebo 25
Teplota (skladovanie): -25...60 °C
Relatívna vlhkosť: 5...95 % bez kondenzácie
Špecikácie prostredia:
Teplota (prevádzka): 0...40 °C
HU LivingColors – Használati utasítás
Köszönjük, hogy a Philips LivingColors állólámpát
- Állítsa be a szín telítettségét (ezzel több
választotta!
fehéret adhat az aktuális színhez). A telítettség
növelése gombbal telítettebbé, a telítettség
A LivingColors terméket kifejezetten az egyéni
csökkentése gombbal pedig halványabbá teheti a
igényeknek megfelelő színes és fényes környezet
színt. Ha sokáig nyomkodja a telítettség csökkentése
megteremtése érdekében fejlesztettük ki. A
gombot, a fény előbb-utóbb teljesen kifehéredik.
LivingColors első használatát megelőzően gyelmesen
olvassa el a használati utasítást, és őrizze meg
- Tompítás. Tompítsa vagy erősítse a fényerősséget
későbbi használatra. Ajánlásaink betartásával a Philips
a fényerőszabályozó gombokkal.
LivingColors termék teljes funkcionalitását élvezheti.
- Automatikus színváltoztatás. Húzza végig
Regisztrálja termékét a www.philips.com/welcome
ujját a színtárcsán (egy teljes kört leírva), majd
oldalon, és maradjon naprakész az új Philips
röviden nyomja meg a „I” (be) gombot. Ekkor
LivingAmbiance termékeket illetően
a LivingColors automatikus színváltó módba áll,
azaz a lámpa elkezdi automatikusan változtatni a
Ez az útmutató az alábbiakhoz nyújt segítséget:
színeket.
1. Bevezetés
2. Egyéni hangulatvilágítás a LivingColors használatával
A színek váltásának sebességét is beállíthatja.
3. Csatlakoztassa a LivingColors készülékeket Philips
A sebesség az óramutató járásával megegyező
LivingAmbiance termékekhez
irányban állítható be, a gyorstól (sötétkék szín a
4. Gyakran ismételt kérdések
színtárcsán) a lassúig (bíbor). Bárhol megérintheti
5. További támogatás
a színtárcsát. Automatikus színváltó módban is
beállíthatja a színek telítettségét és fényességét.
1. Bevezetés:
A normál üzemmódba való visszaálláshoz újra
húzza végig ujját a színtárcsa körül, majd nyomja
- Illessze a tartórudat a talpazatba, majd az
meg a „0” gombot. A másik lehetőség, hogy ki-
óramutató járásával megegyező irányba forgatva
(„0”), majd ismét bekapcsolja „I” a LivingColors
rögzítse.
terméket.
- Illessze a csatlakozódugaszt a lámpa talprészén
található nyílásba, másik végét pedig csatlakoztassa
- Ha egy adott fénybeállítás különösen tetszik
a fali aljzathoz.
Önnek (pl. enyhén tompított vörös), a beállítást
- Tolja a tartórúd tetején található
el is mentheti, így később bármikor könnyedén
csatlakozódugaszt a lámpába, ameddig kattanást
megtalálja. Tartsa lenyomva a Fénybeállítás
nem hall.
gombok egyikét, amíg a távvezérlő sípoló hangot
- Helyezze a lámpát a tartórúdra, majd irányítsa
nem ad. A fénybeállítás ezzel mentésre kerül
a LivingColors lámpát a fal felé (az optimális
a lenyomott Fénybeállítás gomb alatt. Ezen a
távolság 50 cm). A lámpatest magasságát a
módon az automatikus színváltó üzemmódokat is
tartórúd közepén található gyűrű elforgatásával
elmentheti.
szabályozhatja. A gyűrű elforgatása után húzza ki
a tartórúd felső részét megfelelő hosszúságúra,
Ezután folytathatja a fényforrások beállítását. Ha
majd rögzítse a kívánt magasságot a gyűrű
ismét meg akarja nyitni az elmentett fénybeállítást,
ellenkező irányú elforgatásával.
nyomja meg azt a Fénybeállítás gombot, amelyhez
- A távvezérlő hátoldalán található gombot eltolva
a beállítást hozzárendelte. A Fénybeállítás gomb
nyissa fel az elemtartó rekeszt. Helyezzen
rövid időre felvillan, és a LivingColors a megadott
be 3 darab AAA típusú elemet (a „+” és „–”
beállításra áll.
jelzéseknek megfelelő polaritással).
A készülék legfeljebb 3 db. fénybeállítást
(fénybeállítás gombonként ) egyet-egyet képes
2. Hozza létre az Önnek tetsző környezetet:
tárolni.
A LivingColors lámpa a „0” (ki) gombot röviden
- Érintse meg a kívánt színt a színtárcsán, majd ujja
megnyomva kapcsolható ki. A következő
mozgatásával nomítson a színbeállításon.
használatkor a LivingColors lámpa emlékszik az
71

utolsó színbeállításra. Az ismételt bekapcsoláshoz
egy sípoló hangot nem hallat. A lámpa lassan
nyomja meg az „I” (be) gombot.
kialszik.
3. Csatlakoztassa a LivingColors készülékeket
3. Távvezérlőjét csatlakoztathatja egy másik
Philips LivingAmbiance termékekhez
távvezérlőhöz a Philips LivingAmbiance
termékválasztékból. Bármilyen SmartLink
Lehetőség van a Philips LivingAmbiance
logóval ellátott LivingColors vagy LivingWhites
termékeinek a LivingColors távvezérlőjéhez történő
távvezérlő csatlakoztatható. Egy másik távvezérlő
csatlakoztatására. Így Önnek lehetősége nyílik minden
csatlakoztatása lehetővé teszi, hogy ugyanazt a
csatlakoztatott termék egyszerre történő beállítására,
lámpát egy másik távvezérlővel is irányíthassa.
egyetlen távvezérlővel.
Így ugyanazon lámpákkal is lehetősége van 6
különböző fénybeállítás eltárolására is – 3-at
1. Más Philips LivingColors lámpákat is
az egyik, és 3-at a másik távvezérlővel. Új
csatlakoztathat a távvezérlőhöz. A legtöbb Philips
LivingColors vagy LivingWhites távvezérlő
LivingColors termék együttműködik ezzel a
hozzáadásához tegye a következőket.
távirányítóval, csupán azt kell ellenőriznie, hogy
a csatlakoztatni kívánt LivingColors terméken
a. Állítsa alaphelyzetbe hozzáadni kívánt távvezérlőt;
szerepel-e SmartLink logó. Minden SmartLink
nyissa fel az elemtartó rekeszt, majd nyomja meg
logóval ellátott készülék hozzáadható a
néhány másodpercig a RESET („Visszaállítás”)
távvezérlőhöz.
gombot (például egy gemkapocs végével).
Ellenőrizze, hogy az elemek a készülékben
A Philips LivingColors lámpa távvezérlőhöz
vannak-e. A távvezérlő hangjelzést ad, ha az
rendeléséhez irányítsa a távvezérlőt a lámpára,
alaphelyzetbe állítás befejeződött.
majd tartsa nyomva a „I” gombot. A lámpa
b. Irányítsa az alaphelyzetbe állított távvezérlőt az
háromszor felvillan. Tartsa lenyomva a „I” gombot,
éppen használt távvezérlőre. Nyomja meg az „I”
amíg a távvezérlő sípoló hangot nem ad, majd a
gombot mindkét távvezérlőn, amíg azok nem
lámpa zöld színnel fel nem villan. A lámpa ekkor
adnak ki hangot. A távvezérlők csatlakoztatása
hozzá van rendelve a távvezérlőhöz és a legutolsó
megtörtént, így mostantól csatlakoztathatja a
bekapcsolt beállítás szerint fog világítani.
lámpákat a távvezérlőkhöz, és kedve szerint
Ha LivingAmbiance esetén ügyeljen rá, hogy a
vezérelheti azokat.
fehér fényforrást is hozzárendelje a távvezérlőhöz
c. Amennyiben a hozzáadni kívánt távvezérlő kerek,
– mindez ugyanúgy történik, mint a 2. pontban
lehetőség van annak másolására is: azonnal
ismertetett LivingWhites termékek esetében.
csatlakoztathatja ugyanazokhoz a lámpákhoz,
Ha meg szeretné szüntetni a LivingColors lámpa
amelyekhez az eredeti távvezérlő csatlakoztatva
kapcsolatát a távvezérlővel, irányítsa a távvezérlőt
van. A távvezérlő másolásához ismételje meg a b
a lámpára, majd nyomja a „0” gombot addig, amíg
pontban leírt műveletet.
sípszót nem hall. A lámpa háromszor felvillan.
Tartsa lenyomva a „0” gombot, amíg a távvezérlő
Miután hozzáadott egy vagy több lámpát a Philips
egy sípoló hangot nem hallat. A lámpa lassan
LivingColors távvezérlőhöz, a lámpa/lámpák együtt
kialszik.
vagy külön-külön is vezérelhetők.
Egyetlen lámpa vezérléséhez válassza ki a lámpát
2. Ezen túl lehetősége van Philips LivingWhites
(ne feledje, hogy a LivingColors színes és fehér fényű
termékek (csatlakozók, energiatakarékos
lámpát külön kell kiválasztani). Ezt az egyik fényválasztó
lámpák és világítótestek) a távvezérlőjéhez
gombbal lehet megtenni. A fényválasztó gombok
való csatlakoztatásához. A Philips LivingWhites
lenyomva tartásával a választott lámpa villogni kezd.
termékek hozzáadásához: vigye közel a terméket,
Ha másik lámpát szeretne beállítani, engedje fel a
tartsa lenyomva a „I” gombot. A lámpa háromszor
gombot, majd nyomja le ismét – egy másik lámpa kezd
felvillan. Tartsa lenyomva az „I” gombot, amíg
villogni. Miután kiválasztotta a lámpát, a távvezérlőn
a távvezérlő nem hallat egy sípoló hangot. Ezt
felgyullad a fényforrásválasztó jelzőfény (izzó). Ekkor
követően a lámpa hirtelen felvillan kétszer. A
már kizárólag csak a választott lámpa beállítására van
távvezérlőhöz való csatlakoztatással a legutolsó
mód.
„be” beállítás kerül betöltésre.
Ha nincs kiválasztva fényforrás (a fényforrásválasztó
jelzőfény nem világít), a távvezérlőn végzett összes
Ha meg szeretné szüntetni a LivingWhites termék
beállítás valamennyi csatlakoztatott fényforrást
kapcsolatát a távvezérlővel, irányítsa a távvezérlőt
érinteni fogja (így például a helyiségben egyszerre
a termékre, majd nyomja a „0” gombot addig,
csökkentheti az összes fényforrás erejét).
amíg sípszót nem hall. A lámpa háromszor felvillan.
Ha a különböző lámpatestek egyik világítási beállítása
Tartsa lenyomva a „0” gombot, amíg a távvezérlő
különösen elnyeri tetszését, az útmutató 2. részében
leírtak szerint elmentheti a fénybeállítást.
72

4. Gyakran feltett kérdések
vállalathoz (lásd az 5. fejezetet – További
támogatás).
Mi a teendő, ha…
o A LivingColors nem világít
5. További támogatás
o Ellenőrizze a lámpa vezetékének csatlakozását.
Ellenőrizze, hogy a csatlakozó megfelelően
Tájékoztatásért, illetve probléma esetén látogasson
illeszkedik-e a csatlakozóaljzatba.
el a Philips weboldalára: www.philips.com, vagy
o Húzza ki a tápvezetéket, majd dugja vissza.
hívja a Philips Lighting ügyfélszolgálatának ingyenes
Ha a LivingColors különböző színekben
telefonszámát (00800-PHILIPSL vagy 00800-
felvillan, majd kikapcsol, kapcsolja be ismét a
74454775).
távvezérlővel.
Jótállás:
o A LivingColors nem reagál a távvezérlőre
A Philips kétéves jótállása akkor érvényes, ha a
o Ellenőrizze a távvezérlőben lévő elemeket.
terméket az utasításoknak és rendeltetési céljának
Győződjön meg arról, hogy (a „+” és a „-”
megfelelően használják. Reklamációt csak a vásárlást
jelzéseknek) megfelelően vannak behelyezve
igazoló, a vásárlás dátumát, a kereskedő nevét és a
az elemek, és nincsenek lemerülve. Ha a
termék ismertetését tartalmazó eredeti dokumentum
távvezérlő még mindig nem működik, cserélje
(számla, blokk vagy nyugta) bemutatásakor fogadunk el.
ki az elemeket.
o Társítsa a távvezérlőt és a LivingColors lámpát
A Philips által vállalt garancia a következő esetekben
az útmutató 3.1. fejezetében leírt eljárást
érvényét veszti:
követve.
- A vásárlást igazoló dokumentum vagy a
termékleírás bárminemű módosítása, illetve
o Használat után a távvezérlő gombjai
szövegének áthúzása, törlése vagy olvashatatlanná
villognak
tétele.
o Ez azt jelenti, hogy a távvezérlőben lévő
- Nem megfelelő csatlakoztatás és nem
elemek csaknem teljesen lemerültek, és itt az
rendeltetésszerű használat által okozott hibák.
idő kicserélni őket.
- A LivingColors meghibásodása olyan
körülményeknek tulajdonítható, amelyek
o Nem tudom elindítani az automatikus
fennállásakor a készülék használatra nem alkalmas,
színváltó üzemmódot
például villámlás, árvíz, tűzvész, nem megfelelő
o Előfordulhat, hogy a távvezérlő nem tudta
használat vagy gondatlanság.
értelmezni a színtárcsán tett mozdulatot.
- Felnyitották vagy szétszerelték a LivingColors
Próbálkozzon ismét, ügyelve, hogy az ujjával
terméket.
teljes kört írjon le a színváltó tárcsán.
Tisztítás és karbantartás:
o Időzítőhöz szeretném csatlakoztatni a
Húzza ki a dugót a fali aljzatból.
LivingColors lámpát. Van erre lehetőség?
A karcolódás megelőzése érdekében a LivingColors
o Igen, a Philips LivingColors lámpa
lámpát, a távvezérlőt és az adaptert kizárólag puha,
időzítővel is használható (az időzítőt külön
száraz törlővel tisztítsa.
kell megvásárolni). Az időzítővel való
Ne használjon tisztítószert.
bekapcsoláskor a LivingColors lámpa a
legutóbbi beállítást mutatja (normál vagy
Biztonsági utasítások:
automatikus színváltó mód). Ellenőrizze, hogy
- Tartsa a dugaszt és a LivingColors lámpát
a legutóbbi beállítás nincs-e kikapcsolva.
nedvességtől és folyadékoktól távol.
- A LivingColors lámpa kizárólag beltéri használatra
o Nem tudok további lámpákat
szolgál, ezért ne használja nedves helyiségben (pl.
csatlakoztatni a LivingColors távvezérlőhöz
fürdőszobában) és kültéren.
o Kérjük, ellenőrizze, hogy a csatlakoztatni
- A LivingColors lámpa nem játék; ne hagyja, hogy
kívánt termék rendelkezik SmartLink logóval,
gyermekek játsszanak vele.
mivel kizárólag a SmartLink logóval ellátott
- Ne helyezze forró felületre.
termékek csatlakoztathatóak a távvezérlőhöz.
- A LivingColors lámpa és a dugasz biztonsági
o Végezze el ismét az útmutató 3. fejezetében
okokból és a garanciafeltételek értelmében nem
leírt eljárást. Győződjön meg róla, hogy hallja
nyitható fel.
az ismertetett hangjelzéseket és látja a villogó
- Csak a mellékelt adaptert használja; másik adapter
fényjelzéseket.
használata tönkreteheti a LivingColors lámpát.
o A kérdésem nem szerepel a listán.
Környezetvédelem:
o További támogatásért forduljon a Philips
A terméket hasznos élettartama végén a helyi hatósági
73
előírásoknak megfelelően selejtezze le. A távvezérlő
leselejtezésekor távolítsa el belőle az elemeket. Az
Távvezérlés:
elemeket ne a háztartási hulladékkal együtt dobja ki,
Elemek: 3 db Philips Powerlife alkáli minielem (LR03;
hanem vagy egy hivatalos akkumulátor-gyűjtőhelyen
1,5 V).
vagy egy Philips márkakereskedőnél adja le, ahol
gondoskodnak azok környezetbarát módon való
Vezeték nélküli jellemzők:
leselejtezéséről.
Vezeték nélküli rádiófrekvencia-sáv: 2405~2475 MHz
Vezeték nélküli kommunikációs protokoll: IEEE
A dugó műszaki jellemzői:
802.15.4)
Hálózati adapter
Működési csatornák: 11., 15., 20. vagy 25. csatorna
Típus: EADP-10EB C (EU típus)
EADP-10EB D (egyesült királyságbeli +
Környezeti adatok:
szingapúri típus)
Hőmérséklet (üzemi): 0–40 °C
EADP-10EB E (ausztráliai típus)
Hőmérséklet (tárolási): -25–60 °C
Bemenet: 220–240 V ~ 0,3 A 50 Hz
Relatív páratartalom: 5–95% (nem lecsapódó)
Kimenet: 18,5 V 0,83 A
A lámpatest energiafogyasztása: legfeljebb 15,4 W
LV LivingColors lietošanas pamācība
Paldies, ka iegādājāties Philips LivingColors grīdas
ir 50 cm). Lampas augstumu varat noregulēt,
lampu!
pagriežot gredzenu statīva vidū, pavelkot statīva
augšējo daļu vajadzīgajā augstumā un pēc tam
Lampa LivingColors ir īpaši izstrādāta, lai ar krāsu un
pagriežot gredzenu atpakaļ, lai nostiprinātu
gaismu katrs varētu radīt sev piemērotu mājokļa vidi.
vajadzīgo stāvokli.
Lietojot lampu LivingColors pirmo reizi, lūdzu, rūpīgi
- Atveriet tālvadības pults bateriju nodalījumu,
izlasiet un saglabājiet šo instrukciju, lai varētu tajā
pārbīdot pults apakšpusē esošo pogu. Ievietojiet
ieskatīties arī turpmāk. Ievērojot šeit minētās norādes,
trīs AAA tipa baterijas (atbilstoši + un –
varēsit baudīt visas Philips LivingColors lampas
atzīmēm).
piedāvātās iespējas.
2. Izveidojiet sev tīkamu mājokļa gaisotni
Reģistrējiet ierīci tīmekļa vietnē: www.philips.com/
welcome, lai saņemtu informāciju par jauniem Philips
- Pieskarieties vēlamajai krāsai uz krāsu ripas. Varat
LivingAmbiance izstrādājumiem
virzīt pirkstu pa krāsu ripu, lai precīzāk izvēlētos
krāsas toni.
Šajā pamācībā sniegtie padomi jums palīdzēs…
- Maniet krāsas piesātinājumu (pievienojiet
1. sākt lietot ierīci;
izraudzītajai krāsai vairāk baltas krāsas toņa).
2. radīt savu īpašo gaisotni ar LivingColors;
Spiediet piesātinājuma palielināšanas pogu, lai
3. pievienot LivingColors citiem Philips
iegūtu izteiksmīgāku toni, savukārt spiediet
LivingAmbiance izstrādājumiem;
piesātinājuma samazināšanas pogu, lai iegūtu
4. saņemt atbildes uz bieži uzdotiem jautājumiem;
pasteļkrāsas toni. Ja ilgi turēsit nospiestu
5. saņemt papildu palīdzību.
piesātinājuma samazināšanas pogu, iegūsit balto
krāsu.
1. Darba sākšana
- Aptumšošana. Palieliniet vai samaziniet krāsas
- Ievietojiet kāju pamatnē un grieziet to pulksteņa
intensitāti, izmantojot aptumšošanas pogas.
rādītāju kustības virzienā, līdz vairs nevarat
pagriezt.
- Automātiskas krāsu mainīšanas režīms.
- Ievietojiet savienojuma spraudni zem lampas
Ar apļveida kustību virziet pirkstu pa krāsu
pamatnes esošajā atverē, bet otru galu
ripu (vienu pilnu apli) un nospiediet pogu „I”
iespraudiet sienas kontaktligzdā.
(„ieslēgt”); tādējādi LivingColors lampai tiks
- Ievietojiet statīva augšpusē esošo savienojuma
ieslēgts automātiskas krāsu mainīšanas režīms —
spraudni lampā — pārliecinieties, vai atskan
krāsas lampai tiks mainītas automātiski.
klikšķis.
- Novietojiet lampu uz statīva un pavērsiet
Krāsu mainīšanas ātrumu varat regulēt. Ātrumu
LivingColors pret sienu (optimālais attālums
var regulēt pulksteņa rādītāju kustības virzienā —
74

no ātra (tumši zilā krāsa uz krāsu ripas) uz
iestatījums.
lēnu (purpursarkanā krāsa). Krāsu ripai varat
LivingAmbiance lampai noteikti pievienojiet
pieskarties jebkurā vietā. Ieslēdzot automātisko
arī balto gaismu — to var izdarīt tādā pašā
krāsu mainīšanas režīmu, varat regulēt arī krāsu
veidā, kā 2. punktā aprakstītajiem LivingWhites
piesātinājumu un spilgtumu.
izstrādājumiem.
Lai atgrieztos statiskas krāsas režīmā, veicot
Ja LivingColors lampu vēlaties atvienot no
apļveida kustību, atkal virziet pirkstu pa krāsu
tālvadības pults, pietuviniet tālvadības pulti lampai,
ripu un pēc tam nospiediet pogu „0”. Varat izslēgt
pēc tam nospiediet un turiet nospiestu pogu „0”.
LivingColors, nospiežot pogu „0”, un atkal ieslēgt,
Lampa trīs reizes iemirgosies. Turiet nospiestu
nospiežot pogu „I”.
pogu „0”, līdz tālvadības pults nopīkstēs. Lampas
gaisma lēnām izdzisīs.
- Ja esat iecienījis noteiktas krāsas iestatījumu
(piemēram, nedaudz aptumšotu sarkano krāsu),
2. Tālvadības pultij var pievienot arī citus Philips
varat saglabāt šo ainu, lai vēlāk to varētu ērti
LivingWhites izstrādājumus (kontaktdakšas,
ieslēgt: nospiediet un turiet nospiestu kādu no
energoekonomiskās spuldzes un lampas). Lai
ainas pogām, līdz tālvadības pults nopīkst. Tagad
pievienotu Philips LivingWhites izstrādājumu,
nospiestajai ainas pogai ir saglabāta izvēlētā
turiet tālvadības pulti tuvu šim izstrādājumam,
aina. Tādā veidā varat saglabāt arī noteiktu
pēc tam nospiediet un turiet nospiestu pogu „I”.
automātiskas krāsu mainīšanas režīmu.
Lampa trīs reizes iemirgosies. Turiet nospiestu
pogu „I”, līdz tālvadības pults nopīkst; lampa
Varat turpināt regulēt gaismas atbilstoši savām
divas reizes ātri iemirgosies. Tagad izstrādājums
vēlmēm. Ja vēlaties atkārtoti ieslēgt saglabāto
ir pievienots tālvadības pultij, un tam tiks ieslēgts
ainu, vienkārši nospiediet to ainas pogu, kuru
pēdējais izmantotais „on” („ieslēgt”) iestatījums.
spiedāt, saglabājot attiecīgo ainu. Šī ainas poga uz
īsu brīdi iedegsies, apstiprinot, ka tā ir atlasīta, un
Ja LivingWhites izstrādājumu vēlaties atvienot
LivingColors tiks ieslēgti saglabātie iestatījumi.
no tālvadības pults, pietuviniet tālvadības pulti
Varat saglabāt līdz pat trim ainām (vienu ainu
izstrādājumam, pēc tam nospiediet un turiet
katrai ainas pogai).
nospiestu pogu „0”. Lampa trīs reizes iemirgosies.
Izslēdziet LivingColors, īsi nospiežot pogu „0”
Turiet nospiestu pogu „0”, līdz tālvadības pults
(izslēgt). Nākamajā lietošanas reizē LivingColors
nopīkstēs. Lampas gaisma lēnām izdzisīs.
atcerēsies pēdējo izmantoto iestatījumu. Lai to
atkal ieslēgtu, nospiediet pogu „I” (ieslēgt).
3. Savu tālvadības pulti varat pieslēgt arī citai
tālvadības pultij no Philips LivingAmbiance
3. LivingColors pievienošana citiem Philips
izstrādājumu klāsta. Jūsu tālvadības pultij var
LivingAmbiance izstrādājumiem
pievienot jebkuru LivingColors vai LivingWhites
tālvadības pulti, uz kuras ir redzams SmartLink
LivingColors tālvadības pultij var pievienot dažādus
logotips. Pievienojot citu tālvadības pulti, varat
Philips LivingAmbiance klāsta produktus. Tādējādi,
regulēt lampas ar divām dažādām pultīm.
izmantojot vienu tālvadības pulti, varēsiet vienlaikus
Piemēram, izmantojot vienas un tās pašas lampas,
regulēt visus pievienotos izstrādājumus vai arī katru
varat izveidot sešas atšķirīgas apgaismojuma
atsevišķi.
ainas — trīs ainas vienai un trīs — citai tālvadības
pultij. Lai pievienotu papildu LivingColors vai
1. Tālvadības pultij varat pievienot citas Philips
LivingWhites tālvadības pulti, rīkojieties, kā
LivingColors lampas. Ar šo tālvadības pulti
aprakstīts tālāk.
darbosies lielākā daļa Philips LivingColors
lampu: vienkārši pārbaudiet, vai uz LivingColors,
a. Atiestatiet to tālvadības pulti, kuru vēlaties
kuru vēlaties pievienot, ir redzams SmartLink
pievienot: atveriet tās bateriju nodalījumu un
logotips. Jūsu tālvadības pultij var pievienot visus
dažas sekundes turiet nospiestu (piemēram,
izstrādājumus, uz kuriem ir redzams SmartLink
izmantojot saspraudi) pogu RESET (atiestatīt).
logotips.
Pārliecinieties, vai baterijas ir ievietotas. Tālvadības
pultij atskanēs signāls, lai apliecinātu, ka tā ir
Lai Philips LivingColors lampu pievienotu
atiestatīta.
tālvadības pultij, turiet tālvadības pulti tuvu šai
b. Turiet atiestatīto tālvadības pulti tuvu pašlaik
lampai, pēc tam nospiediet un turiet nospiestu
izmantotajai pultij. Nospiediet pogu „I” abām
pogu „I”. Lampa trīs reizes iemirgosies. Turiet
tālvadības pultīm, līdz tālvadības pultīm atskanēs
nospiestu pogu „I”, līdz tālvadības pults nopīkst;
signāls.Tagad tālvadības pultis ir savienotas — tas
pēc īsa brīža lampa iedegsies zaļā krāsā. Tagad
nozīmē, ka tagad tās pašas lampas varat pievienot
lampa ir pievienota tālvadības pultij, un tai tiks
jaunajai tālvadības pultij un regulēt visas lampas,
ieslēgts pēdējais izmantotais „on” („ieslēgt”)
izmantojot jebkuru no pultīm.
75

c. Ja pievienojat apaļu tālvadības pulti, to var arī
pirksta „apļveida” kustību. Lūdzu, mēģiniet
kopēt — varat to uzreiz pievienot tām pašām
vēlreiz, un, veicot pilnu apli, pirkstu noteikti
lampām, kurām ir pievienota oriģinālā tālvadības
novietojiet uz krāsu ripas.
pults. Lai kopētu tālvadības pulti, atkārtojiet b
punktā aprakstītās darbības.
o Vēlos pievienot LivingColors lampu
taimerim. Vai tas ir iespējams?
Kad Philips LivingColors tālvadības pultij ir pievienota
o Jā. Philips LivingColors var izmantot kopā
viena vai vairākas lampas, varat regulēt visas šīs lampas
ar taimeri (nav ietverts komplektā). Ja
kopā vai katru atsevišķi.
LivingColors lampu ieslēgs kopā ar taimeri, tai
Lai regulētu atsevišķu lampu, tā ir jāatlasa (ņemiet
tiks parādīts pēdējais izmantotais iestatījums
vērā, ka LivingColors krāsainās un baltās gaismas
(statiskā krāsa vai automātiskais krāsu
ieslēgšanai tās ir jāatlasa atsevišķi). To var izdarīt,
mainīšanas režīms). Pārbaudiet, vai pēdējais
izmantojot kādu no gaismas atlasīšanas pogām.
izmantotais iestatījums nav „izslēgt”.
Nospiežot un turot nospiestu kādu no gaismas
atlasīšanas pogām, atlasītā lampa sāks mirgot. Ja šī
o LivingColors tālvadības pultij nevar
lampa nav tā, kuru vēlējāties regulēt, atlaidiet pogu
pievienot papildu lampas
un vēlreiz nospiediet to — sāks mirgot cita lampa.
o Pārliecinieties, ka uz izstrādājuma, kuru
Ja lampa ir atlasīta, iedegsies tālvadības pults gaismas
mēģināt pievienot, ir redzams SmartLink
atlasīšanas indikators (kvēlspuldze). Tas nozīmē, ka tagad
logotips. Šai tālvadības pultij var pievienot
varat regulēt tikai atlasīto lampu.
tikai tos izstrādājumus, uz kuriem ir redzams
Ja nav atlasīta neviena gaisma (gaismas atlasīšanas
SmartLink logotips.
indikators ir izslēgts), tiks regulētas visas tālvadības
o Mēģiniet atkārtot šīs rokasgrāmatas 3. nodaļā
pultij pievienotās gaismas (piemēram, varat regulēt visu
aprakstītās darbības. Pārliecinieties, ka dzirdat
istabā ieslēgto gaismu intensitāti).
šajā rokasgrāmatā minētos skaņas un redzat
Ja esat iecienījis noteiktu dažādu lampu gaismas
gaismas (mirgošanas) signālus.
iestatījumu kombināciju, arī to varat saglabāt kā ainu.
To var izdarīt, izpildot šīs rokasgrāmatas 2. nodaļā
o Mans jautājums šajā sarakstā nav iekļauts
aprakstītās darbības.
o Lai saņemtu palīdzību, sazinieties ar Philips
(skat. 5. nodaļu „Papildu palīdzība”).
4. Bieži uzdotie jautājumi
5. Papildu palīdzība
Tālāk ir aprakstīts, kā rīkoties biežāk sastopamo
problēmu gadījumā.
Lai saņemtu informāciju un jebkādu problēmu
o LivingColors lampa nedeg
gadījumā, lūdzu, apmeklējiet Philips tīmekļa vietni
o Pārbaudiet vada savienojumu ar lampu.
www.philips.com vai sazinieties ar Philips apgaismes
Pārbaudiet, vai kontaktdakša ir pareizi
kontaktcentru, zvanot uz bezmaksas tālruņa numuru
ievietota sienas kontaktligzdā.
00800 PHILIPSL vai 00800 74454775.
o Atvienojiet barošanas vadu un atkārtoti
pievienojiet to. Ja LivingColors lampai tiek
Garantija
pārslēgtas dažas krāsas un pēc tam tā tiek
Philips divu gadu garantija ir spēkā, ja izstrādājums
izslēgta, izmantojiet tālvadības pulti, lai to atkal
tiek izmantots atbilstoši lietošanas instrukcijai un
ieslēgtu.
tam paredzētajam mērķim. Sūdzības tiks pieņemtas,
tikai iesniedzot pirkumu apliecinoša dokumenta
o LivingColors nereaģē uz tālvadības pulti
oriģinālu (rēķinu, pavadzīmi vai čeku), kurā ir norādīts
o Pārbaudiet tālvadības pults baterijas. Baterijām
iegādes datums, izplatītāja nosaukums un izstrādājuma
jābūt pareizi ievietotām (+ un -) un uzlādētām.
apraksts.
Ja tālvadības pults joprojām nedarbojas,
mēģiniet nomainīt baterijas.
Philips garantija zaudē spēku, ja:
o Pievienojiet tālvadības pulti LivingColors
- uz iegādes apstiprinājuma vai izstrādājuma
lampai, izpildot šīs rokasgrāmatas 3.1. sadaļā
apraksta būs konstatētas izmaiņas, svītrojumi,
aprakstītās darbības.
dzēsumi vai nesalasāmas zīmes;
- kļūdas izraisīja bojājums, nepareizi savienojumi vai
o Pēc tālvadības pults lietošanas pogas mirgo
ļaunprātīga izmantošana;
o Tas nozīmē, ka tālvadības pults baterijas ir
- defektu izraisīja ārkārtēji, ar LivingColors nesaistīti
(gandrīz) tukšas un tās ir jānomaina.
apstākļi, piemēram, zibens, plūdi, ugunsgrēks,
nepareiza lietošana vai nolaidība;
o Nevar ieslēgt automātisko krāsu
- LivingColors tikusi atvērta vai izjaukta.
mainīšanas režīmu
o Iespējams, tālvadības pults nesaprata jūsu
76
Tīrīšana un apkope
Kontaktdakšas specikācija
Izraujiet kontaktdakšu no sienas kontaktligzdas.
Maiņstrāvas adapteris
Lai nesaskrāpētu LivingColors lampu, tālvadības pulti
Modelis: EADP-10EB C (ES tips)
un adapteri, tie jātīra tikai ar mīkstu un sausu drāniņu.
EADP-10EB D (Lielbritānijas un
Neizmantojiet tīrīšanas līdzekļus.
Singapūras tips)
EADP-10EB E (Austrālijas tips)
Drošības norādes
Ieejas strāva: 220–240 V, ~ 0,3 A 50 Hz
- Nenovietojiet kontaktdakšu un LivingColors
Izejas strāva: 18,5 V 0,83 A
šķidrumu tuvumā un mitrumā.
- LivingColors paredzēta lietošanai vienīgi telpās.
Lampas strāvas patēriņš: līdz 15,4 W
Nelietojiet to mitrās vietās, piemēram, vannas
istabās vai ārpus telpām.
Tālvadības pults
- LivingColors nav rotaļlieta, ar ko var rotaļāties
Baterijas: 3 Philips Powerlife sārma AAA tipa LR03,
bērni.
1,5 V baterijas.
- Nenovietojiet uz karstām virsmām.
- Drošības apsvērumu dēļ un garantijas perioda
Bezvadu pieslēguma specikācija
laikā LivingColors un kontaktdakšu nedrīkst
Bezvadu RF režīma frekvenču josla: 2405~2475 MHz
atvērt.
Bezvadu sakaru protokols: IEEE 802.15.4
- Izmantojiet tikai komplektā iekļauto adapteri:
Darba kanāli: kanāli 11, 15, 20 vai 25
lietojot citu, LivingColors var tik sabojāta.
Apkārtējās vides specikācija
Vide
Temperatūra (darba): 0–40 °C
Ja nolemsit izmest ierīci, utilizējiet to atbilstoši
Temperatūra (uzglabāšanas): -25–60 °C
pašvaldības norādījumiem. Izmetot tālvadības pulti,
Relatīvais mitrums: 5–95 % bez kondensācijas
izņemiet no tās baterijas. Neizmetiet baterijas kopā ar
parastajiem mājsaimniecības atkritumiem. Tās jānodod
apstiprinātā savākšanas vietā vai Philips izplatītājam, jo
šādi baterijas tiks utilizētas videi draudzīgā veidā.
LT „LivingColors“ naudojimo instrukcija
o kitą jo galą įkiškite į sieninį kištukinį lizdą.
Dėkojame, kad įsigijote „Philips LivingColors“ grindų
- Įkiškite maitinimo kištuką stovo viršuje į lempą –
šviestuvą!
įsitikinkite, kad pasigirsta spragtelėjimas.
- Pastatykite „LivingColors“ lempą ant stovo ir
„LivingColors“ šviestuvas buvo specialiai sukurtas,
nukreipkite „LivingColors“ į sieną (optimalus
kad spalvomis ir šviesa galėtumėte suteikti namams
atstumas yra 50 cm). Šviestuvo aukštį galite
savitą atmosferą. Prieš naudodami „LivingColors“
reguliuoti pasukdami stovo viduje esantį
pirmą kartą, atidžiai perskaitykite šias instrukcijas ir
žiedą, patraukdami viršutinę stovo dalį iki
išsaugokite jas. Jei laikysitės mūsų nurodymų, galėsite
pageidaujamo aukščio ir grąžindami žiedą atgal,
mėgautis visomis „Philips LivingColors“ galimybėmis.
kad užksuotumėte padėtį.
- Pastumkite mygtuką nugarėlėje ir atidarykite
Užregistruokite savo produktą svetainėjewww.philips.
nuotolinio valdymo pulto baterijų skyrelį.
com/welcome ,kad sužinotumėte apie naujus „Philips
Įstatykite 3 AAA baterijas (+ ir – kaip nurodyta).
LivingAmbiance“ produktus:
2. Susikurkite savo aplinką
Šis vadovas padės jums…
1. Pradėti naudoti
- Liesdami norimą spalvą spalvų rate. Galite
2. Susikurkite atmosferą su „LivingColors“
braukti pirštu per spalvų ratą ir pakoreguoti
3. „LivingColors“ prijunkite prie kitų „Philips
spalvą.
LivingAmbiance“ gaminių
4. Rasti atsakymą į dažniausiai užduodamus klausimus
- Keisdami spalvų sotį (pridėdami dabartinei
5. Gauti papildomos pagalbos
spalvai daugiau baltumo). Paspauskite soties
padidinimo mygtuką sodriai spalvai arba soties
1. Pradžia:
sumažinimo mygtuką pastelinei spalvai. Ilgiau
palaikę soties sumažinimo mygtuką galiausiai
- Įkiškite stovą į kojelę ir sukite stovą prieš
pasieksite baltą spalvą.
laikrodžio rodyklę tol, kol jo nebebus įmanoma
pasukti.
- Įkiškite maitinimo kištuką į angą po lempos kojele,
77

- Pritemdydami. Didinkite arba mažinkite šviesos
„SmartLink“ ženklas. Visus gaminius, kurie turi
intensyvumą pritemdymo mygtukais.
„SmartLink“ ženklą, galima prijungti prie jūsų
nuotolinio valdymo pulto.
- Leisdami spalvoms keistis automatiškai.
Perbraukite pirštu per spalvų ratą (vieną kartą) ir
Norėdami pridėti „Philips LivingColors“ lempą
trumpai paspauskite „I“ (įjungti); „LivingColors“
nuotolinio valdymo pultui, prineškite jį prie tos
automatiškai persijungs į automatinio spalvų
lempos ir palaikykite nuspaudę mygtuką „I“.
keitimo režimą, lempa pradės automatiškai keisti
Lempa 3 kartus mirktelės. Laikykite nuspaustą „I“
spalvas.
mygtuką, kol iš nuotolinio valdymo pulto pasigirs
pyptelėjimas; lempa trumpai įsižiebs žalia spalva.
Galite reguliuoti greitį, kuriuo spalvos kinta. Greitį
Lempa dabar prijungta prie nuotolinio valdymo
galima reguliuoti pagal laikrodžio rodyklę, nuo
pulto ir ji įsijungs pagal paskutinius nustatymus.
greito (tamsiai mėlyna spalva ant spalvų rato) iki
„LivingAmbiance“ lempai nepamirškite prijungti
lėto (violetinė). Galite paliesti bet kurią spalvų
ir baltos šviesos – tai galite padaryti taip pat,
rato vietą. Šviestuvui veikiant automatiniu režimu
kaip yra aprašyta 2 dalyje apie „LivingWhites“
galite keisti ir spalvų sotį bei ryškumą.
gaminius.
Norėdami vėl įjungti pastovių spalvų režimą, dar
Jei norite atjungti „LivingColors“ lempą nuo
kartą perbraukite per spalvų ratą ir paspauskite
nuotolinio valdymo pulto, prineškite pultą prie
„0“. Taip pat galite išjungti „LivingColors“
gaminio ir palaikykite nuspaustą mygtuką „0“.
paspaudę „0“ ir vėl įjungti paspaudę „I“.
Lempa 3 kartus mirktelės. Laikykite nuspaudę
mygtuką „0“, kol iš nuotolinio valdymo pulto
- Jei jums patinka tam tikras šviesų derinys
pasigirs pyptelėjimas. Tada lempa palengva užges ir
(pavyzdžiui, šiek tiek pritemdyta raudona), galite
išsijungs.
išsaugoti šią sceną, kad ją būtų lengva atkurti:
2. Prie nuotolinio valdymo pulto galite prijungti ir
palaikykite nuspaudę vieną iš scenos mygtukų, kol
„Philips LivingWhites“ gaminius (kištukus,
iš nuotolinio valdymo pulto pasigirs pyptelėjimas.
energijos taupymo įrenginius ir šviestuvus).
Tada jūsų scena bus išsaugota ir galėsite ją
Norėdami pridėti „Philips LivingWhites“ gaminį,
pasirinkti paspaudę scenos mygtuką. Tokiu būdu
prineškite nuotolinio valdymo pultą ir nuspaudę
galite išsaugoti ir tam tikrą automatinį spalvų
laikykite mygtuką „I“. Lempa 3 kartus mirktelės.
keitimo režimą.
Laikykite nuspaustą „I“ mygtuką, kol iš nuotolinio
valdymo pulto pasigirs pyptelėjimas; lempa dukart
Galite ir toliau savo nuožiūra reguliuoti spalvas.
greitai sumirksės. Ji dabar prijungta prie nuotolinio
Kai tik norėsite sugrįžti prie savo išsaugotos
valdymo pulto ir įsijungs pagal paskutinius
scenos, tiesiog paspauskite tą scenos mygtuką,
nustatymus.
kurį paspaudėte ją išsaugodami. Scenos mygtukas
trumpam užsidegs, parodydamas, kad scena
Jei norite atjungti „LivingWhites“ gaminį nuo
pasirinkta, o „LivingColors“ pradės veikti pagal
nuotolinio valdymo pulto, prineškite pultą prie
jūsų išsaugotus nustatymus.
gaminio ir palaikykite nuspaudę mygtuką „0“.
Galite išsaugoti iki 3 scenų (po vieną kiekvienam
Lempa 3 kartus mirktelės. Laikykite nuspaudę „0“
scenos mygtukui).
mygtuką, kol iš nuotolinio valdymo pulto pasigirs
„LivingColors“ išjunkite trumpai spustelėję
pyptelėjimas. Lempa palengva užges ir išsijungs.
mygtuką „0“ (išjungti). „LivingColors“ atsimins
paskutinį pasirinkimą. Norėdami vėl įjungti,
3. Savo nuotolinio valdymo pultą galite prijungti
paspauskite „I“ (įjungti).
prie kito nuotolinio valdymo pulto iš
„Philips LivingAmbiance“ asortimento.
3. „LivingColors“ prijunkite prie kitų „Philips
Visi „SmartLink“ ženklą turintys „LivingColors“
LivingAmbiance“ gaminių
arba „LivingWhites“ nuotolinio valdymo pultai
gali būti prijungti prie jūsų nuotolinio valdymo
Prie „LivingColors“ nuotolinio valdymo pulto galite
pulto. Sujungus pultus bus galima reguliuoti visas
prijungti įvairius „Philips LivingAmbiance“ gaminius.
lempas dviem skirtingais nuotolinio valdymo
Taip galėsite reguliuoti visus prijungtus gaminius iškart
pultais. Pavyzdžiui, galėsite sukurti 6 skirtingas
arba kiekvieną iš jų atskirai – viską reguliuosite vienu
apšvietimo scenas toms pačioms lempoms – 3
nuotolinio valdymo pultu.
su vienu nuotolinio valdymo pultu ir 3 su kitu.
Norėdami pridėti papildomą „LivingColors“ arba
1. Prie nuotolinio valdymo pulto galite prijungti
„LivingWhites“ nuotolinio valdymo pultą, atlikite
ir daugiau „Philips LivingColors“ lempų.
šiuos veiksmus:
Daugelis „Philips LivingColors“ gaminių veiks su
šiuo nuotolinio valdymo pultu, tiesiog patikrinkite,
a. Atstatykite pradinę norimo pridėti nuotolinio
ar ant norimo susieti „LivingColors“ gaminio yra
valdymo pulto būseną: atidarykite maitinimo
78

elementų skyrelį ir kelias sekundes palaikykite
o „LivingColors“ nereaguoja į nuotolinio
nuspaustą „RESET“ (atstatyti) mygtuką (pvz.,
valdymo pultą
su sąvaržėle). Pasirūpinkite, kad viduje būtų
o Patikrinkite pulto elementus. Elementai turi
maitinimo elementai. Iš nuotolinio valdymo pulto
būti įdėti teisingai (pagal + ir -) ir turi būti
pasigirs garsas, parodantis, kad atstatyta jo pradinė
įkrauti. Jei nuotolinio valdymo pultas vis dar
būsena.
neveikia, pabandykite pakeisti elementus.
b. Laikykite į pradinę būseną atstatytą nuotolinio
o Susiekite nuotolinio valdymo pultą su
valdymo pultą arti dabartinio nuotolinio
„LivingColors“ pagal šio vadovo 3.1 skyriuje
valdymo pulto. Paspauskite mygtuką „I“ ant
aprašytą procedūrą.
abiejų nuotolinio valdymo pultų, kol pultuose
pasigirs garsas. Dabar nuotolinio valdymo pultai
o Panaudojus nuotolinio valdymo pultą
yra sujungti – tai reiškia, kad galite prie naujojo
mirksi mygtukai
nuotolinio valdymo pulto prijungti tas pačias
o Tai reiškia, kad maitinimo elementai nuotolinio
lempas bei valdyti visas lempas abiem nuotolinio
valdymo pulte yra (beveik) visiškai išsekę ir
valdymo pultais.
juos reikia pakeisti.
c. Jei pridedamas nuotolinio valdymo pultas yra
apvalus, galite jį nukopijuoti: galite pultą greitai
o Negaliu paleisti automatinio spalvų keitimo
prijungti prie tų pačių lempų, prie kurių yra
režimo
prijungtas originalus nuotolinio valdymo pultas.
o Gali būti, kad nuotolinio valdymo pultas
Kad nukopijuotumėte nuotolinio valdymo pultą,
nesuprato jūsų „perbraukimo“ judesio.
pakartokite „b“ punkte aprašytą procedūrą.
Pabandykite dar kartą, įsitikindami, kad
judėdami aplink visą apskritimą jūsų pirštai
Kai prie „Philips LivingColors“ nuotolinio valdymo
išlieka ant spalvų rato.
pulto prijungiate vieną arba daugiau lempų, galite
o Norėčiau prijungti „LivingColors“ prie
valdyti visas lempas iškart arba kiekvieną lempą
laikmačio. Ar tai įmanoma?
atskirai.
o Taip. „Philips LivingColors“ galite naudoti su
Jei norite valdyti vieną lempą, turite ją pasirinkti
laikmačiu (nepridedamas). Įjungus su laikmačiu,
(prašome įsidėmėti, kad spalvotos ir baltos
„LivingColors“ parodys jūsų paskutinį
„LivingColors“ šviesos turi būti pasirenkamos atskirai).
nustatymą (pastovių spalvų arba automatinio
Tai galite padaryti naudodami šviesos pasirinkimo
spalvų keitimo režimą). Įsitikinkite, kad jūsų
mygtukus. Kai nuspaudę laikote vieną iš šviesos
paskutinis nustatymas nebuvo „išjungti“.
pasirinkimo mygtukų, pasirinkta lempa pradeda mirksėti.
Jei norite reguliuoti ne šią lempą, atleiskite mygtuką ir
o Prie „LivingColors“ nuotolinio valdymo
paspauskite jį dar kartą – pradės mirksėti kita lempa.
pulto negaliu prijungti papildomų lempų
Pasirinkus lempą nuotoliniame valdymo pulte užsidega
o Prašome įsitikinti, kad ant norimo prijungti
šviesos pasirinkimo indikatorius (lemputė). Tai reiškia, kad
gaminio yra „SmartLink“ ženklas. Prie
galite reguliuoti tik pasirinktą lempą.
nuotolinio valdymo pulto galima prijungti
Nepasirinkus šviesos (šviesos pasirinkimo indikatorius
tik tuos gaminius, ant kurių yra „SmartLink“
išjungtas), visi jūsų reguliavimai bus taikomi visoms
ženklas.
prie nuotolinio valdymo pulto prijungtoms šviesoms
o Pabandykite pakartoti šio vadovo 3 skyriuje
(pavyzdžiui, kambaryje galite vienu metu pritemdyti
aprašytą procedūrą. Įsitikinkite, kad išgirstate
visas šviesas).
garsus ir pamatote mirksėjimą, kaip aprašyta.
Jei jums patinka tam tikri skirtingų šviestuvų šviesų
deriniai, galite juos išsaugoti kaip sceną – taip pat, kaip
o Mano klausimo čia nėra
yra aprašyta šio vadovo 2 skyriuje.
o Pagalbos kreipkitės į „Philips“ (žr. 5 skyrių
„Papildoma pagalba“).
4. Dažnai užduodami klausimai
5. Papildoma pagalba
Ką daryti, jeigu...
o „LivingColors“ nešviečia
Norėdami gauti informacijos ir iškilus problemoms,
o Patikrinkite laido prijungimą prie lempos.
apsilankykite „Philips“ tinklapyje adresu www.philips.
Patikrinkite, ar kištukas tinkamai įkištas į
com arba kreipkitės į „Philips Lighting“ ryšių centrą
sieninį el. lizdą.
nemokamu telefono numeriu: 00800-PHILIPSL arba
o Ištraukite ir iš naujo įkiškite maitinimo laidą.
00800-74454775
Jei „LivingColors“ pakeičia kelias spalvas ir
išsijungia, nuotoliniu valdymo pultu įjunkite ją
Garantija:
iš naujo.
„Philips“ dvejų metų garantija galioja, jei gaminys yra
naudojamas laikantis instrukcijų ir pagal numatytą
paskirtį. Pareiškimai dėl garantijos priimami tik tuo
79
atveju, jei pateikiamas pirkimą įrodantis dokumentas
Aplinka:
(sąskaita faktūra ar pardavimo kvitas), nurodantis
Jeigu išmetate prietaisą praėjus nustatytam naudojimo
pirkimo datą, pardavėjo pavardę ir produkto aprašą.
laikui, pašalinkite jį laikydamiesi vietinės valdžios
institucijų nurodymų. Jeigu išmetate nuotolinio
„Philips“ garantija negalioja, jei:
valdymo pultą, iš jo išimkite elementus. Draudžiama
- pardavimo dokumente ar gaminio apraše kažkas
elementus išmesti kartu su įprastomis buitinėmis
buvo pakeista, išbraukta, ištrinta ar neįskaitomai
atliekomis. Elementai turi būti pristatyti į specialų
sugadinta.
surinkimo punktą ar „Philips“ atstovą. Abiem atvejais
- gedimai atsirado dėl sugadinimo, klaidingų
elementai bus utilizuoti aplinkai nekenkiančiu būdu.
sujungimų ar netinkamo elgesio.
- pažeidimas yra atsiradęs dėl ekstremalių
Techniniai kištuko duomenys
aplinkybių, nesusijusių su „LivingColors“,
Kintamosios srovės adapteris
pavyzdžiui, žaibo, potvynio, gaisro, netinkamo
Modelis: EADP-10EB C (ES tipas)
naudojimo ar aplaidumo.
EADP-10EB D (Jungtinė Karalystė +
- „LivingColors“ buvo atidarytas ar išardytas.
Singapūras)
EADP-10EB E (Australija)
Valymas ir priežiūra:
Įvestis: 220 - 240 V ~ 0,3A 50 Hz
Ištraukite kištuką iš sieninio elektros lizdo.
Išvestis: 18,5 V 0,83 A
Kad nesubraižytumėte „LivingColors“ lempos,
nuotolinio valdymo pulto ir adapterio, valykite juos tik
Šviestuvo energijos sąnaudos: iki15,4 W
minkšta, sausa šluoste.
Nenaudokite valymo medžiagų.
Nuotolinis valdymas:
Baterijos: 3 x „Philips Power Life Alkaline“ AAA LR03,
Saugumo instrukcijos
1,5 V.
- „LivingColors“ skirtas naudoti tik patalpose.
Nenaudokite drėgnose vietose, pvz., voniose ar
Belaidė specikacija:
lauke.
Belaidžio radijo dažnių režimo dažnio diapazonas:
- „LivingColors“ nėra vaikams skirtas žaislas.
2405~2475 MHz
- Nedėkite ant karštų paviršių
Belaidžio ryšio protokolas: IEEE 802.15.4)
- Saugumo sumetimais ir pagal garantijos sąlygas
Darbiniai kanalai: kanalai 11, 15, 20 arba 25
„LivingColors“ ir kištuko negalima ardyti.
- Naudokite tik pridedamą adapterį, naudodami kitą
Aplinkos specikacija:
adapterį galite sugadinti „LivingColors“.
Temperatūra (darbinė): 0...40 °C
Temperatūra (saugojimo): -25...60 °C
Santykinė drėgmė: 5...95 % be kondensato
ET LivingColors: kasutusjuhend
Täname Teid Philipsi LivingColorsi põrandalambi
1. Alustamine:
ostmise eest!
- Sisestage lambi jalg alusesse ja keerake jalga
LivingColors on spetsiaalselt disainitud kodus värvide
päripäeva nii kaua, kui enam keerata ei saa.
ja valguse abil isikupärase õhkkonna loomiseks.
- Sisestage ühenduspistik lambi aluse all olevasse
Lugege seda juhendit LivingColorsi lambi esmakordsel
avasse ja pistke selle teine ots seinakontakti.
kasutamisel väga hoolikalt ja hoidke juhend alles. Meie
- Ühendage jala ülaosas asuv ühenduspistik
juhiseid järgides saate Philipsi LivingColorsi lambi
lambiga ning veenduge , et kuulete klõpsatust.
funktsionaalsusest täit naudingut tunda.
- Asetage lamp alusele ja suunake LivingColors
seina poole (optimaalne kaugus on 50 cm).
Registreerige oma toode veebiaadressil www.
Saate valgusti kõrgust kohandada, kui keerate
philips.com/welcome, et olla kursis uute Philips
jala keskel asetsevat võru, tõmbate jala ülaosa
LivingAmbiance'i toodetega
sobiva kõrguseni ja keerate seejärel võru tagasi
kseeritud asendisse.
Käesolevast juhendist leiate järgmist teavet:
- Avage kaugjuhtimispuldi patareikamber tagaküljel
1. alustamine,
asuva nupu nihutamisega. Sisestage 3 AAA-
2. LivingColorsi abil isikupärase õhkkonna loomine,
patareid (+ ja – poolused, nagu näidatud).
3. LivingColorsi ühendamine teiste Philipsi
LivingAmbiance'i toodetega,
2. Looge isikupärane õhkkond:
4. vastused korduma kippuvatele küsimustele,
5. lisaabi saamine.
- Soovitud värvi puudutamine värvusringil.
80

Värvuse sobivamaks muutmiseks liigutage sõrme
Nii saate sama kaugjuhtimispuldiga reguleerida kõiki
värvusringil.
ühendatud tooteid koos või eraldi.
- Värvi küllastatuse muutmine (valge tooni
1. Võite ühendada teisi Philipsi LivingColorsi
lisamine värvile). Vajutage küllastatuse lisamise
lampe oma kaugjuhtimispuldiga. Enamik Philipsi
nuppu, kui soovite sügavat tooni, või küllastatuse
LivingColorsi lampidest töötab selle puldiga,
vähendamise nuppu, kui soovite pastelsemat tooni.
lihtsalt kontrollige, kas LivingColorsil, mida soovite
Kui hoiate küllastatuse vähendamise nuppu pikalt
ühendada, on SmartLinki logo. Kõik SmartLinki
all, saavutate lõpuks valge värvuse.
logoga tooted on teie kaugjuhtimispuldiga
ühendatavad.
- Hämardamine. Suurendage või vähendage
valguse intensiivsust hämardusnuppude abil.
Philipsi LivingColorsi lambi lisamiseks
kaugjuhtimispuldile tooge pult lambi juurde ning
- Värvidel automaatselt muutuda laskmine.
vajutage ja hoidke all nuppu „I”. Lamp vilgub 3
Libistage sõrme värvusringil (üks täisring) ja
korda. Hoidke nuppu „I” all, kuni kuulete puldist
vajutage lühidalt nuppu „I” („sees”). Seejärel
piiksumist ja näete rohelist tuld vilkumas. Nüüd
lülitub LivingColors automaatsele värvimuutumise
on see kaugjuhtimispuldiga ühendatud ja lülitub
režiimile, mis tähendab, et lamp hakkab
tagasi oma viimasele „sees” seadistusele.
automaatselt värvi muutma.
LivingAmbiance'i lambi puhul ühendage kindlasti
ka valge valgus. Saate seda teha samal viisil nagu 2.
Te saate reguleerida värvide muutumise kiirust.
punktis kirjeldatud LivingWhitesi toodete korral.
Kiirust saab muuta päripäeva, kiirest (värvusringil
Kui soovite LivingColorsi lambi ja puldi vahelise
tumesinine) aeglaseks (lilla). Võite värvusringil
ühenduse katkestada, tooge pult lambile lähedale
ükskõik millist osa puudutada. Automaatse
ning vajutage ja hoidke all nuppu „0”. Lamp vilgub
värvimuutuse režiimis saate reguleerida ka
3 korda. Hoidke nuppu „0” all, kuni kuulete puldist
toonide küllastatust ja heledust.
piiksumist. Lamp kustub nüüd aeglaselt.
Taas püsivale värvirežiimile lülitumiseks libistage
veelkord sõrme värvusringil ja vajutage „0”. Võite
2. Võite ühendada Philipsi LivingWhitesi
ka LivingColorsi välja (nupp „0”) ja jälle sisse
tooteid (pistikuid, energiasäästjaid ja valgusteid)
(nupp „I”) lülitada.
ka oma kaugjuhtimispuldiga. Philipsi LivingWhitesi
toote lisamiseks tooge pult sellele lähedale ning
- Kui soovite konkreetset valgusseadistust (näiteks
vajutage ja hoidke all nuppu „I”. Lamp vilgub 3
kergelt hämardatud punast), võite salvestada
korda. Hoidke nuppu „I” all, kuni kuulete puldist
selle stseeni hõlpsaks taasaktiveerimiseks:
piiksumist ja lamp vilgub kiiresti kaks korda. See
vajutage ja hoidke all ühte stseeninuppu, kuni
on nüüd ühendatud kaugjuhtimispuldiga ja lülitub
kuulete kaugjuhtimispuldist piiksu. Teie stseen
viimasele „sees” seadistusele.
on nüüd salvestatud selle stseeninupu alla, mida
vajutasite. Sedasi võite salvestada ka automaatse
Kui soovite LivingWhitesi lambi ja puldi vahelise
värvimuutuse kindlat kiirust.
ühenduse katkestada, tooge pult lambile lähedale
ning vajutage ja hoidke all nuppu „0”. Lamp vilgub
Värve võib vastavalt soovile edasi reguleerida.
3 korda. Hoidke nuppu „0” all, kuni kuulete puldist
Kui soovite salvestatud stseeni juurde tagasi
piiksumist. Lamp kustub nüüd aeglaselt.
pöörduda, vajutage lihtsalt stseeninuppu, mille alla
antud stseen salvestasite. Vastavstseeninupp süttib
3. Samuti võite oma kaugjuhtimispuldi ühendada
hetkeks, andes märku, et stseen on valitud, ja
teise kaugjuhtimispuldiga, mis on saadaval
LivingColors lülitub teie salvestatud seadistustele.
Philips LivingAmbiance'i tootevalikus. Kõiki
Salvestada saab kuni 3 stseeni (iga stseeninupu
SmartLinki logoga LivingColorsi või LivingWhitesi
kohta üks).
puldid on teie kaugjuhtimispuldiga ühendatavad.
Lülitage LivingColors välja, vajutades lühidalt
Teise kaugjuhtimispuldiga ühendamine võimaldab
nuppu „0” (väljas). LivingColors jätab järgmiseks
teil juhtida samu lampe kahe erineva puldiga. Võite
kasutuskorraks teie viimased seadistused meelde.
näiteks samal lambil luua 6 erinevat valgusstseeni
Selle uuesti sisse lülitamiseks vajutage nuppu „I”
– 3 ühel ja 3 teisel puldil. LivingColorsi või
(sees).
LivingWhitesi kaugjuhtimispuldi lisamiseks tehke
järgmised toimingud.
3. LivingColorsi ühendamine teiste Philipsi
LivingAmbiance'i toodetega,
a. Lähtestage kaugjuhtimispult, mille soovite lisada:
avage patareikamber ja hoidke nuppu RESET
Te saate erinevaid Philipsi LivingAmbiance'i tooteid
(LÄHTESTA) mõni sekund all (nt kirjaklambri
ühendada oma LivingColorsi kaugjuhtimispuldiga.
abil). Veenduge, et patareid on sisestatud. Pult
81

edastab helisignaali, mis näitab, et seade on
o Pärast kaugjuhtimispuldi kasutamist
lähtestatud.
hakkavad nupud vilkuma
b. Hoidke lähtestatud pulti oma olemasoleva puldi
o See tähendab, et kaugjuhtimispuldi patareid on
läheduses. Vajutage mõlemal puldil nuppu „I”, kuni
(peaaegu) tühjad ja tuleb välja vahetada.
kuulete helisignaali. Puldid on nüüd ühendatud, mis
tähendab, et saate nüüd samad lambid ühendada
o Mul ei õnnestu käivitada automaatset
uue kaugjuhtimispuldiga ja juhtida kõiki lampe
värvimuutusrežiimi
mõlema puldiga.
o Põhjuseks võib olla see, et kaugjuhtimispult
c. Kui lisatav pult on ümmargune, saate seda ka nüüd
ei saanud teie sõrmelibistusest aru. Proovige
kopeerida: võite selle kohe ühendada samade
uuesti, veendudes, et sõrm on kogu täisringi
lampidega, millega teie esialgne pult ühendatud on.
tegemise vältel värvusringi peal
Puldi kopeerimiseks korrake punktis b kirjeldatud
o Tahaksin ühendada LivingColorsi taimeriga.
protseduuri.
Kas see on võimalik?
o Jah, Philipsi LivingColorsit on võimalik
Kui olete oma Philipsi LivingColorsi
kasutada taimeriga (ei kuulu komplekti).
kaugjuhtimispuldiga ühendanud ühe lambi või rohkem
Kui seade lülitatakse sisse taimeriga, näitab
lampe, saate kõiki neid lampe koos või eraldi juhtida.
LivingColors teie viimast seadistust (püsiv
Üksiku lambi juhtimiseks peate selle valima (pidage
värvirežiim või automaatne värvimuutumise
meeles, et LivingColorsi värvilise ja valge valguse
režiim). Palun veenduge, et viimane seadistus
korral peab värvilise ja valge valguse eraldi valima).
polnud „väljas”.
Saate seda teha, kasutades ühte valguse valiku
nuppudest. Kui vajutate ja hoiate all ühte valguse
o Ma ei saa lisalampe LivingColorsi
valiku nuppu, hakkab valitud lamp vilkuma. Kui see ei
kaugjuhtimispuldiga ühendada
ole lamp, mida soovite reguleerida, vabastage nupp
o Palun veenduge, et ühendataval tootel on
ja vajutage seda uuesti. Siis hakkab järgmine lamp
SmartLinki logo. Ainult SmartLinki logoga
vilkuma. Kui lamp on valitud, süttibvalguse valiku
tooteid saab selle kaugjuhtimispuldiga
indikaator kaugjuhtimispuldil (lambipirn). See tähendab,
ühendada.
et saate nüüd reguleerida vaid valitud lampi
o Proovige selle kasutusjuhendi 3. jaotises
Kui ühtegi valgust pole valitud (valguse valiku indikaator
toodud protseduure korrata. Veenduge, et
on välja lülitatud), mõjutavad teie tehtud toimingud
kuulete helisid ja näete vilkumist vastavalt
kõiki kaugjuhtimispuldiga ühendatud valgusteid (nt
eespool kirjeldatule.
saate hämardada kõiki ruumis olevaid valgusteid).
Kui soovite konkreetset kombinatsiooni erinevate
o Minu küsimust pole siin kirjas
valgustite valgusseadistustest, saate selle samal viisil
o Abi saamiseks võtke ühendust Philipsiga (vt
nagu on toodud selle kasutusjuhendi 2. jaotises ka
jaotist 5, „Lisaabi”).
stseenina salvestada.
5. Lisaabi
4. Korduma kippuvad küsimused
Info saamiseks ja probleemide korral külastage
Mida teha, kui...
palun Philipsi veebisaiti aadressil www.philips.com
o LivingColors ei anna valgust
või helistage Philipsi Lightingi kõnekeskuse tasuta
o Kontrollige, kas lambi juhe on ühendatud.
numbrile 00800-PHILIPSL või 00800-74454775
Kontrollige, kas pistik on korralikult
seinakontaktis.
Garantii:
o Eemaldage voolujuhe ja sisestage uuesti. Kui
Philipsi kaheaastane garantii kehtib siis, kui toodet
LivingColors vahetab seepeale värvi ja lülitub
kasutatakse vastavalt kasutusjuhendile ning ettenähtud
välja, lülitage see kaugjuhtimispuldi abil uuesti
otstarbel. Nõudeid võetakse vastu üksnes ostuarve
sisse.
või -tšeki originaali alusel, millel on ostukuupäev,
edasimüüja nimi ning ostetud toote andmed.
o LivingColors ei reageeri
kaugjuhtimispuldile
Philipsi garantii kaotab kehtivuse, kui:
o Kontrollige kaugjuhtimispuldi patareisid.
- ostudokumendil on midagi muudetud, maha
Patareid peavad olema õigesti paigutatud (+ ja
tõmmatud, kustutatud või muudetud kas
-) ning laetud. Kui kaugjuhtimispult endiselt ei
ostudokumendil või tootekirjeldusel loetamatuks,
tööta, vahetage patareid välja.
- kui rike on põhjustatud kahjustuse, vale ühenduse
o Ühendage pult LivingColorsiga,
või väärkasutuse tagajärjel,
järgideskäesoleva kasutusjuhendi jaotises 3.1
- defekt on tekkinud ekstreemolukordade
toodud protseduuri.
tõttu, milleks LivingColors pole valmistatud, nt
välgulöök, üleujutus, tulekahju, seadme väär või
82
hoolimatu kasutamine.
- LivingColors on avatud või koost lahti võetud.
Pistiku spetsikatsioon:
Vahelduvvooluadapter
Puhastamine ja hooldamine:
Mudel: EADP-10EB C (EÜ-tüüpi)
Võtke pistik seinakontaktist välja.
EADP-10EB D (UK-tüüp + Singapur)
Kriimustamise ärahoidmiseks peate LivingColors-
EADP-10EB E (Austraalia tüüp)
lampe, kaugjuhtimispulti ja pistikut puhastama ainult
Sisend: 220–240 V ~, 0,3 A 50 Hz
pehme kuiva lapiga.
Väljund: 18,5 V 0,83 A
Ärge kasutage puhastusvahendeid.
Valgusti energiatarve: kuni 15,4 W
Ohutusjuhised:
- Hoidke pistikut ja LivingColorsit eemal vedelikest
Kaugjuhtimispult
ja niiskusest.
Patareid: 3 tk, Philipsi Powerlife, AAA LR03, 1,5 V,
- LivingColors on ainult siseruumides kasutamiseks.
leelispatareid.
Ärge kasutage seda märjas kohas, nt vannitoas või
väljas.
Traadita võrgu spetsikatsioon:
- LivingColors ei ole lastele mängimiseks mõeldud
Traadita režiimi sagedusala: 2405–2475 MHz
mänguasi.
Traadita võrgu sideprotokoll: IEEE 802,15.4
- Ärge pange seda kuumadele pindadele.
Töökanalid: kanalid 11, 15, 20 või 25
- Ohutuse ja garantiitingimuste säilimise huvides ei
tohi LivingColorsit ja pistikut lahti võtta.
Keskkonnatingimused:
- Kasutage ainult komplektisolevat adapterit. Teist
Töötemperatuur: 0–40 °C
tüüpi adapteri kasutamine võib LivingColorsit
Hoiustamistemperatuur: -25–60 °C
kahjustada.
Suhteline niiskus: 5–95% (ilma kondensaadita)
Keskkonnakaitse:
Seadme ettenähtud korras kasutusest kõrvaldamisel
järgige kohalikke seadusi. Enne seadme kasutusest
kõrvaldamist eemaldage patareid kaugjuhtimispuldist.
Ärge visake patareisid tavalise olmeprügi hulka.
Patareid tuleb käidelda ametlikus patareide
kogumispunktis või Philipsi müügiesindaja
juures, mõlemad viskavad patareid minema
keskkonnasõbralikul viisil.
RU LivingColors Инструкция по эксплуатации
Благодарим за приобретение напольного
4. Получение ответов на часто задаваемые
светильника Philips LivingColors!
опросы
5. Получение дополнительной поддержки
Светильник LivingColors специально разработан
для создания в доме особой цветовой и
1. Начало работы
световой атмосферы. Внимательно прочтите эту
инструкцию и сохраните ее для дальнейшего
- Вставьте стойку в основание и поверните ее
использования. Следуя нашим рекомендациям, вы
по часовой стрелке до упора.
сможете максимально эффективно использовать
- Вставьте штекер в отверстие в нижней части
возможности светильника LivingColors.
основания лампы, вставьте вилку в розетку
электросети.
Зарегистрируйте изделие на веб-сайте www.philips.
- Вставьте штекер в верхней части стойки в
com/welcome и получайте уведомления о новинках
лампу до щелчка.
серии LivingAmbiance.
- Установите лампу на стойку и направьте
светильник LivingColors в сторону стены
Данное руководство поможет при выполнении
(оптимальное расстояние составляет 50 см).
следующих действий...
Чтобы отрегулировать высоту светильника,
1. Подготовка к работе
поверните кольцо в средней части стойки,
2. Создание в доме особой атмосферы с
выдвиньте верхнюю часть до нужной
помощью светильника LivingColors
высоты, затем поверните кольцо в обратном
3. Подключение светильника LivingColors к другим
направлении, чтобы зафиксировать положение.
устройствам Philips LivingAmbiance
- Откройте отсек для батареек в пульте
83

дистанционного управления (ДУ), сдвинув
После этого можно продолжить настройку
кнопку на задней панели. Вставьте 3 батарейки
светильника. Каждый раз, когда необходимо
типа AAA (соблюдайте полярность: "+" и "–").
будет включить сохраненную комбинацию,
просто нажмите кнопку композиции подсветки,
2. Создание в доме особой атмосферы
которая была нажата при сохранении. Эта
кнопка ненадолго загорится, чтобы указать
- Коснитесь нужного цвета на цветовом
выбранную композицию, а светильник начнет
кольце. Чтобы настроить цвет, проведите
работать в соответствии с сохраненными
пальцем по кольцу.
настройками.
Можно сохранить до 3 композиций
- Изменение насыщенности цвета
подсветки (по одной для каждой кнопки
(добавление белого к текущему цвету).
композиций подсветки).
Нажмите кнопку увеличения насыщенности,
Чтобы отключить светильник LivingColors,
чтобы получить более глубокий цвет,
быстро нажмите кнопку "0". Светильник
или — кнопку уменьшения насыщенности,
запомнит настройки и затем восстановит их.
чтобы изменить цвет на более мягкий. Если
Для включения светильника нажмите кнопку
продолжать нажимать кнопку уменьшения
"I".
насыщенности, цвет освещения изменится на
белый.
3. Подключение светильника LivingColors
к другим устройствам Philips
- Снижение яркости. Повысить или снизить
LivingAmbiance
интенсивность освещения можно при помощи
кнопок управления яркостью.
К пульту ДУ LivingColors можно подключить
другую аппаратуру линейки Philips LivingAmbiance.
- Включение автоматической смены цветов.
В этом случае вы сможете настраивать все
Проведите пальцем по цветовому кольцу
подключенные приборы одновременно или
(один полный круг) и нажмите "I" ("Вкл.");
каждый из них по очереди при помощи одного и
светильник LivingColors перейдет в режим
того же пульта ДУ.
автоматической смены цветов: светильник
начнет изменять цвет автоматически.
1. К пульту ДУ можно подключить другие
светильники Philips LivingColors.
Также доступна настройка скорости
Большая часть моделей Philips LivingColors
изменения цветов. Скорость можно настроить
поддерживает работу с этим пультом ДУ:
движением в направлении по часовой стрелке:
проверьте, есть ли на светильнике логотип
от быстрой (темно-синий свет колеса) до
SmartLink. С данным пультом совместимы все
медленной (пурпурный). Можно коснуться
приборы с логотипом SmartLink.
любой точки цветового колеса. В режиме
автоматической смены цветов также можно
Чтобы подключить светильник Philips
настроить насыщенность и яркость.
LivingColors к пульту ДУ, поднесите пульт к
Чтобы вновь включить режим постоянного
светильнику, а затем нажмите и удерживайте
цвета, еще раз проведите по цветовому кольцу
кнопку "I". Лампа мигнет 3 раза. Продолжайте
и нажмите кнопку "0". Либо можно отключить
удерживать кнопку "I" до тех пор, пока
("0") и повторно включить ("I") светильник
пульт не издаст звуковой сигнал; светильник
LivingColors.
мигнет зеленым светом. После этого он будет
подключен к пульту; светильник будет включен
- Если вам понравились те или иные настройки
и перейдет в последний установленный режим.
освещения (например, приглушенный
При использовании лампы LivingAmbiance
красный цвет), можно сохранить текущую
обязательно подключите белую лампу.
композицию подсветки, а затем
Это делается таким же образом, как и при
восстановить ее. Для этого нажмите и
использовании других приборов LivingWhites
удерживайте одну из кнопок композиций
(см. пункт 2).
подсветки до тех пор, пока пульт ДУ не издаст
Если вам потребуется отключить светильник
звуковой сигнал. После этого сохраненные
LivingColors от пульта дистанционного
настройки можно будет включить, нажав
управления, поднесите пульт к светильнику,
соответствующую кнопку композиции
а затем нажмите и удерживайте кнопку "0".
подсветки. Таким же образом можно
Лампа мигнет 3 раза. Продолжайте удерживать
сохранить скорость автоматической смены
кнопку "0" до тех пор, пока пульт не издаст
цветов.
звуковой сигнал. После этого лампа медленно
погаснет.
84

2. К пульту ДУ можно подключить устройства
к пульту ДУ Philips LivingColors, можно как
Philips LivingWhites (штекеры, устройства
одновременно, так и по отдельности.
экономии энергии и осветительные приборы).
Для того чтобы пульт управлял одним
Чтобы добавить прибор Philips LivingWhites,
светильником, его необходимо выбрать
поднесите к нему пульт ДУ, а затем нажмите
(обратите внимание, что для ламп белого и
на нем кнопку "I". Лампа мигнет 3 раза.
цветного освещения LivingColors каждый
Продолжайте удерживать кнопку "I" до тех
светильник необходимо подключать по
пор, пока пульт не издаст звуковой сигнал;
отдельности). Это делается при помощи кнопок
лампа быстро мигнет два раза. После этого
выбора светильника. При нажатии на кнопку выбора
он будет подключен к пульту ДУ; светильник
светильника одна из ламп начинает мигать. Если
будет включен и перейдет в последний
это не та лампа, которую требуется отрегулировать,
настроенный режим.
отпустите кнопку и нажмите ее еще раз — при
этом мигать начнет другая лампа. Если лампа
Если вам потребуется отключить прибор
выбрана, на пульте ДУ загорится индикатор выбора
LivingWhites от пульта ДУ, поднесите пульт
светильника (лампочка). Это означает, что можно
к прибору, а затем нажмите и удерживайте
регулировать один выбранный светильник.
кнопку "0". Лампа мигнет 3 раза. Продолжайте
Если лампа не выбрана (индикатор выбора
удерживать кнопку "0" до тех пор, пока пульт
светильника не светится), все настройки будут
не издаст звуковой сигнал. После этого лампа
применены ко всем лампам, подключенным к
медленно погаснет.
пульту ДУ (например, можно одновременно
приглушить все светильники в комнате).
3. Пульт ДУ можно также подключить к
Если вам понравилось то или иное сочетание
другому пульту ДУ из серии Philips
настроек разных осветительных приборов,
LivingAmbiance. К данному пульту ДУ
их можно сохранить (см. раздел 2 данного
можно подключить любые другие пульты
руководства).
LivingColors или LivingWhites с логотипом
SmartLink. После этого вы сможете управлять
4. Часто задаваемые вопросы и ответы
одной и той же лампой при помощи двух
разных пультов. Также можно будет создать
Что делать, если…
6 разных композиций подсветки для одного
o Светильник LivingColors не горит.
и того же светильника — 3 на одном и 3 на
oПроверьте подключение кабеля к лампе.
другом пульте. Чтобы добавить еще один
Проверьте, правильно ли вставлена вилка в
пульт LivingColors или LivingWhites, выполните
розетку электросети.
следующие действия.
oОтключите и снова подключите кабель
питания. Если светильник LivingColors
a. Сбросьте настройки пульта ДУ, который
сменит несколько цветов и отключится,
необходимо добавить. Для этого откройте
включите его снова с помощью пульта ДУ.
отсек для батареек, нажмите и удерживайте
маленькую кнопку в течение нескольких
o LivingColors не реагирует на команды
секунд (например, с помощью скрепки).
пульта ДУ.
Убедитесь, то батарейки установлены. Когда
oПроверьте батарейки пульта ДУ. Они
настройки будут сброшены, пульт ДУ издаст
должны быть правильно размещены
звуковой сигнал.
(значки "+" и "-") и заряжены. Если пульт
b. Поднесите пульт ДУ со сброшенными
ДУ по-прежнему не работает, попробуйте
настройками к используемому пульту. На
заменить батарейки.
обоих пультах нажмите и удерживайте кнопку
oПодключите пульт ДУ к светильнику
"I", пока пульты не издадут звуковой сигнал.
LivingColors, выполнив порядок действий,
После этого пульты будут подключены друг
описанный в разделе 3.1 данного
к другу — это значит, что с помощью любого
руководства.
из них можно управлять одними и теми же
светильниками.
o Кнопки мигают после использования
c. Если вы добавляете универсальный пульт
пульта ДУ.
ДУ, на него можно скопировать настройки
oЭто значит, что батареи в пульте ДУ почти
исходного пульта; в результате он будет
разряжены, и их необходимо заменить.
сразу подключен к тем же лампам. Чтобы
скопировать пульт ДУ, выполните действия,
o Не удается запустить режим
описанные в пункте b.
автоматической смены цветов.
oВозможно, движение пальцем по колесу
Управлять всеми лампами, подключенными
85

пульта ДУ не было распознано. Повторите
- неисправности вызваны повреждением,
попытку, убедившись, что во время
неправильным подключением или
движения по кругу ваш палец находится на
использованием не по назначению;
цветовом колесе
- неисправности возникли в результате
непредвиденных обстоятельств, не зависящих
o Я хочу подключить светильник
от работы прибора LivingColors (удар молнии,
LivingColors к таймеру. Это возможно?
наводнение, пожар, неправильное или
oДа. Вы можете использовать светильник
неосторожное использование);
с цветным и белым светом Philips
- прибор LivingColors был вскрыт или разобран.
LivingColors с таймером (не входит в
комплект поставки). При включении по
Чистка и уход
таймеру светильник LivingColors будет
Извлеките вилку из розетки электросети.
использовать последнюю настройку
Во избежание царапин очищайте светильник
(постоянный цвет или автоматическую
LivingColors, пульт ДУ и адаптер только мягкой
смену цветов). Убедитесь, что последней
сухой тканью.
используемой настройкой не являлась
Не используйте моющие средства.
настройка "Выкл.".
Инструкции по безопасности
o К пульту ДУ не удается подключить
- Держите вилку и светильник LivingColors в
дополнительные светильники
сухом месте.
LivingColors.
- Светильник LivingColors предназначен для
oУбедитесь, что на подключаемом приборе
использования в помещениях и не должен
имеется логотип SmartLink. К данному
использоваться при высокой влажности,
пульту ДУ можно подключать только
например, в ванных или на открытом воздухе.
приборы с этим логотипом.
- Светильник LivingColors не является детской
oПопытайтесь повторно выполнить
игрушкой.
действия, описанные в разделе 3 данного
- Не устанавливайте светильник на горячих
руководства. Обязательно дождитесь
поверхностях.
описанных в нем звуковых сигналов и
- В целях обеспечения безопасности и
миганий освещения.
соблюдения условий гарантии, запрещается
вскрывать светильник LivingColors или вилку.
o Мой вопрос отсутствует в списке.
- Используйте только прилагаемый адаптер:
oОбратитесь за помощью в компанию
использование другого адаптера может
Philips (см. раздел 5 "Дополнительная
привести к повреждению светильника
поддержка").
LivingColors.
5. Дополнительная поддержка
Защита окружающей среды
Утилизируйте прибор в соответствии с местными
Для получения дополнительной информации или
нормами. Перед утилизацией пульта ДУ извлеките
в случае возникновения проблем посетите веб-
батарейки. Не утилизируйте батарейки вместе
сайт компании Philips по адресу www.philips.com
с обычным бытовым мусором. Батарейки
или обратитесь в контактный центр Philips Lighting
необходимо утилизировать в соответствии с
по номеру: 00800-PHILIPSL или 00800-74454775
нормами местного законодательства.
(звонок бесплатный).
Характеристики штепсельной вилки:
Гарантия
Адаптер переменного тока
Двухлетняя гарантия Philips является
Модель: EADP-10EB C (для ЕС)
действительной, если продукт эксплуатировался
EADP-10EB D (для Великобритании и
по назначению и в соответствии с инструкциями.
Сингапура)
Претензии покупателей принимаются только
EADP-10EB E (для Австралии)
при наличии документов, подтверждающих
Вход: 220—240 В ~ 0,3 А 50 Гц
покупку (накладная, платежная квитанция или
Выход: 18,5 В 0,83 А
чек) с указанием даты покупки, имени продавца и
описанием продукта.
Энергопотребление светильника: до 15,4 Вт
Гарантия Philips является недействительной в
Пульт ДУ
следующих случаях:
Батарейки: Щелочные батарейки Philips Powerlife
- на квитанции об оплате имеются исправления,
AAA LR03, 1,5 В, 3 шт.
зачеркивания, либо квитанция не читается;
86
Характеристика беспроводного
Условия эксплуатации:
подключения:
Температура (рабочая): 0...40 °C
Радиочастотный диапазон беспроводного
Температура (при хранении): -25...60°C
подключения: 2405~2475 мГц
Относительная влажность: 5...95% без конденсации
Протокол беспроводной связи: IEEE 802,15.4)
паров
Рабочие каналы: каналы 11, 15, 20 или 25
UK Інструкція з використання світильника LivingColors
Дякуємо за придбання торшера Philips LivingColors!
коліщатку. Щоб вибрати один із відтінків,
пересувайте палець по коліщатку.
Світильник LivingColors спеціально розроблено
для створення неповторної атмосфери вдома
- Змінюйте насичення кольорів (додаючи
за допомогою кольору та світла. Перед першим
більше білого до наявного кольору).
використанням світильника LivingColors уважно
Натискайте кнопку збільшення насичення
прочитайте цю інструкцію і збережіть її для
для отримання насиченого кольору або
майбутньої довідки. Дотримуючись наших
кнопку зменшення насичення для отримання
рекомендацій, Ви зможете повні насолоджуватися
пастельного кольору. Якщо натиснути та
усіма функціями Philips LivingColors.
утримувати кнопку зменшення насичення,
відразу засвітиться біле світло.
Зареєструйте свій виріб на веб-сайті www.philips.
com/welcome та отримуйте найсвіжішу інформацію
- Регулюйте яскравість світла. Збільшуйте
про нові вироби Philips LivingAmbiance
або зменшуйте яскравість світла за допомогою
кнопок яскравості.
Цей посібник користувача допоможе Вам:
1. Почати користуватися світильником
- Налаштовуйте автоматичну зміну кольорів.
2. Створити потрібну атмосферу за допомогою
Пересуваючи палець по колірному коліщатку
світильника LivingColors
(одне повне коло), коротко натисніть “I”
3. Під'єднувати світильник LivingColors до інших
(“увімк.”). Світильник LivingColors перейде
виробів Philips LivingAmbiance
в режим автоматичної зміни кольору:
4. Отримати відповіді на запитання, що часто
розпочнеться автоматична зміна кольорів
задаються
лампи.
5. Отримати додаткову підтримку
Можна налаштувати швидкість зміни кольорів.
1. Початок роботи:
Значення швидкості можна налаштувати за
годинниковою стрілкою – від високого (синій
- Вставте стійку у підставку, після чого
колір на колірному коліщатку) до низького
повертайте її за годинниковою стрілкою до
(пурпуровий). Можна торкнутися будь-якої
фіксації.
частини коліщатка. У режимі автоматичної
- Вставте роз'єм шнура з'єднання в отвір знизу
зміни кольору можна також налаштувати
підставки світильника, а його інший кінець
насиченість і яскравість кольорів.
підключіть до розетки.
Щоб повернутися у режим статичного
- Вставте роз'єм шнура з'єднання на верхній
кольору, знову пересувайте палець по
частині підставки у світильник до фіксації.
коліщатку і натисніть “0”. Також можна ще
- Поставте світильник LivingColors на підставку
раз вимкнути “0” і увімкнути “I” світильник
і спрямуйте його на стіну (оптимальна відстань
LivingColors.
становить 50 см). Можна налаштувати висоту
світильника, для цього слід повернути кільце
- Якщо Вам подобається певне налаштування
посередині підставки, підняти верхню частину
світла (наприклад, ледь тьмяне червоне),
підставки на потрібну висоту та зафіксувати
можна зберегти цей ефект освітлення
кільце у потрібному положенні.
для його швидкого відтворення. Для цього
- Відкрийте батарейний відсік пульта
натисніть та утримуйте одну із кнопок
дистанційного керування, посунувши кнопку
ефекту освітлення, поки пульт дистанційного
на задній панелі. Вставте 3 батареї типу AAA
керування не подасть звукового сигналу. Тепер
(враховуючи значення полярності “+” та “–”, як
ефект освітлення присвоєно натисненій кнопці
зображено на малюнку).
ефекту освітлення. Так само можна зберегти
певну швидкість для режиму автоматичної
2. Створіть неповторну атмосферу:
зміни кольору.
- Торкайтеся потрібного кольору на колірному
87

Можна продовжувати налаштовувати світло
Світильник повільно почне згасати.
на свій смак. Якщо потрібно повернутися
2. Пульт дистанційного керування можна також
до збереженого ефекту освітлення, просто
з'єднати з виробами Philips LivingWhites
натисніть кнопку ефекту освітлення, якій
(штекери, енергозберігаючі вироби та
присвоєно цей ефект. Кнопка ефекту
світильники). Щоб з'єднати виріб Philips
освітлення засвітиться на короткий час,
LivingWhites із пультом дистанційного
повідомляючи про вибір ефекту освітлення,
керування, піднесіть пульт до світильника,
а світильник LivingColors почне світитися у
після чого натисніть і утримуйте кнопку
режимі збережених налаштувань.
“I”. Світильник блимне 3 рази. Утримуйте
Можна зберегти до 3 ефектів освітлення
кнопку “I” натисненою, поки пульт не подасть
(по одному на кожну кнопку ефекту
звукового сигналу; світильник швидко блимне
освітлення).
двічі. Тепер світильник з'єднано з пультом
Вимкніть світильник LivingColors, коротко
дистанційного керування і він працюватиме
натиснувши кнопку “0” (“вимк.”). У пам'яті
в режимі останніх налаштувань, які
світильника LivingColors буде збережено
використовувалися під час його роботи.
останнє налаштування для наступного
використання. Щоб знову увімкнути світильник,
Щоб від'єднати виріб LivingWhites від пульта
натисніть кнопку “I” (“увімк.”).
дистанційного керування, піднесіть пульт до
світильника, після чого натисніть і утримуйте
3. З'єднання світильника LivingColors з
кнопку “0”. Світильник блимне 3 рази.
іншими виробами Philips LivingAmbiance
Утримуйте кнопку “0” натисненою, поки пульт
не подасть звукового сигналу. Світильник
Пульт дистанційного керування світильника
повільно почне згасати.
LivingColors можна з'єднати з різними виробами
лінійки Philips LivingAmbiance. Таким чином, за
3. Пульт дистанційного керування можна також
допомогою того самого пульта усі з'єднані вироби
з'єднати з іншим пультом виробів лінійки
можна буде налаштовувати разом або окремо.
Philips LivingAmbiance. Цей пульт можна
з'єднати з будь-яким пультом LivingColors
1. Пульт дистанційного керування можна
або LivingWhites із позначкою SmartLink.
з'єднати з іншими світильниками Philips
З'єднавши інший пульт, керувати тими
LivingColors. Більшість світильників
самими світильниками можна буде двома
Philips LivingColors сумісні з цим пультом
різними пультами. Для тих самих світильників
дистанційного керування: просто перевірте
можна, наприклад створити 6 різних ефектів
наявність позначки SmartLink на світильнику
освітлення – 3 на одному пульті та 3 на іншому.
LivingColors, який потрібно з'єднати. Усі
Щоб додати інший пульт LivingColors або
вироби з позначкою SmartLink можна з'єднати
LivingWhites, виконайте такі кроки:
з пультом дистанційного керування.
a. Скиньте налаштування пульта дистанційного
Щоб з'єднати світильник Philips LivingColors
керування, який потрібно додати: відкрийте
із пультом дистанційного керування, піднесіть
батарейний відсік пульта, після чого
пульт до світильника, після чого натисніть
натисніть і утримуйте кнопку RESET кілька
і утримуйте кнопку “I”. Лампа світильника
секунд (наприклад, скріпкою для паперу).
блимне 3 рази. Утримуйте кнопку “I”
Перевірте наявність батарей. Пульт подасть
натисненою, поки пульт не подасть звукового
звуковий сигнал, повідомляючи про скидання
сигналу; світильник коротко засвітиться
налаштувань.
зеленим світлом. Тепер світильник з'єднано
b. Піднесіть пульт дистанційного керування
з пультом дистанційного керування і він
зі скиненими налаштуваннями до наявного
працюватиме в режимі останніх налаштувань,
пульта. Натисніть і утримуйте кнопку “I” на
які використовувалися під час його роботи.
обох пультах, поки вони не подадуть звукових
Для світильника LivingAmbiance потрібно
сигналів. Тепер пульти з'єднано, а це означає,
також з'єднати біле світло. Процедура
що новий пульт можна з'єднати з тими самими
з'єднання така сама, як і для виробів
лампами і керувати ними будь-яким із пультів.
LivingWhites, що в пункті 2.
c. Якщо пульт дистанційного керування, який
Щоб від'єднати світильник LivingColors від
Ви додаєте, круглий, його можна також
пульта дистанційного керування, піднесіть
скопіювати. Цей пульт буде відразу з'єднано з
пульт до світильника, після чого натисніть
тими самими світильниками, що й оригінальний
і утримуйте кнопку “0”. Світильник блимне
пульт. Щоб скопіювати пульт, повторіть
3 рази. Утримуйте кнопку “0” натисненою,
процедуру, описану в пункті b.
поки пульт не подасть звукового сигналу.
88

З'єднавши пульт Philips LivingColors з одним чи
дистанційного керування (практично)
кількома світильниками, керувати ними можна
розрядилися і їх потрібно замінити.
разом або окремо.
Щоб керувати одним світильником, потрібно
o Неможливо увімкнути режим
вибрати його (зауважте, що для світильника
автоматичної зміни кольору
кольорового та білого світла LivingColors
o Можливо, пульт дистанційного керування
кольорове і біле світло потрібно вибирати окремо).
не розпізнав руху “пересування” пальця.
Зробити це можна за допомогою однієї з кнопок
Спробуйте ще раз, пересуваючи палець так,
вибору світла. Якщо натиснути та утримувати одну
щоб під час здійснення одного повного
із кнопок вибору світла, почне блимати вибраний
кола він був на колірному коліщатку.
світильник. Якщо це не той світильник, який
потрібно налаштувати, відпустіть кнопку і натисніть
o Я б хотів(-ла) з'єднати світильник
її знову – почне блимати інший світильник. Після
LivingColors із таймером. Це можливо?
того як буде вибрано потрібний світильник,
o Так. Світильник Philips LivingColors можна
на пульті дистанційного керування засвітиться
використовувати з таймером (не входить
індикатор вибору світла (лампочка), повідомляючи
у комплект). Коли світильник LivingColors
про можливість налаштування лише вибраного
увімкнено з використанням таймера,
світильника.
світильник увімкнеться з останніми
Якщо не вибрати світла (індикатор вибору світла
налаштуваннями (режим статичного
не світиться), будуть налаштовуватися всі джерела
кольору або автоматичної зміни кольору).
світла, з'єднані з пультом дистанційного керування
Слідкуйте, щоб останнім не було
(наприклад, можна зменшити яскравість усіх
налаштування вимкнення.
джерел світла в кімнаті).
Якщо Вам подобається певне поєднання
o Неможливо з'єднати пульт LivingColors
налаштувань світла різних світильників, його можна
із додатковими світильниками
також зберегти як ефект освітлення так само, як це
o Перевірте, чи виріб, який Ви намагаєтеся
описано в розділі 2 цього посібника користувача.
з'єднати, має позначку SmartLink. Із цим
пультом можна з'єднати лише вироби з
4. Запитання, що часто задаються
позначкою SmartLink.
o Повторно виконайте вказівки розділу 3
Що робити, якщо виникають подані нижче
цього посібника користувача. Відповідно
проблеми.
до вказівок потрібно, щоб пролунав
o Світильник LivingColors не світить
звуковий сигнал і заблимало світло.
o Перевірте з'єднання шнура живлення зі
світильником. Перевірте, чи штепсель
o Питання, яке мене цікавить, немає у
правильно вставлено у розетку.
списку
o Від'єднайте шнур живлення і під'єднайте
o Зверніться за допомогою до компанії Philips
його знову. Якщо світильник LivingColors
(див. розділ 5 “Додаткова підтримка”).
світиться кількома кольорами і гасне,
за допомогою пульта дистанційного
5. Додаткова підтримка
керування увімкніть світильник знову.
Для отримання додаткової інформації та у
o Світильник LivingColors не реагує на дію
разі виникнення проблем відвідайте веб-сайт
пульта дистанційного керування
Philips www.philips.com або зверніться до центру
o Перевірте батареї пульта дистанційного
освітлення Philips за телефонами: 00800-PHILIPSL
керування. Батареї слід встановити
або 00800-74454775 (усі дзвінки безкоштовні)
належним чином (“+” та “-”) і вставити
у батарейний відсік. Якщо пульт
Гарантія:
дистанційного керування й надалі не
Гарантія Philips терміном на два роки дійсна
працює, замініть батареї.
лише за умови, якщо пристрій використовується
o З'єднайте пульт дистанційного керування
згідно з інструкціями та за призначенням.
зі світильником LivingColors, дотримуючись
Претензії приймаються лише в разі надання
вказівок розділу 3.1 цього посібника
оригіналу документа про купівлю (чеку, рахунку
користувача.
або квитанції), де вказано дату придбання, ім'я
продавця та опис товару.
o Кнопки блимають після використання
пульта дистанційного керування
Гарантія Philips анулюється, якщо:
o Це означає, що батареї пульта
- у квитанції або описі товару щось було
змінено, викреслено, витерто або доведено до
89
нечитабельного стану;
Навколишнє середовище:
- несправності є причиною пошкодження,
Виконуючи в належний час утилізацію пристрою,
неправильного під'єднання або використання
дотримуйтеся вказівок місцевих органів влади.
не за призначенням;
Перед утилізацією дистанційного керування
- дефект виник через надзвичайні умови, для
завжди виймайте батареї. Не викидайте
яких світильник LivingColors не передбачений,
використані батареї разом зі звичайними
наприклад внаслідок блискавки, повені, пожежі,
побутовими відходами. Їх слід здати в офіційний
неправильного використання або недбалості;
пункт прийому для утилізації або дилеру Philips,
- світильник LivingColors було відкрито або
щоб уникнути нанесення шкоди довкіллю.
розібрано.
Технічні характеристики штепселя:
Чищення та догляд:
Адаптер змінного струму
Витягніть штепсель із розетки.
Модель: EADP-10EB C (тип ЄС)
Для запобігання появі подряпин, світильник
EADP-10EB D (Великобританія і
LivingColors, пульт дистанційного керування
Сінгапур)
та адаптер слід протирати лише м'якою сухою
EADP-10EB E (Австралія)
серветкою.
Вхід: 220 - 240 В ~ 0,3 А 50 Гц
Не використовуйте засобів для чищення.
Вихід: 18,5 В 0,83 А
Заходи безпеки:
Споживання енергії світильником: до 15,4 Вт
- Тримайте штепсель і світильник LivingColors
подалі від рідин і вологості.
Пульт дистанційного керування:
- Світильник LivingColors призначено
Батареї: 3 лужні батареї Philips Powerlife типу AAA
виключно для використання у приміщенні. Не
LR03, 1,5 В.
використовуйте пристрій у вологих місцях
(наприклад, у ванних кімнатах або надворі).
Характеристики бездротового
- Світильник LivingColors – не іграшка, тому не
використання:
дозволяйте дітям бавитися із пристроєм.
Частотний діапазон бездротового режиму
- Не ставте пристрій на гарячі поверхні
радіочастот: 2405-2475 МГц
- З міркувань безпеки і для дотримання
Протокол бездротового зв'язку: IEEE 802.15.4
гарантійних умов не розбирайте світильник
Робочі канали: канали 11, 15, 20 або 25
LivingColors.
- Використовуйте лише адаптер, що входить у
Загальні технічні вимоги:
комплект: використання іншого адаптера може
Температура (робоча): 0-40 °C
пошкодити світильник LivingColors.
Температури (зберігання): -25-60 °C
Відносна вологість: 5-95 % без конденсації
KK LivingColors пайдалану нұсқаулығы
Philips компаниясының LivingColors еден
2. LivingColors шамы көмегімен жанға жайлы
шамын сатып алғаныңызға рахмет!
жағдай жасау
3. LivingColors шамын басқа Philips
LivingColors технологиясы түстер мен жарықты
LivingAmbiance өнімдеріне жалғау
ұтымды үйлестіре отырып, үйде жанға жайлы
4. Жиі қойылатын сұрақтарға жауап беру
жағдай жасауға арналған. Шамды алғаш
5. Қосымша қолдау алу
рет пайдаланғанда, нұсқауларды мұқият
оқып, болашақта қарау үшін сақтап қойыңыз.
1. Жұмыс жасатуды бастау:
Нұсқауларды орындау арқылы Philips
LivingColors шамының мүмкіндіктерін толық
- Тірегішті шамның аяқ бөлігіне салып,
пайдаланатын боласыз.
тірелгенше сағат тілімен бұраңыз.
- Штепсельдік ұшты шамның аяқ бөлігінің
Өніміңізді www.philips.com/welcome торабында
астыңғы жағындағы ұяға жалғап,
тіркеп, жаңа Philips LivingAmbiance өнімдері
қабырғадағы розеткаға қосыңыз.
туралы біліп отырыңыз.
- Тіректің үстіңгі жағындағы штепсельдік
ұшты шамға қосыңыз — сы
Бұл нұсқаулық мына әрекеттерді орындауға
- Шамды тірекке қойып, LivingColors
көмектеседі:
шырағын қабырғаға қарай бағыттаңыз
1. Жұмысты бастау
(ең жақсы қашықтық —50 см). Шырақтың
90

ұзындығын реттеу үшін, тіректің
режимінің белгілі бір жылдамдығын да
ортасындағы сақинаны бұрап, үстіңгі
сақтауға болады.
жағын қажетті ұзындыққа дейін реттеңіз де,
сақинаны орнына қойып бекітіңіз.
Жарықтың керек түрде реттелуін
- Артындағы түймені сырғытып, қашықтан
жалғастыруға болады. Кез келген уақытта,
басқару құралының батарея бөлімінің
сақталған реңкке қайту үшін, сақтау кезінде
қақпағын ашыңыз. AAA түріндегі 3 батарея
басылған Реңк түймесін басыңыз. Сол
(+ және – жағы сәйкесінше салыну керек)
реңк түймесі жанып, реңктің таңдалғанын
салыңыз.
көрсетеді, ал LivingColors шамы сақталған
параметрге өтеді.
2. Өзіңіз қалаған жағдайды жасаңыз:
Ең көбі 3 реңк (әр Реңк түймесі үшін
біреуден) сақтауға болады.
- Түс шеңберіндегі керекті түсті түрту. Түсті
«0» (Өшіру) түймесін басып қалып,
жақсарту үшін, саусақты түс шеңберінің
LivingColors шамын өшіріңіз. LivingColors
бойымен жылжытуға болады.
шамы соңғы қолданылған режимді келесі
қолданыс үшін сақтайды. Оны қайтадан
- Түс қанықтығын өзгерту (ағымдағы түске
қосу үшін, «I» (қосу) түймесін басыңыз.
қосымша ақшылдық беру). Түсті қоюлату
үшін, түс қанықтығын арттыру түймесін,
3. LivingColors шамын басқа Philips
ал түсті ашық ету үшін, түс қанықтығын
LivingAmbiance өнімдеріне жалғау
азайту түймесін басыңыз.Түс қанықтығын
азайту түймесі ұзақ басылып тұрса,
Philips LivingAmbiance түрлі өнімдерін
соңында түссіз жарық жанады.
LivingColors шамының қашықтан басқару
құралына жалғауға болады. Осылайша, бір-
- Күңгірттеу. Жарық күшінің деңгейін
біріне жалғанған өнімдерді бірге немесе әр
күңгірттеу түймелері арқылы арттыруға
қайсысын бөлек бір қашықтан басқару құралы
немесе азайтуға болады.
арқылы реттеуге болады.
- Түсті автоматты өзгерту режимін
1. Басқа Philips LivingColors шамдарын
таңдау. Саусақты түс дөңгелегі бойымен
қашықтан басқару құралына жалғауға
айналдыра жүргізіп (толық бір айналым),
болады. Philips LivingColors шамдарының
«I» (Қосу) түймесін басып қалыңыз;
көбі осы қашықтан басқару құралымен
LivingColors шамы түсті автоматты түрде
жұмыс істейді: жалғанатын LivingColors
өзгерту режиміне қосылады: шам түстерді
өнімінде SmartLink логотипінің бар-жоғын
автоматты өзгерте бастайды.
тексеріңіз. SmartLink логотипі бар өнімдер
қашықтан басқару құралына жалғанады.
Түстердің ауысу жылдамдығын реттеуге
болады. Жылдамдықты, сағат тілінің
Philips LivingColors шамын қашықтан
бағыты бойынша, жылдамнан (түс
басқару құралына жалғау үшін, қашықтан
шеңберіндегі қою көк) баяуға (күлгін)
басқару құралын шамға жақындатып,
өзгертуге болады. Түс шеңберінің кез
«I» түймесін басып тұрыңыз. Шам 3
келген жерін түртуге болады. Түсті
рет жыпылықтайды. Қашықтан басқару
автоматты өзгерту режимінде түстердің
құралы сигнал бергенше «I» түймесін
қанықтығы мен ашықтығын да өзгертуге
басып тұрыңыз; шам жасыл түспен біраз
болады.
жыпылықтайды. Шам енді қашықтан
Тұрақты түс режиміне қайту үшін, түс
басқару құралына жалғанды және соңғы
шеңберін қайта айналдырып, «0»түймесін
қолданылған параметрмен қосылады.
басыңыз. Әйтпесе, алдымен «0», одан
LivingAmbiance шамы үшін түссіз жарықты
кейін «I» түймелерін басып, LivingColors
да жалғауды ұмытпаңыз. Оны 2-тармақта
шамын өшіріп, қайта қосуға болады.
сипатталған LivingWhites өнімдерін жалғау
әдісі бойынша жалғауға болады.
- Егер белгілі бір жарық параметрі ұнаса
LivingColors шамын қашықтан басқару
(мысалы, аздап күңгірттелген қызыл),
құралынан ажырату қажет болса, құралды
кейін оңай қалпына келтіру мақсатында
шамға жақындатып, «0» түймесін басып
осы реңкті сақтауға болады. Ол үшін,
тұрыңыз. Шам 3 рет жыпылықтайды.
қашықтан басқару құралы сигнал бергенше
Қашықтан басқару құралынан дыбыс
Реңк түймелерінің біреуін басып тұрыңыз.
естілгенше «0» түймесін басып тұрыңыз.
Реңк басылған Реңк түймесіне сақталады.
Шам баяу сөнеді.
Осы жолмен бір түсті автоматты өзгерту
91

2. Бұған қоса, Philips LivingWhites
құралы дөңгелек болса, оның көшірмесін
өнімдерін де (штепсельдік ұштар,
жасауға да болады: оны дереу бастапқы
қуат үнемдегіштер және шамдар)
қашықтан басқару құралы жалғанған
қашықтан басқару құралына жалғауға
шамдарға жалғауға болады. Қашықтан
болады. Philips LivingWhites өнімін қосу
басқару құралының көшірмесін жасау үшін,
үшін, қашықтан басқару құралын оған
«б» тармағындағы әрекеттерді қайталаңыз.
жақындатып, «I» түймесін басып тұрыңыз.
Шам 3 рет жыпылықтайды. Қашықтан
Philips LivingColors қашықтан басқару
басқару құралынан дыбыс естілгенше
құралына бір немесе бірнеше шам
«I» түймесін басып тұрыңыз; шам екі
жалғағаннан кейін осы шамдардың барлығын
рет жыпылықтайды. Ол енді қашықтан
бірге немесе бөлек басқаруға болады.
басқару құралына жалғанды және соңғы
Бір шамды басқару үшін, оны таңдау
қолданылған параметрмен қосылады.
керек (LivingColors түрлі түсті және түссіз
шамы үшін түрлі түсті және түссіз жарықты
LivingWhites өнімін қашықтан басқару
бөлек таңдау керек). Оны жарық таңдау
құралынан ажырату қажет болса, құралды
түймелерінің бірімен жасауға болады.
өнімге жақындатып, «0» түймесін басып
Жарық таңдау түймелерінің бірін басып
тұрыңыз. Шам 3 рет жыпылықтайды.
тұрған кезде, таңдалған шам жыпылықтай
Қашықтан басқару құралынан дыбыс
бастайды. Егер бұл реттелетін шам болмаса,
естілгенше «0» түймесін басып тұрыңыз.
түймені жіберіп, қайта басыңыз (басқа шам
Шам баяу сөнеді.
жыпылықтай бастайды). Шам таңдалғанда,
қашықтан басқару құралындағы жарық
3. Қашықтан басқару құралын да басқа
таңдау көрсеткіші (лампа) жанады. Бұл енді
Philips LivingAmbiance өнімдерінің
тек таңдалған шамды реттеуге болатынын
қашықтан басқару құралына жалғауға
білдіреді.
болады. Қашықтан басқару құралыңызға
Ешбір жарық таңдалмаса (жарық таңдау
SmartLink логотипі бар кез келген
көрсеткіші өшірулі), реттеулердің барлығы
LivingColors немесе LivingWhites қашықтан
қашықтан басқару құралына жалғанған бүкіл
басқару құралы жалғанады. Басқа
шамдарға қолданылады (мысалы, бөлмедегі
қашықтан басқару құралын жалғау сол
барлық шамдарды күңгірттеуге болады).
шамдарды екі түрлі қашықтан басқару
Әртүрлі шамдардағы жарық параметрлерінің
құралымен басқару мүмкіндігін береді.
белгілі бір біріккен түрі ұнаса, оны, осы
Мысалы, бір шамда 6 түрлі жарық
нұсқаулықтың 2-бөлімінде сипатталған
реңктерін (әр қашықтан басқару құралынан
жолмен, реңк ретінде сақтауға болады.
үшеуден) жасауға болады. Қосымша
LivingColors немесе LivingWhites қашықтан
4. Жиі қойылатын сұрақтар
басқару құралын қосу үшін, мына
әрекеттерді орындаңыз:
Мына жағдайларда жасалатын әрекеттер:
o LivingColors шамы жарық шығармай
a. Қосылатын қашықтан басқару құралын
тұр
бастапқы қалпына келтіріңіз, яғни
o Қуат сымының шамға жалғанғанын
батарея бөлімінің қақпағын ашып, RESET
тексеріңіз. Штепсельдік ұштың
(«Бастапқы қалпына келтіру») түймесін
розеткаға дұрыс жалғанғанын
бірнеше секунд басып тұрыңыз (мысалы,
тексеріңіз.
қағаз қыстырғышпен). Батареяларды
o Қуат сымын ажыратып, қайта жалғаңыз.
салыңыз. Бастапқы қалпына келгенде,
LivingColors шамы түсін бірнеше рет
қашықтан басқару құралы дыбыс
ауыстырып, сөніп қалса, қайта қосу
шығарады.
үшін, қашықтан басқару құралын
b. Бастапқы қалпына келтірілген қашықтан
пайдаланыңыз.
басқару құралын қолданыстағы құралға
жақындатыңыз. Дыбыс шығарғанша,
o LivingColors шамы қашықтан басқару
қашықтан басқару құралдарының «I»
құралымен басқарылмайды
түймелерін басып тұрыңыз. Қашықтан
o Қашықтан басқару құралының ішіндегі
басқару құралдары жалғанды. Енді
батареяларды тексеріңіз. Батареялар
қолданыстағы шамдарды жаңа қашықтан
дұрыс салынған (+ және -) және
басқару құралына жалғауға және барлық
зарядталған болуы керек. Басқару
шамдарды осы екі құралдың кез келген
құралы әлі де жұмыс істемесе,
біреуімен басқаруға болады.
батареяларды ауыстырып көріңіз.
c. Егер қосылып жатқан қашықтан басқару
o Қашықтан басқару құралын осы
92

нұсқаулықтың 3.1 бөлімінде берілген
Кепілдік:
тәртіп бойынша LivingColors шамына
Өнім нұсқауларға сай және мақсаты бойынша
қосыңыз.
қолданылған болса, Philips компаниясының екі
жылдық кепілдігі жарамды болады. Кепілдік
o Қашықтан басқару құралын
бойынша арыздар тек сатып алынған күні,
пайдаланған соң түймелер
сатқан мекеменің аты және өнім сипаттамасын
жыпылықтайды
қамтитын түпнұсқалы сатып алу құжаты
o Бұл қашықтан басқару құралындағы
(инвойс, сатқан мекеменің түбіртегі немесе
батарея заряды таусылғанын және оны
чек) болса ғана, қабылданады.
ауыстыру керек екенін білдіреді.
Philips кепілдігі жарамайды егер:
o Түсті автоматты өзгерту режимі
- Сатып алған құжатта немесе өнім
қосылмайды
сипаттамасы құжатында кез келген нәрсе
o Бұл қашықтан басқару құралы
алмастырылған, шимақталған, өшірілген
түс шеңберінің айналу әрекетін
немесе айырғысыз болса.
анықтамағанынан болуы мүмкін. Қайта
- Қызмет көрсетпеуі тоқ байланысы немесе
көріңіз, толық айналым кезінде саусақты
дұрыс қолданбағандық салдарынан тиген
түс шеңберінен алмаңыз
зақым арқасында болса.
- Зақым LivingColors-а сәйкес келмейтін
o LivingColors шамын таймерге жалғау
жағдайлар барысында, мәселен, найзағай,
мүмкін бе?
су алу, өрт, дұрыс қолданбау, немесе
o Иә. Philips LivingColors шамын
ұқыпсыздық салдарынан тиген болса.
таймермен (жинаққа кірмейді)
- LivingColors ашылған немесе
пайдалануға болады. Таймер арқылы
бөлшектелген болса.
іске қосылған LivingColors шамы соңғы
параметрді көрсетеді (тұрақты түс
Тазалау және күту:
немесе түсті автоматты өзгерту режимі).
Шанышқыны қабырғадағы розеткадан
Соңғы параметрдің «Өшірулі» күйінде
суырыңыз.
болмағанын тексеріңіз.
Сырып алмас үшін, LivingColors шамын,
басқару құралын және жалғау ашасын тек
o LivingColors қашықтан басқару
жұмсақ дымқыл шүберекпен ғана тазалау
құралына қосымша шамдар
керек.
жалғанбайды
Тазалау агенттерін қолдануға болмайды.
o Жалғанудағы өнімде SmartLink логотипі
бар екенін тексеріңіз. Осы қашықтан
Қауіпсіздік нұсқаулары:
басқару құралына тек SmartLink
- Штепсельдік ұшты және LivingColors
логотипі бар өнімдер жалғанады.
шамын сұйықтықтардан және ылғал
o Осы нұсқаулықтың 3-бөлімінде
жерден алшақ ұстаңыз.
сипатталған әрекеттерді қайта орындап
- LivingColors тек іште қолдануға арналған.
көріңіз. Сол жерде аталған сигнал
Жуынатын бөлме сияқты ылғалды
беріліп, жарықтың жыпылықтағанын
жерлерде немесе сыртта қолдануға
тексеріңіз.
болмайды.
- LivingColors балалар ойнайтын ойыншық
o Менің сұрағым бұл тізімде жоқ
емес.
o Көмек алу үшін, Philips компаниясына
- Ыстық бетке қоймаңыз
хабарласыңыз («Қосымша қолдау» атты
- Қауіпсіздік үшін және кепілдік шарттары
5-бөлімді қараңыз).
бойынша, LivingColors шамын және
штепсельдік ұшты ашуға болмайды.
5. Қосымша қолдау
- Тек жинақтағы қуат адаптерін
пайдаланыңыз: басқа адаптер LivingColors
Қосымша ақпарат керек болса, сондай-
шамын зақымдауы мүмкін.
ақ қиындықтар орын алса, «www.philips.
com»мекенжайы бойынша Philips
Қоршаған айнала:
компаниясының веб-сайтына өтіңіз немесе
Басқару пультін тастар алдында батареяларын
Philips жарық өнімдерінің байланыс
алып тастаңыз. Батареяларды әдеттегі үй
орталығына мына тегін телефон арқылы
қоқыстарымен бірге тастауға болмайды. Олар
хабарласыңыз: 00800-PHILIPSL немесе 00800-
арнайы жинайтын орынға немесе Philips
74454775
Диллеріне апарылуы тиіс, осы екі жерде де
оны қоршаған айналаға зақым тигізбейтін
93
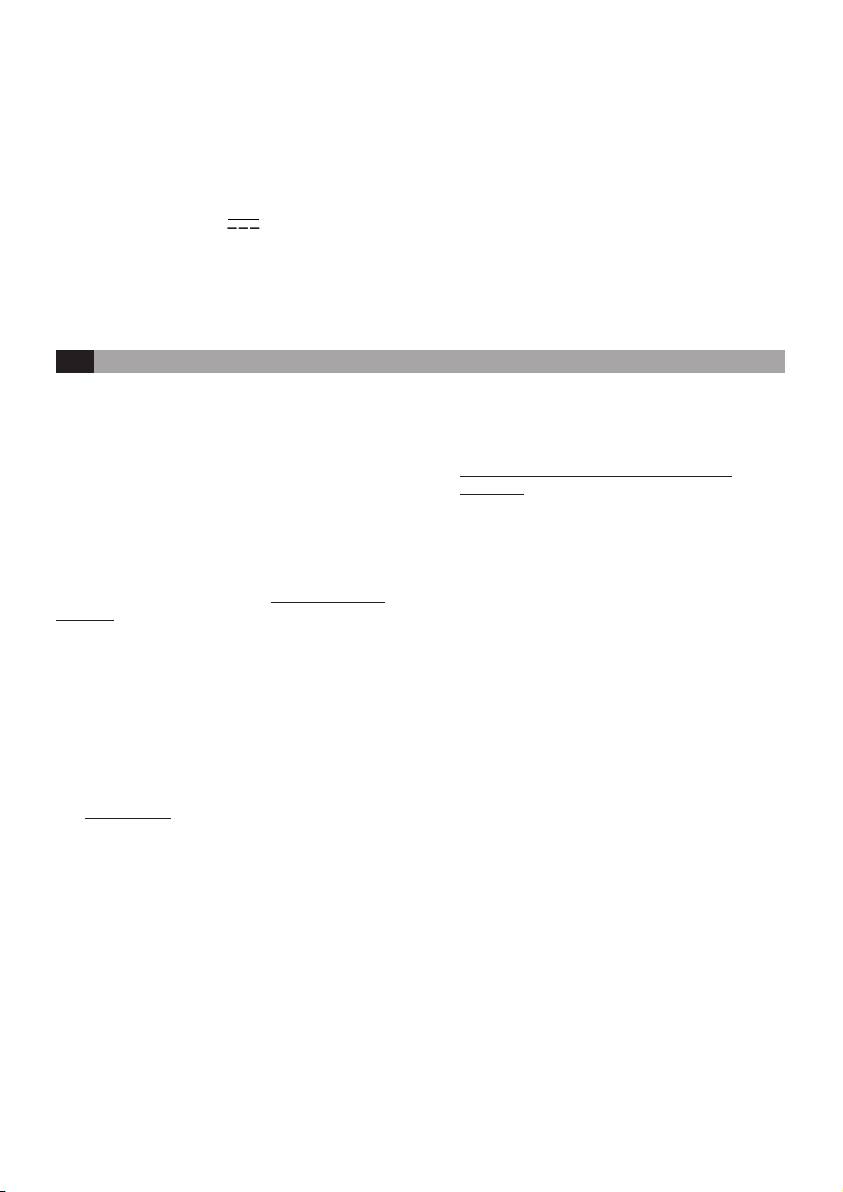
жолмен жояды.
Сымсыз мүмкіндік ерекшеліктері:
Шанышқы ерекшеліктері:
Сымсыз радио жиілігінің мөлшері:
AC адаптор
2405~2475 МГц
Үлгі: EADP-10EB C (Еуропа түрі)
Сымсыз байланыс хаттамасы: IEEE 802,15.4)
EADP-10EB D (Ұлы Британия түрі +
Қызмет ету каналдары: 11, 15, 20 немесе 25
Сингапур)
каналдары
EADP-10EB E (Австралия түрі)
Кіріс: 220 - 240В ~ 0,3A 50 Гц
Сыртқы ортаға бейімделу ерекшеліктері:
Шығыс қуаты: 18,5 В 0,83 A
Температура (қызмет ету): 0...40 °C
Температура (сақтау): -25...60 °C
Шамның қуатты тұтынуы : 15,4 Вт-қа дейін
Салыстырмалы ылғалдылық мөлшері:
5...95 % қоюланбайтын
Қашықтан басқару құралы:
Батареялар: 3 x Philips Powerlife Alkaline AAA
LR03, 1,5 В.
RO Instrucţiuni de utilizare pentru LivingColors
Vă mulţumim pentru achiziţionarea lămpii de podea
telecomenzii prin glisarea butonului din spate.
Philips LivingColors!
Introduceţi 3 baterii AAA (+ şi – după cum este
indicat).
LivingColors a fost proiectat special pentru a crea
propria dvs. ambianţă acasă, prin culoare şi lumină. La
2. Creaţi propria dvs. ambianţă în felul
prima utilizare a produsului LivingColors, vă rugăm
următor:
să citiţi aceste instrucţiuni cu atenţie şi să le păstraţi
pentru consultare ulterioară. Urmând instrucţiunile
- Atingând culoarea dorită de pe selectorul de
noastre, veţi benecia de funcţionalitatea completă a
culoare. Puteţi deplasa degetul pe selector pentru
Philips LivingColors.
a rana culoarea.
Înregistraţi-vă produsul la adresa www.philips.com/
- Modicând saturaţia culorilor (adăugând mai
welcome pentru informaţii la zi despre noile produse
mult alb în culoarea actuală). Apăsaţi butonul de
Philips LivingAmbiance:
creştere a saturaţiei pentru o culoare profundă sau
butonul de scădere a saturaţiei pentru o culoare
Acest manual vă va ajuta să…
mai pastelată. Dacă ţineţi apăsat butonul de
1. Faceţi primii paşi
scădere a saturaţiei, veţi ajunge în nal la culoarea
2. Creaţi propria ambianţă cu LivingColors
albă .
3. Conectaţi LivingColors la alte produse Philips
LivingAmbiance
- Reducerea gradată a luminii. Creşteţi sau
4. Răspundeţi la întrebări frecvente
scădeţi intensitatea luminii prin intermediul
5. Obţineţi asistenţă suplimentară
butoanelor de reducere gradată a luminii.
1. Primii paşi:
- Lăsând culorile să se schimbe automat.
Rotiţi-vă degetul pe selectorului de culori (un
- Introduceţi stâlpul în picior şi apoi rotiţi stâlpul
cerc complet) şi apăsaţi scurt “I” (“pornit”);
în sens orar până la maxim.
LivingColors va comuta în modul automat de
- Introduceţi mufa de conectare în oriciul de
schimbare a culorii: lampa va începe să schimbe
sub piciorul lămpii şi conectaţi celălalt capăt al
culorile automat.
acesteia la priza din perete.
- Introduceţi mufa de conectare din partea de sus
Puteţi regla viteza cu care se schimbă culorile.
a suportului în lampă – asiguraţi-vă că auziţi un
Viteza poate reglată în sens orar, de la rapid
clic.
(culoarea albastru închis de pe selectorul de
- Aşezaţi lampa pe suport şi orientaţi LivingColors
culori) la lent (purpuriu). Puteţi atinge oriunde pe
spre perete (distanţa optimă este 50 cm). Puteţi
selectorul de culori. În timpul modului automat
ajusta înălţimea corpului de iluminat rotind inelul
de schimbare a culorii, puteţi regla de asemenea
din centrul suportului, trăgând partea de sus a
saturaţia şi luminozitatea culorilor.
suportului la înălţimea dorită şi apoi rotind inelul
Pentru a comuta înapoi în modul culoare statică,
înapoi pentru a xa poziţia.
rotiţi-vă din nou degetul pe selectorul de culori
- Deschideţi compartimentul bateriilor
şi apoi apăsaţi “0”. Alternativ, puteţi opri “0” şi
94

reporni “I” LivingColors.
“0” până când auziţi un semnal sonor de la
- Dacă vă place o anumită setare de lumină (de
telecomandă. Lampa va trece acum lent la oprit.
exemplu, lumină roşie uşor redusă), puteţi stoca
această scenă pentru a o reutiliza uşor: ţineţi
2. Puteţi conecta de asemenea produse Philips
apăsat unul dintre butoanele pentru scenă, până
LivingWhites (mufe, produse care economisesc
când telecomanda emite un semnal sonor. Scena
energia şi corpuri de iluminat) la telecomanda dvs.
dvs. este stocată acum sub butonul pentru scenă
Pentru a adăuga un produs Philips LivingWhites,
pe care l-aţi apăsat. În acest mod puteţi stoca de
apropiaţi telecomanda de acesta; apoi ţineţi apăsat
asemenea o anumită viteză a modului automat de
butonul “I”. Lampa va lumina intermitent de 3
schimbare a culorilor.
ori. Ţineţi apăsat butonul “I” până când auziţi
un semnal sonor de la telecomandă; lampa va
Puteţi continua reglarea luminilor după cum doriţi.
ilumina intermitent rapid de două ori. Acum este
Oricând doriţi să reveniţi la scena stocată, apăsaţi
conectată la telecomandă şi va reveni la ultima sa
butonul pentru scenă pe care l-aţi apăsat când aţi
setare “pornit”.
stocat-o. Respectivul buton pentru scenă se va
aprinde scurt pentru a indica faptul că scena este
Dacă aţi dori să deconectaţi un produs
selectată, iar LivingColors vor comuta la setările
LivingColors de la telecomandă, apropiaţi
stocate.
telecomanda de produs, apoi ţineţi apăsat butonul
Puteţi stoca până la 3 scene (câte una pentru
“0”. Lampa va lumina intermitent de 3 ori. Ţineţi
ecare buton pentru scenă).
apăsat butonul “0” până când auziţi un semnal
Opriţi LivingColors apăsând scurt butonul “0”
sonor de la telecomandă. Lampa va trece acum
(oprit). LivingColors îşi va aminti ultima setare
lent la oprit.
pentru utilizarea viitoare. Pentru a porni din nou,
apăsaţi pe “I” (pornit).
3. Puteţi conecta de asemenea telecomanda
la o altă telecomandă din gama Philips
3. Conectaţi LivingColors la alte produse
LivingAmbiance. Orice telecomandă
Philips LivingAmbiance
LivingColors sau LivingWhites cu o siglă
SmartLink poate conectată la telecomanda dvs.
Puteţi conecta diferite produse din gama Philips
Conectarea unei alte telecomenzi vă va permite
LivingAmbiance la telecomanda pentru LivingColors.
să controlaţi aceleaşi lămpi cu două telecomenzi
În acest mod, veţi putea să reglaţi toate produsele
diferite. Aţi putea de exemplu crea 6 scene de
conectate împreună sau individual pe ecare dintre ele
iluminare diferite – 3 pe o telecomandă şi 3
– toate cu aceeaşi telecomandă.
pe cealaltă, cu aceleaşi lămpi. Pentru a adăuga
o telecomandă suplimentară LivingColors sau
1. Puteţi conecta alte lămpi Philips LivingColors
LivingWhites, procedaţi astfel:
la telecomanda dvs. Majoritatea Philips
LivingColors vor funcţiona cu această
a. Resetaţi telecomanda pe care doriţi să o adăugaţi:
telecomandă:pur şi simplu vericaţi dacă există o
deschideţi compartimentul pentru baterie şi
siglă SmartLink pe LivingColors unde aţi dori să
apăsaţi câteva secunde butonul RESET (de ex. cu
vă legaţi. Toate produsele cu o siglă SmartLink pot
o agrafă). Asiguraţi-vă că bateriile sunt în interior.
conectate la telecomanda dvs.
Telecomanda va emite un sunet care indică faptul
că a fost resetată.
Pentru a adăuga o lampă Philips LivingColors la
b. Ţineţi telecomanda pe care aţi resetat-o în
telecomandă, apropiaţi telecomanda de lampă;
apropierea telecomenzii curente. Apăsaţi
ţineţi apăsat butonul “I”. Lampa va lumina
butonul “I” de pe ambele telecomenzi până când
intermitent de 3 ori. Ţineţi apăsat butonul
telecomenzile redau un sunet. Telecomenzile sunt
“I” până când auziţi un semnal sonor de la
acum conectate – aceasta înseamnă că puteţi
telecomandă; lampa va lumina scurt cu culoarea
conecta acum aceleaşi lămpi la noua telecomandă
verde. Acum este conectată la telecomandă şi va
şi controla toate lămpile cu oricare dintre
reveni la ultima sa setare “pornit”.
telecomenzi.
Pentru o lampă LivingAmbiance, vă rugăm să vă
c. Dacă telecomanda pe care o adăugaţi este
asiguraţi că conectaţi de asemenea lumina albă –
rotundă, o puteţi copia acum de asemenea: o
o puteţi face în acelaşi mod ca pentru produsele
puteţi conecta imediat la aceleaşi lămpi la care
LivingWhites descrise la punctul 2.
este conectată telecomanda originală. Pentru a
Dacă aţi dori să deconectaţi o lampă LivingColors
copia telecomanda, repetaţi procedura descrisă la
de la telecomandă, apropiaţi telecomanda de
punctul b.
lampă, apoi ţineţi apăsat butonul “0”. Lampa va
lumina intermitent de 3 ori. Ţineţi apăsat butonul
După ce aţi conectat una sau mai multe lămpi la
telecomanda Philips LivingColors, puteţi controla
95

toate aceste lămpi împreună sau pe ecare dintre
nou, asigurându-vă că aţi aşezat degetul pe
acestea individual.
selectorul de culori când efectuaţi un cerc
complet
Pentru a controla o singură lampă, trebuie să o
selectaţi (vă rugăm să remarcaţi că pentru lumina
o Doresc să conectez LivingColors la un
LivingColors colorată şi albă, lumina colorată şi cea
cronometru. Este posibil acest lucru?
albă trebuie să e selectate separat). O puteţi face
o Da. Puteţi utiliza Philips LivingColors cu un
utilizând unul dintre butoanele de selectare a luminii.
cronometru (neinclus). Când este pornit cu
Atunci când ţineţi apăsat unul dintre butoanele
un cronometru, produsul LivingColors va
de selectare a luminii, lampa selectată va începe să
aşa ultima setare (mod culoare statică sau
clipească. Dacă aceasta nu este lampa pe acre aţi dori
schimbare automată a culorilor). Asiguraţi-vă
să o reglaţi, eliberaţi butonul şi apăsaţi-l din nou – o
că ultima setare nu este “oprit”.
altă lampă va începe să clipească. Atunci când o lampă
este selectată, indicatorul de selectare a luminii de pe
o Nu pot conecta lămpi suplimentare la
telecomandă (becul cu incandescenţă) se va aprinde.
telecomanda LivingColors
Aceasta înseamnă că puteţi regla acum numai lampa
o Vă rugăm să vă asiguraţi că produsul pe care
selectată.
încercaţi să-l conectaţi are o siglă SmartLink.
Atunci când nu este selectată nicio lumină (indicatorul
Numai produsele cu sigla SmartLink pot
de selectare a luminii este stins), toate reglările vor
conectate la această telecomandă.
aplicate tuturor luminilor conectate la telecomandă
o Încercaţi să repetaţi procedura descrisă în
(de exemplu, puteţi regla intensitatea tuturor luminilor
secţiunea 3 a prezentului manual. Asiguraţi-vă
din încăpere).
că auziţi sunetele şi vedeţi luminile întocmai
Dacă vă place o anumită combinaţie de setări de
cum sunt descrise acolo.
lumină ale diferitelor corpuri de iluminat, o puteţi
stoca de asemenea ca o scenă – în acelaşi mod descris
o Întrebarea mea nu este în acest manual
în secţiunea 2 a prezentului manual.
o Contactaţi Philips pentru asistenţă (consultaţi
secţiunea 5 “Asistenţă suplimentară”).
4. Întrebări frecvente
5. Asistenţă suplimentară
Ce trebuie făcut dacă…
o LivingColors nu luminează
Pentru informaţii şi în caz de probleme, vizitaţi site-ul
o Vericaţi conexiunile cablului la lampă.
Web Philips la adresa www.philips.com sau contactaţi
Vericaţi dacă ştecherul este introdus corect
gratuit centrul Philips Lighting Contact la nr. de
în priza de perete.
telefon: 00800-PHILIPSL sau 00800-74454775
o Scoateţi cablul de alimentare şi puneţi-l la loc.
Dacă LivingColors schimbă mai multe culori şi
Garanţie:
apoi se stinge, utilizaţi telecomanda pentru a o
Garanţia Philips de doi ani este validă dacă produsul
porni din nou.
este utilizat conform instrucţiunilor şi în scopul în
care a fost creat. Revendicările vor acceptate doar
o LivingColors nu răspunde la telecomandă
la prezentarea dovezii originale de achiziţie (factură,
o Vericaţi bateriile din telecomandă. Bateriile
bon sau chitanţă) în care sunt incluse data achiziţiei,
trebuie să e aşezate corect (+ şi -) şi
numele distribuitorului şi descrierea produsului.
trebuie să e încărcate. Dacă telecomanda nu
funcţionează nici acum, încercaţi să înlocuiţi
Garanţia Philips se prescrie dacă:
bateriile.
- Orice a fost schimbat, tăiat, şters sau făcut ilizibil
o Conectaţi telecomanda la LivingColors
pe registrul de achiziţii sau descrierea produsului.
urmând procedura descrisă în secţiunea 3.1 a
- Erori cauzate de deteriorări, conexiuni defecte
acestui manual.
sau abuz.
- Un defect este cauzat de circumstanţe extreme,
o Butoanele luminează intermitent după ce
neinerente produsului LivingColors, spre exemplu,
am utilizat telecomanda
iluminare, inundare, foc, utilizare incorectă sau
o Acest lucru înseamnă că bateriile din
neglijenţă.
telecomandă sunt (aproape) descărcate şi
- Produsul LivingColors a fost deschis sau
trebuie înlocuite.
dezasamblat.
o Nu pot activa modul de schimbare
Curăţare şi întreţinere:
automată a culorii
Scoateţi ştecherul din priză.
o Este posibil ca telecomanda să nu înţeles
Pentru a evita zgârierea, lampa LivingColors,
mişcarea dvs. de “rotire”. Încercaţi din
telecomanda şi adaptorul trebuie să e curăţate numai
96
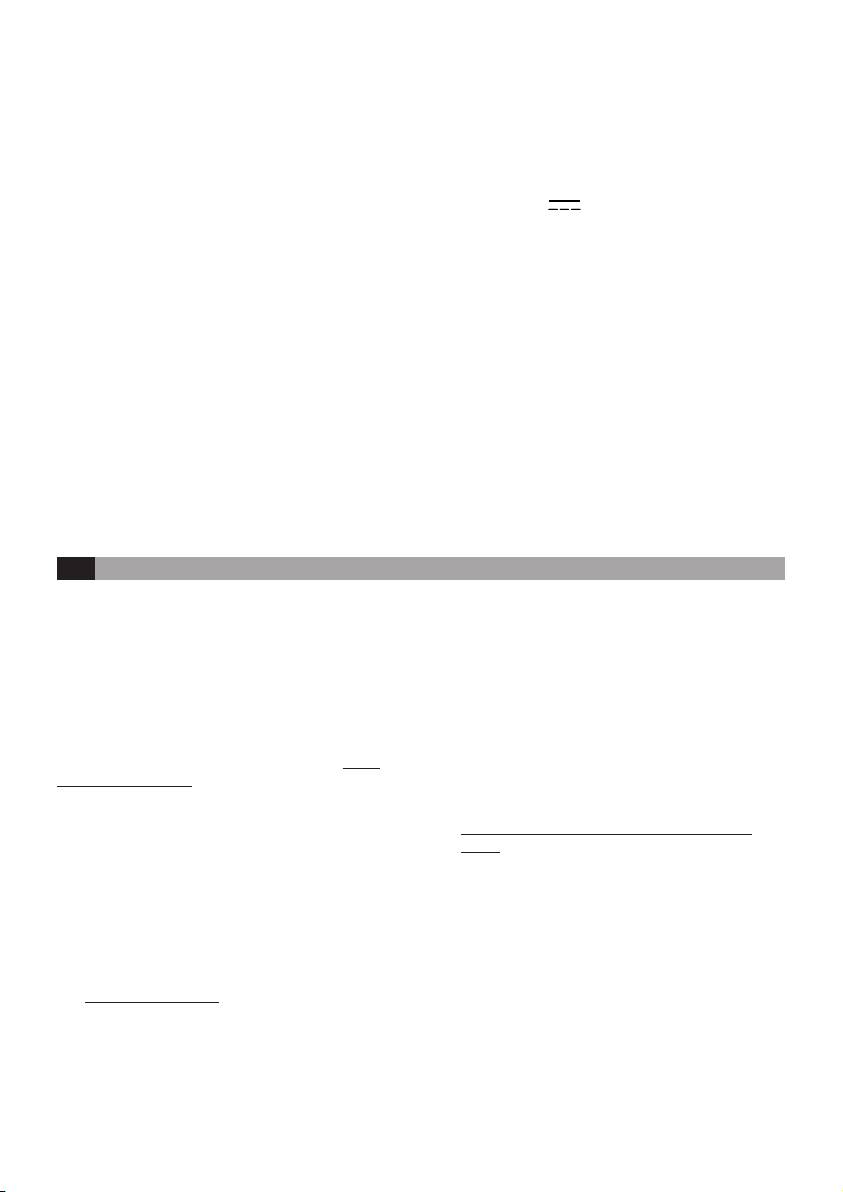
cu o cârpă uscată moale.
Nu folosiţi agenţi de curăţare.
Specicaţiile mufei:
Alimentator CA
Instrucţiuni de siguranţă:
Model: EADP-10EB C (tip UE)
- Păstraţi mufa şi produsul LivingColors departe de
EADP-10EB D (tip Marea Britanie +
lichide şi umiditate.
Singapore)
- LivingColors este exclusiv pentru uz de interior,
EADP-10EB E (tip Australia)
a nu se utiliza în locuri ude, spre exemplu băi sau
Intrare: 220 - 240 V ~ 0,3 A 50 Hz
în exterior.
Ieşire: 18,5 V 0,83 A
- LivingColors nu este o jucărie creată spre
amuzamentul copiilor.
Consumul de curent al corpului de iluminat: până la
- A nu se poziţiona pe suprafeţe erbinţi
15,4 W
- Din motive de securitate şi conform condiţiilor
garanţiei, produsul LivingColors şi mufa nu trebuie
Telecomandă:
deschise.
Baterii: 3 x baterii alcaline Philips Powerlife AAA LR03,
- Utilizaţi numai adaptorul furnizat: utilizarea
1,5 V.
unui alt adaptor poate deteriora produsul
LivingColors.
Specicaţie wireless:
Bandă de frecvenţe mod wireless RF: 2405~2475 MHz
Protecţia mediului:
Protocol de comunicaţii wireless: IEEE 802.15.4)
Dacă aruncaţi aparatul, casaţi-l în conformitate cu
Canale de funcţionare: canale 11, 15, 20 sau 25
instrucţiunile autorităţii locale. Scoateţi bateriile
când îndepărtaţi telecomanda. Nu aruncaţi bateriile
Specicaţie de protecţie a mediului:
împreună cu gunoiul menajer. Acestea trebuie duse la
Temperatură (funcţionare): 0...40 °C
un punct de colectare ocial sau la magazinul Philips,
Temperatură (depozitare): -25...60 °C
care va casa bateriile într-un mod ecologic.
Umiditate relativă: 5...95 % fără condens
SL LivingColors Navodila za uporabo
- Vtič na vrhu stojala vstavite v svetilko – ta mora
Hvala, ker ste kupili talno svetilko Philips LivingColors!
klikniti na mesto.
- Svetilko LivingColors postavite na stojalo in
Svetilka LivingColors vam omogoča, da z barvami in
usmerite proti steni (optimalna razdalja je
svetlobo ustvarjate lasten domači ambient. Pred prvo
50 cm). Višino svetila lahko nastavite tako, da
uporabo svetilke LivingColors natančno preberite
obrnete obroček na sredini stojala, zgornji del
ta navodila in jih shranite za poznejšo uporabo.
stojala povlečete na želeno višino in obroček
Upoštevajte naše smernice in optimalno izkoristite vse
obrnete nazaj, da stojalo pritrdite na položaju.
možnosti svetilke Philips LivingColors.
- Premaknite gumb na hrbtni strani daljinskega
upravljalnika, da odprete pokrov prostora za
Svoj izdelek registrirajte na spletnem mestu www.
baterije. Vstavite tri baterije AAA (pazite na
philips.com/welcome, da boste vedno seznanjeni z
pravilno polariteto).
novimi izdelki Philips LivingAmbiance
2. Ambient po želji ustvarite na naslednji
S priročnikom si lahko pomagate pri …
način:
1. Začetek uporabe
2. Ustvarjanje lastnega ambienta s svetilko
- Dotaknite se želene barve na barvnem kolescu.
LivingColors
Barvo lahko prilagodite tako, da se s prstom
3. Povezava svetilke LivingColors z drugimi izdelki
pomikate po barvnem kolescu.
Philips LivingAmbiance
4. odgovorih na pogosta vprašanja
- Spremenite nasičenost barv (dodajanje beline
5. pridobivanju dodatne podpore
trenutni barvi). Pritisnite gumb za večjo nasičenost
za globlje barve ali gumb za manjšo nasičenost za
1. Začetek uporabe:
bolj pastelne barve. Če dlje časa pritiskate gumb
za manjšo nasičenost, dosežete belo barvo.
- Nosilec vstavite v podstavek in ga do konca
obrnite v desno.
- Zatemnitev. Zvišajte ali znižajte intenzivnost
- Vtič vstavite v odprtino pod podstavkom
svetlobe z gumboma za zatemnitev.
svetilke, drugi konec pa vklopite v stensko
vtičnico.
97

- Pustite, da svetilka samodejno menja barve.
zeleno. Svetilka je zdaj povezana z daljinskim
Prst pomaknite okoli barvnega kolesca (poln
upravljalnikom in se preklopi na zadnjo nastavitev,
krog) in pritisnite "I" (vklop); svetilka LivingColors
ko je bila vklopljena.
preklopi na način samodejnega spreminjanja barv:
Pri svetilki LivingAmbiance ne pozabite povezati
svetilka začne samodejno spreminjati barve.
bele svetilke. To storite enako kot pri izdelkih
Nastavite lahko hitrost spreminjanja barv. Hitrost
LivingWhites, opisanih v 2. točki.
lahko spreminjate v smeri urinega kazalca, in
Če želite prekiniti povezavo med daljinskim
sicer od hitre (temno modra barva na barvnem
upravljalnikom in svetilko LivingColors, se ji
kolescu) do počasne (vijolična). Ko je vklopljen
približajte z daljinskim upravljalnikom in pridržite
način samodejnega spreminjanja barv, lahko
gumb "0". Svetilka 3-krat utripne. Držite gumb "0",
nastavite tudi zasičenost in svetlost barv.
dokler upravljalnik ne zapiska. Svetilka se počasi
Če želite preklopiti nazaj na način brez
izklopi.
spreminjanja barv, se s prstom pomaknite okoli
barvnega kolesca in pritisnite "0". Svetilko
2. Z daljinskim upravljalnikom lahko povežete
LivingColors lahko tudi izklopite ("0") ali vklopite
tudi izdelke Philips LivingWhites (vtiče,
("I").
varčne sijalke in svetila). Če želite dodati
izdelek Philips LivingWhites, se mu približajte z
- Če vam je všeč določena nastavitev svetlobe
daljinskim upravljalnikom in pridržite gumb "I".
(npr. rahlo zatemnjena rdeča), lahko shranite
Svetilka 3-krat utripne. Držite gumb "I", dokler
ta prizor, da ga boste naslednjič lahko priklicali:
upravljalnik ne zapiska. Svetilka utripne dvakrat
pritisnite enega od gumbov za prizore in ga držite,
na hitro. Svetilka je zdaj povezana z daljinskim
dokler daljinski upravljalnik ne zapiska. Prizor
upravljalnikom in se preklopi na zadnjo nastavitev,
je zdaj shranjen pod gumbom za prizor, ki ste ga
ko je bila vklopljena.
pritisnili. Tako lahko shranite tudi določeno hitrost
načina samodejnega spreminjanja barv.
Če želite prekiniti povezavo med daljinskim
upravljalnikom in izdelkom LivingWhites, se mu
Če želite, lahko svetlobo prilagajate še naprej.
približajte z daljinskim upravljalnikom in pridržite
Če pa želite povrniti shranjen prizor, pritisnite
gumb "0". Svetilka 3-krat utripne. Držite gumb "0",
gumb za prizor, s katerim ste ga shranili.Gumb
dokler upravljalnik ne zapiska. Svetilka se počasi
za prizor v potrditev izbire na kratko zasveti in
izklopi.
svetilka LivingColors začne svetiti s shranjenimi
nastavitvami.
3. Z daljinskim upravljalnikom lahko povežete tudi
Shranite lahko do 3 prizore (pod vsak gumb za
drug daljinski upravljalnik iz serije Philips
prizor enega).
LivingAmbiance. Daljinski upravljalnik podpira
Svetilko LivingColors izklopite tako, da pritisnete
vse daljinske upravljalnike LivingColors in
gumb "0" (izklop). Svetilka LivingColors si
LivingWhites z logotipom SmartLink. Če povežete
zapomni zadnjo nastavitev za naslednjo uporabo.
še en daljinski upravljalnik, lahko iste svetilke
Za ponoven vklop svetilke pritisnite "I" (vklop).
upravljate z dvema različnima upravljalnikoma.
Tako lahko npr. ustvarite 6 različnih svetlobnih
3. Povezava svetilke LivingColors z drugimi
prizorov, 3 na enem daljinskem upravljalniku
izdelki Philips LivingAmbiance
in 3 na drugem – pri istih svetilkah. Daljinski
upravljalnik LivingColors ali LivingWhites dodate
Z daljinskim upravljalnikom svetilke LivingColors lahko
po naslednjem postopku:
povežete različne izdelke serije Philips LivingAmbiance
in z njim prilagajate vse povezane izdelke skupaj ali
a. Ponastavite daljinski upravljalnik, ki ga želite
vsakega posebej.
dodati: odprite prostor za baterije in za nekaj
sekund pritisnite gumb RESET (npr. s sponko
1. Z daljinskim upravljalnikom lahko povežete tudi
za papir). Poskrbite, da so v upravljalniku
druge svetilke Philips LivingColors. Z njim
baterije. Upravljalnik predvaja zvok v potrditev
je združljiva večina izdelkov Philips LivingColors:
ponastavitve.
preverite le, ali je na svetilki LivingColors, ki
b. Ponastavljeni daljinski upravljalnik približajte
jo želite povezati, logotip SmartLink – daljinski
trenutnemu upravljalniku. Pritisnite gumb "I" na
upravljalnik podpira vse izdelke s tem logotipom.
obeh upravljalnikih, dokler ne predvajata zvoka.
Upravljalnika sta zdaj povezana. To pomeni, da
Če želite daljinskemu upravljalniku dodati
lahko iste svetilke povežete z novim daljinskim
svetilko Philips LivingColors, se ji približajte z
upravljalnikom in vse svetilke upravljate z obema
daljinskim upravljalnikom in pridržite gumb "I".
upravljalnikoma.
Svetilka 3-krat utripne. Držite gumb "I", dokler
c. Če je daljinski upravljalnik, ki ga dodajate, že
upravljalnik ne zapiska. Svetilka na kratko utripne
nastavljen, ga lahko tudi kopirate in tako takoj
98

povežete z istimi svetilkami, s katerimi je povezan
pazite, da boste med pomikanjem po polnem
prvotni daljinski upravljalnik. Če želite upravljalnik
krogu prst ves čas držali na barvnem kolescu
kopirati, ponovite postopek, opisan v točki b.
o Svetilko LivingColors želim povezati s
Ko z daljinskim upravljalnikom Philips LivingColors
časovnikom. Je to mogoče?
povežete eno ali več svetilk, lahko upravljate vse
o Da. Svetilko Philips LivingColors lahko
skupaj ali vsako posebej.
uporabljate s časovnikom (ni priložen).
Če želite upravljati eno od svetilk, jo izberite (pri
Če svetilko LivingColors vklopi časovnik,
barvni in beli svetilki LivingColors je treba barvno
bo uporabljena zadnja nastavitev (brez
in belo svetlobo izbrati posebej). To storite z enim
spreminjanja barv ali samodejno spreminjanje
od gumbov za izbiro svetlobe. Ko pridržite enega od
barv). Pri tem upoštevajte, da zadnja nastavitev
gumbov za izbiro svetlobe, začne izbrana svetilka utripati.
ne sme biti "izklop".
Če to ni svetilka, ki jo želite prilagoditi, spustite
gumb in ga znova pritisnite – utripati bo začela druga
o Z daljinskim upravljalnikom LivingColors
svetilka. Ko izberete svetilko, začne svetiti indikator
ne morem povezati dodatnih svetilk.
izbire svetlobe (žarnica) na daljinskem upravljalniku. To
o Prepričajte se, da je na izdelku, ki ga želite
pomeni, da zdaj lahko prilagodite samo to svetilko.
povezati, logotip SmartLink. S tem daljinskim
Če ni izbrana nobena vrsta svetlobe (indikator izbire
upravljalnikom je mogoče povezati samo
svetlobe ne sveti), z nastavitvami prilagajate vse svetilke,
izdelke z logotipom SmartLink.
povezane z daljinskim upravljalnikom (npr. hkrati
o Poskusite znova izvesti postopek, opisan v 3.
zatemnite vse svetilke v prostoru).
poglavju tega priročnika. Prepričajte se, da je
Če vam je všeč določena kombinacija nastavitev
mogoče slišati zvoke in videti utripanje, kot je
svetlobe različnih svetil, jo lahko shranite kot prizor
opisano.
tako, kot je opisano v 2. poglavju tega priročnika.
o Imam vprašanje, ki ni zajeto tukaj
4. Pogosta vprašanja
o Za pomoč se obrnite na družbo Philips
(oglejte si 5. poglavje "Dodatna podpora").
Kaj storiti, če …
o Svetilka LivingColors ne sveti
5. Dodatna podpora
o Preverite, ali je kabel priključen na svetilko.
Preverite, ali je vtič pravilno vstavljen v stensko
Če želite dodatne informacije oziroma imate težave
vtičnico.
z uporabo svetilke, obiščite spletno mesto družbe
o Odstranite in znova priključite napajalni kabel.
Philips na naslovu www.philips.com ali pokličite na
Če svetilka LivingColors zasveti v različnih
brezplačno telefonsko številko: 00800-PHILIPSL ali
barvah in se nato izklopi, jo znova vklopite z
00800-74454775
daljinskim upravljalnikom.
Garancija:
o Svetilka LivingColors se ne odziva na
Philipsova dveletna garancija je veljavna pod pogojem,
daljinski upravljalnik.
da izdelek uporabljate v skladu z navodili in v pravi
o Preverite baterije daljinskega upravljalnika.
namen. Reklamacije bomo upoštevali samo, če izdelku
Baterije morajo biti pravilno vstavljene (pazite
predložite originalno potrdilo o nakupu (račun,
na pola + in -) in napolnjene. Če daljinski
blagajniški listek ali drugo potrdilo), na katerem so
upravljalnik še vedno ne deluje, zamenjajte
navedeni datum nakupa, naziv prodajalca in opis
baterije.
izdelka.
o Povežite daljinski upravljalnik s svetilko
LivingColors, kot je opisano v poglavju 3.1
Philipsova garancija je razveljavljena v naslednjih
tega priročnika.
primerih:
- če je bilo na dobavnici ali opisu izdelka karkoli
o Po uporabi daljinskega upravljalnika
spremenjeno, prečrtano, izbrisano ali zabrisano;
začnejo utripati gumbi
- napak zaradi poškodovanja, okvarjenih priključkov
o To pomeni, da so baterije daljinskega
ali neprimerne uporabe;
upravljalnika (skoraj) prazne in jih morate
- če so vzrok za okvaro skrajne razmere, ki
zamenjati.
niso značilne za svetilko LivingColors, kot so
strela, poplava, požar, nepravilna uporaba ali
o Ne morem vklopiti načina samodejnega
malomarnost;
spreminjanja barv
- če ste svetilko LivingColors odprli ali razstavili.
o Daljinski upravljalnik morda ni pravilno zaznal
načina pomikanja. Poskusite znova in pri tem
99
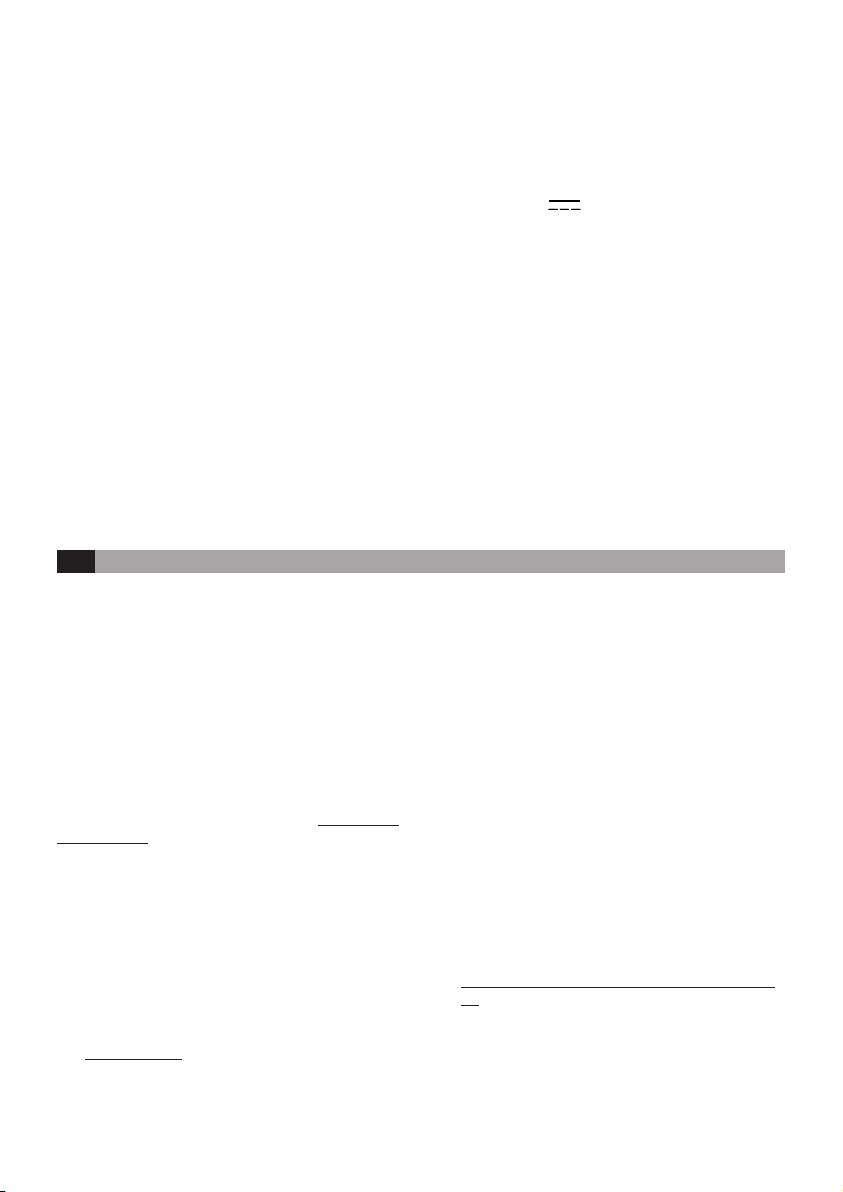
Čiščenje in vzdrževanje:
zbirnem mestu ali pri Philipsovem prodajalcu, kjer
Vtič izvlecite iz omrežne vtičnice.
bodo baterije zavrgli na okolju prijazen način.
Svetilko LivingColors, daljinski upravljalnik in adapter
Specikacije vtiča:
čistite samo s suho in gladko krpo, da jih ne opraskate.
Adapter AC
Ne uporabljajte čistilnih sredstev.
Model: EADP-10EB C (tip za EU)
EADP-10EB D (tip za ZK in Singapur)
Varnostna navodila:
EADP-10EB E (tip za Avstralijo)
- Vtiča in svetilk LivingColors ne izpostavljajte
Vhod: 220 - 240 V ~ 0,3 A 50 Hz
tekočinam in vlagi.
Izhod: 18,5 V 0,83 A
- Svetilka LivingColors je namenjena samo uporabi
v zaprtih prostorih. Ne uporabljajte je na vlažnih
Poraba energije svetila: do 15,4 W
mestih, na primer v kopalnici ali na prostem.
- Svetilka LivingColors ni igrača, zato ne dovolite,
Daljinsko upravljanje:
da bi se z njo igrali otroci.
Baterije: 3 baterije Philips Powerlife Alkaline AAA
- Ne postavljajte je na vroče površine.
LR03, 1,5 V.
- Iz varnostnih razlogov in v skladu z določili
garancije ne odpirajte svetilke LivingColors in
Specikacije brezžične uporabe:
vtiča.
Frekvenčni pas v brezžičnem načinu RF:
- Uporabljajte samo priloženi adapter: uporaba
2405~2475 MHz
drugačnega adapterja lahko poškoduje svetilko
Protokol za brezžično komunikacijo: IEEE 802,15.4)
LivingColors.
Delovni kanali: kanali 11, 15, 20 ali 25
Okolje:
Specikacije okolja:
Izrabljen izdelek zavrzite v skladu z navodili in predpisi
Temperatura (delovanje): od 0 do 40 °C
lokalnih oblasti. Preden zavržete daljinski upravljalnik,
Temperatura (shranjevanje): od -25 do 60 °C
odstranite baterije. Ne zavrzite jih skupaj z običajnimi
Relativna vlažnost: od 5 do 95 % brez kondenzacije
gospodinjskimi odpadki. Oddajte jih na uradnem
MK LivingColors Упатство за користење
Ви благодариме што се одлучивте да купите Philips
на стрелките на часовникот сè додека веќе не
LivingColors подна светилка!
можете да ја вртите.
- Вметнете го делот за поврзување во отворот
LivingColors светилките се специјално дизајнирани
под основата на светилката, а неговиот друг
за да ви овозможат создавање на сопствен
крај приклучете го во штекер на ѕид.
амбиент во вашиот дом, со помош на светлина во
- Вметнете го делот за поврзување од горниот
боја. Пред првото користење на LivingColors, ве
дел на држачот во светилката – треба да
молиме внимателно прочитајте го ова упатство и
слушнете звук на "кликнување".
зачувајте го за користење во иднина. Доколку се
- Поставете ја светилката на држачот и
придржувате кон нашите инструкции ќе можете
насочете ја LivingColors светилката кон ѕидот
да уживате во полната функционалност на Philips
(оптималното растојание е 50 cm). Можете
LivingColors.
да ја прилагодите висината на светилката
преку завртување на прстенот на средината
Регистрирајте го вашиот производ на www.philips.
од држачот, повлекување на горниот дел
com/welcome за да бидете во тек со новите Philips
од држачот до саканата висина, и потоа
LivingAmbiance производи
завртување на прстенот во обратна насока
заради фиксирање на позицијата.
Ова упатство ќе ви помогне при…
- Отворете го одделот за батерии на
1. Започнување со употреба
далечинскиот управувач со повлекување на
2. Создавање сопствен амбиент со помош на
копчето на задната страна. Вметнете 3 AAA
LivingColors
батерии (+ и – како што е покажано).
3. Поврзување на LivingColors со други Philips
LivingAmbiance производи
2. Создадете сопствен амбиент со помош
4. Одговор на често поставуваните прашања
на:
5. Добивање дополнителна поддршка
- Допирање на саканата боја на тркалцето
1. На почеток:
за боја. Можете да го движите прстот по
тркалцето за боја за да ја прилагодите бојата.
- Вметнете ја цевката во основата, и потоа
завртете ја цевката во насока на движењето
100

- Менување на заситеноста на бојата
Можете да зачувате до 3 сцени (по една за
(додавање повеќе бела боја кон тековната
секое копче за сцена).
боја). Притиснете го копчето за зголемување
Исклучете го LivingColors со кратко
на заситеност за подлабока боја или копчето
притиснување на “0” (исклучено). LivingColors
за намалување на заситеност за попастелна.
ќе го зачува последното поставување
Доколку продолжите со притиснување на
за наредното користење. За повторно
копчето за намалување на заситеност, на крај
вклучување, притиснете на “I” (вклучено).
ќе добиете бела боја.
3. Поврзување на LivingColors со други
- Придушување. Засилете или намалете го
Philips LivingAmbiance производи
интензитетот на светлината со помош на
копчињата за придушување.
Можете да поврзете различни производи од Philips
LivingAmbiance палетата со далечинскиот управувач
- Овозможување автоматско менување на
од LivingColors. На овој начин, вие ќе можете
боите. Повлечете со прстот околу тркалцето
да ги прилагодувате сите поврзани производи
за боја (еден полн круг) и кратко притиснете
истовремено или пак поединечно – со истиот
на “I” (“Вклучено”); LivingColors ќе премине
далечински управувач.
во режим на автоматско менување на боите:
светилката ќе започне автоматски да ги менува
1. Можете да поврзете други Philips
боите.
LivingColors лампи со вашиот далечински
управувач. Повеќето Philips LivingColors лампи
Можете да ја прилагодите брзината со
ќе работат со овој далечински управувач:
која се менуваат боите. Брзината може да
проверете дали има SmartLink лого на
се прилагоди во насока на движењето на
LivingColors лампата што би сакале да ја
стрелките на часовникот, од побрзо (темно
поврзете. Сите производи со SmartLink лого
сина боја на тркалцето за боја) кон побавно
можат да се поврзат со вашиот далечинскиот
(виолетова боја). Можете да допрете каде
управувач.
било на тркалцето за боја. Додека сте во
режим на автоматско менување на боите, исто
За да додадете Philips LivingColors лампа
така можете да ги прилагодите заситеноста и
кон далечинскиот управувач, приближете го
осветленоста на боите.
управувачот до лампата; потоа притиснете и
За да се вратите во режим на непроменливи
задржете на копчето “I”. Лампата ќе засвети 3
бои, повторно повлечете со прстот околу
пати. Задржете го копчето “I” додека не чуете
тркалцето за боја и потоа притиснете “0”.
звучен сигнал од далечинскиот управувач;
Алтернативно, можете да го исклучите
лампата кратко ќе засвети со зелена боја.
LivingColors на “0” и повторно да го вклучите
Таа сега ќе биде поврзана со далечинскиот
на “I”.
управувач и ќе ја добие последната
поставеност кога била вклучена.
- Ако ви се допадне одредено поставување на
За LivingColors лампа, исто така поврзете
светлината (на пример, црвена светлина со
ја и белата светилка – тоа можете да го
мало придушување), можете да ја зачувате
направите на ист начин како и за LivingWhites
оваа сцена за лесно повикување: притиснете
производите опишани во точка 2.
и задржете на едно од копчињата за сцена, сè
Ако сакате да ја прекинете врската помеѓу
додека далечинскиот управувач не емитува
LivingColors лампа и далечински управувач,
звучен сигнал. Вашата сцена сега е зачувана
приближете го управувачот до лампата,
под копчето за сцена кое сте го притиснале.
потоа притиснете и задржете на копчето
На овој начин исто така можете да зачувате
“0”. Лампата ќе засвети 3 пати. Задржете го
одредена брзина на режимот за автоматско
копчето “0” додека не чуете звучен сигнал од
менување на боите.
далечинскиот управувач. Лампата полека ќе се
изгасне.
Можете да продолжите со прилагодување
на светилките по ваша желба. Кога ќе сакате
2. Исто така можете да поврзете Philips
да се вратите на некоја зачувана сцена, само
LivingWhites производи (светилки за
притиснете го копчето за сцена кое сте го
вметнување, светилки кои штедат енергија
притиснале при зачувувањето. Тоа копче за
и расветни тела) со вашиот далечински
сцена накратко ќе засвети за да покаже дека
управувач. За да додадете Philips LivingWhites
сцената е избрана, и LivingColors ќе ги добие
производ, приближете го управувачот до него;
зачуваните параметри.
потоа притиснете и задржете на копчето
“I”. Лампата ќе засвети 3 пати. Задржете го
101

копчето “I” додека не чуете звучен сигнал
LivingColors бела светилка и светилка во боја,
од далечинскиот управувач; лампата брзо ќе
белата светилка и светилката во боја треба да се
засвети двапати. Таа сега ќе биде поврзана
изберат одделно). Ова можете да го направите
со далечинскиот управувач и ќе ја добие
со помош на едно од копчињата за избор на
последната поставеност кога била вклучена.
светилка. Кога ќе притиснете и задржите едно
Ако сакате да ја прекинете врската помеѓу
од копчињата за избор на светилка, избраната
LivingWhites производ и далечински управувач,
лампа ќе започне да трепка. Ако тоа не е лампата
приближете го управувачот до производот,
која сакате да ја прилагодите, отпуштете го
потоа притиснете и задржете на копчето
копчето и повторно притиснете го – друга лампа
“0”. Лампата ќе засвети 3 пати. Задржете го
ќе започне да трепка. Кога лампата ќе биде
копчето “0” додека не чуете звучен сигнал од
избрана, индикаторот за избор на светилка на
далечинскиот управувач. Лампата полека ќе се
далечинскиото управувач (сијаличка) ќе засвети.
изгасне.
Тоа значи дека сега можете да ја прилагодувате
само избраната лампа.
3. Исто така, можете да го поврзете вашиот
Кога не е избрана светилка (индикаторот
далечински управувач со друг далечински
за избор на светилка е исклучен), сите ваши
управувач од Philips LivingAmbiance
прилагодувања ќе важат за сите светилки поврзани
палетата. Секој LivingColors или LivingWhites
на далечинскиот управувач (на пример, можете да
далечински управувач на кој има SmartLink
ги придушите сите светилки во собата).
лого може да се поврзе со вашиот далечински
Ако ви се допадне одредена комбинација на
управувач. Поврзувањето на друг управувач
светлосните поставки на различни светилки, исто
ќе ви овозможи да ги контролирате истите
така можете да ја зачувате како сцена – на ист
лампи со два различни управувачи. На пример,
начин како што е опишано во делот 2 од ова
вие би можеле да креирате 6 различни сцени
упатство.
за осветлување – 3 на еден управувач и 3 на
другиот, со истите лампи. За да додадете
4. Често поставувани прашања
дополнителен LivingColors или LivingWhites
далечински управувач, направете го следното:
Што да направите ако…
o LivingColors не емитува светлина
a. Ресетирајте го далечинскиот управувач кој
o Проверете ги местата на поврзување
сакате да го додадете: отворете го просторот
на кабелот со лампата. Проверете дали
за батерија и притиснете го копчето RESET
приклучокот е правилно вметнат во
неколку секунди (на пр. со спојница за
штекерот.
хартија). Батериите треба да бидат внатре.
o Извадете го кабелот за напојување и
Далечинскиот управувач ќе емитува звук за да
повторно приклучете го. Ако LivingColors
покаже дека бил ресетиран.
промени неколку бои и потоа се исклучи,
b. Далечинскиот управувач кој сте го ресетирале
употребете го далечинскиот управувач за
приближете го до вашиот тековен далечински
да извршите повторно вклучување.
управувач. Притиснете го копчето “I” на двата
управувачи сè додека тие не емитуваат звук.
o LivingColors не реагира на далечинскиот
Управувачите сега се поврзани – ова значи
управувач
дека сега можете да ги поврзете истите
o Проверете ги батериите во далечинскиот
лампи со новиот далечински управувач и да ги
управувач. Батериите треба да бидат
контролирате сите лампи со кој било од двата
правилно поставени (+ и -) и треба да
управувачи.
бидат полни. Ако далечинскиот управувач
c. Ако далечинскиот управувач кој сакате да
сè уште не работи, обидете се да ги
го додадете е тркалезен, отсега исто така
замените батериите.
можете и да го копирате: тој веднаш ќе биде
o Поврзете го далечинскиот управувач со
поврзан со истите лампи со кој е поврзан и
LivingColors следејќи ја постапката опишана
вашиот оригинален управувач. За да извршите
во делот 3.1 од ова упатство.
копирање на далечинскиот управувач,
повторете ја постапката опишана во точка b.
o Копчињата трепкаат по употребата на
далечинскиот управувач
Откако ќе поврзете една или повеќе лампи со
o Ова значи дека батериите во далечинскиот
вашиот Philips LivingColors далечински управувач,
управувач се (речиси) празни и треба да се
ќе можете да ги контролирате сите овие лампи
заменат.
истовремено или секоја лампа поединечно.
За да контролирате одделна лампа, потребно
е да ја изберете (обрнете внимание дека за
102

o Не можам да го активирам режимот на
купување или описот на производот.
автоматско менување на боите
- Дефекти предизвикани од оштетување,
o Можно е далечинскиот управувач да не го
неисправни приклучоци или неправилно
препознал вашето “повлекување” со прстот.
користење.
Обидете се повторно, внимавајќи вашиот
- Доколку е предизвикан дефект при екстремни
прст постојано да го допира тркалцето за
околности во однос на LivingColors како удар
боја за време на кружното движење
на гром, поплава, пожар, несоодветна употреба
или несовесност.
o Би сакал да ја поврзам LivingColors
- Доколку LivingColors светилката е отварана
лампата на тајмер. Дали ова е можно?
или расклопувана.
o Да. Можете да ги користите Philips
LivingColors лампите со тајмер (не е
Чистење и одржување:
вклучен). Кога ќе бидат вклучени со
Извадете го приклучокот од штекерот.
тајмер, LivingColors лампите ќе го добијат
За да избегнете гребење, LivingColors светилката,
последното поставување (непроменлива
далечинскиот управувач и адаптерот треба да се
боја или режим на автоматско менување
чистат единствено со мека сува ткаенина.
на боите). Внимавајте последното
Не употребувајте средства за чистење.
поставување да не биде “исклучено”.
Безбедносни инструкции:
o Не можам да поврзам дополнителни
- Чувајте ги приклучокот и LivingColors
лампи со далечинскиот управувач од
производот подалеку од течности и влага.
LivingColors
- LivingColors производот е наменет само за
o Проверете дали производот кој се
внатрешна употреба. Не користете го на
обидувате да го поврзете е означен со
влажни места, на пр. бањи или на отворено.
логото на SmartLink. Само производи со
- LivingColors не претставува играчка со која би
SmartLink лого можат да се поврзуваат со
можеле да си играат децата.
овој далечински управувач.
- Не поставувајте го на жешки површини
o Обидете се повторно да ја извршите
- Заради безбедносни причини и според
постапката опишана во делот 3 од ова
условите од гаранцијата, LivingColors и
упатство. Обрнете внимание да ги чуете
приклучокот не смеат да се отвараат.
звуците и да ги видите засветувањата како
- Користете го единствено испорачаниот
што е тука опишано.
адаптер: употребата на различен адаптер може
да го оштети вашиот LivingColors.
o Моето прашање не е наведено тука
o Ве молиме обратете се до Philips за помош
Животна средина:
(погледнете го делот 5 “Дополнителна
На крајот од работниот век отстранувањето на
поддршка”).
уредот направете го во согласност со упатствата
на локалните власти. Извадете ги батериите
5. Дополнителна поддршка
доколку сакате да го фрлите далечинскиот
управувач. Немојте да ги фрлате батериите со
За повеќе информации и во случај на проблем, ве
нормалниот отпад од домаќинствата. Тие мора да
молиме посетете ја веб-страницата на Philips на
бидат однесени на јавно место за собирање или
www.philips.com или бесплатно обратете се до
кај застапник на Philips, по што батериите ќе бидат
Philips Lighting контакт центарот: 00800-PHILIPSL
отстранети на начин кој не е штетен за животната
или 00800-74454775
средина.
Гаранција:
Спецификации за приклучокот:
Двегодишната гаранцијата од Philips е важечка
AC адаптер
доколку производот се употребува во
согласност со инструкциите за неговата примена.
Модел: EADP-10EB C (тип за ЕУ)
Рекламациите ќе бидат прифатени со поднесување
EADP-10EB D (тип за Обединетото
на оригинален доказ за купување (фактура, сметка
Кралство + Сингапур)
или испратница) на кој се наведени датумот
на купување, името на продавачот и описот на
EADP-10EB E (тип за Австралија)
производот.
Влез: 220 - 240V ~ 0,3A 50 Hz
Излез: 18,5V 0,83 A
Гаранцијата на Philips престанува со важност:
- При каква било промена, прецртување,
Потрошувачка на енергија на светилката: до 15,4 W
бришење или нечитливост на документот за
103

Далечински управувач:
Безжичен комуникациски протокол: IEEE 802.15.4)
Батерии: 3 x Philips Powerlife Alkaline AAA LR03, 1,5
Канали при користење: каналите 11, 15, 20 или 25
V.
Спецификации на околина:
Безжични спецификации:
Температура (при користење): 0...40 °C
Фреквентен појас на безжичен RF режим:
Температура (при складирање): -25...60 °C
2405~2475 MHz
Релативна влажност: 5...95 % без кондензација
BG Указания за употреба на LivingColors
2. Създаване на собствена атмосфера:
Благодарим ви, че закупихте лампата за под Philips
LivingColors!
- Докоснете желания цвят върху колелото на
цветовете. Можете да движите пръста си по
LivingColors е специално конструирана за
колелото, за да регулирате прецизно цвета.
създаване на собствена атмосфера у дома
посредством цветове и светлина. Когато
- Променeте наситеността на цвета
използвате LivingColors за първи път, отделете
(като добавите повече бяло към текущия
време да прочетете внимателно тези инструкции
цвят). Натиснете бутона за увеличаване на
и ги запазете за справка в бъдеще. Спазването на
наситеността - за плътен цвят или бутона за
инструкциите за употреба ще ви даде възможност
намаляване на наситеността - за по-пастелни
да се възползвате от пълната функционалност на
тонове. Ако продължите да натискате бутона
Philips LivingColors.
за намаляване на наситеността , накрая ще
достигнете до белия цвят.
Регистрирайте продукта си на адрес www.
philips.com/welcome, за да имате винаги актуална
- Затъмняване. Увеличете или намалете
информация за новите продукти Philips
интензитета на светлината с помощта на
LivingAmbiance
бутоните за затъмняване.
Това ръководство ще ви помогне за следното:
- Разрешете автоматичната смяна на
1. Първи стъпки
цветовете. Плъзнете пръста си по колелото
2. Създаване на собствена атмосфера с LivingColors
на цветовете (една пълна обиколка) и
3. Свързване на LivingColors с други изделия Philips
натиснете кратко "I" ("Вкл."). LivingColors ще
LivingAmbiance
премине в режим на автоматична промяна
4. Отговори на често задавани въпроси
на цветовете и лампата ще започне да сменя
5. Получаване на допълнителна поддръжка
цветовете си автоматично.
1. Запознаване:
Можете да регулирате скоростта, с която се
променят цветовете. Скоростта може да се
- Вкарайте стойката в основата и я завъртете по
регулира по часовниковата стрелка, от бързо
часовниковата стрелка до отказ.
(тъмносин цвят на колелото на цветовете) до
- Включете свързващия щепсел в буксата,
бавно (виолетов цвят). Можете да натискате
разположена от долната страна на основата
навсякъде върху колелото на цветовете. При
на лампата и включете другия му край в
включен режим на автоматична промяна на
електрически контакт.
цветовете можете да регулирате тяхната
- Поставете свързващия щепсел в горната част
наситеност и яркост.
на стойката в лампата - трябва да чуете леко
За да превключите обратно към режим на
щракване.
статичен цвят, плъзнете отново пръста си по
- Поставете лампата на стойката и насочете
колелото на цветовете, след което натиснете
LivingColors към стената (най-доброто
"0". Можете също да изключите LivingColors с
разстояние е 50 см). Можете да регулирате
"0" и след това да включите отново с "I".
височината на осветителното тяло, като
завъртите шайбата, намираща се в средата на
- Ако харесвате определена настройка на
стойката, издърпате горната част на стойката
светлината (например червена, леко затъмнена
до желаната височина и завъртите шайбата
светлина), можете да съхраните тази сцена,
обратно, за да застопорите положението.
за да можете лесно да я възстановите:
- Отворете отделението за батерии на
натиснете и задръжте един от бутоните
дистанционното управление, като плъзнете
за сцени, докато чуете от дистанционното
бутона на гърба му. Поставете 3 батерии AAA
управление кратък звуков сигнал. Сцената е
(+ и – както е показано).
104

съхранена и е свързана с натиснатия бутон за
управление. Лампата ще избледнее бавно,
сцена. По този начин можете да съхраните и
докато угасне.
определен режим на автоматична промяна на
цветовете.
2. Можете да свържете и изделия
Можете да продължите да регулирате
Philips LivingWhites (съединители,
светлините така, както желаете. Когато
енергоспестяващи лампи и осветителни
решите да се върнете към съхранената
тела) към дистанционното управление. За
сцена, натиснете бутона за сцена, който сте
да добавите изделие Philips LivingWhites,
натиснали при съхраняването й. Този бутон
доближете дистанционното до изделието и
за сцена ще светне за кратко, показвайки, че
натиснете и задръжте бутона "I". Лампата ще
сцената е избрана и LivingColors ще премине
премигне 3 пъти. Задръжте бутона "I", докато
към съхранените настройки.
чуете звуков сигнал от дистанционното
Можете да запазите до 3 сцени (по една за
управление и лампата премигне бързо 2 пъти.
всеки бутон за сцена).
Сега лампата е свързана към дистанционното
Изключете LivingColors, като натиснете
управление и ще се върне към последната си
кратко бутона "0" (изключено). LivingColors
настройка, когато е била включена.
ще запомни последната настройка за
следващо използване. За да включите отново
Ако желаете да прекратите връзката на
LivingColors, натиснете "I" (включено).
изделие LivingWhites с дистанционното
управление, доближете дистанционното до
3. Свързване на LivingColors с други
изделието и натиснете и задръжте бутона
изделия Philips LivingAmbiance
"0". Лампата ще премигне 3 пъти. Задръжте
бутона "0", докато чуете звуков сигнал от
Можете да свържете различни изделия от гамата
дистанционното управление. Лампата ще
Philips LivingAmbiance към дистанционното
избледнее бавно, докато угасне.
управление на LivingColors. По този начин ще
можете да регулирате всички свързани изделия
3. Можете да свържете вашето дистанционно
- заедно или поотделно - с едно единствено
управление с друго дистанционно
дистанционно управление.
управление от гамата Philips
LivingAmbiance . Всяко дистанционно
1. Можете да свържете към дистанционното
за LivingColors или LivingWhites с логото
управление и други лампи Philips
SmartLink може да се свърже с вашето
LivingColors. Повечето изделия Philips
дистанционно управление. Свързването
LivingColors ще работят с това дистанционно
на друго дистанционно управление ще ви
управление - просто проверете дали логото
позволи да управлявате същите лампи с две
SmartLink присъства върху изделието
различни дистанционни. Ще можете например
LivingColors, което искате да свържете. Всички
да създадете 6 различни светлинни сцени - 3
изделия с логото SmartLink работят с това
на едното и 3 на другото дистанционно
дистанционно управление.
управление, с едни и същи лампи. За да
добавите още едно дистанционно управление
За да добавите лампа Philips LivingColors
за LivingColors или LivingWhites, направете
към дистанционното управление, доближете
следното:
дистанционното до лампата и натиснете и
задръжте бутона "I". Лампата ще премигне
a. Нулирайте настройките на дистанционното
3 пъти. Задръжте бутона "I", докато чуете
управление, което желаете да добавите:
звуков сигнал от дистанционното управление
отворете отделението за батерии и натиснете
и лампата премигне кратко в зелено. Сега
бутона RESET за няколко секунди (например с
лампата е свързана към дистанционното
кламер). Батериите трябва да са поставени. От
управление и ще се върне към последната си
дистанционното управление ще се чуе звуков
настройка, когато е била включена.
сигнал, което показва, че настройките му са
За лампа LivingAmbiance трябва да свържете
нулирани.
и бялата светлина – по същия начин, като е
b. Поставете дистанционното управление
описано за изделията LivingWhites в точка 2.
с нулираните настройки близо до
Ако желаете да прекратите връзката на лампа
дистанционното управление, което използвате
LivingColors с дистанционното управление,
в момента. Натиснете бутона "I" и на двете
доближете дистанционното до лампата и
дистанционни, докато от тях се чуе звуков
натиснете и задръжте бутона "0". Лампата ще
сигнал. Сега двете дистанционни управления
премигне 3 пъти. Задръжте бутона "0", докато
са свързани. Това означава, че можете
чуете звуков сигнал от дистанционното
да свържете същите лампи към новото
105

дистанционно управление и да управлявате
LivingColors, като следвате процедурата,
всички лампи с едно от двете дистанционни.
описана в раздел 3.1 на това ръководство.
c. Ако дистанционното, което добавяте, е
кръгло, можете и да го копирате - така ще
o Бутоните мигат след като използвам
го свържете веднага към същите лампи, към
дистанционното управление
които е свързано първото дистанционно
o Това означава, че батериите в
управление. За да копирате дистанционното,
дистанционното управление са (почти)
повторете процедурата, описана в точка b.
напълно изтощени и трябва да се сменят.
След като сте свързали една или няколко лампи
o Не мога да включа режима на
към вашето дистанционно управление Philips
автоматична промяна на цветовете
LivingColors, можете да управлявате тези лампи
o Възможно е дистанционното управление
заедно или поотделно.
да не е възприело вашето плъзване с пръст.
За да управлявате една лампа, трябва да я
Опитайте отново, като внимавате пръстът
изберете (имайте предвид, че за лампи
ви да остане върху колелото на цветовете
LivingColors с цветна и бяла светлина, цветната и
по време на цялото кръгово движение
бялата светлина трябва да се изберат поотделно).
Можете да направите това, като използвате
o Желая да свържа LivingColors с таймер.
бутоните за избор на светлина. Когато натиснете
Възможно ли е това?
и задържите някой от бутоните за избор на
o Да. Можете да използвате Philips
светлина, избраната лампа ще започне да мига.
LivingColors с таймер (не е включен в
Ако това не е лампата, която искате да регулирате,
комплекта). Когато се включи с таймер,
отпуснете бутона и го натиснете отново – друга
LivingColors ще използва последната си
лама ще започне да мига. След като е избрана
настройка (статичен цвят или режим
лампа, индикаторът за избор на светлина на
на автоматична промяна на цветовете).
дистанционното управление (крушка) ще свети.
Уверете се, че последната настройка не е
Това означава, че можете да регулирате само
"изключено".
избраната лампа.
Когато не е избрана светлина (индикаторът за
o Не мога да свържа още лампи към
избор на светлина е изключен), промените се
дистанционното управление LivingColors
прилагат спрямо всички светлини, свързани с
o Уверете се, че върху изделието, което се
дистанционното управление (например, можете да
опитвате да свържете, присъства логото
затъмните всички светлини в стаята).
SmartLink. Само изделия с логото SmartLink
Ако харесвате определено съчетание от настройки
могат да се свързват с това дистанционно
на светлината на различни лампи, можете да ги
управление.
съхраните като сцена - по същия начин, като е
o Повторете процедурата, описана в раздел
описано в раздел 2 на това ръководство.
3 на това ръководство. Уверете се, че сте
чули звуците и сте видели светлините,
4. Често задавани въпроси
описани там.
Какво да направите, ако...
o Имам въпрос, който не се съдържа тук
o LivingColors не свети
o Обърнете се за съдействие към Philips
o Проверете свързването на кабела с лампата.
(вижте раздел 5 - "Допълнителна
Проверете дали щепселът е включен
поддръжка").
правилно в електрическия контакт.
o Изключете захранващия кабел и го
5. Допълнителна поддръжка
включете отново. Ако LivingColors смени
няколко цвята и след това угасне, включете
За да се информирате, както и в случай на
я отново с дистанционното управление.
проблеми, посетете уеб сайта на Philips на адрес
www.philips.com или се свържете безплатно с
o LivingColors не реагира на командите от
Центъра за връзка с клиенти на Philips Lighting, на:
дистанционното управление
00800-PHILIPSL или 00800-74454775
o Проверете батериите в дистанционното
управление. Те трябва да са поставени
Гаранция:
правилно (+ и -) и да имат заряд. Ако
Двугодишната гаранция на Philips е валидна само
дистанционното управление все още не
ако продуктът е използван в съответствие с
работи, сменете батериите.
инструкциите и по предназначение. Гаранционни
o Свържете дистанционното управление с
претенции могат да бъдат уважени само при
предоставяне на оригиналното свидетелство за
106
покупка (фактура, касова бележка или квитанция),
Опазване на околната среда:
на което е посочена датата на покупка, името на
Ако изхвърляте уреда след експлоатационния
търговеца и описание на продукта.
му живот, направете това в съответствие с
Гаранцията от Philips отпада, ако:
инструкциите на местните власти. Изваждайте
- Нещо е променено, зачеркнато, изтрито
батериите, преди да изхвърлите дистанционното
или направено нечетливо в описа на
управление. Не изхвърляйте батериите заедно с
покупката или описанието на продукта.
обикновените битови отпадъци. Те трябва да се
- Неизправността е в резултат на счупване,
предадат в официален пункт или на търговец на
неправилно свързване или използване не
Philips, които ще изхвърлят негодните батериите
по предназначение.
по начин, който не вреди на околната среда.
- Дефектът е предизвикан от екстремни
обстоятелства, неприсъщи за
Технически параметри на щепсела:
използването на LivingColors, например
AC адаптер
мълния, наводнение, пожар, неправилно
Модел: EADP-10EB C (тип за ЕС)
използване или небрежност.
EADP-10EB D (тип за Великобритания и
- LivingColors е отваряна или
Сингапур)
разглобявана.
EADP-10EB E (тип за Австралия)
Вход: 220 - 240 V ~ 0,3 A 50 Hz
Почистване и поддръжка:
Изход:: 18,5 V 0,83 A
Изключете щепсела от контакта.
За да се избегне надраскване, лампата LivingColors,
Потребявана мощност от осветителното тяло:
дистанционното управление и адаптерът трябва да
до 15,4 W
се почистват само с мека суха кърпа.
Не използвайте почистващи препарати.
Дистанционно управление:
Батерии: 3 алкални Philips Powerlife, тип AAA LR03,
Инструкции за безопасност:
1,5 V.
- Пазете щепсела и LivingColors далеч от
течности и влага.
Технически параметри на безжичната
- LivingColors може да се използва само в
връзка:
закрити помещения. Не използвайте във
Безжичен радиочестотен спектър: 2405~2475 MHz
влажна среда, например в банята или на
Протокол за безжична комуникация: IEEE 802.15.4)
открито.
Работни канали: канал 11, 15, 20 или 25
- LivingColors не е играчка, с която да могат да
си играят децата.
Параметри на околната среда:
- Не я поставяйте върху горещи повърхности
Температура (експлоатация): 0...40 °C
- От съображения за безопасност и според
Температура (съхранение): -25...60 °C
условията на гаранцията, LivingColors и
Относителна влажност: 5...95 % без кондензация
щепселът не трябва да се разглобяват.
- Използвайте само включения в комплекта
адаптер. Използването на друг адаптер може
да повреди LivingColors.
HR Upute za korištenje svjetiljke LivingColors
Zahvaljujemo vam na kupnji podne svjetiljke
Ovaj priručnik pomoći će vam u sljedećem…
LivingColors tvrtke Philips!
1. Prvi koraci
2. Stvorite željeni ugođaj uz LivingColors
Svjetiljka LivingColors posebno je dizajnirana kako
3. Povežite LivingColors s drugim LivingAmbiance
bi vam omogućila da uz boje i svjetlo u svom domu
proizvodima tvrtke Philips
stvorite željeni ugođaj. Prije prve uporabe svjetiljke
4. Pronalaženje odgovora na česta pitanja
LivingColors pažljivo pročitajte ove upute i spremite
5. Pronalaženje dodatne podrške
ih za buduće potrebe. Prateći naše smjernice, uživat
ćete u punoj funkcionalnosti svjetiljke LivingColors
1. Početak korištenja:
tvrtke Philips.
- Umetnite stup u postolje, a zatim okrećite stup u
Registrirajte svoj proizvod na web-stranici www.
smjeru kazaljke na satu sve do kraja.
philips.com/welcome kako biste pratili nove Philips
- Utikač umetnite u otvor ispod postolja svjetiljke, a
LivingAmbiance proizvode
drugi kraj umetnite u zidnu utičnicu.
- Priključak na vrhu postolja umetnite u svjetiljku –
107

pazite da čujete škljocanje.
možete spremiti i određenu brzinu načina rada za
- Postavite svjetiljku na postolje i usmjerite
automatsku promjenu boja.
LivingColors prema zidu (optimalna udaljenost
je 50 cm). Visinu rasvjetnog tijela možete
Možete nastaviti s podešavanjem svjetala po želji.
podešavati okretanjem prstena na sredini
Kada se poželite vratiti na spremljeni ambijent,
postolja, izvlačenjem gornjeg dijela postolja do
samo pritisnite gumb za odabir ambijenta koji ste
željene visine i ponovnim okretanjem prstena u
pritisnuli prilikom spremanja. Taj gumb za odabir
suprotnom smjeru kako biste ksirali položaj.
ambijenta kratko će zasvijetliti naznačujući da je
- Otvorite odjeljak za baterije na daljinskom
ambijent odabran, a LivingColors će prijeći na
upravljaču tako da gurnete klizni gumb na
spremljene postavke.
stražnjoj strani. Umetnite 3 AAA baterije (+ i – u
Možete pohraniti do 3 ambijenta (jedan za svaki
skladu s oznakama).
gumb za odabir ambijenta).
Svjetiljku LivingColors isključite kratkim pritiskom
2. Stvorite vlastiti ugođaj na sljedeći način:
gumba "0" (isključeno). Svjetiljka LivingColors
zapamtit će posljednju postavku za sljedeću
- Dodirnite željenu boju na kotačiću za odabir
uporabu. Kako biste je ponovo uključili, pritisnite
boje. Pomicanjem prsta preko kotačića odredite
"I" (uključeno).
nijansu boje.
3. Povežite LivingColors s drugim
- Promijenite zasićenost boje (dodavanje bijele
LivingAmbiance proizvodima tvrtke Philips
boje trenutno odabranoj). Pritisnite gumb za
povećanje zasićenosti za dublju boju ili gumb za
Razne proizvode iz asortimana Philips LivingAmbiance
smanjenje zasićenosti za pastelniju boju. Ako
možete povezati s daljinskim upravljačem svjetiljke
nastavite pritiskati gumb za smanjenje zasićenosti,
LivingColors. Na taj način moći ćete prilagođavati sve
na kraju ćete doći do bijele boje.
povezane proizvode zajedno ili pojedinačno – sve to
jednim daljinskim upravljačem.
- Prigušivanje. Povećajte ili smanjite intenzitet
svjetla pomoću gumba za prigušivanje.
1. S daljinskim upravljačem možete povezati druge
Philips LivingColors svjetiljke. Većina Philips
- Pokretanje automatske promjene boje.
LivingColors svjetiljki radit će s ovim daljinskim
Prijeđite prstom preko kotačića za odabir
upravljačem: samo provjerite postoji li SmartLink
boje (jedan pun krug) i kratko pritisnite "I"
logotip na LivingColors rasvjetnom tijelu koje
("Uključeno"); LivingColors će prijeći u način
želite povezati. Svi proizvodi koji imaju SmartLink
rada za automatsku promjenu boja: svjetiljka će
logotip mogu se povezati s vašim daljinskim
automatski početi mijenjati boje.
upravljačem.
Možete podesiti brzinu kojom se mijenjaju boje.
Kako biste Philips LivingColors svjetiljku dodali
Brzina se može podešavati u smjeru kazaljke
daljinskom upravljaču, približite daljinski upravljač
na satu, od brze (tamnoplava boja na kotačiću
toj svjetiljci; zatim pritisnite i zadržite gumb "I".
za odabir boje) do spore (ljubičasta). Možete
Svjetiljka će bljesnuti 3 puta. Držite gumb "I" dok
dodirnuti bilo koje mjesto na kotačiću za odabir
se daljinski upravljač ne oglasi zvučnim signalom;
boje. Dok je aktivan način rada za automatsku
svjetiljka će nakratko bljesnuti zelenom bojom.
promjenu boja možete podešavati i zasićenost i
Sada je povezana s daljinskim upravljačem i prijeći
svjetlinu boja.
će na posljednju postavku kad je bila uključena.
Kako biste vratili način rada statične boje, ponovo
Za svjetiljku LivingAmbiance provjerite jeste li
prijeđite prstom preko kotačića za odabir
povezali i bijelo svjetlo – to možete učiniti na isti
boja, a zatim pritisnite "0". Možete i isključiti
način kao i za LivingWhites proizvode opisane u
LivingColors pomoću "0" i ponovo je uključiti
koraku 2.
pomoću "I".
Ako želite prekinuti vezu između svjetiljke
LivingColors i daljinskog upravljača, približite
- Ako vam se sviđa određena postavka svjetla (na
daljinski upravljač svjetiljci, a zatim pritisnite i
primjer, malo prigušeno crveno svjetlo), možete
zadržite gumb "0". Svjetiljka će bljesnuti 3 puta.
spremiti taj svjetlosni ambijent kako biste
Gumb "0" držite dok se daljinski upravljač ne
ga poslije lako aktivirali: pritisnite i zadržite jedan
oglasi zvučnim signalom. Svjetiljka će se sada
od gumba za odabir ambijenta dok se daljinski
postepeno prigušiti i isključiti.
upravljač ne oglasi zvučnim signalom. Vaš svjetlosni
ambijent sada je spremljen pod gumbom za
2. Možete povezati i Philips LivingWhites
odabir ambijenta koji ste pritisnuli. Na isti način
proizvode (utikače, komplete za uštedu energije
i rasvjetna tijela) s daljinskim upravljačem. Kako
108

biste dodali Philips LivingWhites proizvod,
sa svjetlom u boji i bijelim svjetlom morate zasebno
približite mu daljinski upravljač; zatim pritisnite
odabrati svjetlo u boji i bijelo svjetlo). To možete
i zadržite gumb "I". Svjetiljka će bljesnuti 3 puta.
učiniti pomoću jednog od gumba za odabir svjetla.
Držite gumb "I" dok se daljinski upravljač ne oglasi
Kada pritisnete i zadržite jedan od gumba za odabir
zvučnim signalom; svjetiljka će brzo bljesnuti dva
svjetla, odabrana svjetiljka počet će bljeskati. Ako to
puta. Sada je povezana s daljinskim upravljačem
nije svjetiljka koju želite prilagoditi, otpustite gumb
i prijeći će na posljednju postavku kad je bila
i ponovo ga pritisnite – počet će bljeskati druga
uključena.
svjetiljka. Kada odaberete svjetiljku, indikator za odabir
svjetla na daljinskom upravljaču (žaruljica) počet će
Ako želite prekinuti vezu između LivingWhites
svijetliti. To znači da sada možete prilagoditi samo
proizvoda i daljinskog upravljača, približite daljinski
odabranu svjetiljku.
upravljač proizvodu, a zatim pritisnite i zadržite
Kada nijedno svjetlo nije odabrano (indikator za
gumb "0". Svjetiljka će bljesnuti 3 puta. Gumb "0"
odabir svjetla je isključen), sve prilagodbe primijenit će
držite dok se daljinski upravljač ne oglasi zvučnim
se na sva svjetla povezana s daljinskim upravljačem
signalom. Svjetiljka će se sada postepeno prigušiti i
(na primjer, možete zajedno prigušiti sva svjetla u
isključiti.
prostoriji).
Ako vam se svidi određena kombinacija postavki
3. Svoj daljinski upravljač možete povezati i s
svjetla raznih rasvjetnih tijela, možete ih spremiti kao
drugim daljinskim upravljačem iz Philips
svjetlosni ambijent – na način opisan u odjeljku 2 u
LivingAmbiance asortimana. Svaki daljinski
ovom priručniku.
upravljač za LivingColors ili LivingWhites koji
ima SmartLink logotip možete povezati sa svojim
4. Česta pitanja
daljinskim upravljačem. Povezivanjem drugog
daljinskog upravljača moći ćete istim svjetiljkama
Što učiniti u sljedećim slučajevima…
upravljati pomoću dva daljinska upravljača.
o LivingColors ne svijetli
Možete, na primjer, izraditi 6 svjetlosnih
o Provjerite vezu između kabela i svjetiljke.
ambijenata za iste svjetiljke – 3 na jednom i 3 na
Provjerite je li utikač pravilno umetnut u zidnu
drugom daljinskom upravljaču. Kako biste dodali
utičnicu.
još jedan daljinski upravljač za LivingColors ili
o Iskopčajte kabel za napajanje i ponovo ga
LivingWhites, učinite sljedeće:
ukopčajte. Ako LivingColors promijeni
nekoliko boja i zatim se isključi, ponovo je
a. Ponovo postavite daljinski upravljač koji želite
uključite pomoću daljinskog upravljača.
dodati: otvorite njegov odjeljak za baterije i
pritisnite gumb RESET (ponovno postavljanje)
o LivingColors ne reagira na daljinski
nekoliko sekundi (npr. pomoću spajalice).
upravljač
Provjerite jesu li baterije umetnute. Daljinski
o Provjerite baterije u daljinskom upravljaču.
upravljač će se oglasiti zvučnim signalom
Baterije trebaju biti pravilno umetnute (+ i -)
naznačujući da je ponovno postavljen.
i napunjene. Ako daljinski upravljač i dalje ne
b. Daljinski upravljač koji ste ponovo postavili
radi, zamijenite baterije.
približite daljinskom upravljaču koji trenutno
o Povežite daljinski upravljač sa svjetiljkom
koristite. Pritisnite gumb "I" na oba daljinska
LivingColors prateći postupak opisan u
upravljača i zadržite dok se ne oglase zvučnim
odjeljku 3.1 u ovom priručniku.
signalom. Daljinski upravljači sada su povezani –
to znači da sada možete povezati iste svjetiljke s
o Gumbi bljeskaju nakon upotrebe daljinskog
novim daljinskim upravljačem i svim svjetiljkama
upravljača
upravljati bilo kojim od dva daljinska upravljača.
o To znači da su baterije u daljinskom upravljaču
c. Ako je daljinski upravljač koji dodajete okrugao,
(gotovo) prazne i treba ih zamijeniti.
možete ga i kopirati: možete ga odmah povezati
s istim svjetiljkama s kojima je povezan vaš
o Ne mogu pokrenuti način rada za
originalni daljinski upravljač. Kako biste kopirali
automatsku promjenu boje
daljinski upravljač, ponovite postupak opisan u
o Moguće je da daljinski upravljač nije registrirao
točki b.
pokret prelaska prstom. Pokušajte ponovo
pazeći da vam prst bude na kotačiću za boje
Kada jednu ili više svjetiljki povežete sa svojim
dok pravite pokret punog kruga
daljinskim upravljačem za Philips LivingColors,
svima njima možete upravljati zajedno ili svakom
o Želim LivingColors povezati s mjeračem
pojedinačno.
vremena. Je li to moguće?
Kako biste upravljali jednom svjetiljkom, morate je
o Da. Philips LivingColors možete koristiti s
odabrati (imajte na umu da za svjetiljku LivingColors
mjeračem vremena (nije u kompletu). Kada
109
se uključi s mjeračem vremena, LivingColors
smijete brisati samo mekom suhom krpom kako na
će prikazati posljednju postavku (statična
njima ne bi nastale ogrebotine.
boja ili način rada za automatsku promjenu
Nemojte koristiti abrazivna sredstva za čišćenje.
boja). Pazite da posljednja postavka ne bude
"isključeno".
Sigurnosne upute:
- Utikač i svjetiljku LivingColors držite podalje od
o Ne mogu povezati dodatne svjetiljke s
tekućina i vlage.
daljinskim upravljačem za LivingColors
- LivingColors služi samo za upotrebu u zatvorenim
o Provjerite ima li proizvod koji želite povezati
prostorima. Nemojte je koristiti na vlažnim
SmartLink logotip. S ovim daljinskim
mjestima, npr. u kupaonici ili na otvorenom.
upravljačem mogu se povezati samo proizvodi
- Svjetiljka LivingColors nije igračka i djeca se ne
koji imaju SmartLink logotip.
smiju igrati s njom.
o Pokušajte ponoviti postupak opisan u odjeljku
- Svjetiljku nemojte stavljati na vruće površine
3 u ovom priručniku. Pazite da čujete zvučne
- Iz sigurnosnih razloga i prema odredbama jamstva,
signale i vidite bljeskanje opisano u uputama.
svjetiljku LivingColors i utikač ne smijete otvarati.
- Koristite isključivo isporučeni adapter:
o Moje pitanje nije na ovom popisu
korištenjem drugog adaptera svjetiljka
o Za pomoć kontaktirajte tvrtku Philips
LivingColors može se oštetiti.
(pogledajte odjeljak 5 "Dodatna podrška").
Zaštita okoliša:
5. Dodatna podrška
Ako nakon određenog vremena svjetiljku odlučite
baciti, učinite to u skladu s uputama lokalnih vlasti.
Ako vam trebaju dodatne informacije ili ako imate
Pri bacanju daljinskog upravljača izvadite baterije.
problema, posjetite internetsku stranicu tvrtke
Nemojte ih odlagati zajedno s normalnim kućnim
Philips na www.philips.com ili nazovite centar za
otpadom. Treba ih odložiti na za to predviđeno
Philips Lighting tvrtke Philips na besplatan broj:
mjesto ili kod svog zastupnika tvrtke Philips kako bi
00800-PHILIPSL ili 00800-74454775
se nadležne osobe pobrinule za njihovo odlaganje na
način koji ne šteti okolišu.
Jamstvo:
Dvogodišnje jamstvo tvrtke Philips vrijedi ako se
Specikacije utikača:
proizvod koristi u skladu s uputama i u predviđene
Adapter za napajanje
svrhe. Reklamacije će biti prihvaćene samo u slučaju
Model: EADP-10EB C (EU vrsta)
podnošenja izvornog dokaza o kupnji (račun, potvrda
EADP-10EB D (UK vrsta + Singapur)
ili primka) na kojemu je istaknut datum kupnje, naziv
EADP-10EB E (vrsta za Australiju)
distributera i opis proizvoda.
Ulaz: 220 - 240 V ~ 0,3 A 50 Hz
Izlaz: 18,5 V 0,83 A
Jamstvo tvrtke Philips ne vrijedi u sljedećim
slučajevima:
Potrošnja energije rasvjetnog tijela: do 15,4 W
- Na potvrdi o kupnji ili opisu proizvoda nešto
promijenjeno, prekriženo, prebrisano ili učinjeno
Daljinski upravljač:
nečitljivim.
Baterije: 3 Philips Powerlife Alkaline AAA LR03, 1,5 V.
- Došlo do pogrešaka zbog oštećenja, pogrešnog
priključivanja ili nepravilnog korištenja.
Bežične specikacije:
- Oštećenje uzrokovano ekstremnim uvjetima
Bežični RF frekvencijski pojas: 2405~2475 MHz
koji nemaju veze sa svjetiljkom LivingColors, npr.
Protokol za bežičnu komunikaciju: IEEE 802.15.4)
udarom groma, poplavom, požarom, pogrešnom
Radni kanali: kanali 11, 15, 20 ili 25
upotrebom ili nepažnjom.
- Svjetiljka LivingColors bila otvarana ili rastavljana.
Specikacije vezane uz okoliš:
Temperatura (rad): 0...40 °C
Čišćenje i održavanje:
Temperatura (spremanje): -25...60 °C
Izvucite utikač iz zidne utičnice.
Relativna vlažnost: 5...95 % bez kondenzacije
Svjetiljku LivingColors, daljinski upravljač i adapter
SR LivingColors - Uputstvo za upotrebu
Hvala vam što ste kupili Philips LivingColors podnu
Lampe LivingColors posebno su osmišljene kako biste
lampu!
u svom domu mogli da kreirate atmosferu po želji
pomoću boje i svetla. Pre prve upotrebe LivingColors
lampe pažljivo pročitajte ova uputstva i sačuvajte ih
110

za buduću upotrebu. Ako budete postupali u skladu
menjanja boja: lampa će automatski početi da
sa našim uputstvima, moći ćete da uživate u svim
menja boje.
funkcijama Philips LivingColors lampe.
Možete da podesite brzinu kojom se menjaju boje.
Registrujte svoj proizvod na Web lokaciji www.philips.
Brzinu je moguće podešavati u smeru kretanja
com/welcome da biste ostali u toku sa novim Philips
kazaljke na satu, od brze (tamno plava boja na
LivingAmbiance proizvodima
točkiću za izbor boje) do spore (ljubičasta).
Ovaj priručnik će vam pomoći u obavljanju sledećih
Možete da dodirnete bilo koju tačku na točkiću
radnji...
za izbor boje. Dok je aktivan režim za automatsko
1. Početak rada
menjanje boja možete takođe da podešavate
2. Napravite atmosferu po želji uz LivingColors
zasićenost i osvetljenost boja.
3. Povežite lampe LivingColors sa drugim Philips
Da biste se vratili u režim nepromenljive boje,
LivingAmbiance proizvodima
ponovo pređite prstom preko točkića za izbor
4. Traženje odgovara na najčešća pitanja
boja, a zatim pritisnite „0“. Takođe, možete da
5. Traženje dodatne podrške
isključite LivingColors lampu pomoću dugmeta
„0“ i da je ponovo uključite pomoću dugmeta „I“.
1. Početak rada:
- Ako vam se dopada određena postavke svetlosti
- Umetnite stub u postolje, a zatim okrećite stub
(na primer crvena, blago prigušena), možete
u smeru kretanja kazaljke na satu dok to bude
sačuvati ovu scenu radi lakog pristupanja:
moguće.
pritisnite i zadržite jedno od dugmadi za izbor
- Utikač umetnite u otvor ispod postolja lampe, a
scene, dok se daljinski upravljač ne oglasi zvučnim
drugi kraj umetnite u zidnu utičnicu.
signalom. Scena je sada sačuvana pod dugmetom
- Priključak na vrhu postolja umetnite u lampu –
za izbor scene koje ste pritisli. Na isti način
uverite se da se čuo zvuk „klik“.
možete da memorišete i određeni režim za
- Postavite lampu na postolje i uperite
automatsko menjanje boje.
LivingColors ka zidu (optimalna udaljenost
je 50 cm). Visinu rasvetnog tela možete da
Možete da nastavite da podešavate svetla na
podešavate okretanjem prstena na sredini
željeni način. Kad god poželite da se vratite na
postolja, izvlačenjem gornjeg dela postolja do
memorisanu scenu, jednostavno pritisnite dugme
željene visine i ponovnim okretanjem prstena u
za izbor scene koje ste pritisnuli kada ste je
suprotnom smeru da biste ksirali položaj.
memorisali. To dugme za izbor scene će zasvetleti
- Otvorite odeljak za baterije na daljinskom
na kratko da bi označilo da je scena izabrana, a
upravljaču tako što ćete pomeriti dugme na
lampa LivingColors će se vratiti na memorisana
poleđini. Umetnite 3 AAA baterije (+ i – kao što
podešavanja.
je označeno).
Možete da sačuvate do 3 scene (po jednu za
svako dugme za izbor scene).
2. Napravite atmosferu po želji na sledeći
Lampu LivingColors isključite tako što ćete
način:
kratko pritisnuti dugme „0“ (isključi). Lampa
LivingColors će zapamtiti poslednje podešavanje
- Dodirivanjem željene boje na točkiću za izbor
boje za sledeću upotrebu. Da biste je ponovo
boje. Prelaženjem prstom preko točkića za izbor
uključili, pritisnite dugme „I“ (uključeno).
boje možete no podesiti nijansu boje.
3. Povežite lampe LivingColors sa drugim
- Menjanjem zasićenosti boja (dodavanje bele
Philips LivingAmbiance proizvodima
boje u trenutnu boju). Pritisnite dugme za
povećavanje zasićenosti da biste dobili bogatiju boju
Sa LivingColors daljinskim upravljačem možete
ili dugme za smanjivanje zasićenosti da bi boja bila
povezati razne proizvode iz asortimana Philips
pastelnija. Ako nastavite sa pritiskanjem dugmeta
LivingAmbiance. Tako ćete moći da podešavate sve
za smanjivanje zasićenosti, na kraju ćete dobiti belu
povezane proizvode istovremeno ili svaki od njih
boju.
pojedinačno – a sve to pomoću jednog daljinskog
upravljača.
- Prigušivanjem. Povećajte ili smanjite intenzitet
svetla pomoću dugmadi za prigušivanje.
1. Sa daljinskim upravljačem možete povezati i druge
lampe Philips LivingColors. Većina lampi
- Aktiviranjem automatske promene boja.
Philips LivingColors radiće sa ovim daljinskim
Pređite prstom preko točkića za izbor boje (jedan
upravljačem: samo proverite da li se na lampi
pun krug) i kratko pritisnite „I“ („Uključeno“);
LivingColors koju biste želeli da povežete nalazi
LivingColors lampa će preći u režim automatskog
logotip SmartLink. Svi proizvodi sa logotipom
111

SmartLink mogu se povezati sa ovim daljinskim
RESET i zadržite ga nekoliko sekundi (npr.
upravljačem.
pomoću spajalice). Proverite da li su baterije
umetnute. Daljinski upravljač će se oglasiti
Da biste lampu Philips LivingColors dodali
zvučnim signalom, što znači da je resetovan.
daljinskom upravljaču, približite daljinski upravljač
b. Držite daljinski upravljač koji ste resetovali blizu
lampi, zatim pritisnite i držite dugme „I“. Lampa
daljinskog upravljača koji trenutno koristite.
će zasvetleti 3 puta. Držite dugme „I“ sve dok
Pritisnite dugme „I“ na oba daljinska upravljača
se daljinski upravljač ne oglasi zvučnim signalom,
i zadržite ga dok se daljinski upravljači ne oglase
nakon čega će lampa kratko zasvetleti zelenom
zvučnim signalom. Daljinski upravljači su sada
bojom. Lampa je sada povezana sa daljinskim
povezani – to znači da sada možete da povezujete
upravljačem i uključivaće se sa poslednjim
iste lampe na novi daljinski upravljač i da
korišćenim postavkama.
kontrolišete sve lampe pomoću jednog i drugog
Za LivingAmbiance lampu obavezno povežite i
daljinskog upravljača.
belo svetlo – to možete da uradite na isti način
c. Ako je daljinski upravljač koji dodajete okrugao,
kao i za LivingWhites proizvode, što je opisano u
možete ga i kopirati: možete ga odmah povezati
2. koraku.
sa onim lampama sa kojima je povezan originalni
Ako želite da prekinete vezu između LivingColors
daljinski upravljač. Da biste kopirali daljinski
lampe i daljinskog upravljača, približite daljinski
upravljač, ponovite postupak iz tačke b.
upravljač lampi, a zatim pritisnite i zadržite dugme
„0“. Lampa će zasvetleti 3 puta. Držite dugme
Nakon što povežete jednu ili više lampi na Philips
„0“ dok se daljinski upravljač ne oglasi zvučnim
LivingColors daljinski upravljač, možete upravljati svim
signalom. Lampa će se postepeno isključiti.
lampama istovremeno ili svakom pojedinačno.
Da biste upravljali jednom lampom, potrebno je da
2. Sa daljinskim upravljačem možete da povežete
je izaberete (imajte u vidu da je kod LivingColors
i proizvode Philips LivingWhites (utikače,
svetla u boji i belog svetla potrebno da izaberete
proizvode za uštedu energije i rasvetna tela).
svetlo u boji ili belo svetlo). To možete uraditi pomoću
Da biste dodali Philips LivingWhites proizvod,
dugmadi za izbor svetla. Kada pritisnete i zadržite neko
približite mu daljinski upravljač, zatim pritisnite
od dugmadi za izbor svetla, izabrana lampa će početi
i držite dugme „I“. Lampa će zasvetleti 3 puta.
da trepće. Ako to nije lampa koju želite da podesite,
Držite dugme „I“ sve dok se daljinski upravljač
pustite dugme i ponovo ga pritisnite – počeće da
ne oglasi zvučnim signalom, nakon čega će lampa
trepće druga lampa. Kada je neka lampa izabrana,
dvaput kratko zasvetleti. Lampa je sada povezana
indikator za izbor lampe na daljinskom upravljaču
sa daljinskim upravljačem i uključivaće se sa
(sijalica) svetli. To znači da sada možete podešavati
poslednjim korišćenim postavkama.
samo izabranu lampu.
Kada nije izabrana nijedna lampa (indikator za izbor
Ako želite da prekinete vezu između LivingWhites
lampe je isključen), podešavanja će uticati na sve lampe
proizvoda i daljinskog upravljača, približite
koje su povezane sa daljinskim upravljačem (na primer,
daljinski upravljač proizvodu, a zatim pritisnite i
možete istovremeno da prigušite sva svetla u sobi).
zadržite dugme „0“. Lampa će zasvetleti 3 puta.
Ako vam se dopadne određena kombinacija postavki
Držite dugme „0“ dok se daljinski upravljač ne
svetala sa različitih rasvetnih tela, možete je sačuvati
oglasi zvučnim signalom. Lampa će se postepeno
u vidu scene – kao što je opisano u odeljku 2 iz ovog
isključiti.
priručnika.
3. Daljinski upravljač možete povezati i sa drugim
4. Najčešća pitanja
daljinskim upravljačima iz asortimana
Philips LivingAmbiance . Sa daljinskim
Šta učiniti u sledećim slučajevima...
upravljačem možete povezati svaki LivingColors
o LivingColors lampa ne emituje svetlo
ili LivingWhites daljinski upravljač sa logotipom
o Proverite da li je kabl lampe pravilno povezan.
SmartLink. Ako povežete drugi daljinski upravljač,
Proverite da li je utikač pravilno postavljen u
moći ćete da upravljate istim lampama pomoću
zidnu utičnicu.
dva upravljača. Na primer, možete da kreirate 6
o Isključite kabl za napajanje i ponovo ga
različitih scena pomoću osvetljenja – 3 na jednom
priključite. Ako LivingColors lampa promeni
daljinskom upravljaču i 3 na drugom, a sve to
nekoliko boja svetla, a zatim se isključi, ponovo
pomoću istih lampi. Da biste dodali još jedan
je uključite pomoću daljinskog upravljača.
LivingColors ili LivingWhites daljinski upravljač,
uradite sledeće:
o LivingColors lampa ne reaguje na daljinski
upravljač
a. Resetujte daljinski upravljač koji želite da dodate:
o Proverite baterije u daljinskom upravljaču.
otvorite odeljak za baterije, pritisnite dugme
112

Baterije bi trebalo da budu pravilno
svrhe. Reklamacije se prihvataju samo uz originalni
postavljene (+ i -) i napunjene. Ako daljinski
dokaz o kupovini (faktura, priznanica ili račun) na
upravljač i dalje ne radi, zamenite baterije.
kojem se nalazi datum kupovine, ime distributera i
o Povežite daljinski upravljač sa LivingColors
opis proizvoda.
lampom tako što ćete obaviti proceduru
opisanu u odeljku 3.1 u ovom priručniku.
Philips garancija prestaje da važi ako je:
- Bilo šta menjano, precrtano, izbrisano ili namerno
o Dugmad trepere nakon korišćenja
učinjeno nečitljivim na računu ili opisu proizvoda.
daljinskog upravljača
- Do problema došlo usled oštećenja, neispravnog
o To je pokazatelj da su baterije u daljinskom
priključivanja ili zloupotrebe.
upravljaču (skoro) ispražnjene i da ih je
- Do problema došlo usled ekstremnih okolnosti
potrebno zameniti.
koje nemaju veze sa karakteristikama proizvoda
LivingColors, na primer, usled udara groma,
o Ne mogu da pokrenem režim za
poplave, požara, nepravilne upotrebe ili nemara.
automatsko menjanje boje
- Lampa LivingColors otvarana ili rastavljana.
o Moguće je da daljinski upravljač nije ispravno
protumačio pokret prstom preko točkića za
Čišćenje i održavanje:
izbor boje. Pokušajte ponovo i uverite se da je
Izvadite utikač iz zidne utičnice.
prst u stalnom kontaktu sa točkićem za izbor
Da ih ne biste izgrebali, LivingColors lampa, daljinski
boje tokom pravljenja jednog punog kruga
upravljač i utikač moraju se čistiti isključivo suvom i
mekom krpom.
o Želeo bih da povežem LivingColors lampu
Ne koristite sredstva za čišćenje.
na tajmer. Da li je to moguće?
o Da. Philips LivingColors lampe možete
Bezbednosna uputstva:
da koristite sa tajmerom (ne dobija se u
- Utikač i lampe LivingColors držite dalje od
kompletu). Prilikom uključivanja pomoću
tečnosti i vlage.
tajmera, LivingColors lampa će aktivirati
- Lampe LivingColors namenjene su isključivo
poslednje podešavanje (režim statične boje
za upotrebu u zatvorenom. Ne koristite ih na
ili režim za automatsko menjanje boja).
vlažnim mestima, kao što su kupatila, kao ni na
Proverite da poslednje podešavanje nije bilo
otvorenom.
„Isključeno“.
- Lampe LivingColors nisu igračke za decu.
- Ne stavljajte na vruće površine
o Ne mogu da povežem još lampi sa
- Iz bezbednosnih razloga i u skladu sa garantnim
daljinskim upravljačem LivingColors
uslovima, LivingColors lampa i utikač ne smeju se
o Proverite da li proizvod koji pokušavate da
otvarati.
povežete na sebi ima logotip SmartLink. Sa
- Koristite samo adapter koji se nalazi u kompletu:
ovim daljinskim upravljačem mogu se povezati
upotreba drugog adaptera može da ošteti
samo proizvodi sa logotipom SmartLink.
LivingColors lampu.
o Pokušajte da ponovo obavite postupak opisan
u odeljku 3 iz ovog priručnika. Vodite računa
Životna sredina:
da čujete zvučne signale i vidite treptanje
Ako nakon isteka radnog veka bacite uređaj, odložite
lampi kao što je opisano u uputstvu.
ga u skladu sa uputstvima lokalnog nadležnog tela.
Pre bacanja daljinskog upravljača, izvadite baterije.
o Moje pitanje nije navedeno ovde
Nemojte bacati baterije sa običnim kućnim otpadom.
o Obratite se kompaniji Philips za pomoć
Morate ih predati na zvaničnom mestu za prikupljanje
(pogledajte odeljak 5 „Dodatna podrška“).
ili distributeru Philips proizvoda, kako bi ih oni odložili
na ekološki način.
5. Dodatna podrška
Specikacije priključka:
AC adapter
Ako želite da dobijete više informacija i u slučaju bilo
Model: EADP-10EB C (EU tip)
kakvih problema, posetite Web lokaciju kompanije
EADP-10EB D (UK tip + Singapur)
Philips na adresi www.philips.com ili se obratite
EADP-10EB E (Australija tip)
kontakt centru Philips Lighting besplatnim pozivom na
Ulaz: 220 - 240 V ~ 0,3 A 50 Hz
broj: 00800-PHILIPSL ili 00800-74454775
Izlaz: 18,5 V 0,83 A
Garancija:
Potrošnja struje rasvetnog tela: do 15,4 W
Dvogodišnja garancija kompanije Philips važi ako se
proizvod koristi u skladu sa uputstvima i u predviđene
113
Daljinski upravljač:
Baterije: 3 x Philips Powerlife Alkaline AAA LR03, 1,5 V.
Bežične specikacije:
Bežični RF frekventni opseg: 2405~2475 MHz
AR
Philips LivingColors
!
LivingColors
. LivingColors
.
Philips LivingColors.
www.philips.com/welcome
LivingAmbiance
...
1.
2.
LivingColors
3. LivingColors
Philips LivingAmbiance
4.
5.
. :
1
114
50 ).
LivingColors (
.
.
.
Philips LivingColors
!
LivingColors
. LivingColors
.
Philips LivingColors.
www.philips.com/welcome
LivingAmbiance
...
1.
2.
LivingColors
3.
LivingColors
Philips LivingAmbiance
4.
5.
. :
1
.
.
.
LivingColors (
50 ).
.
. 3
AAA (+ - ).
2. :
-
.
.
(
-
).
saturation up
saturation down
( )
.
.
saturation down
:
.
.
( )
.
.
LivingColors
( ).
.
.
-
-
Protokol za bežičnu komunikaciju: IEEE 802.15.4)
Kanali za rad: kanal 11, 15, 20 ili 25
Specikacije u vezi sa okruženjem:
Temperatura (rad): 0...40 °C
Temperatura (skladištenje): -25...60 °C
Relativna vlažnost: 5...95 % bez kondenzovanja
Table of contents
- www.philips.com/welcome LivingAmbiance
- saturation up
-
- .
