Philips Luftreiniger: 7 Replacethe filters
7 Replacethe filters: Philips Luftreiniger
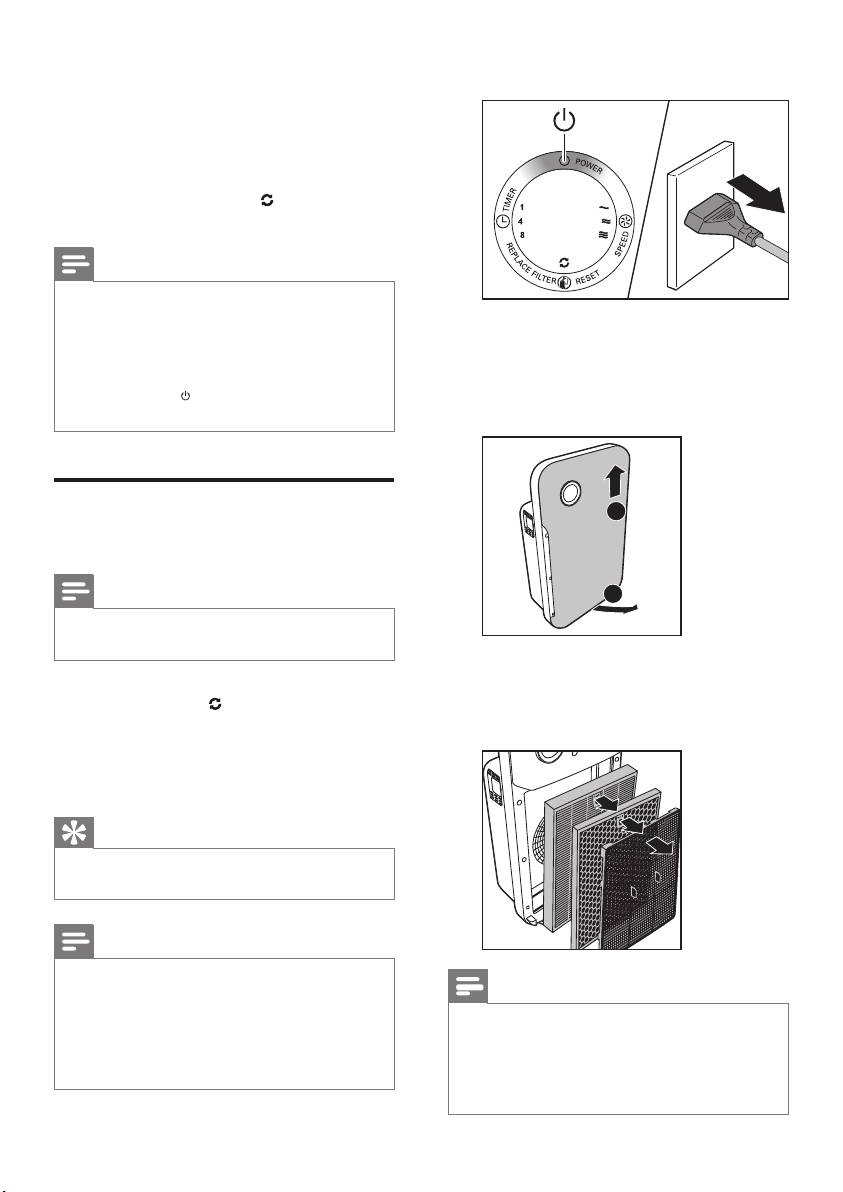
1 Switch off the purier and unplug it.
7 Replacethe
filters
The lter replacement light ( ) indicates the
lters have to be replaced.
Note
•
If you remove the front panel for lter
changing while the purier is switched on, all
2 Place your ngers in the recesses of the
lights on the control panel will be off.
side panels and gently pull the bottom
• Once the front panel is placed back to the
part of the front panel towards you. Lift
purier, all lights ash twice. Then, the purier
is off. Press the
button to switch on the
the panel out of the hooks at the top of
purier again.
the purier.
Replace the activated carbon
2
lterandtheHEPAlter
Note
1
•
The activated carbon lter and the HEPA lter
are not washable nor vacuum cleanable.
3 Remove the lters using the tag on the
Replace both the activated carbon lter and
lter. Take the lters by both sides and
HEPA lter when the
light goes on. This will
gently deposit them into the house hold
last for approximately 2 weeks.
trash bin.
On the last day of the 2 weeks, the purier
beeps every 30 minutes to inform you that the
lter needs to be replaced.
Tip
•
When you remove or insert lters, place the
purier against a wall for more stability.
Note
•
Insert the lters in the correct position.
Note
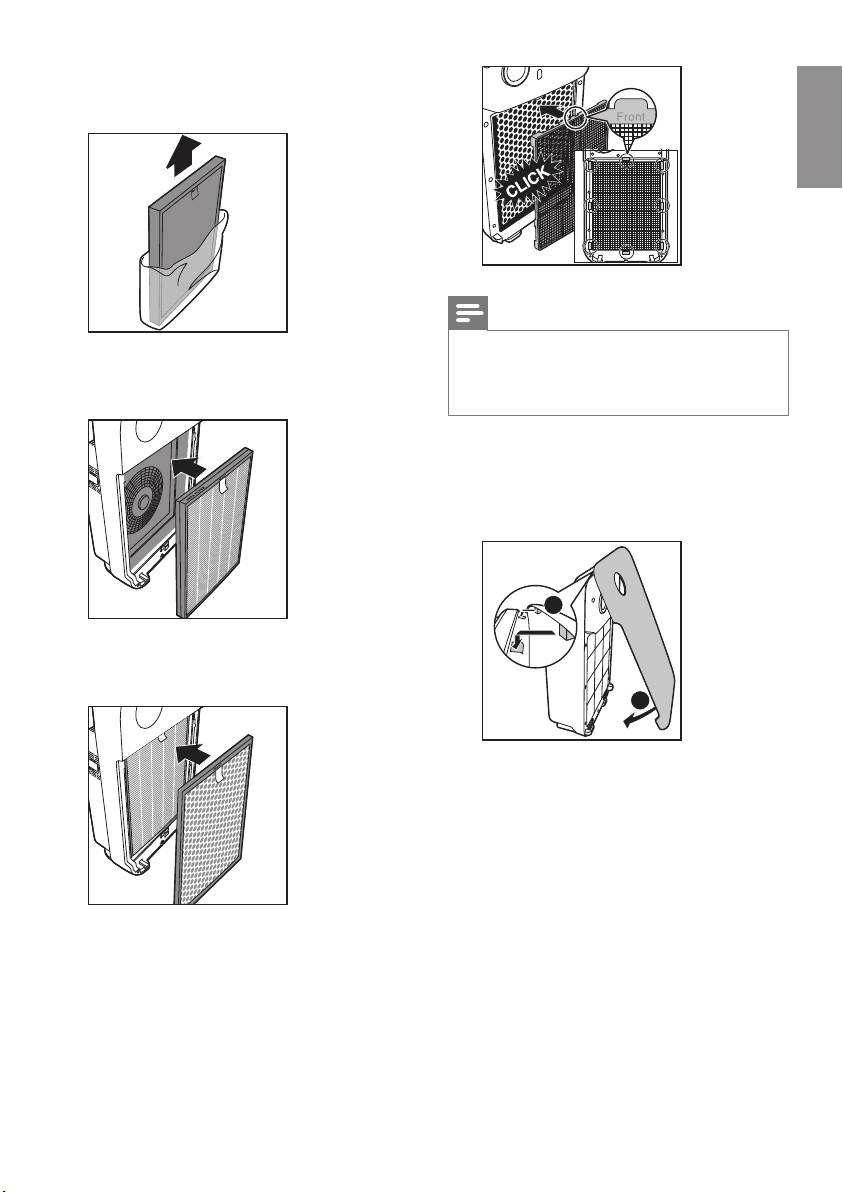
• Make sure you place the lters in the order of
HEPA lter, activated carbon lter, and nally
•
Do not touch the pleated lter surface, or
the pre-lter.
smell the lter as it has collected pollutants
• Make sure that the side with the tag is pointing
from the air.
towards you.
• Wash your hands after disposing of the used
lters.
16
EN
4 Remove all packaging material from the
new lters.
English
English
Note
•
Make sure that the side with the two
5 Place the new HEPA lter in the purier
projections is pointing towards you, and that all
hooks of the pre-lter are properly attached
rst.
to the purier.
8 To reattach the front panel, insert the top
hooks into the top of the purier rst (1).
Then, push the panel against the body of
the purier (2).
1
6 Then, place the new activated carbon
lter in the purier.
2
9 Reset the activated carbon lter and the
HEPA lter lifetime (see ‘Reset the lter
lifetime counter’).
7 Place the pre-ler in the purier.
EN
17
Table of contents
- Contents
- 1 Important
- 2 Yourairpurifier
- 3 Get started
- 4 Use the air
- 5 Clean your air
- 6 Clean the pre-
- 7 Replacethe filters
- 8 Resetthefilter
- 9 Troubleshooting
- 10 Guarantee and
- Inhaltsangabe Inhaltsangabe
- 1 Wichtig
- 2 IhrLuftreiniger
- 3 Erste Schritte
- 4 Verwenden des
- 5 Reinigen des
- 6 Reinigen des Vorfilters
- 7 Auswechseln
- 8 Zurücksetzen
- 9 Fehlerbehebung
- 10 Garantie und Kundendienst
- 11 Hinweise
- Tabledesmatières Tabledesmatières
- 1 Important
- 2 Votrepurificateurd’air
- 3 Priseenmain
- 4 Utilisation du purificateurd’air
- 5 Nettoyage du
- 6 Nettoyage du
- 7 Remplacement
- 8 Réinitialisation
- 9 Dépannage
- 10 Garantie et service
- 11 Mentions légales
- Inhoud
- 1 Belangrijk
- 2 Uw luchtreiniger
- 3 Aan de slag
- 4 De luchtreiniger
- 5 De luchtreiniger
- 6 Reinig het
- 7 Defilters
- 8 De
- 9 Problemenoplossen
- 10 Garantie en
- Содержание Содержание
- 1 Важная
- 2 Очистительвоздуха
- 3 Началоработы
- 4 Эксплуатация очистителя воздуха
- 5 Очистка
- 6 Очисткафильтра предварительной очистки
- 7 Замена
- 8 Обнуление
- 9 Определениеиустранение неисправностей
- 10Гарантияи обслуживание
- 11Примечания
