Vitek VT-4097 SR: Audio (This menu is not available when a disc is in the recorder.) 1. Automatic clock setting ANALOG OUTPUT General Language 1. Parental Control OSD LANGUAGE 2. CHANGE PASSWORD
Audio (This menu is not available when a disc is in the recorder.) 1. Automatic clock setting ANALOG OUTPUT General Language 1. Parental Control OSD LANGUAGE 2. CHANGE PASSWORD: Vitek VT-4097 SR
Table of contents
- DVD and HDD recorder Model VT-4097 Before You Start Accessories Putting the batteries in the remote control Using the remote control Important Safety Instructions Compatible Discs DVD Video compatibility Audio CD compatibility
- DVD-R/RW compatibility DVD+R/RW compatibility MPEG-4 compatibility JPEG CD compatibility DVD Video regions Controls and Display Front panel
- Display Rear panel Remote control 5. Audio
- 6. AVIN
- Y/Pb/Pr, Y/Cb/Cr and may be green, blue, red. The component video Audio Input Set “Video Output” to “YCrCb On” from VIDEO SETUP menu. DVD-Recorder video input DVInput USB Input Connection forAudio Output Terminals Connection for HDMI Output Turning on and off Audio Output Digital Audio Output Selecting the HDD or DVD for playbackand recording Connection forA/V Input Terminals Displaying the disc information on screen (OSD)
- Playing a DVD disc Playing MPEG-4 Movie CD Piaying a DVD+RW or DVD+R disc Playing an Audio CD Playing a program of HDD Playing a JPEG in HDD Playing aJPEG CD
- Program Playback (Audio CD only) Playing MPEG-4 Movie in HDD Advanced Playback Selecting Subtitles (DVD only) Skip Forward/Backward (DVD/Audio CD only) Slow Forward Use thistunction to playthe DISC or HDD contents in slowtorward.
- Switching the Camera Angle (DVD only) Repeating a Title, Chapter (DVD/Audio CD only) It is possible to repeat the chapter/title tor DVD or track/disc tor Audio CD. Title Search A-B Repeat (DVD/Audio CD only) Chapter Search Recording ZOOM screen (DVD/HDD only)
- If you want to record a TV program select TV mode. Select a station you want to record by pressing Channel- or Channel +. OTR (One touch Timer Recording) Timer Recording Recording from a DV (Digital Video) camcorder
- Copyright Time Shifted Recording Copying the DVD titles from Disc to HDD Copying the titles from HDD to Disc Simultaneous recording and playback Copying the files from disc to HDD (from HDD to Disc) Use the copying features of this recorder to:
- Pressthe FILE button. The directory & file list will be displayed I the TV screen. 2. PresstheEDITbutton. Press ADD/CL button after selecting the file to copy by using
- Rename disc (DVD+RW/DVD+R) Finalize disc (DVD+R only) Lock disc (DVD+RW only) Erase optical disc (DVD+RW only) Overwrite disc (DVD+RW only) CopyAII (DVD+RW/DVD+R) Editing a title of DVD+RW or DVD+R
- Erase title (DVD+RW only) Playtitle (DVD+RW/DVD+R) Edit title (DVD+RW/DVD+R) Overwrite title (DVD+RW only) Append title (DVD+RW/DVD+R) Rename title (DVD+RW/DVD+R)
- Copy title (DVD+RW/DVD+R) Rename Editing the title of HDD Lock Unlock Play Delete Protect Split Unprotect Basic Operations Segment Using the Setup Menu Combine Change Index Picture 1. AUTCCHAPTERMARKER
- 2. RECORD QUALITY 5. CHANNEL SWAPPING 3. ANALQGCHANNELSCAN 4. MQDIFYCHANNEL Editing the channel name Video TV Standard Search Type Fine Tuning Decoder
- Audio (This menu is not available when a disc is in the recorder.) 1. Automatic clock setting ANALOG OUTPUT General Language 1. Parental Control OSD LANGUAGE 2. CHANGE PASSWORD
- 3. FACTORY RESET 4. EUROAVOUTPUT 5. DECODER 6. PREVIEWTYPE 7. HDDto Disc Copy Option HDD
- Additional Information Specifications
- Troubleshooting
- Recycling
ENGLISH
the CRT (Cathode RayTube) from damage by displaying a moving
Clock
DVD logo continuously on the screen.
Note: The monitor screen of a projector or projection TV is easily burned
out it a static picture is displayed tor a long time. Be careful not to allow
the monitor screen to be burned out when you set the SCREEN SAVER
mode to “OFF”.
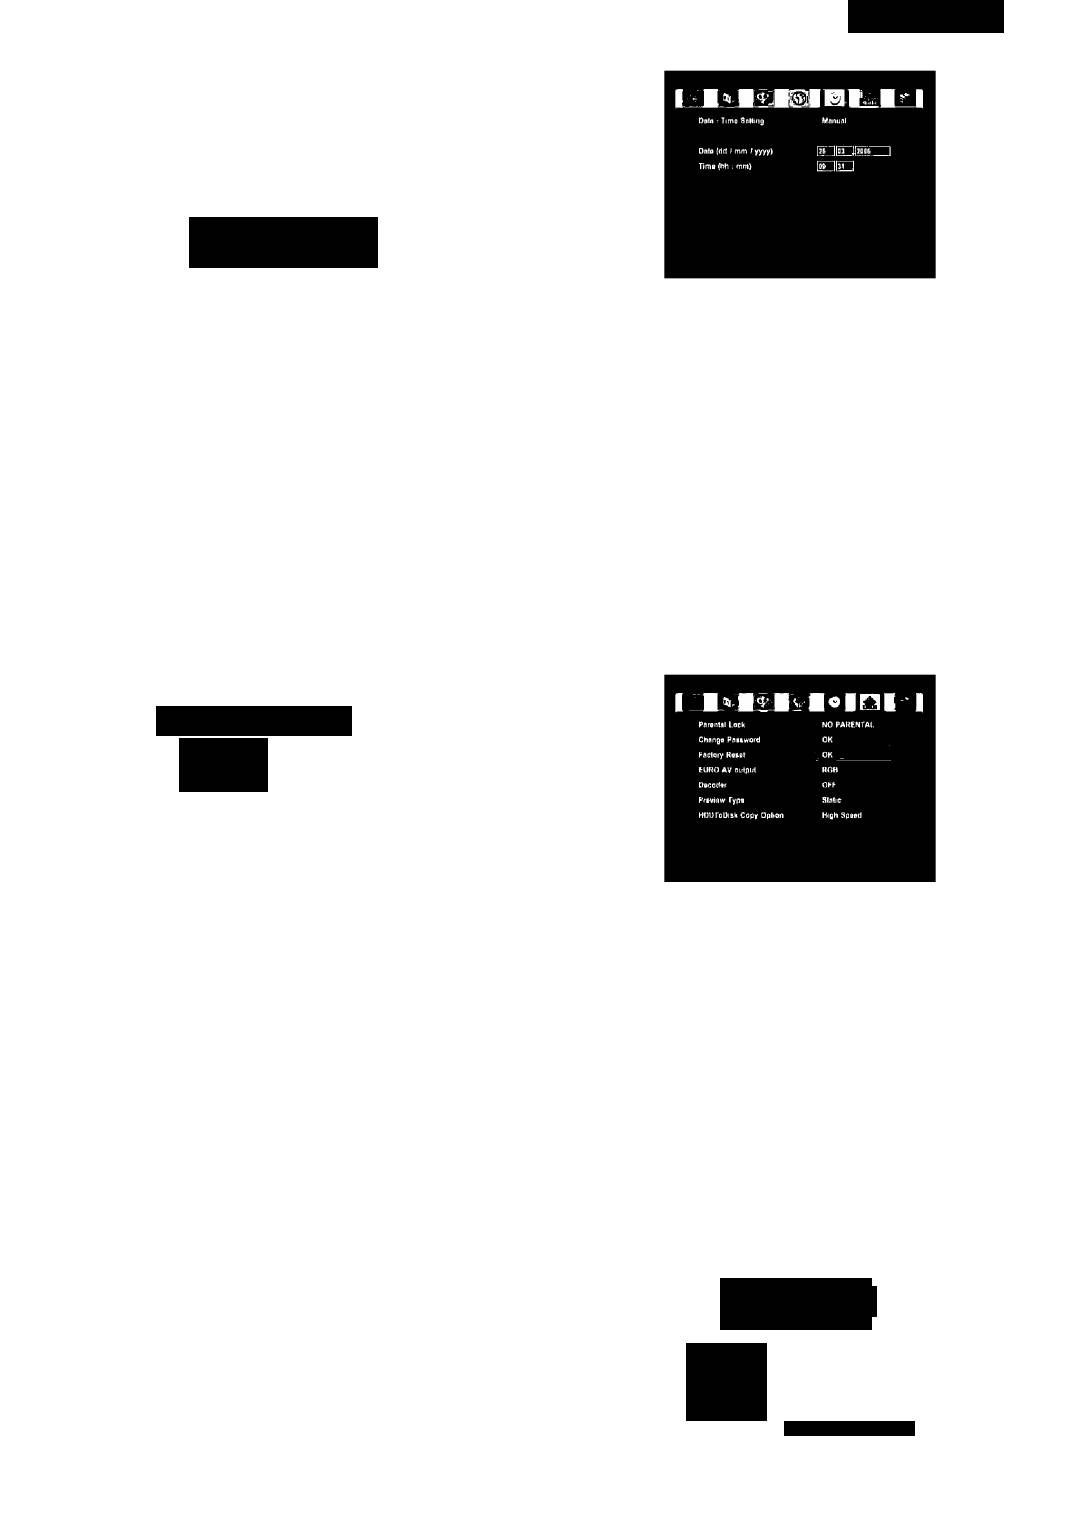
Audio (This menu is not available when a disc is in the recorder.)
Oigilfll (SPOIF) Oulpul LPCM
LPCM Output LPCM 96KH<
1. Automatic clock setting
Some TV channels broadcast time signals togetherwith the program.
This recorder can use these signals to set the clock automatically.
1) Press ENTER button after selecting “Date-Time Setting” by using
▲ or ▼.
2) Press ENTER button after selecting “Auto”.
3) Press ENTER button after selecting “Program” by using ▼.
ANALOG OUTPUT
4) Select the preset channel that broadcasts a clock signal, and press
(Not available to change)
ENTER button.
DIGITAL(SPDIF)OUTPUT
2. Manual clock setting
• RAW(Bit Stream): The original audio stream recorded on the disc
It no station in your area are broadcasting time signals, you can set
is outputted through the digital audio out connector.
the clock manually.
• LPCM: The decoded audio stream is outputted through the digital
1) Press ENTER button after selecting “Date-Time Setting” by using
audio out connector.
▲ or ▼.
3.
LPCM OUTPUT
2) Press ENTER button after selecting “Manual”.
You only need to make this setting it you connected this recorder to
3) Enterthe date &time by using 0to9or ◄,►,▲,▼ and press the
an AV amplifier (or other component) using the digital audio output.
ENTER button. Use 0-9 ▲,▼ to change the value in the highlighted
It yourAV amplifier (or other connected component) is compatible
field.
with high sampling rate audio (96 KHz), set to “LPCM 96KHz”,
Use ◄,► to move from one field to another.
otherwise set to “LPCM 48KHz”.
General
Language
1
OSD Lnnguftga
Audio I tinguAga
Sublill» LAngujigB
DiBC Monu Lnngitnga
1. Parental Control
OSD LANGUAGE
This function is to disable the playing of specified DVD discs that are
This item is used to select the language tor On-Screen Display
unsuitable tor children. There are a total of 8 levels. It the level is 8, the
contents of the disc are suitable tor adult. It the level is 1, the contents
messages that will be displayed on the TV screen.When your
of the disc are suitable tor children. Used to adjust the level of parental
desired language is selected, all OSD messages are displayed in the
lock. Once selected, whenever you play adisc, the selected rating level
selected language.
is compared to the level on the disc. It the level you selected is greater
AUDIO LANGUAGE
than the level of the disc, you may play the loaded disc. It not, you may
Set this value to the preferred audio language. It an audio language
not playthe disc. To set appropriate rating level, do the following instruc
is selected, wheneveryou start playing a new disc, the selected
tions.
audio language is played(it the selected language is contained in the
1. Press ENTER button after selecting the proper rating level by using
disc).
▲ or ▼. The password windowwill be displayed on TV screen.
3.
SUBTITLE LANGUAGE
2. Enterthe current password in 4 digits by using 0to9 button, then
Set this value to the preferred subtitle language. It a subtitle
press ENTER button. Ityou have notchanged the password, enterO,
language is selected, wheneveryou start playing a new disc, the
0, 0, 0.
selected subtitle language is played (it the selected language is
3. PressENTERbuttontoconfirmatterselecting“OK”byusing ,atter
contained in the disc).
it istinished.
4.
DISCMENU LANGUAGE
Set this value to the preferred disc menu language. It a disc menu
2. CHANGE PASSWORD
language is selected, wheneveryou start playing a new disc, the
1) Press ENTER button after selecting “Change Password”.
selected disc menu language is played (itthe selected language is
contained in the disc).
New Password
Enler password here, D D D D j
Inpul new password. D D D D
Input na« again. □□□□
I UR
#■
□UD RSCORDeB
17
4097IMnew.indd 17 27.02.2007 13:35:06


