Vitek VT-4097 SR: 2. RECORD QUALITY 5. CHANNEL SWAPPING 3. ANALQGCHANNELSCAN 4. MQDIFYCHANNEL Editing the channel name Video TV Standard Search Type Fine Tuning Decoder
2. RECORD QUALITY 5. CHANNEL SWAPPING 3. ANALQGCHANNELSCAN 4. MQDIFYCHANNEL Editing the channel name Video TV Standard Search Type Fine Tuning Decoder: Vitek VT-4097 SR
Table of contents
- DVD and HDD recorder Model VT-4097 Before You Start Accessories Putting the batteries in the remote control Using the remote control Important Safety Instructions Compatible Discs DVD Video compatibility Audio CD compatibility
- DVD-R/RW compatibility DVD+R/RW compatibility MPEG-4 compatibility JPEG CD compatibility DVD Video regions Controls and Display Front panel
- Display Rear panel Remote control 5. Audio
- 6. AVIN
- Y/Pb/Pr, Y/Cb/Cr and may be green, blue, red. The component video Audio Input Set “Video Output” to “YCrCb On” from VIDEO SETUP menu. DVD-Recorder video input DVInput USB Input Connection forAudio Output Terminals Connection for HDMI Output Turning on and off Audio Output Digital Audio Output Selecting the HDD or DVD for playbackand recording Connection forA/V Input Terminals Displaying the disc information on screen (OSD)
- Playing a DVD disc Playing MPEG-4 Movie CD Piaying a DVD+RW or DVD+R disc Playing an Audio CD Playing a program of HDD Playing a JPEG in HDD Playing aJPEG CD
- Program Playback (Audio CD only) Playing MPEG-4 Movie in HDD Advanced Playback Selecting Subtitles (DVD only) Skip Forward/Backward (DVD/Audio CD only) Slow Forward Use thistunction to playthe DISC or HDD contents in slowtorward.
- Switching the Camera Angle (DVD only) Repeating a Title, Chapter (DVD/Audio CD only) It is possible to repeat the chapter/title tor DVD or track/disc tor Audio CD. Title Search A-B Repeat (DVD/Audio CD only) Chapter Search Recording ZOOM screen (DVD/HDD only)
- If you want to record a TV program select TV mode. Select a station you want to record by pressing Channel- or Channel +. OTR (One touch Timer Recording) Timer Recording Recording from a DV (Digital Video) camcorder
- Copyright Time Shifted Recording Copying the DVD titles from Disc to HDD Copying the titles from HDD to Disc Simultaneous recording and playback Copying the files from disc to HDD (from HDD to Disc) Use the copying features of this recorder to:
- Pressthe FILE button. The directory & file list will be displayed I the TV screen. 2. PresstheEDITbutton. Press ADD/CL button after selecting the file to copy by using
- Rename disc (DVD+RW/DVD+R) Finalize disc (DVD+R only) Lock disc (DVD+RW only) Erase optical disc (DVD+RW only) Overwrite disc (DVD+RW only) CopyAII (DVD+RW/DVD+R) Editing a title of DVD+RW or DVD+R
- Erase title (DVD+RW only) Playtitle (DVD+RW/DVD+R) Edit title (DVD+RW/DVD+R) Overwrite title (DVD+RW only) Append title (DVD+RW/DVD+R) Rename title (DVD+RW/DVD+R)
- Copy title (DVD+RW/DVD+R) Rename Editing the title of HDD Lock Unlock Play Delete Protect Split Unprotect Basic Operations Segment Using the Setup Menu Combine Change Index Picture 1. AUTCCHAPTERMARKER
- 2. RECORD QUALITY 5. CHANNEL SWAPPING 3. ANALQGCHANNELSCAN 4. MQDIFYCHANNEL Editing the channel name Video TV Standard Search Type Fine Tuning Decoder
- Audio (This menu is not available when a disc is in the recorder.) 1. Automatic clock setting ANALOG OUTPUT General Language 1. Parental Control OSD LANGUAGE 2. CHANGE PASSWORD
- 3. FACTORY RESET 4. EUROAVOUTPUT 5. DECODER 6. PREVIEWTYPE 7. HDDto Disc Copy Option HDD
- Additional Information Specifications
- Troubleshooting
- Recycling
ENGLISH
When “Auto Chapter Marker” is set to “5 min”, chapters are created
Delete
automaticallywithin a title at five-minute intervals. Chapters can also
If you want to delete a captured channel, select “Delete” by using or
be added or removed manually through the Editing features. For
and press the ENTER button.
details, see section “Editing a title”.
4-3. Press ENTER button after selecting “QK” using , if all the settings
2. RECORD QUALITY
are correct.
The record quality offers 6 quality level:
Note: This feature is available only when the recorder is set to the TV
• HQ: High Quality, you can record for up to 1 hour in a blank disc.
mode.
• SP: Standard Play, you can record for up to 2 hours in a blank disc.
• SP+: Extended SR you can record for up to 2 hrs 30 min in a blank
5. CHANNEL SWAPPING
disc.
(If there is no captured channel, this feature is not available.)
• LP: Long Play, you can record for up to 3 hours in a blank disc.
This feature lets you swap the channel assignments of different pro
• EP: Extended Play, you can record for up to 4 hours in a blank disc.
grams. This is so that you can group together station presets which
• SLR: Super Long Play, you can record for up to 6 hours in a blank
naturally go together.
disc.
1. Press ENTER button afterselecting “SWAP” by pressing AorT.
3. ANALQGCHANNELSCAN
This recorder has a built-in TV tuner for recording TV programs.
1. Press ENTER button after selecting “SCAN” by pressing Aor^.
2. Press ENTER button to confirm afterselecting “QK” by pressing
◄ or ►.
Itwill search channels automatically. If the broadcasting is found
during auto searching, it is stored automatically.
Note:
• While doing Channel Search, itwill erase and replace all previously
stored channels.
• This feature is available only when the recorder is set to the TV
mode.
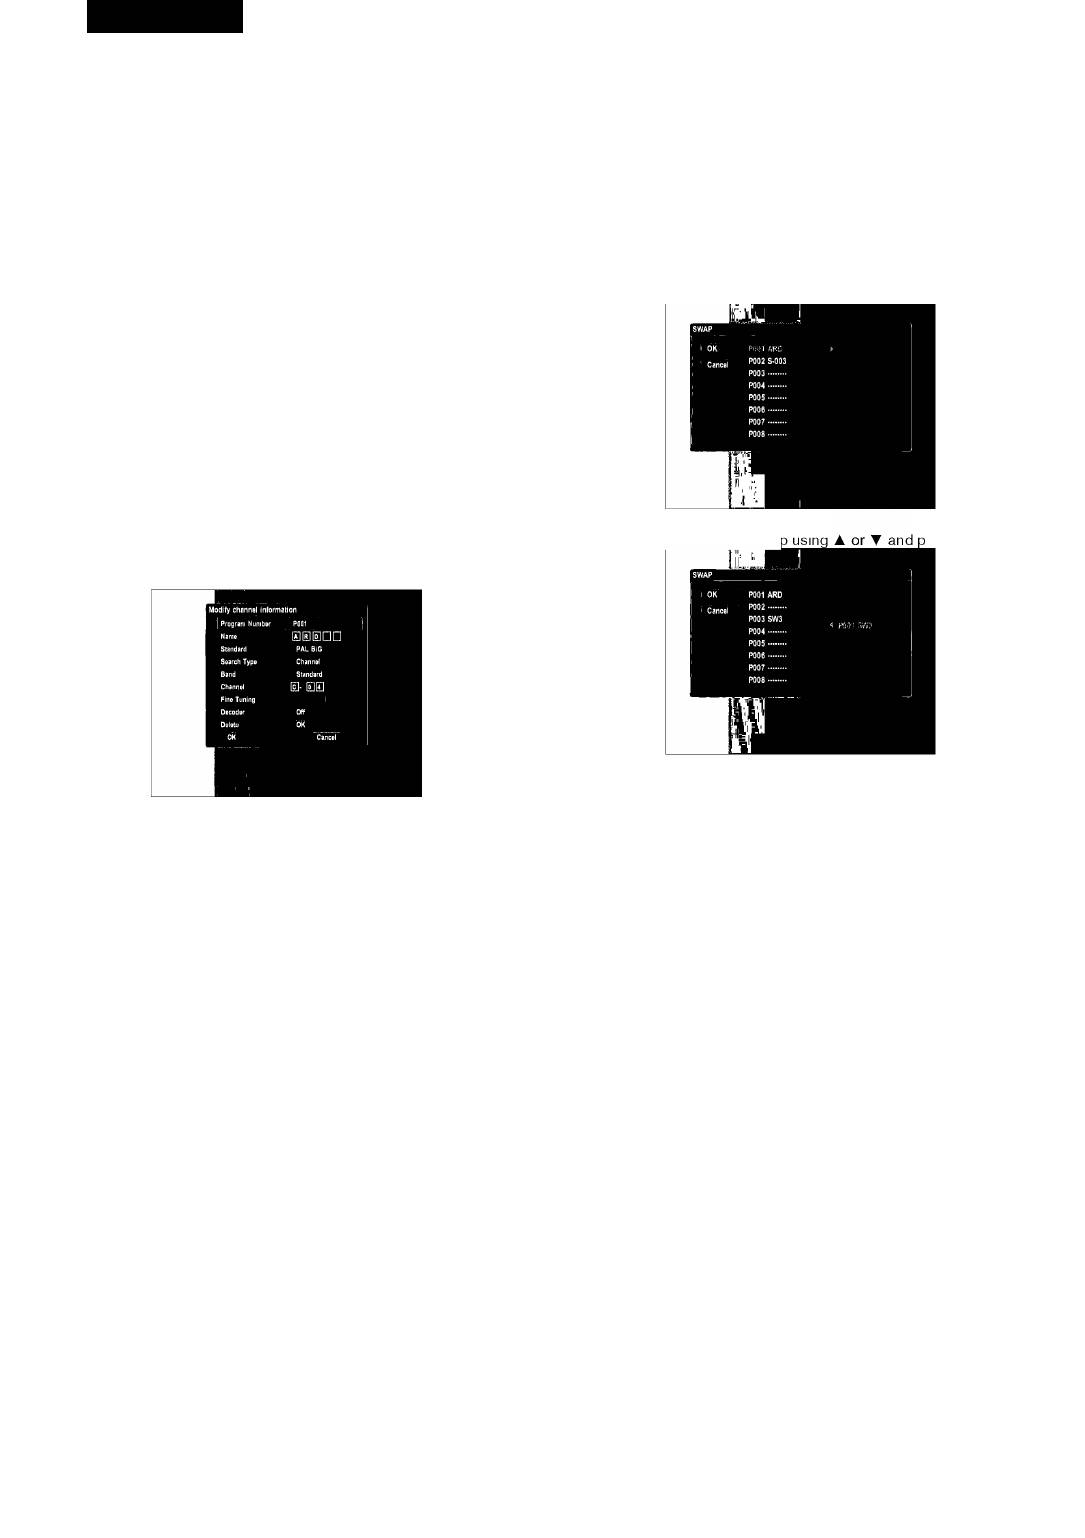
4. MQDIFYCHANNEL
2. Select a preset station to swai ress ►.
(If there is no captured channel, this feature is not available.)
4-1. Press ENTER button after selecting “EDIT” by pressing Aor^. The
information of the current channel will show on the screen.
3. Select the position to insert it using A or ▼ and press ►.
4. If you want to swap more presets, repeat step 2to3.
5. Press ENTER button after selecting “QK” using ^,ifit is finished.
4-2. Select the channel you want to modify by pressing CHANNEL - or
Note: This feature is available only when the recorder is set to the TV
CHANNEL+button.
mode.
6. TIMERRECQRDING
Editing the channel name
See section “Timer Recording”.
1) . Press ENTER button after selecting “Name” by using or Aor^.
7. CQUNTRYSELECTIQN
2) . Input letters which you want to input by using ◄,►,▲,▼ and press
Press ENTER button after selecting your country using Aor^.
ENTER button to confirm it.
Video
TV Standard
1. VIDEQQUTPUTFQRMAT
Set the TV system used for the current channel.
Set up Video Qutput Format according to type supported by your TV
1) . Select “Standard” by using A or ▼ and press the ENTER button.
or monitor.
2) . Select the TV system by using A or ▼ and press the ENTER button.
Ifyour TV is for PAL, set to “PAL”. Ifyour TV is for NTSC, set to
“NTSC”.
Search Type
2. TVASPECTRATIQ
If the captured signal is bad, you can search the channel again by fre
Ifyou have a widescreen TV, select the “16:9 Wide” setting. The
quency or channel number.
widescreen DVD disc is shown using the full screen area. When
1) . Select “Search Type” by using Aor^ and press the ENTER button.
playing the DVD disc recorded in conventional format (4:3), the
2) . Select “Frequency” or “Channel” by using A or ▼ and press the
settings on your TV will determine howthe material is presented.
ENTER button.
(See the manual that came with yourTV for details on what options
3) . Select “Frequency” or “Channel” by using ▼ and press ◄ or ►.
are available). Ifyou have a conventional TV, choose either “4:3
It starts to search the broadcasting automatically. If the broadcast
Letter Box” or “4:3 Pan Scan”. In Letter Box mode, the widescreen
ing is found during searching, it stops to search. Ifyou want to stop
DVD disc is shown with black bars at the top and bottom of the
searching, press STQP button.
screen. Pan Scan chops the sides offwidescreen material to make
it fit the 4:3 screen (so even though the picture looks larger on the
Fine Tuning
screen, you are actually seeing less of the movie).
If the captured signal is not good, you can tune the channel fine.
Note: Some disc will not allow you to change the aspect ratio.
1) . Select “Fine Tuning” by using Aor^.
3. P-SCAN/HDMI QUTPUT
2) . Tune the channel fine by pressing ◄ or ►. Each time or button is
When viewing Progressive Scan TV viaY/Pb/Pr connector, set to “P
pressed ◄ or ► the channel frequency decreases or increases by
Scan/HDMI”. When you also watch the TV via HDMI, set to “P-Scan/
50KHz.
HDMI”. (This feature is not available when “EURQ AV output” is set to
RGB.)
Decoder
4. SCREENSAVER
If the current channel is scrambled, requiring a Canal+ decoder con
If a bright picture does not move for a long time, the TV may be
nected to the EURQ A/V IN connector, set this to “Qn”.
damaged. If this state is continued on longer than 5 minutes, the
screen saverworks when QN is selected. The screen saver protects
16
4097IMnew.indd 16 27.02.2007 13:35:05


