AEG S93000KZM0: 6. WHAT TO DO IF…
6. WHAT TO DO IF…: AEG S93000KZM0
ENGLISH 13
Clean the condenser (black grill) and the
New active air filters can be purchased
compressor at the back of the appliance
from your local dealer.
with a brush. This operation will improve
Refer to “Installation of the carbon air fil-
the performance of the appliance and
ter” for the instructions.
save electricity consumption.
The lowest shelf, dividing the cooler
The air filter is a consumable accessory
compartment from the LONGFRESH 0°C
and as such is not covered by the guar-
compartment can be removed only for
antee.
cleaning. To remove pull out the shelf
straight.
5.3 Defrosting of the
The cover plates above the drawers in
refrigerator
the compartment can be taken out for
cleaning.
Defrosting of the fridge compartment is
automatic.
The water that forms flows into a recipi-
ent on the compressor and evaporates.
To make sure fully functionality of the
This recipient cannot be removed.
LONGFRESH 0°C compartment the low-
est shelf and cover plates must be put
5.4 Periods of non-operation
back in their original position after clean-
ing.
When the appliance is not in use for
long periods, take the following precau-
Take care of not to damage the
tions:
cooling system.
• disconnect the appliance from elec-
tricity supply
Many proprietary kitchen surface clean-
ers contain chemicals that can attack/
• remove all food
damage the plastics used in this appli-
• defrost (if foreseen) and clean the ap-
ance. For this reason it is recommended
pliance and all accessories
that the outer casing of this appliance is
• leave the door/doors ajar to prevent
only cleaned with warm water with a little
unpleasant smells.
washing-up liquid added.
If the cabinet will be kept on, ask some-
After cleaning, reconnect the equipment
body to check it once in a while to pre-
to the mains supply.
vent the food inside from spoiling in
case of a power failure.
5.2 Replacing the carbon filter
To get best performance the carbon air
filter should be changed once every
year.
6. WHAT TO DO IF…
WARNING!
Before troubleshooting, discon-
nect the mains plug from the
mains socket.
Only a qualified electrician or
competent person must do the
troubleshooting that is not in this
manual.
14
www.aeg.com
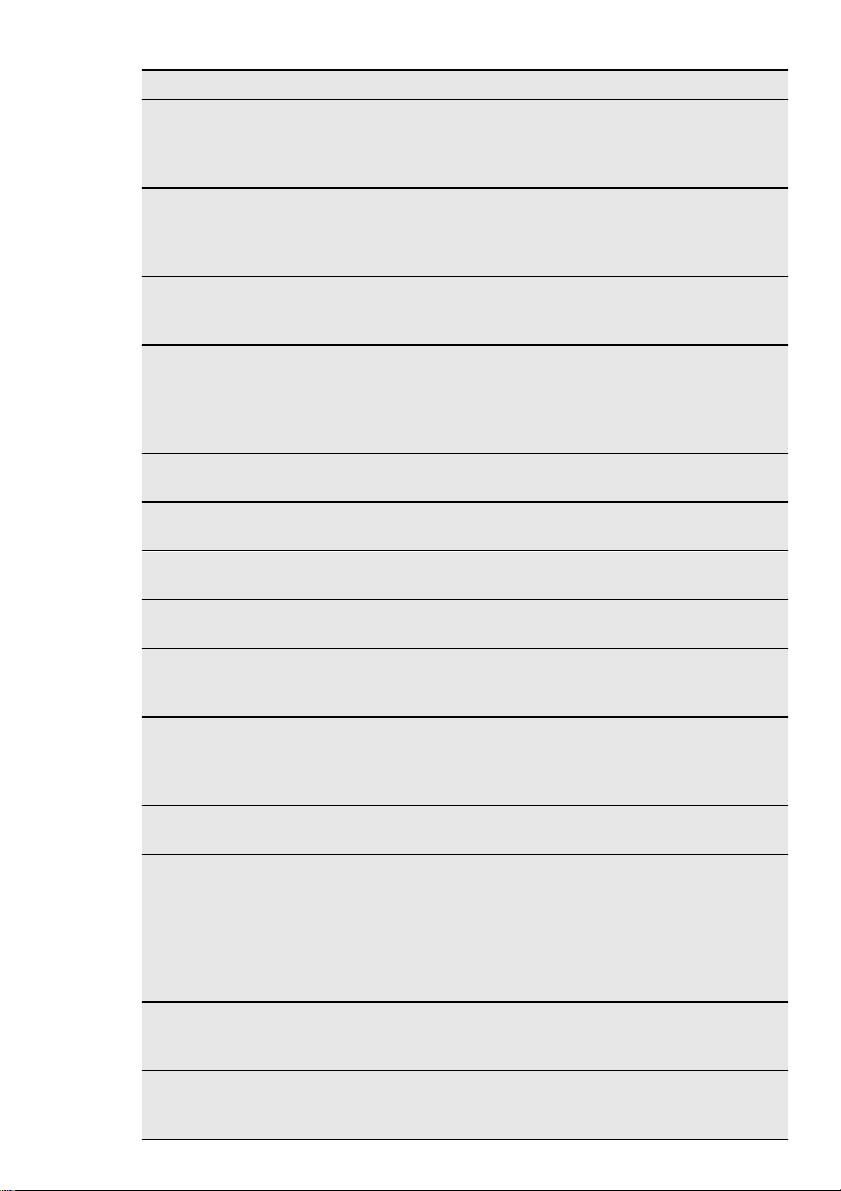
Problem Possible cause Solution
The appliance is
The appliance is not sup-
Check if the appliance
noisy
ported properly
stands stable (all the four
feet should be on the
floor)
The appliance does
The appliance is switched
Switch on the appliance.
not operate. The
off.
lamp does not oper-
ate.
The mains plug is not
Connect the mains plug to
connected to the mains
the mains socket correctly.
socket correctly.
The appliance has no
Connect a different electri-
power. There is no volt-
cal appliance to the mains
age in the mains socket.
socket.
Contact a qualified electri-
cian.
The lamp does not
The lamp is in stand-by. Close and open the door.
work.
The lamp is defective. Refer to "Replacing the
lamp".
The compressor op-
The temperature is not
Set a higher temperature.
erates continually.
set correctly.
The door is not closed
Refer to "Closing the
correctly.
door".
The door has been
Do not keep the door
opened too frequently.
open longer than necessa-
ry.
The product temperature
Let the product tempera-
is too high.
ture decrease to room
temperature before stor-
age.
The room temperature is
Decrease the room tem-
too high.
perature.
The compressor
This is normal, no error
The compressor starts af-
does not start imme-
has occurred.
ter a period of time.
diately after press-
ing the COOLMATIC
switch, or after
changing the tem-
perature.
Water flows on the
During the automatic de-
This is correct.
rear plate of the re-
frosting process, frost de-
frigerator.
frosts on the rear plate.
The temperature in
The temperature regula-
Set a higher/lower temper-
the appliance is too
tor is not set correctly.
ature.
low/high.
Table of contents
- 1. SAFETY INSTRUCTIONS
- 2. CONTROL PANEL
- 3. DAILY USE
- 4. HELPFUL HINTS AND TIPS
- 6. WHAT TO DO IF…
- 7. INSTALLATION
- 8. NOISES
- 9. TECHNICAL DATA
- 1. ISTRUZIONI DI SICUREZZA
- 2. PANNELLO DEI COMANDI
- 3. UTILIZZO QUOTIDIANO
- 4. CONSIGLI E SUGGERIMENTI UTILI
- 6. COSA FARE SE…
- 7. INSTALLAZIONE
- 8. RUMORI
- 9. DATI TECNICI
- 1. SICHERHEITSHINWEISE
- 2. BEDIENFELD
- 3. TÄGLICHER GEBRAUCH
- 4. PRAKTISCHE TIPPS UND HINWEISE
- 5. REINIGUNG UND PFLEGE
- 6. WAS TUN, WENN …
- 7. MONTAGE
- 8. GERÄUSCHE
- 9. TECHNISCHE DATEN
- 1. УКАЗАНИЯ ПО БЕЗОПАСНОСТИ
- 2. ПАНЕЛЬ УПРАВЛЕНИЯ
- 3. ЕЖЕДНЕВНОЕ ИСПОЛЬЗОВАНИЕ
- 4. ПОЛЕЗНЫЕ СОВЕТЫ
- 5. УХОД И ОЧИСТКА
- 6. ЧТО ДЕЛАТЬ, ЕСЛИ ...
- 7. УСТАНОВКА
- 8. ШУМЫ ПРИ РАБОТЕ
- 9. ТЕХНИЧЕСКИЕ ДАННЫЕ


