AEG S83600CMM0: instruction
Class: Household, kitchen appliances, electronics and equipment
Type:

Manual for AEG S83600CMM0

EN WINE-CELLAR-FREEZER USER MANUAL 2
S92500CNM0
FI VIINIKAAPPI-PAKASTIN KÄYTTÖOHJE 19
DE WEINKÜHLRAUM-/
BENUTZERINFORMATION 36
GEFRIERSCHRANKKOMBINATI
ON
SV VINKYL-FRYS BRUKSANVISNING 55
RU ВИННЫЙ ШКАФ-
ИНСТРУКЦИЯ ПО
72
МОРОЗИЛЬНИК
ЭКСПЛУАТАЦИИ
2
www.aeg.com
CONTENTS
4 SAFETY INFORMATION
7 CONTROL PANEL
10 DAILY USE
12 HELPFUL HINTS AND TIPS
13 CARE AND CLEANING
14 WHAT TO DO IF…
16 INSTALLATION
17 NOISES
18 TECHNICAL DATA
ENVIRONMENT CONCERNS
Recycle the materials with the symbol . Put the packaging in applicable containers to
recycle it.
Help protect the environment and human health and to recycle waste of electrical and
electronic appliances. Do not dispose appliances marked with the symbol
with the
household waste. Return the product to your local recycling facility or contact your
municipal office.
VISIT OUR WEBSITE FOR:
- Products
- Brochures
- User manuals
- Trouble shooter
- Service information
www.aeg.com
LEGEND
Warning - Important Safety information.
General information and tips
Environmental information
Subject to change without notice.
ENGLISH
3
FOR PERFECT RESULTS
Thank you for choosing this AEG product. We have created it to give you
impeccable performance for many years, with innovative technologies that help
make life simpler – features you might not find on ordinary appliances. Please spend
a few minutes reading to get the very best from it.
ACCESSORIES AND CONSUMABLES
In the AEG webshop, you’ll find everything you need to keep all your AEG
appliances looking spotless and working perfectly. Along with a wide range of
accessories designed and built to the high quality standards you would expect, from
specialist cookware to cutlery baskets, from bottle holders to delicate laundry bags…
Visit the webshop at:
www.aeg.com/shop
CUSTOMER CARE AND SERVICE
We recommend the use of original spare parts.
When contacting Service, ensure that you have the following data available. The
information can be found on the rating plate.
Model
PNC
Serial Number
4
www.aeg.com
SAFETY INFORMATION
In the interest of your safety and to ensure
Keep ventilation openings, in the appli-
the correct use, before installing and first
ance enclosure or in the built-in structure,
using the appliance, read this user manual
clear of obstruction.
carefully, including its hints and warnings.
• The appliance is intended for keeping
To avoid unnecessary mistakes and acci-
foodstuff and/or beverages in a normal
dents, it is important to ensure that all
household as explained in this instruc-
people using the appliance are thorough-
tion booklet.
ly familiar with its operation and safety
• Do not use a mechanical device or any
features. Save these instructions and
artificial means to speed up the thaw-
make sure that they remain with the appli-
ing process.
ance if it is moved or sold, so that every-
• Do not use other electrical appliances
one using it through its life will be proper-
(such as ice cream makers) inside of re-
ly informed on appliance use and safety.
frigerating appliances, unless they are
For the safety of life and property keep
approved for this purpose by the manu-
the precautions of these user's instruc-
facturer.
tions as the manufacturer is not responsi-
ble for damages caused by omission.
• Do not damage the refrigerant circuit.
• The refrigerant isobutane (R600a) is
contained within the refrigerant circuit
CHILDREN AND VULNERABLE
of the appliance, a natural gas with a
PEOPLE SAFETY
high level of environmental compatibili-
ty, which is nevertheless flammable.
• This appliance is not intended for use
by persons (including children) with re-
During transportation and installation
duced physical, sensory or mental ca-
of the appliance, be certain that none
pabilities, or lack of experience and
of the components of the refrigerant
knowledge, unless they have been giv-
circuit become damaged.
en supervision or instruction concerning
If the refrigerant circuit should become
use of the appliance by a person re-
damaged:
sponsible for their safety.
– avoid open flames and sources of ig-
Children should be supervised to en-
nition
sure that they do not play with the ap-
– thoroughly ventilate the room in
pliance.
which the appliance is situated
• Keep all packaging well away from chil-
• It is dangerous to alter the specifica-
dren. There is risk of suffocation.
tions or modify this product in any way.
• If you are discarding the appliance pull
Any damage to the cord may cause a
the plug out of the socket, cut the con-
short-circuit, fire and/or electric shock.
nection cable (as close to the appliance
as you can) and remove the door to
WARNING!
prevent playing children to suffer elec-
Any electrical component (power
tric shock or to close themselves into it.
cord, plug, compressor) must be
replaced by a certified service
• If this appliance featuring magnetic
agent or qualified service person-
door seals is to replace an older appli-
nel to avoid hazard.
ance having a spring lock (latch) on the
door or lid, be sure to make that spring
1.
Power cord must not be length-
lock unusable before you discard the
ened.
old appliance. This will prevent it from
2.
becoming a death trap for a child.
Make sure that the power plug is
not squashed or damaged by the
back of the appliance. A squashed
GENERAL SAFETY
or damaged power plug may over-
heat and cause a fire.
WARNING!
3.
Make sure that you can come to
the mains plug of the appliance.

ENGLISH
5
4.
Do not pull the mains cable.
• Do not use sharp objects to remove
5.
frost from the appliance. Use a plastic
If the power plug socket is loose,
scraper.
do not insert the power plug. There
is a risk of electric shock or fire.
• Regularly examine the drain in the re-
6.
frigerator for defrosted water. If neces-
You must not operate the appli-
sary, clean the drain. If the drain is
ance without the lamp cover (if
blocked, water will collect in the bot-
foreseen) of interior lighting.
tom of the appliance.
• This appliance is heavy. Care should be
taken when moving it.
INSTALLATION
• Do not remove nor touch items from
the freezer compartment if your hands
For electrical connection carefully
are damp/wet, as this could cause skin
follow the instructions given in
abrasions or frost/freezer burns.
specific paragraphs.
• Avoid prolonged exposure of the appli-
ance to direct sunlight.
• Unpack the appliance and check if
• Bulb lamps (if foreseen) used in this ap-
there are damages on it. Do not con-
pliance are special purpose lamps se-
nect the appliance if it is damaged. Re-
lected for household appliances use
port possible damages immediately to
only. They are not suitable for house-
the place you bought it. In that case re-
hold room illumination.
tain packing.
• It is advisable to wait at least four hours
before connecting the appliance to al-
DAILY USE
low the oil to flow back in the compres-
• Do not put hot pot on the plastic parts
sor.
in the appliance.
• Adequate air circulation should be
• Do not store flammable gas and liquid
around the appliance, lacking this leads
in the appliance, because they may ex-
to overheating. To achieve sufficient
plode.
ventilation follow the instructions rele-
vant to installation.
• Do not place food products directly
against the air outlet on the rear wall. (If
• Wherever possible the back of the
the appliance is Frost Free)
product should be against a wall to
avoid touching or catching warm parts
• Frozen food must not be re-frozen once
(compressor, condenser) to prevent
it has been thawed out.
possible burn.
• Store pre-packed frozen food in ac-
• The appliance must not be located
cordance with the frozen food manufac-
close to radiators or cookers.
turer's instructions.
• Make sure that the mains plug is acces-
• Appliance's manufacturers storage rec-
sible after the installation of the appli-
ommendations should be strictly ad-
ance.
hered to. Refer to relevant instructions.
• Connect to potable water supply only
• Do not place carbonated or fizzy drinks
(If a water connection is foreseen).
in the freezer compartment as it creates
pressure on the container, which may
cause it to explode, resulting in dam-
SERVICE
age to the appliance.
• Any electrical work required to do the
• Ice lollies can cause frost burns if con-
servicing of the appliance should be
sumed straight from the appliance.
carried out by a qualified electrician or
competent person.
CARE AND CLEANING
• This product must be serviced by an au-
thorized Service Centre, and only genu-
• Before maintenance, switch off the ap-
ine spare parts must be used.
pliance and disconnect the mains plug
from the mains socket.
• Do not clean the appliance with metal
objects.
6
www.aeg.com
ENVIRONMENT PROTECTION
This appliance does not contain
gasses which could damage the
ozone layer, in either its refriger-
ant circuit or insulation materials.
The appliance shall not be discar-
ded together with the urban re-
fuse and rubbish. The insulation
foam contains flammable gases:
the appliance shall be disposed
according to the applicable regu-
lations to obtain from your local
authorities. Avoid damaging the
cooling unit, especially at the rear
near the heat exchanger. The ma-
terials used on this appliance
marked by the symbol
are re-
cyclable.
ENGLISH
7
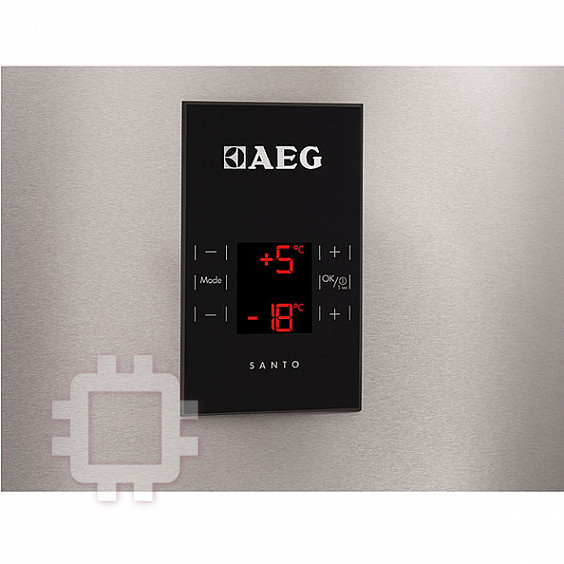
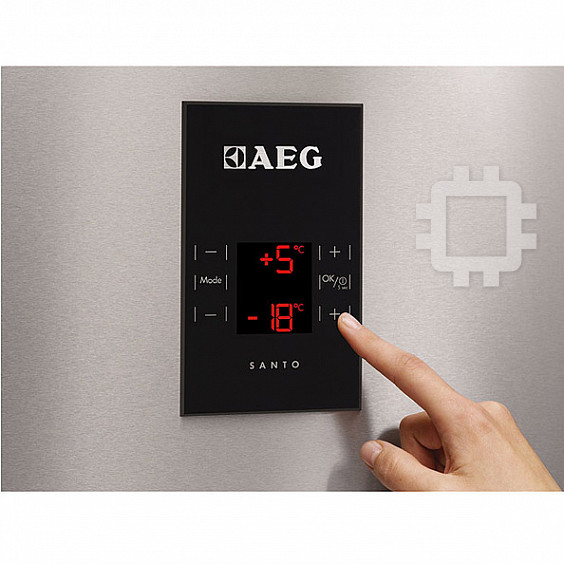
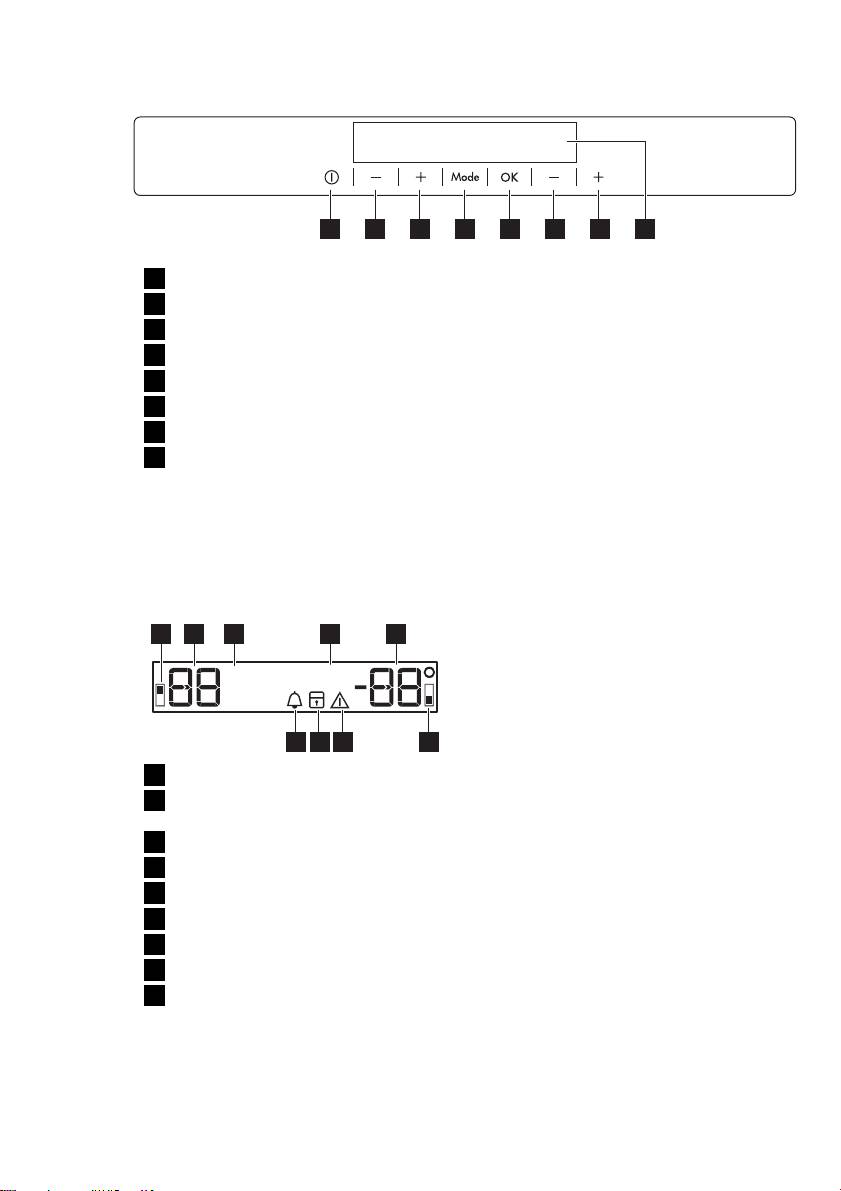
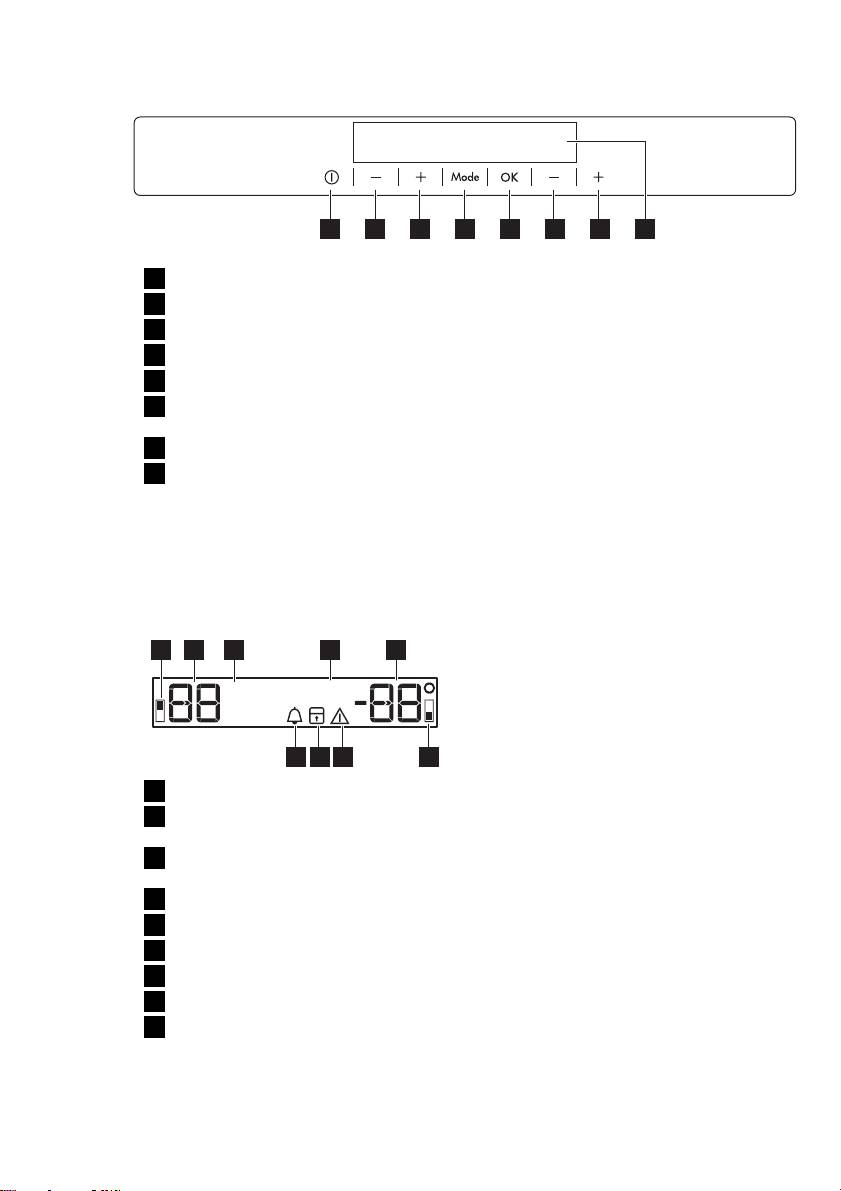
CONTROL PANEL
1 2 3 4 5 6 7 8
Appliance ON/OFF button
2.
1
Press the appliance ON/OFF button if
the display is off.
2
Fridge Temperature colder button
3.
The alarm buzzer could operate after
3
Fridge Temperature warmer button
few seconds.
4
Mode button
To reset the alarm refer to "High tem-
5
OK button
perature alarm".
6
Freezer Temperature colder button
4.
If "dEMo" appears on the display, the
appliance is in demonstration mode.
7
Freezer Temperature warmer button
Refer to "WHAT TO DO IF..." para-
8
Display
graph.
It is possible to change predefined sound
5.
The temperature indicators show the
of buttons to a loudly one by pressing to-
set default temperature.
gether Mode button and Temperature
To select a different set temperature refer
colder button for some seconds. Change
to "Temperature regulation".
is reversible.
SWITCHING OFF
DISPLAY
To switch off the appliance do these
4 5321
steps:
1.
Press the appliance ON/OFF button
Off
FROST
for 5 seconds.
MATIC
min
2.
The display switches off.
3.
To disconnect the appliance from the
9 8 67
power disconnect the mains plug
from the power socket.
1
Wine Cellar compartment indicator
2
Wine Cellar temperature indicator
SWITCHING OFF THE WINE
and timer indicator
CELLAR
3
Wine Cellar off indicator
To switch off the wine cellar:
4
FROSTMATIC function
1.
Press the Mode button until the cor-
5
Freezer temperature indicator
responding icon appears.
6
Freezer compartment indicator
The wine cellar Off indicator and the
7
Alarm indicator
wine cellar compartment indicator
Child Lock function
flash.
8
The wine cellar temperature indicator
9
Minute Minder function
shows dashes.
2.
Press the OK button to confirm.
SWITCHING ON
3.
The wine cellar Off indicator is shown.
To switch on the appliance do these
steps:
1.
Connect the mains plug to the power
socket.

8
www.aeg.com
• flashing the alarm and freezer tempera-
SWITCHING ON THE WINE
ture indicators
CELLAR
• sounding of buzzer.
To switch on the wine cellar :
To reset the alarm:
1.
Press the Mode button until the cor-
1.
Press any button.
responding icon appears.
2.
The buzzer switches off.
The wine cellar Off indicator flashes.
3.
The freezer temperature indicator
2.
Press the OK button to confirm.
shows the highest temperature
reached for a few seconds. Then
3.
The wine cellar Off indicator goes off.
show again the set temperature.
To select a different set temperature refer
to "Temperature regulation".
4.
The alarm indicator continue to flash
until the normal conditions are re-
stored.
TEMPERATURE REGULATION
When the alarm has returned the alarm in-
The set temperature of the wine cellar
dicator goes off.
and of the freezer may be adjusted by
pressing the temperature regulators.
DOOR OPEN ALARM FOR THE
Set default temperature:
WINE CELLAR AND FREEZER
• +10°C for the wine cellar
COMPARTMENTS
• -18°C for the freezer
The temperature indicators show the set
An acoustic alarm will sound if the door is
temperature.
left open for a few minutes. The door
The set temperature will be reached with-
open alarm conditions are indicated by:
in 24 hours.
• flashing Alarm indicator
After a power failure the set tem-
• acoustic buzzer
perature remains stored.
When normal conditions are restored
(door closed), the alarm will stop.
During the alarm, the buzzer can be
FROSTMATIC FUNCTION
switched off by pressing any button.
To switch on the function:
1.
Press the Mode button until the cor-
CHILD LOCK FUNCTION
responding icon appears.
To lock the buttons from unintentional
The FROSTMATIC indicator flashes.
operation select the Child Lock function.
2.
Press the OK button to confirm.
To switch on the function:
The FROSTMATIC indicator is shown.
1.
Press the Mode button until the cor-
This function stops automatically after 52
responding icon appears.
hours.
2.
The Child Lock indicator flashes.
To switch off the function before its auto-
3.
Press the OK button to confirm.
matic end:
The Child Lock indicator is shown.
1.
Press the Mode button until the
To switch off the function:
FROSTMATIC indicator flashes.
1.
Press the Mode button until the Child
2.
Press the OK button to confirm.
Lock indicator flashes.
3.
The FROSTMATIC indicator goes off.
2.
Press the OK button to confirm.
The function switches off by se-
3.
The Child Lock indicator goes off.
lecting a different freezer set tem-
perature.
MINUTE MINDER FUNCTION
HIGH TEMPERATURE ALARM
The Minute Minder function is to be used
to set an acoustic alarm at the preferred
An increase in the temperature in the
time, useful for example when a recipe re-
freezer compartment (for example due to
quires to cool down a mixture for a certain
an earlier power failure) is indicated by:
length of time, or when a reminder is nee-

ENGLISH
9
ded in order not to forget the bottles
placed in the freezer for fast cooling.
To switch on the function:
1.
Press the Mode button until the cor-
responding icon appears.
The Minute Minder indicator flashes.
The Timer shows the set value (30 mi-
nutes) for a few seconds.
2.
Press the Timer regulator button to
change the Timer set value from 1 to
90 minutes.
3.
Press the OK button to confirm.
The Minute Minder indicator is
shown.
The Timer start to flash (min).
At the end of the countdown the Minute
Minder indicator flashes and an audible
alarm sounds:
1.
Remove any drinks contained in the
freezer compartment.
2.
Press OK button to switch off the
sound and terminate the function.
It is possible to deactivate the function at
any time during the countdown:
1.
Press the Mode button until the Mi-
nute Minder indicator flashes.
2.
Press the OK button to confirm.
3.
The Minute Minder indicator goes off.
It is possible to change the time during
the countdown and at the end by press-
ing the Temperature colder button and
the Temperature warmer button.
10
www.aeg.com
DAILY USE
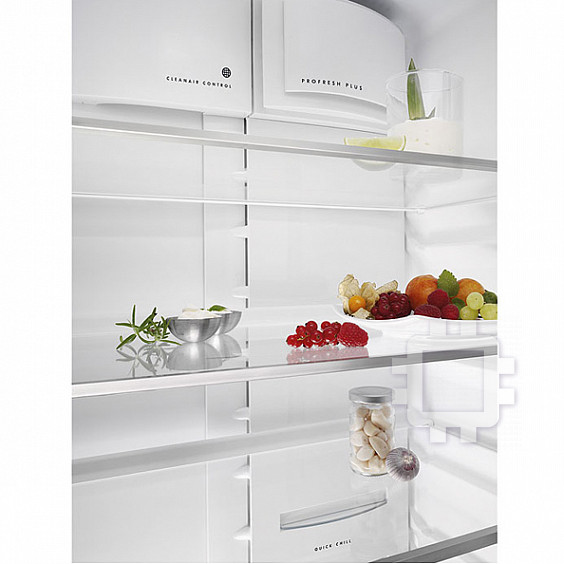
CLEANING THE INTERIOR
Before using the appliance for the first
time, wash the interior and all internal ac-
If “dEMo” appears on the Display, the ap-
cessories with lukewarm water and some
pliance is in demonstration mode: refer to
neutral soap so as to remove the typical
“WHAT TO DO IF...” paragraph.
smell of a brand-new product, then dry
thoroughly.
Do not use detergents or abrasive
powders, as these will damage
the finish.
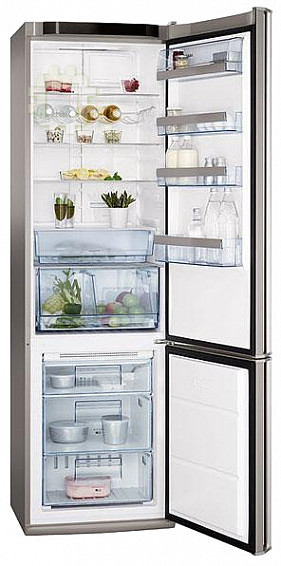
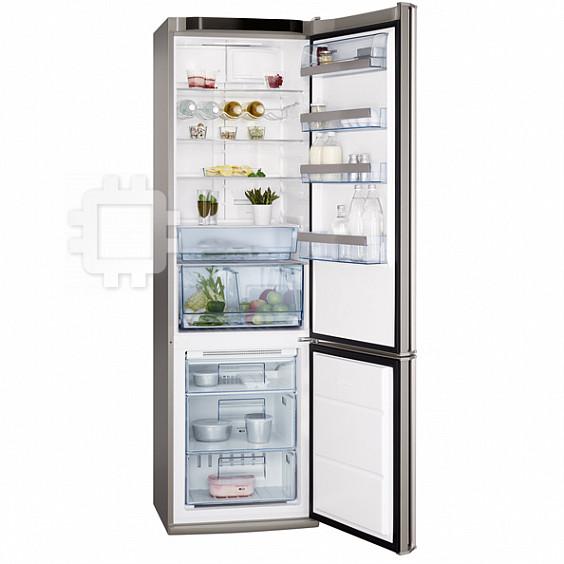
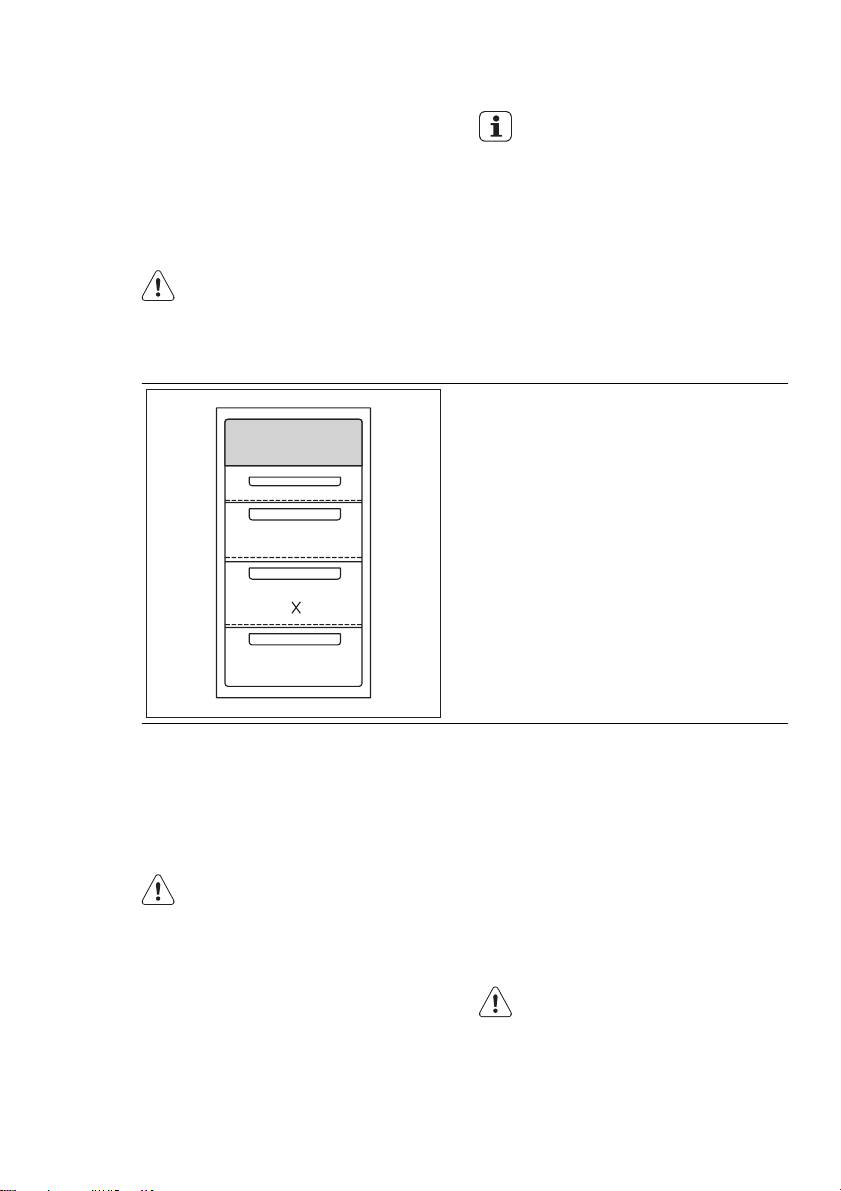
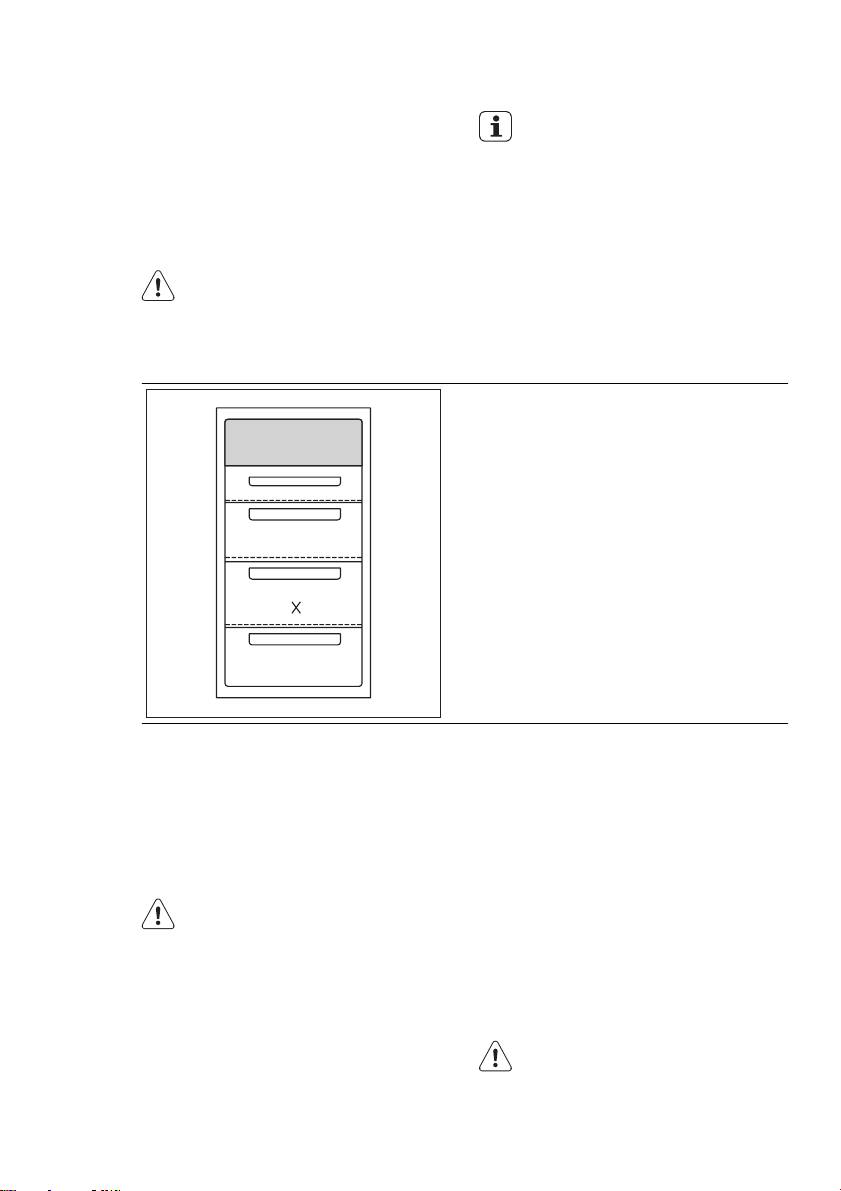
FREEZING FRESH FOOD
The freezer compartment is suitable for
freezing fresh food and storing frozen and
deep-frozen food for a long time.
To freeze fresh food activate the FROST-
MATIC function at least 24 hours before
placing the food to be frozen in the freez-
er compartment.
Place the fresh food to be frozen in the
"X" compartment, as shown in the figure.
The maximum amount of food that can be
frozen in 24 hours is specified on the rat-
ing plate, a label located on the inside of
the appliance.
The freezing process lasts 24 hours: dur-
ing this period do not add other food to
be frozen.
tor compartment or at room temperature,
depending on the time available for this
STORAGE OF FROZEN FOOD
operation.
When first starting-up or after a period
Small pieces may even be cooked still fro-
out of use, before putting the products in
zen, directly from the freezer: in this case,
the compartment let the appliance run at
cooking will take longer.
least 2 hours on the higher settings.
ICE-CUBE PRODUCTION
In the event of accidental defrost-
ing, for example due to a power
This appliance is equipped with one or
failure, if the power has been off
more trays for the production of ice-
for longer than the value shown in
cubes. Fill these trays with water, then put
the technical characteristics chart
them in the freezer compartment.
under "rising time", the defrosted
food must be consumed quickly
Do not use metallic instruments to
or cooked immediately and then
remove the trays from the freezer.
re-frozen (after cooling).
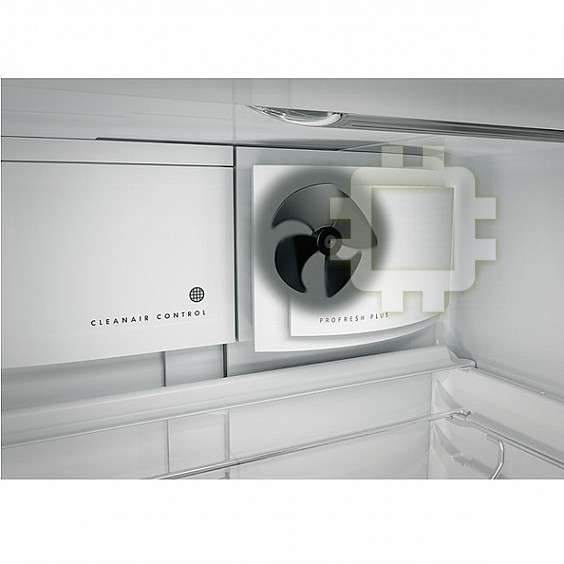
COLD ACCUMULATORS
THAWING
One or more cold accumulators are sup-
Deep-frozen or frozen food, prior to be-
plied in the freezer; these increase the
ing used, can be thawed in the refrigera-
length of time for which food will keep in
ENGLISH
11
the event of a power failure or break-
in the technical documentation regarding
down.
the quality, duration and optimum stor-
age temperature of the wine.
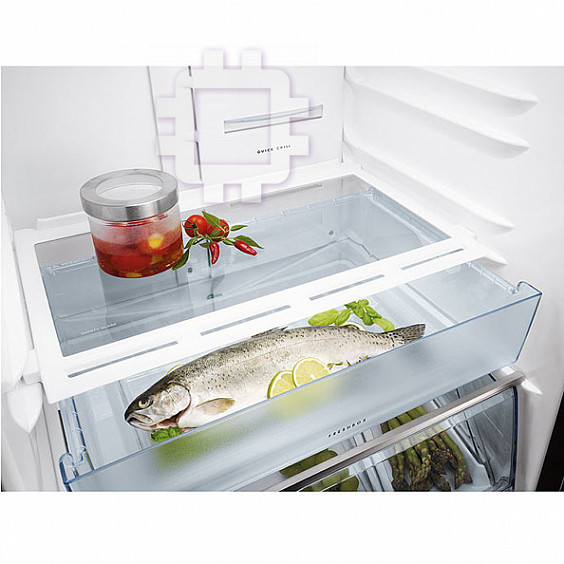
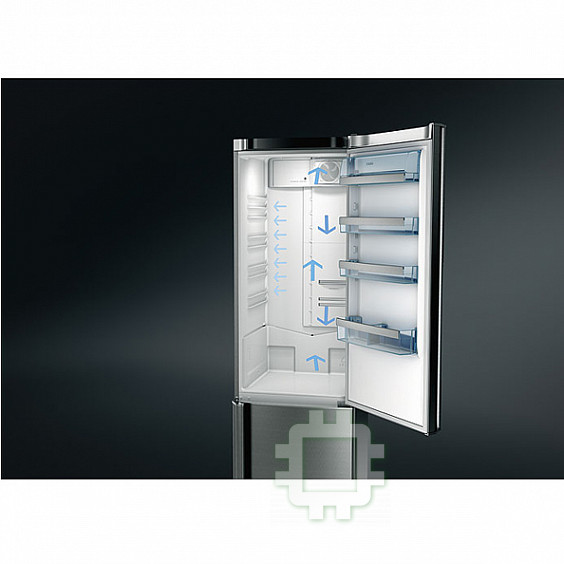
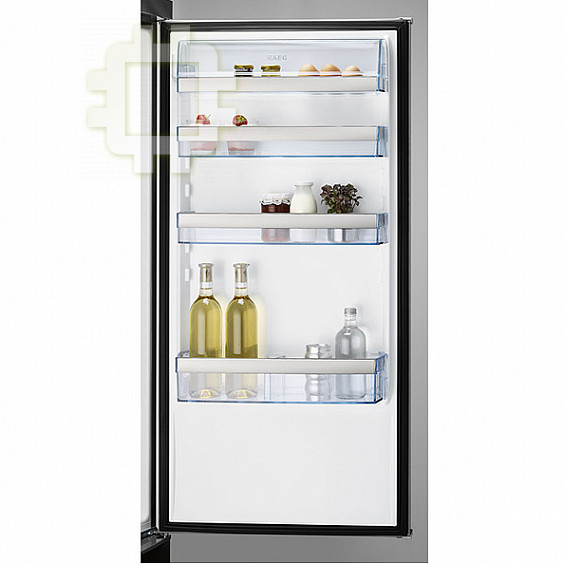
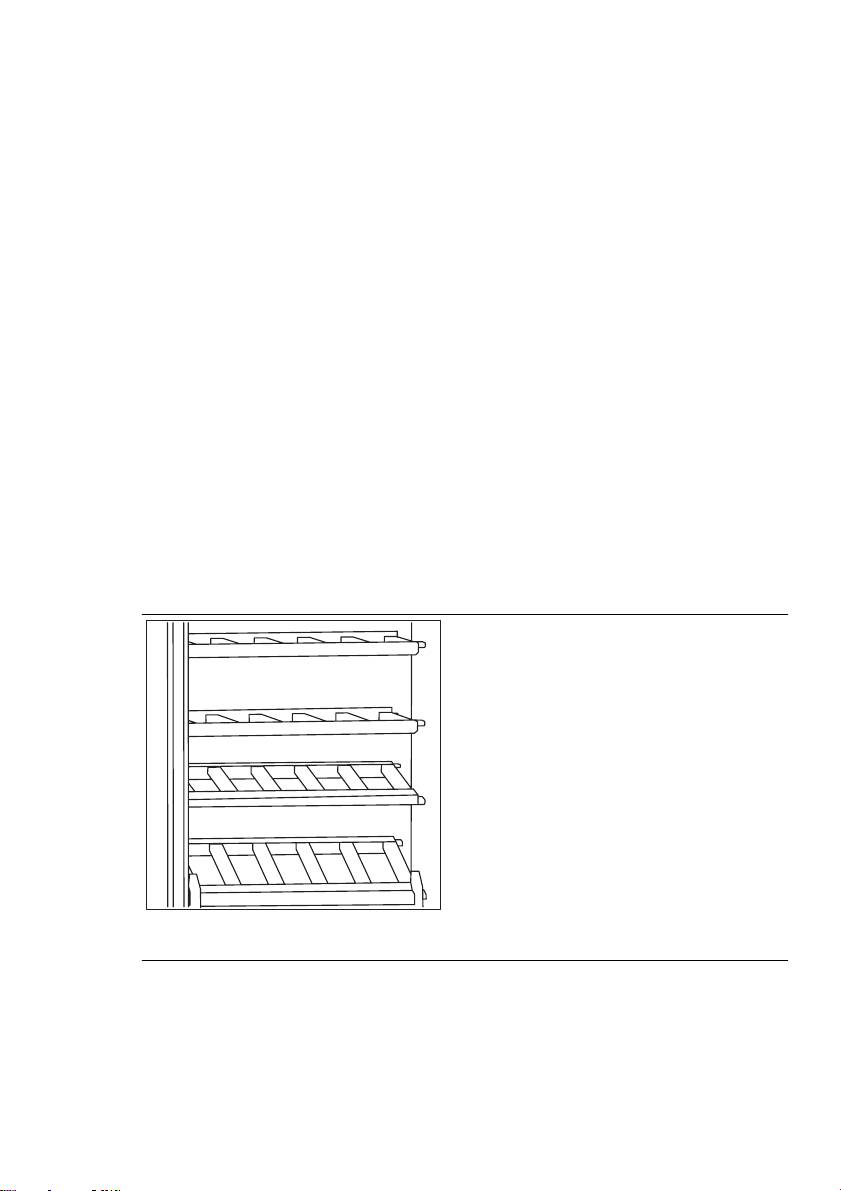
WINE ARRANGEMENT
AIR CIRCULATION
The temperature can be adjusted be-
tween + 6 and + 16°C.
Do not cover the shelves with any protec-
This compartment is ideal for storing and
tive material, such as paper, cardboard or
refining red or white wines for long peri-
plastic, which may obstruct the air circula-
ods.
tion through them.
Lay the bottles down in such a way that
Do not place the bottles at directly
the corks do not dry.
against the back wall of the compartment
Keep the wine in the dark. The door is in
which will obstruct the air circulation
anti-UV darkened double glass to protect
through them.
the wine from the light in case the appli-
ance is located in a well-lit place.
STORAGE ADVICE
Avoid switching the appliance light on too
often or for too long. Wine keeps better
The storage time for wine depends on
in the dark.
ageing, the type of grapes, alcoholic con-
Handle the bottles with care, to avoid agi-
tent and level of fructose and tannin con-
tating the wine.
tained in it. At the time of purchase, check
Follow the recommendations and advice
if the wine is already aged or if it will im-
received at the time of purchase or given
prove over time.
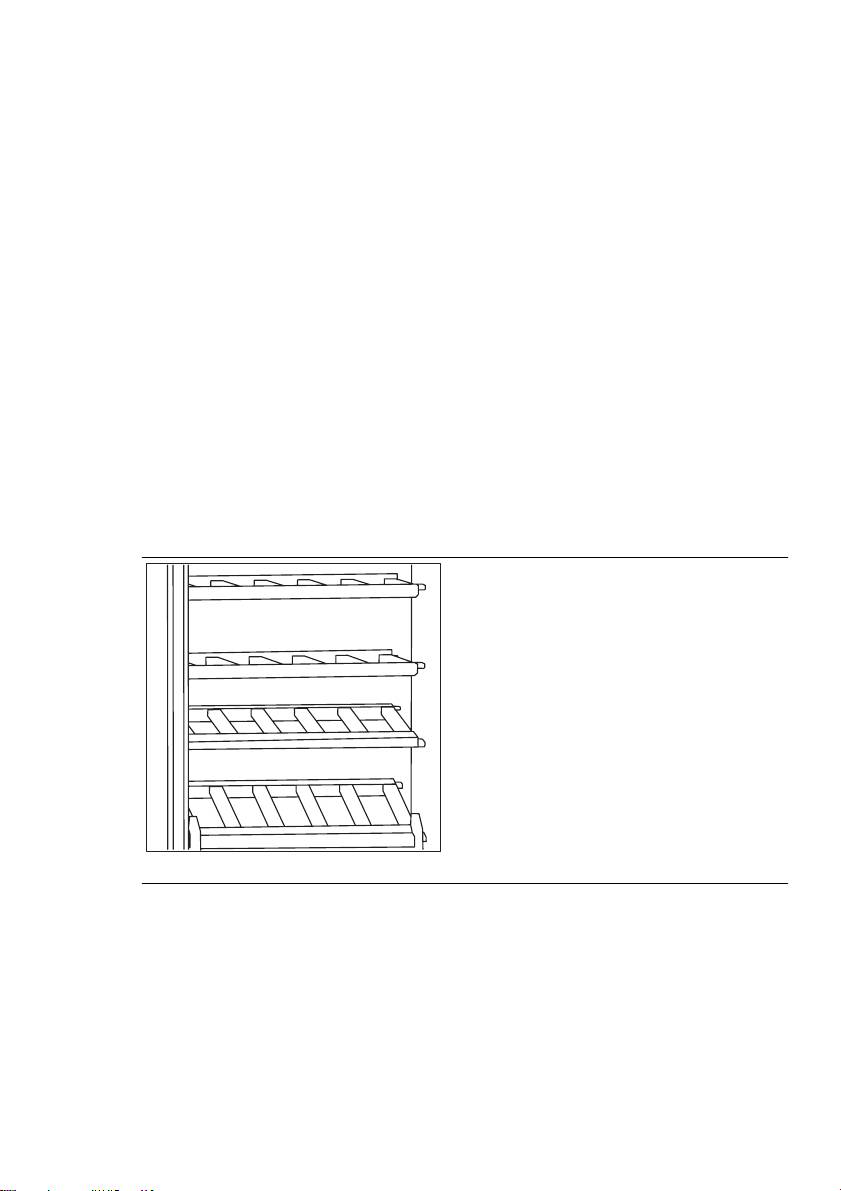
WINE CELLAR SHELVES
Remove the shelves for cleaning.
The shelves can be inclined between the
two guides, making sure that the smallest
pins are properly inserted in the upper
guide seat and the front part of the shelf
is resting on the front guide.
Adjust the wooden shelves as follows:
The short shelf can be placed on the two
short guides at the top.
The long shelf can be placed on the three
long middle guides and inclined between
the last short guide at the bottom and the
shelf support structure.
Place the shelf support structure in the
bottom of the compartment.
In the shelf support structure insert only
the long shelves.

12
www.aeg.com
HELPFUL HINTS AND TIPS
HINTS FOR ENERGY SAVING
HINTS FOR STORAGE OF
FROZEN FOOD
• Do not open the door frequently or
leave it open longer than absolutely
To obtain the best performance from this
necessary.
appliance, you should:
• If the ambient temperature is high and
• make sure that the commercially frozen
the Temperature Regulator is set to low
foodstuffs were adequately stored by
temperature and the appliance is fully
the retailer;
loaded, the compressor may run con-
• be sure that frozen foodstuffs are trans-
tinuously, causing frost or ice on the
ferred from the foodstore to the freezer
evaporator. If this happens, set the
in the shortest possible time;
Temperature Regulator toward warmer
• not open the door frequently or leave it
settings to allow automatic defrosting
open longer than absolutely necessary;
and so a saving in electricity consump-
tion.
• once defrosted, food deteriorates rap-
idly and cannot be refrozen;
HINTS FOR FREEZING
• do not exceed the storage period indi-
cated by the food manufacturer.
To help you make the most of the freez-
ing process, here are some important
hints:
• To freeze the maximum quantity shown
on the rating plate press the FROST-
MATIC switch 24 hours prior to freez-
ing, or 4 to 6 hours for smaller quanti-
ties. The light will light up .
• The FROSTMATIC switch not need not
be pressed for freezing of small quanti-
ties.
• only freeze top quality, fresh and thor-
oughly cleaned, foodstuffs;
• prepare food in small portions to ena-
ble it to be rapidly and completely fro-
zen and to make it possible subse-
quently to thaw only the quantity re-
quired;
• wrap up the food in aluminium foil or
polythene and make sure that the pack-
ages are airtight;
• do not allow fresh, unfrozen food to
touch food which is already frozen, thus
avoiding a rise in temperature of the
latter;
• lean foods store better and longer than
fatty ones; salt reduces the storage life
of food;
• water ices, if consumed immediately af-
ter removal from the freezer compart-
ment, can possibly cause the skin to be
freeze burnt;
• it is advisable to show the freezing in
date on each individual pack to enable
you to keep tab of the storage time.

ENGLISH
13
CARE AND CLEANING
CAUTION!
DEFROSTING OF THE
Unplug the appliance before car-
FREEZER
rying out any maintenance opera-
tion.
The freezer compartment of this model,
on the other hand, is a "no frost" type.
This appliance contains hydrocar-
This means that there is no buildup of
bons in its cooling unit; mainte-
frost when it is in operation, neither on
nance and recharging must there-
the internal walls nor on the foods.
fore only be carried out by author-
The absence of frost is due to the contin-
ized technicians.
uous circulation of cold air inside the
compartment, driven by an automatically
PERIODIC CLEANING
controlled fan.
The equipment has to be cleaned regular-
PERIODS OF NON-
ly:
OPERATION
• clean the inside and accessories with
lukewarm water and some neutral soap.
When the appliance is not in use for long
• regularly check the door seals and wipe
periods, take the following precautions:
clean to ensure they are clean and free
• disconnect the appliance from elec-
from debris.
tricity supply
• rinse and dry thoroughly.
• remove all food
Do not pull, move or damage any
• defrost (if foreseen) and clean the appli-
pipes and/or cables inside the
ance and all accessories
cabinet.
• leave the door/doors ajar to prevent
Never use detergents, abrasive
unpleasant smells.
powders, highly perfumed clean-
If the cabinet will be kept on, ask some-
ing products or wax polishes to
body to check it once in a while to pre-
clean the interior as this will dam-
vent the food inside from spoiling in case
age the surface and leave a strong
of a power failure.
odour.
Clean the condenser (black grill) and the
compressor at the back of the appliance
with a brush. This operation will improve
the performance of the appliance and
save electricity consumption.
Take care of not to damage the
cooling system.
Many proprietary kitchen surface cleaners
contain chemicals that can attack/damage
the plastics used in this appliance. For this
reason it is recommended that the outer
casing of this appliance is only cleaned
with warm water with a little washing-up
liquid added.
After cleaning, reconnect the equipment
to the mains supply.
14
www.aeg.com
WHAT TO DO IF…
WARNING!
Before troubleshooting, discon-
nect the mains plug from the
mains socket.
Only a qualified electrician or
competent person must do the
troubleshooting that is not in this
manual.
Problem Possible cause Solution
The appliance is noisy The appliance is not sup-
Check if the appliance
ported properly
stands stable (all the four
feet should be on the floor)
The appliance does
The appliance is switched
Switch on the appliance.
not operate.
off.
The mains plug is not con-
Connect the mains plug to
nected to the mains sock-
the mains socket correctly.
et correctly.
The appliance has no
Connect a different electri-
power. There is no voltage
cal appliance to the mains
in the mains socket.
socket.
Contact a qualified electri-
cian.
The buzzer sounds.
The temperature in the
Refer to "High Tempera-
The Alarm light flash-
freezer is too high.
ture Alarm".
ing.
The compressor op-
The temperature is not set
Set a higher temperature.
erates continually.
correctly.
The door is not closed cor-
Refer to "Closing the
rectly.
door".
The door has been
Do not keep the door open
opened too frequently.
longer than necessary.
The product temperature
Let the product tempera-
is too high.
ture decrease to room tem-
perature before storage.
The room temperature is
Decrease the room temper-
too high.
ature.
The compressor does
This is normal, no error has
The compressor starts after
not start immediately
occurred.
a period of time.
after pressing the
FROSTMATIC button,
or after changing the
temperature.
Products prevent that wa-
Make sure that products do
ter flows into the water
not touch the rear plate.
collector.
ENGLISH
15
Problem Possible cause Solution
The temperature in
The temperature regulator
Set a higher/lower temper-
the appliance is too
is not set correctly.
ature.
low/high.
The door is not closed cor-
Refer to "Closing the
rectly.
door".
The product temperature
Let the product tempera-
is too high.
ture decrease to room tem-
perature before storage.
Many products are stored
Store less products at the
at the same time.
same time.
The temperature in
There is no cold air circula-
Make sure that there is cold
the wine cellar is too
tion in the appliance.
air circulation in the appli-
high.
ance.
The temperature in
Products are too near to
Store products so that
the freezer is too
each other.
there is cold air circulation.
high.
Upper or lower
An error has occurred in
Call your service represen-
square is shown in
measuring the tempera-
tative (the cooling system
the temperature Dis-
ture.
will continue to keep food
play.
products cold, but temper-
ature adjustment will not be
possible).
dEMo appears on the
The appliance is in dem-
Keep pressed approximate-
Display.
onstration mode (dEMo).
ly 10 sec. the OK button
since a long sound of buz-
zer is heard and the Display
shut off for a short while:
appliance start works regu-
larly.
REPLACING THE LAMP
The appliance is equipped with a longlife
LED interior light.
Only service is allowed to replace the
lighting device. Contact your Service Cen-
ter.
CLOSING THE DOOR
1.
Clean the door gaskets.
2.
If necessary, adjust the door. Refer to
"Installation".
3.
If necessary, replace the defective
door gaskets. Contact the Service
Center.
16
www.aeg.com
INSTALLATION
WARNING!
Read the "Safety Information"
carefully for your safety and cor-
rect operation of the appliance
before installing the appliance.
POSITIONING
WARNING!
If you are discarding an old appli-
ance that has a lock or catch on
the door, you must ensure that it
is made unusable to prevent
young children being trapped in-
side.
The appliance shall have the plug
accessible after installation.
Install this appliance at a location where
the ambient temperature corresponds to
the climate class indicated on the rating
plate of the appliance:
Cli-
Ambient temperature
mate
class
SN +10°C to + 32°C
N +16°C to + 32°C
ST +16°C to + 38°C
T +16°C to + 43°C
ELECTRICAL CONNECTION
Before plugging in, ensure that the volt-
age and frequency shown on the rating
plate correspond to your domestic power
supply.
The appliance must be earthed. The pow-
er supply cable plug is provided with a
contact for this purpose. If the domestic
power supply socket is not earthed, con-
nect the appliance to a separate earth in
compliance with current regulations, con-
sulting a qualified electrician.
The manufacturer declines all responsibili-
ty if the above safety precautions are not
observed.
This appliance complies with the E.E.C.
Directives.
ENGLISH
17
NOISES
There are some sounds during normal
running (compressor, refrigerant circula-
tion).
SSSRRR!
CLICK!
HISSS!
BRRR!
OK
CRACK!
BLUBB!
CLICK!
CLICK!
BRRR!
BRRR!
BLUBB!
BLUBB!
18
www.aeg.com
HISSS!
HISSS!
SSSRRR!
SSSRRR!
CRACK!
CRACK!
TECHNICAL DATA
Dimension of the recess
Height 1855 mm
Width 545 mm
Depth 575 mm
Rising Time 25 h
Voltage 230-240 V
Frequency 50 Hz
The technical information are situated in
the rating plate on the internal left side of
the appliance and in the energy label.
SUOMI
19
SISÄLLYS
21 TURVALLISUUSOHJEET
24 KÄYTTÖPANEELI
27 PÄIVITTÄINEN KÄYTTÖ
29 HYÖDYLLISIÄ NEUVOJA JA VINKKEJÄ
30 HOITO JA PUHDISTUS
31 KÄYTTÖHÄIRIÖT
33 ASENNUS
34 ÄÄNET
35 TEKNISET TIEDOT
YMPÄRISTÖNSUOJELU
Kierrätä materiaalit, jotka on merkitty merkillä . Kierrätä pakkaus laittamalla se
asianmukaiseen kierrätysastiaan.
Suojele ympäristöä ja ihmisten terveyttä kierrättämällä sähkö- ja elektroniikkaromut. Älä
hävitä merkillä
merkittyjä kodinkoneita kotitalousjätteen mukana. Palauta tuote
paikalliseen kierrätyskeskukseen tai ota yhteyttä paikalliseen viranomaiseen.
VIERAILE VERKKOSIVULLAMME, JOKA SISÄLTÄÄ:
- Tuotteet
- Esitteet
- Käyttöohjeet
- Vianetsintä
- Takuu ja kuluttajaneuvonta
www.aeg.com
SYMBOLIEN KUVAUS
Varoitus - Tärkeitä turvallisuusohjeita.
Yleistietoja ja vinkkejä
Ympäristönsuojeluohjeita
Oikeus muutoksiin pidätetään.

20
www.aeg.com
TÄYDELLISTEN TULOKSIEN SAAVUTTAMISEKSI
Kiitämme teitä tämän AEG-tuotteen valitsemisesta. Olemme kehittäneet tämän
tuotteen tarjotaksemme teille huipputason suorituskyvyn moneksi vuodeksi. Laitteen
innovatiiviset teknologiat tekevät elämästänne yksinkertaisempaa – kyseisiä
ominaisuuksia ei välttämättä löydy tavallisista laitteista. Käyttäkää muutama minuutti
lukemiseen, jotta voitte hyödyntää laitteen ominaisuudet parhaalla mahdollisella
tavalla.
LISÄVARUSTEET JA KULUTUSHYÖDYKKEET
AEG-verkkomyymälästä löydätte kaiken tarvitsemanne kaikkien AEG-laitteidenne
ulkonäön ja toiminnan säilyttämiseksi huippukunnossa. Korkeiden laatustandardien
mukaan suunniteltujen ja valmistettujen lisävarusteiden lisäksi löydätte
myymälästämme erityisiä keittoastioita, ruokailuvälinekoreja, pullon pidikkeitä,
erityisiä pyykinpesupusseja, jne.
Vieraile verkkokaupassamme sivulla
www.aeg.com/shop
KULUTTAJANEUVONTA JA HUOLTO
Suosittelemme alkuperäisten varaosien käyttöä.
Pidä seuraavat tiedot saatavilla ottaessasi yhteyttä asiakaspalveluun. Kyseiset
tiedot löytyvät laitteen arvokilvestä.
Malli
Tuotenumero
Sarjanumero

SUOMI
21
TURVALLISUUSOHJEET
Lue tämä käyttöohje ja sen sisältämät
YLEISET
neuvot sekä varoitukset huolellisesti en-
TURVALLISUUSOHJEET
nen laitteen asentamista ja ensimmäistä
käyttöä, jotta osaisit käyttää laitetta turval-
VAROITUS!
lisesti ja oikealla tavalla. Turhien virheiden
ja onnettomuuksien välttämiseksi on tär-
keää, että kaikki laitteen käyttäjät perehty-
Pidä kalusteen sisään asennetun laitteen
vät huolellisesti sen toimintaan ja turvalli-
syvennyksen tai kalustekaapin ilmanvaih-
suusominaisuuksiin. Pidä tämä ohje talles-
toaukot vapaina.
sa ja varmista, että se kulkee aina laitteen
• Laite on tarkoitettu elintarvikkeiden ja/
mukana esimerkiksi asunnon vaihdon yh-
tai juomien säilyttämiseen kotitalous-
teydessä tai luovutetaan mahdolliselle uu-
käytössä tämän käyttöohjeen kuvauksen
delle omistajalle. Näin kaikilla laitteen
mukaisesti.
käyttäjillä on asianmukaiset ohjeet turval-
• Älä yritä nopeuttaa sulatusta mekaanis-
lista käyttöä varten.
ten laitteiden tai muun keinotekoisen
Huomioi tarkasti käyttöohjeen sisältämät
sulatusvälineen avulla.
varoitukset käyttäjien turvallisuuden var-
• Älä käytä muita sähkölaitteita (esim. jää-
mistamiseksi ja omaisuusvahinkojen vält-
telökonetta) jäähdytyslaitteiden sisällä,
tämiseksi. Valmistaja ei vastaa vahingois-
ellei valmistaja ole hyväksynyt niitä ky-
ta, jotka ovat aiheutuneet varoitusten ja
seiseen käyttötarkoitukseen.
turvallisuusohjeiden vastaisesta toiminnas-
ta.
• Varo vahingoittamasta jäähdytysputkis-
toa.
LASTEN JA
• Laitteen jäähdytysputkisto sisältää iso-
butaania (R600a), joka on hyvin ympäris-
TAITAMATTOMIEN
töystävällinen maakaasu, mutta kuiten-
HENKILÖIDEN TURVALLISUUS
kin tulenarka.
• Tämä laite ei ole tarkoitettu fyysisesti,
Varmista, etteivät jäähdytysputkiston
motorisesti tai henkisesti rajoitteisten
komponentit pääse vaurioitumaan lait-
tai kokemattomien tai taitamattomien
teen kuljetuksen ja asennuksen aikana.
henkilöiden (eikä lasten) käyttöön, ellei
Jos jäähdytysputkisto vaurioituu:
heidän turvallisuudestaan vastuussa
– Vältä avotulta ja muita syttymislähtei-
oleva henkilö valvo ja opasta heitä lait-
tä.
teen käytössä.
– Tuuleta huolellisesti huone, johon lai-
Pikkulapsia on valvottava eikä heidän
te on sijoitettu.
pidä antaa leikkiä laitteella.
• Laitteen teknisten ominaisuuksien
• Pidä kaikki pakkausmateriaalit poissa
muuttaminen tai muiden muutosten te-
lasten ulottuvilta. Ne voisivat aiheuttaa
keminen laitteeseen on vaarallista. Va-
tukehtumisvaaran.
hingoittunut virtajohto voi aiheuttaa oi-
• Kun poistat laitteen käytöstä lopullises-
kosulun, tulipalon ja/tai sähköiskun.
ti, irrota pistoke pistorasiasta, leikkaa
VAROITUS!
virtajohto irti (mahdollisimman läheltä
Sähköosien (virtajohto, pistoke,
laitteen liitäntäkohtaa) ja irrota laitteen
kompressori) vaihdon saa suorit-
ovi. Tällä tavoin voidaan välttää leikkivil-
taa vain valtuutettu huoltoliike
le lapsille aiheutuva sähköiskun tai louk-
vaaratilanteiden välttämiseksi.
kuunjäämisen vaara.
• Tässä laitteessa on magneettiset oven
1.
Virtajohtoa ei saa jatkaa.
tiivisteet. Jos entisen laitteesi ovessa on
2.
Varmista, että virtajohto ei joudu
jousilukitus (salpa), riko jousilukitus, en-
puristuksiin tai pääse vahingoittu-
nen kuin poistat vanhan laitteen käytös-
maan laitteen takana. Litistynyt tai
tä estääksesi lasten loukkuunjäämisen
vahingoittunut virtajohto voi ylikuu-
vaaran.
mentua ja aiheuttaa tulipalon.

22
www.aeg.com
3.
Laitteen verkkovirtakytkennän on
HUOLTO JA PUHDISTUS
oltava hyvin ulottuvilla siten, että
pistoke on helppo irrottaa pistora-
• Ennen kuin aloitat laitteen huoltamisen,
siasta.
kytke laite pois päältä ja irrota pistoke
pistorasiasta.
4.
Älä vedä virtajohdosta pistoketta ir-
rottaessasi.
• Älä käytä laitteen puhdistamisessa me-
talliesineitä.
5.
Jos pistoke on löysästi kiinni virta-
johdossa, älä kiinnitä sitä pistorasi-
• Älä käytä huurteen poistamisessa terä-
aan. Tämä aiheuttaa sähköiskun tai
viä esineitä. Käytä muovista kaavinta.
tulipalon vaaran.
• Tarkista säännöllisesti jääkaapin sulatus-
6.
Laitetta ei saa käyttää, jos sisävalon
veden poistoaukko. Puhdista poisto-
lampun suojus (jos varusteena)
aukko tarvittaessa. Jos poistoaukko on
puuttuu.
tukossa, vesi kerääntyy laitteen pohjalle.
• Laite on painava. Sen siirtämisessä on
noudatettava varovaisuutta.
ASENNUS
• Älä koske pakastimessa oleviin tuottei-
Noudata tarkasti sähköliitäntää kä-
siin kostein tai märin käsin. Koskettami-
sittelevissä kappaleissa annettuja
nen voi aiheuttaa ihon hankautumista
ohjeita.
tai kylmävammoja.
• Laite ei saa olla pitkään suorassa aurin-
• Pura laite pakkauksestaan ja tarkista
gonvalossa.
mahdolliset kuljetusvauriot. Vaurioitu-
• Tässä laitteessa olevat polttimot (jos va-
nutta laitetta ei saa kytkeä verkkovir-
rusteena) ovat erityisesti kodinkoneita
taan. Ilmoita mahdollisista vahingoista
varten suunniteltuja erikoispolttimoita.
välittömästi jälleenmyyjälle. Säilytä tässä
Ne eivät sovi huoneiden valaistukseen.
tapauksessa pakkausmateriaalit.
• Odota vähintään kaksi tuntia, ennen
kuin kytket laitteen verkkovirtaan, jotta
PÄIVITTÄINEN KÄYTTÖ
öljy ehtii virrata kompressoriin.
• Älä laita kuumia kattiloita laitteen muo-
• Laitteen ympärillä on oltava hyvä ilman-
viosien päälle.
kierto, jotta ylikuumenemisen vaaraa ei
• Älä säilytä tulenarkoja kaasuja tai nes-
ole. Noudata asennusohjeissa esitettyjä
teitä jääkaapissa, sillä ne voivat räjäh-
ilmanvaihtomääräyksiä.
tää.
• Laite on mahdollisuuksien mukaan sijoi-
• Älä laita elintarvikkeita suoraan takasei-
tettava selkä seinää vasten, jotta palo-
nän ilmanvaihtoaukkoa vasten. (Mikäli
vammoja aiheuttaviin kuumiin osiin
kyseessä on huurtumaton Frost Free -
(kompressori, lauhdutin) ei voida kos-
malli)
kea.
• Pakasteita ei saa pakastaa uudelleen
• Laitetta ei saa sijoittaa lämpöpatterin
sen jälkeen, kun ne on kerran sulatettu.
tai lieden viereen.
• Säilytä valmispakasteet pakkauksen oh-
• Varmista, että laitteen verkkovirtakyt-
jeita noudattaen.
kentä on hyvin ulottuvilla laitteen asen-
• Noudata tarkasti laitteen valmistajan
nuksen jälkeen.
säilytysohjeita. Lue ohjeet.
• Liitä ainoastaan juomavesiverkostoon
• Älä laita pakastimeen hiilihappopitoisia
(jos laitteessa on vesiliitäntä).
tai poreilevia juomia, sillä jäätyessä pak-
kaukseen muodostuu painetta, jolloin
HUOLTOPALVELU
se voi räjähtää ja vahingoittaa laitetta.
• Kaikki laitteen asennukseen liittyvät säh-
• Mehujäät voivat aiheuttaa kylmävam-
kötyöt on annettava ammattitaitoisen
moja, jos ne nautitaan suoraan pakasti-
sähköasentajan tehtäväksi.
mesta otettuina.
• Laitteen huoltotyöt saa suorittaa vain
valtuutettu huoltoliike, ja ainoastaan al-
kuperäisten varaosien käyttäminen on
sallittua.
SUOMI
23
YMPÄRISTÖNSUOJELU
Tämä laite ei sisällä otsonikerrosta
tuhoavia kaasuja jäähdytyspiirissä
eikä eristemateriaaleissa. Käytös-
täpoistettua laitetta ei saa toimit-
taa tavallisen yhdyskuntajätteen
keräykseen. Eristevaahto sisältää
tulenarkoja kaasuja: laitteen käy-
töstäpoistossa ja hävittämisessä
tulee noudattaa paikallisia jäte-
huoltomääräyksiä. Vältä vahingoit-
tamasta jäähdytysyksikköä, erityi-
sesti lämmönvaihtimen läheltä.
Tässä laitteessa käytetyt, symbolil-
la
merkityt materiaalit ovat
kierrätettäviä.
24
www.aeg.com
KÄYTTÖPANEELI
1 2 3 4 5 6 7 8
1
Laitteen ON/OFF -painike
1.
Liitä pistoke pistorasiaan.
2
Jääkaapin lämpötilan alennuspainike
2.
Paina ON/OFF -painiketta, jos näyttö
ei ole päällä.
3
Jääkaapin lämpötilan nostopainike
3.
Hälytyksen äänimerkki saattaa kuulua
4
Mode -painike
muutaman sekunnin kuluttua.
5
OK -painike
Katso hälytyksen kuittausohjeet koh-
dasta "Korkean lämpötilan hälytys".
6
Pakastimen lämpötilan alennuspaini-
ke
4.
Jos "dEMo" tulee näkyviin näyttöön,
Pakastimen lämpötilan nostopainike
laite on esitystilassa. Lue ohjeet koh-
7
dasta "Käyttöhäiriöt".
8
Näyttö
5.
Lämpötilanäytöt näyttävät asetetun
Esimääritetyt painikkeiden äänet voidaan
oletuslämpötilan.
asettaa korkeaksi painamalla samanaikai-
Jos haluat muuttaa lämpötila-asetusta,
sesti Mode -painiketta ja lämpötilan alen-
katso kohta "Lämpötilan säätäminen".
nuspainiketta muutaman sekunnin ajan.
Asetusta voidaan säätää.
LAITTEEN KYTKEMINEN POIS
NÄYTTÖ
TOIMINNASTA
Kodinkone kytketään pois toiminnasta
4 5321
seuraavalla tavalla:
Off
FROST
1.
Paina laitteen ON/OFF-painiketta vii-
MATIC
den sekunnin ajan.
min
2.
Näyttö sammuu.
3.
Katkaise laitteen virta irrottamalla lait-
9 8 67
teen pistoke pistorasiasta.
1
Viinikaappiosaston merkkivalo
2
Viinikaapin lämpötilanäyttö ja ajasti-
VIINIKAAPIN KYTKEMINEN
men merkkivalo
POIS TOIMINNASTA
3
Viinikaapin Pois toiminnasta -merkki-
valo
Viinikaapin kytkeminen pois toiminnasta:
1.
Paina Mode-painiketta, kunnes vas-
4
FROSTMATIC -toiminto
taava kuvake tulee näkyviin.
5
Pakastimen lämpötilanäyttö
Viinikaapin Pois toiminnasta -merkki-
6
Pakastinosaston merkkivalo
valo ja viinikaappiosaston merkkivalo
7
Hälytyksen merkkivalo
vilkkuvat.
8
Lapsilukko
Viinikaapin lämpötilanäytössä näkyy
viivoja.
9
Minute Minder -toiminto
2.
Vahvista OK-painikkeella.
3.
Viinikaapin Pois toiminnasta -merkki-
LAITTEEN KÄYNNISTÄMINEN
valo syttyy.
Kodinkone kytketään toimintaan seuraa-
valla tavalla:

SUOMI
25
VIINIKAAPIN KYTKEMINEN
KORKEAN LÄMPÖTILAN
TOIMINTAAN
HÄLYTYS
Viinikaapin kytkeminen toimintaan:
Pakastinosaston lämpötilan nousemisesta
1.
(esimerkiksi sähkökatkon vuoksi) ilmoite-
Paina Mode-painiketta, kunnes vas-
taan seuraavilla tavoilla:
taava kuvake tulee näkyviin.
• hälytyksen merkkivalo ja pakastimen
Viinikaapin Pois toiminnasta -merkki-
lämpötilanäytöt vilkkuvat
valo vilkkuu.
• kuuluu äänimerkki.
2.
Vahvista OK-painikkeella.
Kuittaa hälytys seuraavasti:
3.
Viinikaapin Pois toiminnasta -merkki-
1.
Paina mitä tahansa painiketta.
valo sammuu.
Jos haluat muuttaa lämpötila-asetusta,
2.
Äänimerkki sammuu.
katso kohta "Lämpötilan säätäminen".
3.
Pakastimen lämpötilanäytössä näkyy
korkein saavutettu lämpötila muuta-
man sekunnin ajan. Tämän jälkeen
LÄMPÖTILAN SÄÄTÄMINEN
näytössä näkyy uudelleen asetusläm-
Lämpötilasäätimillä voidaan säätää viini-
pötila.
kaapin ja pakastimen lämpötila-asetuksia.
4.
Hälytyksen merkkivalo vilkkuu, kunnes
Aseta oletuslämpötila:
normaalit olosuhteet palautuvat.
• +10 °C viinikaappiin
Hälytyksen merkkivalo sammuu, kun häly-
• -18 °C pakastimeen
tys on kuitattu.
Lämpötilanäytöissä näkyy asetettu lämpö-
tila.
VIINIKAAPPI- JA
Asetettu lämpötila saavutetaan 24 tunnin
PAKASTINOSASTOJEN
kuluessa.
AVOIMEN OVEN HÄLYTYS
Asetettu lämpötila säilyy laitteen
muistissa sähkökatkoksen jälkeen.
Jos ovi on auki muutaman minuutin ajan,
laitteesta kuuluu äänimerkki. Oven aukiolo
ilmaistaan seuraavasti:
FROSTMATIC -TOIMINTO
• vilkkuva hälytysmerkki
Käynnistä toiminto seuraavasti:
• äänimerkki
1.
Paina Mode-painiketta, kunnes vas-
Kun olosuhteet ovat palautuneet normaa-
taava kuvake tulee näkyviin.
leiksi (ovi suljettu), äänimerkki sammuu.
Hälytyksen aikana merkkiääni voidaan
Merkkivalo FROSTMATIC alkaa vilk-
sammuttaa painamalla mitä tahansa paini-
kua.
ketta.
2.
Vahvista OK-painikkeella.
FROSTMATIC-merkkivalo syttyy.
LAPSILUKKO
Toiminto kytkeytyy automaattisesti pois
toiminnasta 52 tunnin kuluttua.
Jos haluat estää painikkeiden tahattoman
Toiminnon poistaminen käytöstä ennen
käytön, lukitse painikkeet valitsemalla lap-
sen automaattista päättymistä:
silukkotoiminto.
1.
Paina Mode-painiketta, kunnes
Ota toiminto käyttöön seuraavasti:
FROSTMATIC-merkkivalo alkaa vilk-
1.
Paina Mode-painiketta, kunnes vas-
kua.
taava kuvake tulee näkyviin.
2.
Vahvista OK-painikkeella.
2.
Lapsilukon merkkivalo alkaa vilkkua.
3.
FROSTMATIC-toiminnon merkkivalo
3.
Paina OK-painiketta valinnan vahvista-
sammuu.
miseksi.
Toiminto voidaan sammuttaa
Lapsilukon merkkivalo syttyy.
muuttamalla pakastimen lämpöti-
Poista toiminto käytöstä seuraavasti:
la-asetusta.
1.
Paina Mode-painiketta, kunnes lapsi-
lukon merkkivalo alkaa vilkkua.

26
www.aeg.com
2.
Paina OK-painiketta valinnan vahvista-
miseksi.
3.
Lapsilukon merkkivalo sammuu.
MINUTE MINDER-TOIMINTO
Minute Minder -toiminnolla asetetaan hä-
lytyksen aktivoitumisaika, se on hyödylli-
nen esimerkiksi silloin, kun ruoka-aineksia
on jäähdytettävä jonkin aikaa tai kun muis-
tutus on tarpeen, ettei pulloja unohdeta
pakastimeen pikajäähdytyksen aikana.
Käynnistä toiminto seuraavasti:
1.
Paina Mode-painiketta, kunnes vas-
taava kuvake tulee näkyviin.
Merkkivalo Minute Minder alkaa vilk-
kua.
Ajastin näyttää asetetun arvon (30 mi-
nuuttia) muutaman sekunnin ajan.
2.
Aseta ajastimen arvoksi 1–90 minuut-
tia painamalla ajastimen säätöpaini-
ketta.
3.
Vahvista OK-painikkeella.
Minute Minder-merkkivalo syttyy.
Ajastin alkaa vilkkua. (min).
Kun ajastimen aika on kulunut umpeen,
Minute Minder-merkkivalo vilkkuu ja lait-
teesta kuuluu äänimerkkejä:
1.
Poista juomat pakastimesta.
2.
Paina OK-painiketta äänimerkin pois
päältä kytkemiseksi ja toiminnon lo-
pettamiseksi.
Voit poistaa toiminnon käytöstä milloin ta-
hansa ajastuksen aikana:
1.
Paina Mode-painiketta, kunnes Minu-
te Minder -merkkivalo alkaa vilkkua.
2.
Vahvista OK-painikkeella.
3.
Minute Minder -toiminnon merkkivalo
sammuu.
Aika-asetusta voidaan muuttaa ajastuksen
aikana ja sen päättyessä painamalla läm-
pötilan alennuspainiketta ja lämpötilan li-
säyspainiketta.
SUOMI
27
PÄIVITTÄINEN KÄYTTÖ
SISÄTILAN PUHDISTAMINEN
Ennen kuin otat laitteen käyttöön, pese si-
säosat ja kaikki kaapin sisälle sijoitettavat
Jos näyttöön tulee näkyviin “dEMo”, laite
varusteet haalealla vedellä ja käsitiskiai-
on esitystilassa: katso kohta “Käyttöhäi-
neella poistaaksesi uudelle laitteelle tyy-
riöt”.
pillisen hajun. Kuivaa pinnat ja varusteet
lopuksi huolellisesti.
Älä käytä puhdistusaineita tai han-
kaavia jauheita, sillä ne vahingoit-
tavat pintoja.
RUOKIEN PAKASTAMINEN
Pakastinosasto soveltuu tuoreiden elintar-
vikkeiden pakastamiseen sekä valmispa-
kasteiden pitkäaikaiseen säilyttämiseen.
Kun pakastat tuoretta ruokaa, aktivoi
FROSTMATIC-toiminto vähintään 24 tun-
tia ennen elintarvikkeiden asettamista pa-
kastinosastoon.
Sijoita pakastettavat elintarvikkeet osas-
toon "X" kuvan mukaisesti.
24 tunnin aikana pakastettavien elintarvik-
keiden enimmäismäärä on merkitty arvo-
kilpeen, joka sijaitsee laitteen sisäpuolel-
la.
Pakastusprosessi kestää 24 tuntia: tänä ai-
kana pakastimeen ei saa lisätä uusia pa-
kastettavia ruokia.
SULATUS
PAKASTEIDEN
Pakasteet voidaan sulattaa ennen käyttöä
SÄILYTTÄMINEN
jääkaapissa tai huoneen lämpötilassa riip-
puen siitä, kuinka nopeasti niitä tarvitaan.
Kun käytät pakastinta ensimmäistä kertaa
Pienempiä paloja voidaan kypsentää
tai pitkän käyttämättömän jakson jälkeen,
myös jäisinä suoraan pakastimesta otettu-
anna laitteen toimia vähintään kahden
na: Kypsennys kestää tässä tapauksessa
tunnin ajan suuremmilla asetusarvoilla.
pitempään.
Jos pakastin sulaa vahingossa esi-
merkiksi sähkökatkon vuoksi, kun
JÄÄKUUTIOIDEN VALMISTUS
sähkö on ollut poikki pitempään
kuin teknisissä ominaisuuksissa
Laitteen mukana toimitetaan yksi tai
(kohdassa Käyttöönottoaika) mai-
useampia jääkuutioastioita. Täytä jääkuu-
nitun ajan, sulaneet elintarvikkeet
tioastiat vedellä ja laita ne pakastinosas-
on käytettävä nopeasti tai valmis-
toon.
tettava ruoaksi, jonka jälkeen ne
Älä käytä apuna metallisia välinei-
voidaan pakastaa uudelleen (kun
tä ottaessasi jääkuutioastiaa pois
ne ovat jäähtyneet).
pakastimesta.
28
www.aeg.com
Käsittele pulloja varovasti, jotta viini ei
KYLMÄVARAAJAT
pääse liikkumaan pullossa.
Pakastimen mukana tulee yksi tai usempia
Noudata viinin valmistajan antamia ohjeita
kylmävaraajia. Sähkökatkon tai pakasti-
ja suosituksia viinin säilyttämisen, säilyty-
men toimintahäiriön esiintyessä kylmäva-
sajan ja optimilämpötilan suhteen.
raajat pitävät pakastimen pitempään kyl-
mänä pidentäen näin elintarvikkeiden säi-
ILMANKIERTO
lymisaikaa.
Älä peitä hyllyjä suojaavalla materiaalilla,
kuten paperilla, pahvilla tai muovilla, joka
VIINIPULLOJEN
voi estää ilmankierron hyllyjen läpi.
SIJOITTAMINEN
Älä aseta pulloja kiinni takaseinään, jotta
Lämpötila on säädettävissä välille +6 ja
ilmankierto takaseinän ja pullojen välissä
+16 °C.
ei esty.
Tämä osasto soveltuu puna- tai valkovii-
nien pitkäaikaiseen säilyttämiseen ja kyp-
SÄILYTYSOHJEITA
syttämiseen.
Aseta pullot kyljelleen, jotta korkit eivät
Viinin säilytysaika riippuu viinin iästä, rypä-
kuivu.
leistä, alkoholipitoisuudesta sekä viinin
Säilytä viini pimeässä. Ovi on kaksinker-
fruktoosi- ja tanniinipitoisuudesta. Tarkista
taista himmennettyä UV-suojattua lasia,
viiniä ostaessasi, onko viini jo kypsytetty
joka suojaa viiniä valolta, mikäli kaappi on
vai paraneeko se ajan kuluessa.
sijoitettu valoisaan paikkaan.
Älä kytke laitteeseen valoa turhan usein
tai kovin pitkäksi ajaksi. Viini säilyy parem-
min pimeässä.
VIINIKAAPIN HYLLYT
Poista hyllyt puhdistusta varten.
Hyllyt voidaan asettaa kaltevaan asentoon
ohjainten väliin varmistaen, että pienim-
mät tapit on työnnetty kunnolla ylempien
ohjainten koloihin ja hyllyn etuosa on tuet-
tu tukevasti etummaisen ohjaimen päälle.
Puuhyllyjen säätäminen:
Lyhyt hylly voidaan asettaa ylhäällä sijait-
sevien kahden lyhyen ohjaimen varaan.
Pitkä hylly voidaan asettaa keskitasolla si-
jaitsevien kolmen pitkän ohjaimen varaan
ja kallistaa alhaalla sijaitsevan viimeisen ly-
hyen ohjaimen ja hyllyn tukirakenteen va-
raan.
Aseta hyllyn tukirakenne osaston alao-
saan.
Aseta hyllyn tukirakenteen päälle vain pit-
kiä hyllyjä.

SUOMI
29
HYÖDYLLISIÄ NEUVOJA JA VINKKEJÄ
ENERGIANSÄÄSTÖVINKKEJÄ
PAKASTEIDEN
SÄILYTYSOHJEITA
• Älä avaa ovea usein äläkä pidä ovea au-
ki pitempään kuin on tarpeen.
Noudata seuraavia ohjeita varmistaaksesi
• Jos ympäristön lämpötila on korkea, ja
laitteen parhaan suorituskyvyn:
lämpötila on säädetty hyvin kylmäksi
• Tarkista, että kaupasta ostamasi pakas-
kaapin ollessa hyvin täynnä, kompresso-
teet on säilytetty oikein.
ri voi käydä jatkuvasti, jolloin haihdutti-
• Laita pakasteet pakastelokeroon mah-
meen muodostuu huurretta tai jäätä.
dollisimman nopeasti ostoksilla käynnin
Käännä tässä tapauksessa lämpötilan
jälkeen.
säädin korkeampaan lämpötilaan auto-
• Älä avaa ovea usein, älä myöskään pidä
maattisen sulatuksen käynnistämiseksi,
ovea auki pitempään kuin on tarpeen.
jolloin myös energiankulutus vähenee.
• Sulatettu pakaste pilaantuu nopeasti ei-
kä sitä saa pakastaa uudelleen.
PAKASTUSOHJEITA
• Älä käytä tuotetta pakkaukseen merki-
Seuraavassa on muutamia tärkeitä ohjeita
tyn viimeisen käyttöpäivän jälkeen.
tehokkaan pakastamisen varmistamiseksi:
• Pakastaaksesi arvokilven ilmoittaman
maksimimäärän elintarvikkeita paina
FROSTMATIC -painiketta 24 tuntia en-
nen pakastusta, tai pienempien ruoka-
määrien kohdalla 4 - 6 tuntia aikaisem-
min. Merkkivalo syttyy.
• FROSTMATIC -painiketta ei tarvitse pai-
naa pieniä ruokamääriä pakastettaessa.
• Pakasta vain korkealaatuisia, tuoreita ja
puhdistettuja elintarvikkeita.
• Jaa ruoka pieniin annoksiin, jotta se pa-
kastuu nopeasti ja täydellisesti. Tällöin
voit myöhemmin sulattaa vain tarvitse-
masi määrän.
• Kääri elintarvikkeet alumiinifolioon tai
pakkaa muovipusseihin mahdollisim-
man ilmatiiviisti.
• Älä anna tuoreiden pakastamattomien
ruokien koskea jo pakastuneita tuottei-
ta, jotta niiden lämpötila ei nouse.
• Vähärasvaiset ruoat säilyvät paremmin
kuin rasvaiset. Suola lyhentää elintarvik-
keiden säilytysaikaa.
• Jos jääpaloja nautitaan suoraan pakasti-
mesta otettuina, ne voivat aiheuttaa kyl-
mävammoja.
• Merkitse pakastuspäivämäärä kaikkiin
pakkauksiin, jotta voit helposti seurata
säilytysaikoja.
30
www.aeg.com
HOITO JA PUHDISTUS
HUOMIO
Huurretta ei synny, koska automaattisesti
Kytke laite irti verkkovirrasta en-
valvottu puhallin kierrättää koko ajan kyl-
nen puhdistus- ja huoltotöiden
mää ilmaa pakastinosaston sisällä.
aloittamista.
JOS LAITETTA EI KÄYTETÄ
Laitteen jäähdytysyksikkö sisältää
hiilivetyä; Jäähdytysyksikön huol-
PITKÄÄN AIKAAN
lon ja täytön saa suorittaa ainoas-
Jos laitetta ei ole tarkoitus käyttää pitkään
taan valtuutettu huoltoliike.
aikaan, suorita seuraavat toimenpiteet:
• Kytke laite irti verkkovirrasta.
SÄÄNNÖLLINEN PUHDISTUS
• Ota kaikki ruoat pois.
Laite on puhdistettava säännöllisesti:
• Sulata (jos tarpeen) ja puhdista laite se-
• Puhdista sisäosa ja varusteet lämpimällä
kä kaikki sen varusteet.
vedellä ja käsitiskiaineella.
• Jätä ovi/ovet raolleen, jotta laitteen si-
• Tarkista oven tiivisteet säännöllisesti ja
sälle ei muodostu epämiellyttävää ha-
pyyhi puhtaaksi.
jua.
Jos jätät laitteen toimintaan, pyydä jotakin
• Huuhtele ja kuivaa huolellisesti.
henkilöä tarkistamaan kaappiin jätetyt
Älä vedä, siirrä tai vahingoita kaa-
elintarvikkeet aika ajoin, jotta ne eivät pi-
pin sisällä olevia putkia ja/tai kaa-
laannu esimerkiksi sähkökatkon sattuessa.
peleita.
Älä käytä puhdistusaineita, han-
kausjauhetta, voimakastuoksuisia
puhdistustuotteita tai kiillotusva-
haa sisätilojen puhdistamisessa,
sillä tällaiset tuotteet vahingoitta-
vat pintoja ja jättävät voimakkaan
tuoksun.
Puhdista laitteen takapuolella sijaitsevat
lauhdutin (musta ritilä) ja kompressori har-
jalla. Tämä toimenpide parantaa laitteen
suorituskykyä ja säästää energiaa.
Varo vahingoittamasta jäähdytys-
järjestelmää.
Monet keittiön pintojen puhdistusaineet
sisältävät kemikaaleja, jotka voivat vahin-
goittaa laitteen muoviosia. Tästä syystä
laitteen ulkopintojen puhdistuksessa on
suositeltavaa käyttää vain lämmintä vettä
ja käsitiskiainetta.
Kun laite on puhdistettu, kytke se takaisin
verkkovirtaan.
PAKASTIMEN SULATTAMINEN
Tämän mallin pakastinosasto on huurtu-
matonta tyyppiä. Se tarkoittaa, että lait-
teen toimiessa huurretta ei keräänny lait-
teen sisäpinnoille tai ruokatarvikkeiden
päälle.
SUOMI
31
KÄYTTÖHÄIRIÖT
VAROITUS!
Irrota pistoke pistorasiasta ennen
kuin aloitat vianmäärityksen.
Vianmääritystoimenpiteet, joita ei
ole mainittu tässä käyttöohjeessa,
on annettava ammattitaitoisen
sähköasentajan suoritettaviksi.
Ongelma Mahdollinen syy Korjaustoimenpide
Laitteen käyntiääni
Laitetta ei ole tuettu kun-
Tarkista, että kodinkone on
on kova.
nolla paikalleen.
tukevasti paikallaan (kaikki
neljä jalkaa koskevat latti-
aan).
Laite ei toimi lain-
Virta on katkaistu laittees-
Kytke laitteeseen virta.
kaan.
ta.
Pistoke ei ole kunnolla
Kiinnitä pistoke oikein pis-
kiinni pistorasiassa.
torasiaan.
Laitteeseen ei tule virtaa.
Kokeile kytkemällä pistora-
Pistorasiaan ei tule jänni-
siaan jokin toinen sähkölai-
tettä.
te.
Ota yhteys sähköasenta-
jaan.
Äänimerkki kuuluu.
Pakastimen lämpötila on
Katso kohta "Korkean läm-
Hälytysmerkkivalo
liian korkea.
pötilan hälytys".
vilkkuu.
Kompressori käy jat-
Lämpötilaa ei ole säädetty
Säädä lämpötila korkeam-
kuvasti.
oikein.
maksi.
Ovi ei ole kunnolla kiinni. Lue ohjeet kohdasta "Oven
sulkeminen".
Ovea on avattu liian usein. Älä pidä ovea auki pitem-
pään kuin on tarpeen.
Ruoat ovat liian lämpimiä. Anna lämpötilan laskea
huoneen lämpötilaan en-
nen kuin asetat ruoat lait-
teeseen.
Huoneen lämpötila on
Laske huoneen lämpötilaa.
liian korkea.
Kompressori ei käyn-
Tämä on normaalia, eikä
Kompressori käynnistyy jon-
nisty heti FROSTMA-
tarkoita vikaa.
kin ajan kuluttua.
TIC -painikkeen pai-
namisen tai lämpöti-
lan muuttamisen jäl-
keen.
Elintarvikkeet estävät ve-
Tarkista, että elintarvikkeet
den valumisen vedenke-
eivät kosketa takaseinään.
ruukaukaloon.
32
www.aeg.com
Ongelma Mahdollinen syy Korjaustoimenpide
Laitteen lämpötila on
Lämpötilaa ei ole säädetty
Säädä lämpötila korkeam-
liian alhainen tai kor-
oikein.
maksi/alhaisemmaksi.
kea.
Ovi ei ole kunnolla kiinni. Lue ohjeet kohdasta "Oven
sulkeminen".
Ruoat ovat liian lämpimiä. Anna lämpötilan laskea
huoneen lämpötilaan en-
nen kuin asetat ruoat lait-
teeseen.
Laitteeseen on lisätty pal-
Aseta laitteeseen vähem-
jon ruokia samalla kertaa.
män ruokia yhdellä kertaa.
Viinikaapin lämpötila
Laitteen kylmän ilman kier-
Tarkista kylmän ilman kier-
on liian korkea.
to ei toimi.
to.
Pakastimen lämpötila
Tuotteet ovat liian lähellä
Järjestä tuotteet siten, että
on liian korkea.
toisiaan.
kylmä ilma pääsee kiertä-
mään niiden välissä.
Ylä- tai alaneliö näkyy
On tapahtunut lämpötilan
Ota yhteys valtuutettuun
lämpötilanäytössä.
mittausvirhe.
huoltoliikkeeseen (jäähdy-
tysjärjestelmä pitää elintar-
vikkeet kylminä, mutta läm-
pötilaa ei voi säätää).
dEMo tulee näky-
Laite on esittelytilassa.
Paina OK-painiketta noin 10
mään näyttöön.
(dEMo).
sekunnin ajan, kunnes kuu-
let pitkän äänimerkin ja
näyttö sammuu lyhyeksi
ajaksi: laite käynnistyy ja toi-
mii normaalisti.
LAMPUN VAIHTAMINEN
Jääkaapissa on pitkäikäinen LED-sisävalo.
Vain huoltoliike saa vaihtaa lampun. Ota
yhteyttä huoltoliikkeeseen.
OVEN SULKEMINEN
1.
Puhdista oven tiivisteet.
2.
Säädä ovea tarvittaessa. Lue ohjeet
kohdasta "Asennus".
3.
Vaihda tarvittaessa vaurioituneet oven
tiivisteet. Ota yhteys valtuutettuun
huoltoliikkeeseen.
SUOMI
33
ASENNUS
VAROITUS!
Lue huolellisesti turvallisuusohjeet
oman turvallisuutesi ja laitteen
asianmukaisen toiminnan varmis-
tamiseksi, ennen kuin aloitat lait-
teen asennuksen.
SIJOITTAMINEN
VAROITUS!
Jos poistat käytöstä vanhan lait-
teen, jonka ovi on varustettu lukol-
la tai salvalla, riko lukko, jotta pik-
kulapset eivät voi jäädä loukkuun
laitteen sisään.
Pistokkeen on oltava helposti ulot-
tuvilla laitteen asennuksen jäl-
keen.
Asenna laite paikkaan, jossa ympäristön
lämpötila vastaa laitteen arvokilvessä mai-
nittua ilmastoluokkaa:
Ilmas-
Ympäristön lämpötila
toluok-
ka
SN +10 °C – 32 °C
N +16 °C – 32 °C
ST +16 °C – 38 °C
T +16 °C – 43 °C
SÄHKÖLIITÄNTÄ
Ennen kuin kytket laitteen verkkovirtaan,
tarkista, että arvokilvessä mainittu jännite
ja taajuus vastaavat verkkovirran arvoja.
Laite on kytkettävä maadoitettuun pisto-
rasiaan. Virtajohdon pistoke on varustettu
maadoituskoskettimella. Jos pistorasia, jo-
hon laite kytketään, ei ole maadoitettu,
ota yhteys sähköasentajaan ja pyydä asen-
tajaa kytkemään laite erilliseen maadoi-
tusliittimeen voimassa olevien määräysten
mukaisesti.
Valmistaja ei vastaa millään tavalla vahin-
goista, mikäli edellä olevia turvallisuusoh-
jeita ei ole noudatettu.
Tämä laite vastaa Euroopan yhteisön. di-
rektiivejä.


