AEG S93000KZM0: 2. CONTROL PANEL
2. CONTROL PANEL: AEG S93000KZM0
ENGLISH 5
ant circuit or insulation materials.
1.6 Service
The appliance shall not be dis-
• Any electrical work required to do the
carded together with the urban
servicing of the appliance should be
refuse and rubbish. The insula-
carried out by a qualified electrician or
tion foam contains flammable
competent person.
gases: the appliance shall be dis-
• This product must be serviced by an
posed according to the applica-
authorized Service Centre, and only
ble regulations to obtain from
genuine spare parts must be used.
your local authorities. Avoid
damaging the cooling unit, espe-
cially at the rear near the heat ex-
1.7 Environment Protection
changer. The materials used on
this appliance marked by the
This appliance does not contain
gasses which could damage the
symbol
are recyclable.
ozone layer, in either its refriger-
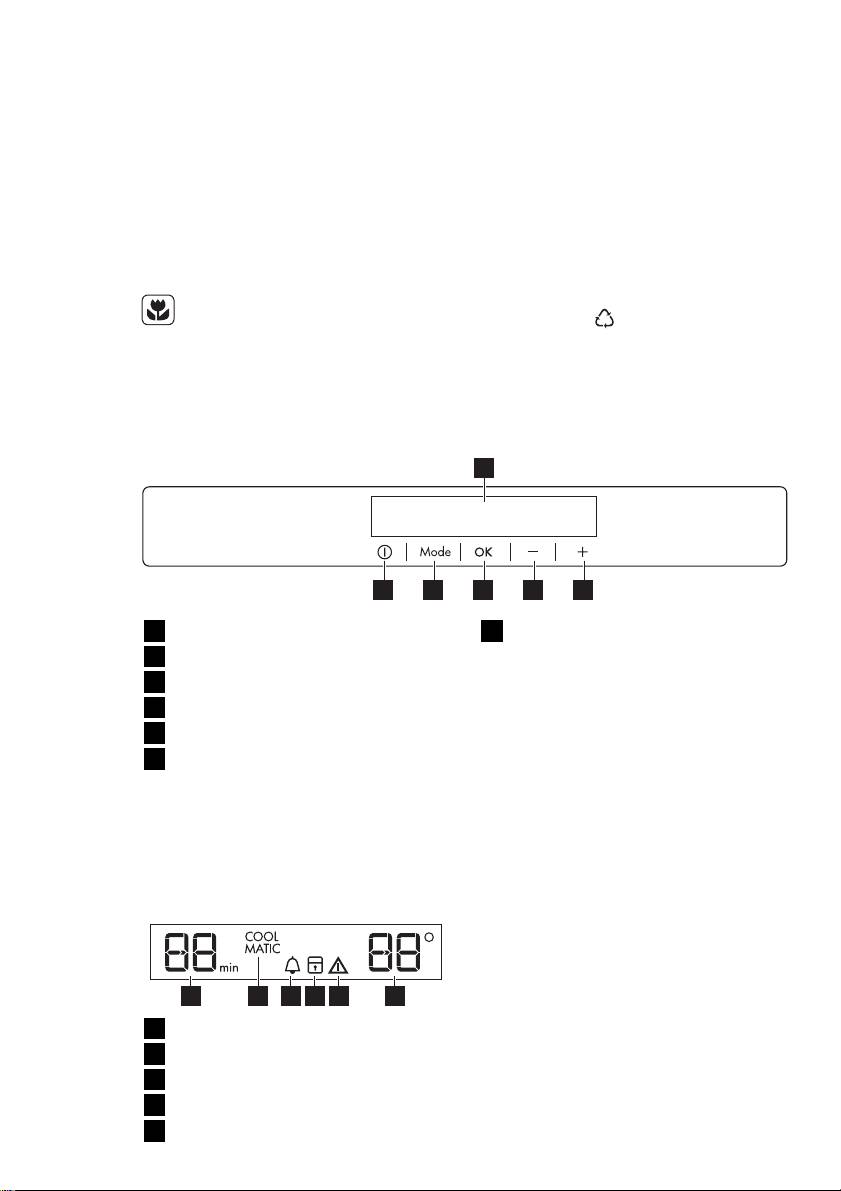
2. CONTROL PANEL
1
56 4 3 2
1
Display
6
Temperature indicator
2
Temperature warmer button
3
Temperature colder button
2.2 Switching on
4
OK button
To switch on the appliance do these
steps:
5
Mode button
1.
Connect the mains plug to the pow-
6
ON/OFF button
er socket.
It is possible to change predefined
2.
Press the ON/OFF button if the dis-
sound of buttons to a loudly one by
play is off.
pressing together Mode button and
Temperature colder button for some
3.
The alarm buzzer could operate af-
seconds. Change is reversible.
ter few seconds.
To reset the alarm refer to "High
2.1 Display
temperature alarm".
4.
If "dEMo" appears on the display,
the appliance is in demonstration
mode. Refer to "What to do if..."
paragraph.
5 62 431
5.
The temperature indicators show the
set default temperature.
1
Timer function
To select a different set temperature re-
2
COOLMATIC function
fer to "Temperature regulation".
3
Minute Minder function
4
Child Lock function
5
Alarm indicator

6
www.aeg.com
2.
Press the OK button to confirm.
2.3 Switching off
3.
The Minute Minder indicator goes
To switch off the appliance do these
off.
steps:
It is possible to change the time at any
1.
Press the ON/OFF button for 5 sec-
time during the countdown and at the
onds.
end by pressing the Temperature colder
2.
The display switches off.
button and the Temperature warmer
button.
3.
To disconnect the appliance from
the power disconnect the mains
plug from the power socket.
2.6 Child Lock function
To lock the buttons from unintentional
2.4 Temperature regulation
operation select the Child Lock function.
To switch on the function:
The set temperature of the fridge may
be adjusted by pressing the temperature
1.
Press the Mode button until the cor-
button.
responding icon appears.
Set default temperature: +5°C for the
2.
The Child Lock indicator flashes.
fridge.
3.
Press the OK button to confirm.
The temperature indicator shows the set
The Child Lock indicator is shown.
temperature.
To switch off the function:
The set temperature will be reached
within 24 hours.
1.
Press the Mode button until the
Child Lock indicator flashes.
After a power failure the set tem-
2.
Press the OK button to confirm.
perature remains stored.
3.
The Child Lock indicator goes off.
2.5 Minute Minder function
2.7 COOLMATIC function
The Minute Minder function is to be
If you need to insert a large amount of
used to set an acoustic alarm at the pre-
warm food, for example after doing the
ferred time, useful for example when a
grocery shopping, we suggest activating
recipe requires to cool down a mixture
the COOLMATIC function to chill the
for a certain length of time.
products more rapidly and to avoid
To switch on the function:
warming the other food which is already
1.
Press the Mode button until the cor-
in the refrigerator.
responding icon appears.
To switch on the function:
The Minute Minder indicator flashes.
1.
Press the Mode button until the cor-
The Timer shows the set value (30
responding icon appears.
minutes) for a few seconds.
The COOLMATIC indicator flashes.
2.
Press the Timer regulator button to
2.
Press the OK button to confirm.
change the Timer set value from 1 to
The COOLMATIC indicator is
90 minutes.
shown.
3.
Press the OK button to confirm.
The COOLMATIC function shuts off au-
The Minute Minder indicator is
tomatically after approximately 6 hours.
shown.
To switch off the function before its au-
The Timer start to flash (min).
tomatic end:
At the end of the countdown the Minute
1.
Press the Mode button until the
Minder indicator flashes and an audible
COOLMATIC indicator flashes.
alarm sounds:
2.
Press the OK button to confirm.
1.
press OK button to switch off the
3.
The COOLMATIC indicator goes off.
sound and terminate the function.
It is possible to deactivate the function
The function switches off by se-
at any time during the countdown:
lecting a different fridge set tem-
perature.
1.
Press the Mode button until the Mi-
nute Minder indicator flashes.
Table of contents
- 1. SAFETY INSTRUCTIONS
- 2. CONTROL PANEL
- 3. DAILY USE
- 4. HELPFUL HINTS AND TIPS
- 6. WHAT TO DO IF…
- 7. INSTALLATION
- 8. NOISES
- 9. TECHNICAL DATA
- 1. ISTRUZIONI DI SICUREZZA
- 2. PANNELLO DEI COMANDI
- 3. UTILIZZO QUOTIDIANO
- 4. CONSIGLI E SUGGERIMENTI UTILI
- 6. COSA FARE SE…
- 7. INSTALLAZIONE
- 8. RUMORI
- 9. DATI TECNICI
- 1. SICHERHEITSHINWEISE
- 2. BEDIENFELD
- 3. TÄGLICHER GEBRAUCH
- 4. PRAKTISCHE TIPPS UND HINWEISE
- 5. REINIGUNG UND PFLEGE
- 6. WAS TUN, WENN …
- 7. MONTAGE
- 8. GERÄUSCHE
- 9. TECHNISCHE DATEN
- 1. УКАЗАНИЯ ПО БЕЗОПАСНОСТИ
- 2. ПАНЕЛЬ УПРАВЛЕНИЯ
- 3. ЕЖЕДНЕВНОЕ ИСПОЛЬЗОВАНИЕ
- 4. ПОЛЕЗНЫЕ СОВЕТЫ
- 5. УХОД И ОЧИСТКА
- 6. ЧТО ДЕЛАТЬ, ЕСЛИ ...
- 7. УСТАНОВКА
- 8. ШУМЫ ПРИ РАБОТЕ
- 9. ТЕХНИЧЕСКИЕ ДАННЫЕ


