Nikon Andere-Fernsteuerung: инструкция
Раздел: Компьютерные аксессуары
Тип:
Инструкция к Nikon Andere-Fernsteuerung
Оглавление
- Меры предосторожности (1/2)
- Меры предосторожности (2/2)
- Корпус
- Когда MC-36 не используется
- Перечень частей MC-36 (3/3) Подсоединение MC-36
- Порядок работы с MC-36 Съемка с таймером автоспуска (1/7)
- Съемка с таймером автоспуска (2/7)
- Съемка с таймером автоспуска (3/7)
- Съемка с таймером автоспуска (4/7)
- Съемка с таймером автоспуска (5/7) 3. Запуск таймера
- 4. Завершение съемки
- Съемка с таймером автоспуска (7/7)
- Ручной спуск затвора
- Меры предосторожности при использовании Уход за MC-36
- Те хнические характеристики
Jp
En
De
Remote Cord
Fr
Es
Se
Ru
MC-36
Nl
Pt
It
Ck
Ch
Instruction Manual
Kr

目次
安全上のご注意........................................2
Jp
はじめに...................................................4
各部の名称...............................................5
電池の入れ方.......................................5
電池の交換方法....................................6
リモートコードMC-36
電源の ON/OFF について.................6
照明/ロックボタンについて............7
カメラとの接続方法................................7
使用説明書
MC-36 の使い方.....................................8
タイマーを使って撮影する....................8
手動レリーズで撮影する.....................15
使用上のご注意.....................................16
取り扱い上のご注意.............................16
主な仕様................................................17
1
安全上のご注意(1/3)
お使いになる前に「安全上のご注意」をよくお
お守りいただく内容の種類を、次の絵表示で区
Jp
警告
(本体について)
読みの上、正しい方法でお使いください。
分し、説明しています。
この「安全上のご注意」は製品を安全に正しく
分解したり、修理や改造をしないこと
絵表示の例
お使いいただき、あなたや他の人々への危害や
感電や異常動作によるけがの原因とな
記号は、注意(警告を含む)を促す内容を
分解禁止
ります。
財産への損害を未然に防止するために重要な内
告げるものです。図の中や近くに具体的な注
容を記載しています。内容を理解してから本文
意内容(左図の場合は感電注意)が描かれて
をお読みいただき、お読みになった後は、お使
落下などによって破損し、内部が露出した
います。
接触禁止
ときは、露出部に手を触れないこと
いになる方がいつでも見られるところに必ず保
記号は、禁止(してはいけないこと)の行
感電や破損部でのけがの原因となります。
管してください。
為を告げるものです。図の中や近くに具体的
な禁止内容(左図の場合は分解禁止)が描か
電池を抜いて、販売店またはニコンサー
表示と意味は次のようになっています。
れています。
すぐに
ビスセンターに修理を依頼してください。
この表示を無視して、誤った取り扱いをす
修理依頼を
記号は、行為を強制すること(必ずするこ
危険
ると、人が死亡または重傷を負う可能性が
と)を告げるものです。図の中や近くに具体
水につけたり、水をかけたり、雨にぬ
高いと想定される内容を示しています。
的な強制内容(左図の場合は電池を取り出す)
らしたりしないこと
この表示を無視して、誤った取り扱いを
が描かれています。
水かけ禁止
発火や感電の原因となります。
警告
すると、人が死亡または重傷を負う可能
性が想定される内容を示しています。
引火、爆発のおそれのある場所では使
この表示を無視して、誤った取り扱いを
用しないこと
すると、人が傷害を負う可能性が想定さ
プロパンガス、ガソリンなどの引火性ガ
注意
れる内容および物的損害の発生が想定さ
使用禁止
スや粉塵の発生する場所で使用すると、
れる内容を示しています。
爆発や火災の原因となります。
2
安全上のご注意(2/3)
(本体について)
(本体について)
(アルカリ電池について)
Jp
警告
注意
危険
熱くなる、煙が出る、こげ臭いなどの
電池からもれた液が目に入ったときは、
ぬれた手でさわらないこと
異常時は、すみやかにカメラおよびリ
すぐにきれいな水で洗い、医師の治療
感電の原因となることがあります。
モコンの電池を取り出すこと
感電注意
を受けること
電池を取る
そのまま使用すると、火災ややけどの
危険
そのままにしておくと、目に傷害を与
原因となります。
幼児の手の届かないところに置くこと
える原因となります。
電池を取り出す際は、やけどに充分ご
けがの原因となることがあります。
放置禁止
すぐに
注意ください。電池を抜いて、販売店
修理依頼を
警告
(アルカリ電池について)
またはニコンサービスセンターに修理
を依頼してください。
長期間使用しないときは電池を外すこと
外装チューブをはがしたり、傷を付け
禁止
指定の電池を使用すること
電池の液漏れにより、火災やけが、周囲
ないこと
を汚損する原因となることがあります。
警告
指定以外のものを使用すると、火災や
液もれ、発熱、破裂の原因となります。
使用禁止
感電の原因となります。
電池を取る
電池を火に入れたり、加熱しないこと
窓を閉め切った自動車の中や直射日光
液もれ、発熱、破裂の原因となります。
禁止
が当たる場所など、異常に温度が高く
なる場所に放置しないこと
新しい電池と使用した電池、種類やメー
カーの異なる電池を混ぜて使用しない
放置禁止
ケースや内部の部品に悪影響を与え、
こと
火災の原因となることがあります。
禁止
液もれ、発熱、破裂の原因となります。
3
安全上のご注意(3/3) はじめに
このたびは、リモートコード MC-36(以下
Jp
警告
(アルカリ電池について)
警告
(アルカリ電池について)
「MC-36」と記載します)をお買い上げくださ
電池をショート、分解しないこと
使い切った電池はすぐに取り出すこと
いまして、ありがとうございます。
液もれ、発熱、破裂の原因となります。
液もれ、発熱、破裂の原因となります。
本製品は、天体写真の撮影などに便利なイン
分解禁止
警告
ターバルタイマー付きリモートコードです。
電池に表示された警告、注意を守ること
水につけたり、ぬらさないこと
接続可能なカメラについては、P.17 をご覧く
液もれ、発熱、破裂の原因となります。
液もれ、発熱の原因となります。
警告
水かけ禁止
ださい。
使用説明書に表示された電池を使用す
充電しないこと
ること
液もれ、発熱の原因となります。
禁止
警告
液もれ、発熱、破裂の原因となります。
電池を廃棄するときは、テープなどで
表記について
電池は幼児の手の届かない所に置くこと
接点部を絶縁すること
幼児の飲み込みの原因となります。
他の金属と接触すると、発熱、破裂、発
•シャッター幕を開く操作を「レリーズ」、
保管注意
万一飲み込んだ場合はただちに医師に
警告
火の原因となります。お住まいの自治体
シャッターボタンを軽く抵抗を感じるところ
ご相談ください。
の規則にしたがって廃棄してください。
まで押すことを「半押し」、半押しの状態か
電池の「+」と「ー」の向きを間違え
電池からもれた液が皮膚や衣服に付いたと
ら深く押し込むことを「全押し」と表記して
ないようにすること
きは、すぐにきれいな水で洗い流すこと
います。
警告
液もれ、発熱、破裂の原因となります。
そのままにしておくと、皮膚がかぶれ
•カメラの各種機能の名称は、カメラによって
警告
たりする原因となります。
異なります。詳しくはお使いのカメラの使用
説明書をご覧ください。
4
各部の名称(1/3)
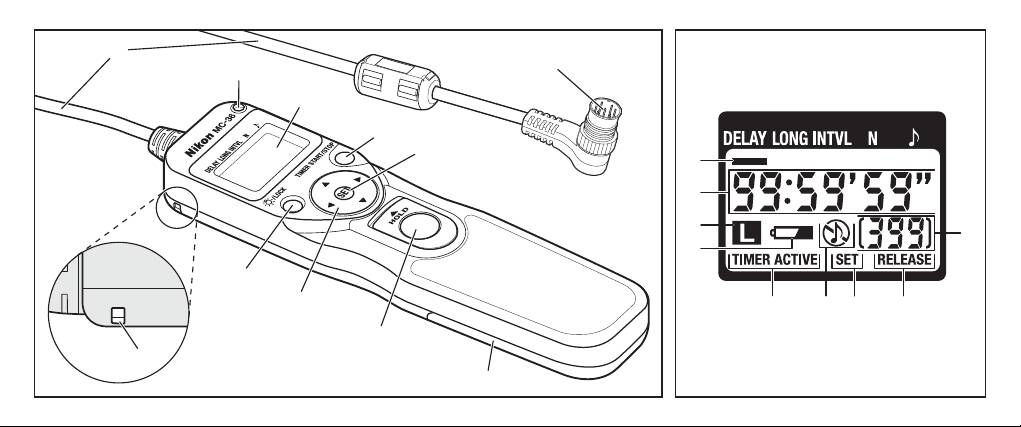
本体と表示パネルのイラストは、表紙裏面に記載しています。
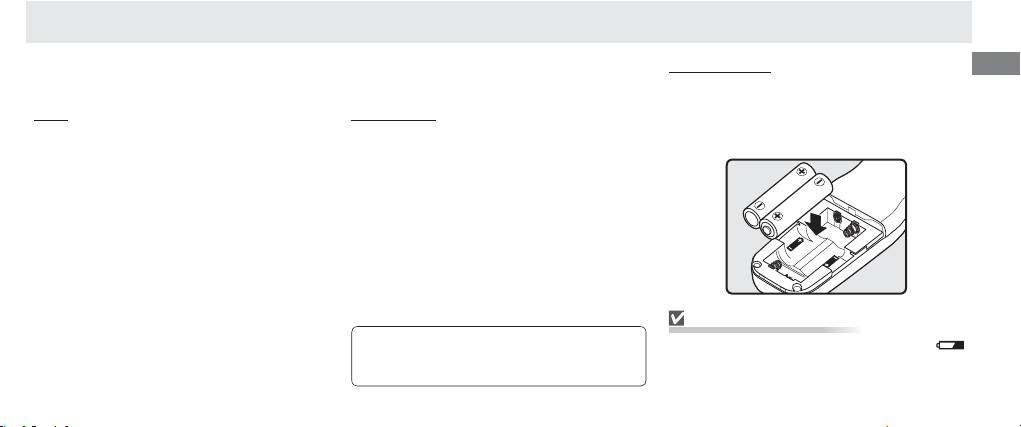
電池の入れ方
Jp
(表示パネルのイラストは、説明のため、すべての表示を点灯させています)
本体裏面の電池カバー(
)をスライドさ
本体
表示パネル
せて取り外し、1.5V LR03 アルカリ単 4
形電池 2 本(別売)を、下図のように入れ
10 ピンプラグ...................................P.7
設定インジケーター.............. P.10〜11
てください。
コード
時間表示部...................... P.10〜13、1 5
レリーズランプ............................... P.13
操作ロック中表示..............................P.7
表示パネル...................P.6、9 〜1 3 、1 5
電池残量警告..................................... P.5
タイマー作動ボタン....................... P.13
タイマー作動中表示....................... P.13
タイマー設定ボタン................ P.9〜12
電子音表示..................................P.9、11
照明/ロックボタン..........................P.7
タイマー設定中表示.................P.9〜11
方向ボタン.............................. P.10〜11
レリーズ中表示....................... P.13、1 5
シャッターボタン........................... P.15
残り撮影回数............................ P.9〜13
電池残量警告について
電池カバー.................................... P.5、6
以降の説明に用いる表示パネルのイラスト
ストラップ穴
(市販の携帯電話用スト
電池残量が少なくなると、表示パネルの
は、説明に関係ある部分だけを強調し、直接
ラップなどを取り付けることができます)
(
)が点灯します。電池交換の準備をしてく
関係がない部分は色を薄くしています。
ださい。
5
各部の名称(2/3)
Jp
電池の交換方法
電源の ON/OFF について
TIMER ACTIVE
、
SET
、
RELEASE
の消灯方法
電池を交換するときは、以下の手順をお守
MC-36 には、電源スイッチがありません。
りください。
電池残量がある間、表示パネルは点灯し続
1.表示パネルの「
TIMER ACTIVE
」(
)や
けます。
「
RELEASE
」(
)が消灯していることを
電池の消耗を抑えるため、使用後は、表
確認する(右記参照)
示パネルの「
TIMER ACTIVE
」(
)、「
SET
」
2.カメラの電源を OFF にして、MC-36
(
)、「
RELEASE
」(
)が消灯しているこ
点滅部分 原因と消灯方法
を取り外す
とをご確認ください(右記参照)。
タイマー作動中(P.13)→
3.電池を取り外す
これらの表示が点滅した状態で放置すると、
TIMER ACTIVE
タイマー作動ボタン(
)を
4.表示パネルの表示が消えてから、新しい
電池の消耗が速くなります。
押す
電池を入れる
タイマー設定中(P.9)→
SET
タイマー設定ボタン(
)を
押す
手動レリーズ中(P.15)→
RELEASE
シャッターボタン(
)を 放 す
(
TIMER ACTIVE
(シャッターボタンが
HOLD
位
は非点滅)
置の場合は
HOLD
を解除する)
6
各部の名称(3/3)
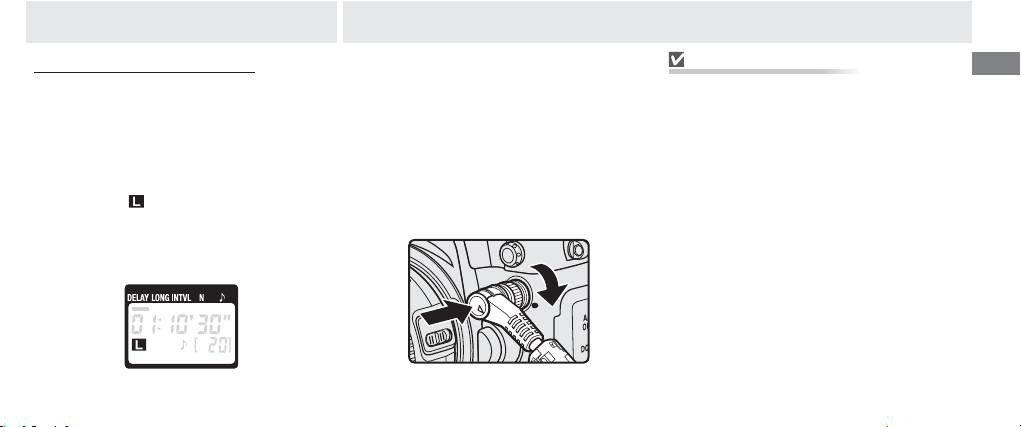
カメラとの接続方法
照明/ロックボタンについて
1.カメラの電源を OFF にする
MC-36 の取り外し方
Jp
2.MC-36 の表示パネルの「
TIMER ACTIVE
」
照明/ロックボタン(
)を短く押すと、
表示パネルの「
TIMER ACTIVE
」(
)や「
RELEASE
」
(
)や「
RELEASE
」(
)が消灯してい
表示パネルの照明が約 6 秒間点灯します。
(
)が消灯していることを確認してから(P.6
ることを確認する(P.6 参照)
点灯中に方向ボタン(
)を押している間
参照)、カメラの電源を OFF にして、MC-36 を
3.
カメラの 10 ピンターミナルからキャップ
取り外してください。使用後は、カメラの 10 ピ
は点灯が続き、ボタンを放してから約 6 秒
を外し、MC-36 の 10ピンプラグ(
)
ンターミナルにキャップを取り付けてください。
後に消灯します。
を接続する
照明/ロックボタンを 3 秒以上押し続け、
•
下図のように、プラグとターミナルの指標
表示パネルに
(
)が点灯すると、シャッ
を合わせてプラグを差し込み、プラグ先端
ターボタン(
)と照明/ロックボタン以
部のねじを締めてロックしてください。
外のボタン操作がロックされます。ロック
を解除するには、照明/ロックボタンを 2
秒以上押し続けてください。
操作ロック中
7
MC-36 の使い方
タイマーを使って撮影する(1/7)
Jp
MC-36 には、2 通りの使い方があります。
1
.カメラの設定
【タイマーを使って撮影する】(P.8)
a.カメラと MC-36 を接続してから(P.7)、カメラの電源を ON にする
•ディレー時間(撮影開始までの時間)や
b.カメラを以下のように設定する
露光時間、撮影間隔、撮影回数などを設
•詳しくはカメラの使用説明書をご覧ください。
定してから、タイマーを作動させて自動
カメラの機能 設定内容
撮影する方法です。
露出モード
M
(マニュアル)
カメラで設定したシャッタースピードで
撮影することもできます(P.14)
シャッタースピード
Bulb
(バルブ)
インターバルタイマー
解除
【手動レリーズで撮影する】(P.15)
M
(マニュアル)または
AF-C
(コンティニュ
•カメラのシャッターボタンの代わりに、
フォーカスモード
アス AF サーボ)
※
MC-36 のシャッターボタンを使って撮
連写モード
S
(1 コマ撮影)
影する方法です。タイマー撮影中でも、
手動レリーズは可能です。
※AF-C の動作を「フォーカス優先」と「レリーズ優先」から選択できるカメ
ラの場合は、「レリーズ優先」に設定してください。
8
タイマーを使って撮影する(2/7)
.タイマーの設定
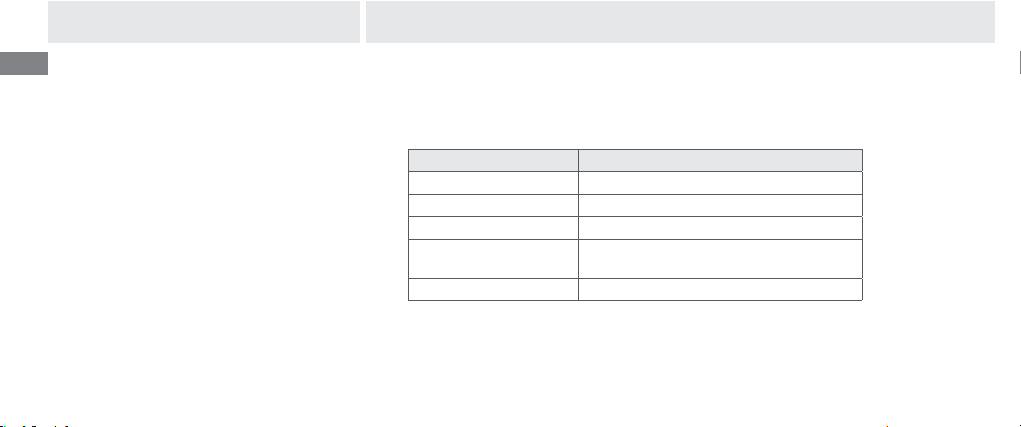
b.以下の 5 項目を設定する
2
Jp
•設定方法については、P.10 の「タイマーの設定方法」をご覧ください。
a.タイマー設定ボタン(
)を押す
•設定画面に切り替わり、表示パネルの
設定項目 設定できる範囲
「
SET
」(
)が点滅します。
DELAY
(ディレー時間)
0秒〜99時間59分59秒(1 秒単位)
LONG
(露光時間)
INTVL
(インターバル) 1 秒〜 99 時間 59 分 59 秒(1 秒単位)
N
(撮影回数) 1 〜 399 回、または無限回(
)
(電子音) オン( )またはオフ( )
設定画面
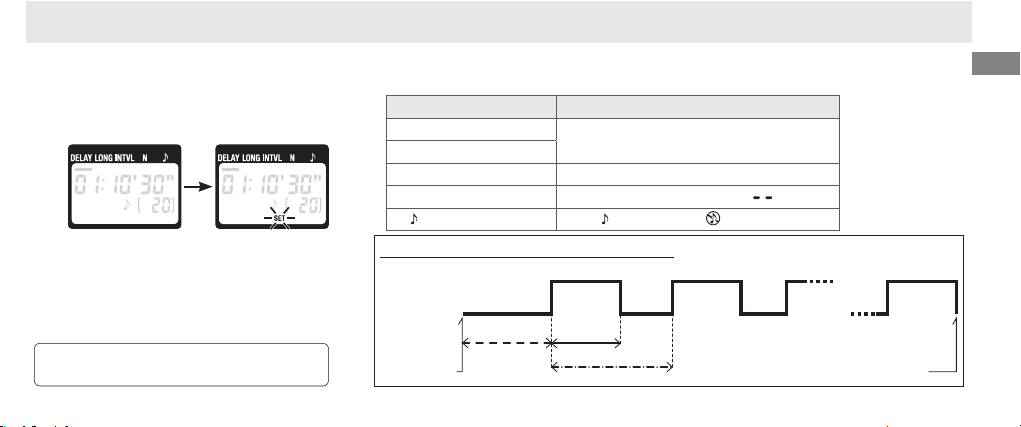
ディレー時間と露光時間、インターバルの関係
撮影回数撮影回数撮影回数
シャッター開シャッター開
1 コマ目1 コマ目
2コマ目2コマ目
Nコマ目Nコマ目Nコマ目Nコマ目
シャッター閉シャッター閉
ディレー時間
露光時間露光時間
事前に MC-36 のタイマーを設定してから、
インターバル
カメラと MC-36 を接続することもできます。
タイマー開始
タイマー終了
9
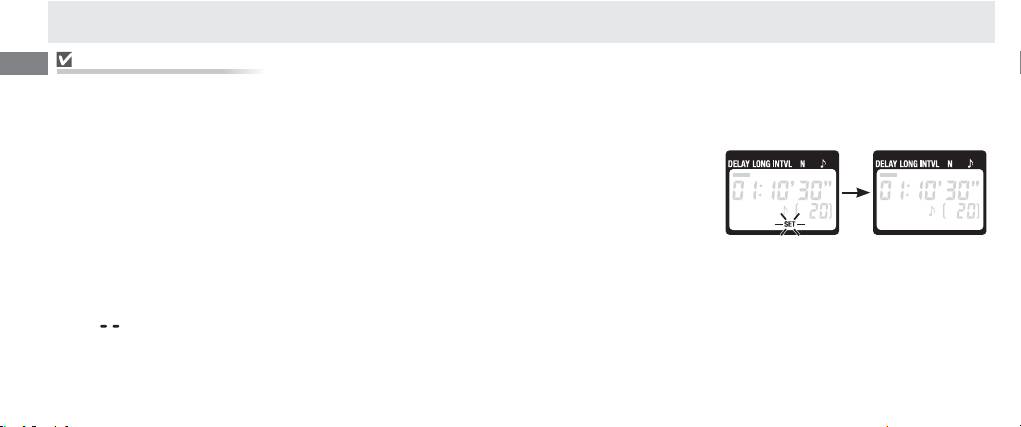
タイマーを使って撮影する(3/7)
Jp
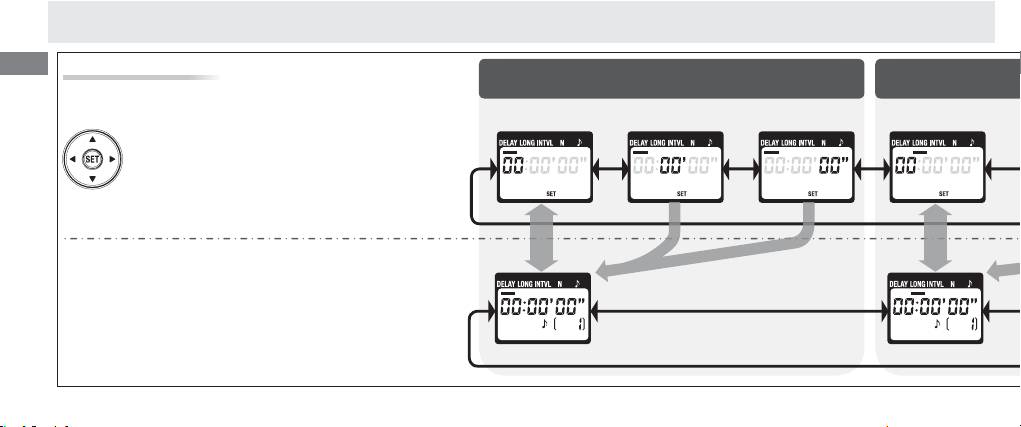
タイマーの設定方法
ディレー時間(撮影開始までの時間)
タイマーの設定には、方向ボタン(
)を使
います。
「時」を設定 「分」を設定
「秒」を設定
「時」を設定
左右:設定項目を選ぶ
【設定画面】
上下:数値を変更する(ボタンを
押し続けると、早送りできます)
どの項目を変更しているかは、設定インジ
ケーター(
)の位置で確認できます。
設定画面の表示中にタイマー設定ボタン
(
)を押すと、設定完了画面(P.12)に切
【設定完了画面】
り替わります。設定完了画面では、方向ボタ
ンの左右で設定インジケーターが移動し、イ
ンジケーターが示している項目の設定内容が
表示されます。もう一度タイマー設定ボタン
を押すと、インジケーターが示している項目
の設定画面に移ります。
10
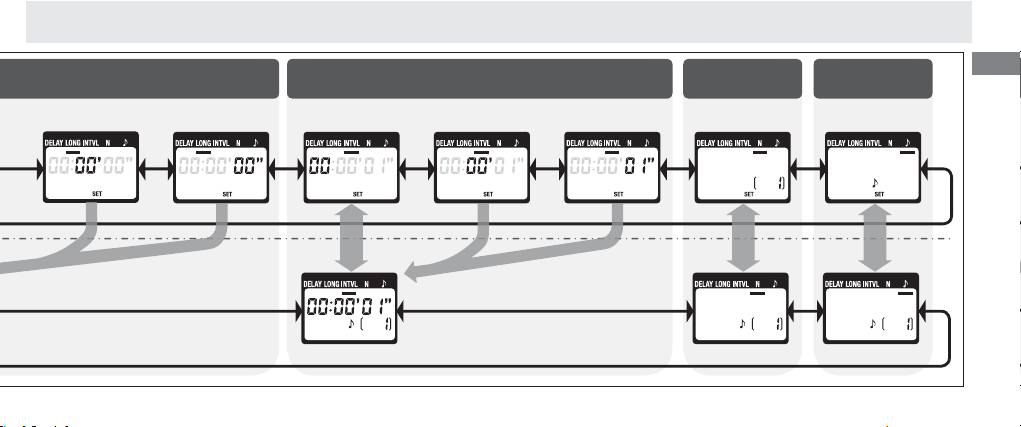
タイマーを使って撮影する(4/7)
Jp
露光時間 インターバル 撮影回数 電子音
「分」を設定
「秒」を設定
「時」を設定 「分」を設定 「秒」を設定
11
タイマーを使って撮影する(5/7)
Jp
タイマー設定時のご注意
c.すべての項目の設定が終わったら、タイ
マー設定ボタン(
)を押す
•タイマーを正しく作動させるために、「インターバル」は必ず、「露光時間」より 1 秒以上長く
•電子音が鳴って(電子音が ON の場合)
してください。
設定が有効になり、設定完了画面に切り
•AF(オートフォーカス)撮影を行う場合、ピント合わせに要する時間を確保するため、
替わります。
・「ディレー時間」を 2 秒以上にする
・「インターバル」を「露光時間」より2秒以上長くする
ことをおすすめします。
•ノイズ除去機能のあるデジタルカメラで「ノイズ除去(D2X などでは「長秒時ノイズ除去」)」
をONにして撮影する場合は、MC-36 の「インターバル」を「露光時間」より 2 倍以上長く
してください。
設定完了画面設定画面
•「インターバル」を 0 秒に設定することはできません。設定画面で「0 秒」と設定しても、設定
完了画面に切り換えたときに、自動的に「1 秒」に変更されます。
•設 定した内容は、設定を変更するか、電
•「撮影回数」を無限回にする場合は、撮影回数の設定画面で回数が「1 回」の状態で方向ボタン
池残量が無くなる(または電池を抜く)
(
)の下を押すか、回数が「399 回」の状態で方向ボタンの上を押してください。回数表示部
まで保持されます。
に、「
」と表示されます。
12
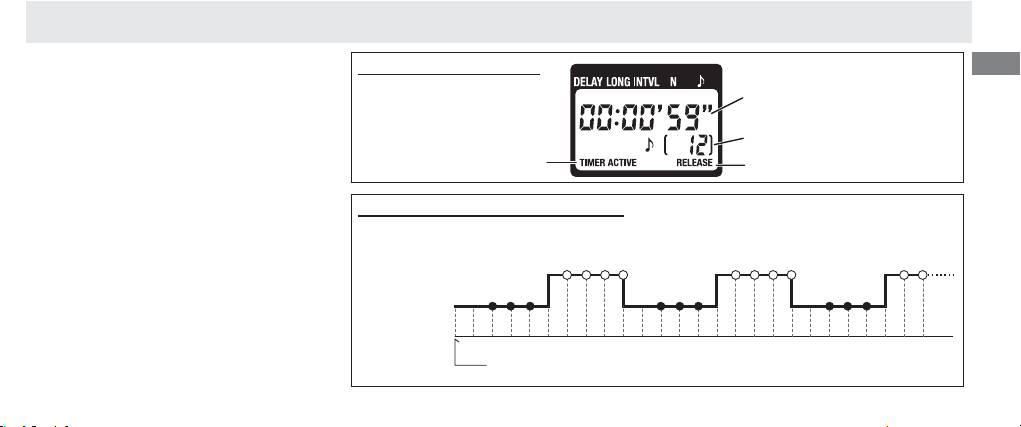
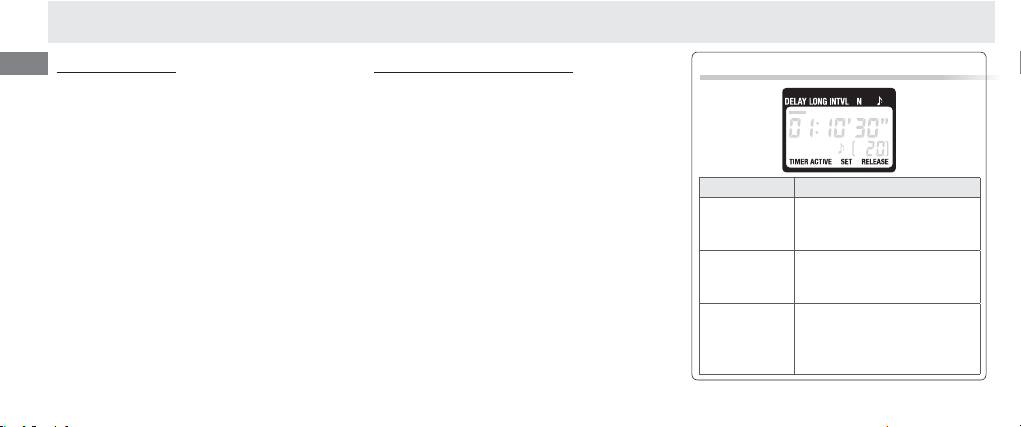
タイマーを使って撮影する(6/7)
3
.撮影を始める
タイマー作動中の表示パネル
Jp
レリーズ中:残りレリーズ時間
タイマー作動ボタン(
)を押す
レリーズの前後:次のレリーズ
•タイマーが作動し、表示パネルの「
TIMER
開始までの時間
ACTIVE
」(
)が点滅します。
残り撮影回数
•レリーズ開始前は、表示パネルにレリー
ズ開始までの時間がカウントダウン表示
タイマー作動中に点滅
レリーズ中に点滅
されます。レリーズ開始3秒前になると、
1 秒間隔で電子音が鳴ります(電子音が
タイマー作動中の電子音とレリーズランプ
ON の場合)。
•レリーズ中は、表示パネルにレリーズ終
(「ディレー時間 5 秒、露光時間 4 秒、インターバル 9 秒」に設定した場合。●は電子音が鳴る
了までの時間がカウントダウン表示され
こと、○はレリーズランプが点灯することを示しています)
ます。また、1 秒間隔でレリーズランプ
シャッター開シャッター開
(
)と表示パネルの「
RELEASE
」(
)
が点滅します。
シャッター閉シャッター閉
•1 回のレリーズが終了するたびに、表示
パネルの残り撮影回数が更新されます。
51234 678 9
10
11 12 13 14 15 16 2517 18 19
20
21 22 23 24
[秒]
タイマー開始
13
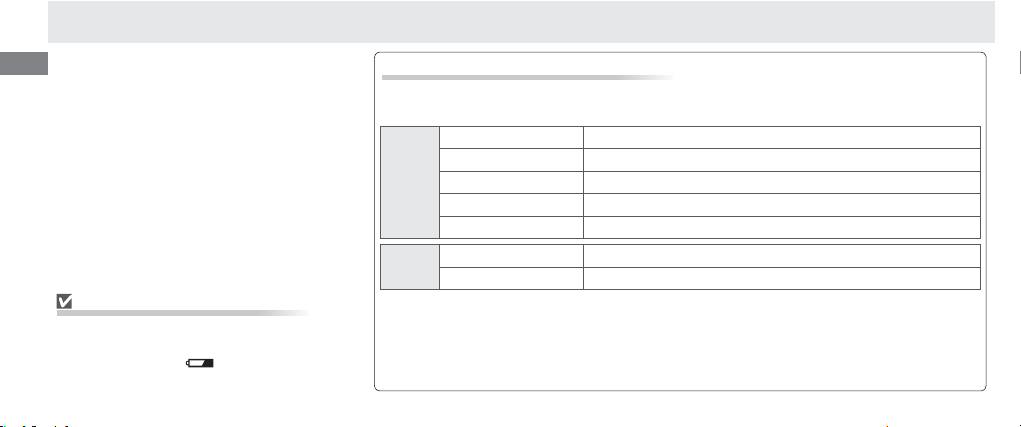
タイマーを使って撮影する(7/7)
Jp
4
.撮影を終える
カメラのシャッタースピードで撮影する
•設定した回数の撮影を終えると、タイ
カメラ側でシャッタースピードを設定して撮影することもできます。この場合は、カメラと
マーが終了します。
MC-36 をそれぞれ、以下のように設定してください。
•タイマー作動中に、途中で撮影をやめる
には、タイマー作動ボタン(
露出モード
M
(マニュアル)または
S
(シャッター優先オート)
)を押し
てください。
シャッタースピード
任意のシャッタースピード
カメラ
インターバルタイマー
解除
フォーカスモード
M
(マニュアル)または
AF-C
(コンティニュアス AF サーボ)
※1
連写モード
S
(1 コマ撮影)
露光時間
0秒
MC-36
インターバル
カメラのシャッタースピードよりも長くする
※2
タイマー撮影についてのご注意
※1AF-C の動作を「フォーカス優先」と「レリーズ優先」から選択できるカメラの場合は、「レリーズ優先」
に設定してください。
長時間のタイマー撮影を行う場合は、MC-
※2AF撮影の場合は、「インターバル」を、カメラのシャッタースピードよりも 2 秒以上長くすることをお
36 の電池残量が充分にあることをご確認くだ
すすめします。また、ノイズ除去機能のあるデジタルカメラで「ノイズ除去(D2X などでは「長秒時ノ
さい。表示パネルの (
)が点灯している
イズ除去」)」を ON にして撮影する場合は、「インターバル」を、カメラのシャッタースピードより 2 倍
場合は、電池を交換することをおすすめします。
以上長くしてください。
14
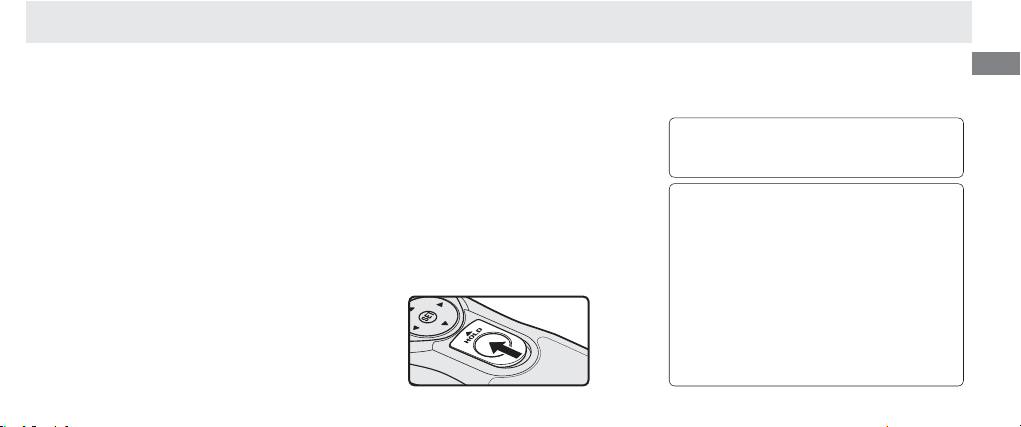
手動レリーズで撮影する
MC-36 のシャッターボタン(
)は、カ
b.
2
.撮影する
シャッターボタンを放して、撮影を終える
Jp
メラのシャッターボタンと同様の半押し/
a.MC-36 のシャッターボタン(
)を半
全押し機能を備えており、カメラのシャッ
押ししてから、全押しする
ター操作を遠隔操作することができます。
•レリーズ中は電子音が 1 秒間隔で鳴り、
MC-36 の電池残量が無い状態でも、手動レ
1
.カメラの設定
表示パネルの「
RELEASE
」(
)が点滅
リーズは可能です。ただしこの場合、表示パネ
します。また、表示パネルの時間表示部
ルには何も表示されず、電子音も鳴りません。
カメラと MC-36 を接続してから(P.7)、
(
)に、レリーズ開始からの経過時間が
カメラの電源を ON にする
表示されます。
タイマー撮影中でも手動レリーズを行うこと
•露出モード、シャッタースピード、フォー
•シャッターボタンを全押ししたまま
ができます。ただしタイマーは、手動レリー
カスモード、連写モードについての制限
HOLD
方向にスライドさせると、全押
ズの有無に関係なく作動し続けます(表示パ
はありません。
し状態を保持することができ、バルブ
ネルやレリーズランプ、電子音も、タイマー
(bulb)撮影時などに便利です。逆方向に
撮影時の動作を続けます)。
スライドさせると、解除されます。
なお、タイマーによるレリーズと手動レリー
ズが重なった場合は、
・いずれか一方がレリーズを開始した時点
で、レリーズが始まります。
・両方がレリーズを終了するまで、レリーズ
が継続します。
15

使用上のご注意 取り扱い上のご注意(1/2)
●タイマー撮影中にカメラの電池やフィルム(ま
●強いショックを与えないでください
●強い電波や磁気の発生する場所で使用しないで
Jp
たはメモリーカード)の残量が無くなっても、
落としたり、ぶつけたりしないようにご注意くださ
ください
MC-36 のタイマーは作動し続けます。
い。強い衝撃や振動を加えると、破損したり精密に
強い電波や磁気を発生するテレビ塔などの周囲や、
●デジタルカメラでは、バッファーメモリー
※
が
調整された部分に悪影響を及ぼします。
強い静電気の周囲では、正常に機能しない場合が
いっぱいになる(連続撮影可能コマ数がゼロにな
あります。
る)と、画像がメモリーカードに書き込まれてバッ
●水にぬらさないでください
ファーメモリーが空くまで、レリーズできません。
本製品は水にぬらさないようにご注意ください。
●電子機器の特性について
※
撮影した画像がメモリーカードに書き込まれるまでの
製品内部に水滴が入ったりすると部品がさびつい
ごくまれに、外部から強い静電気が電子回路に侵
間、データを一時的に保存するカメラ内蔵のメモリー
てしまい、修理費用が高額になるだけでなく、修
入し、表示パネルに異常な表示が点灯したまま、
●AF撮影を行う場合は、シャッターボタンの半押
理不能になることがあります。
製品が作動しなくなることがあります。万一この
しで AF が作動するように設定してください(一部
ような状態になった場合、カメラの電源を OFF に
●急激な温度変化を与えないでください
のカメラでは、シャッターボタンの半押し時に AF
して MC-36 を取り外した上で、MC-36 の電池
極端に温度差のある場所に持ち込む(寒いところ
が作動しないように設定できる場合があります)。
をいったん取り出し、表示パネルの表示が消えて
から急激に暖かいところに持ち込む、またはその
詳しくはカメラの使用説明書をご覧ください。
から入れ直してください。この際、電池が熱くなっ
逆)と、本製品の内外に水滴が生じ、故障の原因
ていることがあるのでご注意ください。この操作
●カメラの電池残量が充分ある状態でお使いくだ
となります。バッグやビニール袋などに入れて、
を行っても不具合が続く場合は、ニコンサービス
さい。詳しくはカメラの使用説明書をご覧くださ
周囲の温度になじませてからお使いください。
センターにお問い合わせください。
い。長時間の撮影には、AC アダプターをお使い
いただくことをおすすめします(別売アクセサ
リーとして用意されている場合)。
●タイマーの時間精度は、腕時計などの一般的な
時計ほど高くありません。
16
取り扱い上のご注意(2/2) 主な仕様
●高温・低温下での液晶表示について
対応カメラ
※
ニコンデジタルカメラD2 シリーズ/ D1 シリーズ/ D200 / D100(マルチファンクショ
Jp
表示パネルの液晶表示は、高温下では黒くなり、
ンバッテリーパック MB-D100 を介して接続)
低温下では応答速度が多少遅くなることがありま
ニコン F6 / F5 / F100 / F90X / F90
す。
いずれの場合も常温時には正常に戻ります。
ディレー時間
0秒〜99時間59分59秒まで 1 秒間隔で設定可能
●
ラジオ、テレビなどへの電波障害についてのご注意
露光時間
本製品は、情報処理装置等電波障害自主規制協議
インターバル 1 秒〜 99 時間 59 分 59 秒まで 1 秒間隔で設定可能
会(VCCI)の基準に基づくクラス B 情報技術装
撮影回数 1 〜 399 回、または無限回
置です。この装置は、家庭環境で使用することを
電源 1.5VLR03 アルカリ単 4 形電池× 2
目的としていますが、ラジオやテレビの近くで使
電池寿命 約 2 ヶ月(ディレー時間 5 分、露光時間4分56秒、インターバル 5 分で連続撮影した場合);
用すると、受信障害を引き起こすことがあります。
表示パネルの照明を点灯させると、電池寿命は短くなります
使用説明書にしたがって正しくお取り扱いください。
動作温度 − 20℃〜 50℃
寸法 約 155 × 40 × 18mm(突起部を除く)
質量 約 105g(電池を除く)
コード長 約 850mm
接続可能な別売
•延長コード MC-21
(MC-21 を 2 本以上介して接続した場合の動作は保証しておりません)
アクセサリー
•GPS 変換コード MC-35(MC-35 の 10 ピンターミナルを介して接続)
※
リモートターミナル付きのカメラ(リモートターミナル付きのモータードライブを装着した場合を含む)には、変換
コード MC-26 を介して接続できます。ただし、モータードライブ MD-12 との組み合わせには対応しておりません。
17

