Vitek VT-4073 SR: Channal amplifier Digital audio amplifier 2.4. PLAY MODE SETTING 3. BASIC OPERATION
Channal amplifier Digital audio amplifier 2.4. PLAY MODE SETTING 3. BASIC OPERATION: Vitek VT-4073 SR
Table of contents
- Operating manual MAINTENANCE RULES IMPORTANT SAFETY NOTICES USAGE NOTICES ON THE DVD PLAYER USAGE NOTICES ON POWER SUPPLY MAIN FEATURES OF THE DEVICE
- 24bit/96Khz Digital/Analog (D/A) converter. Component video output. Laser head overcurrent protecting system 1. Brief instruction of controls Front panel function: Back panel function:
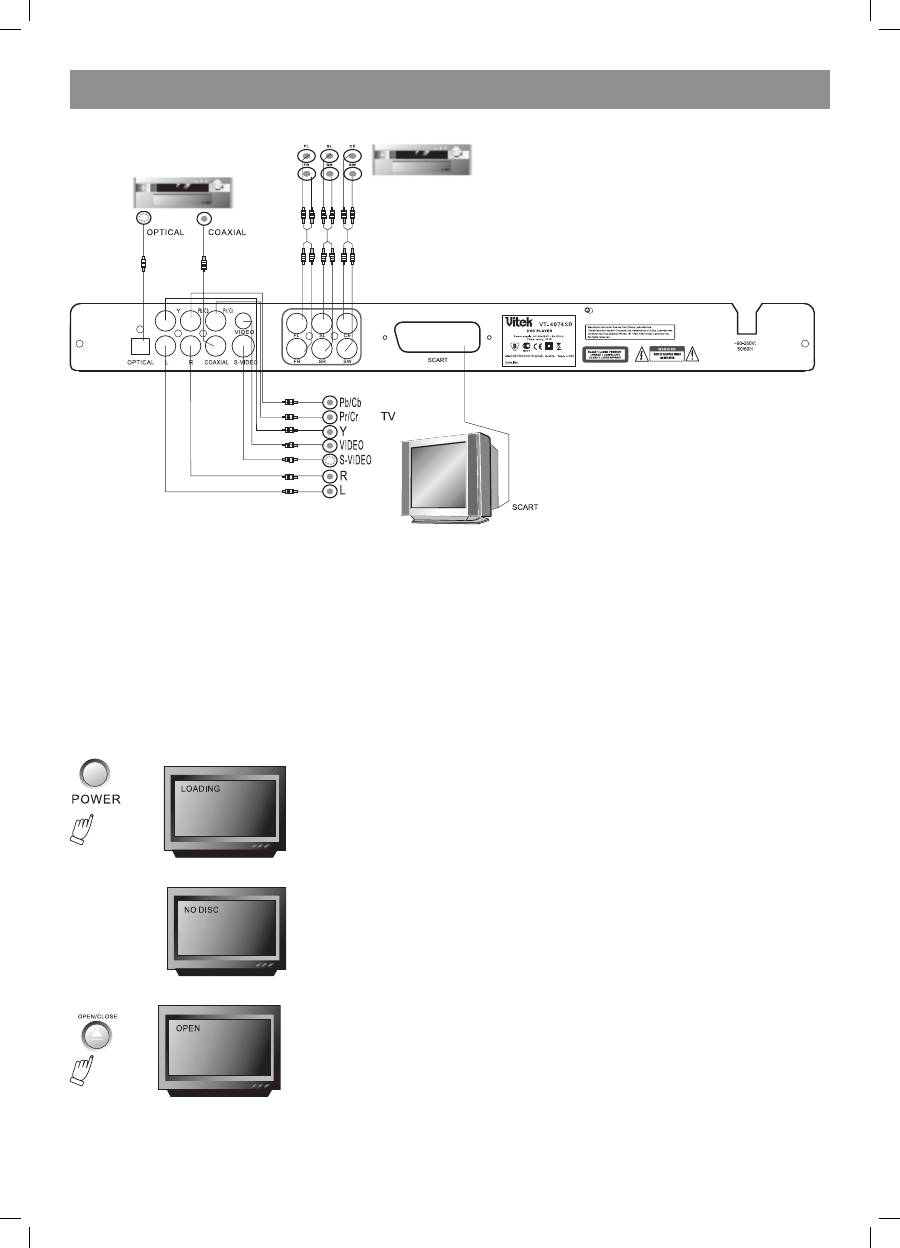
- Remote control 2. PREPARATIONS 2.1 PACKAGE SET 1. DVD player 2.2 Battery installation into the remote control 2.3 SYSTEM CONNECTION
- Channal amplifier Digital audio amplifier 2.4. PLAY MODE SETTING 3. BASIC OPERATION
- 3.1. Disc playing 4. FUNCTIONALITY DESCRIPTION
- 4.2 N/P function 4.3 Subtitles 4.4 OPEN/ 4.5 PBC (PLAYBACK) 4.6 MIC ON/OFF 4.7 ANGLE 4.8 LANGUAGE» 4.9 TITLE 4.10 MENU 4.11. DIRECTION KEYS 4.12 3D FUNCTION 4.13 NUMBER KEYS 4.14 TIME 4.15 REPEAT FROM A TO B
- 4.16 REPEAT FUNCTION 4.17. ZOOM 4.18. PROGRAM 4.19. R/L FUNCTION (SOUND BALANCING) 4.20 VOLUME AND MUTE 4.21. THE “SLOW“ FUNCTION 4.22 VIDEO FUNCTION 5. SETTING UP THE SYSTEM
- 1.1. ANGLE MARK 1.1.3 SCREEN LANGUAGE 1.1.4 HIDE SUBTITLES 1.1.5 SCREEN PROTECTION 1.1.7 MEMORY PLAY SETTINGS
- 1. AUDIO SETUP 1..1 SPEAKER SETUP 1..1.1. DOWNMI� MODE When the center, rear and the subwoofer speaker are in the “Off” 1..1.3 CENTRAL SPEAKER
- 1..1.4 REAR SPEAKER 1..1.5 WOOFER SPEAKER 1.. DIGITAL AUTO SETUP 1...1 DIGITAL AUDIO OUTPUT 1... LPCM OUTPUT
- 1..3. DOLBYDIGITALSETUP 1..3.1 L+R SETUP 1..3. DYNAMIC RANGE COMPRESSION 1..4 EQUALIZER SETUP 1..4.1 EQUALIZER MODE 1..4. BASS ENHANCING 1..4.3 SUB WOOFER
- 1..4.4. TREBLE BOOST 1..5 3D PROCESSING SETUP 1..5.1 PRO LOGIC II SETUP 1..5.1.1 PRO LOGIC II SETUP 1..5.1.. PRO LOGIC II SETUP
- 1..5.1.3. PRO LOGIC II SETUP 1..5.1.4 PRO LOGIC II SETUP 1..5.1.5 PRO LOGIC II SETUP 1..5.1.5. MI�TURE MODE 1..6 MICROPHONE SETUP 1..6.1 MICROPHONE SETUP
- 1..6.1.1 MICROPHONE SETUP 1.3 VIDEO SETUP 1.3.1 COMPONENT 1.3. TV MODE 1.3.3 QUALITY 1.3.3.1 SHARPNESS 1.3.3. BRIGHTNESS 1.3.3.3 CONTRAST 1.4. PREFERENCE SETUP
- 1.4.1 TV TYPE SETUP AUDIO SETUP SUBTITLE SETUP DISC MENU LANGUAGE SETUP PARENTAL CONTROL
- 1.4.6. DEFAULT SETTINGS 1.5. PASSWORD SETUP 1.5.1. PASSWORD SETUP. 1.5.. PASSWORD 6. OPERATING THE МР3 FUNCTION 7. JPEG SETTINGS 8. TROUBLESHOOTING GUIDE 9. DISC PROTECTION
- 10. MPEG 4 OPERATION 11.Technical Specifications
ENGLISH
5
Channal amplifier
Digital audio amplifier
2.4. PLAY MODE SETTING
If you find that the picture couldn’t spread all over the screen or there is no colour, please, select PAL, NTSC or Multi mode by pressing the N/P key.
DVD disc may support pictures with different proportions. When using the TV mode you can also match the screen proportion to the proportions
of your discs. Select Normal/Full, Normal/mailbox, wide screen under the System setup. Operate in the following way: Press <SETUP> key to get
General setup, press <PLAY> key, use direction keys up and down to select the TV mode, then press left/right keys to to select Normal/Full, Normal/
mailbox, or wide screen options according to your need. Finally, press <PLAY>.
3. BASIC OPERATION
Upon the completion of all the system connection works the device is ready for service. Before playing ensure the completion of all the following
preparatory operations:
1. Switch on the TV and select AV mode. If the connection format is Svideo, select the Svideo mode.
. If an amplifier is used, switch it on and select AC3 or DVD mode.
3. Plug the DVD player cable in the electricity network.
Step 1: Press POWER key. After pressing DISC LOADING will display on the screen:
If the disc tray is empty, the NO DISC notice will appear on the screen.
Step : Press the OPEN/CLOSE key, the disc tray will come out automatically.
Step 3: Put he disc on the tray, press the OPEN/CLOSE key to close the tray, the disc type will be shown in the upperleft corner of the screen, as well
as on the VFD screen.
Note: Press the STANDBY key on the remote controller – the unit will switch to standby status. The power consumption in the standby mode is
approx. 10W.
4073IM.indd 5
09.10.2007 12:28:31
