Vitek VT-4073 SR: 4.16 REPEAT FUNCTION 4.17. ZOOM 4.18. PROGRAM 4.19. R/L FUNCTION (SOUND BALANCING) 4.20 VOLUME AND MUTE 4.21. THE “SLOW“ FUNCTION 4.22 VIDEO FUNCTION 5. SETTING UP THE SYSTEM
4.16 REPEAT FUNCTION 4.17. ZOOM 4.18. PROGRAM 4.19. R/L FUNCTION (SOUND BALANCING) 4.20 VOLUME AND MUTE 4.21. THE “SLOW“ FUNCTION 4.22 VIDEO FUNCTION 5. SETTING UP THE SYSTEM: Vitek VT-4073 SR
Table of contents
- Operating manual MAINTENANCE RULES IMPORTANT SAFETY NOTICES USAGE NOTICES ON THE DVD PLAYER USAGE NOTICES ON POWER SUPPLY MAIN FEATURES OF THE DEVICE
- 24bit/96Khz Digital/Analog (D/A) converter. Component video output. Laser head overcurrent protecting system 1. Brief instruction of controls Front panel function: Back panel function:
- Remote control 2. PREPARATIONS 2.1 PACKAGE SET 1. DVD player 2.2 Battery installation into the remote control 2.3 SYSTEM CONNECTION
- Channal amplifier Digital audio amplifier 2.4. PLAY MODE SETTING 3. BASIC OPERATION
- 3.1. Disc playing 4. FUNCTIONALITY DESCRIPTION
- 4.2 N/P function 4.3 Subtitles 4.4 OPEN/ 4.5 PBC (PLAYBACK) 4.6 MIC ON/OFF 4.7 ANGLE 4.8 LANGUAGE» 4.9 TITLE 4.10 MENU 4.11. DIRECTION KEYS 4.12 3D FUNCTION 4.13 NUMBER KEYS 4.14 TIME 4.15 REPEAT FROM A TO B
- 4.16 REPEAT FUNCTION 4.17. ZOOM 4.18. PROGRAM 4.19. R/L FUNCTION (SOUND BALANCING) 4.20 VOLUME AND MUTE 4.21. THE “SLOW“ FUNCTION 4.22 VIDEO FUNCTION 5. SETTING UP THE SYSTEM
- 1.1. ANGLE MARK 1.1.3 SCREEN LANGUAGE 1.1.4 HIDE SUBTITLES 1.1.5 SCREEN PROTECTION 1.1.7 MEMORY PLAY SETTINGS
- 1. AUDIO SETUP 1..1 SPEAKER SETUP 1..1.1. DOWNMI� MODE When the center, rear and the subwoofer speaker are in the “Off” 1..1.3 CENTRAL SPEAKER
- 1..1.4 REAR SPEAKER 1..1.5 WOOFER SPEAKER 1.. DIGITAL AUTO SETUP 1...1 DIGITAL AUDIO OUTPUT 1... LPCM OUTPUT
- 1..3. DOLBYDIGITALSETUP 1..3.1 L+R SETUP 1..3. DYNAMIC RANGE COMPRESSION 1..4 EQUALIZER SETUP 1..4.1 EQUALIZER MODE 1..4. BASS ENHANCING 1..4.3 SUB WOOFER
- 1..4.4. TREBLE BOOST 1..5 3D PROCESSING SETUP 1..5.1 PRO LOGIC II SETUP 1..5.1.1 PRO LOGIC II SETUP 1..5.1.. PRO LOGIC II SETUP
- 1..5.1.3. PRO LOGIC II SETUP 1..5.1.4 PRO LOGIC II SETUP 1..5.1.5 PRO LOGIC II SETUP 1..5.1.5. MI�TURE MODE 1..6 MICROPHONE SETUP 1..6.1 MICROPHONE SETUP
- 1..6.1.1 MICROPHONE SETUP 1.3 VIDEO SETUP 1.3.1 COMPONENT 1.3. TV MODE 1.3.3 QUALITY 1.3.3.1 SHARPNESS 1.3.3. BRIGHTNESS 1.3.3.3 CONTRAST 1.4. PREFERENCE SETUP
- 1.4.1 TV TYPE SETUP AUDIO SETUP SUBTITLE SETUP DISC MENU LANGUAGE SETUP PARENTAL CONTROL
- 1.4.6. DEFAULT SETTINGS 1.5. PASSWORD SETUP 1.5.1. PASSWORD SETUP. 1.5.. PASSWORD 6. OPERATING THE МР3 FUNCTION 7. JPEG SETTINGS 8. TROUBLESHOOTING GUIDE 9. DISC PROTECTION
- 10. MPEG 4 OPERATION 11.Technical Specifications
ENGLISH
8
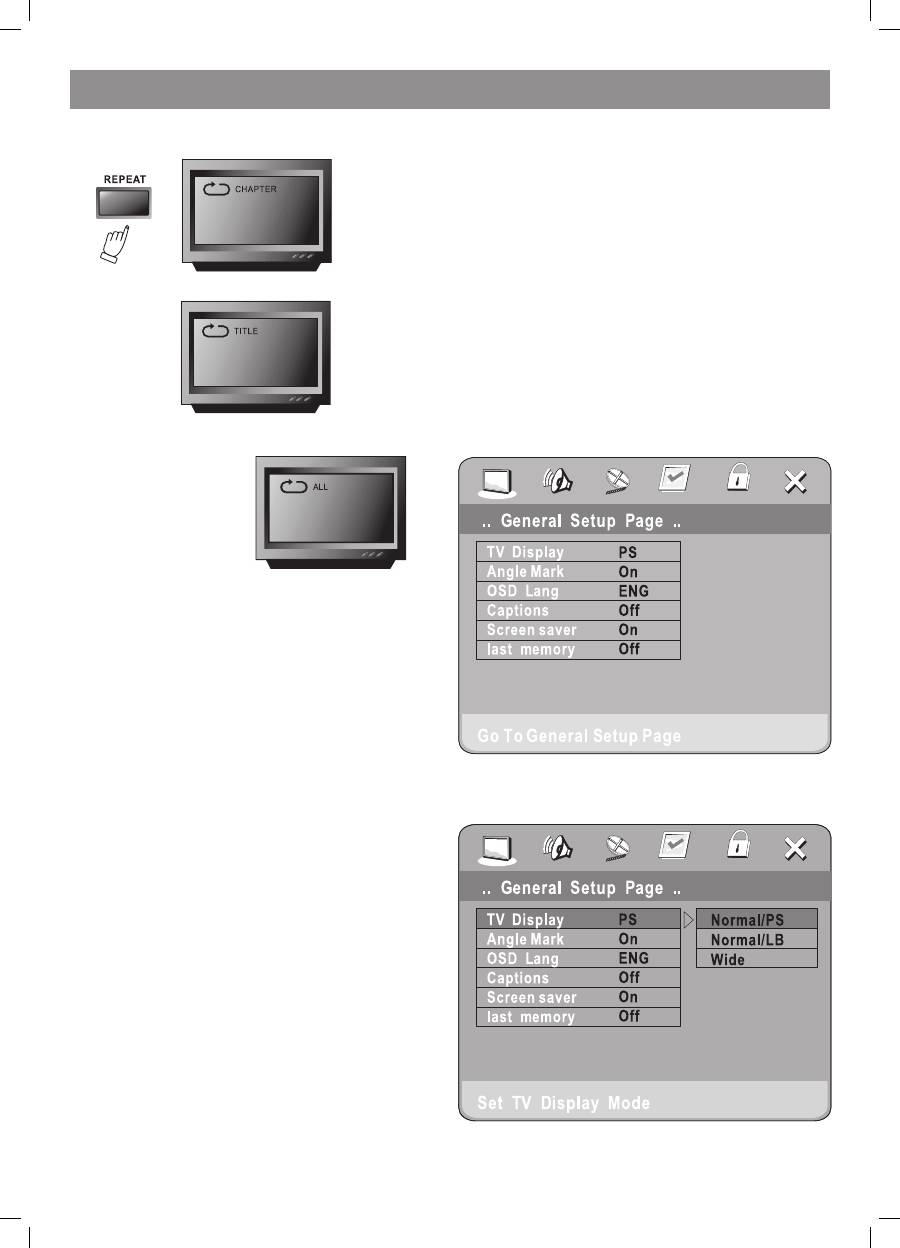
4.16 REPEAT FUNCTION
After pressing the REPEAT key in the DVD mode the following notice will
appear on the TV screen:
When repeating the chapter:
When repeating the title:
Repeating mode off
4.17. ZOOM
The picture may be enlarged up to 4 times to facilitate enjoying a
particular action or still picture. When repeatedly pressing this button
up to 6 times, the zoom scales will be x, 3x, 4x, 1/, 1/3, and 1/4
respectively. Pressing this button one more time will return the screen to
normal play status.
4.18. PROGRAM
If the disc has or more tracks, chapters or files, you may set up the
playing order up to your wish. In order to enter the program menu press
the PROGRAM button.
By pressing digit keys you can input track, title and chapter numbers.
If there are more than ten programmed tracks, press NE�T to go on
programming (with a maximum of 0 programmable items) use the up/
down/left/right keys to move the cursor to the START title. Press ENTER
for starting PROGRAM playing.
The PROGRAM function is unavailable when playing Mp3 discs! By
pressing the PROGRAM button once to enter the DIRECTORYPLAY
mode, you can select the program to play in the current directory;
pressing PROGRAM once again will allow you entering the FILELIST
mode, where you can select the program to play in the file list of the
whole disc.
4.19. R/L FUNCTION (SOUND BALANCING)
when playing discs in DVD or SVCD formats the screen shows Aud 1,
Aud , and “no lead sing” notices. When playing VCD discs it shows “left
lead sing”, “right lead sing” and “no lead sing”.
4.20 VOLUME AND MUTE
Press the <VOL+> volume key to increase volume and the <VOL> key to
reduce volume down to no volume output.
Press the MUTE key to switch the sound off, press it once again for
switching the sound on once again.
4.21. THE “SLOW“ FUNCTION
When playing a DVD disc pressing the SLOW button repeatedly will
enable you to slow the motion by x, 4x, 8x and 16x as the normal
forward speed or x, 4x and 8x as slow, as the normal backward speed.
For an SVCD or VCD disc, the track will be played at a x, 4x, 8x and 16x
slower than the normal playing speed.
4.22 VIDEO FUNCTION
By pressing the <VIDEO>key you may opt between SVIDEO, YUB and
RGB output modes.
5. SETTING UP THE SYSTEM
1. DVD MENU SETTING
After pressing the SETUP button on the remote controller the SETUP
MENU will be displayed. The disc will ask you to enter the PIN.
Simply enter “8888”, which is the manufacturer’s preset value.
1. After accessing the SETUP Menu, press the direction buttons for
moving up and down to select the item desired, then press the PLAY
button to confirm your entry and move to the submenu. Use the left
and right direction buttons to move the pointer, and the up and down
direction buttons to select the option desired. After that press the
PLAY button to confirm your selection. Now the setup of this current
function is completed.
. To end the setup, press the SETUP button again. In the SETUP
MENU you may choose any of the following options up to your wish.
1.1 GENERAL SETUP
This option is used for setting up the TV screen format., video functions,
and DVD functions, with such options, as “TV DISPLAY”, “ANGLE
MARK”, “OSD LANGUAGE”, “CAPTION”, “SCREEN SAVER“ and “LAST
MEMORY”.
1.1.1 TV SCREEN
Follow the operating instructions stated in “DVD MENU SETUP” in
combination with the desired option as shown in the following figure.
Note:
1). Irrespective of what screen format you have selected, if your screen
4073IM.indd 8
09.10.2007 12:28:32
