Vitek VT-4073 SR: 24bit/96Khz Digital/Analog (D/A) converter. Component video output. Laser head overcurrent protecting system 1. Brief instruction of controls Front panel function: Back panel function:
24bit/96Khz Digital/Analog (D/A) converter. Component video output. Laser head overcurrent protecting system 1. Brief instruction of controls Front panel function: Back panel function:: Vitek VT-4073 SR
Table of contents
- Operating manual MAINTENANCE RULES IMPORTANT SAFETY NOTICES USAGE NOTICES ON THE DVD PLAYER USAGE NOTICES ON POWER SUPPLY MAIN FEATURES OF THE DEVICE
- 24bit/96Khz Digital/Analog (D/A) converter. Component video output. Laser head overcurrent protecting system 1. Brief instruction of controls Front panel function: Back panel function:
- Remote control 2. PREPARATIONS 2.1 PACKAGE SET 1. DVD player 2.2 Battery installation into the remote control 2.3 SYSTEM CONNECTION
- Channal amplifier Digital audio amplifier 2.4. PLAY MODE SETTING 3. BASIC OPERATION
- 3.1. Disc playing 4. FUNCTIONALITY DESCRIPTION
- 4.2 N/P function 4.3 Subtitles 4.4 OPEN/ 4.5 PBC (PLAYBACK) 4.6 MIC ON/OFF 4.7 ANGLE 4.8 LANGUAGE» 4.9 TITLE 4.10 MENU 4.11. DIRECTION KEYS 4.12 3D FUNCTION 4.13 NUMBER KEYS 4.14 TIME 4.15 REPEAT FROM A TO B
- 4.16 REPEAT FUNCTION 4.17. ZOOM 4.18. PROGRAM 4.19. R/L FUNCTION (SOUND BALANCING) 4.20 VOLUME AND MUTE 4.21. THE “SLOW“ FUNCTION 4.22 VIDEO FUNCTION 5. SETTING UP THE SYSTEM
- 1.1. ANGLE MARK 1.1.3 SCREEN LANGUAGE 1.1.4 HIDE SUBTITLES 1.1.5 SCREEN PROTECTION 1.1.7 MEMORY PLAY SETTINGS
- 1. AUDIO SETUP 1..1 SPEAKER SETUP 1..1.1. DOWNMI� MODE When the center, rear and the subwoofer speaker are in the “Off” 1..1.3 CENTRAL SPEAKER
- 1..1.4 REAR SPEAKER 1..1.5 WOOFER SPEAKER 1.. DIGITAL AUTO SETUP 1...1 DIGITAL AUDIO OUTPUT 1... LPCM OUTPUT
- 1..3. DOLBYDIGITALSETUP 1..3.1 L+R SETUP 1..3. DYNAMIC RANGE COMPRESSION 1..4 EQUALIZER SETUP 1..4.1 EQUALIZER MODE 1..4. BASS ENHANCING 1..4.3 SUB WOOFER
- 1..4.4. TREBLE BOOST 1..5 3D PROCESSING SETUP 1..5.1 PRO LOGIC II SETUP 1..5.1.1 PRO LOGIC II SETUP 1..5.1.. PRO LOGIC II SETUP
- 1..5.1.3. PRO LOGIC II SETUP 1..5.1.4 PRO LOGIC II SETUP 1..5.1.5 PRO LOGIC II SETUP 1..5.1.5. MI�TURE MODE 1..6 MICROPHONE SETUP 1..6.1 MICROPHONE SETUP
- 1..6.1.1 MICROPHONE SETUP 1.3 VIDEO SETUP 1.3.1 COMPONENT 1.3. TV MODE 1.3.3 QUALITY 1.3.3.1 SHARPNESS 1.3.3. BRIGHTNESS 1.3.3.3 CONTRAST 1.4. PREFERENCE SETUP
- 1.4.1 TV TYPE SETUP AUDIO SETUP SUBTITLE SETUP DISC MENU LANGUAGE SETUP PARENTAL CONTROL
- 1.4.6. DEFAULT SETTINGS 1.5. PASSWORD SETUP 1.5.1. PASSWORD SETUP. 1.5.. PASSWORD 6. OPERATING THE МР3 FUNCTION 7. JPEG SETTINGS 8. TROUBLESHOOTING GUIDE 9. DISC PROTECTION
- 10. MPEG 4 OPERATION 11.Technical Specifications
ENGLISH
3
6. Professional digital Karaoke function.
7. Various screen options of TV display; also you may select preferred story section to view.
8. Full function intelligent upgrade.
9. Progressive scan function.
10. Highly integrated servo system, decoding on singlechip technology, high reliability and stability, super error correction.
11. AM/FM stereo radio tuner.
24bit/96Khz Digital/Analog (D/A) converter.
This latest conversion technology matches the software of 96 KHz sampling frequency (twice as high as a CD) and 4bit data, thus providing you
with perfect sound quality without distortion.
Component video output.
The component video output (Y, Cr, Cb) enables you to enjoy true DVD effect. It renders pure colour signals as they are and without any video noise.
Laser head overcurrent protecting system
Laser head ist he most important and critical part of the whole machine. Its performance is directly linked to the service life and error correcting
function of the whole device. When a common player reads a scratched disc or a nonstandard disc, the laser intensity will be 4 times or even 0
times higher than the normal level, thus greatly reducing its service life. This appliance is equipped with the unique laser head overcurrent protecting
system, which can ensure constant laser current and thus greatly extend the service life of the laser head.
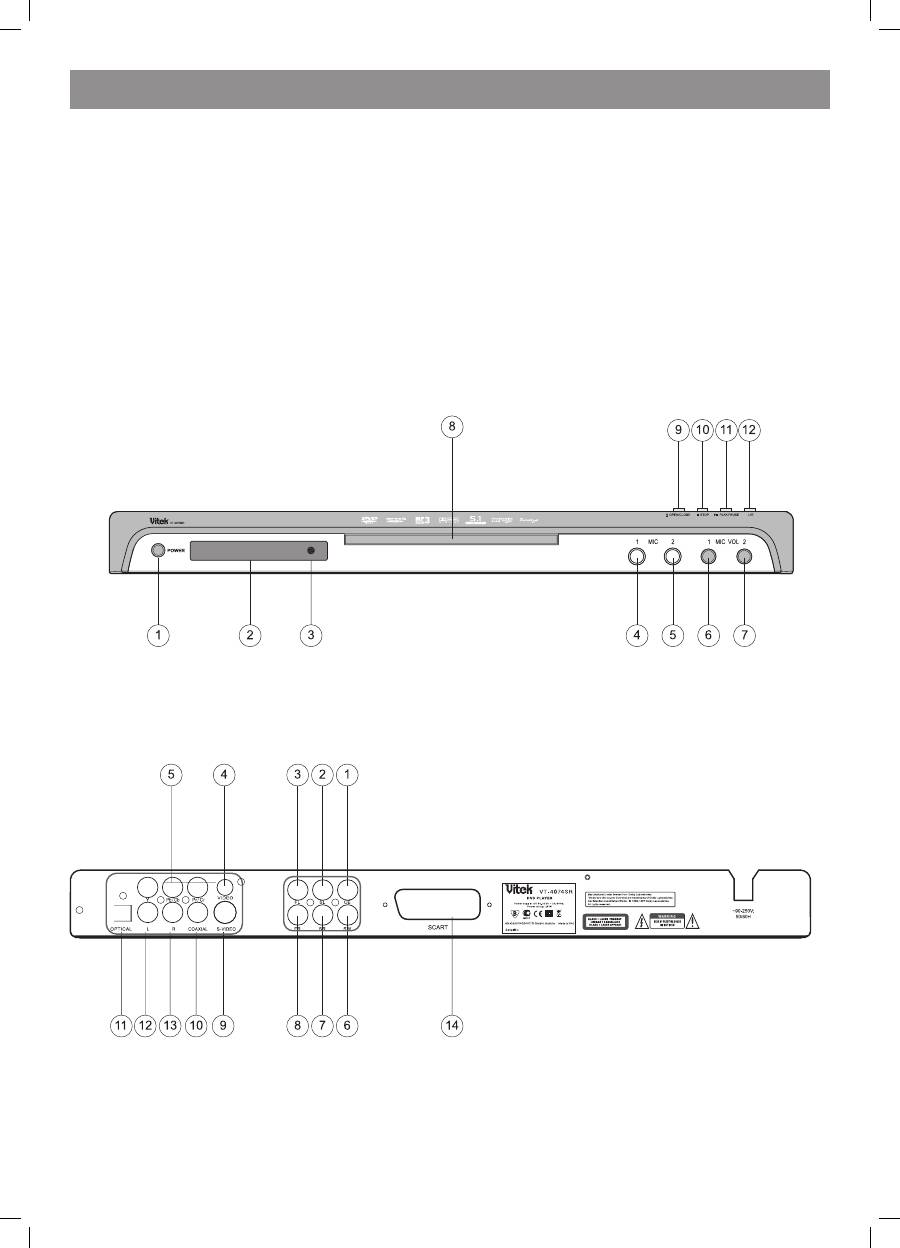
1. Brief instruction of controls
Front panel function:
1. POWER
. SENSOR
3. SCREEN
4. MIC 1
5. MIC
6. MIC VOL 1
7. MIC VOL
8. DISC TRAY
9. OPEN/CLOSE
10. STOP
11. PLAY/PAUSE
1. L/R
Back panel function:
1. 5.1 CH CEN output jack
. 5.1 CH SL output jack
3. 5.1 CH FL output jack
4. Video output jack
5. Component output jack
6. 5,1 CH SW output jack
7. 5,1 CH SR output jack
8. 5,1 CH FR output jack
9. SVideo output jack
10. Digital signal coaxial output jack
11. Digital signal optical output jack
1. L output jack
13. R output jack
14. SCART output jack
4073IM.indd 3
09.10.2007 12:28:30
