Zelmer 28Z025 – страница 4
Инструкция к Утюгу Zelmer 28Z025
61GW28-022_v01
Час нагрівання праски до моменту досягнення попередньо вста-
новленої температури перед автоматичним виключенням у гори-
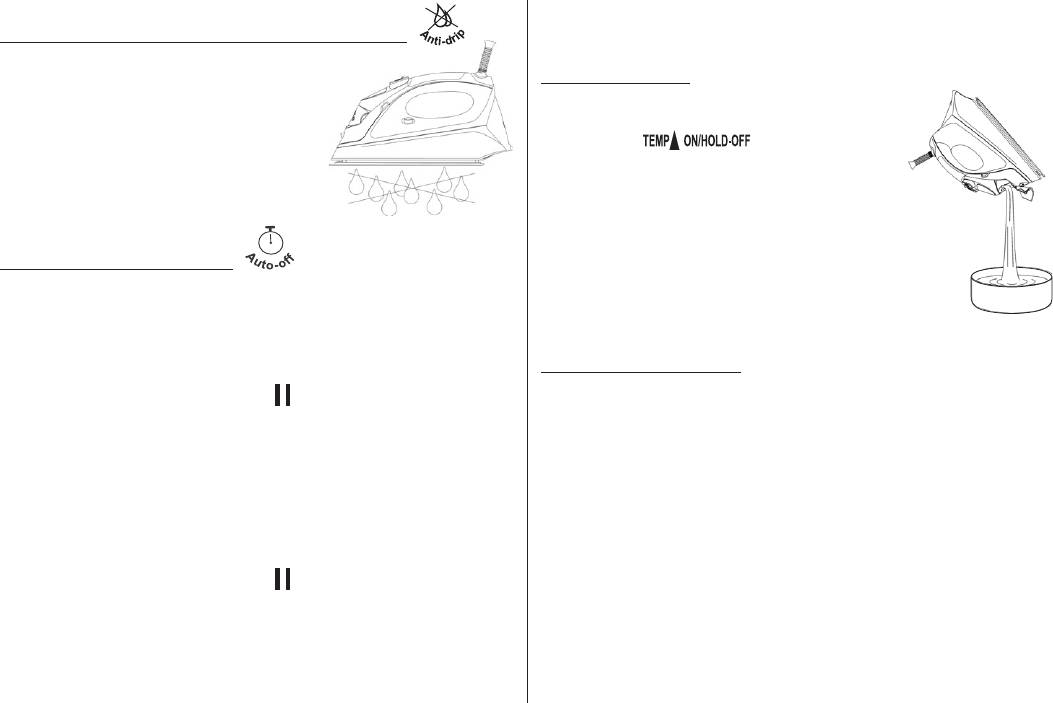
Система для захисту від витікання – Anti-drip
зонтальному або вертикальному положенні складає бл. 60 секунд.
Система для захисту від витікання – –
Anti-Drip, була розроблена так, щоб ав-
Виливання води
томатично запобігти виходу води з під-
Після закінчення прасування, для виключен- –
ошви, якщо праска надто холодна.
ня праски натисніть і притримайте контроль-
Під час роботи, система Anti-Drip може –
ну кнопку на бл. 2 секунди.
викликати голосний звук стукання, осо-
Пролунає окремий звуковий сигнал. Потім
бливо під час нагрівання або охоло-
дисплей (5) згасне.
дження. Це повністю нормальне явище
Відключіть праску від джерела живлення, –
і вказує, що система діє правильно.
поверніть праску верхньою частиною униз,
другою рукою відкрийте кришку баку для
води i делікатно потрясаючи вилийте з баку
Автоматичне виключення
залишки води.
Функція автоматичного виключення запускається автоматично, якщо
Після повного охолодження праски, зберігай- –
праска підключена до джерела живлення і залишається без нагляду.
те її у вертикальному положенні у безпечно-
АВТОМАТИЧНЕ ВИКЛЮЧЕННЯ У ГОРИЗОНТАЛЬНОМУ ПОЛОЖЕННІ
му місці.
1. Праска виключиться автоматично через близько 30 секунд, якщо за-
Чистка та консервація
лишається нерухомою у положенні прасування (горизонтальній).
Відключіть праску від джерела живлення. –
2. На дисплеї (5) з’явиться символ , який буде супроводжуватися
Перед очищуванням, праску залишіть до повного охолодження. –
поперемінним погасанням і підсвічуванням дисплею. Пролунає пе-
Для очищення користуйтесь золоженою ганчіркою і застосовуйте –
рериваний звуковий сигнал.
м’який миючий засіб.
3. Після кожного руху праскою, зникає функція автоматичного ви-
Для миття корпусу не використовуйте агресивні миючі засоби у ви- –
ключення. Засвітиться дисплей (5), звуковий сигнал виключиться,
гляді емульсії, молочка, пасти та ін. Вони можуть між ін. усунути на-
а праска повторно нагріється.
несені інформаційні графічні символи, тобто: шкалу, позначення, по-
АВТОМАТИЧНЕ ВИКЛЮЧЕННЯ У ВЕРТИКАЛЬНОМУ ПОЛОЖЕННІ
переджувальні знаки та ін.
1. Праска автоматично виключиться через 5-10 хвилин, якщо залиша-
Нікол не вживайте гострі або шорсткі предмети для усування залиш- –
ється нерухомою у вертикальному положенні відпочинку.
ків з підошви праски.
Для очищення підошви праски забороняється вживати шорсткі ми- –
2. На дисплеї (5) з’явиться символ , який буде супроводжуватися
ючі засоби та препарати з оцтом, а також засоби для усування ка-
поперемінним погасанням і підсвічуванням дисплею. Пролунає пе-
меню.
рериваний звуковий сигнал.
3. Після кожного руху праскою, зникає функція автоматичного ви-
ключення. Засвітиться дисплей (5), звуковий сигнал виключиться,
а праска повторно нагріється.

Екология – Грижа за околната среда
Всеки ползвател може да допринесе за опазването на
околната среда. Това не е трудно, нито скъпо. За да го по-
стигнете: изхвърлете картонената опаковка в контейнер за
рециклиране на хартиени отпадъци; полиетиленовите пли-
кове изхвърлете в контейнер за пластмаса.
Когато стане непригоден, занесете уреда в подходящ
център за унищожаване, защото съдържа опасни елемен-
ти, които могат да навредят на околната среда.
Не изхвърляйте в кофи за битови отпадъци!!!
Транспортування і зберігання
Транспорутвання виробу може здійснюватись усіма видами тран- –
спорту відповідно до вимог та правил які діють на конкретному виді
транспорту.
Під час перевезення повинна бути усунена можливість переміщенн- –
ня виробів всередині тарнспорного засобу.
Під час транспротування залізницею перевезення повинно здійсню- –
ватися у критих вагонах або контейнерах дрібними чи повагонними
відправками.
Під час транспортування виробів на пласких піддонах вимоги до –
транспортування повинні відповідати ГОСТ 26663, або ГОСТ 19848
– в разі завстосування ящикових піддонів.
Способи і засоби кріплення, схеми рзміщення упкованих виробів –
(кількість ярусів, рядів) у транспортних засобах зазначені на упаковці.
Вироби повинні зберігатися у опалювальних складских приміщеннях –
при температурі +5°С – +40°С. Умови зберігання повинні видповіда-
ти – 1(Л) ГОСТ 15150.
Умови складування виробів зазначені у технічних умовах. –
Імпортер/виробник не відповідає за можливі збитки, що виникли внаслідок
використання обладнання не за його призначенням або його неналежного
обслуговування.
Імпортер/виробник застерігає собі право модифікувати виріб у будь-який
момент, без попереднього повідомлення, для пристосування до правових по-
ложень, стандартів, директив або у зв’язку з конструкційним, тоговельним,
естетичним та іншими причинами.
62 GW28-022_v01

EN
Content
Unwind and straighten the power cord before usage. –
Unplug before lling or emptying the water tank. –
Important safety and handling instructions for an iron with LCD display ....63
Empty the tank after each usage. –
Hints for ironing .........................................................................................64
Technical data ...........................................................................................64
If the non-detachable part of the cord is damaged, it should be re-
Get to know your iron ................................................................................64
placed by the producer or at a proper service point or by a qualied
LCD display ...............................................................................................64
person in order to avoid any hazards.
How to ll the water ...................................................................................65
The appliance should be repaired by trained staff only. Improper repair
Temperature setting ...................................................................................65
can result in serious hazard for a user. In case of defects we recom-
Preparation for operation – rst time ironing .............................................65
mend you to contact qualied service desk.
Spraying ...................................................................................................66
Do not use the appliance when it is damaged or performs abnormally. –
Dry ironing .................................................................................................66
Do not touch the iron rest during or just after ironing. – It is hot!
Steam ironing ............................................................................................66
Avoid any contact of supplying cord with the iron rest. –
Burst of steam ...........................................................................................66
Always connect the iron to a suitable mains supply outletm –
Burst of steam in vertical position ..............................................................67
(AC only), with grounding, which voltage complies with the voltage
Built-in anti-scale system ..........................................................................67
indicated on the appliance nameplate.
Self-cleaning ..............................................................................................67
The appliance generates high temperature. Use it carefully and warn –
Anti-drip system .........................................................................................68
other users against possible hazard.
Auto shut-off feature .................................................................................68
Do not use an extension power cord set without grounding! –
Auto shut-off in horizontal position ....................................................68
Do not add perfumed, vinegar or other chemical liquids into the water –
Auto shut-off in vertical position ........................................................68
tank; they can damage the appliance seriously.
Draining the water .....................................................................................68
Do not immerse the appliance in water or any other liquid. –
Cleaning and maintenance ........................................................................69
Do not roll the power cord around the iron until it has cooled down com- –
Ecology – environment protection .............................................................69
pletely.
Do not attempt to open the cabinet or dismantle any parts from the appliance. –
Dear Customer,
Use and place the appliance on a rm and steady surface. –
Do not open water inlet during ironing. –
Congratulations on your choice of our appliance, and welcome among the
Keep special care when ironing in presence of children. Do not allow to –
users of Zelmer products.
touch the iron during ironing.
In order to achieve best possible results we recommend using exclusively origi-
This appliance is not intended for use by persons (including children) with –
nal Zelmer accessories. They have been specially designed for this product.
reduced physical, sensory or mental capabilities, or lack of experience
Please read these instructions carefully. Pay your special attention to impor-
and knowledge, unless they have been given supervision or instruction
tant safety instructions. Keep this User’s Guide for future reference.
concerning use of the appliance by a person responsible for their safety.
Children should be supervised to ensure that they do not play with the –
Important safety and proper handling instructions for an
appliance.
iron with LCD display
The appliance is not intended to be operated by means of an external –
timer or separate remote-control system.
Always keep these basic safety instruction during ironing:
Do not leave the appliance unattended when it is connected to a mains –
The iron is intended for domestic usage only and you can use it solely –
supply outlet or it is hot.
according to herewith manual.
The iron is not to be used if it has been dropped, if there are visible signs –
Remove any protective lms or stickers from the sole plate and the cabinet. –
of damage or if it is leaking.
63GW28-022_v01
64 GW28-022_v01
Never iron and clothes or fabrics that are being worn by human or pets. –
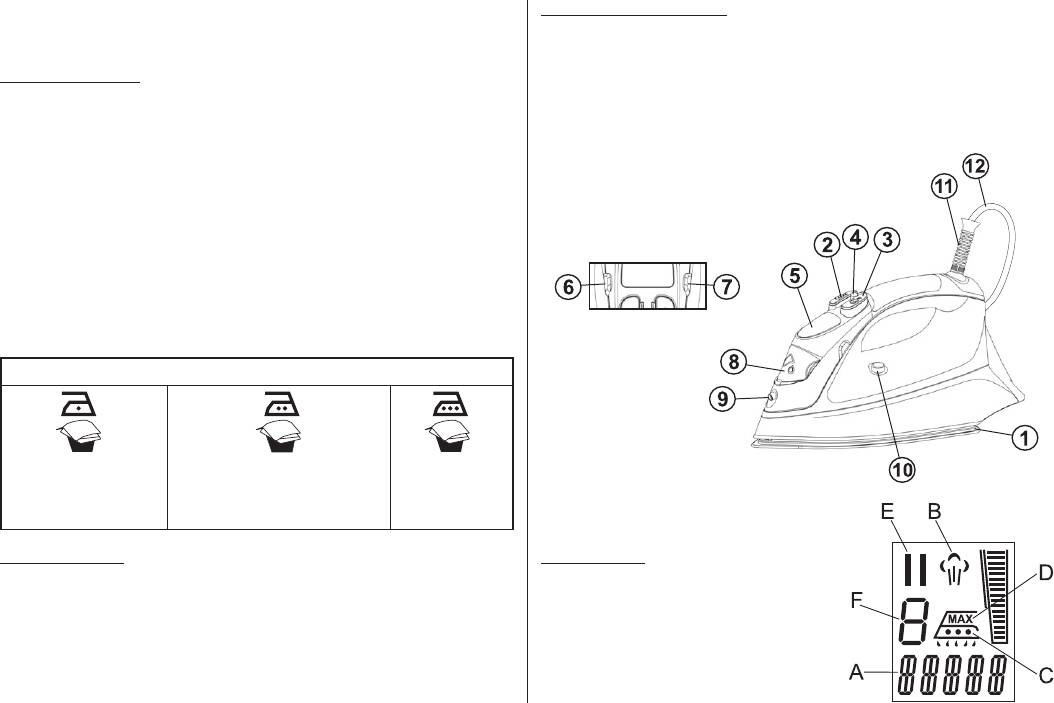
Get to know your iron
Never direct the steam to human or pets. –
1. Sole plate
8. Water inlet cover
Use self-cleaning function at least once a month. –
2. Water Spray button
9. Spraying nozzle
3. Burst of steam button
Hints for ironing
10. Self-cleaning knob
4. Steam control knob
11. Grommet cord
1. Sort out the articles to be ironed according to the type of fabric. This will
5. LCD display
12. Power cord
minimize the frequency of temperature adjustment for different garments.
6. LCD display switch and
2. Test ironing a small area on the backside or inside the garment if you
Temperature increasing knob
are unsure about the type of fabric. Start with a low temperature and
7. Temperature reducing knob
increase gradually.
3. Wait for about three minutes before ironing heat sensitive fabrics. Tem-
perature adjustment needs certain time to reach the required level no
matter it is higher or lower.
4. Delicate fabrics such as silk, wool, velour, etc. are best ironed with an
ironing cloth to prevent shine marks.
5. You may need a few times of press to activate the spray, burst and verti-
cally burst function.
6. Read the garment labels and follow the manufacturer’s ironing in-
structions which are often shown by symbols similar to the following:
Temperature settings
○ Acetate
○ Cupro ○ Triacetate
○ Cotton
○ Elastics
○ Polyester ○ Viscose
○ Linen
○ Polyamide
○ Proteins ○ Wool
○ Polypropylene
○ Silk
Technical data
LCD display
The iron technical parameters are included at the name plate. The iron is
A. Type of fabric indicator
I class appliance, equipped with supplying cord and plug with grounding.
B. Steam ironing indicator
ZELMER iron meets the requirements of effective standards.
C. Temperature setting indicator
The appliance meets the requirements of the following directives:
D. Maximum temperature reached
Low Voltage Device (LVD) – 2006/95/EC. –
indicator.
Electro- Magnetic Compatibility (EMC) – 2004/108/EC. –
E. Auto shut-off indicator
The product is marked with CE symbol on the name plate.
F. Position number

65GW28-022_v01
How to ll the water
In order to increase the temperature press – button many
Disconnect the iron from mains –
times (a sound signal goes with every click). The following labels shall
supply outlet.
appear on display (5): acrylic, nylon, silk, polyester, blend, wool, cotton,
Move the – steam Control Knob
jeans, linen.
(4) to position.
In order to reduce the temperature press – button many times
Release the – water inlet cover (8)
(a sound signal goes with every click). The labels shall appear on dis-
and ll water through the water
play in reverse sequence.
inlet hole.
Dots – indicate the temperature setting.
Fill up to the „ – MAX” level marked
on the side of water tank.
Preparation for operation – rst ironing
Close the – water inlet cover (8).
Remove any protective lms or sticker from the – soleplate (1) and the
cabinet.
Temperature setting
Unwind and straighten the – power cord (12).
Connect the iron to a suitable mains supply outlet. –
Fill the water tank in as described under “ – How To Fill Water”.
The – display (5) glows for a moment and you can hear single sound sig-
The – display (5) glows for a moment and you can hear single sound sig-
nal. Then the display (5) go off.
nal. Then the display (5) go off.
Press the – button on the left side of the display, to switch
Press – button to set the temperature on display
it on you can hear a single sound signal. Number, type of garment and
amount of dots referring to the temperature level.
.
When the temperature is reached the number stops blinking and you –
To set the temperature use – and buttons, located
can hear a single sound signal.
at both sides of the display.
Move the – Steam Control Knob (4) to position.
Steam starts coming out from the holes in the sole plate after putting the –
iron in horizontal position and after Burst of steam knob (3).
Begin rst time ironing with an old towel. –
The steam is not generated after the water tank is emptied. –
The preparation work is completed. The iron is now ready for proper –
use.
After operation press and hold – button for about 2 sec-
onds to switch off the iron. You can hear single sound signal. Then the
display (5) goes off.
Move the – Steam Control Knob (4) to position.
Disconnect the iron from mains supply outlet. –
When the iron gets cool completely, store it vertically in a safe place. –
66 GW28-022_v01
Set the temperature – (5 level)
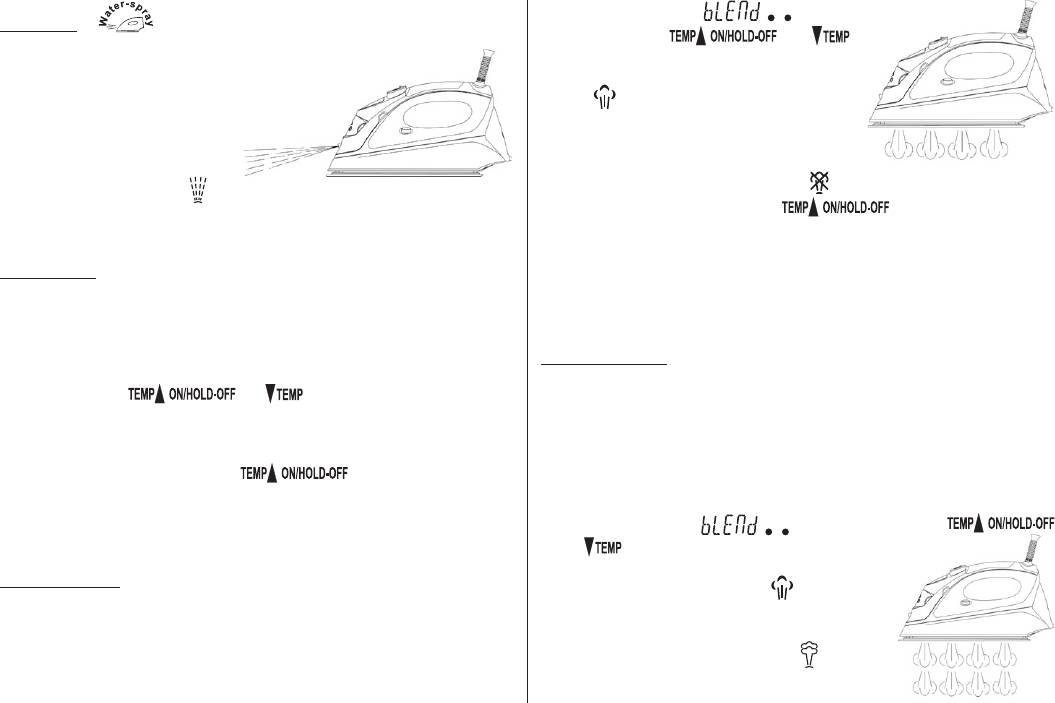
Spraying
or higher with or
This function can be used any –
buttons, as described in “Temperature
time and is not affect any set-
Setting” item. The steam ironing indica-
ting.
Fill the water tank as de- –
tor (B).
scribed in “How to Fill Wa-
Move the – Steam Control Knob (4), in or-
ter”.
der to set the amount of steam.
Aim the – nozzle (9) to the gar-
After operation switch off the steam mov- –
ment.
ing the Steam Control Knob (4) to position.
Press the – spray button (2).
After operation press and hold – button for about 2 sec-
It may be necessary to press the spray button a few times to start this
onds to switch off the iron. You can hear single sound signal. Then the
function.
display (5) goes off.
Disconnect the iron from mains supply outlet. –
Dry ironing – Always follow the garment manufacturer’s ironing
When the iron gets cool completely, store it vertically in a safe place. –
instructions mentioned at the garment label.
REMARK: For steam ironing the temperature setting 5 to 9 is recom-
Connect the iron to a suitable mains supply outlet. –
mended.
The – display (5) glows for a moment and you can hear single sound sig-
nal. Then the display (5) go off.
Burst of steam – Always follow the garment manufacturer’s
Set the temperature according to the requirement on the label of the –
ironing instructions mentioned at the garment label.
garment using or buttons, as described in “Tem-
This function provides extra amount of steam to remove stubborn wrinkles
perature Setting” item.
at clothes and hanging garments.
When the temperature is reached the number stops blinking and you –
can hear a single sound signal, the iron is ready to use.
Fill the water tank in as described under “ – How To Fill Water”.
Connect the iron to a suitable mains supply outlet. –
After operation press and hold – button for about 2 sec-
The – display (5) glows for a moment and you can hear single sound sig-
onds to switch off the iron. You can hear single sound signal. Then the
nal. Then the display (5) go off.
display (5) goes off.
Disconnect the iron from mains supply outlet. –
Set the temperature – (5 level) or higher with
When the iron gets cool completely, store it vertically in a safe place. –
or buttons, as described in “Tempera-
ture Setting” item.
Steam ironing – Always follow the garment manufacturer’s
The – steam ironing indicator (B) appears
ironing instructions mentioned at the garment label.
on display.
Fill the water tank in as described under “ – How To Fill Water”.
The appliance is ready for operation. –
Connect the iron to a suitable mains supply outlet. –
The – display (5) glows for a moment and you can hear single sound sig-
Press the – Burst of Steam Button (3) once
nal. Then the display (5) go off.
– steam will shoot from the holes of the sole-
plate.
67GW28-022_v01
For stubborn wrinkles, wait a few seconds before pressing the – Burst of
For stubborn wrinkles, wait a few seconds before pressing the – Burst of
Steam Button (10) again. Most wrinkles can be removed within three
Steam Button (3) again. Most wrinkles can be removed within three
presses.
presses.
After operation press and hold – button for about 2 sec-
After operation press and hold – button for about 2 sec-
onds to switch off the iron. You can hear single sound signal. Then the
onds to switch off the iron. You can hear single sound signal. Then the
display (5) goes off.
display (5) goes off.
Disconnect the iron from mains supply outlet. –
Disconnect the iron from mains supply outlet. –
When the iron gets cool completely, store it vertically in a safe place. –
When the iron gets cool completely, store it vertically in a safe place. –
It may be necessary to press the burst of steam button a few times to
It may be necessary to press the burst of steam button a few times to
start this function.
start this function.
For optimum steam quality, do not operate the Burst of Steam more
For optimum steam quality, do not operate the Burst of Steam more
than three times after the control light goes off.
than three times in one cycle.
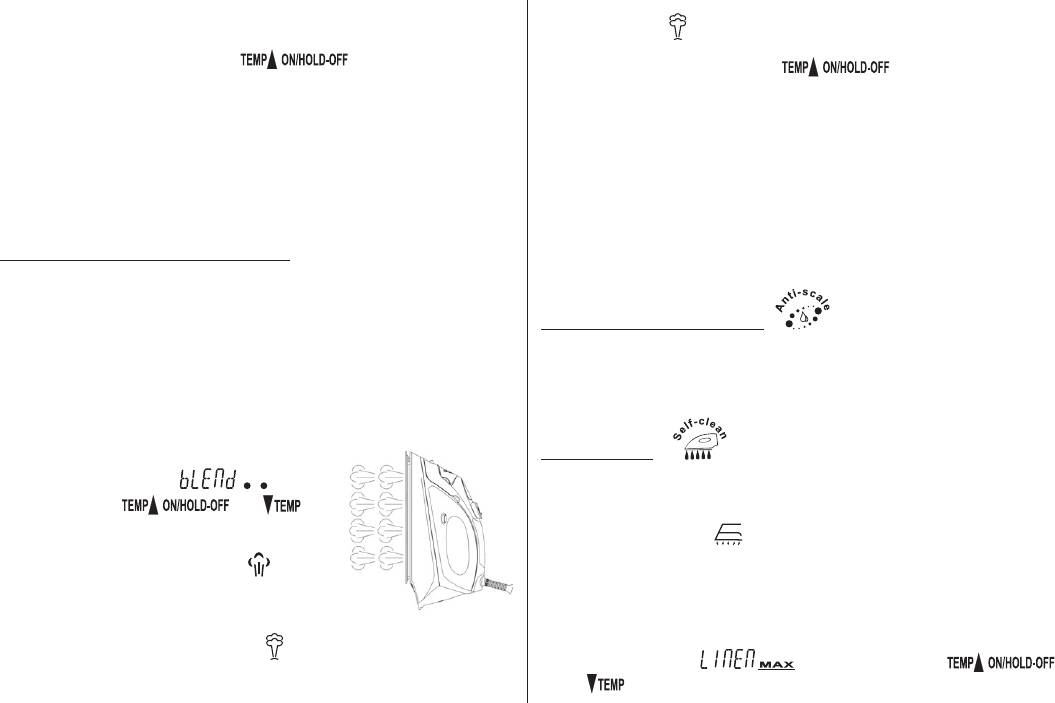
Burst of steam in vertical position – Always follow the garment
Hold the iron some centimetres away from delicate garments (arti-
manufacturer’s ironing instructions mentioned at the garment label.
cial, silk, velvet etc.), otherwise they can be damaged.
This function provides extra amount of steam to remove wrinkles on delicate
garments in hanging position, hanging curtains, or other hanging fabrics.
Build-in anti-scale system
Warning:
The build-in anti-scale cartridge is designed to reduce the build-up of lime
Do not apply steam on any clothes or fabrics that are being worn by
scale that occurs during steam ironing. This will prolong the working life of
human or pets. Never direct the steam to human or pets.
your iron, although it does not stop the natural process of build-up of lime
Fill the water tank in as described under “ – How To Fill Water”.
scale completely.
Connect the iron to a suitable mains supply outlet. –
The – display (5) glows for a moment and you can hear single sound sig-
nal. Then the display (5) go off.
Self-cleaning
This function removes the scales and minerals built up in the Steam Cham-
Set the temperature – (5 level)
ber. The iron will remain in the best condition if this function is performed
or higher with or but-
at least once a month or more regularly depending on the hardness of the
tons, as described in “Temperature Setting”
item.
water used. You can see on LCD display (5).
Fill the water tank in as described under “ – How To Fill Water”.
The – steam ironing indicator (B) ap-
Place the iron on the surface in vertical, resting position. –
pears on display.
Connect the iron to a suitable mains supply outlet. –
The appliance is ready for operation. –
The – display (5) glows for a moment and you can hear single sound sig-
Hold the iron between 15 and 30 centimetres away from the garment. –
nal. Then the display (5) go off.
Press the – Burst of Steam Button (3) once – steam will shoot from
Set the temperature – (9 - highest level) with
the holes of the soleplate. The steam penetrates the fabric removing
or buttons, as described in “Temperature Setting” item.
wrinkles.

68 GW28-022_v01
3. The auto shut off function fades each time the iron is moved. The dis-
Press and hold – button for about 2 seconds to switch off
play (5) will illuminate, the audible signal will switch off and the iron will
the iron. You can hear single sound signal. Then the display (5) goes off.
reheat.
Disconnect the iron from mains supply outlet. –
Hold the iron horizontally over a sink. –
AUTO SHUT-OFF IN VERTICAL POSITION
Press and hold the – Self-cleaning (10) Knob.
1. The iron will switch off automatically after approximately 5-10 minutes,
Steam and boiling hot water will drain from the holes on the soleplate –
if it is immobile in the rest position (vertical).
washing away the scales and minerals that have built up inside the
2. The symbol will appear on the display (5) and will be accompanied
Steam Chamber.
by alternately the illumination and going out of the display. An interrupted
Gently move the iron back and forth until the water tank is empty. –
audible signal will be heard.
When Self-Cleaning is complete, release the Knob – (10).
3. The auto shut off function fades each time the iron is moved. The dis-
Rest your iron back on its heel rest and allow to fully cool down. –
play (5) will illuminate, the audible signal will switch off and the iron will
Wipe the soleplate with a cold damp cloth. –
reheat.
When the iron gets cool completely, store it vertically in a safe place. –
The iron will take about 60 seconds to reach its previous soleplate
Caution! Keep skin/body away from the hot water.
temperature before auto shut-off feature in horizontal or in vertical
works.
Anti-Drip System
The system, which is designed to prevent –
Draining the water
automatically water escaping from the
After operation press and hold –
sole-plate when the iron is too cold.
button for about 2 seconds to switch off the iron.
During use, the anti-drip system may emit –
You can hear single sound signal. Then the dis-
a loud clicking sound, particularly during
play (5) goes off.
heat-up or whilst cooling down. This is per-
Disconnect the iron from mains supply outlet, –
fectly normal and indicates that the system
then turn the iron upside down, open the water
is functioning correctly.
inlet cover and gently shake it to remove the re-
maining water.
When the iron gets cool completely, store it ver- –
Auto shut-off feature
tically in a safe place.
The Auto shut-off feature will operate automatically when the iron is un-at-
tended and it is connected to a mains supply outlet.
AUTO SHUT-OFF IN HORIZONTAL POSITION
1. The iron will switch off automatically after approximately 30 seconds, if it
is immobile in the ironing position (horizontal).
2. The symbol will appear on the display (5) and will be accompanied
by alternately the illumination and going out of the display. An interrupted
audible signal will be heard.
69GW28-022_v01
Cleaning and maintenance
Disconnect the iron from mains supply outlet. –
The iron should get cool completely before cleaning. –
Use a damp cloth and gentle washing liquid for cleaning. –
Do not use aggressive detergents like cream, milk, paste etc. to clean –
the casing. They can remove graphic symbols such as: scales, marking,
caution signs, etc.
Never use sharp or rough objects to remove the deposits on the sole –
plate.
Never use any abrasive, vinegar or descaling agents to clean the iron. –
Ecology – Environment protection
Each user can protect the natural environment. It is neither dif-
cult nor expensive.
In order to do it: put the cardboard packing into recycling pa-
per container; put the polyethylene (PE) bags into container
for plastic.
When worn out, dispose the appliance to particular disposal
centre, because of the dangerous elements of this appliance,
which can be hazardous for natural environment.
Do not dispose into the domestic waste disposal!!!
The manufacturer/importer does not accept any liability for any damages resulting
from unintended use or improper handling.
The manufacturer/importer reserves his rights to modify the product any time in
order to adjust it to law regulations, norms, directives, or due to construction, trade,
aesthetic or other reasons, without notifying in advance.
GW28-022_v01
GW28-022_v01
GW28-022_v01


