Zelmer 13Z014 – страница 4
Инструкция к Кофе-Машину Zelmer 13Z014
61
ОБСЛУГОВУВАННЯ ПУЛЬТУ УПРАВЛІННЯ
Якщо раніш була вживана функція пара, установіть кнопку гаряча
вода/пара (B) у положенні „витиснутий” . З моменту досяг-
Кнопка включіть/виключіть (M)
нення кавоваркою відповідної температури, перестане мигати і згасне
Включіть кавоварку, натискаючи кнопку (M). Сигналізаційна лам-
лампочка стану готовності (N). Кавоварка готова до праці.
почка (L) запалиться червоним кольором, натомість лампочка стану
Увага: Під сопло пари (C) установіть відповідну ємність.
готовності (N) почне мигати.
Для отримання гарячої води/кип’ятка, поверніть регулятор (K) у на-
Увага: Перед запуском кавоварки, необхідно упевнитися, чи регуля-
прямку, відповідно до руху годинникових стрілок у положення . Під
тор (K) знаходиться у положенні 0 (виключений).
час цього процесу світиться лампочка стану готовності (N).
Якщо кавоварка готова до праці, лампочка стану готовності (N) згасне.
Для виключення наливання гарячої води/кип’ятка, установіть регу-
Увага: Пам’ятайте, що лампочка стану готовності (N) мигає, це означає,
лятор повторно у положенні 0.
що каваоваркою не було досягнуто відповідної робочої температури.
Для виключення кавоварки вистачить натиснути кнопку (M).
ЕСПРЕСО
Якщо кавоварка включена – натиснута кнопка (M) (світиться лам-
почка уключіть/виключіть (L)), a кнопка гаряча вода/пара (B)
є у положенні „витиснутий” (лампочка стану готовності (N) не сві-
титься) – обладнання знаходиться у режимі eспресо.
Якщо раніш була вживана функція пара, установіть кнопку гаряча
вода/пара (B) у положенні „витиснутий” . З моменту досяг-
ПАРА
нення кавоваркою відповідної температури, перестане мигати і згасне
Якщо кавоварка включена – натиснута кнопка (M) (світиться лам-
лампочка стану готовності (N). Кавоварка готова до заварки кави.
почка уключіть/виключіть (L)), a кнопка гаряча вода/пара (B)
Увага: Під головку заварки установіть чашку/чашки.
є у положенні „витиснутий” (лампочка стану готовності (N) не сві-
Для заварки еспресо (включення насоса), поверніть регулятор (K)
титься) – обладнання знаходиться у режимі пара.
у напрямку, противному руху годинникових стрілок у положення .
Якщо раніш була вживана функція еспресо або гаряча вода, устано-
Під час цього процесу світиться лампочка стану готовності (N).
віть кнопку гаряча вода/пара (B) у положенні „втиснутий” .
Для виключення насоса (припинення процесу заварки/наливання
З моменту досягнення кавоваркою відповідної температури, переста-
кави), установіть регулятор повторно у положення 0.
не мигати і згасне лампочка стану готовності (N). Кавоварка готова до
функції пари.
Для початку дозування пари поверніть регулятор (K) у напрямку, від-
повідно до руху годинникових стрілок у положення . Під час цього
процесу світиться лампочка стану готовності (N). Для виключення до-
зування пари, установіть регулятор повторно у положенні 0.
ГАРЯЧА ВОДА/КИП’ЯТОК
Якщо кавоварка включена – натиснута кнопка (M) (світиться лам-
почка уключіть/виключіть (L)), a кнопка гаряча вода/пара (B)
є у положенні „витиснутий” (лампочка стану готовності (N) не сві-
титься) – обладнання знаходиться у режимі гаряча вода.
КОРОТКИЙ ПОСІБНИК З ОБСЛУГОВУВАННЯ КАВОВАРКИ
Нижчевказані рисунки мають цель допомогти Вам користуватися кавоваркою. Кожен із рисунків має свій номер. У змісті цього посібника з корис-
тування, будуть посилання на ці рисунки, тому вони були пронумеровані для легкого і зручного користування ними.
Наприклад: Наповніть бак для води (1) холодною водою – не мінеральною.
Кожен раз як побачите ці номери, ознайомтесь, будь-ласка з рисунками.
Підготування кавоварки – заварка еспресо
Упевніться, що регулятор (K) знаходиться
Наповніть бак холодною водою до позна-
у положенні 0. Підключіть живильний кабель
чення MAX.
до розетки перемінного струму 230V.
Виберіть відповідне сито для 1 чашки або
для 2 чашек (у залежності від потреби) i по-
містіть металеве сито (H) у держателі сита
Натисніть кнопку (M) для включення ка-
(E).
воварки. Засвітиться лампочка уключіть/
ВКАЗІВКА: Наповніть металеве сито змеле-
виключіть (L). Почне мигати лампочка ста-
ною кавою за допомогою мірки (G). Утрам-
ну готовності (N).
буйте каву легко трамбувальним пристроєм,
тобто плоскою частиною мірки (G). Не трам-
буйте надто сильно.
Помістіть держатель сита (E) у головці (не-
значно з лівого боку).
Увага: виступи на держателі (E) повинні зна-
Очистіть кільце держателя сита (E) від
ходитися у канавках головки.
надмірної кількості кави. Це забезпечить
Поверніть держатель ситечка (E) вправо до
правильне кріплення держателя сита (E)
опору.
у головці для заварки.
Попередження: Упевніться, що держатель
Увага: Еспресо вимагає дрібно змеленої
ситечка (E) закріплений у головці правильно.
кави, більш ніж звичайної зернистої кави.
Якщо Ви не переконані, не запускайте облад-
нання. Швидше вийміть держатель ситечка
(E) i покладіть його повторно у вищевказаний
спосіб, до його правильного встановлення.
Поверніть регулятор (K) вліво у положення
, як тільки перестане мигати i згасне лам-
почка стану готовності (N). Якщо кава була
Помістіть одну або дві чашки під двумя
змелена й утрамбована належним чином,
виходами держателя ситечка (E).
то приготування темного еспресо з пінкою
„crema” наверху, не повинно тривати більш
як бл. 30 секунд. Під час цього процесу сві-
титься лампочка стану готовності (N).
Поверніть регулятор (K) повторно вправо
у положення 0, для закінчення процесу за-
варки кави.
Утворення молочної піни
Упевніться, що регулятор (K) знаходиться
Натисніть кнопку гаряча вода/пара
у положенні 0 i втиснута кнопка (M). По-
(B), для встановлення кавоварки у режимі
гашена лампочка (N) інформує про стан
пар (положення ).
готовності кавоварки.
Прополоскайте сопло, підкладаючи під
Виключіть пару шляхом повернення регуля-
сопло (C) ємність i поверніть регулятор
тора (K) у положення 0.
(K) у положення пари .
Наповніть малий дзбанок або кварту з не-
ржавіючої сталі у кількості 1/3 або 1/2
Піднесіть дзбанок для занурення сопла пари
ємності свіжим, холодним молоком і по-
до 1/2 см у молоці.
кладіть на сопло пари (C) насадку для
Попередження: ПІД ЧАС УТВОРЕННЯ
утворення піни (D).
ПІНИ, ДЗБАНОК/КВАРТА СТАНЕ ДУЖЕ
Увага: МЕТАЛЕВЕ СОПЛО ПАРИ МОЖЕ
ГАРЯЧИМ.
БУТИ ГАРЯЧИМ.
Поверніть регулятор (K) у положення 0, для
зменшення тиску до моменту подвоєння
об’єму молока. Верхню половину буде скла-
Поверніть регулятор (K) у положення
дати молоко з піною, a нижню половину мо-
i проведіть регулювання витрати пари так
локо, що піддається дії пари.
(занурюючи сопло пари у молоці глибже
Вказівка: Накладіть ложечкою пінку у чаш-
або мілкіше), щоб отримати бажану піну.
ки з еспресо – кавою. Додайте рідке молоко.
Капучіно повинно складатися з 1/3 кави, 1/3
гарячого молока та 1/3 пінки.
62
Гаряча вода/кип’яток
Упевніться, що регулятор (K) знаходиться
Перевірте, щоб кнопка гаряча вода/пара
у положенні 0 i натиснута кнопка (M).
(B) була у положенні „витиснута”
Погашена лампочка (N) інформує про
. Завдяки тому обладнання знаходить-
стан готовності кавоварки.
ся у режимі гаряча вода/кип’яток.
Помістіть сопло пари (C) усередині
кварти.
Поверніть регулятор (K) у положення .
З сопла пари (C) виплине гаряча вода. Під
Попередження: ПІД ЧАС НАЛИВАН-
час цього процесу світиться лампочка стану
НЯ ДЗБАНОК/КВАРТА СТАНЕ ДУЖЕ
готовності (N).
ГАРЯЧИМ.
Якщо досягнете достатньої кількості га-
рячої води, поверніть регулятор (K) у по-
ложення 0. Вийміть чашку або посуд з-під
сопла (C).
Попередження: Коли заварка закінчена
і регулятор (K) знаходиться у положенні 0,
тоді надмір пари під тиском може звільни-
тися у піднос для стікання. Це нормальне
явище.
Очищування
Усуньте решітку (J) i піднос для стікання
Якщо внутрішня частина кільця сита частко-
(I). Очистіть ці частини у теплій воді з за-
во або повністю покрита змеленою кавою,
собом для миття посуди. Не мийте у посу-
очистіть її шляхом прополоскання частини
домийній машині. Це може бути причиною
або повністю бункеру для води.
деформації цих частин.
ПРИГОТУВАННЯ КАВОВАРКИ ПЕРЕД ПЕРШИМ
Увага: При першому користуванні обладнанням або якщо ви не
користувалися обладнанням протягом довготривалого часу, осо-
ВИКОРИСТАННЯМ (ОПИС)
бливо важливим є прополоскати кавоварку.
1. Помістіть кавоварку на сухій та нерухомій основі.
5. З цією метою установіть ситечко у держатель (H) для одної чи двох
2. Упевніться, що піднос для стікання (I) i решітка (J) знаходяться на
чашек. Установіть держатель ситечка (E) у головці для заварки (6).
своєму місці.
6. Помістіть достатньо велику ємність під обидва наповнюючі отво-
3. Наповніть бак кавоварки водою.
ри (7). Упевніться, що кавоварка знаходиться у режимі eспресо
Існують два способи наповнення баку водою:
тобто, що натиснута кнопка (M) (світиться лампочка включіть/
a) Піднесіть кришку баку води, що знаходиться у верхній части-
виключіть (L)), a кнопка гаряча вода/пара (B) є у положенні
ні кавоварки і вживаючи напр. дзбанок, наповніть його свіжою
„витиснута” (лампочка стану готовності (N) не світиться).
холодною водою або фільтрованою водою і закрийте кришку.
7. Поверніть регулятор (K) у напрямку, противному до руху годин-
b) Альтернативно є можливість вийняти бак води і наповнити
никових стрілок (8) у положення еспресо i забезпечіть вихід
його свіжою холодною водою. З цією метою піднесіть кришку,
води до повного спорожнення баку для води. Під час цього про-
схопіть за ручку баку і висуньте його з кавоварки. Далі напо-
цесу світиться лампочка стану готовності (N).
вніть його свіжою холодною водою або фільтрованою водою
(1). Уставте на місце бункер води і закрийте кришку.
ЗАВАРКА КАВИ – ЕСПРЕСО (OПИС)
Увага: Перед включенням кавоварки упевніться, що регулятор
Перед початком заварки кави упевніться, що кавоварка знаходиться
(K) знаходиться у положенні 0 (виключений) (2).
у режимі eспресо тобто, що світиться червона лампочка живлення
4. Підключіть живильний кабель до розетки перемінного струму
(L), a лампочка стану готовності (N) згасне.
230V. Натисніть кнопку (M), щоб включити кавоварку (3). Уклю-
Для досягнення добрих смакових якостей кави, можна попередньо на-
чіть кавоварку, натискаючи кнопку (M). Сигналізаційна лампоч-
гріти чашки, держатель ситечка і і ситечко таким чином:
ка (L) засвітиться червоним кольором, натомість лампочка ста-
Попереднє підігрівання держателя (E) з ситечком (H)
ну готовності (N) почне мигати. Якщо кавоварка готова до праці,
лампочка стану готовності (N) згасне.
1. Наповніть бак води холодною водою (1) i запустіть обладнання (3).
Увага: Пам’ятайте, що лампочка стану готовності (N) мигає, це
2. Виберіть відповідне ситечко (H) i помістіть його у держателі (E) (4).
означає, що кавоваркою не було досягнуто відповідної робочої
Вказівка: Для одної порції кави застосуйте менше ситечко (для
температури.
одної чашки), a більше для двох порцій кави.
63

3. Схопіть держатель ситечка (E), притримайте його під головкою
1. Перевірте чи у бункері є холодна вода. У разі відсутності або не-
i прополоскайте водою, повертаючи регулятор (K) у напрямку
достатньої кількості води, наповніть бункер для води (1) холод-
противному до руху годинникових стрілок у положення еспресо
ною водою.
(8) для початку проходу води і поверніть його назад у поло-
2. Визначіть кількість потрібного молока, ураховуючи число заваре-
ження 0, для виключення обладнання (9).
них чашок або розмір дзбанка для молока.
4. Залишіть до висихання держателя ситечка.
Вказівка: Пам’ятайте, що об’єм молока збільшується під час його
Попереднє підігрівання посуду
спінення.
3. Влийте холодне, охолоджене молоко у дзбанок із нержавіючої
5. Є можливість підігріти чашки, наповнюючи їх гарячою водою. Упев-
сталі, наповнюючи його від 1/3 до 1/2 об’єму (14).
ніться, що кавоварка знаходиться у режимі eспресо тобто, що на-
Вказівка: Зберігайте дзбанок із нержавіючої сталі з молоком у хо-
тиснута кнопка (M) (світиться лампочка включіть/виключіть (L)),
лодильнику так, щоб воно було охолоджене належним чином.
a кнопка гаряча вода/пара (B) є у положенні „витиснута”
Пам’ятайте, щоб перед використанням не полоскати дзбанок те-
(лампочка стану готовності (N) не світиться). Помістіть сопло пари (C)
плою водою.
усередині чашки. Поверніть регулятор (K) у положення для початку
проходу гарячої води з сопла пари (C). Для припинення даного проце-
4. Прополоскайте сопло водної пари (C), підкладаючи під сопло (С)
су, установіть регулятор у положення 0. Вилийте гарячу воду з чашек.
ємність i поверніть регулятор (К) у положення пари (12). Виклю-
чіть пару шляхом повернення регулятора (K) у положення 0 (13).
Заварка кави
5. Відхиліть сопло пари (С) на бік обладнання i встановіть на сопло
6. Перевірте наявніть холодної води у баку. У разі відсутності води
(С) насадку для утворення молочної піни (D).
або недостатньої кількості холодної води, наповніть бак холодною
6. Помістіть сопло пари в молоці таким чином, щоб сопло знаходи-
водою (1) i запустіть обладнання (3).
лося близько 1/2 см нижче поверхні i запустіть спуск пари шляхом
7. За допомогою доданої мірки (G), помістіть дрібно змелену каву
повернення регулятором (K) у положення (15) (16).
у ситечку.
7. Наклоніть дзбанок так, щоб сопло пари знаходилося у дзбанку
8. Другим боком (плоскою поверхнею) мірки (G) утрамбуйте легко
i спускайте дзбанок до моменту появи наконечника сопла пари
каву з поверненням на 90 градусів для заповнення днища. Це
тут же нижче поверхні молока. Це приведе до початку утворення
приводить до ущільнення утрамбованої кави.
молочної піни.
9. Усуньте надмір кави, щоб максимально була нарівні з краєм си-
Увага: Не допускайте нерівномірного виходу пари, у противному
течка (H) (5).
разі здійснюватиметься неправильна аерація піни. Для поперед-
Важливе: Упевніться, щоб у ситечку (H) не було надто великої
ження неправильної аерації, піднесіть дзбанок, щоб сопло пари
кількості кави.
сховалося більш глибоко у молоці. Пам’ятайте, що ідеальна кон-
Вказівка: Дозування кави і ступінь утрамбування повинні кожен
систенція це м’яка, оксамитова пінка.
раз залишитися без змін. Від розміру зернистості змеленої кави
8. У момент якщо молоко нагріється i спіниться, рівень молока у дзбан-
залежить час наливання завареної кави. Чим дробніша кава, тим
ку почне збільшуватися. У такому випадку, спускайте дзбанок, утри-
менша швидкість наливання.
муючи наконечник сопла пари зараз нижче поверхні молока.
Вказівка: Упевніться, що під час трамбування кави плоска части-
9. З моменту отримання піни піднесіть дзбанок так, щоб сопло пари
на мірки (G) є сухою. Зволоження цього наконечника приводить
знаходилося посередині молока.
до зліплювання часточек кави.
Вказівка: Кількість потрібної піни буде змінюватися у залежності
Увага: Надто дрібно змелена кава може привести до закупорення
від виду напою. Напр. cappucino вимагає більшої кількості піни,
отворів у ситечку (H) i відсутності проходу кави.
ніж кавовий напій на базі еспресо, що подається з молоком, що
10. Установіть держатель ситечка (E) у головці і поверніть вправо до
спінюється парою.
упору (6)
10. Закрийте негайно пару, якщо молоко підігріється до температури
11. Підставте чашки нижче отворів для наливання (E) (7).
60–65°C шляхом повернення регулятором (K) у положення 0 (17).
Увага: Перевірте, чи кавоварка готова для використання. Якщо
Вказівка: При відсутності термометру, добрим показанням досяг-
лампочка стану готовності (N) мигає, це означає, що кавоварка
нення відповідної температури є те, що неможливо доторкатися
ще не є у стані готовності до праці.
руками до боку стінки дзбанка більш як 3 секунди.
12. Для запуску процесу наливання кави, поверніть регулятор (K)
Важливе: Не заварюйте молоко.
у напрямку противному руху годинникових стрілок у положення
11. Усуньте дзбанок, зніміть зі сопла (С) пари насадку для утворен-
еспресо (8). Під час цього процесу світиться лампочка стану
ня молочної піни (D), яку після кожного використання необхідно
готовності (N). Для припинення цього процесу поверніть регуля-
умити в теплій воді з доданням засобу для миття кухонної посуди,
тор назад у положення 0 (9).
очищаючи усі отвори. Негайно протерти сопло пари (С) i його на-
Вказівка: Ідеально заварена кава має темний і карамельний ко-
конечник за допомогою чистої зволоженої ганчірки i прополоскати
лір з червонуватими поблисками. У великій степені це залежить від
невеликою кількістю пари.
якості кави. Подавайте свіжо заварену каву, обов’язково гарячу.
12. Тримаючи дзбанок в руці легко стукніть ним у стіл, щоб звільнити
Обслуговування кавоварки після заварки кави
пузирі повітря i далі обертати дзбанком круговим рухом до мо-
менту, якщо молоко стане блискучим без пузирів. Це допоможе
13. Поверніть держатель ситечка (E) вліво й усуньте його з головки.
отримати однорідну консистенцію молока і піни.
14. Спорожніть ситечко (H) від використаної кави. Виконуючи цю дію
притримайте ситечко притискаючи великим пальцем блокаду си-
ЗАСТОСУВАННЯ ФУНКЦІЇ ГАРЯЧОЇ ВОДИ
течка (F).
Вказівка: Після кожного користиування кавоваркою, рекомен-
Функція гарячої води є ідеальною для приготування напою long black
дується прополоскати головку невеликою кількістю води. Це за-
(еспресо розчинене гарячою водою), гарячого шоколаду та наповне-
безпечує очищення від кави, пригорілої до нижньої частини голо-
ння дзбанка для кави з поршнем та чайника для чаю.
вки. З цією метою вистачить повернути регулятор у положення
Увага: Перед застосуванням функції гарячої води упевніться, що на-
eспресо і допустити свобідний прохід води.
садка для спінення молока (D) знята з сопла пари (С).
1. Наповніть бак води холодною водою (1).
ПРИГОТУВАННЯ МОЛОЧНОЇ ПІНИ (ОПИС)
Включіть кавоварку (3). Перед використанням функції гарячої
Для утворення молочної піни застосовується функція пари. Пара ви-
води необхідно, щоб кавоварка знаходилася у режимі гарячої
конує дві задачі. По – перше нагріває молоко. По – друге пара змішує
води, тобто була натиснута кнопка (M) (світиться лампоч-
повітря і в результаті надає делікатний, бархатний вигляд.
ка включіть/виключіть (L)), a кнопка гаряча вода/пара (B)
Подібно, як під час заварки кави, при утворенні молочної піни найкращі
є у положенні „втиснута” (лампочка стану готовності (N) не
результати досягаються в міру часу і набування досвіду користувачем.
світиться (18) (19)).
Вказівка: Пам’ятайте, що кава складає базу для усіх кавових напоїв,
2. Помістити чашку або посуд під сопло гарячої води/пари і запус-
а молоко є тільки добавкою.
тити функцію гарячої води шляхом повернення регулятора (K)
Увага: Рекомендується як перше приготувати еспресо, а потім утвори-
у положення (20) (21). Під час цього процесу світиться лампоч-
ти молочну піну.
ка стану готовності (N).
Перед початком процесу утворення молочної піни упевніться, що ка-
3. З моменту наповнення чашки або посуду потрібною кількістю га-
воварка знаходиться у режимі пари, тобто натиснута кнопка (M)
рячої води, закрийте гарячу воду шляхом повернення регулятора
(світиться лампочка включіть/виключіть (L)), a кнопка гаряча вода/
(K) у положення 0 (22).
пара (B) є у положенні „втиснута” (лампочка стану готов-
4. Вийміть чашку або посуд, а сопло пари (С) залишіть над підносом
ності (N) не світиться (10) (11)).
для стікання (І).
64
ПРИКЛАДОВІ РЕЦЕПТУРИ ЕСПРЕСО – КАВИ
ЕСПРЕСО (SHORT BLACK)
Еспресо це концентрована, міцна кава з шаром пінки на поверхні – відомої як „crema” (шар коричневої пінки). Еспре-
со складає базу усіх кавових напоїв. Його різновидність залежить від кількості доданого молока і пінки.
Підготуйте скляну чашку для еспресо 90мл або малу чашку для кави. ●
Налийте окреме еспресо (30–35мл). ●
LONG BLACK
Стандартне еспресо з добавкою гарячої води, подається у звичайній чашці для кави або кухлі. Гаряча вода добавля-
ється як перша так, щоб зберегти шар” crema”.
Підготуйте чашку 190мл. ●
Налийте в чашку окреме або подвійне еспресо. ●
Долийте до смаку гарячу воду. ●
MACCHIATO
Macchiato, найменування походить від італьянського слова, що значить „пляму”. Традиційно подається як стандартне
еспресо з ложечкою молока на поверхні i невеликою кількістю пінки („crema”) посередині.
Підготуйте скляну чашку для еспресо 90мл або малу чашку для кави. ●
Налийте окреме або подвійне еспресо. ●
Додайте ложечку молока на поверхню. ●
FLAT WHITE
Іншим улюбленим кавовим напоєм є at white, напій на базі еспресо, з молоком, що спінюється парою, подається
у звичайній чашці для кави або кухлі. Шар спіненого молока на повехні повинен складати 2 мм для ізолювання кави.
Підготуйте чашку 190мл. ●
Налийте окреме або подвійне еспресо. ●
Додайте спінене молоко. ●
CAFFÈ LATTE
Еспресо змішане з молоком, що спінюється парою; переважно подається у скляному посуді. Шар спіненого молока
на верхній повехні повинен складати 10 мм для ізолювання кави.
Підготуйте скляний посуд 220мл або чашку. ●
Налийте окреме або подвійне еспресо. ●
Додайте спінене молоко. ●
CAPPUCCINO
Цей чудовий напій це еспресо з добавкою спіненого молока, з пінкою і посипаний какао. Вказаний напій це у двох
третіх кава з молоком, а в одній третій пінка.
Підготуйте чашку 190–240мл. ●
Налийте окреме або подвійне еспресо. ●
Збережіть співвідношення дві треті кави з молоком, одна третя пінки. ●
Посипайте наверху какао. ●
CAFFE MOCHA
Готується в подібний спосіб, як cappucino, але з добавкою рідкого шоколаду. Вистачить тільки додати шоколад до
еспресо і замішати перед доданням молока, спіненого парою та пінки.
Підготуйте чашку 190–240мл. ●
Налийте окреме або подвійне еспресо. ●
Додайте дві ложечки рідкого шоколаду. ●
Додайте молоко, спінене парою. ●
Збережіть співвідношення дві треті кави з молоком, одна третя пінки. ●
CON PANNA
Варіант оригінальної віденської кави, цей чудовий напій – це еспресо espresso з добавкою збитих вершків. Можна
її також посипати корицею або шоколадом.
Підготуйте чашку 190мл. ●
Налийте окреме або подвійне еспресо. ●
Додайте збиті вершки. ●
Посипайте корицею або шоколадом. ●
65
КОНСЕРВАЦІЯ ТА ОЧИЩЕННЯ
A. Таблетки для усування каменю з кавоварки
Влийте в бункер близько 1л теплої води i помістіть в ньому
Дуже важливо регулярно проводити очищення кавоварки. Це дозво-
таблетки для усування каменю кількістю, рекомендованою
лить зберегти високу якість кави, що заварюється. Рекомендується
виробником. Після розчинення таблеток (через близько 5–7
систематично очищувати кавоварку після кожної заварки кави. Тобто:
хвилин) повторно установіть бункер.
Прополоскати водою блок головки. ●
B. Рідина для усування каменю
Прополоскати парою сопло пари ● (С).
Влийте в бункер для води близько 1л теплої води. Додайте
Витерти дочиста сопло пари ● (С) за допомогою зволоженої ганчірки,
засіб для усування каменю кількістю, рекомендованою ви-
негайно пілся закінчення користування кавоваркою.
робником і установіть бункер.
Вийняти ситечко ● (Н) з держателя (Е) i умити його разом з очищен-
C. Розчин оцту
ням отворів ситечка (Н).
Спорожнити і виполоскати підніс для стікання ● (І).
Влийте в бункер близько 1л теплого розчину оцту (3,5 склян-
ки води, 0,5 склянки оцту 10%) i установіть бункер.
Важливе: Не мийте частини кавоварки та аксесуари у посудомийній
машині.
2. Якщо держатель ситечка (Е) закріплений у блоку головки, усуньте
його, прополоскайте старанно під проточною водою i покладіть
Очищення підносу для стікання (I) i решітки (J)
збоку.
Вийміть решітку (J) і підніс для стікання (І) (23). Мийте водою з додан-
3. При застосуванні викрутки, відгвинтіть ситечко знизу блоку
ням делікатного засобу для миття посуду, сполосніть і осушіть.
головки.
Увага: Упевніться, що після виймання і встановлення підносу для сті-
4. Вийміть ситечко, підкладку, гвинт та прокладку і покладіть на бік
кання (І) і решітки (J), вкладка знаходиться на відповідному місці.
у безпечне місце.
Очищення блоку головки, держателя ситечка (Е) і ситечка (Н)
Важливе: Зверніть увагу, щоб не загубити ситечко, підкладку,
гвинт та прокладку після демонтажу блоку головки.
Ситечко (Н) і держатель ситечка (Е) сполосніть теплою водою, кожен
5. Після вживання малої делікатної щітки, очистіть зону заварки го-
раз після закінчення користування і осушіть.
ловки, усуваюч усі дрібки кави.
Для очищення блоку головки від використаної кави, прополоскайте
6. Помістіть достатньо велику ємність під блоком головки.
його водою, протріть головку i внутрішнє кільце зволоженою ганчір-
7. Вставте вилку живильного кабелю в розетку і запустіть кавоварку
кою. Якщо отвори у ситечку закупорені кавою, скористуйтесь делікат-
натискаючи кнопку (M).
ною щіткою.
Увага: Якщо мигає лампочка готовності (N) це вказує на те, що
Гумова прокладка головки
кавоварка знаходиться у стані досягання відповідної робочої тем-
Прокладка головки знаходиться знизу блоку головки й ущільнює дер-
ператури. З моменту досягнення кавоваркою відповідної темпе-
жатель ситечка (Е) під час наливання кави.
ратури, перестане мигати і згасне лампочка стану готовності (N).
Увага: Протягом довготривалої перерви у користуванні кавоваркою,
Це означає, що було досягнуто кавоваркою відповідної темпера-
рекомендується, щоб держатель ситечка (Е) не залишався у блоку го-
тури i вона готова до праці.
ловки, тому що це може зменшити стійкість прокладки.
8. Поверніть регулятор (K) у положення еспресо i забезпечіть
Є натуральною властивістю, що через деякий час прокладка втрачає
проходження половини розчину для видалення каменю через
свою еластичність і вимагається її заміна. Ознакою зносу прокладки
блок головки.
є відсутність щільності поміж держателем ситечка (Е) та головкою (ви-
Важливе: Не виливайте розчин для видалення каменю через со-
дима пара вколо блоку головки під час наливання еспресо).
пло пари (C).
Увага: Якщо вважаєте, що прокладка блоку головки вимагає замі-
Увага: У залежності від розміру ємності під блоком головки, може
ни, зверніться до найближчого авторизованого сервісного центру.
виникнути необхідність спорожнити її під час цього процесу.
Зовнішні елементи
9. Поверніть регулятор (K) у положення 0 для припинення прохо-
дження (після проходження близько половини розчину) i далі на-
Протріть обладнання тільки зволоженою ганчіркою і витріть досуха.
тисніть кнопку (M) виключаючи обладнання.
Не вживайте щітки та абразивні миючі засоби, тому що вони можуть
викликати подряпини на зовнішніх поверхнях.
10. Залишіть кавоварку на близько 10–15 хвилин, для задіяння роз-
чину для усування каменю.
Очищення сопла пари (С)
11. Далі натисніть кнопку (M). Кавоварка включиться.
Збереження у чистоті сопла пари (С) є суттєвим для забезпечення
12. Поверніть регулятор (K) у положення еспресо i забезпечіть
максимальної надійності функції пари. Нагромадження напр. висохло-
проходження іншої частини розчину для видалення каменю через
го молока на соплі (С) погіршить його здатність парування і спінення.
головку.
Важливе: Витерти дочиста сопло пари (С) за допомогою зволоженої
13. Вийміть бункер для води з кавоварки і прополоскайте старанно
ганчірки, негайно пілся закінчення користування кавоваркою, пропо-
під проточною водою, упевніться, що були видалені усі сліди роз-
лоскати невеликою кількістю пари.
чину для усування каменю. Наповніть бункер для води чистою во-
У разі висихання молока на соплі пари (С), обмотайте сопло (С) чи-
дою (1) i встановіть його в кавоварку.
стою зволоженою ганчіркою, поверніть сопло (С) над піднос для сті-
14. Уключіть кавоварку кнопкою (M) i поверніть регулятор (K) у по-
кання (І) і включіть пару на близько 10 секунд. Залишіть ганчірку на
ложення еспресо . Забезпечіть проходження цілої чистої води
соплі (С) протягом близько 5 хвилин для її намокнення. Повторіть цей
через головку. Цей процес повторіть 2 рази.
процес, якщо забруднення не було видалено.
Увага: У залежності від розміру ємності під головкою, може ви-
Важливе: Забороняється очищувати сопло пари (С) за допомогою
никнути необхідність спорожнити її під час цього процесу.
абразивної миючої ганчірки, тому що це може приветси до пошко-
дження сопла.
15. Після закінчення усуньте ємність із-під блоку головки i витріть ста-
ранно блок головки.
УСУВАННЯ КАМЕНЮ
16. Обережно встановіть гумову прокладку, ситечко і підкладку у го-
ловці, навпаки до їхнього демонтажу. Затягнути до упору гвинто-
Камінь це поверхневий осад мінералів, що натуральним способом на-
вертом кріпильний гвинт.
громаджується в обладнанні, де відбувається підігрів води. Тому ви-
магається періодичне усування каменю, нагромадженого у кавоварці.
17. Наповніть бункер для води свіжою водою (1) i встановіть його
Рекомендується усувати камінь з кавоварки через кожні 4-6 місяців, це
в кавоварку. Кавоварка готова до подальшої експлуатації.
залежить від частоти користування кавоваркою.
Розчини для усування каменю
Традиційно для усування каменю з кавоварки, застосовуються
засоби:
Таблетки для усування каменю з кавоварки. ●
Спеціально призначені з цією метою рідини. ●
Розчин оцту. ●
Усування каменю з кавоварки
Увага: Упевніться, що кавоварка виключена i живильний кабель від-
ключений від розетки.
1. Вийміть бункер для води і прополоскайте його дочиста. У залеж-
ності від застосованого розчину для усування каменю, виконуйте
такі дії:
66
ПРИКЛАДОВІ ПРОБЛЕМИ ПІД ЧАС ЕКСПЛУАТАЦІЇ КАВОВАРКИ
ПРОБЛЕМА МОЖЛИВА ПРИЧИНА ЯК ПОРАДИТИ, ЩО ЗРОБИТИ
Упевніться, що держатель (Е) правильно встановлений у блоку
Держатель ситечка (Е) закріплений неправильно або недо-
головки і затягнутий до упору. Подивись Заварка еспресо –
статньо затягнутий.
кави – стор. 63.
Очистіть навколо верхній край ситечка (Н) і витріть дочиста
Кава витікає збоку держателя
На краю вкладки ситечка (Н) знаходяться дрібки кави.
головку.
ситечка
Головка для заварки забруднена. Витріть головку зволоженою ганчіркою.
Головка пошкоджена. Зверніться до авторизованого сервісного центру.
Гумова прокладка головки пошкоджена або зношена. Зверніться до авторизованого сервісного центру.
Відсутність води у бункері для води. Наповніть бункер водою (1).
Втисніть униз бункер для води, щоб упевнитися у правильності
Бункер для води встановлений неправильно.
його установки.
Кава не витікає
Регулятор (К) встановлений в іншому положенні, напр. .
Упевніться, чи регулятор (К) знаходиться у положенні .
Ситечко на головці може бути закупореним. Подивись Усування каменю – стор. 66.
Ситечко для кави (Н) закупорене. Кава надто дрібно змелена
Спорожніть ситечко (Н) і прополоскайте його під проточною
або сильно трамбована.
водою. Витріть головку для заварки за допомогою ганчірки.
Якщо вживаєте дуже дрібно змелену каву, не трамбуйте її
Кава змелена дуже дрібно або надто сильно трамбована.
Кава наливається краплями
надто сильно.
Обладнання закупорене осадами вапна. Подивись Усування каменю – стор. 66.
Вжийте свіжу каву. Після відкриття кави, упевніться, що збері-
Кава вивітріла або суха.
гаєте її у щільному упакуванні.
Еспресо не має характерної
Кава недостатньо сильно трамбована. Утрамбуйте сильніше змелено каву.
пінки
Застосовуйте каву змелену належним чином або змініть марку
Кава надто грубо змелена.
кави.
Недостатня кількість кави у ситечку (Н). Подивись Заварка еспресо – кави – стор. 63.
Кава надто сильно утрамбована. Утрамбуйте більш легко змелено каву.
Змелена кава є надто дрібною Замініть на більш грубо змелену каву.
Упевніться, що держатель ситечка (Е) правильно встановле-
Держатель ситечка (Е) не закріплений належним чином, тому
ний і затягнутий до упору у головці.
що не був достатньо сильно дотягнутий.
Подивись Заварка еспресо – кави – стор. 63.
Держатель послабляється під
час заварки
Очистіть навколо верхній край ситечка (Н) і витріть дочиста
На краю вкладки ситечка (Н) знаходяться дрібки кави.
головку.
Головка для заварки забруднена. Витріть головку зволоженою ганчіркою.
Головка пошкоджена. Зверніться до авторизованого сервісного центру.
Гумова прокладка головки пошкоджена або зношена. Зверніться до авторизованого сервісного центру.
Перед заваркою кави, підігрійте чашки, ситечко і держатель.
Чашки, ситечка (Н) або головка ситечка є холодними.
Подивись Заварка еспресо – кави – стор. 63.
Кава надто холодна.
Перевірте, чи молоко підігріте належним чином під час його
Під час приготування cappuccino або latte, молоко недостатньо
спінення. Не допускайте заварювання молока. Подивись При-
підігріте.
готування спіненого молока – стор. 64.
Відсутність пари із сопла пари Сопло пари (С) заблоковане. Подивись Kонсервація й очищення – стор. 66.
Молоко несвіже. Перевірте, чи молоко є свіжим.
Упевніться, чи молоко перед вживанням охолоджене належ-
Температура молока надто висока.
ним чином.
Для досягнення найкращих ефектів під час спінення, корис-
Недостатня кількість спінено-
туйтесь доданим дзбанком із нержавіючої сталі і за можливіс-
го молока
Дзбанок.
тю перед використанням охолодіть його або прополоскайте
холодною водою.
Сопло пари заблоковане. Подивись Kонсервація й очищення – стор. 66.
Молоко заварилося. Попробуйте повторно вжити свіже, охолоджене молоко.
Упевніться, чи кава рівномірно утрамбована і перевірте, чи
Нерівномірне наповнення
Нерівномірне наповнення або переривчасте витікання кави.
немає перешкоди для виходу з отворів у головці для кріплення
чашок
ситечка.
Пошкоджена перегородка у держателі ситечка (Е). Зверніться до авторизованого сервісного центру.
Вжито невідповідний вид кави. Перевірте інші види кави.
Еспресо має пригорілий смак
Прополоскайте кавоварку повним бункером води до його спо-
Кавоварка не була прополоскана після усування каменю.
рожнення перед заваркою наступної кави.
Відсутність води у бункері для води. Наповніть бункер водою (1).
Насос надмірно шумить
Бункер для води встановлений неправильно. Перевірте, чи бункер для води встановлений правильно.
Вийміть головку ситечка (Е) і очистіть блок головки. Подивись
Ситечко (Н) у головці для заварки може бути закупореним.
Обладнання не працює
Kонсервація й очищення – стор. 66.
Обладнання закупорене осадами каменю. Подивись Усування каменю – стор. 66.
ЕКОЛОГІЯ – ДАВАЙТЕ ДБАТИ ПРО НАВКОЛИШНЄ СЕРЕДОВИЩЕ
Кожна людина може зробити свій внесок у справу охорони природи. Це зовсім не складно і не потребує витрат. Для цього слід:
здати картонну упаковку у пункт прийому макулатури, а поліетиленові пакети викинути у контейнер для пластмаси.
Зношений пристрій слід віддати у відповідний пункт прийому, адже його конструктивні елементи можуть бути небезпечними для
навколишнього середовища.
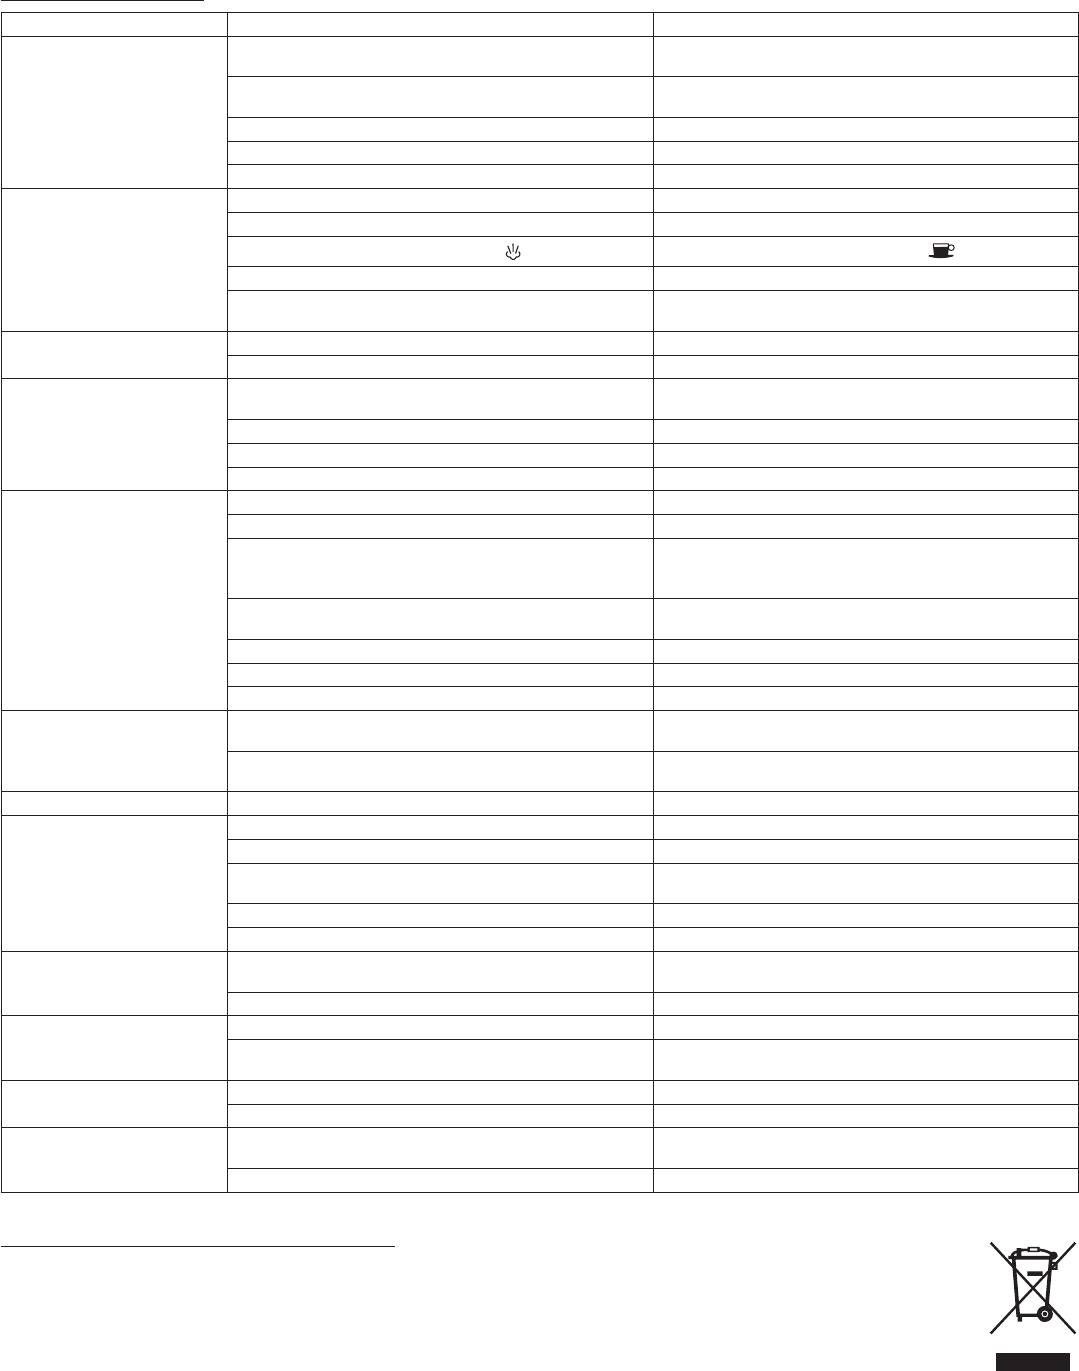
Не викидайте пристрій разом з побутовими відходами!!!
67
68
EN
Dear Customers!
TECHNICAL DATA
We urge that you read this user’s manual carefully. Special attention needs
The technical parameters are given on the data plate of the product.
to be paid to the safety precautions. Please save this manual so it can be
Power rating: 1250 W at 230 V.
referred to in the future use of the product.
Capacity of the water tank: 1.2 l.
The manufacturer/importer does not accept any liability for any
The espresso machine is a class I appliance equipped with a connecting
damages resulting from unintended use or improper handling.
cord with a protective conductor and a plug with an earth contact.
The manufacturer/importer reserves his rights to modify the product
The espresso machine meets the requirements of the standards in force.
any time in order to adjust it to law regulations, norms, directives,
or due to construction, trade, aesthetic or other reasons, without
The appliance is compliant with the requirements of the following
notifying in advance.
directives:
The Low Voltage Directive (LVD) – 2006/95/EC –
SAFETY PRECAUTIONS WHEN USING THE ESPRESSO
Electromagnetic Compatibility (EMC) – 2004/108/EC –
The product is afxed with a CE Mark on the data plate.
MACHINE
Carefully read this user’s manual provided with the appliance and save ●
ABOUT THE ESPRESSO MACHINE
it for future reference.
The espresso machine brews coffee of rich aroma and taste, as the right
Always place the appliance on a at, even surface. ●
brewing temperature of water, 92–94°C, is ensured. The espresso machine
Do not use the espresso machine without water in the water tank. Fill ●
was designed so that its readiness to brew coffee or produce steam for
the water tank with clean and cold water only. Do not ll beyond the
frothing milk can be watched.
maximum capacity of the water tank, which is 1.2 l.
Never remove the lter holder when brewing coffee or collecting boiling ●
water because the appliance is under pressure. Removing the lter
holder may result in burning or hurting oneself.
The steam wand gets very hot during milk frothing and water owing. ●
This may cause burns in case of contact, therefore avoiding any direct
contact with the steam wand is advised.
Before cleaning the espresso machine and in the event that a problem ●
occurs during the coffee brewing process, always turn off the espresso
machine and remove the plug from the socket.
When turning on the cup warming plate and the steam wand, do not ●
allow any contact between the connecting cord and the hot parts of the
espresso machine.
Never place hands under a stream of steam, hot water, or coffee poured ●
as it may result in burning or hurting oneself.
Always disconnect power (button ● ) before inserting the plug into or
removing it from the socket. Do not the remove the plug from the socket
by pulling the connecting cord – grip the plug only.
Always disconnect power and unplug the appliance when it is not going ●
to be used for a longer period of time and before cleaning.
Never use the espresso machine with an extension cord, unless the ●
extension cord has been tested by a qualied electrician or a service
center engineer.
The appliance should always be plugged into an electric socket ●
(alternating current only) equipped with a safety pin and whose voltage
is compliant with the value given on the data plate of the appliance.
Do not use the espresso machine for anything other than its intended ●
use described in the user’s manual.
Do not place the appliance near a heat source, a re, an electric heating ●
element or on a hot stove. Do not place it on another appliance.
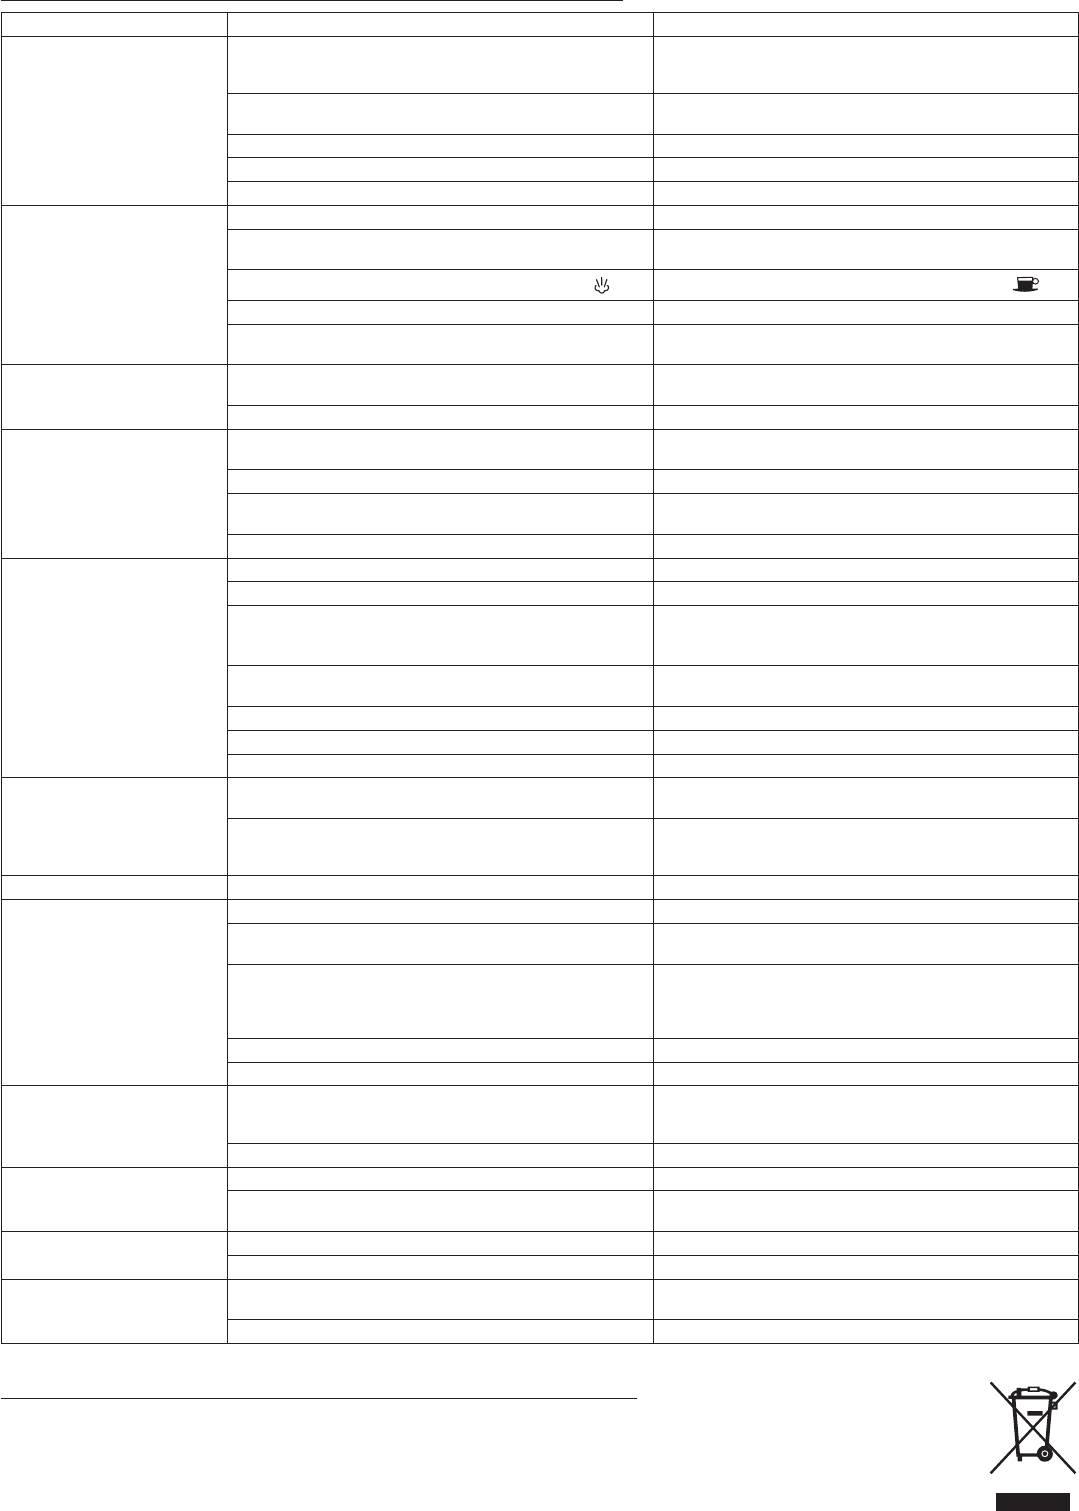
DESCRIPTION OF THE APPLIANCE
Do not let the power cord of the appliance hang over the edge of a table ●
A. 1.2l water tank
or shelf, or touch a hot surface.
Removable water tank to facilitate lling up. Lift to remove.
Do not use the appliance if it is visibly damaged, if it has a damaged ●
B. Hot water/steam button (switch)
power cord, after it has fallen down or been damaged in any other way.
C. Steam wand
If believed to be damaged, the appliance can be tested, repaired or
D. Frothing attachment
regulated only by qualied staff of an authorised service center.
A rubber attachment was designed to facilitate making compact, thick
Do not immerse the appliance in water or any other liquid. ●
froth from milk in just a few seconds. Always use it for frothing
If the non-detachable part of the cord is damaged, it should be replaced ●
milk.
by the producer or at a proper service point or by a qualied person in
E. Filter holder
order to avoid any hazards.
F. Filter lock
This appliance is not intended for use by persons (including children) ●
It is especially helpful when emptying used coffee from the lter as it
with reduced physical, sensory or mental capabilities, or lack of
keeps the lter in the holder when turning.
experience and knowledge, unless they have been given supervision
G. Measuring spoon with tamper
or instruction concerning use of the appliance by a person responsible
H. 1 cup lter, 2 cup lter
for their safety.
I. Drip tray
Children should be supervised to ensure that they do not play with the ●
It can be removed to facilitate cleaning.
appliance.
J. Flow grid
Ensure that the above guidelines are understood.
It can be removed to facilitate cleaning.
K. Regulator knob
Turn to the left – espresso from the brew head, turn to the right – hot
water or steam from the wand.
L. On/off pilot light
M. On/off button (switch)
N. Standby pilot light
Mind that the drip tray (I) will ll up with water in the course of normal
operation. Check it on a regular basis and empty it as and when
necessary to avoid overowing.
69
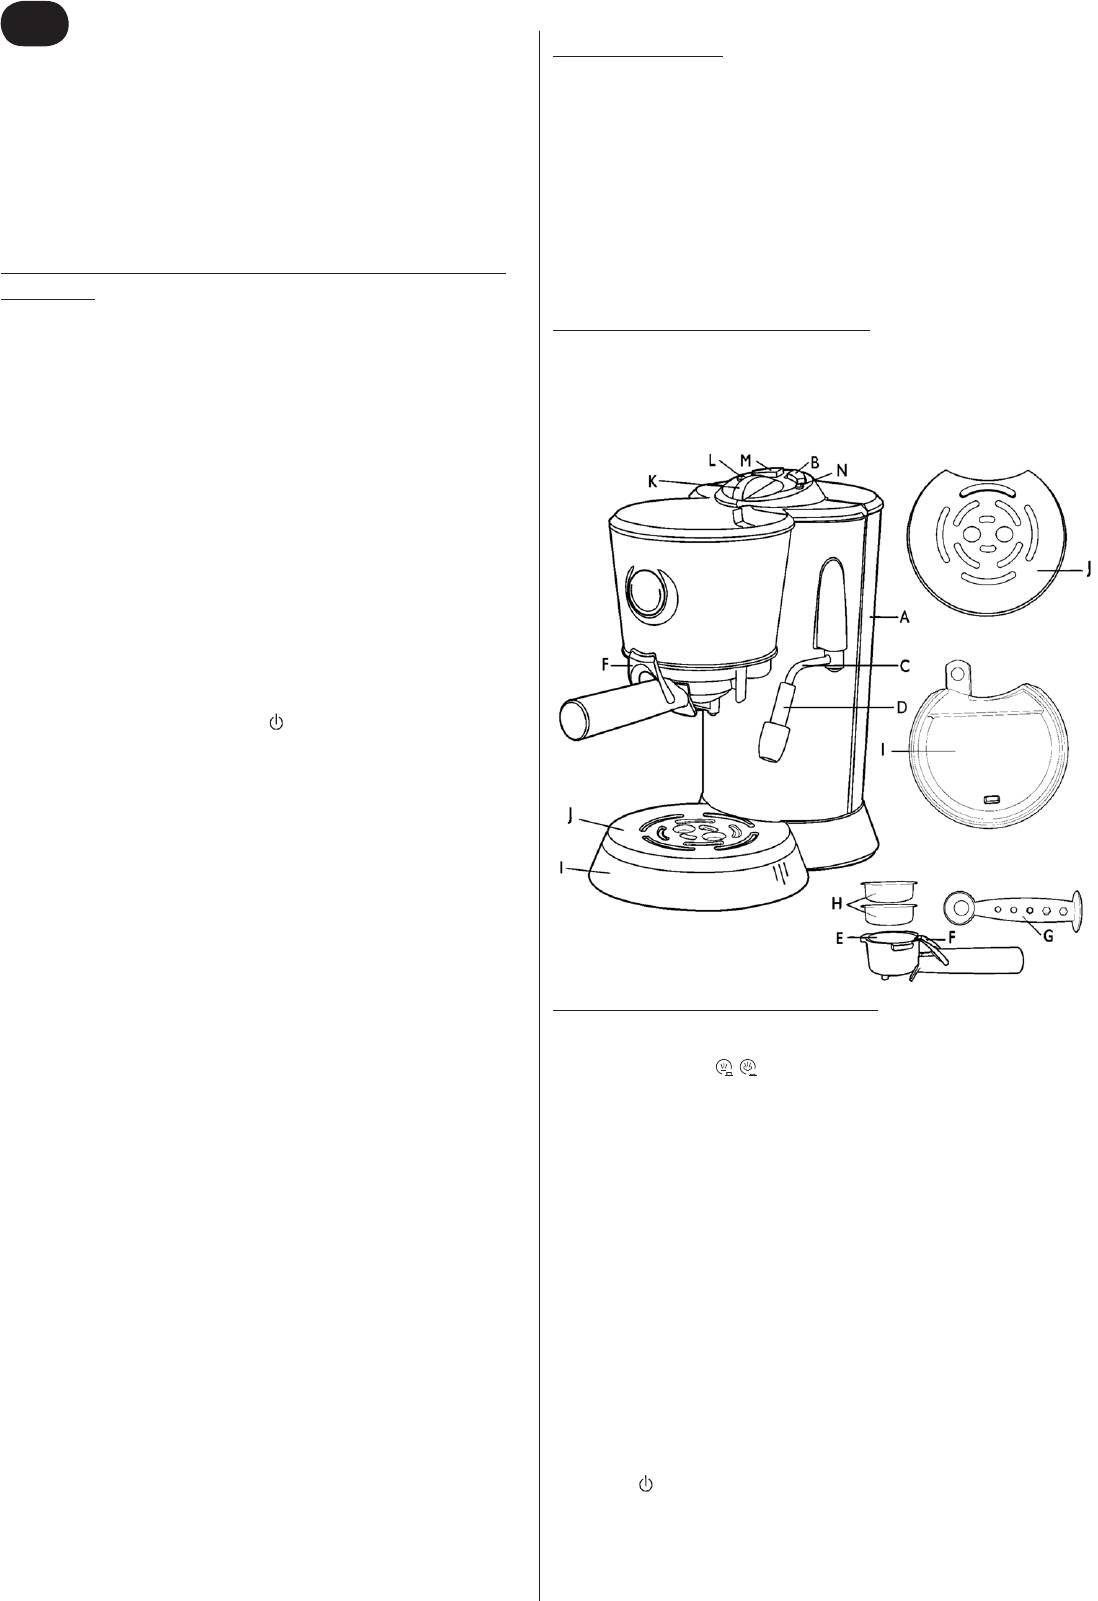
OPERATION OF THE CONTROL PANEL
If the steam function has been used before, set the hot water/steam
button (B) in the “pushed out” position . The moment the espresso
On/off button (M)
machine has reached the right temperature, the standby light (N) will stop
Turn the espresso machine on by pressing button (M). The pilot light (L)
ashing and will come off. The espresso machine is ready to operate.
will illuminate in red, and the standby light (N) will start ashing.
Notice: Place a suitable dish under the steam wand (C).
Warning: Before turning the espresso machine on, check that the regulator
To obtain hot water/steam, turn the regulator knob (K) clockwise into position .
knob (K) is in position 0 (off).
The standby light (N) is illuminated during this process. To turn off the
When the espresso machine is ready to operate, the standby pilot light (N)
pouring of hot/boiling water, re-set the knob into position 0.
will come off.
Warning: Remember that if the standby pilot light (N) ashes, it indicates
that the espresso machine has not reached the right temperature for
operation.
To turn the espresso machine off, simply press button (M).
ESPRESSO COFFEE
When the espresso machine is turned on – button is pushed in (M) (the
on/off light is illuminated (L)), and the hot water/steam button (B) is
in the” pushed out” position (the standby light (N) is not illuminated) –
the appliance is in the espresso mode.
STEAM
If the steam function has been used before, set the hot water/steam button
When the espresso machine is on – button is pushed in (M) (the on/off
(B) in the “pushed out” position . The moment the espresso
pilot light is illuminated (L)), and the hot water/steam button (B) is in
machine has reached the right temperature, the standby light (N) will stop
the “pushed in” position (the standby light (N) is not illuminated) – the
ashing and will come off. The espresso machine is ready for brewing.
appliance is in the steam mode.
Notice: Place a cup/cups under the brew head.
If the espresso or hot water function has been used before, set the
To brew espresso (turning on the pump), turn the regulator knob (K)
hot water/steam button (B) in the “pushed in” position” . The
anticlockwise into position . The standby light (N) is illuminated during
moment the espresso machine has reached the right temperature, the
this process.
standby light (N) will stop ashing and will come off. The espresso machine
To turn off the pump (to stop the coffee brewing/pouring process), re-set
is ready for the steam function.
the knob into position 0.
To start steam dosing, turn the regulator knob (K) clockwise into position
. The standby light (N) is illuminated during this process. To turn of
steam dosing, re-set the knob into position 0.
HOT/BOILING WATER
When the espresso machine is on – button is pushed in (M) (the on/off
light is illuminated (L)), and the hot water/steam button (B) is in the
“pushed out” position (the standby pilot light (N) is not illuminated) –
the appliance is in the hot water mode.
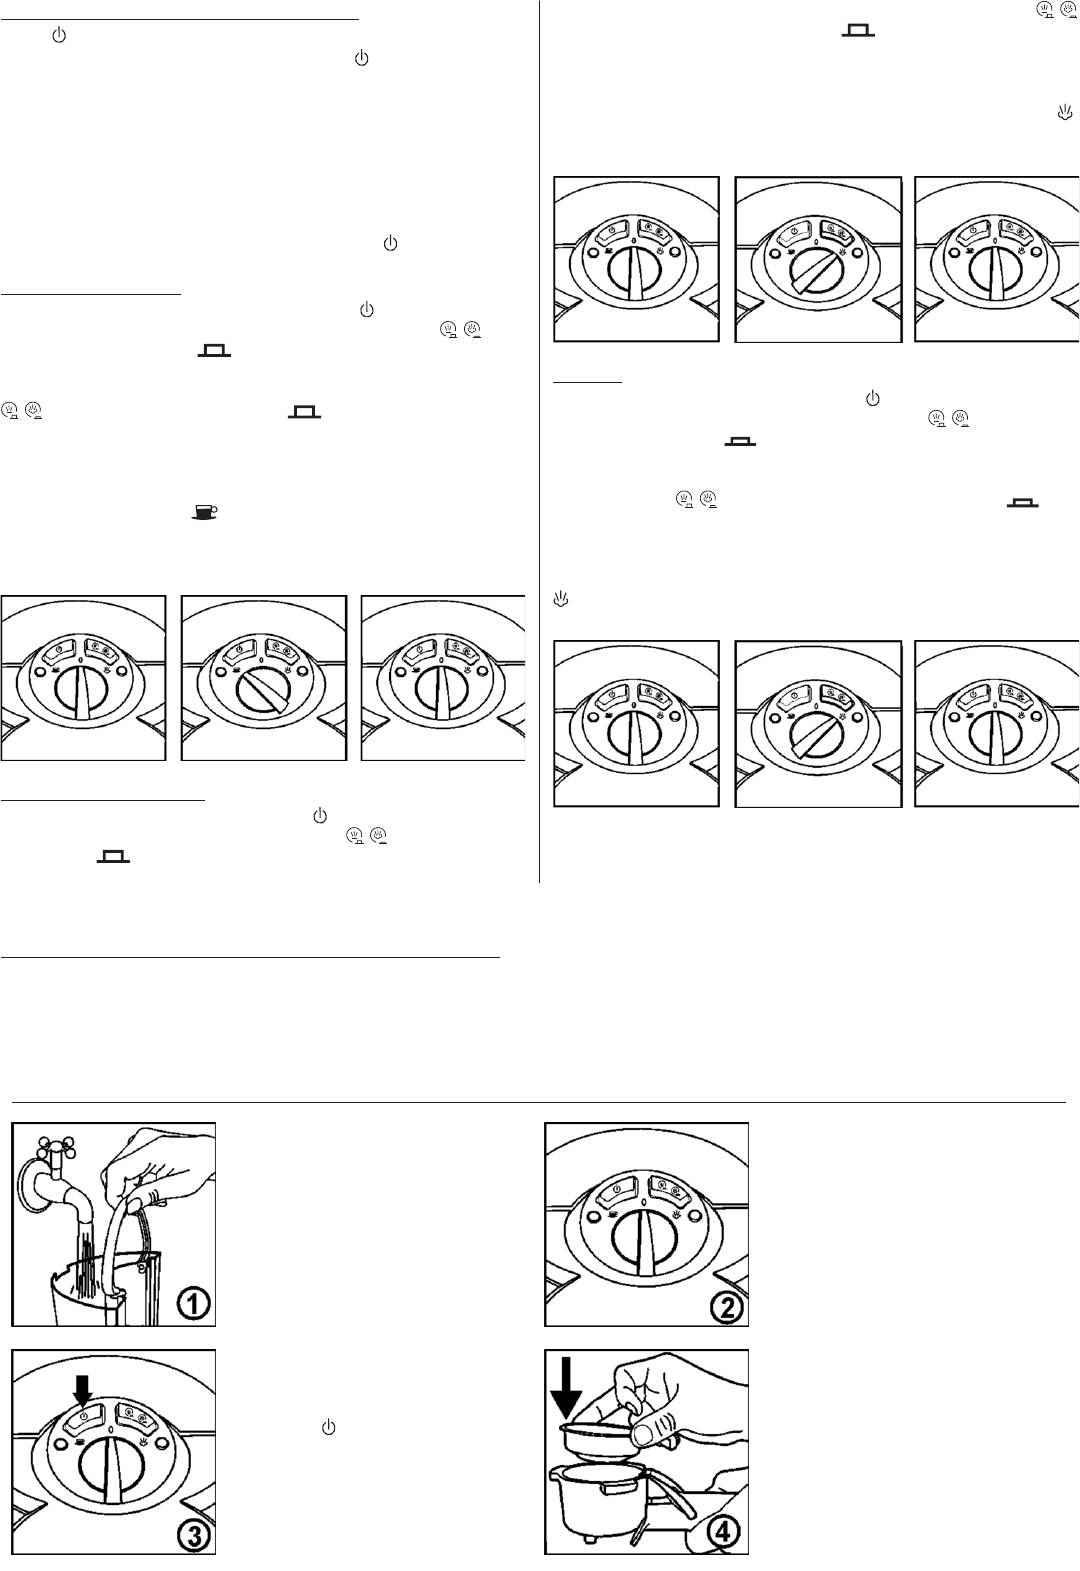
A SHORT GUIDE TO USING THE ESPRESSO MACHINE
The pictures below are intended to help you use the espresso machine. Each picture has its number. The content of the guide will make references to
these pictures, therefore they have been numbered to ensure they are easy and comfortable to use.
For example: Fill up the water tank (1) with cold water – do not use mineral water.
Each time you see such numbers, please refer to the relevant pictures.
Preparing the espresso machine – making espresso
Ensure that the regulaot knob (K) is in position
Fill up the water tank up to the MAX
0. Plug the power cord into a 230 V alternating
indicator.
current mains socket.
Select a lter suitable for 1 cup or 2 cups
(depending on your preferences) and place the
Press button (M) to turn on the espresso
metal lter (H) in the lter holder (E).
machine. The on/off pilot light will illuminate
TIP: Fill up the metal lter with ground coffee
(L). The standby pilot light will start ashing
using the measure (G). Tamp the coffee lightly
(N).
with the temper, i.e. the at part of the measuring
spoon (G). Do not tamp the coffee too rmly.

Place the lter holder (E) in the brew head
(slightly to the left).
Clean the rim of the lter holder (E) to
Notice: projections on the holder (E) must t in
remove any excess coffee. This will ensure
the slots of the brew head.
that the lter holder (E) is properly xed in
Turn the lter holder (E) all the way to the right.
the brew head.
Warning: Ensure that the lter holder (E) is
Notice: Espresso requires coffee which has
correctly xed in the brew head. If you are not
been ground more nely than regular bean
sure, do not operate the appliance, but remove
coffee.
the lter holder (E) and replace it following the
procedure described above until it is properly
placed.
Turn the regulator knob (K) to the left into
position as soon as the standby pilot light
stops ashing and comes off (N). If the coffee
Place one or two cups under the two outlets
has been properly ground and tamped, then
of the lter holder (E).
obtaining espresso with the „crema” foam on top
should take no longer than about 30 seconds.
The standby light (N) is illuminated during this
process.
Turn the regulator knob (K) into position 0
again to nish the coffee brewing process.
Frothing milk
Ensure that the regulator knob (K) is in
Press the hot water/steam button (B) to
position 0 and button is pushed in (M).
set the espresso machine in the steam mode
The turned off pilot light (N) indicates the
(position ).
standby mode of the espresso machine.
Rinse the steam wand by placing a dish under
Turn off the steam by turning the regulator knob
the steam wand (C) and turning the regulator
(K) into position 0.
knob (K) into the steam position .
Fill up a stainless steel jug or cup with fresh
cold milk up to 1/3 or 1/2 of its capacity and
Lift the jug so that the steam wand is immersed
place the frothing attachment (D) onto the
about 1/2 cm below the surface of the milk.
steam wand (C).
Warning: THE JUG/CUP WILL GET VERY HOT
Warning: THE METAL STEAM WAND MAY
DURING FROTHING.
BE HOT.
Turn the regulator knob (K) into position 0 to
reduce the pressure until the volume of the milk
Turn the regulator knob (K) into position
has doubled. The top part will be frothed milk
and regulate the steam ow (by immersing
and the bottom part will be steamed milk.
the steam wand in milk nearer to or further
Tip: Spoon the froth into cups with espresso
from its surface) to obtain the froth required.
coffee. Add liquid milk. A cappuccino should be
1/3 of coffee, 1/3 of hot milk and 1/3 of froth.
70

Hot water/steam
Ensure that the regulator knob (K) is in
Ensure that the hot water/steam button
position 0 and button is pushed in (M).
(B) is in the” pushed out” position . Then
The turned off pilot light (N) indicates that
the appliance is in the hot/boiling water mode.
the espresso machine is ready to operate.
Place the steam wand (C) inside the cup.
Turn the regulator knob (K) into position .
Hot water will ow out of the steam wand (C).
Warning: THE JUG/CUP WILL GET VERY
The standby light (N) is illuminated during this
HOT DURING POURING.
process.
When a sufcient amount of water has been
obtained, turn the regulator knob (K) into
position 0. Remove the cup or dish from
under the steam wand (C).
Warning: When the brewing has been
completed and the regulator knob (K) is in
position 0, excess steam under pressure
may be released into the drip tray. It is
normal.
Cleaning
Remove the grid (J) and the drip tray (I).
If the inner part of the rim of the lter is partially
Clean these part in warm water with washing-
or completely covered with ground coffee, clean
up liquid. Do not wash in a dishwasher as it
it by owing part or all of the water tank content
may deform these parts.
through.
PREPARING THE ESPRESSO MACHINE FOR ITS FIRST
Notice: When using the appliance for the rst time of when it has not
been in used for a longer period of time, it is particularly important that
USE (DESCRIPTION)
the espresso machine is rinsed.
1. Place the espresso machine on a dry and stable surface.
5. To do this, place a lter for one or two cups in the holder (H). lace the
2. Check that the drip tray (I) and the grid (J) are in place.
lter holder (E) in the brew head (6).
3. Fill up the water tank with water.
Place a sufciently large container under the two lling outlets (7).
There are two ways of lling the tank up with water:
Check that the espresso machine is in the espresso mode, that is
that button is pushed in (M) (the on/off light is illuminated (L)) and
a) Lift the lid of the water tank; it is in the top part of the espresso
the hot water/steam button (B) is in the “pushed out” position
machine and using e.g. a jug, ll it up with fresh cold water or
(the standby pilot light (N) is off).
with ltered water and close the lid.
7. Turn the regulator knob (K) anticlockwise (8) into the espresso position
b) Alternatively, the water tank can be taken out and lled up with
and allow the water to ow until the whole container has been
fresh cold water. To do this, lift the lid and using it as a handle,
emptied. The standby light (N) is illuminated during this process.
slide the water tank out. Next, ll it up with fresh cold water or
with ltered water (1). Replace the water tank and close the lid.
BREWING ESPRESSO (DESCRIPTION)
Warning: Before turning the espresso machine on, check that the
regulator knob (K) is in position 0 (off) (2).
Before starting preparations for brewing coffee, check that the espresso
machine is in the espresso mode, i.e. that the red power light (L) is on and
4. Plug in the connecting cord into a 230 V alternating current mains
the standby light (N) comes off.
socket. Press button (M) to turn on the espresso machine (3). Turn
To obtain a avour-rich coffee, the cups, the lter holder and the lter may
on the espresso machine by pressing button (M). The pilot light (L)
be pre-heated in the following manner:
will illuminate in red, whereas the standby pilot light will start ashing.
When the espresso machine is ready to operate, the standby pilot
Pre-heating the lter holder (E) with the ler (H)
light (N) will come off.
1. Fill up the water tank with cold water (1) and turn on the appliance (3).
Warning: Remember that if the standby pilot light (N) ashes, it
2. Select a suitable lter (H) and place it in the holder (E) (4)
indicates that the espresso machine has not reached the right
Tip: Use a smaller lter (for one cup) for one coffee, and a bigger one
temperature for operation.
for two coffees.
71
3. Take the lter holder (E), hold it under the brew head and rinse it with
3. Pour cold, cooled down milk into a stainless steel jug lling it up to 1/2
water by turning the regulator knob (K) anticlockwise to the espresso
or 2/3 of its capacity (14).
position (8) position to start the ow of water and turn it back into
Tip: Store a stainless steel jug with milk in a fridge so that the milk
position 0 to turn off the appliance (9).
is well cooled down. Remember not to rinse the jug with warm water
4. Allow the lter holder to dry.
before use.
Pre-heating cups
4. Rinse the steam wand (C) by placing a dish under it (C) and by
turning the regulator knob (K) into the steam position (12). Turn off
5. Cups may be pre-heated by lling them up with hot water. Check that
the steam by turning the regulator knob (K) into position 0 (13).
the espresso machine is in the espresso mode, that is that button
5. Move the steam wand (C) to the side of the appliance and attach the
is pushed in (M) (the on/off pilot light is illuminated (L)), and the hot
milk frothing attachment (D) onto the steam wand (C).
water/steam button (B) is in the “pushed out” position (the
6. Immerse the steam wand in milk so that the wand is about 1/2 cm
standby mode light (N) is not illuminated). Place the steam wand (C)
below the surface and activate steam dosing by turning the regulator
inside a cup. Turn the regulator knob (K) into position to start the
knob (K) into position (15) (16).
ow of water from the steam wand (C). To stop the process, set the
knob into position 0. Pour the hot water out of the cups.
7. Hold the frothing jug at an angle so that the steam wand sits in the
jug and lower the jug until the end of the steam wand is immersed just
Brewing coffee
below the surface of milk. This will start the milk frothing process.
6. Check if there is cold water in the tank. If there is no or little water, ll
Warning: Do not allow an uneven outow of steam, or the froth will
up the tank with cold water (1) and turn on the appliance (3).
not be properly aired. To avoid it, lift the jug so that the steam wand is
7. Using the measure provided (G), put nely ground coffee in the lter.
deeper immersed in milk. Remember that the ideal texture of milk is
8. Using the other end (the at end) of the measure (G) press the coffee
soft, smooth froth.
down lightly making a 90 degree turn, to ll the bottom. It will tighten
8. The moment the milk has warmed up and frothed, the level of milk
the tamped coffee.
in the jug will start rising. If this happens, start lowering the jug but
9. Remove any excess coffee so it is level with the rim of the lter (H)
always keep the end of the steam wand immersed just under the milk
(5).
surface.
Important: Ensure there is not too much coffee in the lter (H).
9. The moment froth has been obtained, lift the jug so that the steam
Tip: Doses of coffee and the degree to which coffee is tamped should
wand is in the middle of milk.
be the same each time. The pouring time of brewed coffee depends
Tip: The amount of froth required will change depending on the type
on the coarseness of ground coffee. The ner the coffee, the lower
of beverage prepared. E.g. a cappuccino requires more froth than
the pouring speed.
a coffee beverage on the basis of an espresso served with steam
Tip: Check that the at end of the measure (G) is dry when tamping
frothed milk.
coffee. If it is damp, coffee particles may stick together.
10. Immediately after milk has been warmed up to 60-65°C, turn off the
Warning: Too nely ground coffee may block the holes of the lter (H)
steam by turning the regulator knob (K) into position 0 (17).
and stop the coffee ow.
Tip: If you do not have a thermometer, a good indication of reaching
10. Place the lter holder (E) in the brew head and turn it all the way to
the right temperature is if you cannot keep a hand against the jar for
the right (6)
longer than 3 seconds.
11. Place cups under the pouring outlets of the holder (E) (7).
Important: Do not boil the milk.
Warning: Check that the espresso machine is ready to use.
11. Remove the jug and take the frothing attachment (D) off the steam
Remember that if the standby pilot light (N) ashes, it means that the
wand (C). After each use, clean the wand in warm water with the
espresso machine is not ready to use yet.
addition of washing-up liquid. Clear all its outlets. Promptly wipe the
steam wand (C) and its end with a clean damp cloth and rinse with
12. To resume the coffee pouring process, turn the regulator knob (K)
a small amount of steam.
anticlockwise into the espresso (8). The standby light (N) is
illuminated during this process. To stop the process, turn the regulator
12. Holding the jug in one hand tap it lightly on the table so as to release
knob into position 0 (9).
air bubbles and then move the jug in a circular motion until milk gets
shiny and there are no bubbles in it. This will help obtain a uniform
Tip: Perfectly brewed coffee is dark, caramel with reddish highlights.
texture of milk and froth.
It largely depends on the quality of coffee used. Always serve freshly
brewed, hot coffee.
USING THE HOT WATER FUNCTION
After brewing
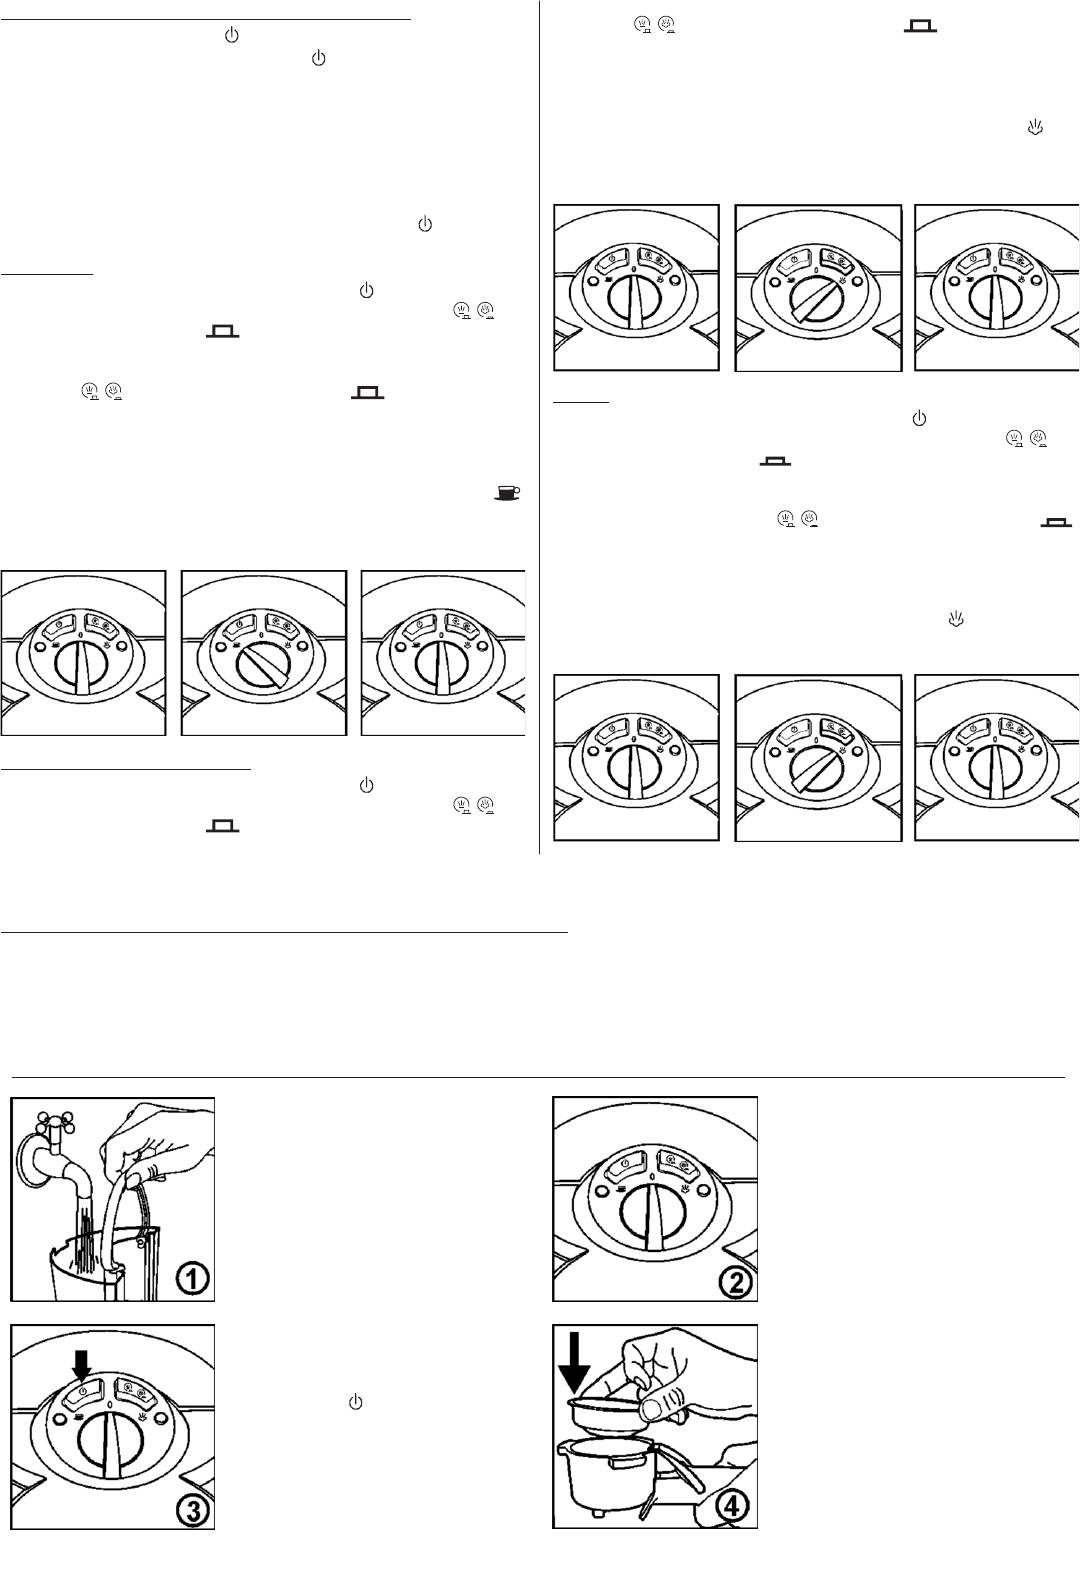
The hot water function is perfect for preparing the long black drink
13. Turn the lter holder (E) to the left and remove it from the brew head.
(espresso diluted with hot water), hot chocolate and for lling a coffee
14. Empty the used coffee from the lter (H). When emptying, hold the
plunger or a tea pot.
lter by pressing the lter lock (F) with a thumb.
Warning: Before using the hot water function, check that the milk frothing
Tip: After each use of the espresso machine, we recommend that
attachment (D) has been taken off the steam wand (C).
brew head is rinsed with a small amount of water. This will wash off
1. Fill up the water tank with cold water (1).
the used coffee which has stuck to the bottom part of the brew head.
Turn on the espresso machine (3). It is important that the espresso
To do this, simply turn the regulator knob into the espresso position
machine is in the hot water mode when using the hot water function,
and run a short ow of water.
which means that button is pushed in (M) (the on/off pilot light is
illuminated (L)), and the hot water/steam button (B) is in the
FROTHING MILK (DESCRIPTION)
“pushed out” position (the standby mode pilot light (N) is not
The steam function is used for frothing milk. Steam performs two functions.
illuminated) (18) (19).
Firstly, it warms milk. Secondly, it mixes milk with air which gives it
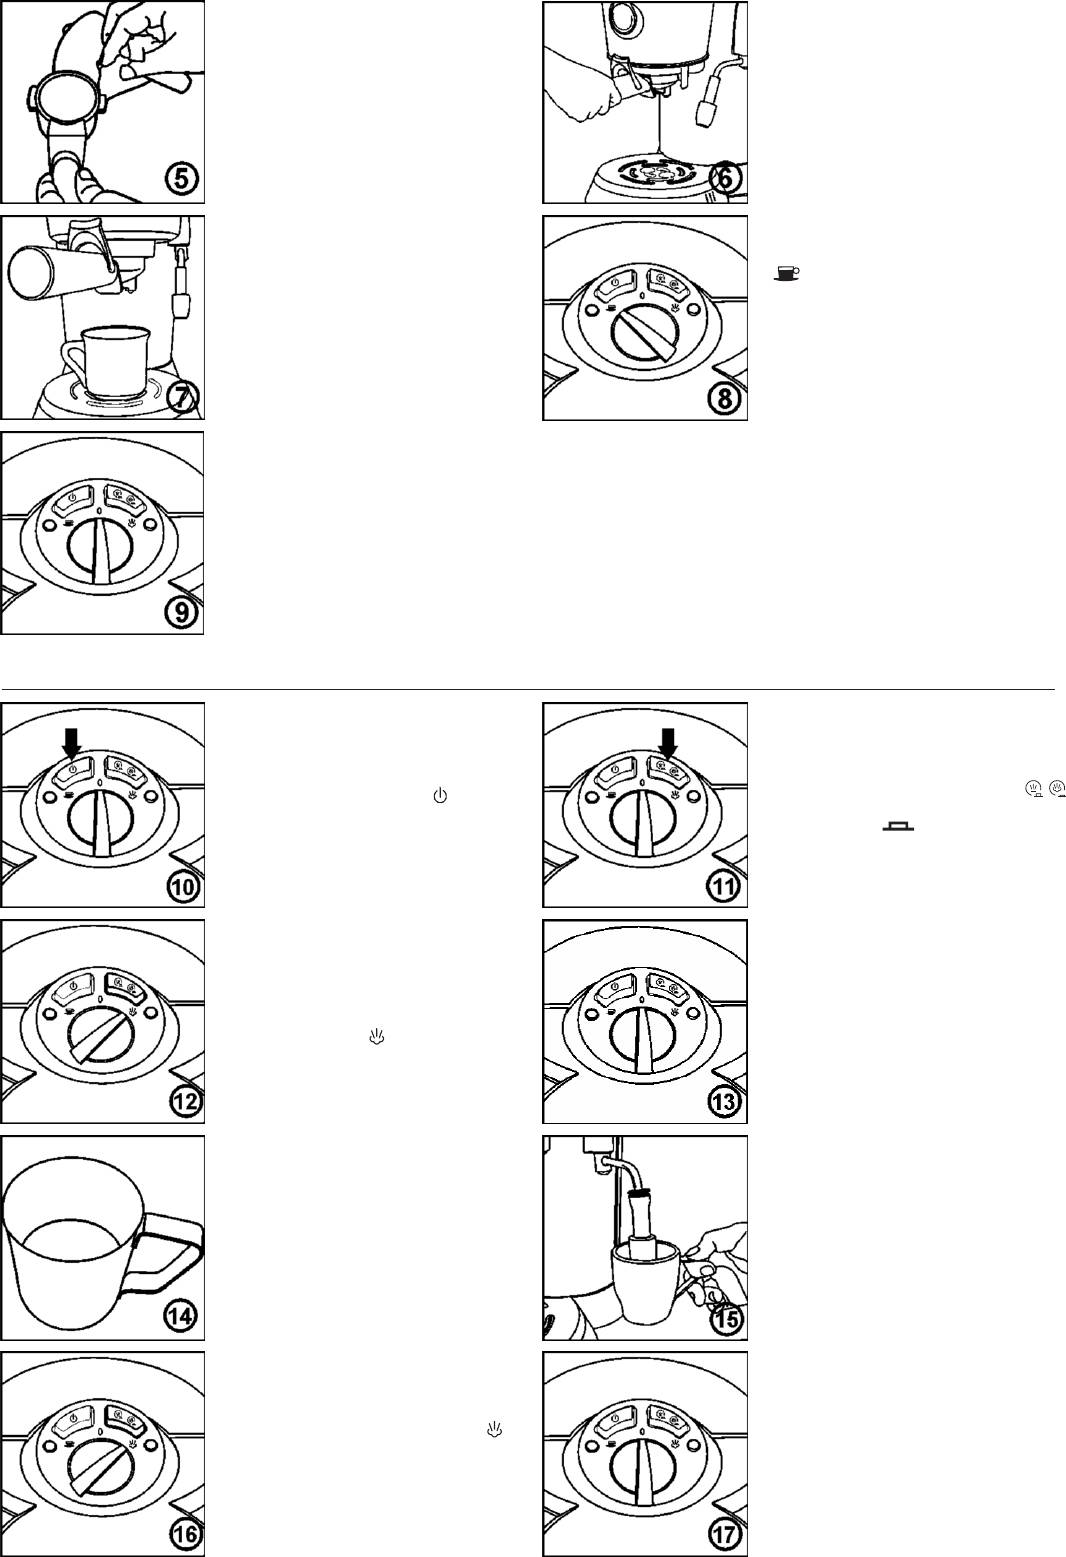
2. Place a cup or a dish under the steam/hot water wand and activate
a delicate, smooth appearance.
the hot water function by turning the regulator knob (K) into position
As is the case with brewing coffee, the best results with frothing milk are
(20) (21). The standby light (N) is illuminated during this process.
achieved with time as the user gains experience.
3. The moment the cup or dish has been lled with the desired amount
Tip: Remember that coffee is the basis of all coffee beverages, and milk is
of hot water, close the hot water by turning the regulator knob (K) into
only an addition.
position 0 (22).
Notice: It is recommended that espresso is prepared rst, and milk is
4. Take out the cup or dish and leave the steam wand (C) over the drip
frothed afterwards.
tray (I).
Before the milk frothing process, check that the espresso machine is in the
steam mode, that is that button (M) is pushed in (the on/off pilot light is
illuminated (L)), and the hot water/steam button (B) is in the “pushed
in” position (the standby mode light (N) is not illuminated (10) (11)).
1. Check if there is cold water in the tank. If there is no or little water, ll
up the tank with cold water (1).
2. Determine the amount of milk needed based on the number of cups
of coffee brewed or on the size of the milk jug.
Tip: Remember that the volume of milk increases during frothing.
72

SAMPLE ESPRESSO RECIPES
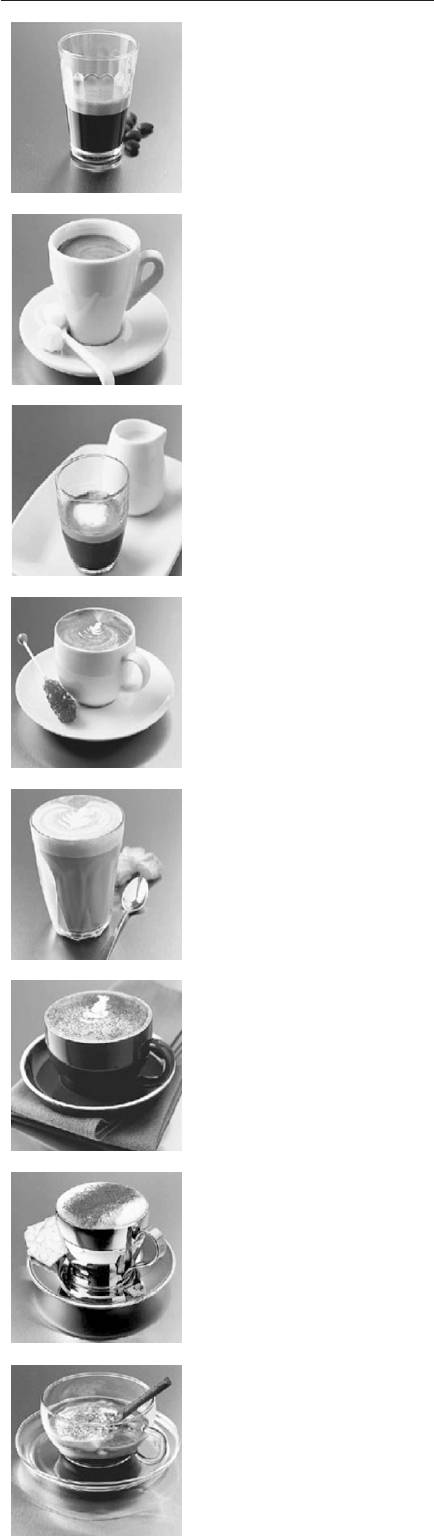
ESPRESSO (SHORT BLACK)
Espresso is a strong concentrated coffee with a layer of foam on the surface known as” crema” (a layer of brown foam).
Espresso is the basis of all coffee beverages. Its varieties are obtained by adding different amounts of milk and froth.
Prepare a glass 90 ml espresso cup or a small coffee cup. ●
Pour in a single espresso (30–35 ml). ●
LONG BLACK
Standard espresso with the addition of hot water, served in a regular coffee cup or in a mug. Hot water is added rst so
that the layer of “crema” is kept.
Prepare a 190 ml cup. ●
Pour in a single or double espresso. ●
Add hot water to taste. ●
MACCHIATO
Macchiato, the name comes from an Italian word meaning a “spot”. Traditionally served as a standard espresso with
a spoonful of milk on the surface and a little foam (“crema”) in the middle.
Prepare a 90 ml glass espresso cup or a small coffee cup. ●
Pour in a single or double espresso. ●
Add a spoonful of milk on the top. ●
FLAT WHITE
Another favourite coffee beverage is a at white, a beverage on the basis of espresso, with steam frothed milk, served in
a regular coffee cup or in a mug. The layer of frothed milk should be 2 mm thick to insulate the coffee.
Prepare a 190 ml cup. ●
Pour in a single or double espresso. ●
Add frothed milk. ●
CAFFÈ LATTE
Espresso mixed with steamed milk; usually served in a glass. A layer of frothed milk on the top should be 10 mm thick to
insulate coffee.
Prepare a 220 ml glass or cup. ●
Pour in a single or double espresso. ●
Add frothed milk. ●
CAPPUCCINO
This fabulous beverage is an espresso with the addition of frothed milk, froth and sprinkled with cocoa. A beverage
produced this way is two thirds of coffee and one third of froth.
Prepare a 190–240 ml cup. ●
Pour in a single or double espresso. ●
Observe the proportions: two thirds of coffee and one third of froth. ●
Sprinkle with cocoa. ●
CAFFE MOCHA
Prepared similarly to a cappuccino, but with the addition of drinking chocolate. Just add chocolate to an espresso and mix
before adding frothed milk and froth.
Prepare a 190–240 ml cup. ●
Pour in a single or double espresso. ●
Add two spoonfuls of drinking chocolate. ●
Add steam frothed milk. ●
Observe the proportions: two thirds of coffee with milk, one third of foam. ●
CON PANNA
A variety of the original Vienna coffee, this fabulous beverage is an espresso with the addition of whipped cream. It may
also be sprinkled with cinnamon or chocolate.
Prepare a 190 ml cup. ●
Pour in a single or double espresso. ●
Add whipped cream. ●
Sprinkle with cinnamon or chocolate. ●
73
MAINTENANCE AND CLEANING
B. Descaling liquid
Pour about 1.5l of warm water into the water tank. Add a suitable
It is important that the espresso machine is regularly cleaned. It will ensure
amount of the descaling agent, as recommended by the
a high quality of the coffee brewed. We recommend that the machine is
manufacturer and replace the tank.
cleaned after each brewing. Procedure:
C. Vinegar solution
Rinse the brew head unit. ●
Rinse the steam wand with steam ● (C).
Pour about 1l warm vinegar solution into the water tank
Wipe the steam wand ● (C) clean with a damp cloth immediately after the
(3.5 glassfuls of water, 0.5 glassful of 10% vinegar) and replace
espresso machine has been used.
the tank.
Take out the lter ● (H) from the handle (E) and wash it, clean the holes
2. If the lter holder (E) is in the brew head unit, take it out, rinse
of the lter (H).
thoroughly under running water and put it aside.
and wash it, clean the holes of the lter ● (I).
3. Using a screwdriver, unscrew the lter from the bottom of the lter
Important: Never wash parts and accessories of the espresso machine in
holder unit.
a dishwasher.
4. Take out the lter, the washer, the screw, and the seal and put them
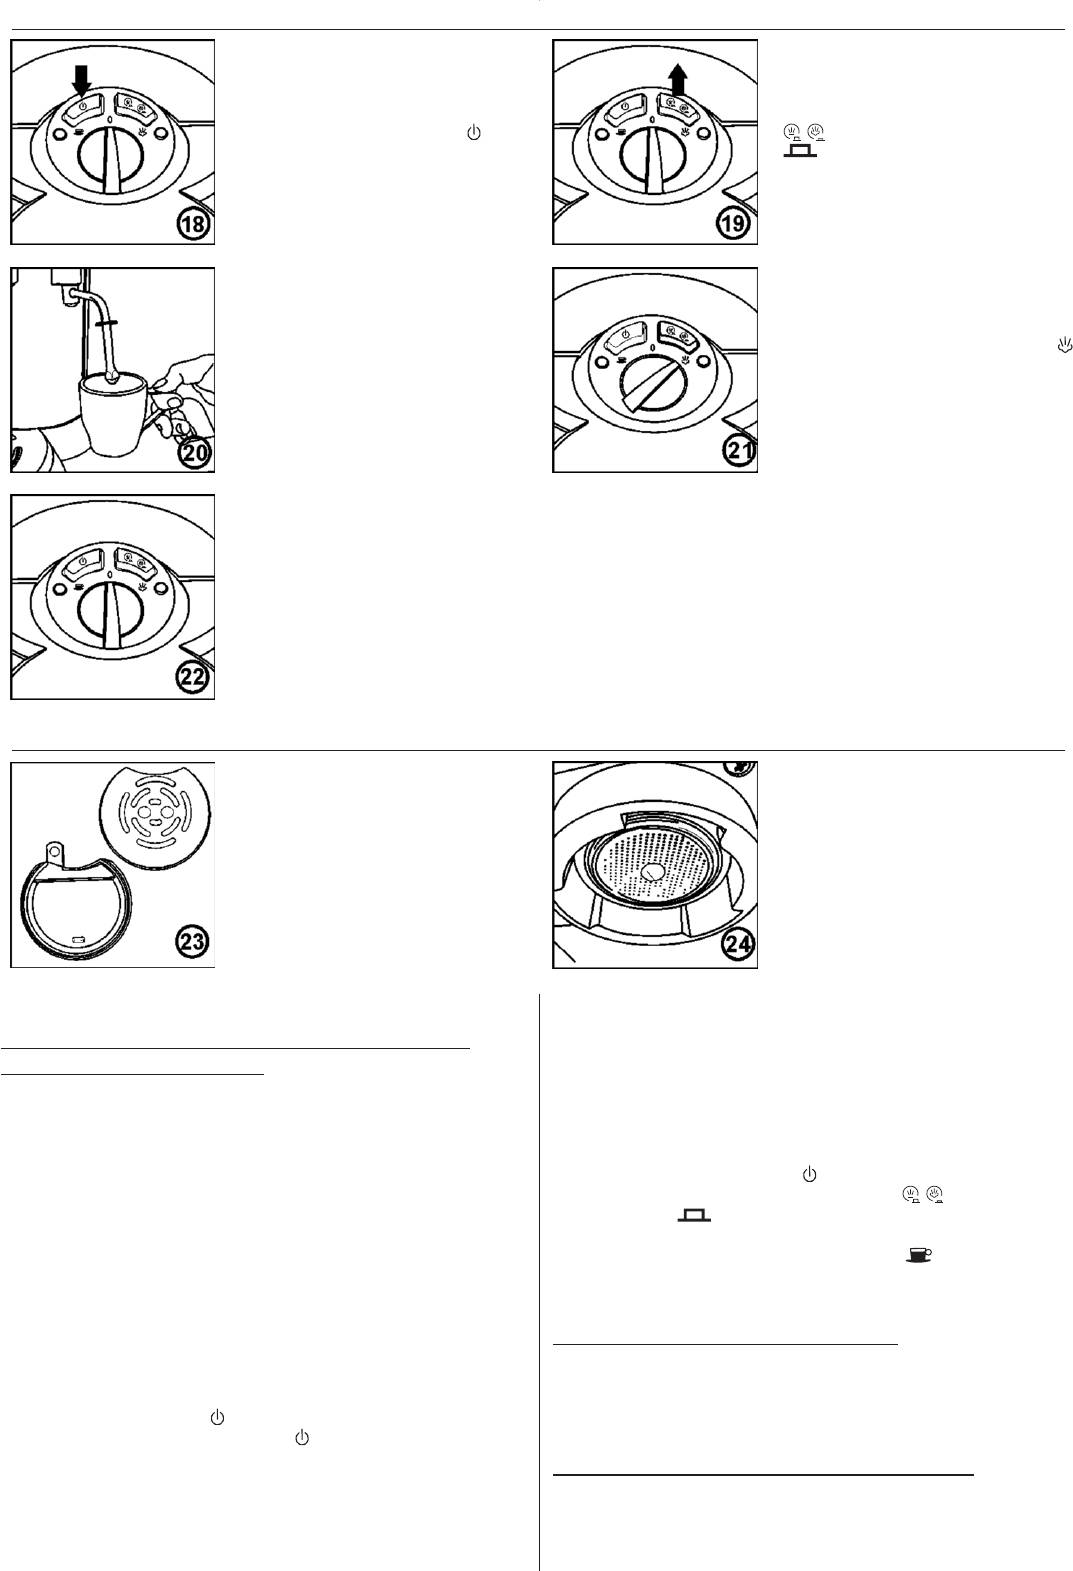
Cleaning the drip tray (I) and the grid (J)
aside in a safe place.
Important: Be careful not to lose the lter, the washer, the screw or
Take out the grid (J) and the drip tray (I) (23). Wash with water with the
the seal after disassembling the brew head unit.
addition of some mild washing-up liquid, rinse and dry.
5. Using a small delicate brush, clean the brewing area of the head
Warning: Ensure that after taking out and replacing the drip tray (I) and
removing all coffee particles.
the grid (J) the insert is in the right place.
6. Place a sufciently big container under the brew head unit.
Cleaning the brew head unit, the lter holder and (E) and the lter (H)
7. Insert the plug of the connecting cord in a mains socket and switch on
Rinse the lter (H) and the lter holder (E) with warm water after each use
the espresso machine by pressing button (M).
and dry.
Warning: Remember that if the standby pilot light (N) ashes, it means
To clean the brew head unit from used coffee, rinse it with water, wipe the
that the espresso machine is in the course of reaching the operating
head and the internal ring with a damp cloth. If the holes of the lter are
temperature. The moment the espresso machine has reached the
blocked with coffee, use a delicate brush.
right temperature, the standby pilot light (N) will stop ashing and will
Rubber seal of the brew head
come off. It indicates that the espresso machine has reached the right
temperature and is ready to operate.
The seal of the brew head is at the bottom of the brew head unit and it
8. Turn the regulator knob (K) into the espresso position and allow
seals the lter holder (E) coffee is poured.
half of the decaling solution to ow through the brew head unit.
Warning: It is recommended that the lter holder (E) is not left in the brew
Important: Do not run the descaling solution through the steam
head unit during long breaks in the use of the espresso machine, as it may
wand (C).
reduce the durability of the seal.
Warning: Depending on the size of the container under the brew
It is natural that a seal loses its elasticity and needs replacing. A lack of
head unit, it may be necessary to empty it during the process.
tightness between the lter holder (E) and the brew head (steam is visible
around the brew head unit when pouring espresso) is an indication that the
9. Turn the regulator knob (K) into position 0 to stop the ow (after about
seal is worn out.
half of the solution has owed through) and then press button (M)
Warning: Contact the nearest authorised service center if you think
and turn off the appliance.
that the seal of the brew head unit needs replacing.
10. Leave the espresso machine for about 10-15 minutes thus allowing
the descaling agent to work.
Outer elements
11. Next, press button (M). This will turn on the espresso machine.
Wipe the appliance with a damp cloth and dry it. Do not use any brushes
12. Turn the regulator knob (K) into the espresso position and allow
or abrasive cleaning agents as they may scratch outer surfaces.
the rest of the descaling solution to ow through the brew head unit.
Cleaning the steam wand (C)
13. Take out the water tank from the appliance and rinse it thoroughly
Keeping the steam wand (C) clean is essential to ensure the maximum
under running water. Check that all traces of the descaling solution
performance of the steam function. Deposits of e.g. dried milk on the wand
have been removed. Fill up the tank with fresh water (1) and place it
(C) will decrease its steaming and frothing capacity.
in the espresso machine.
Important: Wipe the wand (C) clean with a damp cloth and rinse with
14. Turn on the espresso machine with button (M) and turn the regulator
a little steam after each use.
knob (K) into the espresso position . Allow all of the fresh water to
Should milk have dried on the steam wand (C), wrap the wand (C) with
ow through the brew head. Repeat the procedure twice.
a clean damp cloth, place the wand (C) above the drip tray (I) and turn
Warning: Depending on the size of the container under the brew
on steam for about 10 seconds. Next, leave the cloth on the wand (C) for
head unit, it may be necessary to empty it during the process.
about 5 minutes until it soaks. If there still is dirt on the wand, repeat the
15. When the process has nished, remove the container from under the
procedure.
brew head and wipe the whole brew head unit thoroughly.
Important: Never clean the steam wand (C) with an abrasive scourer as it
16. Carefully install the rubber seal, the lter, and the washer in the brew
may damage the wand.
head, following their disassembling procedure in reverse order. Using
a screwdriver, tighten the fastening screw home.
DESCALING
17. Fill the tank up with fresh water (1) and replace it in the espresso
Scale is a mineral build-up which naturally occurs on all appliances
machine. The appliance is ready for further use.
connected with heating water. Therefore the espresso machine will require
descaling on a regular basis. It is recommended that scale is removed
from the espresso machine every 4-6 months, depending on the frequency
of use.
Descaling agents
The following agents are traditionally used for descaling espresso machines:
Espresso machine descaling tablets. ●
Special descaling liquid agents. ●
Vinegar solution. ●
Descaling the espresso machine
Warning: Ensure that the espresso machine is switched off and the
connecting cord is disconnected from the socket.
1. Take out the water tank and rinse it clean. Depending on the descaling
agent used, follow the steps below:
A. Espresso machine descaling tablets
Pour about 1l of warm water into the water tank and put in
a suitable number of descaling tablets, as recommended by the
manufacturer. When the tablets have dissolved (it takes about
5-7 minutes), replace the tank.
74
TROUBLE SHOOTING
PROBLEM POSSIBLE CAUSE HOW TO FIX, WHAT TO DO
Filter holder (E) is not inserted in the brew head properly or is not
Ensure the holder (E) is properly inserted in the brew head unit
tightened properly.
and tightened home. See Brewing espresso – p. 71.
Clean the rim of the lter (H) and wipe all coffee from the brew
There are coffee particles around the lter rim (H).
Coffee runs out around the
head.
edge of the lter holder
Brew head is dirty. Wipe the brew head with a damp cloth.
Brew head is damaged. Contact an authorised service center.
Rubber seal of the head is damaged or worn out. Contact an authorised service center.
No water in the water tank. Fill up the tank with water (1).
Water tank is not properly installed. Press the tank down to ensure it sits properly.
Ensure the regulator knob (K) is in position .
Coffee does not run through
Knob (K) is set into a different position, e.g. .
Filter on the brew head may be blocked. See Descaling – p. 74.
Coffee lter (H) is blocked. Coffee is ground too nely or tamped
Empty the lter (H) and rinse it under running water. Wipe the brew
too rmly.
head with a cloth.
Coffee is ground very nely or tamped too rmly. If you use very nely ground coffee, do not tamp it too rmly.
Coffee lters out in drops
The appliance is blocked with scale build-up. See Descaling – p. 74.
Use fresh coffee. After opening the coffee, ensure it is stored in
Coffee is stale or dry.
a tight container.
Espresso does not have
Coffee is not tamped rmly enough. Tamp coffee more rmly.
characteristic foam
Coffee is ground too coarsely. Use properly ground coffee or change coffee brand.
Not enough coffee in the lter (H). See Brewing espresso – p. 71.
Coffee is tamped too rmly. Tamp ground coffee less rmly.
Coffee is ground too nely. Change to coarser coffee.
Ensure coffee holder (E) is placed correctly and tightened home in
Filter holder (E) does not sit rmly as it has not been tightened rm
the brew head.
enough.
See Brewing espresso – p. 71.
Holder loosens during brewing
Oczyść dookoła górną krawędź sitka (H) i wytrzyj z kawy do czysta
There are coffee particles around the lter rim (H).
głowicę.
Brew head is dirty. Wytrzyj głowicę wilgotną ścierką.
Brew head is damaged. Contact an authorised service center.
Rubber seal of the brew head is damaged or worn out. Contact an authorised service center.
Before brewing, pre-heat cups, lters and holder. See Brewing
Cups, lters (H) or lter head are cold.
espresso – str. 71.
Coffee is too cold
Check if milk is properly heated during frothing. Ensure that milk
When making cappuccino or latte, milk is not heated enough.
does not boil. See Frothing milk –p. 72.
No steam from steam wand Steam wand (C) is blocked. See Maintenance and cleaning – p. 74.
Milk is not fresh. Check if milk is fresh.
Temperature of milk is too high. Check that milk is properly cooled before use.
To obtain best results when frothing, use the stainless steel jug
Not enough frothed milk
Jug.
provided and cool it down or rinse with cold water if possible.
Steam wand is blocked. See Maintenance and cleaning – p. 74.
Milk has been boiled. Try to use fresh, cooled milk.
Check if coffee is evenly tamped and check if anything obstructs
Uneven distribution of coffee
Uneven distribution or interrupted outow of coffee.
the outlets in the head for xing the lter.
into cups
Damaged partition in lter holder (E). Contact an authorised service center.
Coffee used is unsuitable. Try other coffee brands.
Espresso has burnt taste
Before brewing next coffee, rinse the appliance with a tankfull of
Appliance was not rinsed after descaling.
water, allow tank to empty completely.
No water in water tank. Fill up water tank with water (1).
Pump makes too much noise
Water tank is not properly inserted. Check if water tank is properly inserted.
Take out lter holder (E) and clean brew head unit. See
Filter (H) in brew head may be blocked.
Appliance does not work
Maintenance and cleaning – p. 74.
Appliance is blocked with scale build-up. See Descaling – p. 74.
ECOLOGY – ENVIRONMENT PROTECTION
Each user can protect the natural environment. It is neither difcult nor expensive.
In order to do it: put the cardboard packing into recycling paper container; put the polyethylene (PE) bags into container for plastic.
When worn out, dispose the appliance to particular disposal centre, because of the dangerous elements of this appliance, which can be
hazardous for natural environment.
Do not dispose into the domestic waste disposal!!!
75
GW 13-014


