Mitsubishi Electric MDT421S: How to Mount and Attach Options to the LCD Monitor
How to Mount and Attach Options to the LCD Monitor: Mitsubishi Electric MDT421S
English-14
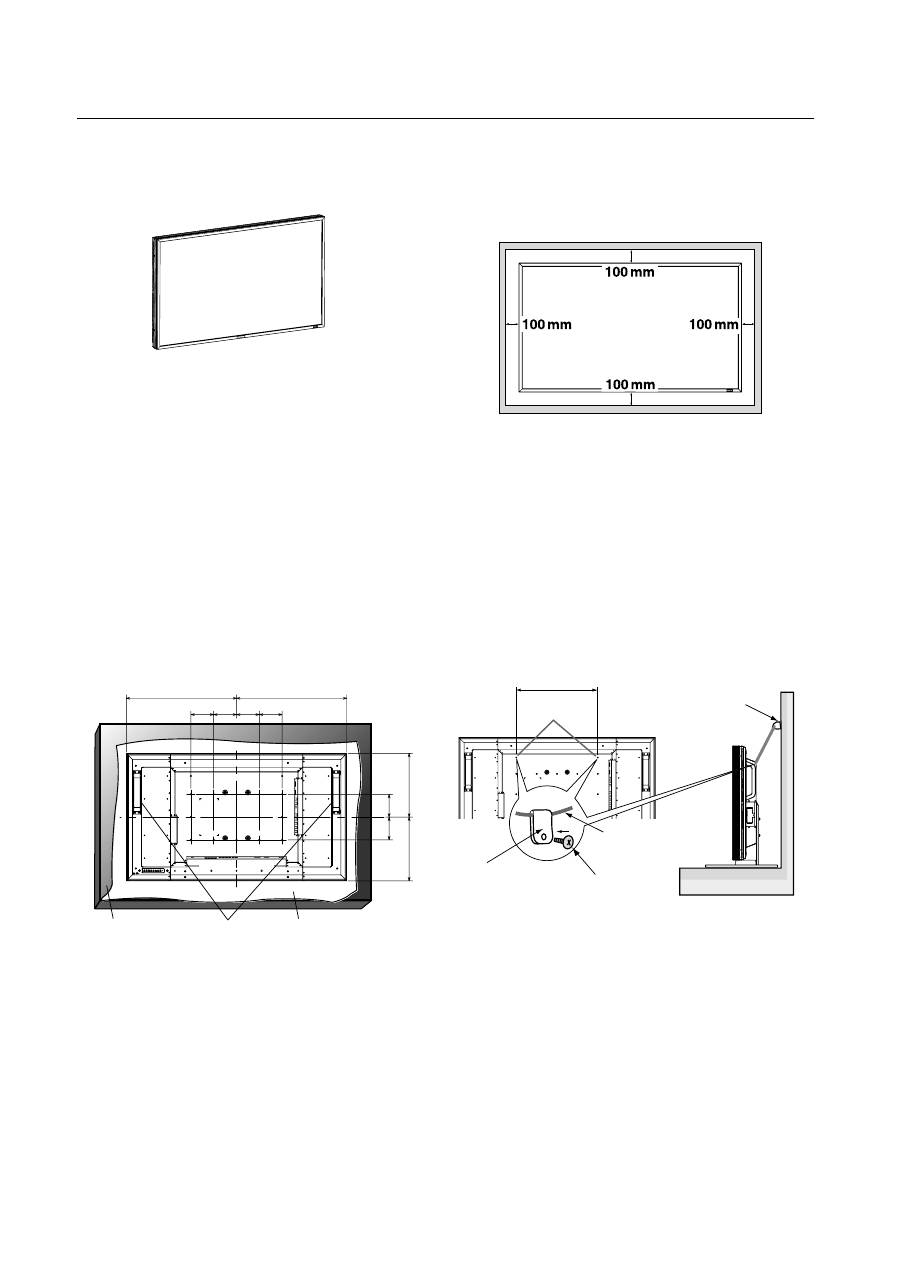
3. Ventilation Requirements for enclosure
mounting
To allow heat to disperse, leave space between surrounding
objects as shown in the diagram below.
4. To avoid monitor from falling
When installing the monitor using the tabletop stands (op-
tional), take measures to prevent the monitor from falling over
in case of an earthquake or other disaster to lessen the prob-
ability of injury and damage resulting from fall.
As shown in the
fi
gure, secure the monitor to a solid wall or
pillar using rope (commercially available) strong enough to
bear the weight of the monitor. (MDT421S: approx. 27 kg (with
the optional stands))
When you use screw hooks (commercially available), ring
screw hooks, not C-shaped screw hooks (with opening), are
recommended.
Caution:
• The effectiveness of preventing from falling substantially
depends on the strength of brackets and base to which
prevention device from falling is attached. When you
cannot ensure suf
fi
cient strength, provide adequate
reinforcement.
• Though the recommended prevention from falling is
intended to lessen the probability of injury and damage, it
doesn’t assure its effectiveness against any kind of
earthquake or disaster.
• Do not sleep where the monitor may topple over or fall in
case of an earthquake or other disaster.
• Before moving the monitor, remove the rope that is
securing the monitor. Failure to do so may result in injury
or breakdown of the monitor.
You can attach mounting accessories to the LCD monitor in
one of the following two ways:
1. In the upright position
2. Lay the screen face down
Lay the protective sheet on a table, which was wrapped
around the monitor when it was packaged, beneath the
screen surface so as not to scratch the screen face.
This device cannot be used or installed without the Tabletop
Stand or other mounting accessory. Failure to follow correct
mounting procedures could result in damage to the equip-
ment or injury to the user or installer. Product warranty does
not cover damage caused by improper installation.
Failure to follow these recommendations could result in void-
ing your warranty.
Use M6 screws (having a length 10 mm longer than the thick-
ness of the mounting bracket) and tighten them securely.
Prevent the screws from loosening using spring washers,
etc. MITSUBISHI ELECTRIC recommends using mounting
interface that comply with TÜV-GS and/or UL1678 standard
in North America.
Caution:
For preventing the monitor from falling.
• Install the monitor with metal brackets for wall or ceiling
installation (commercially available) on your own respon-
sibility. For detailed procedures of installation, refer to the
instructions of the metal brackets.
• To lessen the probability of injury and damage resulting
from fall of the monitor in case of earthquake or other
disaster, be sure to consult the bracket manufacturer for
installation location.
• To lessen the risk of falling of the monitor, thread commer-
cially available rope through the handles at the right and
left of the monitor and secure the rope to the wall mount
brackets or ceiling mount brackets.
• Do not sleep where the monitor may topple over or fall in
case of an earthquake or other disaster.
How to Mount and Attach Options to the LCD Monitor
Screw Holes
400 mm
Screw hook, etc.
commercially available
Clamper
Screw
Rope, etc.
commercially available
482.8
482.8
100 100 100
100
100
100
279.3
279.3
Table
Handles
Protective sheet
(mm)
Оглавление
- Index
- Important Information
- Safety Precautions, Maintenance & Recommended Use
- Contents
- Parts Name and Functions
- Setup Procedure
- How to Mount and Attach Options to the LCD Monitor
- Connections
- Basic Operation
- OSD (On-Screen-Display) Controls
- Controlling the LCD monitor via RS-232C/RS-485 Remote Control
- Features
- Troubleshooting
- Speci fi cations
- Pin Assignment
- Inhaltsverzeichnis
- Wichtige Informationen
- Sicherheitsvorkehrungen, P fl ege und Einsatzempfehlungen
- Inhalt der Verpackung
- Die Teile und ihre Funktionen
- Einrichten des LCD-Monitors
- Montage und Anbringung von Zubehör am LCD-Monitor
- Anschließen von Geräten
- Grundlegende Bedienung
- OSD-Steuerungen (On-Screen-Display)
- Merkmale und Funktionen
- Fehlerbehebung
- Technische Daten
- Pinbelegung
- Índice
- Información importante
- Medidas de seguridad, mantenimiento y uso recomendado
- Contenido
- Denominación de las piezas y funciones
- Procedimiento de con fi guración
- Cómo montar y conectar elementos opcionales al monitor LCD
- Conexiones
- Funcionamiento básico
- Controles OSD (On-Screen-Display: gestor de pantalla)
- Control del monitor LCD mediante control remoto RS-232C/RS-485
- Características
- Solución de problemas
- Especi fi caciones
- Asignación de PIN
- Index
- Informations importantes
- Informations importantesDéclaration
- Consignes de sécurité, d’entretien, et conseils d’utilisation
- Sommaire
- Noms et fonctions des pièces
- Installation
- Comment monter et brancher des accessoires au moniteur
- Connexions
- Opération de base
- Commandes OSD (On-Screen-Display)
- Fonctionnalités
- Résolution des problèmes
- Spéci fi cations
- Brochage
- Indice
- Informazioni importanti
- Precauzioni di sicurezza, manutenzione e raccomandazioni per l’uso
- Contenuto
- Nome delle parti e delle funzioni
- Procedura di installazione
- Montaggio e collegamento delle opzioni al monitor LCD
- Connessioni
- Operazioni di base
- Controlli OSD (On Screen-Display)
- Controllo del monitor LCD attraverso il controllo remoto RS-232C/RS-485
- Caratteristiche
- Risoluzione dei problemi
- Speci fi che
- Assegnazione spinotti
- Index
- Belangrijke informatie
- Veiligheidsmaatregelen, onderhoud en aanbevolen gebruik
- Inhoud
- Namen en functies van onderdelen
- Installatieprocedure
- Opties voor de LCD-monitor monteren en aansluiten
- Aansluitingen
- Basisbediening
- OSD-besturingselementen (On-Screen-Display)
- Kenmerken
- Problemen oplossen
- Speci fi caties
- Pintoewijzingen
- Указатель
- Важная информация
- Техника безопасности , техническое обслуживание и рекомендации по эксплуатации
- Содержимое
- Названия деталей и их функции
- Процедура установки
- Монтаж и прикрепление деталей к ЖКД монитору
- Выполнение соединений
- Основные операции
- Органы управления OSD (On-Screen-Display)
- Управление ЖКД монитором c помощью коробки дистанционного управления RS-232C/RS-485
- Характеристики
- Устранение неисправностей
- Технические характеристики
- Назначение штырьков
