Mitsubishi Electric MDT421S: Connections
Connections: Mitsubishi Electric MDT421S
English
English-15
Connections
Before making connections:
* First turn off the power of all the attached equipment and make connections.
* Refer to the user manual included with each separate piece of equipment.
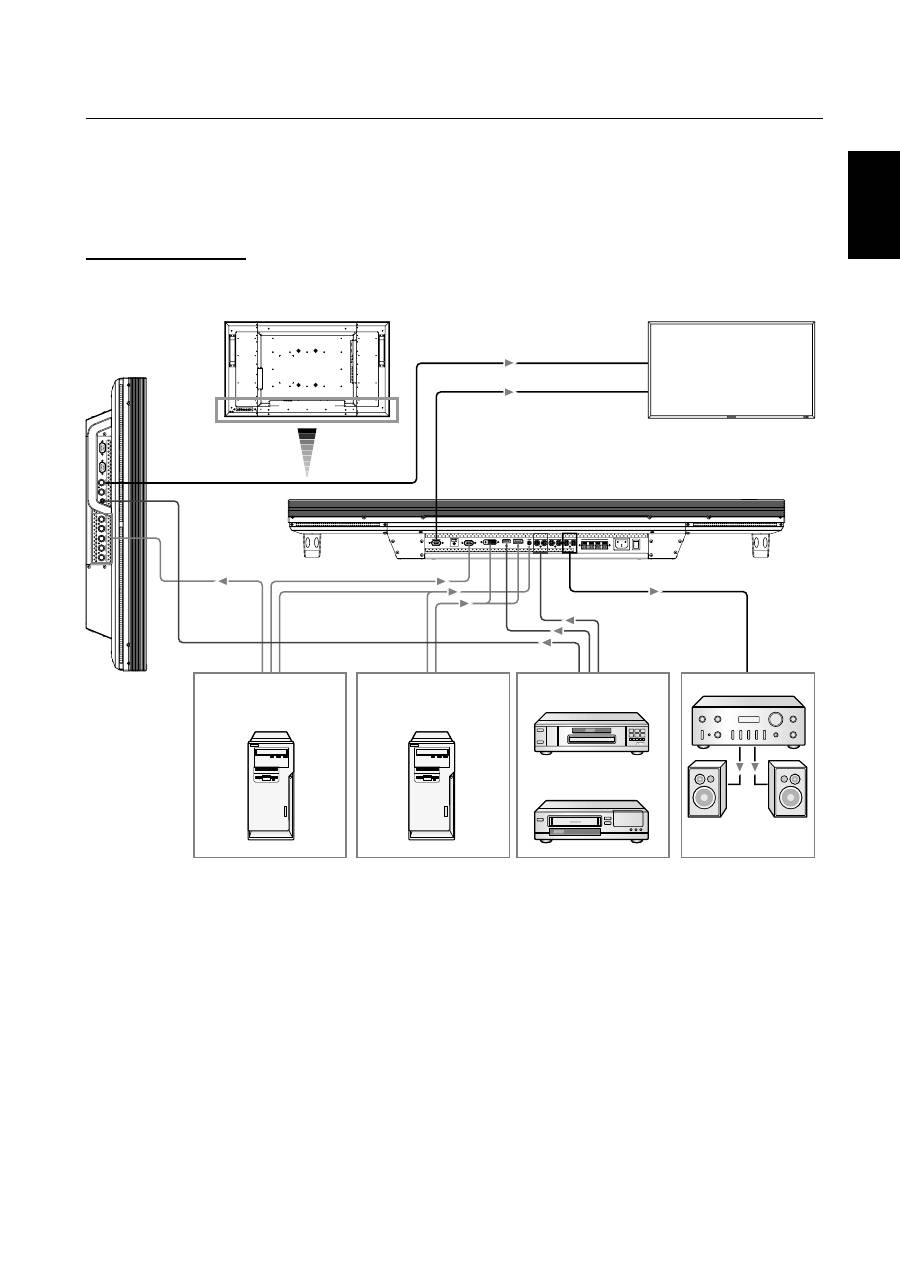
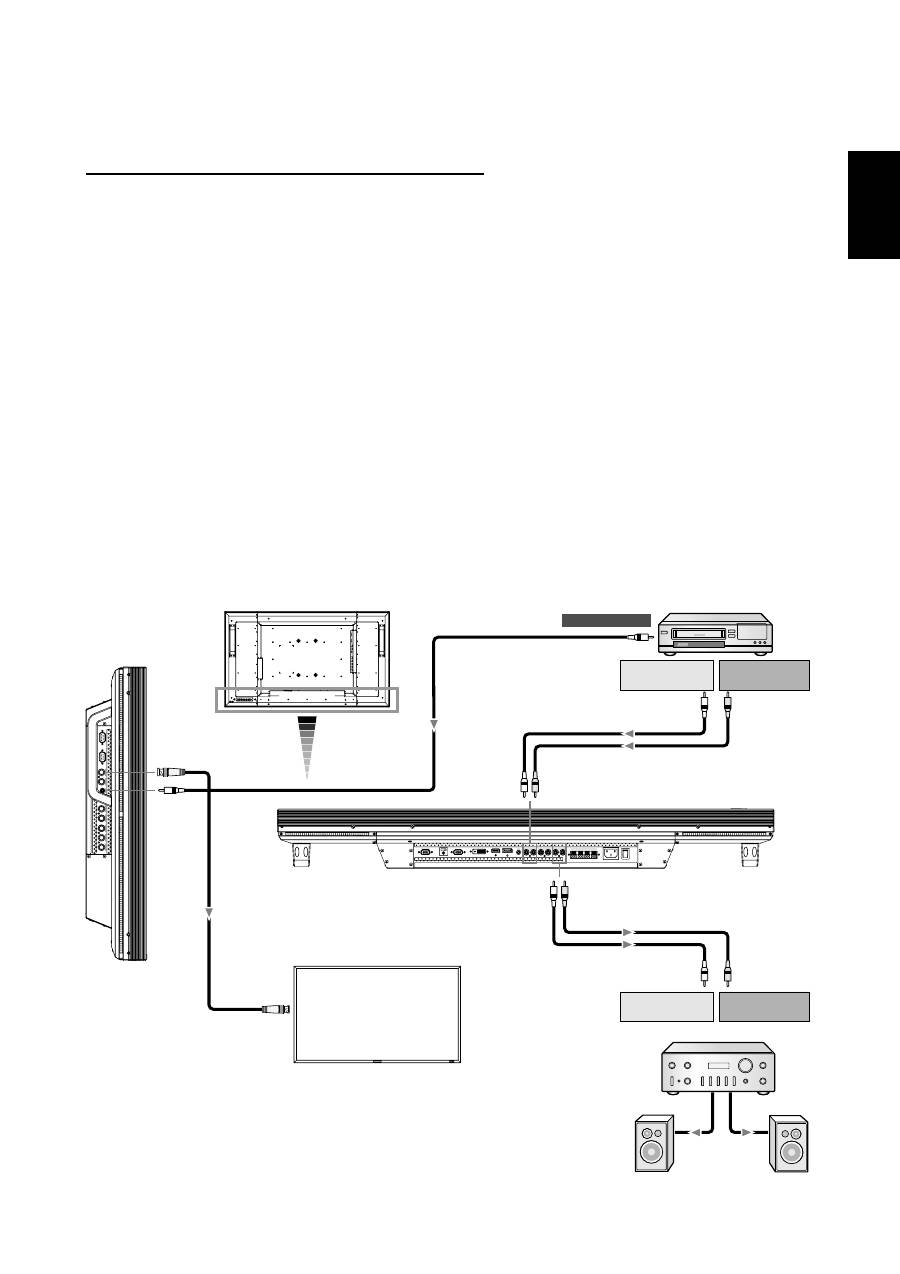
Wiring Diagram
LCD monitor
VCR
(RCA)
LCD monitor (second monitor)
Stereo amplifier
Personal
computer
(analog RGB)
Personal
computer
(DVI-D, DISPLAY PORT)
DVD player
(HDMI)
External speaker
English-16
Connecting a Personal Computer
By connecting your computer to your LCD monitor, you can display images on your computer's screen.
Some video cards may not display an image correctly.
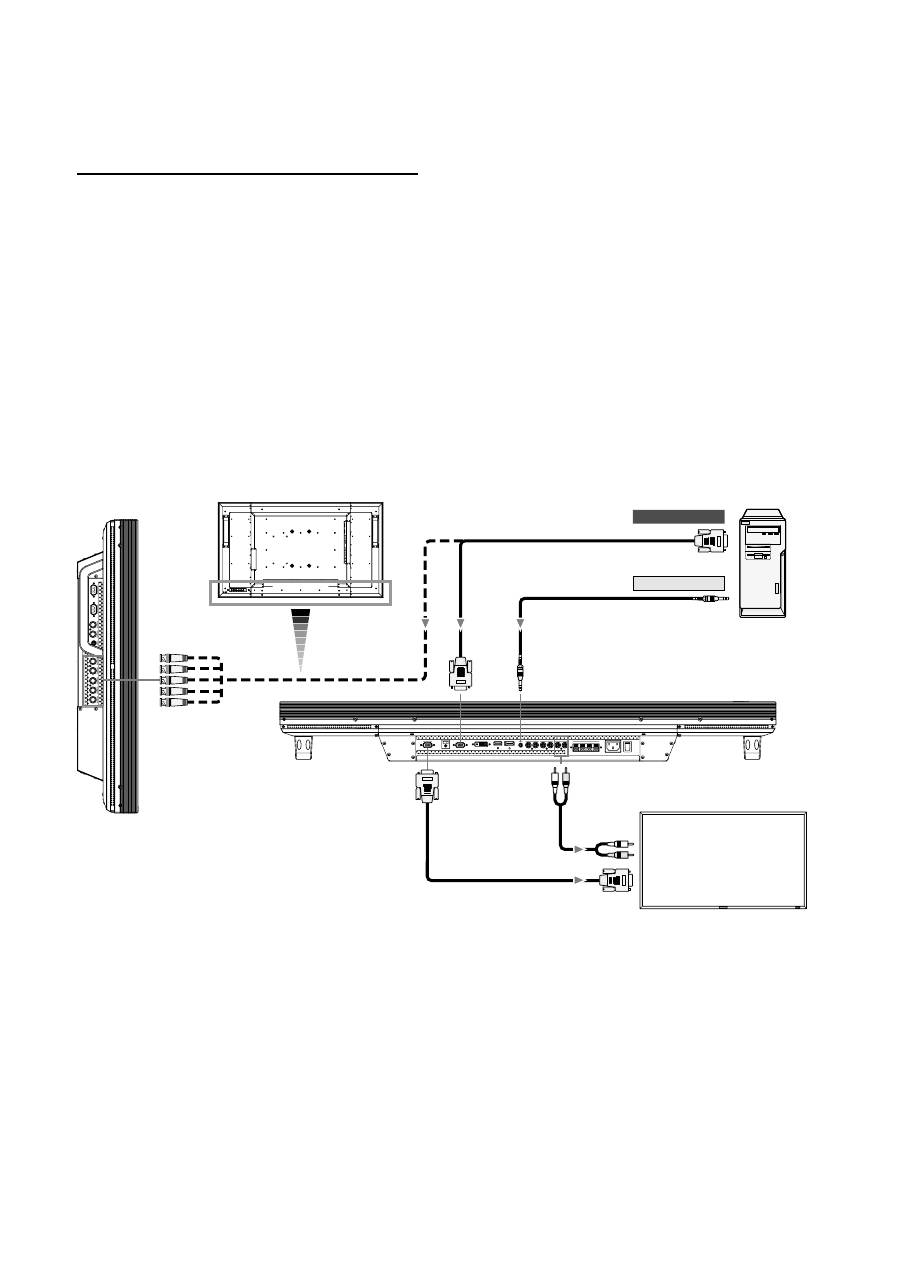
Connect the LCD Monitor to a Personal Computer
• To connect the computer to the RGB 3 IN connector (mini D-sub 15 pin) on the LCD monitor, use the supplied RGB signal
cable (mini D-sub 15 pin to mini D-sub 15 pin).
Select “RGB 3” using the INPUT button on the LCD monitor or the D-SUB button on the remote control.
• To connect the computer to the RGB 4 IN connector (BNC) on the LCD monitor, use a signal cable (mini D-sub 15 pin to
BNC x 5).
Select “RGB 4” using the INPUT button on the LCD monitor or the BNC button on the remote control.
• For audio input, select AUDIO IN 1, 2, or 3 using the AUDIO INPUT button.
• To connect a second LCD monitor, use the RGB OUT connector (mini D-sub 15 pin). (The RGB 3, RGB 4, or RGB 5 (option)
signal selected by the
fi
rst LCD monitor is output.)
• To output audio to the second LCD monitor, use the AUDIO OUT connector.
RCA
Mini D-sub 15 pin
BNC x 5
LCD monitor
PC or IBM compatible
Mini D-sub 15 pin
LCD monitor (second monitor)
Mini D-sub 15 pin
RCA
Mini D-sub 15 pin
To RGB output
To audio output
English
English-17
Connecting with Digital Interface Equipment
Connections can be made with equipment that is equipped with a digital interface compliant with the DVI (Digital Visual
Interface) standard.
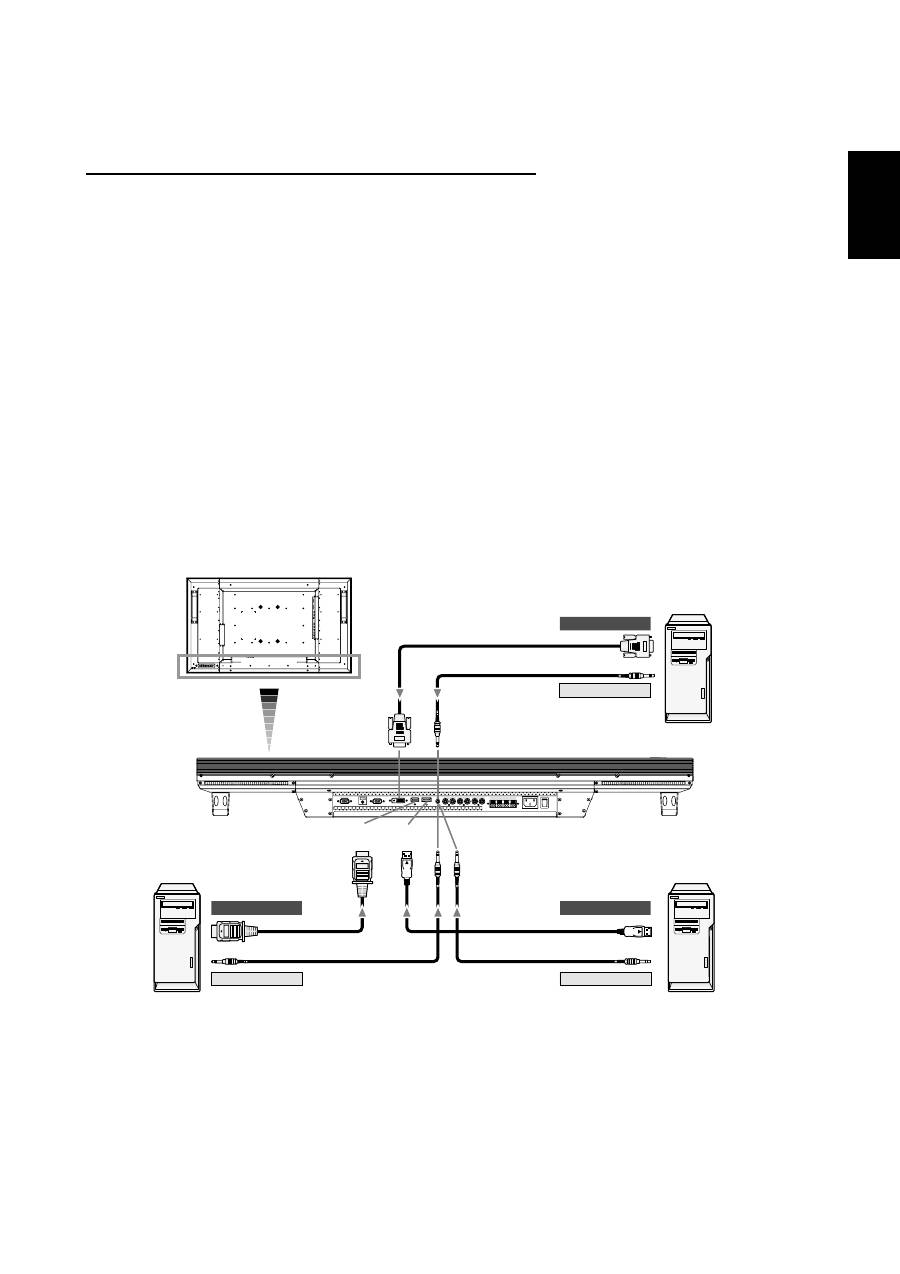
Connect the LCD Monitor to a Computer with a Digital Output
• To connect the computer to the RGB 2 IN connector (DVI-D) on the LCD monitor, use a DVI-D cable.
Select “RGB 2” using the INPUT button on the LCD monitor or the DVI-D button on the remote control.
Set DVI INPUT MODE to “DVI-PC.” (See page 31.)
• To connect the computer to the RGB 1 IN connector (HDMI) on the LCD monitor, use an HDMI cable.
Select “RGB 1” using the INPUT button on the LCD monitor or the HDMI button on the remote control.
Set HDMI INPUT MODE to “HDMI-PC.” (See page 31.)
• To connect the computer to the RGB 6 IN connector (DISPLAY PORT) on the LCD monitor, use a Display Port cable.
Select “RGB 6” using the INPUT button on the LCD monitor or the DISPLAY PORT button on the remote control.
• For audio input, select AUDIO IN 1, 2, or 3 or HDMI using the AUDIO INPUT button. (HDMI is selectable only when the video
input is “RGB 1.”)
• The signals input from the RGB 1 (HDMI), RGB 2 (DVI-D) and RGB 6 (DISPLAY PORT) connectors aren’t output to the RGB
OUT connector.
LCD monitor
PC or IBM compatible
PC or IBM compatible
PC or IBM compatible
DVI-D
DVI-D
DISPLAY
PORT
DISPLAY PORT
HDMI
HDMI
To RGB output
To RGB output
To RGB output
To audio output
To audio output
To audio output
English-18
Connecting a DVD Player with component output / HDMI output / DVI output
You can connect DVD players equipped with a component output, HDMI output, and DVI output to your LCD monitor.
Refer to your DVD player owner’s manual for more information.
Connect the LCD Monitor to a DVD Player
• To connect a DVD player equipped with a component output to the DVD/HD IN connector (BNC) on the LCD monitor, you
may need a BNC connector cable (BNC to RCA adaptor).
Select “DVD/HD” using the INPUT button on the LCD monitor or the YPbPr button on the remote control.
• To connect a DVD player equipped with an HDMI output to the RGB 1 IN connector (HDMI) on the LCD monitor, use an
HDMI cable.
Select “RGB 1” using the INPUT button on the LCD monitor or the HDMI button on the remote control.
Set HDMI INPUT MODE to “HDMI-HD.” (See page 31.)
• For audio input, select AUDIO IN 1, 2, 3 or HDMI using the AUDIO INPUT button. (HDMI is selectable only when the video
input is “RGB 1.”)
HDMI
BNC x 3
LCD monitor
DVD Player
HDMI
BNC-RCA
adapter
BNC x 3
RCA
To HDMI output
DVD Player
To video output
To audio output
L
To audio output
R
RCA
NOTE:
Operations of the connected HDMI device aren’t always guaranteed.
English
English-19
Connecting to a VCR / Stereo Ampli
fi
er
You can connect your VCR / stereo ampli
fi
er to your LCD monitor. Refer to your VCR / stereo ampli
fi
er owner's manual for more
information.
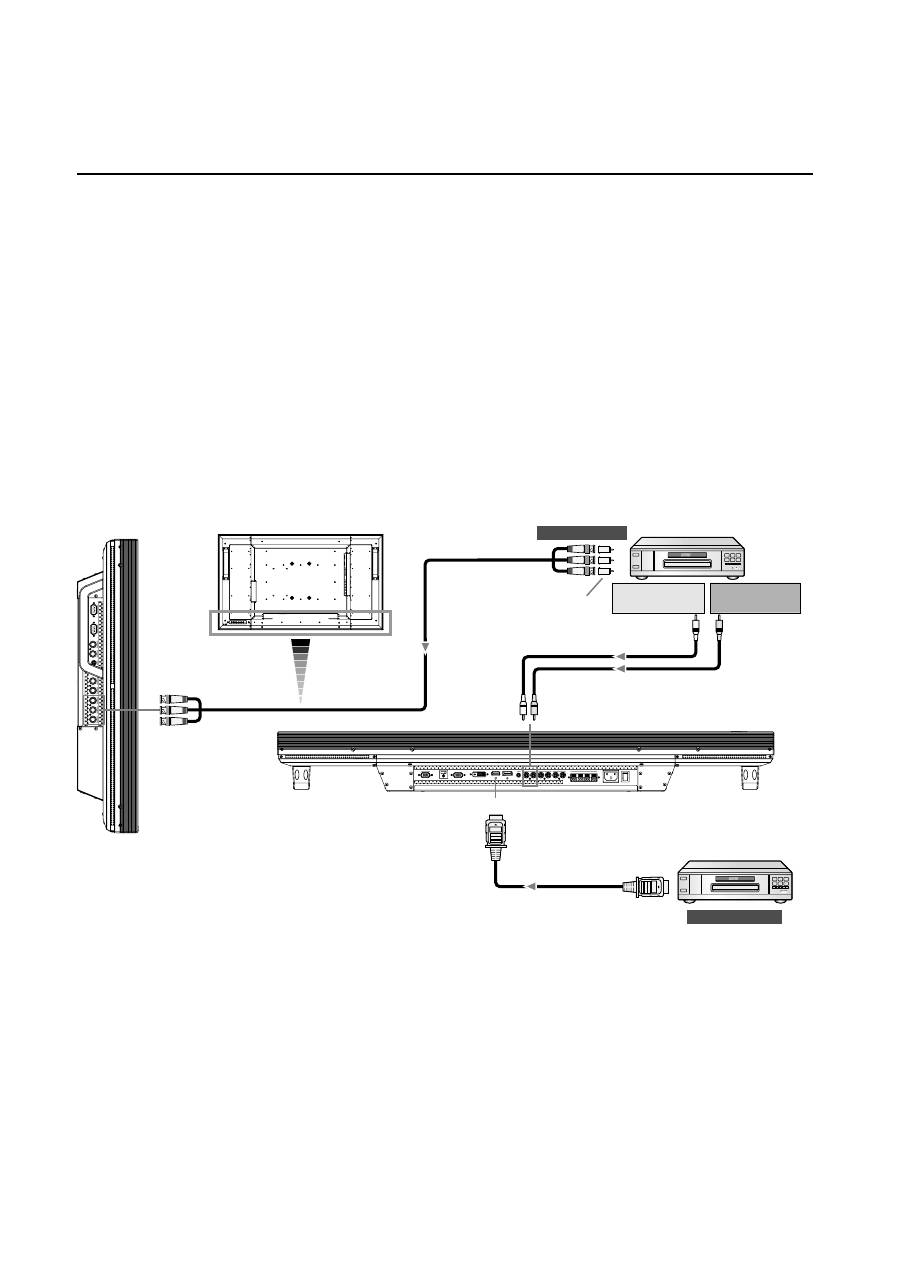
Connect the LCD Monitor to a VCR / Stereo Ampli
fi
er
• To connect the VCR to the VIDEO IN connector (RCA, BNC, or S-VIDEO) on the LCD monitor, use a video cable or S-video
cable.
For connection to the AUDIO IN connector on the LCD monitor, use an RCA cable (audio cable).
Connect the connectors of the RCA cable (audio cable) properly.
When connecting the VCR to the RCA or BNC connector, select “VIDEO” using the INPUT button on the LCD monitor or the
VIDEO button on the remote control.
When connecting the VCR to the S-VIDEO connector, select “VIDEO<S>” using the INPUT button on the LCD monitor or the
VIDEO button on the remote control.
• Before connecting a stereo ampli
fi
er to the LCD monitor, be sure to turn off the stereo ampli
fi
er.
For connection to the AUDIO OUT connector on the LCD monitor, use an RCA cable (audio cable).
Connect the connectors of the RCA cable (audio cable) properly.
Turn on the LCD monitor
fi
rst, and then turn on the stereo ampli
fi
er.
• The audio input signal selected by the LCD monitor is output from the AUDIO OUT connector.
NOTE:
For video signal input, use either of the RCA or BNC connector.
LCD monitor
VCR
To video output
To audio output
L
To audio output
R
To audio input
L
To audio input
R
RCA
LCD monitor (second monitor)
RCA
RCA
RCA
BNC
BNC
Stereo amplifier
RCA
RCA
External
speaker
Оглавление
- Index
- Important Information
- Safety Precautions, Maintenance & Recommended Use
- Contents
- Parts Name and Functions
- Setup Procedure
- How to Mount and Attach Options to the LCD Monitor
- Connections
- Basic Operation
- OSD (On-Screen-Display) Controls
- Controlling the LCD monitor via RS-232C/RS-485 Remote Control
- Features
- Troubleshooting
- Speci fi cations
- Pin Assignment
- Inhaltsverzeichnis
- Wichtige Informationen
- Sicherheitsvorkehrungen, P fl ege und Einsatzempfehlungen
- Inhalt der Verpackung
- Die Teile und ihre Funktionen
- Einrichten des LCD-Monitors
- Montage und Anbringung von Zubehör am LCD-Monitor
- Anschließen von Geräten
- Grundlegende Bedienung
- OSD-Steuerungen (On-Screen-Display)
- Merkmale und Funktionen
- Fehlerbehebung
- Technische Daten
- Pinbelegung
- Índice
- Información importante
- Medidas de seguridad, mantenimiento y uso recomendado
- Contenido
- Denominación de las piezas y funciones
- Procedimiento de con fi guración
- Cómo montar y conectar elementos opcionales al monitor LCD
- Conexiones
- Funcionamiento básico
- Controles OSD (On-Screen-Display: gestor de pantalla)
- Control del monitor LCD mediante control remoto RS-232C/RS-485
- Características
- Solución de problemas
- Especi fi caciones
- Asignación de PIN
- Index
- Informations importantes
- Informations importantesDéclaration
- Consignes de sécurité, d’entretien, et conseils d’utilisation
- Sommaire
- Noms et fonctions des pièces
- Installation
- Comment monter et brancher des accessoires au moniteur
- Connexions
- Opération de base
- Commandes OSD (On-Screen-Display)
- Fonctionnalités
- Résolution des problèmes
- Spéci fi cations
- Brochage
- Indice
- Informazioni importanti
- Precauzioni di sicurezza, manutenzione e raccomandazioni per l’uso
- Contenuto
- Nome delle parti e delle funzioni
- Procedura di installazione
- Montaggio e collegamento delle opzioni al monitor LCD
- Connessioni
- Operazioni di base
- Controlli OSD (On Screen-Display)
- Controllo del monitor LCD attraverso il controllo remoto RS-232C/RS-485
- Caratteristiche
- Risoluzione dei problemi
- Speci fi che
- Assegnazione spinotti
- Index
- Belangrijke informatie
- Veiligheidsmaatregelen, onderhoud en aanbevolen gebruik
- Inhoud
- Namen en functies van onderdelen
- Installatieprocedure
- Opties voor de LCD-monitor monteren en aansluiten
- Aansluitingen
- Basisbediening
- OSD-besturingselementen (On-Screen-Display)
- Kenmerken
- Problemen oplossen
- Speci fi caties
- Pintoewijzingen
- Указатель
- Важная информация
- Техника безопасности , техническое обслуживание и рекомендации по эксплуатации
- Содержимое
- Названия деталей и их функции
- Процедура установки
- Монтаж и прикрепление деталей к ЖКД монитору
- Выполнение соединений
- Основные операции
- Органы управления OSD (On-Screen-Display)
- Управление ЖКД монитором c помощью коробки дистанционного управления RS-232C/RS-485
- Характеристики
- Устранение неисправностей
- Технические характеристики
- Назначение штырьков
