Mitsubishi Electric MDT421S: Brochage
Brochage: Mitsubishi Electric MDT421S
Français-41
Français
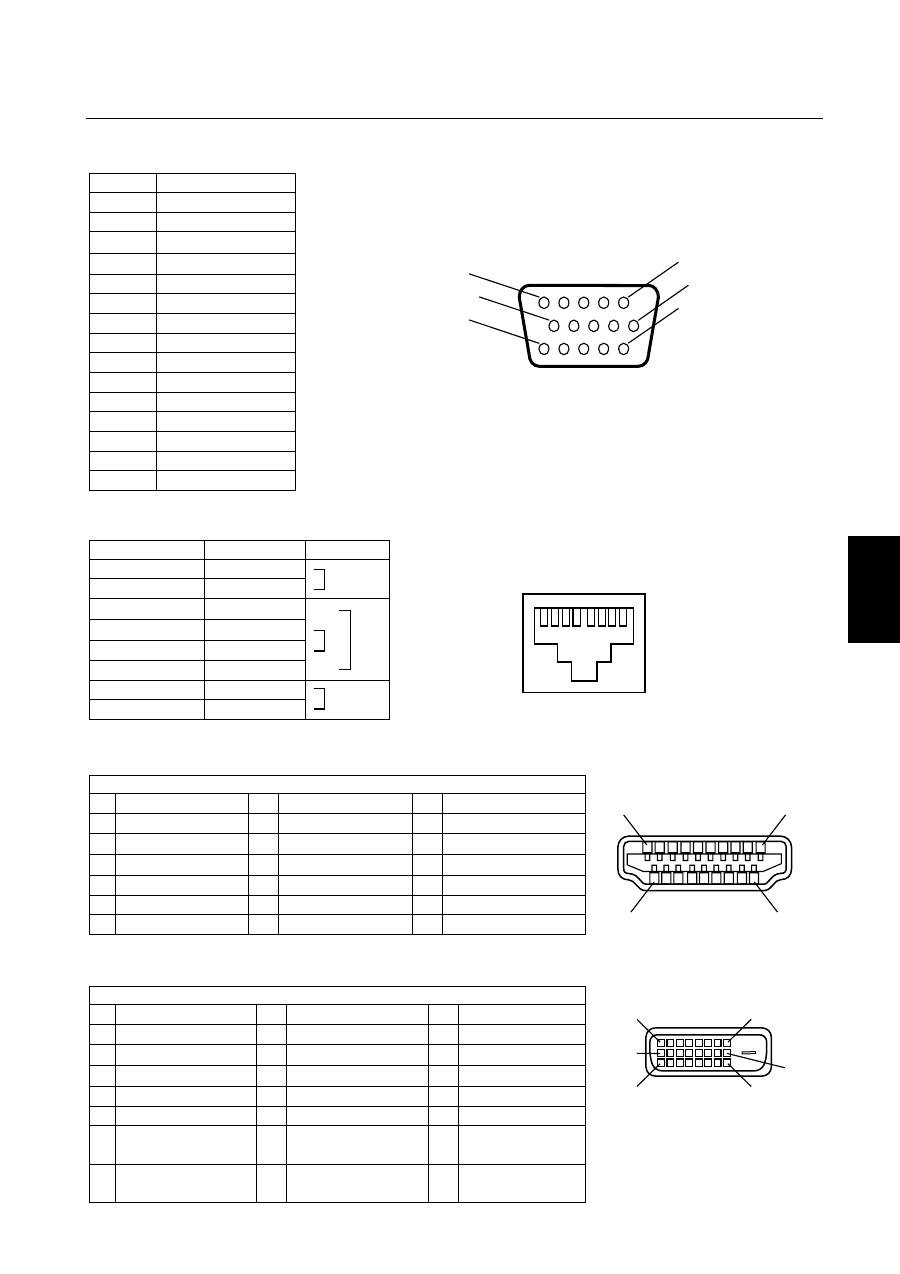
1) Entrée RVB analogique (Mini D-Sub 15 broches): RVB3
Nom
Signal vidéo rouge
Signal vidéo vert
Signal vidéo bleu
GND
DDC-GND
Rouge-GND
Vert-GND
Bleu-GND
+5V (DDC)
SYNC-GND
GND
DDC-SDA
H-SYNC
V-SYNC
DDC-SCL
N° broche
1
2
3
4
5
6
7
8
9
10
11
12
13
14
15
Mini D-sub 15 broches
1
6
11
5
10
15
2) Entrée RVB analogique (CAT5): RVB5
CAT5 RJ45
N° de l’ergot à RJ45
#1
#2
#3
#4
#5
#6
#7
#8
Signal
Rouge Vidéo +
Rouge Vidéo –
Vert Vidéo +
Bleu Vidéo +
Bleu Vidéo -
Vert Vidéo -
RS-485+
RS-485-
Paire
1 2 3 4 5 6 7 8
3) Entrée RVB numérique (HDMI): RVB1
1
2
3
4
5
6
7
8
9
10
11
12
13
14
15
16
17
18
19
Brochage de la prise HDMI:
TMDS Données 2+
TMDS Ecran Données 2
TMDS Données 2-
TMDS Données 1+
TMDS Ecran Données 1
TMDS Données 1-
TMDS Données 0+
TMDS Ecran Données 0
TMDS Données 0-
TMDS Horloge +
TMDS Ecran Horloge
TMDS Horloge -
CEC
Réservé (N.C sur appareil)
SCL
SDA
Sol DDC/CEC
Puissance +5 V
Détection branchement à chaud
18
1
19
HDMI
2
4) Entrée RVB numérique (DVI-D): RVB2
1
2
3
4
5
6
7
8
9
10
11
12
13
14
15
16
17
18
19
20
21
22
23
24
Brochage de la prise VDI-D:
TMDS Données2-
TMDS Données2+
TMDS Ecran Données 2
NC
NC
DDC Horloge
DDC Données
Synchronisation
verticale analogique
TMDS Données1-
TMDS Données1+
TMDS Ecran Données 1
NC
NC
Puissance +5V
Terre (retour pour +5 V,
H-SYNC et V-SYNC)
Détection branchement
à chaud
TMDS Données0-
TMDS Données0+
TMDS Ecran Données 0
NC
NC
TMDS Ecran Horloge
TMDS Horloge+
TMDS Horloge-
1
9
16
8
17
24
DVI-D
Brochage
Français-42
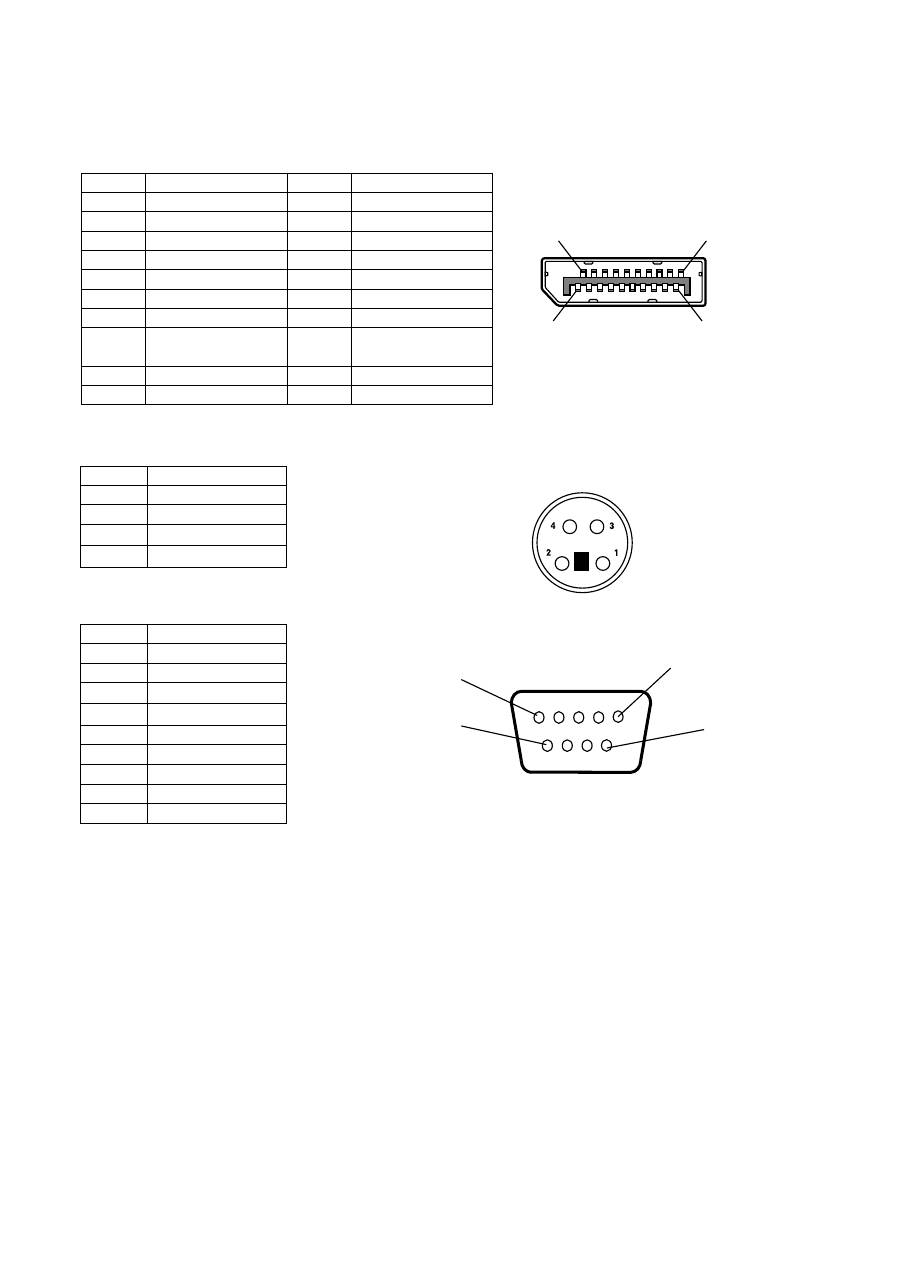
5) Entrée RVB numérique (DISPLAY PORT): RVB6
2
1
19
DISPLAY PORT
20
N° broche
1
2
3
4
5
6
7
8
9
10
N° broche
11
12
13
14
15
16
17
18
19
20
Nom
ML_Lane 3 (n)
GND
ML_Lane 3 (p)
ML_Lane 2 (n)
GND
ML_Lane 2 (p)
ML_Lane 1 (n)
GND
ML_Lane 1 (p)
ML_Lane 0 (n)
Nom
GND Top
ML_Lane 0 (p)
CONFIG1
CONFIG2
AUX CH (p)
GND
AUX CH (n)
Détection branchement
à chaud
Retour
DP_PWR
6) Entrée S-VIDÉO: (MINI DIN4P) VIDÉO<S>
N° broche
Nom
1
GND
2
GND
3
Y (Luminosité)
4
C (Chroma)
MINI DIN 4P
7) Entrée/sortie RS-232C
Mini D-sub 9 broches
5
9
1
6
N° broche
1
2
3
4
5
6
7
8
9
Nom
NC
RXD
TXD
NC
GND
NC
NC
NC
NC
Оглавление
- Index
- Important Information
- Safety Precautions, Maintenance & Recommended Use
- Contents
- Parts Name and Functions
- Setup Procedure
- How to Mount and Attach Options to the LCD Monitor
- Connections
- Basic Operation
- OSD (On-Screen-Display) Controls
- Controlling the LCD monitor via RS-232C/RS-485 Remote Control
- Features
- Troubleshooting
- Speci fi cations
- Pin Assignment
- Inhaltsverzeichnis
- Wichtige Informationen
- Sicherheitsvorkehrungen, P fl ege und Einsatzempfehlungen
- Inhalt der Verpackung
- Die Teile und ihre Funktionen
- Einrichten des LCD-Monitors
- Montage und Anbringung von Zubehör am LCD-Monitor
- Anschließen von Geräten
- Grundlegende Bedienung
- OSD-Steuerungen (On-Screen-Display)
- Merkmale und Funktionen
- Fehlerbehebung
- Technische Daten
- Pinbelegung
- Índice
- Información importante
- Medidas de seguridad, mantenimiento y uso recomendado
- Contenido
- Denominación de las piezas y funciones
- Procedimiento de con fi guración
- Cómo montar y conectar elementos opcionales al monitor LCD
- Conexiones
- Funcionamiento básico
- Controles OSD (On-Screen-Display: gestor de pantalla)
- Control del monitor LCD mediante control remoto RS-232C/RS-485
- Características
- Solución de problemas
- Especi fi caciones
- Asignación de PIN
- Index
- Informations importantes
- Informations importantesDéclaration
- Consignes de sécurité, d’entretien, et conseils d’utilisation
- Sommaire
- Noms et fonctions des pièces
- Installation
- Comment monter et brancher des accessoires au moniteur
- Connexions
- Opération de base
- Commandes OSD (On-Screen-Display)
- Fonctionnalités
- Résolution des problèmes
- Spéci fi cations
- Brochage
- Indice
- Informazioni importanti
- Precauzioni di sicurezza, manutenzione e raccomandazioni per l’uso
- Contenuto
- Nome delle parti e delle funzioni
- Procedura di installazione
- Montaggio e collegamento delle opzioni al monitor LCD
- Connessioni
- Operazioni di base
- Controlli OSD (On Screen-Display)
- Controllo del monitor LCD attraverso il controllo remoto RS-232C/RS-485
- Caratteristiche
- Risoluzione dei problemi
- Speci fi che
- Assegnazione spinotti
- Index
- Belangrijke informatie
- Veiligheidsmaatregelen, onderhoud en aanbevolen gebruik
- Inhoud
- Namen en functies van onderdelen
- Installatieprocedure
- Opties voor de LCD-monitor monteren en aansluiten
- Aansluitingen
- Basisbediening
- OSD-besturingselementen (On-Screen-Display)
- Kenmerken
- Problemen oplossen
- Speci fi caties
- Pintoewijzingen
- Указатель
- Важная информация
- Техника безопасности , техническое обслуживание и рекомендации по эксплуатации
- Содержимое
- Названия деталей и их функции
- Процедура установки
- Монтаж и прикрепление деталей к ЖКД монитору
- Выполнение соединений
- Основные операции
- Органы управления OSD (On-Screen-Display)
- Управление ЖКД монитором c помощью коробки дистанционного управления RS-232C/RS-485
- Характеристики
- Устранение неисправностей
- Технические характеристики
- Назначение штырьков
