Hach-Lange DR 3900 Basic User Manual – страница 6
Инструкция к Hach-Lange DR 3900 Basic User Manual
Σφάλμα που
Σφάλμα που
Ορισμός Λύση
Ορισμός Λύση
εμφανίζεται
εμφανίζεται
Αυτή είναι μια
Απενεργοποιημένη
∆εν επιτεύχθηκε το
∆εν επιτεύχθηκαν τα όρια
προειδοποίηση. ∆εν
ρύθμιση δικτύου, κατά
εύρος ελέγχου!
ανάλυσης δεδομένων
επιτεύχθηκε καθορισμένο
Απενεργοποιημένο
την πρόσβαση αρχική
Ενεργοποιήστε την
όριο ελέγχου.
δίκτυο.
σελίδα της συσκευής
ηλεκτρονική σύνδεση.
μέσω της πλαϊνής
Αυτή είναι μια
γραμμής
Παρατηρήθηκε
προειδοποίηση.
Υπέρβαση εύρους
υπέρβαση των ορίων
Παρατηρήθηκε
Αδυναμία πρόσβασης
Βεβαιωθείτε ότι το
ελέγχου!
Σφάλμα κατά τη ρύθμιση
ανάλυσης δεδομένων.
υπέρβαση του ορίου
στον απομακρυσμένο
όργανο είναι
δικτύου
ελέγχου.
διακομιστή.
συνδεδεμένο στο δίκτυο.
Η υπολογιζόμενη
Αραιώστε το δείγμα και
Συγκέντρωση πολύ
Αποφεύγετε την άμεση
συγκέντρωση υπερβαίνει
πραγματοποιήστε
ξανά
Ασταθείς συνθήκες
υψηλή!
ηλιακή ακτινοβολία στη
το 999999
μέτρηση
φωτισμού!
θέση μέτρησης.
Η απορρόφηση μέτρησης
Αραιώστε το δείγμα και
Άνω της περιοχής
Ανεπαρκής μνήμη για
Σφάλμα κατά την
Επιλέξτε μια μνήμη με
υπερβαίνει το εύρος
πραγματοποιήστε ξανά
μέτρησης
ενημέρωση.
ενημέρωση.
επαρκή χώρο.
βαθμονόμησης του τεστ
μέτρηση
Εάν είναι δυνατόν,
Απενεργοποιήστε και
επιλέξτε ένα χαμηλότερο
ενεργοποιήστε το
Η απορρόφηση μέτρησης
Κάτω της περιοχής
εύρος ένδειξης ή
όργανο. Εάν ο έλεγχος
είναι κάτω από το εύρος
Εσφαλμένος έλεγχος
Η μέτρηση των τιμών
μέτρησης
χρησιμοποιήστε ένα
συστήματος δεν είναι
βαθμονόμησης του τεστ
συστήματος!
αέρα απέτυχε
φιαλίδιο με μεγαλύτερο
επιτυχής, επικοινωνήστε
μήκος διαδρομής
με τον κατασκευαστή ή
τον αντιπρόσωπό του.
Η ανάλυση είναι πιθανώς
Πιθανή
παρεμβολή
Έλεγχος παρεμποδίσεων
λανθασμένη εξαιτίας
Απενεργοποιήστε το
μέσω:
παρεμποδίσεων.
Θερμοκρασία πολύ
όργανο
και αφήστε το να
υψηλή.
κρυώσει για λίγα λεπτά.
Η ανάλυση είναι πιθανώς
Πιθανή παρεμβολή
∆εν είναι δυνατή η
Εάν είναι απαραίτητο,
Έλεγχος παρεμποδίσεων
λανθασμένη εξαιτίας
από:
μέτρηση!
μεταφέρετέ το σε
παρεμποδίσεων.
δροσερότερο μέρος.
Επικοινωνήστε με τον
Αποθηκεύστε ξανά το
Έχει παρέλθει η
κατασκευαστή ή τον
Το αρχείο ενημέρωσης
Σφάλμα κατά την
αρχείο ενημέρωσης και
ημερομηνία επόμενου
αντιπρόσωπό του για την
είναι ελαττωματικό.
ενημέρωση.
επαναλάβετε τη
σέρβις!
επιθεώρηση του
διαδικασία.
οργάνου.
Το USB memory stick
Η ενημέρωση δεν είναι
Ελέγξτε το USB memory
Το υπολογιζόμενο
Ελέγξτε τη συγκέντρωση
δεν είναι συνδεδεμένο.
δυνατή.
stick.
Αρνητικό αποτέλεσμα!
αποτέλεσμα είναι
του δείγματος
αρνητικό
Αδυναμία πρόσβασης
Απρόσιτο στην αρχική
∆οκιμάστε ξανά τη
στο διακομιστή
σελίδα ιντρυμεντς.
σύνδεση αργότερα.
διαδικτύου
.
Ελληνικά 101
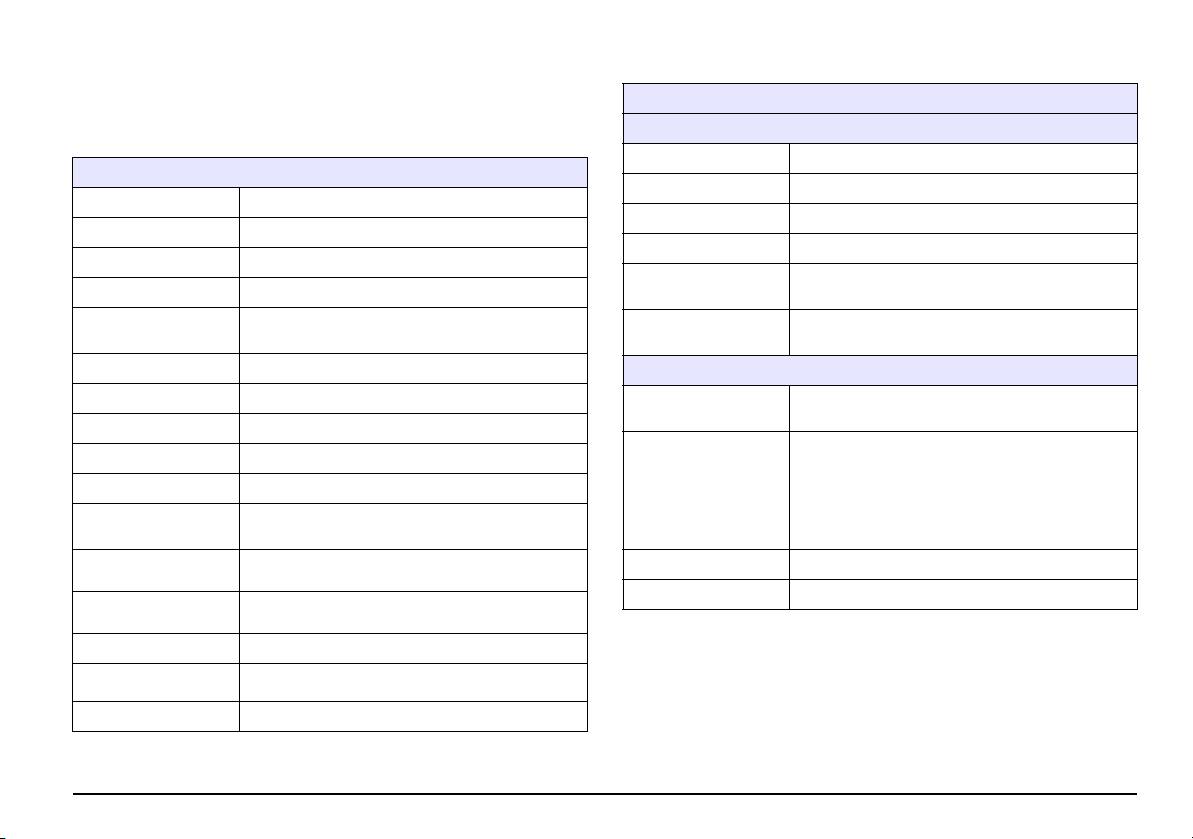
Ανταλλακτικά
Περιγραφή Αρ. κατ.
Λυχνία αλογόνου LZV565
Προσαρμογέας κυψελίδας A για ορθογώνιες κυψελίδες 1cm
LZV846
και στρογγυλές κυψελίδες 1inch
Προσαρμογέας κυψελίδας B για ορθογώνιες κυψελίδες 3cm,
LZV847
μόνο στην Κίνα
Προστασία φωτός LZV849
Τροφοδοτικό πάγκου LZV844
Καλώδιο ρεύματος EU YAA080
Καλώδιο ρεύματος CH XLH051
Καλώδιο ρεύματος UK XLH057
Καλώδιο ρεύματος US XLH055
Καλώδιο ρεύματος Κίνα/Αυστραλία XLH069
Κάλυμμα για τη σκόνη LZV845
∆ιαμέρισμα κυψελίδας LZV848
Ελληνικά 102
English
Specifications
Performance specifications
These are subject to change without notice!
Physical and environmental specifications
Width 350 mm (13.78 in)
Performance specifications
Height 151 mm (5.94 in)
Operating mode Transmittance (%), Absorbance and Concentration
Depth 255 mm (10.04 in)
Source lamp Halogen lamp
Mass 4200 g (9.26 lb)
Wavelength range 320–1100 nm
Ambient operating
10–40 °C (50–104 °F), maximum 80 % relative
Wavelength Accuracy ± 1.5 nm (wavelength range 340–900 nm)
requirements
humidity (without condensate formation)
Wavelength
Ambient storage
–40–60 °C (–40–140 °F), maximum 80 % relative
± 0.1 nm
reproducibility
requirements
humidity (without condensate formation)
Wavelength resolution 1nm
Additional technical data
Wavelength calibration Automatic
Power connector via
Input:100–240 V/50–60 Hz
external power supply
Output: 15 V/40 VA
Wavelength selection Automatic, based on method selection
Use only shielded cable with maximum length of 3 m:
Scanning speed ≥ 8 nm/s (in steps of 1 nm)
2× USB type A
1× USB type B
Spectral bandwidth 5nm
Interfaces
Use only shielded cable (e.g. STP, FTP, S/FTP) with
Photometric measuring
maximum length of 20 m:
± 3.0 Abs (wavelength range 340–900 nm)
range
1× Ethernet
5 m Abs at 0.0–0.5 Abs
Enclosure rating IP40 (excluding interfaces and power supply)
Photometric accuracy
1 % at 0.50–2.0 Abs
Protection class Class I
< 0.5 % to 2 Abs
Photometric linearity
≤1 % at > 2 Abs with neutral glass at 546 nm
Stray light < 0.1 % T at 340 nm with NaNO
2
2000 readings (Result, Date, Time, Sample ID, User
Data log
ID)
User programs 100
English 103
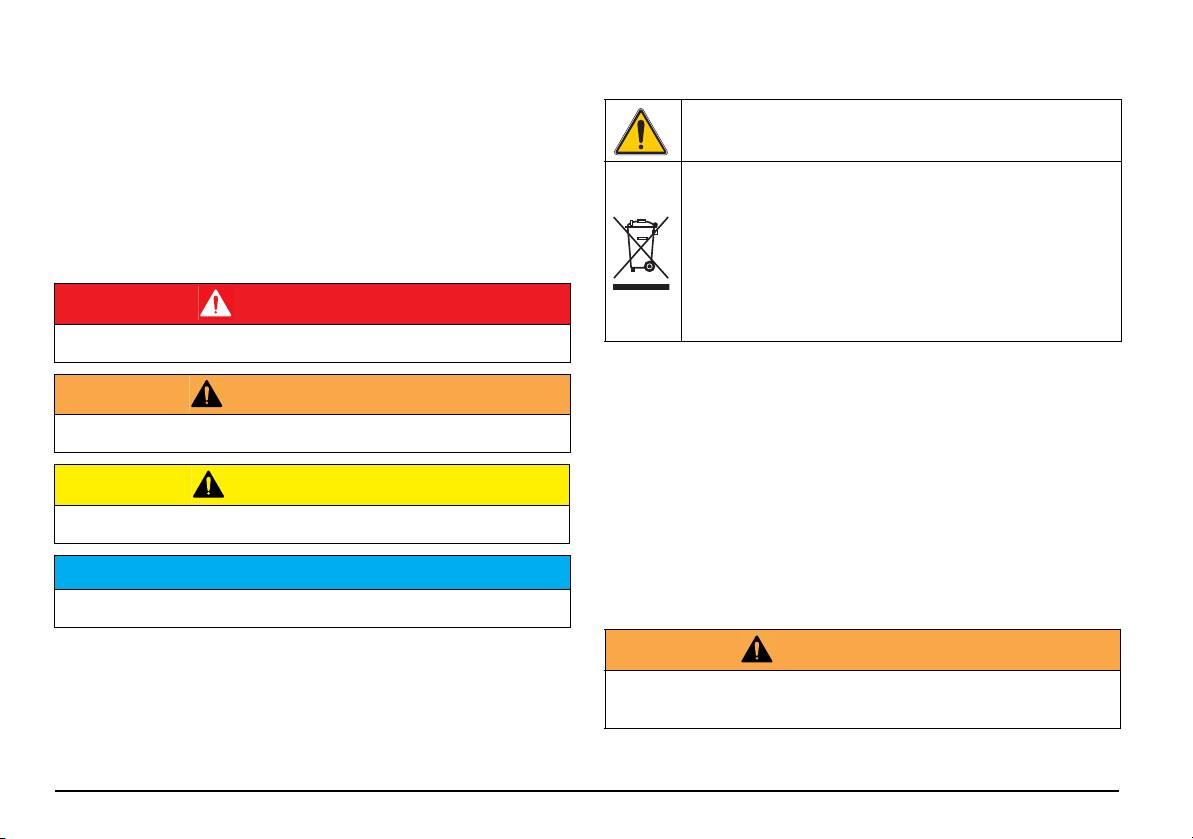
A symbol, if noted on the instrument, will be included with a danger or
General Information
caution statement in the operating instructions.
Safety information
This symbol, if noted on the instrument, references the user manual
Please read this entire manual before unpacking, setting up, or
for operation and/or safety information.
operating this equipment. Pay attention to all danger and caution
statements. Failure to do so could result in serious injury to the operator
Electrical equipment marked with this symbol may not be disposed of
or damage to the equipment.
in European domestic or public disposal systems after 12 August
2005. In conformity with European local and national regulations (EU
To make sure that the protection provided by this instrument is not
Directive 2002/96/EC), European electrical equipment users must
impaired, do not use or install this instrument in any manner other than
now return old or end-of life equipment to the manufacturer for dis-
that specified in these operating instructions.
posal at no charge to the user.
Note: For return for recycling, please contact the equipment
manufacturer or supplier for instructions on how to return
DANGER
end-of-life equipment, manufacturer-supplied electrical
accessories, and all auxiliary items for correct disposal.
Indicates a potentially or imminently hazardous situation that, if not avoided,
results in death or serious injury.
RFID module (not available on all models)
WARNING
RFID technology is a radio application. Radio applications are subject to
Indicates a potentially or imminently hazardous situation that, if not avoided, may
national conditions of authorisation. The use of the DR 3900 (model with
result in death or serious injury.
RFID module) is currently permitted in the following countries: EU, CH,
NO, HR, RS, MK, TR, CY, US, CA, AU, NZ. The manufacturer advises
that the use of the DR 3900 (model with RFID module) outside of the
CAUTION
above-mentioned regions may contravene national laws. The
Indicates a potentially hazardous situation that may result in minor or moderate
manufacturer reserves the right also to obtain authorisation in other
injury.
countries. In case of doubt, please contact the distributor.
The DR 3900 contains an RFID module to receive and transmit
NOTICE
information and data. The RFID module operates with a frequency of
13.56 MHz.
Indicates a situation that, if not avoided, could result in damage to the instrument.
Information that requires special emphasis.
Note: Information that supplements points in the main text.
WARNING
Precautionary labels
The spectrophotometer may not be used in dangerous environments.
The manufacturer and its suppliers reject any express or indirect guarantee for
Read all labels and tags attached to the instrument. Personal injury or
the use with High Risk Activities.
damage to the instrument could occur if this information is not observed.
Follow the following safety information, in addition to any local guidelines
in force.
English 104
Safety information for the correct use of the instrument:
Overview of product
• Do not operate the instrument in hospitals or comparable
The DR 3900 is a VIS spectrophotometer with a wavelength range of
establishments in proximity to medical equipment, like pace makers
320 to 1100 nm. The instrument is delivered with a complete series of
or hearing aids.
application programs and supports several languages.
• Do not operate the instrument near highly flammable substances,
The spectrophotometer DR 3900 contains the following programs and
such as fuels, highly combustible chemicals and explosives.
operating types:
• Do not operate the instrument near combustible gases, vapors or
• Stored programs (pre-installed tests)
dust.
• Barcode Programs
• Do not vibrate or jolt the instrument.
• User Programs
• The instrument can cause interference in immediate proximity to
• Favorites
televisions, radios and computers.
• Single Wavelength
• Do not open the instrument.
• Multi Wavelength
• Improper use of the instrument voids the warrantee.
• Wavelength Scan
Chemical and Biological Safety
• Time course
The DR 3900 Spectrophotometer provides digital readouts in direct
concentration units, absorbance or percent transmittance.
DANGER
When selecting a user-generated or programmed method, the menus
Potential danger in the event of contact with chemical/biological materials.
and prompts serve to direct the user through the test.
Handling chemical samples, standards and reagents can be dangerous.
Familiarise yourself with the necessary safety procedures and the correct han-
This menu system can also generate reports, statistical evaluations of
dling of the chemicals before the work and read and follow all relevant safety data
generated calibration curves and to report instrument diagnostic checks.
sheets.
Normal operation of this instrument may involve the use of hazardous
chemicals or biologically harmful samples.
• Observe all cautionary information printed on the original solution
containers and safety data sheet prior to their use.
• Dispose of all consumed solutions in accordance with national
regulations and laws.
• Select the type of protective equipment suitable to the concentration
and quantity of the dangerous material at the respective work place.
English 105
Installation
Operating environment
Note the following points so that the instrument will operate perfectly and
have a long service life.
WARNING
• Place the instrument firmly on an even surface. Do not push any
Electrical and fire hazards.
objects under the instrument.
Only use the supplied benchtop power supply LZV844.
• The ambient temperature must be 10–40 °C (50–104 °F).
Only qualified experts may perform the tasks described in this section of the man-
ual, while adhering to all locally valid safety regulations.
• The relative humidity should be less than 80 %; moisture should not
condense on the instrument.
Unpack the instrument
• Leave at least a 15 cm clearance at the top and on all sides for air
circulation, to avoid overheating of electrical parts.
The DR 3900 Spectrophotometer comes packaged with the following
items:
• Do not operate or store the instrument in extremely dusty, humid or
wet locations.
• DR 3900 spectrophotometer
• Keep the surface of the instrument, the cell compartment and all
• Dust Cover
accessories clean and dry at all times. Immediately remove
• USB dust cover, fitted as standard
splashes or spilt materials on or in the instrument.
• Benchtop power supply with power cord for EU
• Cell adapter A
NOTICE
• Light shield, fitted as standard in the DR 3900
Protect the instrument from extreme temperatures from heaters, direct sunlight
and other heat sources.
• Operator RFID tag (not available on all models)
• Basic operating instructions DR 3900, operating instructions
LINK2SC
Further information, detailed user manuals and documentation are
available on the website of the manufacturer.
Note: If any of these items are missing or damaged, please contact the
manufacturer or a sales representative immediately.
English 106
Front and back view
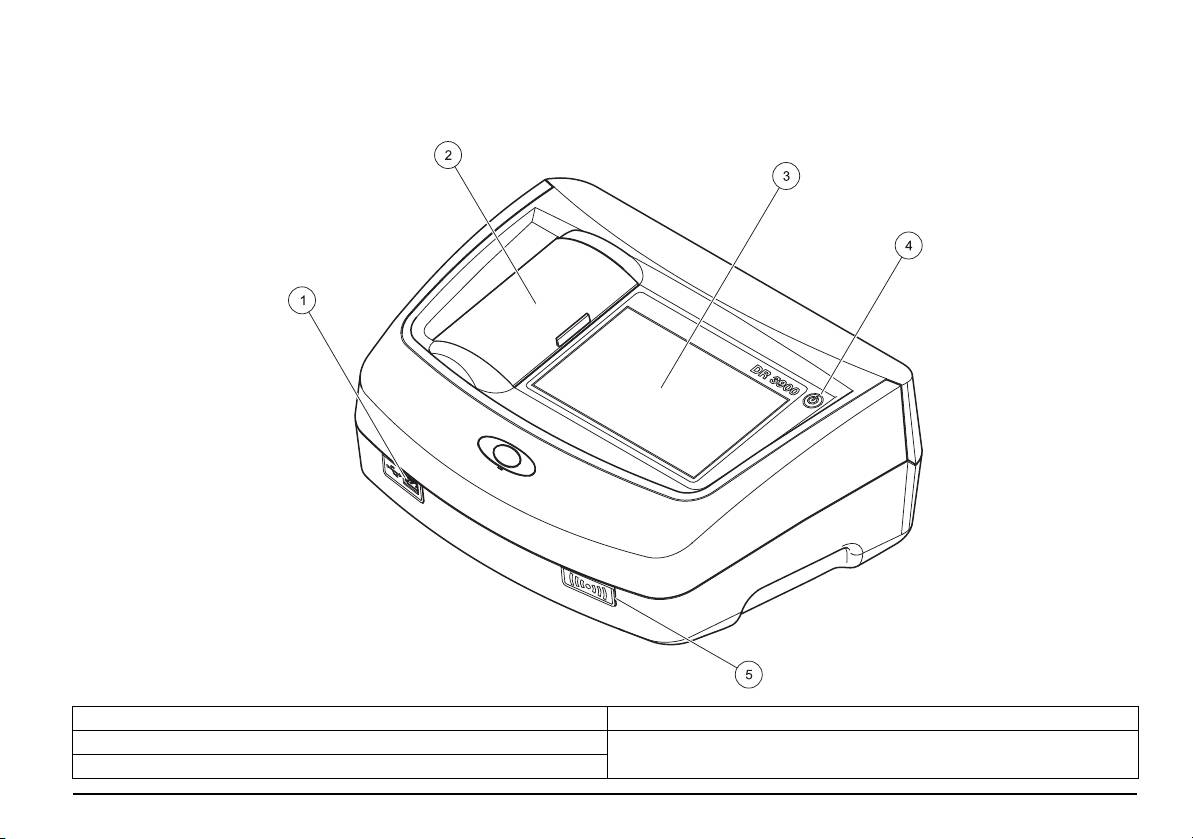
Figure 1 Front view
1 USB port type A 4 On/off switch
2 Cell compartment cover
5 RFID module (not available on all models)
3 Touch screen
English 107
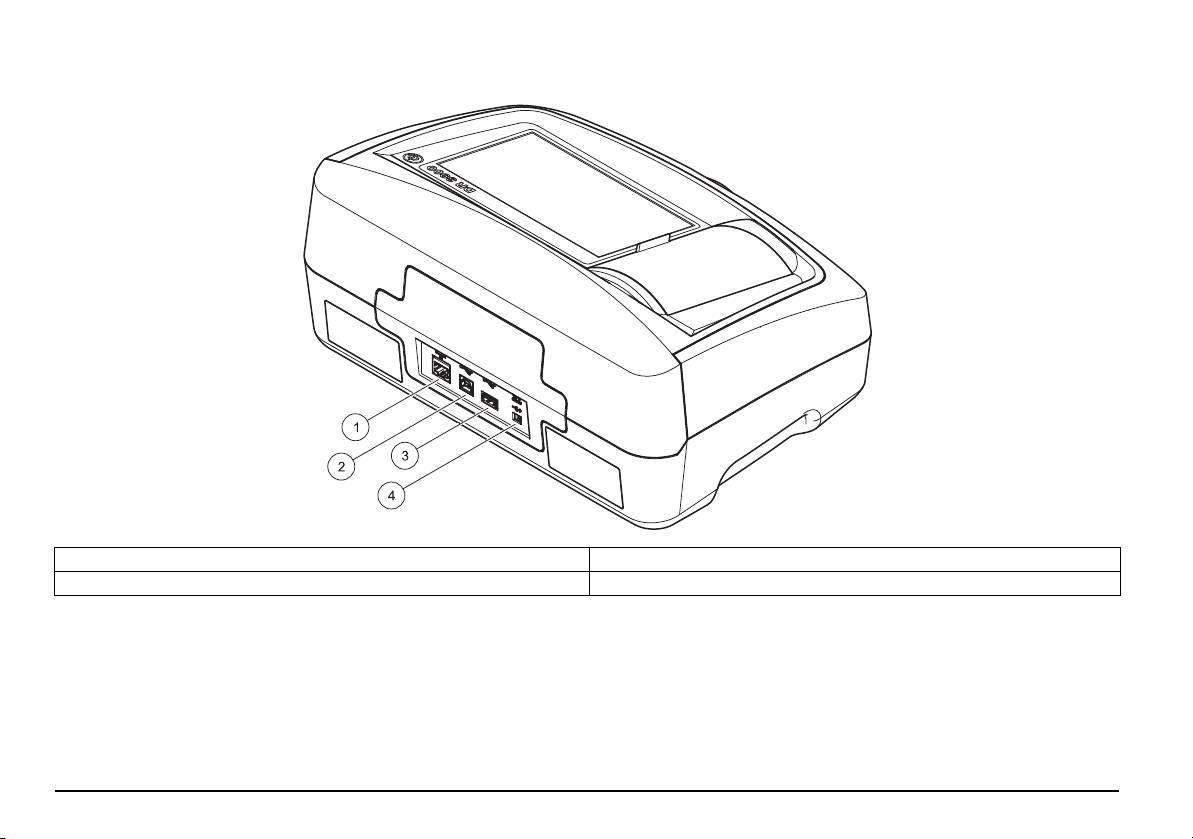
Figure 2 Back view
1 Ethernet port 3 USB port type A
2 USB port type B 4 Connection for benchtop power supply
English 108
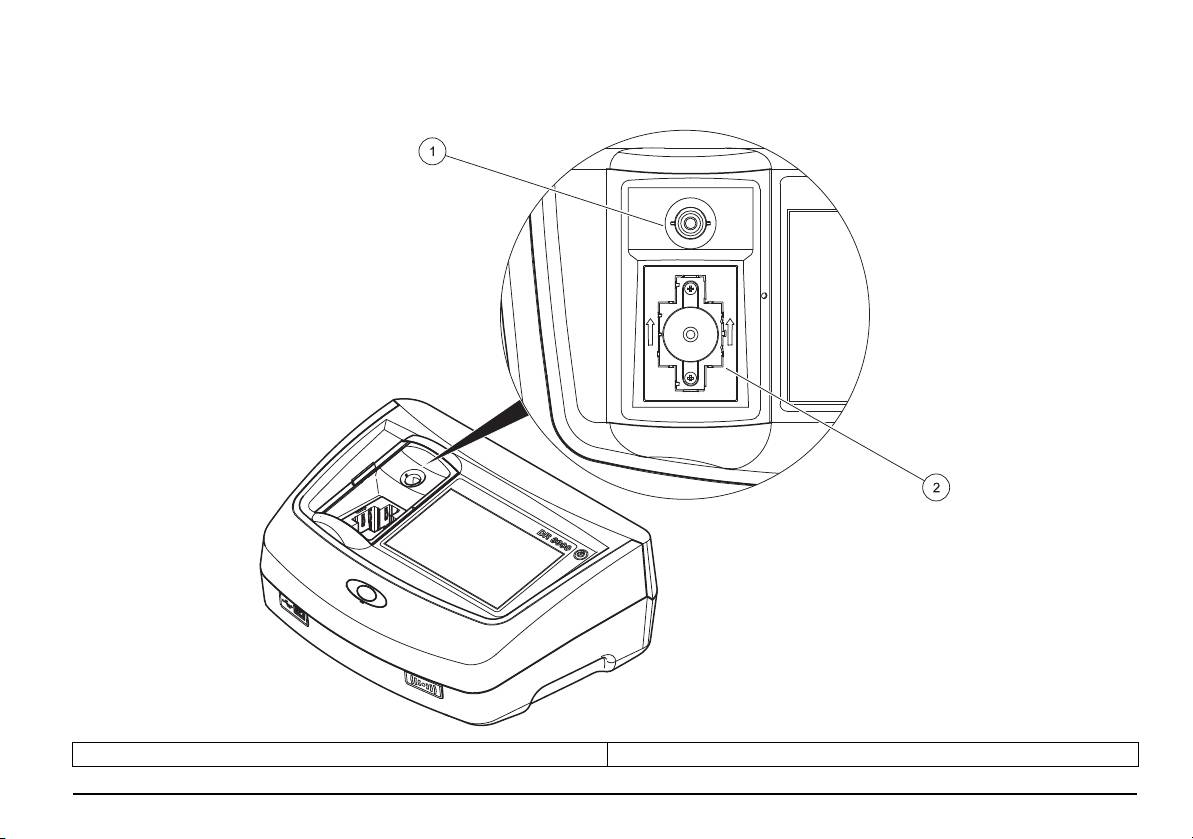
Figure 3 Cell compartments
1 Cell compartment for round cells (1) 2 Cell compartment for rectangular cells (2)
English 109
Power connections
Language selection
WARNING
Electrical and fire hazards.
Only use the supplied benchtop power supply LZV844.
1. Connect the power cable to the benchtop power supply.
2. Plug the benchtop power supply cable into the back of the
instrument (Figure 2, page 108).
3. Insert the power cable plug into a mains socket (100–240 V~/
50–60 Hz).
Turn on the power button next to the display to turn on the power supply
(Figure 1, page 107).
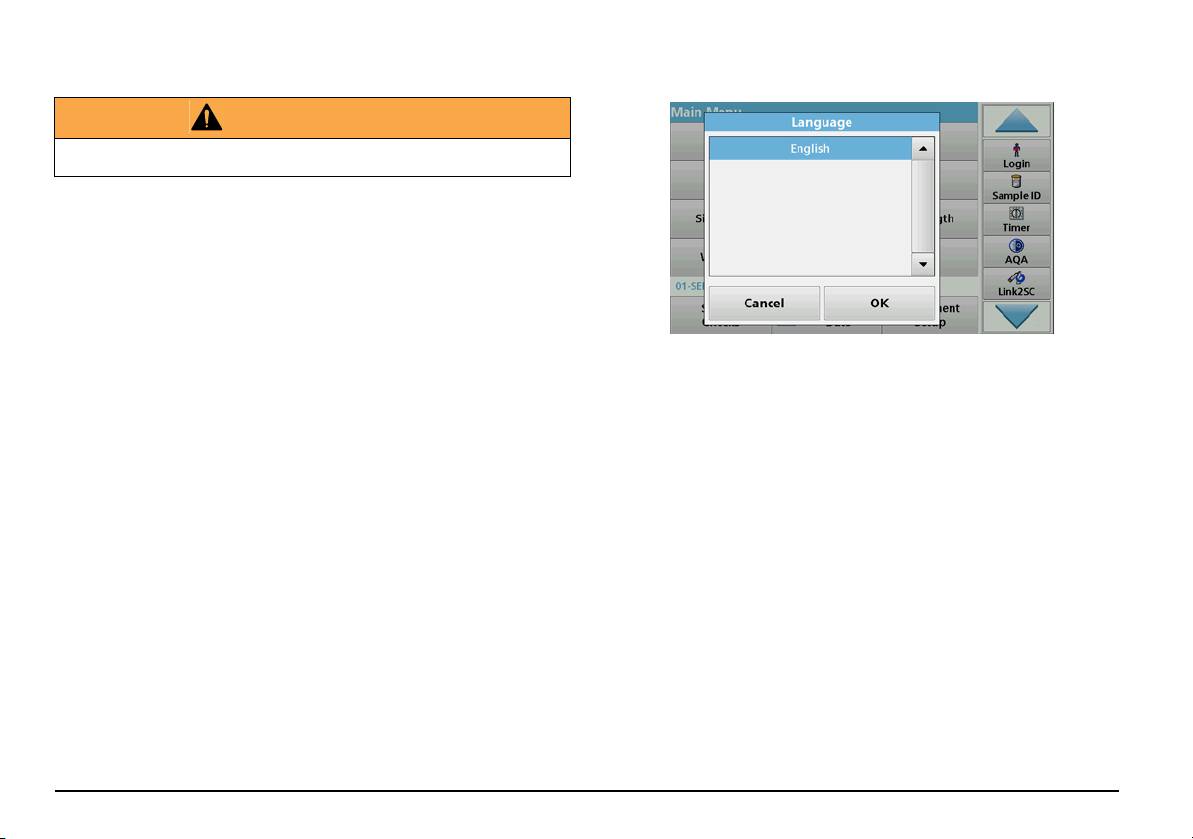
The DR 3900 software includes several language options. The first time
Startup
the instrument is switched on, the language selection screen will be
shown automatically after the startup process.
Switch on the instrument, startup process
1. Select the required language.
1. Connect the power cable to the mains outlet.
2. Press OK to confirm the language selection. The self-check will
2. Switch on the instrument by using the power button next to the
then start automatically.
display.
Change the language setting
3. The instrument starts automatically with a startup process lasting
The instrument functions in the selected language until the option is
approximately 45 seconds. The display shows the logo of the
changed.
manufacturer. At the end of the startup process, a startup melody is
heard.
1. Turn the instrument on.
Note: Wait approximately 20 seconds before switching on again so as
2. During the startup process, touch any point on the screen and
not to damage the electronics and mechanics of the instrument.
maintain contact until the option for selecting a language is shown
(approximately 45 seconds).
3. Select the required language.
4. Press OK to confirm the language selection. The self-check will
then start automatically.
English 110

Self-check
Sleep mode
Each time the instrument is powered up, a test program begins.
The instrument can be put into sleep mode.
This procedure, which takes approximately two minutes, checks the
1. Briefly press the power button next to the display.
system, lamp, filter adjustment, wavelength calibration and voltage.
The "Sleep mode" message is shown. The display will then switch
Each test that functions correctly is marked accordingly.
off automatically.
The Main Menu is displayed when diagnostics are completed.
2. To switch on, press the power button next to the display.
The self-check will start automatically.
Note: In the event of further error messages during the test program,
After that, the instrument is ready to use.
refer to Troubleshooting, Seite 118.
Power off the instrument
1. Press the power button next to the display for approximately
5 seconds.
Standard programs
Tips for the use of the touch screen
The whole screen responds to touch. To choose an option, tap with a
fingernail, fingertip, an eraser or a specialised stylus. Do not press the
screen with a sharp object, such as the tip of a ballpoint pen.
• Do not place anything on top of the screen, to prevent damage or
scratches on the screen.
English 111
• Press buttons, words or icons to select them.
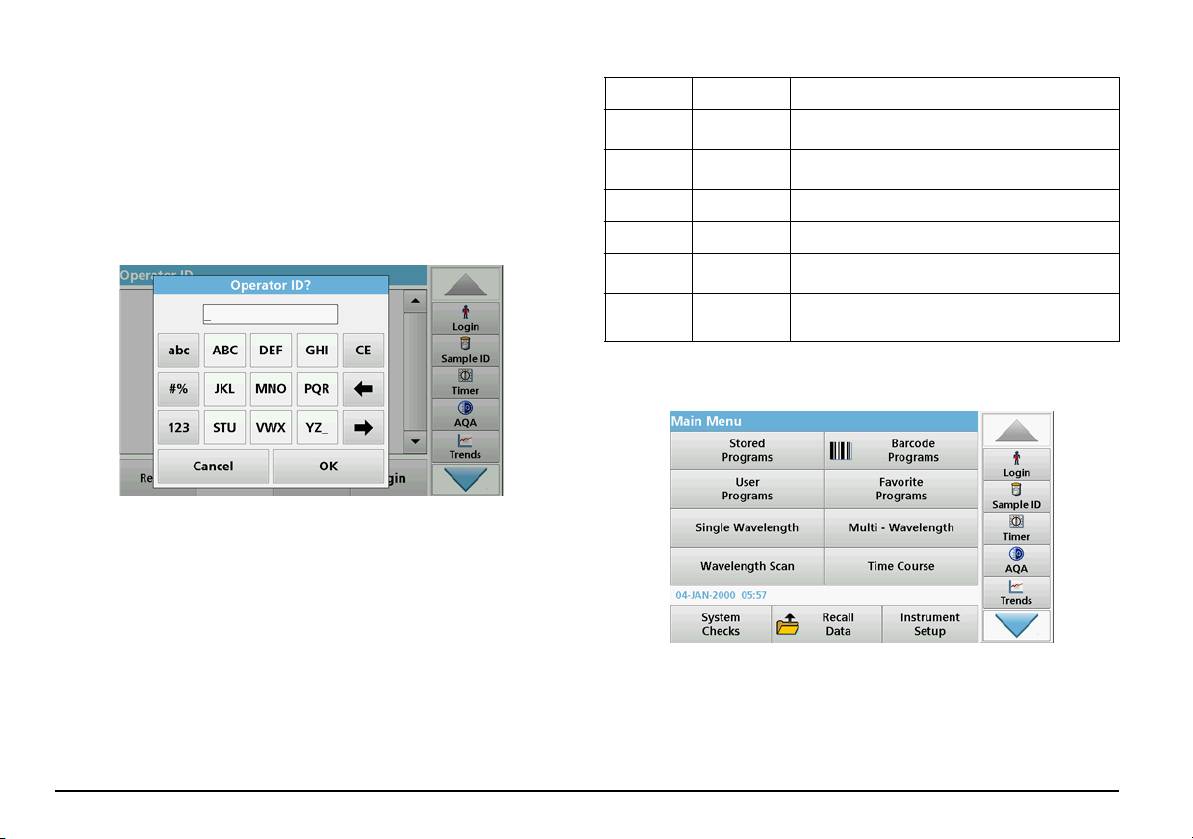
Table 1 Alphanumeric keypad
• Use scroll bars to move up and down long lists very quickly. Press
Icon / key Description Function
and hold the scroll bar, then move up or down to move through the
list.
Toggles the character input mode between upper
ABC/abc Alphabetic
and lower case.
• Highlight an item from a list by pressing it once. When the item has
Punctuation, symbols and numerical sub- and
been successfully selected, it will be displayed as reversed text
# % Symbols
superscripts may be entered.
(light text on a dark background).
123 Numeric For entering regular numbers.
Use of the alphanumeric keypad
CE Clear Entry Clear the entry.
Deletes the current character and goes back one
Left Arrow Back
position.
Right
Next Navigates to the next space in an entry.
Arrow
Main menu
This display is used to enter letters, numbers and symbols as needed
when programming the instrument. Unavailable options are disabled
(grayed out). The icons on the right and left of the screen are described
in Table 1.
The central keypad changes to reflect the chosen entry mode. Press a
key repeatedly until the desired character appears on the screen. A
space can be entered by using the underscore on the YZ_ key.
Press Cancel to cancel an entry, or press OK to confirm an entry.
A variety of modes may be selected from the Main Menu. The following
table briefly describes each menu option.
Note: It is also possible to use a USB keyboard (with US keyboard
layout) or a hand-held USB barcode scanner.
There is a toolbar on the right-hand side of the screen. Press to activate
the various functions.
English 112
Table 2 Main Menu options
Table 2 Main Menu options
Option Function
Option Function
Stored programs are pre-programmed methods that make
The "System check" menu offers a number of options,
Stored
use of HACH chemicals and HACH-LANGE pipette tests.
including optical checks, output checks, lamp history,
Programs /
System checks
instrument update, service time, settings for analytical
The working procedures for HACH-LANGE tests are included
Barcode
quality assurance and instrument backup.
in the test packs.
Programs
Further information, as well as illustrated, step-by-step pro-
(HACH-LANGE
Recall
cess instructions for analyses using HACH programs, are
programs)
measurement
Stored data can be called up, filtered, sent and deleted.
available on the website of the manufacturer.
data
User programs make "made to measure analysis" possible:
In this mode, user-specific or method-specific settings can be
Instrument
• Users can program methods they have developed
entered: operator ID, sample ID, date & time, sound, PC &
themselves
Setup
User Programs
printer, password, energy-saving mode and stored data.
• Existing HACH and LANGE methods can be stored as
user programs. The HACH-LANGE tests can then be
modified to suit the user's requirements.
Save, recall, send and delete data
List of methods/tests created by the user to suit his own
Favorites
The data log
requirements.
The data log can store up to 2000 readings saved by the following
Single wavelength readings are:
programs:
Absorbance readings: The light absorbed by the sample is
measured in absorbance units.
• Stored Programs,
Transmittance reading (%): Measures the percent of the
Single
• Barcode Programs,
original light that passes through the sample and reaches the
Wavelength
detector.
• User programs,
Concentration readings: A concentration factor can be
• Favorites,
entered to enable the measured absorbance values to be
converted into concentration values.
• Single Wavelength and
In the Multi Wavelength mode, absorbance (Abs) or
• Multi Wavelength.
percentage transmittance (%T) is measured at up to four
Multi
wavelengths and absorbance differences and absorbance
A complete record of the analysis is stored, including the Date, Time,
Wavelength
relationships are calculated. Simple conversions into
Results, Sample ID and Operator ID.
concentrations can also be carried out.
A wavelength scan shows how the light from a sample is
absorbed over a defined wavelength spectrum. This function
Wavelength
can be used to determine the wavelength at which the
Scan
maximum absorbance value can be measured. The
absorbance behavior is displayed graphically during the
scan.
The time scan records the absorbance or % transmittance at
Time course
a wavelength over a defined time.
English 113
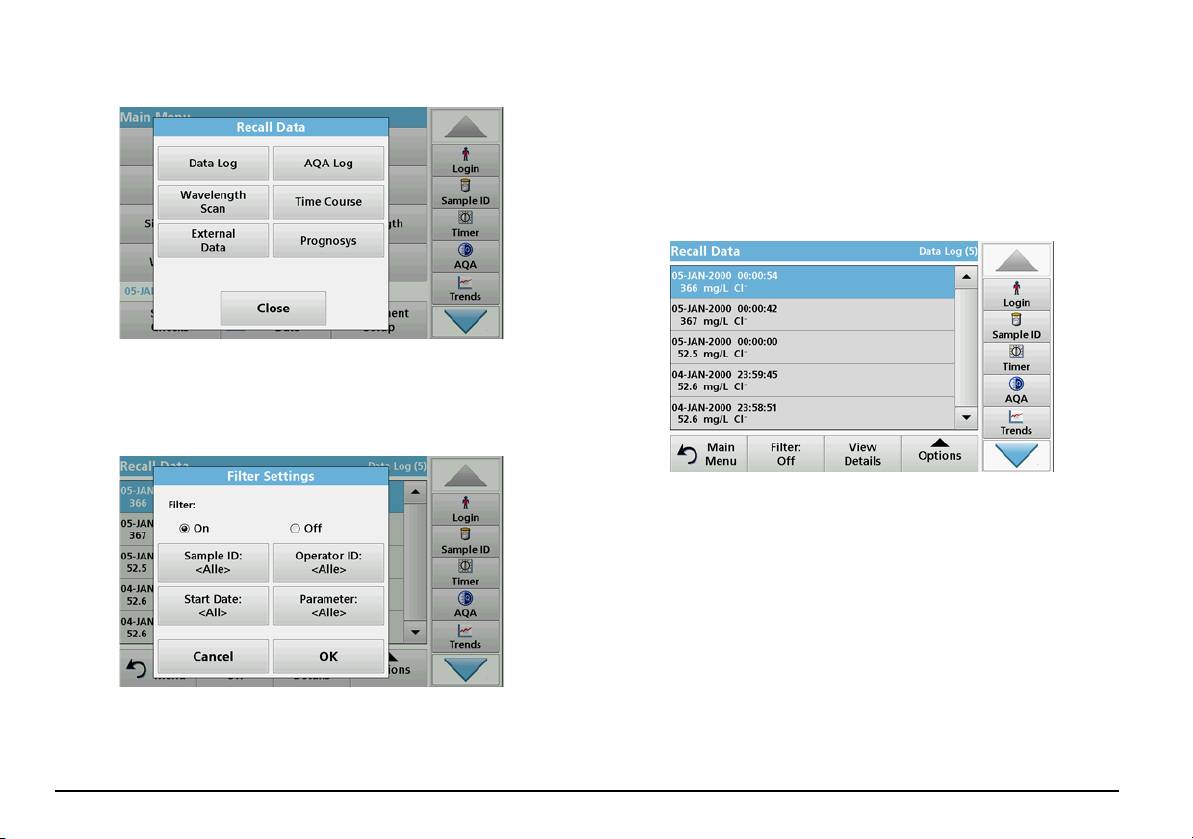
Recall stored data from the data log
4. Activate On. The data can now be filtered using the following
selection criteria.
• Sample ID
• Operator ID
• Start Date
• Parameter
or any combination of the four.
1. Press Recall Data in the Main Menu.
2. Press Data Log.
A listing of the stored data is displayed.
5. Press OK to confirm the selection.
The chosen items are listed.
6. Press View Details to get more information.
Send data from the data log
Data is sent from the internal data log as an XML (Extensible Markup
Language) file or as a CSV (Comma Separated Value) file, to a directory
with the name DataLog on a USB mass storage device or a network
drive. The file can then be processed using a spreadsheet program. The
file name has the format: DLYear-Month-
Day_Hour_Minute_Second.csv or DLYear-Month-
Day_Hour_Minute_Second.xml.
3. Press Filter: On/Off.
The function Filter Settings is used to search for specific items.
English 114
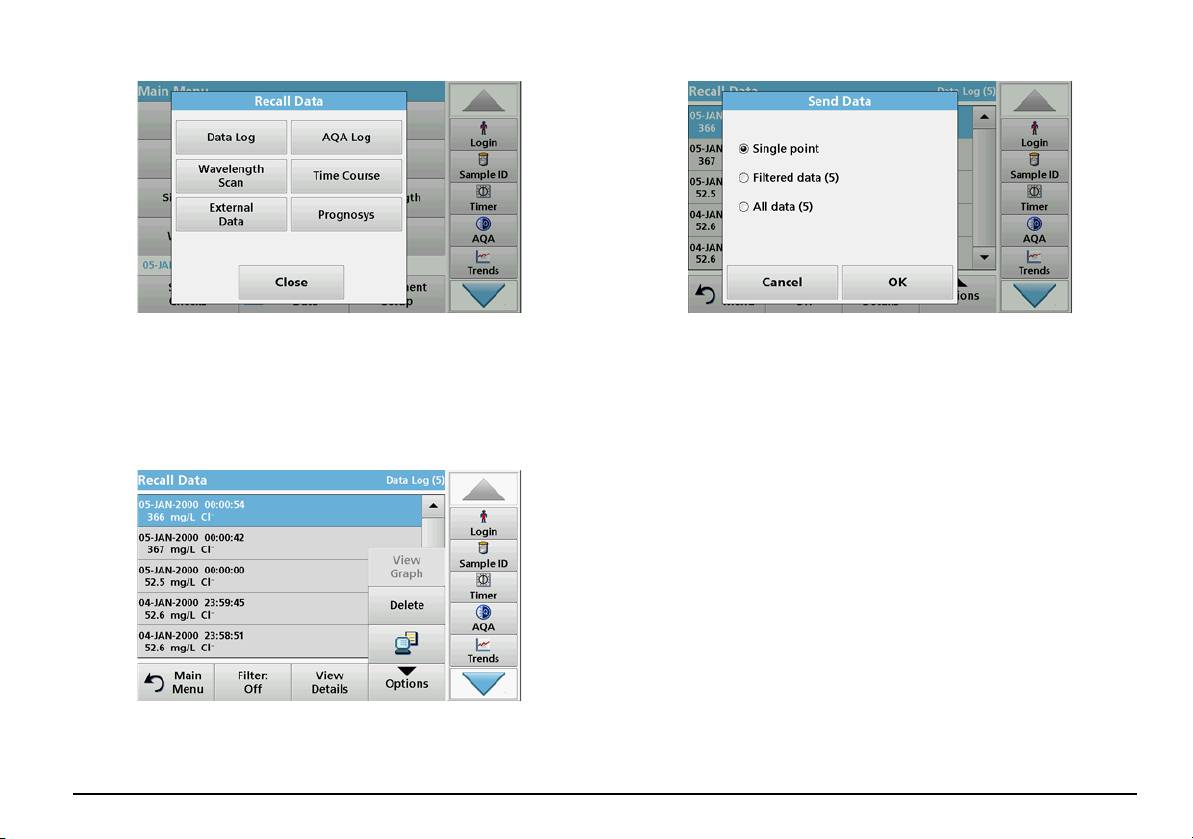
1. Plug the USB storage device into the USB type A port on the
5. Select the data to be sent.
DR 3900, or connect the DR 3900 to a network drive.
The following options are available:
2. Press Recall Data from the Main Menu.
• Single point: only this selected reading will be sent
3. Select the data category to be transferred, e.g. Data Log.
• Filtered data: only readings that correspond to the set filters
will be sent
A list of the selected measurement data is displayed.
• All data: all data in the selected data category will be sent.
6. Press OK to confirm.
Note: The number in parentheses is the total number of data sets
assigned to this selection.
4. Press Options and then the PC&Printer icon.
English 115
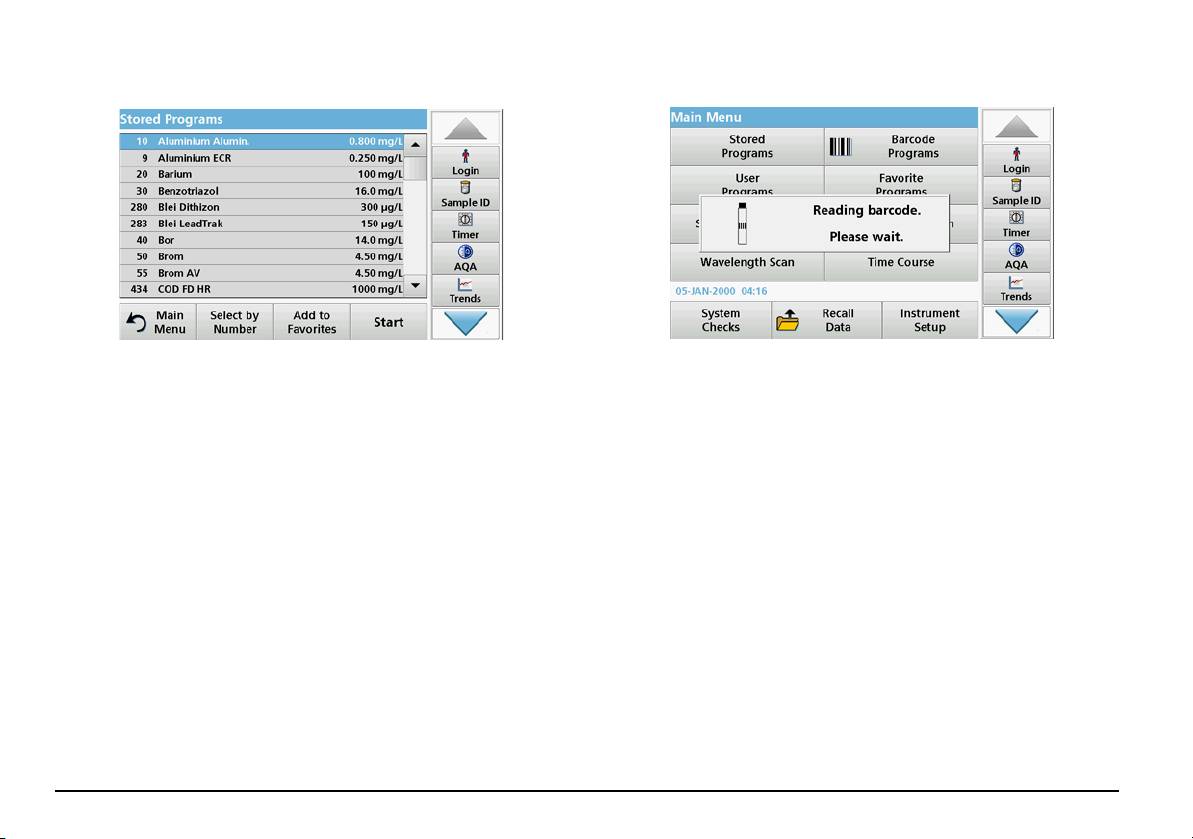
Stored Programs
Complete a barcode test
1. Press Stored Programs in the Main Menu to view an alphabetical
1. Insert the light shield into cell compartment (2).
list of stored programs with program numbers.
2. Prepare the barcode test according to the process specification,
The "Stored Programs" list will appear.
and insert the cell in cell compartment (1).
2. Highlight the required test.
• When a coded cell is placed in cell compartment (1) (Figure 3,
page 109), the corresponding reading program is automatically
Hinweis: Select the program by name or scroll through the list
activated in the Main Menu.
using the arrow keys. Highlight the program or press Select by No.
• Otherwise, press Barcode Programs in the Main Menu and
to search for a specific program number. Press OK to confirm.
insert a zero cell (depending on process specification) into cell
compartment (1).
3. Press Start to run the program. The respective measurement
window is displayed.
Hinweis: All corresponding data (wavelength, factors and
constants) is already preset.
4. Follow the instructions for chemical procedures in the relevant
procedures manual. Further information are available on the
website of the manufacturer.
Hinweis: To display the procedural instructions in the display, press
the info icon. Not all programs have this option.
English 116
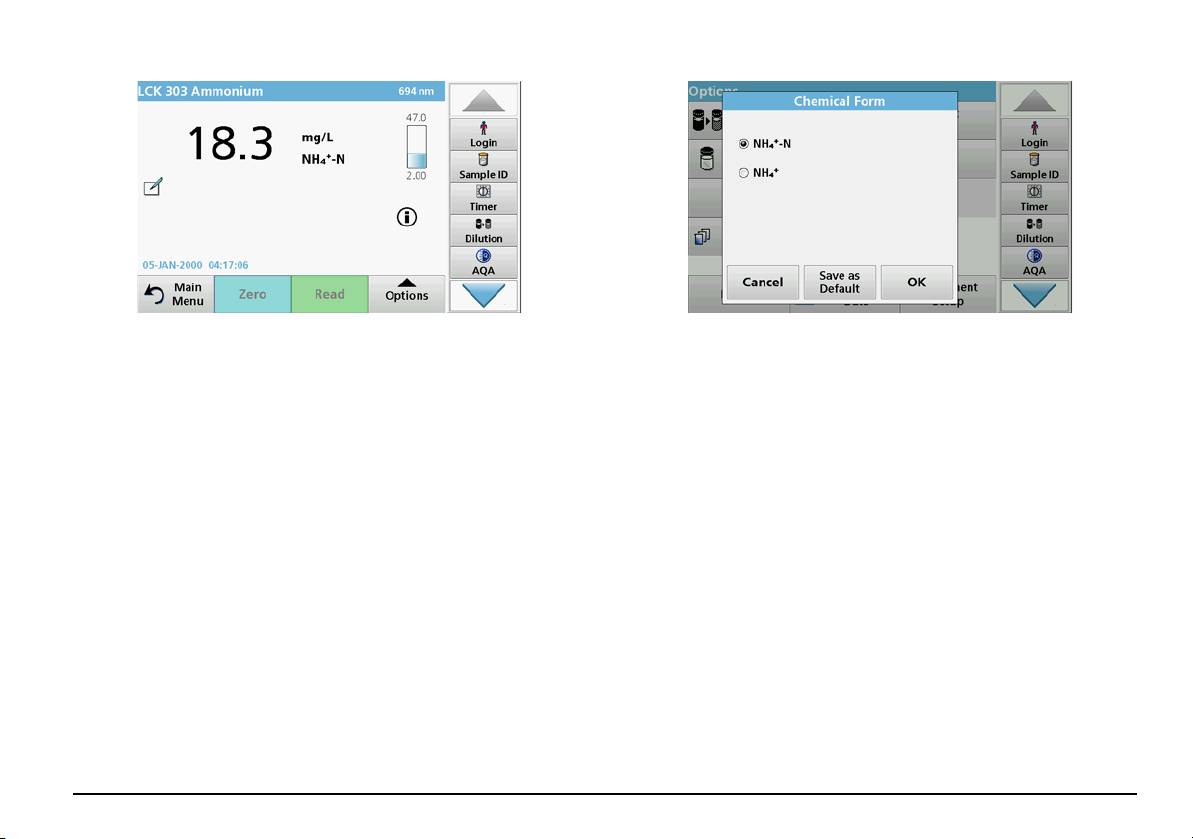
The reading is started automatically and the results are displayed.
1. In the result display, press Options>More>Chemical Form.
To evaluate other cell tests and other parameters, insert the prepared
A list of available evaluation forms appear.
cell into the cell compartment and read off the result.
2. Select the required chemical form and press OK to confirm.
Note: The control bar displayed on the right of the screen shows the
Hinweis: The selected chemical form is displayed, but does not
relationship of the reading result to the measuring range. The black bar
become the default. To change the default, refer to section Change
shows the measured result independently of any dilution factor that was
of the default setting of the chemical form.
entered.
Change of the default setting of the chemical form
Select the chemical evaluation form
1. Insert the zero cell or sample cell (corresponding to the process
specification) into the cell compartment.
The chemical form of the test result of a number of parameters can be
selected individually.
2. In the result display, press Options>More>Chemical Form.
1. In the result display, press the unit (e. g. mg/L) or the chemical
3. A list of available evaluation forms appear. Select the new default
3–
representation of the evaluation form (e. g. PO
–P).
setting.
4
A list of available evaluation forms appears.
4. Press Save as Default.
2. Select the required form from the list. Press OK to confirm.
The current result and all further readings will be displayed in the new
chemical form.
Another way of changing the standard setting is:
English 117
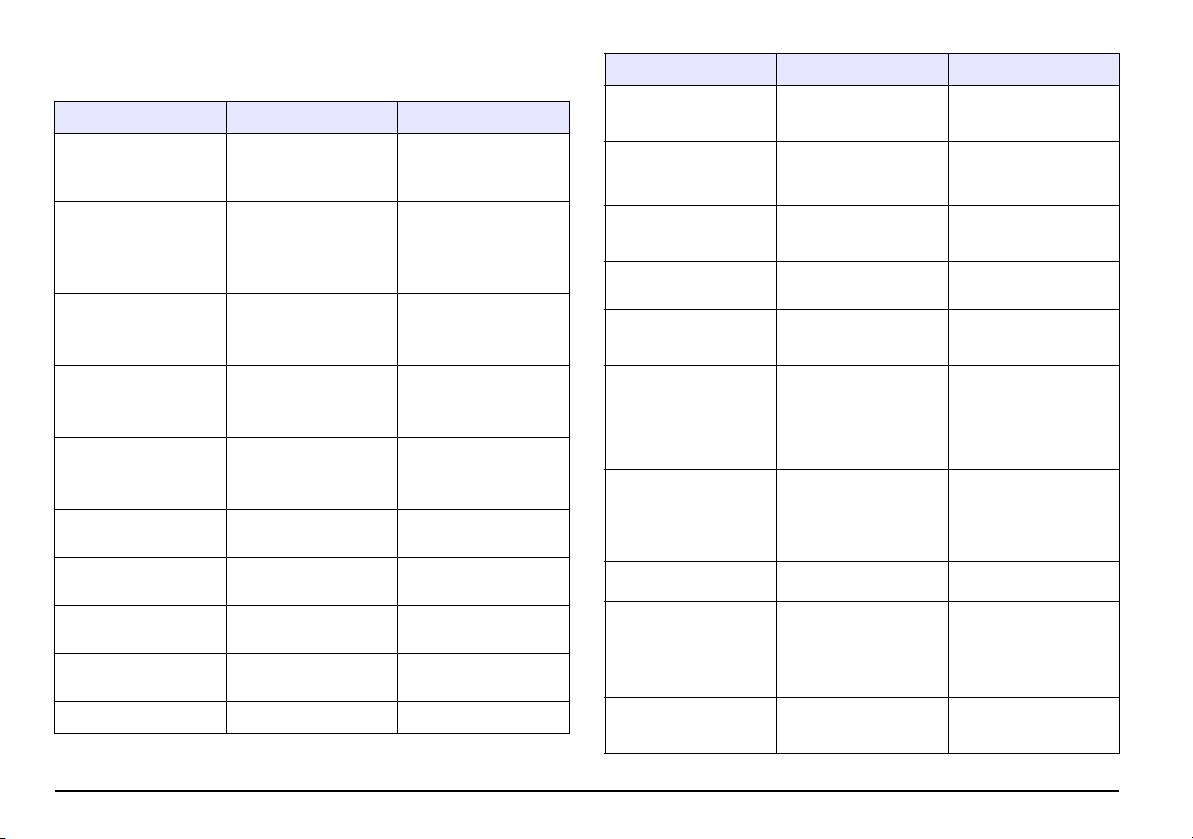
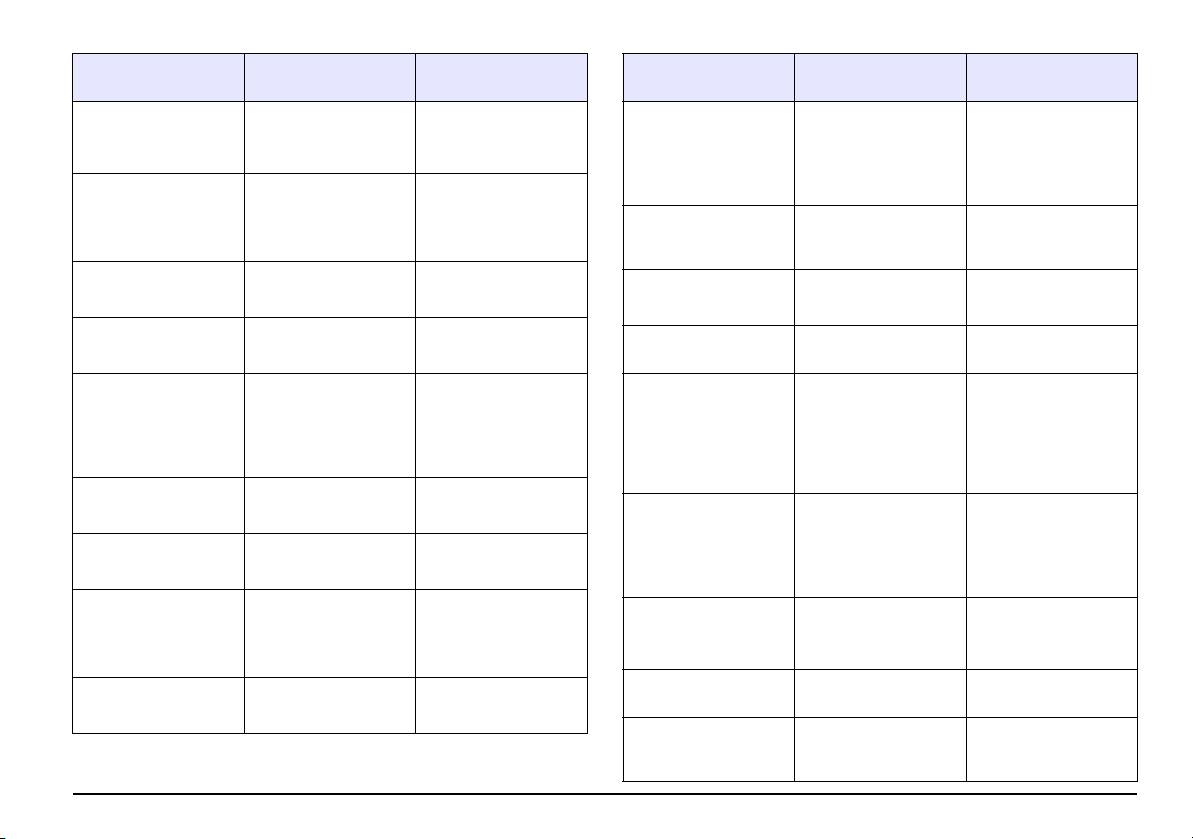
Troubleshooting
Error displayed Definition Resolution
Insert a USB memory
Please insert the USB
stick into a USB A port on
Error displayed Definition Resolution
memory stick.
the instrument.
Attention!
Readings with barcode
Insert the light shield.
Please check the
Network setup or FTP
Please insert the light
cuvettes generally
connection and contact
Press OK.
error
shield.
require the light shield.
the administrator.
Reinsert the cell.
Blank value correction
Blank value correction
If the barcode is not
not possible with
not possible!
Barcode label not read Barcode faulty
recognised, contact the
LCW919.
manufacturer or his
File for instrument
Check the USB memory
representative.
Error during update.
update missing.
stick.
Start the procedure again
An error occurred
or contact the
Save the update file
when uploading the
File for instrument
manufacturer or his
Error during update.
again and repeat the
instrument data.
update is faulty.
representative.
procedure.
Start the procedure again
Switch the instrument of
An error occurred when
or contact the
and then back on again.
reading from the USB
It’s recommended to
manufacturer or his
Check of the air values
If the system check is not
memory stick.
execute a Full System
representative.
failed
successful, contact the
Check
manufacturer or his
Start the procedure again
An error occurred when
representative.
or contact the
writing to the USB
manufacturer or his
Forgotten your
memory stick.
representative.
password?
Entry invalid! Password incorrect
Contact the
Please check on the
Check the USB memory
Error during update.
manufacturer or his
current update file.
stick.
representative.
Please contact
The measured absor-
Dilute sample and
Error during update.
Absorbance > 3.5!
Customer Services.
bance exceeds 3.5
measure again
Fault
Please check network
Barcode check
configuration.
Deviation to the stored
number?
Data updating
data
Please update program
Please check the
data!
connection.
Network setup: DHCP cli-
Please close the cover. Close the cover.
Error when calling up
Enter the IP address
ent has no connection to
the local IP address.
again.
the DHCP server
English 118
Error displayed Definition Resolution
Error displayed Definition Resolution
Network setup: default
Error
Error during default
Try to create the
Contact the
gateway cannot be set
gateway setup.
connection again.
Selfcheck stopped.
manufacturer or a sales
for fixed IP address
Electronic defect
Hardware error.
representative and
Error during network
Error during network
indicate the error number
Error [x]
Check the settings.
drive setup!
setup
Error
Network setup: Subnet
Error during subnet
Enter the subnet mask
Too much ambient
mask cannot be set for
The instrument sensors
Decrease ambient light.
mask setup.
again.
light!
fixed IP address
detects too much ambi-
(Avoid direct sunlight.)
Move instrument into
Start the procedure again
ent light.
Close lid.
shade
Error copying from USB
or contact the
Error during update
or close the lid
memory stick.
manufacturer or his
representative.
No help function is
Make sure that the
available for this
Error in FTP
FTP error
instrument is connected
program.
connection.
to the network.
The analysis is possibly
Shelf life exceeded!
Fault
erroneous. Use new
Use chemicals?
Program not
chemicals
accessible.
Barcode test not present Data updating
Check programming
Please update program
data!
Error in the test data-
Contact the
No evaluation!
base / user database
manufacturer or a sales
The cuvette is soiled or
representative
Fault
Clean the cuvette; allow
there are undissolved
Clean cuvette!
the particles to settle
Reinsert the cell.
particles in the cuvette
If the barcode is not
Fault
No barcode! No barcode found
recognised, contact the
Check the lamp and
Test program stopped!
manufacturer or his
replace it if necessary.
Test program stops when
Please check lamp
representative.
the instrument is started
Close lid.
Close the lid.
Press Start Again.
No instrument backup
Check the USB memory
Error [xx]
present!
stick.
Fault
Data analysis not possi-
Remove the cuvette/
No valid data for these
Test program stopped!
ble, no measurement
Change the selection.
Test program stops when
sample cell from the cell
parameters!
Please remove the
data
the instrument is started
compartment.
cuvette
View Data not possible in
Press OK.
No valid data found!
Change the selection.
Close the lid.
data log
No help function
present.
English 119
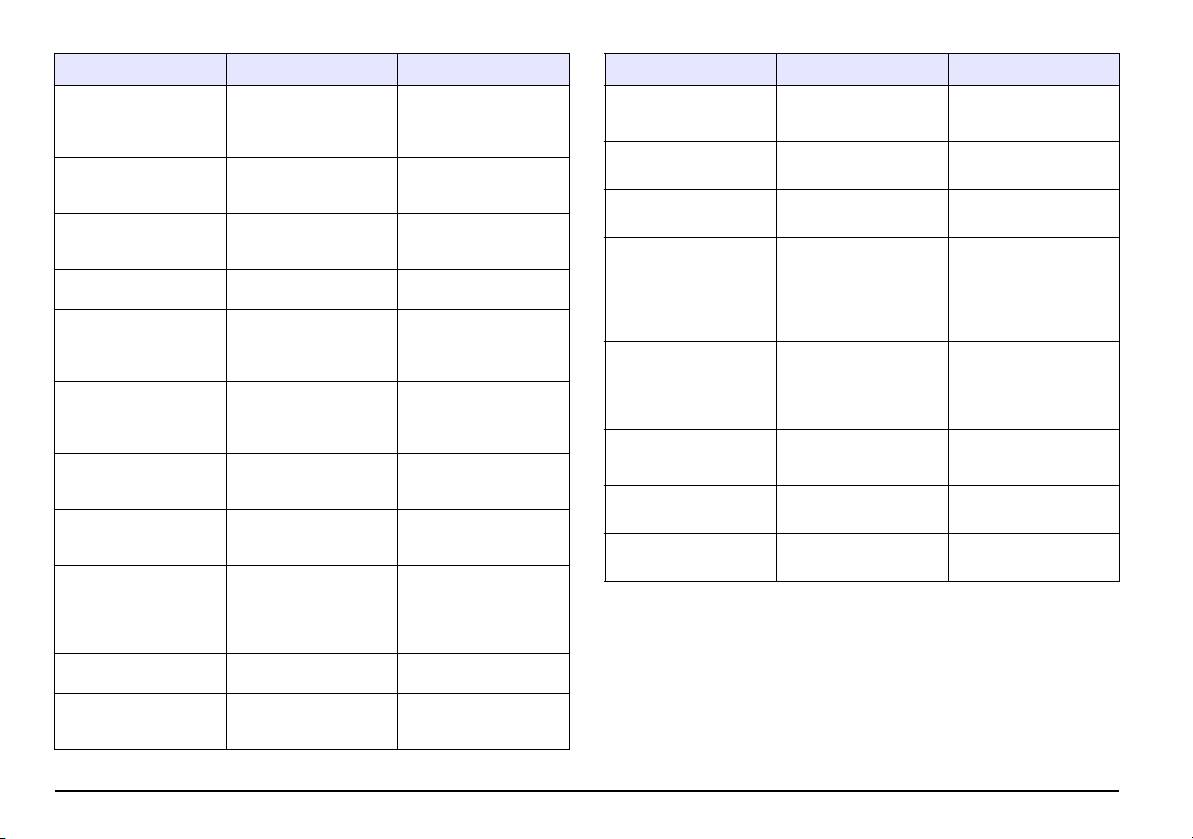
Error displayed Definition Resolution
Error displayed Definition Resolution
Data analysis settings
Make sure that the
Remote server cannot
Error during network
No measurement data
cannot be configured
instrument is connected
Change the selection.
be reached.
setup
present!
without measurement
to the network.
data.
Unstable lighting
Avoid direct sunlight at
This is a warning notice.
conditions!
the measuring location.
Control range not
Data analysis limits not
The control limit set was
reached!
reached
not reached.
Insufficient memory for
Select a memory with
Error during update.
update.
more space.
This is a warning notice.
Control range
Data analysis limits
The control limit was
exceeded!
exceeded.
Switch the instrument of
exceeded.
and then back on again.
Calculated concentration
Dilute sample and
System check
Measurement of air
If the system check is not
Concentration too high!
is higher than 999999
measure again
incorrect!
values failed
successful, contact the
manufacturer or his
The measured
representative.
absorbance is above the
Dilute sample and
Over measuring range
calibration range of the
measure again
Switch of the instrument
test
Temperature too high.
and allow it to cool for a
Measurement not
few minutes. If
The measured
If possible, select a test
possible!
necessary, move it to a
absorbance is below the
with a lower reading
Under measuring range
cooler place.
calibration range of the
range or use a cuvette
test
with a longer path length
Save the update file
Update file is faulty. Error during update.
again and repeat the
The analysis is possibly
Possible interference
procedure.
Interference Check
erroneous due to
by:
interferences.
USB memory stick is
Check the USB memory
Update not possible.
not connected.
stick.
The analysis is possibly
Possible interference
Interference Check
erroneous due to
from:
Web server cannot be
Instruments homepage
Try the connection again
interferences.
reached.
cannot be reached.
later.
Contact the
manufacturer or his
Next service is due!
representative for an
inspection of the
instrument.
The calculated result is
Check concentration of
Negative result!
negative
sample
Network setup off, when
Activate the online
Network switched off.
access to instruments
connection.
homepage via sidebar
English 120
