Nokia 5630: 12. Camera
12. Camera: Nokia 5630

To select media files that are stored on another home network device, and show
them in your device (or in a compatible TV, for example), do the following:
1. Select >
Home media > Browse home. Your device searches for other
compatible devices.
2. Select a device from the list.
3. Select the type of media you want to view from the other device.
4. Select the image, video clip, music clip, or folder you want to view, and select
Show via home network (images and video) or Play via home network (music).
5. Select the device in which the file is shown. In the home network, you cannot
play music on your device, but you can play it on compatible external devices,
and use your device as a remote control.
To stop sharing the media file, select
Options > Stop showing.
To print images saved in
Gallery through the home network with a UPnP
compatible printer, select the print option in
Gallery.
To search for files with different criteria, select
Options > Find. To sort the found
files, select
Options > Sort by.
To copy or transfer files from the other device to your device, select a file on the
other device and
Options > Copy.
12. Camera
Your device has two cameras to capture images and record video clips. A high
resolution main camera is on the back of the device, and a lower resolution
secondary camera is on the front of the device.
Your device supports an image capture resolution of 2048x1536 pixels using the main
camera. The image resolution in this guide may appear different.
The images and video clips are saved in corresponding folders in Gallery.
You can send images and video clips in a multimedia message, as an e-mail
attachment, or by using Bluetooth connectivity. You can also upload them to a
compatible online album.
■ Full focus
Your device camera has Full focus. Full focus enables capturing images in which
all objects are sharp.
46
Camera
■ Capture images
Main camera
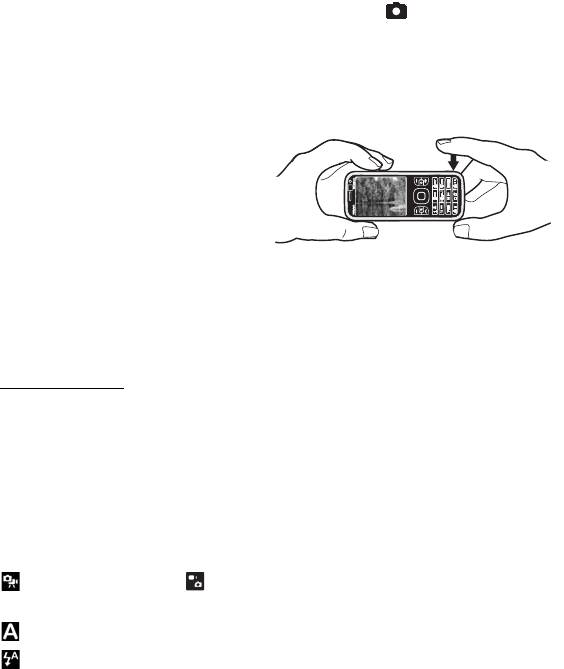
1. To activate the main camera, press the camera key. indicates still image
mode.
2. To zoom in or out, press the volume keys.
To make lighting and colour adjustments before capturing an image, select
from the active toolbar settings. See ‘Active toolbar,’ p. 47 and ‘Scenes,’ p. 49.
3. To take a picture, press the camera
key.
4. To close the main camera, select
Options > Exit.
Secondary camera
1. To activate the secondary camera, press the camera key to activate the main
camera. Select
Options > Use secondary camera.
2. To zoom in or out, scroll up or down.
3. To capture an image, press the scroll key.
Active toolbar
The active toolbar provides you with shortcuts to different items and settings
before capturing an image or recording a video. Scroll to icons, and select them by
pressing the scroll key.
If you want the active toolbar to be visible before and after capturing an image or
recording a video, select
Options > Show toolbar. To view the active toolbar only
for 5 seconds when pressing the scroll key, select
Options > Hide toolbar.
In the active toolbar, select from the following:
Switch to video mode ( Switch to image mode) — to switch between the
video and image modes
Scene modes — to select the scene
Flash mode — to select the flash mode (images only). To activate the red-eye
reduction, select
Red-eye. Avoid capturing image or zoom in very close to the
object. The red-eye reduction may not be shown until the image is saved in the
Gallery.
Keep a safe distance when using the flash. Do not use the flash on people or animals at close
range. Do not cover the flash while taking a picture.
Camera
47
Self timer — to activate the self-timer (main camera only). Select the
self-timer delay, and to activate the self-timer, select
Activate.
Sequence mode — to activate the sequence mode (images only). See ‘Capture
images in sequence,’ p. 48.
Go to Gallery — to open Gallery
To use panorama mode, select
Options > Panorama mode. indicates
panorama mode. Press the camera key to start capturing a panorama image. Turn
slowly to the right or left. You cannot change the direction. To stop the panorama,
press the camera key again. This option is available only for the main camera.
To customise the toolbar, select
Options > Customise toolbar. You can remove an
item from the toolbar, or change, add, or move items.
The available options vary depending on the capture mode and view you are in.
The setup settings return to the default settings when you close the camera.
If you select a new scene, the colour and lighting settings are replaced by the
selected scene. See ‘Scenes,’ p. 49. You can change the setup settings after
selecting a scene if needed.
After capturing an image
After you capture an image, select the following from the active toolbar (available
only if
Show captured image is set to On in still image camera settings):
• To send the image, press the call key, or select
Send ().
• To send the image to a compatible online album, select
Sign in for Share online
()
• To open the Gallery, select
Go to Gallery ().
• If you do not want to keep the image, select
Delete ().
• To use the image as wallpaper in the standby mode, select
Options > Set as
wallpaper
.
• To set the image as a call image for a contact, select
Options > Assign to
contact
.
Capture images in sequence
You can set the main camera to capture six images or more in a sequence. In the
active toolbar, select
Sequence mode > Burst. To capture images, press the
camera key. To capture more than six images, press and hold the camera key. The
number of images captured depends on the available memory.
48
Camera

To use a time interval between capturing images, select Sequence mode and a
time interval. To start capturing images, press the camera key. To stop capturing
images before the time ends, press the camera key again.
After you have captured the images, they are shown in a grid on the display. To
view an image, press the scroll key to open it.
You can also use the sequence mode to capture up to six images using the self-
timer.
To return to the sequence mode viewfinder, press the camera key.
To switch off the sequence mode, in the active toolbar, select Sequence mode >
Single shot.
Scenes
A scene helps you to find the right colour and lighting settings for the
environment. The settings of each scene have been set according to a certain style
or environment. Scenes are only available in the main camera.
Select the image or video mode, and in the active toolbar, select Scene modes and
a scene available for the image or video mode.
To make your own scene suitable for a certain environment, scroll to
User defined,
and select
Options > Change. To copy the settings of another scene, select Based
on scene mode
and the desired scene.
■ Record videos
1. To activate the main camera, press the camera key. If the camera is in the
image mode, change to video mode. In active toolbar, select
Switch to video
mode
. indicates video mode.
To activate the secondary camera, select
Options > Use secondary camera.
2. Press the camera key to start recording. With the secondary camera, press the
scroll key for recording. is shown and a tone sounds, indicating that
recording has started.
To zoom in or out of the subject using the main camera, press the volume keys,
or, using the secondary camera, scroll down or up.
3. To stop recording, select
Stop. The video clip is automatically saved to the
Video clips folder in the Gallery. See ‘Gallery,’ p. 42. The maximum length of
the video clip depends on the available memory.
Camera
49
To pause recording at any time, select Pause. Video recording automatically stops
if recording is set to pause and there are no keypresses within a minute. Select
Continue to resume recording.
To make lighting and colour adjustments before recording a video, select from the
active toolbar settings. See ‘Active toolbar,’ p. 47 and ‘Scenes,’ p. 49.
After recording a video
After you record a video clip, select the following from the active toolbar
(available only if
Show captured video is set to On. See ‘Video settings,’ p. 51):
• To immediately play the video clip you just recorded, select
Play .
• To send the video clip using a multimedia message, e-mail, or Bluetooth
connectivity, press the call key, or select
Send ( ). You may not be able to
send video clips saved in the .mp4 file format in a multimedia message.
• To upload the video clip to a compatible online album, select
Sign in for Share
online
().
• To open the Gallery, select
Go to Gallery ().
• If you do not want to keep the video, select
Delete ().
■ Camera settings
There are two kinds of settings for the still image camera: active toolbar settings
and main settings. To use active toolbar settings, see ‘Active toolbar,’ p. 47. The
active toolbar settings return to the default settings after you close the camera,
but the main settings remain the same until you change them again.
Still image camera settings
To change the main settings, select Options > Settings.
To set the image resolution (only available in the main camera), select
Image
quality
. The better the image quality, the more memory the image consumes. To
print the image, select
Print 3M - Large, or Print 2M - Medium. To send the image
through multimedia messaging (MMS), select
MMS 0.3M - Small.
To select whether to see the captured image after it is captured or to continue
capturing images immediately, select
Show captured image.
To allow the zoom increments to be smooth and continuous between digital and
extended digital zoom, select
Extended digital zoom > On (continuous) (main
camera only). To allow the zoom increments to pause at the digital and extended
50
Camera
Оглавление
- Contents
- SAFETY
- Support
- 1. Get started
- 2. Your device
- 3. Call functions
- 4. Music
- 5. Games
- 7. Write text
- 8. Messaging
- 9. Contacts
- 10. Gallery
- 11. Home media
- 12. Camera
- 13. Media
- 14. Internet
- 15. Personalisation
- 16. Time management
- 18. Settings
- 19. Data management
- 20. Connectivity
- 21. Enhancements
- 22. Battery and charger information
- Care and maintenance
- Additional safety information
- Index


