Binatone BM-1008: инструкция
Раздел: Бытовая, кухонная техника, электроника и оборудование
Тип: Хлебопечка
Характеристики, спецификации
Инструкция к Хлебопечке Binatone BM-1008
Оглавление

Instruction Manual
BM1008
Bread Maker
A
Bread Maker BM1008

ENGLISH ........................................ 4
ENGLISHFRANÇAISРУССКИЙ
FRANÇAIS .................................... 14
РУССКИЙ..................................... 26
УКРАЇНСЬКА ............................... 38
УКРАЇНСЬКА
3
Bread Maker BM1008
Please read the safety instructions carefully before using this ap-
pliance. Please retain the instructions for future reference.
SAFETY MEASURES
When using your appliance, the following basic
safety precautions should always be followed:
X Before using for the first time, check that the appli-
ance voltage is the same as your local supply.
X Only use the appliance for the purposes stipulated
by the instructions.
X Only use attachments supplied with the equipment.
X To avoid electric shocks, do not immerse the appliance, plug
or power cord in water or any other liquids. Do not place
the appliance where it could come into contact with water or other
liquids. If the appliance comes in contact with water, immediately
disconnect it from the mains. Do not use the machine again until it
has been serviced by an authorized service center.
X Do not let children use the appliance without supervision.
X If the power cord plug does not fit into your wall socket,
consult a qualified electrician.
X Use of various adapters may result in damage to the ap-
pliance and termination of warranty.
X Always supervise the equipment while in use.
X To avoid a circuit overload, do not operate any other high voltage
equipment on the same circuit.
X Always unplug before moving the appliance from one
place to another, cleaning and storing.
X Never pull the cord to disconnect the appliance, instead grasp the
plug and pull it to disconnect.
X Do not allow the cord or the machine itself to come in contact with
hot surfaces.
X Position the appliance and the cord so that nobody can acciden-
tally overturn it.
X Do not use the appliance if it has been dropped, or it has a dam-
aged power cord or plug. Do not modify or repair the machine
yourself.
X Do not dismantle the appliance as improper assembly might result
in an electric shock during the subsequent use of the equipment.
Repairs should only be done by authorized service cen-
ters.
X Do not use the device in areas where combustible gas mixtures or
inflammable liquid vapors could be present in the air, or in areas
with inflammable air-borne dust or fibers.
X This equipment is intended for household use only, not for com-
mercial or industrial use.
X Please follow all the requirements of this guide.
X Do not use the appliance if it has mechanical defects (dents, cracks
etc.), get it checked by the nearest authorized service center.
4
SPECIAL SAFETY MEASURES
X Do not use the appliance near to heat sources or
on an unstable surface.
X Only use accessories that are included with your
bread maker.
X Around the appliance there should be a free
space not less than 30 cm from each side.
ENGLISH
X Do not use the appliance on a heat-insulating sur-
face or in direct sunlight.
X Do not cover the appliances air vents with an oven cloth, tea towel
or any other materials.
X Never use the appliance without the kneading blade and baking pan.
X Do not open the lid during the use of the appliance, except for
cases stipulated in this instruction book. Allow the device to cool
down before using again.
X Do not place any metal foil or other materials inside the baking
oven. As this can cause short circuit or a fire.
X Do not touch the moving or hot parts of the device during its work.
X Do not use anything with a sharp blade to extract the bread from the
baking pan as it can damage the device and the non-stick coating.
X Do not use the device for other purposes, except for what it is intended.
X Do not use the device outdoor.
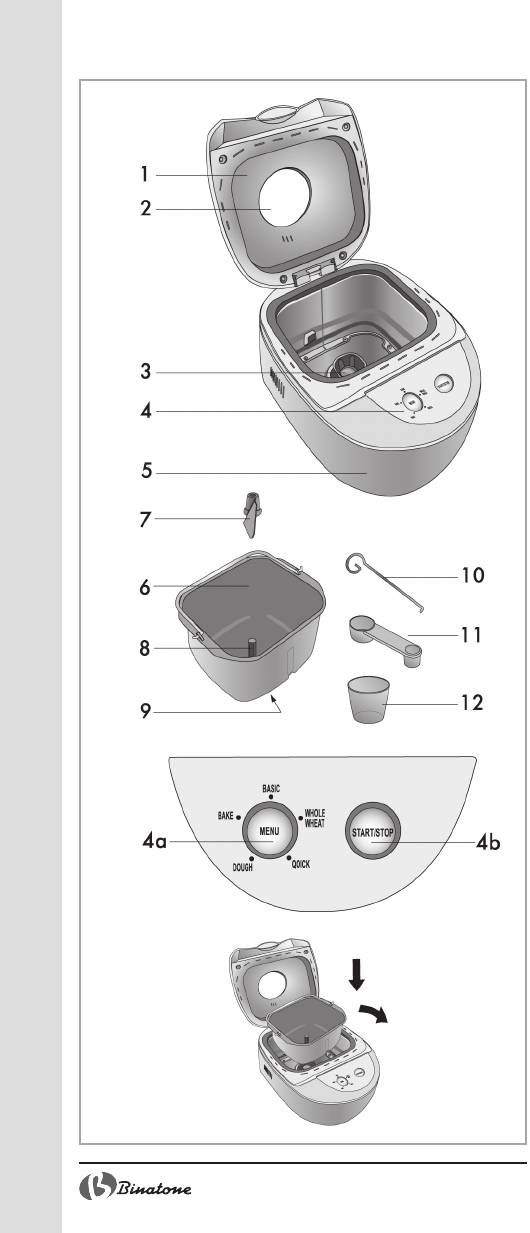
MACHINE PARTS
DESCRIPTION
Figure A:
1. Lid
2. Inspection window
3. Fastening element
4. Control panel (Figure B)
4a.MENU pad
4b.START/STOP pad
5. Body
6. Bread pan
7. Dough-kneading blade
8. Drive shaft
9. The bread pan base
10.Hook
11.Measuring spoon
12.Measuring cup
BEFORE THE FIRST USE
X Check the condition of the machine and avail-
ability of all parts and components.
X Wash all parts of the machine in accordance
with the instructions given in HANDLING AND
CLEANING section.
5
OPERATING INSTRUCTION
Assembling
X Install the bread pan (6) inside the ma-
chine at a slight angle so that the fasten-
ing element (3) enters into the bread
pan base (9). Twist the bread pan (6)
clockwise until it stops (Figure C).
X Mount the dough-kneading blade (7) onto the driving shaft
(8).
Charging the Ingredients
1. Grease the internal surface of the bread pan (6). Grease thor-
oughly the slits between the dough-kneading blade (7) and the
drive shaft (8). This will allow easy removal of the dough-knead-
ing blade (7).
2. Place the ingredients into the bread pan (6). Use the measuring
cup (12) and the measuring spoon (11) to place the correct
amount. Always follow the recipe directions and add the ingredi-
ents in the sequence specified. Usually, liquids are placed into the
bread pan first, and after that sugar, salt and flour are added. It is
recommended to sift the flour before adding it to the bread pan, in
order to expose the flour to oxygen, which is required for a better
rise of the dough. Yeast and baking powder are added last so as
to avoid their contact with liquids. To do this, make a small hole in
the flour and put the yeast or baking powder in.
3. Close the lid (1) and plug into a wall outlet.
Note: As soon as the bread maker is connected to the
power supply, a beep will sound. The indicator
(MENU) (4a) will indicate BASIC (Main)
program. This is the default setting.
4. To select the program you need, press the MENU pad (4a) 1 to 5
times. Each time this pad is pressed, programs will change in se-
quence, the indicator light will move accordingly and a short beep
will sound. To select the desired program, use the tips on the body
of the machine and in this table.
Tips on
Programs
Time Process description
the device
Main Basic 3:00 Dough, fermentation, baking.
Whole wheat Whole wheat 3:40 Dough, fermentation, baking of white
bread wheat bread. This program has pro-
longed heating time which allows the
grains to become impregnated with
water and to increase in volume.
Quick Quick 1:40 Dough, fermentation, baking of the
preparation loaf with baking soda or baking pow-
der. Bread baked with this program,
has a smaller size and dense structure.
Dough Dough 1:30 Dough, fermentation without baking.
Bake Bake 1:00 Only baking, without dough and fer-
mentation. It can be used after termi-
nation of another program if you wish
to increase baking time.
6

5. To activate the program, press START/STOP pad (4b).
Attention: After the program is activated, only START/
STOP pad (4b) will be operable.
6. To stop the operating program and/or to select some other pro-
gram, press and hold START/STOP pad (4b) for 2 or 3 seconds
until you hear a beep which will confirm that the program is
stopped.
ENGLISH
7. If you are using BASIC (Main) program, the kneading process will
stop after 40 minutes from the start of the program, and a long
beep will sound. This is so that you can add additional ingredients.
Open the lid (1), add the extra ingredients (raisins, figs, dried apri-
cots, nuts), and close the lid (1).
8. At the end of the baking process, you will hear 10 beeps. Press
START/STOP pad (4b). The bread can be removed in 3-5 sec-
onds. If you do not press START/STOP pad (4b) at the end of
operation, the machine will automatically proceed to keep the
bread warm for 1 hour. After that, the machine will stop.
Note: During the baking process, steam may escape
through vents in the lid (1). This is normal.
9. To remove the bread, open the lid (1) and grasp the handle of the
bread pan (6) firmly, using oven gloves. Twist the bread pan (6)
counter-clockwise and remove it from the bread maker.
10.To release the bread, turn the bread pan (6) upside down and
shake it several times carefully.
Attention: The bread pan and the bread may be very hot.
Be careful and use oven gloves.
11.If the dough-kneading blade (7) comes out with the bread, re-
move it by using the hook (10). Insert the thin end of the hook (10)
into the hole in the blade (7), grip and remove the blade (7) care-
fully from the bread. Allow the bread to cool for about 15 to 20
minutes in order to prevent it from crumbling and from sticking to
the knife when slicing.
12.Unplug the machine if the use is over.
About the QUICK Program
(Quick Preparation)
“Quick” bread is made by using baking powder and soda which
activate when wet and heated. To make good bread, it is necessary to
place all the liquids at the bottom of the bread pan and to put dry
ingredients on top. During initial kneading, dry ingredients may accu-
mulate in the corners of the bread pan. If this happens, open the lid
(1) of the bread maker, collect these unmixed ingredients together
with a wooden or plastic spoon and add them to the dough.
Memory Function
If the power fails during the baking process, the memory function
will save the selected program and will store it for up to 15 minutes.
Then, after the power is restored, the machine will continue operating
according to the program set earlier. If the interruption in the
power supply exceeds 15 minutes, you will have to restart the
program.
7
Room Temperature
The bread maker operates well at different temperatures. How-
ever, the loaves baked in a very warm room and in a very cold
room may differ in size. We recommend that a temperature be-
tween 15°C and 34°C should be maintained in the room where the
machine is installed.
List of possible problems
# Problem Cause Solution
1. The five LED lights The temperature in Press «Start/stop» and discon-
under the “Menu” the bread maker is too nect the bread maker, then
button are twink- high to make bread. take out the ingredients, and
ling, while the buz- leave the cover opened. Allow
zer keeps beep. the oven to cool down. If the
problem does not disappear,
take it to the service center.
2. Smoke is coming Ingredients from the Disconnect from the power
from the air vents pan have got inside the supply, allow it to cool down
during baking. device body and have and wipe the heating element
stuck to the heating with a soft cloth. Be cautious,
element or near to it. because the internal surface of
the device can be very hot.
3. Indentations in the At the end of the pro- Take the bread out immedia-
middle or bottom of gram, you leave the tely after preparation.
the bread and the bread in the pan too
crust is very thick. long and a lot of mois-
ture is lost.
4. It is difficult to take The dough has stuck to After you have taken out the
the bread out of the shaft of the bread bread, pour hot water inside
the pan. maker the device. After 10 minutes
pour it out, and wash the de-
vice. When using next time, do
not forget to grease the shaft,
blade for dough and the bot-
tom of the pan with oil.
5. Does not knead 1. Selected program 1. Select appropriate program.
the ingredients not suitable.
uniformly, bakes 2. After switching on, 2. Knead components and re-
unevenly. have pressed button peat the process.
«Start/stop», and the
program has stopped.
3. After switching on, 3. Do not open the lid at last
opened the lid and stages of kneading. Use the in-
bread has turned out spection hole.
dry, without a brown
crust.
4. The blade does not 4. Check the blade for knead-
turn properly. ing the dough, and try the ma-
chine without it. If the bread
maker works badly, take it to
the service center.
6. The sound of the The pan for bread is Check up if the pan is correctly
motor is heard, but incorrectly fixed, or it fitted and if the dough is made
the dough does has too much dough according to the recipe and
not get mixed. to mix. check that the ingredients are
correctly measured.
7. There is too much There is too much Check up on all the listed fac-
dough, it is impos- yeast or flour. Pro- tors, and eliminate the problem.
sible to close bably, the room tem-
the cover. perature is too high.
8
8. The size of bread is There is no yeast or the Check up on quantity and
small and the bread quantity of yeast is in- quality of yeast.
does not rise. sufficiently. Yeast can
be inactive, if the tem-
perature of water is too
high (more than 50°C).
9. There is a lot of Too much liquid and Reduce the quantity of liquid
dough and it is has yeast. and yeast.
overflowed the
ENGLISH
edges of the pan.
10. Indentations in the 1. The flour does not 1. Use only flour intended for
middle of the form enough dough. bread making.
bread. 2. Speed of the yeast 2. Ingredients should always
is too great, or the tem- be at room temperature.
perature of yeast is
too high.
3. Too much water 3. Check up, that the quantity
makes the dough rough, of water coincides with what is
crude and too soft. recommended in the recipe.
11. Bread is too big 1. Too much flour is 1. Reduce the quantity of flour
and the structure used but not enough and increase the quantity of
is very dense. water. water.
2. There is too much 2. Reduce the quantity of the
fruit or too much whole corresponding components.
grain flour.
12. The middle slice 1. There is surplus of 1. Check up on the tempera-
of bread is crumb- water and shortage ture, quantity of water and the
led and forms of salt. quantity of salt.
a hollow. 2. The water tempe- 2. Check the water tempera-
rature is too high. ture.
13. Dry flour has stuck 1. There are too many 1. Manually extract any un-
to the surface of components contai- necessary ingredients then
the bread ning gluten, for exa- make the dough.
mple oil, bananas, etc.
2. The dough is badly 2. Check the quantity of water
stirred. and if the dough blade is fitted
correctly. If necessary take to
the service center.
14. When bread that Different recipes or If during preparation of such
includes a lot of ingredients have a bread, the loaf becomes very
sugar is baked, a big influence on the dark, press «Start/stop» to
crust too thick and finished product. In switch off the bread maker for
its color too dark. this case, bread has 5-10 minutes. Take out the
darkened because of bread after the loaf has had
too much sugar. 20 minutes inside during heat-
ing mode with closed lid.
CARE AND CLEANING
1. Unplug the machine and allow it to cool
down.
2. Wipe the inside of the machine gently
with a damp cloth. Do not use abrasive
sponges or abrasive detergents as they
may damage the smooth surface of the
machine. Never submerge the body
of the machine in water.
3. Wash the inside of the bread pan (6), using nonabrasive de-
tergents. Dry carefully.
4. Rinse the dough-kneading blade (7) with running water, using
nonabrasive detergents, and wipe it dry with a soft cloth.
9

Note: If the dough-kneading blade (7) cannot be easily
removed from the mounting shaft (8), fill the bread
pan (6) with warm water (up to 50°C) and allow it
to soak for 30 minutes. After that, remove the blade,
wash it and wipe it with a soft cloth.
5. Be sure that the machine has completely cooled and that it has
been washed and dried before storing.
HELPFUL HINTS AND TIPS
The ingredients characteristics given below will
help you to make real good and flavoured bread.
Bread Ingredients
1. Bread Flour
Bread flour must have high gluten content because it has a
highly elastic structure and helps to maintain the size and shape of
the dough after it has risen. Gluten-containing flour allows you to
make bigger bread having a better internal structure compared
with ordinary flour.
2. Ordinary Flour
Ordinary flour is made from soft and hard wheat. It is used for
quick preparation of buns and cakes.
3. Whole Wheat Flour
Whole wheat flour is made from milled wheat and contains
wheat husk and gluten. It is heavier and it has a greater nutritional
value than ordinary flour. The bread made from whole wheat
flour is usually smaller than that made from ordinary flour. To
achieve ideal bread flavour, many recipes recommend that whole
wheat flour and bread flour should be combined.
4. Dark Wheat Flour
Dark wheat (coarse) flour is a kind of flour which has a high
content of fibers and is similar to whole wheat flour. To make
bigger bread, it is better to use a mixture of dark wheat flour and
bread flour when preparing the dough.
5. Cake Flour
Cake flour is made from soft wheat flour or from wheat flour
that has low protein content.
6. Corn Flour or Oat Flour
Corn flour and oat flour are produced as a result of the milling
of respective grains. These flours are added when coarse bread is
made as they enhance the flavour and improve the texture of the
bread.
Different kinds of flour are similar. Actually, it is the yeast fer-
mentation process (or the absorbing capabilities of different kinds
of flour) that influences the dough kneading and fermentation
process, as well as the bread storage time. You may try different
kinds of flour in order to compare them and to select the kind that
suits you.
10

7. Sugar
Sugar is a very important ingredient that adds sweetness and
flavour to the bread. Usually, white sugar is used. Dark sugar, pow-
dered sugar and icing sugar are added to taste.
8. Yeast
1 tablespoon of dry yeast = ¾ tablespoon of instant yeast
5 tablespoon of dry yeast = 3 ¾ tablespoon of instant yeast
ENGLISH
2 tablespoon of dry yeast = 1.5 tablespoon of instant yeast
Yeast must be stored in the refrigerator because it may spoil if
exposed to a high temperature. Check the yeast life before using. Usu-
ally, problems occurring at the rising stage result from the fact that the
yeast is spoiled. The method described below will help you to check
whether the yeast is usable.
a) Pour ½ cup of warm water (45-50°C) into the measuring cup.
b) Put 1 teaspoon of white sugar into the cup and stir. Then, add 2
teaspoons of yeast to the water.
c) Leave the measuring cup in a warm place for 10 minutes. Do not
stir the water.
d) If foam does not rise to the edges of the cup, the yeast is dead.
9. Salt
Salt improves the flavour and crust color of the bread. However,
salt may delay the dough fermentation process. Never use too much
salt. If do not want to use salt, do not use it. The bread will be bigger
without salt.
10. Eggs
Eggs improve the texture of the bread, increase its nutritional value
and size, and add special flavour.
11. Fat, Butter and Vegetable Oil
Fat makes the bread softer and extends its storage time. Butter
from the refrigerator should be melted or cut into small bits before the
use, so as to facilitate mixing with other ingredients.
12. Baking Powder
Baking powder is mainly used for making the dough rise during
quick preparation. Baking powder induces a chemical gas-release
process which does not require a long time, releases gas bubbles and
makes the bread texture softer.
13. Soda
The principle is the same as the one described above. Soda can
be used in combination with baking powder.
14. Water
Water is the main ingredient for making bread. Water heated to
20-25ºC suits best for baking purposes. Water can be replaced by
fresh milk or a mixture of water and 2% dry milk, which will improve
the flavour and crust color of the bread.
Recipes
The amount of ingredients in each recipe has been calculated
to make a loaf weighing 450 grams.
11
Egg bread
Components
Milk ½ cup
Eggs large 1
Oil or margarine 1 table-spoon
Salt 1 tea-spoon
Bread Flour 2 cup
Sugar 1½ table-spoon
Dry yeast
2
/
3
tea-spoon
Recommended program: «Basic»
Basic white bread
Components
Warm water ¾ cup
Salt ½ tea-spoon
Sugar 1½ table-spoon
Olive oil or vegetable oil 1½ table-spoon
Bread flour or universal flour 2 cup
Instant yeast 1 tea-spoon
Recommended program: «Basic»
White bread
Components
Water
2
/
3
cup
Oil 2 table-spoon
Sugar 1½ table-spoon
Salt 1 tea-spoon
Bread flour 2 cup
Dry yeast ¾ tea-spoon
Recommended program: «Basic»
Whole wheat bread
Components
Warm water ¾ cup
Salt 1 tea-spoon
Sugar ¾ table spoon
Olive oil or vegetable oil 2 table spoon
Whole wheat flour 1 cup
Bread flour 1 cup
Dry yeast 1 tea-spoon
Recommended program: «Whole wheat»
Corn bread
Components
Milk
2
/
3
cup
Large eggs 2
Oil or margarine 1 table-spoon
Salt ½ tea-spoon
Universal flour 1 cup
Corn flour ½cup
Sugar 1 ½ table-spoon
Baking powder 2 tea-spoon
Recommended program: «Quick»
12
DISPOSAL
The appliance should be disposed of in accor-
dance with waste disposal regulations in your coun-
try and with the least damage to the environment.
Only ecologically safe materials are used in the
packaging of our products and the cardboard and
paper can be disposed of with normal paper waste.
ENGLISH
AFTER-SALES SERVICE
If your appliance does not operate at all or
operates poorly, call an authorized service cen-
ter for help or repairs.
The warranty does not cover the
following:
X Non-observance of the above safety mea-
sures and operation instructions.
X Commercial use (use outside the scope of personal household
needs).
X Plugging into a mains socket with a voltage different from the volt-
age on the appliance rating plate.
X Improper care (ingress of liquid, dust, insects, and other foreign
items and substances inside the appliance).
X Use of excessive force during appliance operation or other dam-
ages (mechanical damages resulting from incorrect use, shocks or
dropping of the appliance).
X Unauthorized repairs or replacement of the appliance parts per-
formed by an unauthorized person or service center.
X Accidents, such as lightning strike, flood, fire and other acts of God.
Features may be changed by Binatone without any notice.
Warranty details are set out in the warranty card provided with
the product.
Exploitation period: 3 years after the day of purchase.
Manufacture: Binatone Industries Ltd, Great Britain, Wembley,
1 Beresford Avenue, Vitabiotics House
Made in PRC for Binatone Industries Ltd, Great Britain
13
Four a pain BM1008
Lisez attentivement cette instruction avant le premier usage pour
prendre connaissance du fonctionnement de l'appareil. Gardez
l’instruction pour s’y référer ultérieurement.
MESURES DE SECURITE
En exploitant l’appareil, respectez toujours les
mesures de sécurité suivantes:
X Avant le premier usage, assurez-vous que la ten-
sion indiquée sur l'appareil correspond à la tension
du réseau électrique dans votre maison.
X Utilisez l'appareil seulement à des fins indiquées
dans cette instruction.
X Utilisez seulement les dispositifs qui font partie de la garniture de
l'appareil.
X Pour éviter un choc électrique, ne pas plonger l'appareil, la fiche
ou le câble dans l'eau ou dans un autre liquide. Installez
l'appareil dans un endroit où il ne peut pas tomber dans l'eau ou dans
un autre liquide. Si l'appareil a été accidentellement mouillé,
débranchez-le du réseau immédiatement. N'utilisez pas l'appareil qui
est tombé dans l'eau. Portez-le dans un centre de maintien.
X Ne pas laisser les enfants manier l'appareil sans contrôle des
adultes.
X Si la fiche mâle de l’appareil ne coïncide pas avec votre
prise selon sa structure, consultez auprès de l’expert.
X L’utilisation de différents raccords peut conduire à une
panne de l'appareil et la cessation des garanties.
X Ne pas laisser l'appareil branché sur le réseau sans surveillance.
X Pour éviter la surcharge du réseau électrique, ne pas brancher un
autre appareil de haute puissance au même réseau que votre
appareil.
X Déconnectez l’appareil du réseau avant le déplacement
d’un endroit à l’autre et avant le nettoyage et la conser-
vation.
X Ne tirez jamais sur le câble pour déconnecter l'appareil du réseau;
prenez la fiche et faites-la sortir de la prise de courant.
X Eviter le contact du câble ou de l'appareil avec des surfaces
chauffées.
X Placer l'appareil et le câble de façon à éviter le basculement
accidentel.
X Ne pas utiliser l'appareil si le câble ou la fiche de contact est
endommagé. N’essayez pas de réparer l'appareil vous-même.
Le remplacement du câble électrique et de la fiche de contact doit
être effectué par un centre de maintien agréé.
X Ne démontez jamais l'appareil vous-même; l’assemblage incor-
rect peur résulter en choc électrique pendant l’usage ultérieur de
l'appareil. Tous les travaux de réparation doivent être
effectués seulement par un centre de service agréé.
X Ne pas utiliser l'appareil dans des locaux où l’air peut contenir
des mélanges des gaz combustibles, des vapeurs des liquides
inflammables, ou des poussières et fibres inflammables.
X Cet appareil est destiné à l'usage personnel et n'est pas destiné à
l'usage commercial et industriel.
X Respectez toutes les règles de la présente instruction.
14
X Ne pas utiliser l'appareil qui a des défauts mécaniques
(enfoncements, cassures,…): vérifiez son fonctionnement dans un
centre de service agréé.
MESURES DE SECURITE
SRECIALES
X Ne pas installer l’appareil près de sources de
chaleur ou sur une surface instable.
X Ne pas employer des accessoires n’appartenant
à l’appareil on non-recommandés par le
producteur.
X Laisser de chaque coté de l’appareil un espace
libre au moins de 30 cm.
X Ne pas mettre l’appareil en fonctionnement sur
une surface thermoisolante ou s’il est sous l’action directe des ray-
ons solaires.
X Ne pas couvrire l’appareil par une serviette ou un tissue faisant
rôle d’un obstacle d’échange libre de chaleur. Ne pas oublier que
cette couverture ainsi que un contact avec des matières
inflammables peut provoquer un incendie.
X Ne jamais utiliser l’appareil pour la préparation du pain à
FRANÇAIS
l’interière de la goulotte à pain sans ingrédients nécessaires.
X Ne pas ouvrir le couvercle au cours de préparation sauf les cas
spécifiés dans cette instruction. Avans le rechargement ou le
remontage de la coupe ou de la palette de pétrissage laisser
l’appareil refroidir.
X La mise du papier alu ou d’autres matériaux est strictement interdit.
Ceci peut provoquer un court circuit ou l’incendie.
X Ne pas toucher au cours de fonctionnement des pièces en
mouvement ou détails chauds.
X Ne jamais taper la partie supérieure de la goulotte à pain ou ses
bords pour défourner le pain car ceci peut endommager l’appareil.
X N’utiliser l’appareil qu’en cas mentionnés dans l’instruction.
X Ne pas détériorer la couverture de la goulotte à pain et du couteau
d’agitateur.
X Ne pas utiliser l’appareil dehors.
DESCRIPTIF DES PIÈCES
DE L’APPAREIL
Figure A :
1. Couvercle
2. Hublot
3. Elément de fixation
4. Panneau de commande (Figure B)
4a.Bouton «Menu» (Menu)
4b.Bouton «Start/Stop» (Marche/Arrêt)
5. Corps
6. Cuve à pain
7. Palette de pétrissage
8. Tige de commande
15
9. Base de cuve
10.Crochet
11.Cuiller de mesure
12.Verre gradué
AVANT L’USAGE
X Vérifiez l’état de l'appareil et la présence
de toutes les pièces.
X Lavez toutes les pièces de l'appareil suivant
les instruction du chapitre «ENTRETIEN ET
NETTOYAGE».
MODE D’EMPLOI
Assemblage
X Installez la cuve à pain (6) à l’intérieur de
l’appareil en la tenant légèrement inclinée
de façon à faire entrer l’élément de fixation
(3) dans la base de la cuve (9). Tournez la
cuve (6) dans le sens des aiguilles d’une
montre jusqu'au butoir (Figure C).
X Installez la palette de pétrissage (7) sur la tige de commande
(8).
Chargement des aliments
1. Enduisez d'huile la surface intérieure de la cuve (6). Enduisez
soigneusement les fentes entre la palette de pétrissage (7) et
la tige (8). Ceci permettra de détacher rapidement la pâte et
de sortir facilement la palette (7).
2. Mettez les ingrédients dans la cuve (6). Utilisez le verre gradué
(12) et la cuiller de mesure (11) pour doser correctement les
aliments. Suivez la recette et ajoutez les ingrédients dans l’ordre
indiqué dans la recette. Normalement, les liquides sont versés
dans la cuve en premier lieu, ensuite, il faut ajouter le sucre, le
sel et la farine. Il est conseillé de tamiser la farine avant la
cuisson pour l’enrichir en oxygène ce qui permet à la pâte de
mieux lever. Ajouter la levure et la poudre à lever en dernier
lieu de façon à éviter leur contact avec les liquides. Pour cela,
faites un petit creux dans la farine et mettez-y la levure ou la
poudre à lever.
3. Fermez le couvercle (1) et insérez la fiche d’alimentation dans
la prise de courant.
Note: Dès que le four à pain sera connecté au secteur, un
signal sonore retentira. L’indicateur du bouton
«Menu» (4a) indiquera le programme «Basic» (De
base). Cest une installation par défaut.
4. Pour sélectionner un programme, appuyez sur le bouton
«Menu» (4a) 1 à 5 fois. En appuyant sur le bouton, les
programmes changent consécutivement, accompagnés par le
16

déplacement de l’indicateur lumineux et dun court signal
sonore. Pour sélectionner le programme voulu, utilisez les indi-
cations sur le corps de l'appareil et le tableau ci-joint.
Indications sur
Modes
Durée Description des opérations
l’appareil
De base Basic 3:00 Petrissage de la pâte, fermentation,
levée de la pâte, cuisson.
Pain complet Whole wheat 3:40 Petrissage, fermentation, cuisson du
pain blanc de froment. Ce mode a un
temps prolongé de rechauffement,
permettant aux grains prendre plus
d’eau et augmenter de volume.
Préparation Quick 1:40 Petrissage, fermentation, cuisson du
rapide pain à bicarbonate de sodium ou à
levure chimique. Le pain à moule ainsi
préparé a des dimentions réduites et
une structure plus dense.
Pâte Dought 1:30 Petrissage, fermentation sans cuisson.
Boulangerie Bake 1:00 Seulement cuisson sans petrissage et
fermentation. Peut être employer
après autres modes si le temps de
préparation doit être augmenté.
5. Pour activer le programme, appuyez sur le bouton «Start/ Stop»
(Marche/Arrêt) (4b).
Attention: Après le lancement du programme, seul le
FRANÇAIS
bouton «Start/Stop» (Marche/Arrêt) (4b) sera
accessible.
6. Pour arrêter le programme en fonction et/ou sélectionner un au-
tre programme, pressez et maintenez pendant 2 à 3 sec le bouton
«Start/Stop» (Marche/Arrêt) (4b) jusqu'au signal sonore qui
confirme que le programme est arrêté.
7. Si vous utilisez le programme «Basic» (De base), dans 40 minutes
après le début du programme, le pétrissage sarrêtera, et un long
signal sonore retentira. Cela signifie que vous pouvez ajouter
d’autres ingrédients. Soulevez le couvercle (1), ajoutez les ali-
ments nécessaires (raisins ou abricots secs, figues, noisettes), et
refermez le couvercle (1).
8. A la fin de cuisson vous entendrez 10 signaux sonores. Appuyez
sur le bouton «Start/Stop» (Marche/Arrêt) (4b). Dans 3 à 5
secondes vous pourrez retirer le pain. Si vous n’appuyez pas sur
le bouton «Start/Stop» (Marche/Arrêt) (4b) à la fin du cycle, le
pain sera maintenu chaud automatiquement pendant 1 heure,
ensuite, l’appareil se débranchera.
Note: Il est possible que pendant la cuisson la vapeur
sortira à travers les orifices de ventilation dans le
couvercle (1). C’est normal.
9. Pour retirer le pain, ouvrez le couvercle (1) empoignez bien la
poignée de la cuve à pain (6), en utilisant des gants. Tournez la
cuve (6) contre le sens des aiguilles dune montre et sortez-le du
four à pain.
10.Pour sortir le pain de la cuve, retournez la cuve (6) dessus dessous
et secouez avec précaution.
Attention: La cuve à pain et le pain peuvent être très
chauds. Soyez prudents et utilisez des gants.
17

11.Si la palette de pétrissage (7) est restée dans le pain, retirez-la
à l’aide du crochet (10). Insérez l’extrémité fine du crochet
(10) dans l’orifice de la palette (7), attrapez la palette et retirez
la palette (7) du pain avec précaution. Pour que le pain ne colle
pas au couteau et ne sémiette pas, laissez-le refroidir pendant
15 à 20 min.
12.Débranchez l'appareil du secteur après la fin d’utilisation.
Le programme «Quick» (Préparation rapide)
Le pain «rapide» se fait avec la poudre à lever et la soude qui
deviennent actives lors de l’humidification et de chauffage. Pour obtenir
un bon pain, il faut placer tous les liquides au fond de la cuve, et les
ingrédients secs, en dessus. Pendant le pétrissage initial, les ingrédients
secs peuvent s’accumuler dans les angles de la cuve, Dans ce cas, soulevez
le couvercle (1) du four à pain, ramassez les ingrédients non mélangés
avec une cuillère en bois ou en plastique, et rajoutez-les dans la pâte.
Fonction de mémoire en cas de coupure
délectricité
En cas de panne d’électricité pendant la cuisson de pain, la fonction
de mémoire assurera le maintien du programme sélectionné pendant
15 minutes. Ainsi, après la restitution d’alimentation en énergie,
l'appareil reprendra son fonctionnement suivant le programme
sélectionné précédemment. Si le temps d’absence délectricité dépasse
15 minutes, il faudra relancer le programme de nouveau.
Température ambiante
Le four à pain fonctionne bien à différentes températures
ambiantes, mais une différence est possible dans la taille du pain fait
dans un local très chaud ou très froid. Il est conseillé de maintenir la
température entre 15°C et 34°C dans la salle ou l'appareil est installé.
Problèmes possibles
# Problème Cause Solution
1. 5 indicateurs La température au four Pousser le bouton «Start/
lumineux du est trop élévée pour Stop» (Marche/Arrêt) et de-
bouton «Menu» cuisson. brancher l’appareil. Retirer
clignotent simulta- des ingrédients et laisser le
nément avec le couvercle ouvert. Laisser le
signal sonore. four se refroidir. Si le défaut
persiste, s’addresser au
centre de service.
2. Fumée par la fente Des ingrédients de la Debrancher l’appareil, le
de ventilation au goulotte tombent sur le refroidire et torchonner le
cours d’une rechaud électrique ou réchaudélectrique. Soyez
preparation. se trouvent à son prudent car après le debran-
voisinage. chement l’intérier de l’appa-
reil peut être très chaud.
3. Applatissement du Le mode términé, le pain Retirer le pain tout après la
pain au milieu ou reste sur la goulotte trop préparation.
sur le fond. La longtemps en perdant
croûte est trop l’eau.
épaisse.
4. Difficile de retirer Le mélange est trop Le pain retiré, verser à l’inté-
le pain de la gou- collé à la tige du four. rieur de l’eau chaude. Dans
lotte. 10–30 min. déverser l’eau
18

et laver l’appareil. Au ser-
vice suivant ne pas oublier
beurrer ou huiller la palette
d’agitateur et le fond.
5. Malaxage des in- 1. Le mode est mal 1. Choisir un mode
grédients inhomo- choisi. convenable.
gène, mauvaise 2. Apres la mise en 2. Malaxer des ingredients
cuisson. marche le bouton et reprendre le processus.
«Start/Stop» (Marche/
Arrêt) était activé et le
mode s’arrête.
3. Après la mise en 3. Ne pas ouvrire le couver-
marche le couvercle cle aux dernières étapes de
était ouvert maintes fois malaxage. Se servir d’hub-
et le pain est sec sans lot.
croûte brune.
4. La palette tourne 4. Examiner la palette d’agi-
à peine. tateur et sa tige. Enlever la
pâte et chercher à contrôler
le fonctionnement de la ma-
chine à vide. Si l’appareil
marche mal, addresser au
centre de service.
6. On entend le mo- La goulotte de pain n’est Contrôler la fixation correcte
teur tourner, mais pas fixée correctement de la goulotte, la composi-
la pâte n’est pas ou la portion de la pâte tion de la pâte selon la recette
malaxée. est trop grande pour le dosage des ingrédients.
FRANÇAIS
être bien malaxée.
7. Trop de pâte. Le Trop de la levure ou de Contrôler les paramètres
couvercle ne se la farine. Probablement cités et parer à un inconvé-
ferme pas. la température ambiente nient.
est trop èlévée.
8. Taille du pain est L’absence de levure ou Contrôler la qualité et la
trop petite ou le son manque La levure quantité de levure.
pain ne se leve pas. peut être inactive si la tem-
péreture d’eau est trop
haute (plus de 50°C).
9. La quantité de la Trop de liquide et de Diminuer les quantities de
pâte est trop levure. liquide et de levure.
grande et elle dé-
borde la goulotte.
10. L’applatissement 1. La farine employée ne 1. N’employer que la farine à
du pain au milieur forme pas une pâte dence. pain.
au cours de cuisson. 2. L’intensité de ferman- 2. Les ingrédients introduits
tation de levure ou sa doivent avoir la température
température sont trop ambiente.
grandes.
3. L’excès de l’eau fait 3. Contrôler que la quantité
la pâte épaisse, humide d’eau corresponde à celle
et molle. recommandée.
11. Le pain est trop 1. Trop de farine et peu 1. Diminuer la quantité de
grand et sa struc- d’eau. farine et ajouter de l’eau.
ture est trop dence. 2. Trop des fruits ou 2. Diminuer la quantité des
l’excès de la farine com- ingrédients correspondants
plete et ajouter la levure.
12. Le coeur du mor- 1. L’excès d’eau et le 1. Contrôler la température,
ceau de pain coupé manque du sel. les quantités de l’eau et du
s’emiette et forme sel.
un creux. 2. Température de l’eau 2. Contrôler la température
est trop élévée. de l’eau.
13. La farine seche se 1.Trop des ingrédients 1.Retirer à la main des
colle à la surface conténant le gluten, le ingrédients inutils et petrir.
du pain. beurre, les bananes, ets.
19
2. Malaxage insuffisant. 2. Contrôler la quantité
d’eau et la fixation correcte
de la palette d’agitateur. Si
un contrôle et une répara-
tion de la partie mécanique
du four est nécessaire, ad-
dresser au center de service.
14. Au cours de pré- Des recettes et des in- Si au cours de cette prépa-
paration d’un pain grédients différents influ- ration le pain devient brun,
bien sucré la croûte encent sur le produit final. pousser le bouton «Start/
est trop épaisse et Dans ce car le pain brunit stop» (Marche/Arrêt) pour
trop foncée. par l’excès du sucre. débrancher l’appareil à 5–
10 min. En mode de réchauf-
fement, le couvercle fermé,
retirer le pain après 20 min
de délai.
ENTRETIEN ET NETTOYAGE
1. Débranchez l'appareil du secteur électrique
et laissez refroidir.
2. Essuyez avec précaution la surface extérieure
de l'appareil avec un tissu humide. Ne pas
utiliser des éponges dures ou des produits
abrasifs, car ceci peu abîmer la surface de
l'appareil. Ne pas immerger le corps
de l'appareil dans l'eau.
3. Lavez la cuve à pain (6) de l’intérieur, en utilisant des détergents
non-abrasifs. Laissez sécher.
4. Lavez la palette de pétrissage (7) à l'eau courante avec des
détergents non-abrasifs et essuyez soigneusement avec un chif-
fon mou.
Note: Si la palette (7) ne senlève pas de la tige de fixation
(8), remplissez la cuve (6) d'eau tiède (jusquà
50°C) et laissez tremper pendant 30 min. Ensuite,
retirez-la, lavez et essuyez avec un chiffon mou.
5. Avant de ranger l'appareil, assurez-vous quil a complètement
refroidi, quil est lavé et séché, que le couvercle est fermé.
CONSEILS UTILES
Les caractéristiques des aliments énumérées ci-
dessous vous aideront à faire du pain vraiment bon et
savoureux.
Ingrédients pour le pain
1. Farine à pain.
La farine à pain doit être riche en gluten car sa haute élasticité
permet de maintenir la taille et la forme de la pâte quand elle est déjà
levée. La farine contenant du gluten permet de faire un pain d’une
plus grande taille et de structure intérieure meilleure quavec la
farine ordinaire.
20


