Binatone FS-202: инструкция
Раздел: Бытовая, кухонная техника, электроника и оборудование
Тип: Пароварка
Характеристики, спецификации
Инструкция к Пароварке Binatone FS-202
Оглавление
- МЕРЫ БЕЗОПАСНОСТИ
- СПЕЦИАЛЬНЫЕ МЕРЫ БЕЗОПАСНОСТИ ОПИСАНИЕ ДЕТАЛЕЙ ПРИБОРА
- ПЕРЕД ИСПОЛЬЗОВАНИЕМ ИНСТРУКЦИЯ ПО ЭКСПЛУАТАЦИИ
- 10.Âêëþ÷èòå ïðèáîð â ñåòü.
- Приготовление пищи
- Рис Âèä ðèñà
- Овощи Âèä
- Рыба и морепродукты Âèä
- Мясо и мясопродукты Âèä Яйца и блюда из яиц Âèä
- Подогрев: хлеб и готовые блюда УХОД И ЧИСТКА Удаление накипи Чистка
- Хранение ПОЛЕЗНЫЕ СОВЕТЫ Флан с бананом Трехцветный овощной паштет
- Котлеты из телятины Манты с чесночно8йогуртовым соусом Филе птицы с орегано
- Куриные грудки по8средиземноморски Суфле из печени птицы Карп в соусе с шампиньонами
- Креветки с чесноком, красным перцем и луком Креветки в пиве Перец болгарский, фаршированный творогом и грибами
- Пюре из тыквы Яблоки с изюмом Ванильный десерт УТИЛИЗАЦИЯ
- ПОСЛЕПРОДАЖНОЕ ОБСЛУЖИВАНИЕ Гарантия не распространяется в следующих случаях:
Instruction Manual
FS202, FS302
Food Steamers
A
Food Steamers FS-202, FS-302
B

ENGLISH ........................................ 4
ENGLISHFRANÇAISÐÓÑÑÊÈÉ
FRANÇAIS .....................................18
ÐÓÑÑÊÈÉ .....................................34
ÓÊÐÀ¯ÍÑÜÊÀ ................................50
ÓÊÐÀ¯ÍÑÜÊÀ
3
Food Steamers FS-202, FS-302
Please read the safety instructions carefully before using this ap-
pliance. Please retain the instructions for future reference.
SAFETY MEASURES
When using your appliance, the following basic
safety precautions should always be followed:
Before using for the first time, check that the appli-
ance voltage is the same as your local supply.
Only use the appliance for the purposes stipulated
by the instructions.
Only use attachments supplied with the equipment.
To avoid electric shocks, do not immerse the appliance, plug
or power cord in water or any other liquids. Do not place
the appliance where it could come into contact with water or other
liquids. If the appliance comes in contact with water, immediately
disconnect it from the mains. Do not use the machine again until it
has been serviced by an authorized service center.
Do not let children use the appliance without supervision.
If the power cord plug does not fit to your wall socket,
consult a qualified electrician.
Use of various adapters may result in damage to the
appliance and termination of warranty.
Always supervise the equipment while in use.
To avoid a circuit overload, do not operate another high voltage
equipment on the same circuit.
Always unplug before moving the appliance from one
place to another, cleaning and storing.
Never pull the cord to disconnect the appliance, instead grasp the
plug and pull it to disconnect.
Do not allow the cord or the machine itself to come in contact with
hot surfaces.
Position the equipment and the cord so that nobody can acciden-
tally overturn the equipment.
Do not use the appliance if it has been dropped, or it has a dam-
aged power cord or plug. Do not modify or repair the machine
yourself.
Do not dismantle the appliance as improper assembly might result
in an electric shock during the subsequent use of the equipment.
Repairs should only be done by authorized service cen-
ters.
Do not use the device in areas where combustible gas mixtures
or inflammable liquid vapors could present in the air, or in areas
with inflammable air-borne dust or fibers.
This equipment is intended for household use only, not for com-
mercial or industrial use.
Please follow all the requirements of this guide.
Do not use the appliance if it has mechanical defects (dents, cracks
etc.), get it checked by the nearest authorized service center.
4

SPECIAL SAFETY MEASURES
Do not place the food steamer near or under cur-
tains, shelves, cupboards or other items, which
may be damaged by steam.
Do not touch hot surfaces of the steamer – bas-
kets, lid, rice bowl or drip tray.
Remove steamer lid, baskets and the rice bowl
ENGLISH
using oven gloves or a towel. To prevent accidents
we recommend that you slowly open the lid so
that steam escapes in a direction away from your-
self. Only lift baskets by the handles.
Never switch the appliance on without water in the water reser-
voir, as this may lead to damage to the heating element.
While operating the steamer, make sure the water level does not
drop below the minimum mark as it may result in the appliance’s
failure. If the water level is dropping to the minimum mark, add
water into the water reservoir (see subsection “Assembly and
operation of the steamer”).
Do not place paper or foil on the bottom of steamers as it can
block steam vents.
Put nothing on top of the steamer when in use.
For steamer operation try to use water with minimum amount of
salts as this will help to reduce mineral deposits on the steamer’s
heating element. Remember that deposits shorten the service life
of the appliance. Always keep the heating element clean. Use only
recommended cleaning agents (see section “Care and clean-
ing”).
Do not wrap the power cord around the steamer’s housing.
Never clean the device immediately after using it. Leave it cool
down.
PARTS OF THE
APPLIANCE
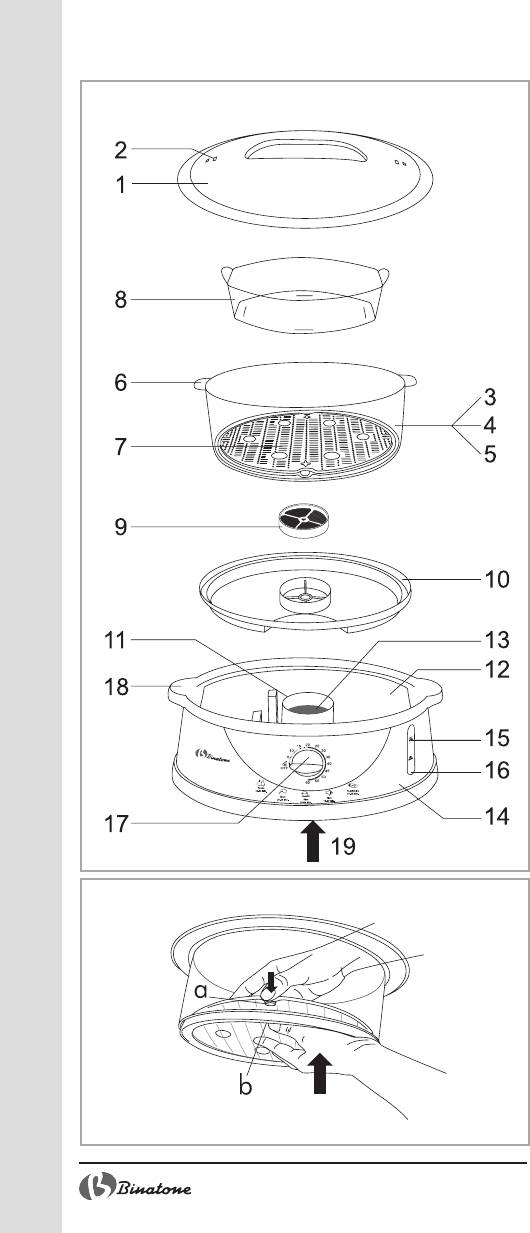
Picture A:
1. Lid
2. Opening for steam circulation
3. Upper steam basket (only in FS-302)
4. Middle steam basket
5. Lower steam basket
6. Handles of the steam baskets
7. Detachable bottom of the steam basket (Picture B)
a. Fixing of the detachable bottom of the steam basket
b. Rim for holding the detachable bottom
8. Rice bowl
9. Aroma diffuser
10.Drip tray
11.Detachable steam condenser
12.Water tank
13.Heating element
14.Steamer base
15.Water level indicator
5
16. Steamer on indicator
17.Switch/timer
18.Opening for adding water
19.Cord storage
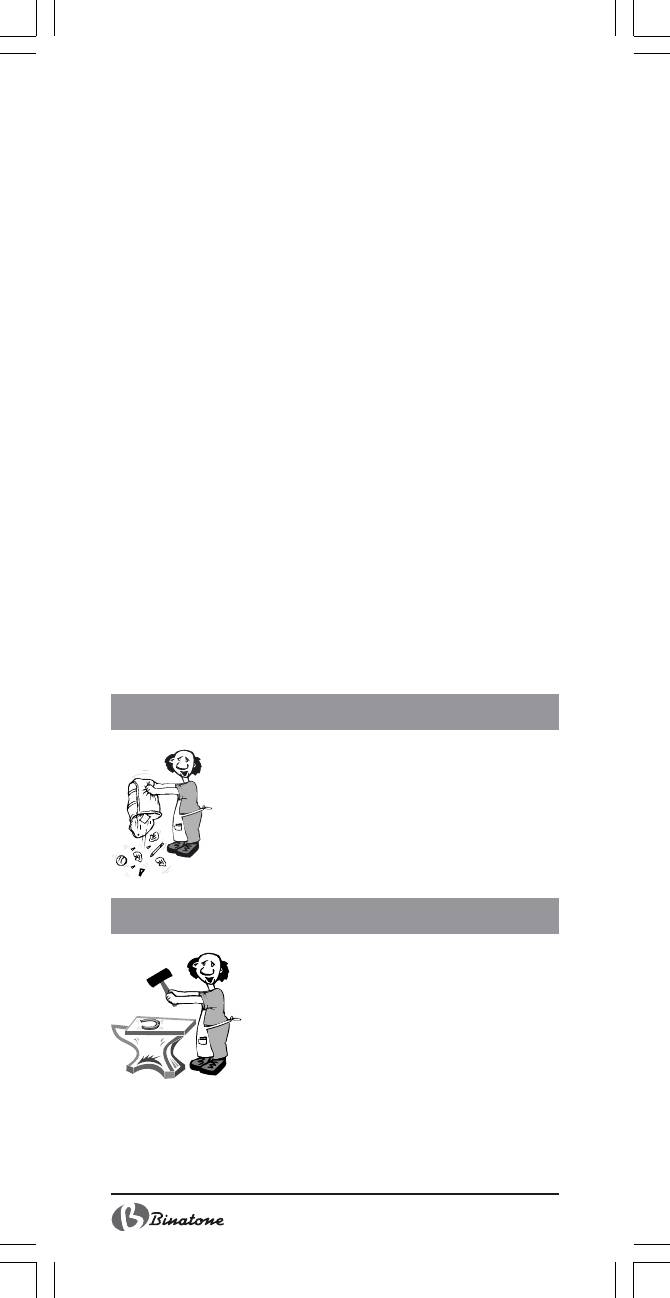
BEFORE USING
THE APPLIANCE
Read the instruction book.
Unpack the appliance.
Wash the steamer thoroughly; especially those
parts that are going to be in contact with food
(see “Care and Cleaning” section).
Before plugging into the mains supply, make
sure that the voltage stated on the appliance
corresponds to your mains supply.
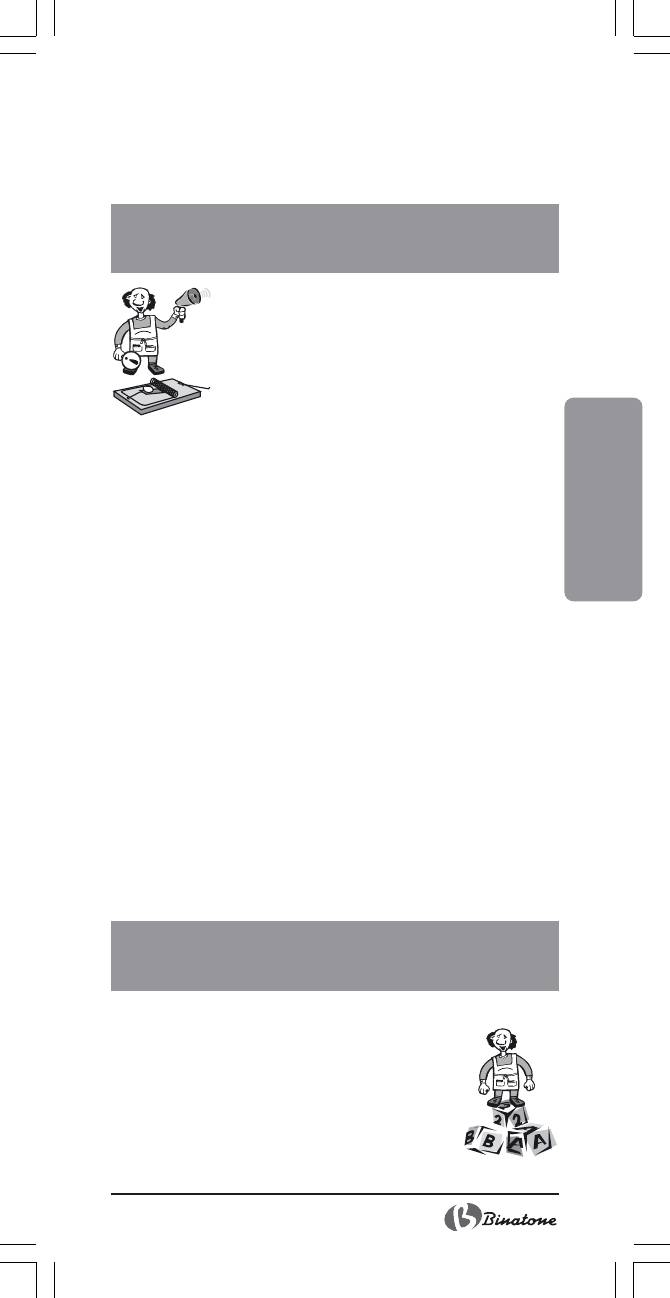
OPERATING INSTRUCTIONS
Steamer assembly and operation
1. Put the steamer base (14) onto a hard, level,
heat-insulated surface near a socket and be-
yond children’s reach.
2. Mount the detachable steam condenser (11).
3. Fill the tank (12) with water, using the marks on
the water level scale (15) as a guide. 850 ml of
water is enough for 1 hour of normal steamer
operation.
Note: Only fill the tank (12) with cold mains water. Do
not use any other liquids or flavourings.
4. Attach the drip tray (10) onto the water tank (12). Then attach the
aroma diffuser (9) in the middle of the tray (10).
Note: An aroma-diffuser is an attachment which will help
you to flavour your steamed dishes. Put your
favourite (non-powdered) seasonings, flavouring
herbs or spices onto your aroma- diffuser. Steam,
passing through the aroma diffuser, becomes
saturated with the flavouring components and your
food becomes delicious and fragrant.
5. Put food into the steamer basket(s). When using several layers it is
recommended that you put foods that take a longer time to cook
in the lower baskets and foods that cook quickly – in the upper
baskets.
6. For cooking loose and liquid food or food releasing a lot of juice
while being steamed, use the special rice bowl (8) sitting it in the
steam basket.
7. Mount the steamer baskets (3, 4, 5) on the vessel for steam con-
densation (10). For convenient assemble, the basket handles have
marks detailing the mounting procedure. They are numbered from
6

the top downwards.
8. When using the rice bowl (8) place it in the upper basket.
9. Cover the upper basket with the lid (1).
10.Plug the device into the mains supply.
11.Set the correct cooking time with the help of the timer (17) by ro-
tating the handle clockwise to the relevant mark denoting the cook-
ing time. The indicator in the water level scale (15) will light up,
the steamer will start operating.
ENGLISH
12.If the water level is approaching the minimum mark, add some
water to the tank (12) through the opening for water top up (18).
13.When the food in the upper basket is ready, carefully take it off
the steamer and cover the remaining basket (s) with the lid.
Attention: Please remember that during operation of the
appliance hot steam will escape. Be careful and
always use an oven glove when taking baskets off the
steamer. Make sure the upper basket is always
covered with the lid.
14.When the cooking time ends (17), the steamer will automatically
switch off. You will hear an audio signal, and the indicator light
(16) will go out.
Note: When cooking large-volume foods (such as chicken)
you can remove the bottom of the steamer baskets
(7) to increase the effective volume of the steamer
(see picture B). To do this, sharply press the
bottom of the steam basket from below with your left
hand, hold the detachable bottom from the inside with
your right hand, simultaneously releasing the fixture
(a) from under the lower rim of the steam basket
(b), pressing it with your right thumb (picture B).
To replace the bottom, mount the fixture (a) under
the rim of the steam basket (b) from one side and fix
the second fixture pressing the basket bottom towards
the centre, so that the fixture (a) goes under the rim
of the steam basket (b).
Cooking
When cooking frozen foods (except frozen vegetables) in your
steamer, they should be allowed to completely thaw first. Do not salt
food before cooking and do not add seasoning, as this will cause ex-
cessive juice release. Add sauces and seasonings after the food is
cooked. If you would like to flavour food during the cooking process,
put some non- powdered seasoning on the aroma-diffuser.
Tables below contain recommendations on cooking various foods
when putting one type of food per basket. Cooking time will increase
if you are using several baskets, since the same amount of steam will
be used for a larger amount of food. Cooking time should also be
increased if you put food in the upper baskets.
Remember: the further food is from the heating element, the longer
the cooking process. Cooking time will also increase if you have put a
7

lot of food in several layers in one basket. In this case, make sure that
all the pieces of food are the same size; bigger pieces should be put in
the lower layer. Don’t be afraid of experimenting to determine the
exact cooking time and achieve the desired result. If you are cooking
in a steamer for the first time, rely on the tables and hints on the appli-
ance base (14), continuously checking to see if the foods are cooked.
Always put meat and chicken in the lowest basket, so that the juices
coming out from them do not come into contact with other foods. This
juice, which accumulates in the drip tray, may be used for making
sauces.
Remember that fish is ready when it becomes opaque and the flesh
flakes away easily. Meat is ready if it releases clear juice. Cook green
vegetables, cabbage, salad, etc. very quickly, so that the leaves re-
main green and crispy.
It is important to watch the foods that are cooking. If you notice
that most part of the food in the basket is ready, turn it over. When the
cooking time is finished, immediately remove the baskets from the
steamer, otherwise the cooking process would continue. Put the bas-
kets on a dish or a tray, wait till the steam drips out and serve the food
on a plate.
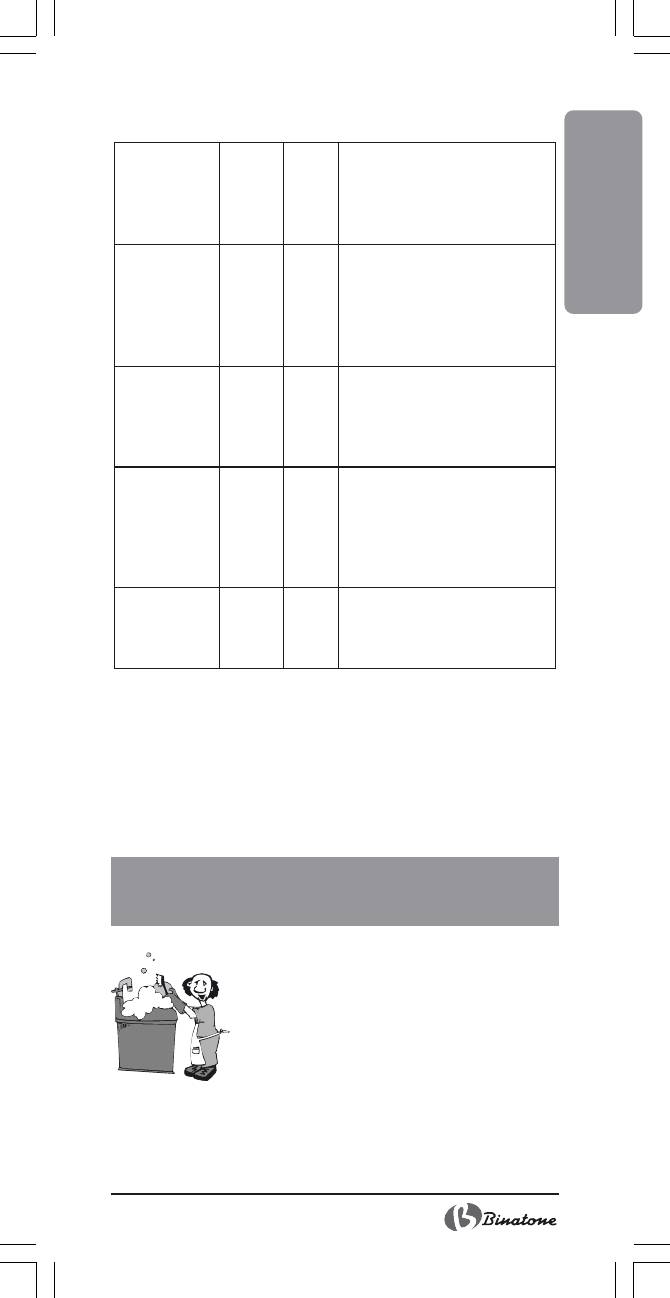
Rice
There are different types of rice. See the guide below for cooking
various kinds of rice.
Measure accurately the rice and water and mix them in the rice
bowl (8). Pour enough water in the tank (12). Cover with the lid
and cook.
To cook soft rice, increase the amount of water mixed with the
rice, as stated in the table. To cook firm rice, decrease the amount
of water.
Check for the degree of preparedness and the consistency of the
rice at the minimum time stated for the type of rice you are cook-
ing.
When checking for the degree of preparedness or stirring, pre-
vent the condensation on the lid (1) from getting into the rice bowl
(8), as this would deteriorate the quality and taste of the steamed
rice.
After cooking the rice, then you can season it with salt, pepper,
butter or a stock cube.
Mix in the rice bowl
Approximate
Type of rice
Rice
Water
cooking time
(cups)
(cups)
(minutes)
Brown
standard
1/2
1
42-45
parboiled
1
1 1/2
45-50
Mixture of wild and
long-grained
standard
1
1 1/2
18-20
fast-cooked
1
1 3/4
16-18
instant
1
1 1/2
12-15
White
round-grained
1
1 1/2
45-50
long-grained
1
1 2/3
50-55
8
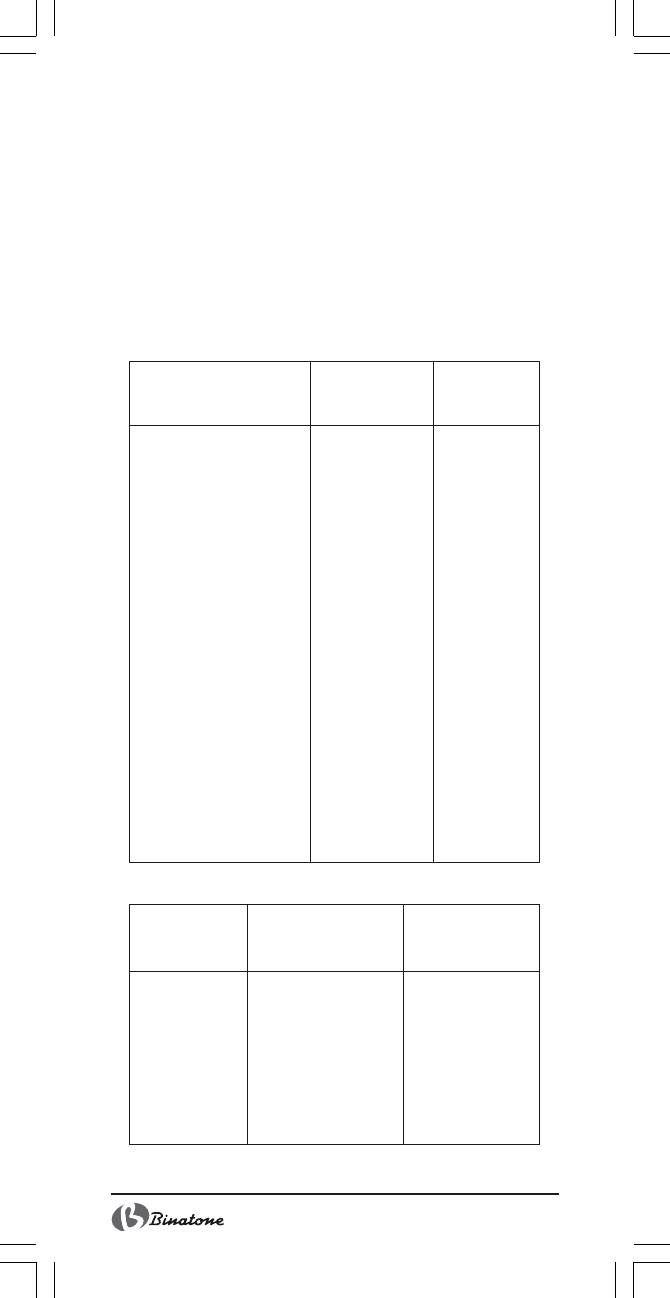
Vegetables
Wash the vegetables carefully and peel, if necessary. Cooking
time for small pieces of vegetables is shorter than for larger pieces.
Cooking time depends on quality, quantity, freshness, size, con-
sistency and temperature if the vegetables are frozen. Select the
amount of water and cooking time, using the information in the
table as a guide.
Do not defrost frozen vegetables before cooking.
ENGLISH
Frozen vegetables that release a lot of juice in the process of cook-
ing should be placed in the rice bowl (8) and covered with foil for
the time of cooking. Frozen food pieces should be separated from
one another or stirred after 10-12 minutes with a fork or a long
handled spoon.
Approximate
Weight/number
Type
cooking time
of pieces
(minutes)
Artichoke, whole
4 whole ones
30-32
with peeled top
Asparagus, sprouts
450 g
12-14
Green beans
230 g
12-14
Oats
450 g
20-22
Beetroot
450 g cut
25-28
Broccoli, sprouts
450 g
20-22
Brussels sprouts
450 g
24-26
Cabbage
450 g cut
16-18
Celery
230 g fine cut
14-16
Cauliflower, whole
450 g
20-22
Aubergine
450 g
16-18
Mushrooms, whole
450 g
10-12
Okra
450 g
18-20
Onions
230 g fine cut
12-14
Parsnip
230 g
8-10
Peas
450 g split
12-13
Sweet peppers, whole
up to 4 medium
12-13
ones (not stuffed)
Potatoes
about 450 g
30-32
Potato, whole
6 small ones
28-30
French turnip
1 medium-sized,
14-16
diced
Spinach
230 g
12-14
Marrow squash
summer yellow
450 g sliced
22-24
and Zucchini
winter Acom
450 g sliced
20-22
and Buttemut
Turnip
450 g
28-30
Frozen vegetables
300 g
25-27
9
Fish and seafood
As a rule, fish and seafood cook quickly. To ensure even cooking
it is recommended to cook them in small portions.
The table contains an approximate cooking time of fresh or frozen
seafood and fish, which has been fully defrosted. Dress and pre-
pare the seafood and fish before cooking.
Shells of shell-fish, oysters and mussels open at different time. So
to prevent over cooking, check during the cooking time whether
the shells have opened.
You may cook fish fillets in the rice bowl (8).
Steamed seafood and fish may be served without any side dishes,
with butter or margarine, with lemon or your favourite sauce.
Approximate
Weight/number
Type
cooking time
of pieces
(min)
Shellfish in shells
hard shelled
450 g
10-12
Crab
King crab, legs/claws
230 g
20-22
Lobster
tail
2-4 pieces
16-18
dressed
450-560 g
18-20
whole, fresh
450-560 g
18-20
Mussels (fresh, in shells)
450 g
14-16
Oysters (fresh, in shells)
350 g
18-20
Scallop (fresh)
freshwater (shelled)
450 g
14-16
seawater (shelled)
350 g
18-20
Shrimps
medium, in shells
450 g
10-12
large, in shells
450 g
12-14
FISH
whole
230-340 g
16-18
dressed
230-340 g
14-16
fillet
450 g
10-12
pieces
340 g
10-12
Meat and meat products
Approximate
Weight/number
Type
cooking time
of pieces
(min)
Beef
chop
450 g
28-30
minced steak
450 g
16-18
cutlet
450 g
22-24
Chicken
pieces
450 g (2-4 pieces)
24-26
Lamb
pieces
450 g
26-28
10
Eggs and egg dishes
Ap-
proxi-
Number
Cooking
Type
mate
of eggs
instructions
time
(min)
Shell egg
Prick eggs at the blunt end
ENGLISH
boiled egg
1-12
15-18
with a needle so they do not to
hard boiled
1-12
19-22
crack during steaming, and
egg
place them into the indents in
detachable bottom of the bas-
ket.
Fried eggs
Break fresh eggs into the rice
scrambled
1-4
10-12
bowl, add salt, pepper and but-
eggs
ter or margarine to your liking.
sunny-side
1-4
12-14
up eggs
Poached eggs
1-4
7-8
Pour two cups of water into
the rice bowl. Steam the water.
Carefully break an egg into a
small cup, carefully pour the egg
into the hot water and steam till
cooked.
Omelet
1-4
20-22
Beat together 6 eggs and 2
tablespoons of milk in the rice
bowl. Add salt and pepper to
taste. Stir eggs after ten minutes.
Warming up: bread and ready-to-eat food
When warming up bread, do not cover the steamer with the lid.
Warming time of ready-to-eat food depends on the temperature,
at which they were stored in the fridge.
While warming up ready-to-eat dish’s, distribute them evenly in
the rice bowl and cover them with aluminum foil.
Warming time of ready-to-eat dishes is established by experiment-
ing.
MAINTENANCE
AND CLEANING
Before cleaning, always switch off the steamer,
unplug at the mains and let it cool down completely.
De-scaling
When the steamer is used regularly, scale can
build up on the walls of the water tank (12) and
the heating element (13). If you do not descale
the device, its operating life will dramatically di-
minish.
To descale the steamer, do the following:
Fill the tank (12) with water up to “MAX” mark;
Add 6-7 tablespoons of 9% table vinegar;
11

Plug the device into the mains supply and set the timer for 20 min-
utes;
Note: During this procedure it is essential to properly air the
kitchen, for vinegar vapour has an unpleasant smell.
Do not mount any baskets on the water tank (12);
After the 20 minutes, wait until the base cools down completely.
Then pour out the vinegar solution and thoroughly rinse the tank
(12) with cold water to remove the remaining vinegar.
Note: Prevent liquid from entering the outside part of the
steamer base (14) or the electric cord. Pour water
out of the tank very carefully.
Carefully wipe the steamer outer base (14).
Cleaning
Wash the lid (1), baskets with detachable bottom (3, 4, 5), the
rice bowl (8), the drip tray (10), the aroma-diffuser (9) and the
detachable steam condenser (11) in warm soapy water. Then rinse
thoroughly and wipe dry. For a more efficient washing of the bas-
kets (3, 4, 5), detach the bottom and wash it separately with a
brush (picture B).
Detachable steamer components may also be washed in the dish-
washer. Follow its user’s guide very carefully.
Wipe the steamer outer base (14) with a damp cloth. Do not sub-
merge it in water or any other liquids.
Do not use abrasive cleansers or solvents.
Storage
Your steamer has been designed to take up as little cupboard space
as possible when not in use. If you are going to store the steamer,
assemble it as follows: mount on the base (14) the upper basket, put
the medium basket inside it, and next the lower one. Put the rice bowl
(8) inside that and cover with the lid.
HELPFUL HINTS
This section contains delicious and healthy reci-
pes which you may easily cook with a steamer. The
first two recipes show how you can use the aroma
diffuser. Don’t be afraid of experimenting with other
recipes.
Banana flan
4 servings
Banana – 3 pieces
Sugar – 120 g
Milk – 200 ml
Eggs – 3
Flour – 25 g
Butter – 10 g
Put in a mixer or blender the bananas, sugar, milk, eggs and flour.
Mix until a smooth mixture is obtained. Butter the rice bowl, fill it with
12

the mixture, cover with aluminium foil and put in a steamer basket.
Cover with the lid and cook for 35 minutes. Serve warm.
Note: You may replace bananas with 300 g of fruits or
berries, which have been cooked: rhubarb, apricots,
cherries, etc.
Your flan will be even more fragrant if before you start cooking it
you put a few sticks of cinnamon in the aroma-diffuser.
ENGLISH
Three-colour vegetable pate
3-4 servings
Carrots – 250 g
Cauliflower – 250 g
Broccoli – 250 g
Cream – 150 ml
Egg – 3 whites
Salt – to your taste
Cook the vegetables in the steamer. Put the carrots in a blender or
a kitchen processor, add 50 ml of cream, 1 white of the egg, some salt
and blend. In the same way prepare cauliflower and broccoli puree.
Put the resulting puree in layers in the rice bowl, cover with foil and
steam for 15 minutes. Then take the pate out and cut. Serve warm or
cold.
To make the dish more fragrant, a few minutes before it is ready,
put some fresh herbs onto the aroma-diffuser; for example tarragon,
marjoram or basil.
Veal cutlets
2-3 servings
500 g veal
100 g mushrooms
1 egg
Chopped fresh herbs, lemon and salt to taste
Mince the veal using a meat grinder. Add steamed mushrooms cut
into small slices and an egg to the minced veal. Mold the minced mix-
ture into cutlet shapes, put them into the steamer basket and steam for
25-30 minutes. When serving, add salt, decorate with a slice of lemon
(peeled and without pits) on top of each cutlet and serve topped with
the chopped herbs.
Manty with garlic and yogurt sauce
2 servings
400 g boneless lamb meat
1 onion
1 glass flour
2 glasses water
1 tablespoon lamb fat
200 g natural yogurt
2 cloves garlic
Salt, ground pepper to taste
Mince lamb meat and onion using a meat grinder, add salt, pep-
per and mix well.
Mix flour, salt and water to make dough. Knead dough and roll it
out into a 2mm thick layer and cut into 6-8 cm. diameter circles. Put
some of the minced meat into the center of each circle and crimp the
13

edges to seal them. Butter the bottom of the steamer basket and steam
the manty until done. Beat the yogurt, garlic and salt in a small bowl
until smooth and evenly mixed. Cover the bowl and put the sauce into
the fridge for no less than 15 minutes. Put the cooked manty onto pre-
heated serving plates. Pour garlic and yogurt sauce over them. Serve
hot.
Note: Instead of the meat filler, you may also prepare a
filling of 300 g of frozen spinach and 150 g of cheese.
Chicken fillet with oregano
4 servings
500 g chicken or turkey tenderloin
2 tablespoons oregano
250 ml dairy cream
Salt to taste
Cut fillet or tenderloin into 4 pieces, put them into the steaming
basket, add 1 tablespoon of oregano. Steam for 15 minutes. Add
salt and pepper. In a pan boil dairy cream with remaining oregano,
salt and pepper. Serve hot with the sauce.
Chicken breasts a la Mediterranean
4 servings
4 chicken breasts
½ onion
160 g mushrooms
200 g frozen spinach
50 g soft cheese
3 tablespoons olive oil
Chop ½ of the onion and brown in olive oil. Add 160 g of mush-
rooms and fry for another 2-3 minutes. Add spinach and seasonings.
Cook until the mixture becomes very tender. Make cuts in the chicken
breasts, fill them with the prepared filling and add slices of cheese.
Wrap each breast with foil and steam for another 15-20 minutes. Serve
hot.
Chicken liver Soufflé
4 servings
150 g chicken liver
1 clove garlic
2 whole eggs and 2 yolks
1 tablespoon chopped parsley
175 g sour cream
Salt, pepper to taste
Peel and chop garlic. Put chicken liver and garlic into a food pro-
cessor or blender and mix until smooth and well combined. Add eggs,
sour cream, chopped parsley, salt and pepper. Put the resulting mix-
ture into the rice bowl and cover it with aluminum foil. Place into the
steaming basket and cook for 25-30 minutes. Serve chilled.
Carp in champignon sauce
2 servings
500 g chilled fillet of carp
2 tablespoons olive oil
1 onion
200 g champignons
14

200 g dairy cream
½ tablespoon flour
Herbs and seasonings to taste
Steam the mushrooms then chop and brown them in olive oil to-
gether with finely chopped onion. Cut the carp fillet into pieces put
them into a steaming basket in one layer and top with herbs. Steam
for 12-15 minutes. Pour the cooking juices from the drip tray into a
small pan and add the dairy cream, flour, mushrooms with onion and
ENGLISH
seasonings, mix thoroughly and bring to the boil. When serving, pour
prepared sauce on carp fillet.
Note: You may prepare the dish with any other firm fleshed
whitefish.
Prawns with garlic, red pepper and onion
4 servings
500 g shelled prawns
1 onion
4 large garlic cloves
1 sweet red pepper
1 ½ teaspoons dried oregano
1 tablespoon finely chopped parsley
3 tablespoons olive oil
Salt and black pepper to taste
Place prawns into a bowl, then rub them on all sides with finely
chopped garlic and oregano. Add 2 tablespoons of olive oil and mix.
Cover and place into a fridge for 30 minutes.
Install the drip tray and a steamer basket; put rings of onion and
stripes of red pepper into the rice bowl. Place prawns and marinade
in a layer on top of the vegetables. Place the bowl into the steaming
basket, cover with the lid and steam for 10-15 minutes. Transfer prawns
with vegetables onto serving plates. Mix with the remaining table-
spoon of olive oil and parsley. Add salt and pepper to taste.
Sweet pepper stuffed with cottage cheese and
mushrooms
3-4 servings
6-8 sweet peppers
300 g mushrooms chopped
1 onion chopped
300 g cottage cheese that isn’t sour
Salt to taste
Core the peppers, place them into the steamer and cook for 10
minutes, then remove them and let them cool down. Fry mushrooms
with onion in a frying pan, mix with cottage cheese, add salt and put
this filling into the peppers. Put the peppers into the rice bowl with
openings up and steam in the steaming basket until done. Serve hot
with sour cream.
Pumpkin puree
3-4 servings
600 g pumpkin
1 potato
2 tablespoons sour cream
1 liter chicken stock (for example, made from stock cubes)
15
Nutmeg, salt & pepper to taste
Peel the pumpkin and the potato, cut into cubes and place them
into the steaming basket. Steam for 25 minutes. While vegetables are
cooking, heat the chicken stock in a pan. Prepare a puree from the
steamed vegetables and mix it with the stock. Add sour cream, nut-
meg, salt and pepper. Serve in a tureen.
Apples with raisins
4 servings
4 apples
4 teaspoons raisins
2 teaspoons sugar
2 teaspoons cinnamon
Maple, chocolate or caramel syrup for serving
Core the apples. Put 1 teaspoon of raisins into the middle of each
apple and top them with ½ teaspoon of sugar. Season with the cinna-
mon. Place apples into the steaming basket, cover with the lid and
cook for 12-15 minutes until the apples became tender. Transfer the
apples into a small serving plate. Serve warm or at room temperature
topped with the syrup.
Vanilla desert
4 servings
4 egg yolks
4 tablespoons sugar
425 g dairy cream
1 package of vanilla sugar
Beat yolks, sugar, vanilla sugar and dairy cream together. Place
into the rice bowl and steam for 20-25 minutes. Serve cold or hot,
with fruits or fruit salad.
DISPOSAL
The appliance should be disposed of in accordance
with waste disposal regulations in your country and
with the least damage to the environment.
Only ecologically safe materials are used in the pack-
aging of our products and the cardboard and paper
can be disposed of with normal paper waste.
AFTER-SALES SERVICE
If your appliance does not operate at all or
operates poorly, call an authorized service cen-
ter for help or repairs.
The warranty does not cover the
following:
Non-observance of the above safety measures and operation in-
structions.
Commercial use (use outside the scope of personal household
needs).
16

Plugging into a mains socket with a voltage different from the volt-
age on the appliance rating plate.
Improper care (filling with liquids other than water, ingress of liq-
uid, dust, insects, and other foreign items and substances inside
the appliance).
Use of excessive force during appliance operation or other dam-
ages (mechanical damages resulting from incorrect use, shocks or
dropping of the appliance).
ENGLISH
Unauthorized repairs or replacement of the appliance parts per-
formed by an unauthorized person or service center.
Scale deposit on the appliance regardless of the use of water.
Accidents, such as lightning strike, flood, fire and other acts of God.
Features may be changed by Binatone without any notice.
Warranty details are set out in the warranty card provided with
the product.
Exploitation period: 3 years after the day of purchase.
Manufacture: Binatone Industries Ltd, Great Britain, Vitabiotics
House,1 Apsley Way, Staples Corner, London, NW2 7HF, UK.
17
Bain de vapeur FS-202, FS-302
Lisez attentivement cette instruction avant le premier usage pour
prendre connaissance du fonctionnement de l’appareil. Gardez
l’instruction pour s’y référer ultérieurement.
MESURES DE SECURITE
En exploitant l’appareil, respectez toujours les
mesures de sécurité suivantes:
Avant le premier usage, assurez-vous que la ten-
sion indiquée sur l’appareil correspond à la tension
du réseau électrique dans votre maison.
Utilisez l’appareil seulement à des fins indiquées
dans cette instruction.
Utilisez seulement les dispositifs qui font partie de la garniture de
l’appareil.
Pour éviter un choc électrique, ne pas plonger l’appareil, la
fiche ou le câble dans l’eau ou dans un autre liquide.
Installez l’appareil dans un endroit où il ne peut pas tomber dans
l’eau ou dans un autre liquide. Si l’appareil a été accidentellement
mouillé, débranchez-le du réseau immédiatement. N’utilisez pas
l’appareil qui est tombé dans l’eau. Portez-le dans un centre de
maintien.
Ne pas laisser les enfants manier l’appareil sans contrôle des
adultes.
Si la fiche mâle de l’appareil ne coïncide pas avec votre
prise selon sa structure, consultez auprès de l’expert.
L’utilisation de différents raccords peut conduire à une
panne de l’appareil et la cessation des garanties.
Ne pas laisser l’appareil branché sur le réseau sans surveillance.
Pour éviter la surcharge du réseau électrique, ne pas brancher un
autre appareil de haute puissance au même réseau que votre
appareil.
Déconnectez l’appareil du réseau avant le déplacement
d’un endroit à l’autre et avant le nettoyage et la conser-
vation.
Ne tirez jamais sur le câble pour déconnecter l’appareil du réseau ;
prenez la fiche et faites-la sortir de la prise de courant.
Eviter le contact du câble ou de l’appareil avec des surfaces
chauffées.
Placer l’appareil et le câble de façon à éviter le basculement
accidentel.
Ne pas utiliser l’appareil si le câble ou la fiche de contact est
endommagé. N’essayez pas de réparer l’appareil vous-même.
Le remplacement du câble électrique et de la fiche de contact doit
être effectué par un centre de maintien agréé.
Ne démontez jamais l’appareil vous-même ; l’assemblage incor-
rect peur résulter en choc électrique pendant l’usage ultérieur de
l’appareil. Tous les travaux de réparation doivent être
effectués seulement par un centre de service agréé.
Ne pas utiliser lappareil dans des locaux où lair peut contenir
des mélanges des gaz combustibles, des vapeurs des liquides
inflammables, ou des poussières et fibres inflammables.
Cet appareil est destiné à l’usage personnel et n’est pas destiné à
l’usage commercial et industriel.
18
Respectez toutes les règles de la présente instruction.
Ne pas utiliser l’appareil qui a des défauts mécaniques
(enfoncements, cassures,…): vérifiez son fonctionnement dans un
centre de service agréé.
MESURES SPECIALES DE
SECURITE
Ne pas placer l’appareil près ou sous les rideaux,
rayons, armoires ou autres objets qui peuvent être
endommagés par l’action de la vapeur.
Ne pas toucher aux parties chaudes de l’appareil-
conteneurs, couvercle, bol au riz ou récipient de
condensation de vapeur.
Enlevez le couvercle, les conteneurs et le bol à
l’aide d’une moufle ou d’une serviette. Ouvrez le couvercle
lentement du côté opposé à vous pour éviter le contact avec la
vapeur. Prenez tous les récipients seulement par les poignées.
Ne jamais mettre en marche l’appareil qui n’a pas d’eau dans le
réservoir. Ceci peut conduire à l’endommagement de l’élément
chauffant.
Quand l’appareil est en marche, veillez que le niveau d’eau ne
FRANÇAIS
tombe pas au-dessous de la marque minimum: ceci peut conduire
à l’endommagement de l’appareil. Si le niveau d’eau s’approche
de la marque minimum, ajoutez de l’eau dans le réservoir (voir
section “Assemblage et exploitation de l’appareil”).
Ne pas mettre du papier ou des feuilles d’aluminium au fond des
conteneurs à vapeur, pour éviter le blocage des orifices de sortie
de vapeur.
Lors de l’utilisation de l’appareil ne rien mettre dessus.
Pour faire fonctionner le bain de vapeur, utilisez l’eau avec la
teneur minimale en sels, ceci permettra de réduire les dépôts de
tartre sur l’élément chauffant de l’appareil. Le tartre réduit la durée
de vie de l’appareil. L’élément chauffant doit être toujours propre.
Pour détartrer l’appareil, n’utilisez que des produits recommandés
(voir section “Entretien et nettoyage”).
Ne pas enrouler le câble d’alimentation autour du corps de
l’appareil.
Ne nettoyez jamais l’appareil tout de suite après son utilisation.
Laissez-le se refroidir.
DESCRIPTIF DES PIECES DE
L’APPAREIL
Figure A:
1. Le couvercle
2. L’orifice pour l’évacuation de vapeur
3. Le conteneur supérieur à vapeur (seulement
pour le FS-302)
4. Le conteneur moyen à vapeur
5. Le conteneur inférieur à vapeur
6. Les manches des conteneurs à vapeur
7. Le fond démontable du conteneur à vapeur (Figure B)
19
a. La fixation du fond démontable du conteneur à vapeur
b. La jante pour fixer le fond démontable
8. Le bol à riz
9. Diffuseur d’arôme
10.Le bol pour la condensation de vapeur
11.Le concentrateur démontable de vapeur
12.Le réservoir pour l’eau
13.L’élément réchauffant
14.Le corps de la casserole à vapeur (base)
15.L’échelle du niveau d’eau
16.L’indicateur d’allumage
17.L’interrupteur / timer
18.L’orifice pour ajouter de l’eau
19.La place pour l’enroulement du cordon
AVANT L’UTILISATION
Lisez attentivement ce manuel.
Dépaquetez l’appareil.
Lavez soigneusement la casserole à vapeur et
surtout ses parties qui seront en contact avec
les aliments (voir la partie “Entretien et
nettoyage “).
Avant de brancher l’appareil au réseau,
vérifiez si la tension indiquée à l’appareil cor-
respond à celle du réseau électrique chez vous.
NOTICE D’UTILISATION
Assemblage et exploitation de la
casserole à vapeur
1. Mettez le corps de la casserole à vapeur (14)
sur une surface ferme, bien plate, calorifuge, à
côté de la prise du courant électrique et hors de
la portée des enfants.
2. Etablissez le concentrateur démontable de vapeur (11).
3. Remplissez le réservoir (12) d’eau, en suivant les marques du
niveau d’eau d’après l’échelle (15). Il suffit d’avoir 850 ml d’eau
pour 1 heure du fonctionnement normal de la casserole à vapeur.
Remarque: Remplissez le réservoir (12) seulement d’eau
froide de conduite d’eau. N’utilisez pas d’autres
liquides, ainsi que l’assaisonnement.
4. Etablissez le bol pour la condensation de vapeur (10) sur le
réservoir pour l’eau (12). Mettez le diffuseur d’arôme (9) au mi-
lieu du bol pour la condensation de vapeur (10).
Remarque: Le diffuseur d’arôme est un dispositif destiné à
aromatiser vos plats. Vous pouvez mettre sur le
diffuseur d’arôme n’importe quel assaisonnement
(non pas en poudre), herbes ou épices. La vapeur,
en passant par le diffuseur d’arôme, est saturée par
20


