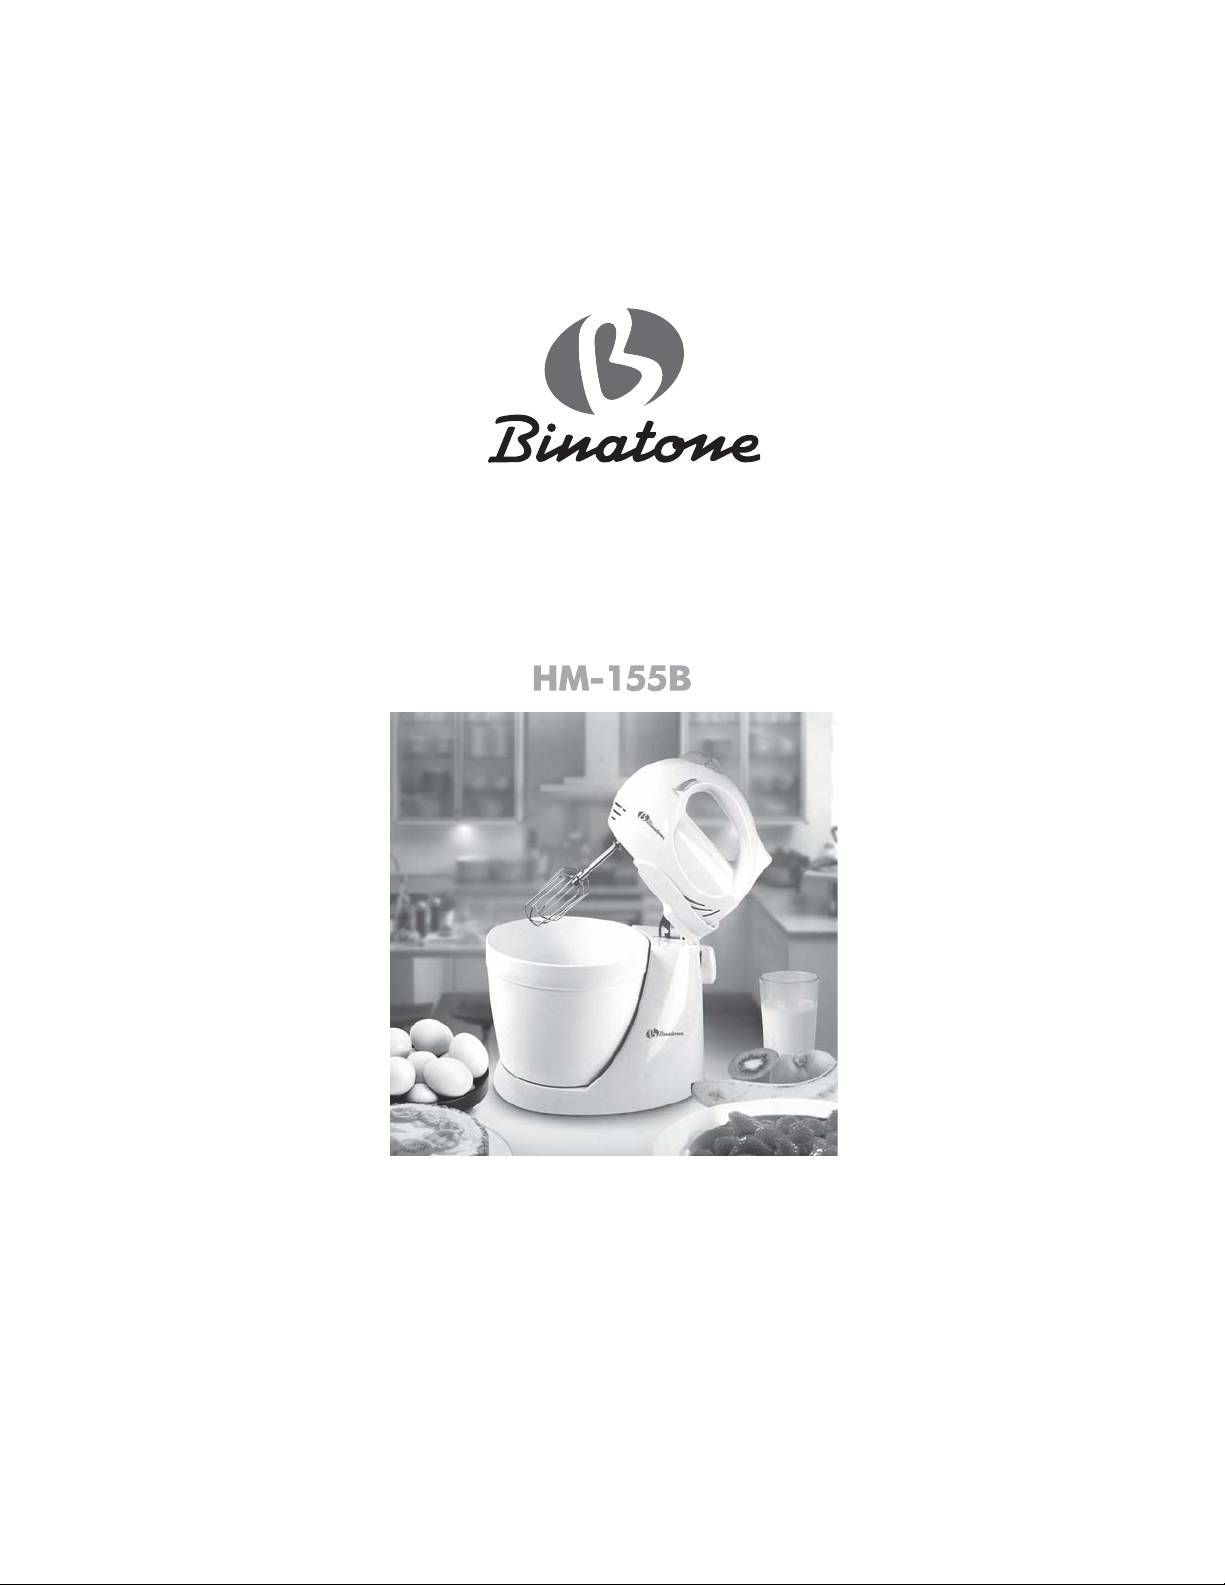
Binatone HM-155B: инструкция
Раздел: Бытовая, кухонная техника, электроника и оборудование
Тип: Миксер
Инструкция к Миксеру Binatone HM-155B
Оглавление
Instruction Manual
Mixer with a bowl
A
B

ENGLISH.........................................4
ENGLISHFRANÇAISРУССКИЙ
FRANÇAIS .................................... 10
РУССКИЙ .....................................16
УКРАЇНСЬКА ...............................22
УКРАЇНСЬКА
3
Mixer with a bowl HM155B
Please read the safety instructions carefully before using this
appliance. Please retain the instructions for future refer-
ence.
SAFETY MEASURES
When using your appliance, the following basic
safety precautions should always be followed:
X Before using for the first time, check that the
appliance voltage is the same as your local supply.
X Only use the appliance for the purposes stipu
lated by the instructions.
X Only use attachments supplied with the equip
ment.
X To avoid electric shocks, do not immerse the appliance,
plug or power cord in water or any other liquids. Do
not place the appliance where it could come into contact with
water or other liquids. If the appliance comes in contact with
water, immediately disconnect it from the mains. Do not use
the machine again until it has been serviced by an autho
rized service center.
X Do not let children use the appliance without supervision.
X If the power cord plug does not fit to your wall socket,
consult a qualified electrician.
X Use of various adapters may result in damage to the
appliance and termination of warranty.
X Always supervise the equipment while in use.
X To avoid a circuit overload, do not operate any other high
voltage equipment on the same circuit.
X Always unplug before moving the appliance from one
place to another, cleaning and storing.
X Never pull the cord to disconnect the appliance, instead grasp
the plug and pull it to disconnect.
X Do not allow the cord or the machine itself to come in contact
with hot surfaces.
X Position the appliance and the cord so that nobody can acci
dentally overturn it.
X Do not use the appliance if it has been dropped, or it has a
damaged power cord or plug. Do not modify or repair the
machine yourself.
X Do not dismantle the appliance as improper assembly might
result in an electric shock during the subsequent use of the
equipment. Repairs should only be done by authorized
service centers.
X Do not use the device in areas where combustible gas mixtures
or inflammable liquid vapors could present in the air, or in
areas with inflammable airborne dust or fibers
X This equipment is intended for household use only, not for
commercial or industrial use.
X Please follow all the requirements of this guide.
X Do not use the appliance if it has mechanical defects (dents,
cracks etc.), get it checked by the nearest authorized service
center.
4
SPECIAL SAFETY
PRECAUTIONS
X Avoid contacts with moving parts of the appli-
ance.
X Never attempt to remove attachments during
operation of the unit. First switch the mixer off.
ENGLISH
X Always insert beaters into the appropriate slots.
X Never use the mixer to mix paints or solvents.
X Do not apply extra force while assembling/
disassembling the appliance.
X Switch the mixer on only when fully assembled. Before use,
always check whether the unit is assembled properly.
X Do not use the appliance if the ambient temperature exceeds
0
0
C/ +35
0
C
X Duration of continuous operation of the appliance:
- Blending whisks – not more than 20 minutes of operation
and 5-10 minutes break.
- Dough kneading attachments – not more than 10 minutes
of operation and 5-10 minutes break.
- Turbo regime – not more than 1 minute of continuous
operation.
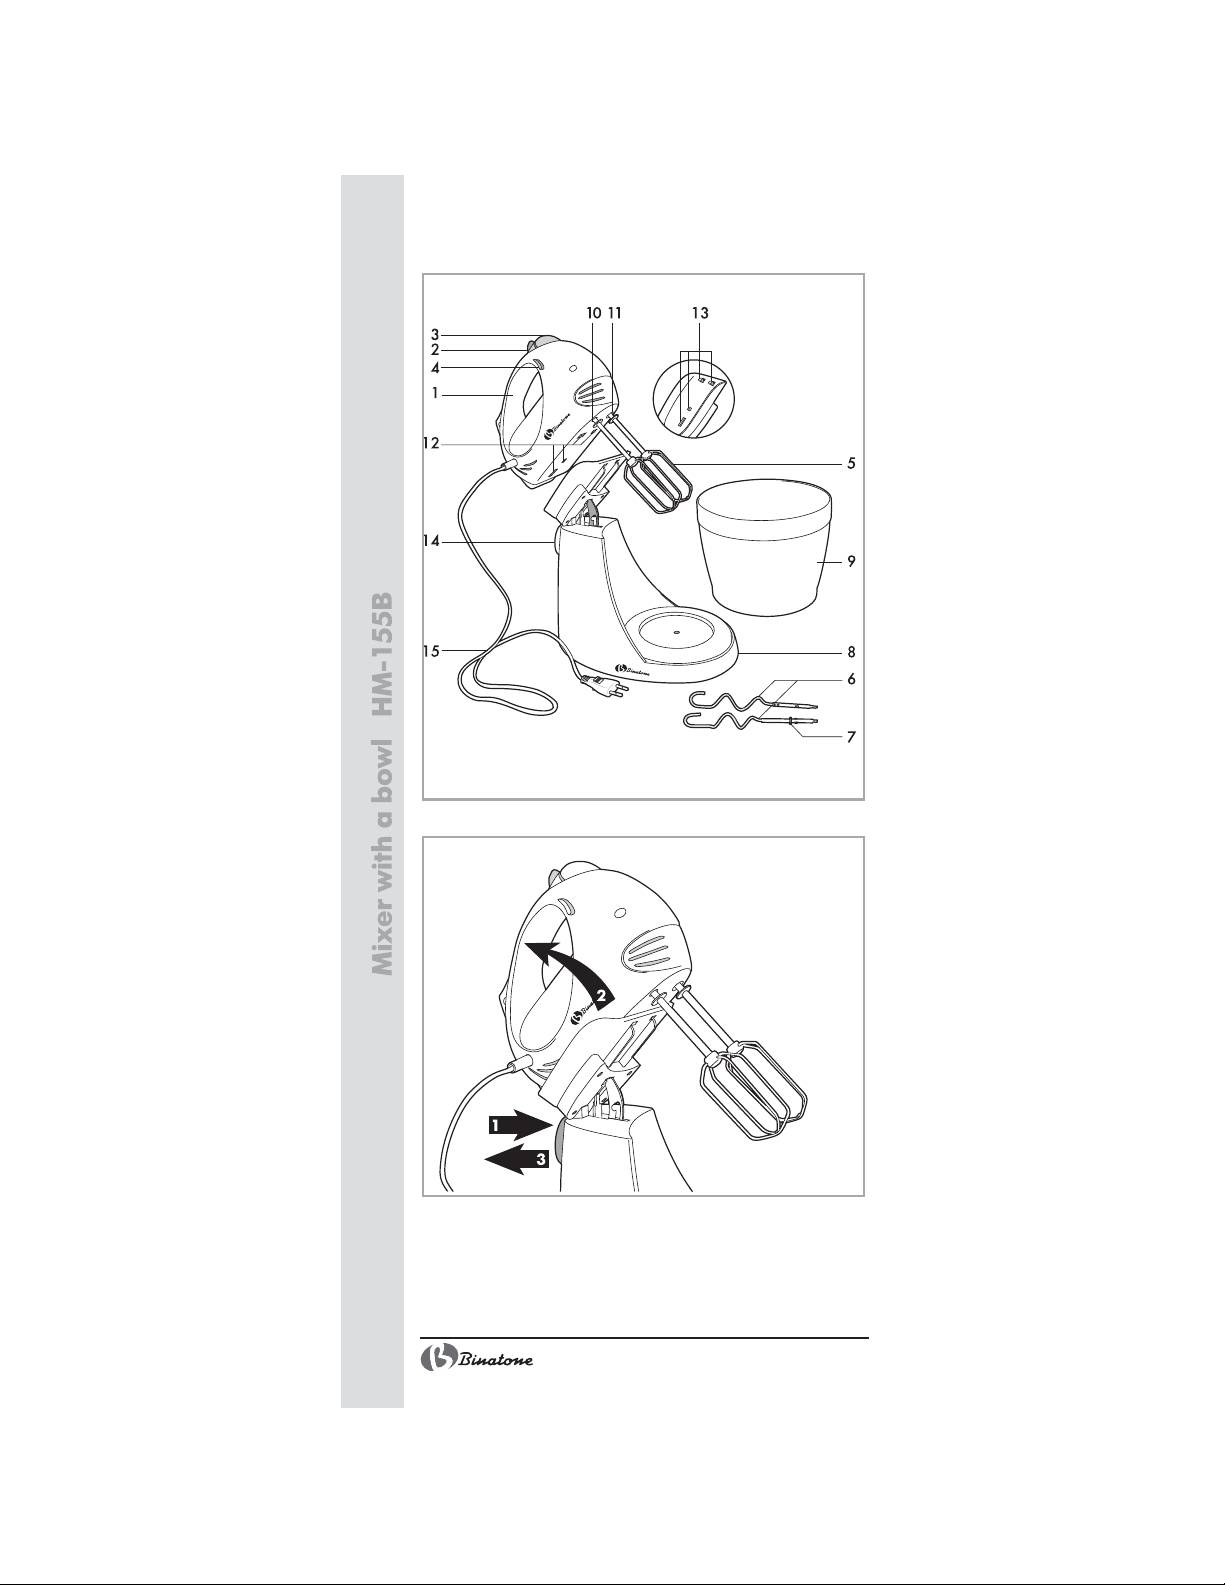
DESCRIPTION OF THE
APPLIANCE
Picture A:
1. Housing
2. Speed control
3. Attachments automatic eject button
4. Turbo regime button
5. Steel beating whisks
6. Steel dough kneading attachments
7. Washer
8. Mixer’s stand
9. Removable plastic bowl
10.Small aperture to fix attachments
11.Large aperture to fix attachments
12.Grooves to fit the mixer onto the bowl
13.Mounting hooks
14.Lock button
15.Power cord
5

PREPARING FOR USE
Unpack the equipment and clean the mixer as
described in the present instructions.
OPERATING INSTRUCTIONS
1. Select the attachments you intend to use.
2. Before fixing the attachments, check that the
speed selector (2) is in position «0» and the
power cord (15) is disconnected from the sup-
ply outlet.
3. Beating whisks (5) can be fixed in random
order. Fix them into apertures for attachments
till a click is heard (10, 11).
4. Dough kneading attachments (6) can be installed only ac-
cording to the following procedure: attachment with washer
(7) has to be fixed into the large aperture for attachments
(10), and the second attachment (without a washer) shall be
fixed into the small aperture (11). Both attachments shall be
fixed until a click is heard.
5. Before switching the appliance on, make sure that both at-
tachments are fixed properly!
6. Connect the appliance to the power outlet and set the speed
selector (2) to the desired setting to start operation of the
machine. Always start operating the machine at the lowest
speed gradually increasing the speed.
7. At the end of the operation set the speed selector (2) to «0»
position and switch the unit off the power supply.
8. Remove excessive products from attachments by a plastic or
wooden scapula.
9. Push the button of automatic ejection of attachments (3) to
take them out of the housing (1).
Use of the stand with removable bowl
You may use the bowl with or without the stand. In order to
use the mixer with the stand:
1. Fill the bowl (9) with all necessary ingredients.
2. Put the bowl (9) on the stand (8). Make sure the bowl guides
are aligned with grooves in the stand.
3. Place the mixer onto the stand:
X Align mating grooves to fix the mixer (12) with the mounting
hooks on the stand (13).
X Push the lock button (14) and place the mixer fully down onto
the stand. Release the button (14).
X Make sure the mixer is securely attached to the stand and all
fixtures are reliably fastened.
4. To remove the bowl from the stand in the course of the opera-
tion of the equipment (without taking the mixer off the stand),
6

push the lock button (14) and while pressing it slightly lift the
mixer as shown in figure 1. Release the button (14). The
mixer is locked in the upper position. To return the mixer into
the initial position, push the button (14) and while pressing it
lower the mixer accurately into place.
5. To prepare a homogeneous substance turn the bowl round
from time to time during the operation process (9).
ENGLISH
CARE AND CLEANING
1. Always disconnect the unit from the power
outlet before cleaning.
2. Rub the housing (1) and the power cord of
the machine with damp cloth and then rub it
dry.
3. Wash the attachments (5,6) in warm water
with detergent and dry them. Attachments may
be washed in a dishwashing machine.
Note: never immerse the appliance’s housing (1) and the
power cord into water.
USEFUL ADVICES
X To achieve homogeneous mass move the whisks
inside the bowl along its perimeter. If it is necessary
to clean the bowl in which you prepare food from
remnants of non-mixed products stop the appli-
ance and remove remnants of products from the
walls of the bowl with a scoop. After that continue
operating the mixer according to the selected re
gime.
X It is recommended to use beating whisks (5) to prepare pud-
dings, puree, mobile dough (for example, pancake dough),
to beat cream and egg whites (fro example, to prepare kiss.
Selection of the speed regime:
Speed
Function
Utilization
OFF
OFF
Switched off.
1 low
To combine
To prepare sauces, puddings,
components
dough for rolls è pancakes.
2 low – middle
To mix
To mix liquid and dry
ingredients, to beat up eggs
3 middle
To shake
To prepare mobile dough and
mixes
To mix butter with sugar, to
4 middle – high
To beat
prepare dough for cookies,
mixes for patisserie and glace
icing
5 high
To froth
To prepare light foamy mixes,
to beat cream, whites, etc.
7
X Attachments to knead dough (6) should be used for average
texture dough. Tough dough should be kneaded manually.
Speed regimes 1 and 2 are considered to be optimal for knead-
ing dough.
X You can change the mixer’s speed in the course of its opera-
tion.
X Turbo regime. The turbo button (4) provides an additional
possibility to increase the mixer’s operation speed in the course
of several short time periods. This function can be activated at
any of 5 speed ranges. To achieve that press the button (4)
and keep it pressed. Time of continuous operation of the appli-
ance in the turbo regime shall not exceed 1 minute.
DISPOSAL
The appliance should be disposed of in accor-
dance with waste disposal regulations in your coun-
try and with the least damage to the environment.
Only ecologically safe materials are used in
the packaging of our products and the cardboard
and paper can be disposed of with normal paper
waste.
AFTER-SALES SERVICE
If your appliance does not operate at all
or operates poorly, call an authorized service
center for help or repairs.
The warranty does not cover the fol-
lowing:
X Non-observance of the above safety mea-
sures and operation instructions.
X Commercial use (use outside the scope of personal household
needs).
X Plugging into a mains socket with a voltage different from the
voltage on the appliance rating plate.
X Improper care (ingress of liquid, dust, insects, and other for-
eign items and substances inside the appliance).
X Use of excessive force during appliance operation or other
damages (mechanical damages resulting from incorrect use,
shocks or dropping of the appliance).
X Unauthorized repairs or replacement of the appliance parts
performed by an unauthorized person or service center.
X Accidents, such as lightning strike, flood, fire and other acts of
God.
8

ENGLISH
Features may be changed by Binatone without any notice.
Warranty details are set out in the warranty card provided with
the product.
Exploitation period: 3 years after the day of purchase.
Manufacture: Binatone Industries Ltd, Great Britain, Wembley,
1 Beresford Avenue, Vitabiotics House
Made in PRC for Binatone Industries Ltd, Great Britain
9
Batteur avec bol HM155B
Lisez attentivement cette instruction avant le premier usage
pour prendre connaissance du fonctionnement de l’appareil.
Gardez l’instruction pour s’y référer ultérieurement.
MESURES DE SECURITE
En exploitant l’appareil, respectez toujours les
mesures de sécurité suivantes:
X Avant le premier usage, assurez-vous que la
tension indiquée sur l’appareil correspond à la ten-
sion du réseau électrique dans votre maison.
X Utilisez l’appareil seulement à des fins indiquées
dans cette instruction.
X Utilisez seulement les dispositifs qui font partie de
la garniture de l’appareil.
X Pour éviter un choc électrique, ne pas plonger l’appareil,
la fiche ou le câble dans l’eau ou dans un autre liquide.
Installez l’appareil dans un endroit où il ne peut pas tomber
dans l’eau ou dans un autre liquide. Si l’appareil a été
accidentellement mouillé, débranchez-le du réseau
immédiatement. N’utilisez pas l’appareil qui est tombé dans
l’eau. Portez-le dans un centre de maintien.
X Ne pas laisser les enfants manier l’appareil sans contrôle des
adultes.
X Si la fiche mâle de l’appareil ne coïncide pas avec
votre prise selon sa structure, consultez auprès de
l’expert.
X L’utilisation de différents raccords peut conduire à
une panne de l’appareil et la cessation des garanties.
X Ne pas laisser l’appareil branché sur le réseau sans surveil-
lance.
X Pour éviter la surcharge du réseau électrique, ne pas brancher
un autre appareil de haute puissance au même réseau que
votre appareil.
X Déconnectez l’appareil du réseau avant le
déplacement d’un endroit à l’autre et avant le
nettoyage et la conservation.
X Ne tirez jamais sur le câble pour déconnecter l’appareil du
réseau ; prenez la fiche et faites-la sortir de la prise de cou-
rant.
X Eviter le contact du câble ou de l’appareil avec des surfaces
chauffées.
X Placer l’appareil et le câble de façon à éviter le basculement
accidentel.
X Ne pas utiliser l’appareil si le câble ou la fiche de contact est
endommagé. N’essayez pas de réparer l’appareil vous-même.
Le remplacement du câble électrique et de la fiche de contact
doit être effectué par un centre de maintien agréé.
X Ne démontez jamais l’appareil vous-même ; l’assemblage in-
correct peur résulter en choc électrique pendant l’usage
ultérieur de l’appareil. Tous les travaux de réparation
doivent être effectués seulement par un centre de
service agréé.
10

X Ne pas utiliser l’appareil dans des locaux où l’air peut contenir
des mélanges des gaz combustibles, des vapeurs des liquides
inflammables, ou des poussières et fibres inflammables.
X Cet appareil est destiné à l’usage personnel et n’est pas destiné
à l’usage commercial et industriel.
X Respectez toutes les règles de la présente instruction.
X Ne pas utiliser l’appareil qui a des défauts mécaniques
(enfoncements, cassures,…): vérifiez son fonctionnement dans
un centre de service agréé.
MESURES SPECIALES DE
SECURITE
X Evitez le contact avec les parties mobiles de
l’appareil.
X Ne jamais essayer d’enlever les manches de
l’appareil en fonction. Arrêtez d’abord l’appareil.
X Posez les ajutages pour fouetter toujours dans
les lieux assignés.
X Ne jamais mélanger les peintures ou les
dissolvants à l’aide du batteur électrique.
X Ne faites pas beaucoup de vos efforts pour monter et démonter
FRANÇAIS
l’appareil.
X Ne branchez pas le batteur électrique qu’après l’assemblage
complet. Avant l’usage assurez-vous toujours que l’appareil
est assemblé correctement.
X N’utilisez pas l’appareil si la température d’air est au-dessous
de 0
0
C et au-dessus de +35
0
C.
X Temps de fonctionnement de l’appareil sans arrêt :
- Manche à fouetter – 20 minutes au maximum de
fonctionnement et 5 à10 minutes d’arrêt.
- Manches à travailler la pâte – 10 minutes au maximum de
fonctionnement et 5 à10 minutes d’arrêt.
- Régime turbo – 1 minute au maximum de fonctionnement
sans arrêt.
DESCRIPTIF DES PIECES DE
L’APPAREIL
Dessin A:
1. Corps de l’appareil
2. Régulateur de vitesse
3. Bouton d’éjection automatique des manches
4. Bouton du régime turbo
5. Manches à fouetter en acier
6. Manches en acier pour travailler la pâte
7. Rondelle
8. Support du batteur électrique
9. Bol amovible en plastique
10.Petite orifice pour fixer les manches
11.Grand orifice pour fixer les manches
12.Encoches de fixation du bol
11
13.Crochets de fixation
14.Bouton de fixation
15. Câble du réseau
AVANT L’UTILISATION
Enlevez tous les emballages de l’appareil et
nettoyez le batteur électrique comme indiqué
dans la présente instruction.
UTILISATION DE L’APPAREIL
1. Choisissez les manches que vous voulez
utiliser.
2. Avant de fixer les manches, assurez-vous
que le régulateur de vitesse (2) est fixé en
position «0» et que le câble du réseau (15) est
déconnecté du réseau électrique.
3. Les manches à fouetter (5) peuvent être
installées en ordre arbitraire. Introduisez-les dans les orifices
de fixation des manches (10, 11) jusqu’à un déclic.
4. Les manches pour travailler la pâte (6) ne peuvent être
installées que dans l’ordre suivant : la manche à rondelle (7)
doit être installée dans le grand orifice pour fixation des manches
(11), et la deuxième manche (sans rondelle) doit être fixée
dans le petit orifice (10). Introduisez les manches jusqu’au
déclic.
5. Avant de brancher l ‘appareil, assurez-vous que les deux
manches sont fixées correctement!
6. Connectez l’appareil au réseau et fixez le régulateur de vitesse
(2) à la position voulue avant le début de fonctionnement de
l’appareil. Commencez toujours par la vitesse minimale, en
augmentant les tours graduellement.
7. Après la fin d’utilisation de l’appareil mettez le régulateur de
la vitesse (2) dans la position «0» et déconnectez l’appareil
du réseau électrique.
8. Enlevez les restes des aliments des manches à l’aide d’une
spatule en plastique ou en bois.
9. Pressez le bouton d’éjection automatique des manches (3),
pour les faire sortir du corps de l’appareil (1).
Utilisation du support avec bol amovible
Vous pouvez utiliser le bol avec ou sans support. Pour utiliser le
batteur électrique avec le support :
1. Mettez tous les ingrédients dans le bol (9).
2. Installez le bol (9) sur le support (8). Assurez-vous que les
glissières du bol entrent dans les encoches sur le support.
3. Installez le batteur électrique sur le support :
X Mettez en coïncidence les encoches paires de fixation du
batteur électrique (12) avec les crochets de fixation du sup-
12
port (13).
X Pressez le bouton de fixation (14) et installez complètement le
batteur électrique sur le support. Relâchez le bouton (14).
X Assurez-vous que le batteur électrique est bien fixé sur le
support et que toutes les fixations sont bien fermées.
4. Pour enlever le bol du support pendant le travail (sans enlever
le batteur électrique du support), pressez le bouton de fixa-
tion (14) et en le maintenant, soulevez le batteur comme
indiqué sur le dessin 1. Relâchez le bouton (14). Le batteur
électrique se fixera en position supérieure. Pour replacer le
batteur électrique en position précédente, pressez le bouton
(14) et remettez le batteur sur place avec précaution, en
maintenant le bouton.
5. Pour obtenir une masse homogène, tournez le bol de temps
en temps pendant le fonctionnement de l’appareil (9).
ENTRETIEN ET NETTOYAGE
1. Toujours déconnecter l’appareil du réseau
électrique avant le nettoyage.
2. Essuyez le corps (1), le support (8) du batteur
électrique et le câble du réseau (15) par un
torchon humide, ensuite par un torchon sec.
FRANÇAIS
3. Lavez les manches (5,6) et le bol en plastique
(9) à l’eau chaude au savon et faites sécher.
Les manches et le bol en plastique peuvent être lavées dans
une machine à laver la vaisselle.
Note: ne jamais plonger le corps de l’appareil (1) et le câble
du réseau (15) dans l’eau.
CONSEILS UTILES
X Pour obtenir une masse homogène, déplacez
les manches à fouetter en direction circulaire à
l’intérieur du récipient. Si vous avez besoin
d’enlever les restes des produits non-mélangés des
parois du récipient de travail, arrêtez l’appareil et
enlevez les restes des aliments des parois du bol à
l’aide d’une spatule. Ensuite continuez le travail
avec le batteur électrique dans le régime choisi.
X Les manches à fouetter (5) sont destinés à préparer des
poudings, la purée, la pâte coulante (par exemple pour les
blinis), pour fouetter la crème et les blancs d’œufs (par exemple
pour les meringues). Choix du régime de vitesse :
13
Vitesse
Fonction
Utilisation
OFF
OFF
Arrêt
Incorporer les
Pour préparer les sauces,
1 basse
ingrédients
les poudings, la pâte des
petits pains et des crêpes
Pour mélanger les
2 basse – moyenne
Mélanger
ingrédients liquides et secs,
battre les oeufs
3 moyenne
Agiter
Pour préparer la pâte
coulante et les mélanges
Pour travailler la beurre
avec le sucre, préparer la
4 moyenne - haute
Battre
pâte des petits fours, les
mélanges pour les gâteaux
et les glaçages
Pour préparer des
5 haute
Fouetter la
mélanges légers et
mousse
mousseux, la crème
fouettée, battre le blanc
d’oeuf etc.…
X Les manches à travailler la pâte (6) sont destinées à travailler
la pâte de consistance moyenne. La pâte très épaisse doit être
travaillée à la main. Pour travailler la pâte, les régimes de
vitesse 1 et 2 sont optimaux.
X Vous pouvez changer la vitesse du batteur électrique en
marche.
X Régime turbo. Le bouton du régime turbo (4) présente une
possibilité supplémentaire d’augmenter la vitesse du
fonctionnement pour de courtes périodes de temps. Cette
fonction peut être activée avec chacune des cinq vitesses.
Pour cela, il faut presser le bouton (4) et le maintenir dans
cette position. Le temps de fonctionnement du batteur
électrique en régime turbo sans arrêt ne doit pas dépasser
une minute.
RECYCLAGE
Appareils électroménager doit être utiliser avec
le moindre tort pour l’environnement et en
conformité des règles d’utilisation des déchets dans
Votre région. Pour recycler l’appareil
correctement, souvent il suffit de le porter dans le
centre local de traitement des déchets. Pour
l’emballage de nos appareils, nous utilisons
uniquement les matériaux recyclables. Donc, le carton et le papier
peuvent être recyclés avec d’autres déchets en papier.
14
SERVICES APRES VENTE
Si votre appareil ne fonctionne pas ou
fonctionne mal, adressez-vous à un centre
agréé pour consultation ou réparation.
La garantie n’est pas valable dans
les cas suivants:
X Non-respect des mesures de sécurité
susmentionnées et des règles d’exploitation.
X Utilisation commerciale (utilisation dépassant les besoins per-
sonnels ménagers).
X Connexion au réseau à une tension différente de celle indiquée
sur l’appareil.
X Mauvais maintien (pénétration des liquides, de la poussière,
des insectes et d’autres corps étrangers à l’intérieur de
l’appareil).
X Effort excessif pendant l’exploitation de l’appareil ou autres
endommagements (défauts mécaniques survenus suite à
l’exploitation incorrecte, la percussion ou la chute de
l’appareil).
X Réparation ou changement des pièces de l’appareil, effectué
par une personne non-autorisée ou hors du centre de service
autorisé.
FRANÇAIS
X Accidents tels que la foudre, l’inondation, l’incendie ou autres
circonstances de force majeure.
Les caractéristiques peuvent être changées par la société
“Binatone” sans aucune notification préalable.
Le délai de garantie et autres pieces sont indiqués dans le
ticket de garanti joint à l’appareil.
Durée de service: 3 ans du jour d’acquisition.
Fabricant: Binatone Industries Ltd, Great Britain, Vitabiotics
House,1 Apsley Way, Staples Corner, London, NW2 7HF, UK
(Binatone Industries Ltd, Grande Bretagne)
15
Миксер с чашей НМ155B
Внимательно прочтите данную инструкцию перед первым
использованием, чтобы ознакомиться с работой нового
прибора. Пожалуйста, сохраните инструкцию для
дальнейших справок.
ÌÅÐÛ ÁÅÇÎÏÀÑÍÎÑÒÈ
Во время эксплуатации прибора всегда
соблюдайте следующие меры предосторожности:
X Перед первым использованием проверьте,
соответствует ли напряжение, указанное на
приборе, напряжению электрической сети в
Вашем доме.
X Используйте прибор только в целях,
предусмотренных данной инструкцией.
X Используйте только приспособления, входящие в комплект
прибора.
X Во избежание поражения электрическим током не
погружайте прибор, вилку или электрический
шнур в воду или другие жидкости. Ставьте прибор в
такие места, где он не может упасть в воду или другие
жидкости. При попадании воды на прибор, немедленно
отключите его от сети. Не пользуйтесь прибором, упавшим
в воду. Отнесите его в уполномоченный сервисный центр.
X Не допускайте детей к работе с прибором без присмотра
взрослых.
X Если штепсельная вилка прибора не совпадает по
конструкции с Вашей розеткой, обратитесь за
помощью к специалисту.
X Применение различных переходников может
привести к порче прибора и прекращению
гарантийных обязательств.
X Не оставляйте включенный в сеть прибор без внимания.
X Во избежание перегрузки электрической сети не
подключайте другой прибор высокой мощности к той же
сети, к которой подключен ваш прибор.
X Отсоединяйте прибор от сети перед
перемещением с одного места на другое и перед
чисткой и хранением.
X Никогда не тяните за шнур при отключении прибора от
сети; возьмитесь за штепсельную вилку и выньте ее из
розетки.
X Не допускайте соприкосновения шнура или самого
прибора с нагретыми поверхностями.
X Располагайте прибор и шнур так, чтобы никто не смог
случайно задеть шнур и опрокинуть прибор.
X Не пользуйтесь прибором с поврежденным электрическим
шнуром или штепсельной вилкой. Не пытайтесь
отремонтировать прибор самостоятельно. Замена
электрического шнура и штепсельной вилки должна
производиться только в уполномоченном сервисном центре.
X Никогда не разбирайте прибор самостоятельно;
неправильная сборка может привести к поражению
16
электрическим током во время последующего
использования прибора. Все ремонтные работы
должны производиться только в уполномоченном
сервисном центре.
X Не пользуйтесь прибором в зонах, где в воздухе могут
содержаться смеси горючих газов, пары
легковоспламеняющейся жидкости или в зонах, где в
воздухе могут содержаться горючие пыли или волокна.
X Этот прибор предназначен только для домашнего
использования и не предназначен для коммерческого и
промышленного использования.
X Выполняйте все требования данной инструкции.
X Не пользуйтесь прибором, имеющим механические
повреждения (вмятины, трещины и т.п.), проверьте его
работоспособность в ближайшем уполномоченном
сервисном центре.
ÑÏÅÖÈÀËÜÍÛÅ ÌÅÐÛ
ÁÅÇÎÏÀÑÍÎÑÒÈ
X Избегайте контакта с подвижными частями
прибора.
X Никогда не пытайтесь снять насадки во время
работы прибора. Сначала выключите прибор.
X Всегда устанавливайте насадки для взбивания
в строго определенные для них установочные
места.
X Никогда не размешивайте краски или растворители с
помощью миксера.
X При сборке и разборке не применяйте излишних усилий,
внимательно прочитайте настоящую инструкцию.
X Включайте миксер только после полной сборки. Перед
использованием прибора всегда проверяйте, правильно
ли он собран.
X Не использовать прибор при температуре окружающего
воздуха ниже 0
0
С и выше +35
0
С
X Время непрерывной работы прибора:
РУССКИЙ
X С венчиками для взбивания – не более 20 минут работы и
510 минут перерыв
X С насадками для замешивания теста – не более 10 минут
работы и 510 минут перерыв
X Турбо режим – не более 1 минуты непрерывной работы.
17
ÎÏÈÑÀÍÈÅ ÄÅÒÀËÅÉ
ÏÐÈÁÎÐÀ
Рисунок А:
1. Корпус прибора
2. Регулятор скорости
3. Кнопка автоматического выброса насадок
4. Кнопка турбо режима
5. Стальные венчики для взбивания
6. Стальные насадки для замешивания теста
7. Шайба
8. Подставка для миксера
9. Съемная пластиковая чаша
10.Маленькое отверстие для фиксации насадок
11.Большое отверстие для фиксации насадок
12.Пазы для крепления миксера на чашу
13.Крепежные крючки
14.Кнопка фиксации
15.Сетевой шнур
ÏÅÐÅÄ ÈÑÏÎËÜÇÎÂÀÍÈÅÌ
Снимите все упаковочные материалы с
прибора и почистите миксер как описано в
настоящей инструкции.
ÈÍÑÒÐÓÊÖÈß ÏÎ
ÝÊÑÏËÓÀÒÀÖÈÈ
1. Выберите насадки, которые вы хотите
использовать.
2. Перед тем как установить насадки
проверьте, что регулятор скорости (2)
установлен в позицию «0» и сетевой шнур
(15) отсоединен от электрической сети.
3. Венчики для взбивания (5) Вы можете
устанавливать в произвольном порядке. Установите их в
отверстия для фиксации насадок (10 и 11) до щелчка.
4. Насадки для замешивания теста (6) могут быть установлены
только следующим образом: насадка с шайбой (7) должна
быть установлена в большое отверстие для фиксации
насадок (11), а вторая насадка (без шайбы)
устанавливается в маленькое отверстие (10). Насадки
устанавливаются до щелчка.
5. Перед включением прибора убедитесь, что обе насадки
установлены правильно!
6. Подключите прибор к электрической сети и установите
регулятор скорости (2) на желаемую позицию для начала
работы прибора. Всегда начинайте работу с минимальной
18
скорости, постепенно увеличивая обороты.
7. По окончании использования прибора установите
регулятор скорости (2) в положение «0» и отключите прибор
от электрической сети.
8. Удалите излишки продуктов с насадок с помощью
пластиковой или деревянной лопаточки.
9. Нажмите кнопку автоматического выброса насадок (3),
чтобы извлечь их из корпуса прибора (1).
Èñïîëüçîâàíèå ïîäñòàâêè ñî ñúåìíîé
÷àøåé
Вы можете использовать чашу, как с подставкой, так и без
нее. Для использования миксера подставкой:
1. Загрузите все необходимые ингредиенты в чашу (9).
2. Установите чашу (9) на подставку (8). Убедитесь, что
направляющие чаши совпали с пазами на подставке.
3. Установите миксер на подставку:
X Совместите парные пазы для крепления миксера (12) с
крепежными крючками на подставке (13).
X Нажмите кнопку фиксации (14) и полностью опустите
миксер на подставку. Отпустите кнопку (14).
X Убедитесь, что миксер плотно закреплен на подставке и
все крепления надежно зафиксированы.
4. Для того чтобы снять чашу с подставки в процессе работы с
прибором (не снимая миксера с подставки) нажмите на
кнопку фиксации (14) и, удерживая ее, приподнимите
миксер, как указано на рисунке 1. Отпустите кнопку (14).
Миксер зафиксируется в верхнем положении. Чтобы
вернуть миксер в прежнее положение нажмите кнопку (14)
и, удерживая ее, аккуратно опустите миксер обратно.
Перемещение миксера из одного положения в другое без
нажатия кнопки (14) приведет к поломке механизма
фиксации.
5. Для получения однородной массы, время от времени
поворачивайте чашу во время работы прибора (9).
ÓÕÎÄ È ×ÈÑÒÊÀ
РУССКИЙ
1. Всегда отсоединяйте прибор от
электрической сети перед чисткой.
2. Протрите корпус (1) и сетевой шнур
прибора влажной тканью и вытрите его
насухо.
3. Промойте насадки (5,6) в теплой воде с
мылом и высушите их. Насадки можно мыть
в посудомоечной машине.
Ïðèìå÷àíèå:
íèêîãäà íå ïîãðóæàéòå êîðïóñ
ïðèáîðà
(1)
è ñåòåâîé øíóð
â âîäó.
19
ÏÎËÅÇÍÛÅ ÑÎÂÅÒÛ
X Для получения однородной массы
перемещайте венчики по кругу внутри емкости.
Если требуется очистить остатки
неперемешанных продуктов со стенок емкости,
в которой вы готовите, остановите прибор и
снимите остатки продуктов со стенок чаши с
помощью лопаточки. Далее продолжайте работу
миксером в выбранном режиме.
X Венчики для взбивания (5) рекомендуется использовать
для приготовления пудингов, пюре, жидкого теста
(например, блинного), для взбивания кремов и яичных
белков (например, для приготовления безе). Выбор
скоростного режима:
Скорость
Функция
Использование
OFF
OFF
Выключен
Соединять
Для приготовления соусов,
1 низкая
компоненты
пудингов, теста для
булочек и оладьев
2 низкая –
Для смешивания жидких и
средняя
Смешивать
сухих ингредиентов,
взбивания яиц
3 средняя
Взбалтывать
Для приготовления
жидкого теста и смесей
Для смешивания масла с
4 средняя –
Взбивать
сахаром, приготовления
высокая
теста для печенья, смесей
для пирожных и глазурей
Для приготовления легких
5 высокая
Взбивать в пену
пенистых смесей, взбитых
сливок, взбивания белков
и т.п.
X Насадки для замешивания теста (6) следует применять для
теста средней консистенции. Очень крутое тесто
рекомендуется замешивать вручную. Для замеса теста
оптимальными являются 1 и 2 скоростные режимы.
X Вы можете изменять скорость работы миксера в процессе
использования.
X Турбо–режим. Кнопка турбо–режима (4) предоставляет
дополнительную возможность увеличения скорости работы
в течение коротких промежутков времени. Эта функция
может быть активизирована на любой из пяти скоростей.
Для этого нужно нажать кнопку (4) и удерживать ее в таком
положении. Время непрерывной работы миксера в режиме
турбо не должно превышать 1 минуту.
20
