Binatone MGR-3030: инструкция
Раздел: Бытовая, кухонная техника, электроника и оборудование
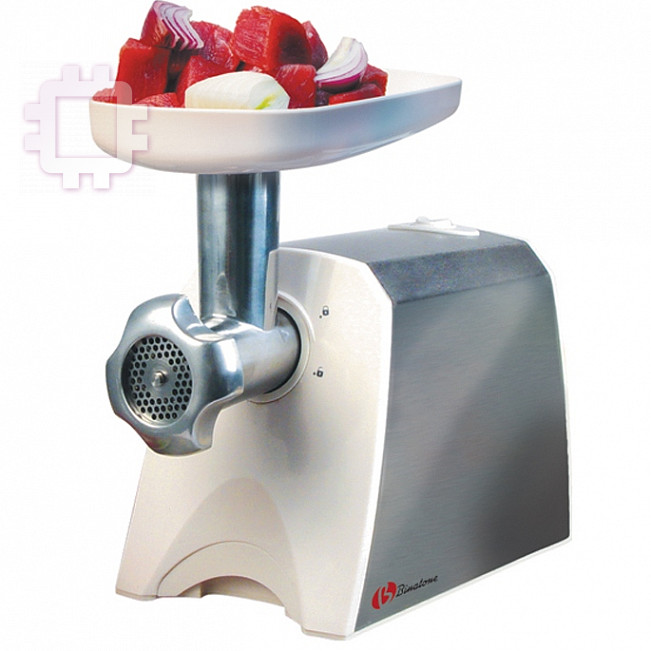
Тип: Мясорубка
Характеристики, спецификации
Инструкция к Мясорубке Binatone MGR-3030
Оглавление

Instruction Manual
MGR3030
Meat Grinder
A
Meat Grinder MGR3030
B
C

ENGLISH.........................................4
ENGLISHFRANÇAISРУССКИЙ
FRANÇAIS .................................... 12
РУССКИЙ .....................................20
УКРАЇНСЬКА ...............................28
УКРАЇНСЬКА
3
Mеat Grinder MGR3030
Please read the safety instructions carefully before using this
appliance. Please retain the instructions for future refer-
ence.
SAFETY MEASURES
When using your appliance, the following basic safety
precautions should always be followed:
Before using for the first time, check that the
appliance voltage is the same as your local supply.
Only use the appliance for the purposes stipu-
lated by the instructions.
Only use attachments supplied with the equip-
ment.
To avoid electric shocks, do not immerse the appliance,
plug or power cord in water or any other liquids. Do
not place the appliance where it could come into contact with
water or other liquids. If the appliance comes in contact with
water, immediately disconnect it from the mains. Do not use
the machine again until it has been serviced by an autho-
rized service center.
Do not let children use the appliance without supervision.
If the power cord plug does not fit to your wall socket,
consult a qualified electrician.
Use of various adapters may result in damage to the
appliance and termination of warranty.
Always supervise the equipment while in use.
To avoid a circuit overload, do not operate any other high
voltage equipment on the same circuit.
Always unplug before moving the appliance from one
place to another, cleaning and storing.
Never pull the cord to disconnect the appliance, instead grasp
the plug and pull it to disconnect.
Do not allow the cord or the machine itself to come in contact
with hot surfaces.
Position the appliance and the cord so that nobody can acci-
dentally overturn it.
Do not use the appliance if it has been dropped, or it has a
damaged power cord or plug. Do not modify or repair the
machine yourself.
Do not dismantle the appliance as improper assembly might
result in an electric shock during the subsequent use of the
equipment. Repairs should only be done by authorized
service centers.
Do not use the device in areas where combustible gas mixtures
or inflammable liquid vapors could present in the air, or in
areas with inflammable air-borne dust or fibers.
This equipment is intended for household use only, not for
commercial or industrial use.
Please follow all the requirements of this guide.
Do not use the appliance if it has mechanical defects (dents,
cracks etc.), get it checked by the nearest authorized service
center.
4
SPECIAL SAFETY
PRECAUTIONS
Before plugging in the appliance, carefully
examine it to make sure there are no visible signs
of mechanical damage and that the cutting discs
and blades are properly installed and securely
ENGLISH
fixed.
If during operation you smell burning, hear
strange sounds, or experience a decline in the
operating power, immediately unplug the appliance and clean
the meat grinder. If after cleaning the appliance does not
resume normal operation, contact an authorized service cen-
ter.
To avoid personal injuries when feeding the meat into the
appliance only use the pusher supplied with the grinder. Do
not feed the meat with your hands.
Do not switch on the appliance when empty.
Before replacing the cutting discs and attachments unplug the
appliance from the wall socket.
Do not lift and move the meat grinder during operation. Any
moving of the appliance should be made after the power is
switched off.
In the case of foods which need to be processed at high speeds,
the appliance should not be run for longer than 10 seconds at
a stretch. Let there be a break of 30 seconds before switching
it on again to prevent the motor from overheating. One can
tell that the machine is being overused when the sound of the
motor changes and slows down.
Do not use the appliance in sustained operation for longer
than 15 minutes. To avoid overheating, allow the appliance to
remain switched off for about 30 minutes.
DESCRIPTION OF THE
APPLIANCE
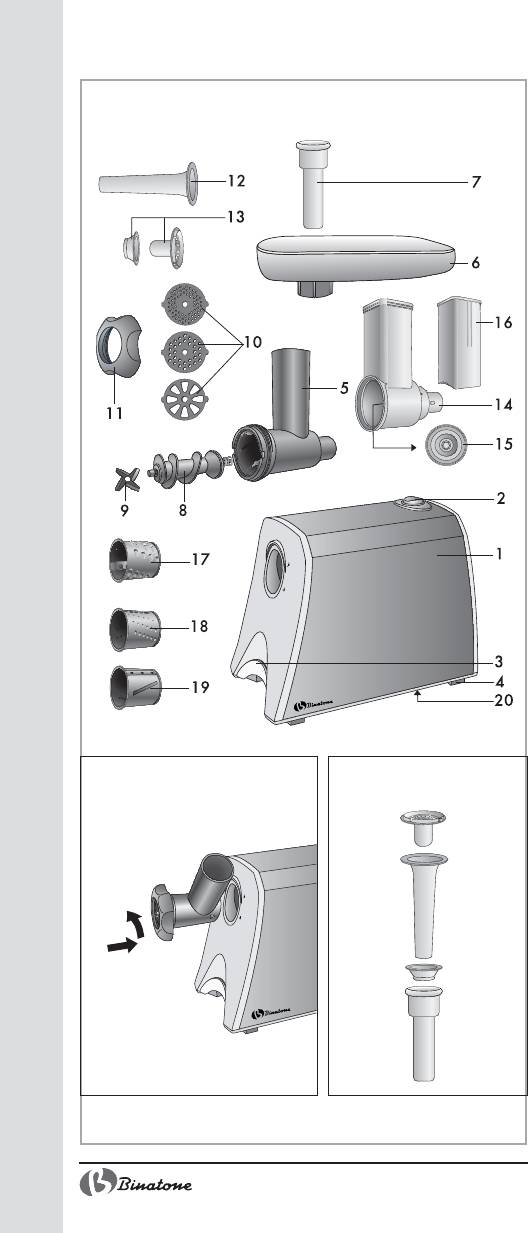
Picture A:
1. Housing with the electrical motor
2. On/Off/REV button
3. Integrated storage box for disks
4. Non-slip feet
5. Stainless steel operating unit with a funnel for
meat feeding
6. Food tray
7. Pusher
8. Stainless steel screw
9. Stainless steel cross-shaped cutter
10.3 stainless steel perforated disks with holes of different diam-
eters
11.Seal ring
12.Sausage attachment
13.Kebbe attachment
14.Plastic operating unit for using the graters
5
15.Adapter for fixing the graters
16.Pusher for using the graters
17.Coarse grater
18.Fine grater
19.Shredder
20.Power cord storage compartment
BEFORE USE
Remove all packing materials from the ap-
pliance.
Wipe the housing with a damp lint free
cloth and wash all parts to be in contact with
food.
Rinse the washed parts of the appliance
with clean water and completely dry them be-
fore assembling.
DIRECTIONS FOR USE
Assembling
1. Insert the screw (8) into the operating unit
(5).
2. Put the cross-shaped cutter (9) on the end of
the screw (8) so that the rounded tip of the
cutter (9) is facing the screw (8). Make sure the
cross-shaped cutter (9) is properly fixed.
3. Place the selected perforated disc (10) on top of the cutter (9)
so that the projections on the disk fit the slots in the operating
unit (5).
4. Tighten the seal ring (11).
5. To attach the operating unit (5) to the housing (1) insert it into
the opening in the grinder’s housing, match the arrow on the
operating unit (5) with the symbol on the housing, push
gently and turn anticlockwise to match the arrow on the oper-
ating unit (5) with the symbol on the housing (Picture B)
6. Place the tray (7) on top of the funnel of the operating unit
(5). Now the grinder is ready for operation.
Dismantling
1. Push gently on the operating unit (5), turn it clockwise to
match the arrow on the operating unit (5) with the symbol
on the housing. Remove the operating unit (5) from the motor.
2. Untwist the seal ring (11).
3. Remove the perforated disk (10) and cross-shaped cutter (9)
from the screw(8). Remove the screw (8) from the operating
unit (5).
Use of the applinace
1. Place the grinder on a dry, smooth flat horizontal surface.
2. Remove the meat from the package. Cut out all bones and
6

tendons from the meat prior to grinding. Cut the meat into
pieces that will fit easily into the grinder funnel.
3. Assemble the meat grinder and plug it into a power supply
with voltage matching the information on the appliance.
4. Put the meat into the tray (6).
5. Switch on the appliance using the On/Off/REV button (2).
6. Gradually push the meat pieces into the funnel using the
pusher (7). Do not push too hard.
ENGLISH
7. After use switch the appliance off and unplug it from the wall
outlet.
Note: the grinder will mince up to 1 kg of meat per minute.
If the operation slows down or the motor stops, it
means that probably some pieces of meat are stuck in
the grinder. Immediately switch the appliance off. Set
the switch button in “REV” position. This will
facilitate movement of meat in the opposite direction.
Release the button and switch the grinder on again. If
the meat is still stuck in the grinder, switch it off and
unplug it from the wall outlet. Disassemble and wash
the appliance according to instructions.
Use of the graters
The coarse grater (17) and fine grater (18) are intended for
grating products into thick and thin pieces. These graters are ideal
for carrot, beet, horse radish, cheese etc.
The shredder (19) is intended for coarse shredding. It is ideal
for cabbage, cucumbers, onion etc.
1. To attach the operating unit for the graters (17,18,19) to the
housing (1) insert it into the opening in the grinder’s housing,
match the arrow on the operating unit (5) with the symbol .
on the housing, push gently and turn anticlockwise to match
the arrow on the operating unit (5) with the symbol on the
housing.
2. Put the selected grater (17,18,19) into the operation unit to
fit the slots on the attachment with the projections on the
adapter (15). The grater (17,18,19) should completely go
into the operating unit (5).
3. Push on the product with the pusher (16).
Use of the kebbe attachment
1. Insert the screw (8) into the operating unit (1).
2. Put the kebbe attachment (13) onto the end of the screw (8).
Make sure the projections on the attachment match the slots
on the operating unit (5). Tighten the seal ring (11).
3. Fasten the assembled operating unit (5) onto the housing (1).
4. Place the tray (6) on top of the funnel of the operating unit
(5). The appliance is then ready for operating. A Kebbe recipe
is provided in the “Useful tips”.
7
Use of the sausage attachment
1. Insert the screw (8) into the operating unit (5).
2. Put the cross-shaped cutter (9) and perforated disk (with 4
mm holes) onto the screw (8).
3. Run the narrow end of the attachment (12) through the seal
ring (11), fasten it onto the operating unit (5).
4. Fasten the assembled operating unit (5) onto the housing (1).
Attach the tray (6).
5. Place the sausage casing on the tip for filling.
6. Put the sausage mixture into the feed tray (6). Switch on the
appliance. Direct the sausage mixture with the pusher (7).
Sausage casings will be filled automatically.
CARE AND CLEANING
1. Do not forget to clean the grinder after each
use.
2. Switch the grinder off and unplug it, making
sure the motor has stopped.
3. Disassemble the appliance (see part “Dis-
mantling”).
4. Remove scraps of meat from the internal sur-
faces of the operating unit (8).
5. Wash all components (except the housing and the power cord)
with warm soapy water and completely dry them before reas-
sembling. Do not use strong and abrasive detergents. All ac-
cessories are dishwasher proof.
6. After washing the appliance, carefully dry all metal
parts to prevent corrosion.
7. The exterior surfaces of the grinder can be cleaned with a
slightly damp soft lint free cloth. Do not immerse the housing
(1) of the appliance into water.
8. Sausage and kebbe attachments can be put inside the pusher
(7) for handy storage (Pic. C). Perforated dicks can be stored
in special integrated box (3).
9. There is a cord storage on the bottom of meat grinder.
Note: do not use spirits, gasoline and any other similar
substances to clean the appliance.
Regularly lubricate the perforated disk and the cross-
shaped cutters with vegetable oil to prevent corrosion.
When the appliance is not used, store it in a safe, dry
place out of reach of children.
8

USEFUL TIPS
Making Kebbe
How to make the kebbe casings:
450 g lean lamb meat, veal or beef*
ENGLISH
150-200 g flour*
1 tsp ground cloves
1 tsp nutmeg
1 pinch chili powder
1 pinch black ground pepper
* Use of larger quantity of meat and lesser quantity of flour will
improve the texture and taste of the dish.
Mince the meat three times (the first time using the perforated
disk with medium holes, and the next two times – using the disk
with small holes) and mix it with the other ingredients. Mince the
mixture three times as well.
Fix the kebbe attachment to the tip of the screw and make the
kebbe outer casings then slightly freeze them. Then fill them with
the following ingredients and fry them in olive oil.
Meat stuffing:
100 g lamb meat
1.5 tbsp olive oil
1.5 tbsp finely chopped onion
1/3 tsp ground cloves
1/2 tsp salt
1.5 tbsp flour
Fry the lamb meat to brown it and mix in all other ingredients,
fill the kebbe casings with this mixture and fry.
You can fill the Kebbe with any other stuffing’s e.g., stewed
vegetables, cooked rice etc.
DISPOSAL
The appliance should be disposed of in accor-
dance with waste disposal regulations in your coun-
try and with the least damage to the environment.
Only ecologically safe materials are used in
the packaging of our products and the cardboard
and paper can be disposed of with normal paper
waste.
AFTER-SALES SERVICE
If your appliance does not operate at all
or operates poorly, call an authorized service
center for help or repairs.
The warranty does not cover the fol-
lowing:
Non-observance of the above safety mea-
9

sures and operation instructions.
Commercial use (use outside the scope of personal household
needs).
Plugging into a mains socket with a voltage different from the
voltage on the appliance rating plate.
Improper care (filling with liquids other than water, ingress of
liquid, dust, insects, and other foreign items and substances
inside the appliance).
Use of excessive force during appliance operation or other
damages (mechanical damages resulting from incorrect use,
shocks or dropping of the appliance).
Unauthorized repairs or replacement of the appliance parts
performed by an unauthorized person or service center.
Accidents, such as lightning strike, flood, fire and other acts of
God.
10

ENGLISH
Features may be changed by Binatone without any notice.
Warranty details are set out in the warranty card provided with
the product.
Exploitation period: 3 years after the day of purchase.
Manufacture: Binatone Industries Ltd, Great Britain, Wembley,
1 Beresford Avenue, Vitabiotics House
Made in PRC for Binatone Industries Ltd, Great Britain
11

Hachoir MGR3030
Lisez attentivement cette instruction avant le premier usage
pour prendre connaissance du fonctionnement de l’appareil.
Gardez l’instruction pour s’y référer ultérieurement.
MESURES DE SECURITE
En exploitant l’appareil, respectez toujours les
mesures de sécurité suivantes:
Avant le premier usage, assurez-vous que la
tension indiquée sur l’appareil correspond à la ten-
sion du réseau électrique dans votre maison.
Utilisez l’appareil seulement à des fins indiquées
dans cette instruction.
Utilisez seulement les dispositifs qui font partie
de la garniture de l’appareil.
Pour éviter un choc électrique, ne pas plonger l’appareil,
la fiche ou le câble dans l’eau ou dans un autre liquide.
Installez l’appareil dans un endroit où il ne peut pas tomber
dans l’eau ou dans un autre liquide. Si l’appareil a été
accidentellement mouillé, débranchez-le du réseau
immédiatement. N’utilisez pas l’appareil qui est tombé dans
l’eau. Portez-le dans un centre de maintien.
Ne pas laisser les enfants manier l’appareil sans contrôle des
adultes.
Si la fiche de la prise de courant de l’appareil n’a pas
la même construction que votre prise de courant,
adressez-vous à un centre de service agréé.
L’utilisation de différents raccords peut conduire à
une panne de l’appareil et la cessation des garanties.
Ne pas laisser l’appareil branché sur le réseau sans surveil-
lance.
Pour éviter la surcharge du réseau électrique, ne pas brancher
un autre appareil de haute puissance au même réseau que
votre appareil.
Débranchez l’appareil du réseau après l’usage, avant
le déplacement ou le nettoyage.
Ne tirez jamais sur le câble pour déconnecter l’appareil du
réseau ; prenez la fiche et faites-la sortir de la prise de cou-
rant.
Eviter le contact du câble ou de l’appareil avec des surfaces
chauffées.
Placer l’appareil et le câble de façon à éviter le basculement
accidentel.
Ne pas utiliser l’appareil si le câble ou la fiche de contact est
endommagé. N’essayez pas de réparer l’appareil vous-même.
Le remplacement du câble électrique et de la fiche de contact
doit être effectué par un centre de maintien agréé.
Ne démontez jamais l’appareil vous-même ; l’assemblage in-
correct peur résulter en choc électrique pendant l’usage
ultérieur de l’appareil. Tous les travaux de réparation
doivent être effectués seulement par un centre de
service agréé.
Ne pas utiliser l’appareil dans des locaux où l’air peut contenir
12

des mélanges des gaz combustibles, des vapeurs des liquides
inflammables, ou des poussières et fibres inflammables.
Cet appareil est destiné à l’usage personnel et n’est pas destiné
à l’usage commercial et industriel.
Respectez toutes les règles de la présente instruction.
MESURES SPECIALES DE
SECURITE
Avant de brancher l’appareil, examinez-le
attentivement pour détecter les défauts
mécaniques éventuels, et assurez-vous que les
disques coupants et les couteaux sont installés
correctement et bien fixés.
Si vous détectez (pendant le fonctionnement
de l’appareil) l’odeur du brûlé, des sons
étrangers, ou si la puissance de fonctionnement diminue,
déconnectez immédiatement l’appareil du réseau
d’alimentation, en retirant le câble de la prise de courant, et
nettoyez le hache-viande. Si le fonctionnement normal ne
reprend pas, adressez-vous à un centre de service agréé.
Pour éviter le traumatisme, pour charger la viande utilisez
FRANÇAIS
uniquement le poussoir approprié. Ne pas pousser la viande
par les mains.
Ne pas mettre en marche l’appareil vide.
Avant de changer les disques coupants et les manches,
déconnectez l’appareil du réseau.
Ne pas lever et ne pas transporter l’appareil lors du
fonctionnement. Effectuer tous les déplacements avec
l’alimentation coupée.
Au traitement des produits, dont demandent le traitement sur
une haute vitesse, le temps de l’utilisation continue de l’appareil
ne doit pas excéder 10 secondes avec l’interruption obligatoire
dans le travail pour 30 secondes, pour éviter la surchauffe du
moteur. Le signe de la surcharge de l’appareil est le changement
du son et le ralentissement du travail du moteur.
N’utilisez pas l’appareil sans arrêt plus de 15 minutes. Pour
éviter la surchauffe de l’appareil faites l’interruption obligatoire
dans le travail pour 30 minutes.
DESCRIPTIF DES PIECES DE
L’APPAREIL
Figure A:
1. Corps avec moteur électrique
2. Sélecteur à trois positions «O/I/REV»
3. Compartiment incorporé à lames circulaires
4. Pieds antidérapants
5. Partie utile en acier inoxydable avec le goulot
de chargement de viande
6. Auge de chargement des aliments
7. Poussoir
13

8. Vis transporteuse en acier inoxydable
9. Couteau cruciforme en acier inoxydable
10.3 disques perforés en acier inoxydable aux orifices de différents
diamètres
11.Anneau d’étanchéité
12.Entonnoir à saucisson
13.Dispositif à faire le «kebbeh »
14.Partie utile en plastique pour l’utilisation des râpes
15.Raccord de fixation des râpes
16.Poussoir pour travailler avec les râpes
17.Grosse râpe
18.Petite râpe
19.Coupe-légumes
20.Réceptacle du cordon d’alimentation
AVANT L’UTILISATION
Enlevez de l’appareil tous les matériaux
d’emballage.
Essuyez le corps du hachoir avec un tissu
humide et lavez à l’eau chaude au savon toutes
les pièces de l’appareil qui contacteront avec
les aliments.
Rincez les pièces lavées à l’eau courante et
laissez sécher complètement avant d’assembler l’appareil.
MODE D’EMPLOI
Avant d’assembler ou de démonter
l’appareil, assurez-vous qu’il est en position arrêt
et débranché du secteur.
Assemblage
1. Introduisez la vis transporteuse (8) dans la
partie utile du hachoir (5).
2. Installez le couteau cruciforme (9) sur le bout de la vis
transporteuse (8) de façon à placer la partie arrondie du
couteau (9) face à la vis transporteuse (8). Assurez-vous que
le couteau cruciforme (9) est fixé correctement.
3. Placez le disque perforé sélectionné (10) sur le couteau (9)
en juxtaposant les dents du disque (10) avec les encoches de
la partie utile (5).
4. Serrez l’anneau d’étanchéité (11) jusqu’au butoir.
5. Pour fixer la partie utile assemblée sur le corps de l’appareil
(1), introduisez-la dans l’orifice du corps en juxtaposant la
flèche de la partie utile (5) avec le symbole sur le corps de
l’appareil (1), appuyez légèrement et tournez contre le sens
des aiguilles d’une montre de façon à faire coïncider la flèche
de la partie utile (5) avec le symbole sur le corps de
l’appareil (1) (Fig.B).
6. Installez l’auge de chargement (6) au-dessus du goulot de la
partie utile (5). Maintenant le hachoir est prêt à l’exploitation.
14

Démontage
1. Appuyez légèrement sur la partie utile (5), tournez-la dans le
sens des aiguilles d’une montre de façon à juxtaposer la flèche
de la partie utile (5) avec le symbole sur le corps de
l’appareil (1), et enlevez-la du moteur.
2. Dévissez l’anneau d’étanchéité (11).
3. Enlevez le disque perforé (10) et le couteau cruciforme (9)
de la vis transporteuse (8), retirez la vis transporteuse (8) de
la partie utile (5) du hachoir.
Utilisation de l’appareil
1. Installez le hachoir sur une surface horizontale sèche, plane
et plate.
2. Enlevez l’emballage de la viande. Enlevez tous les os, tendons
et membranes de la viande avant de la hacher. Découpez la
viande en morceaux dont la taille permet de les placer
facilement dans le goulot de la partie utile (5).
3. Assemblez l’appareil et connectez-le au secteur à la tension
conforme aux indications sur l’appareil.
4. Mettez la viande dans l’auge de chargement (6).
5. Branchez l’appareil en mettant le sélecteur (2) en position
«I».
FRANÇAIS
6. Poussez graduellement la viande dans le goulot à l’aide du
poussoir (7). Ne pas pousser trop fort.
7. A la fin d’utilisation, arrêtez l’appareil et débranchez-le du
secteur.
Note: le hachoir coupe jusqu’à 1 kg de viande crue par
minute.
Si le processus ralentit ou le moteur s’arrête, il est
possible qu’une certaine quantité de viande bloque le
hachoir. Dans ce cas, il est nécessaire d’arrêter le
hachoir immédiatement ; ensuite, mettre le sélecteur
(2) en position «REV» – ceci inversera la direction de
rotation de la vis transporteuse, en poussant la viande
dans le sens opposé. Relâchez le bouton et remettez
en marche le hachoir. Si la viande bloque de nouveau
le hachoir, débranchez-le et déconnectez du secteur.
Démontez et lavez l’appareil suivant les instructions
ci-dessous.
Utilisation des rapes
La grosse et la petite râpe (17,18) sont utilisées pour râper
des aliments en grosses ou minces tranches. Elles conviennent
pour des carottes, betteraves, radis, fromage, etc.
Le coupe-légumes (19) convient pour découper les aliments
en rondelles et pour émincer. Convient pour des choux,
concombres, oignons, etc.
1. Pour fixer la partie utile de la râpe (14) sur le corps de
l’appareil (1), insérez-la dans l’orifice sur le corps, juxtaposez
15
la flèche sur la partie utile (14) avec le symbole sur le corps
de l’appareil (1), appuyez légèrement et tournez contre le
sens des aiguilles d’une montre de façon à faire coïncider la
flèche sur la partie utile (14) avec le symbole sur le corps de
l’appareil (1).
2. Insérez la râpe sélectionnée (17, 18, 19) dans la partie utile
(14) de façon à faire coïncider les encoches de la râpe
(17,18,19) avec les dents du raccord (15). La râpe (17, 18,
19) doit se placer entièrement dans la partie utile (14).
3. Faites avancer l’aliment avec le poussoir à râpe (16).
Utilisation du dispositif “kebbeh”
1. Insérez la vis transporteuse (8) dans la partie utile (5) du
hachoir.
2. Installez sur la vis transporteuse (8) le dispositif à kebbeh (13).
Assurez-vous que les dents du dispositif (13) ont coïncidé
avec les encoches sur la partie utile (5). Serrez l’anneau
d’étanchéité (11).
3. Fixez la partie utile assemblée sur le corps de l’appareil (1).
4. Installez l’auge pour les aliments (6). L’appareil est prêt au
fonctionnement. Vous trouverez la recette de préparation de
kebbeh dans la section «Conseils utiles».
Utilisation de l’entonnoir a saucisson
1. Insérez la vis transporteuse (8) dans la partie utile (5) du
hachoir.
2. Placez le couteau cruciforme (9) et le disque perforé au
diamètre des orifices 4 mm sur la vis transporteuse (8) comme
décrit ci-dessus.
3. Passez le bout étroit de l’entonnoir (12) à travers l’anneau
d’étanchéité (11), et fixez sur la partie utile (5).
4. Fixez la partie utile assemblée sur le corps de l’appareil (1).
Installez l’auge pour les aliments (6).
5. Placez l’enveloppe à saucisson sur l’entonnoir (12) pour
remplissage.
6. Mettez le mélange à saucisson dans l’auge (6). Branchez
l’appareil. Dirigez le mélange à l’aide du poussoir (7).
L’enveloppe à saucisson se remplira automatiquement.
ENTRETIEN ET NETTOYAGE
1. N’oubliez pas de nettoyer le hachoir après
chaque utilisation.
2. Débranchez l’appareil et déconnectez-le du
secteur. Assurez-vous que le moteur s’est
arrêté.
3. Démontez le hachoir (voir section
«Démontage»).
4. Enlevez les restes de viande des surfaces intérieures de la
partie utile.
5. Lavez toutes les pièces (à l’exception du corps et du cordon)
à l’eau tiède savonneuse et laissez sécher complètement avant
16

l’assemblage. Ne pas utiliser de produis abrasifs. Toutes les
pièces amovibles du hachoir peuvent être lavées dans un lave-
vaisselle.
6. Après avoir lavé l’appareil (y compris le lavage en
lave-vaisselle) faites sécher soigneusement toutes
les parties métalliques pour éviter la corrosion.
7. Le corps du hachoir peut être nettoyé à l’aide d’un tissu mou
non-pelucheux légèrement humide sans additifs. Ne pas
immerger le corps de l’appareil et le cordon dans l’eau.
8. Pour faciliter le rangement, l’entonnoir à saucisson et le dispositif
à kebbeh peuvent être cachés à l’intérieur du poussoir, comme
indiqué sur la Fig.C. Les disques perforés peuvent être rangés
dans le compartiment spécial incorporé (3).
9. Pour le rangement du cordon d’alimentation, un réceptacle
est prévu dans la partie inférieure du corps.
Note: ne pas utiliser l’alcool, l’essence et autres produits de
ce type pour nettoyer l’appareil.
Pour éviter la corrosion, enduisez régulièrement à
l’huile végétale les disques perforés et le couteau
cruciforme.
Quand vous n’utilisez par l’appareil, gardez-le dans
FRANÇAIS
un endroit sec et sauf, hors de portée des enfants.
CONSEILS UTILES
Preparation de «Kebbe»
Recette de preparation de l’enveloppe de
« Kebbe »:
Agneau, veau ou bœuf sans graisse* – 450 g
Farine* – 150-200 g
Clous de girofle moulus – 1 cuillère à thé.
Noix de muscade – 1 cuillère à thé.
Chili en poudre – 1 pincée
Poivre moulu – 1 pincée
*Utilisation de plus de viande et moins de farine pour le mélange
améliore la consistance et le goût du plat.
Passez la viande par le hache-viande trois fois (la première
fois, en utilisant le disque perforé aux trous de diamètre moyen,
ensuite deux fois en utilisant le disque perforé aux petits trous) et
mélangez-le avec les autres ingrédients. Passez le mélange obtenu
par le hache-viande trois fois de la même façon.
Enlevez le disque perforé et le couteau en croix du hache-
viande.
Installez le dispositif à faire le « kebbé » au bout de la vis de
façon à les faire coïncider. Vissez la bague de serrage.
Formez les enveloppes de « kebbé » et faites congeler
légèrement. Ensuite remplissez les enveloppes de farce et faites
frire à l’huile d’olive.
17

Farce de viande:
Agneau – 100 g
Huile d’olive – 1,5 cuillères à soupe .
Ognon haché menu – 1,5 5 cuillères à soupe.
Clous de girofle moulus – 1 /3 cuillères à thé
Sel – 0,5 cuillères à thé
Farine – 1,5 cuillères à soupe
Faites frire l’agneau jusqu’à la couleur marron et mélangez
tous les autres ingrédients avec l’agneau haché. Remplissez les
enveloppes de « kebbé » de ce mélange et faites frire.
Farce de legumes ou de ris:
Brocolis cuit (ou courgettes, ou ris cuit) – 250 g
Remplissez les enveloppes de « kebbé » de cette farce et faites
frire.
RECYCLAGE
Appareils électroménager doit être utiliser avec
le moindre tort pour l’environnement et en
conformité des règles d’utilisation des déchets dans
Votre région. Pour recycler l’appareil
correctement, souvent il suffit de le porter dans le
centre local de traitement des déchets. Pour
l’emballage de nos appareils, nous utilisons
uniquement les matériaux recyclables. Donc, le carton et le papier
peuvent être recyclés avec d’autres déchets en papier.
SERVICES APRES VENTE
Si votre appareil ne fonctionne pas ou
fonctionne mal, adressez-vous à un centre
agréé pour consultation ou réparation.
La garantie n’est pas valable dans
les cas suivants:
Non-respect des mesures de sécurité
susmentionnées et des règles d’exploitation.
Utilisation commerciale (utilisation dépassant les besoins per-
sonnels ménagers).
Connexion au réseau à une tension différente de celle indiquée
sur l’appareil.
Mauvais maintien (pénétration des liquides, de la poussière,
des insectes et d’autres corps étrangers à l’intérieur de
l’appareil).
Effort excessif pendant l’exploitation de l’appareil ou autres
endommagements (défauts mécaniques survenus suite à
l’exploitation incorrecte, la percussion ou la chute de
l’appareil).
Réparation ou changement des pièces de l’appareil, effectué
par une personne non-autorisée ou hors du centre de service
autorisé.
Accidents tels que la foudre, l’inondation, l’incendie ou autres
circonstances de force majeure.
18

FRANÇAIS
Les caractéristiques peuvent être changées par la société
“Binatone” sans aucune notification préalable.
Le délai de garantie et autres pieces sont indiqués dans le
ticket de garanti joint à l’appareil.
Durée de service: 3 ans du jour d’acquisition.
Fabricant: Binatone Industries Ltd, Great Britain, Vitabiotics
House,1 Apsley Way, Staples Corner, London, NW2 7HF, UK
(Binatone Industries Ltd, Grande Bretagne)
19
Мясорубка MGR3030
Внимательно прочтите данную инструкцию перед первым
использованием, чтобы ознакомиться с работой нового
прибора. Пожалуйста, сохраните инструкцию для
дальнейших справок.
ÌÅÐÛ ÁÅÇÎÏÀÑÍÎÑÒÈ
Во время эксплуатации прибора всегда
соблюдайте следующие меры предосторожности:
Перед первым использованием проверьте,
соответствует ли напряжение, указанное на
приборе, напряжению электрической сети в
Вашем доме.
Используйте прибор только в целях,
предусмотренных данной инструкцией.
Используйте только приспособления, входящие в комплект
прибора.
Во избежание поражения электрическим током не
погружайте прибор, вилку или электрический
шнур в воду или другие жидкости. Ставьте прибор в
такие места, где он не может упасть в воду или другие
жидкости. При попадании воды на прибор, немедленно
отключите его от сети. Не пользуйтесь прибором, упавшим
в воду. Отнесите его в уполномоченный сервисный центр.
Не допускайте детей к работе с прибором без присмотра
взрослых.
Если штепсельная вилка прибора не совпадает по
конструкции с Вашей розеткой, обратитесь за
помощью к специалисту.
Применение различных переходников может
привести к поломке прибора и прекращению
гарантийных обязательств.
Не оставляйте включенный в сеть прибор без внимания.
Во избежание перегрузки электрической сети не
подключайте другой прибор высокой мощности к той же
сети, к которой подключен Ваш прибор.
Отсоединяйте прибор от сети перед
перемещением с одного места на другое и перед
чисткой и хранением.
Никогда не тяните за шнур при отключении прибора от
сети; возьмитесь за штепсельную вилку и выньте ее из
розетки.
Не допускайте соприкосновения шнура или самого
прибора с нагретыми поверхностями.
Располагайте прибор и шнур так, чтобы никто не смог
случайно задеть шнур и опрокинуть прибор.
Не пользуйтесь прибором с поврежденным электрическим
шнуром или штепсельной вилкой. Не пытайтесь
отремонтировать прибор самостоятельно. Замена
электрического шнура и штепсельной вилки должна
производиться только в уполномоченном сервисном центре.
Никогда не разбирайте прибор самостоятельно;
неправильная сборка может привести к поражению
20
- 1
- 2


